1
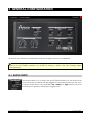
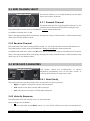
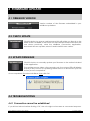
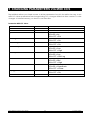
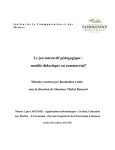
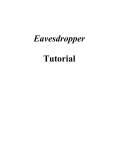
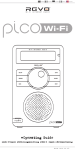
USER'S MANUAL
MiniBrute Connection
software editor
1.0.3
1st edition: June 2012
Information contained in this manual is subject to change without notice and does not represent a commitment on behalf of ARTURIA. The hardware unit and the
software product described in this manual are provided under the terms of a license agreement or non-disclosure agreement. The license agreement specifies the
terms and conditions for its lawful use.
No part of this manual may be produced or transmitted in any form or by any purpose other than purchaser’s personal use, without the explicit written permission of
ARTURIA S.A. All other products, logos or company names quoted in this manual are trademarks or registered trademarks of their respective owners.
© ARTURIA S.A. 1999-2014, all rights reserved.
ARTURIA S.A.
30, Chemin du Vieux Chêne
38240 Meylan
FRANCE
http://www.arturia.com
Arturia MiniBrute Connection User's Manual
1
3 Firmware Update
TABLE OF CONTENTS
1Installation ..................................................................................... 3
1.1Hardware ................................................................................................................... 3
1.2Software ..................................................................................................................... 3
2General Configuration ................................................................. 5
2.1Audio Input ................................................................................................................ 5
2.2Module Parameters .................................................................................................. 5
2.2.1LFO Key Retrigger .............................................................................................................. 6
2.2.2Envelope Legato Mode ........................................................................................................ 6
2.2.3Arpeggiator Hold ................................................................................................................. 6
2.3MIDI Channel Select ................................................................................................. 6
2.3.1Transmit Channel ................................................................................................................. 6
2.3.2Receive Channel .................................................................................................................. 7
2.4Keyboard Parameters .............................................................................................. 7
2.4.1Note Priority......................................................................................................................... 7
2.4.2Velocity Response ................................................................................................................ 7
2.4.3Aftertouch Response ............................................................................................................ 7
4Firmware Update .......................................................................... 9
4.1Firmware Version....................................................................................................... 9
4.2Check Update ........................................................................................................... 9
4.3Update Firmware ....................................................................................................... 9
4.4Troubleshooting ......................................................................................................... 9
4.4.1Connection cannot be established ........................................................................................ 9
4.4.2Update has been interrupted ............................................................................................... 10
5Changing parameters via MIDI CCs ........................................ 11
6Legal Notes ................................................................................. 13
6.1No liability for consequential damages ............................................................... 13
6.2FCC Information (USA) ............................................................................................ 13
6.3Canada .................................................................................................................... 14
6.4Europe ...................................................................................................................... 14
Arturia MiniBrute Connection User's Manual
2
3 Firmware Update
1 INSTALLATION
1.1 HARDWARE
Connect the MiniBrute synthesizer to your computer using a standard USB cable, then power up:
1.2 SOFTWARE
The MiniBrute Connection software editor is freely available from the Arturia website :
http://www.arturia.com/products/minibruteconnection
Simply extract the archive, select the appropriate folder, depending on your computer
operating system:
•
“OSX” for Mac OS X
•
“Win” for Windows
The software does not require any installation on your system, the program can be run directly
from its extracted folder. If you move the application, make sure it is always accompanied with
the mbf firmware file.
The MiniBrute Connection software editor offers two main features, described in the following
pages:
•
the general configuration of the instrument (see chapter 2)
•
the firmware update of the instrument (see chapter 3)
Arturia MiniBrute Connection User's Manual
3
3 Firmware Update
You can switch between those two main features through the tool bar:
Click here to
reach the
Configuration view
Click here to reach
the Firmware
Update view
Connection status: click to check
again the connection between
MiniBrute and the computer
At first launch, the software may detect an older firmware version on your synthesizer, and
suggest to update it. It is highly recommended to follow this suggestion, i.e. to run the firmware
update process until completion. This is basically the same process as fully described in chapter
3, but it is launched automatically.
Arturia MiniBrute Connection User's Manual
4
3 Firmware Update
2 GENERAL CONFIGURATION
At launch, the software automatically loads the settings stored on your MiniBrute.
When changing a parameter, the settings are automatically sent to the synthesizer and
stored in its non-volatile memory. No need for saving or reboot, the new settings apply
instantaneously!
2.1 AUDIO INPUT
This section allows you to select the Audio Gate Threshold, i.e. the audio level
from which the envelopes will be triggered. Three levels, based on the most
common audio levels, are available: low, medium, or high. Select the level
that suits your needs by clicking the toggle switch.
Arturia MiniBrute Connection User's Manual
5
3 Firmware Update
2.2 MODULE PARAMETERS
This section allows the configuration of various
modules parameters such as LFO triggering,
envelope’s legato mode or arpeggiator's notes sorting
order.
2.2.1 LFO Key Retrigger
This parameter sets the trigger mode of the LFO, and offers 2 settings:
•
On: the LFO restarts each time a key is pressed.
•
Off: the LFO is running freely, no matter if a key is pressed or not.
2.2.2 Envelope Legato Mode
This parameter enables or disables the legato mode:
•
On: if a new note is played while the preceding one is still active, the envelopes will not
be triggered again.
•
Off: the envelopes are triggered each time a key is pressed.
When the legato mode is engaged, make sure to set the keyboard Note Priority accordingly.
(see 2.4.1, page 7)
2.2.3 Arpeggiator Hold
This parameter sets the notes sorting order when the arpeggiator Hold mode is engaged.
Two possibilities are offered:
•
On: notes are sorted by time order; it will arpeggiate the notes in the order that you play
them. This “mini-sequencer” feature allows to play bassline-style patterns, as multiple
occurrences of each notes can be entered.
•
Off: notes are sorted by pitch order; this is the “standard” mode one can expect from an
arpeggiator.
Arturia MiniBrute Connection User's Manual
6
3 Firmware Update
2.3 MIDI CHANNEL SELECT
This section allows you to independently set the MIDI
input and output channels.
2.3.1 Transmit Channel
This parameter sets the outgoing MIDI channel, i.e. the
channel the instrument will transmit messages onto.
This parameter is useful when the MiniBrute controls external devices.
Available channels are 1 to 16.
Select the appropriate MIDI channel by clicking the rotary potentiometer: it will increment step
after step until the desired value.
2.3.2 Receive Channel
This parameter sets the incoming MIDI channel, i.e. the channel the instrument will respond to.
This parameter is useful when the MiniBrute is being controlled by external devices.
Available channels are 1 to 16, and All which allows MiniBrute to respond whatever the channel.
Select the appropriate MIDI channel by clicking the rotary potentiometer: it will increment step
after step up to the desired value.
2.4 KEYBOARD PARAMETERS
This section allows the configuration of various
keyboard parameters such as the play mode, or
velocity and aftertouch response curves.
2.4.1 Note Priority
This parameter sets the play mode when more than one key is pressed:
•
High: the highest note (pitch sorted) will be played.
•
Last: the last note (time sorted) will be played.
•
Low: the lowest note (pitch sorted) will be played.
2.4.2 Velocity Response
This parameter sets the velocity curve of the keyboard.
Three settings are available:
•
: the keyboard sends linear values, i.e. low values will be sent when the keyboard is
Arturia MiniBrute Connection User's Manual
7
3 Firmware Update
played slowly, and high values when played fast.
•
: the keyboard sends logarithmic values, i.e. high values will be reached even when
the keyboard is played slowly.
•
: the keyboard sends exponential values, i.e. the highest values will be reached only
when the keyboard is played fast.
The velocity does not affect any of the MiniBrute sounds or modulations, this setting only
affects the velocity data that MiniBrute sends to its USB/MIDI outputs.
2.4.3 Aftertouch Response
This parameter sets the aftertouch curve of the keyboard. Three settings are available:
•
: the keyboard sends linear values, i.e. low values will be sent when the pressure on the
keyboard is gentle, and high values, when pressed hard.
•
: the keyboard sends logarithmic values, i.e. high values will be reached even when
the pressure on the keyboard is gentle.
•
: the keyboard sends exponential values, i.e. the highest values will be reached only
when the pressure on the keyboard is strong.
When engaged on the MiniBrute frontpanel, the aftertouch can modulate the filter's Cutoff
frequency or the Vibrato. The aftertouch values are also sent through MIDI to control external
devices.
Arturia MiniBrute Connection User's Manual
8
3 Firmware Update
4 FIRMWARE UPDATE
4.1 FIRMWARE VERSION
Version number of the firmware embedded in your
MiniBrute synthesizer.
4.2 CHECK UPDATE
Click this button to open a web browser which will guide you directly to the
latest version available. If the version on the Internet is more recent than the
one shown previously, close the MiniBrute Connection application,
download the new update, extract it and install this new version.
4.3 UPDATE FIRMWARE
Click this button to manually update your firmware to the version included
in the application.
The update process takes a few seconds only, the octave LEDs will display
activity to let you know it is updating. Make sure not to disconnect your unit
before process completion!
Once completed, first reboot MiniBrute, then click OK:
4.4 TROUBLESHOOTING
4.4.1 Connection cannot be established
If you did not reboot before clicking “OK”, the unit might not be seen as connected anymore.
Arturia MiniBrute Connection User's Manual
9
3 Firmware Update
This can be fixed easily:
1. Close the MiniBrute Connection software editor.
2. Reboot your instrument.
3. Launch the MiniBrute Connection software editor and try again.
4.4.2 Update has been interrupted
If something went wrong during the firmware update process (computer crash, unplugged USB
cable, zombie attack, etc.), there is still a possibility to restore the instrument:
1. Close the MiniBrute Connection software.
2. Reboot the instrument while pressing down the octave Down and Up buttons: all octave
LEDs should be lit.
3. Launch the MiniBrute Connection software: you will be prompted for the automatic
firmware update. Just cancel, it won't work.
4. Enter into the Firmware Update view, and run the manual update.
5. Reboot the instrument, then click OK. Your MiniBrute is now fully restored and updated.
Arturia MiniBrute Connection User's Manual
10
3 Firmware Update
5 CHANGING PARAMETERS VIA MIDI CCS
The MiniBrute allows you simple access to all the parameters found in the editor via easy to use
MIDI CCs. When parameters are changed using CCs, changes will be lost after a restart. To write
changes to internal memory you have to use the editor.
Parameter MIDI CC Value
Parameter
Receive Channel
Send Channel
Sync Source
MIDI CC
102
103
108
Env Legato Mode
109
LFO Retrig Mode
110
Note Priority
111
Velocity Curve
112
Audio In Threshold
115
Aftertouch Curve
116
Arpeggiator Hold
117
Local ON/OFF
122
Arturia MiniBrute Connection User's Manual
Value
1 to 16, 17=All
1 to 16
0 to 41 = Auto
42 to 83 = Int
84 to 127 = Ext
0 to 63 = Off
64 to 127 = On
0 to 63 = Off
64 to 127 = On
0 to 41 = Last
42 to 83 = Low
84 to 127 = High
0 to 41 = Lin
42 to 83 = Log
84 to 127 = Anti Log
0 to 41 = Low
42 to 83 = Mid
84 to 127 = High
0 to 41 = Exponential
42 to 82 = Logarithmic
83 to 127 = Linear
0 to 63 = Off
64 to 127 = On
0 = turn off ; 127 = turn on
11
3 Firmware Update
6 LEGAL NOTES
6.1 NO LIABILITY FOR CONSEQUENTIAL DAMAGES
Neither ARTURIA nor anyone else involved in the creation, production, or delivery of this
product shall be liable for any direct, indirect, consequential, or incidental damages
arising out of the use of, or inability to use this product (including without limitation,
damages for loss of business profits, business interruption, loss of business information and
the like) even if ARTURIA was previously advised of the possibility of such damages.
Some states do not allow limitations on the length of an implied warranty or the
exclusion or limitation of incidental or consequential damages, so the above limitation
or exclusions may not apply to you. This warranty gives you specific legal rights, and you
may also have other rights which vary from state to state.
6.2 FCC INFORMATION (USA)
DO NOT MODIFY THE UNIT! This product, when installed as indicate in the instructions
contained in this manual, meets FCC requirement. Modifications not expressly approved
by ARTURIA may avoid your authority, granted by the FCC, to use the product.
IMPORTANT: When connecting this product to accessories and/or another product, use
only high quality shielded cables. Cable (s) supplied with this product MUST be used.
Follow all installation instructions. Failure to follow instructions could void your FFC
authorization to use this product in the USA.
NOTE: This product has been tested and found to comply with the limit for a Class B
Digital device, pursuant to Part 15 of the FCC rules. These limits are designed to provide
a reasonable protection against harmful interference in a residential environment. This
equipment generate, use and radiate radio frequency energy and, if not installed and
used according to the instructions found in the users manual, may cause interferences
harmful to the operation to other electronic devices. Compliance with FCC regulations
does not guarantee that interferences will not occur in all the installations. If this product
is found to be the source of interferences, which can be determined by turning the unit
“OFF” and “ON”, please try to eliminate the problem by using one of the following
measures:
· Relocate either this product or the device that is affected by the interference
Arturia MiniBrute Connection User's Manual
12
3 Firmware Update
· Use power outlets that are on different branch (circuit breaker or fuse) circuits or
install AC line filter(s).
· In the case of radio or TV interferences, relocate/ reorient the antenna. If the
antenna lead-in is 300 ohm ribbon lead, change the lead-in to coaxial cable.
· If these corrective measures do not bring any satisfied results, please the local
retailer authorized to distribute this type of product. If you cannot locate the
appropriate retailer, please contact ARTURIA.
· The above statements apply ONLY to those products distributed in the USA.
6.3 CANADA
NOTICE: This class B digital apparatus meets all the requirements of the Canadian
Interference-Causing Equipment Regulation.
AVIS: Cet appareil numérique de la classe B respecte toutes les exigences du
Règlement sur le matériel brouilleur du Canada.
6.4 EUROPE
89/336/EEC.
Arturia MiniBrute Connection User's Manual
13
3 Firmware Update