1
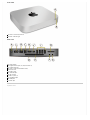
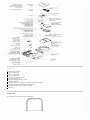
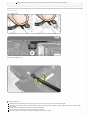
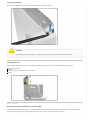
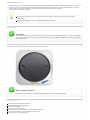
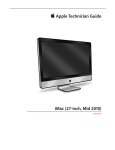
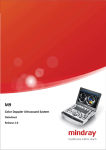
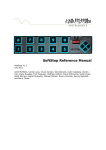
Mac mini (Late 2012)
Introduction
This course provides technicians with important information and service highlights preparing them to service and repair the Mac mini (Late 2012).
Lesson Overview
Lesson Objectives
Upon completion of this course you should be able to:
Explain the new features of the Mac mini (Late 2012).
Recognize, troubleshoot and resolve Mac mini (Late 2012) service issues.
Audience
Prerequisites
Time Required
Service Technicians
None
30 Minutes
What does this training course cover?
This training course serves as an overview of how to service the Mac mini (Late 2012). It only highlights common service issues and
specialized take apart procedures.
Please refer to the Mac mini (Late 2012) service guide for the complete set of detailed instructions, procedures and issues related
to this product.
Product Identification
The Mac mini (Late 2012) models continue in the slimline aluminum housing design, introduced with the Mac mini (Mid 2010).
Externally, Mac mini (Late 2012) models look like Mac mini (Mid 2011) models.
It retains the low-profile housing design and service access through the bottom cover.
What's New
Mac mini (Mid 2011)
Processor
Graphics
Mac mini (Late 2012)
2.3, 2.5, or 2.7 GHz
dual-core Intel Core i5
or
2.0 GHz
quad-core Intel Core i7
2.5 GHz
dual-core Intel Core i5
or
2.3 GHz
quad-core Intel Core i7
(CTO: 2.6GHz quad-core Intel Core i7)
Intel HD Graphics 3000 processor
or
AMD Radeon HD 6630M
Intel HD Graphics 4000 processor
graphics processor
Storage
500GB SATA 5400-rpm
or
500GB SATA 7200-rpm
or
256GB SSD
500GB SATA 5400-rpm
or
1TB SATA 5400-rpm
(CTO 1TB Fusion Drive or 256GB SSD)
or
2 x 1TB SATA 5400-rpm
(CTO 256GB SSD or 2 x 256GB SSD)
Memory
2 or 4GB
1333MHz DDR3 (8GB max)
Two slots
4GB
1600 MHz DDR3 (16GB max)
(CTO 8GB or 16GB)
Two slots
Thunderbolt port (up to 10 Gbps)
FireWire 800 port (up to 800 Mbps)
Four USB 2.0 ports
(up to 480 Mbps)
HDMI port
SDXC card slot
Thunderbolt port (up to 10 Gbps)
Firewire 800 port (up to 800 Mbps)
Four USB 3.0 ports
(up to 5Gbps)
HDMI port
SDXC card slot
Gigabit Ethernet port
Audio in/out
Gigabit Ethernet port
Audio in/out
Wi-Fi
802.11n
802.11a/b/g compatible
Bluetooth
Ethernet
10/100/1000BASE-T Ethernet
(RJ-45 connector)
Wi-Fi
802.11n
802.11a/b/g compatible
Bluetooth
Ethernet
10/100/1000BASE-T Ethernet
(RJ-45 connector)
I/O
Communications
USB 3 Facts
Transfer Speed: USB 3 is capable of a maximum transfer speed up to 5 Gbps. This is 10x faster than the USB 2.0 transfer speed
of 480 Mbps.
Bandwidth: USB 3 features two unidirectional paths; one for transmitting data and one for receiving data. USB 2.0 features only
one bi-directional path and must switch between transmitting or receiving data.
Compatibility: USB 3 devices and connections are backwards compatible with USB 2.0 devices and connections.
Connections and Expansion
Front View
A: Built-in infrared (IR) receiver
B: Power indicator light
Back View
A: Power button
B: Gigabit Ethernet port (10/100/1000 Base-T)
C: FireWire 800 port
D: Cool air inlet (around bottom cover)
E: Exhaust vent
F: Audio in port
G: Audio out port
H: SD card slot
I: USB 3.0 ports (4)
J: Thunderbolt port
K: HDMI port
L: Power port
Exploded View
Service Tools
ESD wriststrap and mat
Torx T6, magnetized
Torx T8, magnetized
Torx T9, magnetized
Hex 2mm (or 5/64-inch) wrench
#0 Phillips screwdriver
Logic board removal tool (922-9588)
Tweezers (optional)
Black stick (922-5065), or other non-conductive nylon or plastic tool
Soft cloth (to protect removed parts from scratches)
Isopropyl alcohol and cleaning cloth (if needed)
Screw tray
Special Tool
This special tool is required for logic board removal:
Logic board removal tool (922-9588)
Software Tools
The following software programs are required for troubleshooting Mac mini (Late 2012):
1. Apple Service Toolkit (AST): version 1.4.5 or higher
AST provides a selection of tools that provide a quick check of the general components of Intel-based Mac hardware. Typically used to triage and
verify repairs of Mac computers.
2. Apple Service Diagnostic (ASD): version 3S151
ASD can determine if any of the thermal sensors are malfunctioning. When sensors fail, replace the corresponding part.
3. Apple Hardware Test (AHT): version 3A241
AHT contains a suite of diagnostics that will test the hardware of your computer. It's a great way to rule out a hardware issue.
4. Mac Resource Inspector (MRI)
MRI is a troubleshooting tool that reveals system errors and reports sensor readings that help identify parts that need replacement.
Before You Begin
Software and Firmware Update
Before you begin troubleshooting, ensure the correct version of OS X is installed. Use Software Update or the Mac App Store to
check for and apply the latest software and firmware updates.
Computers sometimes exhibit symptoms that indicate the wrong version of OS X system software or outdated firmware version is
installed.
Refer to Apple Support article HT1159 to make sure system build is correct for this computer model.
Cosmetic Care
Cosmetic surfaces on this computer have a high exposure to potential damage or scratching.
Be extremely careful not to damage the housing and other cosmetic surfaces with inadvertent tool movements, or to damage the
cosmetic wrapper on the lower hard drive when removing or installing it.
In general, avoid scratching interior or exterior surfaces, and avoid leaving fingerprints.
ESD Reminder
Always follow ESD precautions when working with an open computer.
Take Apart Tips
Dislodging or removing the logic board assembly is required to access many parts.
The logic board cable connectors and sockets are fragile. Use extreme care and finesse to disconnect cables.
Tweezers may be helpful when disconnecting cables.
The edge of the antenna plate is sharp. Use care to avoid injury and to avoid damaging the antenna cable.
Be careful not to touch or damage the EMI fingers or gaskets on the logic board assembly, the housing opening, or on the
bottom cover.
Do not overtighten screws. Install all screws by hand. Do not use power tools.
Important: For solid state drives, tighten screws only finger tight.
During reassembly, make sure all screws are reinstalled. Failure to do so can damage the computer.
Connector Types
Vertical Insertion (JST)
Low-Profile Solid Platform Flex
Vertical Insertion (JST)
Important: These connectors are extremely fragile. Use extreme care. Major repairs may be needed if damaged.
Use a black stick under the cable, next to the connector, with a finger over the top for support, or grasp cables with tweezers, and lift straight
up to remove.
Keep connector level to board when disconnecting and reconnecting.
When connecting, verify that the grooves in the connector, face down.
Press evenly when reconnecting or connector can be tipped up and not fully seated.
Low-Profile Solid Platform Flex
Use black stick and gentle rocking motion to release tension to remove cable.
To install, keep connector level to board and press down evenly.
Fusion Drive
Fusion Drive is a breakthrough concept that combines the high storage capacity of a traditional hard drive and the high performance of a flash based
solid-state drive (SSD).
OS X Mountain Lion fuses a traditional hard drive and SSD into one single volume. Fusion Drive automatically and dynamically moves frequently used
files to flash for quicker access.
A Fusion Drive allows the Mac mini to boot up to 2x faster and import photos up to 3.6x faster.
Fusion Drive Availability
Fusion Drive is an Apple Online Store configurable option. A customer must choose a 1TB or 3TB traditional hard drive to combine
with 128GB of flash storage.
More Information
Fusion Drive service training course (found in GSX)
Apple Support article HT5446
Service Considerations
Wireless Card: EMI Pads
Two EMI pads and one EMI tape are installed on the top of the wireless card. It affects the antenna plate, wireless card and speaker take-apart
procedures. Refer to the Mac mini (Late 2012) service guide for step-by-step instructions.
Upper EMI pad
EMI tape
Lower EMI pad
Included with some Replacement Parts: EMI Pads / Tape
EMI pads/tape are included with the following replacement parts:
Logic board
Speaker
Wireless card
Wireless card flex cable
Use the included EMI pads/tape to replace the existing EMI pads/tape.
Logic Board Handling
When inserting a logic board in to the housing, remember to tuck in gaskets on I/O wall:
Refer to the Mac mini (Late 2012) service guide for step-by-step instructions.
Reminder
Avoid touching EMI fingers and gaskets. Oil from your fingers can reduce connectivity and wireless performance.
Logic Board Return
Return the logic board to Apple in the correct packaging and in the same configuration as the replacement board (as shown below).
Wireless card flex cable
Speaker
Screws for wireless card and speaker (as illustrated)
Battery
Service Procedures
Resetting the System Management Controller (SMC)
The System Management Controller (SMC) is a chip on the logic board that controls all power functions. If the computer is experiencing any power
issue, such as not starting up, not displaying video, sleep issues, or fan noise issues, resetting SMC may resolve it.
Refer to Apple Support article HT3964 for SMC reset instructions.
Resetting the SMC means you will also need to reset the date and time (using the Date & Time pane of System Preferences).
Resetting NVRAM/PRAM
The Mac stores certain settings in a special memory area even if it is turned off. On Intel-based Macs, this is stored in memory known as NVRAM.
(Older Mac computers stored these settings in memory known as PRAM). It stores settings related to speaker volume, screen resolution, startup disk
selection, and recent kernel panic information (if any). If you experience issues related to these functions, you may need to reset the NVRAM.
To reset NVRAM:
1. If the computer is on, turn it off.
2. Locate the following keys on the keyboard: Command, Option, P, and R. You will need to hold these keys down simultaneously in Step 4. Note: If
the keyboard does not have an Option key, use the Alt key instead.
3. Turn on the computer.
4. Press and hold the Command-Option-P-R keys. Important: You must press this key combination before the gray screen appears.
5. Hold the keys down until the computer restarts and you hear the startup sound for the second time.
6. Release the keys.
Resetting NVRAM may change some system settings and preferences. Use System Preferences to restore your settings.
Coin Battery Removal, Testing, and NVRAM Reset
A dead logic board backup battery may prevent computer from operating. Removing the coin battery for 1-2 minutes will also fully reset the logic
board NVRAM.
1. Shut down and unplug the computer. Allow several minutes for power supply to discharge.
2. The coin battery is located on the bottom side of the logic board (refer to the Mac mini (Late 2012) service guide) and provides power for the
battery-backed RAM and clock. Measure DC voltage on battery touching battery with red probe, and grounding with black probe. If voltage is
2.7v or less, replace battery.
3. Reinstall battery and reassemble computer.
4. Power on computer.
5. If computer starts up successfully, check for and apply the latest software and firmware updates.
Starting Up in Safe Mode
A Safe Boot is a special way to start Mac OS X when troubleshooting. To start up into Safe Mode (Safe Boot):
1. Make sure the computer is shut down.
2. Press the power button.
3. Immediately after you hear the startup tone, press and hold the Shift key. Note: The Shift key should be held as soon as possible after the startup
tone but not before.
4. Release the Shift key when you see the screen with the gray Apple and progress indicator (looks like a spinning gear). During startup, ”Safe Boot”
appears on the Mac OS X startup screen.
To leave Safe Mode, restart the computer normally, without holding down any keys during startup.
Recovery HD
A bootable Mac OS X Utilities volume is installed on a hidden partition (Recovery HD) of the internal drive, and may be used to perform the following
tasks:
Repair the internal drive using Disk Utility
Erase or Partition the internal drive using Disk Utility
Restore information on the internal drive using a Time Machine Backup
Restore or Reinstall Mac OS X and Apple applications on the internal drive from the internet
To boot from Recovery HD:
1. Restart the computer while holding down the Command (Cmd) and R keys. Important: If the Mac OS X Utilities application doesn’t appear after
restarting, restart the computer while holding down the Command (Cmd) Option (alt) and R keys, to access and load the Mac OS X Utilities
software from the Internet. The computer must be connected to a network that has access to the Internet.
2. The Mac OS X Utilities window will appear.
If Recovery HD and Internet access is not available, an external recovery disk may be used. Refer to Apple support
article HT4848.
Some utilities may require an access to the Internet and the Mac App Store.
Serial Numbers
2D Barcodes
This computer includes 2D barcodes that require service providers to have updated barcode scanners. It is important to upgrade
scanners to read 2D barcodes in order to enter part serial numbers in GSX. To upgrade the Motorola DS6707 scanner, go to Apple
Support article OP53.
The Mac mini (Late 2012) serial number is located on the bottom of the housing:
When replacing the housing
Remember to write the system serial number on inside of bottom cover when replacing the housing.
Learning Resources
About integrated video on Intel-based Macs
About Mini DisplayPort to HDMI adapters
About NVRAM and PRAM
About the SD and SDXC card slot
Boot Camp: Macs that work with 64-bit editions of Microsoft Windows
Connecting headphones or external speakers to your Mac mini
DVD or CD sharing: Using Remote Disc
Electrostatic Discharge Precautions and Myths
Hand Tools for Desktop and Portable Repairs
How to identify Mac mini models
Intel-based Macs: Resetting the System Management Controller (SMC)
Mac mini (Early 2006) and later: Connecting to a television
Mac mini (Late 2012): Memory specifications and upgrades
Mac mini (Late 2012) and iMac (Late 2012): About Fusion Drive
Mac mini (Mid 2010) and iMac (Mid 2010): Windows support for the SD card slot
Mac mini (Mid 2010) and later: Frequently asked questions about HDMI
Mac mini (Mid 2011): External ports and connectors
Mac mini Server (Mid 2011): How to install OS X Server on a software RAID volume
Mac mini: About HDMI audio and headphones
Mac mini: How to find the serial number
Mac mini: How to remove or install memory
Mac mini: Power consumption and thermal output (BTU) information
Mac OS X versions (builds) for computers
MacBook Pro (Retina, 13-inch, Late 2012), Mac mini (Late 2012): Recommended OS X Software Updates
Monitor and display adapter table
OS X: About OS X Recovery
OS X: About Recovery Disk Assistant
OS X Mountain Lion: Start up in safe mode
Skype calls may have no audio with Bluetooth headset
Using SuperSpeed USB devices on Mac computers