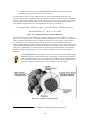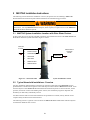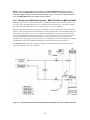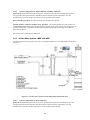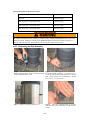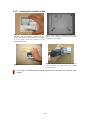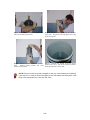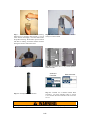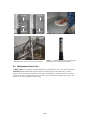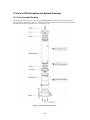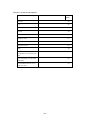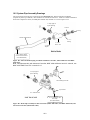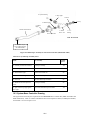
1
Service This manual is to be used by qualified appliance technicians only. Maytag does not assume any responsibility for property damage or personal injury for improper service procedures done by an unqualified person. This Base Manual covers general information Refer to individual Technical Sheet for information on specific models This manual includes, but is not limited to the following: Whole House Filtration System Maytag MWF4100 MWF4200 MWF4300 16022684 October 2003 TABLE OF CONTENTS 1 LEGAL ..........................................................................................................................................................1-1 1.1 1.2 MAYTAG WHOLE HOME WATER FILTRATION SYSTEM WARRANTY .......................................... 1-1 LEGAL DISCLAIMER ................................................................................................................................... 1-3 2 SAFETY........................................................................................................................................................2-1 2.1 2.2 2.3 2.4 2.5 2.6 2.7 2.7.1 S AFETY INSTRUCTIONS .............................................................................................................................. 2-1 OPERATIONAL SAFETY .............................................................................................................................. 2-1 S ERVICE AND MAINTENANCE S AFETY ................................................................................................... 2-2 WINTER S TORAGE...................................................................................................................................... 2-2 OTHER S AFETY R ECOMMENDATIONS .................................................................................................... 2-2 EMERGENCY BYPASS SAFETY (IF INSTALLED ) ..................................................................................... 2-3 MATERIAL S AFETY DATA S HEETS (MSDS).......................................................................................... 2-5 MAYTAG MC1 Cleaning Solution (Citric Acid)...................................................................................2-5 3 INTRODUCTION TO DRINKING WATER ....................................................................................3-1 3.1 3.2 3.3 3.3.1 3.3.2 3.3.3 3.3.4 3.4 3.4.1 3.4.2 3.4.3 3.4.4 3.4.5 3.5 3.5.1 3.5.2 3.5.3 3.5.4 3.5.5 3.5.6 3.5.7 3.5.8 PURPOSE OF THE MAYTAG WHOLE HOME WATER FILTRATION SYSTEM ................................ 3-1 WATER CYCLE AND ITS EFFECT ON DRINKING WATER .................................................................... 3-1 DRINKING WATER SOURCES .................................................................................................................... 3-2 Municipal Water ...........................................................................................................................................3-2 Cistern Water.................................................................................................................................................3-2 Well Water.....................................................................................................................................................3-3 Surface (lake and river) Water....................................................................................................................3-3 COMMON DRINKING WATER QUALITY CONCERNS ............................................................................ 3-4 Municipal Water Quality Concerns – MAYTAG Solutions.................................................................3-4 Cistern Water Quality Concerns - MAYTAG Solutions .......................................................................3-5 Well Water Quality Concerns - MAYTAG Solutions............................................................................3-5 Surface Water Quality Concerns - MAYTAG Solutions.......................................................................3-7 MAYTAG Model Description And Raw Water Quality Applications...............................................3-7 WATER TREATMENT TECHNOLOGIES - COMPARISONS ..................................................................... 3-8 Carafe (Pitcher) Style Water Treatment Devices ....................................................................................3-8 Point Of Use (POU) Faucet Mount Filter.................................................................................................3-9 Point of Use (POU) Reverse Osmosis System (Economy Version)....................................................3-9 Point Of Entry (POE) Reverse Osmosis System...................................................................................3-10 Point Of Entry (POE) Ultraviolet Sterilization......................................................................................3-10 Point of Entry (POE) Ozone .....................................................................................................................3-11 Point Of Entry (POE) Chlorine Dosing Systems ..................................................................................3-11 Point Of Entry (POE) Sand Filtration .....................................................................................................3-12 4 MAYTAG WHOLE HOME WATER FILTRATION SYSTEM.................................................4-1 4.1 4.2 4.2.1 4.2.2 4.2.3 4.3 4.3.1 4.3.2 4.3.3 4.3.4 4.3.5 4.3.6 4.3.7 4.4 GENERAL S YSTEM D ESCRIPTION............................................................................................................ 4-1 HOLLOW FIBRE WATER FILTRATION MEMBRANE............................................................................. 4-2 Filtration Spectrum.......................................................................................................................................4-2 MAYTAG Whole Home Water Filtration System Advantages ...........................................................4-3 Why Membrane Technology is the Solution to Water Problems .........................................................4-3 MAYTAG WHOLE HOME WATER FILTRATION SYSTEM OVERVIEW ........................................... 4-3 Air Vent..........................................................................................................................................................4-3 Cap...................................................................................................................................................................4-3 Prefilter Housing...........................................................................................................................................4-4 System Housing ............................................................................................................................................4-4 Backpulse Tank.............................................................................................................................................4-4 Lock Ring.......................................................................................................................................................4-4 Stand................................................................................................................................................................4-4 MAYTAG WHOLE HOME WATER FILTRATION SYSTEM OPERATION.......................................... 4-5 i 4.4.1 4.4.2 4.4.3 4.5 4.5.1 4.5.2 4.6 4.6.1 4.6.2 4.7 4.8 MAYTAG Whole Home Water Filtration Cycle ....................................................................................4-5 Automatic Front / Backflush Cleaning Cycle (All Models)..................................................................4-6 Automatic Drain Cleaning Cycle (MWF 4300 AWS only) ..................................................................4-7 MAYTAG C ERTIFICATION AND TESTING S UMMARY........................................................................ 4-8 NSF Certifications........................................................................................................................................4-8 Independent Laboratory Testing Results – Biovir Laboratories.........................................................4-10 MAYTAG WHOLE HOME WATER FILTRATION OPTIONS AND CONTROLLERS........................4-10 MAYTAG Whole Home Water Filtration Options ..............................................................................4-10 MAYTAG Controllers ...............................................................................................................................4-14 MAYTAG PRODUCT MATRIX ...............................................................................................................4-18 PRODUCT S PECIFICATIONS .....................................................................................................................4-18 5 MAYTAG INSTALLATION INSTRUCTIONS ...............................................................................5-1 5.1 5.2 5.2.1 5.2.2 5.2.3 5.2.4 5.2.5 5.3 5.3.1 5.4 5.4.1 5.4.2 5.4.3 5.4.4 5.4.5 5.4.6 5.4.7 5.4.8 5.5 5.5.1 5.5.2 5.5.3 5.5.4 5.5.5 5.5.6 5.5.7 MAYTAG S YSTEM INSTALLATION LOCATION WITH OTHER WATER D EVICES ......................... 5-1 TYPICAL HOUSEHOLD INSTALLATIONS - OVERVIEW ......................................................................... 5-1 Municipal and Well/Cistern Systems – MWF 4100 AWS and MWF 4200 AWS............................5-2 Surface Water Systems –MWF 4300 AWS .............................................................................................5-3 Pump/Pressure Tank Systems .....................................................................................................................5-4 System Drain .................................................................................................................................................5-5 Municipal, Cistern and Well Sources........................................................................................................5-6 INSTALLATION REQUIREMENTS .............................................................................................................. 5-7 Drinking Water Tool Kit Disinfection ......................................................................................................5-8 INSTALLATION............................................................................................................................................. 5-9 Pre-Installation Inspection...........................................................................................................................5-9 Inside the System Box................................................................................................................................5-10 Removal from Box.....................................................................................................................................5-11 Pressurizing Backpulse Tank....................................................................................................................5-12 Positioning and Pipe Assembly ................................................................................................................5-13 External Prefilter Assembly (MWF 4300 AWS) ..................................................................................5-19 MWF 4100 AWS, MWF 4200 AWS Controller (Base Controller)...................................................5-20 MWF 4300 AWS Controller (Advanced Controller) ...........................................................................5-25 COMMISSIONING .......................................................................................................................................5-30 Check for Pressure......................................................................................................................................5-30 Remove Cap and Internal Prefilter Bag ..................................................................................................5-31 Filling and Flushing the System for 15 minutes (after the External Prefilter Assembly Installation if included)...................................................................................................................................................5-32 Integrity Test................................................................................................................................................5-33 Sanitize System...........................................................................................................................................5-37 Trans Membrane Pressure (TMP) Test...................................................................................................5-38 Cleaning the Stainless Steel......................................................................................................................5-41 6 MAINTENANCE........................................................................................................................................6-1 6.1 6.2 6.2.1 6.3 6.3.1 6.3.2 6.4 6.4.1 6.4.2 6.4.3 6.5 MAINTENANCE SCHEDULE........................................................................................................................ 6-1 WINTERIZATION PROCEDURE.................................................................................................................. 6-3 Spring Start -up after Winterization............................................................................................................6-7 MAYTAG R EPLACEMENT PROCEDURES ...........................................................................................6-10 Replacement Parts ......................................................................................................................................6-10 Replacement Procedures............................................................................................................................6-11 MAINTENANCE CLEANING AND S ANITIZING PROCEDURES .............................................................6-16 Integrity Test................................................................................................................................................6-17 Sanitizing Procedure ..................................................................................................................................6-18 Cleaning Solution Procedures...................................................................................................................6-23 MAINTENANCE S ERVICE TAG ................................................................................................................6-26 7 FREQUENTLY ASKED QUESTIONS ...............................................................................................7-1 7.1 WHAT DOES THE MAYTAG WHOLE HOME WATER FILTRATION S YSTEM DO ? ........................ 7-1 ii 7.2 7.3 7.4 7.5 7.6 7.7 7.8 7.9 7.10 7.11 7.12 7.13 7.14 7.15 7.16 7.17 7.18 7.19 7.20 7.21 7.22 WHERE IS THE MAYTAG WHOLE HOME WATER FILTRATION S YSTEM INSTALLED ? ............. 7-1 DOES THE MAYTAG WHOLE HOME WATER FILTRATION SYSTEM REQUIRE ELECTRICITY ? 7-1 DOES THE MAYTAG WHOLE HOME WATER FILTRATION SYSTEM AFFECT THE WATER PRESSURE?.................................................................................................................................................... 7-1 WHAT CAN BE DONE TO INCREASE MY WATER PRESSURE? ............................................................... 7-2 HOW OFTEN DOES THE MAYTAG WHOLE HOME WATER FILTRATION S YSTEM NEED TO BE REPLACED ?................................................................................................................................................... 7-2 HOW LONG DOES THE MAYTAG WHOLE HOME WATER FILTRATION S YSTEM LAST? ........... 7-2 WHAT DO I NEED TO DO IF I GO AWAY FOR AN EXTENDED PERIOD OF TIME? ............................... 7-2 HOW DO I BYPASS THE MAYTAG WHOLE HOME WATER FILTRATION S YSTEM? .................... 7-2 WHAT HAPPENS IF THE POWER GOES OUT? .......................................................................................... 7-3 HOW LONG DOES THE AUTOMATIC CLEANING CYCLE TAKE?........................................................... 7-3 HOW MUCH WATER IS USED FOR FLUSHING ?........................................................................................ 7-3 HOW DO I SET A NEW TIME FOR THE DAILY BACKWASH AND CLEANING?..................................... 7-3 IS THERE A REPLACEABLE PREFILTER NEEDED ? ................................................................................. 7-3 WHAT ARE THE MAINTENANCE REQUIREMENTS ? ............................................................................... 7-3 HOW LONG DOES THE CARBON PREFILTER LAST? ............................................................................. 7-3 CAN I WATER MY LAWN WITH THE MAYTAG WHOLE HOME WATER FILTRATION SYSTEM’S FILTERED WATER ? ...................................................................................................................................... 7-3 CAN IT BE SHUT DOWN IN WINTER ? ........................................................................................................ 7-3 WHAT HAPPENS IF THERE IS A BOIL WATER ALERT IN MY AREA ? ................................................... 7-3 IF MY S YSTEM CAME WITH A S TAINLESS S TEEL PREFILTER , CAN I BUY A CARBON PREFILTER ? ......................................................................................................................................................................... 7-4 MY WATER IS FROM THE LAKE AND IT HAS A FUNNY SMELL, CAN SOMETHING BE DONE?......... 7-4 MY LAKE WATER IS QUITE DIRTY AND THE EXTERNAL PREFILTER CARTRIDGE REQUIRES REPLACEMENT QUITE OFTEN. CAN I INCREASE THE TIME BETWEEN REPLACEMENTS OF THE EXTERNAL PREFILTER CARTRIDGE? ..................................................................................................... 7-4 8 TROUBLESHOOTING............................................................................................................................8-1 9 SHIPPING AND STORAGE...................................................................................................................9-1 9.1 9.2 9.3 9.4 9.5 9.6 9.7 9.8 9.9 DIMENSIONS AND WEIGHTS (SHIPPING DETAILS ) – METRIC AND IMPERIAL UNITS ................... 9-1 MAYTAG S YSTEM .................................................................................................................................... 9-2 MAYTAG BACKPULSE TANK ................................................................................................................. 9-2 MAYTAG S YSTEM BASE.......................................................................................................................... 9-3 MAYTAG PIPE ASSEMBLY KIT.............................................................................................................. 9-3 CARBON PREFILTER ................................................................................................................................... 9-4 S TAINLESS S TEEL PREFILTER .................................................................................................................. 9-4 EXTERNAL PREFILTER INSTALLATION KIT .......................................................................................... 9-5 EXTERNAL PREFILTER............................................................................................................................... 9-5 10 SERVICE KIT INFORMATION AND SYSTEM DRAWINGS ............................................... 10-1 10.1 10.2 10.3 10.4 PARTS ASSEMBLY DRAWING ..................................................................................................................10-1 S YSTEM PIPE ASSEMBLY DRAWINGS ...................................................................................................10-3 S YSTEM BASE CONTROLLER DRAWING ..............................................................................................10-4 S YSTEM ADVANCED CONTROLLER DRAWING ...................................................................................10-6 11 INTERNET RESOURCES AND MANUFACTURER DETAILS ............................................ 11-1 11.1 11.1.1 11.1.2 INTERNET R ESOURCES ............................................................................................................................11-1 System Information and Updates........................................................................................................11-1 Procedural Information and Updates..................................................................................................11-1 iii 1 Legal 1.1 MAYTAG Whole Home Water Filtration System Warranty You have just purchased one of the leading whole home water treatment systems available. As an expression of our confidence in the MAYTAG Whole Home Water Filtration System, your drinking water system is warranted to the original end user against defects in material and workmanship when: • • It has been installed in accordance with MAYTAG specifications by a MAYTAG Services Qualified Service Installer. Annual maintenance has been performed by a MAYTAG Services Qualified Service Technician. Proof of purchase (invoice) is required. For a period of one year after installation: All parts and labour on the complete system excluding consumables (e.g. Prefilters, cleaning solutions, batteries etc.) and labour required for the operation and maintenance of the MAYTAG WHOLE HOME WATER FILTRATION SYSTEM as specified in the owners manual. For a period of two years after installation: All parts used in the original installation of the MAYTAG WHOLE HOME WATER FILTRATION SYSTEM, are covered by warranty excluding consumables ( e.g. Prefilters, cleaning solutions, batteries, etc) required for the operation and maintenance of the MAYTAG WHOLE HOME WATER FILTRATION SYSTEM. Labour to install warranted parts and trip charges including mileage are the responsibility of the homeowner. For a period of 5 years from the date of original installation: MAYTAG will replace the original MAYTAG WHOLE HOME WATER FILTRATION SYSTEM Membrane Module when a MAYTAG Services Qualified Service Technician finds a membrane integrity breach, as defined by an integrity check, within the warranty period. MAYTAG reserves the right to examine membrane modules deemed by the MAYTAG Services Qualified Service Technician to have a membrane integrity beach, and provide the final opinion on whether the membrane module is defective. If the part is found to be defective, MAYTAG will pro rate the cost of a membrane module as follows: MAYTAG WHOLE HOME WATER FILTRATION SYSTEM Warranty Schedule Pro-rated cost to the homeowner as a % of Suggested List Up to 24 months 25-36 months 37-48 months 49-60 months 0% 40% 60% 80% Labour to install warranted parts and trip charges including mileage are the responsibility of the homeowner. This warranty does not apply: to damage caused by accident, fire, flood, freezing, Acts of God, misuse, misapplication, neglect, alteration, installation or operation contrary to our printed instructions, or by the use of accessories or components which do not meet MAYTAG specifications. to the cost of installation or defects caused by improper storage or handling prior to installing the equipment. to any work done by anyone other than a MAYTAG Services Qualified Service Technician. 1-1 to work done under normal maintenance, calibration or regular adjustments as specified in operating and maintenance instructions of this manual and or labour involved in moving adjacent objects to gain access to the MAYTAG WHOLE HOME WATER FILTRATION SYSTEM . to any system which has been damaged or defaced. to systems that have been subject to improper, abnormal or insufficient care or cleaning, or to modification, tampering, alteration, improper service, repair, assembly or disassembly by anyone other than a MAYTAG Services Qualified Service Technician. to damage or defects resulting from exposure to excessive heat or cold (including extremely hot or cold water), or use on improper electrical current or voltage. The System is not for use with hot water to systems with which non - MAYTAG consumable items have been used to systems that have been operated without the specified prefilter to systems that have been operated without the necessary sediment prefilter on surface waters to systems that have been subjected to freezing temperatures which have not been properly winterized as specified in the owners manual to systems that have been left drained of water or without proper preservation fluids to membrane fouling if this filtration device is used for commercial and/or rental purposes. This water filtration device is designed for normal household use. Filter replacement due to fouling may vary with the quality and quantity of water. This limited warranty is provided only to the original consumer purchaser or gift recipient of the MAYTAG WHOLE HOME WATER FILTRATION SYSTEM resident in Canada or the United States and may be enforced only by such person. Any repair or replacement to the System under this warranty shall not extend the warranty period. All parts and products removed from the System under this warranty become the property of MAYTAG. The owner is responsible for any repairs or replacements that are not covered by this warranty. MAYTAG reserves the right to make changes in design or add any improvements on any product. The right is always reserved to modify equipment because of factors beyond our control and government regulations. Changes to update equipment do not constitute a warranty change. Charges involved as a result of these product changes do not include freight or foreign, excise municipal or other sales tax. All such freight and taxes are the responsibility of the consumer. The foregoing expressed warranties are in substitution for and exclude all other warranties of any kind whether arising under statute, and tort, or by implication of law or otherwise including, to the full extent as may be allowed by law, liability for any other representations respecting the MAYTAG WHOLE HOME WATER FILTRATION SYSTEM, statutory warranties or implied warranties or conditions as to its merchantability or fitness. No agent, employer, representative of MAYTAG or MAYTAG Qualified Dealer, nor any other person is authorized to modify this warranty in any respect. ALL IMPLIED WARRANTIES, INCLUDING, WITHOUT LIMITATION, WARRANTIES OF MERCHANTABILITY AND FITNESS FOR PARTICULAR PURPOSE, ARE LIMITED IN DURATION TO THE PERIOD SPECIFIED ABOVE FOR THE PARTS DESCRIBED IN THIS LIMITED WARRANTY. As a manufacturer, we do not know the characteristics of your water supply. The quality of water supplies may vary seasonally or over a period of time. Your water usage may vary as well. Water characteristics can also change if your drinking water system is moved to a new location. For these reasons, we assume no liability for the determination of the proper equipment necessary to meet your requirements, and we do not authorize others to assume such obligations for us. MAYTAG’s OBLIGATIONS UNDER THIS WARRANTY ARE LIMITED TO THE REPAIR OR REPLACEMENT OF THE FAILED PARTS OF THIS WHOLE HOME WATER FILTRATION SYSTEM, AND WE ASSUME NO LIABILITY WHATSOEVER FOR DIRECT, INCIDENTAL, CONSEQUENTIAL, SPECIAL, GENERAL OR OTHER DAMAGES. 1-2 The above provisions do not preclude the operation of any applicable provincial or state statute or regulation, which in certain circumstances may not allow some of the limitations or exclusions described in these warranty coverage’s. The MAYTAG Whole Home Water Filtration System must be; • kept wet at all times after installation. • winterized prior to temperatures falling below 0°C (32 F). • tested annually using the integrity test procedure. • operated with a prefilter. Failure to do so may cause the System to dry and/or become damaged, which may lead to personal injury, and/or physical damage and will void any warranty. NOTE: The product specifications for the MAYTAG Whole Home Water Filtration System can be found in section 4.8. 1.2 Legal Disclaimer This manual attempts to outline some of the basic principles of household water collection, treatment and discharge and some of the features of the MAYTAG Whole Home Water Filtration System (the “System”). It is not intended to be a definitive dissertation on the principles set out above, nor is it intended to be relied upon by anyone but MAYTAG Customer Care (“Consultants”) and MAYTAG Services Qualified Service Technicians (“Technicians”). Any other reliance is expressly excluded herein. Further, insofar as Consultants and Technicians are concerned, this document must be utilized in connection with the authorized training procedures created and to be created by MAYTAG or ZENON Environmental Inc. It should be remembered that homeowners will also be provided with an owner’s manual, which will attempt to provide a more general overview of the aforementioned principles and features of the System. The MAYTAG Whole Home Water Filtration System must be installed by a MAYTAG Services Qualified Service Technician and properly maintained in accordance with the Operations and the Owners Manual. Failure to properly maintain the System will compromise performance or and/or result in the failure to control water quality. See tables for Certifications and Laboratory test information. The MAYTAG Whole Home Water Filtration System is not intended for the treatment of water, which has an obvious contamination source (such as sewage or wastewater). Biofilm and pathogens in home piping systems could shed into water filtered through our System. Exposure to microorganisms may also occur during daily activities. To reduce the risk of severe injury, illness, death and/or property damage, read and follow all instructions. Use only MAYTAG authorized parts where required to repair and service the MAYTAG Whole Home Water Filtration System. 1-3 All MAYTAG Whole Home Water Filtration Products must be installed in accordance with all local building and plumbing codes. The MAYTAG Whole Home Water Filtration System must be protected against freezing and < 0°C (32 F) temperatures. Failure to do so may cause the MAYTAG Whole Home Water Filtration System to become damaged, which may lead to personal injury, and/or physical damage. The MAYTAG Whole Home Water Filtration System must be installed on cold-water distribution systems only. Failure to do so may cause System damage, which may lead to personal injury, and/or physical damage. The MAYTAG Whole Home Water Filtration System must be filled with water at all times after installation. Failure to do so may cause the System to dry and become damaged, which may lead to personal injury, and/or physical damage. Trademarks The following are registered trademarks: 1-4 2 Safety 2.1 Safety Instructions Start by reviewing these important safety alert symbols. These safety symbols will alert you to the possibility of serious injury, death, or property damage. Danger notices indicate the potential of severe injury, illness, death and/or property damage, for example electrocution. Read and follow all instructions. Warnings indicate actions that could cause damage to equipment, water contamination, severe injury, illness, death, and/or property damage. The MAYTAG Whole Home Water Filtration System has been designed and tested to offer reliable service, provided it is installed by a MAYTAG Services Qualified Serv ice Technician and is operated, maintained, and tested in strict accordance with the safety instructions contained in this manual. 2.2 Operational Safety • The MAYTAG Whole Home Water Filtration System is under pressure during use and precautions must be taken. • This device is designed to operate on a 120VAC/15 Amp/ 60Hz line. Do not modify plug on the power cord. If the plug does not fit the electrical outlet, have a proper outlet installed by a qualified electrician. 2-1 • 2.3 To avoid System damage: Ensure that a Stainless Steel Prefilter or Carbon Prefilter is in place during operation of the System. In the absence of an internal Prefilter, abrasive damage to the System may occur. A damaged System may permit contaminated water to enter the household distribution system causing illness. Irreversible and premature fouling of the System may also occur resulting in System replacement at the owner’s expense. Service and Maintenance Safety • To avoid electric shock: Disconnect the AC power from the MAYTAG Whole Home Water Filtration System before servicing the controller; do not remove the controller cover while System is in use. Only MAYTAG Services Qualified Service Technicians should attempt to service the controller. • Important: The MAYTAG Whole Home Water Filtration System must be kept in a wetted condition. Once installed or during service and maintenance activities, do not allow the System to sit completely drained for extended periods (>12 hours). Failure to do so may damage the System and cause contaminated water to enter the household for consumption. The MAYTAG Whole Home Water Filtration System must be kept wet at all times after installation. Failure to do so may cause the System to dry and become damaged, which may lead to personal injury, and/or physical damage and will void any warranty. 2.4 • Winter Storage The MAYTAG Whole Home Water Filtration System will be damaged if frozen. The System must be winterized according to the Winterization Procedure 6.2 by a MAYTAG Services Qualified Service Technician. The MAYTAG Whole Home Water Filtration System must be; winterized prior to temperatures falling below 0°C (32°F). Failure to do so may cause the System to dry, freeze and become damaged, which may lead to personal injury, and/or physical damage and will void any warranty. 2.5 Other Safety Recommendations • • • • Do not plug in the Controller transformer if there is water on the electrical wiring or the power supply. Always shut off water flow and release water pressure before cleaning or maintaining the System. The System is intended for indoor use only. The power supply and controller must not be exposed to weather elements. A MAYTAG Services Qualified Service Technician must perform an Integrity Test, Procedure in section 5.5.4, at least once a year. 2-2 The MAYTAG Whole Home Water Filtration System must be; • tested annually using the integrity test. • operated with either a Carbon or Stainless Steel Prefilter. Failure to do so may cause the System to become damaged, which may lead to personal injury, and/or physical damage and will void any warranty. If the MAYTAG Whole Home Water Filtration System is installed in a System that has run untreated well or surface waters, all household water pipes must be sanitized to ensure water quality. 2.6 Emergency Bypass Safety (if installed) Metal water piping systems must be electrically grounded and have electrical continuity throughout as per the local codes. In the absence of a metal bypass valve and piping, electrical bonding between metal inlet and outlet piping on the MAYTAG Whole Home Water Filtration System must be provided as per the local codes. Bypassing the MAYTAG Whole Home Water Filtration System will result in unfiltered water entering the household distribution system. This water may be biologically unsafe and drinking this water could result in illness or death. Exercise caution in bypassing the System. Do not drink the water while the System is in bypass mode. If the System has been operated in by-pass mode and if the water is being drawn from a well or surface water source, the household distribution system should be re-disinfected once returned to filtration mode. If the System is in by-pass mode, the controller must be unplugged. Failure to do so may cause System to dry and become damaged, which may lead to personal injury, and/or physical damage and will void any warranty. 2-3 A bypass system is not required for proper operation of the MAYTAG Whole Home Water Filtration System, however some local plumbing codes may require a bypass. If the System is to be equipped with a bypass, this procedure below may be followed to provide water in an emergency or System malfunction.1 Bypass Procedure 1. Close the Inlet and Outlet ball valves (turn handles clockwise). Ball valves are in the closed position when the handle is positioned perpendicularly to the water pipe. 2. Open Bypass Valve (turn handle counter-clockwise). 3. Unplug the controller. 4. To return to filtered water service; o close bypass valve (turn handle clockwise) o open inlet and outlet valves (turn handles counter-clockwise) o plug in the controller. 1 System malfunction would include a possible water leak or failed integrity test. 2-4 2.7 2.7.1 Material Safety Data Sheets (MSDS) MAYTAG MC1 Cleaning Solution (Citric Acid) 2-5 2-6 2-7 2-8 2-9 2-10 2-11 3 Introduction to Drinking Water 3.1 Purpose of the MAYTAG Whole Home Water Filtration System Historically, there have been many documented cases of disease outbreaks caused by harmful microorganisms, such as bacteria, cysts and certain viruses in drinking water. Individuals who consume infected water are at risk of serious illness or, in some cases, death. Such outbreaks are still common today, in part because of inadequate water treatment processes and infrastructure deterioration. The MAYTAG Whole Home Water Filtration System has been designed to act as an effective barrier to significantly reduce harmful organisms (as set out here after) that can enter the household water distribution system. When used properly, the patented MAYTAG Whole Home Water Filtration System will significantly reduce bacteria, parasites and certain viruses that can enter drinking water distribution systems.2 When used in conjunction with the MAYTAG Carbon Prefilter, the System will reduce chlorine and other unpleasant tastes and odours. 3.2 Water Cycle and Its Effect on Drinking Water The Hydrologic Water Cycle, shown in Figure 3.1, is a continuous process by which water is evaporated from oceans, moves inland as moist air masses, and produces precipitation. The precipitation that falls on the land surface is dispersed in several ways. A portion of it is retained in the soil near where it falls and returns to the atmosphere by evaporation and transpiration (respiration of plant tissue). Another portion of the precipitation becomes overland flow, which feeds local streams and rivers. Finally, precipitation enters the soil system as infiltration and may re-enter channels (lakes or oceans) as it travels through the ground water along the water table. 3 Humans draw water from all of the sources des cribed above for many different uses, including consumption. When the hydrologic cycle is considered, it becomes very clear that there is high potential for water to pick up a variety of contaminants along its journey. These contaminants may include harmful microorganisms such as E.Coli, Cryptospiridium, and Giardia (beaver fever); nuisance metals such as iron and manganese; heavy metals such as lead; and industrial chemicals such as pesticides and herbicides. It is very important to monitor water sources regularly for purity. If water is contaminated, some form of treatment should be provided to eliminate the potentially hazardous components. 2 3 Please refer to NSF and laboratory certifications for performance information. Hydrology and Floodplain Analysis, 2nd Edition, Philip B. Bedient et.al., Addison-Wesley Publishing, 1992, pp. 1 3-1 Figure 3.1 - The Water Cycle 3.3 Drinking Water Sources There are a number of water sources available for drinking water and other household uses. In general, there are two drinking water types: municipal and private. Municipal water can be taken from a number of locations, including surface waters (lakes and/or rivers), ground wells, and rainwater collection systems. The water is typically treated to quality standards set by the local government and then delivered to the community. Private sources can also be taken from surface water (lakes and/or rivers), ground wells, and rain water collection systems. Water from private sources is not typically treated before consumption and may still contain contaminants like turbidity, organics, bacteria, viruses, and/or parasites. 3.3.1 Municipal Water Once the water is taken from the source, it is usually treated with a number of processes that reduce the turbidity, organic content, and microbiological contamination in the water. At a minimum, municipal systems provide disinfection residuals by adding for example chlorine or fluoride to maintain the water’s microbiological safety as it is delivered to the individual residences in the community. More sophisticated processes can address turbidity, organic matter, mineral contamination such as iron and manganese and odours such as hydrogen sulphide. Once the water is treated, it is pumped through a piping distribution system to each individual house. 3.3.2 Cistern Water Cisterns are simple holding tanks commonly made from concrete and, in more recent times, plastic. They are used in locations that do not have municipally treated water supplied directly to residences. In these situations, homeowners can receive water from the municipality on a batch basis from a water hauling company, collect the water using roof top collection systems, or use a combination of both of these methods. In the past, water haulers have pumped water from clean, clear sources such as streams or springs. Because of recent microbiological contamination issues in many locations, water is now more commonly taken from neighbouring town water treatment facilities. At the household, the water is pumped into a holding tank that is typically located underground on the homeowner’s property. To supply the household with water, a pump/pressure tank delivery system is required. 3-2 3.3.3 Well Water As with cistern systems, households that use well water systems do not have municipally treated water supplied directly to them. There are a few well types available, depending on the individual homeowner’s requirements and location of the household. Regardless of the well type, a pump/pressure tank delivery system is required. Each well type is described in more detail below. 3.3.3.1 Drilled Wells Drilled wells are usually 152.4 mm (6”) or 203.2mm (8”) in diameter and lined with a solid pipe (well casing). The well casing usually extends to the bottom of the well into the tapped water source. Drilled wells are typically the deepest of wells and can reach depths of over 213 m (700 ft). The well depth, well casing, and well cap all contribute to making this type of well the safest, as contaminated overland flow is less likely to enter the water supply. 3.3.3.2 Dug Wells Dug wells are typically shallower than drilled wells and have a wider opening. The shallow depth, lack of a sealed well casing, and well cap all contribute to a greater risk of contamination by overland water sources. 3.3.4 Surface (lake and river) Water There are several methods available for collecting and delivering surface water to a household. In most cases, the main objective is to eliminate any sediment that might be churned up by tides and/or waves. Unfortunately, most delivery systems do not make considerations for smaller contaminants like bacteria, viruses, or parasites that may enter the distribution system. Surface water systems can use one of two delivery methods, a pump/pressure tank delivery system or a pump that fills an elevated tank that, in turn, provides water to the household water by gravity. 3.3.4.1 Direct Pump Systems The most common method for delivering water from surface sources is to pump it directly from the source. A suction pipe or hose is placed into the lake or river and held above the lake or river bottom, which limits the amount of sediment that can enter the piping. In these installations, a submersible or centrifugal/jet pump may be used, depending on the setup. 3.3.4.2 Shore Wells Located very close to, and sometimes in, bodies of water, this well type is directly influenced by surface water. Shore wells typically have a casing that is submersed into the ground adjacent to the shoreline. The main purpose of the casing is to settle out heavy particles that are churned up by daily tides and/or wave action. Any contaminants that are light and do not settle out are likely to enter the water delivery system. In these installations, a submersible or centrifugal/jet pump may be used, depending on the setup. 3.3.4.3 Sand Point Wells This well type is less common, but is used in locations that have sandy beaches. A hollow conical metal shaft is pushed into sandy ground close to the lake and attached to a water delivery system. Tiny slits in the metal shaft allow water, but not sand, to enter and be pumped into the delivery system. This type of well uses the natural filtration provided by the sand to remove larger particles before they reach the sand point. Because sand point wells are usually installed close to the water source, they are affected by surface water contaminants like organic matter, bacteria, viruses and parasites. In these installations, a centrifugal/jet pump is required. 3-3 3.4 Common Drinking Water Quality Concerns There are many aesthetic and health-related issues associated with drinking water. Factors that affect drinking water quality may include: • • • • • Geographical location Water source (raw well, raw surface, municipally treated sources) Condition of water distribution system (piping, well casing etc.) Human influences (industrial facilities, gasoline stations, agricultural runoff etc.) Weather related issues Water quality issues can vary in intensity over periods of time and from season to season. Since there are so many factors that affect water quality, it is sometimes difficult to predict. 3.4.1 Municipal Water Quality Concerns – MAYTAG Solutions 3.4.1.1 Microbial Contamination Drinking water that leaves the municipal treatment plant clean and within government drinking water quality guidelines may not reach a household in this same clean state. Water pipes and valves may corrode and develop leaks over time, allowing contaminants to enter the water. In such cases, sanitizing residuals, like chlorine and chloramines, that normally protect the water from further contamination, may not be sufficient to maintain water purity because of the degree of contamination. As a result, water quality may be jeopardized. Municipal water contamination can also occur when aging and insufficient water treatment facilities malfunction. In some instances, water being treated may bypass important processes, such as sanitizing and not be properly treated. Contaminated water that enters the pipes can pose risks to the households being serviced by the water treatment plant. The MAYTAG Whole Home Water Filtration System significantly reduces bacteria, viruses, and parasites from drinking water using ZENON’s patented Water Filtration hollow fibre membranes.4 3.4.1.2 Chlorine (and related tastes and odours) Chlorine has been used since the early 1800’s to reduce odours generated at wastewater treatment plants.5 Increases in illness from water-borne pathogens prompted authorities to begin using chlorine to disinfect drinking water supplies. As a result, occurrences of water-borne illnesses dropped dramatically and diseases like cholera were virtually eliminated. Chlorination is currently the predominant method used to maintain microbiologically safe water and distribution systems. Despite its benefits, there are some issues with chlorine. People are becoming increasingly dissatisfied with the distinctive taste and odour of chlorine. As a result, an increasing number of people are choosing to remove the chlorine from their water using in-home treatment. The MAYTAG Whole Home Water Filtration System MWF 4100 AWS has been specially designed with an Activated Carbon Prefilter and tested to significantly reduce chlorine levels and its related tastes and 6 odours. 3.4.1.3 Non-Chlorine related Tastes and Odours Odours produced by decaying organic plant matter and/or harmless microorganisms can be unpleasant for household consumption. These types of odours are typically seen during hot summer months and are sometimes referred to as “algae-blooms”. Municipal water treatment facilities are often not equipped to 4 Please refer to NSF and laboratory certifications for performance information. Residential Water Processing, 2nd Edition, Wes McGowan, Water Quality Association, 1997, pp. 223 6 Please refer to NSF and laboratory certifications for performance information. 5 3-4 eliminate these unappealing contaminants, since they vary in intensity and duration from year to year depending on a number of environmental factors. When used with the optional Carbon Prefilter, the MAYTAG Whole Home Water Filtration System, MWF 4100 AWS, may provide relief against algae, musty odours and taste produced by the decay of organic matter during hot summer months.7 3.4.2 Cistern Water Quality Concerns - MAYTAG Solutions 3.4.2.1 Microbial Contamination Cistern maintenance is very important. Without proper maintenance, contamination can occur and potentially place the entire water system at risk. Potential methods of contamination include leaking cistern walls or leaking access caps. Older concrete cisterns are at greater risk than newer plastic cisterns. As concrete ages and ground forces (freeze/thaw cycles) erode the cistern materials, cracks may occur. These cracks may allow contaminated ground water from septic beds, agriculture runoff, or other sources to enter the cistern placing the water at risk. In addition to this risk, small animals have been known to find their way into cisterns. Once trapped, they perish and can release potentially harmful microorganisms into the water. If a cistern is contaminated it should be disinfected immediately. Otherwise, the chances are great that the contamination will persist for extended periods of time, with attendant health risks. The MAYTAG Whole Home Water Filtration System significantly reduces bacteria, viruses and parasites from drinking water using ZENON’s patented Ultrafiltration hollow fibre membranes. 8 3.4.2.2 Odours (decaying organic matter etc.) Decaying organic matter, including harmless non-pathogenic microorganisms, can produce earthy or musty odours and tastes in drinking water. These organics typically enter the cistern through rooftop drainage systems. The method of sealing the cistern can also be a factor in allowing this organic matter to enter the system. The degree of odour or off-taste is directly related to the quantity of material that is allowed to enter the cistern. In cases where the water is supplied by the municipality, “algae-bloom” issues may arise, depending on the water source and treatment processes prior to delivery. When used with the optional Carbon Prefilter, the MAYTAG Whole Home Water Filtration System MWF 4100 AWS may provide relief against algae, musty odours and taste produced by the decay of organic matter, primarily during hot summer months.9 3.4.3 Well Water Quality Concerns - MAYTAG Solutions 3.4.3.1 Microbial Contamination All wells are at risk from microbial contamination, regardless of type. Older drilled well casings can become cracked or corroded, allowing microbiologically contaminated water to enter. The design of dug wells makes them vulnerable to contaminated surface water sources. The continuous hydrologic cycle can transport contaminants great distances and, depending on geography, to great depths. Even the deepest wells with sound well casings can become contaminated. Water quality in ground water sources fluctuates constantly - clean water today does not guarantee clean water tomorrow. The MAYTAG Whole Home Water Filtration System significantly reduces bacteria, viruses, and parasites from drinking water using ZENON’s patented Water Filtration hollow fibre membranes.10 7 Please refer to NSF and laboratory certifications for performance information. Please refer to NSF and laboratory certifications for performance information. 9 Please refer to NSF and laboratory certifications for performance information. 10 Please refer to NSF and laboratory certifications for performance information. 8 3-5 3.4.3.2 Particulate Iron Two different processes lead to the formation of particulate iron. Oxygen rich surface waters can enter wells, oxidizing the dissolved iron to particulate iron, and/or iron corrosion can occur. In the latter case, high acidity water breaks down naturally occurring iron-rich minerals. The iron does not dissolve and enters the water supply as larger particles. In both cases, when drawn, the reddish water will contain visible iron particles. Given time these particles will settle making the water clear. The MAYTAG Whole Home Water Filtration System can significantly reduce particulate iron.11 3.4.3.3 Colloidal Iron Colloidal can be described as a combination of particulate and dissolved iron because it is composed of very tiny particles that do not settle easily. As with particulate iron, colloidal iron imparts a red tinge to the water. The MAYTAG Whole Home Water Filtration system can reduce colloidal iron.12 3.4.3.4 Organic Iron (Iron Bacteria) Iron bacteria are harmless bacteria that appear in water supplies with two vital components, a regular supply of dissolved iron and dissolved oxygen. The main by-product of their existence is a jelly-like mass that can clog water pipes and produce foul tasting water. Since these organisms are living, the most effective way to eliminate them is to eliminate their food supply (iron) and stop them from entering the household distribution piping. 3.4.3.5 Particulate Manganese As with particulate iron, two different processes lead to the formation of particulate manganese – oxidation or manganese corrosion. In the latter case, high acidity water breaks down naturally occurring manganeserich minerals. The manganese does not dissolve and enters the water supply as larger particles. In both cases, when drawn, the dark brown water will contain visible manganese particles. Given time, these particles will settle making the water clear. The MAYTAG Whole Home Water Filtration system can reduce particulate manganese.13 3.4.3.6 Organic Manganese (Mangane se Bacteria) Organic manganese is very similar to organic iron, with similar by-products and effects on water quality and drinking water distribution systems. 3.4.3.7 Sulphur Water (Hydrogen Sulphide) In the absence of oxygen, some harmless, non-pathogenic bacteria convert sulphate, leached from rocks, into hydrogen sulphide. The gas readily dissolves in water sources and can be easily detected at very low concentrations by its characteristic rotten egg smell. It causes most metals to corrode and tarnishes silverware. In cases where there are high concentrations in confined areas, this gas may become both poisonous to humans and flammable. Hydrogen sulphide is generated in drinking water in two locations: naturally in the environment and in household drinking water distribution systems. When the formation is in the environment, the raw water supply will show hydrogen sulphide levels upon testing. In drinking water distribution systems, it cannot be diagnosed by testing the raw water because of where the problem is produced. Usually localized in the hot water tank, harmless sulphate reducing bacteria digest sulphate from the raw water, with the help of manganese, to produce hydrogen sulphide. 11 Not performance Tested and Certified by NSF. Not performance Tested and Certified by NSF. 13 Not performance Tested and Certified by NSF. 12 3-6 3.4.3.8 Turbidity Existing in all raw water supplies, turbidity is a physical clouding of water. Turbidity can be comprised of mud, silt, clay, and other sediments in water, in addition to some biological species, like algae and sulphur bacteria (string-like fibre). Whatever the source, the end results are always the same - the water is cloudy. Turbidity does not usually present a health risk, but has been known to interfere with disinfection processes in water treatment plants. The MAYTAG Whole Home Water Filtration system can reduce turbidity.14 3.4.4 Surface Water Quality Concerns - MAYTAG Solutions 3.4.4.1 Microbial Contamination Failing household septic systems and agricultural runoff may contribute to increased incidences of surface water contamination. These may include bacteria, viruses, and parasites. In order to reduce the human health risks associated with these organisms, treatment is required prior to use. Residences that are not serviced by municipally treated water supplies are at greater risk, unless they provide some sort of treatment to eliminate these contaminants. The MAYTA G Whole Home Water Filtration System significantly reduces bacteria, viruses, and parasites from drinking water using ZENON’s patented Water Filtration hollow fibre membranes.15 3.4.4.2 Turbidity Turbidity, described above in section 3.4.3.8, can also affect surface water quality. 3.4.5 MAYTAG Model Description And Raw Water Quality Applications The MAYTAG Whole Home Water Filtration System is available in three models, each having its source water applications and flush program choices. Each model is uniquely equipped to treat a specific source water type. 14 15 Please refer to NSF and laboratory certifications for performance information. Please refer to NSF and laboratory certifications for performance information. 3-7 Table 1a. System design parameters MAYTAG Model and equipment MWF 4100 AWS Equipped with Carbon prefilter, base controller. MWF 4200 AWS Equipped with Stainless Steel prefilter, base controller. MWF 4300 AWS Equipped with Stainless Steel prefilter, advanced controller and External Prefilter. Application Household occupancy (persons) Water use ** (USgpd/ L/d) Raw Water Turbidity** (NTU) chlorinated municipal water 6 or less Up to 400gpd (1500L/d) <0.5, peaks to 1.0 (<5% of time) clean ground water 6 or less Up to 400gpd (1500L/d) <0.5, peaks to 1.0 (<5% of time) surface water 6 or less Up to 400gpd (1500L/d) <5.0, peaks to 10 (<5% of time) **In cases where these values are to be exceeded, consult MAYTAG Technical Assistance at 1-800-7562926. See Section 5.4.7.3 and 5.4.8.3 ,“Controller Program Settings”, for additional information on controller programs. Table 1b. Mineral and colour parameters Iron (Fe) <5.0mg.L Manganese (Mn) <0.5mg/L Apparent Colour 3.5 If raw water exceeds these concentrations, a manganese greensand filter is recommended. 30-50TCU Water Treatment Technologies - Comparisons There are a number of water conditioning and filtration products on the market today, some of which compete directly with the MAYTAG Whole Home Water Filtration System. This section reviews a number of different technologies and compares them to the MAYTAG product. It gives MAYTAG Sales and MAYTAG Customer Care a larger depth of knowledge so that they can talk to prospective buyers about all of the different options in the marketplace today. The information in this section is of a general nature only. It has come from research on the Internet and at various manufacturers’ trade shows, and from the general knowledge and experience gained from operating various types of systems. If asked, the consumer should be informed that they are free to contact competitors to obtain detailed descriptions of the characteristics of their particular system. 3.5.1 Carafe (Pitcher) Style Water Treatment Devices These devices are very popular with consumers and serve a large portion of the household water treatment market because of their low initial cost. Primary uses are to eliminate the unpleasant tastes and odours typically associated with chlorine and other organic compounds. Carafe devices can also remove some particles from water, but do not typically remove bacteria, viruses, or parasites. For the most part, these 3-8 devices use carbon to remove the unwanted chemicals. Very low flow rates and added resins have recently allowed these systems to remove other contaminants such as lead, copper, and zinc. 3.5.1.1 Carafe Disadvantages The following are a number of notable disadvantages as compared to the MAYTAG Whole Home Water Filtration System. Most carafe style devices: • • • • • do not significantly reduce bacteria, viruses and cysts, are not recommended for use on microbiologically unsafe waters, do not filter bacteria that may grow in their activated carbon beds, are less convenient because regular filling and frequent cartridge changes are required, have very low filtration rates. 3.5.1.2 Carafe style filters: • • 3.5.2 only treat water for drinking and potentially cooking, require more frequent replacement. Point Of Use (POU) Faucet Mount Filter Due to their convenience, POU Faucet mounted filters have grown in popularity with consumers. These devices are threaded directly onto the faucet head at the point of use. An evolution of the carafe style filters and using the same technologies, these filters are able to treat a variety of additional drinking water concerns. These include chlorine, hydrogen sulphide, lead, parasites, asbestos, and industrial pesticides. 3.5.2.1 Faucet Mount Device Disadvantages The following are a number of notable disadvantages as compared to the MAYTAG Whole Home Water Filtration System. Most faucet mount devices: • • • • 3.5.3 are not physical barriers to bacteria, viruses and cysts, do not filter bacteria that may grow in their activated carbon beds, only treat water for drinking and potentially cooking from a single tap, require more frequent replacement. Point of Use (POU) Reverse Osmosis System (Economy Version) Reverse Osmosis systems have become very popular because they are perceived to produce much cleaner water than the carafe and POU faucet mounted filters. Using a semi-permeable membrane combined with an activated carbon filter, reverse osmosis systems are able to reject hardness ions and industrial chemicals. Installations include a sediment prefilter (to prevent premature membrane clogging), an activated carbon prefilter (to eliminate chlorine which can damage the reverse osmosis membrane material), and a post membrane activated carbon filter for polishing. 3.5.3.1 POU RO Disadvantages The following are a number of notable disadvantages as compared to the MAYTAG Whole Home Water Filtration System. Most POU RO devices: • • • • • • are not recommended for use on microbiologically unsafe waters, only treat water for drinking and cooking, have pre and post filters that require more frequent replacement to ensure chlorine does not damage RO membrane, waste more water (25% efficiency), have membranes that can be damaged if exposed to chlorine for extended periods, remove all minerals (essential and non-essential). 3-9 3.5.4 Point Of Entry (POE) Reverse Osmosis System A larger version of the POU systems, this treatment device delivers reverse osmosis quality water to the entire household. The current market for this product is limited because of the cost and water recovery of these systems. Since much more water is required for the entire house as opposed to a single tap, water loss becomes a larger issue. 3.5.4.1 POE RO Disadvantages The following are a number of notable disadvantages as compared to the MAYTAG Whole Home Water Filtration System. Most POE RO systems: • • • • • • • • • • • • 3.5.5 have very low peak flow rates and as a result require a large storage capacity, may require extensive renovations because of their large footprints, have higher whole house water costs , have prefilters that require more frequent replacement, have very low recoveries (25% - 50% recovery), have a raw water hardness limitation16 (17 mg/l or 1 grain/gal.), have a raw water iron limitation 17 (0.1 mg/l), have a raw water manganese limitation 18 (0.05 mg/l), have much higher energy costs (requires dedicated pump), have high energy consumption to produce filtered water, can cause problems with piping, as RO water is corrosive on copper piping, remove all minerals (essential and non-essential). Point Of Entry (POE) Ultraviolet Sterilization This technology has gained popularity in recent years because of its availability and non-chemical microbiological disinfection claims. With proper preconditioning, this technology can effectively inactivate microbiological threats from drinking waters. 3.5.5.1 POE UV Disadvantages The following are a number of notable dis advantages as compared to the MAYTAG Whole Home Water Filtration System. Most POE UV systems: • • • • • • • • • • do not provide a physical barrier to bacteria, viruses and cysts, allow inactivated pathogens to be consumed after disinfection, are not all proven to inactivate cysts, can potentially allow dangerous microorganisms into the household water distribution system during power outages or when UV lamps turn off . have a raw water colour and organic limitation that lead to premature fouling of system lowering the treatment effectiveness, have a raw water hardness limitation 19 (105 ppm or 7 grains per gallon), have a raw water iron limitation 20 (0.3 ppm), have a raw water manganese limitation 21 (0.05 ppm), have much higher energy costs, do not lower turbidity. 16 Source water levels higher than this should be prefiltered to ensure optimum membrane performance. Source water levels higher than this should be prefiltered to ensure optimum membrane performance. 18 Source water levels higher than this should be prefiltered to ensure optimum membrane performance. 19 Source water levels higher then this should be prefiltered to ensure optimum UV performance. 20 Source water levels higher then this should be prefiltered to ensure optimum UV performance 21 Source water levels higher then this should be prefiltered to ensure optimum UV performance 17 3-10 3.5.6 Point of Entry (POE) Ozone A relatively new technology for the consumer market, ozone disinfection technology is becoming an alternative for water treatment and disinfection. This technology produces a chemical reaction that converts regular oxygen (O2 ) into Ozone (O3 ). Ozone reacts strongly with many compounds through a process called “oxidation”. Ozone systems have the potential to treat a number of drinking water issues when applied in combination with filtration systems and specialized media filters. These contaminants include: • • • • • Dissolved Iron, Dissolved Hydrogen Sulphide (rotten egg smell), Dissolved Manganese, Arsenic, Total Organic Carbon (TOC). In addition to these water contaminants, ozone has the potential to inactivate bacteria, viruses, and parasites under the proper conditions. 3.5.6.1 POE Ozone Disadvantages The following are a number of notable disadvantages as compared to the MAYTAG Whole Home Water Filtration System. Most POE Ozone systems: • • • • • • • • • • • 3.5.7 do not provide a physical barrier to bacteria, viruses and cysts, allow inactivated pathogens to be consumed after disinfection, are not proven to inactivate cysts, have a raw water colour and organic limitation that lead to premature fouling of system lowering the treatment effectiveness, produce ozone, which at certain concentrations is a dangerous gas and is toxic to humans, cannot produce the required ozone to inactivate potentially harmful bacteria, viruses, and parasites during power outages, have much higher energy costs because ozone production systems typically required higher energies, are affected by lower temperatures (less efficient ozone production), are affected by pH levels above 6.5 (reactions are much slower), are affected by turbidity in water, require very high oxygen quality to produce the required amounts of ozone. Point Of Entry (POE) Chlorine Dosing Systems Chlorine Dosing Systems have been used since the 1800’s to reduce the occurrence of waterborne disease outbreaks in society. These systems are very effective against bacteria and viruses that may be introduced into a drinking water supply. In addition to its disinfection properties, chlorine, in combination with filtration systems and specialized media filters treat a number of other drinking water concerns. These include: • • • • • Dissolved Iron Dissolved Hydrogen Sulphide (rotten egg smell) Arsenic Radon Total Organic Carbon (TOC) Point of entry chlorine dosing systems are commonly used and recommended by municipalities as a secondary barrier to pathogens. 3-11 3.5.7.1 POE Chlorine Dosing System Disadvantages The following are a number of notable disadvantages as compared to the MAYTAG Whole Home Water Filtration System. Most POE Chlorine Dosing systems: • • • • • • • • • • 3.5.8 do not provide a physical barrier to bacteria, viruses and cysts, allow inactivated pathogens to be consumed after disinfection, have a raw water colour and organic limitation that lead to premature fouling of system lowering the treatment effectiveness, create taste and odour issues at higher concentrations, are not very effective against parasitic cysts such as Cryptosporidium Cysts or Giardia Cysts, have lower disinfection properties and oxidation potential at lower temperatures, are affected by pH levels above 6.5 (reactions are much slower), are not a physical barrier to contaminants, do not operate during power outages, can have chlorine in holding tank lose effectiveness if stored open to air for extended periods of time (>2 months). Point Of Entry (POE) Sand Filtration This treatment device has been used traditionally in municipal treatment for its capability to remove turbidity from source waters. Consisting of sand media, particles get trapped and are flushed from the bed regularly by reversing the flow of water to drain. 3.5.8.1 POE Sand Filter Disadvantages The following are a number of notable disadvantages as compared to the MAYTAG Whole Home Water Filtration System. Most POE Sand Filters: • • • • do not provide a physical barrier to bacteria, viruses and cysts, allow inactivated pathogens to be consumed after disinfection, have a raw water colour and organic limitation that lead to premature fouling of system lowering the treatment effectiveness, do not improve taste or reduce odours. 3-12 3.5.8.2 Point of Entry Water Filtration Review System Capabilities Removes bacteria and virus Removes parasites (cryptosporidium & giardia) Efficient self cleaning Keeps filtering when power fails Improves taste Removes cloudiness MAYTAG ULTRA- Ozone Reverse Chlorine Whole Violet Systems Osmosis System Home Systems Systems Water Filtration Yes No No Yes No Yes No No Yes No Yes Some No No No Yes No No Yes Some Yes Yes No No No No Some Yes No No 3-13 4 MAYTAG Whole Home Water Filtration System 4.1 General System Description The core of the MAYTAG Whole Home Water Filtration System is the proprietary ZENON hollow fibre ultrafiltration membrane. It is patent protected and manufactured by ZENON Environmental Inc., located in Oakville, Ontario, Canada for use in household drinking water applications. The MAYTAG Whole Home Water Filtration System operates on existing water pipe pressure to produce cleaner, filtered water. Because it is installed at the point where water enters the home, the System filters the entire water supply. Homeowners may choose to install a separate bypass for outdoor uses, such as lawn watering and automobile washing. Figure 4.1 – System Diagram 4-1 4.2 Hollow Fibre Water Filtration Membrane The MAYTAG Whole Home Water Filtration System contains thousands of individual hollow fibre membrane strands, shown in Figure 4.2 that act to filter tiny particles including bacteria, parasites and certain cysts from water sources. The hollow fibre membrane works on a very simple principle. The water pressure forces water from the outside of the fibre to the inside. Tiny particles are left behind and are flushed to drain during the automatic daily cleaning cycle. Approx. 1 mm (0.04 inches) Figure 4.2 – ZENON Hollow Fibre Ultrafiltration Membrane Figure 4.3 – Microscopic Particle on Unltrafiltration Membrane Membrane fibres have billions of microscopic pores on the surface. The pores form a barrier to impurities, while allowing pure water molecules to pass. 4.2.1 Filtration Spectrum Filtration is defined as the separation of one or more components from a fluid stream. The MAYTAG Whole Home Water Filtration System utilizes a hollow fibre ultrafiltration (UF) membrane that contains pores that are very small (microscopic). The membrane can remove tiny particles including bacteria, cysts and certain viruses. 4-2 4.2.2 • • • • • • • • 4.2.3 MAYTAG Whole Home Water Filtration System Advantages Convenience Unlimited Supply on Demand Pure Tasting Water Safer Water No Electricity Required for Filtering (uses system pressure) Daily Self-Cleaning Small Footprint Minimal Maintenance Why Membrane Technology is the Solution to Water Problems Membrane Technology is the solution to water problems for several different reasons. Membranes Provide: • • • • • 4.3 A physical barrier Superior treated water quality Non-specific removal of pathogens Reliable, non-chemical natural treatment Opportunity to lower cost below other treatment methods MAYTAG Whole Home Water Filtration System Overview The MAYTAG Whole Home Water Filtration System has been designed with simplicity in mind. The components work effectively together to provide cleaner and clearer, filtered water. The System is shown in Figure 4.3. 4.3.1 Air Vent The Air Vent allows air into the System when it is being drained and out of the System when it is being filled during installation or maintenance. In some locations, water aquifers contain high levels of gases that get released when pumped. The air vent ensures that gases do not build up inside the MAYTAG Whole Home Water Filtration System. Some gases that are released from drinking water may be hazardous to human health. Special venting may be required to avoid hazardous gas accumulation in households. Follow local plumbing codes for proper venting requirements. 4.3.2 Cap The Cap seals the MAYTAG Whole Home Water Filtration System and provides access to the MAYTAG prefilters. 4-3 4.3.3 Prefilter Housing The Prefilter Housing chamber has been specially designed to house the MAYTAG Carbon Prefilter or Stainless Steel Prefilter. 4.3.4 System Housing The System Housing, contains the patented ZENON hollow fibre ultrafiltration membrane. This System is the centre of the entire MAYTAG Whole Home Water Filtration System. Small particles including bacteria, parasites and certain viruses are removed from the water and held until they are automatically flushed to drain once per day. There are thousands of individual hollow fibres that allow maximum household flow with minimum pressure loss. 4.3.5 Backpulse Tank The Backpulse Tank pushes filtered water through the membrane fibres, in reverse direction, to expel any trapped particles from the membrane pores. Backpulsing occurs during the Automatic Daily Cleaning Cycle (see section 4.4.3). 4.3.6 Lock Ring The Lock Ring provides stability between the System Housing and the Backpulse tank. This component does not provide System sealing. 4.3.7 Stand The Stand provides support and stability for the MAYTAG Whole Home Water Filtration System. The Stand is connected to the Backpulse Tank and fastened to the household floor. 4-4 Figure 4.3 - MAYTAG Whole Home Water Filtration System 4.4 4.4.1 MAYTAG Whole Home Water Filtration System Operation MAYTAG Whole Home Water Filtration Cycle After installation and commissioning, the MAYTAG Whole Home Water Filtration System is ready to produce cleaner and clearer filtered water. The process is shown in Figures 4.4 and 4.5. When the homeowner uses a household fixture, the water pressure forces unfiltered water into the Prefilter Housing (1). When using the carbon prefilter, larger particles and chlorine are removed as the water passes from outside of the prefilter to the inside. The prefiltered water then passes down into the System (2). The water travels from the outside of the hollow fibre membrane to the inside, leaving behind unwanted particles such as bacteria, parasites and certain viruses 22 (3). The filtered water then travels from the clean water section of the filter to the household piping and to the household fixture that is being used (4). 22 Please refer to NSF and laboratory certifications for performance information. 4-5 (1) (1) (2) (3) Figure 4.5 – Membrane Cross Section (4) Figure 4.4 – Water Filtration Cycle 4.4.2 Automatic Front / Backflush Cleaning Cycle (All Models) The Automatic Front / Backflush Cleaning Cycle allows the MAYTAG Whole Home Water Filtration System to operate for extended periods of time without System maintenance and/or replacement. Systems applied to municipal, cistern, and well sources use this method for Automatic daily cleaning. The cycle occurs once every twenty-four hours, at a time designated by the homeowner. A typical Double Front / Backpulse sequence uses approximately 45 litres (12 USgal) of water. Ideally, the flush cycle is programmed to occur at a time when household water is not being used and the water pressure in the household piping and the MAYTAG Whole Home Water Filtration System is the same as the water main pressure. Water taps may still be used during this time, but a slight drop in water pressure may be noticed. The use of water taps during this cleaning cycle will not affect the cleaning or performance of the MAYTAG Whole Home Water Filtration System. The process is shown in Figures 4.6 and 4.7. The System Controller opens the Drain Valve (3), which immediately drops the System pressure. The higher-pressure water upstream of the filter (1) immediately rushes into the lower-pressure System (2) and then exits the System through the drain valve (3). This is the Frontflush. At the same time, the higher-pressure water in the backpulse tank (4) rushes backwards through the membrane (5) until the pressure has been equalized. This is the Backflush. These processes together provide two important functions: • Frontflush – Scours the outer surface of the membrane fibres and carries dirt particles to drain, 4-6 • Backflush – Expels trapped dirt particles from the Water Filtration Membrane pores so that the front flush can carry them to the drain. (1) (5) (2) (3) Figure 4.6 – Membrane Cross Section-Backflush (4) Figure 4.7 – Front / Backflush Cleaning Cycle 4.4.3 Automatic Drain Cleaning Cycle (MWF 4300 AWS only) The Drain Cleaning Cycle was developed to supplement the Front / Backflush cleaning cycle. This additional cleaning step addresses source related water problems associated with raw lake and river water. This rigorous cleaning method involves completely draining the System. It aids in extending the membrane life by physically scouring the sticky organic and / or mineral particles from the membrane surface and sending them to drain during every automatic cleaning cycle. A typical Double Front / Backpulse Drain Cycle uses approximately 64 litres (17 USgal) of water. The flush cycle should be programmed to occur at a time when household water will not be used and the water pressure in the household piping and the MAYTAG Whole Home Water Filtration System is the same as the water main pressure. The water supplied to the rest of the house is temporarily cut off during the Automatic Drain Cleaning cycle while the System drains and refills itself. In all drain cleaning cycle cases, the Advanced Controller is required. It initiates a series of Front / Backflush cycles to loosen and expel any particles from the MAYTAG Whole Home Water Filtration System pores. See 4.4.2 Automatic Front / Backflush Cleaning Cycle for more information. The process is shown in Figures 4.8 and 4.9. The Controller then initiates a complete System drain by closing the Automatic Inlet valve (1) and opening the Automatic Drain Valve (2). As the water exits the Drain Valve, the Air Vent allows air into the System (3) to prevent a vacuum from forming. The System drains until it is 4-7 empty at which point the automatic valves reverse and filling occurs. Once full, the System is again ready to provide filtered water. (3) (1) (2) Figure 4.8 – System Cross Section Drain Figure 4.9 – Drain Cleaning Cycle 4.5 MAYTAG Certification and Testing Summary The MAYTAG Whole Home Water Filtration System conforms to ANSI/NSF 42/53 for the claims set out below, as verified and substantiated by test data. Current MAYTAG System certifications, as well as the limits to those certifications held, are listed below. Updates can be found on the MAYTAG website at www.MAYTAG.com. For complete statistical analysis and full details of the certification and limits of certification, MAYTAG Services Qualified Service Technicians are asked to review the studies themselves, which are available upon written request from MAYTAG. 4.5.1 NSF Certifications NSF International is the world’s leading testing and certification laboratory for Water Treatment Products. 4-8 Models: MWF 4200 AWS and MWF 4300 AWS: System Tested and Certified by NSF International against NSF/ANSI 42 and 53 for: •Cyst Reduction •Turbidity Reduction •Particulate Reduction - Class 1 Model: MWF 4100 AWS: System Tested and Certified by NSF International against NSF/ANSI 42 and 53 for: •Cyst Reduction •Turbidity Reduction •Particulate Reduction - Class 1 •Chlorine, Taste and Odour Reduction Chlorine Reduction Capacity Rating: 396,000/105,000 (litres/gallons) Do not use the MWF 4100 AWS, with activated carbon filter option , with water that is microbiologically unsafe or of unknown quality unless adequate disinfection before or after the system. Models with activated carbon filter option certified for cyst reduction may be used on disinfected waters that may contain filt erable cysts. The MAYTAG Whole Home Water Filtration System and MAYTAG Whole Home Water Filtration System with Activated Carbon Prefilter, should only be installed where the System and the installation complies with state and local laws and regulations. The MAYTAG Whole Home Water Filtration System and MAYTAG Whole Home Water Filtration System with Activated Carbon Prefilter should only be used to filter water that is cold. The MAYTAG Whole Home Water Filtration System and MAYTAG Whole Home Water Filtration System with Activated Carbon Filter conforms with ANSI/NSF 42/53 for the specific performance claims as verified and substantiated by test data. The MAYTAG Whole Home Water Filtration System must be installed by a MAYTAG Services Qualified Service Technician and properly maintained in accordance with the Owners Manual. Failure to properly maintain the System will compromise performance and/or result in a failure to control water quality. The MAYTAG Whole Home Water Filtration System is not intended for the treatment of water, which has an obvious contamination source (such as sewage or wastewater). Biofilm and pathogens in home piping systems could shed into water after it has been filtered through our System. Exposure to microorganisms may also occur during daily activities. 4-9 4.5.2 Independent Laboratory Testing Results – Biovir Laboratories The following chart is a summary of the MAYTAG Whole Home Water Filtration System and MAYTAG Whole Home Water Filtration System with Activated Carbon Prefilter Independent Laboratory Testing results. Independently Tested By BioVir Laboratories, Inc. , Benicia, California The MAYTAG Water Filtration System has been independently tested by BioVir Laboratories, a California Department of Health (CDH) Approved Laboratory. The test results were: Bacteria Reduction* - greater than 99.99999% Virus Reduction** - greater than 99.7% * Tested with Echerichia coli bacteria ** Tested with Polio virus 4.6 MAYTAG Whole Home Water Filtration Options and Controllers 4.6.1 MAYTAG Whole Home Water Filtration Options The MAYTAG Whole Home Water Filtration System is a versatile household water filtration tool. Additional treatment options have been designed and developed to improve the operation of the MAYTAG Whole Home Water Filtration System. These options enable the MAYTAG Whole Home Water Filtration System to treat a number of different source waters including municipally supplied, cisterns, wells, lakes, and rivers. The options include the: • • • MAYTAG Carbon Prefilter MAYTAG Stainless Steel Prefilter MAYTAG External Prefilter 4.6.1.1 Carbon Prefilter (included with MWF 4100 AWS) Figure 4.10 - MAYTAG Carbon Prefilter The Carbon Prefilter, shown in Figure 4.10, is installed, in accordance with the MAYTAG instructions, in the top portion of the System. It is recommended for municipally chlorinated drinking water supplies where the homeowner dislikes the aesthetic problems caused by chlorine. It performs two important tasks: • It significantly reduces residual chlorine and chlorine related tastes and odours that can be unappealing to homeowners. 4-10 • It protects and extends the life of the MAYTAG Whole Home Water Filtration System by preventing large, sharp particles from entering the System. Activated carbon works in a variety of different ways to remove contaminants from drinking water. Chlorine removal requires a chemical reaction that combines a carbon atom with an oxygen molecule from the water. The reaction produces carbon dioxide, a harmless gas. At the same time, the chlorine molecule is split apart into individual chlorine ions. These ions attach to hydrogen from the water to produce very small quantities of hydrochloric acid. The chemical reaction is shown in Figure 4.11. Activated Carbon + Chlorine + Water → Carbon Dioxide + Hydrochlor ic Acid or Activated Carbon + Cl2 + H 2 0 → CO2 + 2HCl Figure 4.11 - Chemical Reaction for Chlorine Reduction The second method that activated carbon uses to remove contaminants is called “adsorption”, shown in Figure 4.12. This is a process by “which matter adheres to the surface areas of a solid”23 . Activated carbon works in this manner to attract and remove contaminants from the raw water stream. Adsorption allows activated carbon to remove many man-made organic chemicals like pesticides (DDT) and gasoline additives (MMX, MTBE) that may be present in drinking water. This same process reduces odours that are typically associated with hot summer months and are termed “algae-blooms”. Easily detected by a musty, earthy odour, “algae-blooms” are caused by the decay of harmless organisms and other organic material, like leaves, that fall into drinking water sources and cannot be removed using conventional treatment processes. Although the MAYTAG Carbon Prefilter will have some success removing manmade organic chemicals and organic particles associated with “algae-blooms”, it has not been performance tested or certified by NSF to do so. Its strength lies in the reduction of chlorine and chlorinerelated tastes and odours. The life of the Carbon Prefilter will be reduced to different degrees depending on the type and amount of the organic chemicals in the water supply. Figure 4.12 - Activated Carbon Granules 23 Residential Water Processing, 2nd Edition, Wes McGowan, Water Quality Association, 1997, pp. 56 4-11 4.6.1.2 Factors that Affect Activated Carbon Performance There are a number of factors that limit the ability of activated carbon filters to remove chemicals, such as chlorine and other natural and man-made organic substances.24 These are: • Temperature – In general, lower temperatures favour the adsorption process. If the water temperature rises enough, substances previously removed by the activated carbon might be released into the treated water. The most efficient adsorption operating range for activated carbon is 4.4o – 12.8o C (40o to 55o F). Temperature does not affect the reduction or re-release of chlorine-like adsorbed chemicals - it is not held by the activated carbon, but converted to another form before being released into the treated water. • pH (acidity of water) – As the pH decreases (water becomes more acidic) chlorine and organic chemicals are more easily removed. The optimum pH for removing chlorine and other organics is around 7.0, which is neutral (non-acid and non-basic) water. • Contact Time (time for water to flow through activated carbon filter) – In general, the contact time in the filter dictates how effectively the contaminant is removed. This is a very important factor for chemicals that require adsorbing. Reaction times vary for individual organic contaminants and can be as long as several minutes. Chlorine, on the other hand, reacts very quickly with the activated carbon surface and is easily removed even with shorter contact times. The MAYTAG Carbon Prefilter provides approximately 11.5 seconds of contact time at a design flowrate of 17 lpm (4.5 USgpm). This time is suitable for removing chlorine and chlorine-related tastes and odours. 4.6.1.3 Activated Carbon and the Potential for Bacterial Growth Since activated carbon filters remove organic nutrients from water, there is high potential for bacteria to survive and, in some cases, thrive in their beds. These bacteria are typically harmless, but in higher numbers can cause odd tastes and odours issues in the finished water. The MAYTAG Whole Home Water Filtration System has been designed to eliminate these bacteria from the finished water. The MAYTAG Carbon Prefilter has been placed upstream of the System so that bacteria that may grow in the Carbon Filter are removed from the water before it enters the household distribution piping. 24 Residential Water Processing, 2nd Edition, Wes McGowan, Water Quality Association, 1997, pp. 57 4-12 4.6.1.4 Stainless Steel Pre- Filter (included with MWF 4200 AWS and MWF 4300 AWS) Figure 4.13 - MAYTAG Stainless Steel Pre- Filter The Stainless Steel pre- filter, shown in Figure 4.13, is installed, in accordance with the MAYTAG instructions, in the Prefilter Housing directly above the System. It is required for all installations that do not use the MAYTAG Carbon Prefilter. It has been designed to be reused and can be cleaned by the MAYTAG Services Qualified Service Technician using warm water, a soft brush, and household dish detergent. The Stainless Steel Prefilter protects and extends that life of the MAYTAG Whole Home Water Filtration System by stopping large, sharp particles from entering the System. 4.6.1.5 External Prefilter (included with MWF 4300 AWS) Figure 4.14 - MAYTAG External Prefilter The External Prefilter, shown in Figure 4.14, is a multiple density filter that is installed, in a dedicated filter housing before the MAYTAG Whole Home Water Filtration System. It is required for all untreated surface water sources, including lakes and rivers. It must be installed in addition to the Stainless Steel Prefilter. The External Prefilter extends the life of the MAYTAG Whole Home Water Filtration System by reducing the organic particles and nuisance microorganisms (zebra mussels) that enter the System. It also acts as a secondary protection barrier for the MAYTAG Whole Home Water Filtration System by stopping large, sharp particles from entering the System. The external prefilter filters down to a pore size of 10 microns prior to the MAYTAG Whole Home Water Filtration System. 4-13 When treating surface water sources, the MAYTAG External Prefilter is required. Failure to provide this level of prefiltration may lead to System damage endangering the homeowner, potentially causing injury and in serious cases even death. 4.6.2 MAYTAG Controllers The main function of the MAYTAG System Controller is to perform automatic daily cleaning of the System. In order to address the different water types, sources and qualities, a series of System Controllers were developed. All are listed and described below. 4.6.2.1 Base Controller25 (included with MWF 4100 AWS and MWF 4200 AWS) The Base Controller has been designed for use on municipally treated, well, and cistern sources with turbidities up to 1.0 NTU (turbidity units). The Base Controller provides a daily cleaning procedure by performing a number of front / backpulse cycles. As a result, cleaning effectiveness for surface waters and for sources that have turbidity levels greater than 1.0 NTU is limited. Figure 4.15 - MAYTAG Base Controller The Base Controller, shown in Figure 4.15, can be programmed to perform a number of different Front / Backflush sequences depending on the quality of the water within the constraints given below. This Controller uses 2 “AA” batteries to save the program settings during power outages. It also contains a fuse to prevent internal damage during lightning events or other power surges. 4.6.2.1.1 Base Controller Application Summary Table 4.1 - Base Controller Applications Program Water Quality Requirements, Source Water Turbidity (NTU) Household Water Use Household Occupants26 #1 <0.5 Up to 1135 LPD (300 USgpd) Up to 4 people #2 <0.5 Peaks to 1.0NTU, <5% of time Up to 1135 LPD (300 USgpd) Up to 5 people #3 <0.5 Peaks to 1.0 NTU, <5% of time Up to 1510 LPD (400 USgpd) Up to 6 people 25 Base Controller has not been performance tested and certified by NSF. 26 Based on 350 litres (93 USgal) per day per capita. 4-14 The programs are described in more detail below. In each program, typical use patterns are defined as water use of approximately 284 litres/day (75 USgpd) per person in the household. • Program #1 Double Front / Backflush Cycle (3 minutes, 45 litres (12 USgal) water use). This program should be used for all residential applications that use up to 1135 litres/day (300 USgpd). Based on typical use patterns, under normal conditions, this program can be used for households with up to four (4) occupants. This factory set default sequence will be sufficient for most North American installations. Program #1 performs two consecutive Front / Backflush Cycle once per day. This option uses the least amount of water and takes the least amount of time to complete. • Program #2 Triple Front / Backflush Cycle (5 minutes, 68 litres (18 USgal) water use) - This program should be used for all residential applications that use up to 1135 litres/day (300 USgpd). Based on typical use patterns, under normal conditions, this program can be used for households with up to five (5) occupants. This sequence provides three consecutive Front / Backflush Cycles once per day. This program can be set if the homeowner has detected a rapid drop in flow rate from household water fixtures, indicating accelerated System fouling. • Program #3 Quadruple Front / Backflush Cycle (7 minutes, 90 litres (24 USgal) water use) This program should be used for all residential applications that use up to 1510 litres/day (400 USgpd). Based on typical use patterns, under normal conditions, this program can be used for households with up to six (6) occupants. The most rigorous of all Base Controller flush sequences, this program performs four consecutive Front / Backflush Cycles once per day. This program can be used to increase the degree of flushing and extend the life of the System. 4.6.2.2 Advanced Controller27 (included with MWF 4300 AWS) The Advanced Controller has been designed for use on all water sources having turbidities up to 5.0 NTU (turbidity units), with peaks of up to 10 NTU for up to 5% of the time. The Advanced Controller must be used for lake and river waters because it uses the Drain Cleaning Cycle in addition to the Front / Backflush Cleaning Cycle to enhance the daily cleaning effectiveness. Figure 4.16 - Advanced Controller The Advanced Controller, shown in Figure 4.16, can be programmed to perform a number of different cleaning sequences, depending on the quality of the water within the constraints given above. This Controller uses 1 “AA” battery to save the program setting during power outages. It also contains automatic circuit protection to prevent the internals from being damaged during lightning events or other power surges. 27 Advanced Controller has not been performance tested and certified by NSF. 4-15 4.6.2.2.1 Advanced Controller Application Summary Table 4.2 - Advanced Controller Applications Program Water Quality Parameters Household Water Use #1 Municipal and Well Waters (<0.5 NTU) Up to 1135 LPD (300 USgpd) Up to 4 people Up to 1135 LPD (300 USgpd) Up to 4 people Up to 1510 LPD (400 USgpd) Up to 6 people #2 Municipal and Well Waters (<0.5 NTU with peaks to 1.0 NTU <5% of time) #3 Household Occupants28 #4 Well, Surface (<1.0 NTU with peaks to 5.0 NTU, <5% of time) Up to 1135 LPD (300 USgpd) Up to 4 people #5 Well, Surface (<5.0 NTU with peaks to 10.0 NTU, <5% of time) Up to 1510 LPD (400 USgpd) Up to 6 people #6 N/A 29 N/A N/A The programs are described in more detail below. In each program, typical use patterns are defined as water use of approximately 284 litres/day (75 USgpd) per person in the household. 28 29 • Program #1 Double Fr ont / Backflush Cycle – Factory Set Default – See Table 4.2 for water use and occupants. This sequence will be sufficient for most North American installations with low water turbidities. Program #1 performs two consecutive Front / Backflush Cycles once per day. • Program #2 Triple Front / Backflush Cycle – See Table 4.2 for water use and occupants. For a more rigorous flush, the program can be used to perform three consecutive Front / Backflush Cycles once per day. This program can be set if the homeowner has detected a rapid drop in flow rate, indicating accelerated System fouling. • Program #3 Quadruple Front / Backflush Cycle – See Table 4.2 for water use and occupants. This program performs four consecutive Front / Backflush Cycles once per day. It can be used to increase the degree of flushing and extend the life of the System, if required. • Program #4 Double Front / Backflush Single Drain Cycle – See Table 4.2 for water use and occupants. It allows the System to be Front/Backflushed twice followed by a single drain cycle. • Program #5 Double Front / Backflush Double Drain Cycle – See Table 4.2 for water use and occupants. It allows the System to be Front/Backflushed twice followed by two consecutive drain cycles. • Program #6 Output Diagnostics Program – This program can be set and initiated to test all of the controller outputs. It will energize the automatic drain valve for 12 seconds, then energize the automatic inlet valve for 12 seconds and then energize both automatic valves at the same time for 12 seconds. Based on 284 litres (75 USgal) per day per capita. Not Applicable – Program #6 is output diagnostics program. 4-16 4.6.2.3 Integrity Tester30 The main function of the Integrity Tester is to ensure that the System integrity meets the high standards of MAYTAG. The Integrity Tester tests each of the fibres to American Standards (ASTM) to ensure that complete household protection is maintained. Because of its complexity and cost, the Integrity Tester will be used by MAYTAG Services Qualified Service Technicians as a portable testing device during yearly maintenance activities. Figure 4.17 - Integrity Tester The Integrity Tester, shown in Figure 4.17, has all of the same programs as the Advanced Controller. This Controller uses 1 “AA” battery to save the program setting during power outages. It also contains automatic circuit protection to prevent the internals from being damaged during lightning events or other power surges. 30 Integrity Tester has not been performance tested and Certified by NSF. 4-17 4.7 MAYTAG Product Matrix MAYTAG Model and equipment MWF 4100 AWS chlorinated municipal water MWF 4200 AWS MWF 4300 AWS 4.8 Application External Prefilter Required None Internal Prefilter Required Carbon Controller clean ground water None Stainless Steel Basic surface water External Prefilter Stainless Steel Advanced Basic Product Specifications The table below outlines the operational limitations for all MAYTAG Whole Home Water Filtration Systems. Recommended Max Flow Rate Per/min (LPM/USgal) Pressure Drop at 34 LPM (kPa/psi)* 34/9 41/6 Maximum working pressure (kPa/psi) 690/100 Minimum working pressure (kPa/psi) 241/35 Rated Capacity (L/USgal per day)** 1500/390 Minimum Temp (C/F) >0/32 Maximum Temp (C/F) <38/100 Approx flush volume (L/USgal) 45/12 System Efficiency Controller Voltage 97% 120v Base Width (m/in.) 0.45x0.45/18x18 Minimum height required (m/in.) *At time of installation ** Depends on water quality and flow rate 1.88/74 4-18 5 MAYTAG Installation Instructions The following section outlines the installation overview, the specific tools for installing a MAYTAG Whole Home Water Filtration System and the installation and commissioning procedures. To reduce the risk of severe injury, illness, death and/or property damage, read and follow all instructions. Use only MAYTAG authorized parts, where required, to repair and service the MAYTAG Whole Home Water Filtration System. 5.1 MAYTAG System Installation Location with Other Water Devices If other water devices are currently installed in the home, the installation location of the MAYTAG Whole Home Water Filtration System must follow Figure 5.1 below. Water Inlet to House • • • • • • Filtered Water to Household Faucets Pressure Tanks Chlorinator Systems UV System Greens and Sand Filter Sediment Filter Water Softener Figure 5.1 – MAYTAG Whole Home Water Filtration System Installation Location 5.2 Typical Household Installations - Overview All sales, installation and maintenance personnel are required to participate in the MAYTAG Services Qualified Service Technician Program to ensure that they have been trained to MAYTAG standards. Since the main objective of the MAYTAG Whole Home Water Filtration System is to remove bacteria, certain parasites, and certain viruses from drinking water sources, this certification program is important and mandatory for both safety and liability reasons. All efforts must be made to ensure that installations are performed in a careful, sanitary manner for the complete safety of homeowners and technicians. The following section is a general overview of how the MAYTAG Whole Home Water Filtration System is installed for different water sources. 5-1 NOTE: In order to allow only the indoor water to be treated, MAYTAG recommends that a bypass around the MAYTAG Whole Home Water Filtration System be installed for all outside hose bibs, irrigation systems, pool and hot tub makeup valves. This will also help to extend the life of the MAYTAG Whole Home Water Filtration System. 5.2.1 Municipal and Well/Cistern Systems – MWF 4100 AWS and MWF 4200 AWS Municipal systems provide treated water directly to households through a water distribution system. The raw water can be taken from numerous sources, including wells and/or lake water. The water is treated physically with mechanical filtration to raise the water quality to regional standards. When the municipality does not supply water to households, a private pump/pressure tank style system is required. These systems draw water from numerous sources including wells, cisterns (holding tanks), and direct surface water (lakes or rivers). The recommended installation for well/cisterns and clean surface water is the MWF 4200 AWS as shown in Figure 5.2. Cistern systems require a local water hauler to fill the tank on a regular basis so that the household does not run out of water. These systems are often supplemented by rooftop gutter collection systems. The only difference between the MWF 4100 AWS and the MWF 4200 AWS is that the MWF 4200 AWS has a stainless steel pre-filter under the cap. The MAYTAG Whole Home Water Filtration System is installed directly after the water meter as the water enters the home, as shown in Figure 5.2. Figure 5.2 – Municipal and Well/Cistern Installation Drawing, MWF 4100 AWS or MWF 4200 AWS 5-2 5.2.1.1 System Configuration for MWF 4100 AWS and MWF 4200 AWS MAYTAG Whole Home Water Filtration System – installed directly after the household pressure tank. This positioning helps the homeowner determine when the System requires replacement, since the household water pressure and flow will decrease as the System becomes fouled. Base Controller (provided)– Provides automatic daily flushing of the System. Internal Prefilter (Carbon or Stainless Steel - provided) – The Internal Prefilter provides protection to the MAYTAG Whole Home Water Filtration System, primarily from visible particles that would cause the System to foul quickly. The Carbon Prefilter provides additional benefits in removing most undesired tastes such as chlorine. See section 4.8 for System Design Parameters. 5.2.2 Surface Water Systems –MWF 4300 AWS For surface waters and dirty ground waters the recommended installation is the MWF 4300 AWS as shown in Figure 5.3. Figure 5.3 - Surface Water System (submersible pump), MWF 4300 AWS 5.2.2.1 System Configuration for MWF 4300 AWS MAYTAG Whole Home Water Filtration System – installed directly after the household pressure tank. This positioning helps the homeowner determine when the System requires replacement, since the household water pressure and flow will decrease as the System becomes fouled. 5-3 Specialty Media Filter (not provided) – These types of water conditioners include softeners and manganese greensand filters. Depending on the type of media filter, different water quality concerns such as hardness, iron, manganese and hydrogen sulphide can be addressed. These filters should be installed immediately downstream of the household pressure tank and upstream of the MAYTAG Whole Home Water Filtration System. Inlet Solenoid Valve (provided) – The Inlet valve is installed directly upstream of the MAYTAG Whole Home Water Filtration System and is connected to the Inlet pipe assembly using a ¾” MNPT brass nipple. Check Valve (provided) – The Outlet port also has a check valve. This will prevent air getting into the water pipes of the house during the draining function. Advanced Controller (provided) – Due to the higher fouling nature of surface water sources, the MAYTAG Whole Home Water Filtration System requires more rigorous daily flushing. External Prefilter Housing + Filter (provided) – All surface water systems must have an External Prefilter installed. The External Prefilter Housing provides additional protection to the MAYTAG Whole Home Water Filtration System from contaminants such as zebra mussels and other larger particles that are seen in surface water sources. This prefilter is installed between the manual inlet ball valve and the Automatic System Inlet Valve. See section 4.8 for System Design Parameters. When treating surface water sources, a maximum prefilter mesh size of 30 microns is required. Failure to provide this level of prefiltration may lead to System damage. A damaged System will not perform effectively, endangering the homeowner through possible serious personal injury and/or even death. 5.2.3 Pump/Pressure Tank Systems 5.2.3.1 Operational Theory The operation of pump systems is very simple. The pressure in the system pressure tank (holding tank) is maintained between a high and low-pressure setting using a pressure switch and a pump. When the system pressure falls below the low-pressure setting, that is, when the household uses water, the pressure switch mechanically closes an electrical contact, energizing the pump. When the pressure high setpoint is reached by pumping water into the pressure tank, the switch mechanically opens the de-energizing pump. Pump systems always operate in this fashion, regardless of the type of pump. Systems are typically designed so that the pump operates for approximately 2 minutes before the tank is full and does not turn on again for another minute during constant water usage. This operation ensures that the electrical components of the system do not overheat. 5.2.3.2 Pressure Switch Review and Settings There are a number of pressure ranges that are typical in houses, depending on the type of pump used, system pressure losses, and individual homeowner preferences. Standard settings provide a 140 kPa (20 psi) difference between the high and low pressure setting. This setting allows for optimum pump operation as described above (2 minutes on and 1 minute off cycling). The typical low/high-pressure settings that are seen in households, depending on the pump type, are: • • • 138 kPa / 276 kPa (20 psi / 40 psi) 206 kPa / 345 kPa (30 psi / 50 psi) 276 kPa / 413 kPa (40 psi / 60 psi) - recommended 5-4 Some pressure switches can be adjusted to work for all ranges. Pressure switch quality usually determines how much adjustment can be made. Note the 276 kPa / 413 kPa (40 psi / 60 psi) setting is recommended where possible. 5.2.4 System Drain There are a number of different drain connection options for the MAYTAG Whole Home Water Filtration System. The selected drain type depends on a number of factors that must be examined during the initial pre -inspection process. These factors revolve around the water source and its associated water concerns. (To be completed by MAYTAG Services Qualified Service Technician). All drain installations require a proper “indirect” connection, which includes an adequate air gap that follows the applicable plumbing codes. Improper connection may lead to cross-contamination between the drinking water source and the waste water lines. Contaminated water may cause personal injury and/or death. MAYTAG recommends that a licensed plumber install MAYTAG drainage systems due to complexities including air gaps, proper venting, drain sizing, and trap installation. Improper venting and trap installation may lead to sewer gases backing up into the household. This may lead to personal injury to the occupants. 5.2.4.1 Direct Surface Water Source Drains Due to the high level of organic matter in surface water, the MAYTAG Whole Home Water Filtration System requires complete System draining during the daily automatic flush sequence. Unless this is performed, the System life will be shortened and the household water pressure will drop prematurely. This requirement limits the number of drain options available since the System must drain by gravity. There are three options that can be applied to this situation: • Floor Drain – Gravity Feed – Floor drains are installed flush to the floor and are below the MAYTAG Outlet pipe assemb ly. The drain hose can be piped directly to the drain, which is located in the same room as the MAYTAG Whole Home Water Filtration System. • Hub Drain – Gravity Feed – Hub drains are typically set about 6” above floor level. The hub drain is below the clean water port on the MAYTAG Whole Home Water Filtration System. The drain hose can be piped directly downwards to the drain, which is located in the same room as the MAYTAG Whole Home Water Filtration System. • Self-contained sump/pump system (separate trap and possibly vent requirement) – This method of draining is required only if the previous two cannot be used. When the floor or hub drain is not located in the same room or is inaccessible, but a gravity drain is required, a separate, self-contained sump/pump system is required. In some cases, the floor or hub drains do not exist because the sanitary sewer level is above the floor level. This type of drain is more difficult to install because it requires proper venting (to prevent sewer gases from entering the dwelling). It must also be designed to compensate for waste flowrates during flushing procedures. 5-5 5.2.5 Municipal, Cistern and Well Sources These sources typically foul less than direct surface water sources since they have far fewer organic particles. As a result, the daily flushing procedure does not require a complete System drain. The following drain options are available for these installations: All drain installations require a proper “indirect” connection, which includes an adequate air-gap that follows the applicable plumbing codes. Improper connection may lead to cross-contamination between the drinking water source and the waste water lines. Contaminated water may cause personal injury and/or death. MAYTAG recommends that a licensed plumber installs MAYTAG drainage systems due to complexities including air gaps, proper venting, drain sizing and trap installation. Improper venting and trap installation may lead to sewer gases backing up into the household. This may lead to personal injury. • Laundry Tub Drain – Pressurized Feed – A pressurized feed is required since the laundry tub is higher than the clean water piping assembly on the MAYTAG Whole Home Water Filtration System. This drain can be located in another room as long as the drain hose can be fed to the drain location. • Floor Drain – Gravity Feed – Floor drains are level with the floor and are below the clean water piping assembly on the MAYTAG Whole Home Water Filtration System. The drain hose can be piped directly down to the drain without having to rise above the outlet pipe assembly. • Floor Drain – Pressurized Feed – This type of drain is used when the MAYTAG Whole Home Water Filtration System is not in the same room as the floor drain and/or the drain line must be raised above the outlet pipe assembly before going to the drain. In this case, the System cannot be completely emptied automatically, but it can be flushed during the daily flush sequence. • Hub Drain – Pressurized Feed – This type of drain is similar to the Floor drain that requires a pressurized feed when the MAYTAG Whole Home Water Filtration System is not located in the same room and/or the drain line must be raised above the outlet pipe assembly before going to the drain. In this case, the System cannot be completely emptied automatically, but it can be flushed during the daily flush sequence. • Dedicated trap drain – Dedicated trap drains are required when the above 4 options are not available or not desirable. MAYTAG recommends that a licensed plumber install the dedicated trap drain system due to its complexities, which include proper venting, drain sizing, and trap installation. Improper venting and trap installation may lead to sewer gases backing up into the household. Improper drain sizing may lead to cross contamination between the drinking water supply and the waste water lines. Contaminated water may lead to personal injury and/or death. 5-6 5.3 Installation Requirements The Drinking Water Tool Kit should be maintained in premium condition so that the risk of crosscontamination is minimized. Bacteria, parasites, and viruses can live for long periods of time. As a result, dangerous organisms can be carried from one installation or maintenance site to another and may potentially cause serious personal injury, sickness and/or death. Proper tool care and MAYTAG disinfection procedures will minimize these risks. The procedures are described below. Ball valves are recommended for use on all bypass, inlet and outlet plumbing from the System. Gate valves have a tendency to leak and may cause personal injury, sickness and/or death. The following list of tools and supplies are required (not provided) for installation: Required hand tools and supplies Hand Tools fine slot driver: 1/8" x 4" Phillips drivers: #0, 1 slip joint pliers: 12" needle nose pliers pipe wrench: 12" adjustable wrench: 12" torpedo level tire pressure gauge (0-50psi) tape measure: 3/4"x16' open end wrench set: 3/8", 7/16", 1/2", 9/16", 5/8" (or 6” adjustable wrench) Robertson driver: #1 (green), #2 (red), #3 (black) Nut drivers: 5/16”, ¼”, 3/8”(optional) tube cutter- to 1 1/4" masonry drill bit: 3/8" pencil torch head (self lighting) hammer drill strap wrench- 36" 120VAC (or manual) air compressor Integrity tester press. gauge with septum needles (0-100psi) (2) Snips Cap Wrench Supplies teflon tape flux solder(lead free) flux brush emery cloth propane or MPS gas silicon grease- Dow 111 NSF approved tie wraps: 10-14" suspension strap 3/4" ball valves (3) chlorine bleach, 5-6% or 12% chlorine pipe dope(approved for potable) 3/4" brass union: soc x soc or flexhoses 3/4" 90's Cu (soc) 3/4" connectors Cu(soc) 3/4" T's Cu (soc) 1/2" ABS hose (70psi test) 1/2" PVC hose barb 90's 1"x3/4" PVC bushing (MNPTxFNPT) misc 1/2" fittings 1/2-3/4" hose clamps 3/4" brass check valve(FNPT) Spare parts 8" o-rings aa batteries air vent 1/4" FNPT test needle 1/4" MNPTxhose John Guest valve base controller(complete) adv controller(complete) external prefiter dual density cartridge 3/4" brass T's FNPT 1/4" septum sample port 5-7 5.3.1 Drinking Water Tool Kit Disinfection It is strongly recommended that all tools are disinfected prior to use. Disinfecting tools will reduce the risk of cross-contamination between different job sites. Failure to disinfect tools could lead to crosscontamination. Contaminated water may cause sickness, serious personal injury and/or death. 5.3.1.1 Pressure Gauge Disinfection Procedure All pressure gauges MUST be disinfected prior to use in order to avoid cross-contamination. When performing this procedure, handle the disinfection solution with care. It is recommended that protective gloves be worn to avoid skin contact with the chlorine based solution. Failure to follow these guidelines may lead to skin irritation and/or damage to clothes. Pressure gauge and brass gauge adaptor The pressure gauge setup consists of two components: the pressure gauge and the brass gauge adaptor. These are threaded together using Teflon® tape, as shown below. Each step in the disinfection procedure is demonstrated in the accompanying figures. Step 1 - Separate the pressure gauge from the gauge adaptor. Step 2 - Place and soak the gauge adaptor in Household chlorine bleach for 5 minutes. Note the brass adaptor will tarnish. This is acceptable. 5-8 Step 3 – Submerse the end of the pressure gauge into the solution and maintain it in an upright position for 5 minutes. Do not submerse entire gauge into the sanitizer as it may damage the internal components. 5.4 Step 4 – Reassemble the pressure gauge adaptor with Teflon tape and tighten using the drinking water tool kit wrenches. Installation The MAYTAG Whole Home Water Filtration System must be filled with water at all times after installation. Failure to do so may cause the System to dry and become damaged, which may lead to personal injury, and/or physical damage. Ball valves (not supplied), must be used for the System to function properly. Note: Some parts mentioned in the following sections are not supplied with the System. Be familiar with the procedures, parts and requirements prior to an installation. 5.4.1 Pre-Installation Inspection Prior to beginning the installation, look for the following items; • Location for the MAYTAG Whole Home Water Filtration System o Space near Point of Entry o Level area o Indoors with ambient temp between 40-90 F or 4 – 32 deg C. o Footprint, minimum 18”x24” or 46cm x 61cm o Clearance height (floor to ceiling, min 74” or 188cm) o Drillable Floor § If there is floor heating, will require 2’x2’ patio stone and additional height. § If there is a wooden floor, will require ¼”screws and washers • Electrical outlet, 120VAC within 10’ • Existing water equipment (water softeners, filters downstream and UV upstream) • Household water pressure >35 psi (ideal 50-70 psi): • Drain accessible within 20’ and up to 72” high for MWF 4100 AWS / MWF 4200 AWS and must be gravity fed for MWF 4300 AWS. 5-9 5.4.2 Inside the System Box The MAYTAG Whole Home Water Filtration System comes equipped with the following components: MWF 4100 AWS System Box Includes: MWF 4200 AWS System Box Includes: MWF 4300 AWS System Box Includes: Backpulse Stand 2 – Stainless Steel Flex Hoses Base Controller Lock Ring Owners Manual Carbon Prefilter System Backpulse Tank System Cap Backpulse Stand 2 – Stainless Steel Flex Hoses Base Controller Lock Ring Owners Manual Stainless Steel Prefilter System Backpulse Tank System Cap Backpulse Stand 2 – Stainless Steel Flex Hoses Advanced Controller Lock Ring Owners Manual Stainless Steel Prefilter System Backpulse Tank System Cap External Prefilter Housing Wall Bracket Kit 1 – 30 micron External Prefilter Bubble Parts Bag Includes: Bubble Parts Bag Includes: Bubble Parts Bag Includes: 1 – N.C. Solenoid Valve 1 – Nylon Elbow 2 – ¾” Brass Tee 1 – N.C. Solenoid Valve 1 – Nylon Elbow 2 – ¾” Brass Tee 2 – ¾: Brass Bushing 2 – ¼” Brass Plug 2 – ¾” Brass Nipple 1 – Duo Vent 3 – ¾” Bolts 3 – ¼” x 2 ½” Anchors 3 – Nuts 3 – Shims 3 – Washers 1 – Labels (inlet, drain, bypass) 2 – ¾: Brass Bushing 2 – ¼” Brass Plug 2 – ¾” Brass Nipple 1 – Duo Vent 3 – ¾” Bolts 3 – ¼” x 2 ½” Anchors 3 – Nuts 3 – Shims 3 – Washers 1 – Labels (inlet, drain, bypass) 1 – N. C. Solenoid Valve 1 – N.O Solenoid Valve 2 – 1” MNPT x ¾” FNPT PVC Reducing Bushing 1 – Drain Valve 1 – ¼” plug 1 – Nylon Elbow 2 – ¾” Brass Tee 2 – ¾: Brass Bushing 2 – ¼” Brass Plug 4 – ¾” Brass Nipple 1 – Duo Vent 3 – ¾” Bolts 3 – ¼” x 2 ½” Anchors 1 – Check valve 3 – Nuts 3 – Shims 3 – Washers 1 – Labels (inlet, drain, bypass) 5-10 System may be damp and slippery from the preserving process. Be careful not to drop System when removing from the box. Wiping System with a clean, dry cloth will reduce the likelihood of dropping the System. 5.4.3 Removal from Box Step 1 - Open carton and cut away the end of the carton at the bottom of the System. Remove the bubble parts bag and back pulse stand. Step 2 – Attach the backpulse stand to the backpulse tank (with the System still in the box) using the ¼” bolts and washers found in the bubble parts bag. Step 3 – Carefully tip System up out of the System box, so that the System is sitting evenly on the floor. Step 4 – Apply Teflon tape to the ¼”MNPT fitting located on the Air Vent. Screw the vent into the cap, turning it clock-wise. Do not use tools to tighten the air vent as it could cause damage. Ensure that the black cap on the air vent is slightly open by 1 ½ turns to ensure proper operation and venting. Red cap to be closed. Do not remove any seals or plugs from the System until the System is ready to be connected to inlet and outlet assemblies. When inserting air vent, be careful not to cross-thread the threads. 5-11 5.4.4 Pressurizing Backpulse Tank Step 1 – Remove the schraeder valve cap from the backpulse tank. Step 2 – The backpulse tank should be prepressurized from the factory to 35 psi. Confirm that the tank is pressurized to 35 psi using a digital pressure gauge. Step 3 – If the tank was not pressurized to 35psi, pressurize it using an air compressor or hand air pump. After at least 15 minutes, recheck the pressure to ensure there are no leaks. Step 4 – Following Table 5.1, release the pressure in the backpulse tank to the required value for the specific installation location. If too much pressure is released, the tank must be re-pressurized to the correct value. Release pressure by pressing on the schraeder valve. Step 5 – Replace the schraeder valve cap to the backpulse tank. 5-12 Table 5.1 Backpulse Tank Pressure Chart Installation Location Backpulse pressure Municipal 207 kPa (30 psig) Well (20 psig low – 40 psig high cutoff) 140 kPa (20 psig) Well (30 psig low – 50 psig high cutoff) 207 kPa (30 psig) Well (40 psig low – 60 psig high cutoff) 207 kPa (30 psig) Do not pressurize the System Backpulse Tank greater than 35 psig. Higher pressures may cause the Backpulse tank bladder to burst, leading to ineffective daily cleaning of MAYTAG Whole Home Water Filtration System. Ineffective cleaning of the MAYTAG Whole Home Water Filtration System can greatly reduce the life of the System and in some cases lead to sickness and/or death. 5.4.5 Positioning and Pipe Assembly Step 1 – Position the System approx. 6” from where the piping will be. Drill a 3/8” hole through the feet of the backpulse stand. Step 2 – Using the supplied screws and anchors, secure the System to the floor. Use each of the ¼” screws for wooden floors and lag bolts for concrete floor. If the System is to be installed on a heated floor, use a 2’ x 2’ patio stone. Step 3 – Check to see if the System is level. Step 4 – Insert the supplied shims as required under the feet, between the bolts, to help level the System. 5-13 Step 5 – Make a final inspection to confirm that the System is level. Step 6 – Tighten the bolts to secure the System to the floor. Step 7 – Assemble the inlet and outlet devices. Ensure that all threads are fitted with Teflon tape. Attach the inlet device to the System housing and the outlet device to the backpulse tank. Step 8 – For the surface water systems (MWF 4300 AWS), a normally opened solenoid valve must be installed on the inlet assembly. The External Prefilter must also be installed between the normally opened solenoid valve and the inlet ball valve (refer to Figure 5.3 in section 5.2.2) and mounted on a wall. 5-14 48” (122 cm) 20” (50 cm) Step 9 – For surface water systems (MWF 4300 AWS), a check valve must be installed to the ¾” brass nipple on the outlet assembly. Step 10 – Turn off household water. Plumb the inlet (approx. 48” or 122 cm) and outlet (approx. 20” or 50 cm) pipes to the correct height. Use Teflon tape on all threaded connections. Extra care must be taken not to cross thread the ¾” polypropylene nipple. [If soldered joints are used, solder ¾” NPT adapter together with union and allow to cool before threading into ¾” brass T. Cut and fit inlet, outlet piping and by-pass (if necessary). Use ball valves only]. NOTE: For MWF 4300 AWS, plumbing must also be completed for the External Prefilter, see section 5.5.3. Step 11 – Connect the stainless steel flex hoses from the plumbing to the ¾” nipple of the inlet and outlet assemblies for MWF 4100 AWS and MWF 4200 AWS. Step 12 – Connect the stainless steel flex hose from the plumbing to the check valve on the outlet pipe and plumbing to the inlet solenoid valve on the inlet pipe for the MWF 4300 AWS. Be careful not to cross-thread the poly. nipple when installing piping assemblies. 5-15 ¾” Poly Nipple to System Housing Test Port Test Cap Stainless Steel Flexhose ¾” x ¼” Bushing ¾” FNPT Brass “Tee” ¾” MNPT Nipple Figure 5.4 Diagram for Inlet and Outlet on MWF 4100 AWS and MWF 4200 AWS. To System Housing ¾” Poly Nipple Test Port Test Cap Solenoid Plug Stainless Steel Flexhose ¾” FNPT Brass “Tee” ¾” x ¼” Bushing ¾” MNPT Nipple N.O. Solenoid Valve ¾” MNPT Nipple NOT TO SCALE Figure 5.5 Diagram for Inlet on MWF 4300 AWS 5-16 To System Housing ¾” Poly Nipple Test Port Test Cap ¾” MNPT Nipple ¾” MNPT Nipple Stainless Steel Flexhose ¾” FNPT Brass “Tee” ¾” x ¼” Bushing Brass Checkvalve NOT TO SCALE Figure 5.6 Diagram for Outlet on MWF 4300 AWS. Step 13 – Label the valves for the inlet and outlet Step 14 – Assemble the drain fitting by connecting (and bypass if applicable), either on the pipe or on the drain solenoid to the ¾” PVC Nipple attached to the handles, using the supplied labels. the System drain port. Connect the nylon elbow to the solenoid valve. 5-17 Step 15 – Fasten the ½” ABS drain hose to the Nylon barb using a hose clamp (not provided). Step 16 – Run the drain hose to the drain and secure to prevent hose from moving during the backflush. NOTE – MWF 4300 AWS must be a gravity fed drain. Step 17 – Ensure that there are no kinks in the hoses when securing. Avoid the use of metal fasteners that may be destroyed by corrosion over time. Step 18 – Hose should be laying flat. 5-18 5.4.6 External Prefilter Assembly (MWF 4300 AWS) Plumbing parts not included Plumbing parts not included Figure 5.7 Schematic of External Prefilter Assembly The MAYTAG External Prefilter assembly will be shipped complete with all of the following components: • • • • External prefilter assembly (head and housing); protective latex gloves; filter wall bracket; and mounting screws and anchors. 5-19 5.4.6.1 Installing the External Prefilter (Model MWF 4300 AWS) To reduce the risk of severe injury, illness, death and/or property damage, read and follow all instructions. Use only MAYTAG authorized parts, where required, to repair and service the MAYTAG Whole Home Water Filtration System. Inlet Valve Inlet Valve Bypass Valve Outlet Valve Outlet Valve Step 1 – Ensure the household water inlet, new inlet, outlet and bypass valves are closed. Remove the External Prefilter fro m the plastic bag. Step 2 – Assemble the External Prefilter Head and mount on the wall. Complete required plumbing. Step 3 – Insert External Prefilter Cartridge into External Prefilter Housing. Step 4 – Attach the External Prefilter Housing to the External Prefilter Housing Head by tightening connection using the External Prefilter Wrench. Failure to install the External Prefilter during installation or after maintenance activities will allow larger particles to enter the System and may lead to premature fouling and possibly fibre damage. 5.4.7 • • MWF 4100 AWS, MWF 4200 AWS Controller (Base Controller) Use with low turbidity waters, <0.5NTU, usually pretreated municipal water. Has one output terminal and controls only the drain solenoid valve. 5-20 5.4.7.1 Attaching Base Controller to Wall Step 1 – Determine the location where the controller will be mounted. Ensure that the location will allow for the controller to be plugged in to the power outlet and connected to the automatic drain valve. Step 3 – Ensure the controller is level. Step 2 - Drill a single central hole into the wall to insert a screw protruding ¼” and hang the controller on the back screw support. Step 4 – Mount controller to the wall from the front of the controller using the other two provided screws and plugs. It is strongly recommended that the controller be placed in a location that is inaccessible to young children. 5-21 Figure 5.8 Base Controller Schematic Diagram 5.4.7.2 Connect Base Controller to Solenoid Valve Step 1 – Ensure the transformer is not plugged in. Connect the solenoid plug wire to the two valve screw terminals on the right on the base controller. Step 2 – Connect the power supply cable from the transformer to the two 24 VAC screw terminals on the left on the base controller. Do not splice the transformer adaptor unless it is performed in agreement with the local electrical code. Improper splicing may lead to electrical shock if improper connection is exposed to water. Personal injury and/or physical damage may result. 5-22 Step 3 - Secure the System electrical wires neatly using tie-wraps 5.4.7.3 Plug in and set Base Controller Step 1 – Attach solenoid valve to the solenoid plug, paying close attention to the orientation of the prongs. Ensure that the gasket is installed between the plug and adapter valve. Step 2 – Secure the solenoid plug to the solenoid by tightening using a standard screwdriver. Ensure that a flat gasket is installed between the plug adaptor and valve. Failure to install will increase the risk of shock if electrical connection comes into contact with water. Personal injury and/or property damage may result. Step 3 – Install two AA batteries supplied with the controller. Replace battery cover. Step 4 – Connect power supply cord to the wall outlet. 5-23 Do not use extension cords to hook transformer to power source. Doing so will increase the risk of electrical shocking if the wiring is exposed to water. Personal injury and/or property damage may result. Step 5 – Set up the controller using the procedure outlined below. 5 1 1. 2 MODES: use next button (1) to toggle through the modes. MANUAL FLUSH: press next (1) until manual is flashing. Press manual flush (5) and hold. If held longer than 10 seconds, drain solenid remains open. Toggle solenoid closed by pressing manual flush (5) once. SETTING TIME OF DAY: press next (1) until set time appears. Press enter (2). Use up/down arrows (3, 4) to set time of day. Press enter (2) to set. SET TIME OF FLUSH: press next (1) until start time appears. Press enter (2). Use up/down arrows (3, 4) to set time of flush. Press enter (2) to set. SETTING PROGRAM CHOICE: press next (1) until program appears. Press enter (2). Use up/down arrows (3, 4) to select program choice. Press enter (2) to set. 2. 3. 4. 3 4 5. See Table 5.2 for Base Controller Programming Choices Table 5.2 MWF 4100 AWS and MWF 4200 AWS Controller Program Selection Base Controller – MWF 4100 AWS and MWF 4200 AWS Controller Program Settings ControllerProgram Base-Prg 1 Recommen ded household occupancy (persons) Up to 4 Source water turbidity* * (NTU) <0.5 Base-Prg 2 Up to 4 Base-Prg 3 Up to 6 <0.5Peaks to 1.0NTU, <5% of time <0.5 Peaks to 1.0NTU, <5% of time Daily household water consumption No. Flushes per cycle 300Usgal/d (1135L/d) 300Usgal/d (1135L/d) 2 No. tank drains per cycle -- 3 -- 400Usgal/d (1510L/d) 4 -- Flush water used per day (flow at 7USGAL/min) 14Usgal/d (53L/d) 21Usgal/d (80L/d) 28Usgal/d (106L/d) **If turbidity peaks are higher than those listed, consult MAYTAG Technical Assistance at 1-800756-2926 5-24 5.4.8 • • MWF 4300 AWS Controller (Advanced Controller) Use with waters having turbidity up to 5.0NTU, usually rural water installations. Has two output terminals. Controls both the automated drain solenoid valve and the automated inlet solenoid valve. 5.4.8.1 Attaching Controller to Wall Step 1 – Determine the location where the controller will be mounted. Ensure that the location will allow for the controller to be plugged in to the power outlet and connected to the automatic inlet and drain valves. Step 2 – Using a level, draw a line on the wall at the location where the controller is to be installed. It is strongly recommended that the controller be placed in a location that is inaccessible to young children. Step 3 – Use a measuring tape to mark the location where the two holes are to be drilled (ensuring the two holes are 5 ½” apart). Use a 3/16” drill bit to drill the holes Step 4 – Install the plugs and screws, leaving ¼” protruding to hang the controller. Slip the controller over the screws and slide it to the right to secure in position. 5-25 Figure 5.9 Advanced Controller Schematic Diagram 5.4.8.2 Connect Controller to Solenoid Valve Be sure the controller is unplugged prior to removing the back cover to avoid electrocution. Step 1 – Be sure the controller is unplugged. Slide controller off the wall. Remove the back cover and screws from the advanced controller. Step 2 – Insert the inlet solenoid “phone jack” connector into the inlet socket and the drain solenoid connector into the drain socket. Be sure to label each at the end of each lead to avoid confusion and misconnections. 5-26 DO NOT USE DRAIN INLET Step 3 – Double check all connections and labels. Be sure that cords go through the appropriate slot. Step 4 – Replace back cover, insert screws and tighten. Slide back into place on wall. 5.4.8.3 Plug in and set Controller To reduce the risk of severe injury, illness, death and/or property damage, read and follow all instructions, use only MAYTAG Whole Home Water Filtration System replacement parts. Step 1 – Attach the normally closed solenoid valve to the drain solenoid plug paying close attention to the orientation of the prongs ensure that the gasket is installed between the plug and adapter valve. Step 2 – Secure the solenoid plug to the solenoid valve by tightening using a standard screwdriver. Step 3 – Attach the normally opened solenoid valve to the inlet solenoid plug paying close attention to the orientation of the prongs. Ensure that the gasket is installed between the plug and the adapter valve. Step 4 – Secure the solenoid plug to the solenoid by tightening using a standard screwdriver. 5-27 Ensure that a flat gasket is installed between the plug adaptor and valve. Failure to install will increase the risk of shock if electrical connection comes into contact with water. Personal injury and/or property damage may result. 1 Step 5 – Connect power supply cord to the wall socket. Setting Time of Day Setting Flush Time 2 3 4 Step 6 – Set up the controller following the described procedure: 1. Press and hold the ‘Mode’ button until the display begins to flash. Press the ’Mode’ button five more times until the colon, separating the hour and minute designation, begins to flash. The LCD display shows the current hour setting in combination with one of the following; (HH: A) indicates AM, (HH: P) indicates PM and (HH: H) indicates 24-hour clock format. 3. Press the ‘Set’ button until the desired hour is reached. Note: You can choose between the 12-hour format and 24-hour format by passing midnight. 4. Press the ‘Mode’ button to have the minutes ( :MM) appear. 5. Press the ‘Set’ button until the desired minute is reached. 6. Press the ‘Mode’ button to have the Controller show the programmed time. 7. Press the ‘Set’ button to return the Controller to Time mode. The colon separating the hour and minute designations flashes to indicate ‘in service’ operation. Note 1: If 1 minute has elapsed while setting the time and no buttons have been pressed, you must press the Mode button for 6 seconds so that the Controller can be advanced to the next setting. Note 2: This device is pre-programmed to receive month and day settings. These settings will appear as you move through settings as described above however it is not necessary to set month and day as these are not utilized in current versions of the Advanced Controller. 2. 1. Press and hold the ‘Mode’ button until Flush Time begins to flash (HH:MM). A non-flashing colon separating the hour and minute designations verifies this. 2. Press the ‘Mode’ button once. The LCD display shows the current flush hour setting in combination with one of the following: (HH: A) indicates AM, (HH: P) indicates PM and (HH: H) indicates 24-hour clock format. 3. Press the ‘Set’ button until the desired hour is reached. 4. Press the ‘Mode’ button. The minutes ( :MM) begin to flash. 5. Press the ‘Set’ button until the desired flush time minute is reached. 6. Press the ‘Mode’ button to have the Controller return to Time Mode. Note: If 1 minute has elapsed while setting the time and no buttons have been pressed, you must press the Mode button for 6 seconds so that the Controller can be advanced to the next setting. 5-28 Activating the Flush Sequence • MUST be active when System is in service Selecting Program Choice • • Selected program may include a System drain function, but System must be able to drain by gravity to accomplish System drain. See Table 6 for programming choices **Important Note** – A wave symbol above the colon in Time mode indicates that the automatic daily flush sequence is activated. It is essential that the flush sequence be activated while the System is in operation. 1. Press and hold the Mode button until the Flush Time begins to flash (HH:MM). A non-flashing colon separating the hour and minute designations verifies this. 2. Press the Set button until the wave symbol appears above the colon. The wave indicates the automatic daily flush sequence is now activated. 3. Press the Mode button three times to have the Controller return to the Time mode. The Controller automatic flush sequence is now activated. Note: If 1 minute has elapsed while setting the time and no buttons have been pressed; press the Mode button for 6 seconds so that the Controller can be advanced to the next setting. 1. 2. 3. Press and hold the ‘Flush’ button and ‘Integrity’ button together for 6 seconds. The “flush” LED will begins to flash. The number of flashes indicates the program that is currently selected. To toggle between the different programs, use the following keystroke sequence: press the ‘Flush’ button repeatedly to toggle from Program #1 to Program #6. Program selection can be verified by counting the number of LED flashes after pressing the ‘Flush’ button. Once the program has been selected, the Controller should be allowed to stand idle for one minute after the last keystroke. The program will be automatically saved. The program selection can be verified by repeating step 1. See Table 5.3 for Advanced Controller Program Choices Do not use extension cords to hook transformer to power source. Doing so will increase the risk of electrical shocking if the wiring is exposed to water. Personal injury and/or property damage may result. Note that during Advance Controller Program 4 and 5 flushing, household water will be ‘off’ for a 10minute period during the tank drain portion of the cycle. 5-29 Table 5.3 MWF 4300 AWS Controller Program Selection Advanced Controller – MWF 4300 AWS Controller Program Settings ControllerProgram Adv.– Prg 1 Recommen ded household occupancy (persons) Up to 4 (Raw) Source water turbidity** (NTU) <0.5 Adv.– Prg 2 Up to 4 Adv.– Prg 3 Up to 6 <0.5 Peaks to 1.0NTU, <5% of time <0.5 Peaks to 1.0NTU, <5% of time Adv.– Prg 4 Up to 4 Daily household water consumption No. Flushes per cycle 300Usgal/d (1135L/d) 300Usgal/d (1135L/d) 2 No. tank drains per cycle -- 3 -- 400Usgal/d (1510L/d) 4 -- Flush water used per day (flow at 7USGAL/min) 14Usgal/d (53L/d) 21Usgal/d (80L/d) 28Usgal/d (106L/d) <1.0 300Usgal/d 2 1 13Usgal/d Peaks to (1135L/d) (49L/d) 5.0NTU, <5% of time Adv.– Prg 5 Up to 6 <5.0 400Usgal/d 2 2 18Usgal/d Peaks to (1510L/d) (68L/d) 10.0NTU, <5% of time **If turbidity peaks are higher than those listed, consult MAYTAG Technical Assistance 1-800756-2926 5.5 Commissioning The MAYTAG Whole Home Water Filtration System must be filled with water at all times after installation. Failure to do so may cause System to dry and become damaged, which may lead to personal injury, and/or physical damage. 5.5.1 Check for Pressure Always check the System pressure before removing any components from the System. Never remove System parts while under pressure. 5-30 Test port cap Step 1 – Test the System for pressure by removing the test port cap. 5.5.2 Step 2 – Insert the pressure gauge into both inlet and outlet test ports to ensure that the System is at zero pressure. Tighten locking nut. Failure to do so may result in false results Remove Cap and Internal Prefilter Bag Step 1 – Using the cap wrench, carefully remove the cap from the System. Step 2 – Wearing the supplied protective gloves, remove the internal prefilter bag containing either a Carbon Prefilter or Stainless Steel Prefilter from the System and set aside. Step 3 – Replace the cap, using the provided cap wrench to tighten it. 5-31 If not properly tightened and/or the o-ring is not properly examined and cleaned, System leaks may occur. System leaks may cause personal injury or physical damage. If the Stainless Steel Prefilter (MWF 4200 AWS or MWF 4300 AWS) fails or becomes damaged, large sharp particles may enter the MAYTAG Whole Home Water Filtration System. This may cause premature fouling and/or damage to the System Fibre. A damaged System Fibre may lead to contaminated water entering the household distribution system. Illness and/or death may occur from consumption of contaminated water. 5.5.3 Filling and Flushing the System for 15 minutes (after the External Prefilter Assembly Installation if included) The System requires a 15 minute flush after the initial installation to ensure that all of the factory preservative has been removed. Fill the System slowly and watch for leaks to avoid excessive water dripping onto the floor. Do not use hot water during commissioning or maintenance of the System. It is possible that if a hot water tap is used, high levels of factory preservative, chlorine or MAYTAG MC1 Cleaning Solution will enter the hot water tank and cause personal injury, illness and/or death. Ensure that all System connections have been made before starting this step. If connections are not made, leaks may occur causing cross-contamination, personal injury and/or physical damage. Drinking contaminated water may cause illness and/or death. Inlet Valve Inlet Valve Bypass Valve Outlet Valve Outlet Valve Step 1 – Ensure that the outlet valve is closed. Ensure that the bypass valve is closed (if installed). Turn on the house water supply and inspect for leaks. Once no leaks are detected, slowly open the inlet valve half way to begin filling. Step 2 – If an External Prefilter is installed, press the red button on the prefilter head to allow air to escape during filling until no air is heard escaping. 5-32 Advanced Controller Step 3 – As the System begins to fill with water, air will be heard escaping from the Air vent. When the System is full, no more air will escape. Inspect for leaks as the System fills. If a leak appears, close the inlet valve and repair the leak. When no further air exits the System, open the inlet and outlet valves completely. Leave the bypass valve closed (if installed). Base Controller Step 4 – Using the controller, initiate two one minute flush sequences. See section 5.4.7.3 for the Base Controller and 5.4.8.3 for the Advanced Controller. Step 5 – Open a nearby downstream water valve and run to drain for 15 minutes with COLD water. This step is done to remove the factory preservative from the System. 5.5.4 Integrity Test PURPOSE: This test ensures that the membranes are intact and free from tears and ruptures that would permit bacteria and other particles to pass the membranes, contaminating the filtered water. The Integrity Test is conducted at initial start-up after the initial 15 minute flush and afterwards on an annual basis. TOOLS REQUIRED: o 9/16” wrench o 1/8” standard screwdriver o Integrity Tester o Cap Wrench o Pressure Gauge Description: This automated test will pressurize the membranes with air from the outlet side of the System, forcing clean water back through the membranes in the reverse direction. Water easily passes through the 5-33 membranes but due to surface tension of water at the membrane pores, air does not normally pass an intact membrane. Once all the water has been evacuated and air only remains, an automatic air valve closes and a pressure sensor measures any change in air pressure over a five-minute interval. If the pressure change over this interval is minimal, the membrane is intact and the Integrity Tester will indicate a ‘PASS’. Do not allow electrical connections to come in contact with water. The Integrity Tester must be on the floor for the test to be accurate. Inlet Valve Inlet Valve Advanced Controller Base Controller Bypass Valve Outlet Valve Outlet Valve Step 1. Close inlet and outlet valves. (Bypass valve will also be closed.) Step 2. Partially drain System using the controller. Refer to section 5.4.7.3 Step 5 for the Base Controller and section 5.4.8.3 Step 5 for the Advanced Controller. Use a pressure gauge to ensure no pressure is in System. If the System begins to leak as the cap is removed, tighten the cap, drain more water from the System (see Step 2 and ensure the inlet and outlet valves are closed) and then attempt to remove the cap. Step 3. Remove cap using the cap wrench. (Use pressure gauges to ensure there is no pressure in the System first, refer to section 5.5.1). Step 4 – Adjust the water level to 2” above the bottom of the prefilter cavity. To raise the water level, use the inlet valve. To lower the water level use the flush function on the controller – refer to section 5.4.7.3 for base controller and 5.4.8.3 for advanced controller. The water level must be above the hole in the centre of the prefilter cavity. 5-34 If the Integrity Tester is plugged in and the Integrity Tester solenoid cable is connected to the drain solenoid valve, the flush button on the Integrity Tester may be used for lowering the water level. Screwdri ver Step 5 – Remove solenoid cable from drain valve and attach solenoid cable from Integrity Tester to the drain valve. Step 6 – Connect Integrity Tester to power source. John Guest valve is open. Integrity light Step 7 – Reset by holding “Integrity test” 8-30 seconds until “integrity” green light is off. Release immediately. Step 8 – Calibrate the Integrity Tester by first ensuring the John Guest valve is open and not connected. (There should be no water in the Integrity Tester hose and connections before use.) Then hold the “Integrity test” button down until the orange light turns green and the green light goes out. CONTINUE to hold the button down another 20 seconds until the green light flashes momentarily. Then release the button immediately. If there is difficulty with this step, go to Step 7. 5-35 Use wrench to hold here. Tighten here. Step 9 – Insert the needle into the outlet test port Step 10 – Hold the “Integrity test” button until the ensuring the John Guest valve is open. The test port orange button turns green and let go. The drain will connection must be tightened with a wrench. open if there is too much water. If an error light shows, make the appropriate correction as per Step 11 and go to Step 7 (and skip steps 8 and 9). If the test is working properly, the compressor will be heard as it tests the System. If the Integrity Test fails and the compressor has been on, the test should be repeated to ensure all steps were followed properly. Be sure that all connections are tight, ie. test ports, tees, nipples, etc. before repeating the test. Prior to repeating the test; put the cap on, open the inlet and outlet valves and turn a tap on for 10 minutes. This will remove the pressure built up in the System by the Integrity Tester. Start again from Step 1. Step 11 – The “integrity test” green light will be lit. Wait 5 minutes. Interpret the results from the integrity indicator light. Flashes (continuous green light) Action PASS (continuous red light) FAIL – Check for leaks. Tighten all connections and retest System. System may require replacement. Drain some of the water and return to Step 7. (green light) (green light) Add some water (by opening the inlet). Return to Step 7. (green light) (green light) Check for air leaks. Check outlet valve is closed. Return to Step 1. System may require replacement. Check for large air leaks. Check outlet valve is closed. Return to Step 1. System may require replacement. 5.5.4.1 Troubleshooting Guide for Integrity Tester Problem/Situation Fault or failure at end of test. “Integrity test” button released too quickly or too late. Correction/Action Check all connections. Tighten needle connection to test port. Repeat test from the first step. Begin the test again from the first step. 5-36 Problem/Situation After the test the tap does not work properly. Water is leaking from the System when cap is removed. Controller does not zero properly. Can not remove the cap. Integrity tester is hooked up to drain solenoid and System needs to be drained. Correction/Action Be sure the inlet and outlet valves were reopened. Leave the tap on for a few minutes to allow water flow to return to normal. Tighten the cap again to prevent more water from leaking. Drain the System further by pushing the flush button on the controller. Then remove the cap. Open the John Guest valve. Be sure the inlet valve is closed. Drain the System. Be sure the inlet valve is closed. Hold down the flush button on the Integrity tester for approximately 20 seconds to drain the System. Drain solenoid will open for the duration that the button is held down. NOTE: If there is a failure, most of the time it is due to a System leak from hoses, connections or valves. Be sure to; replace the cap, turn on inlet valve half way to minimize air in the System, after air has escaped through air vent turn on outlet valve, and run tap for a few minutes to release pressure prior to repeating the test. 5.5.5 Sanitize System During this procedure, DO NOT open the Bypass Valves, as this will allow potentially contaminated water into the household distribution system. Contaminated water may lead to personal injury and/or death. Chlorine bleach must be in the house for less than 3 months. The active percentage reduces with time. This does not disinfect all of the household pipes. If on a lake or well, it is strongly recommended that all of the pipes are sanitized as water will be previously microbially unsafe NOTE: Water level prior to pouring chlorine bleach into the System should still be at 2” above the bottom of the prefilter cavity from the Integrity test. This is very important so as not to damage the System. If the water level is too low, open the inlet valve slowly for about 30 seconds to raise the water level. Advanced Controller Step 1- With the System Cap off (and internal prefilter still removed), ensure the water level in the internal prefilter cavity is well above the internal prefilter spigot. Pour in 250mL of 12% chlorine bleach OR 500mL of 5% or 6% household chlorine bleach into the top of the System. Let stand 15 minutes. Base Controller Step 2 – Use the controller to activate the drain solenoid in order to drain the System. See section 5.4.7.3 for base controller and 5.4.8.3 for advanced controller. 5-37 Inlet Valve Inlet Valve Bypass Valve Outlet Valve Step 4 – Refill the System by opening the inlet and outlet valves, and ensuring the bypass valve remains closed (if installed). Note that the System still requires further flushing to remove the bleach. This will be completed in the Final Flushing (section 5.5.6.2). Step 3 – Remove the internal prefilter from the bag and install the internal prefilter cartridge (Carbon Prefilter for MWF 4100 AWS and Stainless Steel Prefilter for the MWF 4200 AWS and MWF 4300 AWS) into the internal prefilter cavity, ensuring that the prefilter spigot is sitting evenly in the prefilter cavity. Replace the System Cap. 5.5.6 Outlet Valve Trans Membrane Pressure (TMP) Test Step 1 - Remove inlet and outlet test port caps. Insert a pressure gauge in each. Ensure the two gauges are fitted with Teflon tape before use. Step 2 - Turn on a tap near the System with a high water flow rate. Results of Trans Membrane Pressure Test Situation System TMP is less than 10 psi System TMP is between 10 psi and 15 psi. Action Regular Maintenance Schedule Tell the homeowner that the System is fouled and indicate that a return visit may be required in the near future if it is not replaced. Ensure that the System Prefilter does not cause the pressure drop. System Fouling Rate is/will surpass the 15-psi Accelerated Maintenance schedule. Tell the homeowner that this is the case and a visit 5-38 limit before the next scheduled Maintenance Visit. prior to the next yearly visit may be required. Ensure that the System Prefilter does not cause the pressure drop. System TMP is greater than 15 psi Accelerated Maintenance schedule. Replace System. Step 3. Read the two pressures and subtract the smaller value from the larger value. Refer to the table for appropriate action. For well, cistern and surface water supplies with a pump/pressure tank system, take the outlet pressure only when the inlet pressure reads the following: Pressure Range (psi) 20/40 30/50 40/60 X/Y Inlet pressure for TMP determination (psi) 35 45 55 Y-5 5.5.6.1 Complete Paperwork Step 1 – Complete the warranty card ensuring that all information is provided. Figure 5.10 Example of MAYTAG warranty card. Step 2 – Complete the installation checklist and ensure that all fields are complete. Installation Checklist Module secured to floor with height clearance available to remove pre-filter. (fig 4.3 pg 4-5 and section 5.4.5 step 1&2 pg 5-13) Drain line hose is secured with no kinks. (section 5.4.5 steps 16-18 pg 5-18) Backpulse tank at correct pressure.(table 5.1 pg 5-13) Module cap and air vent secure.(last cap replacement sec 5.5.5 step 3 pg 5-38 and section 5.4.3 step 4 pg 5-11) Air vent has black cap open 1 ½ turns and red cap closed.(section 5.4.3 step 4 pg 5-11) Inlet and outlet valves are open, no leaks with plumbing, by-pass is closed. All piping connections are snug, no leaks. 5-39 Controller is mounted to wall, connected, batteries installed and programmed. (section 5.4.7 pg 5-20 or 5.4.8 pg 5-25) Flush time is set for 3 am local time (section 5.4.7.3 step 5 pg 5-23 or 5.4.8.3 step 5 pg 5-27) Appropriate pre-filter is in prefilter cavity (carbon or stainless steel). MWF 4300 AWS has external prefilter installed.(section 5.4.6.1 pg 5-20) System has been flushed for 15 minutes. (section 5.5.3 pg 5-32) System has been tested for integrity. (section 5.5.4 pg 5-33) System has been sanitized (soaked with chlorine for 15 minutes). (section 5.5.5 pg 5-37) Trans Membrane Pressure test has been done. (section 5.5.6 pg 5-38) Paperwork has been completed; Warranty card This checklist with your signature and Post-Installation Homeowner checklist with your signature and homeowner signature Model number on owners manual Service tag Homeowner aware of need to flush for 1 hour. Step 3 – Complete Post-Installation Homeowner Checklist to ensure the homeowner understands the MAYTAG Water Filtration System. Post-Installation Homeowner Checklist Basic System Operation Normal Noises: • Air vent releasing air (hissing), particularly MWF4300AWS • Daily automatic cleaning during night. Possible low water pressure during daily automatic cleaning, temporary Inlet, Outlet, By-pass (operation if applicable) Controller Settings Temperature and Wetting Requirements Maintenance Requirements: Annual (Recommended every 6 mths for surface Replacement of carbon (and external waters) prefilter if applicable) Clean membrane (chlorine bleach for municipal and ground water and MAYTAG MC1 Cleaning solution for surface waters) Perform integrity test Perform trans membrane pressure test (TMP) If applicable Winterization (Before and After) Flushing requirements (1 hr) & expectations over first few days Step 4 – Record the model number on page 2 of the Owner’s Manual for future reference. 5-40 Step 5 – Complete the service tag ensuring that all fields are complete. Figure 5.11 Example of the MAYTAG service tag. 5.5.6.2 Final Flushing By Homeowner Step 1 – Have the homeowner flush the System with cold water for 60 minutes by opening a bathtub faucet and allowing the water to run down the drain. The 60 minute flush is required to meet NSF drinking water requirements. 5.5.7 Cleaning the Stainless Steel The stainless steel surface of your MAYTAG Whole Home Water Filtration System requires no special maintenance. If required, the surface may be cleaned using a mild soap solution. Do not use any other cleaners or abrasive materials on the stainless steel surface as these cleaners may damage the label. Wipe System dry with a soft cloth afterward. 5-41 6 Maintenance 6.1 Maintenance Schedule A MAYTAG Services Qualified Service Technician must perform all maintenance on the MAYTAG Whole Home Water Filtration System. An annual integrity test must be performed which is required as part of the 5 year limited prorated membrane warranty. If the MAYTAG Services Qualified Service Technician determines that System has a high degree of debris causing a reduction in System flowrate, the number of visits per year may be increased by MAYTAG to ensure that the System stays within operational limitations set by the MAYTAG Whole Home Water Filtration System and to ensure the limited warranty protection remains in effect. The Table below outlines the maintenance schedule that should be followed for each Model of the MAYTAG Whole Home Water Filtration System. Model MWF 4200 AWS Model MWF 4100 AWS MAYTAG Whole Home Water Filtration System Maintenance Schedule Required Service MAYTAG Part No. Carbon Prefilter 67500001 System cleaning -- Clean Integrity testing* -- Test Backpulse Tank air pressure 67500013 Adjust air pressure as required** Test Base Controller batteries: 2 AA -- Check timer and program settings Replace Stainless Steel Prefilter 67500002 Water sources having significant sediment will require more frequent cleaning. Clean System cleaning -- Clean Integrity testing* -- Test Backpulse Tank air pressure 67500013 Comments Every 12 Mo. Water sources with high levels of particulate, usage and/or chlorine will require more frequent changes. Replace Adjust air pressure as required** Test Base Controller Check timer and program -Replace batteries: 2 AA settings *MAYTAG Services Qualified Service Technician must conduct an Integrity Test annually in order to validate the limited warranty. **BP tank pressure setpoint is recorded on page 2 of Owner’s Manual 6-1 MAYTAG Whole Home Water Filtration System Maintenance Schedule (cont.) Model MWF 4300 AWS Required service Every 6 Mo. Every 12 Mo. Part No. Comments Stainless Steel Prefilter 67500002 Water sources with high levels of particulate will require more frequent cleaning. System cleaning -- Clean Integrity testing* -- Test System 67500007 Backpulse Tank air pressure 67500013 Adjust air pressure as required** External Pre-filter cartridge 67500004 Highly variable service rate, due to variability in raw water quality. Clean or replace Advanced Controller battery: 1 AA -- Check timer and program settings Check Clean Test *MAYTAG Services Qualified Service Technician must conduct an Integrity Test annually in order to validate the limited warranty. **BP tank pressure setpoint is recorded on page 2 of Owner’s Manual 6-2 6.2 Winterization Procedure All service and maintenance is to be performed by a MAYTAG Services Qualified Service Technician. Some of the necessary tools required are available for purchase from MAYTAG. If the Stainless Steel Prefilter requires cleaning, you may want to collect enough water in a suitable container from a tap for cleaning the Stainless Steel Prefilter prior to beginning this procedure. All water in the house will be shut off for the duration of this procedure. Be sure to wear clean waterproof gloves during this procedure and to read through the procedure first before beginning. Never use any AUTOMOTIVE type antifreezes when winterizing drinking systems. This may result in serious injury or death. The use of cheaper ‘non-propylene glycol based’ plumbing or RV antifreezes may damage the System’s internal components voiding all warranties. Antifreeze used must be plumbing antifreeze, rated for –50 o C (-58 F), consisting primarily of propylene glycol and must not contain any ethanol or alcohols. Propylene glycol (preservative) will provide protection of the System against freezing down to –40 o C (40 F) as long as the proportion of preservative to water is correct. The amount and concentration of the preservative solution has been selected to take into account water that is not easily drained from the System. This procedure only protects the MAYTAG Whole Home Water Filtration System from freezing and does not protect the rest of the household distribution system. Do not use hot water during commissioning or maintenance of the System. It is possible that if a hot water tap is used, high levels of factory preservative, chlorine or MAYTAG MC1 Cleaning Solution will enter the hot water tank and may cause personal injury, illness and/or death. It is recommended to close the hot water tank inlet valve during commissioning or maintenance of the System and to reopen the hot water tank inlet valve at the end of the procedure. When filling the System, fill the System slowly and watch for leaks to avoid excessive water dripping onto floor. During this procedure, DO NOT open the Bypass Valve, as this will allow potentially contaminated water into the household distribution system. Contaminated water may lead to personal injury and/or death. Chlorine bleach must be in the house for less than 3 months. The active percentage reduces with time. This procedure does not disinfect all of the household pipes. It is strongly recommended that all of the pipes are sanitized as water left in pipes may be microbially unsafe. When treating surface water sources, a maximum prefilter mesh size of 30 micron is required. Failure to provide this level of prefiltration may lead to System damage. A damaged System will not perform effectively, endangering the homeowner or occupant through possible serious personal injury and/or death. Do NOT allow the preservative (plumbing antifreeze) to drain onto the ground, into a septic bed, storm sewer or any body of water. Check the plumbing antifeeze manufacturers directions and warnings for more information. Inlet Valve Bypass Valve Inlet Valve 6-3 Step 1 - Close the inlet ball valve. If a bypass valve is installed, the bypass valve must remain closed. Step 2 - Completely drain the System and household piping. To drain the System use the controller and refer to procedure 5.4.7.3 for use of the Base Controller and procedure 5.4.8.3 for use of the Advanced Controller and flush to drain for 5 minutes. To begin draining the household pipes, turn on a nearby cold water tap and leave it on until the tap only drips. Turn off the tap. Disconnect here. Step 3. Remove the drain hose from the drain valve and insert a ¾” MNPT Hex PVC plug (available at most hardware stores) to avoid preservative from leaking. Remove hose clamp on drain hose and remove elbow. Step 4 - Drain the pipes by disconnecting the outlet pipe on the side of the stainless steel flex hose furthest from the System. Drain into bucket for at least 10 minutes. 6-4 Step 5 - Close the outlet ball valve. Plug the disconnected outlet pipe on the System side with a ¾” MNPT Hex PVC plug at the end of the Stainless Steel flexhose. Step 6 - If using an External Prefilter, drain the External Prefilter Housing (refer to section 6.3.2.3), remove the External Prefilter Cartridge and discard the External Prefilter Cartridge. Replace the External Prefilter Housing without an External Prefilter Cartridge and close the valve on the bottom of the External Prefilter Housing. Step 7 – Use pressure gauges to ensure there is no System pressure. Remove System Cap using the Cap Wrench. Step 8 - Remove Stainless Steel Prefilter (Models MWF4200AWS and MWF4300AWS) or Carbon Prefilter (Model MWF4100AWS). If using a Carbon Prefilter, discard the Carbon Prefilter. If using a Stainless Steel Prefilter, clean and set aside the Stainless Steel Prefilter. 6-5 Step 9 - Fill the System with approximately 16 litres (4 US gallons) of –50 o C (-58 F) propylene glycol based plumbing antifreeze to 2” above the bottom of the prefilter cavity. Propylene glycol antifreeze is available at most hardware or department type retail stores. Step 10 - Unplug the outlet pipe on the System side to “open the outlet” by removing the ¾” PVC plug. Remove approximately 4 litres (1 US gallon) from the System into an empty propylene glycol based container. Close the outlet pipe by replugging the outlet pipe with the ¾” PVC plug. Discard the collected fluid in accordance with the manufacturers directions and save the container. Step 11 - Save all empty antifreeze containers for the spring. Step 12 - If using a Stainless Steel Prefilter, replace the Stainless Steel Prefilter. Step 13 - Replace the System Cap using the Cap Wrench. Step 14 - Check drain plug and outlet plug are closed snug. Make sure there are no leaks. System is ready for the winter. 6-6 Note: Preservative will provide protection against freezing down to –40°C as long as the proportion of propylene glycol to water is correct. The amount and concentration of the propylene glycol solution has been selected to take into account water that is not easily drained from the System. This procedure does not protect the rest of the house from freezing, it only provides necessary precautions for the MAYTAG Whole Home Water Filtration System. 6.2.1 Spring Start-up after Winterization Do NOT allow the preservative (plumbing antifreeze) to drain onto the ground, into a septic bed, storm sewer or any body of water. Check the plumbing antifreeze manufacturers directions and warnings for more information. Step 1 - Drain propylene glycol solution from the System by removing the outlet plug. Drain into the saved antifreeze containers. Step 2 - Dispose of the propylene glycol solution in accordance with the manufacturers directions. Step 3 - Remove drain plug from drain valve. Step 4 - Reconnect drain and outlet piping. (Refer to piping diagrams in Section 10.2 if necessary.) Ensure connections are snug and hose clamp on drain hose is snug. Ensure there are no kinks in the drain hose. 6-7 Inlet Valve Inlet Valve Bypass Valve Outlet Valve Outlet Valve Step 5 - Open the inlet ball valve and fill the System. Air will escape through the Air Vent on the System Cap. Step 6 - Open the outlet ball valve. Open the closest cold water high demand tap (ie. bathtub faucet) for 30 minutes. Advanced Controller Base Controller Step 7 - Open all cold taps one at a time for 1 minute. Flush all toilets once. Step 8 - Close the inlet ball valve. Partially drain System using the flush function for 1 minute to depressurize the System, refer to procedure 5.4.7.3 for use of the Base Controller and procedure 5.4.8.3 for use of the Advanced Controller. Step 9 – Use pressure gauges to ensure no pressure is in the System. Remove System Cap using the Cap Wrench. Step 10 - If using a Stainless Steel Prefilter, remove and set aside the Stainless Steel Prefilter in a clean pail or sink. 6-8 Advanced Controller Step 11 - Be sure the water level in the System is approximately ½ way up the prefilter cavity. Add more water using the inlet ball valve if necessary. Add 500 mL of unscented household chlorine bleach (approximately 5.25% chlorine), minimum 3 months old, to the System. Base Controller Step 12 - Allow System to soak for 15 minutes. Drain System using the controller as in step 8 above. Note: If the winterization spring start up is combined with the annual maintenance sanitizing/cleaning procedure, the System must soak for 60 minutes. If the System is on well water, the chlorine must be substituted with MAYTAG MC1 Cleaning Solution instead of chlorine bleach. Never mix chlorine bleach with the MAYTAG MC1 Cleaning Solution. Step 13 - If using a Carbon Prefilter, install a new Carbon Prefilter. If using a Stainless Steel Prefilter, reinsert Stainless Steel Prefilter. 6-9 Step 14. Replace the System Cap using the Cap Wrench. Inlet Valve Inlet Valve Bypass Valve Outlet Valve Step 15 – If using an External Prefilter, drain the External Prefilter Housing (refer to section 5.4.7), insert a new External Prefilter Cartridge into the External Prefilter Housing. Close the External Prefilter valve. Outlet Valve Step 16 – Partially open inlet ball valve slowly and watch for leaks. The air vent will make a hissing noise as air escapes, if no noise is heard, open the small black cap on top of the air vent. Once the System is full of water, open the inlet ball valve fully. Step 17 – Flush to drain for 5 minutes using the controller (refer to step 8 above). Open the outlet ball valve. Open a nearby cold water high demand tap for 30 minutes. Note: The water may taste slightly different for the first few days but will not be harmful if procedures are followed. It is recommended that first thing in the morning for the first two days after this procedure is complete, leave a cold water tap on full for 30 minutes. 6.3 MAYTAG Replacement Procedures 6.3.1 Replacement Parts Replacement parts used with the MAYTAG Whole Home Water Filtration System Part Number 67500001 67500002 67500008 67500007 67500010 N/A Description Carbon Prefilter Stainless Steel Prefilter 8” Neoprene cap O – Ring System Replacement (includes cap, O-ring, 3 poly nipples and backpulse tank) Cap Wrench Owner’s Manual MWF 4100 AWS v MWF 4200 AWS MWF 4300 AWS v v v v v v v v v v v v v v 6-10 67500003 67500004 67500025 67500026 67500005 67500006 67500011 67500012 67500013 67500014 67500015 67500016 67500017 67500018 67500019 67500027 67500020 67500021 67500022 67500009 67500023 67500024 6.3.2 External Prefilter Kit External Prefilter Replacement Cartridge External Prefilter Wrench External Prefilter ORing Base Controller Advanced Controller Cap Lockring Backpulse Tank Base Inlet or Outlet Pipe Assembly v v v v v v v v v v v v v v v v Drain Pipe Assembly Installation Sub Assembly Kit (inlet, outlet, drain, air vent) v v v v Solenoid Valve NC Solenoid Valve NO Check valve Hex Elbow, ¾”Mx5/8” Hose Barb Air Vent Valve, automatic float, duo vent Integrity Tester O-Ring Lube – NSF Certified Pressure Test Gauge Assembly MAYTAG MC1 Cleaning Solution v v v v v v v v v v v v v v v v v v v v v v v v v v (Inlet for MWF4300AWS may also require solenoid N.O.) v v (Inlet for MWF4300AWS may also require solenoid N.O.) v v v Replacement Procedures There are two situations that require the MAYTAG Whole Home Water Filtration System to be replaced: Situation #1 - System Fouling - Under conditions of normal use, the System becomes fouled or plugged with dirt and debris that built up and could not be flushed from the System. System fouling causes the household water flow and pressure to drop. The homeowner will notice this and request its replacement. When the System is fouled, bacteria, viruses and parasites will be rejected just as effectively as when the System is clean. Situation #2 - Failed Integrity Test – The System may become damaged from misuse, foreign debris, or other unusual operating circumstances. If this does occur, the Integrity Tester will diagnose this as a problem and the System will require replacing. 6-11 A damaged System will increase the likelihood that harmful microorganisms will enter the household distribution system and potentially harm the occupants. The required replacement component for this procedure, assuming that no other work is required, are as follows. Box # 1 Contents MAYTAG Whole Home Water Filtration System MAYTAG Part # 67500007 6.3.2.1 Removing Existing System and Installing Replacement System When loosening the unions, excess water in pipes may leak on the floor or come into contact with the individual servicing the System. Water may be contaminated causing personal injury or household damage. Do not open Bypass Valves because contaminated water may enter household distribution system. Contaminated water might cause personal injury and in some cases death. When lying System down on floor, capture excess water using a bucket or rags. Excess water in the System may leak on the floor or come into contact with an individual. Water may be contaminated causing personal injury or household damage. System may be damp and slippery from the preserving process. Be careful not to drop the System when removing from box. Wiping System with a clean, dry cloth will reduce the likelihood of dropping the System. Inlet Valve Inlet Valve Bypass Valve Outlet Valve Outlet Valve Step 1 - Close inlet, outlet and by-pass valves. Step 2 - Disconnect the drain, inlet and outlet pipe assembly unions from the System. Channel locks may be required to perform initial loosening. 6-12 Step 3 - Remove System, insert ¾” plugs from new System onto old System prior to returning to MAYTAG. Step 4 – Label the box appropriately as in the table below. Call the MAYTAG Technical Assistance for shipping and handling details at 1800-756-2926. Label on System Box Use only if: FOULED – MAYTAG TECHNICIAN NUMBER INTEGRITY – MAYTAG TECHNICIAN NUMBER DAMAGED – MAYTAG TECHNICIAN NUMBER Step 5 – Install replacement System as per the instructions in section 5.4. Be sure to; • Disinfect pressure gauges. • Reuse existing Air Vent, piping assembly parts, Carbon Prefilter or Stainless Steel Prefilter, External Prefilter (if applicable) and Base or Advanced Controller. 6.3.2.2 Installing Replacement O-Ring Step 1 - Apply NSF approved o-ring grease to the entire surface of the o-ring (apply grease sparingly) and insert the o-ring in the o-ring groove of the System housing. 6-13 If the System is fouled If the System has failed the Integrity Test. If the System has been damaged during transportation, warehousing or installation steps. 6.3.2.3 Installing External Prefilter Replacement Inlet Valve Inlet Valve Advanced Controller Base Controller Bypass Valve Outlet Valve Outlet Valve Step 1 - Close the inlet and outlet ball valve. Turn off the household water. If a bypass valve is installed, the bypass valve must remain closed. Step 2 – Release the pressure in the System by using the controller to drain for 1 minute. Refer to procedure 5.4.7.3 for use of the Base Controller and procedure 5.4.8.3 for use of the Advanced Controller. Step 3 – Drain the prefilter by removing the valve plug. Step 4 – Secure a ¼” hose to the quick connect fitting and direct the hose into a bucket. Drain Valve Step 5 – Open the drain valve to drain the prefilter completely into the bucket. Step 6 – For more rapid draining, press on the red button located on the top of the external prefilter housing. 6-14 Drain Valve Step 7 – After the prefilter housing is completely drained, close the External Prefilter drain valve, remove the hose, and replace the housing plug. Step 8 – Separate the prefilter housing from the prefilter head using the optional prefilter wrench. Step 9 – Pull the external prefilter cartridge straight up and out of the external prefilter housing and drip dry to remove any excess water. Dispose of any excess water and place the used external prefilter cartridge in a garbage bag for disposal. Step 10 – Inspect the o-ring and external prefilter housing for damage or wear. 6-15 Step 11 – Wipe any debris from the o-ring surface and inner and outer prefilter housing using a clean soft cloth. Step 12 – Insert the new External prefilter into the external prefilter housing. Ensure that the spigot of the housing lines up with the Prefilter. Be careful not to damage the External Prefilter. Step 13 – Reconnect the prefilter housing to the prefilter head by turning counter-clockwise. Use an External Prefilter Wrench to tighten. Open the inlet and outlet ball valves and turn on the household water. 6.3.2.4 Installing Internal Prefilter Replacement (Carbon or Stainless Steel) Simply drain the System, use the pressure gauges to ensure there is no pressure in the System, remove the cap, remove the existing prefilter and replace with new prefilter. Replace cap and repressurize System. 6.4 Maintenance Cleaning and Sanitizing Procedures To reduce the risk of severe injury, illness, death and/or property damage, read and follow all instructions and use only MAYTAG authorized parts and labour to repair and service the MAYTAG Whole Home Water Filtration System. During this procedure, DO NOT open the Bypass Valves, as this will allow potentially contaminated water into the household distribution system. Contaminated water may lead to person injury and in 6-16 serious cases even death. Chlorine bleach must be less than 3 months old. The active percentage reduces with time. To avoid sending sanitizing solution into household hot water distribution system, do not turn on hot water until sanitizing procedure is complete. Sanitizing solution in the water supply may irritate the skin or cause illness if ingested. MAYTAG has developed a strategy to ensure sanitary installation and maintenance procedures and to e xtend the life of the MAYTAG Whole Home Water Filtration System through periodic maintenance cleaning activities. Two different cleaning solutions have been selected and thoroughly tested to provide these important System features. One is the MAYTAG MC1 Cleaning Solution and the other is any standard, unscented household chlorine bleach. MAYTAG Solution MAYTAG MC1 Cleaning Solution 6.4.1 Applications Municipal and Well water maintenance cleaning MAYTAG Part # 67500024 Integrity Test An annual integrity test is required in order to validate the System limited warranty. See section 5.5.4 for the Integrity Test Procedure. After the integrity test is complete: Step 1 – Check the backpulse tank pressure using a digital gauge. See section 5.4.4 for Backpulse tank pressure guide. Step 2 – If backpulse tank pressure is not at the required pressure, use a hand pump or compressor to pressurize the tank to the required pressure. See Section 5.4.4. 6-17 Step 3 – Unplug the Integrity Tester from the power source. Step 4 – Remove the test needle from the System. Inlet Valve Test Port Cap Inlet Valve Bypass Valve Outlet Valve Step 5 – Replace the test port cap. Advanced Controller Outlet Valve Step 6 – De-pressurize the System by ensuring the inlet and outlet valves are closed. Inlet Valve Base Controller Inlet Valve Bypass Valve Outlet Valve Step 7 – Using the controller, drain the System to let the air pressure out. See section 5.4.7.3 for Base Controller and section 5.4.8.3 for the Advanced Controller. 6.4.2 Outlet Valve Step 8 – Fill the System again with water by opening the inlet and outlet valves. Sanitizing Procedure (for MWF4100AWS and MWF4300AWS) NOTE: If System drain hose has been installed above drain outlet, the manual drain valve, located on the System’s clean water pipe assembly, may be required to provide adequate System draining prior to removing the System Cap. 6-18 Inlet Valve Inlet Valve Advanced Controller Base Controller Bypass Valve Outlet Valve Outlet Valve Step 1 – Isolate the MAYTAG Whole Home Water Filtration System by closing the inlet and outlet valves. The entire house without water during this time. Step 2 – Drain the System using the controller. See section 5.4.7.3 for the base controller and section 5.4.8.3 for the advanced controller Step 3 – Wearing protective gloves, remove the System Cap, using the Cap Wrench. Turn the wrench in a counter-clockwise direction to loosen it. (Use pressure gauges to ensure no System pressure first.) Step 4 – Wipe out the inside of the cap with a clean, soft cloth and place on a clean surface. Step 5 - Inspect the o-ring on the System for damage or wear and wipe debris from the o-ring using a clean, soft cloth. Step 6 – If a replacement o-ring is necessary see section 6.3.2.2 for o-ring replacement. If a replacement o-ring is not necessary, re-grease the o-ring if required. 6-19 View looking into top of the System. Spigot Step 7 – Pull the internal prefilter straight up and out of the System and drip dry to remove excess water. If not reusing, place into garbage bag and dispose. If reusing or cleaning, place on a clean surface. Step 8 – Inspect the prefilter spigot, located inside the internal prefilter housing, and remove any debris if necessary. Step 9 – Partially fill the System (with the System Cap off) by opening the inlet valve partially to allow water to fill the System. Continue to fill until the prefilter housing is between ¼ and ½ full. This will remove any remaining air pressure in the System. Step 10 – Pour 250mL of 12% unscented chlorine bleach or 500mL of 5% or 6% unscented chlorine bleach into the prefilter housing as illustrated. Be careful not to allow its contents to come in contact with any skin or clothing. NOTE: Filling too quickly, may lead to trapped air that may cause bubbling and splashing. If this does occur, close the Inlet valve slightly to slow the flowrate into the System. After filling to the appropriate level, close the Inlet valve. NOTE: Chlorine bleach must be a new bottle (within 3 months). The effective concentration is reduced in an open bottle over time. 6-20 Step 11 – Ensure the System Cap is tightened properly. Step 12 – Open in the inlet valve half way to allow water to enter and pressurize the System. Inlet Valve Inlet Valve Bypass Valve Outlet Valve Step 13 – As the System begins to fill with water, air will be heard escaping from the air vent. When the System is full, no more air will be heard escaping. Inspect for leaks. Advanced Controller Step 15 – Once no leaks are present after filling and pressurizing, allow the System to soak for 60 minutes. This will allow the sanitizing solution time to distribute itself throughout the entire System. Outlet Valve Step 14 – When no further air exits the System, open the inlet valve completely. Note – If a leak is observed, the cap was not properly installed or the o-ring is damaged or dirty. Return to step 1 if any leaks are detected. Base Controller Step 16 – Flush the System using the controller. See section 5.4.7.3 for the Base Controller and section 5.4.8.3 for the Advanced Controller. 6-21 After the System has soaked, it must be flushed as the sanitizing solution in the water supply may irritate the skin or cause illness if ingested. Step 17 – If you are installing a new Carbon Prefilter, see section 6.3.2.4. Inlet Valve Step 18 – Pressurize the System slowly to allow air to escape through the System air vent. Inlet Valve Bypass Valve Outlet Valve Outlet Valve Step 19 – Open the outlet valve. Step 20 – Dispose of protective gloves and wash hands thoroughly in warm water and soap to remove any possible contamination from hands. 6-22 Step 21 – To eliminate the residual sanitizing solution from the household piping, turn all household cold water taps on full for 5 minutes. Ask homeowner to leave taps on for 30 minutes. 6.4.3 Step 22 – Clean the stainless steel on the unit. See section 5.5.7 for cleaning procedures. Cleaning Solution Procedures (for MWF4200AWS) Inlet Valve Inlet Valve Advanced Controller Base Controller Bypass Valve Outlet Valve Outlet Valve Step 1 - Close the Inlet and Outlet valves. The house will be without water during this time. Step 2 - Drain System by pressing flush on the entire controller. Refer to section 5.4.7.3 for base controller and section 5.4.8.3 for advanced controller. During this procedure, DO NOT open the Bypass Valves, as this will allow potentially contaminated water into the household distribution system. Contaminated water may lead to person injury and in serious cases even death. NOTE: If System drain hose has been installed above drain outlet, the manual drain valve, located on the System’s clean water pipe assembly, may be required to provide adequate System draining prior to removing the System Cap. 6-23 Step 3 - Remove cap. (Use pressure gauge first to ensure no System pressure first.) Step 4 - Inspect o-ring for damage or wear and wipe clean. Re-grease with NSF approved o-ring grease if required. Step 5 - Remove prefilter (carbon or stainless steel). Discard carbon prefilter and clean stainless steel prefilter. Step 6 - Partially fill System with Cap off by opening inlet valve. Fill slowly until the prefilter housing is between ¼ and ½ full. NOTE: Filling too quickly may lead to trapped air that may cause bubbling and splashing. If this does occur, close the Inlet Valve slightly to slow the flowrate into the System. After filling to the appropriate level, close the Inlet Valve. 6-24 Step 7 - Pour the MAYTAG MC1 Cleaning Solution into a container with 250 mL (1 cup) of water and mix thoroughly. Pour the solution into the prefilter housing. Be careful to prevent contact with skin or clothing. Wash the container used for mixing the solution well before reuse. Step 8 - Insert Carbon or Stainless Steel Prefilter slowly to avoid overflow. Inlet Valve Inlet Valve Bypass Valve Outlet Valve Step 9 - Replace cap. Step 10 - Open Inlet valve ½ way and fill System. Watch for leaks. Advanced Controller Step 11 - Soak System for 60 minutes. Outlet Valve Base Controller Step 12 - Perform two 5 minutes manual flush sequences. For base controller refer to section 5.4.7.3 and for advanced controller refer to section 5.4.8.3. Cleaning solution may irritate the skin or cause illness if ingested. Flushing step is important. 6-25 Inlet Valve Inlet Valve Bypass Valve Outlet Valve Outlet Valve Step 13 - Open outlet valve. Step 14 - Dispose of gloves and wash hands. Step 15 - Turn all cold water taps on for 5 minutes. Ask homeowner to leave a tap on for 30 minutes. Step 16 – Clean the stainless steel on the System. See section 5.5.7 for cleaning procedures. 6.5 Maintenance Service Tag A MAYTAG Service Tag must be completed during every Maintenance visit. This will ensure that the MAYTAG Whole Home Water Filtration System is operating properly and effectively to remove bacteria, viruses and parasites in addition to any other contaminants for which the System was initially specified and setup. The Checklist will also provide necessary information related to the warranty. See section 5.5.6.1 for an example of a Service Tag. 6-26 7 Frequently Asked Questions 7.1 What does the MAYTAG Whole Home Water Filtration System do? The System has been specifically designed to physically block and remove bacteria, viruses and parasites including cryptosporidium and giardia (beaver fever) and eliminates cloudiness from your drinking water. The carbon prefilter removes chlorine to improve taste and odours on municipal water. The System effectively filters all municipal, well and lake water. 7.2 Where is the MAYTAG Whole Home Water Filtration System installed? The System is installed at the point where water enters the house to provide filtered water from every tap. Water is available on demand with no wasted water during filtration. 7.3 Does the MAYTAG Whole Home Water Filtration System require electricity? Filtration is accomplished with existing water pressure and no electricity is required to filter your water. Unless required for pump operation, the System will continue to filter water during a power failure. Electrical power is required to operate the solenoid valves that initiate flushing of the System. If electrical power is not available, the System will not conduct automatic flushing. Controller settings are saved by battery backup power. 7.4 Does the MAYTAG Whole Home Water Filtration System affect the water pressure? There is minimal effect on your existing water pressure. Under most circumstances, no change in water pressure will be noticed after the installation of a new System. There is no need for an additional water pump if the existing water pressure meets the minimum System requirements. Under normal operation in cloudy water the System may foul more quickly than in cleaner water, may require more frequent cleanings and may require alternate controller settings. 7-1 7.5 What can be done to increase my water pressure? Table 7.1 outlines four reasons why water pressure may be lower than normal. Table 7.1 – Possible causes of low water pressure Problem Solution The External Prefilter Cartridge (if installed) is fouled. Change the prefilter cartridge. The Internal Prefilter (Carbon or Stainless Steel) is fouled. Clean or change the prefilter. The city / pump pressure is low or the line is scaled. Call the city or check the pump. The MAYTAG Whole Home Water Filtration System is fouled. Initiate Manual Flush Function. If this does not resolve the lowpressure situation, arrange for possible System replacement. 7.6 How often does the MAYTAG Whole Home Water Filtration System need to be replaced? The System is designed to last the life of the membrane, with regular maintenance. 7.7 How long does the MAYTAG Whole Home Water Filtration System last? The System will generally last over 10 years if used on municipal water and will last from 5 to 10 years on surface/lake waters depending on the level of contamination in the incoming water. 7.8 What do I need to do if I go away for an extended period of time? If you wish to shut off the water supply to your house while you are away, you may simply close the outlet ball valve on the MAYTAG Whole Home Water Filtration System. The MAYTAG Whole Home Water Filtration System will continue to flush daily but water will be unavailable in the house. If you plan to turn off the inlet ball valve (not recommended), you must unplug the controller. When you return open the outlet ball valve (and unsure inlet ball valve is open and controller is plugged in) and household pressure will be restored. It is recommended that you also turn each tap on for 10 minutes to flush out stagnant water before use. 7.9 How do I bypass the MAYTAG Whole Home Water Filtration System? Bypassing the MAYTAG Whole Home Water Filtration System is not recommended unless there is an Emergency and your MAYTAG Whole Home Water Filtration System is not working properly. Contaminated water may enter your home, which can cause serious health problems, even death. See section 2.6 for Bypass Instructions and warning. 7-2 7.10 What happens if the power goes out? Nothing. The timer has a built in battery backup designed for power failure. The MAYTAG Whole Home Water Filtration System does not require power to filter water and the System will filter water provided adequate water pressure is available at the source. If the power goes out during a scheduled cleaning, the System will return to filtering water and wait for the next scheduled time for cleaning. 7.11 How long does the automatic cleaning cycle take? The System backflushes itself daily to clean the System filter. It automatically flushes impurities down the drain at the homeowner’s pre-selected time. The cleaning cycle takes approximately 5-10 minutes and uses a minimal amount of water. 7.12 How much water is used for flushing? Refer to section 4.8 for the Product Specifications. 7.13 How do I set a new time for the daily backwash and cleaning? Refer to the Controller on the wall to reprogram using the instruction sheet or refer to section 5.4.7.3 for the Base Controller or 5.4.8.3 for the Advanced Controller. 7.14 Is there a replaceable prefilter needed? If used, the carbon prefilter needs to be replaced every 12 months. 7.15 What are the maintenance requirements? An annual maintenance inspection, integrity test and Carbon Prefilter change is performed annually by a MAYTAG Services Qualified Service Technician. If an External Prefilter is used, this will also need to be checked approximately every 6 months 7.16 How long does the Carbon Prefilter last? The Activated Carbon Prefilters are designed to filter over 100,000 US gallons. The average homeowner will find it necessary to change the activated carbon filter every 9-12 months. The quality of water, amount of chlorine, other contaminants in the water (chlorine), and the amount of water used determines the actual life of an Activated Carbon Prefilter. Activated Carbon Prefilters have been designed for maximum life to eliminate the inconvenience of changing them. 7.17 Can I water my lawn with the MAYTAG Whole Home Water Filtration System’s filtered water? You can use filtered water outside if you wish. You may choose to have a bypass installed if you use large amounts of water through your outside tap that does not need to be filtered. Call MAYTAG Technical Assistance for more details. 7.18 Can it be shut down in winter? If the cottage or home is not winterized, there is a draining and shutdown procedure where the System is filled with propylene glycol for the winter. Refer to section 6.2. In the spring, the propylene glycol would be drained from the System and then sanitized for use during cottage or home opening. 7.19 What happens if there is a boil water alert in my area? If you receive notice that there is a boil water alert in your area, there are extra precautions that you must take with your water supply. A boil water alert is a serious announcement made in the interest of protecting your health from water that may be contaminated. 7-3 We would recommend you take extra precautions. Follow these steps during a boil water alert: • • • • Use household chlorine bleach to disinfect the aerators on each faucet in your home each day. Wash your hands frequently. Test your water for bacteria at the beginning of a boil water alert, and once a month thereafter to ensure your water supply has not become contaminated. Call your local government officials for local directions on water quality, testing, frequency of testing, and guidelines. If the bacteria test indicates that bacteria exists in your home, call MAYTAG Customer Care for assistance. If your water tests come back with results that show no bacteria in your water, continue to use your water supply. Continue checking the water for bacteria at least once a month. 7.20 If my System came with a Stainless Steel Prefilter, can I buy a Carbon Prefilter? Depending on the System application, an optional Carbon Prefilter may be purchased to replace the Stainless Steel Prefilter. Call MAYTAG Technical Assistance for support. 7.21 My water is from the lake and it has a funny smell, can something be done? Smells like fish or algae that come from lake water are not harmful. Using a Carbon Prefilter instead of the Stainless Steel Prefilter may minimize these smells. However, if a Carbon Prefilter is used it will need to be replaced more frequently than once year. 7.22 My lake water is quite dirty and the External Prefilter Cartridge requires replacement quite often. Can I increase the time between replacements of the External Prefilter Cartridge? Yes. In some cases, two External Prefilters have been installed. With two External Prefilters, the time to replace the External Prefilter Cartridge is extended by more than twice the original time. 7-4 8 Troubleshooting The following section will help diagnose some of the problems that might occur with the MAYTAG Whole Home Water Filtration System. “Area” General Problem/Situation A part is missing. System leaks water. Checking Backpulse Tank Pressure Pressure is too high. Release some of the pressure until the desire pressure is reached. The pressure is too low. Add more pressure using a compressor or hand pump. All tanks are shipped with approximately 35 psi. Repressurize tank and monitor for leak. Replace if leaking. There is no pressure in the backpulse tank prior to adding pressure. Connecting Piping Assemblies Threads are cross-threaded. A leak results. Air Vent Correction/Action Most standard hardware parts are available at the local hard ware store or call MAYTAG for a MAYTAG Whole Home Water Filtration System replacement part. Cap is not properly tightened. O-ring is not clean or intact. O-ring is not in place. Connections are not tight. Connections were too tight and part broke. Water is not adequately drained from System prior to removing cap. Teflon tape not used on thread. Water spouts from top. No water is flowing through System. Replace the parts if possible. Add more Teflon tape and slowly thread the two parts together to attempt to fix the problem. Be extremely careful with future assemblies. Tighten connection. Loosen connection that is too tight. No Teflon tape, reinstall part using Teflon tape. Air relief port is not capped. Air vent is faulty. Black air relief port cap must be loosened to 1 ½ turns (open). Removal of Cap Can not remove cap. System may be pressurized. Turn off inlet valve and drain System using controller. External Prefilter Does not drain fast enough. Press and hold the red button on the top of the housing to allow air to enter the housing and drain more quickly. Close the valve. Water is leaking from the bottom. 8-1 “Area” Base Controller Problem/Situation Drain does not function. Correction/Action Push “Next” once. The MANUAL indicator will flash. Press and hold the “manual flush” button for 10 seconds. The “Manual” indicator will appear on the screen. This will open the drain valve for 5 minutes. To toggle the valve closed at any time press the “manual flush” button once. If the valve still does not open, it is possible the valve will need to be replaced. Advanced Controller Drain does not function. Ensure Controller is set to be “on” (see sections 5.4.8.3). Press and hold the “flush” button for 10 seconds until the FLUSH LED illuminates then let go. This will open the drain valve for 5 minutes. To toggle the valve closed at any time press the “manual flush” button once. If the valve still does not open, it is possible the valve will need to be replaced. Integrity Tester Refer to section 5.5.4 8-2 9 Shipping and Storage The following sections outline the shipping dimensions, weights and storage precautions that must be taken to ensure that damage does not occur to the MAYTAG Whole Home Water Filtration System or Components. 9.1 Dimensions and Weights (Shipping Details) – Metric and Imperial Units System Stand Backpulse Tank Sub Assembly Kit Advanced Controller Kit Carbon Prefilter Stainless Steel Prefilter External Prefilter Housing External Prefilter (bagged) Dimensions and Weights - Shipping Details Weight (kg) 27.2 1.5 6.8 3.0 3.0 3.4 0.98 4.6 0.8 Height (mm) 360 142 570 170 170 377 377 25 508 Width (mm) 315 360 300 240 240 195 195 7.5 114 Depth (mm) 1100 360 300 185 185 195 195 7.5 N/A System Stand Backpulse Tank Sub Assembly Kit Advanced Controller Kit Carbon Prefilter Stainless Steel Prefilter External Prefilter Housing External Prefilter (bagged) Parameter Weight (lb) 60 3.3 15 6.6 6.6 7.5 2.1 10.1 1.8 Height (in) 14.2 5.6 22.4 6.7 6.7 14.8 14.8 1 20 Width (in) 12.4 14.2 11.8 9.4 9.4 7.7 7.7 0.3 4.5 Depth (in) 43.3 14.2 11.8 7.3 7.3 7.7 7.7 0.3 N/A Parameter 9-1 9.2 MAYTAG System Parameter Notes New System Packaging – from MAYTAG to Customer’s house Corrugated MAYTAG Box (stapled), foam shipping supports, System fitted with ¾” stoppers. Used System Packaging – from Customer’s house to MAYTAG Corrugated MAYTAG Box (properly labelled and taped with packaging tape), Corrugated shipping supports, System fitted with ¾” stoppers Stacking Limits No more than 6 units high Environmental Constraints Cannot be exposed to temperatures below 0°C (32°F) – freezing and damage will occur without winterization. Storage Shelf Life/New Do not store for more than 3 months. Storage Shelf Life/Used Call MAYTAG for instructions. 9.3 MAYTAG Backpulse Tank Parameter Notes New Backpulse Tank Packaging – fro m MAYTAG to Customer’s house Corrugated MAYTAG box (stapled), Assembled to System, protected by foam shipping supports. Return Backpulse Tank Packaging – from Customer’s house to MAYTAG N/A Stacking Limits No more than 3 units Environmental Constraints N/A Storage Shelf Life N/A 9-2 9.4 MAYTAG System Base Parameter Notes New Stand Packaging – from MAYTAG to Customer’s house Corrugated MAYTAG Box (stapled), protected by foam inserts, hardware contained in bubble parts bag. Return Stand Packaging – from Customer’s house to MAYTAG N/A Stacking Limits No more than 10 units high Environmental Constraints N/A Storage Shelf Life N/A 9.5 MAYTAG Pipe Assembly Kit Parameter Notes Kit Packaging – from MAYTAG to Customer’s house Corrugated MAYTAG Box (Stapled), inserted in bubble parts bag, protected by foam shipping supports. Used System Packaging – from Customer’s house to MAYTAG N/A Stacking Limits N/A Environmental Constraints N/A Storage Shelf Life N/A 9-3 9.6 Carbon Prefilter Parameter Notes New Filter Packaging – from MAYTAG to Customer’s house Cardboard MAYTAG Box (stapled), Filter contained in Plastic Bag, Protective Latex gloves packed in separate bag within filter bag inserted in System. Used Filter Packaging – from Customer’s house to MAYTAG N/A Stacking Limits No more than 4 cases (6 per case) high. Environmental Constraints N/A Storage Shelf Life Do not store for more than 12 months. 9.7 Stainless Steel Prefilter Parameter Notes New Filter Packaging – from MAYTAG to Customer’s house Cardboard MAYTAG Box (stapled), Filter contained in Plastic Bag, Protective Latex gloves packed in separate bag within filter bag inserted in System. Used Filter Packaging – from Customer’s house to MAYTAG N/A Stacking Limits No more than 4 cases (6 per case) high. Environmental Constraints N/A Storage Shelf Life N/A 9-4 9.8 External Prefilter Installation Kit Parameter Notes New Kit Packaging – from MAYTAG to Customer’s house Corrugated MAYTAG Box (stapled), protected by foam inserts Return Kit Packaging – from Customer’s house to MAYTAG N/A Stacking Limits No more than 2 units high. Environmental Constraints N/A Storage Shelf Life N/A 9.9 External Prefilter Parameter Notes New Filter Packaging – from MAYTAG to Customer’s house Corrugated MAYTAG Box (stapled), protected by foam inserts. Filter contained in Plastic Bag with replacement instructions, Protective Latex gloves packed in separate bag within filter bag. Used Filter Packaging – from Customer’s house to MAYTAG N/A Stacking Limits No more than 2 cases (8 per case) high. Environmental Constraints N/A Storage Shelf Life N/A 9-5 10 Service Kit Information and System Drawings 10.1 Parts Assembly Drawing The figure below shows the parts explosion for the MAYTAG Whole Home Water Filtration System. Parts numbers are included for reference. Table below details information about each component’s Name, Assembly Kit Number, and whether it is a critical spare or not. . Figure 10.1 Systems Parts Schematic 10-1 Table 10.1 - System Part Descriptions Name Kit Assembly Critical Spare? Air Vent Yes Cap No SO-ring Yes System Yes Lockring No Backpulse Tank No Air Valve Cover No Air Valve O-ring No Base Yes 5/16” thread X 3/8” body anchor (stud and sleave) with washer and Nut No 3/8” Lockwasher (7/16” ID, Steel, Zinc Plate) No 3/8” Hexhead bolt (UNC X 1.5”, steel, zinc plate) No 10-2 10.2 System Pipe Assembly Drawings The figure below shows the parts explosion for the MAYTAG Inlet, Drain and Outlet Assemblies (respectively from top to bottom). Parts numbers are included for re ference. Table 10.2 details information about each component’s Name, Assembly Kit Number and, whether it is a critical spare or not. ¾” Poly Nipple to System Housing Test Port Test Cap Stainless Steel Flexhose ¾” x ¼” bushing ¾” FNPT Brass “Tee” ¾” MNPT Adaptor To ¾” MNPT adaptor and ¾” FNPT ball valve (NOT PROVIDED) Figure 10.2. Inlet and Outlet Piping Assemblies with Base Controller, MWF 4100 AWS and MWF 4200 AWS. Note: Inlet pipe assembly with Advanced Controller, MWF 4300 AWS also has N.O. solenoid, see MWF 4300 AWS Figure 5.5 in section 5.4.5 ¾” Poly Nipple to System Housing Solenoid Plug and Cable Nylon Elbow N.C. Solenoid Valve NOT TO SCALE To ½” id ABS hose with hose clamp (NOT PROVIDED) Figure 10.3. Drain Pipe Assembly for Base Controller (MWF 4100 AWS, and MWF 4200 AWS) and Advanced Controller (MWF 4300 AWS). 10-3 To System Housing ¾” Poly Nipple Test Port Test Cap ¾” MNPT Nipple ¾” MNPT Nipple Stainless Steel Flexhose ¾” FNPT Brass “Tee” ¾” x ¼” bushing Brass Checkvalve NOT TO SCALE To ¾” MNPT adaptor and ¾” FNPT ball valve (NOT PROVIDED) Figure 10.4 Outlet Pipe Assembly for Advanced Controller (MWF 4300 AWS) Table 10.2 - System Pipe Assembly Parts Name Kit Assembly Critical Spare? ¾” normally closed brass solenoid Drain Pipe assembly Yes ¾” normally open brass solenoid Advanced Controller Kit Yes ¾” Brass MNPT nipple Advanced Controller Kit No ¾” X ¼” Brass bushing Inlet and Outlet Pipe assemblies No ¾” brass Tee Inlet and Outlet Pipe assemblies No ¾” MNPT X 5/8” barb nylon hex elbow Drain Pipe assembly No ¾” glass reinforced polypropylene hex nipple Inlet, Outlet and Drain Pipe assemblies Yes 10.3 System Base Controller Drawing The figure below shows the parts explosion for the MAYTAG Base Controller Kit (MWF 4100 AWS and MWF 4200 AWS). Table 10.3 details information about each component’s Name, Assembly Kit Number, and whether it is a critical spare or not. 10-4 Figure 10.5 Base Controller Schematic Diagram Table 10.3 - Base Controller Parts List Part Number 67500005 N/A Name Kit Assembly Base Model Controller Base Model Controller Kit AA batteries Base Model Controller Kit 10-5 Critical Spare? Yes 10.4 System Advanced Controller Drawing The figure below shows the parts explosion for the Advanced Controller (MWF 4300 AWS). Table 10.4 details information about each component’s Name, Assembly Kit Number, whether it is a critical spare or not. Figure 10.6 Advanced Controller Schematic Diagram Table 10.4 - Advanced Controller Parts Part Number 67500006 Name Kit Assembly Advanced Controller Advanced Controller Kit 10-6 Critical Spare? Yes 11 Internet Resources and Manufacturer Details 11.1 Internet Resources 11.1.1 System Information and Updates Further System information and updates can be found at www.MAYTAG.ca. 11.1.2 Procedural Information and Updates Further procedural information and updates can be found at www.MAYTAG.ca. 11-1