1
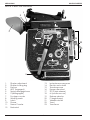
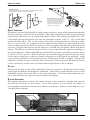
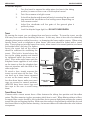
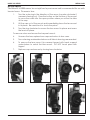
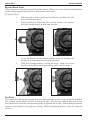
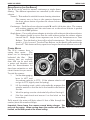
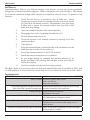
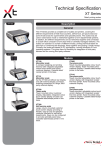
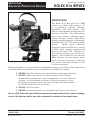
MEDIA LOAN Advanced Production Operating Guide for Services BOLEX H16 REFLEX APS Operating Guides are available online at www.evergreen.edu/medialoan/ INTRODUCTION Bolex H-16 SBM set up for stop-moton filming. The Bolex H-16 Rex and H-16 SBM cameras are 16mm reflex cameras. It is an extremely versatile, portable, dependable, well built camera. The optical system permits through-the-lens viewing at all times. The self-threading allows easy loading of daylight spools. Camera features include single-frame filming, extended exposure, slow motion, backwind and a 133˚-145˚ angle variable shutter. Media Loan’s Advanced Production Services (APS) has a variety of Bolex H-16 cameras manufactured between 1960 and 1976. Although all have similar features, the controls vary slightly. Also available for use with the Bolex cameras are zoom lenses, prime lenses, 400 foot magazines, a motor for sync sound, and intervalometer as well as other accessories. Although the Bolex is a very well built and dependable camera, care must be taken when using a Bolex checked out from APS as they are expensive and difficult to replace. 11 DO NOT subject the camera to severe impacts or prolonged vibrations. 11 DO NOT subject the camera to extreme heat or cold. Drastic temperature changes can cause condensation to occur inside the camera. Let the camera acclimate to the environment you are shooting in by letting it rest in the case with the case tabs opened but the lid closed for at least an hour. 11 DO NOT touch the prism. 11 DO NOT use excessive force or over tighten anything on the camera. You are 100% financially responsible for repair and/or replacement in the event of damage or loss of the Bolex as well as any other equipment checked out from Media Loan. Advanced Production Services Media Loan 360.867.5506 Please Recycle! The Evergreen State College Olympia, WA 98505 bolexh16 | 04.19.11 | AEG MEDIA LOAN BOLEX H16 REFLEX Bolex H-16 Reflex with Turret Mount 2 1 10 4 3 11 5 21 12 6 22 13 7 14 8 17 18 19 16 15 20 9 1. 2. 3. 4. 5. 6. 7. 8. 9. 10. 11. 12. Diopter adjustment Diopter locking ring Eyecup MOT (engaged) Spring disengage lever 0 (disengaged) Footage counter Winding crank Latch Douser Frame Counter Backwind 13. 14. 15. 16. 17. 18. 19. 20. 21. 22. 23. 2 Instantaneous exposure Electric motor shaft Timed exposure Frame rate select STOP (side release) M (continuous run) Release selector P (single-frame) Variable shutter Turret Turret lever 23 BOLEX H16 REFLEX MEDIA LOAN Beam Splitter and Pellicule The beam splitter consists of two prisms cemented together. The surface where they touch is coated with a partially reflecting mirror. A pellicule is a very thin partially reflectng mirror. Film Film Ground glass screen Beam Splitter Between the Lens and Film This system is used by Bolex Rex 16mm cameras. Most light passes through the beam splitter to expose the film, but some is deflected for the reflex system. The image of the subject is projected on the ground glass screen, and viewfinder optics relay it to the eye. Pellicule Beam splitter Beam Splitter Reflex Viewfinder The optical system of the Bolex H-16 reflex cameras utilizes a beam splitter permitting through the lens viewing at all times free from flicker. The reflex viewfinder enables accurate focusing and framing, and allows you to estimate the depth of field. The reflex prism deflects 20 - 25% of the light passing through the lens into the viewfinder system. Only 75 – 80% of the light reaches the film plane. The actual quality of the light reaching the film is reduced by about 1/2 to 1/3 of an f-stop. To compensate for the light reduction, Bolex has determined that the effective shutter speed for the H-16 camera is 1/80 of a second rather than the standard 1/65 of a second. Another compensation for the light loss is the RX lens designed by Bolex with Kern/ Switar. The RX lens is calibrated to pass 1/2 to 1/3 more light than the aperture markings on the barrel indicates. When using RX lenses with the H-16 camera, the effective shutter speed is back to 1/65 of a second. APS will provide you with RX lenses (designated after the name on the barrel of the lens), unless you request otherwise or no RX lenses are available. make sure you know whether or not the lenses you are checking out are RX or non-RX. (Ask an APS employee to show you how to check the lens if necessary.) When using non-RX lenses of 50 mm or less, satisfactory results can be obtained when stopped down to f/8 or smaller. Douser The douser (located on the reflex viewfinder) closes the eyepiece to keep light from reaching and fogging the film plane through the viewfinder. The douser is open when the lever is in the horizontal position and closed when in the vertical position. Close the douser whenever your eye is removed from the eyepiece to prevent film from fogging. Diopter Adjustment The diopter adjustment corrects the optical system to the operator’s eyesight and remains the same for all lenses on the camera. If you wear glasses, you can adjust the diopter to your eyesight and achieve accurate focus without your glasses. Always set the diopter to your eyesight (before filming). Diopter Locking Screw Douser in OPEN position Diopter Adjustment Bolex H-16 SBM viewfinder. 3 MEDIA LOAN BOLEX H16 REFLEX To set the diopter: 1. Turn the turret to expose the reflex prism (no lens in the taking position) or remove the cover of the bayonet mount. 2. Point the camera at a light source. 3. Unlock the diopter adjustment either by loosening the grooved ring around the viewfinder or the locking screw depending on the camera model. 4. Adjust the viewfinder until the grain of the ground glass is perfectly sharp. 5. Lock the diopter finger tight, but DO NOT OVER-TIGHTEN. Turret By turning the turret, you can change from one lens to another. To turn the turret, use the fold away lever rather than handling the lenses. In this way, there is less risk of accidentally changing the aperture and/or focus ring – or damaging the lenses and/or camera. When using heavier lenses, such as telephoto or zoom lenses, the turret should be locked with a turret plug. Turret plugs go into the lowest lens cavity, when turret is in normal position, and most are marked with a red ring. For lighter lenses, the turret lock on the camera Turret should be sufficient for stabilizing the lock turret. This lock is located above the lens in the taking position and should Lens be tightened before the lenses are in taking position place. Place wide-angle lenses and the Turret lever telephoto lenses opposite of each other on the turret so that the telephoto lens does not interfere with the field of the Variable shutter wide-angle lens. To attach a lens, simply unscrew the turret cap and screw on the lens. You can have up to three lenses mounted at once on the turret mount. If using less than three lenses, make sure turret caps are secured in unused positions. ALWAYS keep loose turret caps and lens caps in the case to avoid losing them. Turret plug Filter holder Front release button Bolex H-16 Rex turret. Turret Mount Filters Cameras with a turret mount have a filter between the taking lens position and the reflex prism. The filter remains in place no matter which lens is used. When filming without a filter, an empty filter carrier should be left in the filter slot to prevent light from entering the camera trough the slot and fogging the film. Make sure the carrier is located firmly within the slot and the correct filter is in place before shooting. An incorrect filter will either alter the color balance or exposure. 4 BOLEX H16 REFLEX MEDIA LOAN Bayonet Mount The Bolex H-16 SBM camera has a single lens bayonet mount and is recommended for use with heavier lenses. To mount a lens: 1. Turn the outer ring in the direction of the arrow (counter-clockwise if camera is facing you). Press the button on the bottom of the mount to move the screw into the open position where you will se the tabs of the cap. 2. Lift the cap out of the mount and immediately place the lens mount in its place. Be careful not to touch the prism! 3. Turn the ring clockwise to secure the lens mount in place and screw the lens into place. To remove a lens and secure the bayonet mount: 4. Unscrew the lens; replace lens caps and return to lens case. 5. Turn outer ring as described above until tabs in lens ring are revealed. 6. To remove the lens mount, tip camera forward with hand cupped under below to catch the lens mount. DO NOT touch prism with fingers! 7. Replace cap and secure by turning lens clockwise. 5 MEDIA LOAN BOLEX H16 REFLEX Bayonet Mount Filters Filter insertion is from the control side of the camera. When not in use, the filter should be left in the storage position with the lever folded down and locked. To insert a filter: 1. Slide the button down and insert the filter into the filter slot with the notched side down. 2. The first position is where the filter can be stored until needed. Fold the handle down and secure in notch. To use the filter, it must be inserted all the way in to the filter slot so that it is in between the lens and the prism. 3. From the storage position, unfold the lever. Slide the button down and continue inserting the filter until it’s all the way in. Film Speeds The camera has film speeds ranging from 12 to 64 frames per second, except for the H-16 Reflex (the earliest model) which also has a setting for 8fps. To select the desired film speed, turn the control knob until the corresponding figure is opposite the red dot. When changing filming speeds, do not forget to alter exposure setting. (When changing from 24 to 48 by one stop and so forth.) 6 BOLEX H16 REFLEX MEDIA LOAN Release Selector (aka Side Release) The H-16 can be used for normal, continuous or single frame filming. The different operations are controlled by the release selector. Normal – This method is suitable for most shooting situations. The camera runs as long as the operator depresses the front release button or pushes the release selector towards M. Release selector. Continuous – Push the release selector towards M until it clicks into place. The camera will continue running until the wind runs out or the release selector is pushed back to the STOP position. Single frame – Use a cable release adapter to attach a cable release to the release selector. The adapter should be set so that the cable release pushes the release selector towards the P. Single frame exposures can be set for Instantaneous or Time Release. Turn the knob or lever to I to select Instantaneous. The effective shutter speed is 1/30 of a second. To select Time Release, set the knob’s guide mark or the lever to T. The shutter will stay open for as long as the release selector is set to P. Camera Motor The H-16 cameras have a spring drive motor. The motor can be disengaged to backwind the film. Most cameras that are available from APS can be used with a motor and therefore used with the Intervalometer for time-lapse animation or with electric motor for sync sound. To wind the camera: 1. Set the disengaging Frame speed select dial and Instantaneous and Time Release selector. lever to MOT and the release selector to STOP. (If the release selector will not go to STOP, slightly wind the spring.) 2. Lift the winding crank, which automatically engages the spindle, and set so that the slot in the handle is secured on the tab. 3. Wind the spring counter-clockwise fully without forcing it. 4. Fold the crank back and secure it on the latch on the lower body. Fully wound, the motor will drive about 18 feet of film through the camera (about 28 seconds at 24fps). Important: Never leave the camera wound during storage. This may ruin the spring. When running down the camera with no film loaded, set the film speed at the lowest setting. 7 Motor select in MOT position. MEDIA LOAN BOLEX H16 REFLEX Variable Shutter The H-16 is equipped with a shutter capable of having its aperture varied whether or not the camera is running or stopped. This enables you to reduce exposure time without altering the camera running speed or f-stop. In bright light, the variable shutter can be used to reduce exposure, therefore eliminating the need for a neutral density filter. The shutter may be locked in each of its five positions by pulling it out and pushing in when at the desired setting. The markings on the variable shutter correspond to the equivalent f-stop change (i.e., filming at the 1/2 mark is equivalent to stopping down by 1/2, at mark 2 equals closing down the lens diaphragm by 2 stops.) When the variable shutter is fully closed, no light enters the film plane. Warning: You can still see an image through the viewfinder if the variable shutter is closed. Some cameras show a triangular warning signal, but not all. Make sure you variable shutter is opened to the correct setting when filming. Footage Counter The footage counter indicates how much film has been exposed. The counter will automatically reset when the lid is removed and will read FEET. Variable shutter in open and locked position. Frame Counter The frame counter is helpful for lap dissolves, double exposures and animation. The frame counter adds frames in forward run and subtracts them in reverse. The upper dial counts single frames, 0 - 50. The lower dial totals in units of 50 frames, 0 - 1000. Loading the Camera The H-16 has automatic threading and loop forming capabilities making it an easy camera to load. When shooting at 24fps, there is an option for an audible click every second indicating that 8 inches of film has passed through the camera. This can be useful when timing a pan or zoom shot. For an audible click, move the audible signal select lever down when loading film; for no click place the lever in the 0 position. Before loading the camera: 1. Set the release selector to STOP. 2. Set the disengaging lever to MOT. 3. Set the frame rate to the desired camera speed. 4. Wind the camera. Open the camera lid. Visually inspect the film gate to make sure that it is not dirty. DO NOT use condensed air to blow dust from the camera. Cleaning the gate is a delicate procedure and you can cause irreparable damage if you do not do it correctly. Cameras are inspected and cleaned when they are returned to Media Loan so the camera you check out should be ready for filming. Use care when loading the camera so that you do not inadvertently get hair or debris inside which could ruin your film. Make sure your hands are clean before loading film or otherwise poking about inside the camera. 8 BOLEX H16 REFLEX MEDIA LOAN TO LOAD THE CAMERA: 1. Check that the pressure plate is locked so that it cannot open. The film will jam at this point if the plate is not closed. 2. Close the loop formers by moving the control lever down so that it is parallel to the pressure plate. 3 1 2 3. Remove the empty daylight spool from its spindle by pressing the ejector. This will be your take-up spool. (The spool can pop out so block it with your hand.) 5 4 4. Place the loaded daylight spool on the upper spindle. The film should come off in the direction of the engraved arrow. At the film gate, the emulsion should always face towards the front of the camera. 6 7 5. Using the film end located at the bottom of the camera, clip the film end. 6. Insert film end in the top feed sprocket and start the camera motor by depressing the front release button. 7. The film is automatically threaded through the gate. If you need to adjust the film, you can spread the sprocket guides by carefully pushing the sprocket guide in from the sprocket wheels. 8. Continue to run the film until about 12 inches have run through the drive mechanism. 8 9 10 11 1 - Pressure Pad Locking Pin 2 & 10 - Loop Former 3 & 12 - Spool Shaft 4 - Loop Former Locking Lever and Opening Knob 5 - Audible Signal Click Lever 12 6 - Spool Ejector 7 - Spool Retaining Arm 8 - Sprockets 9 - Pressure Pad 11 - Film Knife 9. Open the loop formers by pressing the button on the lever located on the sprocket/gate assembly. 10.Insert the film end into the take-up spool in the direction of the engraved arrow. Place the spool on the lower spindle and take up any slack by hand. 11.Run the camera again for several seconds, listening to make sure the film is threaded properly. Check that the film is advancing properly and that the loops do not scrape the body. 12.Replace the lid and lock. 13.The footage counter will be reset. Run the camera until the counter reads 0. This indicates the film leader has been taken up and the camera is ready to be used. Film can be loaded in light, but subdued light is best. 9 MEDIA LOAN BOLEX H16 REFLEX Lap Dissolve Superimposing a fade-in on a fade-out makes a lap dissolve so that one picture gradually disappears as the next gradually appears. (This is also known as a cross-dissolve.) This allows for a smooth transition during which the picture brightness scarcely varies. To produce a lap dissolve: 1. Close the first shot in a sequence with a fade out. When beginning to close down the variable shutter, note what frame you are at in the frame counter. Alternatively, time how long it takes you to reach the closed position from the start of the fade and stop filming. 2. Lock the variable shutter in the closed position. 3. Disengage the motor by setting the selector to 0. 4. Set the release selector to M. 5. Close the douser if not already closed by moving it into the vertical position. 6. Cap the lens. 7. Using the backwind key, rewind the film until the frame counter indicates the duration of the fade out. 8. Move the release selector to the STOP position. 9. Frame the second sequence to be filmed. 10. As you begin filming by pressing the release selector to M, begin the fade in by moving the variable shutter smoothly to the open position. 11. Lock the variable shutter into the open position. The Rex-o-fader is an accessory that can help with smooth fades and is available at APS. Ask an APS employee to show you how to attach and use it if you decide to check it out with a Bolex. Troubleshooting PROBLEM CAUSE Film is black: Variable shutter was closed. Lens cap left on. Exposure incorrect. Film underexposed, images reversed; Film loaded incorrectly with the base facing with color film, general orange tint: forward instead of the emulsion. Jumpy Images: Loops formed incorrectly. Shrunken film stock. Prevailing red-orange tint: Using tungsten lamps with a daylight film. An underpowered tungsten lamp. Partially or Completely Obscured images: Turret incorrectly positioned. Telephoto lens on turret obscuring view of other lenses. Parallel scratches on the edge of the film: Dust or particles of emulsion in the film gate. Camera poorly loaded. 10 BOLEX H16 REFLEX MEDIA LOAN PROBLEM CAUSE Fogged film: Light entering through the viewfinder or filter slot. Film loaded in extremely bright light. Camera not seated well. Film fogged at edges: Camera loaded in strong light. Warped take up or feed reel. Filter carrier not in slot during exposure. Out of focus or “breathing” pictures: Pressure plate incorrectly locked. BOLEX PROFICIENCY TEST Please read manual and complete written portion of test prior to operational proficiency. Bring answers with you with your name and TESC ID number clearly indicated. Written Test 1. List the four steps necessary to set the diopter adjustment. 2. How many frames per second is the Bolex capable of shooting? How few? 3. What kind of viewing system does the Bolex H16 employ? Describe how it works. 4. Explain the difference between Bolex Rx lenses and normal lenses. What is the effect on the shutter speed, and how do you compensate? 5. Describe the difference between a bayonet mount and a turret mount camera. 6. What is the function of the turret plug? 7. List the steps necessary to perform a lap dissolve. 8. List the steps necessary to load the camera. 9. Describe any precautions you need to take while cleaning and operating the Bolex. 10.What is the extent of your financial responsibility in case of loss, or damage to the camera? Operational Proficiency Test 1. Identify all of the parts and control of the Bolex H16. 2. Set the diopter and place the 85b filter in the camera. 3. Set the fps at 24, set the counter at 0. 4. Load the film in the camera. 5. Demonstrate how to create a lap dissolve. 6. Demonstrate extended exposure and animation features. 7. Display proper lens mounting to insure appropriate “taking” balance on turret mount camera. Mount lens on bayonet mount camera. 11