1
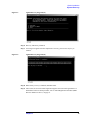
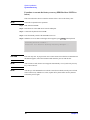
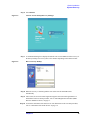
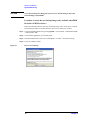
Agilent E5052BU Option 018
Hard Disk Drive Kit
User’s Guide
Third Edition
Manufacturing No. E5052-90222
April 2009
Notices
The information contained in this document is subject to change without notice.
This document contains proprietary information that is protected by copyright.All rights
are reserved. No part of this document may be photocopied, reproduced, or translated to
another language without the prior written consent of the Agilent Technologies.
© Copyright 2007, 2008, 2009 Agilent Technologies
Manual Printing History
The manual’s printing date and part number indicate its current edition. The printing date
changes when a new edition is printed. (Minor corrections and updates that are
incorporated at reprint do not cause the date to change.) The manual part number changes
when extensive technical changes are incorporated.
May 2007
First Edition
December 2008
Second Edition
April 2009
Third Edition
Typeface Conventions
Sample (bold)
Boldface type is used when a term is defined or
emphasis.
Sample (Italic)
Italic type is used for emphasis.
key
Indicates a hardkey (key on the front panel or
external keyboard) labeled “Sample.” “key” may
be omitted.
Sample menu/button/box
Indicates a menu/button/box on the screen labeled
“Sample” which can be selected/executed by
clicking. “menu,” “button,” or “box” may be
omitted.
Sample block/toolbar
Indicates a block (group of hardkeys) or a toolbar
(setup toolbar) labeled “Sample.”
Sample 1 - Sample 2 - Sample 3
Indicates a sequential operation of Sample 1,
Sample 2, and Sample 3 (menu, button, or box).
“-” may be omitted.
2
1
General Information
This chapter describes the Hard Disk Drive Kit, contents of the kit, and required tools to
install the Option 018 into the Agilent E5052B.
3
General Information
Option 018 Hard Disk Drive Kit
Option 018 Hard Disk Drive Kit
The purpose of this kit is to install the option 018 into the Agilent E5052B.
Contents of the Agilent E5052BU Option 018 Hard Disk
Drive Kit
The kit includes the parts listed in Table 1-1. If anything is missing, contact the nearest
Agilent Technologies office.
Table 1-1
Contents of the Agilent E5052BU Option 018 Hard Disk Drive Kit
Description
Qty.
Upgrade Manual (This manual)
1
HDD Assembly
1
4
Chapter 1
2
Option Installation
This chapter describes the procedure to install the option 018 into the Agilent E5052B.
5
Option Installation
Introduction
Introduction
This chapter describes the procedure to install Option 018 into the E5052B. The procedure
consists of the following items.
•
Installation Requirement
•
Saving System calibration Data from Removable Hard Disk to USB Pen Drive
•
Removing Removable Hard Disk
•
Mounting Removable Hard Disk
•
Initial Registration of E5052B
•
Calibration of the Touch Screen
•
Recalling System Calibration Data from USB Pen drive to Removable Hard Disk
Procedure
Installation Requirement
•
5188-4426 Key for Hard Disk Carrier
•
USB Pen Drive (Over 512MB)
6
Chapter 2
Option Installation
Procedure
Saving System calibration Data from Removable Hard Disk to USB
Pen Drive
The following is a description of the procedures to save the system calibration data stored
in the removable hard disk to a USB Pen drive.
Step 1. Exit the measurement window.
System > Service Menu > Administorator Menu > Exit E5052B > OK
Step 2. Insert a USB Pen drive into the USB port in front panel.
Step 3. Open D:\Recovery drive.
Step 4. Click .D:\syscal from the explorer.
Step 5. Select Edit - Copy from menu bar of the explorer.
Step 6. Click the USB Pen drive of the explorer.
Step 7. Select Edit - Paste from menu bar of the explorer.
Step 8. Click .D:\limit from the explorer.
Step 9. Select Edit - Copy from menu bar of the explorer.
Step 10. Click the USB Pen drive of the explorer.
Step 11. Select Edit - Paste from menu bar of the explorer.
Step 12. Turn off the E5052B, and then remove the cord from the outlet before removing the
Removable Hard Disk.
Chapter 2
7
Option Installation
Procedure
Removing Removable Hard Disk
Follow the steps below to remove a removable hard disk.
CAUTION
Before removing a hard disk, you must turn off the unit’s power and then disconnect the
power cord from the outlet.
Step 1. Turn off the power.
Step 2. Insert the key in the lock and turn anti-clockwise.
Step 3. Open the screw in clockwise direction.
Step 4. Press the button under direction.
Step 5. Remove the hard disk.
Mounting Removable Hard Disk
Follow the steps below to mount a removable hard disk.
Step 1. Insert the hard disk into the slot.
Step 2. Turn the screw in anti-clockwise direction until it is locked.
Step 3. Turn the key to the right until it is locked.
Step 4. Remove the key.
Step 5. Turn on the E5052B.
Step 6. After restart, the screen for initial registration appears. Execute initial registration. For
information on the execution procedure, refer to “Initial Registration Procedure (HDD
Revision: NM321 or above)” on page 27 for HDD revision: NM321 or above. If HDD
revision is NM320 or below, refer to “Initial Registration Procedure (HDD Revision:
NM321 or above)” on page 27.
8
Chapter 2
Option Installation
Procedure
Recalling System Calibration Data from USB Pen drive to Removable
Hard Disk
The following is a description of the procedures to copy the system calibration data stored
in the USB Pen drive to the removable hard disk.
Step 1. Exit the measurement window.
System > Service Menu > Administorator Menu > Exit E5052B > OK
Step 2. Insert a USB pen drive in to the USB port in front panel.
Step 3. Open D:\Recovery drive.
Step 4. Click syscal folder in the USB Pen drive from the explorer.
Step 5. Select Edit - Copy from menu bar of the explorer.
Step 6. Click the D:\ of the explorer.
Step 7. Select Edit - Paste from menu bar of the explorer.
Step 8. Click limit folder in the USB Pen drive from the explorer.
Step 9. Select Edit - Copy from menu bar of the explorer.
Step 10. Click the D:\ of the explorer.
Step 11. Select Edit - Paste from menu bar of the explorer.
Step 12. Restart E5052B
Chapter 2
9
Option Installation
System Recovery
System Recovery
By executing system recovery, you can return the system of the E5052B (the Windows
operating system and the firmware) to the factory state (at the time of purchase*1).
NOTE
System recovery is a function of Windows and not a function of the E5052B Firmware.
The system recovery procedure is different in accordance with the HDD revision. The
HDD revision can be confirmed using the following procedure:
Step 1. In E5052B, from Windows Start Menu, click on My Computer.
Step 2. The volume label for C: drive is displayed in Hard Disc Drive area.
CAUTION
Strictly follow the steps described below. If you do any operation other than the following
steps, the system may not be recovered.
Types of system recoveries
The following 2 types of system recoveries are available.
R Factory recovery
Returns the contents of the C drive to the factory state.
R User recovery (available only when the HDD revision is NM320 or below)
Returns the contents of the C and F drives to a user-specified state. To use this function,
you must prepare for recovery in advance. For information on the preparation, see
“Procedure to create the user backup image (only available when HDD Revision is
NM320 or below)” on page 16 for information on the execution, see “Procedure to
execute the user recovery function (only available when HDD Revision is NM320 or
below)” on page 23.
*1.If the hard disk failed and has been replaced after purchase, the state when the replacement
was performed is recovered.
10
Chapter 2
Option Installation
System Recovery
Notes on executing the factory recovery function
Executing the factory recovery function causes the following conditions:
R In addition to the Windows operating system and the firmware, the following settings
of the E5052B are returned to the factory state.
•
•
•
Network setting
GPIB setting
Printer setting
R The driver for the supported printer installed after purchase is deleted.
R You need to execute initial registration again.
Files you created using the save function (files in the F drive) are not affected, but we
recommend backing them up before executing system recovery for precautionary
purposes. For more information on backup, refer to “Backing Up the Data” as described in
E5052B Online Help.
Chapter 2
11
Option Installation
System Recovery
Procedure to execute the factory recovery (HDD Revision: NM321 or
above)
NOTE
The recovery function for Factory image is only loaded.
The User back up function is not available.
Step 1. Turn ON the E5052B.
Step 2. The boot option is displayed. Use the downward arrow key to select the “Agilent Recovery
Solution” and press Enter
Step 3. Windows PE starts up and “Agilent Recovery Program” window is displayed. Press 1, and
then press Enter.
Figure 2-1
Agilent Recovery Program(1/1)
Step 4. A warning message is displayed. Press 1, and then press Enter.
Figure 2-2
Agilent Recovery Program(1/2)
Step 5. Caution is displayed. Press 1, and then press Enter.
12
Chapter 2
Option Installation
System Recovery
Figure 2-3
Agilent Recovery Program(1/3)
Step 6. Recovery function is performed.
Step 7. A message box appears after the completion of recovery process. Press any key to
continue.
Figure 2-4
Agilent Recovery Program(1/4)
Step 8. When factory recovery is finished, E5052B restarts.
Step 9. After restart, the screen for initial registration appears. Execute initial registration. For
information on the execution procedure, refer to “Initial Registration Procedure (HDD
Revision: NM321 or above)” on page 34.
Chapter 2
13
Option Installation
System Recovery
Procedure to execute the factory recovery (HDD Revision: NM320 or
below)
This section describes how to return the contents of the C drive to the factory state.
NOTE
You need a keyboard for this operation.
Step 1. Shut down the E5052B.
Step 2. Disconnect all of the USB device from the USB ports.
Step 3. Connect the keyboard to the E5052B.
Step 4. Press the standby switch of the E5052B to turn it on.
Step 5. When the screen as shown in the figure below appears, press
F11
of the keyboard.
Starting Acronis Loader...
Press F11 for Acronis Startup Recovery Manager...
e5071cse1055
CAUTION
Press F11 only once. If you press F11 twice or more and a screen which is not mentioned in
this manual appears, reboot the instrument and restart the process from the first.
NOTE
After several seconds, the next screen appears automatically even if you do not press any
key, so do not miss it.
NOTE
After Step 5, if the E5052B freezes with the cursor does not blink, turn the power off and
remove unnecessary USB devices. Then, replace the keyboard with a PS/2 keyboard to
execute the process again.
14
Chapter 2
Option Installation
System Recovery
Step 6. Select Restore.
Figure 2-5
Activate Acronis Startup Recovery Manager
e5071cse1079
Step 7. A confirmation dialog box is displayed. Push the enter to select Yes to start the recovery of
the factory backup. The recovery takes a few minutes depending on the amount of data.
Figure 2-6
Recover Factory Backup
e5052bse1018
Step 8. When the recovery is finished, push the enter select OK. The E5052B restarts
automatically.
Step 9. After restart, the screen for initial registration appears. Execute initial registration. For
information on the execution procedure, refer to “Initial Registration Procedure (HDD
Revision: NM320 or below)” on page 37.
Step 10. Execute the calibration of the touch screen. For information on the execution procedure,
refer to “Calibration of the Touch Screen” on page 39.
Chapter 2
15
Option Installation
System Recovery
CAUTION
Never turn off the power during the system recovery because doing so may cause
serious damage to the E5052B.
Procedure to create the user backup image (only available when HDD
Revision is NM320 or below)
This section describes how to create the user backup image. The C and F drives’ contents
saved in this procedure are recalled when the user recovery function is executed.
Step 1. Close the E5052B application by pressing System > Service Menu > Administrator Menu
> Exit E5052B > OK.
Step 2. Close all other applications you currently open.
Step 3. From the Windows start menu, select All Programs > Acronis > Acronis True Image.
Step 4. Click “No, Thanks” button.
Figure 2-7
Recover User Backup
e5071cse1080
16
Chapter 2
Option Installation
System Recovery
Step 5. Click Backup
e5071cse1125
Step 6. Click Next button.
e5071cse1126
Chapter 2
17
Option Installation
System Recovery
Step 7. Select “The entire disk contents or individual partition,” then click Next button.
e5071cse1127
Step 8. Select the C drive and F drive.
e5052bse1019
Step 9. Select the destination folder and input a file name, then click Next button. It is
recommended to save the file to a directory which has enough space like the D drive. Also,
18
Chapter 2
Option Installation
System Recovery
never save the contents of the drive to the C, E or F drive.
e5052bse1020
Step 10. Select “Set the options manually” and click Next button.
e5071cse1130
Step 11. Select “Backup priority” in the left field and “High” in the right field, then click Next
Chapter 2
19
Option Installation
System Recovery
button.
e5071cse1131
Step 12. If necessary, input comments and click Next button. The comments can be omitted.
e5071cse1132
20
Chapter 2
Option Installation
System Recovery
Step 13. Click Proceed button.
e5052bse1021
Step 14. The following screen appears during backup.
e5052bse1022
Step 15. The following screen appears when the user backup image was created. Click OK.
e5052bse1023
Chapter 2
21
Option Installation
System Recovery
CAUTION
Never turn off the power during creating the user backup image because doing so
may cause serious damage to the E5052B.
22
Chapter 2
Option Installation
System Recovery
Procedure to execute the user recovery function (only available when
HDD Revision is NM320 or below)
Returns the contents of the C and F drives to a user-specified state. To use this function,
you must create the user backup image in advance. For more information, see the
description “Procedure to create the user backup image (only available when HDD
Revision is NM320 or below)” on page 16.
Step 1. Close the E5052B application by pressing System > Service Menu > Exit.
Step 2. Close all other applications you currently open.
Step 3. From the Windows start menu, select All Programs > Acronis > Acronis True Image.
Step 4. Click “No, Thanks” button.
e5071cse1080
Step 5. Click Recovery.
e5071cse1136
Chapter 2
23
Option Installation
System Recovery
Step 6. Click Next button.
e5071cse1137
Step 7. Select the saved backup image file, then click Next button.
e5052bse1024
24
Chapter 2
Option Installation
System Recovery
Step 8. Select “Restore disks or partitions,” then click Next button.
e5071cse1139
Step 9. Select the C drive, then click Next button.
e5052bse1025
Chapter 2
25
Option Installation
System Recovery
Step 10. Select the C drive to restore, then click Next button.
e5052bse1026
Step 11. Select “Active” and click Next button.
e5071cse1145
26
Chapter 2
Option Installation
System Recovery
Step 12. Click Next button.
e5052bse1027
Step 13. Select “Yes, I want to assign a logical drive letter to the restored partition.” and click Next
button.
e5071cse1147
Chapter 2
27
Option Installation
System Recovery
Step 14. Select “Yes, I want to restore another partition or hard disk drive.” then click Next button.
e5052bse1077
Step 15. Select the F drive to restore, then click Next button.
e5052bse1028
28
Chapter 2
Option Installation
System Recovery
Step 16. Select the F drive to restore, then click Next button.
e5052bse1029
Step 17. Select “Logical” and click Next button.
e5052bse1078
Chapter 2
29
Option Installation
System Recovery
Step 18. Click Next button.
e5052bse1030
Step 19. Select “Yes, I want to assign a logical drive letter to the restored partition,” then click Next
button.
e5052bse1031
30
Chapter 2
Option Installation
System Recovery
Step 20. Select “No, I do not.” and click Next button.
e5052bse1079
Step 21. Select “Set the options manually” and click Next button.
e5052bse1080
Chapter 2
31
Option Installation
System Recovery
Step 22. Select “Restoration Priority” in the left field and “High” in the right field, then click Next
button.
e5052bse1081
Step 23. Click Proceed button.
e5052bse1032
Step 24. Click Reboot button.
e5052bse1082
32
Chapter 2
Option Installation
System Recovery
CAUTION
Never turn off the power during the recovery of the user backup image because doing
so may cause serious damage to the E5052B.
Step 25. After boot up, perform “Initial Registration of E5052B” on page 34 and “Calibration of the
Touch Screen” on page 39.
Chapter 2
33
Option Installation
Initial Registration of E5052B
Initial Registration of E5052B
When you start up the E5052B at the first time, you need to perform the initial registration
of the Windows XP operating system of the E5052B. There are two procedures in
accordance with the HDD revision.
NOTE
It is not possible to check the HDD revision installed on your E5052B before Windows is
booted. Therefore, you should follow the procedure which you see on the unit.
NOTE
You cannot use the front panel keys during the initial registration of the E5052B therefore
connect the mouse and the keyboard before turning on the power.
NOTE
If you perform the following procedure incorrectly, a message asking you whether to return
to the previous registration screen and perform the registration appears. In this case, follow
the instruction to return to the previous registration screen.
Initial Registration Procedure (HDD Revision: NM321 or above)
Step 1. Turns on the E5052B.
Step 2. The Windows XP Professional Setup wizard appears. Click the Next > button (Figure 2-8).
Figure 2-8
Windows XP Professional Setup wizard
e5071cse1073
34
Chapter 2
Option Installation
Initial Registration of E5052B
Step 3. In the Windows XP Professional Setup dialog box, read the license agreement, then select
the I accept this agreement box and click the Next > button (Figure 2-9).
Figure 2-9
Windows XP Professional Setup dialog box (1/2)
e5071cse1074
Step 4. In the next dialog box, input E5052B in the Name box. Then, click the Next> button
(Figure 2-10).
Figure 2-10
Windows XP Professional Setup dialog box (2/2)
E5052
e5052bse1033
Step 5. The E5052B restart automatically.
Step 6. The Agilent Recovery Image Setup screen (Figure 2-11) appears. Click OK to proceed.
Chapter 2
35
Option Installation
Initial Registration of E5052B
Figure 2-11
Agilent Recovery Image Setup Screen(1/1)
Step 7. A progress bar appears (Figure 2-12) indicating the progress of the Recovery Image setup.
The complete process takes less than 5 minutes to finish.
Figure 2-12
Agilent Recovery Image Setup Screen(1/2)
Step 8. A message dialog box appears after the completion of the Recovery Image Setup
procedure. The dialog box disappears automatically after a few seconds.
Step 9. E5052B firmware is executed, then the measurement display appears.
36
Chapter 2
Option Installation
Initial Registration of E5052B
Initial Registration Procedure (HDD Revision: NM320 or below)
Step 1. Turns on the E5052B.
Step 2. The Windows XP Professional Setup wizard appears. Click the Next > button (Figure
2-13).
Figure 2-13
Windows XP Professional Setup wizard
e5071cse1073
Step 3. In the Windows XP Professional Setup dialog box, select the I accept this agreement box
and click the Next > button (Figure 2-14).
Figure 2-14
Windows XP Professional Setup dialog box (1/2)
e5071cse1074
Step 4. In the next dialog box , input E5052 in the Name box. Then, click the Next> button (Figure
2-15).
Chapter 2
37
Option Installation
Initial Registration of E5052B
Figure 2-15
Windows XP Professional Setup dialog box (2/2)
E5052
e5052bse1033
Step 5. After a while, the E5052B restarts automatically. Then, the measurement display appears.
38
Chapter 2
Option Installation
Calibration of the Touch Screen
Calibration of the Touch Screen
After E5052B measurement screen appears, you have to calibrate the touch screen. Follow
the procedure described below to calibrate the touch screen.
Step 1. Press
.
Step 2. Press Service Menu.
Step 3. Press Test Menu.
Step 4. Press Adjust Touch Screen.
The touch screen calibration screen (Figure 2-16) appears.
Figure 2-16
Touch Panel Calibration Screen
e5071cse1078
Step 5. Touch the x mark on the upper left with your finger. The mark x appears also on the upper
right, lower left, and lower right. Touch the x marks in that order with your finger.
Touching the four locations described above with your finger automatically concludes the
touch screen calibration.
NOTE
With no operation on the touch screen calibration screen for a preset time, it automatically
closes and the previous measurement screen reappears.
Chapter 2
39
REGIONAL SALES AND SUPPORT OFFICES
For more information about Agilent Technologies test and measurement products, applications, services, and
for a current sales office listing, visit our web site: http://www.agilent.com/find/tmdir. You can also contact one
of the following centers and ask for a test and measurement sales representative.
21/01/2004
United States:
Test and Measurement Call Center
(tel) 1 800 452-4844
(fax) 1 888 900-8921
Canada:
Test and Measurement Call Center
(tel) 1 877 894-4414
(fax) 1 888 900-8921
China:
(tel) 800 810-0189
(fax) 800 820-2816
Europe:
(tel) (31 20) 547-2323
(fax) (31 20) 547-2390
Japan:
Call Center
(tel) 0120 421-345
(tel) (81) 426 56-7832
(fax) (81) 426 56-7840
Korea:
(tel) (82 2) 2004-5004
(fax) (82 2) 2004-5115
Latin America:
(tel) (305) 269-7500
(fax) (305) 269-7599
Taiwan:
(tel) 0800 047 866
(fax) 0800 286 331
Australia/New Zealand:
(tel) (61 3) 9210-5555 (Australia)
(fax) (61 3) 9210-5899
(tel) (64 4) 939-0636 (New Zealand)
(fax) (64 4) 972-5364
Asia Pacific:
(tel) (65) 6375-8100
(fax) (65) 6836-0252
Email: [email protected]