1
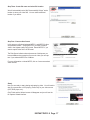
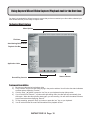
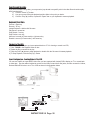
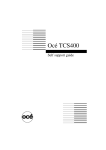
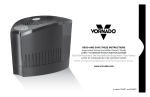
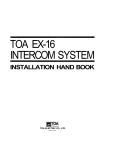
8. Installation Summary
By now you should have completed the following:
1.) Made all of the Audio and Video connections between Instant DVD and your Audio/Video equipment.
2.) Connected Instant DVD to the Power Supply and USB Port on your PC.
3.) Installed USB drivers and verified the device is properly installed
4.) Installed all necessary software applications required for proper operation.
5.) Now you are ready to Start Making DVD Movies.
8. Start Making DVD Movies
Now you are ready to start capturing video. We have created the Capture Wizard application to allow you to quickly
capture and export video on your PC without learning how to edit video or author a DVD. Use the Capture Wizard
application to test video capture and playback of video before moving on to Video Studio 7 or DVD Movie Factory.
We have created a simple getting started Wizard that allows you to verify your connections and make the proper
setup choices before capturing video.
USB Instant DVD Capture Wizard
Step One: Open Cap Wiz.
Click the Cap Wiz icon on your Desktop
Or Click “Start” -> “Programs” -> “ADS Tech Instant DVD” and click on
“Capwiz”
Choose worldwide video standard based on country – For Users in North
America, you will select NTSC. For Users in Europe and many other countries you will select PAL.
For more information on these standards, click on “Learn more about worldwide video standards”
Step Two: Select Video Inputs &Outputs
Choose RCA or S-Video based on your video source
INSTANT DVD 2.0 Page 16
Step Three: Create file name and select file location
We will automatically select ‘My Documents\My Videos” as the
location to store your video files. You can select a different
location if you desire.
Step Four: Choose video format
In this step you will select between MPEG-1 and MPEG-2 video
compression formats. Select MPEG-2 if you wish to capture
video in the highest quality DVD format. Select MPEG-1 if you
want to capture video in the VCD format.
The Disk Space indicator shows the amount of disk space you
have available and an example of how much video you can capture if you selected MPEG-2 at 3 Mb/sec.
For more information on these MPEG, click on “Learn more about
video formats”
Ready
Now you are ready to start viewing and capturing video. You will need to
start your camcorder or VCR playing. Press Play on your video source
(VCR, DVD player, etc.).
Click Finish and the Wizard screen will disappear and you will see the
full Capture Wizard interface.
INSTANT DVD 2.0 Page 17
Using Capture Wizard Video Capture/Playback tool for the first time:
You have just completed the Wizard screens to ensure that you have connected your video cables, selected your
video format and now you are ready to capture video.
The Capture Wizard Interface
Menu Options
File Name
Auto-Naming/Unique Name
Playback List Box
Application Links
Status Indicator
Record/Play Controls
Preview and Record Video
1.)
2.)
3.)
4.)
5.)
6.)
Be sure your video device is playing a video
Click “Preview” and you will see video playing in the preview window. You will notice the status indicators
are Blue and are displaying “Preview”.
Click the “Stop” ( ■ ) button or press the “esc” key on your keyboard to stop video preview.
If you Click the Red “Record” ( ● ) button while previewing video, the video will stop momentarily, then
start again. When the video preview starts again, you are recording. You will notice the status indicators
have turned red and are displaying “Record”.
To Stop recording, press the “Stop” ( ■ ) button or press the “esc” key on your keyboard.
You will notice that the file name has been added to the playback list box.
INSTANT DVD 2.0 Page 18
Ways to begin Recording
1. You can start recording from the Stop or idle status in CapWiz or while you are previewing video.
2. Click the red record( ● ) button to begin recording at any time.
3. To Stop recording, Click the “Stop” ( ■ ) button or the “esc” key on your keyboard.
4. The video will be displayed in the resolution you selected for the video capture:
a.
VCD
352 x 240 NTSC / 352 x 288 PAL
b.
SVCD
480 x 480 NTSC / 480 x 576 PAL
c.
DVD
720 x 480 NTSC /720 x 576 PAL
Playback Captured Video
Captured video files can be displayed on your computer monitor or be decoded through Instant DVD for display on a
TV or recorded to video tape. Use the “Playback On” selection to determine where video will be displayed.
Playback on the computer screen:
This is the default setting. Video will be played back at the resolution it was captured in.
1.) Click on the file name in the Playback List Box, then click on the “Play” (►) button. You may also double click on
the file name for Instant Playback. You will notice that the status indicator turns Green and the display changes to
Play.
2.) To Stop Playback, Click the Stop ( ■ ) button or press the “esc” key on your keyboard.
INSTANT DVD 2.0 Page 19
Seek through the video
If you have recorded a long video, you may want to jump ahead to a specific point in the video file and continue playback from that point.
1.) Click the “Pause” (П) button.
2.) Use your mouse to drag the playback position slider to the point you desire.
3.) Click the “Play” (►) button, or press the “Space” bar on your keyboard to resume playback.
Keyboard Short Cuts:
Preview = Enter key
Record = “R” key
Instant Playback = double click file name
Play/Pause = space bar
Stop Record = esc key
Stop Preview = esc key
Advance 1 second (in Pause mode) = right arrow key
Rewind 1 second (in Pause mode) = left arrow key
Playback to TV or VCR:
If you wish to send the video you have captured back to a TV for viewing or record to a VCR;
1.) Click TV/VCR in the Playback Video on box.
2.) Select the file you would like to play.
3.) Click the PLAY (►) button to begin playback or double click the file name for Instant playback.
4.) To Stop Playback, Click the Stop ( ■ ) button
Export Configuration – Sending Video to TV or VCR
You can use CapWiz to export MPEG video files you have captured with Instant DVD to display on TV or record back
to video tape. Use the cables included to connect to the Video Out and Audio Out jacks, and then connect the Yellow,
Red and White RCA jacks to your TV or VCR as shown in the illustration below.
OR
��� �����
��
��� ������� ��� ���
���� �����
����� ���
� ��� �� ��
�
�
��� �����
�
����� ��
����� ��
����� ���
����� ���
���
����� ��
���� ������ ���� ������
����� ������
INSTANT DVD 2.0 Page 20
Capture Wizard Features and Functions
Recording File Name:
Before Recording check the Recording Filename box in the upper left hand corner of the application. The file name
you selected in the Wizard Screen is listed here.
1. Keep this file name if you wish or run the Wizard to use a new file name.
2. Check the “Auto Naming” box and CapWiz will automatically name each captured file in sequential order;
i.e. if your video file is “My Video”, the first file captured will be named “My Video-000”, the second “My Video-001”
and so on.
3. Every time you stop a capture, the new file name will be displayed in Playback List box.
4. You can also uncheck “auto-naming” and click the “Unique” button and CapWiz will use the file name you enter
in the filename box. You need to provide a new file name for each video clip captured. If you do multiple captures
without changing the unique file name, the file will be written over each time you capture.
Playback List Box
The Playback list box shows the file names of your video captures. This list will match the directory location you
selected in the Capture Wizard screens. If you are unsure of the location you selected, run the Wizard again.
Browse: The Browse button will allow you to browse to other file directories or hard drives. If you select another
directory, any MPEG video files located there will appear in the Playback list box.
Details: The Details button will allow you examine the details of the files in the Playback List box. Click on the
Details Button and a dialog box will open showing detailed information about each file such as: Date, File Size, File
Name and location on your system.
Click on any file in this dialog box and then click Details again and you will see more details about this individual files
such as:
1.)
2.)
3.)
4.)
Video bit rate
Audio sampling rate
Audio bit rate
Frame rate
Deleting a File:
From the detailed information box you can delete a file by clicking the “Remove” button.
CapWiz will ask you if you are sure, click OK and the file is deleted from your system.
Application Links
The icons at the side of the CapWiz screen allow you to easily jump from CapWiz to the bundled applications that
came with your Instant DVD. You can quickly jump to Video Studio, DVD Movie Factory or review the Capture Wizard screens anytime video is not playing in the preview area. When you click on an application icon, that application
will start and CapWiz will automatically close.
You can repeat the Wizard steps and make changes to your settings by clicking the Capture Wizard icon anytime
video is not playing. The Wizard will run every time you start CapWiz unless you can disable this by clicking Options
at the top of the application and click on “Show Wizard” to uncheck this selection.
1.) Click or uncheck - Show Splash Screen to not have splash screen appear at startup
2.) Click or uncheck - Show Wizard to not have Wizard screens appear at startup.
You can re-enable these features at anytime by re-selecting the options.
INSTANT DVD 2.0 Page 21
Menu Options
This section will describe all settings and choices for all of the menu options along the top of the CapWiz Interface.
• Video Inputs/Outputs:
This dialog box allows you to quickly change your video input and output choices. Here you can choose between
RCA, S-VHS or DV Inputs (Instant DVD + DV only) and RCA or S-VHS outputs. These settings can also be changed
by running the Capture Wizard Screens.
• Video Format:
The Video format dialog box allows you to quickly change your video format for NTSC or PAL. If you are not sure
of the correct selection, run the Capture Wizard and read the document called “Learn more about worldwide
Video Standards".
The Video format box also allows you to quickly set your video resolution and quality setting. You can choose:
a. DVD at Good, Better or Best Quality
b. Super Video CD (SVCD)
c. VCD
There are no quality settings for SVCD or VCD as these formats have standard video and audio bit rates.
CapWiz will display the following standard video capture settings based upon your USB Connection.
USB 2.0 Connection
DVD Settings - 4, 6 or 9 Megabits per second (Mb/sec.)
SVCD - MPEG-2 video at 2.4 Mb/sec.
VCD - MPEG-1 video at 1.15 Mb/sec.
USB 1.1
2.5, 3 or 4 MB/sec.*
Same
Same
The Video format and bit rate (4, 6 or 9 Mb/sec) for DVD video will be displayed in a status area of the CapWiz
interface so you will always know what video format and bit rate you are recording.
*If connected at USB 1.1 Full Speed the maximum video bit rate is 4 Mb/sec.
Custom User Defined video settings:
CapWiz lets you set custom capture settings. The custom settings give you lots of flexibility in creating capture
settings to meet your individual needs. To access the Custom Settings dialog box, click on the “Custom Settings”
button.
Video Bit Rates:
Set the video standard you want to capture in. The standard you select must match the standard of your video player
and video content. When you select PAL, you will notice that the Video Resolutions choices automatically change to
PAL resolutions.
MPEG-1 – When MPEG-1 is selected the only video resolution allowed is 352 x 240 (NTSC) or 352 x 288 (PAL),
however you can select video capture bit rates from 1 Mb/sec. up to 15 Mb/sec.
MPEG-2 – You can select any Video capture resolution and any video capture rate from 1 Mb/sec. to 15 Mb/sec.
INSTANT DVD 2.0 Page 22
Video Resolution:
You can select from the following video capture resolutions
NTSC
PAL
325 x 240 (VCD)
352 x 288 (VCD)
352 x 480 (1/2 D1)
352 x 576 (1/2 D1)
480 x 480 (SVCD)
480 x 576 ( SVCD)
704 x 480 (DVD)
704 x 576 (DVD)
720 x 480 (DVD)
720 x 576 (DVD)
Video Bit Rate:
You will notice that you have the ability to select a video capture rate of up to 15 Mb/sec. You will also notice that
any bit rate over 9 Mb/sec. is red in color. This is because any bit rate above 9 Mb/sec. is not supported by DVD
players and DVD burners. We allow you to capture at higher rates because some users may want to have the
capability to capture at the highest rate possible and don’t have DVD burning as a project goal. Just keep in mind
that if you want to burn your video onto a CD or DVD disk, don’t use a setting higher than 9 Mb/sec. or lower than
2 Mb/sec.
Custom Settings Caveats
We have provided lots of flexibility in the manner in which you can capture video at various resolutions and audio/
video bit rates. We have provided this flexibility because many customers have asked for this kind of capability.
However, think about your project goal before you begin recording. If your intent is to capture video to be burned
to CD or DVD disk, then capture at resolutions and bit rates that are “Legal” for burning and playing back in
players. If not, you may find that you have spent hours capturing video only to find that it the DVD authoring
software will not directly burn it, or your player will not play it back.
VCD, SVCD and DVD Legal Settings (check our web site for F.A.Q’s and other updates to this list):
Format
VCD
SVCD
DVD
Video Bit Rates
1.15 Mb/sec.
1.5 Mb/sec. - 2.5 Mb/sec.
3 Mb/sec. – 8 Mb/sec.
Audio Bit Rates
224 kbits/sec.
128-384 kbits/sec.
192 – 448 kbits/sec.
Audio Bit Rates
The audio format is always compressed in MPEG-1 Layer 2 audio. CapWiz also automatically sets the audio
sampling rate to 44.1 Khz for VCD and SVCD settings and 48 Khz for DVD video. We give you the choice to
select the audio bit rate for your custom video captures in the range from 192 kbits/sec to 384 kbits/sec.
Use Deinterlacing (Preview/Playback)
The MPEG-2 software playback codec that we use does not de-interlace video by default. Interlaced video will
show horizontal lines when you preview or playback the video. This interlacing does not affect video quality. All
NTSC and PAL video is interlaced. You will not see the interlacing when playing back a DVD disk on TV.
De-interlacing the video during preview and playback makes the video quality look better on the computer screen.
The default capture settings have de-interlacing turned on by default. De-interlacing the video takes a bit more
CPU processing power. Some slower PC’s may experience jerky video. In the custom settings, you have the
ability to enable or disable de-interlacing. Experiment with your system and your personal preferences to
determine if you want to preview with de-interlacing enabled or disabled.
Use Variable Bitrate
Capturing with variable bit rate will result in overall smaller file sizes than using constant bit rates. When the
Variable bit rate setting is enabled Instant DVD examines the frames of video being captured and will automatically
increase the bit rate in areas of fast motion or action and decrease the bit rate in areas where not much is
changing. This will result in improved overall quality and an overall smaller file size. The default capture settings
are set to constant bit rate.
INSTANT DVD 2.0 Page 23
Video Preprocessing Filters
Instant DVD includes video preprocessing filters which provide the ability to remove some of the noise found on old
video tapes, TV reception or other noisy video sources.
Spatial Filtering
This refers to filtering pixel data that are all located in the same video frame. The Spatial filter is a low-pass filter.
This filter removes part of the high frequency noise components. Too much filtering can reduce image sharpness to
the point of looking very smooth or blurry. The selection range for this filter is from 0 to 7.
Temporal Filter
This filter processes pixel data that are located in the same pixel coordinates but across two frames of video, usually
the current video frame and the previous frame. Because of motion in video sequences, and object located in one
position may have moved in the next video frame. Thus, if there is a log of motion, temporal filtering may cause
blurring or introduce other artifacts. The selection range for this filter is from 0 to 255.
What is the best filter to use for your video? There is no magic formula, you will need to experiment with different filter
settings and pick the filter level that removes noise but does not create blur.
Use Deinterlacing (Preview/Playback)
The MPEG-2 software playback codec that we use does not de-interlace video by default. Interlaced video will show
horizontal lines when you preview or playback the video. This interlacing does not affect video quality. All NTSC and
PAL video is interlaced. You will not see the interlacing when playing back a DVD disk on TV.
De-interlacing the video during preview and playback makes the video quality look better on the computer screen.
The default capture settings have de-interlacing turned on by default. De-interlacing the video takes a bit more CPU
processing power. Some slower PC’s may experience jerky video. In the custom settings, you have the ability to
enable or disable de-interlacing. Experiment with your system and your personal preferences to determine if you
want to preview with de-interlacing enabled or disabled.
Setting Custom Capture Settings
1.)
2.)
3.)
4.)
Click Custom Settings button
When the custom settings dialog box opens, make your selections.
Click OK to save
Click “Use Custom Format” to capture with the settings selected.
• Brightness/Color
Here you can make changes to Brightness, Chroma, Contrast, Hue and Saturation.
You can make changes to the Brightness/Color settings only while Previewing or recording video.
1. Move the slider for each setting choice and you will see the adjustment over the next second or two.
2. If you mess up, Click Reset to restore factory default settings.
3. Click OK to close the box.
• Optional Controls (for Instant DVD + DV Only) *
This dialog box is for use with and enhanced version of Instant DVD called, “Instant DVD + DV”. The
Instant DVD + DV version allows you to connect a digital camcorder and provides the ability to capture from
Digital Video directly to MPEG-1 or MPEG-2. These controls allow you to control the camcorder via software
so you have the ability to Rewind, Fast Forward, Play and Stop the camcorder via these controls.
INSTANT DVD 2.0 Page 24
For Instant DVD + DV Only:
1.)
2.)
3.)
4.)
5.)
Connect your Digital Camcorder with the provided 4 pin to 4 pin DV cable from your camcorder to the 4 pin
DV port on the front of the Instant DVD + DV device.
Turn your camcorder on and to the VCR/VTR mode. Note: we recommend using the external power supply
for your camcorder for best results rather than running on battery power.
Click “PLAY” on the DV Camcorder control panel to start the camcorder tape.
Click “Preview” on the CapWiz interface and you will see video from your digital camcorder.
Click “Stop” on the CapWiz interface to stop previewing video before you click “Stop” on the DV camcorder
control panel.
*If you wish to upgrade your Instant DVD 2.0 unit to an Instant DVD + DV unit, contact the ADS Tech customer
service department to see if there are any current upgrade offers.
• Control
The Control menu gives you another way to control video recording and playback:
The selections are: Preview, Record, Stop, Pause and Play
• Applications
The Applications menu gives you another way to jump to bundled applications and you can also change the path
of these applications if you happened to install them on a different drive.
1. Click the Applications menu button
2. Click on DVD Movie Factory or Video Studio to Jump to the selected application. Capture Wizard will
automatically close when you do this.
3. Click the Edit button. This will show the default or standard directory path the applications are normally installed.
4. To change the directory path click the box with the “…” and you can browse to the directory path you installed
the application.
INSTANT DVD 2.0 Page 25
• Options:
The Options menus provides more selections in customizing your use of the Capture Wizard application:
Click the Options button at the top of the interface to view the Options menu.
Show Splash
If there is a check mark next to this an “ADS” splash screen will appear on your screen when you start Capture Wizard. To disable, click on “Show Splash” and the check mark will disappear.
Show Wizard
If there is a check mark next to this, the “Capture Wizard” screens will appear on your screen when you start Capture
Wizard. To disable, click on “Show Wizard” and the check mark will disappear.
Preview Immediately at Startup
If this has a check mark next to it; video will begin previewing automatically when you start Capture Wizard.
Audio…
This will open a dialog box which will allow you to set the audio bit rate for your video capture. The default settings
for VCD, SVCD and DVD are 224 kilobits per second, but you can select a range from 112 kbps to 384 kbps.
Playback…
This will allow you to playback captured video at any standard playback resolution regardless of the capture
resolution:
1.) Click Options at the top of the screen.
2.) Click Advanced
3.) Click Playback Options
4.) Select the desired playback resolution.
5.) if you select Full Screen, then you can manually drag the playback window to any size.
Selecting this will open a dialog box that allows you to change the playback resolution of captured video. This will
allow you for example to playback SVCD (480 x 480) video at 720 x 480 if you like, and so forth. You can also set to
playback all video at full screen resolution. When this setting is chosen, a full screen video window will open, but it is
manually sizable by dragging any edge of the window.
Use RenderGraph
This setting is off by default. Only use this setting if you have some trouble using the “Seek” bar for playback.
When this is enabled, CapWiz will use any MPEG decoder that is found on your system. If you have more than one
MPEG software decoder installed there could be some confusion between MPEG decoders. To ensure that you
use the Instant DVD software encoder, uncheck this setting.
Skins…
This will bring up the Skin Chooser. Currently CapWiz includes 2 skins. You can easily choose the skin of your
choice. In the future there may be lots of skins to select.
INSTANT DVD 2.0 Page 26
Recording
This presents a Recording Options dialog box with the following selections:
Prompt to Confirm Recording
If this is enabled, you will receive a confirming prompt when ever you click the Record button. This may be used
to more accurately time the beginning of a recording session.
Prompt Delay Record
Enabling this feature will cause the “Recording Options” box to appear when you click the Record Button.
Click “Prompt” Delay Record” again to disable.
When you click the Record button you will be presented with a dialog box with allows you to set the hours,
minutes and seconds for recording delay. For example if you want to start recording in 1 hour, set to one
hour, after one hour, recording will start automatically.
Disable Screen Saver during recording
If you are doing a long capture you may want to disable your screen saver. Sometimes, depending upon the
graphics card you are using, a screensaver, can disrupt the video capture.
Record Duration
You can set a time limit for your recording. If you know you want to record for exactly 1 hour, you can set the
record duration, hours, minutes and seconds exactly. Start recording and walk away knowing that the recording
will stop at the time limit you determine. You can use Record delay and Record duration in combination.
Disk space
You can set up to be warned if you don’t have enough disk space available when you begin recording. Check this
box to enable the feature and set the slider to the amount of disk space you feel comfortable as a warning level.
• Help
About
The About box so you can check the version number you are running and it will also display the amount of
disk space available on your C: drive.
Help Using CapWiz
This will bring up an Adobe Acrobat file that will display this CapWiz manual.
System Info
This will bring up a dialog box with all of your system information. You can click the copy button and paste this
information in an e-mail and send to the ADS tech support person if he/she requests it.
INSTANT DVD 2.0 Page 27