1
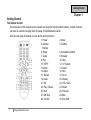
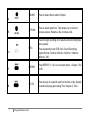
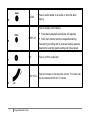
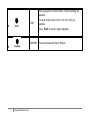
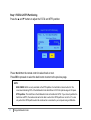
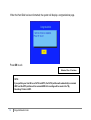
Multimedia Center CMC 1000 series USER MANUAL 1 TABLE OF CONTENTS GETTING STARTED .............................................................................................................................................................. 4 THE REMOTE CONTROL .................................................................................................................................................... 4 TERMINOLOGY .............................................................................................................................................................. 11 THE MULTIMEDIA CENTER PANEL ..................................................................................................................................... 12 USING THE MULTIMEDIA CENTER ..................................................................................................................................... 13 VIDEO IN ..................................................................................................................................................................... 14 FILE COPY .................................................................................................................................................................... 14 BROWSER .................................................................................................................................................................... 15 SETUP ......................................................................................................................................................................... 15 TIMER REC .................................................................................................................................................................. 15 FORMAT HARD DISK ......................................................................................................................................................... 16 FIRMWARE UPGRADE ....................................................................................................................................................... 20 MY RECORDINGS .............................................................................................................................................................. 21 TIMER RECORD MENU ...................................................................................................................................................... 22 CREATING A NEW SCHEDULE ........................................................................................................................................... 22 EDITING SCHEDULES ...................................................................................................................................................... 24 DELETING SCHEDULES .................................................................................................................................................... 25 VIEWING SCHEDULE STATUS ............................................................................................................................................ 26 VIEWING RECORDING HISTORY ........................................................................................................................................ 27 2 Cirago Multimedia Center SETUP MENU .................................................................................................................................................................... 28 CHANGING SYSTEM SETTINGS .......................................................................................................................................... 28 CHANGING VIDEO SETTINGS ............................................................................................................................................ 33 CHANGING AUDIO SETTINGS ........................................................................................................................................... 37 CHANGING RECORD SETTINGS ......................................................................................................................................... 40 CHANGING PHOTOS SETTINGS ......................................................................................................................................... 44 CHANGING NETWORK SETTINGS....................................................................................................................................... 48 BROWSER MENU .............................................................................................................................................................. 65 BROWSING MUSIC......................................................................................................................................................... 67 BROWSING PHOTOS ....................................................................................................................................................... 68 BROWSING MOVIES ....................................................................................................................................................... 69 BROWSING ALL ............................................................................................................................................................. 70 FILE EDIT MENU............................................................................................................................................................ 71 PLAYLIST FEATURE ......................................................................................................................................................... 74 FILE COPY MENU .............................................................................................................................................................. 76 SPECIFICATIONS ................................................................................................................................................................ 80 FREQUENTLY ASKED QUESTIONS ...................................................................................................................................... 83 3 Cirago Multimedia Center Getting Started Chapter 1 Getting Started The Remote Control All procedures in this manual can be carried out using the remote control buttons. Certain functions can also be carried out using the front panel of the Multimedia Center. See the next page for details on each button and its function: 1. Power 3. Number Buttons 5. Setup 7. Guide 9. Play 11. FR/FF 13.Zoom 15.Option 17. Repeat 19. Audio 21. OK 23. Play / Pause 25. Next 27. CM Skip 29. Confirm 4 Cirago Multimedia Center 2. Mute 4. Subtitle 6. Navigation buttons 8. Browser 10. Stop 12. TV System 14. Select 16. REC 18. Go to 20. Display 22. VOL+/VOL24. Return 26. Previous 28.Slow 30.Time Shift No. Button POWER 1 MUTE 2 Function Press to power on or off the Multimedia Center. Press to mute audio output ; press again to resume. 3 NUMBER SUBTITLE 4 Press to enter channel numbers or numeric input when changing settings. Activates available subtitles when playing video files. DivX subtitles supported: SRT,SMI,SUB,SSA format file. SETUP Press to access the Setup Menu directly to change system settings. Navigation Press the arrow buttons to navigate the menus. 5 6 5 Cirago Multimedia Center GUIDE Press to view the Guide menu. BROWSER Press to browse music, photos, movies, and all files on the Multimedia Center and USB host / Memory Cards. PLAY Press to begin playback of a media file. STOP Press to stop playback. 7 8 9 10 Press to fast rewind or fast forward the current playback. 11 12 13 FR/FF Press repeatedly to select faster rewind or fast forward speeds. TV SYSTEM Press to switch between NTSC Interlaced, NTSC Progressive, PAL Interlaced, and PAL Progressive. ZOOM Press to zoom in/out when playing back photos or Video programs. Photo zoom levels:2X,4X,8X,16X; Video zoom levels: 2X, 3X, 4X, 8X. 6 Cirago Multimedia Center SELECT Press to Select files to add to Playlist. OPTION Press to select option bar. This allows you to return to previous screen, Rename a file or Delete a file. 14 15 Press to begin recording or to resume when recording has been paused. REC 16 17 18 7 Cirago Multimedia Center Press repeatedly to set OTR (One Touch Recording) length (30mins / 60mins / 90mins / 120mins / 180mins / 240mins / Off). REPEAT Press REPEAT 1 / ALL to set repeat option - Chapter, Title or Off. GO TO Press to jump to a specific point on the disc or title. Specify the desired viewing point using Title, Chapter or Time. AUDIO 19 Press to audio details on an audio or video file while playing. Press to display current status. DISPLAY 20 Press during playback and display info appears Show track number and time elapsed/remaining. Press during recording and an onscreen display appears, showing the recording quality setting and time elapsed. OK Press to confirm a selection. VOL+/VOL- Press to increase or decrease the volume. TV volume can also be controlled from the TV remote. 21 22 8 Cirago Multimedia Center Press to pause current playback. PLAY/ PAUSE 23 Press again to step to the next frame. Press PLAY to resume playback. RETURN 24 Press to go to the next file (except music files) NEXT Press to go the previous file (except music files) PREV 25 26 CM SKIP 27 9 Cirago Multimedia Center Press to return to the previous screen when navigating the menus. Press to page down the file list at Browser. Press to page up the file list at Browser. Commercial Skip: Press to advance 30 seconds when in playback or record mode. This feature is designed so that you can skip through advertisements during TV shows. Press to play back in slow motion. 5 motion settings are available. SLOW 28 Five slow motion levels (3/4,1/2,1/4,1/8,1/16x) are available. Press PLAY to resume regular playback. CONFIRM 29 10 Cirago Multimedia Center Press to add selected files to Playlist. Press to activate the time shift function, which allows you to pause live TV and resume the program from the point you left it. While paused, the program is recorded to the HDD, as long as space is available. TIME SHIFT 30 Press to activate TIME SHIFT function and wait for the PLAY arrow to appear on the screen. Press PAUSE to pause the recording. Press PLAY to resume viewing the program. Timeshift mode remains active until you press the STOP button. (More on Page 41) Terminology HDD USB LAN CARD 11 All data stored on the Multimedia Center This refers to any device that is connected to the USB host (USB flash drive, computer, external hard drive) This refers to Network or LAN Memory Cards – the Multimedia Center accepts SD, MS and MMC cards Cirago Multimedia Center The Multimedia Center Panel There are some control buttons on the front of the Multimedia Center. The remote control has more functions on it. The green light on the front panel indicates when the Multimedia Center is on. The red light on the front panel indicates that Recording is in progress. NOTE: When powering off the Multimedia Center, the green light on the front panel of the Multimedia Center will take about 10 – 15 seconds to turn off. During this time, all current settings are being saved. 12 Cirago Multimedia Center Using the Multimedia Center Connect Multimedia Center to your TV using HDMI Cable or AV cables provided. Turn on the Multimedia Center. The startup screen below will appear. Your TV may display a “No Signal” message for a few seconds, and will then go to the guide menu. 13 Cirago Multimedia Center Guide Menu Video In To view Live TV, connect your cable or satellite box to the AV input on the Multimedia Center, and select Video In to display what is playing. A DVD player or VCR can also be connected to the Multimedia Center. File Copy File Copy allows you to copy a file from the HDD to an external memory device such as a USB flash drive or memory card and vice versa. A file recorded on the Multimedia Center or USB flash drive or Memory Card is called a „Title‟. 14 Cirago Multimedia Center Browser Select the Browser icon on the guide menu page to browse through movie, photo and music files stored either on the Multimedia Center, USB flash drive, Memory card, or LAN (network) Setup To enter the setup menu, press the SETUP button on the remote control or select the Setup icon on the guide menu. You can change language, date and time, resolution, recording settings and more from this menu. Timer REC To enter the Timer Record setup screen, select the Timer REC icon on the guide menu. This function allows you to setup and edit recording schedules. You can also view a history of recording schedules from this menu. 15 Cirago Multimedia Center Format Hard Disk Chapter 2 Format Hard Disk The media center comes with a formatted hard disk. If you need to reformat it, please follow the instructions below. Guide Menu > Setup > System > HDD Format. A warning page will appear informing you that formatting your hard Disk will erase ALL files on it. Press ◄ and ► on the remote control to make your selection. Press OK to proceed, or cancel to return to the previous page. WARNING: Formatting the HDD will permanently erase all the files on it. 16 Step 1: FAT32 & NTFS Partitioning Press the ▲ and ▼ buttons to adjust the FAT32 and NTFS partition. Press ◄ and ►on the remote control to select back or next. Press OK to proceed or select the back button to return to the previous page. NOTE: MAC USERS: MACs can only read data on the NTFS partition of a hard disk but cannot write to it. We recommend allocating 100% of the Multimedia Center Hard Drive to FAT32 for optimal usage of HD space. NTFS partition: The Hard Drive in the Multimedia Center is formatted to FAT32. If you chose to partition the hard drive as NTFS, the media center will not be able to write to the NTFS partition or record to it. You can only write to the NTFS partition when the media center is connected to your computer using a USB cable. 17 Cirago Multimedia Center Step 2: Format Hard Disk Press ◄ and ► on the remote control to select „back‟ or „format‟. Press OK to proceed with your selection. Press RETURN to go to the previous page. 18 Cirago Multimedia Center When the Hard Disk has been formatted, the system will display a congratulations page. Press OK to exit. Estimated Time: 2-3 minutes NOTE: If you partition your Hard Drive as FAT32 and NTFS, the FAT32 partition will automatically be renamed HDD1 and the NTFS partition will be renamed HDD2. All recordings will be saved in the “My Recordings” folder in HDD1. 19 Cirago Multimedia Center Firmware Upgrade NOTE: If your Multimedia Center is connected to your TV with an HDMI cable, you will not be able to see any menus relating to the firmware upgrade. Please use the AV cables (red, white and yellow) to connect to your TV during the firmware upgrade. Please follow the steps below to upgrade the Multimedia Center firmware. 1) In “Video In” mode, press the STOP and PAUSE button on the remote control. A “Version Information” screen will pop up. The “Kernel Revision” number indicates the firmware version that the media center currently has. 2) Go to http://cirago.com/multimediacenter. If there is a newer firmware version available, download the firmware upgrade files onto a USB flash drive. 3) Turn the Multimedia Center off from the Power switch on the back of the Multimedia Center Box. 4) Insert the USB flash drive to the USB slot on the Multimedia Center. 5) Press and hold the STOP button on the front of the Multimedia Center. The Stop button is located on the bottom right hand side of the Multimedia Center. 6) Turn on the Multimedia Center. (Continue holding the STOP button – approximately 20 – 30 seconds) 7) A screen indicating that the firmware upgrade has started will show up on your TV screen. Once you see the screen, release the STOP button. Please do not turn off the Multimedia Center while the firmware upgrade is in progress. 8) When the firmware has been upgraded, the Multimedia Center will automatically restart. 9) Unplug the USB flash drive and use the Multimedia Center as normal. 20 Cirago Multimedia Center My Recordings Chapter 3 My Recordings The system will make a “My Recordings” folder under “HDD1” or USB device (depending on which one you choose for your recordings to be saved to) automatically for the first time. Your recorded files will be saved in this folder. The file name of each recorded file will be named automatically based on the date and time of recording. You can rename the file after it has completed recording by pressing the OPTION button on the remote control. NOTE: When recording is in progress, the red light on the front of the Multimedia Center will be lit up to indicate that recording is in progress. When recording is in progress, you can watch any file that is on the HDD or rename files (except the recording file). You will not be able to use the File Copy feature while recording is in progress. 21 Cirago Multimedia Center Timer Record Chapter 4 Timer Record Menu The Timer Record menu allows you to create, edit and delete recording schedules and view the status of set recordings and recording history. To enter this menu, select Timer Record from the Guide menu. Creating a New Schedule Press ◄ and ► on the remote control to select the Edit tab from the menu bar. Select Add a New Schedule and press OK. The schedule setting screen appears. 22 NOTE: You can connect a USB Flash Drive, or a external Hard Drive to the USB port on the Media Center and expand your storage capacity. On the screen on the left, under “Device” you can choose between HDD or USB to save your recordings. Use ◄ and ► on the remote control to move between fields and Press ▲ and ▼ to adjust each setting. Start Time Length Repeat Quality Preview 23 Enter the date and time of the recording. Enter the duration of the recording. Select how often you want the schedule to record. Choose from Once, Everyday, Mon-Fri, Mon-Sat or for an individual day of the week. Select the recording quality. Choose from HQ, SLP, EP, LP and SP. The higher the quality, the more space it will take up on the hard drive. See HDD/USB Free Space on the left of the screen for details of how long you can record for using each setting. The Multimedia Center will only show you free space on the HDD, and not on the USB device, even if you choose the USB device as your recording device. This small preview window will show the current program of the select channel. Cirago Multimedia Center Editing Schedules Press ◄ and ► on the remote control to select the Edit tab from the menu bar. Select the schedule you want to edit from the list and press OK. The schedule setting screen appears. Modify the schedule as described in “Creating a New Schedule” on page 21. 24 Cirago Multimedia Center Deleting Schedules Press ◄ and ► on the remote control to select the Delete tab from the menu bar. Select the schedule you want to delete and press OK. A confirmation message appears. Select CANCEL, Delete the selected schedule or Delete all schedules. Press OK to confirm. 25 Cirago Multimedia Center Viewing Schedule Status Press ◄ and ► on the remote control to select the Schedule tab from the menu bar. The list of upcoming recording schedules is displayed. Select a schedule and press OK. Select Enable to proceed with recording or Pause to pause the recording. Press OK to confirm. 26 Cirago Multimedia Center Viewing Recording History Press the ◄ and ► navigation arrows on the remote control to select the History tab from the menu bar. Here you can view a complete history of all recordings that were set. 27 Cirago Multimedia Center Setup Menu Chapter 5 Setup Menu The Setup Menu allows you to configure video, recording and the system settings. To enter the menu, select Setup from the Guide menu. Changing System Settings Press ◄ and ► on the remote control to select the System tab from the menu. Then press ▲ and ▼ to make desired selection. 28 ©2008 Cirago International ltd. , All Rights Reserved Worldwide Menu Language Select to choose the Display language. Press ▲ and ▼ to select the language. Press OK to confirm. 29 Cirago Multimedia Center Text Encoding Select to choose the text encoding language. Press ▲ and ▼ to select the text encoding language. Press OK to confirm. Time Select to set the date and time. Press OK to enter Manual time setup. 30 Cirago Multimedia Center Enter the system menu and press ▲ and ▼ to select each field and the up and down navigation arrows to adjust each setting. You can also use the number keys to input values. Press OK to confirm. 31 Cirago Multimedia Center HDD Format Select to HDD Format. Press ▲ and ▼ button on the remote control to select Cancel or HDD Format. For more information on formatting the HDD, please see pages 15 - 18. Restore Default Select to restore factory default settings. Select Cancel to return to previous menu or OK to proceed. Please note this does not restore the original firmware, just the original factory settings. 32 Cirago Multimedia Center Changing Video Settings Press ◄ and ► on the remote control to select the Video tab from the menu bar. 33 Cirago Multimedia Center Aspect Ratio Select to set the aspect ratio. Press ▲ and ▼ to select from Pan Scan 4:3, Letter Box 4:3, or 16:9. Press OK to confirm. Pan Scan 4:3: Display a wide picture on the entire screen and cuts off the redundant portions. Select when a standard 4:3 TV is connected. Letter Box 4:3: Display a wide picture with two black borders on the top and bottom of 4:3 screen Select when a standard 4:3 TV is connected. 16:9: Compress the image to convert the whole image. Select when a 16:9 TV is connected. 34 Cirago Multimedia Center Brightness Select to set brightness levels. Press ▲ and ▼ to adjust brightness. The new setting is previewed onscreen. Press OK to confirm. Contrast Select to set contrast levels. Press ▲ and ▼ to adjust contrast. The new setting is previewed onscreen. Press OK to confirm. 35 Cirago Multimedia Center TV System Select to adjust TV system. When using a HD TV, choose between HDMI Auto,480P,576P,720P 50HZ,720P 60HZ,1080i 60HZ. Press ▲ and ▼ to set the HD resolution, depending on your viewing preferences. Press OK to confirm. 36 Cirago Multimedia Center Changing Audio Settings Press ◄ and ► on the remote control to select the Audio tab from the menu bar. 37 Cirago Multimedia Center Night Mode Select between Night Modes On, Off and Comfort. This function reduces the maximum dynamic audio range. Press ▲ and ▼ to make your selection. Press OK to confirm. 38 Cirago Multimedia Center Digital Output Select to set Digital output type. Press ▲ and ▼ to select from HDMI and SPDIF RAW or LPCM. S/PDIF (Sony/Phillips Digital Interface Format) carries digital audio signals between the DVD recorder and other component devices, such as a home theater setup with surround sound. The HDMI™(High Definition Multimedia Interface) is a compact audio/video connector interface for transmitting uncompressed digital streams. It represents a digital alternative to consumer analog standards such as Radio Frequency (RF) coaxial cable, composite video, S-Video, SCART, component video, D-Terminal, and VGA. RAW data is the original bit stream and will provide a better audio output quality. LPCM is the default setting, and provides 2 channels audio output. 39 Cirago Multimedia Center Changing Record Settings Press ◄ and ► on the remote control to select the Record tab from the menu bar. 40 Cirago Multimedia Center Quality Select to set the default recording quality. Press ▲ and ▼ to select the quality setting you require. The highest quality setting is HQ which requires the most storage space. The other settings reduce recording quality sequentially and also require less storage space. Press OK to confirm. 41 Cirago Multimedia Center Automatic Timeshift Timeshift allows you to pause Live TV and resume watching it when you are ready to do so. The Cirago Multimedia Center has a 30 minute timeshift recording buffer. When Timeshift is activated, the media center will record the most recent 30 minutes of Live TV. Automatic Timeshift “On”: Timeshift will automatically start whenever you begin watching Live TV. Press “Pause” on the Multimedia Center remote control to pause live TV. Press play to resume watching from the point you left Live TV. If you want to fast forward through the show, press the >> button on your remote control. You cannot stop Timeshift in this mode. Automatic Timeshift “Off”: Timeshift does not start automatically and you have to manually enable it by pressing the Timeshift button on the remote control. After pressing the Timeshift button, you will see a green bar with Timeshift details. Press Play to resume watching what is recorded. Press Timeshift again or the Stop button on the remote control to stop Timeshift recording. Please note that there will be a 5 second delay as the system completes your recording. 42 Cirago Multimedia Center Press “Display” on the Multimedia Center remote control to display the Timeshift bar. Press “Display” again to make the timeshift bar disappear. Timeshift will still be running although you can‟t see it in the Automatic Timeshift “On” mode. Record Device Select to choose the device to which to record. Press ▲ and ▼ to select to default device on which to record. Press OK to confirm. 43 Cirago Multimedia Center Changing Photos Settings Press ◄ and ► on the remote control to select the Photos tab from the menu. 44 Cirago Multimedia Center Slide Show Time Select to set the delay between each photo in the slideshow. Press ▲ and ▼ to select the slide interval. Press OK to confirm. 45 Cirago Multimedia Center Transition Effect Select to set the transition effect of photos. Press ▲ and ▼ to select the photo transition. 1) Cross Fade – fade in and fade out 2) Left to Right- from left to right 3) Top to Bottom- from top to bottom 4) Waterfall- like a steep descent of water from a height 5) Snake – like a snake motion 6) Dissolve – like a water dissolve motion 7) Strip Left Down – like taking off a cover from top left to bottom right 8) All Effect Shuffle – combine all transitions Press OK to confirm. 46 Cirago Multimedia Center Background Music Select to play the music file under the same folder. Press ▲ and ▼ to select the source of the background music when viewing your pictures. Select “off” for no background music. Press OK to confirm. Music files have to be in the same folder as your pictures to play as background music when the Folder option is selected. 47 Cirago Multimedia Center Changing Network Settings Press ◄ and ► on the remote control to select the Network tab from the menu. 48 Cirago Multimedia Center Wired LAN Setup Select to set the Network Settings. Before using the Network functions, please check following items: 1) Connect the Multimedia Center to your Network. 2) Enable NetBIOS or TCP/IP on computer. 3) Turn off your PC‟s firewall. 4) Share the folders which you wish to browse in your PC. Press ▲ and ▼ to select DHCP(AUTO) or FIXED IP(MANUAL). Press OK to confirm. 49 Cirago Multimedia Center DHCP DNS(AUTO) Select AUTO to set the DNS server IP address automatically. Press OK to confirm. 50 Cirago Multimedia Center FIX IP (MANUAL) When using Fixed IP, it is required to manually enter the IP address, Subnet Mask and Default Gateway. For further assistance with these settings, please contact your network administrator. Press the ◄, ►, ▲ and ▼buttons and the number keys on the remote to enter the IP address. Press OK to confirm. 51 Cirago Multimedia Center Wireless Setup Before configuring the WLAN settings, please check the following: 1) Make sure the WLAN USB Adapter (included) is connected to the USB port; 2) Make sure there is a wireless router or an AP (Access Point) on the network, or your PC is equipped with a wireless network adapter/card; 3) Make sure your player is in the effective range of the WLAN. Select Modify if it is your first time to connect to a wireless network. 52 Cirago Multimedia Center Choose between two connection modes: Infrastructure (AP) mode and Peer to Peer (Ad Hoc) mode. Press ◄ to cancel, and ► for next step. 53 Cirago Multimedia Center 1) Get SSID Name Select Auto to search for an existing SSID (Service Set Identifier). Select the access point you wish to access from the SSID list. 54 Cirago Multimedia Center Note: In the Security list, WEP (Wired Equivalent Privacy) and WPA (Wi-Fi Protected Access) means the network is encrypted, i.e. an encryption key is needed to access the network. NONE means it is an open system network. 55 Cirago Multimedia Center 2) Confirm SSID Name 56 Cirago Multimedia Center 3) WLAN Security Setting Select Open System if the network is not encrypted. Otherwise, select Shared Key (WEP) or WPA Key to enter the encryption key. 57 Cirago Multimedia Center 4) Wireless Address Setup Select DHCP IP (AUTO) to set the IP address automatically. Or select FIX IP (MANUAL) to set the IP address manually. 58 Cirago Multimedia Center 5) Setting List The Setting List displays the network settings that you configured. 59 Cirago Multimedia Center 6) Test Connection The system will test your connection. This may take a few minutes. If the test is ok, the network information will be displayed. 60 Cirago Multimedia Center Peer to Peer (Ad Hoc) Peer to Peer mode, which is also called Ad Hoc mode or computer-to-computer mode, is used to connect wireless clients directly together, without the need for a wireless router or access point. 1) Ad Hoc Setup Select Manual if you wish to change the default settings. Then set the Wireless SSID, Wireless Security, and Host IP for the Ad Hoc connection. 61 Cirago Multimedia Center Note: Both the player and your PC need to use the Ad Hoc mode, share a common SSID, and be put into the same IP range. 62 Cirago Multimedia Center 2) Save and Startup Select OK to confirm the above settings. 63 Cirago Multimedia Center The system will automatically configure and test the connection. When the test passes, the network information will be displayed. 64 Cirago Multimedia Center Browser Menu Chapter 6 Browser Menu The Browser menu allows you to browse and play music, photo and movie files stored on the Multimedia Center (HDD), external memory and Network. To enter the menu, select Browser from the Guide menu. Press ▲ and ▼ to select the device on which the media is stored. Choose from HDD, Memory Card, USB (for files on external device connected to USB port) and NET (LAN) and press OK. NOTE: Do not power up the Multimedia Center with a USB flash drive already plugged in. Plug it in after the Multimedia Center has been turned on. 65 ©2008 Cirago International ltd. , All Rights Reserved Worldwide LAN / NETWORK When you are browsing your Network (LAN) , you can choose a network device from the menu. If prompted for a username and password, type in the login information for your computer and save it to “My Short Cuts” to access that computer without logging in again. 66 Cirago Multimedia Center Browsing Music Use the ◄ and ► navigation arrows to select the Music tab. NOTE: Use the ◄ and ► buttons on the remote control to switch from “All” to “Music” mode to view only music files. In the “Music” mode, you can press the “Repeat” button on the remote control till it goes to “Repeat All”. The Repeat All feature will play all the music files in the folder. If you would like to play one music file repeatedly, choose “Repeat 1”. To turn off the repeat function, choose “Repeat Off”. Press ▲ and ▼ to select the folder containing your audio files. The selected file name appears at the bottom of the screen, along with additional information. Press ▲ and ▼ to select the file you want to play and press OK. This browsing music function supports MP3, WMA, AAC and OGG format Playback. Some M4A formats may be supported if they have AAC encoding. 67 Cirago Multimedia Center Browsing Photos Use the ◄ and ► navigation arrows to select the Photos tab from the Browser menu. NOTE: When a photo is displayed in full screen mode, the slide show starts automatically. While listening to MP3 files, you can browse photos at the same time, as long as the photos and the music files are in the same folder. Press ▲ and ▼ to select the folder containing your photo files. Press ▲ and ▼ to select the photo you want to view and press OK or PLAY. The photo is displayed full screen. While viewing a photo, you can press ◄ and ► to rotate the photo. Press ZOOM to zoom in/out a photo. There are four zoom levels are available: 2x, 4x, 8x and 16x. 68 Cirago Multimedia Center Browsing Movies Use the ◄ and ► navigation arrows to select the Movies tab. NOTE: When playing a HD Video, you can adjust the screen size. Go to: Guide Menu > Setup > Video > TV System For information on how to play file formats other than the ones supported by the Multimedia Center, go to FAQs (Page 86, Question 9) Press ▲ and ▼ to select the folder(s) containing your movie files. Enter the folder, press ▲ and ▼ to select the movie you want to view and press OK. The movie will be played in full screen. 69 Cirago Multimedia Center Browsing All Use the ◄ and ► navigation arrows to select the All tab. Press ▲ and ▼ to select the folder(s) containing your all files Enter the folder, press ▲ and ▼ to select the file you want to view and press OK to play. 70 Cirago Multimedia Center File Edit Menu Press ▲ and ▼ to select the file or folder. Press the OPTION button to rename or delete files. Return Select to return to the previous screen. Rename 1. Press ▲ and ▼ on the remote control to select the Rename tab from the menu bar. 2. Press OK on the remote control. The name entry screen appears. 71 Cirago Multimedia Center 3. Use the navigation arrows to select letters and numbers. Select CAPS to toggle between uppercase and lowercase letters. Press ← to delete a letter. Press → to insert a space. Press OK to input each letter or number. 4. Once you have entered the new name, select OK and press OK to confirm all changes. If you want to cancel the naming during the process, press RETURN. 72 Cirago Multimedia Center Delete 1. Press ▲ and ▼ on the remote control to select the Delete tab from the menu bar. 2. Press OK to confirm and delete the file. 3. A confirmation message appears. Press ▲ and ▼ and select OK. 4. Press OK to delete the selected file. To cancel delete, select Return. 73 Cirago Multimedia Center Playlist Feature The Playlist feature allows you to select files from different folders on your Multimedia Center and make a playlist of them. The playlist contains 4 folders – All, Music, Photos and Movies. 1) 74 Go to Browser Menu Press the “Browser” button on your remote control to go to the Browser page. Select “HDD”. Please scroll to the tab corresponding to the playlist you are making. If you are making a photo playlist, scroll to the Photo tab. Find the folder that your files are in and press the “Select” button on your remote control to choose the files you would like to add to the playlist. Before exiting the folder, press “Confirm” button on the remote control to add the selected files to the playlist. Cirago Multimedia Center 2) Return to Playlist Press “Browser” button on your remote control. Select “Playlist”. Make sure you are in the right Tab to view the playlist you would like to play. Press Play to begin viewing. NOTE: The ALL tab in the Playlist stores a list of files for quick access. It is not a Playlist. The All tab can store a combination of photo, music and movie files. When making a playlist, the correct tab in the Browser Menu must be selected for the files to be added to the correct playlist. For instance, in the Browser menu, the Music tab must be selected for files to be added to the Music playlist. To add files to the Playlist, the files need to be on the Media Center Hard Drive. If you are using a USB flash drive or memory card, please copy the files over to the Multimedia Center first and then add them to your Playlist. 75 Cirago Multimedia Center File Copy Menu Chapter 7 File Copy Menu The Setup Menu allows you to copy files between the LAN (Network), USB flash drive, Memory Card and HDD. To enter the menu, select File Copy from the Guide menu. Step 1. Select Source and Destination Device When you enter the File Copy menu, press ▲ and ▼ to select the source of the file which you want to copy. Press ► to go to the Destination Menu. Press ▲ and ▼ to select the Destination device. Press ► to go to the next step, and press ◄ to return to previous step. 76 ©2008 Cirago International ltd. , All Rights Reserved Worldwide Step 2. Select files or folders to Copy From the Source menu, press ▲ and ▼ to select and press PLAY to select file or folders which you want to copy. When you select the file or folder, a Press ► to go to the next step, and press ◄ to return. 77 Cirago Multimedia Center will appear next to it. Step 3. Select the Destination folder From the Destination menu, press ▲ and ▼ to select the destination folder. Press ► to go to the next step, and press ◄ to return. 78 Cirago Multimedia Center Step 4. Copy Status Select OK to copy, select No to cancel. When the file copy is complete, the system will display “File Copy Completed!” If the operation failed, the system will display “File Copy failed!” If the File Copy failed, check to make sure you have enough memory on your destination device. You can only copy to a FAT32 partitioned drive and not to a NTFS partitioned drive. 79 Cirago Multimedia Center Specifications Chapter 8 Specifications USB SUPPORTED: USB devices , USB Card reader CONTENT FORMAT SUPPORTED: Video: MPEG1(dat, mpg), MPEG2(vob, mpg, ts), MPEG4(avi, divx, xvid), ISO Picture: JPG, JPEG, BMP Audio: MP3, WAV, WMA, OGG, AAC Maximum number of file names: 9999 files Compression rate: between 32 kbps and 320 kbps RECORDABLE MEDIA SUPPORTED: Built in HDD (DVD+VR mode), Built in USB HDD VIDEO RECORDING MODE Mode DVD HQ 1 hr SP 2 hrs LP 3 hrs EP 4 hrs SLP 6 hrs 80 Cirago Multimedia Center 500 GB 120 hrs 240 hrs 360 hrs 480 hrs 700 hrs 1 TB 240 hrs 480 hrs 720 hrs 960 hrs 1400 hrs 1.5 TB 360 hrs 720 hrs 1080 hrs 1440 hrs 2100 hrs 2 TB 480 hrs 960 hrs 1440 hrs 1920 hrs 2800 hrs VIDEO RECORDING FORMAT MPEG2: DVD+VR (HQ/SP/LP/EP/S-LP mode) AUDIO RECORDING FORMAT DVD+VR (HQ/SP/LP/EP/SLP mode): MPEG2 2-chanel VIDEO OUTPUT SPECIFICATION Composite Components Output Output 1 Vpp 75 Ohm Y:1 Vpp 75 Ohm Cb:0.7 Vpp 75 Ohm Cr:0.7 Vpp 75 Ohm AUDIO PERFORMANCE DA Converter 24-bit/192kHZ AD Converter 24-bit/96kHZ Signal-Noise (1kHZ) ≥ 95dB Dynamic Range ≥90dB (1kHZ) Channel Separation ≥95dB Total Harmonic Distortion (1kHZ) ≤-85dB 81 Cirago Multimedia Center NETWORK FEATURES Ethernet 10/100Mbps Auto-Negotiation IEEE 802.11b/g,up to 54Mbps - supported by WLAN USB Adapter Wireless GENERAL Power Supply AC 100~240V Power Consumption Approx. 35 W 50~60Hz Operating Temperature +5°C to +40°C (+36°F to +104°F) Operating Humidity 5% to 80% RH Dimensions 2.2” x 7.1” x 8.0” (W/H/D) Net Weight Approx 4 lbs Note: The specifications and design of this product are subject to change without notice Please go to www.cirago.com/multimediacenter for product updates and more features of the Multimedia Center. Click on product updates. If you have any questions or concerns about the Cirago Multimedia Center, please feel free to contact us at 408-331-8834 or email [email protected] 82 Cirago Multimedia Center FAQs Chapter 9 Frequently Asked Questions Please check www.cirago.com/multimediacenter regularly to see if there are any new firmware updates and also new additions to the FAQ. Anytime we have a bug fix or new features to add to the media center, we will have a firmware upgrade for you. This allows you to get access to all the latest features of the Cirago Multimedia Center. T V S I G N A L 1. Sometimes when I turn on the media center, it does not go to the normal startup screen or the screen gets cut off. All the cables are connected properly, so what should I do? This could be because of an incorrect TV system setting. Press the “TV System” button on your remote control at an interval of 4-5 seconds. This will change the TV system and resolution. There are few different settings, so repeat this a few times and it will fix the problem. Alternatively, once you get to the startup screen , go to: Guide Menu > Setup > Video > TV System and try out the different options to find one that works best for your TV and viewing preference. W I R E L E S S / W I R E D L A N W E Why doesn’t my media center get an SSID name with a wireless dongle? The screen always displays: “Can’t get any SSID!!” When you insert a wireless adaptor to the media center, it can take the media center a minute or two to recognize the new hardware and initialize it. While this is happening, the wireless adaptor will not pick up any wireless signals in the area and your media center will give you the “Can‟t get any SSID” error. 2. 83 Cirago Multimedia Center Also, if you are using a wireless adaptor other than the one provided, make sure that it has a Realtek chipset. We strongly encourage using the wireless adaptor that is provided with the media center. 3. I configured everything correctly, but still cannot get the media center to connect to my wireless network. What should I do? Make sure that your wireless access point is actually broadcasting a signal. DHCP should be turned on. Also, check to make sure that there are no IP conflicts with other devices on your network. To ensure that your wireless network is working, make sure that other devices can connect to your wireless network. Try another wireless adaptor with your media center. If that fails, connect to your network using an Ethernet cable to access files on your network. Give us a call and we‟ll help get to the bottom of the problem! 4. When I try to connect to a computer over my network, it asks me for Net User ID and Net Password. What should I use to connect to that computer? The media center asks you to login as a security requirement. You can use the login information for your computer – i.e. the username and password that your computer prompts you to enter when you start your computer. After you enter it, make sure you choose “OK & Save to My Shortcuts”. This will save your login information for future use. You can then access that computer from the “My Shortcuts” menu under network / LAN. R E C O R D I N G 5. I used the Timer Record feature to schedule a recording on Channel 7 for a later date. In the meantime, I switched to Channel 2. When I came back to watch what I recorded, it had recorded what was on Channel 2! Is there a way to set the channel that I want to record? The media center will record the channel that is fed in through the AV input. So, if you leave the media center on channel 2, it will record what is on channel 2. 84 Cirago Multimedia Center 6. Can I record one channel while watching another? The media center does not support recording and watching separate channels. You can watch any content that is on your media player while a show is recording. So, if you have any movies saved on the media player, or external memory, you can watch them while you are recording Live TV. 7. How is Timeshift different from recording? Timeshift is a temporary recording feature that allows you to pause Live TV, and come back to watch what you have recorded within a time span of 30 minutes. Since the recording buffer is 30 minutes, only the most recent 30 minutes of Live TV will be recorded. So, if you leave for longer than 30 minutes, you will miss some of the recording. Timeshift works best for if you plan to return to watching TV within 30 minutes. If you plan to be away longer, then recording is the better option. Recording will actually record any TV shows to the Multimedia Center‟s hard drive. The recording is only limited to the available space on the hard drive. You can come back at any time to watch the recorded show. Please refer to Page 41 of the user manual for more detailed instructions. F I L E F O R M A T S 8. I have a lot of movies in formats that are not supported by the media center. Is there any way I can watch them on the media center? There is a program called Transcode Server that allows you to play some formats that are not supported by the media player. Please note that Transcode Server is not a product that Cirago makes or supports. Transcode Server supports the playback of H.264 and MKV files on the media center. As of March, 2009, Transcode server only works with Windows Operating Systems. Download the Transcode Server software and instructions from www.cirago.com/multimediacenter . 85 Cirago Multimedia Center M I S C E L L A N E O U S 9. When I connect the media center to my computer via the USB cable, nothing happens. What am I doing wrong? Make sure the media center is powered on. Connect the media center to your computer via USB cable provided. Your computer should recognize the media center as a removable storage device. If your computer still does not recognize the media center, try using another USB port on your computer. 10. Can I use the media center to store files other than media files? Yes, depending on which model of the media center you have, you either have 500GB or 1 TB of space. You can use the media center to store all kinds of files. The media center will play only media files, but it can store files in any format. It can be used as an external hard drive. C O N T A C T U S Please call or email us if you are having any trouble with the Cirago Multimedia Center. Cirago International Ltd. 611 Vaqueros Ave, Sunnyvale, CA 94085 Ph: 408-331-8834 Fax: 408-331-8830 Email: [email protected] www.cirago.com User Manual Version 1.1 86 Cirago Multimedia Center 87 Cirago Multimedia Center 88 Cirago Multimedia Center