1
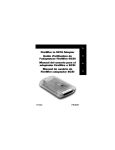
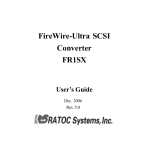
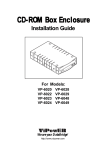
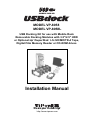
MODEL VP-8058
MODEL VP-8058L
USB Docking Kit for use with Mobile Rack
Removable Docking Modules with 3.5"/2.5" HDD
or Optional zip /SuperDisk LS-120/MO/TR-4 Tape,
Digital Film Memory Reader or CD-ROM drives
TM
TM
Installation Manual
We are your DataBridge
TM
http://www.vipower.com
Table of Contents
1-1 Introduction .......................................................................... 1
1-1.1 USBdock Features .................................................... 2
1-1.2 ATA/ATAPI Device Compatibility ............................... 2
1-1.3 Power Requirements ................................................. 2
1-1.4 Unpacking Your USBdock ......................................... 2
2-1 Installation ............................................................................ 3
2-1.1 Install Driver Software (For Windows 98 Only) .......... 3
2-1.2 Install Stand Set on Mobile Rack ............................... 3
2-1.3 Setting Up the USBdock for Operation ...................... 4
3-1 Disconnecting the USBdock ................................................ 6
4-1 Accessories ......................................................................... 6
PROPRIETARY NOTICE
ViPowER Inc. makes no warranty of any kind with regard to this material,
including, but not limited to, the implied warranties of merchantability
and fitness for a particular purpose. ViPowER Inc. shall not be liable for
errors contained herein or for incidental or consequential damages in
connection with the furnishing, performance, or use of this material.
This document contains proprietary information which is protected by
copyright. All rights are reserved. No part of this document may be
photocopied, reproduced, or translated to another language without the
written consent of ViPowER Inc. The information contained in this
document is subject to change without notice.
PC is a trademark of International Business Machines Corporation.
Mac is a registered trademark of Apple Computer, Inc.
Windows is a registered trademark of Microsoft Corporation.
All other trademarks belong to their respective owners.
© Copyright 1999 by ViPowER, Inc.
11/99A
1-1 Introduction
Congratulations on your purchase of the USBdock docking kit. The USBdock is an
external USB interface adapter which is designed to enable hot-swap, plug-and-play
operation of Enhanced IDE or ATA/ATAPI devices through the USB interface on any
USB-equipped computer. The USBdock’s 50-pin Centronics connector is designed
for use with external devices using the same connector type (such as CD-ROM) and
the Mobile Rack drive case, which provides the perfect solution for data backup and
transporting of data between computers using hard disk drives, zip drives,
LS-120 drives, MO drives, tape drives, digital film readers and more.
The USBdock connects to any notebook,iMac, Net-PC, Micro ATX PC, LCD panel
PC, Mac and PC desktop computer equipped with a USB port. The USBdock allows
you to easily hot-swap various types of drives mounted in the Mobile Rack without
interrupting the computer’s current operation.
This manual will guide you through the hardware installation of the following
USBdock models:
Model VP-8058 USBdock Docking Kit with Mobile Rack (VP-10LSF)
Model VP-8058L USBdock Docking Kit (without Mobile Rack)
1-1.1 USBdock Features
• Enables hot-swap Plug-and-Play operation of ATA (IDE) and ATAPI
devices with computers using the USB interface
• Complies with USB specification V1.1 and USB Mass Storage Specification
V1.0 High Speed USB 12Mbits/sec Bulk mode transfer which yields
overall 1.1 MBytes/sec burst transfer rate
• High performance embedded processor to reduce firmware overhead dual
(ping-pong) buffer to minimize bus latency
• Intelligent interface uses no host CPU resources to control/monitor
time-consuming drive phases other than data transfer
• Embedded MacOS and Windows 2000 drivers support Plug-and-Play
without additional driver installation
• Proprietary Windows driver supports most devices
• Universal firmware supports all devices, automatic detection for ATA
or ATAPI protocol
• Available in various board form factors for specific applications
• Perfect for adding/sharing external storage devices between computers
using the USB interface
• Actual data rate may vary depending on bus utilization and device
response time
USBdock Installation Manual
1
1-1.2 ATA/ATAPI Device Compatibility
• ATAPI removable drives: Iomega Zip 100MB/250MB and Clik!,
LS-120 Super Floppy, Sony HiFD 200MB, MO drives, tape drives
• Enhanced IDE and ATA hard drives: both 2.5” and 3.5” form factors,
any capacity
• ATAPI CD-ROM drives: CD-ROM, CD-R, CD-RW, DVD drives,
compatible with all major CD-RW software
• ATA removable media drives: SyQuest SyFlyer, SparQ and Syjet, Castlewood
ORG. Supports media change and disk ejection
1-1.3 Power Requirements
• +5V devices: +5V devices can draw power directly through the USB port
connection, the +5V/+12V power adapter, or an optional +5V power adapter
• +5V/+12V devices: +5V/+12V devices require the use of a +5V +12V
AC/DC power adapter (included)
Typical power requirements for ATA/ATAPI device types:
Drive Type
Zip
LS-120 SuperDisk
MO
Tape
2.5” HD
3.5” HD
CD-ROM
+5V
X
X
X
+5V/+12V
X
X
X
X
IMPORTANT
It is recommended that the +5V/+12V power adapter be used for
all devices whenever possible to avoid any power problems.
1-1.4 Unpacking Your USBdock
Before installing the USBdock, verify that the following items are included in the
carton. If any parts are damaged or missing, please contact your local dealer or sales
representative immediately.
• One USBdock interface unit
• One +5V +12V AC/DC power adapter and power cord
• One USB cable
• One Mobile Rack Stand Set (4 pieces)
• One Windows 98 software driver diskette
• One Mobile Rack (VP-10LSF) (for Model VP-8058 only)
2
USBdock Installation Manual
Power Adapter
Power Cord
+5V/+12V
Power Adapter
Mobile Rack
Docking Case
Mobile Rack
Drive Case
USB Cable
USBdock
USBdock Docking Kit Components
Mobile Rack
Stand Set
2-1 Installation
The following sections will guide you through the setup of the USBdock for operation.
• For Windows® 98: Please refer to the software installation manual to install
the Windows® 98 driver.
• For use with the Mobile Rack: please refer to the Mobile Rack Installation
manual for instructions for installing devices in the Mobile Rack drive case.
2-1.1 Install Driver Software (For Windows 98 only)
No driver is needed if you are running Windows 2000 or Mac OS. However, before
connecting the USBdock to your system, Windows 98 users must install the driver
provided on the software driver diskette. Please refer to the Software
Installation Manual for instructions.
2-1.2 Install Stand Set on Mobile Rack
A 4-piece stand set is included to help heat dissipation and provide secure placement
of the Mobile Rack. After mounting the device in the Mobile Rack, slide a stand pad
onto each corner .
Stand Pad
(With Raised Nub
on Bottom)
(x4)
Mobile Rack Stand Set Installed
USBdock Installation Manual
3
2-1.3 Setting Up the USBdock for Operation
LED Indicators
Power
Drive Activity
+5V
External
Power
Connector
50-Pin Centronics
Device Connector
Power Select
Switch
+5V +12V
External
Power Connector
USB
Connector
USBdock Power Select Switch & Connector Locations
Perform the following steps (in the order given) to set up the USBdock with your
peripheral device for operation:
1. For Windows 98 users: verify that the Windows 98 driver is installed.
2. Plug the USBdock’s 50-pin Centronics connector into the connector on the
device you plan to connect to your computer.
a. External devices that provide a 50-pin Centronics interface connector
support direct connection with the USBdock.
b. Internal devices such as EIDE hard drives or ATA/ATAPI devices can be
mounted in the Mobile Rack drive case. (Refer to the Mobile Rack manual for
instructions on mounting these devices in a Mobile Rack.)
IMPORTANT
Make sure the Power Select switch on the USBdock is set
to the MIDDLE power OFF position before proceeding.
Power OFF
External
Power Adapter
+5V USB
Interface
USBdock Power Select Switch Settings
4
USBdock Installation Manual
3. Using the +5V/+12V AC/DC Power Adapter:
a. With the Power Select switch in the OFF (MIDDLE) position, plug in the
6-pin connector-end of the power adapter into its corresponding +5V/+12V
power-in connector on the USBdock.
b. Plug one end of the power cord into the power adapter and the other end into
an AC power source outlet.
4. Set the Power Select Switch to an ON position:
a. When using the external power adapter, set the switch to the LEFT position.
(Note that the green LED on the USBdock should be lit, indicating power
ON.) This allows the device to warm up before connecting to the USB port.
IMPORTANT
All drive devices must be powered up and ready to use
before plugging into the computer’s USB port.
b. When using the USB interface for power, set switch to the RIGHT position.
Note: it is recommended to use the +5V/+12V power adapter whenever possible.
5. Plug one end of the USB cable into the USB port on your computer; plug the
other end into the USB port on the USBdock.
6. Viewing the screen, note that the plug-and-play feature will recognize the new
device and assign it as a new drive. Hard disk drive partitions will also be
auto-detected and assigned drive letters.
The device is now ready to use.
+5V +12V
External
Power Adapter
USB Cable
USBdock
Mobile Rack with
Drive Installed
(or direct connect
to external drive)
Power Cord
USBdock Connections for Operation
USBdock Installation Manual
5
3-1 Disconnecting the USBdock
Perform the following steps to disconnect the USBdock from your computer.
1. Turn off the power by sliding the Power Select Switch to the MIDDLE
OFF position. (Note that the drive icon will disappear from the computer screen.)
2. Unplug the USB port connector from the USBdock.
3. You can now switch to another device. When connecting a new device, be sure to
follow the same sequence for setup as previously outlined in section 2-1.3.
4-1 Accessories
Model VP-6020
CD-ROM Box Enclosure
Printed on recycled paper.