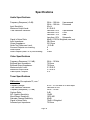
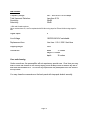
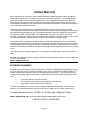
1
Acknowledgments
Manufactured under license from Dolby Laboratories. “Dolby”,”Pro Logic”,
“AC3", and the double-D symbol are trademarks of Dolby Laboratories.
Confidential Unpublished Works. © 1992-1997 Dolby Laboratories, Inc. All
rights reserved. DTS® is a registered trademark of Digital Theater Systems,
L.L.C., Motorola®, ‘Powered by Motorola’™ name and logo are trademarks
of Motorola, Inc.
© Copyright 1996
All Rights Reserved.
B&K Components, Ltd. 2100 Old Union Road, Buffalo New York 14227-2725
* (716)656-0023 FAX (716)656-1291
Table of Contents
Safety precautions
page 3
Features
page 4
Display
page 5,7
Front panel view
page 6
Front panel description
page 6 - 7
Rear panel view
page 8
Rear panel description
page 8 - 11
Remote control
page 12 - 13
Setup
page 14
Factory reset
page 15,35
Making the connection
page 16
Audio only
Audio/video source
Video monitor
VCR
Tape player
Digital
page 16
page 16
page 17
page 17
page 17
page 9,18,24,34
Surround setup
page 19
Channel mode
Bass management
Delay
Surround modes
Speaker calibration
Setup procedure
page 19
page 20
page 20
page 21
page 22, 25
page 22 - 26
Using presets
Recall preset
Save preset
Rename preset
page 26
page 26
page 27
page 28
Page 1
Tuner functions
page 30
AM/FM Band
Tuning/Seek
Direct Frequency Input
FM Stereo/Mono
Save a station preset
Recall a station preset
Auto program station presets
page 30
page 30
page 30
page 31
page 31
page 32
page 33
Advanced operations
page 34 - 36
Star operation
page 34
Troubleshooting
page 36
Specifications
page 37 - 38
Audio
Video
Tuner
page 37
page 37
page 37 - 38
Care and cleaning
page 38
Warranty
page 39
Accessories included: Power cord, Manual, Remote control, 4 AAA batteries
Page 2
SAFETY PRECAUTIONS
PLEASE READ BEFORE INSTALLING
WARNING: TO PREVENT FIRE OR SHOCK HAZARD, DO NOT EXPOSE THIS UNIT
TO RAIN OR MOISTURE.
The lightning flash with arrowhead, within an equilateral triangle, is intended to alert the
user of the presence of uninsulated “dangerous voltage” within the product’s enclosure
that may be sufficient magnitude to constitute a risk of electric shock to you.
The exclamation point within an equilateral triangle is intended to alert the user of the
presence of important operating and maintenance (servicing) instructions in the
literature accompanying the unit.
Caution: To prevent the risk of electric shock, do not remove cover. No user-serviceable
parts inside. Refer servicing to qualified service personnel.
If an outdoor antenna is connected to the antenna input, be sure the antenna system is
grounded to provide some protection against voltage surges and built up static charges.
Keep outdoor antenna away from power lines.
Turn preamplifier ‘off’ when plugging in or unplugging source cables!!!
The AVP4090 is equipped with raised feet so that continuous ventilation can be
maintained. They also help to reduce acoustic feedback into the preamplifier and
provide a measure of protection against scratching any surface the unit might be resting
on. Do not alter or remove them.
Do not stack anything on top of the preamplifier (processor, source, etc).
Do not stack the preamplifier on top of an amplifier.
Always connect the AVP power cord to an unswitched AC outlet for normal operations.
Mistaking SEND, RCV, CTRL OUT, or IR IN connectors for audio/video inputs or outputs
may damage your preamplifier or other components.
Page 3
Features
Overview
Your new AVP series preamplifier from B & K Components, Ltd., is a versatile
audio/video control center with an internal AM/FM tuner. The AVP preamplifiers are
designed to not only sound sensational, but also to be an attractive, easy-to-use
addition to your audio/video system. Although you already have a good idea of your
preamplifier’s features, we’d like to take a moment to point out certain highlights.
Following that, the rest of this section describes the front panels display and controls,
remote control and rear panel features.
Latest technology audio design - With B & K, you’re assured that the basic
design foundation of your preamplifier provides excellent quality, fidelity, and a
sound so true to life, that it sounds as if your system is a sound stage.
Remote control and front panel operation - A straightforward remote control
and intuitive front panel design will let you operate your AVP preamplifier easily,
whether you prefer the hands-on front panel or the easy remote control
operation.
AM/FM stereo tuner with 20 station presets per band - The internal AM/FM
stereo tuner with digital Phase Locked Loop tuning technology and automatic
programming let you preset up to 20 AM and 20 FM stations.
Multiple inputs - The AVP provides 6 analog audio, 6 digital audio, and 4 video
inputs, enabling a variety of system configurations. To select and control the
inputs, you can use either the remote control or the front panel. The analog
audio inputs include CD, TAPE, DVD/VLD, V1, V2, and TV-V3. The digital
inputs include CD, TUNER, DVD/VLD, V1, V2, and TV-V3. The video inputs
include DVD/VLD, V1, V2, and TV-V3.
*Note: The FX/NC input is the internal Surround Sound Processor. You cannot use this input
from the back panel.
Multiple outputs - Multiple audio and video outputs are provided. The audio
outputs include buffered, fixed level, V1, V2, and TAPE. The PRE-OUT variable
level output features an extra pair of connectors. Surround Sound Processor
variable level audio outputs include FRONT L, FRONT R, REAR L, REAR R,
CENTER1, CENTER2, SUB1, and SUB2. The video outputs include V1, V2,
MON1, and MON 2.
Page 4
A/V presets - Your AVP comes equipped with built in preset memories that when
selected set up your AVP for you. You can also make changes to settings (such
as volume and balance levels, etc.) and save your preferences in your own
custom preset. You can save up to 10 A/V presets in each “bank” and recall
them easily with the remote control. Recalling a preset while the preamplifier is
off, automatically turns on the preamplifier.
Two preset “banks” - Your AVP features two preset “banks”, where the
collection of presets are saved. In each bank, you can save up to 10 different
presets, which translates into 20 different presets you can configure and recall at
any time.
Customized input and A/V preset names - You can use this feature to assign a
name to a preset, input, or the turn on message.
Controlling external systems or components - The CTRL OUT output on the
preamplifier is rated 12 VDC @ 15 mA continuous. This feature lets you define
the output to turn on an external system (such as a B & K amplifier) or related
component (such as special room lighting effects).
Full compatibility with most custom installed IR control systems - The IR IN
input on the rear panel lets you integrate the AVP into an infrared system such as
a repeater. This input may also be used for future custom installation
technologies.
Display
The AVP display is a 16 character, alphanumeric fluorescent display. The display will
look similar to the examples below:
Turn on message
Volume level
, )" d
Display on/off
The AVP display can be turned off to minimize its prominence in low light conditions.
Pressing the DISPLAY button alternates the display between on and off.
When the display is turned off, it shows two dots (
-) while it is idle. When
remote control or front panel activity is detected, the display will turn on and stay on for
approximately 20 seconds, after this time it will return to the two dot display.
Page 5
Front panel view
The figure below shows the front panel controls and features. Input selection or
changes to other settings using the front panel controls requires selecting the
appropriate MENU options and using the y or x button to change the settings.
6. Review / x button
7. Menu button
8. Enter button
9. Volume control
1. Headphone jack
2. Display
3. Power button
4. Mute button
5. Display / y button
Front panel description
1. Headphone Jack Stereo headphones having a standard ¼ inch binaural plug can be
connected to the headphone output. The preamplifier must be on, in
Direct mode, and the amplifier off for proper sound.
2. Display The AVP display is a 16 character alphanumeric fluorescent display.
Displays current mode of preamplifier and any changes being performed.
Displays a single dot when preamplifier is in the off condition.
3. Power button Turns the AVP series preamplifier on or off.
4. Mute button Suppresses sound output from the system. The display will show a ‘-’ at
the right side of the display.
Page 6
5. Display / O button Lets you turn the front panel display on or off. When used in combination
with MENU, it will change that options setting. In TEST it selects the
previous channel. When used in combination with MODE, it selects the
previous surround mode.
6. Review / N button Presents a series of displays showing the current settings of the
preamplifier. When used in combination with MENU, it will change that
options setting. In TEST it selects the next channel. When used in
combination with MODE, it selects the next surround mode.
7. Menu button -
Displays a list of menu options, used with y/x to change the options and
settings.
8. Enter button Confirms a selection or displays current setting of an option.
9. Volume control For controlling system volume. Turning the volume control clockwise
increases the volume level, counterclockwise decreases the volume level.
When the preamplifier is in mute, turning the volume up will unmute the
preamplifier, turning the volume down will lower the volume but not
unmute the preamplifier.
Page 7
Rear panel view
The AVP back panel is organized into groups of inputs and outputs for audio and video
as shown below.
1.
2.
3.
4.
5.
6.
7.
8.
Power switch
AC fuse holder
AC input receptacle
Video outputs
Video inputs
Digital inputs
Send/RCV jacks
Preouts
9.
10.
11.
12.
13.
14.
15.
16.
Analog audio inputs
AM antenna input
FM antenna input
Tape loop
V1 loop
V2 loop
CTRL OUT / IR IN jacks
Surround outputs
Rear panel description
1. Power switch For switching AC power to the AVP preamplifier. Off = O, On = I. The
rocker must be in the on (I) position for the preamplifier to operate.
2. AC fuse holder Holds the AC Line fuse. Replace only with 0.5 A (½ A) 250 V fast blow
fuse.
3. AC input receptacle
-
For attaching the supplied AC power cord to the preamplifier.
Page 8
4. Video outputs Outputs labeled MON1, MON2, V1, and V2. Provides composite video
output to a TV, monitor, or VCR for viewing or recording the video signal.
5. Video inputs Inputs labeled TV-V3, V2, V1, and DVD/VLD used to connect the A/V
source to provide the video signal that the preamplifier can switch
between.
6. Digital inputs Inputs labeled V1, V2, TV-V3, TUNER, DVD/VLD, and CD used to
connect a digital audio signal from your source to the AVP preamplifier.
The incoming signal may be either a PCM or AC-3 signal, you configure
the input (in the setup menu) according to your system needs. These
inputs are coaxial only.
PLEASE NOTE:
The DIGITAL inputs on the AVP4090 will only accept an Industry Standard Consumer
Audio DIGITAL input signal. (See setup procedure in this manual)
When you connect a Dolby Digital source to an AVP with Dolby Digital, the signal
must be an Industry Standard Consumer Audio DIGITAL signal into the
AVP4090.
Laserdisc players normally have an Industry Standard Consumer Audio RF
Dolby Digital signal. This type of Dolby Digital signal requires a Dolby Digital RF
demodulator to be placed between the player and the AVP4090. This converts
the RF Dolby Digital signal, out of the laserdisc, to a Dolby Digital DIGITAL
signal. This signal can then be processed by the AVP4090 digital inputs.
7. SEND/RCV inputs Not currently used. For future applications.
8. PRE-OUTS - Provides variable level audio output for sending to a power
amplifier or other audio component. They carry the same signal as
the FRONT L and FRONT R outputs.
9. Analog audio inputs Line level inputs for connecting your audio components to the system
(DVD/VLD, CD, and TV-V3).
10. AM antenna input Connection for the AM antenna. 75 Ohms.
Page 9
11. FM antenna input Connection for the FM antenna. 75 Ohms.
12. Tape Loop - Connections for the audio of a tape deck.
TAPE OUT- Provides a fixed level, buffered audio output for sending to a tape
player. Connect the TAPE OUT from the AVP to the TAPE IN on
the tape player.
TAPE IN -
13. V1 loop -
Accepts audio output from a tape player. Connect the TAPE IN
from AVP to the TAPE OUT on the tape player.
Connections for the audio of a VCR designated as VCR 1.
V1 OUT -
Provides a fixed level, buffered audio output for sending to a VCR.
Connect the V1 OUT on the AVP to the AUDIO IN on the VCR.
V1 IN -
Accepts audio output from a VCR. Connect the V1 IN on the AVP
to the AUDIO OUT on the VCR.
14. V2 loop -
Connections for the audio of a VCR designated as VCR 2.
V2 OUT -
Provides a fixed level, buffered audio output for sending to a VCR.
Connect the V2 OUT on the AVP to the AUDIO IN on the VCR.
V2 IN -
Accepts audio output from a VCR. Connect the V2 IN on the AVP
to the AUDIO OUT on the VCR.
15. CTRL OUT - Output that allows you to remotely control external devices. This
output is rated 12 VDC @ 15 mA continuous. The output goes high
(12 VDC) when the preamplifier is turned on, and low (0 VDC)
when the preamplifier is turned off. This output works with the B&K
amplifiers to remotely turn them on and off (amplifiers with the
control feature). Connect the CTRL OUT on the AVP to the CTRL
IN on the amplifier.
15. IR IN -
Accepts input from external IR receptors. Connect your IR
repeater to IR IN to control the AVP preamplifier when the front IR
receiver is blocked (by cabinet door).
Page 10
16. Surround outputs Outputs for your surround system. These variable level outputs are
provided with the Surround Sound Processor option for sending signal to
the power amplifiers as follows.
FRONT L -
Provides an audio output signal for sending to the input
channel of the power amplifier for the front left speaker.
FRONT R -
Provides an audio output signal for sending to the input
channel of the power amplifier for the front right speaker.
REAR L -
Provides an audio output signal for sending to the input
channel of the power amplifier for the rear left speaker.
REAR R -
Provides an audio output signal for sending to the input
channel of the power amplifier for the rear right speaker.
SUB 1 & 2 -
Provides an audio output signal for sending to the input
channel of the power amplifier for a passive subwoofer or
the input of a powered subwoofer.
CENTER 1 & 2 -
Provides an audio output signal for sending to the input
channel of the power amplifier for the center speaker.
Page 11
Remote control
The B & K A/V system remote control is specially designed to streamline functions.
Although you can choose to use a universal remote, we think you will agree that the
remote shown below is simple and easy to learn.
Most buttons on the remote control are duplicated through the front panel. This means
it’s easy to operate the preamplifier, whether you prefer using the remote control or the
hands on approach from the front panel. We recommend using the remote control for
simplicity. Use the table below to familiarize yourself with the remote controls functions.
Button:
Function:
POWER OFF
Turns power and CTRL OUT off
POWER ON
Turns power and CTRL OUT on
SYSTEM MUTE
V1
Suppresses sound output
Selects audio/video from component V1
TV-V3
Selects audio/video from component TV-V3
FX
Lets you select between the standard Direct mode or
the last used surround mode
V2
Selects audio/video from component V2
TAPE
Selects audio from component TAPE
VLD
Selects audio/video from component VLD
TUNER
Selects internal TUNER
CD
Selects audio from component CD
FREQ
Lets you directly tune in a station frequency by
specifying it with the numeric keypad
BAND
Selects AM or FM frequency band
STATION -/+
TUNE -/+
Selects station preset by moving up (+) or down (-)
Manually tune a station by moving the frequency up (+)
or down (-)
BALANCE L/R
MASTER VOLUME /+
Page 12
Adjusts left/right level balance for front and rear
channels (inactive for Pro Logic and Dolby Digital
modes)
Lets you decrease (-) or increase (+) the volume on all
channels
Button:
Function:
CENTER LEVEL -/+
REAR LEVEL -/+
SUB LEVEL -/+
Lets you decrease (-) or increase (+) the center
channel volume
Lets you decrease (-) or increase (+) the surround
volume
Lets you decrease (-) or increase (+) the subwoofer
volume
REAR DELAY -/+
Lets you decrease (-) or increase (+) the rear channel
delay time
SURROUND TEST
Lets you calibrate speakers using the built in test noise
signal
SURROUND MODE
Lets you select any surround mode
A
Lets you specify “bank A” when recalling or saving an
A/V preset
B,C
Not used ( for future applications)
y/x
Lets you select previous/next option
MENU
Displays a list of menu options; use y/x to change
option settings
ENTER
Confirms a selection; when used while a menu option
is displayed, displays current setting
NUMBERS 0-9
U (star)
Lets you select an A/V preset when followed by
ENTER; when used in combination with FREQ, lets
you enter station frequency
Used for advanced operations in conjunction with the
numeric key pad (0-9)
# (pound)
Not used (for future applications)
REVIEW
Presents a series of displays showing the current
settings (repeatedly pressing REVIEW steps faster)
DISPLAY
Lets you turn the front panel display on or off
SAVE
Lets you save either an A/V preset or station preset;
press SAVE then either numeric buttons 0-9 for saving
an A/V preset, or use STATION -/+ to save a station
preset, press ENTER to save your selection
ZONE 1 / ZONE 2
Page 13
Set to “ZONE 1" for AVP4090
Setup
It’s tempting to just plug in your new AVP and have great sound pour out. Before you
do that, take a few minutes to plan out how you want the preamplifier to fit into your
audio/video system. If you haven’t already done so, ask yourself the following
questions:
What source components do I want to connect to my preamplifier? (CD, VCR,
etc.)
What components do I want my preamplifier to send output to?
What equipment in my system will be receiving and displaying the audio and
video? (TV monitor, Audio amplifier, etc.)
The answers to your questions determine how many cables you need to connect to the
back of the AVP. For example, if you want your preamplifier to access a CD player,
VCR, and Laser Disc player, then output the result to a TV monitor and stereo speaker,
you will end up with multiple connections. On the other hand, if your source component
is a VCR and your output component is your TV monitor and speaker, you will need less
connections. Whatever your audio/video system configuration, good preplanning
equals great sound. Keep these recommendations in mind.
@
Keep the cables between audio sources and video sources separate.
@
To provide the best tuner reception, make sure the antenna is at least several
feet away from the AVP and any other equipment that may produce high
frequency interference such as PC’s, CD players, halogen lamps, etc.
@
Before you begin connecting equipment, decide what types and lengths of
interconnects are required for all your components to work well together. You
should also plan the paths for all interconnects. Remember, use high quality
connections to maintain high quality audio and video.
@
The type of cable you use, the length of the cable run, and obstacles in the
cable’s path (doorways, furniture, walkways, etc.) are also factors to think about.
To really optimize your system, talk to your dealer about cable products
available, to decide which one’s right for you.
@
List all components in your system. Be sure to indicate which jack on the rear
panel of the AVP each component will be connected to. It’s a good idea to also
note the length of the cable for each component’s connection and describe how it
should be routed, or you could draw your routing scheme below your list. As a
shortcut, you can assign a number to each cable, write the number on a label
Page 14
and attach it to the cable near both ends. This makes it easy to identify.
@
To ensure maximum safety, keep all cables out of high traffic areas (hallways or
doorways) and away from equipment that radiates power, including amplifiers,
power cords, heaters, etc.
@
If you might expand your audio/video system later, keep these ideas in mind as
you plan current cable runs.
Factory reset
Reset the AVP before you start. Plug in the power and turn the AVP on. When the
display shows:
Press the 7 (star) then 9 then 8 and the display will show:
'&
The AVP will turn off and back on. Then it will cycle through the three title messages
and then off again. The AVP is now reset to factory defaults. You can perform this
procedure anytime you need to reset the preamplifier to the factory defaults. All your
presets will be erased. Do not interrupt the cycle, do not press any buttons
on the remote or preamplifier face plate. If you accidentally press a button, you will
have to repeat the reset procedure.
Turn the preamplifier ON and the display will show:
You can now program the preamplifier to your desired setup.
Page 15
Making the connection
Take a look at the back panel of the AVP. You will notice that the RCA-type audio input
and output connectors are identified by colors. Red for right channel and white for the
left channel audio. Composite video input and output connectors are identified by
yellow. Digital inputs are identified by orange. The surround outputs are identified by
black. The audio inputs and outputs start at the center of the back panel and continue
to the right. The video inputs and outputs are near the left side of the back panel.
Audio only equipment
The procedure listed is for connecting a CD player to the AVP analog inputs.
1.
Attach one end of the audio interconnect cable to the left audio output on the CD
player, then attach the other end to the white left CD audio input on the AVP.
2.
Attach one end of the audio interconnect cable to the right audio output on the
CD player, then attach the other end to the red right CD audio input on the AVP.
Audio / Video source
The procedure listed is for connecting a DVD/VLD player to the AVP analog
inputs. Use the same instructions for connecting other audio / video sources to
the TV-V3 input.
1.
Attach one end of the audio interconnect cable to the left audio output on the
DVD/VLD player, then attach the other end to the white left DVD/VLD audio input
on the AVP.
2.
Attach one end of the audio interconnect cable to the right audio output on the
DVD/VLD player, then attach the other end to the red right DVD/VLD audio input
on the AVP.
3.
Attach one end of the composite video interconnect cable to the video out on the
DVD/VLD player, then attach the other end to the yellow video input on the AVP
labeled DVD/VLD.
Page 16
Video monitor
To add a video monitor to the system.
1.
Attach one end of the composite video interconnect cable to the video input on
the monitor, then attach the other end to the yellow video output on the AVP
labeled MON1 or MON2 (both MON1 and MON2 perform the same function).
VCR connection
The procedure listed is for connecting a VCR player to the V1 analog input on the
AVP. Use the same instructions for connecting another VCR to the V2 analog
input.
1.
Attach one end of the audio interconnect cable to the left audio output on the
VCR, then attach the other end to the white left V1 IN on the AVP.
2.
Attach one end of the audio interconnect cable to the right audio output on the
VCR, then attach the other end to the red right V1 IN on the AVP.
3.
Attach one end of the composite video interconnect cable to the video out on the
VCR, then attach the other end to the yellow video input on the AVP labeled V1.
This connects the VCR to the AVP for viewing tapes. Now complete this procedure to
make recordings through the AVP. Recordings can only be made from analog sources.
4.
Attach one end of the audio interconnect cable to the left audio input on the VCR,
then attach the other end to the white left V1 OUT on the AVP.
5.
Attach one end of the audio interconnect cable to the right audio input on the
VCR, then attach the other end to the red right V1 OUT on the AVP.
6.
Attach one end of the composite video interconnect cable to the video in on the
VCR, then attach the other end to the yellow video output on the AVP labeled V1.
Tape connection
1.
Attach one end of the audio interconnect cable to the left audio output on the
Tape deck, then attach the other end to the white left TAPE IN on the AVP.
2.
Attach one end of the audio interconnect cable to the right audio output on the
Tape deck, then attach the other end to the red right TAPE IN on the AVP.
3.
Attach one end of the audio interconnect cable to the left audio input on the Tape
deck, then attach the other end to the white left TAPE OUT on the AVP.
Page 17
4.
Attach one end of the audio interconnect cable to the right audio input on the
Tape deck, then attach the other end to the red right TAPE OUT on the AVP.
Digital connection
The AVP preamplifier is equipped with six coaxial digital inputs. The digital inputs will
accept either a standard PCM digital input or a digital Dolby Digital input. If you wish to
use a source that has a TOSLINK output, you must convert it to coax. If you wish to
use a laserdisc player that has a RF Dolby Digital output, you must convert it to a digital
Dolby Digital signal.
The B & K DT-1 will do both conversions for you.
To connect a digital input to the AVP, simply connect a coax cable from the digital
output on your source (CD, DVD/VLD...etc.) to the appropriate orange digital input on
the AVP (CD, DVD/VLD...etc.).
In the SETUP menu, select digital on for the appropriate source, to enable the digital
input (CD DIGITAL ON, VLD DIGITAL ON...etc.).
To connect a digital Dolby Digital (AC-3) signal (NOT RF) to the AVP, simply connect a
coax cable from the Dolby Digital output on your source to the appropriate orange digital
input on the AVP (normally DVD/VLD). This output MUST be a digital output and NOT
RF.
In the SETUP menu, select digital on or digital AC-3, to enable the digital input. The
digital input will automatically switch to Dolby Digital if it is set to ON and a Dolby Digital
signal is present. The AVP will default back to PCM when the Dolby Digital signal stops
for more than 30 seconds. Setting the digital to AC-3 will only allow a Dolby Digital
signal to be accepted.
To set an input for DTS only, select DIGITAL DTS. This will only allow DTS material to
be processed from the input. No advanced star operations will operate.
Page 18
Surround setup
Always set up and calibrate your speakers immediately after connecting your
preamplifier to your system. You need to set up the speakers to achieve the best, most
accurate performance from your preamplifier. This is important because the
preamplifier needs to “know” your speaker configuration to control your current system.
Any time you change your speaker configuration, you should perform setup and then
calibration on your preamplifier.
When you are setting up your speakers, your preamplifier gives you several options to
help you maximize your audio/video system. Since every system is unique, you can
choose from menu options and try different combinations until the sound is exactly the
way you want it.
Channel mode explanation
Channel
Mode/Option
Description
Left / Right
Large
80 Hz high pass filter off. Do not sum bass to
subwoofer. Full range to front left and right.
Small
80 Hz high pass filter on. Sum bass to subwoofer.
Filters bass frequencies from front channels and
sends it to the subwoofer (fc = 80 Hz @12 dB/Oct).
Large
80 Hz high pass filter off. Do not sum bass to
subwoofer. Full range to center channel.
Small
80 Hz high pass filter on. Sum bass to subwoofer.
Filters bass frequencies from the center channel and
sends it to the subwoofer (fc = 80 Hz @12 dB/Oct).
None
No center channel output. Use if you do not have a
center channel speaker.
Large
80 Hz high pass filter off. Do not sum bass to
subwoofer. Full range to rear left and right.
Small
80 Hz high pass filter on. Sum bass to subwoofer.
Filters bass frequencies from rear channels and
sends it to the subwoofer (fc = 80 Hz @12 dB/Oct).
None
No rear channel output. Use if you do not have rear
channel speakers.
Yes
Sends output to the subwoofer (fc = 80 Hz @24
dB/Oct).
Center
Surround
Subwoofer
Page 19
Channel
Mode/Option
Description
No
No subwoofer. Sends all bass frequencies to the
front left and right channels including the LFE
channel. Removes SW BASS MENU.
Bass Management
Note: LFE = Low Frequency Effects channel (or .1 channel)
Option/mode
Description
Bass Normal
LFE on. Bass frequencies and LFE are sent to the appropriate
channels.
Bass LFE Off
LFE off. Removes the LFE channel from the bass management
summing circuitry.
SW Bass Normal
Adds bass to the subwoofer for any channel set to SMALL.
Example: If the front speakers are set to SMALL, the bass frequencies go to
the subwoofer, not the front speakers.
SW Bass Ultra
Allows for all channels to be summed to the subwoofer
regardless of SMALL/LARGE speaker settings.
Delay settings
CTR DELAY - Center channel delay. The center channel has a variable delay
that may be set from 0 ms to 5 ms.
SUR DELAY - Surround channel delay. The surround channel delay is variable
between 0 ms to 15 ms for Dolby Digital and 15 ms to 30 ms for Pro Logic.
When changing the surround delay setting, only the Dolby Digital setting will be
displayed. The Pro Logic setting is automatically 15 ms higher than the Dolby
Digital setting.
Example:
If the surround delay is set at 0 ms, the Pro Logic delay is automatically 15
ms.
If the surround delay is set at 5 ms, the Pro Logic delay is automatically 20
ms.
Page 20
Surround mode explanation
SURROUND MODES
CHANNELS
ON †
DELAY
RANGE
NOTES †
DOLBY SURROUND
LF,RF,C,LR,RR
SUB
0 - 15 ms
or
15 - 30 ms
AC-3 Mode-All speakers are full
range. Dolby Pro Logic- Rear left and
right are mono surround and sent
through the delay.
3 STEREO
LF,RF,C,SUB
0 ms
Rear left and right signals mixed with
front left and right.
3 STEREO HALL
LF,RF,C,LR,RR
SUB
0 - 15 ms
or
15 - 30 ms
Rear left and right are mono surround
and sent through the delay.
STEREO
LF,RF,SUB
0 ms
Stereo listening mode.
STEREO F/R
LF,RF,LR,RR
SUB
0 ms
Front left is sent to the rear left and
front right is sent to the rear right.
SUB is the front left and right signals
summed.
STEREO HALL
LF,RF,LR,RR
SUB
0 - 15 ms
or
15 - 30 ms
DIRECT
LF,RF,SUB
0 ms
Direct mode is the same as Stereo
mode except the 2 channel output
signal is pre-processor for analog
sources.(True Stereo bypass if using
analog inputs)
DTS
LF,RF,C,LR,RR,
SUB
0 ms
L DTS Mode-All speakers are full
range. You must have all speakers in
your system to properly use this
mode.
Same as 3 STEREO HALL with no
center channel.
† Output configurations for each mode are limited by the speaker setup in the SETUP
menu.
L The DTS mode is only a 5.1 channel surround setup. You must have all channels to
properly use this mode. Example: If you are missing the center channel speaker the
system will not send the information to the front left or right, the sound will simply be
lost.
Page 21
Speaker calibration
Always calibrate your speakers after you have performed setup. Surround calibration is
different from adjusting balance levels. When you calibrate, you equalize volume levels
on all channels with a final goal of ensuring that the volume is the same on each one.
When you adjust balance, you turn the volume up or down on specific channels
because the sound you are hearing seems either too loud or too soft.
Calibration is more than equalizing the volume levels on all channels. When you are
calibrating your speakers, variables such as the shape of the room, how furniture is
arranged, as well as anything that influences the acoustics of the room such as
carpeting, curtains, sound panels, etc. must be considered. You should always
calibrate by sitting where you normally sit to watch movies or listen to music. This is
your ideal listening position. Once in this position, adjust the volume of each channel to
match the others. You can do this by listening to each speaker and making
adjustments. To verify equal decibel levels (dB), you can use a sound-pressure level
meter.
Do not use calibration to “boost” or “cut” a channel. For example, if you want to
increase the level of the subwoofer for effect, adjust the level using the SUB LEVEL +
button on the remote after you have completed calibration for equal levels.
Setup procedure
Turn the preamplifier on. The display should read VLD DIRECT if this is the first time
the preamplifier is turned on and set up.
Press the MENU button and the display shows:
Press ENTER, the display shows:
(
You can toggle between the LARGE and SMALL modes by pressing x or y.
Press ENTER, the display shows:
You can toggle between the LARGE, SMALL, and NONE modes by pressing x
or y.
Page 22
Press ENTER, the display shows:
You can toggle between the LARGE, SMALL, and NONE modes by pressing x
or y.
Press ENTER, the display shows:
You can toggle between YES and NO modes by pressing x or y.
Press ENTER, the display shows:
You can toggle between BASS NORMAL and BASS LFE OFF modes by
pressing x or y.
Press ENTER, the display shows:
You can toggle between SW BASS NORMAL and SW BASS ULTRA modes by
pressing x or y.
Press ENTER, the display shows:
-
You can increase center delay to 5 ms by pressing the x, or decrease back to 0
again by pressing y.
Press ENTER, the display shows:
-
You can increase surround delay to 15 ms by pressing the x, or decrease back
to 0 again by pressing y.
Page 23
Press ENTER, the display shows:
You can toggle between OFF, ON, AC-3, and DTS modes by pressing x or y.
This holds true for the CD, V1, V2, TV, and TNR digital settings.
Digital off-
Selects the corresponding AUDIO L/R analog input for Pro Logic
Surround Processing.
Digital on-
Selects the corresponding digital input for PCM Pro Logic Surround
Processing. If Dolby Digital is detected, Dolby Digital surround
processing is automatically used.
Digital AC-3- Selects the corresponding digital input for Dolby Digital Surround
Processing. PCM signals are not processed in this mode.
Digital DTS- Selects the corresponding digital input for DTS 5.1 Surround
Processing. No other signals are processed in this mode.
Press ENTER, the display shows:
Press ENTER:
Press ENTER:
Press ENTER:
Press ENTER:
Press ENTER, the display shows:
.
You can increase to +6.0 dB by pressing the x, or decrease to -6.0 dB by
pressing y. This holds true for the CD, V1, V2, TV-V3, TUNER, and TAPE level
settings. The level controls are for matching the input levels of all your sources
coming into the preamplifier.
Page 24
Press ENTER:
.
Press ENTER:
.
Press ENTER:
.
Press ENTER:
)! .
Press ENTER:
.
Press ENTER:
.
The surround calibration is next. Adjust the levels with the MASTER VOLUME +/buttons. You have a range of -12.0 to +12.0 in 0.5 dB increments. Equalize the volume
level of all the channels by adjusting the calibration of each individual speaker until they
all have the same volume from your ideal listening position. You can move from
channel to channel by pressing the x and y buttons or the ENTER button.
Press ENTER, the display will show:
.
Press ENTER:
.
Press ENTER:
.
Press ENTER:
.
Press ENTER:
.
Press ENTER:
.
Page 25
Press ENTER, the display shows:
You have completed the setup procedure. Remember, you have to perform the
calibration procedure every time you change your speaker configuration.
Using presets
There are 20 A/V presets provided. Presets “0" through “9" are selected using the
numeric buttons on the remote (0-9). Pressing the “A” button first allows you to select
bank “A” presets, “A0" through “A9", using the same numeric buttons (0-9).
The preprogrammed audio/video presets let you instantly select any of the audio/video
sources along with volume level and surround mode settings. You can customize the
presets, even the preset name, for ease of operation.
Recall a preset
Using the remote control, press a number on the keypad to display the preset name.
Pressing “A” selects “bank A”. Once you press a preset number, you can then press x
or y to step through all the preset names. If the AVP is off, pressing a preset number
will turn the preamplifier on, and pressing ENTER will select that preset.
Keypad
number
Display shows
Keypad
number
Display shows
0
5
1
6
$ 7
% 2
3
! 8
& 4
" 9
' Select the desired preset then press ENTER to recall. The display will show (if you
selected preset #1):
Page 26
Save a preset
A preset will save the following information in a preset for you:
Master volume, selected input, input mode (analog, PCM, Dolby Digital, or DTS),
surround mode, rear volume, subwoofer volume, center channel volume, delay
setting, and display status of on or off.
To save a preset, press the SAVE button, followed by the preset number you wish to
overwrite (0-9 or A0-A9), then ENTER.
Example:
If you want to save a setup for the preset 1 (CD), first recall the preset by
pressing 1 then ENTER.
Select the desired surround mode by pressing the MODE button until the
desired mode is displayed.
Next set the desired volume level:
) d
Now save the preset by pressing SAVE:
Press 1:
Press ENTER to select and overwrite the displayed preset:
Your settings are now saved under preset 1 and any time you select this
preset your settings will be recalled.
Follow the same procedure for the other presets.
Page 27
Rename a preset
Once you save your own custom preset, you can rename it to make it easy to
remember for the next time you want to use those same settings. For example,
suppose you saved your favorite settings for watching a movie in A/V preset 2, and
you’d like to rename the preset to “WATCH MOVIE”.
Using the remote control, press MENU until the display shows:
Press x or y until the display shows
Press ENTER to select renaming this title. The display will show the current A/V preset
name:
The display shows a flashing cursor “_” at the character you are currently editing.
Pressing x or y changes the character, pressing ENTER accepts (or skips) the
blinking character.
Continue the steps above until you achieve:
Pressing ENTER at the last character completes the renaming session and exits.
The presets are independent for each “bank” allowing you to save different names in
each “bank”. The character set you have available for renaming is shown below.
A-Z
0-9
/
-
+
?
&
)
)'
(
)
*
+
,
You can also rename the six input titles and the power on title using the same
procedure and character set above.
Page 28
space
Tuner functions
After selecting TUNER, the internal AM/FM tuner features are controlled as follows:
For Controlling:
Use Buttons:
Description:
AM/FM Band
BAND
Alternates between AM and FM bands.
Tuning/Seek
TUNE -/+
Direct Frequency Entry
FREQ then number keypad (0-9)
To directly enter a station frequency.
FM Stereo/Mono
MENU then x
Manually select between stereo and
mono reception.
Save a Station Preset
SAVE, STATION -/+, then
ENTER
To save a desired station to memory.
There are 20 presets per band.
Recall a Station Preset
STATION -/+
Auto-program Station
presets
MENU then ENTER
Adjusts tuning frequency.
To recall a saved station.
Allows the AVP to program the Station
memory for you.
Tuner Operation
AM/FM Band -
Changing band is accomplished by simply pressing the BAND
button. It will toggle the tuner between the FM and AM band.
Tuning/Seek -
Adjusts the tuners frequency to tune in a desired station. Pressing
TUNE once steps frequency manually while pressing and holding
momentarily engages “seek”.
Direct Frequency
To enter a station’s frequency directly into the tuner. Press the
Entry FREQ button on the remote.
The message ENTER FREQUENCY will appear on the display.
Enter the numbers of the desired station frequency using the
numeric keypad (0-9).
Example:
Press FREQ , then 9 6 9. The dot “.” is automatic.
Display will show:
'$.' Page 29
FM Stereo/ MonoFM stereo is automatically selected when tuning a station. If you choose
to manually set it, press MENU until the display shows:
(
Now press x to change mode. You can toggle from stereo to mono by
repeatedly pressing the x button.
Save a station preset To save a station preset, tune the AVP to the desired station you wish to
save. You may use either method listed prior.
Press the SAVE button followed by the STATION + (or -) button until the
display shows the preset number where you want to save this frequency
at. The station preset number is the two digits at the right hand side of the
display. When saving, the AVP will still show the current frequency saved
in each particular preset that you are about to overwrite. The new
frequency will not be accepted until ENTER is pressed.
Press ENTER to save at desired preset number.
Example:
Display shows frequency to save:
'$.' Ignore 01 digits right now.
Press the SAVE button, the display reads:
Press the STATION + button, the display reads:
&%.# Now look at the two right most digits. They tell the station preset number
to save your selection under. Continue pressing the STATION + (or -)
button until the desired number is displayed (01-20).
Press the ENTER button to select the station preset number and save
your station. The display should read (assuming you picked preset 01):
Page 30
The display should now look like this:
'$.' You have now saved the station into the preset 01.
There are two tuner A/V presets you can also save. These presets are the A/V preset
numbers 5 and A5. If you do not save these presets the AVP will always pick the
default frequency of 87.50 MHZ when you press 5 (or A5) and ENTER.
Bring your favorite station up on the display:
'$.' Set the desired volume level:
) d
Set the desired mode (example: stereo front to rear):
Note: You may use any mode you wish.
Press SAVE, 5, then ENTER, and the display shows:
You have now saved your favorite station under A/V preset 5. You may follow the same
procedure for the preset A5.
Recall a Station Preset Simply press the STATION +/- buttons until your desired station is
displayed.
Auto-program Station Presets Select the band you wish to auto-program (AM or FM).
Page 31
Press MENU until the display shows:
Then press ENTER. The display will read:
+
Press ENTER again to confirm.
The AVP will now search the band and program the first 20
strongest stations it receives into the 20 preset memories for that
band.
Remember to connect an antenna to the AVP for proper tuner operation.
Page 32
Advanced operations
Star (7) operations
The AVP has incorporated some new ways to change the mode of the source inputs. In
the standard SETUP menu, the digital modes of VLD, CD ,V1 ,V2 ,TV-V3, and TUNER
are set globally and are not affected as presets are recalled. Now with the U(star)
operations described below, you can override the setup mode to another digital input
mode. You can also save the new mode in an A/V preset for later recall. What does all
this mean? It means you can have presets for more than one digital mode of the same
input source.
For example, you can save one CD preset that uses the standard L,R analog inputs in
direct, and save another CD preset that uses the digital input with PCM stereo.
Depending on what you want to hear at the time, you can select the appropriate preset
without having to go through the SETUP menu and surround mode changes again.
It should be noted that only the DIGITAL ON mode, when set in the SETUP menu,
allows the AVP to automatically switch over to Dolby Digital Surround Processing when
an Dolby Digital digital input is detected. This feature also provides automatic switching
back to PCM 30 seconds after an Dolby Digital signal is no longer present. Overriding
the digital mode to DIGITAL OFF or DIGITAL DTS defeats the automatic sensor.
Procedure
First select the preset you wish to change. We will use preset 1 for this example but the
same holds true for all presets 0-9 and A0-A9.
Press 1, then ENTER to recall preset 1.
Set the input mode by selecting one of the following:
KEYSTROKE
MODE
U(star) then 1 then 0
DIGITAL OFF
U(star) then 1 then 1
DIGITAL ON
U(star) then 1 then 2
DIGITAL AC-3
U(star) then 1 then 3
DIGITAL DTS
Save the setup to preset 1 by pressing SAVE, then 1, then ENTER.
Page 33
The new setup will be saved for preset 1. You can save digital off for preset 1 and
digital on for preset A1 if you wish. This would allow you to have two different sources
into the CD inputs, one digital and one analog.
These star operations do not change the digital settings in the SETUP menu. They are
temporary changes to the mode of the input selected. When the AVP is powered off
and then on, the input will default back to the SETUP menu status (Unless a preset was
selected to turn on the AVP).
NOTE: The star funcitons (U10,U11 U,12,U13) will not work if the digital input is set to
DTS in the SETUP menu.
Other star (7) operation
Star 98 will reset the preamplifier back to the factory presets. This is a master reset for
the preamplifier and will erase everything that was programmed into the system
memory.
Factory reset
Reset the AVP before you start. Plug in the power and turn the AVP on. When the
display shows:
Press the U (star) then 9 then 8 and the display will show:
'&
The AVP will turn off and back on. Then it will cycle through the three title messages
and then off again. The AVP is now reset to factory defaults. You can perform this
procedure anytime you need to reset the preamplifier to the factory defaults. All your
presets will be erased. Do not interrupt the cycle, do not press any buttons
on the remote or preamplifier face plate. If you accidentally press a button, you will
have to repeat the reset procedure.
Turn the preamplifier ON and the display will show:
You can now program the preamplifier to your desired setup.
This is the same procedure as shown on page 15.
Page 34
Troubleshooting
PROBLEM
POSSIBLE CAUSE
POSSIBLE SOLUTION
No sound, display will not
light
1.
2.
3.
4.
Power cord not plugged in.
Power off at AC source.
Power switch off.
AC power inlet fuse blown
or faulty. **
1.
2.
3.
4.
Reconnect power cord.
Check power at plug.
Turn power switch on.
Check for shorts or
overloading.
No sound, display on.
1.
2.
Preamplifier in mute
Volume control to
minimum.
Wrong source selected.
Wrong source mode
selected.(analog/digital)
Line stage to amp. cables
loose or faulty.
Source to line stage cables
loose or faulty.
1.
2.
3.
4.
Unmute preamplifier.
Increase volume.
Select source.
Select proper mode. (page
24,34)
Tighten, repair, or replace
cable.
Tighten, repair, or replace
cable.
3.
4.
5.
6.
5.
6.
Loud hum or buzz on one
or more channels
1.
Poor ground connection in
interconnect cables.
1.
Check all connectors and
repair as necessary.
Surround sound does not
sound correct.
1.
Recordings are not Pro
Logic.
Recordings are not Dolby
Digital.
Surround processor not in
correct mode.
1.
2.
Play a Pro Logic recording.
Play a Dolby Digital
recording.
Select proper surround
processor mode.
2.
3.
3.
**Note: If unit continues to blow power inlet fuses, DO NOT USE A HEAVIER
FUSE!!, have it serviced.
Page 35
Specifications
Audio Specifications
Frequency Response (+3 dB):
Input Sensitivity:
Maximum Output Level:
Total Harmonic Distortion:
Signal to Noise Ratio:
Input Impedance:
Output Impedance:
Noise Test Reference Level:
Surround Outputs non-inverting
Audio Inputs
Audio Outputs (extra L & R) non-inverting
20 Hz - 100 kHz
Unprocessed
20 Hz - 100 kHz
Processed
63 mV
9 V R.M.S.
Less than .02%
Unprocessed
Less than .05%
Front
Less than .12%
Rear
Less than .05%
Subwoofer
89 dB, CCIR 2k Weighted, max level
50k Ohms
221 Ohms
-12.5 dB
8
6
2 sets
Video Specifications
Frequency Response (-3,-3 dB):
Buffered Input Impedance:
Buffered Output Impedance:
Maximum Input Level:
Maximum Output Level:
Video Inputs / Outputs
20 Hz - 10 MHz
75 Ohms
75 Ohms
2 V R.M.S.
2 V R.M.S.
4/4
Tuner Specifications
FM Section ;De-emphasis 75 sec *
Frequency Range:
Total Harmonic Distortion:
Frequency Response (-1,-3 dB)
Capture Ratio:
IHF (Usable) Sensitivity:
Mono/Stereo Sensitivity:
Alternate Channel Selectivity:
Signal to Noise Ratio:
Antenna Input Impedance:
87.50 - 107.90 MHz in 50 kHz steps
Less than 0.25%
20 Hz - 15 kHz
2 dB
12 dBf
15/35 dBf
65 dB
70 dB, A Weighted
75 Ohms
Page 36
AM Section *
Frequency Range:
Total Harmonic Distortion:
Sensitivity:
Selectivity:
520 - 1620 kHz in 10 kHz steps
Less than 0.3%
28 dBf
30 dB
* USA and Canada versions.
Other versions have 50 sec De-emphasis with 50 kHz tuning steps for FM and 9 kHz tuning steps for
AM.
Digital Inputs
6
Line Voltage
120/220/240 VAC switchable
Replacement fuse
Line fuse - 0.5 A / 250 V fast blow
Shipping weight
20 lb
Dimensions
width
17 inches
height 3¾ inches
depth
12 inches
Care and cleaning
Under normal use, the preamplifier will not require any special care. Over time you may
wish to clean the exterior of the unit by wiping it with a damp cloth to remove any dirt or
dust that accumulates on it. Do not let any liquid enter the preamplifier thru the vents in
the top cover.
You may clean the connectors on the back panel with isopropal alcohol annually.
Page 37
Limited Warranty
B&K Components Ltd., referred to herein as B&K, warrants your B&K equipment against all defects in
material and workmanship for a period of five years from the date of purchase. This warranty applies
only to the original purchaser and only to equipment in normal residential use and service. Defective
equipment must be returned to B&K, prepaid, accompanied by sufficient payment to cover the cost of
return shipping and handling, and will be repaired or replaced at the discretion of B&K whose decision as
to the method of reparation will be final.
This warranty shall not apply to any equipment which is found to have been improperly installed,
incorrectly fused, misused, abused, or subjected to harmful elements, used in any way not in accordance
with instructions supplied with the unit, or to have been modified, repaired or altered in any way without
the expressed, written consent of B&K. This warranty does not apply to the cabinet, the remote
controller, or appearance items such as the faceplate, control buttons, or display lenses, nor does it cover
any expenses incurred in shipping the unit to and from the manufacturer’s service depot.
No warranty, implied or otherwise created by State law shall extend beyond the terms of this warranty
and B&K shall not be liable for any incidental or consequential damage arising out of a defect in material
or workmanship of the unit during the terms of this warranty or thereafter. Some States do not allow the
exclusion or limitation of incidental or consequential damages and the foregoing exclusions may not apply
to you.
This warranty gives you specific legal rights. Your may also have other rights which vary from State to
State.
No agent, representative, dealer or employee of B&K has the authority to increase or alter the obligations
or terms of this warranty.
B&K Components Ltd.
RETURNING EQUIPMENT
No equipment may be returned to B&K Components Ltd. Without a RETURN AUTHORIZATION. Should
you find it necessary to return equipment to B&K, for any reason, a RETURN AUTHORIZATION (R.A.)
number must be issued by B&K in respect of the equipment being returned. You may request an R.A.
number by calling B&K at the numbers below. We ask that you provide the following information at that
time.
1.
2.
3.
Your name, address, and phone number.
The model and serial number of the equipment being returned.
A description of the problem being experienced.
Your call will be referred to a Technical Service Representative who will work with you to resolve the
problem. If it is determined that the unit must be returned for repair, an R.A. number will be issued.
Customer service hours are 10:00am to 12:00pm and 1:00pm to 4:00pm.
B&K Components Ltd. 2100 Old Union Road, Buffalo New York 14227
1-800-543-5252 or 1-716-656-0023
Page 38