1
COIL & RADIANT ELECTRIC RANGE T1
_F_TY
thislnstaller:appliance.Please
leavethismanualwith
Consumer:
Pleasereadandkeepthis
manualfor futurereference.
Keepsales
receipt
and/orcancelled
checkasproofof
purchase.
ModelNumber
SerialNumber
.............................................................
Pages 1-3
(OOKIN6
';;_!_(E
iiiliii
(OOKING
..............................
Pages
-12
&
Dateof Purchase
£tEANING
......................
Pages 13-17
CAlL
.................................
Page 18
IRE YOU
In our continuing
effortto improvethe qualityand performance
of ourcookingproducts,
it maybe necessary
to make
changesto the appliance
withoutrevising
thisguide.
If youhavequestions,
call:
1-8oo-888-9ooo
o.sA.
1800-688-2002
Canada
.............................
Pages 4-6
_.........
...................................................
Page 19
D_I'IITIIKATI:III_
II_lb
b
V
II II_ll,fl_l
b'_ll
Page 20
DEL
USUARIO
.............................
Page 44
1-800-688-2080
( U.S.TTYfor
hearing
orspeech
impaired)
(Mon.-Fri.,
8am-8pmEastern
Time)
Internet:
http://www.maytag.com
Forserviceinformation,
seepage19.
Form No.A/O'[/01
Part No. 8113P291-60
....... =,,.,_
h t t p : / / w w w. m a y t a g. c o m
74005908
Litho U.S.A.
IMPORTANT
SAFETY
INSTRUCTIONS
Readand followall instructionsbefore
usingthis applianceto preventthe potentialriskoffire,electricshock,personalinjury
or damageto the applianceas a resultof
improperusageofthe appliance.Useapplianceonly for its intendedpurposeas describedin thisguide,
Toensureproperand safeoperation:Appliance must be properly installed and
groundedby a qualifiedtechnician,
>Cooktop:Smotherfire or flame in a
panwith a lidor cookiesheet,
Topreventgreasefires,donotletcooking greaseor otherflammablematedals accumulatein or near the appliNEVERpick up or move a flaming ance.
pan.
Useonlydry potho)ders.
Moistor damp
>Oven: Smotherfire or flameby cles- potholderson hot surfacesmay result
ingthe ovendoor.
in a steamburn. Do not let potholders
Do not use wateron greasefires. Use
bakingsoda, a dry chemicalor foamtype extinguisher to smother fire or
flame,
touchhotheatingelements.Donotuse
atowel or otherbulkyclothwhichcould
easilytouch hot heatingelementsand
ignite.
Alwaysturnoff allcontrolswhencookingis completed.
> ALLRANGESCAN _
6EFIERAL
IFISTRU(TION5
,EVE, heat unopenedcontainerson
the surface unit or in the oven.
INJURIESTO PERSONS
TIP AND CAUSE _
>- INSTALLANTI-TIP
or drawer,ifequipped,as a stepstoolor
seat
as thisNmay
resultin
possibletipWARNING:
EVER
useappliance
door,
pingofthe appliance,damagetothe ap-
cause containerto burst resultingin
burns,
injury
or damageto
the appliPressure
build-upin
the container
may
ance.
DEVICE PACKED _
WITHRANGE
pliance,andseriousinjuries.
If applianceis installedneara window,
NEVERusealuminumfoil to line drip
bowlsor coverovenracksor ovenbot-
>- INSTALLATION
FOLLOW
ALL _
INSTRUCTIONS
precautionsshouldbe
takento
prevent
curtainsfrom
blowingover
surfaceelements.
tom.This
couldresultin
riskof electric
shock,
fire,or
damageto theappliance.
Usefoil onlyas directedin thisguide.
WARNING: To reduce risk of tipping of the appliance from abnormal usageor by excessiveloading
of the oven door. the appliance
NEVERuseapplianceto warmor heat
the room.Failureto followthis instructioncan lead to possibleburns,injury,
fire,or damageto the appliance,
Aerosol-typecans are EXPLOSIVE
when exposedto heat and may be
highlyflammable.Do not useor store
nearappliance.
must be secure by a properly installed anti-tip device,
NEVER wear loose-fittingor hanging
garments while using the appliance,
Clothingcouldcatchutensilhandlesor
igniteandcauseburnsif garmentcomes
in contactwithhot heatingelements,
Thisappliancehasbeentestedfor safe
performanceusingconventionalcookware.Donotuseanydevicesor accessoriesthat are not specificallyrecommendedin this manual.Do not use
Toensureproperoperationandto avoid
damageto the applianceor possibleinjury,do not adjust,service,repairor replace any part of the applianceunless
specificallyrecommendedin this guide,
Refer all other servicingto a qualified
technician,
eyelidcovers,stovetop grillsor add-on
ovenconvectionsystems.The use of
devicesor accessoriesthat arenot expresslyrecommendedin this manual
cancreateserioussafetyhazards,resuit in performanceproblems, and
reducethe life of the componentsof
IN (ASE OF FIRE
NEVERstoreor use gasolineor other
thisappliance.
Turnoff applianceand vent(lat(nghoodto
avoidspreadingtheflame.Extinguish
flame
then turn on hoodto removesmokeand
odor.
combustibleer flammablematerialsin
the oven,nearsurfaceunitsor in the vicinity of this applianceas fumescould
createa fire hazardor an explosion.
Tocheckif deviceisproperlyinstalled,look
underneathrangewith a flashlightto make
sureoneof the rearlevelinglegsis properly engagedin the bracketslot.The anti-tip
devicesecuresthe rear levelingleg to the
floor when properlyengaged.You should
checkthis anytimethe range has been
moved,
(OOKTOP
-.--.--..
not
ose
oven
°,eaners.
No
commerc,a
-------.---,,,."'"""
""""'"(OOKTOP
oven
c,eane
or
oven,,ner
protect,ve
coatingof anykindshouldbeusedinor around
NEVERleavesurfaceunitsunattended
(selectmodels)
especiallywhenusinghighheat.Anunattendedbelievercouldcausesmoking NEVERcookonbrokencooktop.If cookanda greasyspiHover
cancausea fire.
top shouldbreak,cleaningsolutionsand
Thisapplianceisequippedwithdifferent spillevers may penetrate the broken
cooktopand create a risk of electric
sizesurfaceelements.Selectpanswith
shock.Contacta qualifiedtechnicianimflat bottoms large enough to cover
element.Fittingpan sizeto elementwill
mediately.
improvecookingefficiency.
Cleancooktopwithcaution.Somecleanerscanproducenoxiousfumesif applied
If panissmallerthanelement,a portion to a hotsurface.If a wetsponge,cloth,or
of the elementwill be exposedto direct papertowel is used on a hot cooking
contact and could ignite clothing or
area,becarefultoavoidsteamburn.
potholder,
Only certaintypes of glass,grass/ceramie,ceramic,earthenware,or other
DEEP
FAT
FRYERS
glazedutensilsare
suitablefor cooktop
or ovenservicewithoutbreaking
dueto
the suddenchangein temperature.Follow utensilmanufacturer'sinstructions
whenusingglass,
Use extremecautionwhen movingthe
greasepanor disposingofhotgrease.AIlow greaseto cool beforeattemptingto
movepan,
Turnpan handle
toward
centerof
cooktop,notout
intothe
roomor
overanother surfaceelement.This reducesthe
riskof burns,ignitionof flammablematerials,or spillageif pan is acddently
bumpedor reachedbysmallchildren,
OVEH
COIL
IL[MEHTS
anypartof theoven.
Before self-cleaningthe oven, remove
broilerpan, ovenracksand otherutensils
to preventexcessivesmoking,discolorationof the ovenracksor possibledamage
to utensils.
Wipe up excessivespillovers,especially
greasyspills,beforethecleancycleto preventsmoking,flare-upsorflaming,
It is normalfor the cooktopto becomehot
during a clean cycle. Therefore,avoid
touching the cooktop, door, window or
ovenvent duringa cleancycle.
HEATIH5
ELEMENTS
NEVERtouch surface or oven heating
elements,areasnearelements,or
interior surfacesof oven,
Usecarewhenopeningdoor.Let hot air
or steamescapebeforeremovingor replacingfood.
For proper oven operationand perfer-
Heatingelements
maybe hoteventhough
they
aredark in color.Areasnearsurface
elementsand interiorsurfacesof anoven
may becomehot enoughto causeburns.
Duringand after use, de not touchor let
clothingor otherflammablematerialscontact heating elements,areas near ele-
mance,
donotblockerobstruct
venvent
duct. When
in use, the ventoand
sur-
ments,or
inferiorsurfacesof
oven until
they
havehadsufficient
timeto cool.
roundingarea
to causeburns.may becomehot enough
Other potentiallyhot surfaces include:
Cooktop,areasfacingthe cooktop,oven
vent,and surfacesnearthe vent opening,
ovendoor(s),areasaroundthedoor(s)and
ovenwindow(s).
(selectmodels)
To preventdamageto removableheatingelements,do not immerse,soakor
cleanina dishwasher
or self-cleanoven.
A damagedelementcouldshortresultingin a fireor shockhazard,
Alwaysplaceovenracksin desiredIocationswhileoven is cool.If rackmust be
moved while oven is hot, do not let
potholdercontacthotelementin oven.
Makesuredripbowlsarein
placeasabsence
of these bowlsduring
cooking
I.Lt:AfllflgCr/rJ'lrJUILI/"
Jt:Llr
OVEH
coulddamagewiring.
ProtectiveLiners:Do notusealuminum
foil to line surface unit drip bowls or
oven bottoms,exceptas suggestedin
the manual. Improperinstallationof
theselinersmayresultin a risk of electric shockor fire.
Cleanonly partslistedin this guide.Do
not cleandoorgasket.Thegasketis essentia}for a goodseal.Do not rub,damage,or movethe gasket.
IMPORTANT
SAFETY
INSTRUCTIONS,
CONT.
CHILD
SAFETY
VENTILATING
HOODS Users
o,t,isapp,,ance
are
,ereO_,
warnedthatwhentheovenis
engaged
in
NEVERleavechildrenaJoneor unsuper- Cleanrangehoodand filtersfrequently
visedin areawhereapplianceis in use to preventgrease or other flammabJe
or is stillhot.
materialsfrom accumulatingon hoodor
NEVERallowchildrento sit or standon
anypartof the applianceas they could
beinjuredor burned.
filterandto avoidgreasefires,
Turn the fan on when flambeingfoods
(such as CherriesJubilee)under the
hood.
CAUTION:NEVERstoreitemsof interestto childrenin cabinetsabovean applianceoronbackguardof a range.Chil-
the self-cleancycle,theremay besome
lowlevelexposureto someof the listed
substances,includingcarbonmonoxide.
Exposureto these substancescan be
minimizedby properlyventingthe oven
to the outdoors during the self-clean
cycle by openinga windowand/ordoor
in the roomwherethe applianceis Iocated.
IMPORTANTNOTICE REGARDING
applianceor
be burned or seriously
injured,
IMPOflTAHT
SAFETY
NOTICE
PETBIRDS:Neverkeeppetbirdsinthe
kitchenor in rooms where the fumes
AND
WARNING
fromthe
a very kitchencouldreach.Birdshave
sensitive respiratory system.
Childrenmustbe taughtthat the applianceand utensilsin or on it canbe hot.
Let hot utensilscool in a safeplace,out
of reach of small children. Children
shouldbetaughtthatanapplianceis not
a toy.Childrenshouldnot be allowedto
play with controlsor other partsof the
unit.
The CaliforniaSafeDrinkingWaterand
ToxicEnforcement
Act of 1986(Proposition65) requiresthe GovernorofCaliforniato publisha listof substancesknown
tothe Stateof Californiato causecancer
or reproductive
harm,andrequiresbusinessesto warn customersof potential
exposuresto suchsubstances.
dren
climbing
on appliance,door or
drawerto
reachitemscoulddamagethe
Fumes releasedduring an oven selfcleaningcyclemaybeharmfulor fatalto
birds.Fumesreleaseddueto overheated cookingoil, fat, margarineand overheated non-stick cookware may be
equallyharmful.
SAVE
THESE
INSTRU(TIONS
fOR
fUTURE
REFEREN(E
SURFACE
COOKIHG
SURFACE
CONTROLS
Useto turn onthe surfaceelements.An
infinitechoiceof heatsettingsis available BeforeCooking
After Cooking
fromLOWto HIGH.Theknobscanbeset > Alwaysplacea panon the surface
on or betweenanyof thesettings,
unitbeforeyouturniton.Toprevent >- Makesuresurfaceunitfsturnedoff.
damageto range, never operate
Cleanup messyspills as soon as
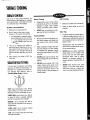
SETTINGTHECONTROLS
surfaceunitwithouta panJnplace,
possible.
1. Placepanon surfaceelement.
> NEVERusethe cooktopas a stor2. Pushin andturntheknobin either
ageareafor foodor cookware.
OtherTips
directionto the desiredheatsetting.
>- Ifcabinetstorageis provideddirect> Thebackguardis markedto identi- DuringCooking
ly abovecookingsurface,limit itto
fy whichelementthe knobcontrols. > Besureyouknowwhichknobconitemsthatareinfrequentlyusedand
left indicatesrightfrontele-_oForexample,
the icontothe
ment.
3. Thereis an indicatorlightlocatedon
the controlpanel.Whenanyofthe surface controlknobsare turnedon, the
lightwill turn on. Thelightwill turnoff
whenthe surfaceelementsare turned
off.
4. After cooking,turn knobto OFF.Removepan.
trois whichsurfaceunit.Makesure
you turnedon the correctsurface
unit.
>
Temperaturesmay be unsafefor
Begincookingona higherheatsetitemssuchasvolatileliquids,cleanling then reduceto a lowersetting
ors or aerosolsprays.
to completethe operation.Never
usea highheatsettingforextended >- NEVERleaveanyitems,especially
plasticitems,on the cooktop.The
cooking,
hot air from the vent may ignite
NEVERaltowa panto boildry.This
flammableitems, melt or soften
coulddamagethe pan andthe upplastics,or increase pressure in
pliance,
closedcontainerscausingthemto
SUGGESTED
HEAT
SETTIHGS
> NEVERtouch cooktopuntil ,, has
Thesize,type of cookwareand cooking
operationwillaffecttheheatsetting.For
informationon cookwareand otherfactors affecting heat settings, refer to
"CookingMadeSimple" booklet,
OFF
5
MEDIUM
]
HIGH:Usetobringliquidto a boil.Always
reducesettingto a lowerheatwhen liquidsbegintoboilor foodsbeginto cook.
9 MED.HIGH:Usetobrownmeat,heatoil
for deepfat fryingor sauteing.Maintain
fastboilforlargeamountsof liquids.
MEDIUM:Use to maintainslowboil for
largeamountsof liquidsandfor mostfryingoperations.
3 MED.LOW:Use to continuecooking
coveredfoodsor steamfoods.
LOW':Useto keepfoodswarmand melt
chocolateandbutter.
canbesafelystoredinanareasubjectedto heat.
burst.
cooled.Expectsome partsof the >- NEVERallow aluminumfoil, meat
cooktop,especiallyaroundthe surprobesor any other metalobject,
face units,to becomewarmor hot
otherthana pan on a surfaceeleduringcooking.Use potholdersto
merit,to contactheatingelements.
protecthands.
SURFACE
COOKING,
CONT.
COIL
[LEMEHI"
SURFACE
($ELKT
MeEts)
COILELEMENTSURFACE
LIFT-UP PORCELAIN
COOKTOP
TO LIFT: Whencool,graspthe cooktop
front edge. Gentlylift up until the two
supportrodssnapintoplace.
TO LOWER: Hold the cooktopfront
edgeand carefullypush backon each
suppOrtrelease,
rOdThentO
_-_ _
lower the topl _
intoplace. I L'_"
I
DUAL
ELEMENT
(Selectmodels)
I
!
Cleancooktopaftereachuse.
Wipeacidor sugarspillsas soon
as the cooktophas cooledas
thesespillsmaydiscoloror etch
the porcelain,
TO PROTECTDRIP
BOWLFINISH:
I Tolessendiscoloration
andcrazing, avoid using high heat for
SUPPORT
longperiods,
I _' RO0
I DOnot useoversizedoookware,
_'
Pans1-2inchesbeyondthe
should not extendmore'.
than
alemont.
ii
Select glass-ceramic surfaces are
equippedwitha dualelementlocatedin
the rightfrontposition.Tooperate,press
the rockerswitchonthecontrolpanelto
the right to control
thelargeelementor
to the leftto control
the smallelement.
COOKWARE
To achieveoptimumcookingperformance, use heavy-gauge,flat, smooth
bottompansthatconformto the diametar
of the cookingarea.(See"Cooking
MadeSimpld'
for cookwarecharacteristicsandrecommendations.)
DRIP BOWLS
I Whenhomecanningor cooking
with big pots, use the Canning
ThedripbowlsundereachsurfacealeElement(Model CE1). Contact
HOT SURFACELIGHT
mentcatchbelieversandmustalways
yourMaytagdealerfor detailsor
(Glass-ceramic
cooking
be used.Absenceof dripbowlsduring
call1-800-688-8408
to order,
surfacemodelsonly)
cookingmaydamagewiring.
! Cleanfrequently.(Seepage14.)
Thehotsurfaceindicatorlightislocated
To preventthe risk of electricshockor ...................................................
_'......................
at the frontcenterof the cooktop.The
fire, neverlinedripbowlswith aluminum
lightwill beilluminatedwhenanycookfoe
ing areais hot. It will remainon, even
after the controlis turnedoff, until the
Drip bowls will discoloror craze over
areahascooled.
time. Thiswillnot affectcookingperfor-
GLISS-CERAMI(
SURFA(E
COILELEMENTS
Whenan elementis on,itwillcycle
onand offto maJntain
theheatsetting.
> Coilelementsareself-cleaning.Do
notimmersein water,
TO REMOVE:
When cool, raise_
element.Careful-_ii__
ly pull out and__
awayfrom recaptacle,
TO REPLACE:
_
into
receptacle.
Guide
Insertelement
terminals_
the elementinto ptace. TERMINALS
Pressdownontheouteredgeofelement
untilit sitslevelondrip bowl.
S
COOKING
AREAS
(SELECT
MODELS)
The cookingareason your range are
identifiedby permanentpatternson the
glass-ceramicsurface. For most efficientcooking,fit the pansizeto theale-
HOT
SURFACE
_
LIGHT
ONCOOKTOP
ment
size.
WARMING
Pans should not extend more than
1/2 to 1-inch beyond the cooking
area.
Formoreinformationoncookware,refer
to "Cooking MadeSimple"booklet.
(Selectmodels)
Usethewarmingcentertokeepcooked
foods warm, such as vegetables,
graviesandoven-safedinnerpfates.
TO TURN ON: Push the
o
CENTER
rockerswitchto the right.
TO TURN OFF: Pushthe
rockerswitchto the left.
WARMING
CENTER
_!
i;i
WARMINGCENTER:
GLASS-CERAMIC
SURFACE
I Allfoodsshouldbe coveredwith
a lid or aluminumfoil to maintain
foodquality.
I OnCanadianmodels,witha warmingzone,thesurfacewill not operateduring
a self-cleancycle.
I When warming pastries and i"_
I Cooktop
mayemitlightsmokeandodorthe firstfewtimesthe cooktopis used.
Thisis normal.
breadsthe covershouldhavean
opening to allow moisture to '. '. I Whena controlis turnedon, a redglowcanbeseenthroughthe glass-ceramescape,
ic surface. Theelementwillcycleon and offto maintainthe presetheatsetI
Do not useplasticwrapto cover
foods.Plasticmaymeltonto the
surface
clean. and be very difficultto
I
Use only cookwareand dishes
recommendedas safe for oven
andcooktopuse.
I Always use oven mitts when
removingfoodfromthe Warming
Centeras cookwareand plates
will behot.
I It is not recommendedto warm
foodfor longerthanonehour,as
foodqualitymaydeteriorate,
I It is not recommendedto heat_
coldfoodonthe WarmingCenter.
........
......
_ ;
TIPS TO PROTECTTHE
GLASS-CERAMIC
SURFACE
> Beforefirst use, clean the cooktop.
(SeeCleaning,page15.)
>- Do not use glass pans.They may
scratchthe surface,
> Do not allow plastic,sugaror foods
with highsugarcontentto melt onto
the hotcooktop.Shouldthis happen,
clean immediately.(See Cleaning,
page15.)
>- Neverlet a pan boil dry as this will
damagethe surfaceand pan.
> Neverusecooktopas a worksurface
or cuttingboard.Nevercookfooddirectlyonthe surface,
ting.
I Glass-ceramic
cooktopsretainheatfor a periodof time afterthe unitis turned
off. Turnthe elementsoffafew minutesbeforefoodic completelycookedand
;
usethe retainedheatto completethe cooking.Whenthe HOTSURFACElight
turnsoff(seebelow),the cookingareawill becoolenoughto touch.
Becauseof the heatretentioncharacteristics,
the elementswill not respond
to changesin settingsas quicklyas coilelements.
I
NOTE:Donot attemptto liftthe cooktop.
>- Never place a trivet or wok ring
betweenthe surfaceand pan. These
itemscanmarkor etchthe top.
> Do notslidealuminumpansacrossa
hot surface. The pans may leave
marks which need to be removed
promptly.(SeeCleaning,page15.)
> Makesurethe surfaceand the pan
bottomarecleanbeforeturningonto
preventscratches.
> Never use a soiled dish cloth or
spongeto cleanthe cooktopsurface,
A film will remainwhichmay cause
stainson the cookingsurfaceafter
the areais heated,
> Do not usea small pan on a large
element.Not only does this waste
energy, but it can also result in
spilloversburningonto the cooking
areawhichrequiresextracleaning.
> Do not use non-flatspecialtyitems
thatareoversizedor unevensuchas
round bottomwoks, rippledbottom
and/oroversizedcannersand griddies.
>- Donot usefoilor foil-typecontainers.
Foilmaymeltontothe glass.If metal
meltsonthecooktop,donot use.Call
anauthorizedUaytagservicer.
> If spillover occurs while cooking,
immediatelycleanthe spill from the
cookingareawhileit is hotto prevent
a tough cleaningchore later.Using
extremecare,wipespillwith a clean
drytowel.
> Do not allow spillsto remainon the
cookingareaor the cooktoptrimfor a
longperiodof time.
> Do not use abrasivecleansingpowders or scouring pads which will
scratchthe cooktop.
> Do notusechlorinebleach,ammonia
or other cleansers not specifically
recommended.
> Toretaintheappearanceofthe glass
ceramiccooktop, clean after each
use.
OYEH
COOKIHG
ELECTROFtlC
CLOCK
AFIDshowse,ectronie
timeofday,timerandovenfunctions.
cootro,
isdesilor
oed
ease
in
Indicator
programmiog.
wordsThe
flashtoprompt
disp,ay
window
yourprogramming
on oontro,
OVEN
COHTROL steps.NOTE:Stylingandfeaturesmaydifferslightlydependingonthemodel.
> Pressthe desiredpad.
Press, or press and
hold, these pads to More+
enter time, oven tern- 5et£1ock
peratureorto selectHI Less,
or LO broil.
Press this pad to
cancel all opera-_ ,-^,,,-_,
tions except the _)
TIMER
and
CLOCK.
NOTE: If more than 30 seconds
elapsebetweenpressinga function
padanda More+ or Less- pad,the
programwill becanceledandthe display will returnto the previousdisplay.
BAKEPAD
Usefor bakingandroasting,
1. PressBakepad.
2. PressMore+ or Less - paduntil
Broil
Clean
Control
Lock
More+ Timer
setC]ock
Less- ClOCk
....
Cook
Time
&top
ume
3. If more or less cleaning time is
desired,pressMore + or Less- pad
to selecttimesbetween2 to 4 hours,
Seepage13for additionalinformation.
3. To delaythe startof cooking,pressthe
Stop Time pad and enterthe time you
wishthe ovento turnoff.
Seepage12for additionalinformation.
CONTROLLOCKPAD
SETTINGTHE CLOCK
The touchpads on the controlcan be 1. PressClockpad.
lockedfor safety and cleaningbenefits 2. PressorpressandholdMore+ or Lessandto preventunwanteduse.Theywill
paduntilthe correcttimeof dayappears
notfunctionwhenlocked,
in the display.
the correct oven temperature
appearsin thedisplay,
If an oven functionis currentlybeing
used,the controlscannotbelocked.The
Seepage9 foradditionalinformation,
currenttime ofdaywill remainin the displaywhenthisfeatureis activated.
BROIL PAD
TO SET:PressControlLockpadfor 3
seconds.The OFF indicatorword will
appearin the displayfor 15 seconds. Clocktime cannotbe changedwhen the
OFFwill reappearfor 15secondsif any ovenhas beenprogrammedfor clockcon-
Usefor top browningor broiling.For
best results,usethe broilerpan providedwithyourrange.
1. Pressthe Broil pad.
2. PressMore+ or Less- padfor HI
or LObroil,
padis pressed,
TO RESTORE CONTROL OPERATION:Pressand holdthe ControlLock
pad for 3 seconds.The indicatorword
See
tion. page11 for additionalinforma-
OFFwill disappear.
CLEAN PAD
Useto setself-cleancycle.
1. Press Clean pad. "----" will
appearin the display.Ovendoor
will automaticallylock.
2. Press More + or Less - pad.
"3:00"hoursof cleaningtime will
automaticallybeentered,
7
Bake
COOK TIME/
STOP TIME PADS
Use to programthe oven to start and
stopautomatically.
1. PressCook Timepad andenterthe
desiredcookingtime.
2. Pressthe Bake pad and enter oven
temperature.
Thedisplaywill flashwhenelectricalpower
is firstsuppliedto the rangeor if therehas
beena powerfailure.
To recallthe timeofdaywhenanotherfunction isdisplayed,pressthe Clock pad.
trolledcooking,self-cleanor delayedselfclean.
SETTINGTHE
TIMER
The
timer can be set
from one minute
(0HR:01)up to 99 hoursand 59 minutes
(g9:59).
Thetimercanbeusedindependently
ofany
otheroven activityand it can be set while
another oven function is operating.THE
TIMERDOESNOTCONTROLTHEOVEN.
1. Pressthe Timerpad.
>-The indicatorwordTIMERwill flash.
2. Pressor pressand hold the More + or
Less- pad until the correct time
appearsin the display.
> The timer will start automatically
after four seconds. A flashing
colonindicatesthat the timeris in
useduringanotherfunction'soperation,
> The last minuteof the countdown
will bedisplayedas seconds,
CLOCKCONTROLLED
OVENCOOKINGBEEPS
TO ELIMINATE12HOURTURNOFF:
1. Pressthe Clock pad and hold for
threeseconds.
Option 1: (defaultoption)Fourbeepsat
the endof cooking,then,one beepevery
30 secondsfor the nextfive minutesor
untilthe CANCELpadis pressed.
Option2: Fourbeepsatthe endofcooking,then,one beepeveryminutefor the
next12hoursor untiltheCANCELpadis
pressed,
2. Pressand holdthe More+ or Lesspad until8888appearsin the display.
Currenttime of day will reappearin
the displayafterfourseconds.
TO RESTORE:Repeatsteps 1 and 2.
"12"will appearbrieflyin the displayfollowedbythe currenttimeof day.
3. At the end of the time set, one long
beepwillsound.(Tochangethe numberof timerbeeps,seenextcolumn.) Option3: Fourbeepsatthe endofcooking,then,nootherbeeps.
TO CANCEL:Pressand holdthe Timer
pad for threeseconds.The time of day SETTINGCLOCKCONTROLLED
will reappearin the display.
OVENCOOKINGBEEPS
(0NIR0t
0PIIONS
at the sametime and hold for three
1. PressCookTimeandCANCEL
pads
seconds,
TIMERBEEPS
> A singlebeepwill sound,
Thereare three choicesfor the end of
"timer" remindersignals.
> Displaywillshowcurrentoption,
Option 1: One beepat the end of the
timeroperation,then,one beepevery30
secondsfor the nextfive minutesor until
the CANCELpad is pressed.
2. Pressthe More + or Less - pad to
selectthe optionnumberyou wish.
Option2: One beepat the end of the
timer operation,then, one beep every
minutefor the next 12 hoursor untilthe
CANCELpadis pressed,
CANCELCLOCK DISPLAY
You may adjustthe oventemperatureif
youthinkthe ovenis not bakingcorrecttemperature,
set the
temperature
25
ly. To decidehow
muchto
changethe
degreeshigheror lowerthanyourrecipe
recommends,then bake.The resultsof
the "test"shouldgiveyouan ideaof how
muchto adjustthe temperature.
TO ADJUSTTHEOVEN
2. Enter 550oby pressingthe More +
pad.
If you preferthatthe time of day not be
displayed:
SETTINGTHETIMERBEEPS
Whenclock displayis not shown,press
1. Pressthe Timer andCANCELpads
at the sametime and hold for three
Clockpadtobrieflyrecall
thetimeofday,
ifdesired.
2. Press the More+ or Less- pad to
selectthe option numberyou wish.
The current time of day will reappear in the display after four seconds.
ADJUSTMENT
Thecurrenttimeof daywill reappear TEMPERATURE:
in the displayafterfourseconds.
1. Pressthe Bakepad.
Option 3: One beepat the end of the TO SET: Press Clock and CANCEL
timer operation,then, no other beeps, padsatthe sametimeandholdfor three
(defaultoption)
seconds,
seconds.
>A singlebeepwill sound.
>Display will showcurrentoption,
OVEN TEMPERATURE
TO RESTORE:Press the Clock and
CANCELpadsatthesametimeandhold
for three seconds.The time of day will
reappearinthedisplay.
AUTOMATICOVENTURN
OFF/SABBATHMODE
The ovenwill automaticallyturnoff after
12 hours,if you accidentlyleave it on.
You can deactivate this feature, if
desired,
3. eralseconds
Pressandholdthe
Bakepadforsevor until0°appearsin
the
display.
> tf the oventemperaturewas previouslyadjusted,the changewill be
displayed.Forexample,if the oven
temperaturewas reducedby 15°,
thedisplaywill show-15°.
4. Pressand holdthe More+ or Less padto changethe temperature.Each
time a pad is pressed,the temperaturechangesby 5°.
>The oven temperature can be
increasedor decreasedby 50 to
350
5. The time of day will automatically
reappearin the display.
It is not necessaryto readjustthe oven
temperatureif thereis a powerfailureor
interruption.Broilingand cleaningtemperaturescannotbeadjusted.
OYEH
COOKING,
com.
OVENVENTLOCATION
ong(ass-cerarnic
range
> Foodpreparationwarning:Follow > Followthe manufacturer'sdirections
foodmanufacturer's
instructions.If a
whenusingovencookingbags.
plasticfrozenfood containerand/or
its coverdistorts,warps,or is other- > Do not useoven for storingfoodor
wise damaged during cooking,
cookware.
immediatelydiscardthe foodand its >Be sure all packing material is
container.Thefoodcouldbecontamremovedfrom oven beforeturning
inated,
on.
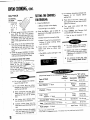
SETTING
THE
COHTROIS
FOR>Press
the Bake pad to recall the
preselected temperature during
BAKING
AND
ROASTINGpreheat
4. Allow 8-15 minutesfor the oven to
1. PressBakepad.
> BAKEwill flashin display.
preheat.
>A singlebeepwill indicatethat the
ovenhaspreheated.
> 0:00will lightin display,
>The
off. PREHEATindicatorwill turn
5. Placefoodin the oven•
2. Pressor pressandholdtheMore+ or 6. Checkcookingprogressat the miniLess - pad to selectoventemperamum cooking time. Cook longer if
Lure.
needed.
>350° will light when eitherpad is 7. PressCANCELpadandremovefood
pressed,
fromthe oven.
>Oven temperaturecanbe setfrom
100°to 550°.
> Timeof daywill reappearin the display.
3. There will be a four seconddelay
beforeoventurnson. Whenthe oven
I To changethe oven temperature
duringcooking,pressthe More +
or Less- padforthe desiredtem-
turnson:
>-PREHEATindicatorwill lightin the
display,
>The BAKEsymbolwill light in display.
perature,
I If youforgetto turnoffthe oven,it
will automaticallyturn off at the
end of 12 hours•If you wish to
deactivatethis feature,see page
8.
I
_.__coilelement
r--_
\
>
range
_
/
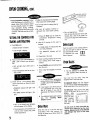
OVEN
VENT
OPENING
> Ona coilelementsurface,besurethe dripbowlin the vent
locationhasa hole in the center.Do
notcoverthe dripbowlwithaluminum
To,,
OVEN
LIGHT
Pushthe switchon the controlpanelto
turnthe ovenlighton and off. Theoven
lightautomaticallycomes
on wheneverthe oven
dooris opened.
OVEN
LIGHT
II1( 1
OVEN R_.CKS
>
Do not attempt to change the
rack position when the oven is
hot.
Your oven has two racks. They are
designedwitha lock-stopedge.
TO REMOVERACK: Pull rack straight
out untilit stopsatthe lock-stopposition;
liftuponthefrontofthe rackandpullout.
TO REPLACE:Placerack on the rack
supportin the oven;tilt the frontend up
slightly; slide
Foradditionalbakingandroasting rackbackuntilit
tips, see "Cooking Made
clears the lockSimple"booklet,
stop
position;
lower front
and
...............................................
.........................................
slide back into
9100° or the actual oven temperathe oven.
turewill appearin the display.
OVEN VENT
Do not cover an entire rack with a/u.
>The temperature
willincreaseby 5o
until the oven reachesthe prese- Whenthe oven is in use, the vent and minum foil or place foil on the oven
lectedtemperature,
surrounding area may become hot bottom,
Bakingresults
willtobeaffected
and damagemay
occur
the oven
enoughto causeburns.Neverblockthe bottom.
ventopening.
RACKPOSITIONS
/i_r_o
]!
W,RMIHG
DRAWER
_
(select models)
3
2
4
1
hot foods at serving temperatureand
! DONOTletfoodsitfor morethan
raisingandproofingbread.It mayalsobe
onehourbeforeor aftercooking.
Thewarming
draweris usedfor keeping ; WARMING
DRAWERservingtemperusedin
warmingbreadsandpastries.
II Foodmustbeat
aturewhenplacedin the drawer.
SETTINGTHECONTROLS:
RACK5:
Usedfor toastingbread
or broilingthinnon-fattyfoods,
RACK4:
Usedfor mostbroiling,
RACK3:
Usedfor most bakedgoodson a
cookiesheetor jelly roll pan,layer
cakes,fruit pies,or frozenconveniencefoods.
1. Ifusingrack,positionitwhereneeded.
2. Push in and turn the knob in either
directionto the desiredheatsetting.
3. Allow the drawer to preheatfor ten
minutes.
4. Placefoodin warmingdrawer,
5. WhenfinO
RACK2:
Used for roastingsmall cuts of
ished,
re move
food and
bread,bundtcakesor custardpies.
RACK1:
meat,casseroles,bakingloavesof
Used for roasting large cuts of
meat and poultry, frozen pies,
dessertsoufflesor angelfoodcake.
to OFF.
turn knob
OFF
_
t_//'I{AI'_, t_x
MIN
C I/
2_
8
II .//_
e
I
Breads, pastriesand fruit pies
may be warmedfrom roomtemperatureonMEDsetting,
! Useonlyovensafecookware.
I Removefood from plasticbags
andplacein ovensafecookware.
! Servingdishesandplatescanbe
warmed while preheating the
drawer.
foil, not plasticwrap.(Friedfoods
needto becovered.)
I donot
Coverfoodwitha
lidor aluminum
..............................
4
WAI;b_ING
DRAWER
MULTIPLERACKCOOKING:
TWORACK:
Userackpositions2 & 4,or 1 & 4.
SUGGESTED
Setting SETTINGS
Typeof Food
>-
Do not use cookware that
extendsbeyondedgeof rack.
>- Forbest results,allowtwo inches betweenthe pan placed on
the rackand the oven sidewall.
MAX.
Bacon
Enchiladas
HorsD'Oeuvres
Pork
Waffles
Casseroles
HamburgerPatties
Pancakes
Potatoes- Baked
DinnerPlate
FriedFood
Pizza
Poultry
>
When opening the oven door,
allow steam and hot air to
escapebeforereachingintothe
ovento removefood.
MED(6-8)
Beef-Rare
CookedCereals
Gravy,CreamSauce
Pies
Biscuits
Eggs
Ham
Potatoes- Mashed
CoffeeCake
Fish/Seafood
Lamb
Vegetables
>
Use caution when removing
itemsfromthe halfrackto avoid
burns.
I.O(2-4)
Warming-Plate
>
Carefullyremoveitemsfromthe
lower rack to avoid disturbing
the halfrack.
"HALFRACK"AccessoryKit is
available when not included
with range. See your dealer or
call 1-800-688-8408to order.
MIN.
Bread- Proofing
>
OVEH
COOKIHG,
co,;.
HALF
RACK
SETTIHG
THE
COHTROLS
4.elementF°r
optimUmfo
b owning,3.4
minutesPreh
r'
rORBROlU,G
INOVEN:
Suppo
1. A I w a ys
J. __,_
r a c k
w h e n
installhalf
oven
is _
cool,
Front
2. To install,grasptop centerof the half
rack, Align the side arm support
betweenthe top fourthand fifthoven
rackguides.Insertthetwotabsonthe
backframeof the half rack intothe
slotsontheupperleftrearoftheoven
wall.
(abeutfourinches).
>BROIL will flashin the display.
1. PresstheBroilpad.
>0:00 will lightinthedisplay,
2. Pressthe More + pad to select HI
(high)broilor theLess- padto setLO
(low)broil.
6. dooropenedto
Turn meat once
thebroilstop
about half
position
way
throughcooking.
7. Press CANCELpad. Removefood
andbroilerpanfromthe oven,
> Timeof day will reappearin display.
>Select HIbroilfor normalbroiling,
>Select LObroilfor lowtemperature
3. Pushfirmlyon the top surfaceof the
halfrack untilthe tabs slide intothe
slotsandthe halfracksidearm support rests on the fourth oven rack
guide,
4. Checkfor properinstallationbe placingyourhandonthetopsurfaceofthe
broilingof longer cookingfoods,
suchas poultry.
3. There will be a four seconddelay
before oven turns on, When oven
turnson:
II For best resultswhen broiling,
usea pandesignedfor broiling,
II Expect broil times to increase
andbrowningto beslightlylighter
if applianceis installedona 208
voltcircuit,
>The BROILsymbolwill lightin the
halfrackandpressingdownfirmly,
TO REMOVEFROMTHEOVEN:
When the oven is
cool, graspthe top ,3jI[_.___ ._
center of the half
rackandpullupward
until the back tabs
onthe rackslideout
of the oven back
slots.
display,
BROIL
SYMBOL
II For additionalbroilingtips, refer
to the "CookingMadeSimple"
booklet.
Chart time based on a preheatedbroil element using the "HI" setting.
Rack
TotalCookTime
Type of Meat
Position* Doneness (Minutes)**
Bacon
4
Well Done 6-10 rain.
I
Do not usecookware
thatextends
beyond
theedgeor rack.
II Forbest results,allowtwo inches
between
thepanplacedonthe rack
andtheovensidewall.
I Whenopeningthe ovendoor,allow
steamandhot airto escapebefore
reachinginto the ovento remove
food.
I Use cautionwhenremovingitems
fromthehalfracktoavoidburns.
aOd.n,ooO.
5. Placefoodin the oven.Leaveoven
i
Beef Steaks- 1"thick
4
4
Medium
Well
15-18 min.
19-23 rain,
Chicken - Pieces
3
Well Done
(LO Broil)
30-45 rain.
Fish - Fillets
- Steaks - 1" thick
4
4
Flaky
Flaky
8-12 rain.
10-15 rain.
Ground Beef - Patties, 3/4" thick
4
Well Done
15-18 rain.
I Carefullyremoveitemsfrom the
Ham - Precooked Slice, 1/2" thick
4
Warm
8-12 min.
lowerracktoavoiddisturbing
thehalf
rack.
Pork Chops - 1"thick
4
Well Done 22-26 min.
I "HALFRACK"
Accessory
Kitavailable ...............
........................................................................................................
............
...........................................
fromyourdealerwhennotincluded *Thetoprackposition is #5.
withrange,orcall1-800-688-8408. **Thischartisa suggested
guide.Thetimesmayvarywithfoodbeingcooked.
ll
CLOCK
COFtTROLLED
SETTING THE CONTROLS
FOR CLOCK CONTROLLED
OVEH
COOKIHG
OVEN
COOKING
b. Less
Press-or
press
and time
hold of
More+
or
pad
to enter
day you
wish the oven to turn off.
TO START IMMEDIATELYAND
TURN OFF AUTOMATICALLY:
>
>
Highly perishable foods such as
dairy products, pork, poultry or
seafood are not recommendedfor
delayed cook operations.
Clock controlled baking is not rec-
c. Press Clock pad.
1. Press the Cook Time pad.
>Time of day will reappear in the
display.
> 0:00 will light in display,
> COOK TIME will flash in the display.
d. DELAYBAKE will remain in display
to show the oven is set for a
ommendedfor items that require a
pre-heated oven, such as cakes,
cookies and breads.
The clock must be functioning and set at
the correct time of day for this feature to
operate correctly.
Clock Controlled Oven Cooking is
used to turn the oven on and off at a preset time of day.This feature can be used
with either oven cooking or self-cleaning.
> IMMEDIATE START: Oven turns on
delayed cook operation.
2. Press or press and hold the More + or
Less - pad to enter cooking time.
3. Press Bake pad.
Cook time can only be set for up to 11
hours and 59 minutes (11:59).
temperature and the BAKE symbol
will light in display.
> 0:00 will light in display.
> BAKE will flash in display,
immediately and automatically
turns off at a preset time.
> DELAYEDSTART:Delays the start of
cooking or cleaning and automatically turns off at a preset time.
6. When the oven turns on, the oven
7. Oven wilt turn off. Four beeps will
sound and END will light in the display.A beep will sound every 30 seconds for the next 5 minutes.
8. Press CANCEL pad. Beeps will stop
and time of day will reappear in display. Remove food from oven.
4. Press or press and hold More + or
Less- pad to enter oven temperature.
NOTE: Beeps will sound if temperature is not set within four seconds.
5. IF YOU WISH TO DELAY
THE STARTOF COOKING:
I
(if not skip to #6)
a. Press Stop Time pad.
It is not necessary to set a start
time. Control will determine when
to turn the oven on based on the
cook time you set.
I
See page 8 if you wish to change
the end of cooking reminder
beeps.
CARE
&(LEANING
_L1LAl_(r/r'r/r'klOVEH
,,_LLI-
> It isnormalforpartsofthe rangeto
becomehotduringa cleancycle,
> Topreventdamagetoovendoor,do
notattemptto openthe doorwhen
the LOCKindicatorword is displayed.
> Avoidtouchingcooktop,door,window,or ovenvent areaduringa
cleancycle.
>
Donotusecommercial
ovencleaners ontheself-cleanovenfinishor
aroundanypartoftheovenasthey
willdamage
thefinishor parts,
Cleanoven
frame,
door
frame
(area
outsideof
gasket)andaroundthe
opening
in the door gasketwith a nonabrasive
cleanersuchas Bon Ami*or detergent
andwater.Theseareasarenotexposed
to cleaningtemperaturesandshouldbe
cleanedto preventsoil from bakingon
duringthe cleancycle,
To prevent damage,do not clean or
rub the gasketaround the oven door.
The gasketis designedto seal in heat
duringthe cleancycle.
Wipe up excess grease or spillovers
fromthe oven bottomto preventexcessivesmoking,flare-upsor flamingduring
the cleancycle.Foreaseof cleaning,the
heatingelementcanbe liftedslightly(1
inch).
The self-cleancycleusesabovenormal Wipe up sugaryand acidic spillovers
cooking
automatically suchas sweetpotatoes,tomatoor milkcleanthetemperaturesto
entireoveninterior.
basedsauces.Porcelainenamelis acid
resistant,not acid proof.The porcelain
It is normal for flare-ups,smokingor
finishmaydiscolorif acidicspillsare not
flamingto occurduring cleaningif the wipeduppriorto a self-cleancycle,
ovenis heavilysoiled.Itis bettertoclean
the oven regularlyratherthan to wait
untilthereis a heavybuild-upof soil in DURING
CLEANCYCLE
the oven.
Whenthe LOCKindicatorwordlightsin
the display,the doorcannotbe opened.
Duringthe cleaningprocess,the kitchen Topreventdamageto door,donot force
shouldbe well ventilatedto help elimi- door open when the LOCK indicator
natenormal
odorsassociatedwithclean- wordisdisplayed.
ing.
AFTERSELF-CLEANING
Aboutonehouraftertheendofthe clean
cycle,the LOCKindicatorwordwill turn
off.At thispoint,thedoorcanbeopened.
Somesoil may leavea lightgray,powdery ashwhichcan be removedwith a
dampcloth. If soil remains,it indicates
that the clean cycle was not long
enough.Thesoilwill be removedduring
the nextcleancycle.
If the oven rackswere left in the oven
and do not slide smoothlyaftera clean
cycle, wipe racks and embossedrack
supportswith a small amountof vegetableoilto restoreeaseof movement.
Finelines may appearin the porcelain
resultingfrom the heatingand cooling
of the finish.This is normalandwill not
affectperformance.
A white discolorationmay appearafter
cleaningif acidicor sugaryfoodswere
notwipedupbeforethecleancycle.This
discolorationis normal and will NOT
affectperformance.
SETTING
THECONTROLS
FORSELF-CLEAN
1. Closeovendoor.
2. PressCleanpad.
Somesmokeandodormay bedetected
> "--:--"or 3:00will lightin display.
the firstfew timesthe oven is cleaned.
> CLEAN wilt flash in display. On
This is normaland will lessen in time.
Turnofftheovenlightbeforecleaningas Smokemayalsooccurif ovenis heavily
selectmodelsLOCKindicatorword
the light may burnout duringthe clean soiledor if broilerpan wasleftin oven.
will appear.
cycle.
As ovenheats,you mayhearsoundsof
> If door is not closed or locked,
Removebroiler pan, all pans and the metalparts expandingand contracting,
beepswill sound and "door"will
oven racksfrom
This is normaland will not damagethe
flashin display.
the oven. The
oven.
3. PressMore+or Less- pad to select
oven racks will
cleantimeor changecleantime.
discolor and
may not slide
>Oven is presetto cleanfor 3 hours.
easily after a
Or,
BEFORESELF-CLEANING
self-cleancycle.
>Select 2 hoursfor lightsoil,upto 4
hoursfor heavysoil.
CLEAN SYMBOL
I 1.1--11--1
--i.UU LOCK
CLEAN
13
4. IFYOUWISHTO DELAYTHE
CLOCKAND CONTROL
CLEAN,N:CLEAHIHG
PROCEDURES
(ifnot,skipto #5):
PAD AREA
a. PressstopTimepad.
_ To activate"ControlLock"for cleaning,seepage7.
_- Wipewitha dampclothanddry.
_- Glass cleaners may be used if
sprayedon a cloth first. DO NOT
spray directly on control pad and
displayarea.
b. Press More+ or Less- pad to
selectthetimeof dayyouwishthe
ovento turnoff.
c. PressClock padandtime of day
will reappearin display.
d. DELAYCLEANwill remainin display to show the oven is set for
delayedcleanoperation,
5. Aboutone hourafterthe cleancycle
ends,the LOCKindicatorword will
turn off. The oven door can be
opened,
_- Besureapplianceisoff andallparts
arecoolbeforehandlingor cleaning.
Thisis toavoiddamageandpossible
burns,
_,- To preventstainingor discoloration,
cleanapplianceaftereachuse.
:_ If a partis removed,besureit iscorrectlyreplaced.
CONTROLKNOBS
BACKGUARD&
bypullingforward.
> Wash, rinse and dry. Do not use
abrasive cleaning agents as they
mayscratchthe finish.
_'- Turnoneachelementto besurethe
COOKTOP
PORCELAIN
ENAMEL,
COOKTOP
ONCOIL
ELEMENT
SURFACES
& TRIM
ONGLASSCERAMIC
SURFACES
Porcelainenamelisglassfusedonmetal
andmay crackorchipwith misuse.It is
LOCK IS STILL ENGAGED
OOO,
CANNOTBE
acid resistant, not acid proof. All
OPENED
UNTIL
LOCK
JS
NOLONGERDISPLAYEO spillovers, especially acid or sugar
spillovers,shouldbe wipedup immediTOCANCELCLEANCYCLE:
atelywitha drycloth.
1. PressCANCELpad.
2. (f LOCK is NOT displayed,open
ovendoor.If LOCKisdisplayed,
allow
oventocoolabout
onehourthenopen
ovendoor.
> Whencool,washwith soapywater,
rinse& dry.
•_ Neverwipeoffa warmor hot surface
with a dampcloth. This may cause
crackingor chipping,
Neveruseovencleaners,abrasiveor
causticcleaningagentson exterior
finishof range,
BOILER PAN & INSERT
Nevercoverinsertwith aluminumfoil as
this preventsthe fat from drainingto the
panbelow,
Place soapy cloth over insert and
pan;letsoakto loosensoil.
_- Washin warmsoapywater.Usesoap
filled scouringpad to removestubbornsoil.
Broilerpanandinsertcanbecleaned
in dishwaser.
> Removeknobs in the OFFposition
knobshavebeencorrectlyreplaced.
DRIPBOWLS
(SELECTMODELS)
Porcelainmay discoloror crazeif overheated.Thisis normalandwillnot affect
cookingperformance.
> When cool, wash after each use,
rinseand dry to preventstainingor
discoloration.May be washedin the
dishwasher.
_ To clean heavy soil, soak in hot
sudsywater,then use a mild abrasire cleanersuchas SoftScrub*and
a plasticscouringpad.
> For burned on soil, removefrom
range, place on newspapersand
carefullyspraywithcommercialoven
cleaner.(Do not spray surrounding
surfaces.)Placein plasticbag and
allowto soakseveralhours.Wearing
rubber gloves, remove from bag,
wash,rinseand dry.
CARE
&CLEAHIHG,
CONT.
ENAMEL
(PAINTED)
SIDEPANELS,
DOOR
HANDLE
& DRAWERS
> Whencool,washwithwarmsoapywater, rinseanddry.Neverwipea warm
or hotsurfacewitha dampclothasthis
may damagethe surface and may
Causea steamburn.
> Forstubbornsoil, use mildlyabrasive
cleaningagentssuchas bakingsoda
pasteor Ben Ami*. Do not use abrasivecleanerssuchas steelwool pads
or ovencleaners.Theseproductswill
scratchor permanentlydamagethe
surface,
NOTE:Use dry towelor clothto wipeup
spills,especiallyacidic or sugaryspills.
Surfacemay discoloror dull if soil is not
immediatelyremoved.This is especially
importantfor whitesurfaces,
GLASS
OVEN
WINDOWS
& DOORS
> Avoidusingexcessiveamountsof water which may seep underor behind
glasscausingstaining.
> Washwithsoapand water.Rinsewith
> Allowthecooktopto coolbeforeclean- METAL FINISHES
ing.
> Wash with soap and water,a glass
General- Alwayscleancooktopafter
cleaner,or mildliquiddetergent.
each use, or when needed,with a > To preventscratchingor dullingof the
damp paper towel and Cooktop
Cleaning Creme
(Part
No.
finish,donotusemildlyabrasive,abra20000001)**.Then, buffwith a clean,
sive,harshor causticcleanerssuchas
ovencleaners.
dry cloth.
NOTE:Permanentstains will developif
soil is allowedto cookon by repeatedly OVEN INTERIORS
usingthe cooktopwhensoiled.
> Followinstructionsonpage13for Self> Heavy Soils or Metal Marks CleaningOven.
Dampen an "scratchless"or "never
scratch" scrubber sponge. Apply
CoektopCleaningCreme*(Part No.
20000001)**and scrubto removeas
much soil as possible.Apply a thin
layerof the cremeoverthe soil,cover
witha damppapertoweland let stand
30 to 45 minutes(2-3 hoursfor very
heavy soil). Keep moist by covering
the paper towel with plastic wrap.
Scrubagain,thenbuffwitha cleandry
cloth,
OVEN RACKS
> Cleanwithsoapywater.
> Removestubbornsoil with cleansing
powder or soap-filledscouring pad.
Rinseanddry.
> Racks will permanentlydiscolorand
may not slide smoothlyif left in the
oven duringa self-cleanoperation.If
this occurs, wipe the rack and
embossedrack supportswith a small
amountof vegetableoilto restoreease
of movement,thenwipeoffexcessoil.
NOTE: Only use a CLEAN, DAMP
"scratchless"
pad thatis safefor non-stick
cookware.Thepatternand glass will be
damagedif thepadis notdamp,if thepad
clearwateranddry. Glasscleanercan is soiled,or ifanothertypeofpad is used. PLASTICFINISHES
beusedif sprayedona clothfirst.
& END
CAPS
> DOnot useabrasivematerialssuchas > Burned-onor CrustySoils- Scrub TRIM
with a "scratchless"or "neverscratch" > Whencool,cleanwithsoapandwater,
scouringpads,steelwoolor powdered scouring pad and CooktopCleaning
rinseanddry.
cleanersastheywill scratchglass.
Creme*.
> Usea glasscleanerand a softcloth.
NOTE:Holda razorbladescraperata 30o NOTE:Neveruseovencleaners,abrasive
GLASS-CERAMIC
angleandscrapeanyremaining
or causticliquidor powderedcleanserson
COOKTOP
soil. Then, clean as
plasticfinishes.Thesecleaningagentswill
(SELECT
MODELS)
described above. Do
scratchor marfinish.
not use the razor
Never use oven cleaners, chlorine blade for daily
NOTE: To preventstainingor discolorableach,ammoniaor glass cleanerswith
ammonia. NOTE: Call an authorized cleaning as it
tion, wipeup fat, greaseor acid (tomato,
servicerif theglass-ceramictop should may wear the
lemon,vinegar,milk,fruitjuice, marinade)
crack, break or if metal or aluminum pattern on
immediatelywitha dry papertowel.
foil should melt on the cooktop,
glass.
MeltedSugaror Plastic- Immediately turn elementto LOW and scrape
fromhot surfaceto a coolarea.Then
turnelementOFFandcool.Cleanresidue with razor,blade scraperand
CeoktopCleaningCreme*.
15
MAIIqTEIL_H(E
OVENDOOR
>- Do not placeexcessiveweighton
or stand on an open oven door.
This could causethe rangeto tip
over,breakthe door,or injurethe
user.
> Do not attemptto open or close
dooror operateoven untildooris
properlyreplaced,
Neverplacefingersbetweenhinge
and frontoven frame.Hingearms
arespringmounted.If accidentally
hit,thehingewill slamshutagainst
ovenframe
and could injureyour
fingers.
TO REMOVE:
1. Whencool,openthe ovendoorto the
broilstopposition(openedaboutfour
inches).
2. Graspdoorat eachside. Do not use
thedoorhandleto liftdoor.
3. Lift up evenlyuntil doorclearshinge
arms.
OVEN WINDOW
TO PROTEGTTHEOVEN
DOORWINDOW:
2. Removebulbcoverandlightbulb.
3. Replacewitha40wattappliance
bulb.
4. Replacebulbcoverandsecurewith
wireretainer.
1. Do not use abrasive cleaning
agentssuch as steel wool scouring pads or powdered cleansers
as they may scratchthe glass.
5. Reconnectpowerto the range.Resetclock.
LEVELINGLEGS
2. Do not hit the glass with pots,
pans, furniture, toys or other
objects.
3. Do not Close the door until the
oven racksare in place,
Scratching,hitting,jarringor stressing
the glass may weaken its structure
causinganincreasedrisk ofbreakage
at a later date.
> Besurethe anti-tipbracketsecuresoneof the rearlevelinglegs
to thefloorto preventthe range
fromaccidentallytipping.
The rangeshouldbe leveledwhen installed. If the rangeis net
eve, turnthe plasticlevI
elinglegs,locatedat each ,,, i_
cornerof the range,until " i
r_'l
rangeis level.
....jJ,_/fi.
I'
OVENLIGHT
>
Disconnect power to range
beforereplacinglightbulb.
'¢,
_-_-_S
_
_
T_PSR,_CKET
__-'_
LEVELING
LEG
>- Use a dry potholderto prevent
possibleharm to hands when
replacingbulb.
CONVENIENCE
OUTLET
> Be sure bulb is cool before
touchingbulb.
The convenienceoutlet is locatedon
the lowerleftsideof the backguard.
> Do not touch hot bulb with a
dampcloth as this may cause
the bulbto break,
Be sureappliancecordsdo not reston
or nearthe surfaceelement.If the surfaceelementis turnedon, the cordand
outletwill bedamaged.
The convenienceoutletcircuitbreaker
BULB COVER
1. Graspdoorat eachside.
2. Alignslots in the doorwith the hinge
TOarmsonthe
REPLACE:range.
_____
3. Slidethe door down onto the hinge
_ET,_,,ER
armsuntilthe dooris completelyseated on the hinges.Pushdown on the TO REPLACEOVENLIGHTBULB:
top cornersof the doorto completely 1. Whenoven is cool,holdbulb cover
seat dooron hinges.Doorshouldnot
in place,thenslidewire retaineroff
appearcrooked,
cover.NOTE:Bulbcoverwill fall if
NOTE:The oven dooron a new range
not held in place while removing
mayfeel"spongy"whenit isclosed.This
wireretainer.
is normalandwill decreasewithuse.
(Canadian
Models
Only)
into it exceeds10 amps.To resetthe
circuitbreaker,pressthe switchlocated
onthe loweredgeof the backguard.
may trip if the smallapplianceplugged
_.lJJ
_.1]_
j_
1,.J
ClRCUIT
BREAKER
SWITCH
CARE
&CLEANING,
CONT.
STORAGE DRAWER
WARMING DRAWER
(SelectModels)
(Select
Models)
4. Carefullypullthedrawerallthe way
outholdingon to the sides,not the
drawerfront.
TO REPLACEWARMINGDRAWER:
1, Pullthebearingglidestothefrontof
the chassisglide.
> Do not store plastic, paper
products,
food
flammable
materialsin
thisordrawer.The
drawermay becometoo warm
for theseitemswhenthe oven
is in use.
Thestoragedrawercanbe removedto
allowyouto cleanunderthe range.
TO REMOVE:
1. Emptydrawerand pull out to the
firststopposition.
2. Liftupthefrontofthe drawer.
>- Do not store plastic, paper
productsor flammablematedals in the warmingdrawer,The
drawermay becometoo warm
for theseitemswhen the oven
aboveis in useor the warming
draweris pre-heated.
> Toavoidcontactwiththewarmingdrawerheatingelement,pull
drawerallthewayout to addor
removefood.
> Never use oven cleaners to
cleanthe warmingdrawer,
3, Pulloutto thesecondstopposition.
4. Graspsidesand lift drawertop up
and out.
TO REPLACE:
TO REMOVEWARMINGDRAWING:
1. Emptydrawerandpullout to itsfull
openposition,
1. Fit the ends of the drawerglides
intothe railsin the range,
2. Locatethe black triangleleveron
eachsideof the drawer,
2. Lift up the frontof the drawerand
gentlypushin to thefirststop posilion.
3. Pressthe lever downon the right
sideand liftthe leverup onthe left
side at the sametime. Then pull
3. Liftdrawerup againandpushuntil
draweris closed.
17
2. Alignthe glideon eachsideof the
drawerwith the glideslots on the
range.
_
draweroutanotherinch,
_r_
3. Pushthe drawerintotherangeuntil
levers "click" (approximately2").
Pull the draweropenagainto seat
bearingguidesintoposition.If you
do not hearthe levers"click"or the
bearingguidesdo not feel seated,
remove the drawer and repeat
steps 1 through3. This will minimizepossibledamageto the bearingglides.
BEFORE
YOU
CALL
FOR
SERVICE
FORMOSTCONCERNS,
BAKINGRESULTSARENOTAS
TRYTHESEFIRST:
EXPECTEDOR DIFFERFROM
II Checkifovencontrolshavebeenprop- PREVIOUS
OVEN.
edyset.
II Makesurethe ovenvent hasnot been
I Checkto besureplugis securelyinsertedintoreceptacle.
blocked.Seepg.9 forlocation,
II Checktomakesurerangeislevel,
II Checkor re-setcircuitbreaker.Check II Temperatures
oftenvarybetweena new
or replacefuse.
ovenandan oldone.As ovensage,the
! Checkpowersupply,
oventemperature
often"drifts"andmay
becomehotteror cooler.Seepg. 8 for
instructions
onadjusting
theoventemperPARTORALL OF APPLIANCE
ature. NOTE:it is notrecommended
to
DOESNOTWORK,
adjustthetemperature
if onlyoneor two
NOTE: On Canadian models with
recipesarein question.
warming zone, during a self.clean II Checkthatoventemperature
isdecreased
cycle- glass-ceramic
cookingsurface
by25° Fwhenconvectbaking.
will not operate.
I See"CookingMadeSimple"bookletfor
I Checkif surfaceand/orovencontrols
moreinformation
on bakewareand bakhavebeenproperlyset.Seepgs.4 &
ing,
7.
II Checkif ovendooris unlockedafter
self-clean
cycle.Seepg.14.
FOODISNOTBROILING
PROPERLYOR SMOKES
II Checkif ovenissetfora delayedcook EXCESSIVELY.
or cleanprogram.
Seepgs.12& 13.
II Checkovenrackpositions.Foodmaybe
tooclosetoelement.
II Checkif coil elementis properlyinstalledor needsto be replaced.
See II Broilelement
wasnotpreheated.
pg.5.
II Aluminum
foilwasincorrectly
used.Never
linethebroilerinsertwithfoil.
OVEN DOORWILL NOTUNLOCK
AFTERSELF-CLEANCYCLE.
I Oveninterioris stillhot. Allowaboutone
hourfortheovento coolafterthecomplelionofa
self-clean
cycle,Thedoorwordis
canbe
openedwhenthe
LOCKindicator
notdisplayed.
MOISTURECOLLECTSONOVEN
WINDOWORSTEAMCOMES
FROMOVENVENT,
I Thisisnormalwhencookingfoodshighin
moisture.
I Excessive
moisture
wasusedwhencleaningthewindow.
THEREIS A STRONGODOROR
LIGHTSMOKEWHEN OVENIS
TURNEDON.
II Thisisnormalfora newrangeandwilldisappearaftera fewuses. initiating
a clean
cyclewill"burnoff"theodorsmorequickly.
II Turningon a ventilationfan will helpremovethesmokeand/orodor.
II Excessive
foodsoilsonthe ovenbottom.
Usea self-clean
cycle.
"F" PLUSA NUMBER
GLASS-CERAMICSURFACE
SHOWSWEAR,
1. Tinyscratches
or abrasions,
! Oven doorwas closedduringbroiling. APPEARSINTHE DISPLAY
Leavethedooropentothefirststopposi- II Thisis calleda faultcode. If a faultcode
lion(about4 inches),
appearsin the displayandbeepssound,
pressthe CANCEL
pad. If thefaultcode
I Cooktopandpanbottomareclean. I Trimexcessfatfrommeatbeforebroiling,
andbeepscontinue,disconnect
powerto
Do not slideglassor metalpans I A soiledbroilerpanwasused.
theappliance.
Waita fewminutes,thenreacrosstop. Makesurepanbottom
connectpower.Iffaultcodeandbeepsstill
is notrough.Usetherecommended
continue,disconnectpowerto the applicleaningagents.Seepg.15.
OVENWILL NOTSELF-CLEAN.
anceandcallanauthorized
servicer.
2. Metalmarks.
I Checktomakesurethecycleisnotsetfor
II Donotslidemetalpansacrosstop.
a delayedstart.Seepg.13.
Whencool, clean with Cooktop I Checkifdoorisclosed,
Cleaning
Creme.Seepg.15.
3, Brownstreaksandspecks.
OVENDID NOTCLEANPROPERLY.
I Spillsnotremovedpromptly.
Wiping I Longercleaning
timemaybeneeded,
withsoiledclothor sponge.Panbottomnotclean.
I Excessivespillovers,especiallysugary
and/oracidicfoods,werenotremoved
pri4, Areaswitha metallicsheen,
or totheself-clean
cycle.
I Mineraldepositsfromwaterand
food.
5. Pittingorflaking.
II Sugaryboiloversthat were not
removedpromptly.
Seepg.14.
II If the oven is heavilysoiled,excessive
flare-upsmayresultin a faultcodeduring
a cleancycle.PressCANCELpad and
allowtheoventocoolcompletely,
wipeout
excesssoilandresetthecleancycle.Ifthe
faultcodeandbeepsstillcontinue,disconnectpowerto the applianceand callan
authorized
servicer.
MAYTAG
RANGE
WARRANTY
WH.T
IS
NOT
(OYEREP
BY
TsE
W,
FullOneYearWarranty- Partsand Labor
1. Conditions
anddamagesresultingfromanyofthefollowing:
a. Improperinstallation,
delivery,or maintenance.
Forone (1) yearfromthe originalretailpurchasedate,any part whichfails in normal
homeusewill berepairedor replacedfreeof
charge,
b. Anyrepair,modification,
alteration,or adjustmentnotauthorizedbythe
manufacturer
or anauthorizedservicer.
c. Misuse,abuse,accidents,
or unreasonable
use.
LimitedWarranties- PartsOnly
d. Incorrectelectriccurrent,voltage,or supply.
SecondYear- Afterthe first yearfromthe
originalpurchasedate,partswhichfail in norreal homeusewill be repairedor replaced
free of chargefor the part itself,with the
ownerpayingall othercosts,includinglabor,
mileageandtransportation.
e. Impropersettingofanycontrol.
2. Warranties
arevoidifthe originalserialnumbershavebeen removed,
altered,or cannotbereadilydetermined.
ThirdThroughFifthYear- Fromthe original
purchasedate,partslistedbelowwhichfailin
normalhomeusewillberepairedor replaced
free of chargefor the part itself,with the
ownerpayingallothercosts,includinglabor,
mileageandtransportation.
> ElectronicControls
5. Thecostofserviceor servicecallto:
a.Correctinstallation
errors.
b. Instructthe useronthe properuseof theproduct.
>- Glass-ceramicCooldop:Duetothermal
breakage.
>,-Electric Heating Elements: Surface,
broilandbakeelementsonelectriccookingappliances.
3. Lightbulbs.
4. Productspurchasedforcommercial
or industrialuse.
c. Transporttheapplianceto theservicer.
6. Consequential
or incidentaldamagessustainedbyany personas a result
ofanybreachofthesewarranties.Somestatesdonotallowthe exclusionor
limitationof consequential
or incidental
damages,sotheaboveexclusion
maynotapply.
IFYOU
NEED
SERvI(E
I
CanadianResidents
Theabovewarranties
onlycoveranappliance
installedin Canadathathasbeencertifiedor
listedbyappropriate
testagenciesforcomplF
ancetoaNationalStandard
ofCanadaunless
theappliancewasbroughtintoCanadadueto
transferofresidence
fromtheUnitedStatesto
Canada.
LimitedWarranty
OutsidetheUnitedStates
and Canada- PartsOnly
Fortwo (2)yearsfromthe dateof originalretail purchase,anypartwhichfailsin normal
homeusewill berepairedor replacedfreeof
chargefor the partitself,withthe ownerpaying all othercosts,includinglabor,mileage
andtransportation,
Thespecificwarranties
expressed
aboveare
the ONLYwarranties
providedby themanufacturer.Thesewarrantiesgiveyou specific
legalrights,and you may also have other
rightswhichvaryfromstatetostate.
MAYTAG
19
nr,Nts:
Callthe dealerfromwhomyourappliancewas purchasedor call Maytag
AppliancesSalesCompany,MaytagCustomerAssistanceat 1-800-6889900,USAor 1-800-688-2002
Canada,to locateanauthorized
servicer.
II Besureto retainproofof purchaseto verifywarrantystatus.Referto WARRANTYfor furtherinformationon owner'sresponsibilities
for warrantyservice.
I
If thedealeror servicecompanycannotresolvetheproblem,writeto Maytag
AppliancesSalesCompany,
Attn:CAIR_Center,P.O.Box2370,Cleveland,
TN37320-2370,
orcall1-800-688-9900
U.S.A.or1-800-688-2002
Canada.
U.S.customers
usingTTYfordeaf,hearingimpairedor speechimpaired,call
1-800-688-2080.
NOTE:Whenwritingor callingabouta serviceproblem,pleaseincludethe
followinginformation:
a.Yourname,addressandtelephonenumber;
b. Modelnumberandserialnumber;
c. Nameandaddressofyourdealeror servicer;
d.A cleardescription
ofthe problemyouarehaving;
e. Proofof purchase(salesreceipt).
I User'sguides,servicemanualsand partsinformationare availablefrom
MaytagAppliancesSalesCompany,
MaytagCustomer
Assistance.
• 403 West Fourth Street North
• P.O. Box 39 • Newton, Iowa 50208
_ _
::: _ _:_
_:
-;_
_ 5: + _ _::_It:::_;,=_
_
"_ _ _ ;_ _
.....
__ _
_
_!!__:_:;_,i_'_'_'_
•
,
;_ :_ _ _
_'
_
_t
: • ;_
_ _ _'_"
:
_,:
_"
%,:,,
_!i¢i
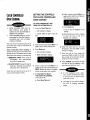
Oven Light
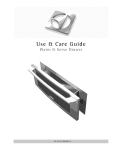
Storage Drawer
CAUTIONS:
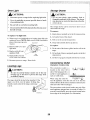
• Disconnect power to range before replacing light bulb.
• Do not store plastic, paper products, food or
flammable materials in this drawer. The drawer
may
oven become
is in use.too warm for these items when the
• Use
dry potholder
whena replacing
bulb.to prevent possible harm to hands
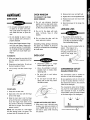
• Be sure bulb is cool before touching bulb.
The storage drawer can be removed to allow you to
clean under the range.
To remove:
• Donottouchhotbulbwithadampclothasthismaycause
the bulb to break.
1. Empty drawer and pull out to the first stop position.
To replace oven light bulb:
1. When oven is cool, hold bulb cover in place, then slide wire
retainer offcover. NOTE: Bulb cover will fall if not held in
place while removing wire
retainer.
8ULeCOVER
2. Lift up the front of the drawer.
3. Pull out to the second stop position.
4. Grasp sides and lift drawer up and out.
Remove bulb cover and _
To replace:
2. light bulb.
///_c./'_¢_)
3. Replace with a40 watt _J/
_,_--_
appliance bulb.
_
_/_E
4. Replace bulb cover and
RErA_NSR
sccurc with wire retainer.
)
1. Fittheendsofthedrawerglidesintotherailsinthe
range.
2. Lift upfront of drawer andgently push in to the first
stop position.
3. Lifldrawerupagain andpush untildrawerisclosed.
5. Reconnect power to range. Reset clock.
Convenience Outlet
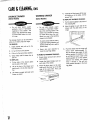
Leveling Legs
A
'
(Canadian
modelsonly)
CAUTION:
located
on the lower
The convenience
outletleft
is
Be sure the anti-tip bracket secures one of the rear
leveling legs to the floor to prevent the range from
accidentally tipping,
__-
Whentheusing
the outlet
sure
appliance
cord be
does not rest on or near the
surface element. If the surface element is turned on, the
cord and outlet will be damaged.
c_
,.
LsvEuNG
LEG
_ i;_,_
side of the backguard. It is
useful for small appliances
such as waffle irons.
The range should be leveled when installed. If the
range is not level, turn the plastic leveling legs, )J_ I
located at each comer of the range, until range _/_
_.:/)
is level.
_,
The
outlet circuit
if the
smallconvenience
appliance plugged
into itbreaker
exceedsmay
10 trip
amps.
To
reset the circuit breaker, press the switch located on the
lower edge of the backguard. (See illustration.)
2O
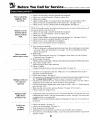
Before You Call for Service.......................
Check these )oints if...
•
•
•
•
•
Part or all of the
appliance does
not work.
operate or heat
food.
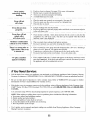
1. Tiny scratches or abrasions.
• Check to make sure cooktop and pan bottom are clean. Do not slide glass or metal pans
across top. Make sure pan bottom is not rough. Use the recommended cleaning
agents. See page 18.
2. Metal marks.
• Do not slide metal pans across top. If it happens, clean when cool with Cooktop
Cleaning Creme. See page 18.
3. Brown streaks and specks.
• Spills not removed promptly. Wiping with soiled cloth or sponge. Pan bottom not clean.
4. Areas with a metallic sheen.
• Mineral deposits from water and food.
5. Pitting or flaking.
• Sugary boilovers that were not removed promptly. See page 18.
Glass-ceramic
surface shows wear.
:
•
•
* °
•
•
•
•
•
•
•
to be sure plug is securely inserted into receptacle.
or re set circuit breaker. Check or replace fuse.
power supply.
if surface and/or oven controls have been properly set. See pages 8 and 11.
if oven door is unlocked after a self-clean cycle. See pages 15-16.
if oven is set for a delayed cook or clean program. See page 14.
NOTE: On Canadian models, the rightfront element on glass-ceramic cooking surfaces will
not operate during a self-clean cycle.
• Check to be sure plug is securely inserted into receptacle.
• Check or re-set circuit breaker. Check or replace fuse.
• Check power supply.
• Check if surface and/or oven controls have been properly set. See pages 8 and 11.
• Check if coil element is properly installed. See page 9.
• Check if oven is set in a delayed oven operation.
• Check to see if coil elements need to be replaced.
Surface or oven
elements fail to
•
Check
Check
Check
Check
Check
Check
•
*
-I •
•
•
•
•
•
•
•
•
•
-
•
•
•
•
•
•
*
•
•
-
•
•
•
•
•
•
•
•
•
•
•
•
•
•
•
•
•
•
•
•
"
•
•
•
•
•
•
•
"
• Check the oven temperature selected. Make sure oven is preheated when recipe or
directions recommend preheat.
• Check rack positions. See page 12.
• Use correct pan. Dark pans produce dark browning. Shiny pans produce light browning.
Baking results are
"Cooking
Made
Simple"
booklet
more
on bakeware.
• See
Check
the use of
foil in
the oven.
Neverforuse
foil information
to cover an entire
oven rack. Place a
small piece of foil on the rack below the pan to catch spillovers.
• Check pan placement. Stagger pans when using two racks. AIlow 1-2 inches between
pans and oven walls.
• Make sure the oven vent has not been blocked. See page 12 for location.
• Check to make sure range is level.
not what you
expected•
•
•
•
•
*
*
•
•
•
•
•
•
•
•
_ •
Baking results
differ from
previous oven.
•
•
•
•
•
•
•
•
•
•
•
Food is not
broiling
properly•
•
•
•
•
* •
•
•
•
•
•
,
•
•
•
•
•
•
*
•
•
•
•
•
•
•
•
•
•
•
•
,
•
•
•
•
•
•
•
•
.
.
•
•
•
•
•
* •
•
• Temperatures often vary between a new oven and an old one. As ovens age, the oven
temperature often "drifts" and may become hotter or cooler. See page 7 for instructions
on adjusting the oven temperature.
NOTE: It is not recommended to adjust the temperature if only one or two recipes are
in question.
•
•
•1 •
•
•
•
•
•
•
•
•
•
•
•
•
•
•
•
•
•
•
•
•
•
•
•
•
•
•
•
•
•
•
•
•
•
•
•
°
•
•
•
•
•
•
•
•
•
•
•
•
•
•
•
•
•
Check oven setting. See page 13.
Check oven rack positions. See page 13.
Broil element was not preheated.
Aluminum foil was incorrectly used. Never line the broiler insert with foil.
Oven door was closed during broiling. Leave the door open to the first stop position
(about 4 inches).
21
•
Oven smokes
excessively during
broiling.
•
•
•
•
•
•
•
•
•
•
•
•
•
•
•
•
*
*
•,•
•
•
•
••
•
• Check to make sure controls are set properly. See page 16.
• Check to make sure the cycle is not set for a delayed start.
•* •Check
if door is closed.
* * • , * * * . . * * • * * • * • • • • . • • • * . • • • • . •
Oven will not
•
.
•
*
*
•
self-clean.
• • • * • •
,
•
•
*
•
•
.
Oven did not clean
properly•
""
unlock after
self-clean cycle•
•
•
.
•
•
•
•
•
•
•
•
•
•
.
•
.
•
•
•
•
•
.
• Longer cleaning time may be needed.
• Excessive spillovers, especially sugary and or acid foods, were not removed prior
to the self-clean cycle.
Oven'doo; wiil'not
....
Food too close to element. See page 13 for more information.
Broiler insert covered with aluminum foil.
Trim excess fat from meat prior to broiling.
A soiled broiler pan was used.
• • • • • • • • • • • • • • • • • • • • • • • • • • • • • • • • • • •
": "Oven i_t_no_ is _t]ll h'ol. AllOw _bo_t'o_ ho_r'f_r'the'a'o_n't_
_o_l'aft_r the"
completion of a self-clean cycle. The door can be opened when the LOCK
indicator word is not displayed.
Moisture condensation
collects on oven window.
• This is normal when cooking food high in moisture.
• Excessive moisture was used when cleaning the window.
There is a strong odor or
light smoke when oven
is turned on.
• This is normal for a new range and will disappear after a few uses. Initiating a
clean cycle will "burn off' the smells more quickly.
• Turning on a ventilation fan will help remove the smoke and/or odor.
• Excessive food soils on the oven bottom. Use a self-clean cycle.
,
•
•
•
•
•
•
•
* •
•
•
•
"F" plus a number
appears in display•
•
,
•
.•
•
•
•
•
•
•
•
•
•
•
•
•
,
•
,
•
*
•
,
•
•
•
•
.
•
•
•
•
•
•
•
.
•
•
•
•
•
* *
•
•
.
•
This is called a fault code. Ifa fault code appears in the display and beeps sound,
press the Cancel pad. If the fault code and beeps continue, disconnect power to
the appliance and call an authorized servicer.
ff You Need Service:
• Call the dealer from whom your appliance was purchased or call Maytag Appliances Sales Company, Maytag
Customer Assistance at 1-800-688-9900, USA or 1-800-688-2002, CANADA to locate an authorized servicer.
• Be sure to retain proof of purchase to verify warranty status. Refer to WARRANTY (next page) for further
information of owner's responsibilities for warranty service.
• If the dealer or service company cannot resolve the problem, write to Maytag Appliances Sales Company, Attn:
CAIR TM Center, EO. Box 2370, Cleveland, TN 37320-2370, or call 1-800-688-9900, USA or 1-800-688-2002,
CANADA.
U.S. customers using TTY for deaf, heating impaired or speech impaired, call 1-800-688-2080.
NOTE: When writing or calling about a service problem, please include the following information:
a. Your name, address and telephone number;
b. Model number and serial number;
c. Name and address of your dealer or servicer;
d. A clear description of the problem you are having;
e. Proof of purchase (sales receipt).
• User's guides, service manuals and parts catalogs are available from Maytag Appliances Sales Company,
Maytag Customer Assistance.
22
•
Range '-warranty . .................................
]
i
i:i
Full One Year Warranty
- Parts and Labor
For one (1) year from the original retail purchase date, any part which fails in normal home use will be repaired or replaced
free of charge,
Limited
Warranties
- Parts Only
Second Year - After the first year from the original purchase date, parts which fail in normal home use will be repaired or
replaced flee of charge for the part itself, with the owner paying all other costs, including labor, mileage and transportation.
Third Through Fifth Year - From the original purchase date, parts listed below which fail in normal home use will be
repaired or replaced free of charge for the part itself, with the owner paying all other costs, including labor, mileage and
transportation.
• Electronic Controls
• Glass-ceramic Cooktop: due to thermal breakage.
i!
• Electric Heating Elements: surface broil and bake elements on electric cooking appliances.
Third Through Tenth Year - From the original purchase date, parts listed below which fail in normal home use will be
repaired or replaced free of charge for the part itself, with the owner paying all other costs, including labor, mileage and
transportation.
• Sealed Gas Burners
Canadian
::)
Residents
The above warranties only cover an appliance installed in Canada that has been certified or listed by appropriate test agencies for compliance to a National Standard of Canada unless the appliance was brought into Canada due to transfer of
residence from the United States to Canada.
!
Limited Warranty Outside the United States and Canada - Parts Only
!!
For two (2) years from the date of original retail purchase, any part which fails in normal home use will be repaired or
replaced free of charge for the part itself, with the owner paying all other costs, including labor, mileage and transportation.
i
!
:
The specific warranties expressed above are the ONLY warranties provided by the manufacturo: These warranties give you
specific legal rights, and you may also have other rights which vary from state to state.
i
!
What is Not Covered By
These Warranties:
'
I, Conditions and damages resulting from any of the
3. Light bulbs.
following:
a. Improper installation, delivery, or maintenance.
b. Any repair, modification, alteration, or adjustment
not authorized by the manufacturer or an
authorized servicer,
c. Misuse, abuse, accidents, or unreasonable use.
d. Incorrect electric current, voltage, or supply.
:
5. The cost of service or service call to:
a. Correct installation errors.
b. Instruct the user on the proper use of the product.
c. Transport the appliance to the servicer.
6. Consequential or incidental damages sustained by any
person as a result of any breach of these warranties.
e. Improper setting of any control.
i!
4. Products purchased for commercial or industrial use.
2. Warranties are void if the original serial numbers have
been removed, altered, or cannot be readily
determined.
:
MAYTAG
FormNo.
A/_2/99
PartNo.
• 403 West Fourth Street North
Ott3P260-60
_
•
Some states do not allow the exclusion or limitation of
consequential or incidental damages, so the above
exclusion may not apply.
• EO. Box 39 ° Newton,
hltp://www
maytag.com
Iowa 50208
74003685
LJthoO.S.A,
: