1
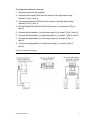
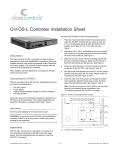
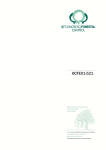
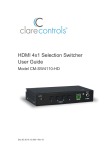
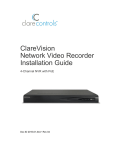
amp.1640 User Guide
16 channel premium amplifier
2014-03-359 • Rev 02
Copyright
© 04MAR14 Clare Controls, Inc. All rights reserved.
This document may not be copied in whole or in part or otherwise
reproduced without prior written consent from Clare Controls, Inc.,
except where specifically permitted under U.S. and international
copyright law.
Trademarks
Manufacturer
Version
FCC compliance
The amp.1640 name is a trademark of Clare Controls, Inc.
Clare Controls, Inc.
7519 Pennsylvania Ave., Suite 104, Sarasota, FL 34243, USA
This document applies to amp.1640 version 01.
This device complies with part 15 of the FCC Rules. Operation is
subject to the following two conditions: (1) This device may not cause
harmful interference, and (2) this device must accept any interference
received, including interference that may cause undesired operation.
EU compliance
2002/96/EC (WEEE directive): Products marked with this symbol
cannot be disposed of as unsorted municipal waste in the European
Union. For proper recycling, return this product to your local supplier
upon the purchase of equivalent new equipment, or dispose of it at
designated collection points. For more information see:
www.recyclethis.info.
Contact information
For contact information, see www.clarecontrols.com.
Content
Important information...ii
Limited three-year warranty...ii
Limitation of liability...iii
Important safety instructions...iv
Welcome to amp.1640...1
Features...1
Rear panel features...3
Rack mounting the amp.1640 amplifier...4
Installation – getting connected...5
Installation – setup and options...6
Global switches...8
Operations...8
Troubleshooting...9
Specifications...10
amp.1640 User Guide
i
Important information
Limited three-year warranty
Clare Controls, Inc. warrants to the original retail purchaser only that this product
will be free from defects in materials and workmanship for a period of three
years, which starts from the first day you purchase this product, provided the
product was purchased from a Clare Controls Authorized Dealer.
If, during the warranty period, the unit cannot be repaired, a suitable replacement
will be issued. Replacement units will be comparable to the original. However,
due to potential design changes over time, replacement units may not be
identical to the unit replaced.
A valid invoice of purchase via an authorized dealer shall be required for any
warranty coverage.
Items not covered by this warranty
•
Damage caused due to incorrect usage and/or connections.
•
Damage caused due to installation by person(s) not adequately trained in the
installation of this equipment.
•
Any attempt to open this unit and access internal components shall
immediately void this warranty.
•
Damage caused by any physical force (dropping the unit or dropping an
object upon the unit, etc.).
•
Damage caused by voltage or cycle fluctuations outside acceptable range.
•
Damage caused by over-current, voltage spikes, or lightning damage due to
inadequate surge protection.
You can contact Customer Support at http://support.clarecontrols.com. Please be
ready to provide the following information.
•
Product model number, version, and serial number.
•
Detailed description of the trouble issues.
•
Description of all connections and third-party equipment being used.
ii
amp.1640 User Guide
Limitation of liability
To the maximum extent permitted by applicable law, in no event will Clare
Controls, Inc. be liable for any lost profits or business opportunities, loss of use,
business interruption, loss of data, or any other indirect, special, incidental, or
consequential damages under any theory of liability, whether based in contract,
tort, negligence, product liability, or otherwise. Because some jurisdictions do not
allow the exclusion or limitation of liability for consequential or incidental
damages the preceding limitation may not apply to you. In any event the total
liability of Clare Controls, Inc. shall not exceed the purchase price of the product.
The foregoing limitation will apply to the maximum extent permitted by applicable
law, regardless of whether Clare Controls, Inc. has been advised of the
possibility of such damages and regardless of whether any remedy fails of its
essential purpose.
While every precaution has been taken during the preparation of this manual to
ensure the accuracy of its contents, Clare Controls, Inc. assumes no
responsibility for errors or omissions.
amp.1640 User Guide
iii
Important safety instructions
WARNING: To reduce the risk of fire or electric shock, do not expose this
apparatus in or near rain or moisture.
1. Read the following instructions carefully.
2. Keep manual for future reference.
3. Heed all warnings.
4. Follow all instructions in this manual.
5. Do not expose the apparatus to dripping or splashing and that no objects
filled with liquids, such as vases, shall be placed on the apparatus.
6. Do not use this apparatus near water.
7. Clean only with a dry cloth.
8. Do not block any ventilation openings. Install according to manufacturer’s
instructions.
9. Do not install near any heat sources such as radiators, heat registers, stoves
or other apparatus that produce heat.
10. Do not override the safety purpose of the polarized or grounding-type plug. A
polarized plug has two blades - one wider than the other. A grounding type
plug has two blades and a third grounding prong. The wide blade or the third
prong is provided for your safety. If the provided plug does not fit into your
outlet, consult an electrician for replacement of the obsolete outlet.
11. Protect the power cord from being walked on or pinched particularly at plug,
convenience receptacles, and the point where it exits from the apparatus.
12. Only use attachments/accessories specified by the manufacturer.
13. Unplug this apparatus during lightning storms or when unused for long
periods of time.
14. Refer all servicing to qualified service personnel. Servicing is required when
the apparatus has been damaged in any way, such as when the powersupply cord or plug is damaged, liquid has been spilled, or objects have fallen
into the apparatus, the apparatus has been exposed to rain or moisture, does
not operate normally, or has been dropped.
15. To completely disconnect this unit from the AC mains, disconnect the power
supply cord plug from the AC receptacle.
Caution: To reduce the risk of electrical shock, do not remove cover. No user
serviceable parts inside. Refer servicing to qualified service personnel.
iv
amp.1640 User Guide
Welcome to amp.1640
The Clare Controls amp.1640 is a 16-channel (8 zones) Class D amplifier. It is a
compact and efficient cool-running device housed in a 1U rack-mount chassis.
The amp.1640 uses an advanced switch-mode power supply to drive sixteen
channels, delivering 40 watts at 8Ω. The amp.1640 is stable to 4Ω.
The amp.1640 incorporates eight matched 2-channel amplifier modules that
deliver eight zones of clear audio performance. It uses two independent feedback
loops that provide lower distortion, less noise on output, a frequency response
that is less dependent on load and lower a output impedance than other Class D
amplifiers.
The amp.1640 also includes a switch-mode power supply that consumes less
than 0.2 W in standby. It implements a total of nine independent protection
circuits, monitoring the temperatures, currents and voltages of several different
functional blocks, assuring uninterrupted music until maximum limits are reached.
Features
Efficiency
The amp.1640 is built on Class D technology, running cooler, more efficiently
(greater than 90%), and more economically than traditional Class A/B amps, with
equal or better audio performance.
1 RU form factor
Class D amplifier technology can also be built into smaller, lighter components,
allowing us to fit sixteen high-performance channels in a space-saving 1 U rackmountable chassis.
Advanced protection
The amp.1640 features a comprehensive protection system with a total of nine
independent protection circuits. These circuits monitor the temperatures,
currents, and voltages of several different functional blocks to assure optimal
reliability.
Bridging
The power output of adjacent channels can be combined to provide additional
power when needed in certain areas. This is easily accomplished by setting a single
DIP switch and wiring accordingly.
amp.1640 User Guide
1
Global switching
A dedicated input can be assigned to multiple output channels via the channel
Global In connection. By turning ON the Global DIP switch for each pair of
channels, those channels can be configured to play the common signals from the
global input. This allows you to use multiple channels for a single listening area
without the need for line level distribution amps or Y-cables.
Individual channel and gain adjustments
Each pair of channels has its own gain adjustment, which adjusts the maximum
output. This allows you to match the output to its area. It can also be used to limit
how loud each speaker is allowed to play. If you choose to use Global switching,
you can use the Global gain to control the maximum output for all Global
channels at once. Regardless of which gain you use, be sure set the volume at a
level that does not clip or cause distortion when the volume is at its maximum
level. This can cause damage to the speakers and the amplifier.
Installation-friendly connections
Each speaker connection features a removable Phoenix-style connector that
accommodates up to 14 gauge stranded speaker wire.
Power
The amp.1640 receives its power from a standard 120VAC/60Hz outlet. The amp
can be triggered to turn on via the 12 VDC trigger input on the rear of the amp.
This allows the amp to remain in Standby mode until it is required for use,
thereby greatly reducing overall power consumption.
2
amp.1640 User Guide
Rear panel features
(1) Line inputs
Individual channel inputs for use with multi-channel preamps or dedicated
sources.
(2) Global input
Allows an individual input source to be shared across any or all channels.
(3) Global loop out
Allows global inputs to be looped out to other amplifiers or devices.
(4) Global DIP switch
Allows distribution of the audio signal from the Global In (L and R) to multiple
amplifier channels in a configuration of your choice.
(5) Bridge DIP switch
Allows the combining of two channels to create a single bridged output channel.
The single combined output channel is driven at 160 W at 8Ω. This can be very
useful when more power is needed in particular areas, such as outdoor
environments. Note: 8Ω speakers must be used when bridging channels.
(6) Gain control
Allows individual control of the maximum output for each pair of amp channels.
(7) 12V trigger
Powers on the amplifier from Standby mode into full power mode when triggered.
(8) Global gain
Allows control of the maximum output of all channels that have been set to Global
mode (i.e., Global DIP switches for those channels are ON).
(9) Speaker outputs
Individual Phoenix-style terminal connectors (included) for each speaker.
(10) Fan
Rear location fan with front intake allows for direct stacking of the amplifier with
other equipment, greatly reducing rack space usage.
(11) Power connector
amp.1640 User Guide
3
Rack mounting the amp.1640 amplifier
Your amp.1640 comes with equipped for mounting the unit in a 1U rack space.
Notes
•
Be sure that the unit is in a well-ventilated area that provides adequate
cooling.
•
Do not block the fan vent located on the rear of the unit.
•
Do not place the unit on carpeting or any similar material.
•
Do not install the unit near a source of heat, or in an extremely humid or wet
location.
•
If your installation lacks good airflow (such as solid cabinet doors or wallmounted racks), it may be necessary to create ventilation to allow outside air
into the space.
To mount the amp.1640 in a rack:
1. Remove the eight screws (four on each side) from the
amp.1640 and set aside.
2. Place an ear on each side of the amp.1640, and then attach them using the
screws you set aside.
3. Slide the unit into the rack, and then attach it with four rack mounting screws.
Figure 1: amp.1640 rack mounting
4
amp.1640 User Guide
Installation – getting connected
Caution: All connections and switching must be done with the amplifier powered
off. Do not connect the power cord to the amplifier until your connections and set
up is complete.
Inputs
For line level connections, use high-quality RCA cables that feature low
impedance, shielding and high-quality connectors.
Speaker outputs
Use 14-18 gauge stranded two-conductor loudspeaker wire for all high level
connections. At each loudspeaker-level connection, ensure that at least 2 inches
of each conductor are separated. Strip away 1/4 inch of insulation from each
conductor. Connect the appropriate conductor to the speaker connection using
the Phoenix-style connectors, observing correct polarity.
Verifying phase
If during or after calibrating your receiver you suspect the sound is not right and
you cannot see any markings on the wire to verify that polarity is correct, try this
simple test:
1. Sit in the normal listening position for the system.
2. Play some music with your receiver set to Mono. Listen to the music and
observe the audio.
Does the bass sound full and even with the other audio?
Do the vocals sound centered and even in volume? If any of the answers are
YES, follow steps 3 and 4.
3. Turn off your receiver and reverse the connections for one of the speakers.
4. Repeat your test at the same volume level while reversing connections for
each speaker, one by one. When the sound has the loudest and best
sounding bass, and vocals are centered and clear, your connections are
correct and in-phase.
Loop outputs
Any source connected to the Global Line In Input can be sent to other
components or amplifiers by connecting them to the Global Loop output
connectors.
amp.1640 User Guide
5
Installation – setup and options
Input selection
Caution: Only change DIP switch positions when the amplifier is turned off. Each
channel is capable of delivering the sources from a dedicated Line-In or the
Global-Inputs by changing the Line-In/ Global In DIP switch.
Power connection
Plug the supplied power cord into the amplifier and to a polarized wall outlet or
appropriate surge protector.
Note: There is no power button on the amp.1640. The unit automatically powers
up when you plug it into an outlet.
Caution: Do not plug the amplifier’s power cord into a switched outlet, as is
featured on some surround receivers. If you wish to have the amplifier turn on
when the receiver is powered up, use the 12 V trigger jack on the rear of the unit.
Bridging channels
When greater power capacity is required, such as noisy outdoor environments,
you can combine, or bridge, two amplifier channels into a single channel. The
bridged channel is driven at four times the power of the individual channel. When
bridged, the single bridge output is driven at 160 watts at 8Ω, due to the bridging
process. Therefore, only an 8Ω speaker load should be used. You must not
parallel two 8Ω speakers on a single bridged output, as the amplifier actually
sees this as a 2Ω load.
Notes
•
When bridging, only the right input is used.
•
You cannot use bridge and global on the same channel, since only a bridged
channel sees the right channel input.
•
Do not connect more than one speaker to the outputs on a bridged channel.
•
Maintain an 8Ω minimum speaker load when using bridge mode. Due to the
bridging process, the amplifier actually sees the 8Ω speaker as a 4Ω load per
channel.
6
amp.1640 User Guide
To bridge two adjacent channels:
1. Remove power from the amplifier.
2. Connect the left input (RCA) from the source to the right input of amp
channel 1 (Fig. 2, item 1).
3. Connect the right input (RCA) from the source to the right input of amp
channel 2 (Fig. 2, item 1).
4. Set the Bridge DIP switches ON for both channel 1 and channel 2 (Fig. 2,
item 2).
5. Connect the left speaker (+) to left amp output (+) of output 1 (Fig. 2, item 3).
6. Connect the left speaker (-) to right amp output (+) of output 1 (Fig. 2, item 3).
7. Connect the right speaker (+) to left amp output (+) of output 2 (Fig. 2,
item 3).
8. Connect the right speaker (-) to right amp output (+) of output 2 (Fig. 2,
item 3).
Figure 2: Example of bridging
amp.1640 User Guide
7
Global switches
The global switches allow you to distribute the audio signal from Global In to
multiple amplifier channels in a configuration of your choice.
To use the Global switches:
1. Connect the audio source to Global IN (Fig. 3, item 1).
2. Set the Global DIP switches for the channels to ON (Fig. 2, item 2).
3. Connect the leads of the speakers to the matching channel connectors (Fig 3,
item 3).
Figure 3: Example of global switching
Operations
LED indicators
When the amp.1640 is powered on, the LEDs on the front panel indicate the
amplifiers operating state.
BLUE – Amplifier is ON and functioning properly
ORANGE – Amplifier is ON and in Standby mode.
8
amp.1640 User Guide
Gain adjustments
Use the gain adjustments on the rear panel of the amplifier to adjust the
maximum output level of each channel pair. This is useful when you want to limit
the maximum volume level in an area, such as a child’s room or guest area. Be
sure to set the gain adjustment at a level that does not clip or cause distortion
when the volume is set to the maximum level. This can cause damage to the
speakers and the amplifier.
Troubleshooting
No audio from any channel.
•
Verify that the power cable to the amplifier is correctly connected and plugged
into an outlet that has power.
•
The audio cable to the source component is not properly connected, it is not
properly connected to the input, or the cable is defective. Check your
connections and replace defective cables with ones that are known to be
good.
No audio from one or more channels.
•
The audio cable to the source component is not connected properly or it is
defective. Check the connections or replace the cable, if necessary.
•
The Global DIP switch is positioned incorrectly. Set the DIP switch to its
proper position. See “Global switches” on page 8.
•
The Bridge DIP switch is positioned incorrectly. Set the DIP switch to its
proper position. See “Bridging channels” on page 6.
•
Check the speaker wire connections at the amplifier and the speaker.
•
The Gain adjustment for the channel is turned down. Turn it slowly to the right
to raise the volume.
•
To test a bad channel, connect it to a speaker that you know works.
Hearing a hum or buzzing sound.
•
Check the RCA input cables by removing them one at time. (Be sure to power
down the device before disconnecting the cable.) Check to see if a
connection or a cable is to blame.
Amplifier will not turn on.
•
Check that the amplifier is plugged into a live outlet.
•
Check that 12V is present, if using the 12V trigger.
amp.1640 User Guide
9
Specifications
Voltage
120-240 VAC, 2 A 50/60 Hz
Current
Standby
Alarm
0.06 A (1.3 A with music, max.)
2.6A (with Sine wave, worst case)
Inputs
16 Gold RCA jacks with adjustable gain
(+4 dBu pro to -10 dBV consumer)
Input impedance
Single ended 10 k Ω
Output power
16 x 80 W into 4 Ω, or 40 W into 8 Ω
Peak output power
(Bridge mode, single output)
160 W at 8 Ω bridged
Frequency response
10 Hz – 20 kHz
(4 Ω, 8 Ω, Open load)
± 0.4dB
Idle noise
< 140 dBr(A)
THD+N distortion
(4 Ω SE, f = 100 Hz, Po=1w)
0.003%
IMD Intermodulation (CCIF)
(f=18.5 kHz, 1 kHz Po 10W)
0.0009%
Trigger control
12 VDC on 3.5 mm mono jack
Fan noise
Variable speed, 28 db(A) worst case
Standby power
<0.5 W
Weight
8.6 lbs. (3.9 kg)
Dimensions (W × H × D)
17.00 × 1.75 × 12.25 in. (43.2 × 4.5 × 29.2 cm)
Operating environment
Temperature
Relative humidity
32 to 104°F (0 to 40°C)
0 to 95% noncondensing
Note: All specifications are subject to change without notice.
10
amp.1640 User Guide
™
amp.1640
16-Channel Audio Amplifier
The Clare amp.1640 packs 16-channels (8 zones) of exceptional
Class D amplification into a cool-running, 1 U rack-mounted
chassis. Using technologies designed by ICEpower, a wholly
owned subsidiary of Bang & Olufsen, the amp.1640 uses an
advanced switched-mode power supply to drive 16 channels,
delivering 40 watts into 8Ω. The amp.1640 is stable to 4Ω.
Compact and efficient, Clare’s amp.1640 addresses common
installation headaches with run-cool design in a compact form
factor.
Audio Stages
The amp.1640 incorporates eight matched 2-channel amplifier
modules in a compact 1 U form factor, which combine to
deliver 8 zones of sharp, clear audio performance. Use of
two independent feedback loops allows the amp.1640 to
provide lower distortion, less noise on output, a frequency
response less dependent on load and lower output impedance
than other class D amps. The result is a natural, relaxed and
dynamic sound with excellent stereo perspective and a tightly
controlled precise bass that will do justice to every source and
recording in your customer’s collection.
Technical Specifications
Audio
Inputs
16 Gold RCA jacks with adjustable gain
Input impedance
Single Ended 10k Ω
Output power
16x40 W into 8 Ω
Peak output power
(bridge mode, single output)
160W
Ideal Output Load
4 Ω stereo/ 6- 8 Ω bridged mono
Frequency response
10hz-20khz ( 4 Ω, 8 Ω, Open load)
THD+N distortion
( 4 Ω SE, f = 100Hz, Po =1w)
±0.4 dB
0.003%
IMDIntermodulation (CCIF)
(f=18.5kHz, 1kHz Po10W)
0.0009%
Dynamic Range
(A-weighted, 160W, 8 Ω)
115 dB
Features
Trigger control
12 VDC on 3.5 mm mono jack
Bridgeable
Yes, to 160 WPC
Global input
Yes
Input level adjustments
Yes
General
Ambient temperature
•
•
•
•
•
•
•
•
•
ICEpower Class D technology
>90% efficient design
16 x 40 WPC into 8ohms
Global bus with loop through
System trigger
Input channel level adjustments
Front panel status indication:
blue = on, orange = standby
1 rack space
Includes rack ears
™
|
32ºF to 95ºF (0ºC to 35ºC)
Fan Noise
Variable Speed, 28 db(A) worst case
Power
120V - 240 Vac, 50/60Hz
Standby Power
<0.5w
Dimensions
17" w x 1.75" h x 12.25" d
(432 x 45 x 292 mm)
Weight
8.6 lbs
Clare Controls is a provider of intelligent home automation technologies. Our product line includes ClareOS solutions that streamline
the integration, management of sophisticated home automation systems, plus several families of specialized point-solution components
for forward-thinking integrators. ClareOS products are deployed locally in customer sites and administered remotely via cloud-based
technologies that maximize dealer efficiency while providing unprecedented customer control. For more info, visit clarecontrols.com.
7519 Pennsylvania Avenue, Suite 104, Sarasota FL 34243
|
Main: 941.328.3991
|
Fax: 941.870.9646
|
Doc ID: 2014-02-296-04