1
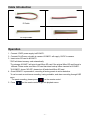
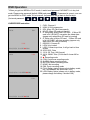
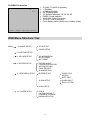
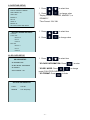
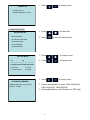
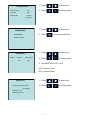
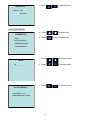
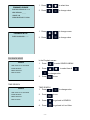
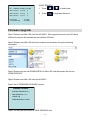
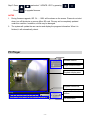
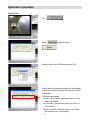
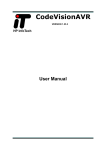
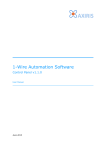
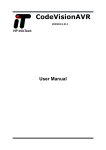
H.264 Hidden Recorder Board
(HVR-Lite)
User Manual
Ver. 1.0.0
Model number: 3194071
Thank you for purchasing our H.264 Hidden Recorder Board (HVR-Lite). Please
read this manual before installation.
For customer support, contact your dealer, keep your Invoice for further support.
Do not open/modify the device, as it may cause damage to the unit and
void the Warranty. For internal repairs, consult your dealer or an Authorized
Service Center.
Do not use any accessories other than what comes with the unit otherwise, it
would void the warranty.
Protect from humidity. Do not put it in water and be careful to protect it from
rain, sea water, or high humidity environment etc.
Protect from high temperatures
To avoid damage or mis-operation of the device, only use in temperature of 0 ~
+40°C.
Do not bring the device suddenly from a hot to a cold place, or vice versa. This
may cause damaged to the inside of the unit by creating condensation.
EU Environmental Protection
The symbol of crossed-out garbage shows that this product should not be treated
as household waste, and it falls into the category of electric /electronic
equipment for recycling. This electronic device should not be disposed in a
regular trash. We strongly advice you to contact related authorization before
you dispose this product.
Table of Contents
Table of Contents .............................................................................................................................. - 1 Package contains ............................................................................................................................. - 2 Diagram ............................................................................................................................................. - 2 Cable Introduction ............................................................................................................................ - 3 Operation........................................................................................................................................... - 3 IR Remote Controller........................................................................................................................ - 4 OSD Operation ................................................................................................................................. - 5 OSD Menu Structure Tree ............................................................................................................... - 6 Firmware Upgrade .......................................................................................................................... - 14 PC Player ........................................................................................................................................ - 15 Operation procedure ...................................................................................................................... - 17 Specification .................................................................................................................................... - 20 -
-1-
Package contains
Main unit x 1
IR remote control x 1
Cable accessory x 1
CD (Software, user manual) x 1
Diagram
White: audio out
black: ground
red: power input
12VDC input
Micro SD Slot
A/V output
black: ground
yellow: video out
A/V input & Power
output
IR Receiver
red: power out
black: ground
yellow: video in
white: audio in
Buzzer
-2-
Cable Introduction
IR Cable
Power cable
AV output cable
AV input/ Power output cable
Operation
1. Connect 12VDC power supply to #3194071.
2. Connect AV in/Power out cable to camera. #3194071 will supply 12VDC to camera.
3. Insert micro SD card to #3194071.
* DVR will detect memory card automatically.
* For storage, #3194071 will auto-format Micro SD card if the original Micro SD card format is
different. Please make sure Micro SD card has done backup before inserted to #3194071.
* If #3194071 shows “NO SD”, please turn off and check Micro SD card.
4. Once #3194071 is powered on, recording is factory preset at motion detection.
* It can be reset as continuous recording, having schedule, and alarm recording through OSD
menu
* For panic recording, please press
on the remote control.
5. Press
on the remote control to get into playback menu.
-3-
IR Remote Controller
Button
Function
Description
Universal password: UP/UP/DOWN/DOWN/+/+/-/-
Panic Record
Start to Record manually. Press again to cancel
recording mode
KEYPAD
Virtual keypad input
Lock
Key lock
MENU/Exit
Menu mode or Exit to last page
UP (2)/ DOWN (4)/
LEFT (5)/ RIGHT (3)
Enter
Confirm
Plus (6) ; Minus (7)
Adjust Value
Play
Into playback menu or start to play
Pause (8)
Pause playback, press again to play frame by frame
Re-wind
Rewind playback
Fast forward (0)
Fast forward play 2/4/8 times
Fast rewind (9)
Fast rewind play2/4/8 times
Stop
Stop playback
-4-
OSD Operation
* When you get into MENU or PLAY mode, it would need password if #3194071 is in key lock
mode. Please enter password (default: 1234) and press
. If password is correct, user can
get into MENU or PLAY mode. If it is incorrect, the password will go back to the first digi t.
(Universal password:
)
LIVE/RECORD Instruction
1
H264
95%
O
ID
LOCK
FULL
LOSS
2010/10/01 10:10:25 ● CON
1
H264
LOCK
95%
R
ID
LOW
2010/10/01 10:10:25PM ● PAN
1
H264 NO SD R
1.
2.
3.
4.
5.
CH01: Channel 1
H264: H.264 compression
95%: Micro SD Card free capacity
NO SD: Micro SD card not inserted
R: Recycledly writing Micro SD card. If Micro SD
card is full, #3194071 overwrites the oldest data
(appear only when Micro SD card is inserted)
6. O: Write once to Micro SD card. If Micro SD card
is full, #3194071 will stop recording (appear only
when Micro SD card is inserted)
7. 00000001: Camera ID
8. LOCK: Key locked
9. LOSS: Camera input loss, it will go back to blue
screen
10. 2010/10/01: Date
11. 12:14: 50: Time (24H format)
12. 12:14: 50AM: Time (12H format if shows AM or
PM)
13. ●: Recording mode
14. CON: Continuous recording mode
15. ALARM: Alarm recording mode
16. MOTION: Motion recording mode
17. NONE: Not recording
18. PAN: Panic recording mode
19. FULL: Battery status (shows only in battery mode,
but if use adapter, will also show FULL)
20. LOW: Battery status (shows only in battery mode,
please charge the battery if shows LOW)
ID
FULL
2010/10/01 10:10:25 ● PAN
-5-
PLAYBACK Instruction
1
1.
2.
3.
4.
5.
6.
7.
8.
9.
ID
FULL
>PB 1X PAUSE
ID CAM_01: the ID of recording
>: Playback
<: Rewind playback
PB: Playback mode
1X: Speed of playback, 1X/ 2X/ 4X/ 8X
PAUSE: Pause palyback
2010/10/01: Date of recording
10:10:25: Time of recording
FULL: Battery status (shows only in battery mode)
2010/10/01 10:10:25
OSD Menu Structure Tree
MENU
I. CHANNEL SETUP
TITLE SETUP
COLOR SETUP
II. DATE/TIME SETUP
III. SD CARD SETUP
SD INFORMATION
SD REC MODE
SD FORMAT
IV. RECORD SETUP
RECORD MODE
CONTINUOUS RECORD
MOTION RECORD
PANIC RECORD
ALARM RECORD
VI. PERIPHERAL SETUP
BUZZER SETUP
VIDEO LOSS
MOTION
BEEP TIME
ALARM SETUP
ALARM INPUT
RELAY OUTPUT
AUDIO SETUP
VII. SYSTEM SETUP
DVR ID
FACTORY DEFAULT
FIRMWARE UPGRADE
PASSWORD SETUP
-6-
MENU OPERATION
1. Press
MAIN MENU
to enter MAIN MENU
CHANNEL SETUP
DATE/TIME SETUP
2. Press
to select item
SD CARD SETUP
3. Press
RECORD SETUP
to enter the selected item
PERIPHERAL SETUP
SYSTEM SETUP
I. CHANNEL SETUP
1. Press
to select item
CHANNEL SETUP
2. Press
to enter the selected item
TITLE SETUP
COLOR SETUP
TITLE SETUP
CHANNEL 1: _ _ _ 1
1. Press
to change value
2. Press
to change cursor
1. Press
to select item
2. Press
to change value
COLOR SETUP
BRIGHTNESS
32
CONTRAST
32
SATURATION
32
HUE
32
(1-63)
-7-
II. DATE/TIME SETUP
DATE/TIME SETUP
1. Press
to select item
DISPLAY FORMAT:YY/MM/DD
TIME FORMAT: 12H
YEAR: 2000
2. Press
to change value
DAY: 06
* Display Format: YY/MM/DD, MM/DD/YY, or
DD/MM/YY.
HOUR: 21
* Time Format: 12H/ 24H
MONTH: 01
MINUTE: 06
DAYLIGHT SAVING TIME SETUP
DAYLIGHT SAVING TIME SETUP
1. Press
to select item
2. Press
to change value
1. Press
to select item
TURN: OFF
START TIME
MONTH: 04
DAY: 02
HOUR: 00
END TIME
MONTH: 11
DAY: 04
HOUR: 00
III. SD CARD SETUP
SD CARD SETUP
SD INFORMATION
* SD CARD INFORMATION: Press
to enter
SD REC MODE: OVERWRITE
SD FORMAT
AUTO FORMAT: ON
* SD REC MODE: Press
mode (FULLSTOP:OVERWRITE)
* SD FORMAT: Press
SD CARD INFORMATION
TOTAL:
1.84 GB
REMAIN:
1.83 GB (100%)
-8-
to enter
to change
FORMAT SD
1. Press
to change mode
1. Press
to select item
FORMAT SD: NO
PRESS ENTER KEY TO RUN
IV. RECORD SETUP
RECORD SETUP
RECORD MODE
2. Press
to enter the selected item
1. Press
to change cursor
2. Press
to change value
CONTINUOUS RECORD
MOTION RECORD
PANIC RECORD
ALARM RECORD
RECORD MODE
AM
PM
0- -3--6- -9--0--3- -6--9-MMMMMMMMMMMMMMMMMMMMM
M: MOTION
P: PANIC
C: CONTINUOUS
A: ALARM
1. Press
to change value
CONTINUOUS RECORD
FRAME RATE: H264 30 (N) / 25 (P)
2. Frame rate adjustable by users: H264 30(N)/25(P);
QUALITY: SUPER
H264 15(N)/12(P); H264 8(N)/6(P)
3. Quality adjustable by users: Super/ Low/ STD/ High
-9-
MOTION RECORD
FRAME RATE: H264 30 (N) / 25 (P)
QUALITY: SUPER
SENSITIVITY: HIGH
POST-RECORD: 10 SEC
PRE-RECORD: ON
1. Press
to change value
2. Frame rate adjustable by users: H264 30(N)/25(P);
H264 15(N)/12(P); H264 8(N)/6(P)
3. Quality adjustable by users: Super/ Low/ STD/ High
4. Sensitivity adjustable by users: High/ Med/ Low
1. Press
to change value
PANIC RECORD
FRAME RATE: H264 30 (N) / 25 (P)
QUALITY: SUPER
PRE-RECORD: ON
2. Frame rate adjustable by users: H264 30(N)/25(P);
H264 15(N)/12(P); H264 8(N)/6(P)
3. Quality adjustable by users: Super/ Low/ STD/ High
1. Press
to change value
ALARM RECORD
FRAME RATE: H264 30 (N) / 25 (P)
QUALITY: SUPER
POST-RECORD: 10 SEC
PRE-RECORD: ON
2. Frame rate adjustable by users: H264 30(N)/25(P);
H264 15(N)/12(P); H264 8(N)/6(P)
3. Quality adjustable by users: Super/ Low/ STD/ High
VI. PERIPHERAL SETUP
1. Press
to select item
PERIPHERAL SETUP
BUZZER SETUP
2. Press
ALARM SETUP
AUDIO SETUP
- 10 -
to enter selected item
BUZZER SETUP
VIDEO LOSS
:
ON
MOTION
:
OFF
BEEP TIME
:
02 SEC
1. Press
to select item
2. Press
to change value
1. Press
to select item
(2~6 SEC)
ALARM SETUP
2. Press
ALARM INPUT
to enter selected item
RELAY OUTPUT
ALARM INPUT
ALARM
STATUS
1
N.C.
RELAY OUT
1. Press
to select item
2. Press
to change value
ON
3. ALARM STATUS: N.C./ N.O.
[N.O.]: Normal Open
[N.C.]: Normal Close
RELAY OUT
RELAY OUT TIME: 10 SEC
1. Press
to select item
2. Press
to change value
(10~60 SEC)
MOTION : NO
VIDEO LOSS: NO
- 11 -
AUDIO SETUP
1. Press
to change value
1. Press
to select item
2. Press
to enter selected item
AUDIO IN : LINE
(MIC/LINE)
VII. SYSTEM SETUP
SYSTEM SETUP
DVR ID
FACTORY DEFAULT
FIRMWARE UPGRADE
PASSWORD SETUP
1. Press
to change cursor
2. Press
to change value
1. Press
to change value
DVR ID
ID: _ _ _ _ _ _
FACTORY DEFAULT
LOAD DEFAULT: NO
PRESS ENTER KEY TO RUN
- 12 -
1. Press
to select item
2. Press
to change value
1. Press
to change cursor
2. Press
to change value
FIRMWARE UPGRADE
EXISTING VERSION: B. 0.7.5
NEW VERSION: _ _ _ _
UPDATE: NO
PRESS ENTER KEY TO RUN
PASSWORD SETUP
ENTER PASSWORD: * * * *
PLAYBACK MODE
In the Playback screen
SEARCH
1. Press
to enter SEARCH MENU
TIME: 2000/ 01/ 01 00:00 RUN
EVENT SEARCH
2. Press
to select item &
BEGIN: NO DATA
END: NO DATA
3. Press
to change value
to run
TIME SEARCH
SEARCH
TIME SEARCH
1. Press
to change value
TIME: 2000/ 01/ 01 00:00 RUN
EVENT SEARCH
2. Press
to run
3. Press
to go back to SEARCH
4. Press
to go back to Live Video
BEGIN: NO DATA
END: NO DATA
- 13 -
EVENT SEARCH
NO
YY/MM/DD HH:MM:SS MODE
0001 09/12/17
12:11:00
C
0002 09/12/17
12:11:07
P
0003 09/12/17
12:11:12
A
M: MOTION
C: CONTINUOUS
EVENT SEARCH
1. Press
2. Press
to select item
to playback the event
P: PANIC
A: ALARM
Firmware Upgrade
Step1: Please insert Micro SD Card into #3194071. If the original format of micro SD card is
different, the device will automatically format Micro SD card.
Step2: Please insert Micro SD card into computer and computer will get the following
information:
Step3: Please copy the new ROMCODE.ISO to Micro SD card and replace the old one
(ROMCODE.ISO)
Step4: Please insert Micro SD card into #3194071.
Step5: Go to “FIRMWARE UPGRADE” section
FIRMWARE UPGRADE
EXISTING VERSION: B.0.7.7
NEW VERSION: B. 0. 7. 8
UPDATE: NO
PRESS ENTER KEY TO RUN
Step6: You can see the version on “NEW VERSION” item.
- 14 -
Step7: Press
Press
and select “ UPDATE: YES” by pressing
.
to upgrade firmware.
NOTES:
1. During firmware upgrade, ISP 1%......100% will be shown on the screen. Please do not shut
down, turn off the device or remove Micro SD card. File may not be completely updated
under this condition. In addition, old file may be damaged.
2.
The system will update the new version and display the progress information. When it is
finished, it will automatically reboot.
PC Player
Software version
Player function button
Playback display area
Playback control bar
Playback functional
buttons
File information
- 15 -
Search Files
Backup DVR file
Login
Select Path
Enter
Backup format
Set Start Time
Set End Time
Export backup
Cancel
file
Time/ Date on
Time/ Date format
Time/ Date top
left
Change account and
password
Multiply 32 times
the original
speed
Save JPEG picture
Enhance the
Print
resolution
Audio adjust
Mute
Playback control bar:
Stop Pause
Last
-1/2X
-2X
-1X
1X
2X
1/2X
Next
File information:
* Computer Requirement: Dual Core CPU or above , 1GB RAM or above
* Operation System Requirement: Windows XP or above
* PC has to be installed with Sound Card, which makes PC have audio function. Otherwise,
PC may not be able to run the software.
- 16 -
Operation procedure
Search Files
Click
Press
and then press
.
Select a folder with DVR files and press “OK”
Double click the selected recording file to playback
or click the selected recording file and press “Open”
to playback.
File searching method:
* List all time : list all the recording sessions in the
folder you browse.
* List file event : list the event which you select in
“List all time”
* Search all event : list all the events in the folder
you browse (max. 1000 events)
- 17 -
* Format storage : Format SD card easily
Backup Files
Press
and choose backup
format (DVR/ WMV/ AVI/ JPG) and choose backup
channel.
* Backup as DVR format: Can only backup four
channels
* Backup as WMV/ JPG format: backup four
channels or individual channel
* Backup as AVI format: backup four channels or
individual channel; backup resolution as CIF or
D1.
During the playback, you can press
to set start time to
backup file.
Then, press
to set end
time to backup file.
* Green bar: backup start time
* Red bar: backup end time
Press
to export backup
file to PC, or
Press
Start time and End time
- 18 -
to cancel Backup
Playback Files
Move the mouse cursor to the place you want to
enlarge. Right click to zoom in. Right click again
to get back to the original scene.
Admin
Click
and key in account and
password.
Default: root/ root
* Display information: On/Off
* Date format: yyyy/mm/dd
dd/mm/yyyy
mm/dd/yyyy
* Time/Date position: Top Left/ Bottom Right
Press
to change account and
password in Admin area.
- 19 -
Specification
#3194071 H.264 Hidden Recorder Board (HVR-Lite)
Operating System
Non-OS
Video input format
NTSC or PAL (Auto-detect)
Video Compression
H.264
MENU OSD
English
Record Resolution
720x240 (NTSC) / 720x288 (PAL)
Recording Frame Rate
6/8, 13/15, 25/30 fps
Video Recording Mode
Schedule continuous, Schedule motion, Schedule alarm, Panic
Pre-recording
Supported
Post recording
Yes, 10~60 sec
Audio recording
Yes
Playback mode
Via device itself or bundled software on PC
Playback
Playback Search
Recording Quality
Time/Date Stamp
Time Date Stamp Format
Daylight Saving Time
Recording Storage
Control
Power Supply
Power Failure
LED
Firmware Upgrade
Buzzer
Operation temperature
Dimensions
Fast Forward, Backward: x2/ x4/ x8, Frame by Frame
By Time, By Event
4 Levels adjustable (Super, High, Normal, Standard)
Yes
(1) yy-mm-dd, (2) dd-mm-yy, (3) mm-dd-yy, 3 formats selectable by
OSD
Yes
Micro SD card (support SDHC) up to 32GB
IR remote control
12VDC
Auto Recovery
Power (Red)/Recording (Green & Yellow)
Yes, through Micro SD card
Yes
0~+50℃
54x54 (mm)
- 20 -