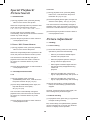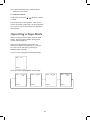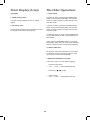
1
DVD/ VCR
combo
�
MDVDVCR5
1
Introduction
Congratulations on the purchase of your
Magnavox DVD and VCR player. It is hoped that
you have a lot of enjoyment from your player.
Thank you very much for your purchase of this
product.
To enjoy your player to the full from the very
beginning, read this manual carefully and keep it
handy for ready reference.
•
Do not block and of the ventilation openings.
Ensure that vents are not covered by
newspapers, tablecloths, curtains, etc. Do not
install in a tight fitting cabinet.
•
Do not insert or allow foreign objects to enter
any grill openings.
•
This appliance is not intended for use in
bathrooms, laundry areas or similar moist
locations. Never locate this appliance in the
immediate surroundings of ,or where it may fall
into, a bath, basin, washtub, shower or
swimming pool.
•
Do not run the power cord under carpeting.
Arrange the supply cord away from traffic
areas and where it will not become a trip
hazard.
•
To disconnect the appliance, turn appliance
off, switch off power outlet and remove plug
from power outlet.
•
Do not abuse the supply cord. Never carry the
appliance by the supply cord. Never yank the
supply cord from the power outlet; instead,
grasp the plug and pull to disconnect. Keep
supply cord away from heated surfaces.
•
Do not operate the appliance with a damaged
supply cord or plug or after the appliance
malfunctions, has been dropped or damaged
in any way. Consult an authorised service
facility or similarly qualified person for
examination.
•
This product has not been designed for any
other uses other than those specified in this
booklet. This product is intended for household
use only.
•
Since movement of the CD mechanism and
the sensitive circuitry may cause interference
to a nearby radio tuner, switch this unit off
Important Safeguards
When using electrical appliances, in
order to reduce the risk of fire, electric
shock, and /or injury to persons, basic
safety precautions should always be
followed.
For Your Safety
Read all instructions carefully even if you feel
you are quite familiar with the appliance.
•
This appliance is not intended for use by
young children or infirm persons unless
they have been adequately supervised by a
responsible person to ensure that they can use
the appliance safely.
•
Young children should be supervised
to ensure that they do not play with the
appliance.
•
This appliance should be placed on a flat,
stable surface before it is operated.
•
INDOOR USE ONLY - this appliance is not
intended for outdoor use.
•
Do not expose this appliance to rain or
moisture. Do not immerse.
•
Do not place items filled with liquids, such as
vases, on the appliance. Do not expose
appliance to dripping or splashing liquids.
•
Do not place naked flame sources, such as
candles, on the appliance.
•
Do not locate the appliance near heat sources
such as radiators, heaters, air ducts or direct
sunlight.
while operating other radio devices.
2
Compulsory Warning
Caution
If the supply cord is damaged it must be replaced
by the manufacturer or its service agent or a
similarly qualified person in order to avoid a
hazard.
•
Do not open - do not attempt to repair,
disassemble or modify this appliance.
•
Dangerous high voltages exist inside this
appliance.
Save These Instructions
•
This appliance is only to be serviced by a
qualified person.
•
No user-serviceable parts inside.
•
Class 1 laser product.
•
Recording any broadcast may infringe
copyright.
3
Warning
To prevent fire or shock hazard, do not expose this appliance to rain or moisture. The apparatus should
not be exposed to dripping or splashing and that no objects filled with liquids, such as vases, shall be
placed on the apparatus. The ventillation should not be impeded by covering the ventilation openings with
items, such as newspapaers, tablecloths, curtains, etc. No naked flame sources, such as lighted candles,
should be placed on the apparatus.
Important
Since the CD circuitry may cause interference to other radio tuners nearby, switch this unit off when not in
use or move it away from the affected radio tuner.
RISK OF ELECTRIC SHOCK
DO NOT OPEN
The lightning flash with
arrowhead symbol, within
an equilateral triangle, is
intended to alert the user to
the presence of uninsulated
“dangerous voltage ” within
the product’s enclosure
that may be of sufficient
magnitude to constitute a risk
of electric shock to persons.
WARNING: TO REDUCE
THE RISK OF ELECTRIC
SHOCK, DO NOT REMOVE
COVER (OR BACK). NO
USER-SERVICEABLE
PARTS INSIDE,
REFERSERVICIN
GTOQUALIFIED
SERVICEPERSONNEL.
The exclamation point
within an equilateral triangle
is intended to alert the user
to presence of important
operating and maintenance
(servicing) instructions in the
literature accompanying the
appliance.
Laser Safety
This unit employs an optical laser beam system in the
CD mechanism, designed with built-in safeguards. Do
not attempt to disassemble; refer to qualified service
personnel.
INVISIBLE LASER RADIATION
WHENOPEN ANDINTERLOCK
FAILEDORDEFEATED. AVOID
DIRECT EXPOSURE TO LASER
BEAM.
Exposure to this invisible laser light beam may be
harmful to the human eye.
THIS IS A CLASS-1 LASER PRODUCT. USE OF
CONTROLS,OR ADJUSTMENTSORPROCEDURE
SOTHER THAN THOSE SPECIFIED HEREIN, MAY
RESULT IN HAZARDOUS LASER.
4
Advantages of This
Product Are.....
•
DVD, VCD, CD, CD-R(MP3), CD-RW, VHS
playback function
•
DVD one-touch record function
•
Watching DVD for recording broadcast
•
Integrated REMOTE (VCR, DVD)
•
Index Search
•
GUI (Graphical User Interface) OSD (On
Screen Display)
•
By using the [DISPLAY] button on the remote
control, information on the DVD / VCD / CD
player and disc, can be displayed on the TV
screen.
•
Screen saver function (DVD)
•
Built-in Dolby Digital decoder (DVD)
•
Analog audio 2-channels output for DOWNMIX
(x1)
•
Composite RCA video out (x1)
•
Slow Forward / Reverse playback (DVD)
•
Fast Forward / Reverse playback (DVD)
•
Search of title, chapter, and time in DVD disc,
and search of time and track
time in CD
•
Various TV aspect (DVD) 4:3 for Pan and
Scan, 4:3 for Letter Box, and 16:9 for Wide
•
Repeat playback for DVD
•
5 languages OSD (On Screen Display)
function (DVD)
•
You can select and display OSD in 5
languages.
•
Parental Lock function (DVD)
•
This function can prevent playback of software
that may be unsuitable for children.
•
Multi Audio function (DVD)
•
The audio soundtrack can be heard in up to 8
languages and depends on the disc. (The
number of audio languages depends on the
software.)
•
Multi Subtitle function (DVD)
•
The subtitle can be seen in up to 32 languages
and depends on the disc. (The number of
subtitle languages depends on the software.)
•
Multi Angle function (DVD)
•
This function allows you to choose the viewing
angle of scenes which were shot from a
number of different angles. (The number of
angles depends on the software.)
•
Screen zoom function (DVD)
Read Carefully Before
Using
Cautions in use of DVD-Video player are
described below. Please read carefully before
using a DVD-Video player.
Installation Place and Handling
•
When you place this player near other devices,
they may affect poorly together.
•
When you place DVD-Video player and TV in
the upper and lower sides, it may cause
flickering of pictures or failure (tape is not
ejected).
•
When you place this player near strong
magnetic materials, it may affect image or
voice
poorly or damage recording.
•
Do not spill volatile liquids like insect spray
over the player. Do not leave rubber or plastic
products in contact with the player for a long
time. They will cause deterioration or paint
peel-off.
Not in Use
5
•
When the unit is not in use, be sure to remove
the disc or tape and turn off the power.
•
If you do not use the unit for a long period,
remove batteries in REMOTE to prevent
leakage.
•
Tape and Disc Handling
In case you don’t use the unit for a long time,
the unit may not function properly in the
future. Turn on and use the player
occasionally.
Do not use any tape and disc as below. Damage
of video head or cut/coiling of tape may cause
failure.
Moving
•
•
•
•
Repack the unit as it was originally packed at
the factory. Alternatively, pack this product
with towel not to be damaged.
•
•
•
Eject any videotape.
Cleaning
•
Dust off dirt in cabinet or control panel part
smoothly with a soft cloth.
•
For heavy dirt, soak the cloth in a weak
detergent solution, wring it well and wipe. Use
a dry cloth to wipe it out.
•
Follow instructions in using chemical cleaners.
•
Do not use any type of solvent such as
gasoline or benzene, as they may cause
deterioration or paint peel-off.
•
Video is a high precision device. To obtain
a clear screen, we recommend regular
inspection and maintenance every 1,000 hours
of use by technical engineers.
•
For checking, contact your dealer or your
nearest service center.
Checking and Replacement of Antenna
•
Antenna is subject to change in its direction or
damage by wind and rain. For clean screen,
contact and consult your nearest service
center about checking and replacement.
In recording important screen
•
Be sure to record the screen and check
whether recording is performed properly.
Poor signal and bad tape quality will affect the
quality of your recording.
Copyright
•
•
Moisture condensation may occur in tape.
Moisture condensation damages the tape.
Please use the tape after the moisture
condensation is disappeared.
•
After use, store tape vertically in a case to
prevent damage & loss to data.
•
Do not store in the following places.
•
•
•
•
Checking
Do not use your recordings without permission
of the copyright ower.
6
Tape with mold
Tape or disc stained with juice or
attachments
Tape having breakage
Disassembled tape
Disc with severe scratch
High temperature and humidity
Subject to generation of mold
Much dirt or dust
Near strong magnetic materials such as
speaker
Identification of Controls
Main body (front panel)
1. Standby/On button
Press to turn the VCR on or off.
10. Remote sensor
This receiver receives a signal from
your remote control.
NOTE: The Standby/On button is no
function During OTR and Record mode.
11. VCR mode indicator
12 Display panel
Display system informations
2. Eject/VCR
Press to stop tape movement and eject
a video cassette.
13. DVD mode indicator
3. Cassette compartment
Insert a video cassette into this slot.
14. Pause/Step
4. DVD tray
Open or close tray by pushing DVD
open/close button,place a disc on the
disc tray lable side up.
15. Play (VCR/DVD)
Press to start playback, in VCR mode
start to play VCR tape, in DVD mode
start to play Disc.
5. Video/Line in/Audio in (L/R) (AV-F)
Attach the VCR’s audio & video input
at these terminals.
16. Search (VCR/DVD)
Press (
/
) button to search
rewind or forward the tape or DVD
6. CLK/CNT
17. Stop (VCR/DVD)
Stop playing the disc and tape.
7. Channel up/down
Press to change the channel.
18. Open/Close (DVD)
Use to open or close the tray.
8. VCR/DVD/Function
9. Record
Press to record the program currently
airing on the channel. Press multiple
times to process one-time-recording
time options.
7
Operation Display Window
1. VCR Operation
7. Disc In Operation
2. Child (Lock)
8. DVD Disc Operation
3. TIMER REC display
• TIMER Recording,
• To be Timer-recorded,
In Timer record state - will flash on/off
indicating ‘No tape’ or ‘Tape without tab’
9. Dolby Sound Indicator
4. Title
This is displayed in VCD and CD disc.
12. Copying Indicator
Use to copy contents of disc into videotape.
10. dts Sound indicator
11. REC Indicator
5. Chapter
This is displayed in DVD disc.
6. Time, Counter and Current Operation
POWER: Tray is opened
CLOSE: Tray is closed
LOAD: Disc is loaded
no DISC: There is no disc in tray
Error: Disc has some error
MENU: Menu screen is displayed
SETUP: Setup menu is displayed
ON: Power is ON
OFF: Power is OFF
8
Rear Panel
1. DVD 5.1 CH Audio Out
2. Audio Out (R/L)
3. Video/Audio RCA IN/OUT (AV)
4. TV Antenna In
5. DVD Digital Audio Out(Optical)
6. DVD S-Video Out
7. DVD Component Video Out (Green / Blue /
Red)
Engineering note: Please check correct
color on sockets. Y=Green(top) Blue(middle)
Red(bottom)
8. DVD Digital Audio Out(Coaxial)
9. TV/VCR RF Out
Accessories
1.
3.
Remote
RF wire
2.
4.
User manual
5.
9
Batteries
RCA cable
Remote Control
Remote
1. Display Button
2. Open/close Button (DVD) Eject (VCR)
3. +10 Button
4. SP/LP Button
5. Enter Button
6. Set up Button
7. Stop Button
8. Fast Backward Button
9. Fast Forward Button
10. PBC Button
11. Return Button
12. Root Button
13. Zoom Button
14. Angle Button
15. Audio Button
16. CLK Button
17. Subtitle Button
18. TV/AV Button
19. Standby/On Button
NOTE: The Standby/On switch is no
function During OTR and Record mode.
20. DVD MUTE Button
21. Numeric Buttons (TRACKING)
22. DVD Volume Control Button
23. DVD Menu Button
24. Channel/Direction Buttons
( Up Down Left Right )
25. REC Button
26. Play Button
27. Pause/STEP Button
28. Next Button
29. Previous Button
30. Slow F.F Button
31. Slow REW Button
32. Program Button
33. Clear Button
34. Repeat A-B Button
35. Search Button
36. VCR/DVD Select Button
37. Repeat Button
38. Digest Button
Child Lock!!!
Press the Standby/On [
for about 8 seconds.
] button of the remote
No buttons of front panel and remote can be
operated now and Lock indicator ( “
” ) will be
displayed on window display. To release child
lock, press the power [ ] button of the remote
control for about 8 seconds.
10
Instructions in Using Remote
Connecting Your TV Through Antenna
•
Operate REMOTE within 5m from the unit.
•
•
Do not press 2 (two) buttons at the same time.
•
Do not light up sending part of REMOTE.
•
Do not keep in the place with much dust and
humidity.
Before you start, unplug all the equipment from
the mains supply.
Option 2
(1) Insert the Aerial cable into the VCR “TV
Antenna In”.
(2) Connect the RF cable form “VCR RF Out” into
the TV RF In.
Setting Up Your Player
(3) The TV stations will Re-search.
Connecting your TV thru Antenna and
RCA cable (Recommended setup)
Please refer to the section of “TEST SIGNAL
GENERATION MODE” on page 22
Option 1
(1) Connect the AV cable lead form VCR “Audio/
Video Output” on the rear panel of the player
to the TV AV In.
(2) Change the TV to AV IN mode.
11
Setting Up Your Player
How to Connect Your
Player to a Camcorder
Connecting your player through extra
equipment (satellite system)
•
•
Before you start, unplug all the equipment from
the mains supply.
How to Connect
How to Connect Your
Player to Another Player
•
Before you start, unplug all the equipment from
the mains supply.
If you have connected your camcorder in this
way, you can also connect a RCA lead from “AV”
on the back panel of the player to the television.
To use this function, you can also connect the
camcorder by using a phono cable if your player
has front input sockets. Check the front of your
player for this connection.
Before you start, unplug all the equipment from
the mains supply.
How to Connect
Connecting Dolby
Digital Amp with
Digital Audio out Jack
How to Connect
1) Insert the tape you wish to record on into the
first player and press [TV/AV] until “AV” appears on the front display.
2) Insert the tape you wish to copy from into the
second player. Press the [PLAY] button on the
second player.
3) Press the [RECORD] button on the first player.
The player will start recording.
12
AV RCA Connecting
How to connect
The product has the AV input, shown in the diagram below, you can connect other equipment.
When connecting other equipment please refer to
their manuals for further information.
Recording from Other Equipment
Simple recording can be performed, ensure the
equipment is turned on and is displaying the
correct channel. Timer recording, set the video
to perform a timed recording ensuring AV is
selected as the channel to be recorded. Some
equipment may have a timer which allows it to be
powered on to the correct channel, if this feature
is not available the other equipment should be left
powered on.
Front AV
The product has front input sockets, it is possible
to connect devices such as a camcorder
to the video.
To watch a camcorder tape the video must be in
AVF mode.
Recordings of this input are the same as described on pages 10-12.
13
Auto Setting
1. Press the [
/
] buttons to select the
desired country on the setup manu. And press
the [ENTER] button to confirm the selected
country. Then VCR will auto-search and setup
all your channels automatically.
(Only on the first time setup off the factory)
Option 1
2. After the channel auto searching is
completed,the “Please wait” screen will appear
a while.
Connecting your TV thru Antenna and
RCA cable (Recommended setup)
(please make sure that you connected
your TV and VCR properly)
3. The auto searching is completed, the screen
is change to “CLOCK SET”. In case of setting
the clock newly, press the [0-9] buttons as the
following order:
hour -> minute -> day -> month -> year.
At that time, “--/--/----”, this clock input guide
will appear on the TV screen.
Select your TV to AV mode
Tuning the VCR on
(1) Press Standby/On on the remote control. You
can also press on the front panel.
(2) Set the VCR/DVD to VCR mode by the remote
control or front panel button.
•
In case of correcting it, current date is
displayed on the TV screen, then press the
[
/ ] buttons to move the current to
the wanted position and input the new
numbers.
•
The clock will work, although the VCR is in
the clock setting state.
•
In the “year” display, press “04” will change
to 2004. Likewise, press “99” will change to
2099.
(3) VCR indicator light will be on in the panel.
Option 2
Connecting your TV thru Antenna
Turn on the TV
Turn the TV channel whichever channel you
select when connecting thr VCR
4. The [ENTER] button is pressed to confirm the
new clock. Press the [SETUP] button to leave
the SETUP menu screen.
(1) Press Standby/On on the remote control.You
can also press on the front panel.
NOTE: This AUTO SETTING situation
happens only on the first time setup off
the factory. Should reset of clock or TV
stations is needed, please reter to page
15 “MANUAL CLOCK SET” or page 22
“INSTALLATION”
(2) Set the VCR/DVD to VCR mode by the remote
control or front panel button.
(3) VCR indicator light will be on in the panel.
(4) Tune your TV to find the VCR channel,
please refer to the section of “TEST SIGNAL
GENERATION MODE” on page 22.
COUNTRY
Australia
New zealand
Option 3
Connecting your player through extra
equipment (satellite system)
ENTER: Confirm SETUP: End
Select your TV to AV mode
Tuning the VCR on
CLOCK SET
(1) Press Standby/On the remote control.You can
also press on the front panel
(2) Set the VCR/DVD to VCR mode by the remote
control or front panel button
Time
--:--
Date
-- / -- / - - - SETUP: End
(3) VCR indicator light will be on in the panel
14
Setup Operation
(4) The [ENTER] button is pressed to confirm the
new clock, the Main SETUP will appear after
storing the changed data in VCR. And the
[SETUP] button is pressed to interrupt before
confirming the changed data and the main
SETUP will appear without the data change.
1. Display Color
All lines have gray background and selected line
have green background white characters.
2. Basic Operation
(1) Press the [SETUP] button to display the
SETUP menu on a TV screen.
(2) Press the [
/
] buttons to select the
desired function on the SETUP menu. And
press the [ENTER] button to confirm the
selected function.
(3) Press the [SETUP] button to return to the
SETUP menu at any time.
(4) Press the [SETUP] button to leave the SETUP
menu screen.
3. Manual Clock Set
(1) Press the [SETUP] button to call the Main
SETUP in TV mode.
(2) Press the [
/
] buttons to select the line of
“Clock Set” and press the [ENTER] button to
confirm that.
(3) In case of setting the clock newly, press the
[0-9] buttons as the following order:
hour -> minute -> day -> month -> year.
At that time, “—/—/——”, this clock input guide
will appear on the TV screen.
•
In case of correcting it, current date is
displayed on the TV screen, then press
the [
/
] buttons to move the cursor
to the wanted position and input the new
numbers.
•
The clock will work, although the VCR is in
the clock setting state.
•
In the “year” display, press “04” will change
to 2004. Likewise, press “99” will change to
2099.
•
In the Clock Set mode, no data is inputted
more than 60 seconds, the VCR goes to
TV mode (real picture) from Clock Set
mode automatically.
15
CLOCK SET
SETUP
Clock set
Record timer
Installation
Search
Preferences
---------->
Time
--:--
Date
-- / -- / - - - -
ENTER: Confirm SETUP: End
SETUP: End
CLOCK SET
Time
-------->
Date
CLOCK SET
11:--
Time
---------->
-- / -- / - - - -
SETUP: End
Date
11:11
-- / -- / - - - -
SETUP: End
----->
CLOCK SET
CLOCK SET
Time
Date
11:11
-- / -- / - - - -
SETUP: End
-->
Time
Date
11:11
-- / -- / - - - -
SETUP: End
16
CLOCK SET
-->
Time
11:11
Date
11 / 11 / 2011 (Fri)
ENTER: Confirm SETUP: End
Record Timer
•
1. Recording Programming
All the procedures of daily (Mon-Fri) recording are
the same as “once timer recording”.
1-1.MENU OPERATIONS
•
(1) Press the [SETUP] button to call the Setup
Menu in TV state.
•
(2) At that time, the VCR will check whether there
are some errors or not:
•
DAILY(MON-SUN) [In the case of selecting the
type to “DAILY(MON-SUN)”]
All the procedures of daily (Mon-Sun) recording
are the same as “once timer recording”.
If the clock has not been set, then it will
change to “Clock Set” screen automatically.
•
If the PRs have not been set, then
it will change to “Installation” screen
automatically.
WEEKLY [In the case of selecting the type to
“WEEKLY”]
All the procedures of daily (once a week)
recording are the same as once timer recording.
If there is no error, (2) screen appears.
Press the [
/
] buttons to select the tape
speed and press the [
/ ] button to input the
next data.
Press the [
/
] buttons to select the empty
(not occupied) record timer program.
Press the [ENTER] button at the screen to confirm
that.
Press the [ENTER] button to confirm that.
(3) Press the [
/
] buttons to select the type
of the wanted timer recording.
If the program overlaps with another one, which
had already been programmed, the Error
message will appear for 3 seconds and it will
change to the screen for the “TIMER REVIEW”
automatically.
(4) The [ENTER] button is pressed to confirm that,
the data input screen for the new timer
programming will appear.
•
DAILY(MON-SAT) [In the case of selecting the
type to “DAILY(MON-SAT)”]
All the procedures of daily (Mon-Sat) recording
are the same as “once timer recording”.
Press the [
/
] buttons to select the line of
“Record Timer” and press the [ENTER] button to
confirm that.
•
DAILY(MON-FRI) [In the case of selecting the
type to “DAILY(MON-FRI)”]
If the program does not overlap, the Guide
Message will appear for 3 seconds.
ONCE (In the case of selecting the type to
“Once”)
(5) Press the [0-9] buttons to set a PR number
or press the [
/ ] buttons to select an
external (AV). “PRs”: To choice the recording
signals from the own tuner, which is built-in
VCR to tune and detect broadcasting signals.
(6) Press the [0-9] buttons in the following order:
start time -> end time -> start date.
In initial state, the start date will be displayed a
current date automatically.
Also, if the day or the month is changed at the
start date, the day of the week will be changed too
automatically, changed after inputting the day.
17
* ONCE
TIMER 1
SETUP: End
-->
PR
Starttime
Endtime
Startdate
Howoften
Tapespeed
11
--:---:-11/11(Wed)
Once
SP
TIMER 1
-->
PR
Starttime
Endtime
Startdate
Howoften
Tapespeed
11
12:---:-11/11(Wed)
Once
SP
SETUP: End
-->
SETUP: End
TIMER 1
PR
Starttime
Endtime
Startdate
Howoften
Tapespeed
11
12:20
14:20
11/11(Wed)
Once
SP
ENTER: Confirm
SETUP: End
-------------->
11:11
12:12
11/11(Wed)
Once
SP
->
TIMER 1
PR
Starttime
Endtime
Startdate
Howoften
Tapespeed
ENTER
-------------->
-------------->
18
TIMER 1
TIMER 1
-->
PR
Starttime
Endtime
Startdate
Howoften
Tapespeed
11
12:20
14:-11/11(Wed)
Once
SP
SETUP: End
SETUP: End
TIMER 1
TIMER 1
11
12:20
14:20
11/11(Wed)
Once
SP
->
ENTER: Confirm
SETUP: End
->
PR
Starttime
Endtime
Startdate
Howoften
Tapespeed
PR
Starttime
Endtime
Startdate
Howoften
Tapespeed
11
12:20
14:20
11/11(Wed)
Once
SP
ENTER: Confirm
SETUP: End
TIMER 1
->
-->
11
12:20
--:-11/11(Wed)
Once
SP
PR
Starttime
Endtime
Startdate
Howoften
Tapespeed
11
12:20
14:20
11/11(Wed)
Once
SP
ENTER: Confirm
----------------------------------------------------------------------->
-->
Timer 1 Stared
TIMER 1
-->
PR
Starttime
Endtime
Startdate
Howoften
Tapespeed
11
12:20
14:20
11/11(Wed)
Once
SP
Overlap!
19
SETUP: End
->
PR
Starttime
Endtime
Startdate
Howoften
Tapespeed
2. Timer Review (Erasure & Correction)
2-1.Erasure
(3) The [
/
] buttons are pressed to correct
the record timer program, the OSD screen
will be changed to the screen of (3).
(1) Press the [SETUP] button to call the SETUP
menu in TV state or press the [PROGRAM]
button.
(4) How to correct: See the NEW
PROGRAMMING procedures. The next steps
are same as the steps of New Programming.
Press the [
/
] buttons to select the line of
“Record Timer” and press the [ENTER] button to
confirm that.
(5) To correct the other record timer programs,
repeat the procedure from the step (1) to
step (4).
(2) At that time, the VCR will check whether there
are some errors or not:
•
If the clock has not been set, then it will
change to “Clock Set” screen automatically.
•
If the PRs have not been set, then
it will change to “Installation” screen
automatically.
If there is no error, (2) screen appears.
Press the [
/
timer program.
] buttons to select a erasing
The [ENTER] button is pressed to confirm that,
the stored contents of the selected Timer
program are displayed.
(3) The [CLEAR] button is pressed to erase.
2-2.Correction
(1) Press the [SETUP] button to call the SETUP
menu in TV state or press the [PROGRAM]
button.
Press the [
/
] buttons to select the line of
“Record Timer” and press the [ENTER] button to
confirm that.
(2) At that time, the VCR will check whether there
are some errors or not:
•
If the clock has not been set, it will change
to “Clock Set” screen automatically.
•
If the PRs have not been set, it will change
to “Installation” screen automatically.
•
If there is no error, (2) screen appears.
Press the [
/
] buttons to select a correcting
record timer program.
The [ENTER] button is pressed to confirm that,
the stored contents of selected Record Timer
program are displayed on the TV screen.
20
SETUP
SETUP
Clock set
Record timer
Installation
Search
Preferences
-> (1) GO TO “Clock set”
-> (2) GO TO “Installation”
ENTER: Confirm SETUP: End
ENTER: Confirm SETUP: End
(1)
(2)
->
ENTER
PR
Start
End
Date
01
11
AV
04
06
07
07
14:10
10:00
12:00
10:10
11:40
15:00
18:00
16:00
12:00
14:00
11:30
12:00
17:00
19:00
19/11
24/12
25/12
Mo-Fri
W/Fri
Mo-Sa
Mo-Su
ENTER: Confirm SETUP: End
--->
Clock set
Record timer
Installation
Search
Preferences
(3)
TIMER 2
->
PR
Starttime
Endtime
Startdate
Howoften
Tapespeed
01
14:10
16:00
18/11(Wed)
Once
SP
ENTER: Confirm SETUP: End
21
Installation
This function is for you tune your TV to
find the VCR channel.
1. Auto Installation
1. Test Signal Generation Mode
(1) Press the [SETUP] button to display the Setup
Menu screen in TV mode.
(1) If you use the TV Aerial RF input for the VCR.
In power-on state, press the [ENTER] button for 5
seconds to go to the test signal generation mode.
Press the [
/
] buttons to select the line of “
Installation “ and press the [ENTER] button
to confirm that.
If press the [ENTER] button for 5 seconds again
or press the [SETUP] button, the real picture will
appear.
(2) Press the [
/
] buttons to select the line of
“Auto Installation” and press the [ENTER]
button to confirm that.
(2) Tune the TV till it gets the clear test signal,
which has the black and white pattern (2 white
bar pattern).
(3) After the channel searching is completed, the
“Please wait” screen will appear a while.
Check whether all the received stations have bad
picture quality due to the interference between the
modulated signal and through signals (general
broadcasting signal).
(4) If other stations are positioned on near the
current RF OUTPUT PR, the guide message
appears automatically.
The VCR recommends the optimal RF OUTPUT
PR number automatically.
If there is, adjust the RF output channel on LED or
SETUP operation.
Press the [ENTER] button to confirm the
recommended PR.
If not, press the [0-9] button to change the
recommended PR.
And then, press the [ENTER] button to confirm. If
you don’t want to exchange, press the [SETUP]
button. (Please refer to the section of “RF
OUTPUT SETUP” on page 25)
•
On LED: “RF 36” is displayed (“RF” is blinking)
and it can be adjusted directly by pressing [09] buttons on remote control.
•
On SETUP: See the RF OUTPUT SET
procedures.
2. Manual Installation
This function is for you to search new stations and
add into the VCR.
(5) The Clock Set screen automatically appears
for manual clock set.
(1) Press the [SETUP] button to display the Setup
Menu screen in TV state.
How to set the clock: See the CLOCK SET
procedures.
Press the [
/
] buttons to select the line of
“Installation” and press the [ENTER] button to
confirm that.
(6) After completing the Auto Searching
procedures, the “Manual Installation” screen
appears. Whenever a channel is searched and
memorized, the PR number will be increased
from 01 to 99 on both LED and OSD.
(2) Press the [
/
] buttons to select the line
of “Manual Installation” and press the [ENTER]
button to confirm that.
During channel searching, you can press the
[SETUP] button to interrupt it, then the VCR
goes to the Real Picture.
Press the [
/
] buttons to select the researching channel and press the [ENTER] button
to confirm that.
•
COUNTRY
Australia
New zealand
ENTER: Confirm SETUP: End
22
Reception - The list is: AERIAL, CABLE If
aerial is selected, CH is written before the
channel number. If cable is selected, CC is
written before the channel number. If the user
changes the reception: “AUTO SEARCH” is
set to “--”
•
•
Auto search -The user can either launch
the auto search using right and left keys, or
directly enter the channel number. Auto search
moves automatically from last cable to first
antenna channel found and vice versa.
(1)
SETUP
Clock set
Record timer
Installation
Search
Preferences
Fine Tuning-The user can fine tuning using
right and left keys.
3. Organizer
ENTER: Confirm SETUP: End
This function is for you to edit the name of
channel and delete the channel.
(2)
Press SETUP button, goto Installation.
INSTALLATION
3-1.Name
•
Auto installation
Manualinstallation
Organizer
RF outputset
Creating of New Names :
Press the [
/
] buttons to select the wanted
characters. (the [
/ ] button will be used to
move the position of digit).
The [ENTER] button is pressed to confirm that.
ENTER: Confirm SETUP: End
To make and memorize the new names for the
other channels, repeat the procedure.
3-2. Delete PR
(3)
ORGANIZER
(1) Press the [SETUP] button to call the Main
SETUP in TV mode.
PR
Name
Swap with PR
Delete program.
Press the [
/ ] buttons to select the line of
“Installation” and press the [ENTER] button
to confirm that.
(2) Press the [
/
] buttons to select the line
of “Organizer” and press the [ENTER] button
to confirm that.
(3) Press the [
Delete PR..
/
01
----01
ENTER: Confirm SETUP: End
(4 )
] buttons to select the
ORGANIZER
(4) The [ENTER] button is pressed to confirm that.
The [SETUP] button is pressed to interrupt
before pressing the [ENTER] button , the real
picture will appear without storing the data.
PR
Name
Swap with PR
Delete program.
01
----01
(5) To erase the another channel, repeat the
procedure from the step (3) to step (4).
ENTER: Confirm SETUP: End
23
ENTER: Confirm SETUP: End
3-3. Swap With PR
(1) Press the [SETUP] button to call the Setup
Menu in TV mode.
PR
Name
Swap with PR
Delete program.
Press the [
/
] buttons to select the line of
“Installation” an press the [ENTER] button
to cofirm that.
01
----01
(2) Press the [
/
] buttons to select the line
of “organizer” and press the [ENTER] button
to confirm that.
ENTER: Confirm SETUP: End
(3) Press the [
/
] buttons to select the
aligning channel and press the [ENTER]
button to confirm that.
(4) The [
/ ] buttons are pressed to move the
selected PR.
PR
Name
Swap with PR
Delete program.
The changed position of the PR number will be
memorized whenever the PR is moved by
pressing the [
/ ] buttons.
(5) Press the [ENTER] button to confirm that or
the [SETUP] button to finish the alignment
without data change.
01
----01
ENTER: Confirm SETUP: End
(6) To align the other channels, repeat the
procedure from the step (3) to step (5).
PR
Name
Swap with PR
Delete program.
SETUP
01
---02
01
Clock set
Record timer
Installation
Search
Preferences
ENTER: Confirm SETUP: End
ENTER: Confirm SETUP: End
PR
Name
Swap with PR
Delete program.
INSTALLATION
02
----02
Auto installation
Manualinstallation
Organizer
RF outputset
ENTER: Confirm SETUP: End
ENTER: Confirm SETUP: End
PR
Name
Swap with PR
Delete program.
01
----01
24
4. RF Output Set
SETUP
Clock set
Record timer
Installation
Search
Preferences
In case, your VCR RF output interface the TV
channel output, your need to change the RF
setup as per following steps.
(1) Press the [SETUP] button to call the Setup
Menu in TV mode.
Press the [
/
] buttons to select the line of
“Installation” and press the [ENTER] button
to confirm that.
ENTER: Confirm SETUP: End
(2) Press the [
/
] buttons to select the line of
“RF Output Set” and press the [ENTER] button
to confirm that.
INSTALLATION
Auto installation
Manualinstallation
Organizer
RF outputset
(3) The initial channel number is CH36 and it can
be adjusted from CH21 to CH69.
Press the [0-9] buttons to setup the desired PR
numbers.
ENTER: Confirm SETUP: End
And the [SETUP] button is pressed to interrupt
before confirming the new data, the Main
SETUP will appear without the data change.
Note: The 36 or BG means will blinks till
36 or BG input in the data.
RF OUTPUTSET
CH
36
ENTER: Confirm SETUP: End
25
Preferences
1. OSD On/Off. (OSD - On Screen
Display)
SETUP
Clock set
Record timer
Installation
Search
Preferences
The OSD On/Off control is set to “ON” mode
before shipping and it can be changed to
“OFF” mode.
(1) Press the [SETUP] button to call the Main
SETUP screen. Press the [
/
] buttons to
select the line of “Preference” and press the
[ENTER] button to confirm that.
ENTER: Confirm SETUP: End
(2) Press the [
/
] buttons to select the line
of “OSD” and press the [ENTER] button to
select.
SEARCH
Search
Go to zero
Index +
Index -
1. Go to Zero
(1) Press the [SETUP] button to call the Main
SETUP screen in [cassette-in] state. Press the
[
/
] buttons to select the line of
“Search” and press the [ENTER] button to
confirm that.
ENTER :Confirm SETUP: End
Super-Imposed
(2) Press the [
/
] buttons to select the line
of “GO TO ZERO” and press the [ENTER]
button to confirm that.
REW SP
GO TO ZERO
Then, the sub-SETUP picture will disappear and
the VCR will wind a tape to the position, “0:00:00”
and will play automatically. Also, the OSD picture
will disappear after 3 seconds from stopping the
wind.
0:00:30
or
Super-Imposed
FF SP
GO TO ZERO
-0:00:30
26
(3)
2. Index +
SETUP
Searching a cassette tape for programs
(indexing)
Clock set
Record timer
Installation
Search
Preferences
When you record a programs, the VCR places an
index mark at the start of the recording.
To search for an index mark:
(1) Press the [SETUP] button to call the Main
SETUP screen in [cassette-in] state.
ENTER: Confirm SETUP: End
Press the [
/
] buttons to select the line of
“Search” and press the [ENTER] button to
confirm that.
SEARCH
(2) Press the [
/
] buttons to select the line
of “Index +” and press the [ENTER] button to
confirm that.
Go to zero
Index +
Index -
Then, the sub-menu picture will disappear and the
VCR will search the next biss mark,
and if it find biss mark, then the Play back picture
will appear automatically.
ENTER :Confirm SETUP: End
And this process will be repeated continuously. If
you want stop this process then
press the key related to the tape function. (ex:
stop, play, ff, rew....)
Super-Imposed
REW SP
INDEX 00
0:00:00
After
Real picture
27
3 Sec
3. IndexSETUP
(1) Press the [SETUP] button to call the Main
SETUP screen in [cassette-in] state.
Clock set
Record timer
Installation
Search
Preferences
Press the [
/
] buttons to select the line of
“Search” and press the [ENTER] button to
confirm that.
(2) Press the [
/
] buttons to select the line
of “Index -” and press the [ENTER] button to
confirm that.
ENTER: Confirm SETUP: End
Then, the sub-menu picture will disappear and the
VCR will search the previous BISS
mark, and if it find biss mark, then the Play back
picture will appear automatically.
SEARCH
And this process will be repeated continuously.
If you want stop this process then press the key
related to the tape function. (ex: stop, play, ff,
rew....)
Go to zero
Index +
Index -
ENTER :Confirm SETUP: End
Super-Imposed
REW SP
INDEX 00
0:00:00
After
Real picture
28
3 Sec
4. VISS (VHS Index Search System)
(2) The index marks are automatically recorded
on the tape at the recording start time. It is
impossible to record and erase the index
marks at any time.
Remarks : Subtitle after the point 4 diagrams.
(1) Under the following conditions, VISS can be
executed.
•
Power On
•
Cassette In
•
Except for recording mode
•
Except for performing a Timer
Programming
•
Except for channel setting
(3) Press the [INDEX+/-] buttons, the VCR will
wind(fast forward or rewind) a tape and play
the first part for 5 seconds whenever the index
mark is found.
After 5 seconds it will wind (fast forward OR
rewind) again until it reaches the next index mark.
If press the [PLAY] button during the temporary
playback(within 5 seconds), the VCR will go to
normal playback mode.
Press the [STOP] button to stop the VISS
operation.
(4) During the operation of VISS, the mode
displayed contents are as follow:
REW SP
INDEX -01
PLAY
SP
--------->
---------->
-0:00:30
-0:00:45
FF
SP
INDEX 01
PLAY
SP
--------->
0:00:30
REW SP
INDEX -02
•
•
-0:00:55
-0:01:30
FF
SP
INDEX 02
PLAY
SP
--------->
0:00:55
Remarks:
SP
--------->
---------->
0:00:45
PLAY
0:01:30
Some index marks that may be missed by the
VCR:
If two recordings overlap, the index mark
for the second program will be erased.
Therefore, when you use the index feature
to find the second program, the VCR will
skip over it.
If you record multiple programs in one
recording session, the VCR will only find
the index mark that was placed on the
video cassette tape when the recording
session began.
29
•
A mark too close to your location on the
tape.
•
The mark of the beginning of a recorded
segment of the minutes or less.
•
The first index mark on the tape when you
start at the beginning of the tape.
Special Playback/
Picture Search
3-2.review
(1) During playback mode, press the [REW]
button once, VCR will search the picture
backward: SP (x3), LP (x5).
1. Variable Slow
(2) Press the [REW] button again, the tape will
advance more rapidly. : SP (x7), LP (x15)
(1) During playback mode, press the [SLOW]
button once to see the slow picture.
The review mode is automatically changed to
playback mode, when this mode is continued for
more than 5 minutes without any mode changes.
Whenever the [SLOW] button is pressed in slow
mode, the slow speed will be changed:
1/15 -> 1/10 -> 1/5 -> 1/30 -> 1/25 -> 1/20 -> 1/15 -> .....
(3) Press the [PLAY] button to switch it back to
normal playback mode.
And the VCR goes to playback mode
automatically, if the slow mode exceeds 5 minutes
without any mode changes.
Picture Adjustment
(2) Press the [PLAY] button to switch it back to
normal playback mode.
1. Tracking
2. Pause / Still / Frame Advance
1-1. Auto Tracking
(1) During playback mode, press the [PAUSE]
button once to see the still picture.
(1) Under the following cases, the auto tracking
operation is performed automatically.
Whenever the [PAUSE] button is pressed in still
mode, the picture will advance frame by frame.
The still mode is automatically changed to
playback mode when this mode is continued
for more than 5 minutes without any mode
changes.
(2) Press the [PAUSE] button to switch it back to
normal playback mode.
•
When a pre-recorded cassette tape is
inserted and is played back.
•
When the playback speed is changed
during continuous played back.
•
When signal is detected again after the
signal temporarily disappeared during
continuous
playback.
•
When the cassette tape, which has a
signal, is playedback firstly after power on.
•
When the cassette tape, which has a
signal, is playedback firstly after recording.
3. Two Step Picture Search
3-1.Cue
(1) During playback mode, press the
[FFORWARD] button once, VCR will search
the picture forward: SP (x3), LP (x5).
(2) During auto tracking, if press the [STOP]
button, the auto tracking operation will be
stopped.
(2) Press the [F/FORWARD] button again, the
tape will advance more rapidly. :
SP (x7), LP (x15)
However, if press the [PLAY] button again, the
auto tracking will be performed again.
The cue mode is automatically changed to
playback mode, when this mode is continued
for more than 5 minutes without any mode
changes.
1-2. Manual Tracking
(1) In playback mode, press the [1] or [3] buttons
to adjust tracking manually.
(3) Press the [PLAY] button to switch it back to
normal playback mode.
But, unfortunately, the optimal tracking position
can be recognized by TV screen only because
there is no display for this operation.
30
(2) In special playback mode, tracking data is
obtained in slow mode.
2. V-LOCK Control
In still mode, press the [
V-LOCK.
/
] buttons to adjust
But, the optimal V-LOCK position, which has no
picture movement in still mode, can be recognized
by TV screen only because there is no display for
this operation.
Operating a Tape Mode
When the VCR operates a tape, the tape mode
display, the tape speed indicator and the tape
counter will be displayed.
When the VCR playbacks a Hi-Fi tape, the
detected conditions are displayed on TV screen
for 3 sec and be changed by pressing the
[AUDIO] button manually.
(1) In the case of playingback a Monaural tape:
PLAY
SP
0:30:10
(2) In the case of playingback a Hi-Fi tape:
PLAY
SP Hi-Fi
L+R
PLAY
------>
--------->
0:30:10
SP Hi-Fi
L
PLAY
------->
0:30:10
------>
0:30:10
31
PLAY
SP Hi-Fi
R
0:30:10
SP Hi-Fi
OFF
Front Display (Array)
The Other Operations
Synopsis
1. Child Lock
1. TAPE running mode
In power-off state, if press the [STANDBY/ON]
button for 5 seconds sequentially, the VCR will
switch to power-on state, and then will go to the
child lock mode.
The tape running displays (PLAY, FF, REW, ....)
appear.
2. TV tuning mode
In power-on state, If press the [STANDBY/ON]
button for 5 seconds sequentially, the VCR will
switch to power-off state, and then will go to the
child lock mode.
The PR number appears for 3 seconds and it will
be changed to the clock automatically.
In child lock mode, no keys can be operated and
LOCK INDICATOR (“LOCK”) will be displayed on
LED display.
And if press the [POWER] button for 5 seconds
sequentially again, the lock mode will be released,
and then will go to power on mode automatically.
2. Auto Power Off
No signal is continuously detected for more than
5 minutes in RF (PR, Antenna) mode, the VCR
goes to power-off mode automatically.
3 Select the External Line (AV)
There are 3 cases. It is changed by toggling.
• Press the [AV] button.
----->AV ----->AVF----->PR01(last tuned PR)
• Press the [
/
] button.
----->AV ----->AVF----->PR01(last tuned PR)
• Input the [00].
----->AV ----->AVF----->PR01(last tuned PR)
32
VCR Playback
1. Press [
•
] button to power on.
Place the desired DVD dis c on DVD tray,
press [VCR/DVD] button to DVD mode and
press [PLAY] button. Then, you can watch
DVD.
Press [VCR] button of remote control to change
into VCR mode.
To Copy From DVD To Videotape
2. Insert the desired tape.
1. Insert the desired DVD disc and press [PLAY]
button.
3. If you want to playback it, press [PLAY] button.
•
When the operational picture status is flickering or
poor, adjust with [
/
] button.
2. Insert a recordable tape.
3. Press [REC] button on the front panel.
Recording
•
To Record With VCR
Press [VCR/DVD] button of remote control
to change into VCR mode.
•
Power on TV and select CH36, or press
[INPUT] button of TV set to select External
Input mode.
This product incorporates copyright
protection technology that is protected
by method claims of certain U.S patents
and other intellectual property rights
owned by Macrovision Corporation and
other right owners Use of this copyright
protection technology must be authorized
by Macrovision Corporation, and is
intended for home and other limited
viewing uses only unless otherwise
authorized by Macrovision Corporation.
Reverse engineering or disassembly is
prohibited.
Insert a tape with recording tab.
3. With [CHANNEL], [NUMBER] button, select
the desired broadcasting channel or external
input unit to record.
4. Select the desired speed (SP or LP) button.
5. Press [REC] button.
•
Then, it starts recording.
6. If you want to pause recording, press [PAUSE]
button.
•
] button.
To VCR recording pause mode, Press [REC]
button once.
2. Insert a recordable tape.
•
DVD plays and VCR starts recording.
4. To exit copy.press [
1. Press [ ] button to power on.
•
When it is a DVD disc with copy protect
function, you can’t copy it.
After pressing [PAUSE] button, if the pause
status continues for five minutes, the
recording is released automatically.
7. To exit recording, press [STOP] button.
To Enjoy Another TV channel or DVD
during recording
If you want to playback DVD during recording with
video, insert a DVD disc.
33
One Touch Timer
Recording (OTR)
When your urgent business happens suddenly
in watching TV or you want to record the current
TV program for the desired time, follow the
procedures below.
1. First, follow the steps 1 to 4 in “Recording With
VCR”.
2. Press [REC] button as much as you want.
•
See the “Recording Times Table” below.
Button Press Times
• Operational Status
Once
• Continuous recording until you press STOP
button
Twice
• Recording for thirty minutes from current
time
3 (times)
• Recording for one hour
5 (times)
• Recording for one hour and thirty minutes
6 (times)
• Recording for two hours and thirty minutes
7 (times)
• Recording for three hours
8 (times)
• Recording for three hours and thirty
minutes
9 (times)
• Recording for four hours
10 (times)
• Recording to the status of Once Press
3. To stop Recording mode, press [STOP] button
more than 8 seconds.
34
About VCR
Erasure Protection
Video Head Cleaning
Video cassettes are equipped with a safety tab
to prevent accidental erasure. When the tab is
removed, recording can not be performed.
The video heads enable the VCR to read video
information pictures from the tape during
playback. In the unlikely event that the heads
become clogged with dirt video playback will
be impossible. This can easily be determined
during playback of a known good tape, there
is good sound, but the picture is extremely
snowy. If this is the case, have the video cassette
recorder checked by qualified service personnel.
To Prevent Accidental Erasure
•
NOTES:
During normal operation of the VCR, the
video and audio heads can accumulate
dirt over a period of time, especially when
using an old or poor quality tape. When
the heads are dirty, the picture can get
snowy and the tracking control will have
little or no effect. If this condition occurs,
head cleaning cartridges may take care of
the problem and restore normal picture.
We recommend that head cleaning
cartridges be used sparingly since they
are very abrasive and can damage the
video heads during prolonged use. If the
problem is not resolved with the head
cleaning cartridge then the unit needs
to be checked by a qualified service
personnel.
After recording, break off the safety tab with a
screwdriver if you don’t want to record over the
tape.
To Record Again
•
35
Cover the hold with cellophane tape.
What Is Dew Condensation Symptom?
3. The Disc will be played automatically.
If a VCR is moved from a cool place to a warm
and damp place or a place facing a direct cool
wind from air-conditioner...and others,
temperature varies sharply, which makes dew on
head drums of VCR.
•
If it is a DVD disc, it will show the Menu/
Title Page on the screen.
•
If it is a CD, it will play the first track
directly.
4. Press the STOP Button if you want to stop the
Disc playback You can resume playback by
pressing the PLAY button and it will start at
the location where you have pressed stopped
(Resume Play).
If Dew Condensation Occurs,
1. First, turn it on for one or two hours
before using it.
2. Do not use it because it may develop
troubles of a VCR or videotape.
5. Press the STOP Button twice to have the Disc
really stopped.
|| (PAUSE) / STEP
This function is applicable for DVD and CD audio.
•
For DVD, the picture will become static.
•
For CD audio, it will become silent.
1. Press the ( || ) Button will cause the player to
enter PAUSE/STEP mode.
2. Press the PLAY Button again will resume to
Play State.
DVD Player Operation
DVD Setup Mode
Basic Operation
•
Setup Mode provides the menu for the
configuration of TV DISPLAY Mode, OSD
LANGUAGE mode, DOLBY Mode, AUDIO
Mode, PARENTAL Mode, PASSWORD,etc.
•
Item selection in the SETUP menu is done by
using the Direction button and the ENTER
button.
•
To exit the SETUP Mode to press the SETUP
button again.
•
The initial password for PARENTAL Mode is
set at 1379.
1. Press “VCR/DVD” button on the unit or press
the VCR/DVD button on the remote handset
to turn on DVD.
2. Press “OPEN / CLOSE” button to load disc in
disc tray.
3. Press “OPEN / CLOSE” button to close the
tray.
•
Hold the disc without touching either of its
surfaces, position it with the printed title
side facing up.
Note: To setup the TV display mode must
be in stop mode.
Play Discs
1. Press the OPEN / CLOSE Button on the front
panel and load the Disc on the tray.
The label side should be facing upwards. For a
Double-sided DVD Disc, put the disc with
label A/1 up.
2. Press the OPEN/CLOSE button again to close
the tray and the disc will be loaded.
36
DVD Player Operation
Set Menu Items:
. . General Setup Page . .
Press the SETUP Button on the remote
controller. The following menu will be shown:
TV Display
Angle Mark
OSD Lang
Captions
Screen Saver
1. GENERAL SETUP
TV DISPLAY
•
Go To General Setup Page
Normal/PS
This is selected when the DVD player is
connected to a normal TV. Wide-screen images
are shown on the screen. but with some parts
cut automatically.
•
- GENERAL SETUP PAGE-
Normal/LB
This is selected when the player is connected
to a normal TV. Wide-screen images are shown
on the screen, with black belt on the top and
bottom.
•
PS
On
ENG
On
Off
TV Display PS
Normal/PS
Angle Mark On
Normal/LB
OSD Lang ENG
Wide
Captions On
Screen Saver Off
Set TV Display Mode
Wide
- GENERAL SETUP PAGE-
This is selected when the player is connected
to a wide-screen TV.
TV Display PS
Angle Mark
This only works when there is an angle mark
on the disc. Select On, the screen shows the
mark when playing DVD.
•
On
•
Off
•
French
•
German
•
Italian
•
Dutch
Off
Screen Saver Off
Set Angle Mark
- GENERAL SETUP PAGETV Display PS
This is used to select the OSD language.
English
On
Captions On
OSD Language
•
Angle Mark On
OSD Lang ENG
Angle Mark On
English
OSD Lang ENG
French
Captions On
Screen Saver Off
Dutch
Set OSD Language
- GENERAL SETUP PAGETV Display PS
Captions
Angle Mark On
This option can show or hide the captions.
OSD Lang ENG
•
On (Show captions)
•
Off (Hide captions)
German
Italian
Captions On
On
Screen Saver Off
Off
Closed Caption
37
- GENERAL SETUP PAGE-
Screen Saver
Start the screen saver, the screen saver image
appears when the player stops or the image is
frozen for a few minutes. This saver can keep
the screen from being damaged.
•
On (Start the screen saver).
•
Off (Remote the screen saver).
•
Back to the feature bar, press
TV Display PS
Angle Mark On
OSD Lang ENG
Captions On
Screen Saver Off
Off
Screen Saver
key
On
2. AUDIO SETUP
. . Audio Setup Page . .
When AUDIO SETUP option is selected, the
following menu will be shown.
Speaker Setup
Dolby Digital Setup
Speaker Setup
Downmix
•
LT/RT
Go To Audio Setup Page
A disc recorded multi channel soundtrack,
the output signal will be incorported to left
and right channel.
•
- SPEAKER SETUP PAGE-
STEREO
STR
LT/RT
LRG
Stereo
Center Speaker SML
A disc recorded multi channel soundtrack,
the output signal will be incorported to
stereo.
•
Downmix
Front Speaker
OFF
Rear Speaker
SML
Subwoofer
On
Set Downmix Mode
Disable DOWNMIX.
(If you connect this player to 5.1CH external
Amp, please turn it to this mode.)
- SPEAKER SETUP PAGE-
Front Speaker
User can setup the front speakers.
•
•
Off
Downmix
STR
Front Speaker
LRG
Large
Center Speaker SML
Small
LARGE
Rear Speaker
SML
SMALL
Subwoofer
On
They are for 5.1 Channel speaker output only.
Setup Front Speaker
Center Speaker
- SPEAKER SETUP PAGE-
User can setup the center speakers.
Downmix
STR
The option is available when DOWNMIX is off.
Front Speaker
LRG
•
LARGE
Center Speaker SML
Large
•
SMALL
Rear Speaker
SML
Small
Subwoofer
On
Off
•
OFF
Set up Center Speaker
They are for 5.1 Channel speaker output only.
38
- SPEAKER SETUP PAGE-
Rear Speaker
User can setup the rear speakers. The option
is available when DOWNMIX is off.
•
LARGE
•
SMALL
•
OFF
Downmix
STR
Front Speaker
LRG
Center Speaker SML
Rear Speaker
Subwoofer
SML
Large
On
Small
Off
Setup Rear Surround Speaker
They are for 5.1 Channel speaker output only.
- SPEAKER SETUP PAGE-
Subwoofer
User can turn on/off the subwoofer through
this option.
•
•
Downmix
STR
Front Speaker
LRG
Center Speaker SML
ON
Rear Speaker
SML
OFF
Subwoofer
On
On
Off
They are for 5.1 Channel speaker output only.
Set up Subwoofer
- Dolby Digital Setup-
Dynamic
Dynamic
Full
6/8
This option is used to set the compression ratio
in order to control the sound (volume) contrast.
4/8
2/8
Off
Dynamic Range Compression
3. Video Setup
. . Video Setup Page . .
Component
TV Mode
Quality
Go To Video Setup Page
39
Component
User can set the S-Video or YUV video output.
. . Video Setup Page . .
Component S-Video
S-Video
TV Mode
YUV
Quality
Component
TV Mode
In YUV video mode, user can selete Interlace
or Progressive scan mode.
. . Video Setup Page . .
Component S-Video
TV Mode
P-SCAN
Quality
Interlace
Set P-SCAN On/Off
- Video Quality Setup-
Sharpness
User can set the level of sharpness for the
image displayed. There are three different
levels.
Sharpness Low
High
Brigntness 00
Medium
Contrast 00
• HIGH
Low
Sharpness
• MEDIUM
- Video Quality Setup-
• LOW
Sharpness Low
Brightness 00
Brightness
Brightness IIIIIIIIIII__ 0
Contrast 00
User can set the level of brightness for the
image displayed. It is ranged from -20 to 20.
Brightness
- Video Quality Setup-
ContrasT
Sharpness Low
Brightness 00
User can set the level of contrast for the image
displayed. It is ranged from -16 to 16.
Contrast 00
Contrast
40
Contrast IIIIIIIIIII__ 0
4. Preference Setup
- Preference Page -
(Under in DVD Stop mode)
. . Preference Page . .
TV Type
Audio
Subtitle
Disc Menu
Parental
Password
Default
PAL
ENG
ENG
ENG
Go To Preference Page
- Preference Page -
TV Type
The DVD palyer supports PAL, Multi and NTSC
system TV type
TV Type
PAL
Audio
ENG
PAL
Multi
Subtitle
ENG
NTSC
Disc Menu ENG
Parental
Password
Default
Set TV Standard
Audio
- Preference Page -
If a language listed below is recorded on the
disc, you can play the sound in such language.
TV Type
PAL
English
If not, the language recorded will be used.
Audio
ENG
French
• English
Subtitle
ENG
German
• French
• German
Disc Menu ENG
Italian
Parental
Dutch
Password
Default
• Italian
Preferred Audio Languages
• Dutch
Subtitle
- Preference Page-
If a language listed below is recorded on the
disc, you set the subtitle to be displayed in
such language. If not, the language recorded
will be used.
TV Type
Audio
ENG
English
• English
Subtitle
ENG
French
• French
• German
• Italian
Disc Menu ENG
German
Parental
Italian
Password
Dutch
Default
Off
Set Preference to English
• Dutch
• OFF
PAL
41
Disc Menu
- Preference Page-
If a language listed below is record on the disc,
you can set the Menu to be displayed in such
language. If not, the language recorded will be
used.
TV Type
PAL
Audio
ENG
Subtitle
ENG
English
French
• English
Disc Menu ENG
• French
Parental
German
Password
Italian
Default
Dutch
• German
Preferred Menu Language
• Italian
• Dutch
- Preference Page -
Parental
When playing disc with parental lock function,
you may select an age control grade according
to grade of disc and your own preference. For
example, if PG is selected, DVD Video disc rated
higher than the PG grade cannot be played.
Initial password: 1379
TV Type
PAL
Audio
ENG
Subtitle
ENG
Disc Menu ENG
1. KID SAF
2. G
Password
3. PG
4. PG 13
Default
2. G
1. KID SAF
Parental
5. PGR
6. R
3. PG
7. NC 17
4. PG 13
8. Adult
5. PGR
Off
Set Parental Control
6. R
7. NC 17
- Preference Page-
8. Adult
Off
TV Type
Password
Some DVD have a parental level assigned to
the complete disc or particular scenes on the
disc. This feature allows the viewing limit to be
set and settings are region specific. To activate
the parental settings.
PAL
Audio
ENG
Subtitle
ENG
Disc Menu ENG
Parental
Password
Default
Change Password
42
Change
Default
DVD Root menu
User can load the original factory setting by
choose RESET and press ENTER.
The DVD Menu Play function is only applicable
for DVD movie. User can access the casting
information, Production History, Movie
Introduction etc. directly through this function.
• RESET
6. Exit Setup
1. Press the DVD ROOT Button on the remote
controller to enter the Root Menu.
Quit the Setup Menu.
2. Use the Direction button (
) or input the
item index through the Number keys (0-9) to
do the selection.
- Preference PageTV Type
PAL
Audio
ENG
Subtitle
ENG
3. Press ENTER to confirm the selection.
Progressive Scan
Disc Menu ENG
Progressive scan creates a picture with double the
scan lines of traditional component video pictures
and creates a sharper image.The advantages of
progressive scan video output are reduced picture
flickering and motion artifacts as well as a sharper
image on large screens.
Parental
Password
Default
Reset
Load Factory Setting
Audio
This function is applicable for DVD and CD audio
but with different effects.
•
Pressing the AUDIO Button will change the
Audio channel.
REW / F.F (
Exit Setup Menu
/
)
This function is applicable for DVD and CD audio
but with different effects. The FAST FORWARD
key and FAST BACKWARD key are used to
achieve fast play function.
•
For DVD , there are 5 different levels of speed
(2x, 4x, 8x, 16x,32x). Every successive key
press will increment the speed of quick play.
•
For CD audio, the FORWARD/BACKWARD
will perform quick rolling on the music output.
Note : Press PLAY Button at any stage will
resume to normal speed.
43
PREV./NEXT (
/
)
Subtitle
During playback, press one of the PREV./NEXT
buttons (PREVIOUS button and NEXT button)
•
•
This function is only applicable for DVD disc. It
can change the subtitle language shown on the
screen.
When the PREV. button is pressed once, the
pickup returns to the beginning of the
PREVIOUS playing chapter or track.
Note : Number of subtitle available
depends on the DVD disc.
When the NEXT button is pressed once, the
pickup will go to the beginning of next chapter
or track.
Angle
Some discs may have multiple viewing angles
during production. The ANGLE button is to
select the viewing angle shown on the screen.
Slow F.F
The Slow Forward is applicable for DVD. There
are 4 steps of slow motion speed, 1/2, 1/4, 1/8,
1/16. Successive key presses will decrement the
playback speed.
Note : The number of Angle of View
depends on the Disc.
Search
Note: Press Play Key to switch back to
normal playback speed.
This function is applicable for DVD and CD audio.
Through this function, the user can access a
specific location or a specific track by key in the
target time or the track number.
Repeat Mode
This function is applicable for DVD and CD audio
but with different effects.
•
•
1. Press the SEARCH Button Enter to search
mode .
For DVD disc playback, user can choose to
repeat the current chapter,the current title or
disc. Subsequent key press of the REPEAT
key can change between these three options.
2. Input the target time though the number button
(0~9) and the player will jump to the target
location immediately.
For CD, user can choose to repeat the
current track or the whole disc (Repeat All).
Subsequent key press of the REPEAT key can
change between these two options.
A-B
This function is applicable for DVD and CD audio.
User can specify the repeating interval by marking
the starting point and the end point.
1. Press the A - B Button to mark the starting
point. (Playback will continue).
2. Press the A - B Button to mark the end
point. (The marked part will be repeated
automatically)
Note : Press the A - B Button during
repetition will disable the Repeat mode.
44
Display (Remain Time)
This function is applicable for DVD only. It will
display the timing information of the playback
on the screen.
•
For DVD playback, subsequent key press
on the DISPLAY Button will show the Title
Elapsed Time, Title Remain Time, Chapter
Elapse Time and Chapter Remain Time one
by one.
Press the DISPLAY Button
Title Elapsed
TT 01/04 CH 01/12
0:02:13
Press the DISPLAY Button
Title Remain
TT 01/04 CH 01/12
1:33:30
Press the DISPLAY Button
Chapter Elapsed
TT 01/04 CH 01/12
0:02:15
Press the DISPLAY Button
Chapter Remain
TT 01/04 CH 01/12
0:02:18
Press the DISPLAY Button
Display
Play
This function is applicable for DVD and CD audio.
During the disc playback, when the STOP Button
is pressed once, the player will enter the Resume
Play mode. At this time, if the PLAY Button is
pressed, the player will resume playback at the
location where the STOP Button is pressed. If
the STOP button is pressed (i.e. STOP Button is
pressed twice), the player will be Stop.
Zoom
This function is applicable for DVD . User can
enlarge or reduce a static picture or a moving
picture by pressing the ZOOM buttons. There are
6 levels of zooming (2x, 3x, 4x, 1/2x, 1/3x,1/4x)
and they can be achieved one by one through
subsequent key presses on the ZOOM button.
NOTE: User can select the portion of
the picture to be enlarged by using the
Direction button (
)
45
Off
Program Mode
Program : TT(- -)/CH (- -)
This function is applicable for DVD and CD audio.
User can assign the playback sequence
according to his/her preference. For CD audio,
user can assign the track sequence while
for DVD disc, user can assign both the Title and
Chapter sequence.
01
02
03
04
05
06
07
08
09
10
Exit
NEXT
Program : TT(- -)/CH (- -)
1. Press the PROGRAM button. The Program
Sequence table will be shown on the screen.
01
02
03
04
05
2. Enter the track numbers according to the user
preference through the Number keys (0-9).
3. After assigning the playback sequence, move
the highlight cursor to the START option by
using the Navigation Arrows. Press ENTER on
the remote controller to confirm.
05
03
08
06
07
08
09
10
Exit Start NEXT
Program : TT(- -)/CH (- -)
01
02
03
04
05
To Remove the program move the highlight cursor
to desire Program By use the Navigation arrows
then press the clear button to Remove the
selected program.
05
03
08
06
07
08
09
10
Exit Start
NEXT
Digest Play
This function is applicable for DVD and CD
audio but with different effects.Through this
function,user can have a brief view of the content
on the disc.For playing DVD,the screen will be
divided into 6 sub-screens with each one showing
different parts of the movie (depends on the mode
selected).
•
•
01
02
03
04
05
06
Type:Title
Select(01-08):- Exit Menu NEXT
For DVD,there are 4 options:
Time Interval,Chapter Digest, Title Interval and
Chapter Interval.
•
Chapter Interval
The current chapter will be divided into serval
parts with all of them have the same length in
time. Each of the 6 sub-screens will show one of
the divided parts. Each sub-screen will only play
the frist 4 seconds of the assigned part.
Title Interval
The movie will be divided into serval parts
according to the number of Titles it contains.Each
of the 6 sub-screens will show one of the divided
Titles. Each sub-screen will only play the first 4
seconds of the assigned Title.
- For CD audio, this function only supports Intro
Play.The player will play the first 6 seconds of
each track sequentially.
The current title will be divided into several parts
with all of them have the same length in time (10
mins). Each of the 6 sub-screens will show one of
the divided parts. Each subscreen will only play
the frist 4 seconds of the assigned part.
Note:
- To switch off the digest features,
choose EXIT in the Menu.
- Press the [ARRAY] and [ENTER] button
to select the Title you want to play.
46
MP3 Operation
Operations
This unit can support ISO9660 file system
CD-ROM navigation. Multi-Media files such as
MP3 thus can be played in the player.
During Slide Show Mode:
•
Press the PAUSE Button will freeze the screen
so that the current picture can be held for a
long time. To resume the slide show mode,
press PLAY Button.
•
Press the NEXT Button on the remote
controller will skip the next picture.
•
Press the PREVIOUS Button on the remote
controller will repeat the current picture.
Operation
•
•
Insert the MP3 disc into the tray.The
navigation menu will be displayed. The menu
will show the files in the root directory, and the
MP3 files can then be played automatically.
In the MP3 menu shows a blue and an orange
cursor. The blue cursor indicates the currently
playing MP3 song, the orange cursor indicates
a title to be selected.
Blue cursor
MP3 SONG001
MP3 SONG002
Orange cursor
MP3 SONG003
MP3 SONG004
MP3 SONG005
MP3 SONG006
You can select the other songs by the direction
buttons or directly input the song number by
pressing the number keys. The orange cursor will
move to the selected song. Then press ENTER
to confirm.
Note:There are three digits displayed.If
you want call up a title with only one or
two digits, you can either start the entry
with “0” or “00”,or can you can enter
the number of the song and then wait a
few seconds until the cursor skips to the
selected title.
Press the repeat button to select: Random
(playback in random order), Single (play one title,
then stop), Repeat one (repeat the current title),
Repeat Folder (repeat current folder) and
Repeat ALL (repeat the current all title).
Picture CD
Digital picture (JPEG) from a digital camera can
be burnt on to a disc and played on this
TV. Insert a picture CD into the tray and the disc
will be loaded automatically. If the disc
type can be identified, the player will start showing
the pictures one by one (Slide Show Mode).
47
Before Doubting About Troubles (DVD)
Symptom
Checks
The recorder does not
play.
• If a DVD is from overseas, it may not be played. Please
check a DVD’s region code whether it has the relative region
code.
• Please check whether a DVD is inserted in a right direction.
• If it is a CD-ROM for PC or DVD-ROM, it does not work.
• Play mode may be “SLOW” or “PAUSE” (In abnormal speed
play, no sound comes through)
• Did you connect the parts in right way?
• Please check the operative condition of TV or amplifier.
• From SETUP, please check “AUDIO” items.
• Did you turn on your TV sets?
• Did you connect the parts in right way?
• The play may be in “PAUSE”.
• Disc may have some contaminants or be damaged.
• Disc may be bad one.
• Please check the connection with Dolby Digital amplifier.
• Please check the plugs are connected with one another
tightly.
• Some contaminants may be remained in connectin terminal.
• Please check the degree of remote control, distance or any
interruption.
• Battery may be weak or exhausted.
• When you operate DVD, use it by pressing [VCR/DVD]
button.
• A receiver of remote control may be different with a sender.
• If a DVD does not include language information, it does not
support the function.
• “ANGLE” is supported only in a DVD contains muilt angle
scenes.
Also a user can confirm the support with the “ANGLE”
mark on screen.
• Please check the degree of remote control, distance or any
interruption.
• Please check a battery in remote control whether it is
exhausted or not.
• DVD may not contain menu information.
• The file name of MP3 recognize only the Alphabet (A-Z, az),
number (0~9) and a special symbol on keyboard (~,!,@,
#,$....) and 10 letters can be displayed in maximum.
• The letters except above case will be displayed like “----”.
If the surface of disk is injured, the file display and playback
can be impossible.
No sound comes
through.
A disc is playing but
screen does not
appear or poor screen
appears.
Sound is irregular.
REMOTE does not
work.
“AUDIO” or “SUBTITLE”
button does not work.
“ANGLE” button does
not work while a DVD
is playing.
“MENU” does not
appear while a DVD is
playing.
The file name of MP3
(CD-R) appears with
strange letters.
Any MP3 (CD-R) file
isn’t displayed.
48
Symptom
Checks
“Power On” does not work.
• Please check whether a powre plug is inserted in
an electric outlet.
• Please check whether a videotape is inserted in.
• Try to insert a plug again.
• Please check whether a power plug is inserted in
an electric outlet.
• Please check whether a videotape is in.
• Please check whether a videotape is inserted in a
right direction (a side of transparent window should be on
the upside)
• Have you inputted a videotape again just after the
tape was ejected? Please try it again after fully ejecting it.
• When a videotape forces to be ejected, the tape may not
be inputted. In the case, please pull out an outlet, and then
push the tape smoothly.
• That’s why a safe mode to protect a videotape is operated
automatically. Please pull out the tape and input is again.
• In case the product is used for a long time, a videotape
may not be ejected for a film inside may be stretched. In the
case, please pull out a power plug for about 10mins and
then press “EJECT” button.
• Please check your antenna’s connection.
• TV Channel should be fixed on video channel.
• Please check your antenna’s signal whether it may be weak.
In case of its weakness, please use a frequency amplifier
connected with the device.
• While in no use of VCR, was it turned on?
• While in recording a program, do you watch another
channel?
• Please press “TRACKING” for better screen. Videotape
may be poor. Try to change it to another one.
• Please use a head-cleaner to clean VCR heads.
VCR heads may be contaminated.
It does not work even in “Power
On”.
A videotape is not inputted in.
On inputting a videotape, the tape
is re-ejected.
A videotape is not ejected.
A channel on video and a play
screen does not appear.
Noise (screen noise) appears on
screen.
While in playing, noise appears.
Sound and screen are irregular.
Sound comes out but screen
does not appear.
Screen is irregular and stripes
appears.
“Screen Error” message is
displayed in a screen.
49
Symptom
Checks
While recording and playing,
the top of screen extremely
waves.
A screen is not clear.
• Since VCR Play signals are not stable like a TV signals,
screen may be unstable or curved while in playing. To fix
the problem, please horizontal adjustment.
• In case videotape is the one recorded by other products or
old one, stripe may appear on the screen.
• Try to adjust the screen by [TRACKING +/-] button
• Try to use a head-cleaner.
• Try to adjust the screen by [TRACKING +/-] button.
• Some tapes or discs distributed in the market for
lending is set to prevent copy in manufacturing.
These tapes cannot be duplicated in a good
condition.
• For recording, you should use videotape with a tab.
• Please check whether a channel is fixed on video.
If not, you have to turn it into “TV” by pressing “CH” button.
• Please check whether a channel is fixed on video.
If not, you have to turn it into “TV” by pressing “CH” button.
• Please check whether the timer recording info is right.
• Are RF cables inputted antenna connection terminal
correctly?
• Does a CH number selected in display section appear?
• Please check a tab on a tape whether it is broken or
not. (If it was broken, please scotch-tape it)
• Check whether a tape attached with a recording tap is
inserted.
• Check whether the screen is displayed in VCR Only
Channel. Press [CH] button in this remote controller
to adjust in “General Broadcast” condition.
• Is the rounded line (RF cable) connected in “ANT.
IN” terminal?
• Is the selected channel number shown in Display?
• Is a tab of cassette tape broken? (Please cover a tab hole
with cellophane adhesive tape (Scotch tape)
• Please check whether the clock is right.
• Does the display on your video show “f” (Ready to timer
recording)? Please make it out.
• Please check whether the timer recording info is right.
• Please check a tab on a tape whether it is broke or not. (If it
was broken, please scotch-tape it)
• Was a cable data output code connected correctly?
• Were a converter manufacturer setup and output channel
right?
• Did you enter a password? (Please cancel it.)
• Did you turn off your player? (Please turn it on.)
• You may not memorize channels.
• Please check your channel setting or press a number
button.
• Some tapes or discs distributed in the market for lending is
set to prevent copy in manufacturing.
These tapes cannot be duplicated in a good condition.
A screen at pause is trembling
or slow screen is not clear.
While duplicating, screen is
not clean and distorted.
Recording a TV program is
impossible.
Once pressing “REC”, a
videotape is ejected
automatically.
Timer recording of Cable TV
does not work.
In spite of pressing “CHANNEL”,
a channel can not be set.
While duplicating, screen is not
clean and distorted.
50
Specifications
Power
240V~50Hz
Consumed electricity
50W
Weight
5.7kg
Dimension (WxHxD)
430mm x 91mm x 355.5mm
Operative temperature
+5°C~40°C
Installation condition
Horizontal/Relative humidity under 80%
Signal type
PAL B/G COLOR
Antenna Input/output
U/V-mixed:75Ω unbalanced
VIDEO input
1.0 Vp-p (unbalanced, RCA JACK)
AUDIO input
RCA JACK
UHF output
21~69 CH
VIDEO output
(common use of DVD and VCR)
VIDEO output terminal 1.0Vp-p unbalanced,
RCA JACK
VIDEO output (DVD only)
RCA or Y Pb Pr
AUDIO output
(common use of DVD and VCR)
RCA Jack output terminal (2 kinds):
RCA JACK
AUDIO output (DVD only)
Analogue AUDIO output(5.1CH)
Digital audio output(OPTICAL, COAXIAL)
Playable type
Very high dense tapes with VHS marks
Playable disc
DVD, CD(12mm),CD(8mm), MP3, CD-R, CD-RW
Tape speed SP
SP: 23.39mm/s, LP: 11.70mm/s
Playtime
SP: 3hrs LP : 6hrs(use of E180tape)
Clock display
24hrs
• Design and specification are subject to change without notice
51
Warranty
DO NOT SEND IN THIS WARRANTY
Fill out the following details and file with your
purchase invoice.
The benefits conferred by this warranty are in
addition to all implied warranties, other rights
and remedies in respect of the product which the
consumer has under the Trade Practices Act and
similar State and Territory Laws.
RETAIN & FILE WITH YOUR RECEIPT.
Your Purchase Receipt/Invoice is proof of date
of purchase. You must be able to present it at
the place of purchase to obtain a replacement or
service under warranty.
The original purchaser of this Magnavox product
is provided with the following warranty subject to
the following conditions.
Mistral Housewares Pty Ltd warrant this product
for a period of 1 year from the date of purchase
for all parts defective in workmanship or materials.
This product or defective parts will be replaced
free of charge.
Mistral Housewares Pty Ltd reserves the right to
discontinue items, modify designs and change
specifications without incurring obligation. Whilst
every effort is made to ensure that descriptions,
specifications and other information in this
publication is correct, no warranty is given in
respect thereof and the company shall not be
liable for any errors therein.
WARRANTY CONDITIONS
1.
This warranty is only valid for appliances
used according to the manufacturer’s
instructions
2.
This appliance must not be modified or
changed in any way.
3.
Connection must be to the voltage
requirements as specified in the ratings label
located on the product.
4.
Purchased from:
Co. Name:
Address:
Date of Purchase:
The manufacturer does not accept liability
for any direct or consequential damage,
loss or other expense arising from misuse
or incorrect installation and operation of the
appliance.
5.
Warranty will only be given where proof of
purchase is provided, e.g. original invoice.
6.
Not designed or warranted for industrial or
commercial use.
NOTE: Consistent with our continuing
product development policy,
improvements may have been made
which render the contents of this
package slightly different to that shown.
Cat. No. MDVDVCR5
June 2006
52