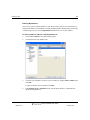
Download Vertical Wave User guide

Transcript
Wave IP 3.0
Wave ViewPoint
User Guide
Release 3.0
October 2012
© 2012 by Vertical Communications, Inc. All rights reserved.
Vertical Communications and the Vertical Communications logo and combinations thereof and
Vertical ViewPoint and Wave Contact Center are trademarks of Vertical Communications, Inc.
All other brand and product names are used for identification only and are the property of their
respective holders.
LIMIT OF LIABILITY/DISCLAIMER OF WARRANTY
Vertical Communications, Inc. makes no representation or warranties with respect to the
accuracy or completeness of the content of this publication and specifically disclaims any
implied warranty of merchantability or fitness for any particular purpose, and shall not be liable
for any loss of profit or any other commercial damage, including but not limited to, special,
incidental, or consequential.
COPYRIGHT STATEMENT
This publication contains proprietary and confidential information of Vertical Communications,
Inc. The contents of this document may not be disclosed, copied or translated by third parties,
in any form, or by any means known, or not now known or conceived, without prior explicit
written permission from Vertical Communications, Inc.
Vertical Communications, Inc. reserves the right to revise this publication and to make changes
in content without notice.
Wave ViewPoint User Guide
Release 3.0
October 2012
Revision History
Release
Date
3.0
10/12
3.0
4/12
Documentation Changes
Page No.
The ViewPoint Mobile App now allows you to make and take calls and
access some ViewPoint features from supported Android mobile devices.
14-1
GENERAL RELEASE
GENERAL RELEASE
The ViewPoint Mobile App allows you to make and take calls and access
some ViewPoint features from supported iOS mobile devices.
2.5
2.0 SP1
10/11
03/11
14-1
GENERAL RELEASE
ViewPoint can now be installed on the Wave Server for administrative
purposes only.
---
Added section “Performing automatic updates” describing how ViewPoint
will automatically update on your PC when a new version is available.
2-2
Added section “Automatically displaying account code information for
contacts.”
5-7
Added section “Adding bookmarks to a voice message”. If a voice message
contains bookmarks, the bookmarks are now included when the voice
message is forwarded to a gateway user (a user on another Wave system
in a WaveNet network).
7-9
Added new routing list action option: When calling a ViewPoint Group, you
can now specify that Group members who are on the phone will not be
called.
9-18
SERVICE PACK RELEASE
Added section “Installing ViewPoint”, including an important note to never
install ViewPoint on the Wave Server.
2-2
The ViewPoint Incoming Call Alert window can now display up to 3 Call
Monitor fields in addition to caller name and number.
5-18
Added note on how to set different incoming call alert options for Call
Monitors that have been shared with you.
12-14
Added appendix “Troubleshooting ViewPoint Problems”.
D-1
Wave ViewPoint User Guide
Release 3.0
October 2012
Revision History
Release
Date
2.0
09/10
Documentation Changes
Page No.
Added section “What’s new in this version” that describes how to view a list
of new ViewPoint features.
1-1
You can now choose the ViewPoint softphone as your primary or secondary
phone when you log on. See section “Using ViewPoint with a different phone
or Wave Server“.
2-10
You can now share folders with other users. Your Wave system
administrator sets up sharing, as well as the access permissions that control,
whether the other users view the contents of the shared folders or view and
act on the contents (for example, take another user’s call via a shared Call
Monitor.
2-35
You can now modify personal status preferences to reflect your changing
availability and location, or to customize how your calls will be handled.
3-1
Wave IMpulse supports simple, secure, user-to-user instant messaging
in ViewPoint.
4-4
The new All tab in the Call Monitor displays all calls to and from your phone,
all queue calls for any queue that you are currently logged into, and all calls
from other users’ Call Monitors that have been shared with you.
5-3
Added note that to supervise a call, at least one party in the call must be from
the local Wave system.
6-13
A Wave mobile extension allows your remote phone to be treated as a Wave
station so that you can use ViewPoint to manage your voice messages and
greetings, place outbound calls, answer and manage calls displayed in the
Call Monitor, and so forth.
6-17
Wave Mail allows you to synchronize your voice messages and contacts
between Wave and your e-mail program.
7-27
Added note to table in section “Viewing call details” clarifying the “Blind
transfer” and “Supervised transfer” results.
8-3
GENERAL RELEASE
In the Call Transfer report, filtering calls by all users or by a ViewPoint
Group is now supported, in addition to the previous options (individual user
or queue). Also, the new Inbound Calls column on the Data tab allows you
to compare the number of calls received by vs. transferred to each target
during the reporting period.
Release 3.0
13-16
October 2012
Revision History
Release
Date
1.5 SP3
09/09
Documentation Changes
Page No.
SERVICE PACK RELEASE
Two additional ViewPoint reports are now available on all systems with no
licensing requirements. See sections “Call Transfer report” and “User Call
Trends report.”
1.5 SP2
05/09
SERVICE PACK RELEASE
Added important note on not using the ViewPoint Call Monitor to manage
calls to a virtual extension.
1.5
11/08
Added steps to display ViewPoint Group tabs in the Contacts folder.
10-3
13-1
GENERAL RELEASE
Added the Call Monitor “Report a Problem” feature.
C-2
Updated Appendix B with current command line arguments.
B-1
--
Added a note that Call Waiting is not always supported.
12-6
Added “Flag a call” button in Call Monitor.
5-17
Added Extensions tabs section.
4-3
Revised screenshot in Groups chapter.
10-18
Revisions to Archive Recording Browser section.
A-1
Added screenshot and description of Call Monitor Parties pane.
6-9
Changed “workgroup” to “group” throughout.
1/08
5-7
Added a new chapter “Running Contact Center Reports” that describes
call activity and phone usage reports available from the ViewPoint Tools
menu.
Removed references to Exchange synchronization.
1.0 SP2
13-16, 13-23
--
Added “Personal Status” chapter.
3-1
Revised voicemail notification scheduling.
7-19
SERVICE PACK RELEASE
Added “Customizing” chapter.
12-1
Added “Routing Lists” section.
9-5
Added “Call Rules” chapter.
11-1
Added Revision History table.
this page
Wave ViewPoint User Guide
Release 3.0
October 2012
Revision History
Release
Date
1.0
10/07
Documentation Changes
Page No.
GENERAL RELEASE
Initial Release.
---
Wave ViewPoint User Guide
Release 3.0
October 2012
Contents
Contents
Chapter 1
Introducing Vertical Wave
About Vertical Wave ViewPoint - - - - - - - - - - - - - - - - - - - - - 1-1
What’s new in this version - - - - - - - - - - - - - - - - - - - - - - - - - - - 1-1
Installing ViewPoint - - - - - - - - - - - - - - - - - - - - - - - - - - - - - - - 1-1
Accessing Wave - - - - - - - - - - - - - - - - - - - - - - - - - - - - - - - 1-2
Using ViewPoint - - - - - - - - - - - - - - - - - - - - - - - - - - - - - - - - - - 1-2
Using the Wave TAPI Service Provider and Contact Manager
Assistant - - - - - - - - - - - - - - - - - - - - - - - - - - - - - - - - - - - - - 1-2
Using your phone - - - - - - - - - - - - - - - - - - - - - - - - - - - - - - - - - 1-3
Feature comparison table - - - - - - - - - - - - - - - - - - - - - - - - - 1-3
Getting technical support - - - - - - - - - - - - - - - - - - - - - - - - - 1-4
Wave documentation - - - - - - - - - - - - - - - - - - - - - - - - - - - - 1-4
Related reading - - - - - - - - - - - - - - - - - - - - - - - - - - - - - - - - - - 1-4
Accessing Help - - - - - - - - - - - - - - - - - - - - - - - - - - - - - - - - - - 1-5
Chapter 2
Using ViewPoint
About ViewPoint - - - - - - - - - - - - - - - - - - - - - - - - - - - - - - - 2-1
Installing ViewPoint - - - - - - - - - - - - - - - - - - - - - - - - - - - - - - Using ViewPoint remotely - - - - - - - - - - - - - - - - - - - - - - - - - - Using ViewPoint with a remote phone - - - - - - - - - - - - - - - - - Using the ViewPoint Softphone - - - - - - - - - - - - - - - - - - - - - - -
2-2
2-5
2-5
2-6
Logging on to ViewPoint - - - - - - - - - - - - - - - - - - - - - - - - - - 2-7
Using ViewPoint with a different phone, Wave Server, or language 2-10
Using ViewPoint with another station ID - - - - - - - - - - - - - - - - 2-14
Using ViewPoint in languages other than English - - - - - - - - - 2-15
Changing your station, Wave Server name, or user name after
logging on - - - - - - - - - - - - - - - - - - - - - - - - - - - - - - - - - - - 2-17
Wave ViewPoint User Guide
Release 3.0
October 2012
1-2
Contents
Changing your password - - - - - - - - - - - - - - - - - - - - - - - - - - 2-17
Logging on with command-line switches - - - - - - - - - - - - - - - - 2-18
Exiting ViewPoint - - - - - - - - - - - - - - - - - - - - - - - - - - - - - - 2-18
Elements of the ViewPoint window - - - - - - - - - - - - - - - - - 2-19
The Menu Bar - - - - - - - - - - - - - - - - - - - - - - - - - - - - - - - - - The Toolbar - - - - - - - - - - - - - - - - - - - - - - - - - - - - - - - - - - - The Navigation Pane - - - - - - - - - - - - - - - - - - - - - - - - - - - - The Status Bar - - - - - - - - - - - - - - - - - - - - - - - - - - - - - - - - - -
2-19
2-20
2-20
2-21
Working in ViewPoint folders - - - - - - - - - - - - - - - - - - - - - 2-22
Working with multiple Viewpoint folders at the same time - - - Adjusting the Phonebook Pane layout in the Call Monitor - - - Deleting voice messages and other items - - - - - - - - - - - - - - Copying and pasting items - - - - - - - - - - - - - - - - - - - - - - - - Dragging and dropping items - - - - - - - - - - - - - - - - - - - - - - Printing items in folders - - - - - - - - - - - - - - - - - - - - - - - - - - -
2-25
2-26
2-27
2-27
2-28
2-31
Organizing items in folders - - - - - - - - - - - - - - - - - - - - - - - 2-31
Public folders - - - - - - - - - - - - - - - - - - - - - - - - - - - - - - - - - - Customizing columns - - - - - - - - - - - - - - - - - - - - - - - - - - - - Viewing public folders - - - - - - - - - - - - - - - - - - - - - - - - - - - - Managing the Deleted folder - - - - - - - - - - - - - - - - - - - - - - - -
2-31
2-31
2-33
2-33
Sharing folders - - - - - - - - - - - - - - - - - - - - - - - - - - - - - - - 2-35
Using the audio controls - - - - - - - - - - - - - - - - - - - - - - - - - 2-36
Importing and exporting Wave items - - - - - - - - - - - - - - - - 2-37
Importing and exporting contacts - - - - - - - - - - - - - - - - - - - - - 2-38
Exporting ViewPoint recordings - - - - - - - - - - - - - - - - - - - - - - 2-41
Chapter 3
Using Personal Statuses
About personal statuses - - - - - - - - - - - - - - - - - - - - - - - - - - 3-1
Available personal statuses - - - - - - - - - - - - - - - - - - - - - - - - - - 3-4
Selecting a personal status - - - - - - - - - - - - - - - - - - - - - - - - 3-7
Selecting a personal status in Viewpoint - - - - - - - - - - - - - - - - - 3-7
Selecting a personal status using your phone - - - - - - - - - - - - - 3-7
Modifying a personal status - - - - - - - - - - - - - - - - - - - - - - - 3-8
Using personal status defaults - - - - - - - - - - - - - - - - - - - - 3-10
Specifying a default personal status greeting and routing list - 3-10
Wave ViewPoint User Guide
Release 3.0
October 2012
1-3
Contents
Setting personal status defaults - - - - - - - - - - - - - - - - - - - - - - 3-10
Changing the personal status of another user - - - - - - - - - - 3-11
Chapter 4
Using the Extensions List
Viewing Wave extensions - - - - - - - - - - - - - - - - - - - - - - - - - 4-1
Searching the Extensions list - - - - - - - - - - - - - - - - - - - - - - - - 4-2
Extensions list tabs - - - - - - - - - - - - - - - - - - - - - - - - - - - - - - - 4-3
Extensions list columns - - - - - - - - - - - - - - - - - - - - - - - - - - - - 4-3
Placing calls to an extension - - - - - - - - - - - - - - - - - - - - - - - 4-4
Using Wave IMpulse for instant messaging - - - - - - - - - - - - 4-4
Sending an instant message to another user - - - - - - - - - - - - - 4-4
Receiving an instant message from another user - - - - - - - - - - 4-6
Inviting users to an instant messaging conference - - - - - - - - - - 4-6
Chapter 5
Receiving and Handling Calls in ViewPoint
Using the Call Monitor folder - - - - - - - - - - - - - - - - - - - - - - - 5-1
Call Monitor folder tabs - - - - - - - - - - - - - - - - - - - - - - - - - - - - - 5-3
Call Monitor folder panes - - - - - - - - - - - - - - - - - - - - - - - - - - - 5-5
Call Monitor folder columns - - - - - - - - - - - - - - - - - - - - - - - - - - 5-5
Displaying the Call Monitor folder automatically - - - - - - - - - 5-6
Selecting and acting on a call in the Call Monitor - - - - - - - - 5-7
Call ownership - - - - - - - - - - - - - - - - - - - - - - - - - - - - - - - - - - - 5-7
Double-clicking calls - - - - - - - - - - - - - - - - - - - - - - - - - - - - - - 5-8
Commands while a call is ringing - - - - - - - - - - - - - - - - - - - 5-8
Taking the call - - - - - - - - - - - - - - - - - - - - - - - - - - - - - - - - - - 5-8
Sending the call to voicemail - - - - - - - - - - - - - - - - - - - - - - - - - 5-9
Commands while you’re on a call - - - - - - - - - - - - - - - - - - - 5-9
Putting a call on hold - - - - - - - - - - - - - - - - - - - - - - - - - - - - Transferring a call - - - - - - - - - - - - - - - - - - - - - - - - - - - - - - Adding notes to a call - - - - - - - - - - - - - - - - - - - - - - - - - - - - Sending an email message about a call - - - - - - - - - - - - - - - Recording a call - - - - - - - - - - - - - - - - - - - - - - - - - - - - - - - - Associating a call with a contact - - - - - - - - - - - - - - - - - - - - Parking a call - - - - - - - - - - - - - - - - - - - - - - - - - - - - - - - - - - Unparking a call - - - - - - - - - - - - - - - - - - - - - - - - - - - - - - - - -
Wave ViewPoint User Guide
Release 3.0
October 2012
5-10
5-11
5-13
5-13
5-13
5-15
5-15
5-16
1-4
Contents
Sending a call to voicemail - - - - - - - - - - - - - - - - - - - - - - - - Playing a caller's name over your speakers - - - - - - - - - - - - Disconnecting a call while staying on the phone - - - - - - - - - Flagging a problem call to report later - - - - - - - - - - - - - - - - -
5-16
5-16
5-16
5-17
Incoming call indicators - - - - - - - - - - - - - - - - - - - - - - - - - 5-18
Sharing your Call Monitor folder - - - - - - - - - - - - - - - - - - - 5-19
Viewing shared calls - - - - - - - - - - - - - - - - - - - - - - - - - - - - - - 5-20
Chapter 6
Placing Calls in ViewPoint
Placing a call - - - - - - - - - - - - - - - - - - - - - - - - - - - - - - - - - - 6-1
Placing calls using the Dial bar - - - - - - - - - - - - - - - - - - - - - - Using the Place Call To dialog - - - - - - - - - - - - - - - - - - - - - - - Quick-dialing from ViewPoint folders - - - - - - - - - - - - - - - - - - Placing calls using drag-and-drop - - - - - - - - - - - - - - - - - - - - Placing calls using other contact managers - - - - - - - - - - - - - -
6-2
6-3
6-6
6-7
6-8
Checking a number - - - - - - - - - - - - - - - - - - - - - - - - - - - - - 6-8
Redialing numbers and returning calls - - - - - - - - - - - - - - - - 6-9
Creating conference calls - - - - - - - - - - - - - - - - - - - - - - - - - 6-9
Adding parties to a conference - - - - - - - - - - - - - - - - - - - - - - 6-10
Conferencing multiple active calls together - - - - - - - - - - - - - - 6-11
Ending a conference call - - - - - - - - - - - - - - - - - - - - - - - - - - - 6-12
Supervising other users’ calls - - - - - - - - - - - - - - - - - - - - - 6-12
Using the ViewPoint Softphone - - - - - - - - - - - - - - - - - - - - 6-14
About the ViewPoint Softphone Dial Pad - - - - - - - - - - - - - - - 6-15
Placing calls using the ViewPoint Softphone - - - - - - - - - - - - - 6-16
Answering and handling calls using the ViewPoint Software - - 6-16
Using a remote phone - - - - - - - - - - - - - - - - - - - - - - - - - - 6-17
Using a remote phone with ViewPoint - - - - - - - - - - - - - - - - - 6-17
Using a remote phone without ViewPoint - - - - - - - - - - - - - - - 6-18
Chapter 7
Managing Voice Messages in ViewPoint
About managing voice messages in ViewPoint - - - - - - - - - - 7-1
The Messages folder - - - - - - - - - - - - - - - - - - - - - - - - - - - - - - 7-2
Archiving voice messages and call recordings - - - - - - - - - - - - 7-3
Managing thousands of voice messages or call recordings - - - 7-4
Wave ViewPoint User Guide
Release 3.0
October 2012
1-5
Contents
Listening to your voice messages and call recordings - - - - - 7-4
Listening to a voice message as it is being left - - - - - - - - - - - - 7-4
Handling your voice messages - - - - - - - - - - - - - - - - - - - - - 7-4
Forwarding a voice message - - - - - - - - - - - - - - - - - - - - - - - - Replying to a voice message - - - - - - - - - - - - - - - - - - - - - - - - Calling back the person who left a voice message - - - - - - - - - E-mailing a voice message - - - - - - - - - - - - - - - - - - - - - - - - - Opening the contact record from a voice message - - - - - - - - Deleting voice messages - - - - - - - - - - - - - - - - - - - - - - - - - - Associating a voice message from “Unknown” with a contact - Marking a voice message unheard - - - - - - - - - - - - - - - - - - - Marking a voice message Urgent or Private - - - - - - - - - - - - - Adding notes to a voice message - - - - - - - - - - - - - - - - - - - - Adding bookmarks to a voice message - - - - - - - - - - - - - - - - -
7-5
7-6
7-6
7-7
7-7
7-7
7-8
7-8
7-8
7-9
7-9
Managing call recordings - - - - - - - - - - - - - - - - - - - - - - - - 7-10
Managing your voicemail maximums - - - - - - - - - - - - - - - - 7-10
Setting a maximum length for your voice messages - - - - - - - 7-10
Sending a message directly to a user’s voicemail - - - - - - - 7-12
Knowing when you have new voice messages - - - - - - - - - 7-13
Number displayed in the Navigation Pane - - - - - - - - - - - - - Stutter dial tone - - - - - - - - - - - - - - - - - - - - - - - - - - - - - - - - Message waiting light - - - - - - - - - - - - - - - - - - - - - - - - - - - - Sound played - - - - - - - - - - - - - - - - - - - - - - - - - - - - - - - - - E-mail, pager, and call notifications - - - - - - - - - - - - - - - - - - Scheduling notifications - - - - - - - - - - - - - - - - - - - - - - - - - - -
7-13
7-13
7-13
7-13
7-14
7-19
Managing voicemail greetings - - - - - - - - - - - - - - - - - - - - - 7-23
The Greetings folder - - - - - - - - - - - - - - - - - - - - - - - - - - - - - Greeting hierarchy - - - - - - - - - - - - - - - - - - - - - - - - - - - - - - Recording a new greeting - - - - - - - - - - - - - - - - - - - - - - - - - E-mailing a greeting - - - - - - - - - - - - - - - - - - - - - - - - - - - - - -
7-24
7-25
7-26
7-27
Synchronizing Wave voice messages and contacts with your
e-mail program - - - - - - - - - - - - - - - - - - - - - - - - - - - - - - 7-27
Configuring your Wave Mail mailbox in ViewPoint - - - - - - - - - 7-31
Wave ViewPoint User Guide
Release 3.0
October 2012
1-6
Contents
Chapter 8
Using the Call Log Folder
The Call Log folder - - - - - - - - - - - - - - - - - - - - - - - - - - - - - 8-1
Call Log folder filters - - - - - - - - - - - - - - - - - - - - - - - - - - - - - - - 8-2
Call Log folder columns - - - - - - - - - - - - - - - - - - - - - - - - - - - - 8-3
Viewing call details - - - - - - - - - - - - - - - - - - - - - - - - - - - - - - - - 8-3
Taking notes on a Call Log entry - - - - - - - - - - - - - - - - - - - Sending an email message about a Call Log entry - - - - - - Associating a call from “Unknown” with a contact - - - - - - - Returning a call in the Call Log - - - - - - - - - - - - - - - - - - - - Entering an account code for a Call Log entry - - - - - - - - - Opening the contact record from a contact’s call - - - - - - - - Sharing the Call Log - - - - - - - - - - - - - - - - - - - - - - - - - - - Reporting on the Call Log - - - - - - - - - - - - - - - - - - - - - - - - -
Chapter 9
8-6
8-6
8-7
8-7
8-8
8-8
8-8
8-9
Call Forwarding and Routing Lists
About call forwarding and routing lists - - - - - - - - - - - - - - - - 9-1
Forwarding calls - - - - - - - - - - - - - - - - - - - - - - - - - - - - - - - 9-2
Turning forwarding on and off via the FWD button - - - - - - - - - - 9-5
Call forwarding and voicemail - - - - - - - - - - - - - - - - - - - - - - - - 9-5
Using routing lists - - - - - - - - - - - - - - - - - - - - - - - - - - - - - - 9-5
The Routing Lists folder - - - - - - - - - - - - - - - - - - - - - - - - - - - - 9-7
Using the Routing List Wizard vs. the Routing List Editor - - - - - 9-9
Creating a routing list using the Routing List Wizard - - - - - - - 9-10
Creating a routing list using the Routing List Editor - - - - - - - - 9-11
Handling calls differently if you do not answer or are busy - - - 9-15
Routing calls to groups - - - - - - - - - - - - - - - - - - - - - - - - - - - - 9-18
Using greetings with routing list final actions - - - - - - - - - - - - - 9-20
Chapter 10
Managing Contacts and Groups
About contact management and Wave - - - - - - - - - - - - - - 10-1
The Contacts folder - - - - - - - - - - - - - - - - - - - - - - - - - - - - 10-2
Searching the Contacts folder - - - - - - - - - - - - - - - - - - - - - - - 10-2
Private and public contacts - - - - - - - - - - - - - - - - - - - - - - - - - 10-2
Wave ViewPoint User Guide
Release 3.0
October 2012
1-7
Contents
Viewing shared contacts - - - - - - - - - - - - - - - - - - - - - - - - - - - 10-3
Contacts folder tabs - - - - - - - - - - - - - - - - - - - - - - - - - - - - - - 10-3
Changing double-click behavior - - - - - - - - - - - - - - - - - - - - - - 10-4
Managing contacts - - - - - - - - - - - - - - - - - - - - - - - - - - - - - 10-5
Entering a new contact - - - - - - - - - - - - - - - - - - - - - - - - - - - - 10-5
Placing calls to your contacts - - - - - - - - - - - - - - - - - - - - - - - 10-8
Teaching Wave to recognize your contacts - - - - - - - - - - - 10-8
Identifying contacts by name - - - - - - - - - - - - - - - - - - - - - - - - 10-9
Associating a call or Caller ID number with a contact - - - - - - 10-11
Understanding name and number on Caller ID - - - - - - - - - - 10-14
Using contact PINs for guaranteed recognition - - - - - - - - - - 10-14
Opening contacts from within other folders - - - - - - - - - - - 10-15
Synchronizing your Wave contacts with your e-mail program - - 10-15
Using contacts maintained in another contact manager - - 10-15
Using the Wave Contact Manager Assistant - - - - - - - - - - - - 10-16
Importing contacts from other contact managers into Wave - 10-16
Using ViewPoint Groups - - - - - - - - - - - - - - - - - - - - - - - - 10-17
Personal and public Groups - - - - - - - - - - - - - - - - - - - - - - - 10-18
The Groups folder - - - - - - - - - - - - - - - - - - - - - - - - - - - - - - 10-18
Creating a Group - - - - - - - - - - - - - - - - - - - - - - - - - - - - - - - 10-19
Chapter 11
Using Call Rules
About call rules - - - - - - - - - - - - - - - - - - - - - - - - - - - - - - - 11-1
Call rules overview - - - - - - - - - - - - - - - - - - - - - - - - - - - - - - - 11-1
Distinguishing which incoming calls activate the call rule - - - - 11-2
Examples of how you can use call rules - - - - - - - - - - - - - - - - 11-3
The Call Rules dialog - - - - - - - - - - - - - - - - - - - - - - - - - - - 11-3
Enabling and disabling a call rule - - - - - - - - - - - - - - - - - - - - - 11-4
Organizing the priority of call rules - - - - - - - - - - - - - - - - - - - - 11-4
Creating a new call rule- - - - - - - - - - - - - - - - - - - - - - - - - - 11-4
Specifying people that trigger a call rule - - - - - - - - - - - - - - - - 11-6
Specifying dates and times to trigger a call rule - - - - - - - - - - - 11-7
Quickly creating call rules for contacts or groups - - - - - - 11-10
Call rule priority - - - - - - - - - - - - - - - - - - - - - - - - - - - - - - 11-10
Wave ViewPoint User Guide
Release 3.0
October 2012
1-8
Contents
How Wave resolves call rule conflicts - - - - - - - - - - - - - - - - - 11-11
Chapter 12
Customizing ViewPoint
About customizing ViewPoint - - - - - - - - - - - - - - - - - - - - - 12-1
Guide to the Options dialog - - - - - - - - - - - - - - - - - - - - - - - - - 12-1
Customizing phone behavior - - - - - - - - - - - - - - - - - - - - - - 12-3
Recording your voice title - - - - - - - - - - - - - - - - - - - - - - - - - Changing the language of phone command prompts - - - - - - Customizing or turning off call waiting - - - - - - - - - - - - - - - - Changing your personal operator - - - - - - - - - - - - - - - - - - - - Customizing your listing in the dial-by-name directory - - - - - Customizing how long your phone rings - - - - - - - - - - - - - - - -
12-4
12-5
12-6
12-7
12-8
12-9
Configuring the ViewPoint Softphone - - - - - - - - - - - - - - - 12-10
Customizing incoming call behavior - - - - - - - - - - - - - - - - 12-13
Customizing voice message behavior - - - - - - - - - - - - - - 12-15
Setting voice messages playback order - - - - - - - - - - - - - - - 12-15
Playing a sound when a new message arrives - - - - - - - - - - 12-16
Customizing ViewPoint for operators - - - - - - - - - - - - - - - 12-17
Customizing the ViewPoint display - - - - - - - - - - - - - - - - 12-17
Changing ViewPoint’s language - - - - - - - - - - - - - - - - - - - - 12-18
Defining double-click behavior in the Contacts folder - - - - - - 12-19
Customizing columns - - - - - - - - - - - - - - - - - - - - - - - - - - - - 12-20
Other customization options - - - - - - - - - - - - - - - - - - - - - 12-21
Chapter 13
Running Contact Center Reports
About the Contact Center Reporter - - - - - - - - - - - - - - - - - 13-1
Running a report - - - - - - - - - - - - - - - - - - - - - - - - - - - - - - 13-3
Using the Contact Center Reporter toolbar in Excel - - - - - - - Shared and local reports - - - - - - - - - - - - - - - - - - - - - - - - - - Reporting on outbound Contact Center calls - - - - - - - - - - - - Backups of original reports - - - - - - - - - - - - - - - - - - - - - - - - Do not modify Contact Center report templates! - - - - - - - - - -
13-4
13-5
13-5
13-6
13-6
Setting Reporter options - - - - - - - - - - - - - - - - - - - - - - - - - 13-6
Setting general Reporter options - - - - - - - - - - - - - - - - - - - - - 13-6
Wave ViewPoint User Guide
Release 3.0
October 2012
1-9
Contents
Setting individual report options - - - - - - - - - - - - - - - - - - - - - - 13-8
Using Excel tabs to view report results - - - - - - - - - - - - - - - 13-9
Totals on the Data tab - - - - - - - - - - - - - - - - - - - - - - - - - - - - 13-9
Using the Report Options tab in Excel - - - - - - - - - - - - - - - - - 13-9
Printing and scheduling reports with the Report Runner - 13-10
Using the Report Runner - - - - - - - - - - - - - - - - - - - - - - - - - 13-11
Running the Report Runner without a command line statement - - 13-12
Available reports overview - - - - - - - - - - - - - - - - - - - - - - 13-13
Call Log report - - - - - - - - - - - - - - - - - - - - - - - - - - - - - - - 13-14
Filtering Call Log data by column - - - - - - - - - - - - - - - - - - - - 13-15
Call Transfer report - - - - - - - - - - - - - - - - - - - - - - - - - - - 13-16
Reading the Call Transfer report - - - - - - - - - - - - - - - - - - - - 13-16
Grouped Service Level report - - - - - - - - - - - - - - - - - - - - 13-17
Reading the Grouped Service Level report - - - - - - - - - - - - - 13-17
Outbound Call Comparison report - - - - - - - - - - - - - - - - - 13-18
Reading the Outbound Call Comparison report - - - - - - - - - - 13-18
Outbound Calls by Phone Number report - - - - - - - - - - - - 13-19
Reading the Outbound Call by Phone Number report - - - - - 13-19
Outbound Long Distance Summary report - - - - - - - - - - - 13-20
Before running the Outbound Long Distance Summary report 13-20
Reading the Outbound Long Distance Summary report - - - - 13-21
Unanswered Calls During Business Hours report - - - - - - 13-22
Reading the Unanswered Calls During Business Hours report 13-22
User Call Trends report - - - - - - - - - - - - - - - - - - - - - - - - 13-23
Reading this report - - - - - - - - - - - - - - - - - - - - - - - - - - - - - - 13-23
Chapter 14
Using the ViewPoint Mobile App
Appendix A
Using the Wave Archived Recording Browser
About the Wave Archived Recording Browser - - - - - - - - - - A-1
Running the Archived Recording Browser - - - - - - - - - - - - - A-2
Searching for recordings - - - - - - - - - - - - - - - - - - - - - - - - - A-3
Starting a new search - - - - - - - - - - - - - - - - - - - - - - - - - - - - - - A-3
Wave ViewPoint User Guide
Release 3.0
October 2012
1-10
Contents
Saving your current search - - - - - - - - - - - - - - - - - - - - - - - - - - A-9
Loading a saved search - - - - - - - - - - - - - - - - - - - - - - - - - - - - A-9
Managing individual recordings - - - - - - - - - - - - - - - - - - - Acting on archived call recordings - - - - - - - - - - - - - - - - - Checking the archive for missing audio files - - - - - - - - - - Purging archived recordings - - - - - - - - - - - - - - - - - - - - - -
Appendix B
A-10
A-11
A-13
A-14
Logging On with Command-Line Switches
About ViewPoint command-line switches - - - - - - - - - - - - - - B-1
ViewPoint command-line switch reference - - - - - - - - - - - - - B-1
Associating ViewPoint with a specific phone - - - - - - - - - - - - - - B-3
Appendix C
Reporting Problems
About the Problem Report Wizard - - - - - - - - - - - - - - - - - - - C-1
Reporting a problem that involves a specific call - - - - - - - - - C-2
Reporting a problem that does not involve a specific call - - - C-3
Appendix D
Troubleshooting ViewPoint Problems
Index
Wave ViewPoint User Guide
Release 3.0
October 2012
Chapter 1
Introducing Vertical Wave
CHAPTER CONTENTS
About Vertical Wave ViewPoint . . . . . . . . . . . . . . . . . . . . . . . . . . . . . . . . . . . . . . 1-1
Accessing Wave . . . . . . . . . . . . . . . . . . . . . . . . . . . . . . . . . . . . . . . . . . . . . . . . . 1-2
Feature comparison table . . . . . . . . . . . . . . . . . . . . . . . . . . . . . . . . . . . . . . . . . . 1-3
Getting technical support. . . . . . . . . . . . . . . . . . . . . . . . . . . . . . . . . . . . . . . . . . . 1-4
Wave documentation. . . . . . . . . . . . . . . . . . . . . . . . . . . . . . . . . . . . . . . . . . . . . . 1-4
About Vertical Wave ViewPoint
Vertical’s award-winning Wave ViewPoint integrates your phone and Windows PC to make
your phone a much more powerful tool, dramatically expanding the ways in which you can
place, receive, and manage your phone calls.
What’s new in this version
To learn about the new ViewPoint features in this version, in ViewPoint click Help > Contents
and Index, and then choose Release Notes > What’s new in this version from the Contents pane.
Installing ViewPoint
If you need to install or upgrade your version of ViewPoint, contact your Wave administrator,
or see Chapter 9 in the Wave Server Installation Guide.
Wave ViewPoint User Guide
Release 3.0
October 2012
Accessing Wave
1-2
Chapter 1: Introducing Vertical Wave
Accessing Wave
You can access Wave in any of the following ways. Each method is described below.
•
Wave ViewPoint
•
Wave TAPI Service Provider and Contact Manager Assistant
•
Your phone
Using ViewPoint
This manual describes how to use ViewPoint, Wave’s easy-to-use Windows interface. With
ViewPoint you can point and click to play voice messages and place calls, access contacts and
users, and more. To jump right into using Wave ViewPoint, skip to Chapter 2.
Using the Wave TAPI Service Provider and Contact Manager Assistant
If you make extensive use of contact management applications or customer relationship
management software that are TAPI-compatible, such as Microsoft Outlook, GoldMine,
GoldMine FrontOffice 2000, or Act!, you can install the Wave TAPI Service Provider and place
Wave calls to contacts directly from those applications. You do not need to have Wave
ViewPoint installed on your computer to use the TAPI Service Provider.
The TAPI Service Provider links your contact management applications to your Wave phone,
just as Wave ViewPoint is linked to your phone. After the TAPI Service Provider is installed,
you can use your contact manager application’s Place Call feature to call its contacts using your
Wave phone. Ask your Wave system administrator to install the Wave TAPI Service Provider,
and then follow the instructions in your contact manager application for placing calls.
You can also install the Wave Contact Manager Assistant (CMA) and receive screen-pops for
calls that show the name, the Caller ID, and the time of day of the call. You do not need to have
Wave ViewPoint installed on your computer to use the CMA.
Note: With Act!, you can receive screen-pops without installing the CMA.
For more information, see the Wave TAPI Service Provider Help and the Wave Contact
Manager Assistant Help.
Wave ViewPoint User Guide
Release 3.0
October 2012
Feature comparison table
1-3
Chapter 1: Introducing Vertical Wave
Using your phone
Voice prompts guide you to enter Wave phone commands via your phone’s keypad. Depending
on your phone type (SIP, digital, or analog), you can also use phone feature buttons or soft keys
to access Wave features. For more information, see the Wave Phone User Guide, or the Wave
Phone Quick Reference Guide specific to your phone type.
Feature comparison table
The following table shows the major features that are available in Wave, via ViewPoint, the
phone menu prompts, or the Contact Manager Assistant (CMA). If your Wave system does not
include some of these features, your Wave system administrator may have made them
unavailable to you.
Feature
ViewPoint
Phone
CMA
Managing voice messages
Yes
Yes
No
Placing, receiving, and handling calls
Yes
Yes
Some
Managing participants in conference calls
Yes
No
No
Managing contacts
Yes
No
Yes
Screen-pops for incoming calls
Yes
n/a
Yes
Managing Groups
Yes
No
No
Viewing the Extensions list
Yes
No
No
Viewing the Call Log
Yes
No
No
Recording greetings
Yes
Yes
No
Forwarding calls
Yes
Yes
No
Managing routing lists
Yes
No
No
Managing call rules
Yes
No
No
Wave ViewPoint User Guide
Release 3.0
October 2012
Getting technical support
1-4
Chapter 1: Introducing Vertical Wave
Feature
ViewPoint
Phone
CMA
Changing the active greeting
Yes
Yes
No
Changing the active routing list
Yes
No
No
Getting technical support
Contact your Wave system administrator for technical support. For information on how to report
problems, see Appendix C.
You can get help through Wave documentation as described in the next section.
Wave documentation
Related reading
The following documents are included with Vertical Wave in Acrobat format, and can be found
on the Vertical Wave Documentation CD.
For information about this version of Vertical Wave, including new features, known issues, and
other late-breaking information, see the Release Notes included on the Documentation CD.
Manuals
•
Wave Phone User Guide. Describes how to use digital phones, SIP phones, and analog
phones with Wave.
Quick Reference Guides
•
Wave Analog Phone Quick Reference Guide. Provides instructions for using analog
phones with Vertical Wave.
•
Wave Digital Phone Quick Reference Guide. Provides instructions for using Vertical
Edge digital phones.
Wave ViewPoint User Guide
Release 3.0
October 2012
Wave documentation
1-5
Chapter 1: Introducing Vertical Wave
•
Wave SIP Phone Quick Reference Guide. Provides instructions for using Vertical Wave
SIP phones.
•
Wave Voice Mail Quick Reference Guide. Provides instructions for using Vertical Wave
voicemail features.
Accessing Help
From any Wave dialog, you can press F1 or click Help to get context-sensitive Help describing
the window and its individual fields.
Wave ViewPoint User Guide
Release 3.0
October 2012
Release 3.0
October 2012
Chapter 2
Using ViewPoint
CHAPTER CONTENTS
About ViewPoint . . . . . . . . . . . . . . . . . . . . . . . . . . . . . . . . . . . . . . . . . . . . . . . . . 2-1
Logging on to ViewPoint . . . . . . . . . . . . . . . . . . . . . . . . . . . . . . . . . . . . . . . . . . . 2-7
Exiting ViewPoint. . . . . . . . . . . . . . . . . . . . . . . . . . . . . . . . . . . . . . . . . . . . . . . . 2-18
Elements of the ViewPoint window . . . . . . . . . . . . . . . . . . . . . . . . . . . . . . . . . . 2-19
Working in ViewPoint folders. . . . . . . . . . . . . . . . . . . . . . . . . . . . . . . . . . . . . . . 2-22
Organizing items in folders . . . . . . . . . . . . . . . . . . . . . . . . . . . . . . . . . . . . . . . . 2-31
Sharing folders . . . . . . . . . . . . . . . . . . . . . . . . . . . . . . . . . . . . . . . . . . . . . . . . . 2-35
Using the audio controls . . . . . . . . . . . . . . . . . . . . . . . . . . . . . . . . . . . . . . . . . . 2-36
Importing and exporting Wave items . . . . . . . . . . . . . . . . . . . . . . . . . . . . . . . . . 2-37
About ViewPoint
ViewPoint provides a central place to manage your calls, voicemail, contacts and Wave account
in an easy-to-use, graphical Windows interface. In ViewPoint you can quickly and easily drag
and drop to transfer or conference calls, point and click to hear voice messages or call people
back, set up call rules and “follow me” call forwarding to handle important callers, monitor
Contact Center queues, and more.
Another option for iOS devices (iPhone, iPad, and iPod Touch) is to use the ViewPoint Mobile
App to make and take calls and access some ViewPoint features. For details, see Chapter 14.
Even without ViewPoint, you can still access many Wave functions by using the phone
commands. For details, see the Wave Phone User Guide.
Wave ViewPoint User Guide
Release 3.0
October 2012
About ViewPoint
2-2
Chapter 2: Using ViewPoint
Installing ViewPoint
See your Wave system administrator about installing ViewPoint on your computer.
Important: Viewpoint may be installed directly onto the Wave Server for administrative
purposes only.
For more information about ViewPoint requirements, see Chapter 9 in the Wave Server
Installation Guide.
Performing automatic updates
When a new version of ViewPoint is available, you will see the following message when you
log on:
You have 2 options:
•
Click Start Now to start the auto-update. (By default, the Launch ViewPoint when
upgrade is complete checkbox is selected to start the new version of ViewPoint
automatically when the update is complete.) One of the following happens:
•
If you are logged on using a Windows administrator account. When the User
Access Control dialog opens, click Yes to continue.
Wave ViewPoint User Guide
Release 3.0
October 2012
About ViewPoint
2-3
Chapter 2: Using ViewPoint
•
•
If you are not logged on using a Windows administrator account. You are
prompted to grant the installer program administrative rights by entering the valid
user name and password of a Windows administrator account:
Click Remind Me Later if you are busy and do not want to be interrupted. If you choose
this option, the auto-update message will not be presented again for 24 hours.
Wave ViewPoint User Guide
Release 3.0
October 2012
About ViewPoint
2-4
Chapter 2: Using ViewPoint
Note: By default, the ViewPoint auto-update process is enabled for all ViewPoint users. You
can disable auto-update in ViewPoint by choosing Tools > Options and then de-selecting the
Disable auto-updates checkbox on the ViewPoint tab.
Wave ViewPoint User Guide
Release 3.0
October 2012
About ViewPoint
2-5
Chapter 2: Using ViewPoint
Using ViewPoint remotely
If your office’s network is set up so you can log on remotely via a Virtual Private Network
(VPN) connection, you can use ViewPoint from another location as if you were on the network
at your office. Contact your network administrator to see if you have VPN support and how to
start VPN from your remote computer.
Important: ViewPoint will not run without a network connection to your Wave Server. Be sure
you have an active VPN connection to your office before launching ViewPoint.
Using ViewPoint with a remote phone
A remote phone is any phone that is external to the Wave system, for example a cell phone,
home phone, or legacy PBX phone. You can use a remote phone with or without ViewPoint.
You specify a remote phone number when you log on to ViewPoint. See “Using ViewPoint with
a different phone, Wave Server, or language” on page 2-10.
When you use a remote phone with ViewPoint, you can use ViewPoint to manage your voice
messages and greetings, place outbound calls, answer calls displayed in the Call Monitor, and
so forth. Also, depending on how your Wave system administrator configured your account, you
may be able to use ViewPoint to visually manage calls that are forwarded to your remote
number or routed to your remote number as a result of an action in your routing list.
For more information, see “Using a remote phone” on page 6-17.
Wave ViewPoint User Guide
Release 3.0
October 2012
About ViewPoint
2-6
Chapter 2: Using ViewPoint
Using the ViewPoint Softphone
The ViewPoint Softphone is software included with ViewPoint that appears as a new Dial Pad
tab at the bottom of the Call Monitor.,
You can use the controls on this tab to switch between your headset vs. PC microphone and
speakers, adjust call volume, and so forth. You use the number keys on this tab to send DTMF
tones while you are on a call, for example in response to prompts from an IVR application. (The
number keys are disabled unless you are on a call.)
Important: In this version, you cannot place a call using the number keys on the ViewPoint
Softphone Dial Pad tab. Use any of the standard ViewPoint methods to place a call, as described
in “Placing calls using the ViewPoint Softphone” on page 6-16.
If you have been configured to do so by your Wave administrator, you can use the ViewPoint
Softphone in either of the following ways:
•
As your primary phone, if you do not have a physical phone. You can use the ViewPoint
Softphone as your primary phone from the local LAN or when you run ViewPoint while
logged in via VPN from a remote location.
•
As your secondary phone, when you are away from your physical phone, for example
when you are on the road.
You specify the ViewPoint Softphone when you log on to ViewPoint. See “Using ViewPoint
with a different phone, Wave Server, or language” on page 2-10.
Wave ViewPoint User Guide
Release 3.0
October 2012
Logging on to ViewPoint
2-7
Chapter 2: Using ViewPoint
You must have audio playback and capture devices (microphone, speakers, headset, or other
USB audio devices) on your PC or laptop in order to logon using the ViewPoint Softphone. The
default device settings work in most cases. To change the default settings, see “Configuring the
ViewPoint Softphone” on page 12-10.
For instructions on how to place, answer, and handle calls using the ViewPoint Softphone, see
“Using the ViewPoint Softphone” on page 6-14.
Logging on to ViewPoint
To use ViewPoint, you must log on using a valid Wave user account. Ask your Wave
administrator for the information you need to use to log on.
Note: Each running ViewPoint program requires a license. If you see a message stating that
you have exceeded your ViewPoint licenses, you cannot log on. See your Wave system
administrator for help if such a message appears.
To log on to ViewPoint
1.
Choose Start > Programs > Vertical Wave ViewPoint > Wave ViewPoint. The ViewPoint
Log On dialog opens.
2.
Enter your user name in the User Name field if it is not already displayed. If you do not
know your user name, ask your Wave system administrator.
3.
Enter your numeric password in the Password field. Use the same password that you use
to log into your Wave voicemail account using the phone.
4.
If you want to skip the process of logging on to the Wave ViewPoint in future sessions,
check Automatically log on as this user.
Wave ViewPoint User Guide
Release 3.0
October 2012
Logging on to ViewPoint
2-8
Chapter 2: Using ViewPoint
5.
If you check Automatically log on as this user, anyone at your computer can open your
ViewPoint program and listen to your voice messages, because ViewPoint will open
without requiring a password.
6.
If you need to change login options, for example to use ViewPoint at a different location
than your normal location, click Options >> to display additional settings. See “Using
ViewPoint with a different phone, Wave Server, or language” on page 2-10 for more
information about each option.
7.
Click OK to launch ViewPoint.
Wave ViewPoint User Guide
Release 3.0
October 2012
Logging on to ViewPoint
2-9
Chapter 2: Using ViewPoint
Disabling automatic logon
The automatic logon feature allows you to skip the process of logging on to ViewPoint in future
sessions. If you previously selected the Automatically log on as this user option and now want
to turn it off, do the following:
1.
In ViewPoint, choose Tools > Options. The Options dialog opens.
2.
On the ViewPoint tab, deselect the Log on automatically checkbox.
3.
Click OK.
Wave ViewPoint User Guide
Release 3.0
October 2012
Logging on to ViewPoint
2-10
Chapter 2: Using ViewPoint
Using ViewPoint with a different phone, Wave Server, or language
There may be times when you need to modify the options you normally use when you log on to
ViewPoint. To change logon options, click Options >> in the ViewPoint Logon dialog.
This section describes how to do the following:
•
Change the Wave phone associated with ViewPoint. ViewPoint works best in
conjunction with a phone. ViewPoint can be associated with only one phone at a time.
This phone will ring whenever you use a ViewPoint command that requires ringing your
phone, for example, playing a voice message over the phone, using the Place Call
command, or making a call recording. You can change the associated phone when you
want to use a different phone with ViewPoint (for example, your PC has been moved to a
different office, you are visiting at another company location, and so forth.)
Note: You can also change the associated phone after logging on by selecting File > Use
a different station.
•
Use the ViewPoint Softphone in as your primary or secondary phone. See “Using the
ViewPoint Softphone” on page 2-6 for an overview of the ViewPoint Softphone.
•
Use a phone that is external to the Wave system to log on to ViewPoint, for example if
you are using a remote phone or mobile extension.
•
Change the language used for the ViewPoint user interface.
•
Change the Wave Server that you connect to. ViewPoint connects to a specific Wave
Server server. If multiple Wave Servers are available on your network, you can change
the one to which ViewPoint is connected. You must also change the Wave Server name if
the network name of its computer has changed.
•
Use ViewPoint without an associated phone. Note that if you do so, ViewPoint
commands that require a phone (for example, managing calls or making call recordings)
will not be available to you.
Wave ViewPoint User Guide
Release 3.0
October 2012
Logging on to ViewPoint
2-11
Chapter 2: Using ViewPoint
To change ViewPoint login options
1.
Start ViewPoint as described in the previous section. If your system logs you on
automatically, you can change the options after ViewPoint starts by choosing File > Use a
different station. The expanded ViewPoint Log On dialog opens:
2.
In the Use this phone with ViewPoint section, specify the phone with which ViewPoint is
associated in one of the following ways:
•
Default station ID. Select this option to use one of the following as your ViewPoint
phone. (You can select this option for a Wave phone in the office or a mobile
extension.)
•
Default station ID of your physical phone. This is typically your own phone at
your own location.
•
Your primary softphone. If you do not have a physical phone, you can use the
ViewPoint Softphone to place and take calls, using your PC’s microphone and
speakers, headset, or other USB audio devices. See “Using the ViewPoint
Softphone” on page 2-6 for an overview of the ViewPoint Softphone.
Note: A physical phone or a primary softphone is configured for you by your Wave
administrator when you are added to the system.
Wave ViewPoint User Guide
Release 3.0
October 2012
Logging on to ViewPoint
2-12
Chapter 2: Using ViewPoint
•
Station ID. To log on to ViewPoint using a different Wave phone, for example if you
are a guest at another location or temporarily using a different office, select this
option and enter that phone’s station ID. To obtain a Wave phone’s station ID, pick
up the phone and press *00. (You can select this option for a Wave phone in the
office or a mobile extension.)
•
Remote number. Select this option to log on to ViewPoint using a phone that is
external to the Wave system, for example if your Wave system administrator has
configured you to use a mobile extension. Enter the phone number of that phone, for
example 6175551212. Click
to open the Check Remote Number dialog to view
or make corrections to the actual dial string that will be used based on the remote
number that you enter here (see “Specifying options for a remote number” on
page 2-13 for details).
•
Integrated Secondary Softphone. Select this option to log on to ViewPoint using the
ViewPoint Softphone as a secondary phone when you are away from your regular
physical phone. See “Using the ViewPoint Softphone” on page 2-6 for an overview
of the ViewPoint Softphone.
•
Forward my calls to softphone. Optionally, select this checkbox to
automatically forward your calls to your softphone. (Selecting this checkbox
at logon saves you the step of manually changing your default call forwarding
number after logging on.)
•
None. Select this option to use ViewPoint without an associated phone. ViewPoint
commands that require a phone (for example, managing calls or making call
recordings) will not be available to you.
3.
Select the Language for the ViewPoint user interface from the drop-down list. (For
another way to change the ViewPoint display language, see “Using ViewPoint in
languages other than English” on page 2-15.)
4.
In the Server field, enter the network name of the Wave Server that ViewPoint will
connect to when you log on. If you have more than one Wave Server on your network,
you can choose which one to connect to. Click Browse to browse the network and select
a Wave Server.
5.
Click OK.
Wave ViewPoint User Guide
Release 3.0
October 2012
Logging on to ViewPoint
2-13
Chapter 2: Using ViewPoint
Specifying options for a remote number
to open the
If you selected Remote number in the ViewPoint Login dialog, you can click
Check Remote Number dialog to specify how Wave will actually dial the remote number that
you entered.
The number as it will be dialed after dialing rules are applied is displayed in the middle of the
dialog. This displayed dial string may be modified as you make changes as described below.
1.
In the Call Using section, select one of the following options:
•
Default Phone number access code. Select this option to dial this number using the
Default Phone number access code set up by your Wave system administrator.
•
This access code. Select this option to use a different access code. Ask your Wave
system administrator if other access codes are available for your use.
2.
Select the correct Country/Region from the drop-down list.
3.
Verify that the remote Number you entered via the ViewPoint Logon dialog is correct.
4.
If the Use country code and area code dialing rules checkbox is selected, Wave applies
the country code and area code dialing rules set up by your Wave system administrator.
For example, the area code will not be included for a local call. If this checkbox is not
selected, Wave dials the Number exactly as you entered it.
5.
Click OK.
Wave ViewPoint User Guide
Release 3.0
October 2012
Logging on to ViewPoint
2-14
Chapter 2: Using ViewPoint
Using ViewPoint with another station ID
Most Wave users have a default station ID, which represents the phone your Wave system
administrator assigned to you (if you roam between phones your station ID may be 0). When
you log on to ViewPoint specifying an associated phone other than your default station, the
Select Your ViewPoint Phone dialog opens, enabling you to clarify which phone you want to
use with ViewPoint.
To use ViewPoint with another station
1.
In the Select Your ViewPoint Phone dialog, choose one of the following options:
•
Use station n as a visitor. This option appears only if you specified another user’s
station as your associated phone—for example, you are logging on at another user’s
desk. The phone remains set for its normal user, but ViewPoint is set for you. Calls
you place and receive using the phone use the normal user’s account (for example,
the dialing permissions) and appear in the normal user’s Call Log.
Example: However, calls you place and receive using ViewPoint commands use
your account. Choose this option if you do not intend to use the phone extensively
during this ViewPoint session.
•
Use <this phone > to place and answer calls... . The phone (station or remote
number) is set for you. Calls you place and receive using the phone use your
account settings. Choose this option if you will be using the phone as your own
during this ViewPoint session.
Example: If you choose this option, you can also select Forward my calls to this
station / number to receive calls to your own extension here. For more information
about call forwarding, see “Forwarding calls” on page 9-2.
Wave ViewPoint User Guide
Release 3.0
October 2012
Logging on to ViewPoint
2-15
Chapter 2: Using ViewPoint
•
Use my default station. Your default station remains ViewPoint’s associated phone.
Whenever you use a ViewPoint command that requires the phone—for example, to
play a voice message—ViewPoint uses your default station. Choose this option only
if your default station is nearby.
•
I am not near a Wave phone. You log on with station ID 0, meaning that ViewPoint
is not associated with a phone. ViewPoint commands that require a phone—for
example, placing a call—are unavailable.
Note: When you run ViewPoint without an associated phone, the Call Monitor
folder title bar displays “No associated phone” as a reminder.
2.
Click OK. ViewPoint opens with the phone selection you made.
Using ViewPoint in languages other than English
You can display the ViewPoint interface in various languages. ViewPoint will automatically
adjust to the proper language when your Windows language (as set in the Windows Control
Panel) matches one of the supported languages.
Wave ViewPoint User Guide
Release 3.0
October 2012
Logging on to ViewPoint
2-16
Chapter 2: Using ViewPoint
To change the ViewPoint display language
1.
In ViewPoint, choose Tools > Options. The Options dialog opens.
2.
Click the ViewPoint tab.
3.
Choose the Language for the ViewPoint user interface from the drop-down list.
4.
Click OK. Your change takes effect the next time that you start ViewPoint.
You can also specify the language to use when you log on to ViewPoint. See “Using ViewPoint
with a different phone, Wave Server, or language” on page 2-10.
Wave ViewPoint User Guide
Release 3.0
October 2012
Logging on to ViewPoint
2-17
Chapter 2: Using ViewPoint
Changing your station, Wave Server name, or user name after logging on
You can log on as a different user, or with a different associated phone, without exiting and
restarting the ViewPoint program. This feature makes it easy to log on to another user’s account
from your ViewPoint, or to switch ViewPoint’s associated phone. (To log on to another user’s
account, you must know the other user’s password.)
To log on as a different user, choose File > Log on as a different user. The Wave ViewPoint Log
On dialog opens. See “Logging on to ViewPoint” on page 2-7.
To change ViewPoint’s associated phone, choose File > Use a different station. The Wave
ViewPoint Log On dialog opens with your name and password already entered and the Options
showing.
Changing your password
To change your password via ViewPoint
1.
Choose Tools > Options. The Options dialog opens.
2.
Click Change Password. (The Change Password button is located at the bottom of each
tab in the Options dialog.) The Change Password dialog opens.
Wave ViewPoint User Guide
Release 3.0
October 2012
Exiting ViewPoint
2-18
Chapter 2: Using ViewPoint
3.
4.
Use the following fields to change your password:
•
Old password. Enter your current password.
•
New password. Enter your new password.
•
Verify new password. Enter your new password to confirm it.
Click OK to close the Change Password dialog, and then click OK to close the Options
dialog.
Logging on with command-line switches
You can add switches to the Windows shortcut command line that starts ViewPoint. The
command line switches enable you to run multiple copies of ViewPoint at once connected to
different phones or Wave servers, log on using a particular station, and perform other tasks. See
Appendix B for more information.
Exiting ViewPoint
To exit ViewPoint, choose File > Exit.
Wave ViewPoint User Guide
Release 3.0
October 2012
Elements of the ViewPoint window
2-19
Chapter 2: Using ViewPoint
Elements of the ViewPoint window
The following graphic shows a typical window in ViewPoint, in this case the Inbox that contains
your voice messages.
The ViewPoint window contains the following elements:
•
The menu bar
•
The toolbar
•
The navigation pane
•
The status bar
•
The ViewPoint folder that is currently displayed (see “Working in ViewPoint folders” on
page 2-22)
The Menu Bar
The menu bar, at the top of ViewPoint, provides access to Wave commands. Click each menu
to see the commands that menu contains. Menu commands are referenced in this manual in the
format File > New > Contact. You can drag the menu bar from its left edge to detach it.
Wave ViewPoint User Guide
Release 3.0
October 2012
Elements of the ViewPoint window
2-20
Chapter 2: Using ViewPoint
The Toolbar
The toolbar, directly under the menu bar in each folder, provides single-click access to
frequently used Wave commands. Toolbar buttons can change depending on which folder
you’re in. The following illustration shows the toolbar for the Messages folder.
In any folder, clicking the left-most toolbar button creates a new item for that folder. For
example, in the Call Monitor, clicking the left-most button lets you place a new call:
You can also click the small arrow to the right of that button for a menu that lets you create any
new ViewPoint item. The arrow is available in every folder.
The Navigation Pane
Use the navigation pane, on the left side of the ViewPoint window, to switch between
ViewPoint’s folders. Click a folder icon in the navigation pane to open that folder in the
ViewPoint main window.
Wave ViewPoint User Guide
Release 3.0
October 2012
Elements of the ViewPoint window
2-21
Chapter 2: Using ViewPoint
Each folder in the navigation pane gives you access to other related folders, as follows:
•
Messages. Displays the Inbox folder. Folders: All other Messages folders, including
local folders and any folders that other users have shared with you.Call Monitor. Displays
the Call Monitor. Folders: Extensions and (if you are an agent in Contact Center queue)
Queue Monitor.
•
Contacts. Displays the Contacts folder. Folders: The Public\Contacts folder.
•
Call Log. Displays the Call Log.
•
Configuration. Displays the Greetings folder. Folders: Greetings, Personal Statuses,
Routing Lists, Groups, Public\Groups.
Customizing the Navigation Pane
To add or remove buttons from the navigation pane, click the small arrow icon in the lower right
corner of the pane, then choose Add or Remove Buttons from the menu that appears. Check or
uncheck button options on the submenu to include or hide them in the pane.
The Status Bar
The status bar is located at the bottom of ViewPoint window.
The status bar gives you quick access to the following information:
•
Last caller. Lists the name (if available) and Caller ID of your last incoming call. You can
press F11 to place a call to that number.
•
•
Number of items. Number of items in the current folder. For example, if you have 18
contacts, the Contacts folder status bar displays “18 Items.” In any Messages folder, the
status bar also indicates the number of Unheard messages.
Name and extension. The name and extension of the user logged on to ViewPoint on this
computer.
Note: If you are a Contact Center agent, clicking this spot on the status bar displays a
dropdown list so you can specify if you are making personal or queue calls.
Wave ViewPoint User Guide
Release 3.0
October 2012
Working in ViewPoint folders
•
2-22
Chapter 2: Using ViewPoint
Phone. If you see a Phone pane showing the name of another user, it indicates that user is
logged in to your station. While that user is logged in, calls you place using the phone
will be subject to that user’s dialing restrictions, and logged as coming from that user. To
restore the station to yourself, pick up the phone and dial *00.
•
Personal Status. The current personal status of the user logged on to ViewPoint. Click the
personal status button to choose a different personal status. See Chapter 3 for information
on personal statuses.
•
Audio output. You can click these buttons to switch ViewPoint's audio output between
your computer speakers and your phone. Audio output includes playing your voice
messages. Click the arrow to the right of the button to switch your audio output. If you do
not have a sound device, the speaker option may be disabled.
•
Call forwarding. If the FWD button is bold and has a phone icon to the left, it means you
are currently forwarding your calls. Hover your mouse over the button to display the
forwarding number. You can also click the arrow to quickly select one of your personal
numbers (which you can set via Tools > Options > My Numbers) as the forwarding
number. Double-click the button to open the Call Forwarding dialog, in which you can
change or turn off call forwarding. See “Forwarding calls” on page 9-2.
Working in ViewPoint folders
Wave ViewPoint contains several folders, which appear in the main part of ViewPoint window
and give you access to specific Wave functions.
Note: Some folders may not be available to you. Your Wave system administrator controls
which folders your ViewPoint program displays.
To open a folder, do one of the following:
•
Click its icon in the Navigation pane. See “The Navigation Pane” on page 2-20
•
Choose View > Go To, then select the folder to display.
Wave ViewPoint User Guide
Release 3.0
October 2012
Working in ViewPoint folders
2-23
Chapter 2: Using ViewPoint
For an overview of each folder, see the following table.
Navigation
Pane
Folder
Description
Messages
Hear and manage your voice messages. To call back a
message, right-click it and choose Place Call.
Selecting the Messages folder gives you access to your
Inbox, Saved, and Deleted folders.
Call Monitor
Place calls and handle incoming calls (transfer calls, create
conference calls, monitor a voice message as it is being left,
record a call).
Selecting the Call Monitor folder also gives you access to
the Extensions folder, your Contacts folders, and (if you are
a member of one or more Contact Center queues) the
Queue Monitor.
Call Monitor \ Extensions
View all Wave extensions, their personal statuses, and who
is on the phone now.
Call Monitor \ Queue Monitor
Contact Center agents only. View and manage agents, and
view real-time queue statistics.
Contacts
Manage an online phone book of your own phone contacts.
Selecting the Contacts folder also gives you access to the
Public\Contacts folder (public contacts are available to all
Wave users).
Call Log
View a record of all your incoming or outgoing phone calls.
To return a call, right-click it and choose Place Call.
Wave ViewPoint User Guide
Release 3.0
October 2012
Working in ViewPoint folders
Navigation
Pane
2-24
Chapter 2: Using ViewPoint
Folder
Description
Configuration
Selecting the Configuration folder gives you access to the
Greetings, Personal Statuses, Routing Lists, Groups, and
Public\Groups folders.
Configuration \ Greetings
Record your voice-mail greetings and change the active
greeting.
Configuration \ Personal Statuses
Manage personal statuses that communicate your location
and availability to your coworkers and control how your
incoming calls are handled.
Configuration \ Routing Lists
Set up “follow me” call forwarding (calls ring a series of
numbers to find you), and direct calls to Groups or other
extensions.
Configuration \ Groups
Define Groups of users and contacts. You can then send
voice messages to the Group, and more. (Only you can see
the personal Groups that you create—they do not appear in
other users’ ViewPoints.)
Configuration \ Public\Groups
Send voice messages to the members of a public Group
and more. (Public Groups, which are accessible to all Wave
users who have permission to see them, can only be
created by your Wave system administrator or a ViewPoint
user with permission to do so.)
Wave ViewPoint User Guide
Release 3.0
October 2012
Working in ViewPoint folders
2-25
Chapter 2: Using ViewPoint
Working with multiple Viewpoint folders at the same time
You can have several folders open at once by opening each folder in its own window. To open
a folder in its own window, right-click a folder in the Folders list and choose Open in New
Window on the shortcut menu.
Wave ViewPoint User Guide
Release 3.0
October 2012
Working in ViewPoint folders
2-26
Chapter 2: Using ViewPoint
Adjusting the Phonebook Pane layout in the Call Monitor
The Phonebook pane—shown by default in the Call Monitor—includes the Extensions list and
the Contacts folder. You can perform drag-and-drop call handling operations between the pane
and the Call Monitor. See “Dragging and dropping items” on page 2-28. With the Extensions
list, you can see whether a user is on the phone before placing a call to that user.
With the Phonebook pane open, click the appropriate tab to display the Extensions list or
Contacts folder.
To move the Phonebook Pane within the Call Monitor folder, choose View > PhoneBook Pane,
and then select a location from the sub-menu.
To remove the Phonebook Pane from the Call Monitor folder, choose View > Phonebook
Pane > Off.
Wave ViewPoint User Guide
Release 3.0
October 2012
Working in ViewPoint folders
2-27
Chapter 2: Using ViewPoint
Deleting voice messages and other items
To delete a voice message from your Inbox, select it and then press Delete. The voice message
moves to your Deleted folder. It will be permanently deleted from the Deleted folder according
to the settings defined in Tools > Options.
To permanently delete a voice message from your Inbox
1.
Select the voice message. To select more than one voice message, press Ctrl and
then select them.
2.
Press Shift+Delete. A confirmation dialog opens.
3.
Do one of the following:
•
Click Yes if you want the selected voice message to be permanently removed from
your computer.
•
Click No to keep the voice message in your Inbox.
To delete other items
1.
In the folder in which the item appears, select the item. To select more than one item,
press Ctrl and click each item that you want to delete.
2.
Right-click the selected item and choose Delete on the shortcut menu. A confirmation
dialog opens.
3.
When you delete an item that is not a voice message, such as a greeting, the item is
permanently and irretrievably removed from your computer. You cannot recover it after
you delete it.
4.
Click OK to permanently delete the item.
Copying and pasting items
Copying a row in any folder places a copy of the item in that row on the clipboard as text. This
information can be pasted into other applications, such as a text program.
Choose Edit > Copy to place a copy of selected items on your clipboard. Choose Edit > Paste to
paste the items. Use this method to paste Call Log entries and voice message information into
the Problem Report Wizard (See “About the Problem Report Wizard” on page C-1.).
Wave ViewPoint User Guide
Release 3.0
October 2012
Working in ViewPoint folders
2-28
Chapter 2: Using ViewPoint
Dragging and dropping items
You can drag and drop one item onto another item to perform actions such as making a call,
transferring a call, and adding a call to a conference. You can also move an item to a folder.
For example, if you drag an active call in your Call Monitor onto a user in the Extensions tab of
the Phonebook pane, the call transfers to that user. Conversely, you can drag a user from the
Phonebook pane to the Call Monitor to call that user.
The following table lists the drag-and-drop actions you can perform within Wave ViewPoint.
The From column shows the items you can click and drag. The To column shows the destination
items. The remaining columns show the actions that result when you drag and drop an item or
use the Shift and Ctrl keys in conjunction with dragging and dropping.
Note: Whenever you can drag an item to the Call Monitor to place a call, you can also drag it
to the Dial toolbar field.
DRAG AND DROP ITEMS
From
Call
To
Drag
SHIFT + Drag
CTRL + Drag
Call
No action
Opens the
Conference
dialog
Conferences
the calls
together
Extension,
Contact, Call
Log, Voice
Message
Performs a
blind transfer
Opens the
Transfer
dialog
Performs a
consultation
transfer
Note: Alt + Drag of a call to an extension transfers
the call directly to that extension’s voicemail.
Call Log
Call
Conferences
the Call Log
party with the
call
Opens the
Conference
dialog
Empty Call
Monitor
Places a call to
the Call Log
party
Opens the
Place Call To
dialog
Wave ViewPoint User Guide
Release 3.0
October 2012
Working in ViewPoint folders
2-29
Chapter 2: Using ViewPoint
DRAG AND DROP ITEMS (continued)
From
Contact
Folder
To
Drag
SHIFT + Drag
Call
Conferences
the contact’s
default
number with
the call
Opens the
Conference
dialog
Empty Call
Monitor
Places a call to
the default
phone number
Opens the
Place Call To
dialog
Folder
Moves the
contact to the
folder
Opens the
Move Item
dialog
Folder
Moves the
folder to
another folder
Opens the
Move Folder
dialog
Contact
Moves the
folder to the
Contacts
folder
Opens the
Move Folder
dialog
Voice Message
Moves the
folder to the
Messages
folder
Opens the
Move Folder
dialog
CTRL + Drag
Copies the
folder
Wave ViewPoint User Guide
Release 3.0
October 2012
Working in ViewPoint folders
2-30
Chapter 2: Using ViewPoint
DRAG AND DROP ITEMS (continued)
From
Voice Message
Extension
Text
(for example, a
phone number
you copied
from a web
page)
To
Drag
SHIFT + Drag
Call
Conferences
the message
sender with
the call
Opens the
Conference
dialog
Empty Call
Monitor
Places a call to
the message
Caller ID
Opens the
Place Call To
dialog
Folder
Moves the
message to
the folder
Opens the
Move Item
dialog ox
Call
Conferences
the call
Opens the
Conference
dialog
Empty Call
Monitor
Places the call
Opens the
Place Call To
dialog
Call Monitor
Places a call to
the number
that was
dropped
Opens the
Place Call To
dialog
CTRL + Drag
Copies the
message
Wave ViewPoint User Guide
Release 3.0
October 2012
Organizing items in folders
2-31
Chapter 2: Using ViewPoint
Printing items in folders
To print the contents of a folder, choose File > Print. When you print a folder that contains
several columns, you may need to change the orientation of the page to “landscape” so that all
columns that appear in the folder are printed.
Organizing items in folders
The Messages folder contains one folder already created, the Saved folder. When you listen to
a voice message on the phone and save it, the message is moved into the Saved folder.
Public folders
Most items you create or see in ViewPoint are stored in private folders so they are not shown
when a different user logs into ViewPoint. However, ViewPoint also supports public Contacts
and Groups folders that contain items that can seen by all ViewPoint users and edited by those
with the proper permission. See “Viewing public folders” on page 2-33.
Customizing columns
You can choose to show or hide columns in a folder. You can also customize columns in a folder
by moving, resizing, and resorting them. The changes you make to columns in a folder are saved
when you exit ViewPoint.
Showing, hiding, and reordering columns
For each folder in ViewPoint, you can choose the columns that you want to see in the folder.
Note that by default, some folders do not show all of the available columns.
Wave ViewPoint User Guide
Release 3.0
October 2012
Organizing items in folders
2-32
Chapter 2: Using ViewPoint
To show, hide, or reorder columns in a ViewPoint folder
1.
Choose View > Show Columns (or right-click the column header). The Show Columns
dialog opens.
2.
Do any of the following:
3.
•
To move columns into or out of the folder, select them and click Add or Remove.
You can also drag and drop.
•
To reorder the columns in the folder, select the column in the Show these columns
list, and click the Up and Down arrows to move the column up or down in the list.
Click OK to save your changes.
Note: You can also reorder columns from within the folder by dragging the column headers.
Dragging a column off the screen until an X displays removes that column.
Moving columns
To move a column, do either of the following:
•
In the folder, click the column header and then drag and drop it to a new location.
•
Use the Show Columns dialog to reorder the columns in a folder, as described above.
Resizing columns
To change a column’s width, in the folder click and drag the right-hand side of the column
header.
Wave ViewPoint User Guide
Release 3.0
October 2012
Organizing items in folders
2-33
Chapter 2: Using ViewPoint
Sorting the contents of a column
Click a column header to sort the items in a folder by the information in that column. Click the
column header again to sort in the reverse order.
The column in the folder that contains an arrow in its header is the column by which the display
is currently sorted. The direction of the arrow indicates the sort order.
Viewing public folders
Public folders contain items that all Wave users can view and use. For example, any user can
view a public contact’s information or place a call to that contact.
Example: Your company defines its departments as public Groups. All users in the company
can view the members of those Groups.
Note: Items in public folders are not generally available for editing or deleting. You must have
special permission to edit a public item.
Managing the Deleted folder
The Deleted folder contains voice messages that you have deleted from the Voice Mail folder.
Items in the Deleted folder continue to be stored in the limited space that has been allocated to
you for your voice files. To regain space for more voice messages or other voice files, empty
your Deleted folder.
To view the contents of the Deleted folder, click it in the Folder List.
Wave ViewPoint User Guide
Release 3.0
October 2012
Organizing items in folders
2-34
Chapter 2: Using ViewPoint
Emptying the Deleted folder
You can delete an item from the Deleted folder just as you would from any folder. When items
are deleted from the Deleted folder, they are deleted permanently.
To empty the Deleted folder, choose Tools > Empty Deleted Folder.
To empty the Deleted folder automatically
1.
Choose Tools > Options. The Options dialog opens.
2.
Click the Voice Messages \ Usage tab.
Wave ViewPoint User Guide
Release 3.0
October 2012
Sharing folders
2-35
Chapter 2: Using ViewPoint
3.
Choose one of the following options:
•
Remove all items when exiting. Deletes all messages in the Deleted folder
automatically each time you exit ViewPoint.
•
Periodically remove old items. Select this checkbox to remove old items
automatically from the Deleted folder.
•
Age: ___ days. Enter the number of days an item will remain in the Deleted
folder before Wave automatically deletes it.
4.
Click Remove All Items Now to immediately delete all messages in your Deleted folder
when you click OK to close the Options dialog.
5.
Click OK.
Sharing folders
Your Wave system administrator can share other users' folders with you, for example a voice
message Inbox shared by all members of a project team. Shared folders appear in your
ViewPoint navigation pane, and you can view the folder contents and optionally (depending on
your access permission level as assigned by your administrator) edit items in the folder. For
example, if another user's Inbox is shared to you and you have full access permission, you can
listen to voice messages in that folder, reply to a message, delete it, and so forth.
The following folders can be shared:
•
Call Log. When shared, you can access the other user's call history.
•
Message. When shared, you can access the contents of the other user's Inbox, Shared,
and/or Deleted folders. Note the following:
•
Voice messages marked Private do not appear in a shared folder.
•
If you have full access permission to another user’s shared Message folder, you can
delete voice messages from that folder. If that other user has also shared his or her
Deleted folder, the deleted message is moved to that Deleted folder. If that other
user has not shared his or her Deleted folder, the deleted message is permanently
removed.
•
Call Monitor. When shared, you can access the other user's current call activity. Note
that Contact Center queue calls are not displayed in a shared Call Monitor. See
“Sharing your Call Monitor folder” on page 5-19 for more information.
•
Contacts. When shared, you can access and use the other user's contacts.
Wave ViewPoint User Guide
Release 3.0
October 2012
Using the audio controls
2-36
Chapter 2: Using ViewPoint
Using the audio controls
Wave’s audio controls make it easy to create recordings and listen to recordings and voice
messages. These audio controls appear throughout ViewPoint.
Creating recordings and playing voice messages
You create recordings by speaking into your phone.
Recor
d
When you are ready to record, pick up your phone, and
then click the button. A beep signals that recording has
begun.
Stop
When you are finished recording, you can either hang up
or click the button.
Play
Click the button to listen to the recording or voice
message. Click it again to pause playback.
To move forward and backward within the recording or voice message,
drag the slider bar:
You can play audio either over your computer speakers or your phone. Choose Tools > Audio
Output to switch audio output from one to the other. You can also use the button in the status
bar. When playing audio over the phone, if your phone is on hook, it will ring to connect you to
the audio being played.
Note: When sending audio to your phone, ViewPoint displays a message identifying the
station ID being rung.
Wave ViewPoint User Guide
Release 3.0
October 2012
Importing and exporting Wave items
2-37
Chapter 2: Using ViewPoint
Using voice message bookmarks
You can set bookmarks in voice messages by dragging the arrows that appear under the slider
bar. When you play a message you have bookmarked, only the portion of the file between the
bookmarks plays. This capability can be useful when you want to mark the location of an
important phone number in a voice message.
Importing and exporting voice files
To import or export a voice file, use the buttons on the recording control.
Import
You can import a voice file in WAV format to use for any
ViewPoint recording (greetings, voice titles, and so on).
Wave can import WAV files with a frequency of 8Khz,
11.025 Khz, 22.05 Khz, or 44.1 Khz.
Export
You can export any of your ViewPoint recordings, including
voice messages and recorded conversations, to a WAV or
MP3 file on your hard disk.
Importing and exporting Wave items
See the following topics for more about importing and exporting Wave items:
•
Contacts. See “Importing and exporting contacts” on page 2-38.
•
ViewPoint recordings (voice messages and call recordings). See page “Exporting
ViewPoint recordings” on page 2-41.
•
Archived call recordings. See “Acting on archived call recordings” on page A-11.
Wave ViewPoint User Guide
Release 3.0
October 2012
Importing and exporting Wave items
2-38
Chapter 2: Using ViewPoint
Importing and exporting contacts
You can import contacts into Wave:
•
From a CSV file generated via Wave
•
From a CSV file generated from another contact manager such as Microsoft Outlook
You can export contacts from Wave to a CSV file that you can import into another Wave
ViewPoint, Outlook, GoldMine, FrontOffice 2000, Act!, or other contact management software.
To import contacts from a CSV file
1.
Choose File > Import and Export. The Import and Export Wizard opens.
2.
Select Import Contacts, and then click Next.
Wave ViewPoint User Guide
Release 3.0
October 2012
Importing and exporting Wave items
2-39
Chapter 2: Using ViewPoint
3.
In File to Import, click Browse and select the CSV file that you want to import.
4.
In Destination folder, select the Wave Contact folder into which you want to import the
contacts in the CSV file.
5.
Under Options, select one of the following:
•
Replace duplicates with items imported. If Wave finds a duplicate contact in the
CSV file, the contact from the file will replace the existing Wave contact.
•
Allow duplicates to be created. If Wave finds a duplicate contact in the CSV file, it
will import all contacts, even those that are duplicates of Wave contacts.
•
Do not import duplicate items. If Wave finds duplicate contacts in the CSV file, it
will not import them.
6.
Select Use phone numbers as caller identification for these contacts to add the imported
contacts’ phone numbers to Wave’s list of Caller ID numbers so that contacts can be
identified when they call. For more information, see “Teaching Wave to recognize your
contacts” on page 10-8.
7.
If you are importing a CSV file that was created by Wave or Outlook, go to step 10.
8.
If you are importing contacts from another application and have not previously mapped
the fields, click Map Custom Fields. The Map Custom Fields dialog opens using the
default map, showing the first contact record to be imported, and how the existing fields
will be mapped to Wave fields.
Wave ViewPoint User Guide
Release 3.0
October 2012
9.
If you have saved a different map and want to use it, click Load Map and select it.
Otherwise, map the fields manually as follows:
•
Check First record contains field names at the bottom of the dialog if the CSV file’s
first record consists of the names of fields. Then drag fields or values from the left
pane (the CSV file) to the fields in the right pane (Wave contacts) in which you
want the values to appear. Drag unwanted field mapping from the right pane to the
left pane to clear them.
•
Click Previous or Next to view other records in the CSV file to see how they
will map.
•
Click Clear Map to remove all mapping from the right pane.
•
Click Default Map to restore the default mapping.
•
Click Save Map to save the current mapping to a new file (this can be useful if you
regularly import contacts from several different sources). If you do not click Save
Map, the default map is saved when you click OK.
When you are finished mapping fields, click OK. Any changes to the default or custom
map are saved for future importing.
10. Click Next in the Import and Export Wizard, and then click Finish. The contacts in the
CSV file are imported.
Note: When text is imported from a CSV file, a comma in the text breaks the text between
fields unless the text is within quotation marks.
To export contacts to a CSV file
1.
Release 3.0
Choose File > Import and Export. The Import and Export Wizard opens.
October 2012
Importing and exporting Wave items
2-41
Chapter 2: Using ViewPoint
2.
Under Choose an action to perform, select Export Contacts, and then click Next.
3.
In Save exported file as, browse to the folder in which you want to save the CSV file.
4.
In Source folder, choose the Contacts file that you want to export, and then click Next.
5.
Click Finish. The CSV file is exported.
Exporting ViewPoint recordings
You can export voice messages and call recordings in WAV or MP3 format.
1.
In the ViewPoint Messages folder, select the voice message or call recording.
2.
Click the Export audio button.
3.
Specify the target location.
4.
Select WAV or MP3 from the Save as type drop-down list.
5.
Click Save.
Note: If a call recording has already been archived, you must use the Archived Recording
Browser to export it. See Appendix A.
Wave ViewPoint User Guide
Release 3.0
October 2012
Release 3.0
October 2012
Chapter 3
Using Personal Statuses
CHAPTER CONTENTS
About personal statuses. . . . . . . . . . . . . . . . . . . . . . . . . . . . . . . . . . . . . . . . . . . . . . . . . 3-1
Selecting a personal status . . . . . . . . . . . . . . . . . . . . . . . . . . . . . . . . . . . . . . . . . . . . . . 3-7
Modifying a personal status . . . . . . . . . . . . . . . . . . . . . . . . . . . . . . . . . . . . . . . . . . . . . . 3-8
Using personal status defaults . . . . . . . . . . . . . . . . . . . . . . . . . . . . . . . . . . . . . . . . . . . 3-10
Changing the personal status of another user . . . . . . . . . . . . . . . . . . . . . . . . . . . . . . . 3-11
About personal statuses
Your personal status appears with your name in other ViewPoint users’ Extensions lists, letting
your colleagues know where you are and what you are doing. For example, setting your personal
status to On Vacation alerts other users not to call you on a critical issue.
Also, you can also use personal status as a quick way to change your call handling. For example,
the Do Not Disturb status sends your incoming calls directly to voicemail without ringing your
phone.
Note: To change your own or another person’s personal status, you must have permission to
do so. If you cannot change your own or another user’s personal status according to the
instructions in this chapter, see your Wave system administrator.
Wave ViewPoint User Guide
Release 3.0
October 2012
About personal statuses
3-2
Chapter 3: Using Personal Statuses
To view the available personal statuses, click Configuration in the navigation bar, and then click
Personal Statuses:
Double-click a personal status to view its properties.
Wave ViewPoint User Guide
Release 3.0
October 2012
About personal statuses
3-3
Chapter 3: Using Personal Statuses
A personal status consists of the following:
•
A personal status icon and a name, such as Available. These appear next to your name in
the Extensions list, so that other Wave users can see at a glance whether you are in the
office and available or not. Likewise, by looking at the Extensions list you can see the
personal status of other users.
•
A collection of preferences that determines how your incoming calls are handled. Each
personal status consists of the following call handling preferences:
•
Where I Am. Identifies the phone to which your incoming calls will be sent when the
personal status is active. The default Where I Am location is your phone, or your
forwarding number if your calls are forwarded.
•
Taking calls. Specifies whether calls ring through to your phone or not when the
personal status is active.
•
Queue calls. For Contact Center agents only, specifies whether queue calls are sent
to your phone when the personal status is active. For more about using personal
statuses as a Contact Center agent, see Chapter 5 in the Wave Contact Center
Administrator Guide.
•
Routing List. Specifies the routing list that Wave uses to process calls when the
personal status is active.
•
Greeting. Specifies the recording that Wave plays to callers when they reach your
voicemail (or any other final action of your routing list) when the personal status is
active.
Depending on the personal status, you can modify some of these preferences. See
“Modifying a personal status” on page 3-8.
Wave ViewPoint User Guide
Release 3.0
October 2012
About personal statuses
3-4
Chapter 3: Using Personal Statuses
Available personal statuses
Five personal statuses are available to all users. Three additional personal statuses are available
only to Contact Center agents.
Personal statuses (for all users)
The following five personal statuses are available for all users.
Icon
Status
Available
Description
Lets people know that you are available to take calls. All calls
ring through to you according to your current call forwarding,
routing list, and other settings.
If you are an agent in a Contact Center queue, you can use this
status to make yourself available for both queue and non-queue
calls. For additional Contact Center agent personal statuses,
see the next table.
Do Not
Disturb
Lets people know that you are not taking calls. No calls ring
your phone. Calls are sent straight to the “unanswered” final
action of your routing list (usually your voicemail).
Note: You can create a call rule that overrides the Do Not
Disturb personal status by allowing calls from specific people to
ring your phone. See Chapter 11.
In a Meeting
Out of the
Office
These three personal statuses let people know where you are
when you are away from your desk. Like Do Not Disturb, these
personal statuses send your calls directly to the “unanswered”
final action of your routing list (usually your voicemail) without
ringing your phone. You can change that default behavior with
these statuses.
On Vacation
Wave ViewPoint User Guide
Release 3.0
October 2012
About personal statuses
3-5
Chapter 3: Using Personal Statuses
Personal statuses (for Contact Center queue agents)
In addition to the personal statuses described above, the personal statuses shown in the
following table are available if you are an agent in one or more Contact Center queues. For
information about working as an agent in a Contact Center queue, see the Wave Contact Center
Administrator Guide.
Icon
Status
Description
Available
(Queue Only)
This status or the Available status makes you available to take
calls. When you select this status, the queue begins sending
calls to you.
With this status, only queue calls ring your phone.
Non-queue calls are sent directly to your voicemail. To have all
your calls ring your phone, make yourself available by
selecting the Available status (see the previous table).
You can also select this status by picking up the phone and
pressing *51.
Wave ViewPoint User Guide
Release 3.0
October 2012
About personal statuses
Icon
3-6
Chapter 3: Using Personal Statuses
Status
Description
Available
(Non-Queue)
This status makes you unavailable at the end of your shift.
When you select this status, the queue stops sending calls to
you.
With this status, non-queue calls still ring your phone. To
prevent all calls from ringing your phone, make yourself
unavailable by selecting Do Not Disturb.
You can also select this status by picking up the phone and
pressing *52.
On Break
This status puts you on a break during your shift. While this
status is selected, the queue does not send calls to you.
When you take a break, be sure to use the On Break status
rather than Available (Non-Queue), which ends your shift.
Using On Break when you take a break will ensure the integrity
of Contact Center statistics.
You can also select this status by picking up the phone and
pressing *53.
Wave ViewPoint User Guide
Release 3.0
October 2012
Selecting a personal status
3-7
Chapter 3: Using Personal Statuses
If you are an agent in a Contact Center queue, note the following:
•
You can make yourself available for queue calls by selecting either Available or
Available (Queue Only).
•
You can make yourself unavailable for queue calls by selecting any status other than
Available (Non-Queue), Available (Queue Only), or On Break.
Selecting a personal status
You can select a personal status using ViewPoint or the phone.
Selecting a personal status in Viewpoint
Use any of the following methods to select a personal status in ViewPoint:
•
Click the Personal Status button on the status bar, and then select a personal status.
•
Choose Tools > Personal Status and then select a personal status.
•
In the Personal Statuses folder, select a personal status and then choose Actions > Set as
Active.
Selecting a personal status using your phone
You can select a personal status on the phone in the following ways:
•
Log on and press 6 1. You can select the Available personal status quickly by picking up
the phone and pressing *50.
•
For Contact Center agent statuses, pick up your phone and press *51 through *53. Use
these quick commands to begin and end your shift and to go on break. See “Starting and
ending your shift, and taking breaks” in Chapter 5 in the Wave Contact Center
Administrator Guide.
Wave ViewPoint User Guide
Release 3.0
October 2012
Modifying a personal status
3-8
Chapter 3: Using Personal Statuses
Modifying a personal status
You can modify personal statuses to reflect your changing availability and location. For
example, if you are often away from your desk attending meetings, you can modify the In a
Meeting personal status to send your callers directly to voicemail.
Not all preferences are modifiable:
•
Where I Am. Cannot be modified for any personal status. The default Where I Am location
is your phone or your call forwarding number if your calls are being forwarded.
•
Taking Calls. Can be modified for In A Meeting, Out Of The Office, or On Vacation.
•
Greeting. Cannot be modified for any personal status. Your default greeting is always
used.
•
Routing List. Can be modified for all personal statuses.
If you are an agent in a Contact Center queue:
•
Queue calls. Cannot be modified for any personal status. Queue Calls is always set to Yes
for Available (Queue Only) and Available (Non-Queue), and to No for all other statuses.
To modify a personal status
1.
In the Personal Statuses folder, double-click the personal status. The Personal Status
dialog box opens.
2.
Specify how you want your calls handled while this personal status is selected using the
following drop-down lists. For most call handling preferences, you can select either a
specific item or Default. Selecting Default uses the item that is your current personal
status default, which is shown in parentheses. “Setting personal status defaults” on page
3-10 for more information.
Wave ViewPoint User Guide
Release 3.0
October 2012
Modifying a personal status
•
3-9
Chapter 3: Using Personal Statuses
Where I am. Modifying this preference for a personal status is not supported in this
version. This preference identifies the phone to which your incoming calls will be
sent when this personal status is active. The default Where I Am location is your
phone, or your forwarding number if your calls are forwarded.
•
Taking calls. Specifies whether you want calls to ring through to your phone or not
when this personal status is active.
•
Yes (use my routing list). Incoming calls follow your active routing list, which
usually includes ringing your phone.
•
No (use only my final action). Incoming calls are sent directly to the final
action on your active routing list, which by default is your voicemail.
Note: You can modify this setting only for the personal statuses In a Meeting, Out
of the Office, and On Vacation.
•
Queue calls. Modifying this preference for a personal status is not supported in this
version. This preference is displayed only if you are an agent in a Contact Center
queue. Specifies whether queue calls are sent to your phone when this personal
status is active.
•
Yes. Marks you as available to take queue calls, and while this personal status
is active you can receive calls from all queues for which you are signed in.
•
No. Marks you as not available to take queue calls.
Note: Queue calls is always set to Yes for Available (Queue Only) and Available
(Non-Queue), and to No for all other statuses.
•
Routing List. Select the routing list that your calls will follow when this personal
status is active. To create a new routing list, click
, or press ALT+click to edit the
selected routing list. For more about routing lists, see “Using routing lists” on
page 9-5.
•
Greeting. Modifying this preference for a personal status is not supported in this
version. For more about greetings, see “Managing voicemail greetings” on
page 7-23.
3.
Click OK to save your changes.
Wave ViewPoint User Guide
Release 3.0
October 2012
Using personal status defaults
3-10
Chapter 3: Using Personal Statuses
Using personal status defaults
Specifying a default personal status greeting and routing list
When you select a personal status with a greeting or routing list preference, it makes that
greeting or routing list active. When you are done using that personal status, you probably want
your active greeting and routing list to revert to what they were before they were made active
by the personal status.
Personal status defaults are a way of accomplishing this. Personal status defaults specify the
greeting and the routing list that become active when you select a personal status that has no
greeting or routing list preference.
You can specify only one default personal status greeting and one default routing list at a time.
When you select a personal status with no greeting preference, the personal status default
greeting becomes active. When you select a personal status with no routing list preference, the
personal status default preference becomes active.
Example: You set your “Everyday” greeting to be your personal status default, because this
is the greeting you normally use. Several times during the day you change your active
greeting by selecting the personal status In a Meeting, which applies your custom “Be Back
Soon” greeting. When you return from the meeting and select the personal status Available (or
any other personal status) your personal status defaults are restored, so your “Everyday”
greeting becomes active again.
You can change the greeting and the routing list that are your personal status defaults at any
time. See “Setting personal status defaults” on page 9-13.
Setting personal status defaults
•
To set your personal status default greeting, edit the greeting and select the Default
personal status greeting checkbox. See “Recording a new greeting” on page 7-26 for
details.
Note: When you make a greeting active using the telephone commands, that greeting
also becomes your personal status default greeting.
•
To set your default routing list, edit the routing list and select the Use this routing list as
the default for incoming calls checkbox. See “Creating a routing list using the Routing
List Editor” on page 9-11 for details.
Wave ViewPoint User Guide
Release 3.0
October 2012
Changing the personal status of another user
3-11
Chapter 3: Using Personal Statuses
To set a personal status preference back to the default setting
Perform these steps to set a personal status preference back to the default setting
1.
Edit the personal status. See “Modifying a personal status” on page 3-8.
2.
For the Routing List preference, select Default from the drop-down list. The Default entry
displays the name of the current default item in parentheses, for example “Default
(Standard)”.
3.
Click OK.
Changing the personal status of another user
You can change the personal status of another Wave user if you know that user’s password (or
you can do it without entering a password if you have the appropriate permission). This feature
is useful when a user wants to change his or her personal status but does not want to or cannot
log on to Wave. For example, an administrative assistant can change the personal status for the
boss, or the user who is acting as the Operator user can change the Operator’s personal status
without logging on as the Operator user.
To change another user’s personal status in ViewPoint
1.
In the Extensions list, right-click the user.
2.
Choose Apply Personal Status and click a personal status.
3.
If you do not have the appropriate permission, you will be prompted for that user's
password:
Enter the user’s password and click OK.
Wave ViewPoint User Guide
Release 3.0
October 2012
Release 3.0
October 2012
Chapter 4
Using the Extensions List
CHAPTER CONTENTS
Viewing Wave extensions . . . . . . . . . . . . . . . . . . . . . . . . . . . . . . . . . . . . . . . . . . 4-1
Placing calls to an extension . . . . . . . . . . . . . . . . . . . . . . . . . . . . . . . . . . . . . . . . 4-4
Using Wave IMpulse for instant messaging . . . . . . . . . . . . . . . . . . . . . . . . . . . . 4-4
Viewing Wave extensions
You can see all Wave extensions, along with information about the current status of each
extension, in the Extensions list. You can use the Extensions list to quickly place calls to other
Wave extensions or to change another user’s personal status if you have permission to do so.
You can display the Extensions list in the Call Monitor for quick access, including
drag-and-drop calling. See “Adjusting the Phonebook Pane layout in the Call Monitor” on
page 2-26.
A glance at the Extensions list can tell you:
•
A user’s extension number
•
Whether a user is currently on a call
•
A user’s current personal status
•
Whether a user has call forwarding turned on, and the location to which the calls are
forwarded
•
The extensions of your office’s auto attendants and Contact Center queues.
Wave ViewPoint User Guide
Release 3.0
October 2012
Viewing Wave extensions
4-2
Chapter 4: Using the Extensions List
The Extensions list automatically updates in real time.
Note: From the Extensions list you can change another user’s personal status if you know that
user’s password, or have the proper permission. For instructions, see “Changing the personal
status of another user” on page 3-11.
Searching the Extensions list
To find someone quickly, you can type their first or last name (fully or partially) in the Search
field. The Extensions list displays all items whose first or last name begins with the entered text.
Wave ViewPoint User Guide
Release 3.0
October 2012
Viewing Wave extensions
4-3
Chapter 4: Using the Extensions List
Extensions list tabs
The Extensions list can optionally contain tabs that display related groups of extensions. Tabs
are located at the bottom of the Extensions list. Click each tab to view its contents.
•
All tab. This tab displays all Wave extensions. Note that your Wave system may be
configured to not show this tab.
•
Group tabs. The Extensions list can optionally display a tab for each public ViewPoint
Group of which you are a member, and a tab for any personal ViewPoint Groups that you
created. Click a Group tab to see the extensions within that Group. See “Using ViewPoint
Groups” on page 10-17.
•
Queue tabs. If you are an agent in a Contact Center queue, the Extensions list contains a
tab for each queue. Click the tab to see the agents who are members of that queue, as well
as all of the current calls for the queue. An asterisk (*) on the queue tab indicates that you
are signed out for that queue. For details about participating in a queue, see Chapter 5 in
the Wave Contact Center Administrator Guide.
Showing, hiding, and reordering Extensions list tabs
To show or hide individual tabs, as well as choose their order, do the following:
1.
In the Extensions list, choose View > Show Tabs. (You can also right-click anywhere in
the the Extensions list and then choose Show Tabs.)
2.
Select a tab name and click Add or Remove to set up the Show these tabs in this order
list. Use the up and down arrow buttons to arrange the order of tabs in the list.
3.
Click OK. The specified tabs are displayed at the bottom of the Extensions list.
Extensions list columns
Some Extensions list columns are hidden by default. Press F1 for Help to see a complete list of
columns with explanations. To show or hide columns, see “Customizing columns” on
page 2-31.
Wave ViewPoint User Guide
Release 3.0
October 2012
Placing calls to an extension
4-4
Chapter 4: Using the Extensions List
Placing calls to an extension
To place a call to an extension, double-click the extension. If your phone is on hook, it rings to
connect you to the call being placed.
Using Wave IMpulse for instant messaging
Wave IMpulse supports simple, secure, user-to-user instant messaging in ViewPoint. With
instant messaging you can initiate a real-time typed conversation between yourself and another
user.
You can:
•
Send and receive instant messages with other users.
•
Send and receive instant messages with users in Wave organizations other than the one to
which you belong.
•
Initiate an instant messaging conference.
Each of these features requires that you have the appropriate Wave permissions assigned by
your Wave administrator. Ask your Wave administrator if you are configured to use these
features. Also, before your instant message can be delivered to another user, that user must be
running ViewPoint and must also have the appropriate Wave permissions assigned.
Sending an instant message to another user
To send an instant message to another user, right-click the user in the Extensions view and then
click Send Instant Message.
If that user is not currently online, the following message is displayed:
“Joe Wang seems to be offline. Message you send will be delivered when Joe Wang
comes online.”
Wave ViewPoint User Guide
Release 3.0
October 2012
Using Wave IMpulse for instant messaging
4-5
Chapter 4: Using the Extensions List
You can recognize whether users are online or not by the Presence icon next to their name in the
Extensions view. In the following example, Ana Chen and Audrey Escobar are online
Type your instant message in the window that opens:
Click Send to send your instant message. If that user is running ViewPoint and has the
appropriate Wave permissions assigned when you click Send, the message window pops open
in the receiving user’s ViewPoint, allowing him or her to respond.
Wave ViewPoint User Guide
Release 3.0
October 2012
Using Wave IMpulse for instant messaging
4-6
Chapter 4: Using the Extensions List
As your conversation progresses, all of the messages and replies are displayed at the top of the
window:
If you send or receive a message and there is no new interaction from the other party within a
minute, the date and time of the last message is displayed in the window, for example “Sent at
5:14 PM on Thursday.”
Receiving an instant message from another user
When you receive an instant message from another user, the instant message window displaying
the message pops up if it is not already open. Similarly, when you log onto ViewPoint, the
message window pops open displaying any instant messages you received while you were not
logged on.
Inviting users to an instant messaging conference
You can create an instant messaging conference before you start sending messages, or add other
users as you go along.
Wave ViewPoint User Guide
Release 3.0
October 2012
Using Wave IMpulse for instant messaging
4-7
Chapter 4: Using the Extensions List
To create an instant messaging conference
1.
Right-click the name of one of the participants in the Extensions view and then click
Send Instant Message.
2.
In the window that opens, click the arrow button located to the right of the Send button,
and then click Invite to Conference.
3.
The Invite to Conference dialog opens listing the users who are currently available.
Wave ViewPoint User Guide
Release 3.0
October 2012
Using Wave IMpulse for instant messaging
4.
4-8
Chapter 4: Using the Extensions List
Select the names of the conference participants to invite and then click OK.
The invitees are automatically added to the conference.
Participating in a conference
Any of the conference participants can send messages that will be displayed in each user’s
ViewPoint.
Any participant can invite additional participants to join the conference by following the steps
listed above.
To exit a conference, click the Close button at the top of the window.
Note: In this version, selecting or deselecting one or more participant names in the left pane
has no effect. In a future version, you will be able to use this area to remove a participant from
the conference, send a private message to a participant, and so forth.
Wave ViewPoint User Guide
Release 3.0
October 2012
Chapter 5
Receiving and Handling Calls in ViewPoint
CHAPTER CONTENTS
Using the Call Monitor folder . . . . . . . . . . . . . . . . . . . . . . . . . . . . . . . . . . . . . . . . 5-1
Displaying the Call Monitor folder automatically . . . . . . . . . . . . . . . . . . . . . . . . . 5-6
Selecting and acting on a call in the Call Monitor . . . . . . . . . . . . . . . . . . . . . . . . 5-7
Commands while a call is ringing . . . . . . . . . . . . . . . . . . . . . . . . . . . . . . . . . . . . 5-8
Commands while you’re on a call . . . . . . . . . . . . . . . . . . . . . . . . . . . . . . . . . . . . 5-9
Incoming call indicators . . . . . . . . . . . . . . . . . . . . . . . . . . . . . . . . . . . . . . . . . . . 5-18
Sharing your Call Monitor folder . . . . . . . . . . . . . . . . . . . . . . . . . . . . . . . . . . . . 5-19
Using the Call Monitor folder
In the Wave ViewPoint, the Call Monitor folder is the visual counterpart to your phone. The Call
Monitor lets you see all your incoming calls and any outgoing calls at once, often with the
callers identified by name. You must have a phone associated with ViewPoint in order to use
most Call Monitor features.
Note: Calls made or answered via an Outside Line feature button on a phone do not appear in
the ViewPoint Call Monitor.
Wave ViewPoint User Guide
Release 3.0
October 2012
Using the Call Monitor folder
5-2
Chapter 5: Receiving and Handling Calls in ViewPoint
The following graphic illustrates the ViewPoint Call Monitor.
In the Call Monitor folder you can:
•
See who is calling you and take the call or send it to voicemail
•
Click calls to transfer them, put them on hold, send them to voicemail, or perform other
actions
•
Move among multiple calls on hold with a click of the mouse
•
Record calls
•
Conference calls (including creating or starting a conference)
Each row in the Call Monitor folder is an item that contains information about one call, or one
party in a call. Conference calls appear in a special Conference pane that shows the parties other
than yourself.
For an explanation of Call Monitor folder columns, press F1 for online Help. For information
about changing the Call Monitor folder columns that are displayed, see “Customizing columns”
on page 12-20.
Wave ViewPoint User Guide
Release 3.0
October 2012
Using the Call Monitor folder
5-3
Chapter 5: Receiving and Handling Calls in ViewPoint
Call Monitor folder tabs
For most people, the Call Monitor folder contains two tabs, called My Phone and All. You can
optionally display other tabs that group related calls. Click each tab to view the related call
activity at your phone.
•
My Phone tab. This tab always appears in your Call Monitor folder and displays all calls
to or from your phone. This includes calls that are forwarded to your extension (in this
case, the called party who forwarded the call is identified in the Owner column), and calls
to your DID number if you have one.
•
Parked tab. The Parked tab shows all current parked calls.
•
Queue tab. If you are an agent in a Contact Center queue, all the current calls for the
queue appear on a separate tab labeled with the queue name. An asterisk (*) on the queue
tab indicates that you are signed out for that queue. For details about participating in a
queue, see Chapter 5 in the Wave Contact Center Administrator Guide.
•
All tab. The All tab shows all of the following that apply to you:
•
All calls to and from your phone.
•
If you are an agent in a Contact Center queue: All queue calls for any queue that you
are currently signed into. (If you are not signed into a queue, that queue’s calls do
not appear in your All tab, but they do appear on that queue’s Queue tab.)
•
All calls from any other users’ Call Monitors that have been shared with you.
Calls on the All tab are grouped under headers that correspond to the names of your other Call
Monitor tabs, as in the following example.
Note that a call may appear multiple times in the All tab, for example, under both the My Phone
header and the Parked header. You can select any appearance of a call to perform commands on
it.
Wave ViewPoint User Guide
Release 3.0
October 2012
Using the Call Monitor folder
5-4
Chapter 5: Receiving and Handling Calls in ViewPoint
Showing, hiding, and reordering Call Monitor tabs
To show or hide individual Call Monitor tabs, as well as choose their order, do the following:
1.
Choose View > Show Tabs. (You can also right-click the Call Monitor column headers or
tabs.)
2.
Click All to select all tabs, or select a tab name and click Add or Remove to show or hide
it. Use the up and down arrow buttons to arrange the order in which the tabs are
displayed.
3.
Click OK.
Using the My Phone tab to handle calls
The My Phone tab appears if you have other tabs showing. After you answer a call, the Call
Monitor automatically switches to the My Phone tab. It is the only tab from which you can
perform call-handling commands on a call. If you select an active call in another tab, the
call-handling commands are unavailable.
Wave ViewPoint User Guide
Release 3.0
October 2012
Using the Call Monitor folder
5-5
Chapter 5: Receiving and Handling Calls in ViewPoint
Call Monitor folder panes
The Call Monitor folder contains the following panes that you can hide or show:
•
•
Phonebook Pane. Shows the Extensions list and the Contacts folder and enables
drag-and-drop call handling. See “Adjusting the Phonebook Pane layout in the Call
Monitor” on page 2-26 and “Dragging and dropping items” on page 2-28.
Notes Pane. Enables you to type and add call notes. See “Adding notes to a call” on
page 5-13.
•
Parties pane. Shows the parties in a conference call other than yourself.
•
ViewPoint Softphone Dial Pad. Available if you are using the ViewPoint as your primary
or secondary phone. See “Using the ViewPoint Softphone” on page 2-6 for an overview
of the ViewPoint Softphone.
Call Monitor folder columns
The Call Monitor folder contains several columns that show detailed information about a call,
such as Trunk Name and Target Station. Some of the columns are hidden by default. For an
explanation of the columns, press F1 in the Call Monitor folder for its online Help. For
instructions on hiding and showing columns, see “Customizing columns” on page 12-20.
Viewing a custom data column in the Call Monitor
If your Wave system is configured to display custom data (for example, a caller’s account
number) in the Call Monitor, the custom data appears in one or more columns. You can view the
available columns in the Show Columns dialog. You can hide and show custom data columns
the same way you can hide and show normal columns (see “Customizing columns” on
page 2-31.) Contact your Wave system administrator to see if any custom data columns are
available in your Call Monitor folder.
Wave ViewPoint User Guide
Release 3.0
October 2012
Displaying the Call Monitor folder automatically
5-6
Chapter 5: Receiving and Handling Calls in ViewPoint
Displaying the Call Monitor folder automatically
Wave can open the Call Monitor folder automatically when you place or return calla form some
ViewPoint folders. When the Call Monitor folder opens automatically, it appears in front of all
other open windows on your computer.
To display the Call Monitor folder automatically
1.
Choose Tools > Options. The Options dialog opens.
2.
Click the ViewPoint \ Call Monitor tab.
3.
Under Display Call Monitor in the following situations, select one or both of the following
checkboxes:
•
Placing new calls from Contacts or Extensions. The Call Monitor folder opens each
time you place a call from the Contacts or Extensions folder.
•
Returning calls from Voice Messages or Call Log. the Call Monitor folder opens
each time you return a call from a voice message or Call Log entry.
Wave ViewPoint User Guide
Release 3.0
October 2012
Selecting and acting on a call in the Call Monitor
5-7
Chapter 5: Receiving and Handling Calls in ViewPoint
4.
To display the Call Monitor folder automatically on incoming calls, click the ViewPoint \
Call Alerts tab and check Display the Call Monitor.
5.
Click OK.
Selecting and acting on a call in the Call Monitor
Click a call in the Call Monitor folder to select it. After it is selected, you can choose commands
to apply to that call.
To use a command on a call in the Call Monitor folder, do one of the following actions:
•
Right-click the call and choose a command on the shortcut menu. This option is often the
fastest way of choosing a command, but it may be difficult to do so during times when
phone traffic is heavy. This is due to the fact that calls change position in the Call Monitor
folder as new calls arrive and transferred calls leave the Call Monitor folder.
•
Click a button on the toolbar.
•
Choose a command from the Actions menu.
•
Press Enter. This puts the selected call on hold, or retrieves it if it is already on hold.
Important: Do not use the ViewPoint Call Monitor to select and act on a call to a virtual
extension—use the phone commands (as described in the Wave Phone User Guide) to control
these calls. A virtual extension number can be assigned to a user who does not need a physical
phone, for example because the user works on the road using a cell phone. Ask your system
administrator if there are any virtual extensions assigned on your system.
Automatically displaying account code information for contacts
On an incoming call from a ViewPoint contact, Wave automatically displays the contact’s
account code information (if any) along with the call in the ViewPoint Call Monitor. If you do
not observe this behavior, ask your Wave administrator if this feature has been disabled on your
system.
Call ownership
In the Call Monitor you can perform call-handling commands only on calls that you own. You
own a call if you are the one who answered it. If you select a call that you do not own, the
call-handling commands are unavailable.
Wave ViewPoint User Guide
Release 3.0
October 2012
Commands while a call is ringing
5-8
Chapter 5: Receiving and Handling Calls in ViewPoint
Examples of calls that you can see, but that you do not own, include calls in a Queue tab that
are being handled by another agent, or calls in a shared Call Monitor tab that are being handled
by the sharing user.
To determine who owns a call, look at the name in the Owner column.
Double-clicking calls
Double-clicking in the Call Monitor folder has the following effects:
•
Double-clicking an active call puts it on hold.
•
Double-clicking any other type of call takes the call (connects you to the caller). This
includes incoming calls, calls on hold, parked calls, and calls to which you are listening
while the caller leaves a message.
Commands while a call is ringing
While calls are ringing at your phone, the Call Monitor folder displays “Incoming Call.” If
Wave can identify the caller, the item in the Call Monitor folder also displays the caller’s phone
number and name, which enables you to screen your calls. (See “Teaching Wave to recognize
your contacts” on page 10-8.) While calls are ringing, you can perform the following actions:
•
Take the call
•
Send the call to voicemail
•
“Grab and hold” the call (put the call on hold without talking to the caller first)
Taking the call
If you are already on another call, select the incoming call and choose Actions > Take Call. Your
current call is put on hold. You can easily move among multiple calls by choosing Take Call
again.
When you use Take Call in the Call Monitor folder, you can play the caller’s name over your
speakers by choosing Actions > Announce Caller.
Wave ViewPoint User Guide
Release 3.0
October 2012
Commands while you’re on a call
5-9
Chapter 5: Receiving and Handling Calls in ViewPoint
Sending the call to voicemail
Select the call, and then choose Actions > Take Message. The call is sent to your voicemail.
Note: Contact center agents cannot perform this command on an incoming queue call.
Screening a voice message as it is being left
You can listen to a voice message as the caller is leaving it and pick up the call if needed. To do
so:
1.
Select the call while it is ringing or while the caller is leaving a message.
2.
Choose Actions > Screen Message.
3.
Pick up your phone and listen to the message as it is being left. This is a one-way
connection. The caller cannot hear you.
4.
To interrupt the message and take the call, choose Actions > Take Call. You are connected
to the caller.
You can also listen to a voice message as it is being left via the phone.
Commands while you’re on a call
Once you are on an active call, you can perform actions on that call, including the following:
•
Putting a call on hold. See page 5-10.
•
Transferring a call. See page 5-11.
•
Adding notes to a call. See page 5-13.
•
Sending an e-mail message about a call. See page 5-13.
•
Recording a call. See page 5-13.
•
Including the call as part of a conference call. See page 5-12 for steps to transfer a call
and then conference all parties together. (Conferencing is described in more detail in
Chapter 6.)
•
Associating a call with a contact. See page 5-15.
Wave ViewPoint User Guide
Release 3.0
October 2012
Commands while you’re on a call
5-10
Chapter 5: Receiving and Handling Calls in ViewPoint
•
Parking a call. See page 5-15.
•
Sending a call to voicemail. See page 5-16.
•
Playing a caller's name over your speakers. See page 5-16.
•
Disconnecting a call while staying on the phone. See page 5-16.
•
Entering an account code for a call. See page 5-17.
•
Flagging a problem call to report later. See page 5-17.
Instructions for each of these commands appear in the following sections.
Note: To perform a Call Monitor command on a call, you must first select the call.
Putting a call on hold
To put a call on hold, select the call, and then choose Actions > Hold. Alternatively, double-click
the call or select the call and press Enter.
To retrieve the call from hold, select the call and either choose Actions > Take Call, double-click
the call, or press Enter.
You can put as many calls on hold at one time as you want. The Duration column in the Call
Monitor folder shows how long each call has been waiting on hold.
Note:
•
Use ViewPoint instead of the Hold button on your phone to put calls on hold. When on
hold from ViewPoint, callers hear your system’s hold music, but they hear only silence if
you use your phone’s Hold button.
•
If you’re using a digital feature phone with multiple line appearances, you do not hear
dial tone after putting a call on hold. To get dial tone, select an unoccupied line.
Ringback for calls on hold
By default, if you hang up with one or more calls on hold, Wave’s ringback feature rings your
phone to remind you. When the call rings back, the call’s status in the Call Monitor changes to
Ringing (On Hold). Talk to your Wave system administrator about configuring ringback
behavior.
Wave ViewPoint User Guide
Release 3.0
October 2012
Commands while you’re on a call
5-11
Chapter 5: Receiving and Handling Calls in ViewPoint
Transferring a call
The Call Monitor folder allows you to easily transfer a call to any party, either another Wave
user or someone at an external phone number. You can look up users and contacts by name, and
you can see in advance if an extension is busy. You can also transfer a call to an auto attendant
or to a user’s voicemail.
Drag-and-drop transferring
With the Phonebook pane showing in the Call Monitor folder, you can drag a call from the Call
Monitor to an extension to transfer the call to that extension, or to a contact’s name to transfer
the call to the contact’s default number. For more information about drag-and-drop commands,
see “Dragging and dropping items” on page 2-28. To show the Phonebook pane, see “Adjusting
the Phonebook Pane layout in the Call Monitor” on page 2-26.
Blind, supervised, and direct-to-voicemail transfers
You can transfer a call in one of the following ways:
•
Blind transfer, sometimes called an unattended transfer. You transfer the call without first
speaking to the recipient. When the recipient answers the phone, the call is connected.
•
Blind transfers occur automatically when transferring a ringing call, and when
transferring to voicemail or an auto attendant.
•
Supervised transfer, sometimes called an attended or consultation transfer. You speak to
the transfer recipient first, while the caller is placed on hold. You can then complete the
transfer, or conference the three of you together, or cancel the transfer and return to the
caller.
•
Direct to voicemail. You transfer the call directly to an extension’s voicemail.
To transfer a call
1.
Select the call that you want to transfer.
2.
Choose Actions > Transfer. The Transfer To dialog opens.
3.
Select the person or enter the number to which to you want to transfer the call. See
“Placing a call” on page 6-1 for instructions.
Note: You may be prohibited from transferring an external caller to an external number.
See your Wave system administrator for more information.
Wave ViewPoint User Guide
Release 3.0
October 2012
Commands while you’re on a call
5-12
Chapter 5: Receiving and Handling Calls in ViewPoint
4.
In the Transfer field at the bottom of the dialog, click either Blind, Supervised, or to
Voicemail. See the beginning of this section for more information about the different
types of transfers.
5.
Click OK. If you selected Blind or to Voicemail, the transfer is completed and the call
disappears from your Call Monitor.
Note: If you selected Supervised, you are connected to the recipient’s extension, and the
caller is put on hold. The incomplete transfer displays as a linked three-party call in the
Call Monitor.
6.
Speak to the recipient and announce the caller. A dialog opens and asks you if you want
to complete the transfer or cancel it.
7.
Choose one of the following options:
•
Complete. The transfer is completed and the call disappears from your Call Monitor.
You can also complete the transfer by hanging up the phone.
•
Conference. The caller, the recipient, and you are all connected in a conference call.
•
Cancel. The transfer process ends and you are reconnected to the caller, so you can
transfer him or her to voicemail or another destination.
Transfer tips for operators
By using Groups and showing the Extensions tab of the Phonebook pane in the Call Monitor
folder, you can easily find and choose the recipient of a call that you want to transfer. Define
Groups to represent the departments of your office. When transferring a call you can then view
only the members of a Group, for example, the Marketing Group. You can see at a glance the
names of members of the Marketing department and who is available to take a call. See “Using
ViewPoint Groups” on page 10-17 and “Adjusting the Phonebook Pane layout in the Call
Monitor” on page 2-26.
Wave ViewPoint User Guide
Release 3.0
October 2012
Commands while you’re on a call
5-13
Chapter 5: Receiving and Handling Calls in ViewPoint
You can also transfer calls more easily by resizing the Transfer To dialog, by showing and hiding
columns, and by sorting calls by column. See “Customizing ViewPoint for operators” on
page 12-17.
Adding notes to a call
While a call is visible in your Call Monitor folder, you can type notes about the call in the Notes
Pane. If the Notes Pane is not showing, click Notes in the bottom pane.
If the call is transferred to someone else, notes that you created about the call are sent with the
call (for example, you can add a note such as “Customer wants to track invoice #123987” before
transferring the call to your shipping department). When the call is complete, you can view or
edit the notes for the call in the Call Log folder (see Chapter 8, “Using the Call Log Folder” ).
If the call is recorded or transferred to voicemail, you will see the notes associated with the
recording.
Sending an e-mail message about a call
From an active call, you can create an e-mail message that’s automatically preformatted with
details about the call (from name and number, date and time, and so forth). This can be useful
for receptionists who sometimes need to take a verbal messages from the caller.
To create an e-mail from a call, select the call and choose Actions > Send To. A new e-mail
message opens preformatted with call details. You can add optional notes or message
information before sending the e-mail.
Recording a call
If your Wave system administrator has given you the required permission, you can record your
Wave conversations, including conference calls. By default, recordings appear in your
Voicemail Inbox folder, although the system may be configured to send them to another
extension’s Inbox.
Wave ViewPoint User Guide
Release 3.0
October 2012
Commands while you’re on a call
5-14
Chapter 5: Receiving and Handling Calls in ViewPoint
The maximum length of a single recording is equal to the total number of minutes available in
your voice mailbox. By default this is 20 minutes, but your Wave administrator may have set a
different limit.
Note: You cannot receive more voice messages when your voice mailbox is full. You should
check your available mailbox space after recording any conversation to be sure that you have
space for new voice messages. See “Managing your voicemail maximums” on page 7-10 for
more information.
Privacy issues with call recording
Some countries, states, or other locations require that you announce to callers that their calls
may be or are being recorded. Be sure that you understand how to comply with call recording
privacy requirements.
To record a call
1.
During an active call, choose Actions > Start Recording. Wave starts to record the call.
You may hear a regular beep while recording, depending on your system configuration.
2.
To stop recording before the call is finished, choose Actions > Stop Recording.
To play a call you just recorded
1.
Go to your Voicemail \ Inbox folder, or open another mailbox if your system is set up
differently.
2.
Select the recording.
3.
Choose Actions > Play.
Using the phone commands
You can start and stop recording your calls using the *16 phone command. You can also use the
phone commands to listen to recordings in your Inbox. For more information, see the Wave
Phone User Guide.
Wave ViewPoint User Guide
Release 3.0
October 2012
Commands while you’re on a call
5-15
Chapter 5: Receiving and Handling Calls in ViewPoint
Associating a call with a contact
Unidentified calls appear in the Call Monitor folder as being from “Unknown.” You can
associate a particular unidentified call with one of your contacts, so that the Call Monitor and
Call Log folders display a name with the call. You can also permanently associate the call’s
Caller ID phone number or text with the contact, so that Wave automatically identifies the
contact on all subsequent calls from that phone.
To associate a call with a contact, choose Actions > Associate. See “Associating a call or Caller
ID number with a contact” on page 10-11.
Parking a call
Parking a call puts a call on hold and lets any Wave user retrieve it from any Wave phone or
ViewPoint program in your office. To display parked calls in the Call Monitor, choose View >
Show Tabs from the Call Monitor, and check Show all parked calls.
To park a call
1.
In the Call Monitor, select the call you want to park.
2.
Choose Actions > Park. The Status column in the Call Monitor folder displays “Parked
on <orbit number>.
Ringback for parked calls
By default, if you hang up with one or more calls on hold, Wave’s ringback feature rings your
phone to remind you. When the call rings back, the call’s status in the Call Monitor changes to
Ringing (Parked). Talk to your Wave system administrator about configuring ringback behavior.
Wave ViewPoint User Guide
Release 3.0
October 2012
Commands while you’re on a call
5-16
Chapter 5: Receiving and Handling Calls in ViewPoint
Unparking a call
You can retrieve a parked call from any Wave phone or from any PC running ViewPoint.
To answer a parked call from any ViewPoint program
1.
Click Tools > Unpark. The Unpark dialog opens.
2.
Select the call that you want to unpark and answer and click OK.
You can also answer a parked call by picking up a Wave phone, pressing *53, and then entering
the parking slot number.
Sending a call to voicemail
To send an active call to voicemail, choose Actions > Take Message.
Playing a caller's name over your speakers
You can play a recording of a caller’s name over your speakers at any time during a call by
choosing Actions > Announce Caller. If you hear nothing, there is no voice title recorded for the
caller.
Disconnecting a call while staying on the phone
You can disconnect a call without hanging up the phone. Select the call, and then choose
Actions > Disconnect. This command is useful if:
•
You want to disconnect a single party in a conference call. Hanging up your phone would
disconnect you from the whole conference.
•
You are going to immediately dial another call. If you hang up and pick up your analog
phone too quickly, Wave can read that as a Flash command, which would put the call on
hold instead of disconnecting it.
Wave ViewPoint User Guide
Release 3.0
October 2012
Commands while you’re on a call
5-17
Chapter 5: Receiving and Handling Calls in ViewPoint
Entering an account code for a call
While on a call, you can enter an account code for the call or change the one already entered.
1.
Select the call, and then choose Actions > Enter Account Code.
2.
Enter an account code. You can enter numbers, letters, or other characters.
3.
Click OK.
You can also enter an account code from the Call Log after the call is complete. See “Entering
an account code for a Call Log entry” on page 8-8.
Wave
Flagging a problem call to report later
The “Flag a Problem” button in the Call Monitor toolbar lets you click once to flag a problem
call, for example, a call that is not displayed correctly in the Call Monitor, or a call in ViewPoint
that doesn’t match the call on your phone. Any time after flagging calls, you can run the
Problem Report Wizard once and gather the logs for all of the flagged calls.
Flagging a call streamlines the process of using the Problem Report Wizard (see Appendix C)
to report problems about individual calls to your system administrator. For example, a company
operator might have too many calls coming in and cannot afford the time away to run the
Problem Report Wizard for each individual call.
To flag a problem call
1.
In the Call Monitor, select the problem call.
2.
Click the “Flag a Problem” button on the toolbar.
3.
If prompted in the Problem Notes dialog, enter notes about the problem, and then click
OK. (By default, you will not be prompted to enter notes. To configure this behavior,
contact your Vertical support representative.)
Wave ViewPoint User Guide
Release 3.0
October 2012
Incoming call indicators
5-18
Chapter 5: Receiving and Handling Calls in ViewPoint
To gather logs for all flagged calls
1.
At a less busy time, run the Wave Problem Report Wizard from the Start menu by
choosing All Programs > Vertical Wave ViewPoint > Wave Problem Report Wizard.
Note: Running the Problem Report Wizard from the Start menu picks up the appropriate
logs for any flagged calls across multiple ViewPoint sessions. You can also run the Wizard
from within ViewPoint by choosing Help > Report a Problem, but this will only gather the
logs for calls flagged during the current ViewPoint session.
2.
Follow the onscreen instructions. On the second Wizard screen, deselect the This
problem involved a specific call or message checkbox.
Incoming call indicators
When you receive an incoming call, the Incoming Call Alert window opens, displaying the
caller’s name and number, if available. Optionally, your Wave administrator may specify up to
3 additional Call Monitor fields to be displayed in the Incoming Call Alert window, as in the
following example.
Note: In this version, a size restriction on the Incoming Call Alert window prevents it from
displaying all data for all 3 optional fields. If you manually resize the Incoming Call Alert
window, the new size will be retained when the window is displayed for subsequent calls. If the
Incoming Call Alert window displays only the caller name and number, you cannot resize it.
Click the icons in the popup to (from left to right) send the call to voicemail, send to voicemail
and screen the massage, or take the call.
If you have a phone that displays Caller ID, you can use it as an incoming call indicator.
Wave ViewPoint User Guide
Release 3.0
October 2012
Sharing your Call Monitor folder
5-19
Chapter 5: Receiving and Handling Calls in ViewPoint
Sharing your Call Monitor folder
Your Wave system administrator can share your Call Monitor with other users. Those users see
your calls when they click on a tab with your name on it in their Call Monitors. If they have
View and Edit permission, they can answer your calls using that tab and perform all
call-handling commands on them. If they have View Only permission, they can see your calls
but cannot answer them or perform any commands on them.
Note: Calls you receive from a Contact Center queue can be seen only by fellow agents in your
queue, even if you are sharing your Call Monitor folder with other users.
When your calls are shared with another user, they appear as expected in your own Call Monitor,
but if the other user accepts one of your shared calls, you cannot manage it or take it.
A shared Call Monitor does not mean that calls ring at another user’s phone. To have your calls
ring at another user’s phone, forward your calls to that user. For more information about call
forwarding, see Chapter 9.
You can use call sharing in the following ways:
•
A coworker can cover your calls when you step away from your desk.
•
Your assistant can screen all your calls and pick up routine calls while letting important
calls go through to you directly.
Example: A manager shares calls with an assistant so that the assistant can see the manager’s
calls. Based on the caller’s name or number, the assistant lets some calls go through, answers
other calls, and sends some calls directly to the manager’s voicemail. If another call arrives
while the manager is already on a call, the assistant can see with whom the manager is talking,
determine if the current call is too sensitive to be interrupted, and handle the call
appropriately.
For more about sharing a Call Monitor, see “Sharing folders” on page 2-35.
Wave ViewPoint User Guide
Release 3.0
October 2012
Sharing your Call Monitor folder
5-20
Chapter 5: Receiving and Handling Calls in ViewPoint
Viewing shared calls
When another user’s Call Monitor is shared with you, a <call owner name> tab for each user
appears in your Call Monitor folder. This tab displays only the calls for that user.
When another user’s Call Monitor is shared with you, the following tabs appear in your Call
Monitor folder:
•
A <call owner name> tab for each user who has shared calls with you. This tab displays
only the calls for that user.
•
The All tab, which displays all calls including shared calls. The calls are organized by
call owner name.
See “Call Monitor folder tabs” on page 5-3 for information about how tabs are used in the Call
Monitor to display calls.
Wave ViewPoint User Guide
Release 3.0
October 2012
Chapter 6
Placing Calls in ViewPoint
CHAPTER CONTENTS
Placing a call . . . . . . . . . . . . . . . . . . . . . . . . . . . . . . . . . . . . . . . . . . . . . . . . . . . . 6-1
Checking a number . . . . . . . . . . . . . . . . . . . . . . . . . . . . . . . . . . . . . . . . . . . . . . . 6-8
Redialing numbers and returning calls . . . . . . . . . . . . . . . . . . . . . . . . . . . . . . . . 6-9
Creating conference calls . . . . . . . . . . . . . . . . . . . . . . . . . . . . . . . . . . . . . . . . . . 6-9
Supervising other users’ calls . . . . . . . . . . . . . . . . . . . . . . . . . . . . . . . . . . . . . . 6-12
Using the ViewPoint Softphone . . . . . . . . . . . . . . . . . . . . . . . . . . . . . . . . . . . . . 6-14
Using a remote phone . . . . . . . . . . . . . . . . . . . . . . . . . . . . . . . . . . . . . . . . . . . . 6-17
Placing a call
ViewPoint provides the following ways for you to place calls:
•
Placing calls using the Dial bar. See page 6-2.
•
Using the Place Call To dialog. See page 6-3.
•
Quick-dialing from ViewPoint folders. See page 6-6.
•
Placing calls using drag-and-drop. See page 6-7.
•
Placing calls using other contact managers. See page 6-8.
You can use any of these methods to place a call from a Wave phone (any phone physically
connected to a port on the Wave Server), a remote phone (any phone external to the Wave
system, for example a cell phone, home phone, or legacy PBX phone), or the ViewPoint
Softphone.
Note: Another way to place a call to a user is to double-click the user in the Extensions list.
Wave ViewPoint User Guide
Release 3.0
October 2012
Placing a call
6-2
Chapter 6: Placing Calls in ViewPoint
Placing calls with the phone on- or off-hook
When placing calls from ViewPoint you can choose the command with your phone either
on-hook or off-hook. If the phone is on-hook when you place a call, your phone rings
immediately after you finish dialing the number. If the phone is off-hook when you place a call,
you hear Wave dialing the number.
Placing calls using the Dial bar
ViewPoint has a Dial bar on the menu bar that you can use to place calls.
To place a call using the Dial bar
1.
Type either of the following in the Dial bar:
•
The number to dial. If it is an external number, type the full number including area
code (10 digits in North America, for example 6173540600). Do not enter a Wave
access code (such as 9). To dial international numbers enter + followed by the
country code and the number, for example +44 020 7323 8299. Do not add the
international access code (for example, 011 in North America).
Note: Hyphens, spaces, periods and parentheses are allowed.
•
The name or partial name of a user, contact, or contact company name. Wave
searches all of the Contacts, Extensions, and Groups for a match. If only one match
is found, the system places the call immediately. If there is more than one match, a
dialog opens and you can select a name on the list and click Dial to place the call.
2.
To specify an account code for the call, add a vertical bar character ( | ) after the number,
followed by the account code.
3.
Press Enter to place the call.
You can also drag-and-drop items into the Dial bar, including a text phone number from another
application. See “Placing calls using drag-and-drop” on page 6-7.
To redial a call using the Dial bar
Click the arrow on the right of the Dial bar for a list of recently dialed names and numbers. Click
a number to redial it.
Wave ViewPoint User Guide
Release 3.0
October 2012
Placing a call
6-3
Chapter 6: Placing Calls in ViewPoint
Using the Place Call To dialog
The Place Call To dialog visually guides you to place a call. It is not as efficient as using the
Dial bar (if you know the person's name or number) or the Call Monitor's Phonebook pane.
1.
Choose File > New > Call. The Place Call To dialog opens.
2.
Enter or select the number to dial in one of the following ways:
•
Enter the number to dial in the Name/Number field. You can also type the name of a
contact or user.
•
Click Contacts and select a contact on the list.
The contact’s default phone number appears in the drop-down list below the main
list. If the contact has more than one phone number associated with it, you can
select a different number to call on the drop-down list.
To create a new contact, click
to open a new Contact dialog. To edit the
currently selected contact, press Alt and click
. See “Entering a new contact” on
page 10-5 for more information.
Wave ViewPoint User Guide
Release 3.0
October 2012
Placing a call
6-4
Chapter 6: Placing Calls in ViewPoint
•
Click Extensions and select an extension in the list. The list is identical to other
Extensions lists in ViewPoint (see “Viewing Wave extensions” on page 4-1).
If the extension is a user with public numbers (My Numbers marked as public), you
can choose one of those numbers from the drop-down list below the main list. See
“Entering My Numbers” on page 6-5 for more about public numbers.
•
Click My Numbers. To place a call to one of your own phone numbers, such as your
home or mobile phone, select it on the list. You can double-click a blank category to
enter a new number for it.
Note: To verify that the phone number is entered in a correct format, click
.
3.
To enter an account code for the call, type a vertical bar character ( | ) after the number,
followed by the account code.
4.
Click OK to place the call.
Note: If you are using the ViewPoint Softphone, try the following troubleshooting tips
if your phone does not ring when you click OK to place a call. (This information does not
apply if you are using any other type of phone.)
•
If you can see the call in your Call Monitor, select the call and choose Actions >
Take Call. If you can take the call successfully, it means that your audio device is
working, but that the default ringing WAV file may not be opening correctly. See
your Wave administrator.
•
If you can see the call in your Call Monitor, but you cannot take the call as
described above, check your Softphone device settings (Tools > Options > Phone >
Softphone Devices). If the settings are disabled, there may be a problem with the
device configuration or the device settings were not loaded correctly. Checking your
physical devices and device drivers in Windows may help you identify the problem,
or contact your Wave administrator.
•
Check your phone’s status in the Extensions view. If the status is off-hook but you
are not connected to the call, report the problem using the Problem Report Wizard.
(This step gathers the appropriate logs and trace files that may help your Vertical
support representative troubleshoot your problem.) See “About the Problem Report
Wizard” on page C-1 for more information.
•
Exit and log back into ViewPoint to see if that resolves the issue.
Wave ViewPoint User Guide
Release 3.0
October 2012
Placing a call
6-5
Chapter 6: Placing Calls in ViewPoint
Entering My Numbers
You can store your own phone numbers in your Wave account, such as your home number or
mobile phone number, e-mail address, or instant messaging address. When placing, forwarding,
or transferring a call, you can click My Numbers and then select one of your numbers.
To enter a number or address in the My Numbers list
1.
Choose Tools > Options. The Options dialog opens.
2.
Click the Personal \ My Numbers tab.
3.
Click the type of number you want to enter or modify, for example Home or Mobile, then
click Edit.
To delete a number, select it and then click Clear.
4.
In the Number, Email, or IM address field, enter the phone number, e-mail address or
instant messaging address.
Wave ViewPoint User Guide
Release 3.0
October 2012
Placing a call
6-6
Chapter 6: Placing Calls in ViewPoint
5.
Select the Public checkbox to make the number publicly available. This has the following
effects:
•
Other users can quick-dial your public numbers by right-clicking your name in their
ViewPoint Extensions list. If this checkbox is not selected, the number is kept
private and does not appear on this right-click menu.
•
When a call comes into Wave from one of your public numbers, your name appears
in the From column, and can be used to identify you, for example by other users’
call rules. If unchecked, calls from the number display as from “Unknown.”
Note: In cases where the same number is defined in different places, Wave chooses
the name to display by prioritizing as follows: (1) a user’s public number, (2) a public
contact, (3) a private contact.
Note: Other programs can access to the number, for example, a ViewPoint Add-in that
automatically dials certain numbers. If unchecked, other programs cannot read or access
the number, though your system administrator can still view it.
6.
Click OK to return to the Options dialog.
7.
Click OK to close the Options dialog.
Quick-dialing from ViewPoint folders
In certain ViewPoint folders you can quickly place calls by either right-clicking an item or
selecting it and using the Actions menu. You can choose the following commands:
•
Speed Dial. Immediately places a call to the default number of the selected item. For a
user, it is his or her extension. For a contact, it is the contact’s default phone number.
•
Place Call. Opens a sub-menu that lets you choose from all the available numbers for the
selected item (for example, all of a contact’s numbers). You can also choose Other to
open the Place Call To dialog with that item selected (see “Using the Place Call To
dialog” on page 6-3).
Wave ViewPoint User Guide
Release 3.0
October 2012
Placing a call
6-7
Chapter 6: Placing Calls in ViewPoint
You can quick-dial the following types of calls from ViewPoint folders:
To quick-dial...
Use this folder
Notes
A user or other
extension
Extensions (or the
Extensions list in the
Call Monitor’s
Phonebook pane)
A caller (call back)
Call Log
Places a call to the Caller ID or callback
number associated with the call.
A message (call
back)
Messages (Inbox or
other folder)
Places a call to the Caller ID or callback
number associated with the message.
A contact
Contacts (or the
Contacts list in the
Call Monitor’s
Phonebook pane)
Speed dialing by double-clicking
In the Extensions list, double-clicking an extension speed-dials that extension.
In the Contacts folder, double-clicking a contact may speed-dial the contact’s default number,
depending on how you have configured your Contacts folder (see “Defining double-click
behavior in the Contacts folder” on page 12-19).
Placing calls using drag-and-drop
You can place a call to an extension, contact, or Group by dragging and dropping it either into
the Call Monitor or the Dial bar. When dropped, Wave places the call using the default phone
number.
For a complete list of ViewPoint drag-and-drop operations, see “Dragging and dropping items”
on page 2-28.
Wave ViewPoint User Guide
Release 3.0
October 2012
Checking a number
6-8
Chapter 6: Placing Calls in ViewPoint
Placing calls using other contact managers
You can place calls by using other contact managers such as Microsoft Outlook, GoldMine or
FrontOffice 2000, or Interact Commerce Corporation’s Act!. For more information, see “Using
the Wave TAPI Service Provider and Contact Manager Assistant” on page 1-2.
Checking a number
To confirm that Wave has correctly interpreted a number or address that you have entered—for
example, that it has recognized the correct country on an international call—click
next to
the Number or Address field. The Check Phone Number dialog opens. You can correct any
dialing errors here before you place the call.
Note: The Check Phone Number dialog opens automatically if the number you entered was
unclear or ambiguous.
To check a phone number
1.
Under Call Using, make sure the appropriate dialing service is selected for the type of
call.
2.
Under Country/Region, make sure the correct country is selected.
3.
Under City/Area code and Local number, confirm that Wave has interpreted the number
correctly.
4.
Select Use country code and area code dialing rules if you want Wave to apply dialing
rules that determine if a number is a local or long-distance call. Clear it to have Wave dial
the number exactly as entered, as if you had dialed it on the phone.
5.
Click OK to close the Check Phone Number dialog.
Wave ViewPoint User Guide
Release 3.0
October 2012
Redialing numbers and returning calls
6-9
Chapter 6: Placing Calls in ViewPoint
Redialing numbers and returning calls
You can quickly perform the following dialing actions in ViewPoint:
•
Redial the last number you dialed. Press F12 on your keyboard.
•
Return the last call you received. Press F11 on your keyboard. The name of the last caller
and the phone number appear in the status bar at the bottom of ViewPoint window.
Both these features are available from the File menu, including redial options for the last four
calls you placed while ViewPoint was running. You can redial older calls from the Call Log.
You can also redial and return calls using the Dial bar (see “Placing calls using the Dial bar” on
page 6-2) or the phone commands (see the Wave Phone User Guide for more information).
Creating conference calls
Wave lets you easily conference multiple calls together. The Call Monitor folder treats a
conference call as a single call.
The maximum number of parties that can be in a single conference can be as few as 4, or as
many as 30, depending on how your Wave system was set up. Ask your Wave system
administrator for details.
You can create a conference call by:
•
Adding parties one at a time to a call
•
Combining separate active calls into one call
Conference calls appear in the Parties pane of the Call Monitor. The Parties pane shows all
participants other than yourself Right-click a participant in the Parties pane to perform
commands on that participant, for example Hold or Disconnect.
Wave ViewPoint User Guide
Release 3.0
October 2012
Creating conference calls
6-10
Chapter 6: Placing Calls in ViewPoint
Adding parties to a conference
Use this procedure to start and build a conference call. The call is placed on hold while you are
adding new parties, but the parties already conferenced can continue to talk to each other.
1.
Dial the first party and wait for an answer.
2.
Click the call in the Call Monitor folder.
3.
Choose Actions > Conference. The Conference dialog opens.
4.
Select the second party for the conference call or enter a phone number to dial, and then
click OK. See “Placing a call” on page 6-1 for more information.
Note: If you have more than one active call when you choose the Conference command,
click the New Call tab in the Conference dialog to place the call.
5.
While the call is ringing, the only option in the Conference dialog is Cancel, which
disconnects the call:
After the call is answered, you are connected to the new party in a separate call. The
Conferencing dialog then presents the following options:
•
Complete. Click to add the new party to the conference call.
•
Cancel. Click to disconnect the new party’s call. You are returned to the conference
call.
6.
Repeat steps 2-5 to add more parties to the conference.
Wave ViewPoint User Guide
Release 3.0
October 2012
Creating conference calls
6-11
Chapter 6: Placing Calls in ViewPoint
Adding parties to a conference using drag-and-drop
To drag and drop parties into a conference, you must have the Calls pane open in the Extensions
or Contacts folder, or the Phonebook pane open in the Call Monitor folder. For more
information, see “Adjusting the Phonebook Pane layout in the Call Monitor” on page 2-26 for
instructions.
Drag and drop parties to the conference as follows:
•
Using the Calls Pane in the Extensions or Contacts folder, you can drag users or contacts
onto the active call in the Calls Pane to automatically add them as parties to the
conference. If you press Shift while you drag a user from the Extensions list, the
Conference dialog opens and provides further options.
•
Using the Phonebook Pane in the Call Monitor folder, you can create a conference call by
pressing Shift and dragging and dropping a call, contact, or extension onto another call.
Note: For other drag-and-drop operations you can perform in ViewPoint, see “Dragging and
dropping items” on page 2-28.
Conferencing multiple active calls together
Use the following procedure when you have two or more separate existing calls that you want
to conference together with yourself. Note that you cannot conference two conference calls
together.
To conference separate existing calls together:
1.
Select all the calls that you want to conference together. Press Ctrl on your computer
keyboard as you select multiple calls.
2.
Choose Actions > Conference. The selected calls are now conferenced with you.
Wave ViewPoint User Guide
Release 3.0
October 2012
Supervising other users’ calls
6-12
Chapter 6: Placing Calls in ViewPoint
Ending a conference call
A conference call normally ends when all parties hang up at roughly the same time. If you leave
the conference call early, by default the conference call continues without you. The other
participants can continue to talk, even if you started the conference and your company is paying
for the outgoing calls used to create it. To terminate the call, each participant must hang up, or
you must disconnect all parties.
Your system may be configured to disconnect the conference when you leave.
Supervising other users’ calls
With the proper permissions, you can enter another user’s call as a third party without being
invited. This is usually done by a manager to supervise the other user, or by an operator to
briefly join someone's call to announce something that needs immediate attention.
You can supervise calls in the following ways:
•
Monitor. You can listen to the other user’s call without being heard by the other parties in
the call.
•
Coach. You can speak to the other user without being heard by other parties in the call.
The other user is the only party to hear you. You hear all parties.
•
Join. You join the call as a full participant, able to hear and be heard by all parties in the
call. Essentially, you create a conference call by inviting yourself in.
Note the following:
•
Each supervise command is available only if you have permission to use that command
and the user is configured to allow being supervised with that command. When
supervising a call with multiple users, all other users in the call must be configured to
allow being supervised with that mode. If even one user already in the call does not
permit being supervised, you cannot supervise the call. Talk to your Wave system
administrator about whether you can monitor, coach, and join other users’ calls, and
which users you can supervise, if any.
•
You can monitor or join a call, but you coach a party in the call. For example, once you
have joined a conference call, you need to right-click one of the parties in the call in the
Parties pane in order to see the Coach option.
Wave ViewPoint User Guide
Release 3.0
October 2012
Supervising other users’ calls
6-13
Chapter 6: Placing Calls in ViewPoint
•
To coach, monitor, or join a call, at least one party in the call must be from the local Wave
system. For example, monitoring a call between two Gateway users (a Wave user whose
“home” is another node in the WaveNet network) is not supported.
•
Depending on your system setup, if the person you are supervising leaves the call—for
example, transfers it to someone else—you are disconnected.
To supervise another user’s call using ViewPoint
1.
2.
Select one of the following:
•
A call in the Call Monitor or Queue Monitor.
•
A user in the Extensions list who is currently on a call.
•
A Contact Center queue agent in the Agents pane of the Queue Monitor.
Choose Actions > Supervise, and select the supervisor mode you want to use. The option
is available only if both you and the other users in the call permit that supervisor mode.
To supervise another user’s call using the phone
1.
Pick up the phone and enter one of the following commands at the dial tone:
•
*57. Join.
•
*58. Coach.
•
*59. Monitor.
2.
Enter the extension of the user whose call you want to monitor, coach, or join, followed
by #.
3.
Press 1 to confirm the extension, or press * to enter a different extension.
Note: You can enter the complete digit string rapidly without waiting for the prompts.
For example, *58 102# 1 to coach extension 102.
4.
Once connected to the call, you can use the following phone command options:
•
To change the supervising mode—for example, from monitoring to coaching—
press Flash, then enter the code for the new mode.
•
To supervise a different user, press Flash # to return to the dial tone, then begin
again.
Wave ViewPoint User Guide
Release 3.0
October 2012
Using the ViewPoint Softphone
6-14
Chapter 6: Placing Calls in ViewPoint
Using the ViewPoint Softphone
The ViewPoint Softphone is software included with ViewPoint that appears as a new Dial Pad
tab in the Call Monitor.
If you have been configured to do so by your Wave administrator, you can use the ViewPoint
Softphone in either of the following ways:
•
As your primary phone, if you do not have a physical phone. You can use the ViewPoint
Softphone as your primary phone from the local LAN or when you run ViewPoint while
logged in via VPN from a remote location.
•
As your secondary phone, when you are away from your physical phone, for example
when you are on the road.
You must have audio playback and capture devices (microphone and speakers, headset, or other
USB audio devices) on your PC or laptop in order to logon using the ViewPoint Softphone. The
default Softphone device settings will work in most cases. For information about how to
optionally modify the default settings, see “Configuring the ViewPoint Softphone” on
page 12-10.
Specifying the ViewPoint Softphone when you log on
You specify how you want to use the ViewPoint Softphone when you log on to ViewPoint.
Wave ViewPoint User Guide
Release 3.0
October 2012
Using the ViewPoint Softphone
6-15
Chapter 6: Placing Calls in ViewPoint
In the ViewPoint Logon dialog:
•
•
To use the ViewPoint Softphone as your primary phone, select Default station ID.
To use the ViewPoint Softphone as your secondary phone, select Integrated
Secondary Softphone.
About the ViewPoint Softphone Dial Pad
When you select either of the options listed above when you log on to ViewPoint, a Dial Pad
icon is displayed at the bottom of the ViewPoint Call Monitor pane:
Click on this icon to display the ViewPoint Softphone Dial Pad. (If the entire Dial Pad is not
visible, click and drag the lower edge of the Call Monitor pane to adjust the viewing area.).
Number
keys
Use to send DTMF tones while you are on a call, for example in response to
prompts from an IVR application. The dial pad is disabled unless you are on
a call.
In this version, you cannot place a call using the ViewPoint Softphone Dial
Pad. Use any of the standard methods to place a call in ViewPoint, as
described on page 6-16.
Wave ViewPoint User Guide
Release 3.0
October 2012
Using the ViewPoint Softphone
6-16
Chapter 6: Placing Calls in ViewPoint
Click to toggle between using your headset while on a call, or your
microphone and speakers.
Use the slider bar to adjust the call volume.
Click to mute or unmute the call.
Use the slider bar to adjust the volume when you are recording a call.
Placing calls using the ViewPoint Softphone
Important: In this version, you cannot place a call using the ViewPoint Softphone Dial Pad.
To place a call when you are using the ViewPoint Softphone, use any of the methods described
in this chapter:
•
“Placing calls using the Dial bar” on page 6-2.
•
“Using the Place Call To dialog” on page 6-3.
•
“Quick-dialing from ViewPoint folders” on page 6-6.
•
“Placing calls using drag-and-drop” on page 6-7.
•
“Placing calls using other contact managers” on page 6-8.
Answering and handling calls using the ViewPoint Software
To answer a call when you are using the ViewPoint Softphone, double-click it in the Call
Monitor.
See Chapter 5, “Receiving and Handling Calls in ViewPoint” for more information, including:
•
“Selecting and acting on a call in the Call Monitor” on page 5-7.
•
“Commands while a call is ringing” on page 5-8.
•
“Commands while you’re on a call” on page 5-9.
Wave ViewPoint User Guide
Release 3.0
October 2012
Using a remote phone
6-17
Chapter 6: Placing Calls in ViewPoint
Using a remote phone
A Wave mobile extension allows your remote phone to be treated as a Wave station. (A remote
phone is any phone that is external to the Wave system, for example your cell phone, your home
phone, or a legacy PBX phone from another phone system.)
With a mobile extension, you can do the following from your remote phone:
•
Use ViewPoint to manage your voice messages and greetings, place outbound calls,
answer and manage calls displayed in the Call Monitor, and so forth. This functionality is
automatically available to you when you supply a remote number when you log onto
ViewPoint, as described in “Using ViewPoint with a different phone, Wave Server, or
language” on page 2-10.
•
Use ViewPoint to manage calls that are forwarded to your remote phone or routed to your
remote phone as a result of an action in your routing list. (This option is set for you by
your Wave system administrator.)
•
Use the Wave phone commands for full call control even if you are not using ViewPoint.
Using a remote phone with ViewPoint
When you place a call via ViewPoint or perform other ViewPoint actions remotely, Wave rings
your remote phone's number to connect you so that you can perform the selected action.
Because Wave calls you to connect you to place a call, calls placed via ViewPoint are billed to
your office, not your remote phone's number.
To place a call from a remote phone using ViewPoint
1.
Use any of the methods described in “Placing a call” on page 6-1 to place the call.
2.
When Wave rings your phone, pick up your phone to be connected with the call.
To answer and handle a call using ViewPoint
•
Use any of the methods described in Chapter 5.
Wave ViewPoint User Guide
Release 3.0
October 2012
Using a remote phone
6-18
Chapter 6: Placing Calls in ViewPoint
Using a remote phone without ViewPoint
This section describes how to do the following:
•
Place calls from a remote phone. See page 6-18.
•
Answer and handle calls from a remote phone. See page 6-18.
•
Use * commands form a remote phone. See page 6-19.
Placing calls from a remote phone
Placing an outbound call from your remote phone after logging into Wave requires permission.
Ask your Wave system administrator if this feature has been enabled for you.
To place a call from a remote phone without using ViewPoint
1.
Call into Wave from your remote phone.
2.
When the system prompts you to enter an extension, enter # <your extension> # <your
password> #.
3.
Press # to get an internal dial tone.
4.
Dial the number including the access code. (From internal dial tone, you can also dial
other Wave extensions, and use the * commands - see “Using * commands from a remote
phone” on page 6-19 for a list of available commands.)
Note: When placing a series of outbound calls from your remote phone, press **3 to end each
call instead of hanging up the phone. This keeps you connected to Wave. If you hang up, you
must call into Wave and log on again to place another outbound call.
Answering and handling calls from a remote phone
When using the Wave phone commands with a remote phone, you must press *# instead of the
Flash button to put calls on hold, use call-handling commands such as transfer or conference,
and so forth.
To answer and handle a call without using ViewPoint
1.
Pick up the phone to answer the call.
2.
Press *# to access the Wave phone commands to handle the call.
Wave ViewPoint User Guide
Release 3.0
October 2012
Using a remote phone
6-19
Chapter 6: Placing Calls in ViewPoint
Using * commands from a remote phone
The following * commands are available if you are using a mobile extension. Some *
commands are only available if you are an agent in a Contact Center queue.
Feature
Press
Description
Station ID
*00
Identifies the station ID assigned to your
phone.
Page
*11
Pages all phones with speakers.
Call as Queue
*14 + queue
extension #
Contact Center agents: Sets outbound caller
ID to the specified queue’s name and
extension for all subsequent calls.
Press *14 # to revert to calling as yourself.
Set Personal Status
to Available
*50
All calls ring through to you according to your
current call forwarding, routing list, and other
settings.
Set Personal Status
to Available (Queue
Only)
*51
Contact Center agents: Makes you available to
start taking queue calls. Non-queue calls are
sent directly to your voicemail.
Set Personal Status
to Available
(Non-Queue)
*52
Contact Center agents: Makes you unavailable
at the end of your shift. Non-queue calls still
ring your phone.
Set Personal Status
to On Break
*53
Contact Center agents: Puts you on a break
during your shift. While this status is selected,
the queue does not send calls to you.
Terminate wrap-up
time
*54
Contact Center agents: Terminates your
wrap-up time early and marks you as ready to
take queue calls again.
Wave ViewPoint User Guide
Release 3.0
October 2012
Using a remote phone
6-20
Chapter 6: Placing Calls in ViewPoint
Feature
Press
Description
Hear Queue
Statistics
*55
Contact Center agents: Plays current statistics
for a queue.
Sign In or Out of
Queue
*56 + queue
extension #
Contact Center agents: Signs you in or out of
the specified queue.
Monitor Call
*57 +
extension
Lets you listen in on an active call. Neither the
user nor the other parties in the call can hear
you.
Coach Call
*58 +
extension
Lets you coach a user on an active call. The
user can hear you, but the other parties in the
call cannot.
Join Call
*59 +
extension
Lets you join another user’s call as a full
participant. All parties can hear you.
Block Caller ID
*67 +
extension or
number to dial
Keeps your caller ID information private for the
next call.
Block Call Waiting
*70 +
extension or
number to dial
Turns off all audio and visual call waiting
indicators available on your phone for the next
call.
Conference
*71
Adds the party to a conference.
Night Answer Enable
*85
Redirects all inbound calls to the Wave system
to a predefined destination.
Night Answer Disable
*86
Turns off night answer mode.
Wave ViewPoint User Guide
Release 3.0
October 2012
Using a remote phone
6-21
Chapter 6: Placing Calls in ViewPoint
Feature
Press
Description
Log Incident
**
Logs a time stamp in the Wave system trace
logs that may be useful when troubleshooting
a problem.
Softhold
(Accept Call
Waiting)
*#
Places the active call on hold and connects you
to the incoming call.
If you put a call on hold when you are using a
mobile extension and then hang up your
phone, the party on hold will be dropped. This
behavior is different than when you hang up
with a party on hold while using a regular Wave
phone (an internal station)—in that case, the
party on hold remains on hold until you retrieve
the call or the call rings back your phone.
For details on how to use a specific * code, see the Wave Phone User Guide.
Wave ViewPoint User Guide
Release 3.0
October 2012
Release 3.0
October 2012
Chapter 7
Managing Voice Messages in ViewPoint
CHAPTER CONTENTS
About managing voice messages in ViewPoint. . . . . . . . . . . . . . . . . . . . . . . . . . 7-1
Listening to your voice messages and call recordings . . . . . . . . . . . . . . . . . . . . 7-4
Handling your voice messages . . . . . . . . . . . . . . . . . . . . . . . . . . . . . . . . . . . . . . 7-4
Managing call recordings. . . . . . . . . . . . . . . . . . . . . . . . . . . . . . . . . . . . . . . . . . 7-10
Managing your voicemail maximums . . . . . . . . . . . . . . . . . . . . . . . . . . . . . . . . 7-10
Sending a message directly to a user’s voicemail. . . . . . . . . . . . . . . . . . . . . . . 7-12
Knowing when you have new voice messages . . . . . . . . . . . . . . . . . . . . . . . . . 7-13
Managing voicemail greetings . . . . . . . . . . . . . . . . . . . . . . . . . . . . . . . . . . . . . . 7-23
Synchronizing Wave voice messages and contacts with your e-mail program . 7-27
About managing voice messages in ViewPoint
You can manage your voice messages and call recordings in Wave ViewPoint in the same way
that you manage e-mail messages in your e-mail program. Your new voice messages or
recordings appear in a list in your Inbox folder according to the time and the caller. You can
listen to them in any order you want, and you can easily forward them, reply to them, or save
them.
For instructions on how to listen to voice messages or recordings using the phone commands,
see the Wave Phone User Guide.
Wave ViewPoint User Guide
Release 3.0
October 2012
About managing voice messages in ViewPoint
7-2
Chapter 7: Managing Voice Messages in ViewPoint
The Messages folder
The Messages folder is your complete voice mailbox. It contains your Inbox, Saved, and
Deleted folders, which hold your voice messages as well as any call recordings sent to your
mailbox. New messages appear in the Inbox folder. Use the audio controls above the status bar
to play your voice messages. When you play a message, the audio bar shows elapsed message
playback time in minutes and seconds.
Voice messages have the following display attributes:
•
Bold text indicates a new (Unheard) message.
•
FW: in the From column indicates a message that was forwarded to you.
•
You can view the date on which a forwarded message was created by showing the
Created column in the Messages folder. See “Customizing columns” on page 12-20.
•
RE: in the From column indicates a message that was sent to you in reply to another
message.
Wave ViewPoint User Guide
Release 3.0
October 2012
About managing voice messages in ViewPoint
7-3
Chapter 7: Managing Voice Messages in ViewPoint
Messages folders
You can store your voice messages in multiple folders. The Messages folder contains three
predefined folders:
•
Inbox folder. New voice messages appear here. After you listen to them, they remain here
unless you move or delete them.
•
Saved folder. Saved messages appear here. When you save a message by using the phone
commands, it moves to the Saved folder.
•
Deleted folder. When you delete a voice message in ViewPoint, it is moved to the Deleted
folder. Voice messages deleted using the phone commands do not appear in the Deleted
folder. To empty the Deleted folder, see “Emptying the Deleted folder” on page 2-34.
Note: The Inbox and Saved folders are the only voice message folders accessible through the
phone commands. Voice messages in other folders are not accessible using the phone.
Shared message folders
Your Wave system may be set up to share other users’ voice message folders with you. If so,
you will see each shared folder in your Messages folder. The actions you can perform in a shared
folder depend on the permissions you’ve been given for that folder. Likewise, your own
message folders can be shared with other users. To change folder sharing, talk to your Wave
system administrator. For more about folder sharing, see “Sharing folders” on page 2-35.
Viewing Custom Data
Messages folders contains a Custom Data column that is hidden by default. By showing it you
can view all custom data that your office might have associated with the call, for example,
customer ID or caller priority. To show columns, choose View > Current View > Show Columns.
Archiving voice messages and call recordings
The system may be set up to periodically archive your older voice messages and call recordings.
If you find that your messages disappear from your voice mailbox, ask your Wave system
administrator whether they have been archived. You can access archived messages using the
Wave Archived Recording Browser (see Appendix A).
Wave ViewPoint User Guide
Release 3.0
October 2012
Listening to your voice messages and call recordings
7-4
Chapter 7: Managing Voice Messages in ViewPoint
Managing thousands of voice messages or call recordings
If you need to manage thousands or millions of messages or call recordings, you should have
your Wave system administrator set up automatic archiving, or manually archive your
messages. This eases the performance burden on ViewPoint and the Wave ISM, and you can
still use the Archived Recording Browser to quickly review, search, and manage the recordings
(see Appendix A).
Listening to your voice messages and call recordings
To listen to a voice message or call recording, double-click it in any Messages folder. For
instructions on using the audio controls, see “Using the audio controls” on page 2-36.
You can play the message or recording either over your computer's speakers or over your phone.
Choose Tools > Audio Output to switch audio output from one to the other. You can also use the
button on the right side of the status bar.
Note: You can open other ViewPoint folders while a message is playing and the message will
continue to play. The message stops playing, however, if you open a folder with another audio
control visible, for example, the Greetings folder.
Listening to a voice message as it is being left
To listen to a voice message as the caller is leaving it, without being heard by the caller, see
“Screening a voice message as it is being left” on page 5-9.
Handling your voice messages
You can perform the following tasks on a voice message using a few mouse clicks:
•
Forward it to other users. See page 7-5.
•
Reply to one or more users directly with a voice message of your own. See page 7-6.
•
Return the call, if the Caller ID or contact information is available. See page 7-6.
•
Export the voice message as a WAV or MP3 file. See page “Exporting ViewPoint
recordings” on page 2-41.
•
E-mail the voice message as a WAV or MP3 file attachment. See page 7-7.
Wave ViewPoint User Guide
Release 3.0
October 2012
Handling your voice messages
7-5
Chapter 7: Managing Voice Messages in ViewPoint
•
Open the contact record of the contact who left the message. See page 7-7.
•
Call back the person who left you the message. See page 7-6.
•
Associate a message with a contact so the caller is recognized. See page 7-8.
•
Delete a voice message. See page 7-7.
•
Mark an existing message Private, Unheard, or Urgent. See page 7-8.
•
Add notes to an existing message. See page 7-9.
•
Send a new voice message to other users. See page 7-12.
Forwarding a voice message
You can forward a voice message, except if it is marked Private, to one or more users. A copy
of the message is sent directly to the voicemail of all recipients.
You can also attach a recording of your own at the beginning of the forwarded message. For
example, “Bob, this is Jim. I received this message and thought you would want to hear it.” Your
recording precedes the forwarded message.
To forward a voice message
1.
In any Messages folder, right-click a voice message that you want to forward and select
Forward on the shortcut menu. The Forward Message dialog opens.
2.
In the Available Users list, select the users or groups to whom you want to forward the
message. Selecting a group forwards the message to all members of the group. Select
multiple items by holding the Ctrl key while you select.
3.
Click Add to move the selected users/groups to the Recipients list.
4.
Optionally, record a short message that introduces the message you are forwarding. Use
the audio controls (for detailed instructions, see “Using the audio controls” on
page 2-36).
5.
Click Send. A copy of the selected voice message, preceded by your short introductory
message, is forwarded to the recipients. When recipients select the message, they can
view (in the To field) a list of other users who received the same message. Users can reply
to the sender or to all recipients.
Wave ViewPoint User Guide
Release 3.0
October 2012
Handling your voice messages
7-6
Chapter 7: Managing Voice Messages in ViewPoint
Replying to a voice message
Replying to a voice message lets you send a recorded reply directly to the voicemail of the user
who sent you the message. You can send the reply to other users as well. Select the message and
choose Actions > Reply. Then perform steps 3-5 of “To forward a voice message” in the
previous section.
You can reply in this way only to a message left by another Wave user. You cannot send a
message in reply to a message left by an external caller.
Note: Replying to a message sends a new message to another user's voicemail. To call back
the person who left you the voice message, choose Actions > Place Call instead (see the next
section).
Note: If the user who sent you the message has since been deleted, the Reply and Reply All
options will be disabled in the Actions menu. In this situation, the sending user’s name will
remain in the messages’s From field until you switch views, after which it will change to
“Unknown”.
To reply to all recipients of a message
1.
Select the message.
2.
Click Actions > Reply to all.
The recipients are listed in the Recipients pane of the Reply to Message dialog.
Calling back the person who left a voice message
You can call back the person who left you a voice message by using the Wave Place Call or the
Speed Dial command. Place Call lets you choose the number to call if several numbers are
available. Speed Dial returns the call to the default number.
Note: On messages from unidentified callers, Wave places a call to the phone number from
which the message originated. If the message was left by someone calling from an office (PBX)
extension, you might not be able to connect to the correct party.
To call a person back
1.
Select the voice message left by the person you want to call back.
2.
On the Actions menu, choose Place Call or Speed Dial.
Wave ViewPoint User Guide
Release 3.0
October 2012
Handling your voice messages
7-7
Chapter 7: Managing Voice Messages in ViewPoint
E-mailing a voice message
You can e-mail a voice message as a WAV or MP3 file attachment to someone who is outside
the Wave system.
To e-mail a voice message, you must have an e-mail reader that supports MAPI installed on your
computer, such as Microsoft Outlook or Eudora Pro.
To e-mail a voice message
1.
Select the message you want to send by e-mail.
2.
Choose File > Send To, and select the desired format for the Mail Recipient. Your MAPI
mail ViewPoint Send dialog opens with the message attached.
3.
Address and send the e-mail as you normally would.
Opening the contact record from a voice message
If a voice message was left by an identified contact (see Chapter 10), you can open the contact
record to view or change information about the contact. To do so, choose Actions > Open
Contact.
Deleting voice messages
By default, messages in the Deleted folder that are older than three days are permanently
removed from Wave. For information about how to change the default, see “Emptying the
Deleted folder” on page 2-34.
To move a voice message to the Deleted folder
1.
Select the message.
2.
Choose Edit > Delete. The message is moved to the Deleted folder. You can still play it or
retrieve it if necessary.
Wave ViewPoint User Guide
Release 3.0
October 2012
Handling your voice messages
7-8
Chapter 7: Managing Voice Messages in ViewPoint
Deleting a voice message permanently
To delete a message permanently, hold down the Shift key while you choose the Delete
command. A message is also deleted permanently when you delete it from the Deleted folder or
empty the Deleted folder. See “Managing the Deleted folder” on page 2-33.
Associating a voice message from “Unknown” with a contact
A voice message that appears from “Unknown,” means that Wave could not identify the caller
as a Wave contact or user (Caller ID, if present, is still shown in the Number column). You can
associate the message with a contact, so that the correct name appears in the Call Monitor and
so that Wave identifies the contact on subsequent calls from that phone.
See “Associating a call or Caller ID number with a contact” on page 10-11 for complete
instructions.
Marking a voice message unheard
To mark an old (heard) voice message as new (Unheard), select the message and then choose
Actions > Mark As Unheard.
Marking a voice message Urgent or Private
You can mark a voice message Urgent, Private, or both. Private messages cannot be forwarded,
and users who share your mailbox cannot play them, reply to them, or call back the sender.
The icons in the columns to the right of the envelope icon show whether a message is Urgent
or Private
.
•
To mark a voice message Urgent, select the message and choose Actions > Urgent. Select
the command again to remove its Urgent status.
•
To mark a voice message Private, select the message and choose Actions > Mark As
Private. After a message is marked Private, it cannot be made not Private again.
Wave ViewPoint User Guide
Release 3.0
October 2012
Handling your voice messages
7-9
Chapter 7: Managing Voice Messages in ViewPoint
Adding notes to a voice message
To add written notes to a voice message, click the message and type your notes in the Notes Pane
at the bottom of the Messages folder. Notes that you enter during a recorded call are
automatically saved with the recording in your Inbox.
Any notes on a message accompany that message when it is forwarded to another user.
Hiding and showing notes
To hide or display the Notes Pane, choose View > Notes Pane. To hide the Notes column, see
“Showing and hiding columns” on page 12-20.
Adding bookmarks to a voice message
You can add bookmarks to a voice message to indicate a specific section within the message.
This is useful if you want to be able to reference specific details later. Also, since bookmarks
accompany the message when it is forwarded to another user, when forwarding a long message,
you can use bookmarks to direct the recipient’s attention to a specific section.
Note: Adding bookmarks does not shorten the voice message or change it in any way—it just
positions message playback to start at the first bookmark and end at the second bookmark. The
entire message is still available for playback.
To add bookmarks to a message, use the orange triangles at the bottom of the playback bar.
Click and drag each bookmark to the point in the message that you want to reference.
Wave ViewPoint User Guide
Release 3.0
October 2012
Managing call recordings
7-10
Chapter 7: Managing Voice Messages in ViewPoint
Managing call recordings
The following types of call recordings can appear in your Inbox:
•
Recordings that you made yourself using the Call Monitor (see “Recording a call” on
page 5-13).
•
Recordings made automatically by the system. Usually such recordings are sent to the
voice mailbox of a Wave system administrator or Contact Center queue supervisor. If you
are receiving such recordings in error, speak to your Wave system administrator.
You can listen to a call recording by double-clicking it, just as you listen to a voice message.
Any command you can use on a voice message you can also use on a call recording.
Managing your voicemail maximums
Choose Tools > Options > Voice Messages > Usage to view the size of your voice mailbox (in
minutes), and the percentage of that space you have used.
Your voice mailbox has a limited amount of disk space (in minutes) to store your voice
messages. In addition, your mailbox has a maximum length for any individual message. The
default is 180 seconds (3 minutes).
Note: If you log on to Wave using the phone commands and your voice mailbox is nearly full,
Wave prompts you to empty your Deleted folder.
Setting a maximum length for your voice messages
You can conserve space by setting a maximum length for voice messages. If a message exceeds
the time limit, Wave ends the message. The default maximum is 180 seconds (three minutes).
The highest maximum you can set is 300 seconds (5 minutes), unless your Wave administrator
changes the limit.
Note: Call recordings are not limited by message length specified here, but are limited only
by the size of your voice mailbox.
Wave ViewPoint User Guide
Release 3.0
October 2012
Managing your voicemail maximums
7-11
Chapter 7: Managing Voice Messages in ViewPoint
To set the maximum length for voice messages
1.
Choose Tools > Options. The Options dialog opens.
2.
Click the Voice Messages tab.
3.
In the Maximum message length field, enter the maximum voice message length in
seconds.
4.
Click OK.
Wave ViewPoint User Guide
Release 3.0
October 2012
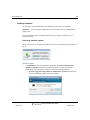
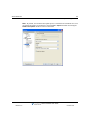
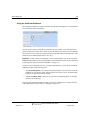
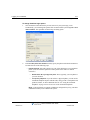
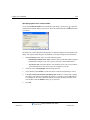
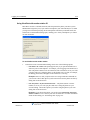
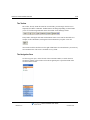
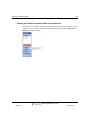
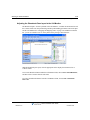
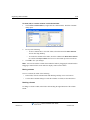
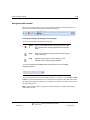
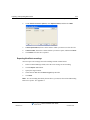
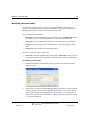
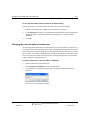
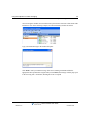
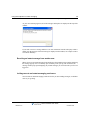
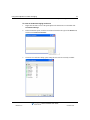
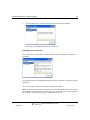
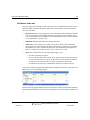
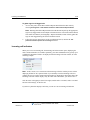
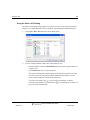
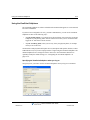
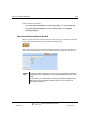
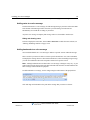
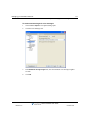
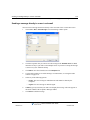
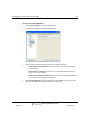
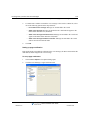
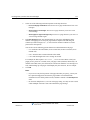
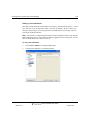
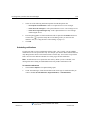
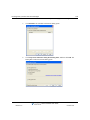
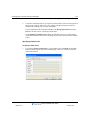
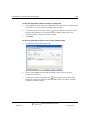
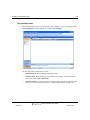
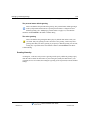
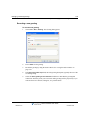
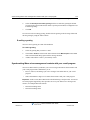
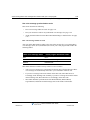
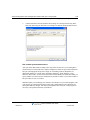
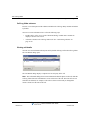
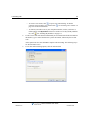
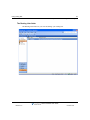
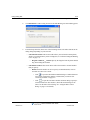
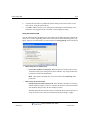
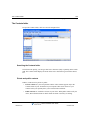
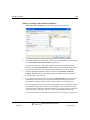
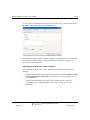
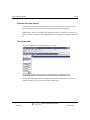
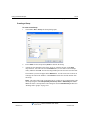
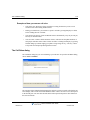
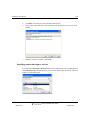
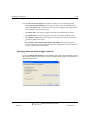
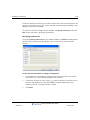
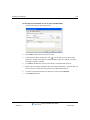
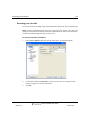
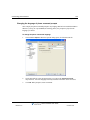
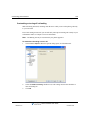
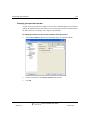
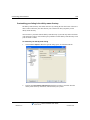
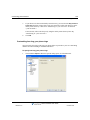
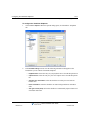
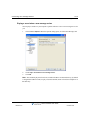
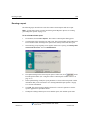
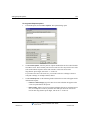
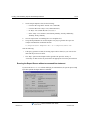
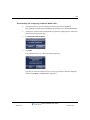
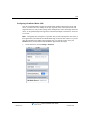
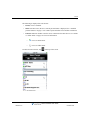
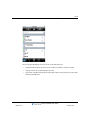
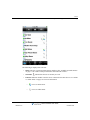
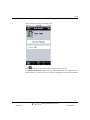
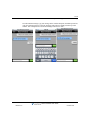
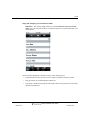
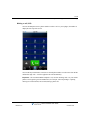
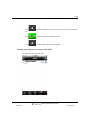
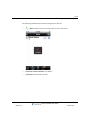
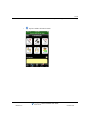
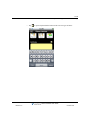
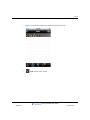
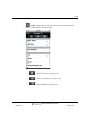
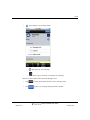
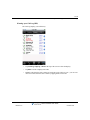
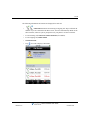
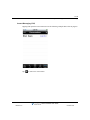
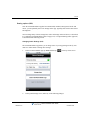
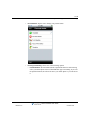
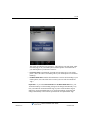
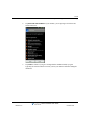
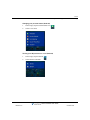
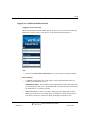
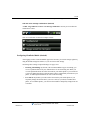
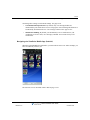
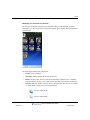
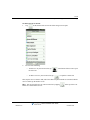
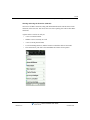
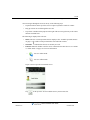
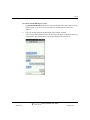
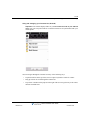
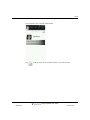
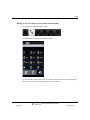
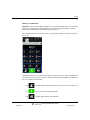
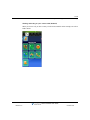
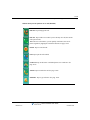
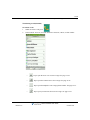
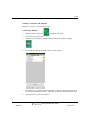
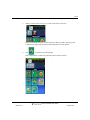
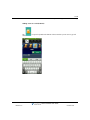
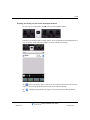
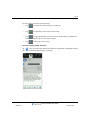
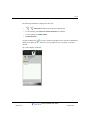
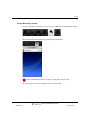
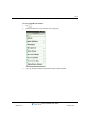
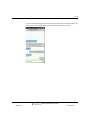
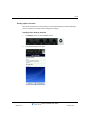
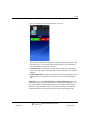
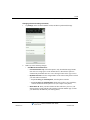
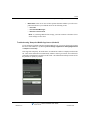
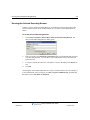
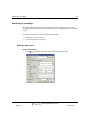
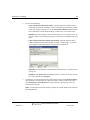
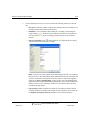
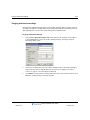
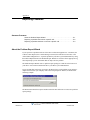
Sending a message directly to a user’s voicemail
7-12
Chapter 7: Managing Voice Messages in ViewPoint
Sending a message directly to a user’s voicemail
You can record a message and send it directly to the voicemail of one or more Wave users.
1.
Choose File > New > Voice Message. The New Message window opens.
2.
Click the recipients who you want receive the message in the Available Users list. Hold
down the Ctrl key as you click to select multiple users. If you select a Group, the message
is sent to every user within the Group.
3.
Click Add to move the selected users to the Recipients list.
4.
Use the audio controls to record the message. For instructions, see “Using the audio
controls” on page 2-36.
5.
Select any of the following options:
•
Private. The voice message is marked Private and cannot be shared by the
recipients.
•
Urgent. The voice message is marked Urgent.
6.
In Notes, type any notes that you want to accompany the message. The notes appear in
the Notes column of the recipients’ Messages folders.
7.
Click Send to send the message.
Wave ViewPoint User Guide
Release 3.0
October 2012
Knowing when you have new voice messages
7-13
Chapter 7: Managing Voice Messages in ViewPoint
Knowing when you have new voice messages
New voice messages appear in the Inbox folder soon after they are left. Wave indicates new
voice messages in the following ways:
•
Number in navigation pane
•
Stutter dial tone
•
Message-waiting light (if supported by your phone)
•
Sound played
•
E-mail, pager, and call notifications
Number displayed in the Navigation Pane
ViewPoint’s navigation pane displays the number of new messages in two
places: next to Inbox in the navigation bar, and next to the specific folder
(for example, Messages) in the Favorite Folders list.
Stutter dial tone
A dial tone that begins with a stutter when you pick up the phone indicates
that you have Unheard voice messages.
Message waiting light
If your phone has a message waiting light that Wave supports, you can have
it flash to indicate new voice messages.
Sound played
You can have Wave play a sound whenever a new voice message arrives. Choose Tools >
Options, click the Voice Messages tab, and select the Play a sound when a new message arrives
checkbox.
Wave ViewPoint User Guide
Release 3.0
October 2012
Knowing when you have new voice messages
7-14
Chapter 7: Managing Voice Messages in ViewPoint
E-mail, pager, and call notifications
Wave can alert you by e-mail, page, or phone call whenever you receive a new voice message.
This feature is handy if you are working at a remote location without ViewPoint. You can then
call your office and hear your messages. Your Wave system administrator can set up e-mail,
pager, and call notification for you.
You can receive notification for all voice messages, or for urgent messages only. You can also
receive notifications only on specific days or at specific times. See “Scheduling notifications”
on page 7-19.
Note:
•
For e-mail notification to work properly, the Wave ISM must be configured correctly. See
your Wave system administrator if you encounter any problems.
•
Notification is sent only for new voice messages, not new call recordings.
Setting up e-mail notification
E-mail notification messages include the caller's name (if available), the phone number at which
the call originated, the extension at which the message was left, the message length, and any
notes associated with the message. You can even have Wave attach the voice message itself to
the e-mail as an audio file so that you can play it wherever you are.
Wave ViewPoint User Guide
Release 3.0
October 2012
Knowing when you have new voice messages
7-15
Chapter 7: Managing Voice Messages in ViewPoint
To set up voice mail notification
1.
Choose Tools > Options. The Options dialog opens.
2.
Click the Voice Messages \ E-Mail Notification tab.
3.
Select one of the following notification options on the drop-down list:
•
Do not send e-mail notifications. You do not receive e-mail notification of new
voice messages.
•
Send e-mail for all messages. You receive an e-mail notification whenever you
receive a new voice message.
•
4.
Send e-mail for Urgent messages only. You receive an e-mail notification whenever
you receive a voice message marked Urgent.
In the E-mail address(es) field, type one or more e-mail addresses to which you want
Wave to send notifications. Separate addresses by semicolons.
Wave ViewPoint User Guide
Release 3.0
October 2012
Knowing when you have new voice messages
5.
7-16
Chapter 7: Managing Voice Messages in ViewPoint
To instruct Wave whether to attach the voice message to the e-mail as a WAV file, select
one of the following options on the drop-down list:
•
Do not attach voice message. Messages are not attached to the e-mail.
•
Attach voice message. Messages are attached to the e-mail and also appear in the
Inbox folder marked as new (Unheard).
•
Attach voice message and mark as heard. Messages are attached to the e-mail and
appear in the Inbox folder marked as old (heard).
•
Attach voice message and delete from Inbox. Messages are attached to the e-mail
and are moved to the Deleted folder.
6.
Click OK.
Setting up pager notification
Pager notifications can include the Caller ID of the voice message, the Wave extension that the
caller dialed, and the length of the voice message.
To set up pager notification
1.
Choose Tools > Options. The Options dialog opens.
2.
Click the Voice Messages \ Pager Notification tab.
Wave ViewPoint User Guide
Release 3.0
October 2012
Knowing when you have new voice messages
3.
7-17
Chapter 7: Managing Voice Messages in ViewPoint
Select one of the following notification options on the drop-down list:
•
Do not send pager notifications. You do not receive pager notification of new voice
messages.
•
Send a page for all messages. You receive a page whenever you receive a new
voice message.
•
Send a page for Urgent messages only. You receive a page whenever you receive a
voice message marked Urgent.
4.
In the Dial Sequence field, enter the dial string for your pager, including the phone
number of the paging service and your pager's PIN, if required. The dial string can
contain any touch tone digit (0-9, *, #). You can enter commas to indicate 2-second
pauses in the dial sequence.
You can also use the following special characters to add information to the page:
•
I or i sends the Caller ID number (for an external call) or Wave extension (for an
internal call).
•
E or e sends the Wave extension that the caller dialed.
•
L or l sends the length of the voice message in seconds.
For example, the dial sequence 18007771000,,,1245983#E causes Wave to dial your
paging service, pause for 6 seconds, enter your pager’s PIN (1245983) followed by # to
indicate end-of-PIN, enter your extension (the extension at which the voice message was
left), and then hang up. Your pager would display only the extension, 103 for example.
5.
Click OK.
Note:
•
If you receive only the last portion of the pager data that you specify, you may not
have placed enough pauses between the pager number to be dialed and the
information to send. If this problem occurs, add more commas to the Dial Sequence
field.
•
Do not enter multiple stars (*) in a row in the pager string. Use only one star to send
a dash. Multiple consecutive stars can terminate the page message.
Wave ViewPoint User Guide
Release 3.0
October 2012
Knowing when you have new voice messages
7-18
Chapter 7: Managing Voice Messages in ViewPoint
Setting up call notifications
Wave places notification calls to the number of your choice. The notification call says, “<voice
title> has a new voice message from <caller’s voice title if available>. Press # to hear your
message.” By pressing #, you can log onto the account and hear the new message, and even
press 4 3 to call the person back.
Note: You can enter or change the phone number to which notification calls are sent using the
phone commands. To do so, log on and press 6 4. By logging on from a remote phone, you can
have call notifications sent to wherever you are.
To set up call notification
1.
Choose Tools > Options. The Options dialog opens.
2.
Click the Voice Messages \ Call Notification tab.
Wave ViewPoint User Guide
Release 3.0
October 2012
Knowing when you have new voice messages
3.
7-19
Chapter 7: Managing Voice Messages in ViewPoint
Select one of the following notification options from the drop-down list:
•
Do not place call notifications. Calls are not placed for new voice messages.
•
Place call for all messages. A call is placed whenever a new voice message arrives.
•
Place call for urgent messages only. A call is placed whenever a voice message
marked urgent arrives.
4.
Enter the phone number to which notification calls are placed in the Number field. You
can also click
to open the Notify Me via Call dialog, where you can select the
number to call (see “Using the Place Call To dialog” on page 6-3).
5.
Click OK.
Scheduling notifications
If you do not want to receive notifications 24 hours a day, 7 days a week, you can schedule
notifications to occur at specific times only. For example, you can have Wave send notifications
only during business hours or after business hours on work days. You can also set up custom
hours. You can create different schedules for e-mail, pager, and call notification.
Note: Notifications are never queued for later delivery. When you use a schedule, voice
messages that arrive during an unscheduled time do not produce notifications at all.
To schedule notifications
1.
Choose Tools > Options. The Options dialog opens.
2.
Under Voice Messages, choose the notification tab for the type of notification that you
want to schedule (E-mail Notification, Pager Notification, or Call Notification).
Wave ViewPoint User Guide
Release 3.0
October 2012
Knowing when you have new voice messages
7-20
Chapter 7: Managing Voice Messages in ViewPoint
3.
Click Schedule. The Schedule Notifications dialog opens.
4.
Click Only send a notification during the following times, and then click Add. The
During Dates and Times Wizard dialog opens.
Wave ViewPoint User Guide
Release 3.0
October 2012
Knowing when you have new voice messages
5.
7-21
Chapter 7: Managing Voice Messages in ViewPoint
To base the notification times on your system’s business hours, click one of the options in
the top group. Click the link to view your system’s schedule for business hours and
holidays. After making your selection, click Finish.
To base notification times on another schedule, click During custom hours, then click
Next. See the next section, “Specifying custom hours.”
Check Enable this schedule action to make this schedule action active. Unchecking it
means that notifications will not be sent during the time frame specified in this schedule
action.
Specifying custom hours
To specify custom hours
1.
If you selected During custom hours as your schedule action, click Next on the During
Dates and Times page to open the next Wizard page, where you can specify when the
notification activates.
Wave ViewPoint User Guide
Release 3.0
October 2012
Knowing when you have new voice messages
7-22
Chapter 7: Managing Voice Messages in ViewPoint
To have the notification activate on a daily or weekly basis
2.
On the Weekly tab, check the days on which you the call rule to activate. The notification
will activate every week on that day during the times specified.
3.
To edit the active hours for a day, click the
button for that day. You can also type in
the hours using hyphens for a range and commas to separate multiple ranges. For
example: 9:00 AM - 12:00 PM, 1:00 PM - 5:00 PM.
4.
Click Finish.
To have the notification activate on one or more individual dates
5.
Click the On a Specific Date and Time tab.
6.
Enter or select a Date from the drop-down calendar control to specify when the
notification will be active.
7.
To edit the active hours for that date, click
. You can also type in the hours using
hyphens for a range and commas to separate multiple ranges. For example: 9:00 AM 12:00 PM, 1:00 PM - 5:00 PM.
Wave ViewPoint User Guide
Release 3.0
October 2012
Managing voicemail greetings
7-23
Chapter 7: Managing Voice Messages in ViewPoint
8.
Click Add to add that date, with its selected hours, to the Dates and Times list.
9.
Repeat steps 6 through 8 to add other dates to the Dates and Times list, if needed. The
notification will activate on each date/time specified in the Dates and Times list.
10. To remove a date from the Dates and Times list, click it and click Remove.
11. Click Finish when done.
Managing voicemail greetings
Greetings are recorded messages that callers hear when they reach your voicemail. For example,
“This is Steve. I’m not at my desk at the moment, but leave me a message and I’ll get back to
you soon.”
With Wave you can record and store multiple greetings and specify when you want Wave to use
each one. For example, you can have a normal greeting for everyday use, another greeting for
extended absences, and a third greeting for vacations. You can also create and use custom
greetings for individual callers (see Chapter 11).
Space for greetings
You have a limited amount of disk space for greeting and voice title recordings. See your Wave
system administrator to find out how much space has been allocated to you and how much you
have used.
Wave ViewPoint User Guide
Release 3.0
October 2012
Managing voicemail greetings
7-24
Chapter 7: Managing Voice Messages in ViewPoint
The Greetings folder
The Greetings folder lets you view and manage your greetings. To open the Greetings folder,
click Configuration in the navigation bar, and then click Greetings.
The Greetings folder contains three sections:
•
The Greetings list. Your existing greetings appear here.
•
The Notes Pane. This pane displays the contents of the greeting. To hide or show the
Notes Pane, choose View > Notes Pane.
•
The audio controls. Use these controls to record a new greeting, import a greeting from
disk, or rerecord a selected greeting. See “Using the audio controls” on page 2-36.
Wave ViewPoint User Guide
Release 3.0
October 2012
Managing voicemail greetings
7-25
Chapter 7: Managing Voice Messages in ViewPoint
The personal status default greeting
This icon identifies the personal status greeting. The personal status default greeting is
used by all personal statuses unless a specific personal status is configured to use a
different greeting. (See “Modifying a personal status” on page 3-8.) Note that this
column is called Is Default in the Show Columns dialog.
The active greeting
This icon identifies the greeting that Wave plays by default when callers reach your
voicemail. Only one greeting at a time can be the active greeting. Callers may hear a
greeting other than your active greeting if you specify a different greeting in a call rule,
routing list, or personal status. Note that this column is called Is Active in the Show
Columns dialog.
Greeting hierarchy
A routing list, a call rule, and your active greeting can all specify a different greeting to play
when the caller reaches the final action of your routing list (usually the final action is your
voicemail). In case of a conflict, the routing list’s greeting (if one is specified) overrides all other
settings.
Wave ViewPoint User Guide
Release 3.0
October 2012
Managing voicemail greetings
7-26
Chapter 7: Managing Voice Messages in ViewPoint
Recording a new greeting
To record a new greeting
1.
Choose File > New > Greeting. The Greeting dialog opens.
2.
Enter a Name for the greeting.
3.
Record the greeting by using the audio controls. See “Using the audio controls” on
page 2-36.
4.
In the Recording audio script field, enter the greeting description, typically the text of the
recorded greeting.
5.
Select the Active greeting for this extension checkbox to make this the greeting that
callers hear when they reach your voice mail. Other greetings will be played only if you
reference them in a call rule, routing list, or a personal status.
Wave ViewPoint User Guide
Release 3.0
October 2012
Synchronizing Wave voice messages and contacts with your e-mail program
7-27
Chapter 7: Managing Voice Messages in ViewPoint
6.
Select the Default personal status greeting checkbox to make this greeting the default
greeting used by all personal statuses unless a specific personal status is configured to use
a different greeting.
7.
Click OK.
To rerecord or edit an existing greeting, double-click the greeting in the Greetings folder and
edit the greeting by using the audio controls.
E-mailing a greeting
You can e-mail a greeting as a WAV file attachment.
To e-mail a greeting
1.
Select the greeting that you want to e-mail.
2.
Choose File > Send To, and select the desired format for the Mail Recipient. Your MAPI
mail ViewPoint Send dialog opens with the message attached.
3.
Address and send the e-mail as you normally would.
Synchronizing Wave voice messages and contacts with your e-mail program
You can use Wave Mail to synchronize your voice messages and contacts between Wave and
your e-mail program. Wave Mail allows you to:
•
Receive, listen to, and manage your voice messages from either Wave or your e-mail
program.
•
Share and maintain a single set of contacts between Wave and your e-mail program.
Important: In this version, Wave Mail works with the following e-mail providers. You can use
an e-mail program supported by these providers to access your shared voice messages and
contacts, for example Microsoft Outlook.
•
Microsoft Exchange 2007
•
Microsoft Exchange 2010
Wave ViewPoint User Guide
Release 3.0
October 2012
Synchronizing Wave voice messages and contacts with your e-mail program
7-28
Chapter 7: Managing Voice Messages in ViewPoint
How voice message synchronization works
This section describes the following:
•
How voice message folders are used. See page 7-28.
•
How you can listen to and act on synchronized voice messages. See page 7-29.
•
About potential conflicts between Wave Mail and Exchange or Outlook rules. See page
7-29.
How voice message folders are used
After you enable Wave Mail according to the steps in this section, all of your existing Wave
voice messages (New, Saved, and Deleted) are sent to your e-mail program and stored in the
following folders:
Wave voice message status
E-mail program destination folder
New
Inbox
Saved
Wave Saved Messages
Deleted
Deleted Items
Wave Mail continues to monitor activity in these two sets of folders.
•
After your voice messages are synchronized for the first time, all subsequent new Wave
voice messages are automatically delivered to your e-mail Inbox folder as well.
•
If you move a message between the folders on the Wave side, Wave Mail moves it
accordingly on the Exchange side. Similarly, if you move a message between the folders
on the Exchange side, Wave Mail moves it accordingly on the Wave side.
•
Wave Mail maintains synchronization of the Heard/Unheard (Read/UnRead),
Urgent/Normal, and Private/Normal message states in the folders on both sides.
Wave ViewPoint User Guide
Release 3.0
October 2012
Synchronizing Wave voice messages and contacts with your e-mail program
7-29
Chapter 7: Managing Voice Messages in ViewPoint
•
If you move a message to any other folder on the Exchange side, Wave Mail permanently
deletes the message on the Wave side.
•
If you rename the Wave Saved Messages folder, Wave Mail continue to use it with the
new name.
•
If you delete the Wave Saved Messages folder on the Exchange side, Wave Mail will
re-create it automatically the next time it needs it to synchronize a message residing in the
Saved folder on the Wave side.
How you can listen to and act on synchronized voice messages
With Wave Mail, you can listen to and manage your voice messages in any of the following
ways:
•
Via the phone, using the phone commands. See the Wave Phone User Guide for details.
•
Via ViewPoint, as described earlier in this chapter.
•
Via your e-mail program. See its documentation for details.
About potential conflicts between Wave Mail and Exchange or Outlook rules
If you have Exchange or Outlook rules for processing messages, it is possible that one or more
rules may be executed on a message that interfere with the expected synchronization between
Wave Mail and Exchange. For example, a rule might move a message to another folder, causing
a voice message to be deleted before you have a chance to listen to it.
To avoid conflicts of this type
1.
Define a new rule and make it the first rule to be executed before any other rules.
2.
Configure that rule to identify incoming voice messages delivered to the user’s Exchange
Inbox by Wave Mail. For example, the rule could search for “Voicemail: From” in the
message subject, or use other identification logic that applies to a particular user.
Wave ViewPoint User Guide
Release 3.0
October 2012
Synchronizing Wave voice messages and contacts with your e-mail program
7-30
Chapter 7: Managing Voice Messages in ViewPoint
3.
Add an action that if the rule identifies an incoming voice message delivered by Wave
Mail, stop processing all other rules. For example, an Outlook rule might look like this:
How contact synchronization works
After you enable Wave Mail according to the steps in this section, all of your existing Wave
contacts and your e-mail contacts are compared. Duplicate contacts are processed so that Wave
and your e-mail program end up with a single set of matching contacts. (Duplicates are
determined primarily by a name match, but address matching—phone numbers, e-mail
addresses, and so forth—are also used to determine a match.) When you enable Wave Mail, you
specify whether you want to use the information in your Wave contact or your e-mail contact to
take precedence in case of a conflict.
With Wave Mail, you can manage your contacts in ViewPoint or via your e-mail program. After
your contacts are synchronized for the first time, Wave Mail monitors both contact lists for
subsequent additions, changes, and deletions and updates Wave and your e-mail program as
necessary to keep both contact lists synchronized.
Wave ViewPoint User Guide
Release 3.0
October 2012
Synchronizing Wave voice messages and contacts with your e-mail program
7-31
Chapter 7: Managing Voice Messages in ViewPoint
Configuring your Wave Mail mailbox in ViewPoint
Important: Before you can begin synchronizing your voice messages and contacts between
Wave and your e-mail program, your Wave system administrator must assign you the
appropriate permission and configure your user account to use the feature. (If the settings
described below are disabled, this has not yet occurred.) Either your Wave system administrator
or you then need to perform the following steps to configure your Wave mailbox. If you perform
these steps in ViewPoint as described below, your Wave system administrator can tell you what
information you need to enter here.
To enable Wave Mail and configure your Wave Mail mailbox
1.
Choose Tools > Options. The Options dialog opens.
2.
Click the Personal \ Wave Mail tab.
3.
Select the Enable voice mail and contact synchronization checkbox.
Wave ViewPoint User Guide
Release 3.0
October 2012
Synchronizing Wave voice messages and contacts with your e-mail program
7-32
Chapter 7: Managing Voice Messages in ViewPoint
4.
Select the name of your Exchange Mail server from the drop-down list.
5.
Enter the Account name of your e-mail provider.
6.
Enter the Password for your e-mail provider’s account.
7.
Select one of the following Contact conflict priority settings. This setting determines
which contact takes precedence if similar contacts exist in Wave and your e-mail
program.
•
Wave has priority. The Wave contact information will be propagated to your e-mail
program.
•
External mail server has priority. The e-mail contact information will be propagated
to Wave.
8.
Click OK.
Wave ViewPoint User Guide
Release 3.0
October 2012
Chapter 8
Using the Call Log Folder
CHAPTER CONTENTS
The Call Log folder . . . . . . . . . . . . . . . . . . . . . . . . . . . . . . . . . . . . . . . . . . . . . . . 8-1
Taking notes on a Call Log entry. . . . . . . . . . . . . . . . . . . . . . . . . . . . . . . . . . . . . 8-6
Sending an e-mail message about a Call Log entry . . . . . . . . . . . . . . . . . . . . . . 8-6
Associating a call from “Unknown” with a contact . . . . . . . . . . . . . . . . . . . . . . . . 8-7
Returning a call in the Call Log . . . . . . . . . . . . . . . . . . . . . . . . . . . . . . . . . . . . . . 8-7
Entering an account code for a Call Log entry . . . . . . . . . . . . . . . . . . . . . . . . . . 8-8
Opening the contact record from a contact’s call . . . . . . . . . . . . . . . . . . . . . . . . 8-8
Sharing the Call Log . . . . . . . . . . . . . . . . . . . . . . . . . . . . . . . . . . . . . . . . . . . . . . 8-8
Reporting on the Call Log . . . . . . . . . . . . . . . . . . . . . . . . . . . . . . . . . . . . . . . . . . 8-9
The Call Log folder
The Call Log folder contains a record of all incoming and outgoing phone calls associated with
your extension. Internal calls—calls between Wave users—may or may not be logged,
depending on how your Wave system administrator set up the system.
Wave ViewPoint User Guide
Release 3.0
October 2012
The Call Log folder
8-2
Chapter 8: Using the Call Log Folder
To open the Call Log folder, click its entry in the navigation bar.
Call Log folder filters
The Call Log folder toolbar contains the following drop-down lists that enable you to view only
the calls you want.
Use either or both of the following:
•
Time filter. View the most recent calls according to the time frame you select. The time
frame begins at midnight for the range selected; for example, “1 day” shows calls since
midnight of the current day, and “1 month” shows calls since midnight of this date last
month.
•
Inbound/outbound filter. View only inbound calls, only outbound calls, or both.
Wave ViewPoint User Guide
Release 3.0
October 2012
The Call Log folder
8-3
Chapter 8: Using the Call Log Folder
Call Log folder columns
Press F1 to see a description of the columns available in the Call Log. Many columns are hidden
by default.
You can view more information for a call in the following ways:
•
Double-click a call to view it in the Call Details dialog, in which more columns are
displayed. See the next section.
•
Add more columns to the Call Log folder itself. See “Customizing columns” on
page 12-20.
Viewing call details
You can view more information about your calls by double-clicking a call in the Call Log folder.
The Call Details dialog opens.
The Call Details dialog displays a separate line for each party in the call.
Note: The Call Details dialog shows current information about the parties in the call, while the
Call Log folder shows the information as it was at the time of the call. Therefore the two can
sometimes be different, for example, if the call was from a contact and you changed the
contact’s name since the time of the call.
Wave ViewPoint User Guide
Release 3.0
October 2012
The Call Log folder
8-4
Chapter 8: Using the Call Log Folder
Call Details Columns
Column
Description
Indicates the incoming and outgoing components of the call,
respectively.
Name
Name of the parties in the call. On incoming calls, “Unknown”
appears unless the user identified the caller as a contact. On
outgoing calls, the user’s name appears.
Start Time
Date and time that each party began participating in the call.
End Time
Date and time that each party left the call.
Duration
Duration of the call.
Answered Time
Date and time that the call was answered.
Answered By
Name of the users for whom this was an incoming call.
Account Code
Account code associated with the call, if any. See “Entering an
account code for a Call Log entry” on page 8-8.
Number
On incoming lines, Caller ID name and number, if available. On
outgoing lines, the number dialed. On a call to or from another
Wave user, this field contains <NA>.
Number Type
The type of number displayed in the Number column. Types are:
Phone: External phone number
Internet: Internet or IP network address
Extension: Internal extension
Access Code
On outgoing calls and incoming calls over an IP gateway, the
access code of the dialing service used to place the call.
Wave ViewPoint User Guide
Release 3.0
October 2012
The Call Log folder
8-5
Chapter 8: Using the Call Log Folder
Call Details Columns (continued)
Column
Description
DID
On incoming lines, your Direct Inward Dial number if the caller
used it to call you. DID is not applicable for outgoing lines.
Device
On incoming lines, the trunk or station number at which the call
was placed. On outgoing lines, your station number.
Dial String
Digits that Wave actually dialed over the trunk, which can be
different than the digits Wave displays in a contact's phone
number. For example, a dial string can contain an international
or long-distance access code, least-cost routing information, or
dialing prefix or suffix.
Left Message
A check in this field indicates that the caller left a voice
message.
Result
How the call ended. The possible outcomes are:
Abandoned. Caller hung up before the call was answered.
Connected. Caller was connected to a party.
To voice mail. Caller went to voice mail, but did not necessarily
leave a message.
Blind transfer. A blind transfer sent the caller to another party.
See note below.
Supervised transfer. A supervised transfer sent the caller to
another party. See note below.
Login. Caller logged in to a valid Wave user account.
Login failed: Caller attempted to log in to a Wave user account,
but failed to enter a valid password within the maximum number
of retries allowed.
No Answer. Outbound call was not answered.
Unknown. Wave was unable to identify the outcome of the call.
Wave ViewPoint User Guide
Release 3.0
October 2012
Taking notes on a Call Log entry
8-6
Chapter 8: Using the Call Log Folder
Call Details Columns (continued)
Column
Description
A call result of “Blind transfer” or “Supervised transfer” is
displayed in a user’s Call Log only if the calling user performs
the transfer, not the called user. For example:
If user A calls user B, and then user A transfers the call to user
C, user A’s Call Log displays a “Transfer” result for the call.
If user A calls user B, and then user B transfers the call to user
C, user A’s Call Log displays the call’s result as “Connected”,
and user B’s Call Log displays a “Transfer” result.
See “Blind, supervised, and direct-to-voicemail transfers” on
page 5-11 for a description of the different types of call transfer.
Custom Data
Custom data, if any, associated with the call. Custom data can
be collected by IVR Plug-ins or Contact Center queues that
prompt the caller for information.
Taking notes on a Call Log entry
By clicking Notes in the bottom pane, you can take notes on a Call Log entry. Notes can help
you identify a call in the list or summarize important information about a call.
To take notes on a Call Log entry, select the entry, click in the Notes Pane, and then type your
notes. When you are done, you can press Enter or click your mouse anywhere. The notes you
just created appear in the Notes column for that Call Log entry. You can enter up to 2000
character in the Notes field.
Sending an e-mail message about a Call Log entry
You can create an e-mail message from a Call Log entry that is automatically preformatted with
call details. This can be useful for receptionists who sometimes need to send written messages
about a call.
To create an e-mail from the Call Log, select a call and choose Actions > Send To. A new e-mail
message opens preformatted with call details. You can add optional notes or other information
before sending the e-mail.
Wave ViewPoint User Guide
Release 3.0
October 2012
Associating a call from “Unknown” with a contact
8-7
Chapter 8: Using the Call Log Folder
Associating a call from “Unknown” with a contact
When a Call Log entry appears from “Unknown,” it means that Wave was unable to identify the
caller as a Wave contact or user. You can associate the call with a contact, so that the correct
name displays and Wave identifies the contact on subsequent calls from that phone.
See “Associating a call or Caller ID number with a contact” on page 10-11 for complete
instructions.
Returning a call in the Call Log
To return a call in the Call Log
1.
Select the call in the Call Log folder that you want to return.
2.
On the Actions menu, choose one of the following:
•
Place Call. This command lets you choose the number to dial from a submenu. If the
caller is a contact, you can choose the phone number to call from the list of the
contact’s phone numbers. You can also choose to call by using the Caller ID number
of the call.
•
Speed Dial. This command places a call immediately to a user’s extension, a
contact’s default number, or an unknown caller’s Caller ID number. You can also
choose Speed Dial by double-clicking the call.
3.
Click OK. Wave dials the number.
Wave ViewPoint User Guide
Release 3.0
October 2012
Entering an account code for a Call Log entry
8-8
Chapter 8: Using the Call Log Folder
Entering an account code for a Call Log entry
You can enter an account code or change the one already entered for a call in the Call Log. You
must have permission to view and edit the Call Log to enter or change account codes.
To enter an account code for a Call Log entry
1.
Select the call, and then choose Actions > Enter Account Code.
2.
Enter an account code. You can enter numbers, letters, or other characters.
3.
Click OK.
You can also enter an account code during a call using ViewPoint (see “Entering an account
code for a call” on page 5-17) or the phone commands.
Opening the contact record from a contact’s call
If a call was identified as being from a contact, you can open the contact’s record to view or
change information about that contact. To do so, select the call and choose Actions > Open
Contact.
Sharing the Call Log
Your Wave system administrator may have shared other users’ Call Logs with you. If so, your
Call Log will contain a tab for each share, where you can view the other users’ call history.
Likewise, your Call Log may be shared with other users. To change Call Log sharing, talk to
your Wave system administrator. For more about folder sharing, see “Sharing folders” on
page 2-35.
Wave ViewPoint User Guide
Release 3.0
October 2012
Reporting on the Call Log
8-9
Chapter 8: Using the Call Log Folder
Reporting on the Call Log
If you want to create reports based on the contents of your Call Log, you can run the Wave
Contact Center Reporter by choosing Tools > Reports. In order to use the Contact Center
Reporter, you must have permission to do so and it must be licensed on your system.
For help about a particular report, click Help on the Contact Center Reporter toolbar in Excel,
or choose Help in the Contact Center Reporter dialog. See your Wave system administrator for
more about using the Contact Center Reporter.
Wave ViewPoint User Guide
Release 3.0
October 2012
Release 3.0
October 2012
Chapter 9
Call Forwarding and Routing Lists
CHAPTER CONTENTS
About call forwarding and routing lists. . . . . . . . . . . . . . . . . . . . . . . . . . . . . . . . . 9-1
Forwarding calls . . . . . . . . . . . . . . . . . . . . . . . . . . . . . . . . . . . . . . . . . . . . . . . . . 9-2
Using routing lists . . . . . . . . . . . . . . . . . . . . . . . . . . . . . . . . . . . . . . . . . . . . . . . . 9-5
About call forwarding and routing lists
Vertical Wave provides two ways of receiving your calls at a phone other than your own,
ensuring that you do not miss important calls when you are away from your desk:
•
Call forwarding. You send your incoming calls to ring at another phone. You can forward
to another extension or an external number (for example, your home phone number).
Click Tools > Call Forwarding to forward your calls to another number (see “Forwarding
calls” on page 9-2).
Note: By default, when you forward your calls to a remote phone, the forwarded calls do
not appear in the ViewPoint Call Monitor and you cannot use ViewPoint call handling
features on the calls. Your Wave administrator can optionally configure your account so
that these calls appear in the ViewPoint Call Monitor.
•
Routing lists. Your incoming calls try a series of phone numbers until you answer at one
of them. You can also specify how your calls are handled when you are on the phone or
do not answer. Open the Routing Lists folder to create routing lists (see “Using routing
lists” on page 9-5).
Wave ViewPoint User Guide
Release 3.0
October 2012
Forwarding calls
9-2
Chapter 9: Call Forwarding and Routing Lists
Forwarding calls
To turn call forwarding on:
1.
Choose Tools > Call Forwarding. The Call Forwarding dialog opens.
2.
Do one of the following:
3.
•
Click On: (enter or select a number below) to forward your calls to a specific
number.
•
Click On: Softphone to forward your calls to your softphone. (This option is only
available if you selected Integrated Secondary Softphone when you logged on to
ViewPoint.)
Enter or select the number to dial in one of the following ways:
•
Enter the number to which calls are forwarded in the Name/Number field. You can
also type the name of a contact or user.
•
Click Extensions and select an extension on the list. You can also select an auto
attendant, IVR Plug-in, or Group.
•
Click Contacts and select a contact on the list. The contact’s default phone number
appears in the drop-down list below the main list. If the contact has more than one
phone number associated with it, you can select a different number on the
drop-down list.
Wave ViewPoint User Guide
Release 3.0
October 2012
Forwarding calls
9-3
Chapter 9: Call Forwarding and Routing Lists
4.
•
To create a new contact, click
to open a new Contact dialog. To edit the
currently selected contact, press Alt and click
. See “Entering a new contact” on
page 10-5 for more information.
•
To forward your calls to one of your own phone numbers, such as your home or
mobile phone, click My Numbers and select it on the list. To edit your My Numbers
list, click
. See “Entering My Numbers” on page 6-5.
To enter an account code that will automatically be associated with all calls forwarded to
this number, type a vertical bar character (|) after the number, followed by the account
code.
At this point most users can click OK to complete call forwarding. The following step is
for advanced Wave users.
5.
To set other call forwarding options, click the Advanced tab.
Wave ViewPoint User Guide
Release 3.0
October 2012
Forwarding calls
9-4
Chapter 9: Call Forwarding and Routing Lists
You can set any of the following options:
•
Prompt recipient to accept or decline call. If checked, when you pick up the phone
at an external number, Wave announces the caller (“Call from”) and intended
recipient (“Call for <your voice title>”) and asks you to accept or decline the call.
Unaccepted calls proceed to the next action in your routing list, usually your
voicemail.
You can use this checkbox to have all your unanswered calls go to your Wave
voicemail, rather than voicemail active at your forwarded number(s).
The call prompts loop, so you might not hear it from the beginning when you pick
up the phone. Press any key on your phone other than 1 or 2 to restart the prompt at
the beginning.
Note: This option is used only when forwarding calls to an external number.
•
Prompt recipient for password. If checked, the person who picks up the phone
hears, “Call for <your voice title>. Please connect me.” To be connected to the
caller, you must enter your Wave password. Entering a password ensures that only
you can receive your forwarded calls. This is useful when forwarding calls to a
hotel or a company with an operator.
Note: This option works only when calls are forwarded to an external number and
when you have a voice title for yourself recorded. If you have not recorded a voice
title, Wave ignores your selection of this option. For more about how to record your
voice title, see page 12-4.
•
Wait for answer. Enter the length of time in seconds that you want a call to ring the
forwarding number before going to proceeding to the next action on your routing
list (usually your voicemail). If you are using the option Prompt recipient for
password (described below) or Prompt recipient to accept or decline call
(described later in this step), you should enter at least 30 seconds. If you enter less
time, the call might be sent to your voicemail before you finish listening and
responding to the prompts.
6.
Click OK.
Wave ViewPoint User Guide
Release 3.0
October 2012
Using routing lists
9-5
Chapter 9: Call Forwarding and Routing Lists
Turning forwarding on and off via the FWD button
When your calls are forwarded, the FWD button in the status bar appears with an active
forwarding icon
. Click the button to open the Call Forwarding dialog to turn call
forwarding on or off or make other changes. Click the down arrow on the FWD button to turn
call forwarding off, or choose a different forwarding number.
Call forwarding and voicemail
If no one answers at your call forwarding location, the call is sent to your voicemail (unless you
have specified a different behavior using a routing list or call rule).
Using routing lists
A routing list is a series of phone numbers that Wave dials when calls for you arrive. If you do
not answer at one location, Wave proceeds to the next. For example, you can set up a routing
list that tries you at your desk, then at your home, and finally at your mobile phone.
A routing list ends with a final action that determines what happens if no one answers. Usually
the caller is sent to your voicemail, but you can specify other final actions. For example, you
can transfer calls to another extension, put callers on hold and try the series of numbers again,
or hang up.
You can specify a different final action for when you’re on the phone vs. when you’re away from
your desk. For example, if your phone is busy you can play a voicemail greeting such as “I'm
sorry I'm on the phone, please leave a message and I'll return your call as soon as possible.”
You can create as many routing lists as you want and make any one of them the active routing
list at any time.
Call center queue calls sent to agents do not follow the agents’ routing lists. See the Wave
Contact Center Administrator Guide for details.
Wave ViewPoint User Guide
Release 3.0
October 2012
Using routing lists
9-6
Chapter 9: Call Forwarding and Routing Lists
Keeping calls from “sticking” at voicemail in a series of external numbers
If you have a routing list that tries to reach you at a series of external numbers, you don’t want
calls at an unanswered step to be “answered” by voicemail there. To avoid this, make sure that
Prompt recipient to accept or decline call is checked for each routing list step. (See “Creating a
routing list using the Routing List Editor” on page 9-11 for instructions.) With this setting,
unless the call is actively accepted, it continues down your routing list.
Routing lists for individual callers
By using call rules, you can have Wave use a specific routing list for a specific caller or group
of callers. For example, you can have a routing list for important customers that includes trying
your mobile phone and another routing list for everyone else that only rings your extension. See
Chapter 11 for more information.
Caller options while following a routing list
When a routing list moves to the next action, Wave can alert the caller and offer the following
choices:
•
Press 1 or stay on the line to try the next number.
•
Press 2 to leave a voice message.
•
Press 3 to return to the auto attendant.
•
Press 0 to transfer to the Operator. If you have defined a personal Operator, the call
is transferred to that extension. If you have not defined a personal Operator, the call
is transferred to your office’s Operator extension.
You can specify whether Wave offers these choices for each action in the routing list. See
“Creating a routing list using the Routing List Editor” on page 9-11.
Wave ViewPoint User Guide
Release 3.0
October 2012
Using routing lists
9-7
Chapter 9: Call Forwarding and Routing Lists
The Routing Lists folder
The Routing Lists folder lets you view and manage your routing lists.
Wave ViewPoint User Guide
Release 3.0
October 2012
Using routing lists
9-8
Chapter 9: Call Forwarding and Routing Lists
The default routing list
This icon identifies the default personal status routing. The default personal status
routing list is used by all personal statuses unless a specific personal status is configured
to use a different routing list. (See “Modifying a personal status” on page 3-8.) Note that
this column is called Is Default in the Show Columns dialog.
The active routing list
This icon identifies the routing list that all incoming calls follow. Calls can follow another
routing list if you have created call rules for them (see Chapter 11). Only one routing list
at a time can be the active routing list, and you cannot delete the active routing list. Note
that this column is called Is Active in the Show Columns dialog.
The Standard routing list
The Standard routing list is the default routing list that is built into Wave. It consists of one
action: trying you at your Preferred Location. (See “Call Forwarding and Routing Lists” on page
9-1.) If you are busy or do not answer, the routing list sends the caller to voicemail.
You cannot edit the Standard routing list. To have calls follow a different route, you must create
a new routing list and make it the active routing list.
To make a routing list the active and default routing list:
1.
Right-click the routing list that you want to make the active routing list.
2.
Choose Actions > Set as Default and Active.
Wave ViewPoint User Guide
Release 3.0
October 2012
Using routing lists
9-9
Chapter 9: Call Forwarding and Routing Lists
Using the Routing List Wizard vs. the Routing List Editor
When you create a new routing list, Wave offers two ways of proceeding:
•
Routing List Wizard. For new users. The Wizard provides a simple interface to guide you
through the creation process.
•
Routing List Editor. For advanced users. The editor gives you access to the full range of
routing list editing options.
Wave ViewPoint User Guide
Release 3.0
October 2012
Using routing lists
9-10
Chapter 9: Call Forwarding and Routing Lists
Setting a default routing list method
To skip the Welcome to the Routing List Wizard dialog when creating subsequent routing lists,
select the Do not prompt me again checkbox. Whichever choice you made will automatically
recur for subsequent routing lists.
To change your choice or reactivate the Welcome to the Routing List Wizard dialog, choose
Tools > Options, go to the ViewPoint tab, and select one of the following in New routing lists:
•
Use the Wizard. The Routing List Wizard starts and guides you step-by-step through the
process of creating a routing list. This method is recommended for new users.
•
Use the Editor. The Routing List dialog opens, where you can quickly set up all features
of a new routing list. This method is recommended for experienced users.
•
Prompt me to use the Wizard or Editor. ViewPoint prompts you each time to choose
between the Wizard and the Editor. (Select this option to restore the prompt shown above
if you have skipped it.)
Creating a routing list using the Routing List Wizard
1.
Choose File > New > Routing List. If prompted to choose between the Wizard and the
Editor, choose Routing List Wizard.
2.
Follow the on-screen prompts to create the type of routing list you want. For each Wizard
page, you can press F1 for online Help.
When you create a routing list using the Wizard that routes calls to an external number, the
routing list uses the advanced settings (Prompt recipient for password, Prompt recipient to
accept or decline call, Wait for answer) that you have specified for call forwarding. See
“Forwarding calls” on page 9-2.
Wave ViewPoint User Guide
Release 3.0
October 2012
Using routing lists
9-11
Chapter 9: Call Forwarding and Routing Lists
Creating a routing list using the Routing List Editor
To create a routing list using the Editor
1.
Choose File > New > Routing List. If prompted to choose between the Wizard and the
Editor, choose Routing List Editor. The Routing List dialog opens.
The Actions tab shows the actions of your routing list in the order that they will be
performed. You can reorder the actions by dragging-and-dropping or clicking the arrow
buttons.
2.
Enter a name for the routing list in the Name field.
3.
To make this routing list the personal status default, check Use this routing list as the
default for incoming calls. When this checkbox is selected, the this routing list is used by
all personal statuses unless a specific personal status is configured to use a different
routing list. (See “Modifying a personal status” on page 3-6.)
Wave ViewPoint User Guide
Release 3.0
October 2012
Using routing lists
9-12
Chapter 9: Call Forwarding and Routing Lists
4.
Click New Action to add a routing list action. The Edit Routing List Action dialog opens.
5.
From the drop-down list, choose one of the following actions. The other elements in the
dialog change depending on your selection.
•
Call Preferred Location. This action sends calls to your Preferred Location phone,
which is your station unless you have changed it (see “Call Forwarding and Routing
Lists” on page 9-1).
•
Ring this number for __ seconds. Specify the length of time the phone should
ring when calling this location.
•
Call Another Location. This action directs calls to the internal or external number
that you specify.
•
Number. Enter the number to call. To specify an internal number, enter an
extension or a Wave user’s name.
•
Click
to open the Check Phone Number dialog to confirm that Wave
can correctly interpret the number or address that you entered. See
“Checking a number” on page 6-8.
•
Click
to open the Call Me at Another Location dialog to specify a
contact, extension or other number. (The fields on this dialog are the
same as on the Place Call To dialog. See “Using the Place Call To
dialog” on page 6-3 for details.)
Wave ViewPoint User Guide
Release 3.0
October 2012
Using routing lists
9-13
Chapter 9: Call Forwarding and Routing Lists
Note: Calls routed to another extension do not follow call forwarding or routing
lists in effect at that extension. To send calls to another extension so that they follow
that extension’s forwarding or routing list, use a final routing list action of Transfer
To extension.
You cannot route calls to an auto attendant or call center queue as a routing list
action, but you can do so by using a final action of Transfer To extension.
•
Call Group. This action directs calls to one or all members of the Group that you
specify. For more about calling a Group, see “Routing calls to groups” on
page 9-18.
•
Call Group. Select the Group to call. Click
•
Method. Select one of the following ways to ring the Group’s phones:
•
to create a new Group.
•
Individually in a round robin. The call tries each user or contact in the
Group in order until it is answered, starting with the next member in line
after the one who answered the preceding call.
•
Sequentially from the top down. The call tries each user or contact in the
Group in order until it is answered, starting with the first.
•
Simultaneously. The default numbers or Preferred Locations of all users
and contacts in the Group ring simultaneously, and the call goes to the
first who accepts it.
Ring this group for __ seconds. Specify the length of time each Group phone
should ring before the call tries the next phone in the Group.
Note: If you create a public ViewPoint group and give it an extension (making it a
dialable Voicemail distribution group), the ViewPoint group no longer appears in the
Call Group drop-down list. This is functioning as designed—groups with extensions
are filtered out from any workflow that would make them dialable.
•
Play greeting. This action does not ring a phone, but instead plays the caller the
greeting that you select from the Greeting drop-down list. You can also play a
greeting as part of each action and before the final action. To record a new greeting
from this dialog, click
. See “Recording a new greeting” on page 7-26.
While any greeting is playing, the caller can press 0 to transfer to the Operator or 1
to leave a voice message. You might want your greeting to mention these options.
Wave ViewPoint User Guide
Release 3.0
October 2012
Using routing lists
9-14
Chapter 9: Call Forwarding and Routing Lists
6.
Click the Advanced tab to set additional options relating to the chosen action. See the
next section, “Using the Advanced tab.”
7.
Click OK to add this action to your routing list. The Routing List Action dialog closes,
and the new action appears on the Actions tab of the Routing List dialog.
Using the Advanced tab
Click the Advanced tab of the Routing List Action dialog to set additional options related to the
action you’ve chosen. Depending on the action selected, not all of the following options may
appear. (There is no Advanced tab if you specified the action Play greeting on the General tab.)
•
When calling local or gateway users:
•
Do not call if member is on the phone. When this option is checked, calls sent to a
ViewPoint Group by the routing list will not be offered to any Group member who
is off-hook or in Do Not Disturb mode.
Note: This option is available only if you selected the action Call Group on the
General tab.
•
When calling an external number:
•
Prompt recipient to accept or decline call. Wave announces the caller (“Call from”)
and the intended recipient (“Call for”), and offers the option to accept or decline the
call. Declined calls proceed to the next routing list action.
With this option checked, the call will not be connected unless someone presses 1 to
accept it. For this reason, leave the field unchecked when routing to a pager.
Wave ViewPoint User Guide
Release 3.0
October 2012
Using routing lists
9-15
Chapter 9: Call Forwarding and Routing Lists
•
Prompt recipient for password. The person who answers the phone hears, “Call for
<your voice title>. Please connect me.” To be connected to the caller, you must
enter your Wave password. Using this option ensures that only you can receive your
calls at the external phone number.
Note: This option is available only if you have recorded a voice title. See
“Recording your voice title” on page 12-4 for more information.
•
When calling a Group:
•
Do not call if member is on the phone. When this option is selected, calls sent to a
ViewPoint Group by the routing list will not be offered to any Group member who
is off-hook or in Do Not Disturb mode.
•
Prompt recipient for password applies only to external numbers in the Group.
•
Prompt recipient to accept or decline call is automatically selected when calling a
Group.
For more about calling a Group in a routing list action, see “Routing calls to groups” on
page 9-18.
•
Prompt caller before trying this action. This option is available for a “Call Preferred
Location”, “Call Another Location”, or “Call Group” action. Select this checkbox to play
the caller a message before the routing list tries this action. Select the message to play
from the drop-down list. You can select one of your greetings or System menu to try the
next location, which says “There was no answer at that location. To try the next location,
press 1. To leave a message, press 2. To return to the main menu, press 3.” Click
to
create a new greeting.
Handling calls differently if you do not answer or are busy
When you have finished creating the routing list’s actions, click the If not answered or busy tab
of the Routing List dialog, to set the routing list’s final action. Final actions are performed on
calls that are still unanswered after trying all the actions.
Note: To specify different final actions for busy and no-answer states, see the next section,
“Handling busy station calls differently than calls not answered.”
Wave ViewPoint User Guide
Release 3.0
October 2012
Using routing lists
9-16
Chapter 9: Call Forwarding and Routing Lists
To specify a final action, make the following choices
•
Play Greeting. Check to play a greeting before the final action, then choose the greeting
from the drop-down list. For information about the System hold greeting, see the Pause
and repeat final action in the following list.
Important: Under most circumstances you should select this check box and select Active
as the greeting. For information, see “Using greetings with routing list final actions” on
page 9-20.
•
Action. Select the final action from the drop-down list. The following table describes the
possible final actions.
Final Action
Description
Take a message.
The call is sent to your voicemail.
Hang up.
The call is disconnected.
Prompt to hang up.
Internal callers are disconnected. External callers
are prompted to choose to end the call or to stay
on the line for more options. Callers who want
more options are transferred back to your
company’s auto attendant if one exists.
Transfer to extension.
The call is transferred to an extension that you
select on the Extension drop-down list, for
example, an operator, a coworker who handles
your calls, or an auto attendant. The transferred
call is treated as a new call to that extension. If no
one answers at that extension, the call follows that
extension's routing list.
Transfer to external
number.
The call is transferred to the external number that
you enter in the Number field.
Transfer to other
voicemail.
The call is sent directly to another extension’s
voicemail. Select an extension from the Mailbox
drop-down list.
Wave ViewPoint User Guide
Release 3.0
October 2012
Using routing lists
9-17
Chapter 9: Call Forwarding and Routing Lists
Final Action
Description
Pause and repeat.
The caller holds for the number of seconds you
define in the Pause duration field, and then begins
the routing list again. During the pause, callers
can press 0 for the operator or 1 to leave a voice
message. The greeting you choose can mention
these options.
The special prerecorded greeting called the
System Hold Greeting says, “The person you are
calling is unavailable. To hold, please stay on the
line. To leave a message, press 1.” It does not
mention the option to press 0 for the operator.
Handling busy station calls differently than calls not answered
You can optionally specify two final actions—one for situations when your station is busy, one
for situations when each action rings and goes unanswered. This allows you to handle calls
differently when you’re on a call vs. when you’re away from your phone(s). For example, you
can have a special greeting that plays when you’re on a call, that says, “I'm on the phone right
now, please leave a message.”
To use this feature, check Handle busy calls differently, and specify a final action for when your
line is busy. See the next section for additional information. If unchecked, the one final action
is used in both situations.
Note: Wave can detect a routing list action as “busy” only when it is a Wave station. External
numbers and Groups cannot trigger the “busy” final action.
Using “Handle Busy Calls Differently”
When you check Handle busy calls differently, the action you pick behaves differently from a
normal final action. As soon as the routing list encounters a busy station, the final action
triggers, skipping any subsequent actions. For example, if you have one action that tries your
office station and a second that tries your cell phone, with Handle busy calls differently set to
“Take a message,” and a call comes in while your station is busy, the call is sent to your
voicemail without trying your cell phone.
Wave ViewPoint User Guide
Release 3.0
October 2012
Using routing lists
9-18
Chapter 9: Call Forwarding and Routing Lists
Note: If while you are on the phone you receive an incoming call on an available line
appearance (for example, with call waiting or on a digital phone with multiple primary line
appearances), the call goes to the “Final action if the station is busy” after the ring duration
expires for your phone.
Routing calls to groups
A routing list action can send a call to Group by using the action Call Group. The first person in
the Group to answer the call is connected to the caller.
See “Creating a Group” on page 10-19 for instructions on creating a Group.
When a routing list calls a Group, the only numbers called are contacts’ default numbers and
users’ extensions. Note that users’ call forwarding settings are not followed. If you want to call
a group that includes two numbers for one person (for instance, your desk phone and your cell
phone), you must define two members of the Group, for example, yourself as a user and yourself
as a contact at your cell phone number.
Note: Contact Center queue and auto attendant extensions in a Group are not processed by a
routing list the same way that user extensions and contacts are processed. If a routing list step
calls a Group and the next member in the Group is a queue or auto attendant, processing stops
and the call is sent to the voice mailbox of the current step. For this reason, you may want to
reorder the members of a Group in order to maximize the chances for a call to be answered. For
example, if your routing list processes calls using the Sequentially from the top down method,
consider moving non-user extensions to the bottom of the list. See “Creating a Group” on
page 10-19.
To route calls to a Group as an action in an existing routing list
1.
Double-click the routing list in the Routing Lists folder. The Routing List dialog for that
routing list opens.
2.
Click Add. The Routing List Action dialog opens.
3.
In the Action field, select Call a Group.
4.
Select a Group or click
to create a new Group.
Note: Your system administrator may have defined a limit to the number of contacts in
a group that is called by a routing list. If you are unable to select a large group, talk to your
system administrator.
Wave ViewPoint User Guide
Release 3.0
October 2012
Using routing lists
9-19
Chapter 9: Call Forwarding and Routing Lists
5.
Under Method, choose one of the following ways to ring the Group’s phones:
•
Sequentially from the top down. The call tries each user or contact in the Group in
order until it is answered, starting with the first.
•
Individually in a round robin. The call tries each user or contact in the Group in
order until it is answered, starting with the next member in line after the one who
answered the preceding call.
•
Simultaneously. The default numbers or Preferred Locations of all users and
contacts in the Group ring simultaneously, and the call goes to the first who accepts
it.
6.
In the Ring this group for __ seconds field, specify the length of time each Group phone
should ring before the call tries the next phone in the Group.
7.
Use the Advanced tab for further options:
•
Do not call if member is on the phone applies only if the action is Call Group. When
you select this option, calls sent to the group by a routing list will not be offered to
any Group member who is off-hook or in Do Not Disturb mode.
•
•
Prompt recipient for password applies only to external numbers in the Group.
Prompt recipient to accept or decline call is automatically selected when calling a
Group.
8.
Click OK. You return to the Routing List dialog, in which the new routing list action
appears in the Actions list.
9.
Use the arrows next to the Actions list to reorder any actions in the routing list and then
click OK.
Note: When routing calls to a Group, you also can use the Pause and repeat final action. This
action keeps callers on hold until a member of the Group answers the call. Calls are answered
in the order of longest hold time, or “first in, first out” (FIFO).
Wave ViewPoint User Guide
Release 3.0
October 2012
Using routing lists
9-20
Chapter 9: Call Forwarding and Routing Lists
Using greetings with routing list final actions
For most routing lists, you should check Play greeting before the final action and select Active.
This ensures that callers who reach the routing list’s final action (for example, your voicemail)
hear a greeting. It also allows the greeting to change based on your other settings. For example,
you can use a call rule to play a different greeting when your friend Jim calls (see Chapter 11).
If you select a specific greeting under Play greeting, that greeting overrides the active greeting
and plays to all callers who reach the final action of the routing list, even if a different greeting
is specified in a call rule or personal status.
If you clear the Play greeting checkbox, no greeting plays to callers who reach the final action
of this routing list, even if a greeting is specified in a call rule. If the final action is Take a
Message, callers who reach your voicemail hear only the beep that signals that recording has
begun.
When to use a specific greeting with a routing list
It is highly recommended that you select a specific greeting to play if your routing list’s final
action is not ‘Take a Message.” In such a case, you want to be sure that the greeting that callers
hear matches the action that is about to happen. Examples of greetings for other final actions are
the following:
•
Hang Up. “I’m sorry you couldn’t find me. I’m not taking messages at the moment.
Good-bye.”
•
Transfer to extension. “I’m sorry you couldn’t find me. I’m transferring you now to my
administrative assistant.”
•
Pause and repeat. “The person you are calling is unavailable. To hold, please stay on the
line. To leave a message, press 1.” This is the text of the System Hold Greeting, a
greeting provided with Wave for just this circumstance. You can also record your own
version. See “Recording a new greeting” on page 7-26.
Wave ViewPoint User Guide
Release 3.0
October 2012
Chapter 10
Managing Contacts and Groups
CHAPTER CONTENTS
About contact management and Wave . . . . . . . . . . . . . . . . . . . . . . . . . . . . . . . 10-1
The Contacts folder . . . . . . . . . . . . . . . . . . . . . . . . . . . . . . . . . . . . . . . . . . . . . . 10-2
Managing contacts . . . . . . . . . . . . . . . . . . . . . . . . . . . . . . . . . . . . . . . . . . . . . . 10-5
Teaching Wave to recognize your contacts. . . . . . . . . . . . . . . . . . . . . . . . . . . . 10-8
Opening contacts from within other folders . . . . . . . . . . . . . . . . . . . . . . . . . . . 10-15
Synchronizing your Wave contacts with your e-mail program. . . . . . . . . . . . . 10-15
Using contacts maintained in another contact manager . . . . . . . . . . . . . . . . . 10-15
Using ViewPoint Groups . . . . . . . . . . . . . . . . . . . . . . . . . . . . . . . . . . . . . . . . . 10-17
About contact management and Wave
ViewPoint’s Contacts folder provides you with an online phone book of your phone contacts in
which you can enter the names, phone numbers, and other information about people you talk
with frequently on the phone. After you enter contacts, you can place calls to them with a few
clicks of the mouse.
This chapter describes the Contacts folder and then explains the following aspects of working
with contacts:
•
Managing contacts
•
Teaching Wave to recognize your contacts
•
Using ViewPoint Groups
Wave ViewPoint User Guide
Release 3.0
October 2012
The Contacts folder
10-2
Chapter 10: Managing Contacts and Groups
The Contacts folder
To open the Contacts folder, click its icon in the navigation bar.
Searching the Contacts folder
To find someone quickly, you can type their first or last name (fully or partially) in the Search
field. The Contacts folder displays all items whose first or last name begins with the entered
text.
Private and public contacts
In Wave, contacts can be private or public:
•
Private contacts are your own personal contacts. These contacts appear only in the
Contacts folder of your ViewPoint on your computer. Other users cannot see your
contacts unless you explicitly share your Contacts folder with them.
•
Public contacts are available to all users in your office. When public contacts call your
office, Wave identifies them no matter which extension or user they are calling.
Wave ViewPoint User Guide
Release 3.0
October 2012
The Contacts folder
10-3
Chapter 10: Managing Contacts and Groups
Public contacts contained in the Public\Contacts folder and can also be accessed via the
Phonebook pane's Contacts tab, and by choosing Actions > Place Call. To enter or edit a public
contact, you must have public contact editing permissions. If you do not have those permissions,
you can view and place a call to public contacts, but you cannot edit them.
Viewing shared contacts
To view other users’ contacts that have been shared with you, click that user’s name under
Public Folders in the Folder List and click the Contacts folder. To set up or change folder
sharing, talk to your system administrator. For more about folder sharing, see “Sharing folders”
on page 2-35.
Contacts folder tabs
The Contacts folder can optionally contain tabs that display related groups of extensions. Tabs
are located at the bottom of the Contacts folder. Click each tab to view its contents.
•
•
All tab.
•
In the Contacts folder, the All tab displays all of your personal contacts.
•
In the Public\Contacts folder, the All tab displays all public contacts.
Group tabs. The Contacts folder can optionally display a tab for each public ViewPoint
Group of which you are a member, and a tab for any personal ViewPoint Groups that you
created. Click a Group tab to see the extensions within that Group. See “Using ViewPoint
Groups” on page 10-17.
Wave ViewPoint User Guide
Release 3.0
October 2012
The Contacts folder
10-4
Chapter 10: Managing Contacts and Groups
Showing, hiding, and reordering Contacts folder tabs
To show or hide individual tabs, as well as choose their order
1.
In the Contacts folder, choose View > Show Tabs. (You can also right-click anywhere in
the the Contacts pane and then choose Show Tabs.)
2.
Select a tab name and click Add or Remove to set up the Show these tabs in this order
list. Use the up and down arrow buttons to arrange the order of tabs in the list.
3.
Click OK. The specified tabs are displayed at the bottom of the Contacts folder.
Changing double-click behavior
You can choose whether double-clicking a contact opens the contact for editing or places a call
to the contact. See “Defining double-click behavior in the Contacts folder” on page 12-19 for
more information.
Wave ViewPoint User Guide
Release 3.0
October 2012
Managing contacts
10-5
Chapter 10: Managing Contacts and Groups
Managing contacts
You can manage your contacts using Wave ViewPoint, or you can use another contact manager
application or customer relationship management program with Wave if you prefer. You can
also import contacts from other contact managers into Wave. See “Importing contacts from
other contact managers into Wave” on page 10-16.
Entering a new contact
Entering a new contact involves the following tasks, which are explained in detail in the three
procedures that follow:
•
Entering a contact's name and basic information. Other basic information includes the
contact’s company, any account code, and the language used for prompts for this contact.
You can also enter up to 5,000 characters in the Notes Pane of the Contact dialog. See
page 10-6.
•
Entering a contact's phone numbers and addresses. When you enter a contact’s phone
numbers, you can specify the number used for Caller ID and the number that is the
default number to dial when you call the contact. You can also specify a contact's e-mail
and instant messaging addresses for reference. See page 10-7.
•
Recording a voice title for a contact. Like your own voice title, a contact’s voice title is a
short recording that you create of the contact's name. See page 10-8.
Note: You have a limited amount of space for all voice files, including voice titles. Therefore,
if you have many contacts, you can save space by recording voice titles for the most important
ones only. Ask your Wave system administrator how much space you have been allocated and
how much you have used.
Wave ViewPoint User Guide
Release 3.0
October 2012
Managing contacts
10-6
Chapter 10: Managing Contacts and Groups
Entering a contact's name and basic information
1.
Choose File > New > Contact. The Contact dialog opens to the General tab.
2.
If you have permission to create public contacts, select which folder to create the contact
in, using the Create new contact in folder drop-down list.
If you have permission to create public contacts, you can make this contact a public
contact by choosing Contacts (Public). Public contacts can be seen and used by all Wave
users. All other selections create a private contact, which only you can see and use.
3.
Enter the appropriate information about the contact in the First Name, Last Name,
Company, and Title fields. The first and last names are displayed in the Call Monitor
folder when this contact calls you.
4.
If your office uses account codes, you can enter an Account code for the contact. Wave
automatically uses the account code for the call when it identifies the contact on an
incoming call or when you dial one of the contact’s numbers on an outgoing call.
If you are prompted to enter account codes when you place calls, you will hear a double
beep instead of a single beep to indicate you are dialing a contact who has an account
code already entered. When you hear the double beep, you can press # on your phone to
accept the contact’s existing account code, or you can enter another account code.
For more information, see “Entering an account code for a Call Log entry” on page 8-8.
Wave ViewPoint User Guide
Release 3.0
October 2012
Managing contacts
5.
10-7
Chapter 10: Managing Contacts and Groups
In the Preferred telephone prompts drop-down list, select the language that you want
Wave to use when it plays voicemail and other prompts to this contact. The available
languages are the languages that were installed on your system.
Entering a contact's phone numbers and addresses
1.
On the General tab in the Contact dialog, double-click the appropriate line in the Phone
Numbers and addresses list. The related Address dialog opens.
•
For Business, Home, Mobile, or Other., enter the following information:
•
Number: Enter the phone number to dial for the contact.
•
This number is the contact’s default: Select this checkbox if this is the phone
number you dial most frequently to reach the contact. The number you choose
as the default is slightly faster to select when you place calls.
•
Use this number as caller identification for this contact: Select this checkbox
if you want Wave to identify calls from this number as calls from the contact.
Checking this box adds the phone number to the contact’s Incoming Caller ID
list (see “Teaching Wave to recognize your contacts” on page 10-8). If this
option is unchecked, calls from this number appear in the Call Monitor and
Call Log folders as being from “Unknown.”
•
For Email or IMaddress. Enter the e-mail or instant message address for the contact.
You can enter notes about the address in the Description field.
2.
Enter notes about the phone number or address in the Description field. For example, for
a business number, this is a good place to enter the contact’s extension.
3.
Click OK to close the Phone Number dialog.
4.
To enter more phone numbers or addresses for this contact, repeat steps 1-3 for the other
categories in the Phone numbers and addresses list.
5.
Click OK to close the Contact dialog. The new contact now appears in the Contacts
folder.
Wave ViewPoint User Guide
Release 3.0
October 2012
Teaching Wave to recognize your contacts
10-8
Chapter 10: Managing Contacts and Groups
Recording a voice title for a contact
1.
In the Contacts folder, select the contact for whom you want to record a voice title and
choose File > Open.
2.
In the Contact dialog, click the Caller Identification tab.
3.
Record the Voice Title by using the audio controls. See “Using the audio controls” on
page 2-36 for instructions.
4.
Click OK.
Note: Wave can play the voice titles of contacts over your computer speakers automatically
when those contacts call. See “Customizing incoming call behavior” on page 12-13 for more
information.
Placing calls to your contacts
You can place a call to a contact with a phone number using ViewPoint. See “Placing a call” on
page 6-1 for instructions.
Teaching Wave to recognize your contacts
Wave’s more advanced features depend on Wave recognizing your contacts. You can teach
Wave to recognize your contacts in the following ways:
•
By recognizing the Caller ID number or name of the contact’s phone.
•
By recognizing a special number you give to the contact to dial after your extension,
called a Contact PIN. By using Contact PINs, Wave can recognize contacts regardless of
the phone they use to call.
Note: Wave automatically identifies other Wave users when they call from their stations or
their public numbers.
The benefits of having Wave recognize contacts include:
•
Their names appear in the Call Monitor while the phone is ringing to let you know who is
calling.
•
Their names are displayed on your Caller ID phone, if you have one.
Wave ViewPoint User Guide
Release 3.0
October 2012
Teaching Wave to recognize your contacts
10-9
Chapter 10: Managing Contacts and Groups
•
Their names appear in the Call Log and Messages folders, so that you can easily see
contacts in your phone record and quickly call them back.
•
You can hear your contact's name announced over your phone or PC speakers—without
forcing your callers to say their name every time they call—by saving a recorded voice
title with the contact.
•
You can use call rules to set up individualized call handling for them, such as playing a
unique voicemail greeting or routing their calls according to a specific routing list (see
Chapter 11).
One form of identification, Caller ID from the phone company, is available automatically for
every call. The phone number and Caller ID name of the caller appear in the Number column
of the Call Monitor, the Call Log, and the Messages folders.
Identifying contacts by name
Each contact has a list of associated phone numbers called the Incoming Caller ID list. When a
call arrives from one of those phone numbers, Wave identifies that contact.
The Incoming Caller ID list can include Caller ID names as well as phone numbers. See
“Understanding name and number on Caller ID” on page 10-14 for pointers on which item is
more useful for identifying a given contact.
Wave ViewPoint User Guide
Release 3.0
October 2012
Teaching Wave to recognize your contacts
10-10
Chapter 10: Managing Contacts and Groups
To view a contact's Incoming Caller ID list, select the contact in the Contact’s folder, choose
File > Open, and then click the Caller Identification tab.
To guarantee that Wave recognizes contacts, regardless of the phone number from which they
are calling, use a contact PIN. See “Using contact PINs for guaranteed recognition” on
page 10-14 for more information.
Adding phone numbers for contact recognition
You can add a phone number to a contact’s Incoming Caller ID list by doing one of the
following:
•
Add a new phone number for the contact in the General tab and check Use phone number
as caller identification for this contact. See “Entering a new contact” on page 10-5 for
more information.
•
Associate the phone number from a call or voice message with the contact. See
“Associating a call or Caller ID number with a contact” on page 10-11 for more
information.
Wave ViewPoint User Guide
Release 3.0
October 2012
Teaching Wave to recognize your contacts
10-11
Chapter 10: Managing Contacts and Groups
Deleting a number from the Incoming Caller ID list
If Wave wrongly identifies a contact as the caller, it is likely that the Incoming Caller ID list for
that contact includes an incorrect phone number. You can prevent further misidentification by
deleting the phone number from the list.
To delete a number from the Incoming Caller ID list
1.
Double-click the contact from whom you want to delete a phone number. The Contact
dialog opens.
2.
Click the Caller Identification tab.
3.
In the Incoming Caller ID list, select the incorrect phone number.
4.
Click Delete and then click OK.
Associating a call or Caller ID number with a contact
If Wave shows a caller’s name as “Unknown,” but you know who the caller is, you can associate
the call with one of your contacts. Doing this replaces “Unknown” with the contact’s name.
You can also associate the Caller ID number or the name from the call with a contact. Doing this
adds the number to the contact’s Incoming Caller ID list. Future calls from that phone show that
contact as the caller. In this way you can “teach” Wave to recognize the people who call you.
For example, the following illustration shows a voice message before association, showing
“Unknown” as the caller.
The next illustration shows the same message after you associate it with your contact Nathaniel
Chestnut.
Wave ViewPoint User Guide
Release 3.0
October 2012
Teaching Wave to recognize your contacts
10-12
Chapter 10: Managing Contacts and Groups
You can teach Wave to recognize a caller by Caller ID name instead of the phone number. This
can be useful, for example, if the contact calls from a company with a PBX that randomly
assigns phone numbers to trunks but uses a Caller ID name that remains the same.
Note: You cannot associate a phone number or Caller ID text with a public contact unless you
have permissions to edit public contacts. You can, however, label an individual call as being
from a public contact.
To associate a call with a contact
1.
2.
Click one of the following:
•
An active call in the Call Monitor folder
•
An entry for a call in the Call Log folder
•
A voice message in any Messages folder
Click
on the toolbar. The Associate dialog opens.
Wave ViewPoint User Guide
Release 3.0
October 2012
Teaching Wave to recognize your contacts
3.
10-13
Chapter 10: Managing Contacts and Groups
To associate this call with a contact, select the Associate the following contact with this
call checkbox. Then, identify the contact to associate with the call in any of the following
ways:
4.
•
Type all or part of the contact’s first, last or company name in the Search field and
then click
.
•
Scroll to the contact in the list, and then select it.
•
Create a new contact directly from this dialog. To do so, click
. (See “Entering a
new contact” on page 10-5 for instructions.) When you finish creating the contact
and return to this dialog, the new contact is displayed in the list.
To cancel an association and revert the call to its original identification, uncheck
Associate the following contact with this call.
5.
If the call came from a phone number that is new for this contact, you can add the new
number to the contact’s phone number list now. To do so, check Save the following
number in this contact, and then select the phone number category to save it as via the
Save As drop-down list.
6.
If you want only to label the individual call or voice message with the contact’s name,
deselect the Use caller identification for this contact checkbox.
If you want Wave to associate all subsequent calls from that phone with the contact,
check Use caller identification for this contact and select one of the following:
•
Number. Wave uses the phone number to recognize subsequent calls.
•
Name. Wave uses the Caller ID text to recognize subsequent calls.
•
Callback. Wave uses the callback number entered by the caller. (This option is only
available if the caller entered a callback number.)
See the next section for more information.
7.
Click OK.
Wave ViewPoint User Guide
Release 3.0
October 2012
Teaching Wave to recognize your contacts
10-14
Chapter 10: Managing Contacts and Groups
Understanding name and number on Caller ID
When you receive a call, Wave receives two pieces of information about where the call
originated: the phone number and the Caller ID name. You can associate either of these items
with a contact.
Depending on where the call originated, one item may work better than the other, as the
following examples illustrate:
•
If the call is from a home phone (for example, ANTANDER,LOU - 6178380405). In this
case, where both the number and name are unique, either could be used for association.
•
If the call is from a company with many phone lines (for example, Vertical Comm -
6175641121). In this case the phone number may change with every call, because the
office’s PBX system uses a random trunk for all outgoing calls. The Caller ID name,
however, remains constant, so you should use that for association.
•
If the call is from a standardized Caller ID name (for example, california - 7605550807).
In cases where the Caller ID name is standardized for many different phones, you should
use the phone number for association.
Using contact PINs for guaranteed recognition
Contact PINs provide a guaranteed way for callers to be recognized by Wave whenever they
call. A contact with a PIN can call from any phone number and be identified by Wave.
Contact PINs are unique numbers that you give out to contacts. Contacts add their PINs to your
extension when they call you.
Note: You cannot enter a contact PIN for a public contact.
Example: Your extension is 177, and you give Mr. Jones a contact PIN of 55. Mr. Jones calls
your office, and when prompted to enter your extension, he types in 17755. Wave is thus
assured of identifying this call as coming from Mr. Jones.
Example: You have a car for sale, so you could advertise it in the paper with your extension
plus a contact PIN (for example, “Call me at ext. 17756”). Set up the contact as “Car buyer”
with a PIN of 56. Now when anyone calls about the ad, it appears as from “Car buyer” in your
Call Monitor.
Wave ViewPoint User Guide
Release 3.0
October 2012
Opening contacts from within other folders
10-15
Chapter 10: Managing Contacts and Groups
To enter a contact PIN
1.
In the Contacts folder, double-click the contact for whom you want to create a contact
PIN. The Contact dialog opens.
2.
Click the Caller Identification tab.
3.
Under Contact PIN, enter the number that you intend to give to this contact. If the contact
PIN you entered conflicts with one already created, Wave prompts you to enter a different
number.
4.
Click OK.
Opening contacts from within other folders
After an incoming call has been identified as coming from a contact, you can easily open the
contact record from a Messages folder (if the contact left a voice message) or the Call Log
folder. Select the call or voice message, and then choose Actions > Open Contact.
Synchronizing your Wave contacts with your e-mail program
You can use Wave Mail to synchronize your contacts between Wave and your e-mail program.
For details, see “Synchronizing Wave voice messages and contacts with your e-mail program”
on page 7-27.
Using contacts maintained in another contact manager
If you make extensive use of another TAPI-compatible contact manager or customer
relationship management application such as Microsoft Outlook, GoldMine or FrontOffice
2000, or Interact Commerce Corporation’s Act!, you can place Wave calls to your contacts from
those applications by using the Wave TAPI Service Provider. See your Wave system
administrator about installing the TAPI Service Provider, and then follow your contact
manager’s instructions for placing calls. Calls placed by other applications still appear in your
Wave Call Log and Call Monitor folders.
Wave ViewPoint User Guide
Release 3.0
October 2012
Using contacts maintained in another contact manager
10-16
Chapter 10: Managing Contacts and Groups
You can also install the Wave Contact Manager Assistant (CMA) and receive screen-pops
showing the name, the Caller ID, and the time of day of the call. Act! users can receive
screen-pops without installing the CMA.
You do not need to have the Wave ViewPoint installed to use the TAPI Service Provider or the
CMA.
Using the Wave Contact Manager Assistant
The Contact Manager Assistant enables Outlook, GoldMine, or FrontOffice 2000 contact
managers to pop up contact information automatically when contacts in one of your contact
managers call. Wave recognizes the incoming Caller ID number, Caller ID, or name.
To run the Contact Manager Assistant
1.
Choose Start > Programs > Vertical Wave > Contact Manager Assistant. The program
starts and runs in the background.
2.
Right-click
in the system tray for a shortcut menu of commands that you can use to
configure and personalize the program. For further instructions, see the CMA’s online
Help.
Importing contacts from other contact managers into Wave
You can export contacts from other contact managers and import them into Wave.
Exporting contacts from Microsoft Outlook
The following instructions show how to export contacts from Microsoft Outlook:
1.
In Outlook, Select File > Import and Export.
2.
Select Export to a file from the list and click Next.
3.
Select Comma Separated Values (Windows) and click Next.
4.
Select a folder in which to store the contacts file and click Next.
5.
Enter a filename and click Next.
6.
Click Finish.
Wave ViewPoint User Guide
Release 3.0
October 2012
Using ViewPoint Groups
10-17
Chapter 10: Managing Contacts and Groups
Importing contacts into Wave
You can import contacts into Wave:
•
From a CSV file generated via Wave
•
From a CSV file generated from another contact manager such as Microsoft Outlook
For details, see “Importing and exporting Wave items” on page 2-37.
Using ViewPoint Groups
A ViewPoint Group is a group of related extensions or contacts. (Extensions in Wave include
users, Contact Center queues, and auto attendants.)
With a Group you can:
•
Send, reply, or forward a voice message to the Group. All users with voice mailboxes in
the Group receive the message at once. See “Sending a message directly to a user’s
voicemail” on page 7-12.
•
Create a call rule for the Group. Incoming calls from any user or contact in the Group are
handled according to the call rule. For example, you can have a custom voicemail
greeting that plays for all the members in your “VIP group.” See Chapter 11 for more
information.
•
View any extension in your Group when transferring calls, which makes it easier to pick
the right recipient. You can set any Group to appear as a tab in the Extensions section of
the Transfer To dialog. For example, you can define the members of your Sales
department as a Group, including a Station Hunt Group or a special Sales auto attendant.
When you have a call for the Sales department, you can click the Sales tab and see all the
department members at a glance, along with their current personal statuses. See
“Transferring a call” on page 5-11, and “Extensions list tabs” on page 4-3.
•
Create a routing list that distributes calls to the users and contacts in a Group according to
the distribution algorithm you choose. See “Routing calls to groups” on page 9-18.
Wave ViewPoint User Guide
Release 3.0
October 2012
Using ViewPoint Groups
10-18
Chapter 10: Managing Contacts and Groups
Personal and public Groups
Generally, the Groups you will create in Wave are personal Groups. Only you can see the
personal Groups that you create—they do not appear in other users’ ViewPoints.
Public Groups, which are accessible to all Wave users who have permission to see them, can
only be created by your Wave system administrator or a ViewPoint user with permission to do
so.
The Groups folder
The Groups folder lets you view and manage your Groups.
To open the Groups folder, click the Configuration icon in the navigation bar. The Favorite
Folders list offers access to your office’s Public Groups folder.
Wave ViewPoint User Guide
Release 3.0
October 2012
Using ViewPoint Groups
10-19
Chapter 10: Managing Contacts and Groups
Creating a Group
To create a new Group
1.
Choose File > New > Group. The Group dialog opens.
2.
Enter a Name for the Group and any Notes to describe the Group.
3.
Add one or more members to the Group. To do so, select the category in the Show
drop-down list, select the item from the Available list (or Ctrl+click to select multiple
items), and then click Add. You can also drag and drop an item from one list to the other.
The members you selected appear in the Members list. Use the arrows next to the list to
rearrange the order of the members. Click Remove to delete the selected member from
the Group.
Note: The order of the Group is important only if you have set up a routing list that calls
the Group using the method Sequentially from the top down or Individually in a round
robin. The order is not important if the routing list uses the Simultaneously method. See
“Routing calls to groups” on page 9-18.
Wave ViewPoint User Guide
Release 3.0
October 2012
Using ViewPoint Groups
10-20
Chapter 10: Managing Contacts and Groups
Note: Contact Center queue and auto attendant extensions in a Group are not processed
by a routing list the same way that user extensions and contacts are processed. If a routing
list step calls a Group and the next member in the Group is a queue or auto attendant,
processing stops and the call is sent to the voice mailbox of the current step. For this
reason, you may want to reorder the members of a Group in order to maximize the chances
for a call to be answered. For example, if your routing list processes calls using the
Sequentially from the top down method, consider moving non-user extensions to the
bottom of the list.
4.
Click OK.
Each ViewPoint Group can appear as a tab in your Extensions list. For more information, see
“Extensions list tabs” on page 4-3.
Wave ViewPoint User Guide
Release 3.0
October 2012
Chapter 11
Using Call Rules
CHAPTER CONTENTS
About call rules . . . . . . . . . . . . . . . . . . . . . . . . . . . . . . . . . . . . . . . . . . . . . . . . . 11-1
The Call Rules dialog . . . . . . . . . . . . . . . . . . . . . . . . . . . . . . . . . . . . . . . . . . . . 11-3
Creating a new call rule . . . . . . . . . . . . . . . . . . . . . . . . . . . . . . . . . . . . . . . . . . 11-4
Quickly creating call rules for contacts or groups . . . . . . . . . . . . . . . . . . . . . . 11-10
Call rule priority. . . . . . . . . . . . . . . . . . . . . . . . . . . . . . . . . . . . . . . . . . . . . . . . 11-10
About call rules
Wave call rules enable you to handle specific incoming calls differently from other calls. For
example, you can create a call rule for your friend Jim so that he is routed to your cell phone
and hears a special voicemail greeting whenever he calls. A call rule can trigger on calls from
specific people and/or the dates and times that the call is received.
Call rules overview
To create a call rule, you determine two things:
•
Which incoming calls activate the call rule
•
How the call rule handles those calls differently than calls that do not match a call rule
Wave ViewPoint User Guide
Release 3.0
October 2012
About call rules
11-2
Chapter 11: Using Call Rules
Distinguishing which incoming calls activate the call rule
You can distinguish which incoming calls are handled by a call rule by using one or both of the
following conditions:
•
People or Group condition. The rule activates depending on who is calling. In addition to
having call rules for individual callers, you can have call rules that apply to all internal
callers, all external callers, unidentified callers, or any member of a Group.
Example: You create a call rule for your important client that activates whenever he or
she calls.
•
Dates/Times condition. The rule activates depending on when the call arrives. You can
handle calls differently during business hours, after business hours, and at specific dates
or times.
Example: You create a call rule that handles all incoming calls after business hours.
When you combine caller and schedule conditions, the call rule handles calls only when both
conditions are met. For example, a call rule for your client Jim after business hours handles only
calls from Jim that occur after business hours. If Jim calls during business hours, the call rule
does not activate. Likewise, if anyone other than Jim calls after business hours, the call rule does
not activate.
Determining how the call rule handles calls
A matching call rule can handle incoming calls differently than other calls in the following
ways:
•
Greeting. You can choose which greeting plays if the caller reaches your voicemail.
•
Routing List. You can choose which routing list the call follows.
•
Send to voicemail. You can send the call straight to voicemail without ringing your
phone, as if you were in Do Not Disturb status.
•
Always ring. You can override Do Not Disturb so that the call always rings your phone.
Wave ViewPoint User Guide
Release 3.0
October 2012
The Call Rules dialog
11-3
Chapter 11: Using Call Rules
Examples of how you can use call rules
•
Calls from your “Prospects” Group can follow a routing list that tries you at several
locations in the office during business hours.
•
During your lunch hour, you can have a special “At lunch” greeting that plays to callers
before sending them to voicemail.
•
You can have the privacy of Do Not Disturb activate automatically every day at 6:00 pm,
but only for internal callers.
•
You can create a contact called “Nuisance Callers” and associate the phone numbers of
salespeople with that contact. Those callers can follow a routing list that plays a greeting
and then hangs up without ringing your phone. The greeting can say, “I’m sorry. I don’t
accept calls from salespeople during business hours.”
The Call Rules dialog
The Call Rules dialog lets you view and manage your call rules. To open the Call Rules dialog,
choose Tools > Call Rules.
The top pane of the Call Rules dialog displays the call rules you have created. Call rules that are
active display with a check mark in the Enabled column. Click a call rule to see its description
in the bottom pane. You can click the links in the bottom pane description to edit elements of
the selected call rule.
Wave ViewPoint User Guide
Release 3.0
October 2012
Creating a new call rule
11-4
Chapter 11: Using Call Rules
Enabling and disabling a call rule
To disable a call rule, select it in the top pane and click Disable. Disabled call rules are not used.
To enable it again, click Enable.
Organizing the priority of call rules
Call rules are listed in the top pane in order of priority, with the highest-priority call rule on top.
To change a call rule’s priority, select it and move it in the list by clicking Move Up or Move
Down.
See “Call rule priority” on page 11-10 for more information.
Creating a new call rule
The following procedure explains how to create a call rule.
To create a new call rule
1.
From the Call Rules window, click New Rule. To edit an existing call rule, select it in the
top pane and click Edit Rule. The Conditions page of the Call Rule Wizard opens, where
you can choose which incoming calls are trigger the rule.
Wave ViewPoint User Guide
Release 3.0
October 2012
Creating a new call rule
2.
11-5
Chapter 11: Using Call Rules
Check either or both of the following options:
•
From people or Group. Check to have the call rule trigger on calls from certain
individuals, groups, or categories of calls. Click people or Group in the bottom pane
to select which people trigger the rule. See “Specifying people that trigger a call
rule” on page 11-6 for instructions.
•
During dates and times. Check to have the call rule trigger on calls that arrive
during certain dates and times. Click dates and times in the bottom pane to specify
when the rule triggers. See “Specifying dates and times to trigger a call rule” on
page 11-7 for instructions.
3.
Click Next. The Actions page of the Call Rule Wizard opens, where you can specify what
actions the call rule performs on calls that trigger it.
4.
Check the following options singly or in combination:
•
Play the specified greeting, if the call goes to voicemail. Check, then click the
greeting link in the bottom pane, to specify a greeting that the caller hears if the call
goes to your voicemail.
•
Send the call directly to voicemail. Check to have the call rule send incoming calls
to your voicemail without ringing your phone.
•
Offer the call to me, even if I am not taking calls. If checked, calls that trigger the
rule will always ring your phone, overriding your Do Not Disturb.
•
Follow the specified routing list. Check, then click the routing list link in the bottom
pane, to specify a routing list that the call rule uses to route the call.
Wave ViewPoint User Guide
Release 3.0
October 2012
Creating a new call rule
11-6
Chapter 11: Using Call Rules
5.
Click Next. The Finish page of the Call Rule Wizard opens.
6.
Enter a name for the call rule. Use the bottom pane to edit elements of to the call rule if
needed.
7.
When the call rule is complete, click Finish.
Specifying people that trigger a call rule
If you select the From people or Group checkbox on the Condition page of the Call Rule Wizard,
click people or Group in the bottom pane to specify which callers trigger the call rule. The From
People or Group dialog opens.
Wave ViewPoint User Guide
Release 3.0
October 2012
Creating a new call rule
11-7
Chapter 11: Using Call Rules
From the This call rule will apply to drop-down list, choose one of the following options:
•
The selected contact/user/Group. Click an item in the list. Type the beginning of the
name in the Search field to narrow the search. The call rule triggers on all calls from the
selected contact, user, or Group member.
•
All internal callers. The call rule triggers on all calls from within the Wave system.
•
All external callers. The call rule triggers on all calls from outside the Wave system.
•
All “Unknown” callers. The call rule triggers on all external calls not associated with a
personal or public Wave contact.
•
All “Unknown” callers without Caller ID name and number. The call rule triggers on
external calls that are not associated with a personal or public Wave contact, and also do
not have a Caller ID name and number.
Specifying dates and times to trigger a call rule
If you check During dates and times on the Conditions page of the Call Rule Wizard, click the
dates and times link in the bottom pane to specify when the call rule triggers. The During Dates
and Times Wizard opens.
Wave ViewPoint User Guide
Release 3.0
October 2012
Creating a new call rule
11-8
Chapter 11: Using Call Rules
To base the call rule’s activation on your system’s business hours, click one of the options in the
top group. Click the link to view your system’s schedule for business hours and holidays. After
making your selection, click Finish.
To activate the call rule according to another schedule, click During custom hours, then click
Next. See the next section, “Specifying custom hours.”
Specifying custom hours
If you selected During custom hours as your schedule condition, click Next on the During Dates
and Times page to open the next Wizard page, where you can specify when the call rule
activates.
To have the call rule activate on a daily or weekly basis
1.
On the Weekly tab, check the days on which you the call rule to activate. The call rule
will activate every week on that day during the times specified.
2.
To edit the active hours for a day, click the
button for that day. You can also type in
the hours using hyphens for a range and commas to separate multiple ranges. For
example: 9:00 AM - 12:00 PM, 1:00 PM - 5:00 PM.
3.
Click Finish.
Wave ViewPoint User Guide
Release 3.0
October 2012
Creating a new call rule
11-9
Chapter 11: Using Call Rules
To have the call rule activate on one or more individual dates
1.
Click the On a Specific Date and Time tab.
2.
Enter a Date on which the call rule will be active.
3.
To edit the active hours for that date, click
. You can also type in the hours using
hyphens for a range and commas to separate multiple ranges. For example: 9:00 AM 12:00 PM, 1:00 PM - 5:00 PM.
4.
Click Add to add that date, with its selected hours, to the Dates and Times list.
5.
Repeat steps 2 through 4 to add other dates to the Dates and Times list, if needed. The call
rule will activate on each date/time specified in the Dates and Times list.
6.
To remove a date from the Dates and Times list, click it and click Remove.
7.
Click Finish when done.
Wave ViewPoint User Guide
Release 3.0
October 2012
Quickly creating call rules for contacts or groups
11-10
Chapter 11: Using Call Rules
Quickly creating call rules for contacts or groups
To quickly create a call rule that triggers on calls from a contact or a member of a Group, do the
following:
1.
Select the contact or Group in the appropriate ViewPoint folder.
2.
Choose Actions > Create Call Rule.
The Call Rule Wizard opens with that contact or Group already entered. See “Creating a new
call rule” on page 11-4 for further instructions.
Call rule priority
Wave handles incoming calls according to the priority of your call rules. The call rules in the
Call Rules window are ordered from the top down. If two call rules apply to the same call, the
call rule highest in the list is the one used.
You can create multiple call rules that contain similar caller and schedule conditions, and then
prioritize them to ensure that the correct greeting and routing list are used for calls. For example,
if you create a call rule for a Group, but want calls from a certain individual within that Group
to be handled differently, you can create a call rule for that individual and give it a higher priority
than the Group’s call rule.
To set the priority of a call rule
1.
Select a call rule in the Call Rules window.
2.
Click Move Up or Move Down to move the call rule to a higher or lower priority position.
Wave ViewPoint User Guide
Release 3.0
October 2012
Call rule priority
11-11
Chapter 11: Using Call Rules
How Wave resolves call rule conflicts
When a call is subject to multiple call rules, the actions taken (greeting, routing list, etc.) are
determined by the highest call rule in the list for which an action is selected. If the highest rule
sets an action, that action is used. But if it has an unselected action, while a lower rule sets that
action, the action from the lower rule is used. This can result in actions from different call rules
being used on a single call.
Example: A call rule for Paul plays a custom greeting, but leaves the routing list action
unselected. Paul is also a member of the Sales Group, for which you have a lower call rule
that specifies a routing list to follow. When Paul calls, Wave plays the custom greeting from
the higher call rule, and uses the routing list from the lower call rule.
Wave ViewPoint User Guide
Release 3.0
October 2012
Release 3.0
October 2012
Chapter 12
Customizing ViewPoint
CHAPTER CONTENTS
About customizing ViewPoint . . . . . . . . . . . . . . . . . . . . . . . . . . . . . . . . . . . . . . 12-1
Customizing phone behavior . . . . . . . . . . . . . . . . . . . . . . . . . . . . . . . . . . . . . . 12-3
Configuring the ViewPoint Softphone . . . . . . . . . . . . . . . . . . . . . . . . . . . . . . . 12-10
Customizing incoming call behavior . . . . . . . . . . . . . . . . . . . . . . . . . . . . . . . . 12-13
Customizing voice message behavior . . . . . . . . . . . . . . . . . . . . . . . . . . . . . . 12-15
Customizing ViewPoint for operators . . . . . . . . . . . . . . . . . . . . . . . . . . . . . . . 12-17
Customizing the ViewPoint display. . . . . . . . . . . . . . . . . . . . . . . . . . . . . . . . . 12-17
Other customization options . . . . . . . . . . . . . . . . . . . . . . . . . . . . . . . . . . . . . . 12-21
About customizing ViewPoint
You can customize ViewPoint and your Wave account to suit the way you work.
Most customization options presented in this chapter are set in the Options dialog, accessed by
choosing Tools > Options. Your Wave system administrator may have made some or all tabs of
the Options dialog unavailable to you. See your system administrator if you cannot access a
particular option that is described in this chapter.
Guide to the Options dialog
Note: Depending on your system configuration and your specific user permissions, some
Options tabs or Wave features described in this chapter may not be visible to you in ViewPoint.
See your system administrator for more information.
Wave ViewPoint User Guide
Release 3.0
October 2012
About customizing ViewPoint
12-2
Chapter 12: Customizing ViewPoint
Use the following table to locate instructions for the fields in the Options dialog.
Tab
Field
See...
All
Change Password
“Changing your password” on
page 2-17
Personal
Voice title
“Recording your voice title” on
page 12-4
Telephone prompts
“Changing the language of phone command prompts” on page 12-5
Personal operator
“Changing your personal operator” on
page 12-7
List in dial-by-name
directory
“Customizing your listing in the
dial-by-name directory” on page 12-8
Personal \
My Numbers
“Entering My Numbers” on page 6-5
Personal \
Wave Mail
“Synchronizing Wave voice messages
and contacts with your e-mail program”
on page 7-27
Phone
Default ring duration
“Customizing how long your phone
rings” on page 12-9
Enable call waiting
“Customizing or turning off call waiting” on page 12-6
Phone \ Softphone
Devices
Voice Messages
“Configuring the ViewPoint Softphone”
on page 12-10
Maximum message length “Setting a maximum length for your
voice messages” on page 7-10
Voice Messages \
Usage
Voice Messages \
E-Mail Notification
Voice message playback
order
“Setting voice messages playback
order” on page 12-15
Play a sound when a new
message arrives
“Playing a sound when a new message
arrives” on page 12-16
Mailbox size
“Managing your voicemail maximums”
on page 7-10
Remove Items From
Deleted folder
“Managing the Deleted folder” on
page 2-33
“Setting up e-mail notification” on
page 7-14
Wave ViewPoint User Guide
Release 3.0
October 2012
Customizing phone behavior
Tab
12-3
Chapter 12: Customizing ViewPoint
Field
See...
Voice Messages \
Pager Notification
“Setting up pager notification” on
page 7-16
Voice Messages \
Call Notification
“Setting up call notifications” on
page 7-18
ViewPoint
Log on automatically
“Disabling automatic logon” on
page 2-9
Double clicking contacts
behavior
“Defining double-click behavior in the
Contacts folder” on page 12-19
Language
“Using ViewPoint in languages other
than English” on page 2-15
New Routing Lists
“Using the Routing List Wizard vs. the
Routing List Editor” on page 9-9
Disable auto-updates
“Performing automatic updates” on
page 2-2
ViewPoint \ Call
Monitor
“Displaying the Call Monitor folder
automatically” on page 5-6
ViewPoint \ Call
Alerts
“Customizing incoming call behavior”
on page 12-13
Customizing phone behavior
The options described in this section allow you to customize your interaction with Wave on the
phone. These options include:
•
Recording your voice title. See this page.
•
Changing the language of phone command prompts. See page 12-5.
•
Customizing or turning off call waiting. See page 12-6.
•
Changing your personal operator. See page 12-7
•
Customizing your listing in the dial-by-name directory. See page 12-8
•
Customizing how long your phone rings. See page 12-9.
Wave ViewPoint User Guide
Release 3.0
October 2012
Customizing phone behavior
12-4
Chapter 12: Customizing ViewPoint
Recording your voice title
A voice title is a short recording of just your name that Wave fits into its own recorded prompts.
Note: You have a limited amount of space for your voice title, your contacts’ voice titles, your
greetings, and recorded conversations. Your Wave administrator can tell you how much space
you have been allocated and how much you have used.
To record a voice title in ViewPoint
1.
Choose Tools > Options. When the Options dialog opens, click the Personal tab.
2.
Use the audio controls for Voice title to record your voice title. See “Using the audio
controls” on page 2-36 for more information.
3.
Click OK.
Wave ViewPoint User Guide
Release 3.0
October 2012
Customizing phone behavior
12-5
Chapter 12: Customizing ViewPoint
Changing the language of phone command prompts
Wave can play the phone command prompts in any language that has been installed with Wave.
Whenever you log on or press Flash (on an analog phone), the prompts are played in the
language you choose.
To change the phone commands language
1.
Choose Tools > Options. When the Options dialog opens, click the Personal tab.
2.
On the Personal tab, select the language that you want on the Telephone prompts
drop-down list. All of the languages currently installed on the Wave Server are listed.
3.
Click OK. When prompted, restart ViewPoint.
Wave ViewPoint User Guide
Release 3.0
October 2012
Customizing phone behavior
12-6
Chapter 12: Customizing ViewPoint
Customizing or turning off call waiting
With call waiting turned off, incoming calls that arrive while you are on the phone go directly
to your voicemail.
Even if call waiting is turned off, you can still easily intercept an incoming call visually in your
Call Monitor folder. See Chapter 5 for more information.
Note: Call Waiting can only be customized if your phone supports it.
To customize call waiting or turn it off
1.
Choose Tools > Options. When the Options dialog opens, click the Phone tab.
2.
Select the Enable call waiting checkbox to use call waiting. Deselect this checkbox to
turn call waiting off.
3.
Click OK.
Wave ViewPoint User Guide
Release 3.0
October 2012
Customizing phone behavior
12-7
Chapter 12: Customizing ViewPoint
Changing your personal operator
A caller can always press 0 after reaching your voice mail or when listening to your routing list
prompts. By default, 0 transfers the caller to your system Operator, but you can transfer them to
any other extension, for example, your company’s auto attendant.
To change the extension to which callers transfer when they press 0
1.
Choose Tools > Options. When the Options dialog opens, click the Personal tab.
2.
Choose an extension on the Personal operator drop-down list.
3.
Click OK.
Wave ViewPoint User Guide
Release 3.0
October 2012
Customizing phone behavior
12-8
Chapter 12: Customizing ViewPoint
Customizing your listing in the dial-by-name directory
The dial-by-name directory lets callers dial a user by entering the first few letters of the user’s
name. Callers who know your name but not your extension can find you quickly via the
dial-by-name directory.
You can remove your name from the dial-by-name directory if you want only callers who know
your extension to call you. You can also specify whether or not the dial-by-name directory reads
your extension to callers.
To customize your dial-by-name listing
1.
Choose Tools > Options. When the Options dialog opens, click the Personal tab.
2.
Deselect the List in dial-by-name directory checkbox to remove your name from the
dial-by-name directory. If checked, callers can dial you by name.
Wave ViewPoint User Guide
Release 3.0
October 2012
Customizing phone behavior
3.
12-9
Chapter 12: Customizing ViewPoint
If you choose to be listed in the dial-by-name directory, you can select the Play extension
to the caller checkbox to have Wave read your extension to callers who find you via the
dial-by-name directory. Callers hear “Transferring to <your voice title> at extension
<your extension>.”
If not selected, callers who find you by using the dial-by-name directory hear only
“Transferring to <your voice title>.”
4.
Click OK.
Customizing how long your phone rings
You can specify how long a call rings your phone before it proceeds to your voice mail. Ring
duration for call forwarding is determined elsewhere.
To specify how long your phone rings
1.
Choose Tools > Options. When the Options dialog opens, click the Phone tab.
Wave ViewPoint User Guide
Release 3.0
October 2012
Configuring the ViewPoint Softphone
2.
12-10
Chapter 12: Customizing ViewPoint
In Default ring duration: ___ seconds, enter the number of seconds your phone will ring
before a call proceeds to the next action on your routing list (by default your voice mail).
(The ring duration you enter here can be overridden by the ring duration specified in a
personal status or routing list.)
Note: By default the minimum ring duration is 5 seconds and the maximum is 120
seconds. Your system administrator can extend the possible range from 1 to 999 seconds.
3.
Click OK.
Note: Caller ID is transmitted between the first and second ring. If your phone supports Caller
ID, you may want to increase the Default ring duration: ___ seconds setting so that there is
enough time for Caller ID to be displayed and read before the call is sent to your voice mail.
Configuring the ViewPoint Softphone
Important: Before you can use the ViewPoint Softphone as your primary or secondary phone,
you must be configured to do so by your Wave system administrator. See “Using the ViewPoint
Softphone” on page 2-6 for an overview of the ViewPoint Softphone.
The default device settings for the audio playback and capture devices (microphone and
speakers, headset, or other USB audio devices) on your laptop or PC that you use in conjunction
with the ViewPoint Softphone will work in most cases. You use this tab to modify the default
settings to use a specific device, or if you receive a popup at logon warning you that the default
device could not be loaded.
Wave ViewPoint User Guide
Release 3.0
October 2012
Configuring the ViewPoint Softphone
12-11
Chapter 12: Customizing ViewPoint
To configure the ViewPoint Softphone
1.
Choose Tools > Options. When the Options dialog opens, click the Phone \ Softphone
tab.
2.
In the Headset settings section, enter the following information that applies to the
headset that you use with the ViewPoint Softphone.
•
•
Playback Device. Select the entry for your playback device from the drop-down list.
Capture Device. Select the entry for your voice capture device from the drop-down
list.
•
Acoustic echo cancellation. Select this checkbox to reduce perceived echo on
headset calls.
•
Noise cancellation. Select this checkbox to reduce background noise on headset
calls.
•
Auto gain control (ACG). Select this checkbox to automatically adjust volume level
on headset calls.In the
Wave ViewPoint User Guide
Release 3.0
October 2012
Configuring the ViewPoint Softphone
3.
12-12
Chapter 12: Customizing ViewPoint
In the Speaker phone settings section, enter the following information that applies to the
computer speakers and microphone that you use with the ViewPoint Softphone.
•
•
Playback Device. Select the entry for your playback device from the drop-down list.
Capture Device. Select the entry for your voice capture device from the drop-down
list.
•
Acoustic echo cancellation. Select this checkbox to reduce perceived echo on
speaker phone calls.
•
Noise cancellation. Select this checkbox to reduce background noise on speaker
phone calls.
•
Auto gain control (ACG). Select this checkbox to automatically adjust volume level
on speaker phone calls.
4.
5.
In the *Ringer settings section, enter the following information that applies to how you
will be audibly notified that you have a new call.
•
Playback Device. Select the entry for your playback device from the drop-down list.
•
Volume. Use the slider to set the default volume on Softphone calls.
Click OK.
Wave ViewPoint User Guide
Release 3.0
October 2012
Customizing incoming call behavior
12-13
Chapter 12: Customizing ViewPoint
Customizing incoming call behavior
You can specify the call alert behavior to occur when you receive an incoming call. If you have
Call Monitor tabs other than “My Phone,” you can set call alerts separately for each
tab-category of calls (see “Call Monitor folder tabs” on page 5-3). For example, you can have
the ViewPoint title bar flash only on calls for your colleague whose Call Monitor you are
sharing.
To set call alerts
1.
Choose Tools > Options. When the Options dialog opens, click the ViewPoint \ Call
Alerts tab.
Wave ViewPoint User Guide
Release 3.0
October 2012
Customizing incoming call behavior
2.
12-14
Chapter 12: Customizing ViewPoint
Select one or more of the following options for all incoming calls:
•
Display a pop-up notification window. Opens a pop-up window opens displaying the
callers’s name.
•
Play the caller’s name over the speakers. Announces the caller's name over your
computer speakers if the recording is available. Wave users and identified contacts
are announced if they have voice titles already recorded.
•
Flash the title bar. Flashes ViewPoint’s title bar.
•
Display the Call Monitor. Brings ViewPoint to the front of your desktop with the
Call Monitor showing when a call arrives. If you are actively working in another
folder, ViewPoint opens the Call Monitor folder.
Note: If your Wave administrator has shared one or more other users’ Call Monitors with
you, you can specify different options for incoming calls from each Call Monitor. To do
so, select each Call Monitor entry from the drop-down list in turn and select the
appropriate options. To set the same options for all Call Monitors to which you have
access, select For all incoming calls from the drop-down list.
3.
Click OK.
Wave ViewPoint User Guide
Release 3.0
October 2012
Customizing voice message behavior
12-15
Chapter 12: Customizing ViewPoint
Customizing voice message behavior
You can customize the following voice message behaviors.
Setting voice messages playback order
This is the order in which Wave plays back voice messages when you are listening to your voice
messages using the phone commands, for example “Unheard (oldest to newest), Heard (oldest
to newest)”.
To set voice message playback order
1.
Choose Tools > Options. When the Options dialog opens, click the Voice Messages tab.
2.
Under Voice messages playback order, choose the order in which you prefer to listen to
your messages, for example Unheard (newest to oldest), Heard (newest to oldest).
3.
Click OK.
Wave ViewPoint User Guide
Release 3.0
October 2012
Customizing voice message behavior
12-16
Chapter 12: Customizing ViewPoint
Playing a sound when a new message arrives
You can play a sound over your computer ‘speakers whenever a new voice message arrives for
you.
1.
Choose Tools > Options. When the Options dialog opens, click the Voice Messages tab.
2.
Check Play a sound when a new message arrives.
3.
Click OK.
Note: The sound file played is Chord.wav, located in the Wave ViewPoint directory (by default
C:\Program Files\Wave\Client). To play a custom sound file, name it Chord.wav and place it in
that directory.
Wave ViewPoint User Guide
Release 3.0
October 2012
Customizing ViewPoint for operators
12-17
Chapter 12: Customizing ViewPoint
Customizing ViewPoint for operators
If you are an Operator user, you can use the following options to make your tasks easier and
faster:
•
Transfer calls by dragging-and-dropping to the Phonebook pane. If you display the
Phonebook pane in the Call Monitor folder, you can transfer a call by dragging it from the
Call Monitor to a contact or an extension. This action performs a blind transfer. See
“Adjusting the Phonebook Pane layout in the Call Monitor” on page 2-26 and “Dragging
and dropping items” on page 2-28.
•
Resize the Transfer To dialog. You can make the Transfer To dialog larger so that you can
see more users and more columns at a glance. Wave remembers the new size of the
Transfer To dialog whenever you open it.
•
View users by Group. In the Extensions list and Transfer To dialog, each Group can be
represented by a tab that lists its members. You can create Groups that represent the
departments of your office, so that when transferring calls, you can see at a glance all the
users in a given department. For example, if you have to transfer a call to Sales, you can
click the Sales tab (for the Sales Group) and see all the members of the Sales department
and their current personal statuses. See “Extensions list tabs” on page 4-3.
•
Manage all parked calls together. Right-click any Call Monitor tab, choose Show Tabs,
and add the Parked tab.
Customizing the ViewPoint display
You can customize your ViewPoint display in any of the following ways:
•
Change ViewPoint’s language. See page 12-18.
•
Define double-click behavior in the Contacts dialog. See page 12-19.
•
Customize columns. See page 12-20.
Wave ViewPoint User Guide
Release 3.0
October 2012
Customizing the ViewPoint display
12-18
Chapter 12: Customizing ViewPoint
Changing ViewPoint’s language
You can change the language of the ViewPoint user interface. To do so:
1.
Choose Tools > Options. When the Options dialog opens, click the ViewPoint tab.
2.
Select the desired language from the Language drop-down list.
3.
Click OK. You must restart ViewPoint for the change to take effect.
Wave ViewPoint User Guide
Release 3.0
October 2012
Customizing the ViewPoint display
12-19
Chapter 12: Customizing ViewPoint
Defining double-click behavior in the Contacts folder
Double-clicking a contact lets you either edit the information for the contact or place a call to
the contact.
To set double-click behavior
1.
Choose Tools > Options. When the Options dialog opens, click the ViewPoint tab.
2.
Under Double clicking contacts behavior, select one of the following behaviors:
•
Edit the contact. Double-clicking a contact in the Contacts folder opens the Contact
dialog for the contact.
•
Call the contact. Double-clicking a contact in the Contacts folder places a call to the
contact.
3.
Click OK.
Wave ViewPoint User Guide
Release 3.0
October 2012
Customizing the ViewPoint display
12-20
Chapter 12: Customizing ViewPoint
Customizing columns
You can choose to show or hide columns in a folder. You can also customize columns in a folder
by moving, resizing, and sorting them. The changes you make to columns in a folder are saved
when you exit ViewPoint.
Showing and hiding columns
For each folder in ViewPoint, you can choose the columns that you want to see in the folder.
Some folders do not show all the available columns by default.
To show or hide columns in a ViewPoint folder
1.
Choose View > Current View > Show Columns. You can also right-click in the folder and
select Show Columns. The Show Columns dialog opens. For an explanation of the
columns, click Help.
2.
Do any of the following:
•
In the Available columns list, select a column and click Add to show it.
•
In the Show these columns in this order list, select a column and click Remove to
hide it.
•
Use the arrows to arrange the columns in the left-to-right order you want. The
highest columns appear furthest to the left.
You can also drag and drop to move columns between panes and reorder them.
3.
Click OK.
Wave ViewPoint User Guide
Release 3.0
October 2012
Other customization options
12-21
Chapter 12: Customizing ViewPoint
Moving columns
To move a column, click its header and then drag and drop it to a new location. You can also
move columns by using the Show Columns dialog (see the previous section).
Resizing columns
You can change column widths by dragging the sides of the column headers.
Sorting by column
Click a column header to sort the items in a folder by the information in that column. Click the
column header again to sort in the reverse order.
The column in the folder that contains an arrow is the column by which the display is currently
sorted. The direction of the arrow indicates the order.
Other customization options
The following table refers you to customization options described elsewhere in this manual.
Feature
Description
See page
Recording greetings
Create recordings that callers hear when
they reach your voicemail.
7-23
Automatically logging on
Log on to ViewPoint without needing to
enter your password.
2-7
Changing your password
Change the password you use to log on
to Wave
2-17
Wave ViewPoint User Guide
Release 3.0
October 2012
Other customization options
12-22
Chapter 12: Customizing ViewPoint
Feature
Description
See page
Displaying the Call Monitor
folder automatically
Bring ViewPoint to the front with the Call
Monitor showing when you place calls
from ViewPoint.
5-6
Setting e-mail and pager
notification
Receive an e-mail message or a page
whenever you have new voice
messages.
7-14
Setting deletion options
Choose how voice messages are
permanently deleted from the Deleted
folder.
2-33
Wave ViewPoint User Guide
Release 3.0
October 2012
Chapter 13
Running Contact Center Reports
CHAPTER CONTENTS
About the Contact Center Reporter . . . . . . . . . . . . . . . . . . . . . . . . . . . . . . . . . . 13-1
Running a report . . . . . . . . . . . . . . . . . . . . . . . . . . . . . . . . . . . . . . . . . . . . . . . . 13-3
Setting Reporter options . . . . . . . . . . . . . . . . . . . . . . . . . . . . . . . . . . . . . . . . . . 13-6
Using Excel tabs to view report results . . . . . . . . . . . . . . . . . . . . . . . . . . . . . . . 13-9
Printing and scheduling reports with the Report Runner . . . . . . . . . . . . . . . . . 13-10
Available reports overview. . . . . . . . . . . . . . . . . . . . . . . . . . . . . . . . . . . . . . . . 13-13
Individual report descriptions. . . . . . . . . . . . . . . . . . . . . . . . . . . beginning on 13-14
Important: You can use the Contact Center Reporter to report on non-queue call activity and
phone usage, even if you are not an agent in a Contact Center queue. The available reports are
listed on the next page, and are described in more detail on page 13-13. Once Wave Contact
Center is generally available, additional reports will be available.
About the Contact Center Reporter
The Contact Center Reporter allows you to run more than a dozen detailed reports on call
activity and phone usage in Wave. You run reports on both queue calls and activity that has
nothing to do with queues, such as general user and trunk usage. By carefully tracking the
relevant call activity, you can quickly identify how effectively your phone system is being used
by agents, queues, or trunks.
With the Contact Center Reporter, you can also analyze general system data not related to call
distribution systems, such as the activity on your trunks.
You can configure each report to show information over any time period, from a single day to
months or even years.
Wave ViewPoint User Guide
Release 3.0
October 2012
About the Contact Center Reporter
13-2
Chapter 13: Running Contact Center Reports
Note the following:
•
You cannot run reports on time periods for which you have archived the Call Log.
Archiving removes information from the Wave database and makes it unavailable for
reports.
•
If you are running the Contact Center Reporter on a computer other than the Wave
Server, make sure that the clocks on the two computers are synchronized. All report times
and dates are based on the clock of the local PC.
Contact Center Reporter requirements
To run the Contact Center Reporter, you need the following:
•
Microsoft Excel 2003 SP3 or higher must be installed on the ViewPoint PC.
•
Wave permission to run reports. You must have the permission Access Contact Center
Reporter set to Allow. See Chapter 11 in the Wave Global Administrator Guide for
instructions on setting permissions.
•
A Contact Center Reporter license is required to run many reports. However, you do not
need a Contact Center Reporter license to run the following reports:
•
•
Call Log report
•
Call Transfer report
•
Grouped Service Level report
•
Outbound Call Comparison report
•
Outbound Calls By Phone Number report
•
Outbound Long Distance Summary report
•
Unanswered Calls During Business Hours report
•
User Call Trends report
To avoid a potential error when running reports, you must obtain the following updates
from the Microsoft Download Center (www.microsoft.com/downloads) and install them
on the ViewPoint PC:
•
KB955466 (Excel 2003 update)
•
KB907417 (Office 2003 update)
Wave ViewPoint User Guide
Release 3.0
October 2012
Running a report
13-3
Chapter 13: Running Contact Center Reports
Running a report
The following steps describe how to start the Contact Center Reporter and run a report.
Note: To run some reports, you must first define general Reporter options. See “Setting
general Reporter options” on page 13-6.
To run a Contact Center report
1.
In ViewPoint, choose Tools > Reports. The Contact Center Reporter dialog opens.
2.
Click the name of the report that you want to run. The report template opens in Microsoft
Excel and shows data according to the options most recently selected for that report.
3.
If the following prompt regarding macros appears while Excel is opening, check Always trust
macros from this source. Then click Enable Macros.
4.
The Options dialog for the selected report opens. If it does not, click
on the
Excel Reporter toolbar. (See “Using the Contact Center Reporter toolbar in Excel” on
page 13-4.)
5.
In the Options dialog, modify the report parameters to focus on the time period or other
information that you are interested in. See “Setting individual report options” on page
13-8 for more information.
6.
Click OK. The report runs and is displayed in Excel. Use Excel’s options to view the
report in graphical or spreadsheet format.
7.
The Reporter dialog remains open. To run another report, click another report name.
Wave ViewPoint User Guide
Release 3.0
October 2012
Running a report
13-4
Chapter 13: Running Contact Center Reports
Viewing report headers and footers
You must have a printer installed on your computer in order to view the headers and footers on
reports. The headers and footers include such data as report title, agent and queue name, date
range, date printed, and the days of the week for the report. If you do not have a printer (local
or network) configured on your computer, the headers and footers will be blank.
Using the Contact Center Reporter toolbar in Excel
Wave makes Contact Center Reporter options available to you from within Excel on the
Reporter toolbar. To display the Contact Center Reporter Toolbar in Excel, choose View >
Toolbars > Contact Center Reporter Toolbar.
Note: For the Contact Center Reporter toolbar to be available, you must have opened a report
from the Contact Center Reporter dialog.
The Contact Center Reporter toolbar offers buttons for the commands listed in the following
table.
Contact Center Reporter toolbar buttons
New Wave Report. Opens the Reporter dialog or brings it to the front
if it is already open, so that you can select a report to run. See “Running
a report” on page 13-3.
Export without Macros. Saves the report so that it can be opened in
Excel on any PC. Reports saved with macros can be opened only on
PCs with Wave applications installed.
Report Options. Opens the Report Options dialog for the report
currently showing, so that you can change the report parameters and
run the report again.
Refresh Report. Runs the report again with the same options as were
used to generate the current report. Use to update the report with the
latest data.
Help. Opens the Contact Center Reporter online Help.
Wave ViewPoint User Guide
Release 3.0
October 2012
Running a report
13-5
Chapter 13: Running Contact Center Reports
Shared and local reports
Reports can be either shared or local, as follows:
•
Shared reports are stored on the Vertical Wave Server and can be run from any
ViewPoint PC. Shared reports are indicated in the Reporter dialog by
(blank report)
or
(report with data) in the Shared/Data column.
The default path for shared reports on the Wave Server is:
C:\Program Files\Vertical Wave Server\Reports
•
Local reports are stored on the ViewPoint PC itself, and can only be run from that PC.
Local reports are indicated in the Reporter dialog by
in the Shared/Data column.
The default path for local reports is:
C:\Program Files\Vertical Wave\ViewPoint\Reporter\Reports
The reports that come with Wave are all shared reports.
To share a local report
1.
Select the report in the Reporter dialog.
2.
Choose File > Share.
After sharing a report, click the Refresh Report button on the Reporter dialog toolbar to see the
shared report in the Reporter dialog.
Reporting on outbound Contact Center calls
For agents’ outbound calls to appear in reports, the agents must place their calls as the queue
rather than as themselves. To do so, use the ViewPoint status bar. See “The Status Bar” on page
2-21.
Wave ViewPoint User Guide
Release 3.0
October 2012
Setting Reporter options
13-6
Chapter 13: Running Contact Center Reports
Backups of original reports
Because a user can accidentally overwrite a shared report by sharing one of his own reports with
the same name, backup copies of the original Wave report templates are provided in the
Reports_backup directory in the Wave Server directory.
Do not modify Contact Center report templates!
Important: Wave maintains report template (.XLT) files on the ViewPoint PC for its internal
use. Do not modify these as a means of editing the Wave reports. If you do, your changes will
be lost, because Wave regularly overwrites the reports. To modify a report template, save the
XLT file with a different name so that it is not overwritten by the Reporter.
Setting Reporter options
You set Reporter options in several ways:
•
Setting general Reporter options. See page 13-6.
•
Setting individual report options. See page 13-8.
Setting general Reporter options
Some reports will not run unless you have set general Reporter options. To do so, you must have
Administrator permissions.
Wave ViewPoint User Guide
Release 3.0
October 2012
Setting Reporter options
13-7
Chapter 13: Running Contact Center Reports
To set general Reporter options
1.
From the Reporter, choose Tools > Options. The Options dialog opens.
2.
Under Toll-free options, enter the prefixes of phone numbers that are free to dial from the
local Wave Server. These include your local area code as well as any toll-free area codes
such as 800 and 888. Separate entries with commas. You do not need to enter
long-distance prefix digits, such as the “1” in the U.S.
If your entire local area code is not free, you can enter each free exchange as the area
code plus exchange, for example 508452, 508673.
3.
Under In-state options, use the following fields to define how in-state calls appear on the
outbound call reports:
•
Label for in-state category. Type the name for in-state calls that will appear on the
x-axis of reports that use this option.
•
Enter in-state... Enter a list of area code and exchanges that are in your State but not
free, for example area codes in your State other than your local one. You do not
need to enter long-distance prefix digits, such as the “1” in the U.S.
Wave ViewPoint User Guide
Release 3.0
October 2012
Setting Reporter options
4.
13-8
Chapter 13: Running Contact Center Reports
Under Criteria for counting outbound calls, use the following fields to define which calls
are counted in various report categories:
•
Minimum outbound number length. In North America this field should be left at 10
so that the reports pick up all long-distance calls. Further filtering, for example for
the Outbound Long Distance Summary report, will be provided by the toll-free and
in-state fields above.
•
Minimum inbound/outbound call duration. These two fields ensure that the reports
count only calls that were connected. You can adjust the setting as desired. A setting
of 1 second is generally sufficient to include all connected calls.
•
Short call duration. Enter the number of seconds at or below which a call is
considered a “short call” by various reports, such as the Agent Performance by Skill
report.
5.
Click OK.
Setting individual report options
The Options dialog appears automatically whenever you run a report, letting you specify the
parameters for the report. You can also click Report Options on the Reporter toolbar to change
a report’s parameters and run it again, for example, with a different date range.
The following options are available for most reports:
•
Queue. Select the queue on which you want to run the report.
•
Agent. Select the agent on whom you want to run the report.
•
Period. Select the time frame for which you want to report. Use the Start and End fields
for custom time frames.
•
Interval. Select the length of time reflected by the report, such as hours, days, or months.
The time periods appear on the x-axis of the report.
Click OK in the Report Options dialog to run the report according to the options that you selected.
Wave ViewPoint User Guide
Release 3.0
October 2012
Using Excel tabs to view report results
13-9
Chapter 13: Running Contact Center Reports
Using Excel tabs to view report results
Most Wave reports contain the following tabs in Excel:
•
Report. A graphical presentation of the data.
•
Data. A numerical presentation of the data.
•
Report Options. A worksheet showing the options selected for the report.
Totals on the Data tab
Sometimes totals on the Data tab appear to be inaccurate. This is usually due to the way Excel
presents numbers, rounding them to the number of displayed digits. The total is always formed
by taking the sum of the complete numbers, then rounding. For example:
Displayed numbers
Total
s
Complete numbers
6.47
5.87
6.4650
5.8699
12.33
12.3349
Using the Report Options tab in Excel
Most users should not try to change the report parameters by changing the data on the Report
Options tab. Instead, click Report Options on the Reporter toolbar and enter new parameters in
the Options dialog, as described earlier in this section.
The Report Options tab in Excel is for those who want to print out the full workbook, with a
record of the selected options. Macro writers and other skilled spreadsheet users can also use
the tab to generate reports without using the Report Options dialog.
Wave ViewPoint User Guide
Release 3.0
October 2012
Printing and scheduling reports with the Report Runner
13-10
Chapter 13: Running Contact Center Reports
Printing and scheduling reports with the Report Runner
The Report Runner enables you to create a desktop shortcut for running and printing a report.
You can then run the report just by clicking the shortcut. You can choose whether to send the
report to a printer or a file.
You can also use the Windows Task Scheduler to run the Report Runner at any time and interval
you choose. See Windows Online Help for the Task Scheduler for more information.
To create a Report Runner shortcut for running a report
1.
Create a shortcut to the Report Runner file, Tvrrun.exe. The default location for the
Report Runner file is:
C:\Program Files\Vertical
Wave\ViewPoint\Reporter\TVRRun\Tvrrun.exe
For instructions on creating a shortcut, see your Microsoft Windows documentation.
2.
Right-click the shortcut and choose Properties.
3.
In the Target field, add the following after the path:
•
The path to the XLS file of the report you want to run.
•
(optional) -C to send the chart report to your default printer.
•
(optional) -T to send the data report to your default printer.
•
(optional) -S <output file> to print the report to a file. If you do not specify an
output file, the new report overwrites the source XLS file. Note: Do not use quotes
around the file path.
See the next section for examples of the Target statement.
4.
To set report options, such as queue name or selected hours, use the Report Options tab in
your saved XLS spreadsheet file. See “Using the Report Options tab in Excel” on page
13-9.
5.
Click OK.
Wave ViewPoint User Guide
Release 3.0
October 2012
Printing and scheduling reports with the Report Runner
13-11
Chapter 13: Running Contact Center Reports
Examples of the shortcut Target statement
The following are examples of how the shortcut’s Target field might look:
• C:\Program Files\Vertical Wave\ViewPoint\Reporter\TVRRun\
Tvrrun.exe C:\Program Files\Vertical Wave\ViewPoint\Reporter\
Reports\Wait by Outcome1.xls -C
•
The chart for the Wait by Outcome1.xls report is sent to the printer.
• C:\Program Files\Vertical Wave\ViewPoint\Reporter\TVRRun\
Tvrrun.exe C:\Program Files\Vertical Wave\ViewPoint\Reporter\
Reports\Trunk Performance.xls -C -T
•
The chart and the data sheet for the Trunk Performance Report are sent to the printer.
• C:\Program Files\Vertical Wave\ViewPoint\Reporter\TVRRun\
Tvrrun.exe C:\Program Files\Vertical Wave\ViewPoint\Reporter\
Reports\User Activity.xls -S
•
The XLS file of the User Activity report is overwritten with the new report.
• C:\Program Files\Vertical Wave\ViewPoint\Reporter\TVRRun\
Tvrrun.exe C:\Program Files\Vertical Wave\ViewPoint\Reporter\
Reports\User Activity.xls -S C:\Program Files\Vertical
Wave\ViewPoint\Reporter\Reports\Fred_Sanders.xls
•
The User Activity report is written to the file Fred_Sanders.xls in the Reports directory
(Note no quotes around the file path).
Using the Report Runner
When running or scheduling reports automatically with the Report Runner, you must do the
following:
1.
Run the report manually for the user you want and for the period you want.
2.
Clear all sheets except for the “Report Options” sheet. (Click the top left cell to select all,
then press Delete.)
Wave ViewPoint User Guide
Release 3.0
October 2012
Printing and scheduling reports with the Report Runner
3.
13-12
Chapter 13: Running Contact Center Reports
On the “Report Options” sheet, do the following:
•
Clear the date range in the “Period” row (column B).
•
Clear the data in the “Days” row (columns B and C).
•
In “Days” row (column B) enter 1,2,3,4,5,6,7.
•
In the “Days” row (column C) enter Sunday, Monday, Tuesday, Wednesday,
Thursday, Friday, Saturday.
4.
Save the report (name it something like “User Template.xls”).
5.
Set up the Report Runner to use this template every day to generate the report. An
example command line would look like this:
C:\Reports\User Template.xls -S C:\Reports\User3.xls
Note the following:
•
If the query generates no data, the existing report will be cleared, so you won't see the
data from the previous execution.
•
The “Days” option in the template will be ignored if the period is “Today” or
“Yesterday.” In that case the day used will be the appropriate one for the period chosen.
Running the Report Runner without a command line statement
If you run the file Tvrrun.exe without modifying its command line, the system opens a Help
topic that explains the Report Runner commands.
Wave ViewPoint User Guide
Release 3.0
October 2012
Available reports overview
13-13
Chapter 13: Running Contact Center Reports
Available reports overview
You can produce the reports listed in the following table. For detailed examples of the reports, see
the sections referenced in the table.
Name
Contact Center Reports
Description
Call Log report
By any time interval, shows all the information that appears in the Call Log
for the entire system or the selected user or queue, in a spreadsheet form
that is easy to sort or filter.
Call Transfer report
(see page 13-16)
By any time interval, reports on all of the calls transferred to another entity
by a user, Contact Center queue, or ViewPoint Group.
Grouped Service Level
report
By five-second increments, shows wait time for all external calls that were
answered by a user.
Outbound Call Comparison
report
Shows the number and duration of outbound calls in the following
categories: In-state, Toll-free, and Other.
Outbound Calls by Phone
Number report
Shows the number and duration of outbound calls placed to prefixes that
you specify, for example 800 or 212.
Outbound Long Distance
Summary report
By any time interval, shows your outbound long-distance phone traffic and
estimates your phone bill.
Unanswered Calls During
Business Hours report
By any time interval, shows external inbound calls during your Wave
business hours that were not answered by a user.
User Call Trends report
Shows the number of calls a user made or received and the user’s average
talk time.
(see page 13-14)
(see page 13-17)
(see page 13-18)
(see page 13-19)
(see page 13-20)
(see page 13-22)
(see page 13-23)
Wave ViewPoint User Guide
Release 3.0
October 2012
Call Log report
13-14
Chapter 13: Running Contact Center Reports
Call Log report
The Call Log report shows all the information that appears in the Call Log for a user or a queue,
in a spreadsheet form that is easy to sort or filter. Using Microsoft Excel’s drop-down filtering
tools, you can filter by any column to see just the calls you want.
This report should only be run for a small number of days due to the quantity of data it can
produce.
Note: By default you can report only on your Call Log and all Call Logs that are visible to you
in ViewPoint (for example, a queue’s Call Log if you have permission to view it, and any Call
Logs that have been shared with you). To report on any Call Log, you must have the Wave
permission Report on all call logs set to Allow. See Chapter 11 in the Wave Global
Administrator Guide for more about setting general Wave permissions.
For a description of the Call Log columns, see Chapter 8 in the Wave ViewPoint User Guide.
Wave ViewPoint User Guide
Release 3.0
October 2012
Call Log report
13-15
Chapter 13: Running Contact Center Reports
Filtering Call Log data by column
To filter the report by column, click the arrow on any column header. From the drop-down list,
select the column entry that you want to display. The report shows only calls with that column
entry. Alternately, select Custom to filter by more complex criteria.
Examples of using the filter include viewing the following:
•
All calls with account code 55 (Account Code column)
•
All inbound or all outbound calls (Direction column)
•
All calls longer than 30 minutes (Duration column, select Custom)
•
All abandoned calls (Result column)
•
All calls that were automatically recorded by the queue (Recorded by Queue column)
Wave ViewPoint User Guide
Release 3.0
October 2012
Call Transfer report
13-16
Chapter 13: Running Contact Center Reports
Call Transfer report
This report shows how many calls were transferred by all users, an individual user, a queue, or
a ViewPoint Group during the reporting period, and to whom the calls were transferred.
Reading the Call Transfer report
The following fields appear in this report:
•
•
Number of transfers. Displays on the y-axis of the report.
Transfer Target. Each entity to which a call was transferred appears as a bar along the x-axis
of the report.
On the Data tab, the Inbound Calls column displays the total number of inbound calls received
by the transfer target during the reporting period, allowing you to compare the number of calls
received by vs. transferred to the target during that period.
Wave ViewPoint User Guide
Release 3.0
October 2012
Grouped Service Level report
13-17
Chapter 13: Running Contact Center Reports
Grouped Service Level report
This report shows wait time for all external calls, displayed in five-second groupings. Wait time
includes the amount of time that the caller waited between the extension being dialed and the
user picking up, plus any time spent in a blind transfer later in the call. Note that wait time does
not include time that the caller spent on hold, parked, or in a supervised transfer.
Reading the Grouped Service Level report
The following fields appear in the Grouped Service Level report:
•
Wait Time. Displays on the x-axis of the report as five-second groupings
•
% of Calls. Shows how each grouping compares as a percentage of the total number of calls.
Displays on the y-axis of the report. The total number of calls is displayed at the bottom of the
report.
Wave ViewPoint User Guide
Release 3.0
October 2012
Outbound Call Comparison report
13-18
Chapter 13: Running Contact Center Reports
Outbound Call Comparison report
The Outbound Call Comparison report separates your outbound calls into three categories:
In-state, Toll-free, and Other. The In-state and Toll-free categories depend on your settings in
the general Reporter Options dialog (see “Setting general Reporter options” on page 13-6).
Standard long-distance calls (calls made to non-free area codes) are included under “Other.”
Reading the Outbound Call Comparison report
The following fields appear in the Outbound Call Comparison report:
•
Interval. Displays as the x-axis of the report.
•
Number of Calls. Displays as bars. Read against the left y-axis of the report.
•
Total Duration. Displays as a line. Read against the right y-axis of the report.
Wave ViewPoint User Guide
Release 3.0
October 2012
Outbound Calls by Phone Number report
13-19
Chapter 13: Running Contact Center Reports
Outbound Calls by Phone Number report
This report counts the number and duration of outbound calls placed to a specified list of phone
number prefixes. Enter the prefixes in the Number prefixes field in the Options dialog for this
report (separate prefixes with commas).
Note: If your prefixes overlap, a call can show up in more than one column. For example, if
you enter a prefix of 6 and another of 617, calls beginning with 617 will be counted in both
columns.
Reading the Outbound Call by Phone Number report
The following fields appear in the Outbound Calls by Phone Number report:
•
Number prefixes. The prefixes you entered appear as the x-axis of the report.
•
Number of Calls. Displays as bars. Read against the left y-axis of the report.
•
Total Duration. Displays as a line. Read against the right y-axis of the report.
Wave ViewPoint User Guide
Release 3.0
October 2012
Outbound Long Distance Summary report
13-20
Chapter 13: Running Contact Center Reports
Outbound Long Distance Summary report
You can use this report to track your outbound long-distance phone traffic and estimate a phone
bill for a given period. The chart displays the total number of outbound long distance calls and
the duration of each. The Data tab shows the estimated cost of your long distance calls.
Before running the Outbound Long Distance Summary report
You cannot run the Outbound Long Distance Summary report unless your system has been set
up in the following way:
•
One or more Organizations are defined. See Chapter 20 in the Wave Global
Administrator Guide for more about using Organizations.
•
In-state area codes are defined in the Reporter Options dialog.
When setting up the Options for this report, specify the following additional fields. Your long
distance carrier can provide you with exact numbers.
•
Cost per minute. Enter the per-minute cost in dollars of your long-distance calls. For
example, enter .05 for five cents a minute.
•
Cost interval in seconds. The length of the intervals a minute is divided into for the purposes
of calculating the cost of the call.
Wave ViewPoint User Guide
Release 3.0
October 2012
Outbound Long Distance Summary report
13-21
Chapter 13: Running Contact Center Reports
Reading the Outbound Long Distance Summary report
The following fields appear on the Outbound Long Distance Summary report:
•
Interval. Displays along the x-axis of the report.
•
Long Distance Calls. All outbound trunk calls whose numbers do not begin with any of
the digit sequences listed in the Toll free options field in the Reporter Options dialog.
Displays as bars. Read against the left y-axis of the report.
•
Duration. Displays as a line. Read against the right y-axis of the report.
The following fields appear on the Data tab of this report. Each is totaled at the bottom.
•
Interval. The time interval chosen.
•
Outbound calls. The total number of outbound trunk calls, long distance or otherwise.
Note that to count as an outbound call, a call must match the Criteria for counting
outbound calls defined in the Reporter Options dialog (see “Setting general Reporter
options” on page 13-6).
•
Long distance calls. The total number of long distance calls.
•
Duration. The total duration of long distance calls for each interval.
•
Cost. The total cost of long distance calls for each interval, based on the Cost per minute and
Cost interval in seconds data you entered.
Wave ViewPoint User Guide
Release 3.0
October 2012
Unanswered Calls During Business Hours report
13-22
Chapter 13: Running Contact Center Reports
Unanswered Calls During Business Hours report
The Unanswered Calls report shows external inbound calls during your Wave business hours
that were not answered by a user. This includes calls that were answered by another extension
type, such as a queue or an auto attendant, but never picked up by a user.
Note: The report counts calls that show a Result of “Abandoned” or “To voicemail” in the Call
Log. Because of this, calls that a user answered and then sent to voicemail count as unanswered.
Reading the Unanswered Calls During Business Hours report
The following fields appear on the Report tab of the Unanswered Calls During Business Hours
report:
•
Time interval. Displays as the x-axis of the report.
•
Unanswered Calls. Total number of unanswered calls. Displays as stacked bars. Read
against the left y-axis of the report.
•
% Unanswered Calls. Unanswered calls as a percentage of all calls. Displays as a line. Read
against the right y-axis of the report.
Wave ViewPoint User Guide
Release 3.0
October 2012
User Call Trends report
13-23
Chapter 13: Running Contact Center Reports
User Call Trends report
The User Call Trends report displays the number of inbound calls a user received and outbound
calls the user placed, with the average talk time for each category.
Reading this report
The following fields appear in this report:
•
Time interval. Displays as the x-axis of the report.
•
Calls. The number of calls. Displays as the y-axis of the report.
•
Inbound calls / Outbound calls. Displays as different-colored bars.
•
Average talk time Inbound/Outbound. In minutes. Displays as two lines.
Wave ViewPoint User Guide
Release 3.0
October 2012
Release 3.0
October 2012
Chapter 14
Using the ViewPoint Mobile App
CHAPTER CONTENTS
About the ViewPoint Mobile App . . . . . . . . . . . . . . . . . . . . . . . . . . . . . . . . . . . . 14-1
Installing and using ViewPoint Mobile for iOS . . . . . . . . . . . . . . . . . . . . . . . . . . 14-4
Installing and using ViewPoint Mobile for Android. . . . . . . . . . . . . . . . . . . . . . 14-41
The ViewPoint Mobile App allows you to make and take calls and access some ViewPoint
features using supported mobile devices.
About the ViewPoint Mobile App
The ViewPoint Mobile App gives you complete access to your corporate directory, whether
you're in the office, working from home, or on the road visiting clients. You have access to all
of the extensions from Wave and Viewpoint back in the office, as well as all extensions on other
Wave Servers connected via WaveNet. You also can use Viewpoint Mobile to make calls to local
contacts on a supported mobile device, and you can control these calls in Viewpoint Mobile,
view them in your Call Log, record them automatically, and so forth. Your presence information
(for example if you are on a call) and personal status, as well as that of other staff, is immediately
viewable and updateable.
The ViewPoint Mobile App brings all of the Enterprise Call Features you're accustomed to in
the office when you use ViewPoint on your desktop with you when you leave the office. To
anyone viewing your presence, calling you, or receiving a call from you, you appear no
differently than you do when you are working from your desk.
Other ViewPoint Mobile App features include:
•
A Favorites list, giving you one-tap access to the people you call the most.
•
A visual interface for your voice messages that allows you to play, pause, and stop
playing messages, and so forth.
•
Instant Messaging for those times when a simple question, reply, or note are in order.
Wave ViewPoint User Guide
Release 3.0
October 2012
14-2
Chapter 14: Using the ViewPoint Mobile App
•
Add parties to a conference, just as easily as if you were sitting at your desk.
•
Single-tap call recording, just like when you are in the office.
•
Android only: The ViewPoint Mobile for Android widget is a real-time application that
runs on your Android device. Using the widget, you don’t need to run the full ViewPoint
Mobile App to see if you have missed any calls, voice messages, or Instant Messages,
update your personal status on the fly, or make yourself available (or not) for Instant
Messaging to other Wave users.
Carrier network features
The ViewPoint Mobile App is designed to be fully functional using a Wi-Fi or 3G or higher
connection to the Wave Server. These connections utilize the carrier network for their voice
transmission, and offer full enterprise functionality. The confidentiality of transmitted data is
ensured through the use of secure encrypted connections.
Important: Some carriers do not allow smartphones to have simultaneous voice and 3G data
sessions. Viewpoint Mobile users who are on these carrier networks will not have access to all
functionality while on a call unless they are connected to Wi-Fi.
The ViewPoint Mobile App is designed to help to preserve device battery life by pushing
incoming data to the device rather than forcing the device to seek and retrieve data. Push
notifications to your mobile device allow you to receive calls and be notified that you have a
new voice message, even when you are not in the Viewpoint Mobile App.
Supported devices
You can use the ViewPoint Mobile App on supported iOS and Android mobile devices:
•
Apple iOS devices: iPhone 3GS, iPhone 4, iPhone 4S, iPad and iPod Touch.
•
Android devices: Mobile phones and tablet devices running Android 2.3 and above.
Since a variety of Android mobile devices from many manufacturers are currently
available, see the ViewPoint Mobile for Android Release Notes for a list of devices that
have been tested successfully.
Both landscape and portrait modes are supported on iOS and Android devices.
Wave ViewPoint User Guide
Release 3.0
October 2012
14-3
Chapter 14: Using the ViewPoint Mobile App
Mobile phones vs. tablets
There are some differences in how mobile phones vs. tablets work with the ViewPoint Mobile
App:
•
Mobile phones. Your Wave administrator will configure your mobile phone as a Wave
mobile extension, which allows the phone to be treated as a Wave station. (For more
information, see “Using mobile extensions for externally routed calls” in Chapter 11 in
the Wave Global Administrator Guide.)
You use the phone’s built-in voice capability to take and place calls.
•
Tablets. You can use the Viewpoint Mobile App to manage personal status, check your
voicemail, send Instant Messages, see other users’ presence information and personal
status, and view your Call Log. Since these devices do not have voice capability, they
cannot be configured as Wave mobile extension, but you can take and place calls using a
separate phone in conjunction with the tablet.
Important: Although third-party SIP softphones are available for tablets, they are not
supported for use with the ViewPoint Mobile App because they can negatively affect
battery life.
Online vs. offline mode
You can work in online mode (communicating with the Wave Server) or offline mode if the
Wave Server is not accessible. Not all features are available when you are in offline mode.
While you launch the ViewPoint Mobile App, the following message sequence at the top of the
screen confirms that you are in online mode:
“Working in offline mode.”
“Connecting...”
“Connected.”
“Instant Messaging connected.”
iOS only: On an iOS mobile device, if you are not connected to the Wave Server, “Working in
offline mode” is displayed at the top of the screen.
Wave ViewPoint User Guide
Release 3.0
October 2012
14-4
Chapter 14: Using the ViewPoint Mobile App
Installing and using ViewPoint Mobile for iOS
This section describes the iOS version of ViewPoint Mobile in detail, including:
•
Downloading and configuring ViewPoint Mobile. See page 14-5.
•
Configuring ViewPoint Mobile. See page 14-6.
•
Launching ViewPoint Mobile. See page 14-8.
•
Logging in to ViewPoint Mobile. See page 14-9.
•
Navigating the ViewPoint Mobile App. See page 14-11.
•
Setting options. See page 14-37.
See the following topics for more about how to use ViewPoint Mobile for iOS features:
•
Viewing and managing user lists. See page 14-13.
•
Making a call. See page 14-22.
•
Viewing and acting on your current calls. See page 14-23.
•
Viewing and acting on your voice messages. See page 14-30.
•
Viewing your Call Log. See page 14-34.
•
Instant Messaging. See page 14-36.
Wave ViewPoint User Guide
Release 3.0
October 2012
14-5
Chapter 14: Using the ViewPoint Mobile App
Downloading and configuring ViewPoint Mobile (iOS)
1.
From the iOS device, go to the following location on the Vertical AppMarket:
http://appmarket.vertical.com/ProductDetails.asp?ProductCode=VW-VPMOBILE-IOS
2.
On this page, select the link to download the App from the Apple App Store. Follow the
instructions to download the App.
3.
Tap Download ViewPoint Mobile.
4.
Tap Install.
If the installation fails, you will see the following message.
Typically, the reason for failure is because you lost your Internet connection during the
download. Tap Retry, or tap Done and try again later.
Wave ViewPoint User Guide
Release 3.0
October 2012
14-6
Chapter 14: Using the ViewPoint Mobile App
Configuring ViewPoint Mobile (iOS)
Once the ViewPoint Mobile App has been downloaded, installed, and registered on the iOS
device, you must enter a few settings for the App. Typically, these will be entered once and
forgotten. However, many of these settings can be changed later, either via Settings on the iOS
device, or via Quick Settings in the App itself, as described in Chapter 14 in the Wave ViewPoint
User Guide.
Note: Configuring these settings here is optional, and you will be prompted to enter some of
them again when you launch the ViewPoint Mobile App for the first time. However, if you do
enter this information according to the following steps, you will only need to enter your
Password when you launch the ViewPoint Mobile App after that first login.
1.
On the iOS device, choose Settings > ViewPoint.
Wave ViewPoint User Guide
Release 3.0
October 2012
14-7
Chapter 14: Using the ViewPoint Mobile App
2.
For Wave Server Properties, enter:
•
Address. Wave Server’s IP Address or fully-qualified domain name (for example
www.MyWaveServer.com).
•
The IP Address or fully-qualified domain name entered here must be resolvable by
the DNS server to an IP address that is reachable from the network where the iOS
device is currently operating.
•
Port. Port on which Wave will communicate.
3.
For Login Information, enter the same User Name that you use to log on to ViewPoint
Desktop.
4.
Select your VoiceMail Download Preferences.
•
5.
6.
Download Headers. Select ON to only download message headers (this will save
storage space on the iOS device), or OFF to automatically download entire new
voice messages when the App is active.
Select your ViewPoint Device Login Settings.
•
My Mobile Phone #. Enter the 10-digit number of the mobile device to which your
calls will be forwarded. If you are using an iPhone, enter the iPhone’s number. If
you are using an iPad or iPod Touch (which do not have voice capability), enter the
number of another phone to use (for example a cell phone).
•
Wave Station ID. Enter the station ID of your desk phone, if you want to use the
ViewPoint Mobile App to make and take calls using that desk phone. (To hear your
station ID, dial *00 from that phone.)
Select whether you want to receive Push notifications for new calls and voice messages.
Note: If you change these settings, you must reconnect to the Wave Server for the
changes to take effect.
•
7.
New Calls. Select ON or OFF.
New Voice Mail Messages. Select ON or OFF.
Wave ViewPoint User Guide
Release 3.0
October 2012
14-8
Chapter 14: Using the ViewPoint Mobile App
Launching ViewPoint Mobile (iOS)
To launch the ViewPoint Mobile App, tap its icon in the Apps view of the iOS device where it
was installed.
Note that in this example, the icon is indicating that you have 3 unread voice messages.
Wave ViewPoint User Guide
Release 3.0
October 2012
14-9
Chapter 14: Using the ViewPoint Mobile App
Logging in to ViewPoint Mobile (iOS)
Logging in for the first time
When you launch the ViewPoint Mobile App for the first time, you are prompted to enter the
following information. You may need to scroll down to see the final fields described below.
User
•
Enter the same User Name and Password that you use to logon to ViewPoint Desktop.
Server Settings
•
For Server, enter the Wave Server’s IP Address or fully-qualified domain name (for
example www.MyWaveServer.com).
Administrator Note: The IP Address or fully-qualified domain name entered here must
be resolvable by the DNS server to an IP address that is reachable from the network where
the iOS device is currently operating.
Wave ViewPoint User Guide
Release 3.0
October 2012
14-10
Chapter 14: Using the ViewPoint Mobile App
•
Server Port defaults to 50070. If your Wave administrator has changed the ViewPort
Mobile port number, enter the new value here. If this field is blank, the default port
number is used.
For Calls Use
•
For Station ID, enter your Wave Station ID. This will allow you to use your desktop
phone to make and take calls with the ViewPoint Mobile App. (To hear your station ID,
dial *00 from your desktop phone.)
•
For Mobile #, enter the 10-digit number of the mobile device to which your calls will be
forwarded. If you are using an iPhone, enter the iPhone’s number. If you are using an
iPad or iPod Touch (which do not have voice capability), enter the number of another
phone to use (for example a cell phone).
When you are done, tap Login to begin.
Subsequent logins
If you enter Wave Server Properties as described in “Configuring ViewPoint Mobile (iOS)” on
page 14-6, from now on when you launch the ViewPoint Mobile App you only need to enter
your Password.
Wave ViewPoint User Guide
Release 3.0
October 2012
14-11
Chapter 14: Using the ViewPoint Mobile App
Navigating the ViewPoint Mobile App (iOS)
When the ViewPoint Mobile App launches, you start in the Users view.
You can go to another view by tapping an icon in the navigation bar at the bottom of the screen:
•
Users. See page 14-13.
•
Calls. See page 14-23.
•
Dialpad. See page 14-22.
•
Messages. See page 14-30.
Wave ViewPoint User Guide
Release 3.0
October 2012
14-12
Chapter 14: Using the ViewPoint Mobile App
Tap More to access additional views:
•
Call Log. See page 14-34.
•
Chat. See page 14-36.
Wave ViewPoint User Guide
Release 3.0
October 2012
14-13
Chapter 14: Using the ViewPoint Mobile App
Viewing and managing user lists (iOS)
In the Users view, tap one of the following at the top of the screen:
•
Opens the Favorites list. See page 14-13.
•
Opens the Users list. See page 14-15.
•
Opens the Contacts list. See page 14-20.
Managing your Favorites list (iOS)
The Favorites list displays all of the users and contacts that you call frequently or that are
important to you. You can use the Favorites list to quickly place, transfer, and forward calls to
special people.
Wave ViewPoint User Guide
Release 3.0
October 2012
14-14
Chapter 14: Using the ViewPoint Mobile App
The following is displayed for each favorite:
•
Picture, if one is available.
•
Status. For Wave users, the user’s current personal status is displayed. See “Available
personal statuses” on page 3-4 for a table of personal status icons and what each means.
•
Presence. Indicates whether or not the user is connected to the Wave Server. See “Online
vs. offline mode” on page 14-3 for more information.
•
. User is in online mode.
•
. User is in offline mode.
To add a favorite to the list, tap
at the top of the screen.
Wave ViewPoint User Guide
Release 3.0
October 2012
14-15
Chapter 14: Using the ViewPoint Mobile App
In the Select Target screen, do one of the following:
•
To add a user to your Favorites list, tap
•
To add a contact to your Favorites list, tap
to open the Users list.
to open the Contacts list.
Then, tap the user or contact to add, and if more than one phone number is associated with the
user or contact, tap the number to use.
You can also add a user to your Favorites list by tapping
Details screen.
at the top of the User or Contact
Viewing and using the Users list (iOS)
You can see all Wave extensions, along with information about the current status of each
extension, in the Users list. You can use the Users list to quickly place calls to other Wave
extensions.
A glance at the Users list can tell you:
•
A user’s extension number
•
Whether a user is currently on a call
•
A user’s current personal status
•
as call forwarding turned on, and the location to which the calls are forwarded
•
The extensions of your office’s auto attendants and Contact Center queues.
Wave ViewPoint User Guide
Release 3.0
October 2012
14-16
Chapter 14: Using the ViewPoint Mobile App
You can navigate through the Users list in any of the following ways:
•
Tap the Search bar at the top of the screen to open a keyboard to search for a name.
•
Drag up or down to scroll through the Users list.
•
Tap a letter or number in the jump list at the right of the screen to go directly to the entries
that start with that letter.
Wave ViewPoint User Guide
Release 3.0
October 2012
14-17
Chapter 14: Using the ViewPoint Mobile App
The following is displayed for each user:
•
Status. The user’s current personal status is displayed. See “Available personal statuses”
on page 3-4 for a table of each personal status icon and what it means.
•
Hook state.
•
Presence. Indicates whether or not the user is connected to the Wave Server. See “Online
indicates that the user is currently on a call.
vs. offline mode” on page 14-3 for more information.
•
. User is in online mode.
•
. User is in offline mode.
Wave ViewPoint User Guide
Release 3.0
October 2012
14-18
Chapter 14: Using the ViewPoint Mobile App
Tap on a user to open the User Details screen:
Tap
at the top of the screen to add the user to your Favorites list.
Tap Send Instant Message to IM the user. You can only IM another user if both of you are
in online mode—you can see if a user is online by examining his or her presence indicator.
Wave ViewPoint User Guide
Release 3.0
October 2012
14-19
Chapter 14: Using the ViewPoint Mobile App
To send an instant message, type your message in the window that opens, and then tap Send. As
your conversation progresses, all of the messages and replies are displayed at the top of the
window. This example shows a short IM exchange between two users:
Wave ViewPoint User Guide
Release 3.0
October 2012
14-20
Chapter 14: Using the ViewPoint Mobile App
Using and managing your Contacts list (iOS)
Important: The contacts displayed here are your local contacts stored on your iOS
device, not your Viewpoint contacts. ViewPoint contacts are not synchronized with your
mobile phone.
You can navigate through the Contacts list in any of the following ways:
•
Tap the Search bar at the top of the screen to open a keyboard to search for a name.
•
Drag up or down to scroll through the Contacts list.
•
Tap a letter or number in the jump list at the right of the screen to go directly to the entries
that start with that letter.
Wave ViewPoint User Guide
Release 3.0
October 2012
14-21
Chapter 14: Using the ViewPoint Mobile App
Tap a contact to view or change contact details.
Tap
at the top of the screen to add the contact to your Favorites list.
Wave ViewPoint User Guide
Release 3.0
October 2012
14-22
Chapter 14: Using the ViewPoint Mobile App
Making a call (iOS)
You use the Dialpad to enter a phone number to make a call. As you tap digits, the number is
displayed at the top of the screen.
You can dial any internal Wave extension or external phone number. You do not need to dial the
default first digit code—it will be applied to the call automatically.
Important: The ViewPoint Mobile Dialpad is only used for initiating calls. Use your mobile
phone’s own keypad to generate DTMF tones (for example, when responding to a prompt,
entering an account number, and so forth) during a phone call.
Wave ViewPoint User Guide
Release 3.0
October 2012
14-23
Chapter 14: Using the ViewPoint Mobile App
•
Tap
list.
to add the number as entered at the top of the screen to your Contacts
•
Tap
to place a call top the displayed number.
•
Tap
to delete digits from the entered number.
Viewing and acting on your current calls (iOS)
The Calls view lists all current calls:
Wave ViewPoint User Guide
Release 3.0
October 2012
14-24
Chapter 14: Using the ViewPoint Mobile App
The following information and controls are displayed for each call:
•
Status. Indicates an active call. Tap to put an active call on hold:
•
Caller ID or contact information (if available).
•
Call duration in minutes and seconds.
Wave ViewPoint User Guide
Release 3.0
October 2012
14-25
Chapter 14: Using the ViewPoint Mobile App
•
Tap for available call control actions..
Wave ViewPoint User Guide
Release 3.0
October 2012
14-26
Chapter 14: Using the ViewPoint Mobile App
•
Tap
to open a keyboard at the bottom of the screen to type call notes:
Wave ViewPoint User Guide
Release 3.0
October 2012
14-27
Chapter 14: Using the ViewPoint Mobile App
•
•
Swipe a row from left to right to get a toolbar of quick call controls:
Hold. Puts the caller on hold.
Wave ViewPoint User Guide
Release 3.0
October 2012
14-28
Chapter 14: Using the ViewPoint Mobile App
•
Transfer. Transfers the call. You use the next screen to select the extension,
contact, or other number to transfer the call to:
•
Opens the Users view. See page 14-13.
•
Opens your Contacts list. See page 14-20
•
•
Opens the Dialpad. See page 14-22.
Wave ViewPoint User Guide
Release 3.0
October 2012
14-29
Chapter 14: Using the ViewPoint Mobile App
•
Conference. Creates a conference call.
•
Record. Records the call.
•
Disconnect. Hangs up the call.
There are 2 other controls at the top of the Calls view:
•
Tap
to make a new call.
•
Tap
to go to Quick Settings, where you can change any of the settings described
on page14-37.
Wave ViewPoint User Guide
Release 3.0
October 2012
14-30
Chapter 14: Using the ViewPoint Mobile App
Viewing and acting on your voice messages (iOS)
The Messages view displays your voicemail folders. Tap on a folder to view its contents.
Wave ViewPoint User Guide
Release 3.0
October 2012
14-31
Chapter 14: Using the ViewPoint Mobile App
In the following example, there is one voice message in the user’s Saved folder:
•
•
Tap to play the voice message.
Tap to delete the voice message.
Wave ViewPoint User Guide
Release 3.0
October 2012
14-32
Chapter 14: Using the ViewPoint Mobile App
•
Tap to reply to, forward, or e-mail the voice message.
Wave ViewPoint User Guide
Release 3.0
October 2012
14-33
Chapter 14: Using the ViewPoint Mobile App
•
Tap to display voice message details:
•
•
Tap to play the voice message.
Tap to reply to, forward, or e-mail the voice message.
There are 2 other controls at the top of the Messages view:
•
Tap
•
Tap
to return to the folder where this voice message resides.
to play voice messages using the phone’s speaker.
Wave ViewPoint User Guide
Release 3.0
October 2012
14-34
Chapter 14: Using the ViewPoint Mobile App
Viewing your Call Log (iOS)
The Call Log displays your call history.
•
Tap Incoming, Outgoing, or Both at the top of the screen to filter the display.
•
Tap More to scroll to display more calls.
•
Multiple calls from the same contact are listed once in the Call Log view—you can view
other recent calls from the same contact by tapping details for the call.
Wave ViewPoint User Guide
Release 3.0
October 2012
14-35
Chapter 14: Using the ViewPoint Mobile App
The following information and controls are displayed for each call:
•
Call direction. Indicates an incoming or outgoing call. Tap to call back the
number. If you are connected to the Wave Server, the call is automatically dialed via the
Wave network, otherwise you are prompted to use your phone’s cell carrier network.
•
For an incoming call, Caller ID or contact information (if available).
•
For an outgoing call, number dialed.
•
Call date and time.
•
Tap
for a call to display Call Details.
Wave ViewPoint User Guide
Release 3.0
October 2012
14-36
Chapter 14: Using the ViewPoint Mobile App
Instant Messaging (iOS)
Tapping Chat opens the Conversations screen. The following example shows a chat in progress.
Tap
to start a new conversation.
Wave ViewPoint User Guide
Release 3.0
October 2012
14-37
Chapter 14: Using the ViewPoint Mobile App
Setting options (iOS)
Once the ViewPoint Mobile App has been downloaded, installed, and registered on the iOS
device, you can optionally enter a few settings for the App. Typically, these will be entered once
and forgotten.
You can change many of these settings later, either via Settings on the iOS device, as described
in “Configuring ViewPoint Mobile (iOS)” on page 14-6, or via Quick Settings in the App itself,
as described in the following section.
Changing Quick Settings (iOS)
The ViewPoint Mobile App allows you to change some of your App settings on the fly. You
must be in online mode to change these settings.
1.
In the ViewPoint Mobile App, tap Calls and then tap
at the top of the screen.
2.
In the Quick Settings screen, make any of the following changes:
Wave ViewPoint User Guide
Release 3.0
October 2012
14-38
Chapter 14: Using the ViewPoint Mobile App
•
Personal Status. Tap the icon to change your personal status.
•
Incoming Call Handling. Choose one of the following options:
•
Push Notification. (Recommended) Sends a push notification for each incoming
call to your mobile phone if the ViewPoint Mobile App is not running. If you view
the push notification, the call will be sent to you mobile phone so you can answer
it
Wave ViewPoint User Guide
Release 3.0
October 2012
14-39
Chapter 14: Using the ViewPoint Mobile App
This option provides the best experience—calls will ring your desk phone, while
also notifying you on your mobile phone with the option to forward the call to
your mobile phone if you decide to answer it.
•
Forward to Phone. Automatically forwards each incoming call to your mobile
phone. (This is the same as forwarding calls to your mobile phone via ViewPoint
Desktop.)
•
No Mobile Notification. Disables all notifications as well as call forwarding to your
mobile phone. (You will still be able to control your own calls from inside the
App.)
Important: If you select Push Notification or No Mobile Notification here, your
ViewPoint Desktop’s call forwarding setting will be changed automatically every
time you launch the ViewPoint Mobile App. If your Forward to Phone target is
different in Viewpoint Mobile than it is in Viewpoint Desktop, forwarding will
change automatically to the location specified in the Viewpoint Mobile App.
Wave ViewPoint User Guide
Release 3.0
October 2012
14-40
Chapter 14: Using the ViewPoint Mobile App
•
For Calls Use. Choose one of the following options to indicate your preferred device
for placing and taking calls.
•
Mobile Phone. (Recommended) 10-digit number of the of the mobile device to
which your calls will be forwarded. If you are using an iPhone, enter the iPhone’s
number. If you are using an iPad or iPod Touch (which do not have voice
capability), enter the number of another cell phone to use.
•
Default Station. Choose this option to use your Wave desktop phone, for example
when you are in your office. (To hear your station ID, dial *00 from your desktop
phone.)
•
Other Phone. Enter another phone number here, for example your home’s landline
•
Other Wave Station. Choose this option to use another Wave phone as your
phone for times when you are working from home.
preferred device, for example if you are on the road and are using a temporary
office.
3.
Tap Change User to log in as a different user.
4.
Tap Email ViewPoint Mobile Logs to submit ViewPoint Mobile log files for
troubleshooting purposes. The logs are collected for you automatically.
Wave ViewPoint User Guide
Release 3.0
October 2012
14-41
Chapter 14: Using the ViewPoint Mobile App
Installing and using ViewPoint Mobile for Android
This section describes the Android version of ViewPoint Mobile in detail, including:
•
Downloading and configuring ViewPoint Mobile and widget. See page 14-42.
•
Launching ViewPoint Mobile. See page 14-45.
•
Using the ViewPoint Mobile widget. See page 14-46.
•
Logging in to ViewPoint Mobile. See page 14-48.
•
Viewing status information and notifications. See page 14-49.
•
Configuring ViewPoint Mobile. See page 14-50.
•
Navigating the ViewPoint Mobile App. See page 14-51.
•
Setting options. See page 14-76.
•
Troubleshooting ViewPoint Mobile issues. See page 14-81.
See the following topics for more about how to use ViewPoint Mobile for Android features:
•
Viewing and managing user lists. See page 14-52.
•
Making a call and acting on your current calls. See page 14-60.
•
Viewing and acting on your voice messages. See page 14-69.
•
Viewing your Call Log. See page 14-71.
•
Instant Messaging. See page 14-73.
Wave ViewPoint User Guide
Release 3.0
October 2012
14-42
Chapter 14: Using the ViewPoint Mobile App
Downloading and installing ViewPoint Mobile and widget (Android)
Note: Most of the screen shots in this document were captured on an HTC Sensation mobile
phone, running Android 2.3.4 and HTC Sense 3.0, Software Number 1.50.531.1. ViewPoint
Mobile for Android may look slightly different if you run it on a different Android device or on
another Android software platform.
Installing the ViewPoint Mobile App (Android)
Important: Before installing, go to Settings > Security on your Android device. Under Device
Administration, verify that the option Unknown Sources (Allow Installation of apps from
sources other than the Play store) is selected. If this option is not selected, you will not be able
to complete the installation.
To install the ViewPoint Mobile App
1.
From the Android device, go to the following location and follow the on-screen
instructions:
http://appmarket.vertical.com/ProductDetails.asp?ProductCode=VW-VPMOBILE-AND
ROID
Wave ViewPoint User Guide
Release 3.0
October 2012
14-43
Chapter 14: Using the ViewPoint Mobile App
2.
Tap Download ViewPoint Mobile. If you continue, you are agreeing to all of the items
listed on the screen.
3.
Tap Install to continue. If you get a message that the installation failed, try again.
Typically, the reason for failure is because you lost your Internet connection during the
download.
Wave ViewPoint User Guide
Release 3.0
October 2012
14-44
Chapter 14: Using the ViewPoint Mobile App
Installing the ViewPoint Mobile widget (Android)
The ViewPoint Mobile widget is a real-time application that runs on your Android device. For
details on how to use the widget, see page 14-46.
To install the ViewPoint Mobile widget
Note: Depending on the Android device, the steps to install a widget may be slightly different
from the following.
1.
After you have successfully installed the ViewPoint Mobile App, press Home on the
Android device to go to the Home screen. Make sure that there is enough free space on
the Home screen for the new widget.
2.
Choose an empty space for your widget. Tap and hold the space for a few seconds until
the Add to Home screen opens.
3.
Tap Widget.
Wave ViewPoint User Guide
Release 3.0
October 2012
14-45
Chapter 14: Using the ViewPoint Mobile App
4.
Scroll through the list to the ViewPoint widget, and tap it to add it to your home screen.
Launching ViewPoint Mobile (Android)
To launch the ViewPoint Mobile App, do either of the following:
•
Tap its icon in the screen of the Android device where it was installed.
•
Tap the “V” logo in the center of the widget’s screen.
Wave ViewPoint User Guide
Release 3.0
October 2012
14-46
Chapter 14: Using the ViewPoint Mobile App
Using the ViewPoint Mobile widget (Android)
Using the widget, you don’t need to run the full ViewPoint Mobile App to:
•
See if you have missed any calls, voice messages, or Instant Messages.
•
Update your personal status on the fly.
•
Make yourself available (or not) for Instant Messaging to other Wave users.
Viewing missed call, voice message, and IM counts (Android)
•
Shows your missed call count.
•
Shows your missed voice message count.
•
Shows your missed IM count.
Wave ViewPoint User Guide
Release 3.0
October 2012
14-47
Chapter 14: Using the ViewPoint Mobile App
Changing your personal status (Android)
1.
In the widget, tap the Personal Status icon
2.
Select a new status:
.
Turning your IM presence on or off (Android)
1.
In the widget, tap the IM icon
2.
Select IM ON or IM OFF.
.
Wave ViewPoint User Guide
Release 3.0
October 2012
14-48
Chapter 14: Using the ViewPoint Mobile App
Logging in to ViewPoint Mobile (Android)
Logging in for the first time
When you launch the ViewPoint Mobile App for the first time, you must enter the following
information. (You may need to scroll down to see the final fields described below.)
User
•
Enter the same User Name and Password that you use to logon to ViewPoint Desktop.
Server Settings
•
For Server, enter the Wave Server’s IP Address or fully-qualified domain name (for
example www.MyWaveServer.com).
Administrator Note: The IP Address or fully-qualified domain name entered here must
be resolvable by the DNS server to an IP address that is reachable from the network where
the Android device is currently operating.
•
Server Port defaults to 50070. If your Wave administrator has changed the ViewPort
Mobile port number (the port on which Wave communicates with the Android device),
enter the new value here. If this field is blank, the default port number is used.
Wave ViewPoint User Guide
Release 3.0
October 2012
14-49
Chapter 14: Using the ViewPoint Mobile App
Call Settings
•
•
For Phone Number, enter the 10-digit number of the mobile device to which your calls
will be forwarded.
•
If you are using an Android phone, enter the phone’s number.
•
If you are using an Android tablet (which does not have voice capability), enter
the number of another phone to use (for example a cell phone).
For Station ID, enter your Wave Station ID. This will allow you to use your desktop
phone to make and take calls with the ViewPoint Mobile App. (To hear your station ID,
dial *00 from your desktop phone.)
When you are done, tap Login to begin.
Viewing status information and notifications (Android)
A variety of status information and notifications are displayed at the top of the screen.
Working on- or off-line (Android)
A blue V-logo indicates that you are working in online mode and communicating with the
Wave Server:
A grey V-logo indicates that you are working in offline mode if the Wave Server is not
accessible:
Wave ViewPoint User Guide
Release 3.0
October 2012
14-50
Chapter 14: Using the ViewPoint Mobile App
Call and voice message notifications (Android)
A white V-logo indicates a call or voice message notification. You may see more than one
notification at a time.
Click on a notification for details. Examples include:
Configuring ViewPoint Mobile (Android)
After logging in to the ViewPoint Mobile App for the first time, you can start using it right away
using the default settings listed below, or you can choose other settings.
You change these settings via Quick Settings. See page 14-76.
•
Incoming call handling. By default, if the ViewPoint Mobile App is not running, you
receive a push notification on your Android device for each incoming call. When you
view the push notification, the call is forwarded to your mobile phone so you can answer
it. You can change this setting so that incoming calls are automatically forwarded to your
phone, or disable push notifications as well as call forwarding.
•
For calls use. By default, your calls will be forwarded to your mobile phone. If you
frequently change the location where you receive calls (at your desk, at another Wave
phone, or at a landline phone), you can store those numbers and quickly change from one
to another.
Wave ViewPoint User Guide
Release 3.0
October 2012
14-51
Chapter 14: Using the ViewPoint Mobile App
You change these settings via Advanced Settings. See page 14-80.
•
Voicemail download preferences. By default, only voice message headers are
downloaded to your mobile device to save storage space. You can change this behavior to
automatically download entire new voice messages whenever the App is active.
•
Mobile alert handling. By default, you automatically receive notifications to your
Android device for new calls, voice messages, and IMs. You can turn off any or all
notifications.
Navigating the ViewPoint Mobile App (Android)
When the ViewPoint Mobile App launches, you start in the Favorites view. In this example, you
have not added any favorites yet.
The Favorites view is described in more detail on page 14-53.
Wave ViewPoint User Guide
Release 3.0
October 2012
14-52
Chapter 14: Using the ViewPoint Mobile App
You can go to another view by tapping an icon in the ViewPoint Mobile toolbar at the top of the
screen:
•
Tap Users to view and manage the Users, Favorites, and Contacts lists. See page 14-52.
•
Tap Calls to make a call, or view and act on your current calls. See page 14-60.
•
Tap VM to view and act on your voice messages. See page 14-69.
•
Tap Call Log to view your call history. See page 14-71.
•
Tap IM to view Instant Messaging conversations in progress or start a new one. See
page 14-73.
•
Tap Settings to change settings that affect the behavior of the ViewPoint Mobile App.
See page 14-76.
Viewing and managing user lists (Android)
To access the Users, Favorites, and Contacts lists, tap Users on the ViewPoint Mobile toolbar.
In the Users view, tap one of the following at the bottom of the screen:
•
Opens the Favorites list. See page 14-53.
•
Opens the Users list. See page 14-55.
•
Opens the Contacts list. See page 14-58.
Wave ViewPoint User Guide
Release 3.0
October 2012
14-53
Chapter 14: Using the ViewPoint Mobile App
Managing your Favorites list (Android)
The Favorites list displays all of the users and contacts that you call frequently or that are
important to you. You can use the Favorites list to quickly place, transfer, and forward calls to
special people.
The following is displayed for each favorite:
•
Picture, if one is available.
•
Hook state. Indicate whether the favorite is on a call.
•
Status. For Wave users, the user’s current personal status is displayed. See “Available
personal statuses” on page 3-4 for a table of personal status icons and what each means.
•
Presence. Indicates whether or not the user is connected to the Wave Server. See “Online
vs. offline mode” on page 14-3 for more information.
•
. User is in online mode.
•
. User is in offline mode.
Wave ViewPoint User Guide
Release 3.0
October 2012
14-54
Chapter 14: Using the ViewPoint Mobile App
To add a favorite to the list:
1.
Tap
at the bottom of the screen. The Select Target screen opens:
2.
Do one of the following:
•
To add a user to your Favorites list, tap
the Users list.
•
To add a contact to your Favorites list, tap
at the bottom of the screen to open
to open the Contacts list.
Then, tap the user or contact to add, and if more than one phone number is associated with the
user or contact, tap the number to use.
Hint: You can also add a user to your Favorites list by tapping
Details or Contact Details screen.
at the top of the User
Wave ViewPoint User Guide
Release 3.0
October 2012
14-55
Chapter 14: Using the ViewPoint Mobile App
Viewing and using the Users list (Android)
You can see all Wave extensions, along with information about the current status of each
extension, in the Users list. You can use the Users list to quickly place calls to other Wave
extensions.
A glance at the Users list can tell you:
•
A user’s extension number
•
Whether a user is currently on a call
•
A user’s current personal status
•
as call forwarding turned on, and the location to which the calls are forwarded
•
The extensions of your office’s auto attendants and Contact Center queues.
Wave ViewPoint User Guide
Release 3.0
October 2012
14-56
Chapter 14: Using the ViewPoint Mobile App
You can navigate through the Users list in any of the following ways:
•
Tap the Search bar at the top of the screen to open a keyboard to search for a name.
•
Drag up or down to scroll through the Users list.
•
Tap a letter or number in the jump list at the right of the screen to go directly to the entries
that start with that letter.
The following is displayed for each user:
•
Status. The user’s current personal status is displayed. See “Available personal statuses”
on page 3-4 for a table of each personal status icon and what it means.
•
Hook state.
•
Presence. Indicates whether or not the user is connected to the Wave Server. See “Online
indicates that the user is currently on a call.
vs. offline mode” on page 14-3 for more information.
•
. User is in online mode.
•
. User is in offline mode.
Tap on a user to open the User Details screen:
Tap
at the top of the screen to add the user to your Favorites list.
Wave ViewPoint User Guide
Release 3.0
October 2012
14-57
Chapter 14: Using the ViewPoint Mobile App
To send an Instant Message to a user:
1.
Tap Send Instant Message to IM the user. You can only IM another user if both of you are
in online mode—you can see if a user is online by examining his or her presence
indicator.
2.
Type your message using the keyboard that opens, and then tap Send.
As your conversation progresses, all of the messages and replies are displayed at the top
of the window. This example shows a short IM exchange between two users:
Wave ViewPoint User Guide
Release 3.0
October 2012
14-58
Chapter 14: Using the ViewPoint Mobile App
Using and managing your Contacts list (Android)
Important: The contacts displayed here are your local contacts stored on your Android
device, not your Viewpoint contacts. ViewPoint contacts are not synchronized with your
mobile phone.
You can navigate through the Contacts list in any of the following ways:
•
Tap the Search bar at the top of the screen to open a keyboard to search for a name.
•
Drag up or down to scroll through the Contacts list.
•
Tap a letter or number in the jump list at the right of the screen to go directly to the entries
that start with that letter.
Wave ViewPoint User Guide
Release 3.0
October 2012
14-59
Chapter 14: Using the ViewPoint Mobile App
Tap a contact to view or change contact details.
Tap
at the top of the screen to add the contact to your Favorites list.
Wave ViewPoint User Guide
Release 3.0
October 2012
14-60
Chapter 14: Using the ViewPoint Mobile App
Making a call and acting on your current calls (Android)
Tap Calls on the ViewPoint Mobile toolbar.
The Dialpad opens, if you are not already on a call.
If you are already on one or more calls (for example a conference call, a call on hold, and so
forth, the Calls view opens displaying those calls across the top.
Wave ViewPoint User Guide
Release 3.0
October 2012
14-61
Chapter 14: Using the ViewPoint Mobile App
Making a call (Android)
Important: The ViewPoint Mobile Dialpad is only used for initiating calls. Use your mobile
phone’s own keypad to generate DTMF tones (for example, when responding to a prompt,
entering an account number, and so forth) during a phone call.
Enter the phone number or extension to dial. As you type, the number is displayed at the top of
the screen.
The Dialpad includes a list of most recent callers for your convenience. Tap on the drop-down
arrow to see the list, then tap on any entry to put the phone number in the dial bar. You can return
the call by tapping the dial button.
•
Tap
to add the number as entered at the top of the screen to your Contacts list.
•
Tap
to place a call to the displayed number.
•
Tap
to delete digits from the entered number.
Wave ViewPoint User Guide
Release 3.0
October 2012
14-62
Chapter 14: Using the ViewPoint Mobile App
Viewing and acting on your current calls (Android)
When you are on a call, you have a variety of call actions available. In this example, one call on
hold is shown:
Wave ViewPoint User Guide
Release 3.0
October 2012
14-63
Chapter 14: Using the ViewPoint Mobile App
Actions that you can perform on a call (Android)
End Call. Tap to hang up the call.
New Call. Tap to make a new call.If you are already on a call, the current
call is put on hold.
When the new call connects, you can quickly conference some or all
parties together by tapping the Conference button. See page 14-65.
Record. Tap to record the call.
Hold. Tap to put the call on hold.
Conference. Tap to add some or all dialed parties to a conference. See
page 14-65.
Transfer. Tap to transfer the call. See page 14-64.
Add Notes. Tap to type call notes. See page 14-68.
Wave ViewPoint User Guide
Release 3.0
October 2012
14-64
Chapter 14: Using the ViewPoint Mobile App
Transferring a call (Android)
To transfer a call
1.
While on an active call, press
.
2.
In the Transfer To screen, select the transfer-to extension, contact, or other number.
•
Tap to open the Users view to select a target. See page 14-52.
•
Tap to open the Contacts list to select a target. See page 14-58.
•
Tap to open the Dialpad to enter a target phone number. See page 14-61.
•
Tap to open your Favorites list to select a target. See page 14-53.
Wave ViewPoint User Guide
Release 3.0
October 2012
14-65
Chapter 14: Using the ViewPoint Mobile App
Creating a conference call (Android)
There are two ways to create a conference call:
Conferencing: Method 1
1.
While on an active call, press
and call the other party.
2.
The current call is put on hold.
3.
When the new call connects, quickly conference all parties together by tapping
.
4.
The Conference With screen displays all of your current calls.
By default, all of your calls will be included in the conference. Tap any call that you do
not want to be included to deselect it. (This does not affect the actual status of the call.)
5.
Tap Conference to create the conference.
Wave ViewPoint User Guide
Release 3.0
October 2012
14-66
Chapter 14: Using the ViewPoint Mobile App
Conferencing: Method 2
1.
While on an active call, press
.
2.
In the Conference With screen, select the party to add to the conference.
•
Tap to open the Users view to select a party. See page 14-52.
•
Tap to open the Contacts list to select a party. See page 14-58.
•
Tap to open the Dialpad to enter a phone number. See page 14-61.
•
Tap to open your Favorites list to select a party. See page 14-53.
Wave ViewPoint User Guide
Release 3.0
October 2012
14-67
Chapter 14: Using the ViewPoint Mobile App
3.
When you return to the Calls view, you can see the parties in the call:
Repeat to add additional parties to the conference. When you add a each party to the
conference, the other calls are placed on hold while the next call is placed.
4.
Tap
to conference all calls together.
This example shows a conference call with 2 parties besides yourself:
Wave ViewPoint User Guide
Release 3.0
October 2012
14-68
Chapter 14: Using the ViewPoint Mobile App
Adding notes to a call (Android)
Tap
notes:
to open a keyboard at the bottom of the screen that you can use to type call
Wave ViewPoint User Guide
Release 3.0
October 2012
14-69
Chapter 14: Using the ViewPoint Mobile App
Viewing and acting on your voice messages (Android)
To view your voice mail folders, tap VM on the ViewPoint Mobile toolbar.
Select the voice message folder to display (Inbox, Saved, or Deleted) from the dropdown list to
view its contents. In the following example, the Inbox contains one message.
Tap
next to a message to play it. You can use the controls at the bottom of the screen to
stop and restart message playback or position playback within the message.
Tap
screen.
to display message details. See page 14-70 for more about the Message Details
Wave ViewPoint User Guide
Release 3.0
October 2012
14-70
Chapter 14: Using the ViewPoint Mobile App
Use the toolbar to act on the selected message:
•
Tap
to forward the selected message to another user.
•
Tap
to call back the person who left the message.
•
Tap
to toggle speakerphone on and off. Turn on speakerphone to go hands-free
and listen to the message over your phone’s speaker.
•
Tap
to delete the voice message.
Viewing message details (Android)
Tap
next to a message in the VM screen to display message details, including the message
date and time, duration, and call notes, if available:
Wave ViewPoint User Guide
Release 3.0
October 2012
14-71
Chapter 14: Using the ViewPoint Mobile App
Tap
to play the message. You can use the controls to stop and restart message playback
or position playback within the message.
Use the toolbar buttons to forward the message to another user, call back the person who left the
message, toggle your speakerphone on and off, or delete the message:
Viewing your Call Log (Android)
To access your call history, tap Call Log on the ViewPoint Mobile toolbar.
You can filter the Call Log display by selecting All, Incoming, or Outgoing from the dropdown
list.
Note: Multiple calls from the same contact are listed once in the Call Log view—you can view
other recent calls from the same contact by tapping details for the call.
Wave ViewPoint User Guide
Release 3.0
October 2012
14-72
Chapter 14: Using the ViewPoint Mobile App
The following information is displayed for each call:
•
Call direction. Indicates an incoming or outgoing call.
•
For an incoming call, Caller ID or contact information (if available).
•
For an outgoing call, number dialed.
•
Call date and time.
To make a callback, tap
. If you are connected to the Wave Server, the call is automatically
dialed via the Wave network, otherwise you are prompted to use your phone’s cell carrier
network.
Tap a call to display call details.
Wave ViewPoint User Guide
Release 3.0
October 2012
14-73
Chapter 14: Using the ViewPoint Mobile App
Instant Messaging (Android)
To view current IM conversations or start a new one, tap IM on the ViewPoint Mobile toolbar.
The Conversations screen displays any in-progress IM conversations.
indicates an IM that you haven’t viewed yet, along with a message count.
Tap an in-progress conversation to display the conversation or IM.
Wave ViewPoint User Guide
Release 3.0
October 2012
14-74
Chapter 14: Using the ViewPoint Mobile App
To start a new IM conversation:
1.
Tap
.
2.
In the Send IM screen, select the name of the target user.
3.
Type your message using the keyboard that opens, and then tap Send.
Wave ViewPoint User Guide
Release 3.0
October 2012
14-75
Chapter 14: Using the ViewPoint Mobile App
As your conversation progresses, all of the messages and replies are displayed at the top
of the window. This example shows a short IM exchange between two users:
Wave ViewPoint User Guide
Release 3.0
October 2012
14-76
Chapter 14: Using the ViewPoint Mobile App
Setting options (Android)
This section describes how to make changes via the Quick Settings and Advanced Settings
screens. You must be in online mode to change these settings.
Changing Quick Settings (Android)
1.
Tap Settings on the ViewPoint Mobile toolbar.
2.
The Quick Settings screen opens.
Wave ViewPoint User Guide
Release 3.0
October 2012
14-77
Chapter 14: Using the ViewPoint Mobile App
Make any of the following changes:
•
Personal Status. Tap to change your personal status. Then, select the new status from
the list
•
Incoming Call Handling. Choose one of the following options:
•
Push Notification. (Recommended) Sends a push notification for each incoming
call to your mobile phone if the ViewPoint Mobile App is not running. If you view
the push notification, the call will be sent to you mobile phone so you can answer
it.
Wave ViewPoint User Guide
Release 3.0
October 2012
14-78
Chapter 14: Using the ViewPoint Mobile App
Here is an example of a push notification for a new call:
This option provides the best experience—calls will ring your desk phone, while
also notifying you on your mobile phone with the option to forward the call to
your mobile phone if you decide to answer it.
•
Forward to Phone. Automatically forwards each incoming call to your mobile
phone. (This is the same as forwarding calls to your mobile phone via ViewPoint
Desktop.)
•
No Mobile Notification. Disables all notifications as well as call forwarding to your
mobile phone. (You will still be able to control your own calls from inside the
App.)
Important: If you select Push Notification or No Mobile Notification here, your
ViewPoint Desktop’s call forwarding setting will be changed automatically every
time you launch the ViewPoint Mobile App. If your Forward to Phone target is
different in Viewpoint Mobile than it is in Viewpoint Desktop, forwarding will
change automatically to the location specified in the Viewpoint Mobile App.
Wave ViewPoint User Guide
Release 3.0
October 2012
14-79
Chapter 14: Using the ViewPoint Mobile App
•
For Calls Use. Choose one of the following options to indicate your preferred device
for placing and taking calls.
•
Mobile Phone. (Recommended) 10-digit number of the of the mobile device to
which your calls will be forwarded. If you are using an Android phone, enter the
number. If you are using an Android tablet (which does not have voice capability),
enter the number of another cell phone to use.
•
Default Station. Choose this option to use your Wave desktop phone, for example
when you are in your office. (To hear your station ID, dial *00 from your desktop
phone.)
•
Other Phone. Enter another phone number here, for example your home’s landline
•
Other Wave Station. Choose this option to use another Wave phone as your
phone for times when you are working from home.
preferred device, for example if you are on the road and are using a temporary
office.
3.
Tap Change User to log in as a different user.
Wave ViewPoint User Guide
Release 3.0
October 2012
14-80
Chapter 14: Using the ViewPoint Mobile App
Changing advanced settings (Android)
1.
Tap Settings on the ViewPoint Mobile toolbar, and then tap Advanced Settings.
2.
Make any of the following changes:
•
VoiceMail Download Preferences.
•
Download Headers Only. Select this option to only download message headers
(this will save storage space on the Android device). Deselect this option to
automatically download entire new voice messages whenever the App is active.
•
My Mobile Phone #. Enter the 10-digit number of the of the mobile phone to which
your calls will be forwarded.
• If you are using an Android phone, enter the phone’s number.
• If you are using an Android tablet (which does not have voice capability),
enter the number of another phone to use (for example a cell phone).
•
Wave Station ID. Enter your Wave Station ID. This will allow you to use your
desktop phone to make and take calls with the ViewPoint Mobile App. (To hear
your station ID, dial *00 from your desktop phone.)
Wave ViewPoint User Guide
Release 3.0
October 2012
14-81
Chapter 14: Using the ViewPoint Mobile App
•
Mobile Alert. Select one or more of these options determine whether you will receive
push notifications to your Android device for the following events:
•
New Calls.
•
New Voice Mail Messages.
•
IM Online / Receive Alerts.
Note: If you change Mobile Alert settings, you must reconnect to the Wave Server
for the changes to take effect.
Troubleshooting Viewpoint Mobile App issues (Android)
If you encounter a problem using the ViewPoint Mobile App, you can exit the App by pressing
the device’s Back button, or by choosing Phone settings > Applications > Manage Applications
> Viewpoint > Force Stop.
If the App fails completely, the notification “ViewPoint has crashed” is displayed in the status
bar. Click on that notification to automatically submit a crash log to Vertical. You will then be
prompted to include details on what led to the crash—this information will help Vertical resolve
the problem as quickly as possible.
Wave ViewPoint User Guide
Release 3.0
October 2012
14-82
Chapter 14: Using the ViewPoint Mobile App
Gathering relevant system logs
The system log files WCAPISVRxxx.log and Connectionsxxx.log are not included
automatically in the problem report package when you report a problem using the Problem
Report Wizard, but may be useful when troubleshooting a ViewPoint Mobile App connectivity
issue. For more information, including the location of these log files and how to gather them
manually, see “Gathering logs to report a Wave problem” in Chapter 22 in the Wave Global
Administrator Guide.
Wave ViewPoint User Guide
Release 3.0
October 2012
Appendix A
Using the Wave Archived Recording Browser
APPENDIX CONTENTS
About the Wave Archived Recording Browser . . . . . . . . . . . . . . . . . . . . . . . . . .A-1
Running the Archived Recording Browser. . . . . . . . . . . . . . . . . . . . . . . . . . . . . .A-2
Searching for recordings . . . . . . . . . . . . . . . . . . . . . . . . . . . . . . . . . . . . . . . . . . .A-3
Managing individual recordings . . . . . . . . . . . . . . . . . . . . . . . . . . . . . . . . . . . . .A-10
Acting on archived call recordings. . . . . . . . . . . . . . . . . . . . . . . . . . . . . . . . . . .A-11
Checking the archive for missing audio files . . . . . . . . . . . . . . . . . . . . . . . . . . .A-13
Purging archived recordings . . . . . . . . . . . . . . . . . . . . . . . . . . . . . . . . . . . . . . .A-14
About the Wave Archived Recording Browser
The Wave Archived Recording Browser is a tool for listening to and managing thousands of
mailbox recordings (voice messages or call recordings) that have been archived by Wave. You
can search for recordings using a variety of criteria, edit or delete recordings, flag recordings for
follow up, or restore them to the appropriate Inbox or other folder from which they were
archived.
Wave ViewPoint User Guide
Release 3.0
October 2012
Running the Archived Recording Browser
A-2
Appendix A: Using the Wave Archived Recording Browser
Running the Archived Recording Browser
In order to use the Archive Recording Browser, you must know the network location of the
archive and have network access to that location. See your Wave system administrator for
details.
To run the Archived Recording Browser
1.
Choose Start > Programs > Vertical Wave > Wave Archived Recording Browser. The
Wave Archived Recording Browser dialog opens:
2.
Enter your archive user User Name and Password. These can be different than your Wave
user name and password—ask your Wave system administrator for the user name and
password to use.
3.
To log on to a different archive PC, enter that PC’s name or IP address in the Server text
box.
4.
Click OK.
After using the Archived Recording Browser, to log on as another archive user (for example, as
a user with different access privileges), click File > Log On as a Different User, and then enter
that archive user’s User Name and Password.
Wave ViewPoint User Guide
Release 3.0
October 2012
Searching for recordings
A-3
Appendix A: Using the Wave Archived Recording Browser
Searching for recordings
The Archived Recording Browser does not display any entries when you run it. To view
recordings in the Browser window, you must first search for recordings that match criteria that
you set.
To search for recordings, use either of the following methods:
•
Start a new search. See page A-3.
•
Load a saved search. See page A-9.
Starting a new search
To start a new search
1.
Click
on the toolbar. The Search Archived Recordings dialog opens.
Wave ViewPoint User Guide
Release 3.0
October 2012
Searching for recordings
2.
A-4
Appendix A: Using the Wave Archived Recording Browser
Do one of the following:
•
If your search only involves basic criteria. Click the Basic tab to quickly specify
commonly-used criteria. Anything you enter on the Basic tab is treated as a partial
search. For example, entering “617” in the From Name or Number field will return
all records with 617 in that field, including “61755511212”, and “5126175555”.
Example: For a description of each field on the Basic tab, see “Search criteria” on
page A-5. When you are done specifying your search criteria on the Basic tab, go to
step 3.
•
If you want to specify more complex search criteria. Click the Advanced tab to
search on additional fields in the mailbox recording’s Call Log entry, or to define
more complex search criteria than you can specify on the Basic tab.
Example: For a description of each field on the Advanced tab, see “Search criteria”
on page A-5.
Example: Click Add to List after defining each entry. To remove an entry from the
list, select it and then click Remove.
3.
On either tab, you can specify how the results will be sorted. From the Order results by
drop-down lists, select the Browser column on which to sort the search results. Then
select Ascending or Descending from the drop-down list to specify how to sort the
contents of that column.
Note: Search results can also be sorted by clicking any column header in the Archived
Recording Browser.
Wave ViewPoint User Guide
Release 3.0
October 2012
Searching for recordings
4.
A-5
Appendix A: Using the Wave Archived Recording Browser
When you are done specifying your search criteria on either tab, do any of the following:
•
To execute the search, click Find Now.
•
To reuse the search criteria again at a later time, click Save As. In the Save Search
As dialog, Enter a name for your search and then click Save.
•
To reset the contents of the Search Archived Recordings dialog to the default
settings, click Reset.
Search criteria
The following table describes the search criteria that you can set up on either the Basic or
Advanced tab in the Search Archived Recordings dialog:
Search Criteria
Tab
Field
Description
Basic
Wave Server
If your system archives mailbox recordings from more than
one Wave Server, you can search all of the Servers, or
select a specific Server from the drop-down list.
Mailbox
You can search all users’ mailbox folders, or select a
specific user from the drop-down list.
From Name or
Number
To search for recordings related to calls from a specific user
or number, select this checkbox, and then enter all or part
of the user’s name (for example, “Janice” or “Jan”) or phone
number (for example, “17815551212”, or “781”.) To search
for calls from an external caller, enter “Unknown”.
To Name or
Number
To search for recordings related to calls placed to a specific
user or number, select this checkbox, and then enter all or
part of the user’s name or phone number.
Received
To limit your search to a specific time period, select this
checkbox, and then select a time period from the
drop-down list (for example, “Yesterday” or “Last 3
months”.) If you select “Specific date”, enter the date in the
text box using the format provided, or click
to select a
date from a calendar.
Wave ViewPoint User Guide
Release 3.0
October 2012
Searching for recordings
A-6
Appendix A: Using the Wave Archived Recording Browser
Search Criteria (continued)
Tab
Field
Description
Length
To search for recordings of a specific length, select this
checkbox. Select an option from the drop-down list, and
then enter the number of minutes in the text box (for
example, “Within 30 sec.of 5 minutes”.)
Note: To enter seconds, use the hh:ss format or decimal
places. For example, to indicate 1 minute 30 seconds, enter
either “1:30” or “1.5”.
Advanced
Flagged for
follow up
To search for recordings that were previously flagged for
follow up, select this checkbox.
Call Notes
To search for recordings that contain a specific text string in
the Call Notes field, select the checkbox, and then enter the
string in the text box.
Archive Notes
To search for recordings that contain a specific text string in
the Archive Notes field, select this checkbox, and then enter
the string in the text box.
Show me
recordings
that match
these criteria
Lists one or more criteria that you specify on the Advanced
tab. To remove an entry from the criteria list, select it and
then click Remove.
Define more
criteria
To add an entry to the criteria list, select a Field and
Condition from the drop-down lists, and then select a Value
from the drop-down list or enter it in the text box (for
example, “Account Code Equals 1074”.)
To search for recordings that match one of several values
in a single field, select the condition Or. When you use Or,
you must specify the complete field contents that you are
searching for, as in:
“From Or Nancy Jones OR Pete Smith OR Irene Orleans”.
Wave ViewPoint User Guide
Release 3.0
October 2012
Searching for recordings
A-7
Appendix A: Using the Wave Archived Recording Browser
Search Criteria (continued)
Tab
Field
Description
Field
Field on which the search criteria is based. For a
description of each field, see “Using the Call Log view” in
Chapter 22 in the Wave Global Administrator Guide.
Condition
Select any of the following conditions.
Equals, Does
not equal
Use to search based on the exact contents
of a field. For example, to search for
recordings of calls from Kevin
McDonough, add the criteria “From Equals
Kevin McDonough”.
Note that when you use Equals and Does
not equal, you cannot search based on
part of the field’s contents—the criteria
“From Equals Irene” would not return any
matches.
Equals is the only valid condition for some
fields (Flagged for follow-up, Message
Heard, Call Direction, Call Result, Left
Message, and Recorded By.) For these
fields, select one of the values offered in
the drop-down list, for example, “Call
Result Equals Left Message”.
Greater than,
Less than
Use to search based on the numeric
contents of a field. For example, to search
for recordings of calls that were on hold for
more than 10 minutes, add the criteria
“Hold Time Greater than 10”.
Between
Use to search based on a range of values
for a field. For example, to search for
recordings of calls that lasted more than
10 but less than 20 minutes, add the
criteria “Call Duration Between 10 and 20”.
Wave ViewPoint User Guide
Release 3.0
October 2012
Searching for recordings
A-8
Appendix A: Using the Wave Archived Recording Browser
Search Criteria (continued)
Tab
Field
Description
Or
Use to search for recordings based on two
or more values for a field. For example, to
search for recordings of calls from several
callers, add a criteria like “From Or Nancy
Jones OR Pete Smith OR Irene Orleans”.
Like
Use to search based on wildcard
characters that represent one or more
characters.
Use a question mark (?) to represent a
single alphanumeric character. For
example, to search for recordings of calls
from the 617 area code and 555
exchange, add the criteria, “Number Like
617555????”.
Use an asterisk (*) to represent one or
more alphanumeric characters. For
example, to search for recordings of calls
from anyone with a first name of Nancy,
add the criteria “From Like Nancy”.
You can combine wildcard characters in a
single search criteria. For example, to
search for recordings from calls from an
area code that begins with 8 and has the
555 exchange, add the criteria “Number
Like “8??555*”.
Note that if you want to search for the
actual character * or ?, use the Equals or
Does not equal condition.
Wave ViewPoint User Guide
Release 3.0
October 2012
Searching for recordings
A-9
Appendix A: Using the Wave Archived Recording Browser
Search Criteria (continued)
Tab
Field
Description
Contains
Value
Use to search based on a portion of a field.
For example, to search for recordings of
calls where 555 appears anywhere in the
number, add the criteria “Number Contains
555”.
Field contents for which to search. Note that when
searching on the contents of a time-based fields (Call
Duration, Hold Time, and so forth), the value is always
entered in minutes.
Saving your current search
There are two ways to save your current search criteria in order to search using the same criteria
at a later time:
1.
In the Search Archived Recordings dialog, click Save As, or in your Browser, click
on the toolbar.
The Save Search As dialog opens.
2.
Enter a name for your search and then click Save.
Loading a saved search
To load a saved search, select it in the drop-down list on the toolbar. To change the search
criteria for a saved search, select it and then choose Tools > Find. The Search Archived
Recordings dialog opens where you can make your changes.
Wave ViewPoint User Guide
Release 3.0
October 2012
Managing individual recordings
A-10
Appendix A: Using the Wave Archived Recording Browser
Managing individual recordings
Mailbox recordings that match your search criteria are displayed in the Browser.
The following information is displayed for each recording:
•
If
, recording has been flagged for follow-up.
•
Identifies the recording type:
•
Voice message
•
Call recording
•
Server. Wave Server from which the recording was archived.
•
Mailbox. User’s mailbox folder from which the recording was archived. If you restore the
recording, it will be returned to this mailbox.
•
From. Name of the person who placed the call. On incoming calls, “Unknown” is
displayed unless the user identified the caller as a contact. On outgoing calls, this column
contains the user’s name.
•
Received. Date and time when a voice message was left, or a call recorded.
•
Length. Length of the recording in minutes:seconds format.
Wave ViewPoint User Guide
Release 3.0
October 2012
Acting on archived call recordings
•
A-11
Appendix A: Using the Wave Archived Recording Browser
Number. On incoming calls, the extension, Caller ID name and number (if available), or
external number that was dialed. On outgoing calls, the extension or external number that
was dialed.
•
Created. Date and time when the mailbox recording was archived.
•
Custom Data. Custom data, if any, associated with the call.
•
Notes. Starting text of any notes added to a voice message or call recording via the Call
Monitor or Call Log. The complete notes appear in the Call Notes pane at the bottom of
the Browser. For a call recording, Wave automatically adds information about the stations
and/or trunks involved in the call.
•
If you make changes to Call Notes via the Archived Recording Browser, those changes
are included if you restore the recording to its original Inbox or other folder, but the Call
Log notes remain unchanged.
•
Archive Notes. Notes added to the archived recording via the Archived Recording
Browser. Archive notes are maintained only in the archive, and are not included if the
recording is restored to its original Inbox or other folder.
Acting on archived call recordings
To act on archived recordings:
1.
Adjust the display in any of the following ways:
•
Click on any column heading to sort the search results on that column. You can type
characters or words to jump to the first matching record in the sorted column that
begins with that text.
•
Enter a number in the Recordings text box at the top right of the Browser and press
buttons to browse through the
search results.
Enter to go to that entry in the list. Use the
•
To change the number of entries displayed per page, choose Tools > Options. In the
Options dialog, enter the Number of recordings to display per page.
Wave ViewPoint User Guide
Release 3.0
October 2012
Acting on archived call recordings
2.
A-12
Appendix A: Using the Wave Archived Recording Browser
Click an archived file to select it. You can perform the following actions on a selected
file:
•
Play. Double-click any column except the first column to play the recording, or use
the audio controls at the bottom of the Browser.
•
Bookmark. To set a bookmark while listening to a recording, click and drag the
orange triangle
under the progress indicator at the bottom of the Browser.
The next time that you play the recording, playback will start at the bookmark
location.
•
Open Call Log Details. Click
on the toolbar to view details about the Call Log
entry associated with the mailbox recording.
Note: You can view Call Log details for all call recordings, and for voice messages
that were left by a caller via the Wave phone commands. Internal voice messages will
only have associated Call Log details if internal (station-to-station) call logging is
turned on via Tools > System Settings > Call Log tab in User/Group Management
applet in the Wave Global Administrator Management Console. Voice messages sent
directly to a user’s voice mailbox by another user via ViewPoint do not have any
associated Call Log details.
•
Flag recording. Double-click the first column for a recording to flag the selected
recording for follow up. Double-click it again to remove the flag. (You can also use
the Flag this recording for follow-up checkbox for the selected recording.)
Wave ViewPoint User Guide
Release 3.0
October 2012
Checking the archive for missing audio files
A-13
Appendix A: Using the Wave Archived Recording Browser
•
Add notes. To add new notes or edit existing notes to the selected recording, type in
the Call Notes or Archive Notes panes.
•
Restore recording. Click
•
Export recording. Click
•
Refresh. Click
in the Browser.
•
Delete recording. Click
on the toolbar to delete one or more selected recordings
from the archive folder. (To delete recordings based on criteria that you set, see
“Purging archived recordings” on page A-14.)
on the toolbar to move the selected recording back to
the mailbox from which it was archived. It also stays in the archive until purged.
, one of the audio controls at the bottom of the Browser,
to export one or more selected recordings to a location on a hard drive other than the
folders from which they were archived. (Exported recordings are not deleted from
the archive folder.)
on the toolbar to refresh the list of mailbox recordings displayed
Checking the archive for missing audio files
When you check the archive for missing audio files, all archive database entries that do not have
a corresponding audio file in the archive folder are deleted from the database.
To check the archive for missing audio files
1.
Choose Tools > Check Archive. Note: If this option is not available, ask your Wave
system administrator to grant you Archive Admin privileges.
2.
Click OK at the warning message to check the archive.
Wave ViewPoint User Guide
Release 3.0
October 2012
Purging archived recordings
A-14
Appendix A: Using the Wave Archived Recording Browser
Purging archived recordings
You must have Administrator privileges to perform this operation. When you purge archived
recordings, all mailbox recordings in the archive folder that match the criteria that you set are
deleted permanently, as well as the corresponding archive database entries.
To purge archived recordings
1.
Choose Tools > Purge Recordings. Note: If this option is not available, ask your Wave
system administrator to grant you Archive Admin privileges. The Purge Archived
Recordings dialog opens:
2.
Specify the recordings that you want to delete from the archive. Selecting recordings to
purge works the same as using the Basic tab to search for recordings. See “Search
Criteria” on page A-5 for a description of each field.
3.
Click Delete to purge mailbox recordings that match your criteria from the archive. Click
OK at the warning message to confirm the purge.
Wave ViewPoint User Guide
Release 3.0
October 2012
Appendix B
Logging On with Command-Line Switches
APPENDIX CONTENTS
About ViewPoint command-line switches . . . . . . . . . . . . . . . . . . . . . . . . . . . . . .B-1
ViewPoint command-line switch reference . . . . . . . . . . . . . . . . . . . . . . . . . . . . .B-1
About ViewPoint command-line switches
You can add various switches to the command line that ViewPoint shortcut uses to start
ViewPoint. To change the command line, right-click ViewPoint shortcut icon, choose
Properties, and then click the Shortcut tab. The Target field shows the command line.
Add switches to the end of the command line (after the closed-quote mark) with a space before
the switch. You can add multiple switches separated by spaces. For example:
“C:\Program Files\Vertical Wave\ViewPoint\Vertical.Wave.ViewPoint.exe”
/Server:Wave /station:77
ViewPoint command-line switch reference
The following ViewPoint command-line switches are supported:
•
/allowmultiple. Enables you to run multiple instances of ViewPoint at the same time on
your computer.
•
/language. Changes the ViewPoint interface language to any installed language. (A list of
installed languages appears in the Language drop-down in the ViewPoint Log On dialog.
See page 2-11). Specify one of the language directory names found in your C:\Program
Files\Vertical Wave\ViewPoint directory.
Syntax:
/language:<language directory name>
Wave ViewPoint User Guide
Release 3.0
October 2012
ViewPoint command-line switch reference
B-2
Appendix B: Logging On with Command-Line Switches
Example:
The four languages installed with ViewPoint 1.5 are de (Deutsch), es (Espanol), fr
(Francais), and fr-ca (Francais - Canada). You would use /language:de to start
ViewPoint with a German (Deutsch) language interface.
•
/Server. Runs ViewPoint against a specific Wave Server on your network. This is useful
when you want to have one ViewPoint session using a Wave Server other than the one
your ViewPoint runs against by default.
Syntax:
/server:<servername>
Example:
/server:Wave
•
/user /password. Use to automatically log on to ViewPoint as a specific user. With both
/user and /password present, ViewPoint skips the Logon dialog. (The two switches can
also be used separately.)
Syntax:
/user:<username> /password:<password>
Example:
/user:Neil Pratt /password:2112.
•
/station. Associates ViewPoint with a specific phone. See “Associating ViewPoint with a
specific phone” on page B-3” for the syntax and more about how to use this command.
Wave ViewPoint User Guide
Release 3.0
October 2012
ViewPoint command-line switch reference
B-3
Appendix B: Logging On with Command-Line Switches
Associating ViewPoint with a specific phone
You can use the /station switch to set up various ViewPoint shortcuts for different phones so
that you can quickly change the phone associated with ViewPoint. (Otherwise, to change the
phone associated with ViewPoint you have to wait for ViewPoint to launch, choose File > Use
a different station, and wait for ViewPoint to launch again.
Syntax:
/station:<station number/default station>
•
For <station number>, specify a station ID, for example /station:77.
•
For <default station>, enter either of the following: /station:default ;
/station:-1.
Wave ViewPoint User Guide
Release 3.0
October 2012
Release 3.0
October 2012
Appendix C
Reporting Problems
APPENDIX CONTENTS
About the Problem Report Wizard. . . . . . . . . . . . . . . . . . . . . . . . . . . . . . . . . . . .C-1
Reporting a problem that involves a specific call. . . . . . . . . . . . . . . . . . . . . . . . .C-2
Reporting a problem that does not involve a specific call . . . . . . . . . . . . . . . . . .C-3
About the Problem Report Wizard
If you experience a problem with one of the Wave workstation applications—ViewPoint, the
Contact Center Reporter, the Contact Manager Assistant, the TAPI Service Provider, or the
Archived Recording Browser—report the problem to your Wave system administrator by using
the Problem Report Wizard. The Problem Report Wizard is a tool that collects appropriate log
files and prompts you for information that can help solve the problem.
The Problem Report Wizard creates a problem report package as a ZIP file in the location of
your choice. You can then send the ZIP file to your Wave system administrator.
To prevent ZIP files from being overwritten, the Wizard gives each problem report package a
unique name based on your company name and a unique sequence number, as shown in the
following example.
The Wizard increments the sequence number in the file name each time it creates a new problem
report package.
Wave ViewPoint User Guide
Release 3.0
October 2012
Reporting a problem that involves a specific call
C-2
Appendix C: Reporting Problems
Reporting a problem that involves a specific call
If you encountered a problem that involved a call, there are two ways to report it:
To report a problem via an active call in the Call Monitor
1.
Select the problem call in the Call Monitor.
2.
Choose Actions > Report a Problem. The Problem Report Wizard opens with details
about the call already entered.
3.
Complete the Problem Report Wizard screens.
To report a problem via a call record in the Call Log
1.
In ViewPoint, go to the Call Log folder and select the call during which the problem
occurred.
2.
Choose Actions > Report a Problem. The Problem Report Wizard opens with details
about the call already entered.
3.
Complete the Problem Report Wizard screens.
Note: The Flag a Problem button in the Call Monitor toolbar lets you click once to flag a
problem call, for example, a call that is not displayed correctly in the Call Monitor, or a call in
ViewPoint that doesn’t match the call on your phone. Any time after flagging calls, you can run
the Problem Report Wizard once and gather the logs for all of the flagged calls. See “Flagging
a problem call to report later” on page 5-17.
Wave ViewPoint User Guide
Release 3.0
October 2012
Reporting a problem that does not involve a specific call
C-3
Appendix C: Reporting Problems
Reporting a problem that does not involve a specific call
If your problem does not involve a specific call, run the Problem Report Wizard as follows:
1.
Do one of the following:
•
From ViewPoint, choose Help > Report a Problem.
•
Run the file C:\Program Files\Common Files\Vertical\Wave\TVPRWizard.exe.
2.
Answer the questions presented in each Wizard window.
3.
Optionally, check Send Problem Report Package via e-mail in the final window to e-mail
the problem report package to your Wave system administrator. It can be helpful to
include in your e-mail the time at which the problem occurred, as closely as you can
identify it.
Note: Because a problem report package can be large, after you send it to your Wave system
administrator, you should delete it from your system to regain disk space.
Wave ViewPoint User Guide
Release 3.0
October 2012
Release 3.0
October 2012
Appendix D
Troubleshooting ViewPoint Problems
This appendix contains information that may be helpful when you are troubleshooting a
problem that occurs when starting or using ViewPoint.
Firewall problems may prevent ViewPoint from starting.
Symptom: After installing ViewPoint successfully on a PC, the following message is displayed
and ViewPoint fails to start:
“Wave Server is unable to connect to ViewPoint, which could be due to a configuration
issue on the Wave Server. Please contact your administrator so the can check if the Wave
Global Administrator's Workstation Firewall settings allow connections from
nnn.nnn.nnn.nnn”
where “nnn.nnn.nnn.nnn” is the IP address of the Wave Server.
This problem may occur if your company network is defined as a “public network” on the PC’s
network settings and there is a firewall between the PC and the Wave Server. Additionally,
internet security programs such as McAfee may prevent the connection.
Solution: Define the network to the Wave system as a “work network” instead of a “public
network” to eliminate the firewall between the PC and the Wave Server or allow access by the
Wave Server through the PC’s firewall.
On a system configured with a locale of “Spanish (Spain)”, a long distance
prefix may be incorrectly added before dialing a long distance number via
ViewPoint.
Symptom: A “0” prefix may be incorrectly added before dialing a long distance number via
ViewPoint, even though long distance prefixes are not used in Spain.
This problem has been fixed on new systems as of Wave ISM 1.5 SP3. However, if a system
was previously configured to use the “Spanish (Spain)” locale it is possible that ViewPoint may
still incorrectly add a “0” before dialing a long distance number.
Wave ViewPoint User Guide
Release 3.0
October 2012
D-2
Appendix D: Troubleshooting ViewPoint Problems
Solution:
1.
Start the General Settings applet.
2.
On the System tab, click Apply. (The Apply button will be enabled even though you have
not yet made any changes.)
3.
Click Done.
COM Exception when logging into ViewPoint.
Symptom: After a user clicks OK in the ViewPoint Log On dialog, the following error occurs:
[03/12/2008 10:22:39.900 - 3][ViewPoint - Except]
System.Runtime.InteropServices.COMException (0x8007041D): Retrieving the COM
class factory for component with CLSID
{EFED4BC8-3AD3-4D22-8493-F4E91D0BA58A} failed due to the following error:
8007041d.
Solution:
1.
From a command prompt, change directory (cd) to the following:
C:\Program Files\Common Files\Vertical\Wave
2.
Run the following program:
tvwkssvc.exe /service
Wave ViewPoint User Guide
Release 3.0
October 2012
Index
Symbols
, (comma, for pauses in page strings), 7-17
*50 (select Available personal status), 3-7
F11 (return your last call), 6-9
F12 (redial your last call), 6-9
Numbers
0 (transfer to Operator)
changing destination of transfer, 12-7
from greeting, 9-13
from routing list, 9-6
while on hold with Pause and Repeat, 9-17
A
about
ViewPoint Mobile App, 14-1
Wave Mail, 7-27
accessing Wave, 1-2
account codes
entering for contacts, 10-6
account codes, entering
during a call, 5-17
using the dial bar, 6-2
when placing a call, 6-4
Act!, 1-2
active greeting, 7-25
active routing list, 9-8
agents
personal statuses for, 3-5
All tab
display options for, 5-3
in Extensions list, 4-3, 10-3
answering calls
Call Monitor folder
commands
answer, 5-8
archive database, checking for missing audio files,
A-13
Archived Recording Browser
about, A-1
acting on recordings, A-11
adding notes to recordings, A-13
browsing search results, A-11
changing number of entries per page, A-11
checking archive for missing audio files, A-13
deleting recordings, A-13
exporting recordings, A-13
flagging recordings for follow-up, A-12
loading saved search, A-9
logging on, A-2
managing recordings, A-10
opening Call Log details for recordings, A-12
playing recordings, A-12
purging recordings, A-14
refreshing search results, A-13
restoring recordings to Servers, A-13
running, A-2
saving current search, A-9
searching for recordings, A-3
sorting search results, A-11
specifying search criteria, A-5
archived recordings
managing individual recordings, A-10
purging, A-14
searching for, A-3
archived voicemail, 7-3
associating
from a Call Log entry, 8-7
from an active call, 5-15
from voicemail, 7-8
audio controls, using, 2-36
Wave ViewPoint User Guide
Release 3.0
October 2012
Index-2
audio output, changing, 2-22
automatic logon
disabling, 2-9
B
backup reports, 13-6
beep, with call waiting, 12-6
blind transfers, 5-11
bookmarks for voicemail, 2-37
busy, handling calls when, 9-17
C
call
joining, 6-12
monitoring, 6-12
callback number, using to identify contacts, 10-13
Call Center Reporter
overview, 13-1
requirements, 13-2
using Excel toolbar, 13-4
caller ID
including with pager notification, 7-16
selecting name or number as contact
identification, 10-14
used to identify contacts, 10-9
calling back
a Call Log entry, 8-7, 8-8, 9-11
voicemail, 7-6
your last caller, 6-9
Call Log folder
overview, 8-1
adding notes to calls in, 8-6
associating a call with a contact, 8-7
filters for, 8-2
opening a contact record from, 8-8
reporting on, 8-9
returning calls from, 8-7, 8-8, 9-11
viewing additional call details, 8-3
Call Log report, 13-14
Call Monitor folder
overview, 5-1
adding Phonebook pane to, 2-26
commands
associate with contact, 5-15
disconnect, 5-16
park, 5-15
play caller’s name, 5-16
put on hold, 5-10
record call, 5-13
send incoming call to voicemail, 5-9
take call, 5-8
transfer, 5-11
unpark, 5-16
displaying on incoming calls, 12-14
display options for All tab, 5-3
double-clicking in, 5-8
opening automatically, 5-6
ownership of calls in, 5-7
panes in, 5-5
sharing, 2-35, 5-19
tabs
overview, 5-3
showing and hiding, 4-3, 5-4, 10-4
call notification of voicemail, 7-14
call ownership, 5-7
call rules
overview, 11-1
creating, 11-4
examples of, 11-3
how system resolves conflicts, 11-11
organizing by priority, 11-10
Call Rules window, 11-3
calls
answering, 5-8
associating with a contact, 5-15
checking a phone number to dial, 6-8
conferencing, 6-9
using drag-and-drop, 6-11
Wave ViewPoint User Guide
Release 3.0
October 2012
Index-3
disconnecting without hanging up, 5-16
e-mailing a message about, 5-13
forwarding
as displayed in Extensions list, 4-1
prompting for password, 9-4
prompting to accept or decline, 9-4
status bar button for, 2-22
turning on or off, 9-2
and voicemail, 9-5
when logging on, 2-14
handling differently when busy, 9-17
handling individual ones differently, 11-1
hold, 5-10
incoming call indicators, 5-18
notification of voicemail, 7-14
parking, 5-15
placing
overview, 6-1
from Extensions list, 4-4
from other contact manager applications, 1-2
quickly from ViewPoint folders, 6-6
to contacts, 6-3
to extensions, 6-4
to My Numbers, 6-4
using the toolbar’s dial field, 6-2
recording, 5-13
screening with ViewPoint, 5-8
sending incoming to voicemail, 5-9
taking notes on, 5-13
transferring, 5-11
using drag-and-drop, 5-11
unparking, 5-16
Call Transfer report, 13-16
call waiting
customizing, 12-6
turning off, 12-6
checking numbers, 6-8
coaching a user, 6-12
columns
moving and resizing, 12-21
showing and hiding, 12-20
sorting by, 12-21
conference calls
creating, 6-9
using drag-and-drop, 6-11
configuring
ViewPoint Softphone, 12-10
Wave Mail, 7-31
Contact Center Reporter
using, 8-9
Contact Manager Assistant, 10-16
contacts
overview, 10-1
account codes for, 10-6
adding and deleting phone numbers for
identification, 10-10
associating "Unknown" callers with, 10-11
benefits of recognition, 10-8
default phone number, 10-7
deleting phone numbers used for identification,
10-11
entering, 10-5
entering phone numbers for, 10-7
identifying by caller ID, 10-9
importing and exporting, 2-38, 10-17
in other contact manager applications, 10-15
phone prompt language for, 10-7
PINs for, 10-14
placing calls to, 6-3
private and public, 10-2
recording voice titles for, 10-8
searching for, 10-2
synchronizing Wave and e-mail, 7-30
Contacts folder
adding as a pane in Call Monitor, 2-26
double-click behavior in, 12-19
sharing, 2-35
copying and pasting ViewPoint items, 2-27
CSV files, importing and exporting, 2-37
custom data, viewing, 5-5
custom hours, for call rules, 7-21, 11-8
Wave ViewPoint User Guide
Release 3.0
October 2012
Index-4
D
default personal status greeting, 7-25
default phone number, for contacts, 10-7
default routing list, 9-8
default station, changing, 2-15
Deleted folder, 2-33
deleting ViewPoint items, 2-27
deleting voicemail, 2-27
dial bar, 6-2
dial-by-name, customizing your listing in, 12-8
dialing. See placing calls
disabling
automatic logon, 2-9
disconnecting calls without hanging up, 5-16
distribution algorithms for routing calls to groups,
9-19
documentation, 1-4
drag-and-drop, in ViewPoint, 2-28
drag-and-drop transferring, 5-11
E
E, special character in page strings, 7-17
e-mailing
call messages, 5-13
greetings, 7-27
voicemail, 7-7
e-mail notification of voicemail, 7-14
emptying the Deleted folder, 2-33
ending calls without hanging up, 5-16
Examples
printing reports with Report Runner, 13-11
Excel, using reports toolbar in, 13-4
exiting ViewPoint, 2-18
exporting
contacts, 2-38, 10-17
Extensions list, 2-41
voice files, 2-37
extensions, placing calls to, 6-4
Extensions list
overview, 4-1
adding as pane in Call Monitor, 2-26
exporting, 2-41
tabs in, 4-3, 10-3
external phone
specifying at logon, 2-10
F
F11 (return your last call), 6-9
F12 (redial your last call), 6-9
feature comparison table, 1-3
final actions in routing lists, 9-16
folders
overview, 2-31
columns in, 12-20
for voicemail, 7-3
opening in new windows, 2-25
private and public, 2-31
sharing, 2-35
sorting by column, 12-21
Folders list, 2-20
forwarding calls
as displayed in Extensions list, 4-1
prompting for password, 9-4
prompting to accept or decline, 9-4
status bar button for, 2-22
turning on or off, 9-2
and voicemail, 9-5
when logging on, 2-14
forwarding voicemail, 7-5
FrontOffice 2000, 1-2
FWD button on status bar, 2-22
Wave ViewPoint User Guide
Release 3.0
October 2012
Index-5
G
importing
contacts, 2-38, 10-17
voice files, 2-37
Incoming Call Alert window, 5-18
instant messages, 4-4
instant messaging
inviting users to conference, 4-6
receiving messages, 4-6
sending messages, 4-4
using with Wave, 4-4
GoldMine, 1-2
greetings
overview, 7-23
active, 7-25
e-mailing, 7-27
for when you’re on the phone, 9-17
hierarchy for, 7-25
personal status default, 7-25
recording, 7-26
System Hold Greeting, 9-17
used with
routing list final actions, 9-20
routing lists as an action, 9-13
Greetings folder, 7-24
Grouped Service Level report, 13-17
groups
overview, 10-17
benefits of using, 10-17
personal and public, 10-18
routing calls to, 9-18
groups folder, 10-18
J
joining a call, 6-12
L
H
headers and footers, viewing in reports, 13-4
Help, online, 1-5
hiding columns, 12-20
hold
putting calls on, 5-10
retrieving from other phones (call parking), 5-15
L, special character in page strings, 7-17
language
changing, 12-18
changing at logon, 2-10
local reports, 13-5
logging on
as a visitor, 2-14
changing default station, 2-15
skipping, 2-7
to ViewPoint, 2-7
to ViewPoint with another phone, 2-14
with command line switches, B-1
with new options, 2-17
M
I
I, special character in page strings, 7-17
identifying contacts
adding and deleting phone numbers for, 10-10
by caller ID, 10-9
by PIN, 10-14
menu bar, 2-19
messages, e-mailing from a call, 5-13
message waiting light, enabling and disabling, 7-13
Microsoft Outlook, 1-2
mobile extension
Wave ViewPoint User Guide
Release 3.0
October 2012
Index-6
specifying at logon, 2-10
monitoring a call, 6-12
My Numbers
entering, 6-5
placing calls to, 6-4
My Phone tab in Call Monitor, 5-3
N
names
of callers displayed in Call Monitor, 5-8
playing caller’s over speakers, 5-16
playing caller’s over speakers automatically,
12-14
yours in dial-by-name directory, 12-8
navigation pane, 2-20
notes
adding to active calls, 5-13
adding to calls in Call Log, 8-6
adding to voicemail, 7-9
notifications of new voicemail, 7-14
O
online Help, 1-5
Operators
changing personal operator, 12-7
customizing ViewPoint for, 12-17
Options dialog, guide to, 12-1
orbit number, 5-15
Outbound Call Comparison report, 13-18
Outbound Calls by Phone Number report, 13-19
Outbound Long Distance Summary report, 13-20
Outlook, 1-2
ownership of calls in the Call Monitor, 5-7
P
pager notification of voicemail, 7-14
page string, special characters for, 7-17
panes
in Call Monitor folder, 5-5
Phonebook, 2-26
parked calls, 5-15
parked calls, Call Monitor tab for, 4-3, 5-4, 10-4
parking calls, 5-15
password
changing, 2-17
prompting for in routing lists, 9-15
prompting for when forwarding calls, 9-4
skipping entry at logon, 2-7
pasting ViewPoint items, 2-27
Pause and repeat, routing list final action, 9-17
personal status
overview, 3-1
changing another user’s, 3-11
list for call center queue agents, 3-5
list of pre-defined, 3-4, 3-5
viewing in Extensions list, 4-1
phone
audio output from, 2-22
changing at logon, 2-10
phone commands, selecting language of, 12-5
phone notifications for new voicemail, 7-18
phone numbers, checking, 6-8
"Phone" pane on status bar, 2-22
PINs, for contacts, 10-14
Place Call command, 6-6
placing calls
from Extensions list, 4-4
from other contact manager applications, 1-2
quickly from ViewPoint folders, 6-6
to contacts, 6-3
to extensions, 6-4
to My Numbers, 6-4
Wave ViewPoint User Guide
Release 3.0
October 2012
Index-7
using the dial bar, 6-2
priority
of call rules, 11-10
of greetings, 7-25
private
contacts, 10-2
folders, 2-31
groups, 10-18
voicemail, 7-8
Problem Report Wizard, C-1, D-1
problems, reporting, C-1, D-1
prompts
changing language of for contacts, 10-7
for password with call forwarding, 9-4
for password with routing lists, 9-15
selecting language of, 12-5
to accept or decline calls from routing lists, 9-14
to accept or decline forwarded calls, 9-4
to callers following routing lists, 9-15
public
contacts, 10-2
folders, 2-31
groups, 10-18
My Numbers, 6-6
purging archived recordings, A-14
Q
queues
personal statuses for agents, 3-5
R
recording calls, 5-13
recordings, how to make and play, 2-36
redialing your last call, 6-9
remote phone
specifying at logon, 2-10
using, 6-17
replying to voicemail, 7-6
reporting on Call Log, 8-9
reporting problems, C-1, D-1
reports
overview, 13-1
backups for, 13-6
Call Log, 13-14
Call Transfer, 13-16
Grouped Service Level, 13-17
options for, 13-8
Outbound Call Comparison, 13-18
Outbound Calls by Phone Number, 13-19
Outbound Long Distance Summary, 13-20
running, 13-3
shared and local, 13-5
Unanswered Calls During Business Hours, 13-22
User Call Trends, 13-23
using Excel toolbar to run, 13-4
viewing headers and footers, 13-4
returning your last call, 6-9
ringback, 5-15
for calls on hold, 5-10
ringer, customizing duration of ringing, 12-9
routing lists
overview, 9-5
active, 9-8
caller options while following, 9-6
creating, 9-11
default, 9-8
final actions for, 9-16
greetings and final actions, 9-20
prompting for password, 9-15
prompting to accept or decline, 9-14
routing calls to groups, 9-18
Standard, 9-8
when station is busy, 9-17
Routing Lists folder, 9-7
Routing List Wizard, using, 9-10
Wave ViewPoint User Guide
Release 3.0
October 2012
Index-8
S
T
scheduling
call rules, 11-7
notifications of voicemail, 7-19
screening
calls, 5-8
voicemail, 5-9
screen-pops for calls, 1-2
searching for contacts, 10-2
shared reports, 13-5
sharing folders, 2-35
showing columns, 12-20
speakers, audio output from, 2-22
Speed Dial command, 6-6
Standard routing list, 9-8
status bar, 2-21
stutter dial tone, turning on and off, 7-13
supervised transfers, 5-11
support, technical, 1-4
synchronizing voice messages and contacts with
e-mail, 7-27
System Hold Greeting, 9-17
tabs
in Call Monitor folder, 5-3
in Extensions list, 4-3, 10-3
TAPI Service Provider
overview, 1-2
using from other contact manager applications,
10-15
technical support, 1-4
title bar, flashing on incoming calls, 12-14
toolbar
overview, 2-20
dial field on, 6-2
toolbar, for reports, using in Microsoft Excel, 13-4
transferring calls, 5-11
using drag-and-drop, 5-11
triangles in audio controls, 2-37
U
Unanswered Calls During Business Hours report,
13-22
"Unknown" callers, associating with contacts,
10-11
unparking calls, 5-16
Wave ViewPoint User Guide
Release 3.0
October 2012
Index-9
urgent voicemail, 7-8
user
coaching, 6-12
User Call Trends report, 13-23
using
instant messaging with Wave, 4-4
remote phone, 6-17
ViewPoint Softphone, 6-14
V
ViewPoint
changing
language at logon, 2-10
phone at logon, 2-10
Wave Server at logon, 2-10
columns in, 12-20
customizing for Operators, 12-17
exiting, 2-18
layout, 2-19
logging on, 2-7
reporting problems with, C-1, D-1
starting using with command line switches, B-1
using drag-and-drop in, 2-28
using without an associated phone, 2-10
ViewPoint logon options
changing, 2-10
ViewPoint Mobile App
about, 14-1
Call Log, 14-34, 14-71
Calls view, 14-23, 14-60
Chat view, 14-36, 14-73
Contacts list, 14-20, 14-58
Dialpad, 14-22
downloading and configuring, 14-5, 14-42
Favorites list, 14-13, 14-53
launching, 14-8, 14-45
logging in, 14-8, 14-45
Messages view, 14-30, 14-69
navigating, 14-11, 14-51
online vs. offline mode, 14-3
options
setting, 14-37, 14-76
supported devices, 14-2
Users list, 14-15, 14-55
ViewPoint Softphone
answering and handling calls, 6-16
configuring, 12-10
Dial Pad, 6-15
placing calls, 6-16
specifying at logon, 2-10
using, 6-14
visitor, logging on as, 2-14
voice files
importing and exporting, 2-37
recording and playing, 2-36
voicemail
overview, 7-1
adding notes to, 7-9
associating with a contact, 7-8
bookmarks, 2-37
and call forwarding, 9-5
calling back, 7-6
deleting, 2-27
disappearing from ViewPoint, 7-3
e-mailing, 7-7
folders, 7-3
forwarding, 7-5
heard, 7-8
listening to, 7-4
listening to while caller leaves, 5-9
new, indications of, 7-13
notification of, 7-14
playback order of, 12-15
playing a sound for, 12-16
private, 7-8
replying to, 7-6
scheduling notifications, 7-19
screening, 5-9
sending, 7-12
sending a call directly to, 5-9
Wave ViewPoint User Guide
Release 3.0
October 2012
Index-10
setting maximum length of, 7-10
unheard, 7-8
urgent, 7-8
viewing contact record for, 7-7
voicemail folder, 7-2
sharing, 2-35
voice messages
synchronizing Wave and e-mail, 7-28
voice titles
recording for contacts, 10-8
recording for yourself, 12-4
W
Wave Mail
about, 7-27
configuring, 7-31
Wave Server
changing at logon, 2-10
windows, opening folders in new, 2-25
Wizard for routing lists, using, 9-10
Wave ViewPoint User Guide
Release 3.0
October 2012