1
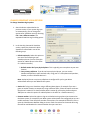
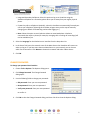
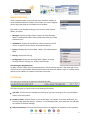
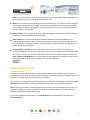
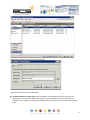
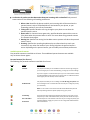
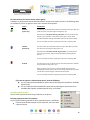
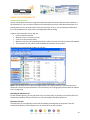
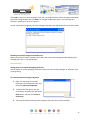
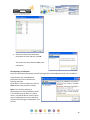
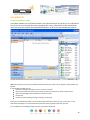
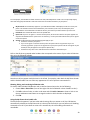
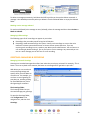
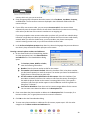
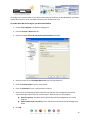
VERTICAL VIEWPOINT 2.0 USER GUIDE Business Communications Solutions 9910 Irvine Center Drive Irvine, CA 92618 www.bcsconsultants.com [ m ] 949.333.1000 [ f ] 949.333.1001 TABLE OF CONTENTS Logging on to Viewpoint …………………………………………………………………………………………. 3 Change Viewpoint Login options ….…………………………………………………………………………. 4 Change your Password ……………………………………………………………………………………………. 5 The Navigation Pane ……………………………………………………………………………………………….. 6 The Status Bar …………………………………………………………………………………………………………. 6 Using Personal Statuses ……………….…………………………………………………………………………. 7 Using Extension Lists ………………………………………………………………………………………………. 14 Instant Messaging …………………………………………………………………………………………………… 15 Using Call Monitor …………………………………………………………………………………………………… 19 Placing a Call on Hold/Transfer/Park ………………………………………………………………………. 23 Adding Notes/Sending Email about a Call ……………….………………………………………………. 26 Recording a Call ………………………………………………………………………………………………………. 27 Placing Calls using the Dial Bar ………………………………………………………………………………… 28 Place Call to Dialog ………………………………………………………………………………………………….. 29 Listening to your Voice Messages and Call Recordings ……………………………………………. 30 Greetings: Managing & Recording ………………………………………………………………………….. 33 Call Log Folder …………………………………………………………………………………………………………. 35 Call forwarding ………………………………………………………………………………………………………… 36 Entering Contacts ……………………………………………………………………………………………………. 38 Synchronizing Wave Voice Messages ………………………………………………………………………. 41 Contact Center Requirements …………………………………………………………………………………. 44 BCS Information ……………………………………………………………………………………………………… 45 2 VIEWPOINT USER GUIDE LOGGING ON TO VIEWPOINT To use ViewPoint, you must log on using a valid Wave user account. Ask your Wave administrator for the information you need to use to log on. Note: Each running ViewPoint program requires a license. If you see a message stating that you have exceeded your ViewPoint licenses, you cannot log on. See your Wave system administrator for help if such a message appears. To log on to ViewPoint: 1. Choose Start > Programs > Vertical Wave ViewPoint > Wave ViewPoint. The ViewPoint Log On dialog opens. 2. Enter your user name in the User Name field if it is not already displayed. If you do not know your user name, ask your Wave system administrator. 3. Enter your numeric password in the Password field. Use the same password that you use to log into your Wave voicemail account using the phone. 4. If you want to skip the process of logging on to the Wave ViewPoint in future sessions, check Automatically log on as this user. Note: If you check Automatically log on as this user, anyone at your computer can open your ViewPoint program and listen to your voice messages, because ViewPoint will open without requiring a password. 5. If you need to change login options, for example to use ViewPoint at a different location than your normal location, click Options >> to display additional settings. See “Using ViewPoint with a different phone, Wave Server, or language” on page 2-6 for more information about each option. 6. Click OK to launch ViewPoint. 3 CHANGE VIEWPOINT LOGIN OPTIONS To change ViewPoint login options 1. Start ViewPoint as described in the previous section. If your system logs you on automatically, you can change the options after ViewPoint starts by choosing File > Use a different station. The expanded ViewPoint Log On dialog opens: 2. In the Use this phone with ViewPoint section, specify the phone with which ViewPoint is associated in one of the following ways: • Default station ID. Select this option to use one of the following as your ViewPoint phone. (You can select this option for a Wave phone in the office or a mobile extension.) Default station ID of your physical phone. This is typically your own phone at your own location. Your primary softphone. If you do not have a physical phone, you can use the ViewPoint Softphone to place and take calls, using your PC’s microphone and speakers, headset, or other USB audio devices. S Note: A physical phone or a primary softphone is configured for you by your Wave administrator when you are added to the system. • Station ID. To log on to ViewPoint using a different Wave phone, for example if you are a guest at another location or temporarily using a different office, select this option and enter that phone’s station ID. To obtain a Wave phone’s station ID, pick up the phone and press *00. (You can select this option for a Wave phone in the office or a mobile extension.) • Remote number. Select this option to log on to ViewPoint using a phone that is external to the Wave system, for example if your Wave system administrator has configured you to use a mobile extension. Enter the phone number of that phone, for example 6175551212. Click to open the Check Remote Number dialog to view or make corrections to the actual dial string that will be used based on the remote number that you enter here 4 • Integrated Secondary Softphone. Select this option to log on to ViewPoint using the ViewPoint Softphone as a secondary phone when you are away from your regular physical phone. • Forward my calls to softphone. Optionally, select this checkbox to automatically forward your calls to your softphone. (Selecting this checkbox at logon saves you the step of manually changing your default call forwarding number after logging on.) • None. Select this option to use ViewPoint without an associated phone. ViewPoint commands that require a phone (for example, managing calls or making call recordings) will not be available to you. 3. Select the Language for the ViewPoint user interface from the drop-down list 4. In the Server field, enter the network name of the Wave Server that ViewPoint will connect to when you log on. If you have more than one Wave Server on your network, you can choose which one to connect to. Click Browse to browse the network and select a Wave Server. 5. Click OK. CHANGE PASSWORD To change your password via ViewPoint 1. Choose Tools > Options. The Options dialog opens. 2. Click Change Password. The Change Password dialog opens. 3. Use the following fields to change your password: • Old password. Enter your current password. • New password. Enter your new password. • Verify new password. Enter your new password to confirm it. 4. Click OK to close the Change Password dialog, and then click OK to close the Options dialog. 5 NAVIGATION PANE Use the navigation pane, on the left side of the ViewPoint window, to switch between ViewPoint’s folders. Click a folder icon in the navigation pane to open that folder in the ViewPoint main window. Each folder in the navigation pane gives you access to other related folders, as follows: • Messages. Displays the Inbox folder. Folders: All other Messages folders, including local folders and any folders that other users have shared with you. • Call Monitor. Displays the Call Monitor. Folders: Extensions and (if you are an agent in Contact Center queue) Queue Monitor. • Contacts. Displays the Contacts folder. Folders: The Public\Contacts folder. • Call Log. Displays the Call Log. • Configuration. Displays the Greetings folder. Folders: Greetings, Personal Statuses, Routing Lists, Groups, Public\Groups. Customizing the Navigation Pane To add or remove buttons from the navigation pane, click the small arrow icon in the lower right corner of the pane, then choose Add or Remove Buttons from the menu that appears. Check or uncheck button options on the submenu to include or hide them in the pane. STATUS BAR The status bar is located at the bottom of ViewPoint window. The status bar gives you quick access to the following information: Last caller. Lists the name (if available) and Caller ID of your last incoming call. You can press F11 to place a call to that number. Number of items. Number of items in the current folder. For example, if you have 18 contacts, the Contacts folder status bar displays “18 Items.” In any Messages folder, them status bar also indicates the number of Unheard messages. Name and extension. The name and extension of the user logged on to ViewPoint on this computer. 6 Note: If you are a Contact Center agent, clicking this spot on the status bar displays a dropdown list so you can specify if you are making personal or queue calls. Phone. If you see a Phone pane showing the name of another user, it indicates that user is logged in to your station. While that user is logged in, calls you place using the phone will be subject to that user’s dialing restrictions, and logged as coming from that user. To restore the station to yourself, pick up the phone and dial *00. Personal Status. The current personal status of the user logged on to ViewPoint. Click the personal status button to choose a different personal status. Audio output. You can click these buttons to switch ViewPoint's audio output between your computer speakers and your phone. Audio output includes playing your voice messages. Click the arrow to the right of the button to switch your audio output. If you do not have a sound device, the speaker option may be disabled. Call forwarding. If the FWD button is bold and has a phone icon to the left, it means you are currently forwarding your calls. Hover your mouse over the button to display the forwarding number. You can also click the arrow to quickly select one of your personal numbers (which you can set via Tools > Options > My Numbers) as the forwarding number. Double-click the button to open the Call Forwarding dialog, in which you can change or turn off call forwarding. USING PERSONAL STATUSES About Personal Status Your personal status appears with your name in other ViewPoint users’ Extensions lists, letting your colleagues know where you are and what you are doing. For example, setting your personal status to On Vacation alerts other users not to call you on a critical issue. Also, you can also use personal status as a quick way to change your call handling. For example, the Do Not Disturb status sends your incoming calls directly to voicemail without ringing your phone. Note: To change your own or another person’s personal status, you must have permission to do so. If you cannot change your own or another user’s personal status according to the instructions in this chapter, see your Wave system administrator. To view the available personal statuses, click Configuration in the navigation bar, and then click Personal Statuses: 7 Double-click a personal status to view its properties. A personal status consists of the following: A personal status icon and a name, such as Available. These appear next to your name in the Extensions list, so that other Wave users can see at a glance whether you are in the office and available or not. Likewise, by looking at the Extensions list you can see the personal status of other users. 8 A collection of preferences that determines how your incoming calls are handled. Each personal status consists of the following call handling preferences: Where I Am. Identifies the phone to which your incoming calls will be sent when the personal status is active. The default Where I Am location is your phone, or your forwarding number if your calls are forwarded. Taking calls. Specifies whether calls ring through to your phone or not when the personal status is active. Queue calls. For Contact Center agents only, specifies whether queue calls are sent to your phone when the personal status is active. For more about using personal statuses as a Contact Center agent. Routing List. Specifies the routing list that Wave uses to process calls when the personal status is active. Greeting. Specifies the recording that Wave plays to callers when they reach your voicemail (or any other final action of your routing list) when the personal status is active. Depending on the personal status, you can modify some of these preferences. Available personal statuses Five personal statuses are available to all users. Three additional personal statuses are available only to Contact Center agents. Personal statuses (for all users) The following five personal statuses are available for all users. ICON STATUS DESCRIPTION Available Lets people know that you are available to take calls. All calls ring through to you according to your current call forwarding, routing list, and other settings. If you are an agent in a Contact Center queue, you can use this status to make yourself available for both queue and non-queue calls. For additional Contact Center agent personal statuses, see the next table. Do Not Disturb Lets people know that you are not taking calls. No calls ring your phone. Calls are sent straight to the “unanswered” final action of your routing list (usually your voicemail). Note: You can create a call rule that overrides the Do Not Disturb personal status by allowing calls from specific people to ring your phone. In A Meeting Out of the Office On Vacation These three personal statuses let people know where you are when you are away from your desk. Like Do Not Disturb, these personal statuses send your calls directly to the “unanswered” final action of your routing list (usually your voicemail) without ringing your phone. You can change that default behavior with these statuses. 9 Personal statuses (for Contact Center queue agents) In addition to the personal statuses described above, the personal statuses shown in the following table are available if you are an agent in one or more Contact Center queues. ICON STATUS DESCRIPTION Available (Queue Only) This status or the Available status makes you available to take calls. When you select this status, the queue begins sending calls to you. With this status, only queue calls ring your phone. Non-queue calls are sent directly to your voicemail. To have all your calls ring your phone, make yourself available by selecting the Available status (see the previous table). You can also select this status by picking up the phone and pressing *51. Available (Non-Queue) This status makes you unavailable at the end of your shift. When you select this status, the queue stops sending calls to you. With this status, non-queue calls still ring your phone. To prevent all calls from ringing your phone, make yourself unavailable by selecting Do Not Disturb. You can also select this status by picking up the phone and pressing *52. On Break This status puts you on a break during your shift. While this status is selected, the queue does not send calls to you. When you take a break, be sure to use the On Break status rather than Available (Non-Queue), which ends your shift. Using On Break when you take a break will ensure the integrity of Contact Center statistics. You can also select this status by picking up the phone and pressing *53. If you are an agent in a Contact Center queue, note the following: You can make yourself available for queue calls by selecting either Available or Available (Queue Only). You can make yourself unavailable for queue calls by selecting any status other than Available (Non-Queue), Available (Queue Only), or On Break. Selecting a personal status You can select a personal status using ViewPoint or the phone. Selecting a personal status in Viewpoint Use any of the following methods to select a personal status in ViewPoint: Click the Personal Status button on the status bar, and then select a personal status. 10 Choose Tools > Personal Status and then select a personal status. In the Personal Statuses folder, select a personal status and then choose Actions > Set as Active. Selecting a personal status using your phone You can select a personal status on the phone in the following ways: Log on and press 6 1. You can select the Available personal status quickly by picking up the phone and pressing *50. For Contact Center agent statuses, pick up your phone and press *51 through *53. Use these quick commands to begin and end your shift and to go on break. Modifying a Personal Status You can modify personal statuses to reflect your changing availability and location. For example, if you are often away from your desk attending meetings, you can modify the In a Meeting personal status to send your callers directly to voicemail. Not all preferences are modifiable: Where I Am. Cannot be modified for any personal status. The default Where I Am location is your phone or your call forwarding number if your calls are being forwarded. Taking Calls. Can be modified for In A Meeting, Out Of The Office, or On Vacation. Greeting. Cannot be modified for any personal status. Your default greeting is always used. Routing List. Can be modified for all personal statuses. If you are an agent in a Contact Center queue: Queue calls. Cannot be modified for any personal status. Queue Calls is always set to Yes for Available (Queue Only) and Available (Non-Queue), and to No for all other statuses. To modify a personal status 1. In the Personal Statuses folder, double-click the personal status. The Personal Status dialog box opens. 2. Specify how you want your calls handled while this personal status is selected using the following drop down lists. For most call handling preferences, you can select either a specific item or Default. Selecting Default uses the item that is your current personal status default, which is shown in parentheses. Where I am. Modifying this preference for a personal status is not supported in this version. This preference identifies the phone to which your incoming calls will be sent when this personal status is active. The default Where I Am location is your phone, or your forwarding number if your calls are forwarded. 11 Taking calls. Specifies whether you want calls to ring through to your phone or not when this personal status is active. o Yes (use my routing list). Incoming calls follow your active routing list, which usually includes ringing your phone. o No (use only my final action). Incoming calls are sent directly to the final action on your active routing list, which by default is your voicemail. Note: You can modify this setting only for the personal statuses In a Meeting, Out of the Office, and On Vacation. Queue calls. Modifying this preference for a personal status is not supported in this version. This preference is displayed only if you are an agent in a Contact Center queue. Specifies whether queue calls are sent to your phone when this personal status is active. o Yes. Marks you as available to take queue calls, and while this personal status is active you can receive calls from all queues for which you are signed in. o No. Marks you as not available to take queue calls. Note: Queue calls is always set to Yes for Available (Queue Only) and Available (Non-Queue), and to No for all other statuses. Routing List. Select the routing list that your calls will follow when this personal status is active. To create a new routing list, click, or press ALT+click to edit the selected routing list. Greeting. Modifying this preference for a personal status is not supported in this version. 3. Click OK to save your changes. Using personal status defaults Specifying a default personal status greeting and routing list When you select a personal status with a greeting or routing list preference, it makes that greeting or routing list active. When you are done using that personal status, you probably want your active greeting and routing list to revert to what they were before they were made active by the personal status. Personal status defaults are a way of accomplishing this. Personal status defaults specify the greeting and the routing list that become active when you select a personal status that has no greeting or routing list preference. You can specify only one default personal status greeting and one default routing list at a time. When you select a personal status with no greeting preference, the personal status default greeting becomes active. When you select a personal status with no routing list preference, the personal status default preference becomes active. Example: You set your “Everyday” greeting to be your personal status default, because this is the greeting you normally use. Several times during the day you change your active greeting by selecting the 12 personal status In a Meeting, which applies your custom “Be Back Soon” greeting. When you return from the meeting and select the personal status Available (or any other personal status) your personal status defaults are restored, so your “Everyday” greeting becomes active again. You can change the greeting and the routing list that are your personal status defaults at any Time. Setting personal status defaults To set your personal status default greeting, edit the greeting and select the Default personal status greeting checkbox. Note: When you make a greeting active using the telephone commands, that greeting also becomes your personal status default greeting. To set your default routing list, edit the routing list and select the Use this routing list as the default for incoming calls checkbox. To set a personal status preference back to the default setting Perform these steps to set a personal status preference back to the default setting 1. Edit the personal status. See “Modifying a personal status” on page 3-7. 2. For the Routing List preference, select Default from the drop-down list. The Default entry displays the name of the current default item in parentheses, for example “Default (Standard)”. 3. Click OK. Changing the personal status of another user You can change the personal status of another Wave user if you know that user’s password (or you can do it without entering a password if you have the appropriate permission). This feature is useful when a user wants to change his or her personal status but does not want to or cannot log on to Wave. For example, an administrative assistant can change the personal status for the boss, or the user who is acting as the Operator user can change the Operator’s personal status without logging on as the Operator user. To change another user’s personal status in ViewPoint 1. In the Extensions list, right-click the user. 2. Choose Apply Personal Status and click a personal status. 3. If you do not have the appropriate permission, you will be prompted for that user's password: Enter the user’s password and click OK. 13 USING THE EXTENSIONS LIST Viewing Wave Extensions You can see all Wave extensions, along with information about the current status of each extension, in the Extensions list. You can use the Extensions list to quickly place calls to other Wave extensions or to change another user’s personal status if you have permission to do so. You can display the Extensions list in the Call Monitor for quick access, including drag-and-drop calling. A glance at the Extensions list can tell you: • A user’s extension number • Whether a user is currently on a call • A user’s current personal status • Whether a user has call forwarding turned on, and the location to which the calls are forwarded • The extensions of your office’s auto attendants and Contact Center queues. The Extensions list automatically updates in real time. Note: From the Extensions list you can change another user’s personal status if you know that user’s password, or have the proper permission. For instructions, see “Changing the personal status of another user” on page 3-10. Searching the Extensions list To find someone quickly, you can type their first or last name (fully or partially) in the Search field. The Extensions list displays all items whose first or last name begins with the entered text. Extensions list tabs The Extensions list can optionally contain tabs that display related groups of extensions. Tabs are located at the bottom of the Extensions list. Click each tab to view its contents. 14 • • • All tab. This tab displays all Wave extensions. Note that your Wave system may be configured to not show this tab. Group tabs. The Extensions list can optionally display a tab for each public ViewPoint Group of which you are a member, and a tab for any personal ViewPoint Groups that you created. Click a Group tab to see the extensions within that Group. Queue tabs. If you are an agent in a Contact Center queue, the Extensions list contains a tab for each queue. Click the tab to see the agents who are members of that queue, as well as all of the current calls for the queue. An asterisk (*) on the queue tab indicates that you are signed out for that queue. Showing, hiding, and reordering Extensions list tabs To show or hide individual tabs, as well as choose their order, do the following: 1. In the Extensions list, choose View > Show Tabs. (You can also right-click anywhere in the the Extensions list and then choose Show Tabs.) 2. Select a tab name and click Add or Remove to set up the Show these tabs in this order list. Use the up and down arrow buttons to arrange the order of tabs in the list. 3. Click OK. The specified tabs are displayed at the bottom of the Extensions list. Extensions list columns Some Extensions list columns are hidden by default. Press F1 for Help to see a complete list of columns with explanations. Placing Calls to an Extension To place a call to an extension, double-click the extension. If your phone is on hook, it rings to connect you to the call being placed. INSTANT MESSAGING Using Wave Impulse for Instant Messaging Wave IMpulse supports simple, secure, user-to-user instant messaging in ViewPoint. With instant messaging you can initiate a real-time typed conversation between yourself and another user. You can: Send and receive instant messages with other users. Send and receive instant messages with users in Wave organizations other than the one to which you belong. Initiate an instant messaging conference. 15 Each of these features requires that you have the appropriate Wave permissions assigned by your Wave administrator. Ask your Wave administrator if you are configured to use these features. Also, before your instant message can be delivered to another user, that user must be running ViewPoint and must also have the appropriate Wave permissions assigned. Sending an instant message to another user To send an instant message to another user, right-click the user in the Extensions view and then click Send Instant Message. If that user is not currently online, the following message is displayed: “Joe Wang seems to be offline. Message you send will be delivered when Joe Wang comes online.” You can recognize whether users are online or not by the Presence icon next to their name in the Extensions view. In the following example, Ana Chen and Audrey Escobar are online Type your instant message in the window that opens: 16 Click Send to send your instant message. If the user is running ViewPoint and has the appropriate Wave permissions assigned when you click Send, the message window pops open in the receiving user’s ViewPoint, allowing him or her to respond. As your conversation progresses, all of the messages and replies are displayed at the top of the window: Receiving an instant message from another user When you receive an instant message from another user, the instant message window displaying the message pops up if it is not already open. IM Conferencing Inviting users to an instant messaging conference You can create an instant messaging conference before you start sending messages, or add other users as you go along. To create an instant messaging conference 1. Right-click the name of one of the participants in the Extensions view and then click Send Instant Message. 2. In the window that opens, click the arrow button located to the right of the Send button, and then click Invite to Conference. 3. The Invite to Conference dialog opens listing the users who are currently available. 17 4. Select the names of the conference participants to invite and then click OK. The invitees are automatically added to the conference. Participating in a conference Any of the conference participants can send messages that will be displayed in each user’s ViewPoint. Any participant can invite additional participants to join the conference by following the steps listed above. To exit a conference, click the Close button at the top of the window. Note: In this version, selecting or deselecting one or more participant names in the left pane has no effect. In a future version, you will be able to use this area to remove a participant from the conference, send a private message to a participant, and so forth. 18 CALL MONITOR Using the Call Monitor Folder In the Wave ViewPoint, the Call Monitor folder is the visual counterpart to your phone. The Call Monitor lets you see all your incoming calls and any outgoing calls at once, often with the callers identified by name. You must have a phone associated with ViewPoint in order to use most Call Monitor features. Note: Calls made or answered via an Outside Line feature button on a phone do not appear in the ViewPoint Call Monitor. In the Call Monitor folder you can: See who is calling you and take the call or send it to voicemail Click calls to transfer them, put them on hold, send them to voicemail, or perform other actions Move among multiple calls on hold with a click of the mouse Record calls Conference calls (including creating or starting a conference) Each row in the Call Monitor folder is an item that contains information about one call, or one party in a call. Conference calls appear in a special Conference pane that shows the parties other than yourself. For an explanation of Call Monitor folder columns, press F1 for online Help. 19 ` For most people, the Call Monitor folder contains two tabs, called My Phone and All. You can optionally display other tabs that group related calls. Click each tab to view the related call activity at your phone. My Phone tab. This tab always appears in your Call Monitor folder and displays all calls to or from your phone. This includes calls that are forwarded to your extension (in this case, the called party who forwarded the call is identified in the Owner column), and calls to your DID number if you have one. Parked tab. The Parked tab shows all current parked calls. Queue tab. If you are an agent in a Contact Center queue, all the current calls for the queue appear on a separate tab labeled with the queue name. An asterisk (*) on the queue tab indicates that you are signed out for that queue. All tab. The All tab shows all of the following that apply to you: All calls to and from your phone. If you are an agent in a Contact Center queue: All queue calls for any queue that you are currently signed into. (If you are not signed into a queue, that queue’s calls do not appear in your All tab, but they do appear on that queue’s Queue tab.) All calls from any other users’ Call Monitors that have been shared with you. Calls on the All tab are grouped under headers that correspond to the names of your other Call Monitor tabs, as in the following example. Note that a call may appear multiple times in the All tab, for example, under both the My Phone header and the Parked header. You can select any appearance of a call to perform commands on it. Showing, hiding, and reordering Call Monitor tabs To show or hide individual Call Monitor tabs, as well as choose their order, do the following: 1. Choose View > Show Tabs. (You can also right-click the Call Monitor column headers or tabs.) 2. Click All to select all tabs, or select a tab name and click Add or Remove to show or hide it. Use the up and down arrow buttons to arrange the order in which the tabs are displayed. 3. Click OK. Using the My Phone tab to handle calls The My Phone tab appears if you have other tabs showing. After you answer a call, the Call Monitor automatically switches to the My Phone tab. It is the only tab from which you can perform call-handling commands on a call. If you select an active call in another tab, the call-handling commands are unavailable. 20 Call Monitor folder panes The Call Monitor folder contains the following panes that you can hide or show: The Phonebook Pane, which shows the Extensions list and the Contacts folder and enables drag-and-drop call handling. The Notes Pane, which enables you to type and add call notes. The Parties pane, which shows the parties in a conference call other than yourself. The ViewPoint Softphone Dial Pad, if you are using the ViewPoint as your primary or secondary phone. Call Monitor folder columns The Call Monitor folder contains several columns that show detailed information about a call, such as Trunk Name and Target Station. Some of the columns are hidden by default. For an explanation of the columns, press F1 in the Call Monitor folder for its online Help Displaying the Call Monitor Folder Automatically Wave can open the Call Monitor folder automatically when you place or return calla form some ViewPoint folders. When the Call Monitor folder opens automatically, it appears in front of all other open windows on your computer. To display the Call Monitor folder automatically 1. Choose Tools > Options. The Options dialog opens. 2. Click the ViewPoint \ Call Monitor tab. 3. Under Display Call Monitor in the following situations, select one or both of the following checkboxes: a. Placing new calls from Contacts or Extensions. The Call Monitor folder opens each time you place a call from the Contacts or Extensions folder. b. Returning calls from Voice Messages or Call Log. the Call Monitor folder opens each time you return a call from a voice message or Call Log entry. 4. To display the Call Monitor folder automatically on incoming calls, click the ViewPoint \ Call Alerts tab and check Display the Call Monitor. 5. Click OK. 21 Selecting and acting on a call in the Call Monitor Click a call in the Call Monitor folder to select it. After it is selected, you can choose commands to apply to that call. To use a command on a call in the Call Monitor folder, do one of the following actions: Right-click the call and choose a command on the shortcut menu. This option is often the fastest way of choosing a command, but it may be difficult to do so during times when phone traffic is heavy. This is due to the fact that calls change position in the Call Monitor folder as new calls arrive and transferred calls leave the Call Monitor folder. Click a button on the toolbar. Choose a command from the Actions menu. Press Enter. This puts the selected call on hold, or retrieves it if it is already on hold. Important: Do not use the ViewPoint Call Monitor to select and act on a call to a virtual extension—use the phone commands to control these calls. A virtual extension number can be assigned to a user who does not need a physical phone, for example because the user works on the road using a cell phone. Ask your system administrator if there are any virtual extensions assigned on your system. Call ownership In the Call Monitor you can perform call-handling commands only on calls that you own. You own a call if you are the one who answered it. If you select a call that you do not own, the call-handling commands are unavailable. Examples of calls that you can see, but that you do not own, include calls in a Queue tab that are being handled by another agent, or calls in a shared Call Monitor tab that are being handled by the sharing user. To determine who owns a call, look at the name in the Owner column. Double-clicking calls Double-clicking in the Call Monitor folder has the following effects: Double-clicking an active call puts it on hold. Double-clicking any other type of call takes the call (connects you to the caller). This includes incoming calls, calls on hold, parked calls, and calls to which you are listening while the caller leaves a message. Commands while a call is ringing While calls are ringing at your phone, the Call Monitor folder displays “Incoming Call.” If Wave can identify the caller, the item in the Call Monitor folder also displays the caller’s phone number and name, which enables you to screen your calls. While calls are ringing, you can perform the following actions: Take the call Send the call to voicemail “Grab and hold” the call (put it on hold without talking to the caller first) Transfer the call without talking to the caller first 22 Taking the call If you are already on another call, select the incoming call and choose Actions > Take Call. Your current call is put on hold. You can easily move among multiple calls by choosing Take Call again. When you use Take Call in the Call Monitor folder, you can play the caller’s name over your speakers by choosing Actions > Announce Caller. Sending the call to voicemail Select the call, and then choose Actions > Take Message. The call is sent to your voicemail. Note: Contact center agents cannot perform this command on an incoming queue call. Screening a voice message as it is being left You can listen to a voice message as the caller is leaving it and pick up the call if needed. To do so: 1. Select the call while it is ringing or while the caller is leaving a message. 2. Choose Actions > Screen Message. 3. Pick up your phone and listen to the message as it is being left. This is a one-way connection. The caller cannot hear you. 4. To interrupt the message and take the call, choose Actions > Take Call. You are connected to the caller. You can also listen to a voice message as it is being left via the phone. You can rerecord this greeting to say, for example, “This is Angela. I am on another call right now, but if you hold for a moment I will be right with you.” The options that callers hear with this greeting are contained in a separate prompt that only your Wave system administrator can change. To grab and hold a call, select the incoming call and choose Actions > Hold. PUTTING CALL ON HOLD/TRANSFER/PARK Placing a Call on Hold To put a call on hold, select the call, and then choose Actions > Hold. Alternatively, double-click the call or select the call and press Enter. To retrieve the call from hold, select the call and either choose Actions > Take Call, double-click the call, or press Enter. You can put as many calls on hold at one time as you want. The Duration column in the Call Monitor folder shows how long each call has been waiting on hold. Note: Use ViewPoint instead of the Hold button on your phone to put calls on hold. When on hold from ViewPoint, callers hear your system’s hold music, but they hear only silence if you use your phone’s Hold button. 23 If you’re using a digital feature phone with multiple line appearances, you do not hear dial tone after putting a call on hold. To get dial tone, select an unoccupied line. Ringback for calls on hold. By default, if you hang up with one or more calls on hold, Wave’s ringback feature rings your phone to remind you. When the call rings back, the call’s status in the Call Monitor changes to Ringing (On Hold). Talk to your Wave system administrator about configuring ringback behavior. Transferring a Call The Call Monitor folder allows you to easily transfer a call to any party, either another Wave user or someone at an external phone number. You can look up users and contacts by name, and you can see in advance if an extension is busy. You can also transfer a call to an auto attendant or to a user’s voicemail. Drag-and-drop transferring With the Phonebook pane showing in the Call Monitor folder, you can drag a call from the Call Monitor to an extension to transfer the call to that extension, or to a contact’s name to transfer the call to the contact’s default number. Blind, supervised, and direct-to-voicemail transfers You can transfer a call in one of the following ways: Blind transfer, sometimes called an unattended transfer. You transfer the call without first speaking to the recipient. When the recipient answers the phone, the call is connected. Note: Blind transfers occur automatically when transferring a ringing call, and when transferring to voicemail or an auto attendant. Supervised transfer, sometimes called an attended or consultation transfer. You speak to the transfer recipient first, while the caller is placed on hold. You can then complete the transfer, or conference the three of you together, or cancel the transfer and return to the caller. Direct to voicemail. You transfer the call directly to an extension’s voicemail. To transfer a call 1. Select the call that you want to transfer. 2. Choose Actions > Transfer. The Transfer To dialog opens. 3. Select the person or enter the number to which to you want to transfer the call. Note: You may be prohibited from transferring an external caller to an external number. 4. In the Transfer field at the bottom of the dialog, click either Blind, Supervised, or to Voicemail. 24 5. Click OK. If you selected Blind or to Voicemail, the transfer is completed and the call disappears from your Call Monitor. If you selected Supervised, you are connected to the recipient’s extension, and the caller is put on hold. The incomplete transfer displays as a linked three-party call in the Call Monitor. 6. Speak to the recipient and announce the caller. A dialog opens and asks you if you want to complete the transfer or cancel it. 7. Choose one of the following options: Complete. The transfer is completed and the call disappears from your Call Monitor. You can also complete the transfer by hanging up the phone. Conference. The caller, the recipient, and you are all connected in a conference call. Cancel. The transfer process ends and you are reconnected to the caller, so you can transfer him or her to voicemail or another destination. Transfer tips for operators By using Groups and showing the Extensions tab of the Phonebook pane in the Call Monitor folder, you can easily find and choose the recipient of a call that you want to transfer. Define Groups to represent the departments of your office. When transferring a call you can then view only the members of a Group, for example, the Marketing Group. You can see at a glance the names of members of the Marketing department and who is available to take a call. You can also transfer calls more easily by resizing the Transfer To dialog, by showing and hiding columns, and by sorting calls by column. Parking a call Parking a call puts a call on hold and lets any Wave user retrieve it from any Wave phone or ViewPoint program in your office. To display parked calls in the Call Monitor, choose View > Show Tabs from the Call Monitor, and check Show all parked calls. To park a call 1. In the Call Monitor, select the call you want to park. 2. Choose Actions > Park. The Status column in the Call Monitor folder displays “Parked on <orbit number>. Ringback for parked calls By default, if you hang up with one or more calls on hold, Wave’s ringback feature rings your phone to remind you. When the call rings back, the call’s status in the Call Monitor changes to Ringing (Parked). Unparking a call You can retrieve a parked call from any Wave phone or from any PC running ViewPoint. 25 To answer a parked call from any ViewPoint program 1. Click Tools > Unpark. The Unpark dialog opens. 2. Select the call that you want to unpark and answer and click OK. You can also answer a parked call by picking up a Wave phone, pressing *53, and then entering the parking slot number. Sending a call to voicemail To send an active call to voicemail, choose Actions > Take Message. Playing a caller's name over your speakers You can play a recording of a caller’s name over your speakers at any time during a call by choosing Actions > Announce Caller. If you hear nothing, there is no voice title recorded for the caller. Disconnecting a call while staying on the phone You can disconnect a call without hanging up the phone. Select the call, and then choose Actions > Disconnect. This command is useful if: You want to disconnect a single party in a conference call. Hanging up your phone would disconnect you from the whole conference. You are going to immediately dial another call. If you hang up and pick up your analog phone too quickly, Wave can read that as a Flash command, which would put the call on hold instead of disconnecting it. Entering an account code for a call While on a call, you can enter an account code for the call or change the one already entered. 1. Select the call, and then choose Actions > Enter Account Code 2. Enter an account code. You can enter numbers, letters, or other characters. 3. Click OK. You can also enter an account code from the Call Log after the call is complete. ADDING NOTES AND SENDING EMAILS ABOUT A CALL Adding Notes to a Call While a call is visible in your Call Monitor folder, you can type notes about the call in the Notes Pane. If the Notes Pane is not showing, click Notes in the bottom pane. If the call is transferred to someone else, notes that you created about the call are sent with the call (for example, you can add a note such as “Customer wants to track invoice #123987” before transferring the call to your shipping department). 26 When the call is complete, you can view or edit the notes for the call in the Call Log folder. If the call is recorded or transferred to voicemail, you will see the notes associated with the recording. Sending an Email About a Call From an active call, you can create an email message that’s automatically preformatted with details about the call (from name and number, date and time, and so forth). This can be useful for receptionists who sometimes need to take a verbal messages from the caller. To create an email from a call, select the call and choose Actions > Send To. A new email message opens preformatted with call details. You can add optional notes or message information before sending the email. RECORDING A CALL If your Wave system administrator has given you the required permission, you can record your Wave conversations, including conference calls. By default, recordings appear in your Voicemail Inbox folder, although the system may be configured to send them to another extension’s Inbox. The maximum length of a single recording is equal to the total number of minutes available in your voice mailbox. By default this is 20 minutes, but your Wave administrator may have set a different limit. Note: You cannot receive more voice messages when your voice mailbox is full. You should check your available mailbox space after recording any conversation to be sure that you have space for new voice messages. Privacy issues with call recording Caution: It is the responsibility of you and your Wave system administrator to comply with any federal, state, or other applicable statutes regarding the recording of phone calls. BCS disclaims any responsibility for failing to comply with such regulations. Some countries, states, or other locations require that you announce to callers that their calls may be or are being recorded. Be sure that you understand how to comply with call recording privacy requirements. To record a call 1. During an active call, choose Actions > Start Recording. Wave starts to record the call. You may hear a regular beep while recording, depending on your system configuration. 2. To stop recording before the call is finished, choose Actions > Stop Recording. 27 To play a call you just recorded 1. Go to your Voicemail \ Inbox folder, or open another mailbox if your system is set up differently. 2. Select the recording. 3. Choose Actions > Play. Using the phone commands You can start and stop recording your calls using the *16 phone command. You can also use the phone commands to listen to recordings in your Inbox. PLACING CALLS USING THE DIAL BAR ViewPoint has a Dial bar on the menu bar that you can use to place calls. To place a call using the Dial bar 1. Type either of the following in the Dial bar: The number to dial. If it is an external number, type the full number including area code (10 digits in North America, for example 6173540600). Do not enter a Wave access code (such as 9). To dial international numbers enter + followed by the country code and the number, for example +44 020 7323 8299. Do not add the international access code (for example, 011 in North America). Hyphens, spaces, periods and parentheses are allowed. The name or partial name of a user, contact, or contact company name. Wave searches all of the Contacts, Extensions, and Groups for a match. If only one match is found, the system places the call immediately. If there is more than one match, a dialog opens and you can select a name on the list and click Dial to place the call. 2. To specify an account code for the call, add a vertical bar character ( | ) after the number, followed by the account code. 3. Press Enter to place the call. You can also drag-and-drop items into the Dial bar, including a text phone number from another application. To redial a call using the Dial bar Click the arrow on the right of the Dial bar for a list of recently dialed names and numbers. Click a number to redial it. 28 PLACE CALL TO DIALOG The Place Call To dialog visually guides you to place a call. It is not as efficient as using the Dial bar (if you know the person's name or number) or the Call Monitor's Phonebook pane. 1. Choose File > New > Call. The Place Call To dialog opens. 2. Enter or select the number to dial in one of the following ways: Enter the number to dial in the Name/Number field. You can also type the name of a contact or user. Click Contacts and select a contact on the list. The contact’s default phone number appears in the dropdown list below the main list. If the contact has more than one phone number associated with it, you can select a different number to call on the drop-down list. To create a new contact, click to open a new Contact dialog. To edit the currently selected contact, press Alt and click . Click Extensions and select an extension in the list. The list is identical to other Extensions lists in ViewPoint. If the extension is a user with public numbers (My Numbers marked as public), you can choose one of those numbers from the drop-down list below the main list. Click My Numbers. To place a call to one of your own phone numbers, such as your home or mobile phone, select it on the list. You can double-click a blank category to enter a new number for it. Note: To verify that the phone number is entered in a correct format, click. 3. To enter an account code for the call, type a vertical bar character ( | ) after the number, followed by the account code. 4. Click OK to place the call. 29 Note: If you are using the ViewPoint Softphone, try the following troubleshooting tips if your phone does not ring when you click OK to place a call. (This information does not apply if you are using any other type of phone.) If you can see the call in your Call Monitor, select the call and choose Actions > Take Call. If you can take the call successfully, it means that your audio device is working, but that the default ringing.WAV file may not be opening correctly. See your Wave administrator. If you can see the call in your Call Monitor, but you cannot take the call as described above, check your Softphone device settings (Tools > Options > Phone > Softphone Devices). If the settings are disabled, there may be a problem with the device configuration or the device settings were not loaded correctly. Checking your physical devices and device drivers in Windows may help you identify the problem. Check your phone’s status in the Extensions view. If the status is off-hook but you are not connected to the call, report the problem using the Problem Report Wizard. (This step gathers the appropriate logs and trace files that may help your Vertical support representative troubleshoot your problem.) Exit and log back into ViewPoint to see if that resolves the issue. LISTENING TO YOUR VOICE MESSAGES AND CALL RECORDINGS The Messages folder The Messages folder is your complete voice mailbox. It contains your Inbox, Saved, and Deleted folders, which hold your voice messages as well as any call recordings sent to your mailbox. New messages appear in the Inbox folder. Use the audio controls above the status bar to play your voice messages. When you play a message, the audio bar shows elapsed message playback time in minutes and seconds. 30 Voice messages have the following display attributes: Bold text indicates a new (Unheard) message. FW: in the From column indicates a message that was forwarded to you. Note: You can view the date on which a forwarded message was created by showing the Created column in the Messages folder. RE: in the From column indicates a message that was sent to you in reply to another message. Listening to your Voice Messages and Call Recordings To listen to a voice message or call recording, double-click it in any Messages folder. For instructions on using the audio controls. You can play the message or recording either over your computer's speakers or over your phone. Choose Tools > Audio Output to switch audio output from one to the other. You can also use the button on the right side of the status bar. Note: You can open other ViewPoint folders while a message is playing and the message will continue to play. The message stops playing, however, if you open a folder with another audio control visible, for example, the Greetings folder. Listening to a voice message as it is being left To listen to a voice message as the caller is leaving it, without being heard by the caller. Handling your voice messages You can perform the following tasks on a voice message using a few mouse clicks: Forward it to other users. Reply to one or more users directly with a voice message of your own. Return the call, if the Caller ID or contact information is available. Export the voice message as a WAV or MP3 file. E-mail the voice message as a WAV or MP3 file attachment. Open the contact record of the contact who left the message. Call back the person who left you the message. Associate a message with a contact so the caller is recognized. Delete a voice message. Mark an existing message Private, Unheard, or Urgent. Add notes to an existing message. Send a new voice message to other users. Forwarding a voice message You can forward a voice message, except if it is marked Private, to one or more users. A copy of the message is sent directly to the voicemail of all recipients. 31 You can also attach a recording of your own at the beginning of the forwarded message. For example, “Bob, this is Jim. I received this message and thought you would want to hear it.” Your recording precedes the forwarded message. To forward a voice message 1. In any Messages folder, right-click a voice message that you want to forward and select Forward on the shortcut menu. The Forward Message dialog opens. 2. In the Available Users list, select the users or groups to whom you want to forward the message. Selecting a group forwards the message to all members of the group. Select multiple items by holding the Ctrl key while you select. 3. Click Add to move the selected users/groups to the Recipients list. 4. Optionally, record a short message that introduces the message you are forwarding. Use the audio controls 5. Click Send. A copy of the selected voice message, preceded by your short introductory message, is forwarded to the recipients. When recipients select the message, they can view (in the To field) a list of other users who received the same message. Users can reply to the sender or to all recipients. Replying to a voice message Replying to a voice message lets you send a recorded reply directly to the voicemail of the user who sent you the message. You can send the reply to other users as well. Select the message and choose Actions > Reply. Then perform steps 3-5 of “To forward a voice message” in the previous section. You can reply in this way only to a message left by another Wave user. You cannot send a message in reply to a message left by an external caller. Note: Replying to a message sends a new message to another user's voicemail. To call back the person who left you the voice message, choose Actions > Place Call instead. Deleting voice messages By default, messages in the Deleted folder that are older than three days are permanently removed from Wave. To move a voice message to the Deleted folder 1. Select the message. 2. Choose Edit > Delete. The message is moved to the Deleted folder. You can still play it or retrieve it if necessary. Deleting a voice message permanently 32 To delete a message permanently, hold down the Shift key while you choose the Delete command. A message is also deleted permanently when you delete it from the Deleted folder or empty the Deleted folder. Marking a voice message unheard To mark an old (heard) voice message as new (Unheard), select the message and then choose Actions > Mark As Unheard. Managing Call Recordings The following types of call recordings can appear in your Inbox: Recordings that you made yourself using the Call Monitor Recordings made automatically by the system. Usually such recordings are sent to the voice mailbox of a Wave system administrator or Contact Center queue supervisor. If you are receiving such recordings in error, speak to your Wave system administrator. You can listen to a call recording by double-clicking it, just as you listen to a voice message. Any command you can use on a voice message you can also use on a call recording. GREETINGS: MANAGING & RECORDING Managing Voicemail Greetings Greetings are recorded messages that callers hear when they reach your voicemail. For example, “This is Steve. I’m not at my desk at the moment, but leave me a message and I’ll get back to you soon.” With Wave you can record and store multiple greetings and specify when you want Wave to use each one. For example, you can have a normal greeting for everyday use, another greeting for extended absences, and a third greeting for vacations. The Greetings folder The Greetings folder lets you view and manage your greetings. To open the Greetings folder, click Configuration in the navigation bar, and then click Greetings. 33 The Greetings folder contains three sections: The Greetings list. Your existing greetings appear here. The Notes Pane. This pane displays the contents of the greeting. To hide or show the Notes Pane, choose View > Notes Pane. The audio controls. Use these controls to record a new greeting, import a greeting from disk, or rerecord a selected greeting. The personal status default greeting This icon identifies the personal status greeting. The personal status default greeting is used by all personal statuses unless a specific personal status is configured to use a different greeting. Note that this column is called Is Default in the Show Columns dialog. The active greeting This icon identifies the greeting that Wave plays by default when callers reach your voicemail. Only one greeting at a time can be the active greeting. Callers may hear a greeting other than your active greeting if you specify a different greeting in a call rule, routing list, or personal status. Note that this column is called Is Active in the Show Columns dialog. Recording a New Greeting To record a new greeting 1. Choose File > New > Greeting. The Greeting dialog opens. 2. Enter a Name for the greeting. 3. Record the greeting by using the audio controls. 4. In the Recording audio script field, enter the greeting description, typically the text of the recorded greeting. 5. Select the Active greeting for this extension checkbox to make this the greeting that callers hear when they reach your voice mail. Other greetings will be played only if you reference them in a call rule, routing list, or a personal status. 6. Select the Default personal status greeting checkbox to make this greeting the default greeting used by all personal statuses unless a specific personal status is configured to use a different greeting. 7. Click OK. 34 To rerecord or edit an existing greeting, double-click the greeting in the Greetings folder and edit the greeting by using the audio controls. CALL LOG FOLDER The Call Log folder contains a record of all incoming and outgoing phone calls associated with your extension. Internal calls (calls between Wave users) may or may not be logged, depending on how your Wave system administrator set up the system. To open the Call Log folder, click its entry in the navigation bar. Call Log folder filters The Call Log folder toolbar contains the following dropdown lists that enable you to view only the calls you want. Use either or both of the following: Time filter. View the most recent calls according to the time frame you select. The time frame begins at midnight for the range selected; for example, “1 day” shows calls since midnight of the current day, and “1 month” shows calls since midnight of this date last month. Inbound/outbound filter. View only inbound calls, only outbound calls, or both. Call Log folder columns Press F1 to see a description of the columns available in the Call Log. Many columns are hidden by default. You can view more information for a call in the following ways: Double-click a call to view it in the Call Details dialog, in which more columns are displayed. Add more columns to the Call Log folder itself. Viewing call details You can view more information about your calls by double-clicking a call in the Call Log folder. The Call Details dialog opens. The Call Details dialog displays a separate line for each party in the call. 35 Note: The Call Details dialog shows current information about the parties in the call, while the Call Log folder shows the information as it was at the time of the call. Therefore the two can sometimes be different, for example, if the call was from a contact and you changed the contact’s name since the time of the call. CALL FORWARDING To turn call forwarding on: 1. Choose Tools > Call Forwarding. The Call Forwarding dialog opens. 2. Do one of the following: Click On: (enter or select a number below) to forward your calls to a specific number. Click On: Softphone to forward your calls to your softphone. (This option is only available if you selected Integrated Secondary Softphone when you logged on to ViewPoint.) 3. Enter or select the number to dial in one of the following ways: Enter the number to which calls are forwarded in the Name/Number field. You can also type the name of a contact or user. 36 Click Extensions and select an extension on the list. You can also select an auto attendant, IVR Plug-in, or Group. Click Contacts and select a contact on the list. The contact’s default phone number appears in the drop-down list below the main list. If the contact has more than one phone number associated with it, you can select a different number on the drop-down list. To create a new contact, click to open a new Contact dialog. To edit the currently selected contact, press Alt and click . To forward your calls to one of your own phone numbers, such as your home or mobile phone, click My Numbers and select it on the list. To edit your My Numbers list, click 4. To enter an account code that will automatically be associated with all calls forwarded to this number, type a vertical bar character (|) after the number, followed by the account code. At this point most users can click OK to complete call forwarding. The following step is for advanced Wave users. 5. To set other call forwarding options, click the Advanced tab. You can set any of the following options: Prompt recipient to accept or decline call. If checked, when you pick up the phone at an external number, Wave announces the caller (“Call from”) and intended recipient (“Call for”) and asks you to accept or decline the call. Unaccepted calls proceed to the next action in your routing list, usually your voicemail. You can use this checkbox to have all your unanswered calls go to your Wave voicemail, rather than voicemail at your forwarded number(s). 37 The call announcing prompt loops, so you might not hear it from the beginning when you pick up the phone. Press any key on your phone other than 1 or 2 to start the prompt at the beginning. This option is used only when forwarding calls to an external number. Prompt recipient for password. If checked, the person who picks up the phone hears, “Call for <your voice title>. Please connect me.” To be connected to the caller, you must enter your Wave password. Entering a password ensures that only you can receive your forwarded calls. This is useful when forwarding calls to a hotel or a company with an operator. This option works only when calls are forwarded to an external number and when you have a voice title for yourself recorded. If you have not recorded a voice title, Wave ignores your selection of this option. Wait for answer. Enter the length of time in seconds that you want a call to ring the forwarding number before going to proceeding to the next action on your routing list (usually your voicemail). If you are using the option Prompt recipient for password (described below) or Prompt recipient to accept or decline call (described later in this step), you should enter at least 30 seconds. If you enter less time, the call might be sent to your voicemail before you finish listening and responding to the prompts. 6. Click OK. Turning forwarding on and off via the FWD button When your calls are forwarded, the FWD button in the status bar appears with an active forwarding icon. Click the button to open the Call Forwarding dialog to turn call forwarding on or off or make other changes. Click the down arrow on the FWD button to turn call forwarding off, or choose a different forwarding number. Call forwarding and voicemail If no one answers at your call forwarding location, the call is sent to your voicemail (unless you have specified a different behavior using a routing list or call rule). ENTERING CONTACTS The Contacts folder To open the Contacts folder, click its icon in the navigation bar. Searching the Contacts folder To find someone quickly, you can type their first or last name (fully or partially) in the Search field. The 38 Contacts folder displays all items whose first or last name begins with the entered text. Private and public contacts In Wave, contacts can be private or public: Private contacts are your own personal contacts. These contacts appear only in the Contacts folder of your ViewPoint on your computer. Other users cannot see your contacts unless you explicitly share your Contacts folder with them. Public contacts are available to all users in your office. When public contacts call your office, Wave identifies them no matter which extension or user they are calling. Public contacts contained in the Public\Contacts folder and can also be accessed via the Phonebook pane's Contacts tab, and by choosing Actions > Place Call. To enter or edit a public contact, you must have public contact editing permissions. If you do not have those permissions, you can view and place a call to public contacts, but you cannot edit them. Entering a new contact Entering a new contact involves the following tasks, which are explained in detail in the three procedures that follow: Entering a contact's name and basic information. Other basic information includes the contact’s company, any account code, and the language used for prompts for this contact. You can also enter up to 5,000 characters in the Notes Pane of the Contact dialog. Entering a contact's phone numbers and addresses. When you enter a contact’s phone numbers, you can specify the number used for Caller ID and the number that is the default number to dial when you call the contact. You can also specify a contact's e-mail and instant messaging addresses for reference. Recording a voice title for a contact. Like your own voice title, a contact’s voice title is a short recording that you create of the contact's name. Note: You have a limited amount of space for all voice files, including voice titles. Therefore, if you have many contacts, you can save space by recording voice titles for the most important ones only. Ask your Wave system administrator how much space you have been allocated and how much you have used. Entering a contact's name and basic information 1. Choose File > New > Contact. The Contact dialog opens to the General tab. 2. If you have permission to create public contacts, select which folder to create the contact in, using the Create new contact in folder drop-down list. If you have permission to create public contacts, you can make this contact a public contact by choosing Contacts (Public). Public contacts can be seen and used by all Wave users. All other selections create a private 39 contact, which only you can see and use. 3. Enter the appropriate information about the contact in the First Name, Last Name, Company, and Title fields. The first and last names are displayed in the Call Monitor folder when this contact calls you. 4. If your office uses account codes, you can enter an Account code for the contact. Wave automatically uses the account code for the call when it identifies the contact on an incoming call or when you dial one of the contact’s numbers on an outgoing call. If you are prompted to enter account codes when you place calls, you will hear a double beep instead of a single beep to indicate you are dialing a contact who has an account code already entered. When you hear the double beep, you can press # on your phone to accept the contact’s existing account code, or you can enter another account code. 5. In the Preferred telephone prompts drop-down list, select the language that you want Wave to use when it plays voicemail and other prompts to this contact. Entering a contact's phone numbers and addresses 1. On the General tab in the Contact dialog, doubleclick the appropriate line in the Phone Numbers and addresses list. The related Address dialog opens. For Business, Home, Mobile, or Other., enter the following information: Number: Enter the phone number to dial for the contact. This number is the contact’s default: Select this checkbox if this is the phone number you dial most frequently to reach the contact. The number you choose as the default is slightly faster to select when you place calls. Use this number as caller identification for this contact: Select this checkbox if you want Wave to identify calls from this number as calls from the contact. Checking this box adds the phone number to the contact’s Incoming Caller ID list. If this option is unchecked, calls from this number appear in the Call Monitor and Call Log folders as being from “Unknown.” For Email or IM address. Enter the e-mail or instant message address for the contact. You can enter notes about the address in the Description field. 2. Enter notes about the phone number or address in the Description field. For example, for a business number, this is a good place to enter the contact’s extension. 3. Click OK to close the Phone Number dialog. 4. To enter more phone numbers or addresses for this contact, repeat steps 1-3 for the other categories in the Phone numbers and addresses list. 40 5. Click OK to close the Contact dialog. The new contact now appears in the Contacts folder. SYNCHRONIZING WAVE VOICE MESSAGES How voice message folders are used After you enable Wave Mail according to the steps in this section, all of your existing Wave voice messages (New, Saved, and Deleted) are sent to your e-mail program and stored in the following folders: Wave voice message status New Saved Deleted E-mail program destination folder Inbox Wave Saved Messages Deleted Items Wave Mail continues to monitor activity in these two sets of folders. • After your voice messages are synchronized for the first time, all subsequent new Wave voice messages are automatically delivered to your e-mail Inbox folder as well. • If you move a message between the folders on the Wave side, Wave Mail moves it accordingly on the Exchange side. Similarly, if you move a message between the folders on the Exchange side, Wave Mail moves it accordingly on the Wave side. • Wave Mail maintains synchronization of the Heard/Unheard (Read/UnRead), Urgent/Normal, and Private/Normal message states in the folders on both sides. • If you move a message to any other folder on the Exchange side, Wave Mail permanently deletes the message on the Wave side. • If you rename the Wave Saved Messages folder, Wave Mail continue to use it with the new name. • If you delete the Wave Saved Messages folder on the Exchange side, Wave Mail will re-create it automatically the next time it needs it to synchronize a message residing in the Saved folder on the Wave side. How you can listen to and act on synchronized voice messages With Wave Mail, you can listen to and manage your voice messages in any of the following ways: • Via the phone, using the phone commands. See the Wave Phone User Guide for details. • Via ViewPoint, as described earlier in this chapter. 41 • Via your e-mail program. See its documentation for details. About potential conflicts between Wave Mail and Exchange or Outlook rules If you have Exchange or Outlook rules for processing messages, it is possible that one or more rules may be executed on a message that interferes with the expected synchronization between Wave Mail and Exchange. For example, a rule might move a message to another folder, causing a voice message to be deleted before you have a chance to listen to it. To avoid conflicts of this type 1. Define a new rule and make it the first rule to be executed before any other rules. 2. Configure that rule to identify incoming voice messages delivered to the user’s Exchange Inbox by Wave Mail. For example, the rule could search for “Voicemail: From” in the message subject, or use other identification logic that applies to a particular user. 3. Add an action that if the rule identifies an incoming voice message delivered by Wave Mail, stop processing all other rules. For example, an Outlook rule might look like this: How contact synchronization works After you enable Wave Mail according to the steps in this section, all of your existing Wave contacts and your e-mail contacts are compared. Duplicate contacts are processed so that Wave and your e-mail program end up with a single set of matching contacts. (Duplicates are determined primarily by a name match, but address matching—phone numbers, e-mail addresses, and so forth—are also used to determine a match.) When you enable Wave Mail, you specify whether you want to use the information in your Wave contact or your e-mail contact to take precedence in case of a conflict. With Wave Mail, you can manage your contacts in ViewPoint or via your e-mail program. After your contacts are synchronized for the first time, Wave Mail monitors both contact lists for subsequent additions, changes, and deletions and updates Wave and your e-mail program as necessary to keep both contact lists synchronized. Configuring your Wave Mail mailbox in ViewPoint Important: Before you can begin synchronizing your voice messages and contacts between Wave and your e-mail program, your Wave system administrator must assign you the appropriate permission and configure your user account to use the feature. (If the settings described below are disabled, this has not yet occurred.) Either your Wave system administrator or you then need to perform the following steps 42 to configure your Wave mailbox. If you perform these steps in ViewPoint as described below, your Wave system administrator can tell you what information you need to enter here. To enable Wave Mail and configure your Wave Mail mailbox 1. Choose Tools > Options. The Options dialog opens. 2. Click the Personal \ Wave Mail tab. 3. Select the Enable voice mail and contact synchronization checkbox. 4. Select the name of your Exchange Mail server from the drop-down list. 5. Enter the Account name of your e-mail provider. 6. Enter the Password for your e-mail provider’s account. 7. Select one of the following Contact conflict priority settings. This setting determines which contact takes precedence if similar contacts exist in Wave and your e-mail program. Wave has priority. The Wave contact information will be propagated to your e-mail program. External mail server has priority. The e-mail contact information will be propagated to Wave. 8. Click OK. 43 CONTACT CENTER REQUIREMENTS To run the Contact Center Reporter, you need the following: Microsoft Excel 2003 SP3 or higher must be installed on the ViewPoint PC. Wave permission to run reports. You must have the permission Access Contact Center Reporter set to Allow. A Contact Center Reporter license is required to run many reports. However, you do not need a Contact Center Reporter license to run the following reports: Call Log report Call Transfer report Grouped Service Level report Outbound Call Comparison report Outbound Calls By Phone Number report Outbound Long Distance Summary report Unanswered During Business Hours report User Call Trends report To avoid a potential error when running reports, you must obtain the following updates from the Microsoft Download Center (www.microsoft.com/downloads) and install them on the ViewPoint PC: KB955466 (Excel 2003 update) KB907417 (Office 2003 update) 44 BCS INFORMATION CONTACT INFORMATION (Mon-Fri 8am-5pm) Main: (949) 333-1000 [email protected] Main Fax: (949) 333-1001 [email protected] Customer Service: (949) 333-1010 [email protected] IT Support: (949) 333-1040 [email protected] Sales: (949) 333-1020 [email protected] Website: www.bcsconsultants.com OTHER SERVICES CARRIER SERVICES: Data Center, Internet Access, Voice Services, & Wireless Services HOSTED SOLUTIONS IT NETWORK SERVICES: Anti-Spam, Backup Disaster Recovery, Computer Services, Managed Services, Server & Network Design, & Wireless Security STRUCTURED CABLING: Voice & Data Cabling TELECOM: Unified Communications, Voice & Video Conferencing, VOIP, Wireless Communications VIDEO CONFERENCING & VIDEO SURVEILLANCE Maximize your communication system’s performance, while protecting your investments, giving you peace of mind and service priority with BCS’s Customer For Life (CFL) Cisco Maintenance Program. Call or email our Sales Team for pricing. 45 MY INFORMATION NAME: EXTENSION: DIRECT #: PASSWORD: NOTES: 46