1
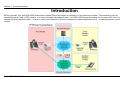
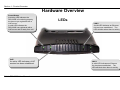
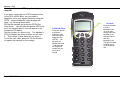
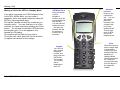
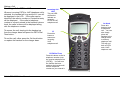
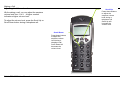
USER MANUAL
Table of Contents
DPH-300S
Dual Mode Cordless VoIP Phone
Table of Contents
PACKAGE CONTENTS .......................................2
SYSTEM REQUIREMENTS .................................2
FEATURES...........................................................5
INTRODUCTION ..................................................6
HARDWARE OVERVIEW ....................................8
FACTORY RESET ..............................................10
NETWORK CONNECTIONS..............................12
CONFIGURATION..............................................13
WEB-BASED CONFIGURATION UTILITY ........13
SETUP ................................................................15
SETUP WIZARD.................................................15
USING THE CONFIGURATION PAGE...............24
CHECK YOUR IP ADDRESS .............................43
STATICALLY ASSIGN AN IP ADDRESS ...........44
D-Link DPH-300S User Manual
1
Section 1 - Product Overview
Package Contents
•
D-Link DPH-300S Cordless IP Telephone
•
D-Link DPH-300S Cordless IP Telephone Connector Base
•
Power Adapter 12V DC, 1.25 A
•
Manual and Warranty on CD
•
Quick Installation Guide
•
Ethernet Cable (the DPH-300S’s Ethernet port is Auto-MDIX)
Note: Using a power supply with a different voltage rating than the one included
with the DPH-300S will cause damage and void the warranty for this product.
System Requirements
•
Broadband Internet connection
•
Ethernet-Based Cable or DSL Modem
•
A multi-port Ethernet router (possibly integrated as part of the Cable or DSL Modem listed above).
•
100Mbps of available Internet bandwidth
•
Computer with Windows, Macintosh, or Linux-based operating system and an installed Ethernet adapter
•
Internet Explorer Version 6.0 or Netscape Navigator Version 6.0 and Above
D-Link DPH-300S User Manual
2
Section 1 - Product Overview
11
IMPORTANT BATTERY SAFETY INSTRUCTIONS
CAUTION: TO REDUCE THE RISK OF FIRE OR INJURY CAUSED BY THE BATTERIES, READ AND FOLLOW THESE INSTRUCTIONS.
1.
2.
3.
4.
5.
6.
7.
8.
Use Only AAA, 1.2V 600mAh Ni-MH (Nickel Metal Hydride) batteries supplied by D-Link or D-Link Authorized Distributors.
Contact D-Link to purchase replacement batteries if needed.
Do not mix old and new batteries in this product.
Do not mix different battery types or batteries from different manufacturers in this product.
Batteries are intended to be charged while in the handset. Charging with other chargers or in any other manner may cause the batteries to explode.
Do not dispose of the batteries in a fire. The batteries may explode. Check with local codes for possible special disposal instructions.
Do not open or mutilate the batteries. Released electrolyte is corrosive and may cause damage to the eyes or skin. It may be toxic if swallowed.
Exercise care in handling the batteries in order not to short them with conducting materials such as rings, bracelets, keys, or tools. The battery or
conductor may overheat and cause burns.
9. Observe proper polarity orientation between the batteries and the battery receptacle of the handset.
10. Be aware that NiMH batteries, regardless of their apparent charge state, may be capable of producing electrical current sufficient to cause injury and
property damage.
11. Never expose NiMH batteries to temperatures above 50 °C.
Statement of Liability
D-Link Corporation / D-Link Systems, Inc. does NOT assume any liability for death, injury or damage to equipment or property resulting from the use of this
phone in a manner inconsistent with the use for which it was intended. D-Link Corporation / D-Link Systems, Inc, will not be liable for consequences that may
result from tampering with the batteries or charger-base or consequences resulting from their use thereafter.
D-Link DPH-300S User Manual
3
Section 1 - Product Overview
** BATTERY CHARGING NOTE **
Before you connect your DPH-300S to the Internet, your network, or your PC, you should install the batteries in the handset
and place it on the base station for charging. The batteries need to be charged for at least 12 hours before the first time
you use the DPH-300S.
1.
2.
3.
4.
Install the batteries.
Plug in the power adapter.
Put the handset on the base station
Wait 12 hours.
D-Link DPH-300S User Manual
4
Section 1 - Product Overview
Features
•
•
•
•
•
•
•
•
•
•
•
•
•
•
•
•
•
•
•
•
•
•
•
•
•
User-friendly configuration and diagnostic utilities
1 Foreign Exchange Office (FXO) POTS port (RJ-11 Jack)
2 NWay 10/100BASE-TX Fast Ethernet ports for network connections
Voice Activity Detection (VAD)/Comfort Noise Generation (CNG)
Silence suppression to reduce bandwidth consumption
Adaptive jitter buffer for smooth voice reception
Lost packet recovery ability for improved voice quality
IP address assignment using DHCP, PPPoE or static configuration
Support Caller ID function
Remote configuration and management over the Internet using web browsers
FSK and DTMF dual mode CLIP (Calling Line Identification Presentation)
Stores up to 30 calling numbers, in three types
Stores up to 50 phonebook numbers, up to 12 characters for each name and 12 digits for each number
LCD displays calling and dialing number
Barring numbers setting (up to 5 numbers)
Ringer tone selection − 9 different melodies
IP and PSTN ringer tone independently configurable
Ringer volume adjustment − 9 levels
Handset earpiece volume setting − 9 levels
Delete single or all records in phonebook
Redialing and preparation dialing functions
Page on base unit to look for the handset easily
Clicking key tone on or off
GAP compliant
Speakerphone
D-Link DPH-300S User Manual
5
Section 1 - Product Overview
Introduction
Before you start, your new DPH-300S Dual-mode Cordless Phone will require a connection to the Internet to function. The connection may be
directly through a Cable or DSL modem, or it may be through a broadband router. Your DPH-300S phone will enable you to make VoIP (Voice over
Internet Protocol) telephone calls − at zero or a very much reduced cost when compared to regular telephone service − to nearly anywhere, over the
Internet.
D-Link DPH-300S User Manual
6
Section 1 - Product Overview
The DPH-300S phone allows you to make and receive calls from both ordinary phone service and from IP telephony over the Internet. The basic
diagram shown above outlines how your new dual-mode IP phone works.
D-Link DPH-300S User Manual
7
Section 1 - Product Overview
Hardware Overview
Connections
LAN 2 Port
Connect the Ethernet cable from
your Cable/DSL modem to this port.
LAN 1 Port
Connect the Ethernet cable from a
computer on your LAN to this port.
Reset button
To manually reset, depress
button with the power on for at
least seven seconds
Power Adapter
Connect your 12V DC, 1.25A power
adapter here.
Phone Connection
Connect to your phones using
standard phone cabling.
D-Link DPH-300S User Manual
8
Section 1 - Product Overview
Hardware Overview
Power/Status
A blinking LED indicates the
DPH-300S is functioning properly,
but has not yet registered with a
VoIP server.
A solid LED indicates the
DPH-300S has registered with a
VoIP server and is ready for a call.
LEDs
LAN 2
A solid LED indicates an Ethernet
link has been established. The
LED will blink when there is activity
VoIP
An active LED indicates a VoIP
session has been established.
D-Link DPH-300S User Manual
LAN 1
A solid LED indicates an Ethernet
link has been established. The
LED will blink when there is activity
9
Installation
Factory Reset
In order to accomplish a Factory Reset of the DPH-300S, it is necessary to do the following:
1) Remove the handset from the base station.
2) Place the base station face-down on a flat surface (such as a table or desk top).
3) Insert a bent paperclip or a toothpick in the hole for the Factory Reset Button (see the photo on page 7 for the button’s location), and hold the
button down.
4) While still holding the button down, unplug the power adapter.
5) Wait 10 seconds, then reconnect the power adapter without letting go of the Factory Reset Button.
6) Once you have restored power, continue holding the Factory Reset Button down for another 10 seconds.
7) Complete! The DPH-300S should have had the following factory default settings restored: IP Address; Call Logs (all).
8) Note that if your DPH-300S is still connected to the Internet, the auto-provisioning process should repeat itself after the factory reset, and the
phone should return to a ready-state showing “D-Link” in the handset display and allowing IP calling.
If you need to reset the handset to its original factory default settings, see page 19, HS Setting > Set Default.
D-Link DPH-300S User Manual
10
Installation
Installation
This section will walk you through the installation process. Placement of the router is very important. Do not place the router in an enclosed area
such as a closet, cabinet, or in the attic or garage.
Before you Begin
Allow the handset batteries to charge for at least 12 hours before you begin.
Read the Opening Ports on Routers and Gateways section of this manual if you are using the DPH-300S with a router or gateway.
The DPH-300S needs to be setup before use. You can use the Quick Installation Guide (included with the DPH-300S) to perfor m the
hardware installation. There is an easy to use setup Wizard built-in to the DPH-300S to accomplish the IP address setup. You will need to run the Wizard
and enter your Internet connection information in order to use your phone for IP calling only if you do not have access to Dynamic IP Addressing.
Dynamic IP Address is the default setting and requires no user changes.
If you have Dynamic IP Addressing (also called, “DHCP”), check the Quick Installation Guide for information on the physical connection of the
DPH-300S, and skip to page 28 of this document: Auto-provisioning. Otherwise, continue to the next section.
D-Link DPH-300S User Manual
11
Installation
Network Connections
Connection using a Multi-port Router
The DPH-300S can either be connected to an available port on a
Cable/DSL modem multi-port router, with other devices connected to
their own ports (as below).
Multi-port Router
Connection
Connection using a Single-port Modem
Or it can be connected to the WAN port of a Cable/DSL modem with a
PC connected to the DPH-300 for Internet access as in the figure
below.
D-Link DPH-300S User Manual
Single-port Cable/DSL
Modem Connection
12
Configuration
Configuration
This section will show you how to configure your new D-Link DPH-300S using the web-based configuration utility.
Web-based Configuration Utility
Whenever you want to configure your DPH-300S, you can access the Configuration Menu by opening your PC’s web-browser and typing in the IP
Address assigned to the DPH-300S. The DPH-300S has DHCP enabled by default, so its IP Address will be that assigned by the DHCP server on
your LAN. This DHCP server is often contained in a multi-port Ethernet router. See your router’s documentation to determine the addresses
assigned by its DHCP server. If you do not know the IP address assigned to the DPH-300S (or you do not yet have a multi-port Ethernet router)
you can connect to the DPH-300S by the following method:
•
Connect the LAN port on the DPH-300S directly to the Ethernet
port on your PC.
•
Set your PC to have a static IP address of 10.1.1.2 with a subnet
mask of 255.0.0.0 and a default gateway of 10.1.1.1
•
Switch on the DPH-300S
•
Open the web browser on your PC
•
Type in the IP Address of the DPH-300S (http://10.1.1.1)
D-Link DPH-300S User Manual
13
Configuration
•
Type admin in the User Name field
•
Type admin in the Password field
•
Click OK
If you get a Page Cannot be Displayed error, please refer to
the Troubleshooting section for assistance.
The Home > Wizard screen will appear. Please refer to the
Quick Installation Guide for more information regarding the
Setup Wizard.
D-Link DPH-300S User Manual
14
Configuration
SETUP
This chapter is concerned with using your computer to configure the LAN connection. The following chapter describes the various windows used to
configure and monitor the DPH-300S.
Setup Wizard
SETUP
Click on the Run Wizard button to launch the Setup Wizard.
D-Link DPH-300S User Manual
15
Configuration
WELCOME TO DPH-300S SETUP WIZARD
Dynamic IP Address (using DHCP) is both the default option, and the most
commonly used method to assign devices on a LAN IP address information
when connecting to a broadband modem or multi-port Ethernet router/DHCP
server.
D-Link DPH-300S User Manual
16
Configuration
CHANGE YOUR DPH-300S PASSWORD
The default password is "admin". In order to secure your network, please
modify the password.
Note: Confirm Password must be same as "New Password". Of course, you
can click on the Skip to ignore the step.
D-Link DPH-300S User Manual
17
Configuration
SELECT INTERNET CONNECTION TYPE
Please select the connection type that your ISP uses. Of course, you can
modify the information later, if necessary.
Click on the Next button to go to the next Setup Wizard window.
D-Link DPH-300S User Manual
18
Configuration
DYNAMIC IP ADDRESS
Dynamic IP Address (using DHCP) is both the default option, and the most
commonly used method to assign devices on a LAN IP address information
when connecting to a broadband modem or multi-port Ethernet router/DHCP
server.
Host Name – The Host Name is optional but may be required by some ISPs.
The default host name is the device name of the Router and may be
changed.
MAC Address – The default MAC address is set to the WAN’s physical
interface MAC address on the Broadband Router. You can use the “Clone
MAC Address” button to copy the MAC address of the Ethernet Card installed
by your ISP and replace the WAN MAC address with the MAC address of the
router. It is not recommended that you change the default MAC address
unless required by your ISP.
Primary/Secondary DNS – Enter a DNS Address if you wish not to use the
address provided by your ISP.
D-Link DPH-300S User Manual
19
Configuration
STATIC IP ADDRESS
Static IP (or Fixed IP) addressing is used when connecting to a broadband
connection the requires static IP addressing or when connecting behind a
router that does not offer a DHCP server function. This choice requires the
input of specific IP address information.
IP Address − Input the IP address provided from you router configuration
settings, ISP, or network administrator.
Subnet Mask − Input the Subnet mask provided from your router
configuration settings, ISP, or network administrator.
Default Gateway address − Input the Gateway address provided from your
router configuration settings, ISP, or network administrator.
Primary DNS Address − Input the DNS address provided from your router
configuration settings, ISP, or network administrator.
Secondary DNS Address − Input a secondary DNS address (optional)
provided from your router configuration settings, ISP, or network
administrator.
D-Link DPH-300S User Manual
20
Configuration
SET PPPoE
PPPoE – (Point-to-Point Protocol over Ethernet) is used when connecting
directly to a DSL modem that offers a PPPoE connection. This choice
requires the input the User name and Password of your PPPoE account −
provided by your ISP.
User Name − Enter your PPPoE User Name as provided by your ISP.
Password − Enter your PPPoE Password.
Retype Password − Retype your PPPoE Password to confirm.
Click the Connect button to continue.
D-Link DPH-300S User Manual
21
Configuration
VOIP SETTINGS
A SIP User Agent is a logical entity capable of handling VoIP calls between
peers.
Phone Number – The telephone number assigned to the User Agent by the
SIP VoIP telephony service provider.
Server address – This selects the port number the router will listen to when
determining when calls are being made.
Authentication Name – The Username used to access your SIP server and
your VoIP service provider.
Password – The Password used to access your SIP server and your VoIP
service provider.
Retype Password – Retype your password to confirm and click Apply.
D-Link DPH-300S User Manual
22
Configuration
SETUP COMPLETED
Once you have completed the Setup Wizard to configure the DPH-300S for
its Internet connection, you will need to save the settings and restart the
DPH-300S before the settings become active. When you have restarted the
DPH-300S, it will automatically connect to the Network Manager and
complete the auto-provisioning process.
Click the Restart button to save the settings and restart the router.
You will now be able to connect the DPH-300S to the Internet so it can
contact the SIP server and make telephone calls over the Internet using VoIP
technology.
Connect the DPH-300 to an available Ethernet port on your broadband router
or modem and use your VoIP telephone. You will hear a short tone on the
telephone after you have dialed a number to indicate that the DPH-300S has
successfully connected to the SIP server (registered) and the Power/Status
LED will glow continuously.
D-Link DPH-300S User Manual
23
Configuration
Using the Configuration Page
Whenever you want to configure your DPH-300S, you can access the Configuration Menu by opening the web-browser and typing in the IP Address
assigned to the DPH-300S. The DPH-300S has DHCP enabled by default, so its IP Address will be that assigned by the DHCP server on your LAN.
This DHCP server is often contained in a multi-port Ethernet router. See your router’s documentation to determine the addresses assigned by its
DHCP server. If you do not know the IP address assigned to the DPH-300S (or you do not yet have a multi-port Ethernet router) you can connect
to the DPH-300S by the following method:
•
Connect the WAN port on the DPH-300S directly to the Ethernet port on your PC.
•
Set your PC to have a static IP address of 10.1.1.2 with a subnet mask of
255.0.0.0 and a default gateway of 10.1.1.1
•
Switch the DPH-300S on
•
Open the web browser on your PC
•
Type in the IP Address of the DPH-300S (http://10.1.1.1)
•
Type admin in the User Name field
•
Type admin in the Password field
•
Click OK
D-Link DPH-300S User Manual
24
Configuration
Static IP (or Fixed IP) addressing is used when connecting to a broadband connection the requires static IP addressing or when connecting behind
a router that does not offer a DHCP server function. This choice requires the input of specific IP address information.
STATIC IP ADDRESS
Static IP (or Fixed IP) addressing is used when connecting to a
broadband connection the requires static IP addressing or when
connecting behind a router that does not offer a DHCP server
function. This choice requires the input of specific IP address
information.
IP Address − Input the IP address provided from you router
configuration settings, ISP, or network administrator.
Subnet Mask − Input the Subnet mask provided from your router
configuration settings, ISP, or network administrator.
Default Gateway address − Input the Gateway address provided
from your router configuration settings, ISP, or network administrator.
Primary DNS Address − Input the DNS address provided from your
router configuration settings, ISP, or network administrator.
Secondary DNS Address − Input a secondary DNS address
(optional) provided from your router configuration settings, ISP, or
network administrator.
D-Link DPH-300S User Manual
25
Configuration
PPPoE
PPPoE (Point-to-Point Protocol over Ethernet) is used when
connecting directly to a DSL modem that offers a PPPoE connection.
This choice requires the input the User name and Password of your
PPPoE account − provided by your ISP.
User Name − Enter your PPPoE User Name as provided by your
ISP.
Password − Enter your PPPoE Password.
Primary / Secondary DNS Addresses − Enter the DNS addresses
provided by your ISP.
Retype Password − Retype your PPPoE Password to confirm.
Click the Connect button to continue.
D-Link DPH-300S User Manual
26
Configuration
VoIP SERVER CONFIGURATION
Server FQDN – Use this drop-down menu to Enable or Disable the
Server Fully Qualified Domain Name (FQDN) function.
This is enabled when the SIP URL domain name is used to
specify the SIP server. The phone will then use the domain name in
Domain Name field to resolve the SIP server’s IP address using
DNS.
This is disabled when the SIP server’s IP address is used to
identify the SIP server.
IP Address – Enter the IP address of the SIP Server in this field.
Domain Name – Enter the domain name of the SIP server, if it is
identified by an FQDN string (sip.primus.net, for example). No entry
is required if the SIP server is identified by its IP address.
Outbound Proxy IP address - The Outbound Proxy is a normal
SIP proxy. If instructed to do so by your ISP, enable the Outbound
Proxy, and enter its IP address, Domain Name and Port Number in
the appropriate fields.
Outbound Proxy Domain Name – You can choose to enable the
Outbound Proxy Domain Name by choosing enabled in the
drop-down menu.
Outbound Proxy Port – Enter the TCP/UDP port number in use by
your ISP for the Outbound Proxy server.
D-Link DPH-300S User Manual
27
Configuration
Outbound Proxy Port – Enter the Outbound Proxy Server’s
listening port number in this field.
Use DNS-SRV – You can choose to use the DNS server provided by
clicking the enabled radio-button.
DNS-SRV Query Domain – You can enter a Domain Name for the
DNS server in this field.
Service Domain – Enter the SIP service domain name in this field.
URL Format – Select SIP-URL to have the router include the
domain name with the SIP number in the SIP messages that it
sends. Select TEL-URL to have the router use the SIP number
without a domain name in the SIP messages that it sends. It is not
normally necessary to change the default setting.
User Parameter Phone – You can set this to phone or none. This
determines whether or not the phone number is appended to the
information forwarded to your SIP server. Your VoIP service
provider will instruct you which setting to use.
Caller ID Delivery – You can choose to send your Caller ID
information with each VoIP.
Display CID – You can choose to display the Caller ID information
collected from incoming VoIP calls.
Timer T2 – You can choose the length of the T2 timer. The default
is 4 seconds.
D-Link DPH-300S User Manual
28
Configuration
Initial Unregister – You can set this to phone or none. This
determines whether or not the phone number is appended to the
information forwarded to your SIP server. Your VoIP service
provider will instruct you which setting to use.
Port – Enter the SIP server’s listening port for the SIP in this field.
Leave this field set to the default if your VoIP service provider did not
give you a server port number for SIP.
Service Domain Enter the SIP service domain name in this field.
Register Expiration – Use this field to set how long the router will
wait before sending a repeat registration request if a registration
attempt fails or there is no response from the registration server.
Session Expires -This field will set the longest time that the router
will allow a SIP session to remain idle (without traffic) before
dropping it.
Min-SE – When two SIP devices negotiate a SIP session, they must
negotiate a common expiration time for idle SIP sessions. this field
sets the shortest expiration time that the router will accept. The
router checks the session expiration values of incoming SIP INVITE
requests against the minimum session expiration value that you
enter here. If the session expiration of an incoming INVITE request
is less than this value, the router negotiates with the other SIP device
to increase the session expiration value to match the minimum
session expiration value.
Session Expires Refresher
- This determines which side of an
expired call session will initiate the session refresh. uac – specifies
D-Link DPH-300S User Manual
29
Configuration
the Caller side will initiate the session refresh. uas – specifies the
Call receiver (the “Callee”) will initiate the session refresh.
D-Link DPH-300S User Manual
30
Configuration
XML PROVISIONING
Provisioning Function – Use this drop-down menu to Enable or
Disable the Provisioning Function on the router. You can also select
Enable & Use Proxy, if directed to do so by your ISP.
Server URL – Enter the URL of the Provisioning Server in this field
in the form of a web address − https://provision.net, for example.
Proxy Address – Enter the IP address of the Proxy Server in this
field. This Proxy IP address is only needed if the Provisioning
Function is set to Enable & Use Proxy.
Proxy Port Number – Enter the port number the Proxy Server will
use to make the connection in this field.
D-Link DPH-300S User Manual
31
Configuration
SIP USER AGENT
A SIP User Agent is a logical entity capable of handling VoIP calls
between peers.
Phone Number – The telephone number assigned to the User
Agent by the SIP VoIP telephony service provider.
Display Name – The name used in place of the Phone Number to
identify the device or user in contact indices.
User Agent Port – This selects the port number the router will listen
to when determining when calls are being made.
Authentication Name – The Username used to access your SIP
server and your VoIP service provider.
Password – The Password used to access your SIP server and your
VoIP service provider.
Retype Password – Retype your password to confirm and click
Apply.
D-Link DPH-300S User Manual
32
Configuration
PEER TO PEER
Index – Use this field to assign a reference number to the
information entered below.
Phone Number – The telephone number assigned to the User
Agent.
User IP Address – Enter the peer’s IP address in the format
[email protected].
Port – This selects the port number the router will listen to when
determining when calls are being made.
uSER
D-Link DPH-300S User Manual
33
Configuration
SIP TELEPHONY
DTMF Method – Out-of band Dual Tone Multi-frequency – The Dual
Tone Multi-frequency (DTMF) mode sets how the router will handle
the tones that your telephone makes when you push its buttons. It
is recommended that you use the same mode that your VoIP service
provider uses.
Payload Type – A payload type is a number from 96 through 127
that identifies the type of payload carried in the packet. For example,
a payload type of 122 denotes a fax payload. This field is only active
when the DTMF method is set to RFC 2833.
VAD – Voice Activity Detection (VAD) – detects whether or not
speech is present. This lets the router reduce the bandwidth that a
call uses by not transmitting “silent Packets” when you are not
speaking.
Country Code – You can select the default country code for your
area.
D-Link DPH-300S User Manual
34
Making a Call
Making a Call to the PSTN (regular telephone
network)
If you have connected your PSTN telephone line
to the DPH-300S’s Base, you can make a
telephone call to any regular telephone using the
PSTN − normal telephone usage charges will
apply − by following these steps:
Pick up the handset and press the PSTN Dial
Tone button. You will hear the familiar PSTN dial
tone, the handset and L1 icon will appear in the
handset’s LCD display.
Dial the number you want to call. The handset’s
LCD will display the phone number as you enter
it. This number is also dialed as you enter it.
To end the call, either press the On Hook button
or replace the handset on the charger.
D-Link DPH-300S User Manual
PSTN Dial Tone
Press this button
to initiate a
telephone call
over the regular
telephone line
(PSTN). You
will hear the
familiar dial tone
− and then dial
the telephone
number as you
would on a
normal
PSTN Mode
On Hook
Press this button
to end a
telephone call.
You can also
simply place the
handset in the
charger base to
end any
telephone call.
This will end both
a PSTN and a
VoIP telephone
call.
35
Making a Call
Making a Call to the PSTN in Standby Mode
If you have connected your PSTN telephone line
to the DPH-300S’s Base, you can make a
telephone call to any regular telephone using the
PSTN by following these steps:
Pick up the handset and dial the number as you
normally would. You can clear any or all of the
numbers you have entered by pressing the Clear
button. You will hear the familiar PSTN dial tone,
the handset and L1 icon will appear in the
handset’s LCD display.
This number will be dialed as you enter it.
To end the call, either press the On Hook button
or replace the handset on the charger.
PSTN Dial Tone
Press this button
to dial a
telephone
number (over the
regular telephone
line (PSTN)).
You will hear the
familiar dial tone
− and then the
handset will dial
the telephone
number as you
entered it.
Keypad
You can just
dial a regular
telephone
number and
then press the
PSTN Dial
Tone button.
The number
will be
displayed in
the LCD.
D-Link DPH-300S User Manual
On Hook
Press this
button to end
a telephone
call. You can
also simply
place the
handset in the
charger base
to end any
telephone call.
This will end
both a PSTN
and a VoIP
telephone call.
Clear
Press this button to
erase a single digit
of a telephone
number you have
entered while the
handset is in
Standby Mode.
Holding this button
for a couple of
seconds will erase
all of the digits of
the telephone
number
36
Making a Call
Making a VoIP Call to another DPH-300S or
Peer number
You can dial another Peer user’s number directly.
Simply enter the number − 66990011, for example
− and press the IP button. You will be connected
to that user shortly (provided they are currently
connected to the Internet).
To end the call, either press the On Hook button
or replace the handset on the charger.
IP
Press this button
after you have
dialed the Peer’s
number to initiate
the VoIP call to
another DPH-300S
phone or Peer
user.
Keypad
Enter another
DPH-300S’s number
directly − in the
same way you would
dial a PSTN
telephone number.
Then press the IP
button to initiate the
call.
D-Link DPH-300S User Manual
On Hook
Press this
button to end
a telephone
call. You can
also simply
place the
handset in the
charger base
to end any
telephone call.
This will end
both a PSTN
and a VoIP
telephone call.
37
Making a Call
Receiving a Call : PSTN or VoIP
When an incoming PSTN or VoIP telephone call is
detected, the handset will ring and the L1 icon will
be displayed in the LCD. If the caller can be
identified, the caller’s number or ContactList entry
will be displayed. If the caller’s telephone
number is currently stored in the handset’s phone
book, the caller’s name will be displayed along
with the telephone number.
To answer the call, simply pick the handset up
from the charger base and press the PSTN Dial
Tone button.
To end the call, either press the On Hook button
or replace the handset on the charger base.
Incoming Call
LED
This red LED
will flash to
indicate an
incoming
PSTN or VoIP
telephone call
IP
Press this
button to
answer an
incoming
VoIP
telephone call.
On Hook
Press this
button to end
a telephone
call. You can
also simply
place the
handset in the
charger base
to end any
telephone call.
This will end
both a PSTN
and a VoIP
telephone call.
PSTN Dial Tone
Press this button to dial a
telephone number (over
the regular telephone line
(PSTN)). You will hear
the familiar dial tone −
and then the handset will
dial the telephone
number as you entered it.
D-Link DPH-300S User Manual
38
Making a Call
Using the Speakerphone
While making a call, you can engage the
handset’s built in speaker to make both ends of
the conversation audible to several people on
your end of the line.
To activate the speakerphone press and hold the
PSTN Dial Tone button until the speakerphone
icon is displayed and you can hear the activity on
the line from the speaker built in to the back of the
handset or the IP button until the speakerphone
icon appears and then your list of IP calls. To
deactivate the speakerphone, press the PSTN
Dial Tone or IP button until the speakerphone icon
disappears. The call then be continued using
the handset normally.
D-Link DPH-300S User Manual
IP
Press and hold this
button to activate the
speakerphone function
for VoIP calls. To
deactivate the
speakerphone
function, press and
hold this button a
second time
PSTN Dial Tone
Press and hold this
button to activate the
speakerphone
function for PSTN
calls. To deactivate
the speakerphone
function, press and
hold this button a
second time
39
Making a Call
Adjusting the Volume Level
Scroll Up
Press these buttons
to adjust the
earpiece volume
level during a
telephone call
Scroll Up will
increase the
volume level.
While making a call, you can adjust the earpiece
volume level from 1 to 9. A higher number
indicates a higher volume level.
To adjust the volume level, press the Scroll Up or
Scroll Down button during a telephone call.
Scroll Down
Press these buttons
to adjust the
earpiece volume
level during a
telephone call
Scroll Down will
decrease the
volume level.
D-Link DPH-300S User Manual
40
Making a Call
Troubleshooting
1. The DPH-300S will not make a call using a phone number
„ Check that you did not misdial the number.
„ The phone is not connected to the Internet.
The phone is not registered with the Network Manager. It may take the phone a few minutes to register. Verify all network settings,
including DNS.
Far side of the call is not registered with the Network Manager. If you are calling someone who has an videoconference d e v i c e i n
a d d i t i o n t o a DPH-300S, you may have to make direct IP calls to them.
2. The DPH-300S can’t make direct IP calls
„ The phone is not connected to the Internet. See the Internet Connection sections of this user manual.
„ The person you are trying to call is unreachable. Ensure the IP address of the person you are trying to call is correct.
3. The DPH-300S p roduces an off-hook signal
„ The telephone is off the hook. Hang up the phone.
4. The DPH-300S produces a fast busy signal
„ Person you are trying to call is not registered with the Network Manager. Call the person using direct IP or wait until the person is registered
with the Network Manager.
„ Person you are trying to call is in a call or has rejected your call. Try your call at a later time.
5. DPH-300S doesn’t ring with an incoming call
„ Telephone cable is not properly plugged into the wall or the DPH-300S. Verify that the cable is connected properly.
6. Phone freezes-up while answering a call
„ Phone is not functioning properly behind a firewall. See page 65 “Router Port Configuration”.
D-Link DPH-300S User Manual
41
Making a Call
7. No audio in call
„ Port forward the appropriate ports to the phone. The phone needs ports 1720 (TCP) and ports 15328-15333 (TCP and UDP) open to
function properly. See the section Opening Ports on Routers and Gateways on page 58, or consult your router’s documentation or your
network administrator for help on doing this.
D-Link DPH-300S User Manual
42
Making a Call
Networking Basics
Check your IP address
After you install your new D-Link adapter, by default, the TCP/IP settings should be set to obtain an IP address from a DHCP server (i.e. wireless
router) automatically. To verify your IP address, please follow the steps below.
Click on Start > Run. In the run box type cmd and click on the OK.
At the prompt, type ipconfig and press Enter.
This will display the IP address, subnet mask, and the default
gateway of your adapter.
If the address is 0.0.0.0, check your adapter installation, security
settings, and the settings on your router. Some firewall software
programs may block a DHCP request on newly installed adapters.
If you are connecting to a wireless network at a hotspot (e.g. hotel,
coffee shop, airport), please contact an employee or administrator
to verify their wireless network settings.
D-Link DPH-300S User Manual
43
Making a Call
Statically Assign an IP address
If you are not using a DHCP capable gateway/router, or you need to assign a static IP address, please follow the steps below:
Step 1
Windows® XP - Click on Start > Control Panel > Network Connections.
Windows® 2000 - From the desktop, right-click on the My Network Places > Properties.
Step 2
Right-click on the Local Area Connection which represents your D-Link network adapter and select Properties.
Step 3
Highlight Internet Protocol (TCP/IP) and click on the Properties.
Step 4
Click on the Use the following IP address and enter an IP address that is on the same subnet as
your network or the LAN IP address on your router.
Example: If the router’s LAN IP address is 192.168.1.1, make your IP address 192.168.1.X where X
is a number between 2 and 99. Make sure that the number you choose is not in use on the network.
Set Default Gateway the same as the LAN IP address of your router (192.168.1.1).
Set Primary DNS the same as the LAN IP address of your router (192.168.1.1). The Secondary
DNS is not needed or you may enter a DNS server from your ISP.
Step 5
Click on the OK twice to save your settings.
D-Link DPH-300S User Manual
44
Technical Specification
Technical Specifications
Ethernet Ports
Two Ports for Fast Ethernet Connections
RJ-45, Auto MDI/MDI-X, 10/100
Mbs
Standard Compliance IEEE 802.3 for 10 Mbps Ethernet
IEEE 802.3u for 100 Mbps Ethernet
Rate Adaptation 10/100 Mbps, Auto-Negotiation
Cordless Phone Interface
Standard Compliance DECT (Digital Europe Cordless
Telecommunication)
GAP (Generic Access Profile)
Frequency 1880-1900 MHz
RF Channels 10 Channels
Modulation GFSK
Voice Coding ADPCM< 32K bit/s t.
Power Requirement:
External Power Adapter AC Power Adapter, AC 9V, 1 A
Embedded Factory Reset Switch On rear of Base Unit
Telephony Support:
Call Control Protocol SIP (RFC3261)
CODEC G.711 (A-law and U-law)
G.726
G.729A
iLBC
Echo Cancellation G.168
Configuration/Management:
DHCP (Dynamic Host DHCP Client (RFC2131)
Configuration Protocol)
D-Link DPH-300S User Manual
Embedded Web Server
Configuration Restore/Backup
TELNET
TFTP Client For firmware upgrade and
configuration file download
Performance Monitor
Security:
User Authentication Administration Username/Password control for
TELNET and WEB configuration
SIP Authentication SIP Authentication with MD5
password encryption
VoIP NAT Traversal SIP/STUN
Safety/EMI Certifications:
UL/CUL
EMI Certification:
FCC Class B
BSMI Class B
CE Class B
Environmental Specifications:
Operating Temperature 0° to 40°C
Storage Temperature -10° to 55°C
Operating Humidity Range 5 to 95%, Non-condensing
45
Contacting Technical Support
Contacting D-Link
When contacting technical support, please provide the following information:
•
Serial number of the unit
•
Model number or product name
•
Software type and version number
USA
Canada
Europe (UK)
Germany
France
Netherlands
Belgium
Italy
Sweden
Denmark
Norway
Finland
Spain, Portugal
Czech Republic
Switzerland
D-Link DPH-300S User Manual
dlink.com
dlink.ca
dlink.co.uk
dlink.de
dlink.fr
dlink.nl
dlink.be
dlink.it
dlink.se
dlink.dk
dlink.no
dlink.fl
dlink.es
dlink.cz
dlink.ch
Greece
Luxembourg
Poland
Hungary
Singapore
Australia
India
Dubai, Egypt
Turkey
Israel
Latin America
Brazil
South Africa
Russia
China
Taiwan, HQ
dlink.gr
dlink.be
dlink.pl
dlink.hu
dlink-intl.com
dlink.com.au
dlink.co.in
dlink-me.com
dlink.com.tr
dlink.co.il
dlink.cl
dlinkbrasil.com.br
d-link.co.za
dlink.ru
dlink.com.cn
dlink.com.tw
46
Contacting Technical Support
Notices
Trademarks:
D-Link is a registered trademark of D-Link Corporation/D-Link Systems, Inc. Other trademarks or registered trademarks are the property of their
respective owners.
Copyright Statement:
No part of this publication or documentation accompanying this product may be reproduced in any form or by any means or used to make any
derivative such as translation, transformation, or adaptation without permission from D-Link Corporation/D-Link Systems, Inc., as stipulated by the
United States Copyright Act of 1976 and any amendments thereto. Contents are subject to change without prior notice.
© Copyright 2006 by D-Link Corporation/D-Link Systems, Inc. All rights reserved.
Information in this document is subject to change without notice.
CE Mark Warning:
This is a Class B product. In a domestic environment, this product may cause radio interference, in which case the user may be required to take
adequate measures.
FCC Statement:
This equipment has been tested and found to comply with the limits for a Class B digital device, pursuant to part 15 of the FCC Rules. These limits
are designed to provide reasonable protection against harmful interference in a residential installation. This equipment generates, uses, and can
radiate radio frequency energy and, if not installed and used in accordance with the instructions, may cause harmful interference to radio
communication. However, there is no guarantee that interference will not occur in a particular installation. If this equipment does cause harmful
interference to radio or television reception, which can be determined by turning the equipment off and on, the user is encouraged to try to correct
the interference by one or more of the following measures:
• Reorient or relocate the receiving antenna.
D-Link DPH-300S User Manual
47
Contacting Technical Support
• Increase the separation between the equipment and receiver.
• Connect the equipment into an outlet on a circuit different from that to which
the receiver is connected.
• Consult the dealer or an experienced radio/TV technician for help.
D-Link DPH-300S User Manual
48