1
VERTU ASCENT X
User Guide
Contents
Preface 4
About your phone 4
Conventions used in this guide 4
Health and safety 5
General 5
Operating environment 5
Electronic devices 5
Battery safety 6
Wall charger safety 6
SAR Notice – RM-589V 6
FCC/Industry Canada notice 7
Declaration of conformity 7
Care and maintenance 8
General 8
Battery 8
Ceramics and sapphire 8
Leather 8
Metal 9
Rubber 9
Getting started 10
Vertu package contents 10
Your Vertu phone - front 10
Your Vertu phone - back 11
Your Vertu phone - left, right & base 11
Inserting the SIM card and battery 12
Using your Vertu phone 13
Home screen 14
Icons and indicators 16
Menus 18
CD-ROM 21
Security 24
PIN code 24
PIN2 code 24
Call barring 25
Fixed dialling 26
Closed user group 27
Security code 27
Browser security 28
Call functions 30
Making a call 30
Speed dialling 31
Receiving a call 32
Ending a call 33
In-call options 33
Multiparty calls 34
Call settings 35
Call history 37
Text input 39
Input modes 39
Traditional text input mode 39
Predictive text input mode 39
Numeric input mode 40
Mode indicators 40
Changing input modes 40
Changing writing language 41
Key-character mapping 41
1
Contents
Contacts 43
Saving a new contact 43
Business cards 45
Contacts memory 46
Other Contacts settings 47
Contact groups 48
My numbers 49
Service numbers 49
Copying and moving contacts 50
Messages 52
Text messages 52
Multimedia messages 57
Audio messages 60
E-mail messages 61
Delivery reports 65
Flash messages 65
Smart messages 65
Voice messages 65
Info messages 66
Instant messages (IMs) 66
Service commands 66
Deleting messages via the Messages menu 66
General message settings 67
Service messages 68
Settings 69
Date and time 69
Profiles 70
Themes 71
Tones 71
Display 72
Lights 73
My shortcuts 73
Connectivity 74
Phone 77
Accessories 80
Configuration 80
Workshop reset 82
Sync and backup 82
Additions 84
Collection 84
Games 84
Torch 85
Calculator 85
Media player 86
Equaliser 88
Stopwatch 88
Timer 90
Voice recorder 91
Notes 92
Calendar 93
Calendar notes 93
Calendar views 95
Calendar settings 95
To-do list 96
2
Contents
Alarm clock 98
Troubleshooting 121
Web 99
Accessing web pages 99
Web settings 100
Clearing the cache 101
Specifications 123
Vertu Services 102
Vertu Feeds 102
Travel 105
Vertu Concierge 106
Vertu Fortress 107
Access to Vertu services while roaming 107
Navigate 108
GPS and A-GPS 108
Maps 108
Navigation settings 110
Menu tree 124
Warranty and legal information 126
Manufacturer’s limited warranty 126
Export controls 127
Licenses 128
General Public Licence for the software known as MSNTP 128
EU recycling notice 129
Vertu Concierge Terms and Conditions 130
Passive Near Field Communication Device 132
Index 133
Camera 111
Taking a photo 111
Recording a video clip 113
General camera settings 114
Gallery 115
Gallery folders 115
Gallery files 117
Folder and file options 118
Memory card options 118
Accessories 119
Battery 119
Wall charger 120
Data cable 120
3
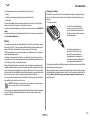
Preface
About your phone
Preface
This wireless device is approved for use on EGSM 900 MHz, GSM 850/1800/
1900 MHz, and WCDMA Band I, II, V and VI. Contact your service provider for more
information about networks.
To use a device, you must have service from a wireless service provider. Some
features are not available on all networks; other features may require that you make
specific arrangements with your service provider to use them. Network services
involve transmission of data. Check with your service provider for details about fees
in your home network and when roaming on other networks. Your service provider
can explain what charges will apply.
Your service provider may have requested that certain features be disabled or not
activated in your device. If so, these features will not appear on your device menu.
Your device may also have customised items such as menu names, menu order and
icons.
To use any features in this device other than the alarm clock, the device must be
switched on.
When using the features in this device, obey all laws, and respect all local customs,
privacy and legitimate rights of others, including copyrights.
Copyright protection may prevent some images, music and other content from being
copied, modified or transferred.
Content owners may use different types of digital rights management (DRM)
technologies to protect their intellectual property, including copyrights. This device
uses various types of DRM software to access DRM-protected content. With this
device you can access content protected with WMDRM 10 and OMA DRM 2.0. If
certain DRM software fails to protect the content, content owners may ask that such
DRM software's ability to access new DRM-protected content be revoked.
Revocation may also prevent renewal of such DRM-protected content already in your
device. Revocation of such DRM software does not affect the use of content
protected with other types of DRM or the use of non-DRM-protected content.
Remember to make back-up copies or keep a written record of all important
information stored in your device.
4
Conventions used in this guide
WARNING: Indicates important information relating to safety.
IMPORTANT: Indicates important information not relating to safety.
NOTE: Indicates a point to be aware of when using your Vertu phone.
TIP: Represents useful information, such as a quick way to access a
feature.
Menu
Represents text that appears on your Vertu phone’s display, for
example, “From the Home screen, select Menu”.
Copyright © Vertu 2010. All rights reserved.
Reproduction, transfer, distribution or storage of part or all of the contents in this
document in any form without the prior written permission of Vertu is prohibited. Vertu
operates a policy of continuous development. Vertu reserves the right to make
changes and improvements to any of the products described in this document
without prior notice.
Under no circumstances shall Vertu be responsible for any loss of data or income or
any special, incidental, consequential or indirect damages howsoever caused.
The contents of this document are provided “as is”. Except as required by applicable
law, no warranties of any kind, either expressed or implied, including, but not limited
to, the implied warranties of merchantability and fitness for a particular purpose, are
made in relation to the accuracy, reliability or contents of this document. Vertu
reserves the right to revise this document or withdraw it at any time without prior
notice. The availability of particular products may vary by region. Please check with
Vertu Concierge.
Vertu and the V logo are registered trademarks or trademarks. Other product and
company names mentioned herein may be trademarks or registered trademarks of
their respective owners.
Health and safety
Health and safety
WARNING: Read the following simple guidelines. Not following them may
be dangerous or illegal.
General
• Do not attempt to dismantle the phone or any of its accessories. Only qualified
service personnel should repair your Vertu phone and its accessories.
• Do not touch the phone, battery or wall charger with wet hands.
• Keep your Vertu phone, and all parts and accessories, out of the reach of small
children and pets. The SIM card and other small parts could present a choking
hazard.
• Use only batteries and accessories approved by Vertu for use with this particular
model. The use of any other types may invalidate any approval or warranty, and
may be dangerous. In particular, use of unapproved chargers or batteries may
present a risk of fire, explosion, leakage or other hazard. For availability of
approved accessories, please check with your dealer.
• The bundled battery and wall charger are only for use with your Vertu phone. Do
not use this battery or charger with any other device.
• Before connecting your Vertu phone to another device, read the supporting
documentation to confirm that the other device is compatible.
Operating environment
• Observe all local safety regulations regarding the use of mobile phones while
driving.
• Pull off the road and park before making or answering a call.
• Do not stop on the hard shoulder of a motorway to answer or make a call, except
in an emergency.
• If using an integrated handsfree device, make sure the phone is securely placed in
its holder.
• Do not place the phone on the passenger seat or where it can break loose during
a collision or sudden stop.
• Only qualified personnel should install the device in a vehicle. Faulty installation or
service may be dangerous. For more information, consult your vehicle
manufacturer or representative.
• Vehicle air bags inflate with great force. Do not place objects, including either
installed or portable wireless equipment, in the area over the airbag or in the airbag
deployment area.
• Switch off your Vertu phone when refuelling.
• Do not handle your Vertu phone when operating machinery.
• Switch your Vertu phone off if you are entering a hospital or health care facility.
Medical equipment may be affected by phone usage.
• Switch your Vertu phone off when travelling on an aircraft. The phone signal may
interfere with systems in the aircraft. You are legally bound to comply with this
recommendation.
• Switch your Vertu phone off in any facility where posted notices prohibit phone
usage. Always follow building regulations governing phone usage.
• Switch your Vertu phone off when blasting is in progress, and observe all provided
guidelines and regulations.
• Switch your Vertu phone off in areas with potentially explosive atmospheres, such
as fuel storage areas and spray paint facilities.
• Keep your Vertu phone away from fuel and chemicals.
Electronic devices
• If you wear a pacemaker, or are in the company of someone who does, you should
be aware that there is a small risk of mobile phone usage interfering with the
operation of the pacemaker. You should contact your doctor, or the manufacturer
of the pacemaker, for more information. If you have any reason to suspect that
interference is taking place, switch off your phone immediately.
• Persons with pacemakers should keep the phone more than 15 cm (6 inches) from
their pacemaker when the phone is switched on.
• Persons with pacemakers should not carry the phone in a breast pocket.
• Persons with pacemakers should use the ear opposite the pacemaker to minimise
the potential for interference.
• Mobile phone usage may interfere with some hearing aids. If this happens, you
should contact your service provider or doctor for further information.
• Mobile phone usage may interfere with the functionality of inadequately shielded
medical devices. Consult a physician or the manufacturer of the device to ensure
safe procedures are used.
• Mobile phone usage may interfere with the functionality of any inadequately
shielded electronic system in a motor vehicle. Examples include airbags and fuel
injection systems. You should contact the manufacturer of the vehicle or system to
ensure that the system is properly shielded.
5
Health and safety
Battery safety
SAR Notice – RM-589V
• Stop using the battery if you detect any abnormalities, such as odour,
discolouration or heat during use, charging or storage.
• Do not use your Vertu phone with a damaged battery.
• Do not short-circuit the battery. Accidental short-circuiting can occur when a
metallic object causes a direct connection between the + and - terminals of the
battery.
• Do not touch the battery terminals.
• Do not leave the battery in areas of extreme cold or heat.
• Do not store your Vertu phone in, or near, direct heat sources such as radiators.
This could cause the battery to overheat and explode.
• Never soak the battery in water or any other liquid.
• Never attempt to open the battery. The battery contains substances that may be
harmful if swallowed or allowed to come into contact with unprotected skin.
• In the unlikely event of a battery leak, take care to keep the battery discharge away
from your eyes and skin. If the leakage does come into contact with eyes or skin,
flush thoroughly with clean water and consult a doctor.
• Do not dispose of the battery in a fire.
• Do not dispose of the battery in a regular waste container. The battery contains
toxic chemicals and must be disposed of appropriately. Contact your local
authorities for more information.
YOUR VERTU PHONE (MODEL: ASCENT X, TYPE: RM-589V, FCC ID: P7QRM589V) MEETS GUIDELINES FOR EXPOSURE TO RADIO WAVES.
Your Vertu phone is a radio transmitter and receiver. It is designed to not exceed the
limits for exposure to radio waves recommended by international guidelines. These
guidelines were developed by the independent scientific organization ICNIRP, and
include safety margins designed to assure the protection of all persons, regardless of
age and health.
The exposure guidelines for mobile devices employ a unit of measurement known as
the Specific Absorption Rate, or SAR. The SAR limit stated in the ICNIRP guidelines
is 2.0 Watts/kilogram (W/kg), averaged over ten grams of tissue. Tests for SAR are
conducted using standard operating positions, with the device transmitting at its
highest certified power level in all tested frequency bands. The actual SAR level of an
operating device can be below the maximum value because the device is designed
to use only the power required to reach the network. That amount changes
depending on a number of factors, such as how close you are to a network base
station. The highest SAR value under the ICNIRP guidelines for use of the device at
the ear is 0.47 W/kg.
This phone meets RF exposure guidelines when used either in the normal use
position against the ear or when positioned at least 22 mm (7/8 inch) away from the
body. When a carry case, belt clip or holder is used for body-worn operation, it should
not contain metal, and should position the phone at the above-stated distance away
from your body.
In order to transmit data files or messages, this device requires a good quality
connection to the network. In some cases, transmission of data files or messages
may be delayed until such a connection is available. Ensure that the above separation
distance instructions are followed until the transmission is completed.
Use of device accessories and enhancements may result in different SAR values.
SAR values may vary depending on national reporting and testing requirements and
the network band. Additional SAR information may be provided under product
information at www.vertu.com.
USA and Canada: Your mobile device is also designed to meet the requirements for
exposure to radio waves established by the Federal Communications Commission
(USA) and Industry Canada. These requirements set a SAR limit of 1.6 W/kg,
averaged over one gram of tissue. The highest SAR value reported under this
standard during product certification for use at the ear is 0.52 W/kg, and when
properly worn on the body is 0.64 W/kg.
Wall charger safety
• Do not use a damaged or worn charger. The use of a damaged or worn charger
could result in electric shock, burns or fire.
• Do not bend or twist the cable of the charger.
• Do not pull on the connected data cable in order to remove the charger plug from
a socket. Grasp the plug directly when unplugging the charger to avoid causing any
damage to the cable.
• Do not touch the pins of the plug when connecting or disconnecting it from a power
source.
• Never charge your Vertu phone when the connection point is damp or wet.
• Chargers must only be used in dry conditions. They should never be used when
damp or wet.
• Do not place heavy objects on the charger.
• When the charger is not in use, disconnect it from the power source.
6
Health and safety
FCC/Industry Canada notice
Your Vertu phone may cause TV or radio interference (for example, when using a
phone in close proximity to receiving equipment). The FCC or Industry Canada can
require you to stop using your phone if such interference cannot be eliminated. If you
require assistance, contact Vertu Concierge.
This device complies with Part 15 of the FCC rules. Operation is subject to the
following two conditions: (1) this device may not cause harmful interference, and (2)
this device must accept any interference received, including interference that may
cause undesired operation.
NOTE: Vertu is not responsible for any radio or TV interference caused by
unauthorised modifications to this equipment. Such modifications could
void your authority to operate the equipment.
Declaration of conformity
We, Vertu, declare under our sole responsibility that the product, Model Ascent X,
type RM-589V is in conformity with the provision of the following Council Directive:
1999/5/EC.
A copy of the Declaration of Conformity can be found at http://www.vertu.com.
7
Care and maintenance
Your Vertu products have been crafted from some of the finest materials and care
should be taken to keep them in good condition. Damage caused to your Vertu phone
by failing to observe these care instructions is not covered by the warranty.
• Only use a soft, clean cloth to clean your Vertu phone. Do not use chemicals,
detergents, abrasive substances, or any liquids. Use a cotton swab to clean the
camera lens.
General
Battery
• Always use your Vertu phone in the intended manner. Incorrect usage may affect
performance.
• To avoid permanent damage to your Vertu phone, use only Vertu approved
batteries and accessories.
• The bundled battery and wall charger are only for use with your Vertu phone. Do
not use this battery or charger with any other device. This could cause permanent
damage to the device, battery or charger.
• Use only batteries and accessories approved by Vertu for use with this particular
model.
• Before connecting your Vertu phone to another device, read the supporting
documentation to confirm that the other device is compatible.
• Keep your Vertu phone, and all parts and accessories, out of the reach of small
children and pets.
• Do not allow your Vertu phone, battery or accessories to come into contact with
liquids or moisture. If your Vertu handset accidentally gets wet, dry it completely
with a soft, absorbent cloth before removing the back cover. Remove the battery
and leave all parts to dry naturally. Do not apply heat.
• Do not use or store your Vertu phone in dusty or dirty locations.
• Do not use or store your Vertu phone in hot or cold areas.
• Do not open your Vertu phone unless absolutely necessary. Before replacing the
back cover, ensure that the interior of the phone and the back cover seals are dry,
clean, and free of any foreign objects.
• Do not mishandle or abuse your Vertu phone.
• Do not apply paint or other such substances to your Vertu phone.
• Interference may affect the performance of your Vertu phone. This is normal and
the phone should operate as normal once you move away from the source of the
interference.
• If your Vertu phone, or any of the accessories, are not working as they should,
please consult your dealer. They can provide you with the expert assistance you
require.
• Do not attempt to disassemble your Vertu phone. Only Vertu authorised personnel
should service the phone.
• Do not leave the battery connected to the charger and power source for longer than
necessary. This will result in repeated short charging, which will reduce battery
performance and lifespan. Please disconnect the charger when the battery is full.
• Do not leave the battery in areas of extreme cold or heat. This could affect the
performance and lifetime of the battery. A device with a hot or cold battery may not
work temporarily. The battery has optimum performance in an ambient temperature
of between +15 °C (+59 °F) and +25 °C (+77 °F)
• Only remove the battery with the phone switched off.
Care and maintenance
8
Ceramics and sapphire
Ceramics and sapphire are very hard materials, but are also brittle and can be
scratched by harder materials or objects. They can also be damaged if dropped.
• Avoid contact between your Vertu phone and hard materials such as diamond
jewellery, nail files, abrasives, and mineral crystals.
• Do not drop or knock your Vertu phone on hard surfaces.
• Avoid repeated rubbing of your Vertu phone against hard surfaces.
Leather
All Vertu leather products are made by expert craftsmen. Each leather hide is unique
and has natural markings which should be considered part of the individuality of fine
leather. All leather can be damaged and should be treated with care.
• Avoid exposing your Vertu phone to water and high humidity.
• Avoid dropping, knocking or rubbing your Vertu phone on hard surfaces.
• Do not expose your Vertu phone to extreme temperatures.
• Avoid contact between your Vertu phone and oily substances, make-up and
solvents.
Care and maintenance
Metal
Vertu metals are finished to a high standard and care needs to be taken to maintain
their appearance.
• Avoid contact between your Vertu phone and chemicals such as solvents, alkaline
and acid solutions, cola-based drinks and salt water. If contact occurs, wipe with a
clean, soft cloth as soon as possible.
• Avoid contact between your Vertu phone and sharp objects.
• Avoid dropping or knocking your Vertu phone on hard surfaces.
• Do not use metal polishes on your Vertu phone.
Rubber
• Avoid direct exposure to strong light, heat and humidity
• Avoid contact with dark coloured or heavily dyed materials (such as PVC, polyester
and denim) as the colour may transfer to the rubber.
• Should you find that the rubber has attracted surface dirt, this can, in some
instances, be removed by gently rubbing with a soft, light coloured damp cloth.
9
Getting started
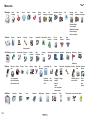
Vertu package contents
Getting started
1
1
1
1
1
1
1
1
1
1
1
Vertu ASCENT X phone RM-589V
Battery
Wall charger (comprising wall charger plug and data cable) with international
adaptors
Additional data cable
Back cover release key
Microfibre polishing cloth
Holographic authenticity card
Ascent guide
Warranty book
CD-ROM
Call to action card - describes how to register your handset for Vertu Services
The package contents may vary slightly in accordance with regional regulations.
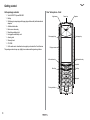
Your Vertu phone - front
Light sensor
Chronograph key
Power key
Earpiece
Concierge key
Display screen
Left selection key
Right selection key
Joystick
Send key
End key
Keypad
Pulsing indicator
10
Getting started
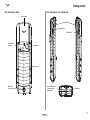
Your Vertu phone - back
Your Vertu phone - left, right & base
Antenna area
Speakers
Chronograph key
Concierge key
Camera flash
and torch
Camera lens
Back cover
Back cover
locking screw
Micro-USB connector
(for charging and
data transfer)
Microphone
11
Getting started
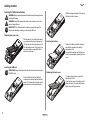
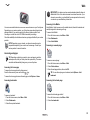
Inserting the SIM card and battery
Slide the locking mechanism (04) over the
SIM card to hold it in place.
WARNING: Always switch the phone off and disconnect the charger before
touching the battery.
WARNING: Keep SIM cards and the back cover release key out of the
reach of small children.
IMPORTANT: The SIM card and its contacts are easily damaged. Be
careful when handling, inserting or removing the SIM card.
04
Removing the back cover
With the back of your Vertu phone facing
you, position the back cover release key
(01) into the slot of the locking screw (02).
Turn the locking screw (02) a quarter of a
turn anticlockwise, and gently lift off the
back cover as shown.
01
Inserting the battery
Position the battery so that the contacts
align with the contacts in the battery
compartment (05).
Ensure that the battery and SIM card are
seated correctly before replacing the back
cover.
05
02
Inserting the SIM card
IMPORTANT: Always switch the phone off before inserting or removing the
USIM/SIM card.
Insert the SIM card into the SIM card
compartment, ensuring that the bevelled
corner (03) is located bottom right and the
gold contact area is facing downwards.
03
12
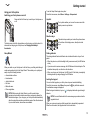
Replacing the back cover
06
To replace the back cover, locate the
internal clip (06) first.
Lower the back cover into position until it
clicks into place. The cover should close
tightly using only light pressure.
Getting started
Using your Vertu phone
Switching your Vertu phone on and off
Press and hold the Power key to switch your Vertu phone on
or off.
To run the Setup Wizard again at any time:
From the Home screen, select Menu > Settings > Setup wizard.
Joystick
The Joystick enables you to move the cursor around the
display screen in any direction.
Selection keys
The selection keys enable you to select the options shown
at the bottom of the display screen, directly above the
keys.
The battery may not be fully charged when you first receive your Vertu phone. For
information on charging your Vertu phone, see Charging the battery in
Accessories.
Setup Wizard
When you switch on your Vertu phone for the first time, you will be guided through
certain setup options by the Vertu Setup Wizard. This enables you to quickly and
easily set up the following functions:
• Accurate date and time.
• Home location.
• Joystick shortcuts.
• Font size.
• Bluetooth name.
• Phone registration.
NOTE: While running the Setup Wizard, you will be asked to give
permission for automatic network connections, and agree to accept the
related data charges. If you do agree, your Vertu phone will automatically
adjust to regional time variations and will also receive Vertu Feeds relevant
to your current location, where these are available.
Pulsing indicator
The pulsing indicator flashes at different rates to indicate the status of your Vertu
phone:
• When the phone is on, but the backlight is off (power save mode), the LED flashes
slowly.
• If you miss a call or receive a message, the LED flashes with a double pulse. This
indication takes priority over those for other situations.
• When you charge your Vertu phone, the LED stays lit. If the battery is completely
discharged when you begin charging, the LED flashes.
Locking the keypad
You can lock the keypad on your Vertu phone to prevent accidental dialling.
From the Home screen, select Menu, then press the
-key within two seconds.
A confirmation message is displayed.
When the keypad is locked, a key icon ( ) is displayed below the signal strength
indicator.
NOTE: You can still make calls to the some emergency numbers when the
keypad is locked.
When you receive an incoming call the keypad lock is automatically suspended.
When the call is ended, the keypad returns to the locked state.
13
Getting started
Unlocking the keypad
Home screen
Select Unlock, then press the
-key within two seconds.
A confirmation message is displayed.
The Home screen displays a configurable clock, along with icons and indicators that
show the current status of your Vertu phone.
Automatic keyguard
Clock
You can set the keyguard to automatically lock the keypad when the phone has not
been used for a set time period.
To set up automatic keyguard:
1. From the Home screen, select Menu > Settings > Phone > Automatic
keyguard.
2. Select On.
3. Enter the period of inactivity after which the keypad will be locked, then select
OK.
For information on the security keyguard, see Security keyguard in Security.
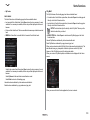
The clock displays the time and date in the Home screen.
You can change the clock display between Analogue, Digital and Miniature, or have
no clock displayed.
Home screen with Analogue clock:
The analogue clock includes a chronograph stopwatch feature,
For details of the stopwatch feature, see Stopwatch in Additions.
Home screen with Digital clock:
14
Getting started
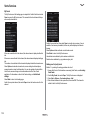
Home screen with Miniature clock:
Home screen with Analogue clock and Accurate Time active while travelling:
Home screen with Hidden clock:
Home screen with Digital clock and Accurate Time while travelling:
For information on changing the clock display, see Date and time format in
Settings.
The clock includes Accurate Time functionality. This functionality enables you to view
the times at your current and home locations when you travel to another time zone or
a different country. Also, if you have set an alarm, it will adjust to the local time.
15
Getting started
Home screen with Miniature clock and Accurate Time while travelling:
Icons and indicators
Signal strength
Strong signal.
Weak signal. To get a stronger signal, move to an area
clear of obstructions that may block the signal.
No signal.
Battery charge
Battery full.
For information on activating Accurate Time, see Time management in Settings.
Battery charge low. You need to recharge your Vertu
phone soon.
No charge.
Battery charging. The bars change to white as the
battery is charged.
Battery fully charged.
Profiles
Silent.
Meeting.
Outdoor.
My Style 1.
16
Getting started
My Style 2.
Notifications
Missed call.
Flight.
New message(s) received (includes voice mail messages.
For more information on profiles, see Profiles in Settings.
Connectivity
Bluetooth on.
Other icons
Synchronising data. For information on synchronising data, see Sync
and backup in Settings.
Connected to Bluetooth device.
Alarm set. For information on alarms, see the Alarm clock section.
Connected to Bluetooth headset.
Accurate Time may not be available.
Connected via USB cable.
City Brief update received. For information on City Brief, see City Brief
in Vertu Services.
Audible indicators
Calls
Dialling, incoming call, call in progress.
Call in progress (on-screen note).
Data call in progress.
Call on hold (on-screen note).
Loudspeaker on.
Calls forwarded.
Your Vertu phone can play tones to indicate the current signal strength and battery
charge level. These features can be accessed using voice commands.
This feature is useful if you are using a headset and cannot view the status indicators
on your Vertu phone.
To check the current signal strength:
1. From the Home screen, press and hold the Right selection key until you hear a
tone.
TIP: If you have a headset connected, press and hold the headset button
until you hear a tone.
2. Speak the voice command for the audible signal bar. A tone or series of beeps is
played to inform you of the signal strength. The meanings of the tones or beeps
are as follows:
• one beep - signal is weak.
• two beeps - signal is moderately weak.
• three beeps - signal is moderately strong.
• four beeps - signal is strong.
17
Getting started
• longer tone - no signal.
To check the current battery charge level:
1. From the Home screen, press and hold the Right selection key until you hear a
tone.
2. Speak the voice command for the audible battery bar. A series of beeps is played
to inform you of the battery charge level. The meanings of the beeps are as
follows:
• one beep - battery charge is low.
• two beeps - battery is half full.
• three beeps - battery is almost full.
• four beeps - battery is full.
For information on setting up voice recognition, see Voice recognition in Settings.
Menus
Main menu
The main menu displays all the top level menu categories, from which you can access
all the functions of your Vertu phone.
Messages
The Messages menu enables you to write, send, receive
and read messages.
See Messages section for details.
Contacts
The Contacts menu enables you to add and delete
contact numbers, select whether to store them on the
phone or SIM memory, and set up speed dialling.
See Contacts section for details.
Call history
The Call history menu enables you to view information
about voice and data calls that you have made, received
and missed.
You can also view information about messages received
and sent, and the amount of data received and sent while
web browsing.
See Call history in the Call functions section for
details.
The Settings menu enables you to change the way your
Vertu phone is configured.
This covers a wide range of features from changing the
stand-by display background to setting up access points
for network connectivity.
We recommend that you protect your Vertu phone and
SIM card from unauthorised use by protecting them with
passwords using the Security option.
See Settings section for details.
Settings
18
Getting started
Additions
The Additions menu contains extra items including
games and a torch, calculator and media player.
See Additions section for details.
Navigate
The Navigate feature enables you to access maps for
different cities and countries. You can also use your Vertu
phone for satellite navigation.
See Navigate section for details.
Calendar
The Calendar menu enables you to view your calendar,
set reminders for forthcoming events or dates, add notes,
and create a to-do list.
See Calendar section for details.
Camera
See Camera section for details.
Alarm clock
See Alarm clock section for details.
Gallery
The gallery contains all your image, video and audio files,
both preloaded and downloaded. Photos that you take
with your Vertu phone are stored in the gallery.
See Gallery section for details.
Web
The Web menu enables you to access various Web
services on your Vertu phone.
See Web section for details.
Vertu Services
The Vertu Services menu contains software and
services available only to Vertu owners.
See Vertu Services section for details.
The SIM services menu enables you to view
confirmation messages sent between your Vertu phone
and the network. You can access this menu only if it is
supported by your SIM card.
For availability and information on using SIM card
services, contact your service provider.
Accessing this service may involve sending messages or
making a phone call for which you may be charged.
For information on the menu structure of your Vertu phone, see the Menu tree
section.
SIM services
Opening menus
From the Home screen, press the Joystick to open the main menu.
Use the Joystick to scroll through the menus.
Press the Joystick to open a menu.
19
Getting started
Navigating through menus
When navigating through menus, select Back to return to the previous menu. Select
Exit to return to the Home screen from the main menu.
Press the End key to return to the Home screen from any menu.
You can also use voice commands to activate menu functions on your Vertu phone.
See Making a call using voice dialling in Call functions for more information.
Changing main menu view
To change the main menu view:
1. From the Home screen, select Menu > Options > Main menu view.
2. Select one of the following options:
• List to display the main menu icons one at a time.
• Grid to display all the main menu icons on one screen. You can move the icons
around the grid to have the options you use the most in your favourite positions.
Go to menu
You can use the Go to menu shortcuts to bypass the main menu and give you quick
access to the features that you use most often.
You can set up the Go to menu automatically or manually.
If you set up the menu automatically, the Go to menu will be dynamically updated with
the four most frequently used features, a link to the Tones folder, and the two most
recently used features, in this order.
To set up the Go to menu automatically:
1. From the Home screen, select Go to.
2. Select Options > Auto sorting on.
To set up the Go to menu manually:
1. From the Home screen, select Go to.
2. If automatic sorting is on, select Options > Auto sorting off.
3. Select Options > Select options.
4. Select each required item.
5. Select Done when you finished.
6. Select Yes to save the changes.
20
You can organise the Go to menu manually by moving items in the list.
To organise the Go to menu manually:
1. From the Home screen, select Go to.
2. If automatic sorting is on, select Options > Auto sorting off.
3. Select Options > Organise.
4. Scroll to a required item, then select Move.
5. Move the item to the required place in the list by moving the Joystick up or down,
then select OK.
6. Repeat steps 4 and 5 as required.
7. Select Done when you finished.
8. Select Yes to save the changes.
Joystick shortcuts
The Joystick has shortcuts pre-programmed with some popular features. When your
Vertu phone leaves our workshop, the shortcuts are:
Up - Vertu Feeds
Down - Camera
Left - Create message
Right - Calendar
You can change three of these shortcuts to your favourite items using one of the
following methods:
• From the Home screen, select Menu > Settings > My shortcuts > Navigation
key, then change the required shortcut(s). For further information, see Setting up
Joystick shortcuts in Settings.
• From the Home screen, press and hold the Joystick in the direction of the shortcut
to change, then select the required item for the shortcut.
NOTE: The shortcut to Vertu Feeds cannot be changed.
Getting started
Accessing a phone feature using a voice command
CD-ROM
Using voice recognition, your Vertu phone can dial contacts and access phone
features using voice commands. For information on voice dialling, see Making a call
using voice dialling in Call functions.
You can access the following features on your Vertu phone by speaking them as voice
commands:
• General, Silent, Meeting, Outdoor, My style 1, My style 2, Flight - to activate
the spoken profile. For information on profiles, see Profiles.
• Record - to access the voice recorder. For information on the voice recorder, see
Voice recorder in Additions.
• Missed calls, Received calls - to access the required list in the call history. For
information on the call history, see Call history in Call functions.
• Audible battery bar, Audible signal bar - to listen to the audible indicators. For
information on audible indicators, see Audible indicators.
• Homepage - to access your Web homepage.
• Call voice mailbox, Call video mailbox - to call your voice or video mailbox,
respectively. You can only call these mailboxes if they are supported by your
service provider.
To access a phone feature using a voice command:
1. From the Home screen, press and hold the Right selection key until you hear a
tone.
The Vertu CD-ROM works on a PC with a CD-ROM drive, with Microsoft®
Windows® 2000, Microsoft® Windows® XP or Microsoft® Vista® installed. You
need at least 250 MB of free disk space and administrator rights to the PC.
The Vertu CD-ROM also works on a Macintosh computer with Mac OS X 10.4.6 (or
later) and iSync 2.2 (or later) installed.
The Vertu CD-ROM contains the following items:
• An option to register your Vertu phone.
• Electronic versions of this User Guide.
• A link to order settings for multimedia messaging (MMS), e-mail and Internet
browsing.
• Vertu PC Suite (for PC only).
• iSync Plug-in (for Mac only).
• A link to download the Map Loader application.
TIP: If you have a headset connected, press and hold the headset button
until you hear a tone.
2. Speak the voice command for the required feature.
For information on setting up voice recognition and using it to access menu items,
see Voice recognition in Settings.
Registering your Vertu phone
Vertu aims to provide you with the very best service possible. To enable us to do this,
please register your Vertu phone.
You can register your Vertu phone in any of the following ways:
• calling Vertu Concierge using the dedicated key on your phone.
• using the option on the Vertu CD-ROM.
• selecting Register from the Vertu Services menu.
• visiting www.verturegistration.com.
NOTE: If registering your Vertu phone using a computer, the computer
needs to be connected to the Internet.
NOTE: If registering your Vertu phone using a computer, you will need to
know the serial number and International Mobile Equipment Identity (IMEI)
of your Vertu phone.
The serial number is engraved on the back of your Vertu phone.
The IMEI can be viewed by entering *#06# from the Home screen.
21
Getting started
To register your Vertu phone via the Vertu CD-ROM:
1. Insert the CD-ROM into your computer’s CD-ROM drive.
2. Select your preferred language.
3. Click the Register Phone button. The Vertu registration web page will
automatically open.
4. Fill in the required information on the web page.
To register your Vertu phone via the phone menu:
1. From the Home screen, select Menu > Vertu Services > Register.
2. The Vertu registration web page will automatically open.
3. Fill in the required information on the web page.
Viewing the User Guide
To view an electronic version of the User Guide:
1. Insert the CD-ROM into your computer’s CD-ROM drive.
2. Select your preferred language.
3. Click the Launch PDF button.
Setting up MMS, e-mail and internet browsing
1.
2.
3.
4.
5.
Check that your PC has a connection to the internet.
Insert the CD-ROM into your computer’s CD-ROM drive.
Select your preferred language.
Click the Order Settings button.
A link to the Vertu web site is opened.
Vertu PC Suite
Vertu PC Suite includes the following features to extend the functionality of your Vertu
phone:
• Backup/Restore - enables you to create a backup from your Vertu phone on a
PC. You can also move data between different phones.
• Synchronise - enables you to synchronise contacts, calendar items, notes and emails between your Vertu phone and PC applications.
• Connect to the Internet - enables you to connect your PC to the internet using
your Vertu phone. For details, see Using your Vertu phone as a modem in
Settings.
• File manager - enables you to browse files on your Vertu phone, and transfer files
between your phone and PC.
22
• Contacts - enables your to create contacts on your PC and save them to your
Vertu phone.
• Messages - enables you to create and send text messages using your PC.
• Transfer music - enables you to rip CDs, create music files and transfer music to
your Vertu phone.
• Store images - enables you to store images and videos from your Vertu phone on
your PC.
• View multimedia - enables you to play and convert multimedia files.
• Install applications - enables you to install Java applications on your Vertu
phone.
Installing Vertu PC Suite
To install Vertu PC Suite:
1. Insert the CD-ROM into your computer’s CD-ROM drive.
2. Select your preferred language.
3. In the Vertu PC Suite section, click the Install Now button.
4. Follow the on-screen instructions to install Vertu PC Suite on your computer.
Installing iSync plug-in
To install iSync plug-in:
1. Insert the CD-ROM into your computer’s CD-ROM drive.
2. Select your preferred language.
3. In the iSync plug-in section, click the Install Now button.
4. Follow the on-screen instructions to complete the installation.
Map Loader application
To install the Map Loader application:
1. Insert the CD-ROM into your computer’s CD-ROM drive.
2. Select your preferred language.
3. In the Map Loader section, click the Install Now button.
4. A link to the Map Loader web page is opened.
5. Follow the on-screen instructions to complete the installation.
Getting started
Connecting to a computer
You can connect your Vertu phone to a computer using either your Vertu data cable
(CA-101V) or Bluetooth.
For information on connecting your Vertu phone to a computer using the data cable,
see Data cable in Accessories.
For information on using Bluetooth, see Bluetooth in Settings.
23
Security
5. Enter the new PIN code again for verification, then select OK. A confirmation
message is displayed.
Security
PIN2 code
The PIN2 code is used to protect the advanced user functions of your SIM card, for
example, fixed dialling. The PIN2 code must not be the same as the PIN code.
Your Vertu phone has a number of security features that help to prevent:
• Unauthorised use of your Vertu phone when your SIM card is inserted.
• Unauthorised use of your Vertu phone if a different SIM card is inserted.
• Unauthorised use of your SIM card in another phone.
PIN code
The (4 to 8 digit) PIN (Personal Identification Number) code helps protect your SIM
card against unauthorised use. When the PIN code security feature is active, you
need to enter the PIN code each time you switch on your Vertu phone. If you
previously used your SIM card in another phone, the code will be the same.
IMPORTANT: The SIM card will be blocked if you enter an incorrect PIN
code three times in succession.
If this happens, you will need to contact your service provider to obtain the
PUK (PIN Unblocking Key), and enter this on your phone.
The PUK cannot be changed. If you enter an incorrect PUK 10 times in
succession, your SIM card will be permanently blocked.
NOTE: The default setting for the PIN code security feature is defined by
your service provider. Some service providers do not allow you to disable
the PIN code request.
To activate or deactivate the PIN code security feature:
1. From the Home screen, select Menu > Settings > Security.
2. Select PIN code request.
3. Select On to enable the PIN code request, or Off to disable it.
4. Enter the PIN code, then select OK. A confirmation message is displayed.
To change the PIN code:
1. From the Home screen, select Menu > Settings > Security.
2. Select Access codes > Change PIN code.
3. When prompted, enter the current PIN code, then select OK.
4. When prompted, enter the new PIN code, then select OK.
24
NOTE: The PIN2 code is supplied with some SIM cards. For more
information, contact your service provider.
To change the PIN2 code:
1. From the Home screen, select Menu > Settings > Security.
2. Select Access codes > Change PIN2 code.
3. When prompted, enter the current PIN2 code, then select OK.
4. When prompted, enter the new PIN2 code, then select OK.
5. Enter the new PIN2 code again for verification, then select OK. A confirmation
message is displayed.
IMPORTANT: The PIN2 protected features of your SIM card will be blocked
if you incorrectly enter your PIN2 code a number of times, normally after
three consecutive attempts.
If this happens, you will need to contact your service provider to obtain the
PUK2 (PIN2 Unblocking Key). Enter this on your phone to unblock the PIN2
code and restore your SIM card’s full functionality.
Security
Call barring
NOTE: Call barring is only available if it is supported by your service
provider.
4. When prompted, enter the new barring password, then select OK.
5. Enter the new barring password again for verification, then select OK. A
confirmation message is displayed.
Call barring is a network service that allows you to restrict the incoming and outgoing
calls that you receive and make. Contact your service provider for more information
about using this feature.
When outgoing calls are barred, calls may still be possible to the emergency
number(s) programmed into your Vertu phone.
You need to enter the barring password to set up call barring. To obtain this password,
contact your service provider.
To activate or deactivate call barring:
1. From the Home screen, select Menu > Settings > Security.
2. Select Call barring service.
3. Select an option from the following:
• Outgoing calls - to bar all outgoing calls.
• International calls - to bar all international calls.
• Intl. except to home - to bar all international calls with the exception of calls
made to your home country (defined by your service provider) if abroad.
• Incoming calls - to bar all incoming calls.
• Incoming if abroad - to bar all incoming calls when you are abroad.
4. Select Activate to activate the barring, or Cancel to deactivate it.
TIP: To view the current status of the selected barring, select Check
status.
5. Enter the barring password, then select OK. A confirmation message is
displayed.
To deactivate all call barrings at the same time:
1. From the Home screen, select Menu > Settings > Security.
2. Select Call barring service.
3. Select Cancel all barrings.
4. Enter the barring password, then select OK.
To change the barring password:
1. From the Home screen, select Menu > Settings > Security.
2. Select Access codes > Change barring pass.
3. When prompted, enter the current barring password, then select OK.
25
Security
Fixed dialling
NOTE: Fixed dialling is only available if it is supported by your service
provider.
Fixed dialling is a network service that allows you to restrict outgoing calls to only the
numbers you specify in a fixed dialling list. Contact your service provider for more
information about using this feature.
When fixed dialling is active, it may still be possible to call emergency numbers
programmed in your Vertu phone, for example 112 and 911, or other official
emergency numbers.
NOTE: You will need to enter the PIN2 code to save and edit numbers in the
fixed dialling list, or to call numbers not in the list.
NOTE: When fixed dialling is on, GPRS connections are not possible
except while sending text messages over a GPRS connection. In this case,
the recipient’s phone number and the message centre number must be
included in the fixed dialling list.
NOTE: You cannot access the SIM memory manually (view or copy
numbers on the SIM card) while fixed dialling is active.
To activate or deactivate fixed dialling:
1. From the Home screen, select Menu > Settings > Security.
2. Select Fixed dialling.
3. Select the required option from the following:
• On - to restrict calls to the fixed dialling list.
• Off - to deactivate fixed dialling.
4. Enter the PIN2 code, then select OK.
To add numbers to the fixed dialling list:
TIP: You will need to activate fixed dialling before you can view or modify
the fixed dialling list.
1.
2.
3.
4.
26
From the Home screen, select Menu > Settings > Security.
Select Fixed dialling.
Select Number list.
Enter the PIN2 code, then select OK.
5. Add a number using one of the following methods:
• Enter a number manually, then select OK. Enter a name for the number, then
select OK.
• Select Search, then select a name from your list of contacts.
6. To add additional numbers to the list, select Options > Add, enter the PIN2
code, then add numbers as before.
7. Select Back when you have completed the list.
To modify the fixed dialling list:
1. From the Home screen, select Menu > Settings > Security.
2. Select Fixed dialling.
3. Select Number list.
4. Select Options, then select an option from the following:
• Add - to add a number to the list.
• Edit - to edit the highlighted entry.
• Delete - to delete the highlighted entry.
• Delete all - to delete all entries in the list.
5. Enter the PIN2 code.
6. Confirm deletions if prompted.
7. Select Back when you have finished modifying the list.
TIP: You can copy an entry from the fixed dialling list to Contacts by
selecting Options > Copy number.
TIP: You can call a number from the fixed dialling list by selecting Options
> Voice call.
Security
Closed user group
NOTE: Closed user groups are only available if they are supported by your
service provider.
A closed user group is a network service that allows you to specify a group of people
you can call and who can call you. Contact your service provider for more information
about using this feature.
NOTE: When outgoing calls are limited to closed user groups, calls may be
possible to the emergency numbers programmed in your Vertu phone, for
example 000, 08, 110, 112, 118, 119, 911 and 999, or other official
emergency numbers.
To enable or disable a closed user group:
1. From the Home screen, select Menu > Settings > Security > Closed user
group.
2. Select an option from the following:
• On - to enable the closed user group.
• Off - to disable the closed user group.
• Default - to specify that the people included in the group, which you have
agreed with the service provider, can call you and you can call them.
3. If you are enabling a closed user group, enter the group number when prompted,
then select OK. A confirmation message is displayed.
Security code
The security code helps protect your Vertu phone from unauthorised use. You will
need to enter this security code before you can do the following:
• Switch on the phone when a new SIM card is inserted (if you have set up security).
• Delete all contacts.
• Clear the call timers.
• Restore the workshop settings.
• Change the security level.
• Change the security code.
The first time you access a feature that requires the security code, you will be
prompted to create the security code.
To create the security code:
1. From the Home screen, select Menu > Settings > Security > Access codes >
Create security code.
2. When prompted, enter the required security code (between 5 - 10 digits long),
then select OK.
3. Enter the security code again for verification, then select OK. A confirmation
message is displayed.
NOTE: Make a note of the security code, and ensure you keep it secret and
in a safe place.
NOTE: If you enter an incorrect security code five times in succession, your
Vertu phone will not accept the correct security code for the next five
minutes. Within that five minutes, your Vertu phone will show an error when
you attempt to enter the security code, even if it is correct.
Security level
The security level feature allows you to specify when you are required to enter the
security code.
To change the security level:
1. From the Home screen, select Menu > Settings > Security > Security level.
2. Select an option from the following:
• None - to disable the security code and allow any SIM card to be used in the
phone.
• Memory - to allow any SIM card to be used in the phone, but require entry of
the security code to access your Vertu phone’s directory after a different SIM
card has been inserted.
27
Security
• Phone - to require entry of the security code when you switch on the phone
after inserting a different SIM card.
3. When prompted, enter the security code, then select OK.
NOTE: If you change the security level, the numbers in the Call history will
be deleted.
Browser security
Security features may be required for some services, for example online banking or
shopping. For such connections you need security certificates and possibly a
security module, which may be available on your SIM card. For more information,
contact your service provider.
This icon is displayed during a secure browsing session.
Security keyguard
To set your Vertu phone to request the security code when you unlock the keyguard:
1. From the Home screen, select Menu > Settings > Phone > Security keyguard.
2. Select On.
3. Enter the security code, then select OK.
This icon is displayed during an unsecured browsing session.
Certificates
Certificates can be used for making secure connections through a browser or for
authenticating a downloaded application.
There are three kinds of certificates:
• authority certificates - these can be used for authenticating downloaded
applications, authenticating other authority certificates and for authenticating
servers. They may be pre-installed, or can be downloaded while browsing.
• user certificates - these are used for client authentication and/or making a digital
signature. This means that user certificates can be used to prove the identity of a
given user over a wireless connection. User certificates can also be used for
encrypting and digitally signing information, thus ensuring the confidentiality and
integrity of mobile transactions. They may be pre-installed in the security module
(see Security module), or can be downloaded while browsing.
• server certificates - these may be sent by the server to the phone in case of server
authenticated (in contrast to anonymous) secure connection establishment.
When received, the validity of the certificates is checked using the local time and
authority certificates stored locally.
To view the lists of authority certificates and user certificates stored in your Vertu
phone:
1. From the Home screen, select Menu > Settings > Security > Authority
certificates/User certificates.
2. Select View.
To select the purpose of authority certificates stored in your Vertu phone:
IMPORTANT: Before changing any certificate settings, you must make
sure that you trust the owner of the certificate and that the certificate
belongs to the listed owner.
28
Security
1. From the Home screen, select Menu > Settings > Security > Authority
certificates.
2. Select Options > Select use > Apps. signing/Cross-certification/Server
authentic. as required.
Security module
When available on your SIM card, the security module improves security services for
applications requiring a browser connection, and allows you to use a digital signature.
The security module may contain certificates as well as private and public keys.
NOTE: The certificates are saved in the security module by your service
provider. The security module is not supplied by Vertu.
To view or change the security module settings:
From the Home screen, select Menu > Settings > Security > Security module sett.
Digital signatures
You can make digital signatures with your Vertu phone if your SIM card has a security
module. Using a digital signature is similar to signing your name to a paper bill,
contract, or other document.
NOTE: You need to know your signing PIN to make digital signatures. If this
is not provided with your SIM card, contact your service provider for further
information.
To make a digital signature:
1. Select a link on a page, for example, the title of the book you want to buy and its
price. The text to sign, which may include the amount and date, is shown.
2. Check that the header text is Read, and that the digital signature icon (
)
is displayed. If the digital signature icon does not appear, there is a security
breach and you should not enter any personal data, including your signing PIN.
3. Read all of the text. The text may not fit within a single screen so you may need
to scroll through it.
4. Select Sign.
5. Select the user certificate to sign with.
6. Enter and confirm the signing PIN. The digital signature icon disappears, and the
service may display a confirmation.
29
Call functions
Call functions
Making a call
Before making a call, check that you have a good signal and the battery is charged.
Making a call from the Home screen
To make a call from the Home screen:
1. Using the keypad, enter the phone number to call.
TIP: When calling international numbers, press
the
-key twice to display a + sign.
To make an emergency call:
1. Press and hold the End key in order to return to the Home screen.
2. Enter a valid emergency number, for example 000, 08, 110, 112, 118, 119, 911
or 999.
WARNING: Emergency numbers vary by location and those listed above
may not be supported by your service provider.
3. Press the Send key.
NOTE: When making an emergency call, remember to give all the
necessary information as accurately as possible.
NOTE: Remember that your phone may be the only means of
communication at the scene of an accident – do not end the call until you
are sure that it is appropriate to do so.
Making a call from Contacts
2. Press the Send key.
To make a call from Contacts:
1. From the Home screen, select Names or Menu > Contacts > Names.
2. Scroll to the required contact, then select Details.
3. Scroll to the required number, then select Call.
Making a call from the Call history
Making an emergency call
WARNING: Your Vertu phone, like any wireless phone, operates using
radio signals, wireless and land line networks as well as user-programmed
functions. Because of this, connections in all conditions cannot be
guaranteed. Therefore, you should never rely solely upon any wireless
phone for essential communications, for example medical emergencies.
WARNING: If certain features are in use, you may need to turn them off
before you can make an emergency call. For more information, contact
your service provider
WARNING: Some networks require a valid SIM card to be inserted in the
phone in order to make an emergency call.
30
To make a call from the Call history:
1. From the Home screen, select Menu > Call history.
2. Select All calls.
TIP: You can view only missed, received or dialled calls if required. For
details, see Call history.
3. Scroll to the required name or number, then select Call.
Calling the last dialled number
To call the last dialled number, press the Send key twice.
TIP: If you have a headset connected, you can call the last dialled number
by pressing the headset button twice.
Call functions
Automatic redialling
Occasionally, a call may not connect because your network is experiencing heavy
traffic, or the called party is busy. With the automatic redial feature activated, your
Vertu phone redials the number up to 10 times, and notifies you when the network is
available.
To activate automatic redial:
1. From the Home screen, select Menu > Settings > Call > Automatic redial.
2. Select On.
Making a call using voice dialling
Using voice recognition, your Vertu phone can dial contacts and access menu items
using voice commands. These commands are not dependent on the speaker’s voice
so you do not need to record voice tags in advance.
TIP: Voice dialling works best for long unique names.
To make a call to a contact using voice dialling:
1. From the Home screen, press and hold the Right selection key until you hear a
tone.
TIP: If you have a headset connected, press and hold the headset button
until you hear a tone.
2. Speak the name of the contact to call.
3. Select the required contact from the displayed list. Your Vertu phone
automatically dials the number.
TIP: If you do not select a contact from the list within five seconds, the first
option is automatically dialled.
TIP: If the contact you want to call is not listed, select Quit to exit voice
dialling.
For information on setting up voice recognition, see Voice recognition in Settings.
Speed dialling
Speed dialling enables you to quickly dial numbers from the Home screen. You can
save up to eight numbers in your speed dial list.
Activating speed dialling
To activate speed dialling:
1. From the Home screen, select Menu > Settings > Call > Speed dialling.
2. Select On.
Adding a number to the speed dial list
To add a number stored in your contacts to the speed dial list:
1. From the Home screen, select Names or Menu > Contacts > Names.
2. Select the required contact.
3. Scroll to the required number, then select Options > Speed dial.
4. Select the speed dial number to assign to the phone number. A confirmation
message is displayed.
NOTE: The speed dial number 1 is reserved for calling your voice mailbox
number as a speed dial.
To add a new number to the speed dial list:
TIP: This method enables you to save a new phone number in your
contacts at the same time as adding it to the speed dial list.
1. From the Home screen, press Menu > Contacts > Speed dials.
2. Select the speed dial number to assign.
3. Enter the phone number, then select OK.
TIP: You can also select Search to select a phone number stored in your
contacts.
4. Enter details of the contact, then select Save. Confirmation messages are
displayed.
31
Call functions
Making a call using speed dialling
To make a call using speed dialling:
From the Home screen, simply press and hold the numeric key assigned to the
required phone number.
Receiving a call
Answering a call
To answer an incoming call:
Press the Send key or select Answer.
Deleting a speed dial
To delete a speed dial:
1. From the Home screen, press Menu > Contacts > Speed dials.
2. Scroll to the speed dial to delete, then select Options > Delete.
3. Select Yes to confirm the deletion. A confirmation message is displayed.
TIP: If you have a headset connected, you can answer an incoming call by
pressing the headset button.
Anykey answer
With the Anykey answer feature activated, you can answer an incoming call by
pressing any key except the Power key, selection keys and End key.
To activate Anykey answer:
1. From the Home screen, select Menu > Settings > Call > Anykey answer.
2. Select On.
Automatic answer
With the Automatic answer feature activated, calls are automatically answered when
a handsfree accessory is connected.
To activate Automatic answer:
1. From the Home screen, select Menu > Settings > Accessories.
2. Select the handsfree accessory.
3. Select Automatic answer.
4. Select On. The automatic answer icon is displayed on the Home screen.
Rejecting a call
To reject an incoming call:
Press the End key.
TIP: If you have a headset connected, you can reject an incoming call by
pressing the headset button twice.
32
Call functions
Ending a call
In-call options
To end a call, press the End key.
Adjusting volume
TIP: If you have a headset connected, you can end a call by pressing the
headset button.
To adjust the volume while in a call:
Move the Joystick up to increase the volume, and down to
decrease the volume.
The Volume screen is displayed while you adjust the
volume.
Putting a call on speakerphone
To put a call on speakerphone, select Loudsp.
To switch off the speakerphone, select Handset.
Putting a call on hold
To put a call on hold, press the Send key or select Options > Hold. A notification is
displayed.
To unhold the call, press the Send key or select Unhold.
Muting a call
To mute a call, select Options > Mute. The call muted icon is displayed.
To unmute the call, select Unmute.
Putting a call on handsfree
When your Vertu phone is connected to a handsfree accessory, select Options >
Headset/Handsfree.
To switch the call back to the phone, select Options > Handset.
33
Call functions
Voice clarity
This feature improves the sound quality during calls, and is useful when in noisy
environments.
To activate voice clarity while in a call, select Options > Voice clarity > Active.
TIP: You can also activate voice clarity via the main menu by selecting
Menu > Settings > Call > Voice clarity > Active.
TIP: You can access the main menu while in a call by selecting Menu.
TIP: The following options are also available while in a call:
• Volume - see Adjusting volume for details.
• Contacts.
• Lock keypad.
• Record - to start recording the call. Voices of all parties in the call are
recorded.
• Send DTMF - to send Dual Tone Multi Frequency (DTMF) signals. These
are tones that can be used to access services such as voice mailboxes
and automated billing systems.
Multiparty calls
Making a second call
To make a call while already in a call:
1. Select Options > New call.
2. Enter the second number, or select Search to use a number from your contacts.
3. Select Call. The first call is put on hold.
Answering or rejecting a second call
To answer an incoming call while already in a call, press the Send key or select
Answer. The first call is put on hold.
To reject an incoming call while already in a call, select Reject.
NOTE: To interact with a second call, Call waiting needs to be active. For
information on activating Call waiting, see Call waiting.
Swapping between calls
To swap between calls, press the Send key or select Swap.
Creating a conference call
A conference call can be created when you have two calls on your Vertu phone - one
that is active and one that is held. By creating a conference call, the separate calls are
joined together. Each party is then able to talk with the others.
To create a conference call, select Options > Conference.
Adding a party to a conference call
To add a new party to an ongoing conference call:
1. Make a second call. See Making a second call for details. The conference call
is put on hold.
2. When the second call has connected, select Options > Add to conference.
Having a private conversation with a conference call party
To have a private conversation with a conference call party, you need to separate that
party from the conference call. To do this:
1. Select Options > Private call.
2. Select the party with whom you want to have a private conversation.
34
Call functions
Transfer
Call settings
If you have an active call and a held call on your Vertu phone, and if this functionality
is supported by your service provider, you can use the Transfer feature. This feature
connects the other parties of the active and held calls together in one call. Your calls
with both parties are ended.
To transfer calls, select Options > Transfer.
Call divert
The call divert feature enables you to divert incoming calls to another phone number
or mailbox if you are not able to answer them. This ensures that no calls are missed.
NOTE: Call divert is only available if it is supported by your service provider.
To set up call divert:
1. From the Home screen, select Menu > Settings > Call > Call divert.
2. Select the conditions during which you would like to divert incoming calls from
the following:
• All voice calls - to divert all calls.
• If busy - to divert calls when you are already in a call.
• If not answered - to divert calls when you cannot answer them.
• If out of reach - to divert calls when your Vertu phone is switched off or out of
network coverage.
• If not available - to divert calls if they are not answered, if you are already in a
call, or if your phone is switched off or out of network coverage.
TIP: To cancel all call diverts, select No call diverts.
3. Select Activate.
TIP: To view the current status of the divert, select Check status. The
current status is displayed. To view the number that calls are diverted to,
select Number.
TIP: To cancel this divert, select Cancel.
4. If you have activated the call divert for the option If not answered or If not
available, select the time after which the divert should occur.
NOTE: Cancelling all call diverts may affect the ability to receive voice mail
messages.
35
Call functions
NOTE: Your service provider may not allow you to cancel all call diverts.
Contact your service provider for further information.
Call waiting
Call waiting notifies you of an incoming call while you are in another call. You can then
answer or reject the second call. For information on how to answer or reject a second
call, see Answering or rejecting a second call.
NOTE: Call waiting is only available if it is supported by your service
provider.
To set up call waiting:
1. From the Home screen, select Menu > Settings > Call > Call waiting.
2. Select Activate.
TIP: To view the current status of call waiting, select Check status.
TIP: To cancel call waiting, select Cancel.
Call duration display
This feature displays the call duration during each call.
To activate the Call duration display feature:
1. From the Home screen, select Menu > Settings > Call > Call duration display.
2. Select On.
Summary after call
This feature displays the call duration after each call.
To activate the Summary after call feature:
1. From the Home screen, select Menu > Settings > Call > Summary after call.
2. Select On.
36
Send my caller ID
This feature enables call recipients to view your phone number on their phone when
you call them.
To change the caller ID setting:
1. From the Home screen, select Menu > Settings > Call > Send my caller ID.
2. Select one of the following options:
• Set by network - to use the default setting supplied by your service provider.
• Yes - to show your phone number to all call recipients.
• No - to hide your phone number from all call recipients.
Call functions
Call history
Clearing log lists
The Call history feature displays information about calls that you have missed,
received and made recently. You can also view information about message
recipients, packet data, and the number of messages sent and received.
Call history entries are displayed in chronological order. New entries are added to the
top of the lists, with older entries moved down a position. If a new entry is added to a
full list, the last entry in the list is removed.
To clear log lists:
1. From the Home screen, select Menu > Call history > Clear log lists.
2. Select All call lists/Missed calls/Received calls/Dialled numbers/Message
recipients as required.
Viewing recent call information
NOTE: Lists are cleared immediately without confirmation requests. When
lists have been cleared, the information cannot be recovered.
Viewing call duration
To view recent call information:
From the Home screen, select Menu > Call history > All calls/Missed calls/
Received calls/Dialled numbers as required.
Viewing message recipients
To view information about the duration of calls made and received by your Vertu
phone:
1. From the Home screen, select Menu > Call history > Call duration.
2. Select Last call/Received calls/Dialled calls/All calls as required.
TIP: To clear all call duration lists, select Clear timers. You need to enter
the security code. For information about the security code, see Security
code in Security.
To view details of message recipients:
From the Home screen, select Menu > Call history > Msg. recipients.
37
Call functions
Viewing packet data counters
Viewing the message log
To view information about the volume of packet data (in bytes) sent and received:
1. From the Home screen, select Menu > Call history > Data counter.
2. Select the required item.
To view information about the number of messages of each type sent and received:
1. From the Home screen, select Menu > Call history > Message log.
2. Select the required item.
NOTE: SMS messages sent over the General Packet Radio Service
(GPRS) are not included in packet data counters or timers.
TIP: To clear all packet data counters, select Clear counters. You need to
enter the security code. For information about the security code, see
Security code in Security.
TIP: To clear all message counters, select Clear all counters. You need to
enter the security code. For information about the security code, see
Security code in Security.
Viewing the positioning log
Viewing packet data timers
To view information about the duration of GPRS sessions:
1. From the Home screen, select Menu > Call history > Data timer.
2. Select the required item.
The network that you are connected to may send you position requests. For
information about positioning requests, contact your service provider.
To view the most recent positioning requests:
From the Home screen, select Menu > Call history > Positioning > Position log.
Viewing the synchronisation log
TIP: To clear all call duration lists, select Clear timers. You need to enter
the security code. For information about the security code, see Security
code in Security.
The synchronisation log stores statistics about the data that has been transferred
when synchronising your Vertu phone with a computer or server.
To view the synchronisation log:
From the Home screen, select Menu > Call history > Sync log.
38
Text input
Input modes
Predictive text input mode
Your Vertu phone has three text input modes:
• Traditional (multipress) text input mode.
• Predictive text input mode (T9).
• Numeric input mode.
Traditional text input mode and predictive text input mode are used for text entry.
Numeric input mode is used for number entry.
When you move the cursor into a field that requires you to enter text or numbers, an
appropriate input method will be automatically selected.
Predictive text input mode enables you to enter text more quickly than by using
traditional text input mode. Instead of having to press keys multiple times to enter
characters, you can enter text using only one keypress for each character.
Predictive text input mode uses a large intelligent database to predict the word that
you wish to enter. Prediction is based on the number and combination of your
keypresses. If several words match the keypresses, you can select the required word
from those listed by the prediction feature.
Traditional text input mode
To enter text using predictive text input mode:
1. Press the key that represents the first character of the required text. The phone
suggests the most probable character. The word that is being entered is
underlined to indicate that it is active and may change as more characters are
added.
2. Press the keys that represent the next characters of the word. The phone
displays its prediction of the word. The prediction usually becomes more
accurate as you enter more characters. To view alternative matches, press the
-key.
3. When the required word is displayed, press the
-key to confirm the word and
enter a space. The underline is removed. You can then begin a new word.
Text input
Each key of your phone keypad represents multiple characters. For details of keycharacter mapping, see Key-character mapping.
Using traditional text input mode, you enter a character by repeatedly pressing the
key that represents the required character until that character is displayed.
To enter multiple characters using the same key, you need to pause between each
character until the cursor is displayed.
Entering text
TIP: To enter a number without changing to numeric input mode, press and
hold the key for the required number.
TIP: To enter a compound word, enter the first part of the word, then scroll
right to confirm it. Write the next part of the word, then confirm again.
TIP: If ? is displayed at the end of the word, then it could not be matched
with the predictive text database. You can add the word to the database by
selecting Spell, entering the word using traditional text input mode, then
selecting Save.
39
Text input
Adding words to the predictive text database
You can add words to the predictive text database when there is no match during text
entry (see previous section for details). You can also add new words via the menu
during text entry:
To add new words to the predictive text database:
1. While in a text entry field, select Options > Prediction options > Insert word.
2. Enter the new word using traditional text input mode, then select Save.
TIP: Upper case characters, web addresses and smileys (emoticons) can
all be saved to the predictive text database.
Numeric input mode
Using numeric input mode, you press a key to enter the corresponding number.
Typically the input mode changes to numeric input mode for fields that contain phone
numbers.
Mode indicators
When the cursor is in a text entry field, one of the following text input mode indicators
will be displayed at the top left of the screen:
•
- Traditional text input mode, initial letter is upper case and subsequent
letters are lower case.
•
- Traditional text input mode, upper case.
•
- Traditional text input mode, lower case.
•
- Predictive text input mode, initial letter upper case, subsequent letters
lower case.
•
- Predictive text input mode, upper case.
•
- Predictive text input mode, lower case.
•
- Numeric input mode.
40
Changing input modes
To change to traditional text input mode:
Press and hold the
-key, then select Prediction off
or
select Options > Prediction options > Status > Off.
To change to predictive text input mode:
Press and hold the
-key, then select Prediction on
or
select Options > Prediction options > Status > On.
TIP: You can toggle between traditional text input mode and predictive text
input mode by pressing and holding the Left selection key (Options).
TIP: You can toggle between traditional text input mode and predictive text
input mode by pressing the
-key twice within 0.3 seconds.
To change to numeric input mode:
Press and hold the
-key, then select Number mode.
To change between initial upper case, all upper case and all lower case sub-modes,
press the
-key.
TIP: For fields in which letters and numbers are both commonly entered,
you can also access numeric input mode by pressing the
-key.
More tips on text entry
To delete characters one by one, select Clear.
To delete all characters in a field, select Options > Clear field.
To enter a special character while in traditional text input mode or numeric input
mode, press the
-key, then select the required character.
To enter a special character while in predictive text input mode, press and hold the
-key, then select the required character.
To enter a smiley while in traditional text input mode or numeric input mode:
1. Press the
-key.
2. Select Next.
3. Select the required smiley.
Text input
To enter a smiley while in predictive text input mode:
1. Press and hold the
-key.
2. Select Next.
3. Select the required smiley.
Key-character mapping
English
Key
Changing writing language
To enter text in a different language without changing the language of the phone:
1. Press and hold the
-key.
2. Select Writing language.
3. Select the required language.
For information on changing the language of the phone, see Language settings in
Settings.
Upper case
Lower case
.,'?!"1-()@/:_
.,'?!"1-()@/:_
ABC2ÄÆÅÀÁÂÃÇ
abc2äæåàáâãç
DEF3ÈÉÊËÐ
def3èéêëð
GHI4ÌÍÎÏ
ghi4ìíîï
JKL5£
jkl5£
MNO6ÖØÒÓÔÕÑ
mno6öøòóôõñ
PQRS7$
pqrs7ß$
TUV8ÙÚÛÜ
tuv8ùúûü
WXYZ9ÝÞ
wxyz9ýþ
.,'?!"-()@/:_;+&%*=<>£€ .,'?!"-()@/:_;+&%*=<>£€
$¥¤[]{}\~^`¡¿§#| ↵
$¥¤[]{}\~^`¡¿§#| ↵
0↵
0↵
French
Key
Upper case
Lower case
.,?!'"1-()@/:_
.,?!'"1-()@/:_
ABC2ÀÂÆÇÄÁÃ
abc2àâæçäáã
DEF3ÉÈÊË
def3éèêë
GHI4ÏÎÌÍĞİ
ghi4ïîìíğı
JKL5
jkl5
MNO6ÔŒÖÑÒÓØ
mno6ôœöñòóø
PQRS7$
pqrs7ß$
TUV8ÛÙÜÚ
tuv8ûùüú
WXYZ9
wxyz9
41
Text input
Key
Upper case
Lower case
Key
.,'?!"-()@/:_;+&%*=<>£€ .,'?!"-()@/:_;+&%*=<>£€
$¥¤[]{}\~^`¡¿§#| ↵
$¥¤[]{}\~^`¡¿§#| ↵
0↵
0↵
pqrs7ß$
TUV8ÙÚÜÛ
tuv8ùúüû
WXYZ9ÝÞ
wxyz9ýþ
Lower case
.,?!'"1-()@/:_
.,?!'"1-()@/:_
ABC2ÄÀÁÃÂÅÆÇ
abc2äàáãâåæç
Spanish
DEF3ÈÉËÊÐ
def3èéëêð
Key
GHI4ÌÍÎÏ
0↵
0↵
Upper case
Lower case
ghi4ìíîï
., ¿?¡!'"1-()@/:_
., ¿?¡!'"1-()@/:_
JKL5£
jkl5£
ABC2ÁªÀÂÃÄÅÆÇ
abc2áªàâãäåæç
MNO6ÖÒÓÔÕØÑ
mno6öòóôõøñ
DEF3ÈÉËÊÐ
def3èéëêð
PQRS7$
pqrs7ß$
GHI4ÍÎÏÌ
ghi4íîïì
TUV8ÜÙÚÛ
tuv8üùúû
JKL5£
jkl5£
WXYZ9ÝÞ
wxyz9ýþ
MNO6ÑÓºÖÔÒÕØ
mno6ñóºöôòõø
PQRS7$
pqrs7ß$
TUV8ÚÜÙÛ
tuv8úüùû
WXYZ9ÝÞ
wxyz9ýþ
0↵
0↵
Italian
42
PQRS7$
Upper case
.,'?!"-()@/:_;+&%*=<>£€ .,'?!"-()@/:_;+&%*=<>£€
$¥¤[]{}\~^`¡¿§#| ↵
$¥¤[]{}\~^`¡¿§#| ↵
Key
Lower case
.,'?!"-()@/:_;+&%*=<>£€ .,'?!"-()@/:_;+&%*=<>£€
$¥¤[]{}\~^`¡¿§#| ↵
$¥¤[]{}\~^`¡¿§#| ↵
German
Key
Upper case
Upper case
Lower case
.,?!'"1-()@/:_
.,?!'"1-()@/:_
ABC2ÀÁÄÂÃÅÆÇ
abc2àáäâãåæç
DEF3ÈÉËÊÐ
def3èéëêð
GHI4ÌÍÏÎ
ghi4ìíïî
JKL5£
jkl5£
MNO6ÒºÓÖÔÕØÑ
mno6òºóöôõøñ
.,¿?¡!ªº'"-()@/:_;+&%*=< .,¿?¡!ªº'"-()@/:_;+&%*=<
>£€$¥¤[]{}\~^` §#| ↵
>£€$¥¤[]{}\~^` §#| ↵
0↵
0↵
Contacts
Contacts
You can use the Contacts feature to store phone numbers, e-mail addresses, home
addresses, and other information relating to a contact. You can also add an image or
assign a ring tone to a contact.
NOTE: Some features are only available if the contact is stored on your
Vertu phone. See Contacts memory for information about the differences
between contacts stored on your Vertu phone or on the SIM card.
Saving a new contact
To save a new contact on your Vertu phone:
1. From the Home screen, select Menu > Contacts.
2. Select Add new.
3. Enter the details of the new contact.
4. Select Save. The contact details are displayed after a confirmation message.
5. Select Done.
TIP: You can also save a new contact from the Home screen. To do this:
1. Enter a number, then select Save.
2. Select the number type.
3. Enter a name for the contact, then select Save.
TIP: If someone whose phone number isn’t stored in Contacts calls you,
you can create a contact for that person. To do this:
1. Scroll to the required number in the Call history, then select Options >
Save. For information on the Call history, see Call history in Call
functions.
2. Enter a name for the contact, then select Save.
Adding an image to a contact
When you add an image to a contact, that image is displayed when you call the
contact or the contact calls you.
To add an image to a contact:
1. From the Home screen, select Names or Menu > Contacts > Names.
2. Scroll to the required contact, then select Details.
3. Select Options > Add image or Options > Add detail > Multimedia > Image.
4. To add an image that is stored on your Vertu phone, select Open Gallery, then
select the required image
or
select New image to start the camera and take a photo to use.
The updated contact details are displayed after a confirmation message.
TIP: For information on accessing images in the Gallery, see Gallery files
in Gallery.
TIP: For information on taking photos, see Taking a photo in Camera.
Personalising the ring tone
When you add a ring tone to a contact, that tone is played when the contact calls you.
To personalise the ring tone for a contact:
1. From the Home screen, select Names or Menu > Contacts > Names.
2. Scroll to the required contact, then select Details.
3. Select Options > Add detail > Multimedia > Tone.
4. To add a tone that is stored in the Gallery on your Vertu phone, select Open
Gallery, then select the required tone
or
to add a ring tone that you have downloaded, select Tone downloads > Ringing
tones, then select the required tone.
The updated contact details are displayed after a confirmation message.
43
Contacts
TIP: For information on accessing tones in the Gallery, see Gallery files in
Gallery.
TIP: For information on accessing web pages, see the Web section.
Saving multiple phone numbers for a contact
You can save a maximum of five phone numbers for a contact. These can be any
combination of the following types - General, Mobile, Home, Work, Fax. For
example you can have two work phone numbers and three mobile phones numbers
stored for a contact.
To add a phone number to a contact:
1. From the Home screen, select Names or Menu > Contacts > Names.
2. Scroll to the required contact, then select Details.
3. Select Options > Add detail > Number, then select the required number type.
4. Enter the number, then select Save. The contact details are displayed after a
confirmation message.
TIP: You can also add a phone number to a contact from the Home screen.
To do this:
1. Enter a number, then select Options > Add to contact.
2. Scroll to the required contact, then select Add.
3. Select the number type.
TIP: To change the number type:
1. From the Home screen, select Names or Menu > Contacts > Names.
2. Scroll to the required contact, then select Details.
3. Scroll to the required number.
4. Select Options > Change type, then select the new number type.
44
Default phone number
The first number saved for a contact is automatically set as the default phone number.
When you call or send a message to a contact without specifying which phone
number to use, this default number is used.
To change the default number:
1. From the Home screen, select Names or Menu > Contacts > Names.
2. Scroll to the required contact, then select Details.
3. Scroll to the phone number you want as the default, then select Options > Set
as default. The contact details are displayed after a confirmation message.
Adding information to a contact
You can save other information for a contact, such as postal address, birthday and email addresses, on your Vertu phone.
To add information to a contact:
1. From the Home screen, select Names or Menu > Contacts > Names.
2. Scroll to the required contact, then select Details.
3. Select Options > Add detail, then select the type of information you want to add.
4. Enter the information, then select Save. The contact details are displayed after a
confirmation message.
Finding contacts
To find a contact stored on your Vertu phone:
1. From the Home screen, select Names or Menu > Contacts > Names.
2. Enter the first letter of the name of the contact to find. The list of contacts is
filtered to display only the matching contacts.
3. Enter more letters of the contact’s name if needed. Select a contact to view the
details for that contact.
Contacts
Deleting contacts
Business cards
The business card feature enables you to send and receive contact information as a
multimedia message, a text message, or via Bluetooth.
Sending a business card in a multimedia message
To delete a contact:
1. From the Home screen, select Names or Menu > Contacts > Names.
2. Scroll to the required contact, then select Details.
3. Select Options > Delete > Delete contact.
4. Select Yes to confirm the deletion. The list of names is displayed after a
confirmation message.
To delete all contacts:
1. From the Home screen, select Menu > Contacts.
2. Select Del. all contacts.
3. Select whether to delete all contacts from the phone memory or from the SIM
card. For information on storing contacts on the SIM card, see Selecting the
memory to use.
4. Select Yes to confirm the deletion.
5. Enter the security code, then select OK. See Security code in Security for
information on the security code. A confirmation message is displayed.
To send a business card in a multimedia message:
1. From the Home screen, select Names or Menu > Contacts > Names.
2. Scroll to the required contact, then select Details.
3. Select Options > Send business card > Via multimedia.
4. If the contact details include more than one phone number and a ring tone, select
Default number to send only the default phone number
or
select All details to send all of the contact information.
5. Add a recipient to the message, then select Send. A confirmation message is
displayed when the business card has been sent.
For further information on multimedia messages, see Multimedia messages in
Messages.
Sending a business card in a text message
To send a business card in a text message:
1. From the Home screen, select Names or Menu > Contacts > Names.
2. Scroll to the required contact, then select Details.
3. Select Options > Send business card > Via text message.
4. If the contact details include more than one phone number, select Default
number to send only the default phone number
or
select All details to send all of the contact information.
NOTE: If the contact details include an image and/or ring tone, the image
and/or ring tone can only be sent in a business card as a multimedia
message or via Bluetooth.
5. Enter the phone number of the business card recipient, then select OK. A
confirmation message is displayed when the business card has been sent.
For further information on text messages, see Text messages in Messages.
45
Contacts
Sending a business card via Bluetooth
To send a business card via Bluetooth:
1. From the Home screen, select Names or Menu > Contacts > Names.
2. Scroll to the required contact, then select Details.
3. Select Options > Send business card > Via Bluetooth. Your Vertu phone will
search for nearby Bluetooth devices and display them in a list.
4. Select the device to which you want to send the business card. Your Vertu phone
connects to the device and sends the business card. A confirmation message is
displayed when the business card has been sent.
For further information on Bluetooth, see Bluetooth in Settings.
Receiving a business card
When you receive a business card, a notification is displayed.
To save a received business card:
1. Select Show to view the business card.
2. Select Save. A confirmation message is displayed.
To discard a received business card without saving it:
1. If you want to view the business card before discarding it, select Show.
2. Select Exit or press the End key.
3. Select Yes to discard the business card. A confirmation message is displayed.
Contacts memory
Contacts can be stored on your Vertu phone and on the SIM card.
Phone memory
You can store 2000 contacts in your Vertu phone’s memory.
Names and phone numbers have a maximum length of 50 characters.
Text fields have a maximum length of 60 characters.
SIM card memory
Contacts stored on the SIM card only have a single name and phone number.
Contacts stored on a USIM card can have a name, three phone numbers and an
e-mail address.
The number of contacts that can be stored on the SIM/USIM card and the number of
characters supported is determined by your service provider.
If you move the SIM card to another phone, your SIM contacts are moved as well.
Selecting the memory to use
To select the memory to be used by the Contacts feature:
1. From the Home screen, select Menu > Contacts.
2. Select Settings.
3. Select Memory in use.
4. Select an option from the following:
• Phone and SIM - to enable access to contacts stored on your Vertu phone and
the SIM card from the list of contacts. New contacts will be stored on the
phone.
• Phone - to enable access to contacts stored on your Vertu phone only from the
list of contacts. New contacts will be stored on the phone.
• SIM card - to enable access to contacts stored on the SIM card only from the
list of contacts. New contacts will be stored on the SIM card.
A confirmation message is displayed.
46
Contacts
NOTE: If you install a different SIM card in your Vertu phone, the memory
used is automatically reset to Phone and SIM.
Checking the memory status
To check the memory status:
1. From the Home screen, select Menu > Contacts.
2. Select Settings.
3. Select Memory status.
4. Select an option from the following:
• Phone - to view the memory status of your Vertu phone. The percentages of
free and used contacts memory are displayed.
• SIM card - to view the memory status of the SIM card. The number of contacts
stored on the SIM card and the number of contacts that can be added are
displayed.
NOTE: The memory capacity of the SIM card is determined by your service
provider.
Other Contacts settings
Setting the Contacts view
Your list of contact can be displayed in several different ways.
To set how Contacts are viewed:
1. From the Home screen, select Menu > Contacts.
2. Select Settings.
3. Select Contacts view.
4. Select an option from the following:
• Name list - to display your contacts as a list of names.
• Name and number - to display your contacts as a list of names with the default
number.
• Name and image - to display your contacts as a list of names with the
associated image.
A confirmation message is displayed.
Setting the name display
To set whether the first or last name is displayed first in your list of contacts:
1. From the Home screen, select Menu > Contacts.
2. Select Settings.
3. Select Name display.
4. Select First name first or Last name first as required. A confirmation message
is displayed.
Setting the font size
To set the font size for the list of contacts:
1. From the Home screen, select Menu > Contacts.
2. Select Settings.
3. Select Font size.
4. Select Normal font or Large font as required. A confirmation message is
displayed.
47
Contacts
Contact groups
3. Select Options > Add to group.
4. Select the required group. The contact details are displayed after a confirmation
message.
Changing the default group for a contact
Saving a new group
Each contact can be added to multiple groups. The first group that a contact is added
to is automatically set as the default group for that contact. When the contact calls
you, the image of the default group is displayed and/or the ring tone of this group is
played.
To change the default group for a contact:
1. From the Home screen, select Names or Menu > Contacts > Names.
2. Scroll to the required contact, then select Details.
3. Scroll to the group you want as the default, then select Options > Set as default.
The contact details are displayed after a confirmation message.
To save a new group:
1. From the Home screen, select Menu > Contacts.
2. Select Groups.
3. Select Add or Options > Add new group
4. Enter a name for the group.
5. Select an image and/or ring tone for the group if required, then select Save. The
list of groups is displayed after a confirmation message.
To view and edit the details of a group:
1. From the Home screen, select Menu > Contacts.
2. Select Groups.
3. Scroll to the required group, then select Options > Group details.
4. If required, edit the details of the group, then select Save. The list of groups is
displayed after a confirmation message.
Adding contacts to a group
Viewing details of group members
The contact groups feature enables you to easily manage and use contacts by
assigning them to groups.
You can add an image or assign a ring tone to a group. For example, if you create a
group for work colleagues and assign a specific ring tone to this group, you can
quickly and easily recognise when you are being called by a work colleague.
You can also send messages to a group instead of adding contacts as message
recipients one by one.
NOTE: You need to save a group before you can add contacts to it.
To add a contact to a group from the list of groups:
1. From the Home screen, select Menu > Contacts.
2. Select Groups.
3. Scroll to the required group, then select View.
4. Select Add.
5. Select the contact to add to the group. The list of group members is displayed
after a confirmation message. Add more contacts to the group as required.
To add a contact to a group from the list of contacts:
1. From the Home screen, select Names or Menu > Contacts > Names.
2. Scroll to the required contact, then select Details.
48
Viewing and editing group details
To view the details of group members:
1. From the Home screen, select Menu > Contacts.
2. Select Groups.
3. Scroll to the required group, then select View.
4. To view the details of group members, scroll to the required member, then select
Options > Contact details.
Contacts
Deleting a group
My numbers
To delete a group:
1. From the Home screen, select Menu > Contacts.
2. Select Groups.
3. Scroll to the required group, then select Options > Delete group.
4. Select Yes to confirm the deletion. The list of groups is displayed after a
confirmation message.
The My numbers feature enables you to view your own numbers that are predefined
and stored on the SIM card.
Removing contacts from a group
To remove a contact from a group from the list of groups:
1. From the Home screen, select Menu > Contacts.
2. Select Groups.
3. Scroll to the required group, then select View.
4. Scroll to the required contact, then select Options > Remove member.
5. .Select Yes to confirm the deletion. The list of group members is displayed after
a confirmation message.
To remove a contact from a group from the list of contacts:
1. From the Home screen, select Names or Menu > Contacts > Names.
2. Scroll to the required contact, then select Details.
3. Scroll to the required group, then select Options > Remove from group.
4. Select Yes to confirm the deletion. The contact details are displayed after a
confirmation message.
NOTE: You can only view your own numbers is this functionality is
supported by your service provider.
NOTE: You cannot edit or delete your own numbers.
To view your own numbers:
1. From the Home screen, select Menu > Contacts.
2. Select My numbers.
Service numbers
The Service numbers feature enables your to view and call phone numbers, such as
help lines, special service numbers, etc., that your service provider has stored on the
SIM card.
NOTE: You can only view and call service numbers if this functionality is
supported by your service provider.
NOTE: You cannot edit or delete service numbers.
To view and call a service numbers:
1. From the Home screen, select Menu > Contacts.
2. Select Service numbers. The list of services is displayed.
3. To call a service number, scroll to the required service, then press the Send key
or select Call.
49
Contacts
Copying and moving contacts
When you copy contacts, the original entry remains stored; when you move contacts,
the original entry is removed.
Copying a single contact
To copy a single contact between your Vertu phone and the SIM card:
1. From the Home screen, select Names or Menu > Contacts > Names.
2. Scroll to the required contact, then select Options > Edit > Copy contact.
3. Select Yes to confirm the copying.
4. The list of contacts is displayed after a confirmation message.
Copying multiple contacts
To copy multiple contacts between your Vertu phone and the SIM card:
1. From the Home screen, select Names or Menu > Contacts > Names.
2. Scroll to the first contact to copy, then select Options > Edit > Mark > Mark. The
list of contacts is displayed.
3. Select the other contacts to copy.
4. Select Options > Copy marked > From phone to SIM/From SIM to phone as
required.
5. Select Yes to confirm the copying.
6. Select OK when the confirmation message is displayed.
Copying all contacts
To copy all contacts between your Vertu phone and the SIM card, either:
1. From the Home screen, select Menu > Contacts.
2. Select Copy contacts.
3. Select From phone to SIM/From SIM to phone as required.
4. Select Yes to confirm the copying.
5. Select OK when the confirmation message is displayed.
or:
1. From the Home screen, select Names or Menu > Contacts > Names.
50
2. Select Options > Edit > Mark > Mark all.
3. Select Options > Copy marked > From phone to SIM/From SIM to phone as
required.
4. Select Yes to confirm the copying.
5. Select OK when the confirmation message is displayed.
Copying contact information
To copy contact information between your Vertu phone and the SIM card:
1. From the Home screen, select Names or Menu > Contacts > Names.
2. Select the required contact.
3. Scroll to the required detail to copy with the contact name. This can be a phone
number or an e-mail address (if e-mail addresses are supported on the SIM
card).
4. Select Options > Copy number > Keep original or Options > Copy e-mail
address > Keep original as required. The contact details are displayed after a
confirmation message.
Moving a single contact
To move a single contact between your Vertu phone and the SIM card:
1. From the Home screen, select Names or Menu > Contacts > Names.
2. Scroll to the required contact, then select Options > Edit > Move contact.
3. Select Yes to confirm the move.
4. The list of contacts is displayed after a confirmation message.
Moving multiple contacts
To move multiple contacts between your Vertu phone and the SIM card:
1. From the Home screen, select Names or Menu > Contacts > Names.
2. Scroll to the first contact to move, then select Options > Edit > Mark > Mark. The
list of contacts is displayed.
3. Select the other contacts to move.
4. Select Options > Move marked > From phone to SIM/From SIM to phone as
required.
5. Select Yes to confirm the move.
6. Select OK when the confirmation message is displayed.
Contacts
Moving all contacts
To move all contacts between your Vertu phone and the SIM card, either:
1. From the Home screen, select Menu > Contacts.
2. Select Move contacts.
3. Select From phone to SIM/From SIM to phone as required.
4. Select Yes to confirm the move.
5. Select OK when the confirmation message is displayed.
or:
1. From the Home screen, select Names or Menu > Contacts > Names.
2. Select Options > Edit > Mark > Mark all.
3. Select Options > Move marked > From phone to SIM/From SIM to phone as
required.
4. Select Yes to confirm the move.
5. Select OK when the confirmation message is displayed.
Moving contact information
To move contact information between your Vertu phone and the SIM card:
1. From the Home screen, select Names or Menu > Contacts > Names.
2. Select the required contact.
3. Scroll to the required detail to move with the contact name. This can be a phone
number or an e-mail address (if e-mail addresses are supported on the SIM
card).
4. Select Options > Copy number > Move original or Options > Copy e-mail
address > Move original as required. The contact details are displayed after a
confirmation message.
51
Messages
Text messages
Messages
The following message types are available when using your Vertu phone:
• Text messages - also known as Short Message Service (SMS) messages.
• Multimedia messages - also known as Multimedia Messaging Service (MMS)
messages.
• Audio messages.
• E-mail.
• Flash messages.
• Smart messages.
• Voice messages.
• Info messages.
• Instant Messages (IMs).
• Service messages
Text messaging, or the Short Message Service (SMS), enables you to exchange
messages containing only text with other phones.
Your Vertu phone supports the sending of more than the standard 160-character limit
for a single text message. If you enter more than 160 characters, the message is split
into linked text messages. These linked messages will be sent at the same time.
When you send a text message, your Vertu phone uses a profile that defines how the
phone handles interaction with your service provider. In most cases, the profile will
be set using information on the SIM card. For information on manually setting up text
messaging, see Text message settings.
For most service providers you will not need to modify these settings as the
necessary information will be obtained from your SIM card automatically. Depending
on your SIM card, you may be able to store more than one set of message profiles.
For information on setting up your text message service centre, see Text message
settings.
Creating and sending a text message
NOTE: The various types of messages are only available when supported
by your service provider.
To create and send a text message from the Home screen:
1. Select Menu > Messages > Create message, or move the Joystick left.
2. Add recipients using one or more of the following methods:
• With the cursor in the To: field, select Add. Select the type of recipient, then
select the required phone number.
• With the cursor in the To: field, enter the first few letters of a contact name, then
select Match. If several matches are displayed, select the required one. Select
the required phone number if the contact has multiple phone numbers.
• Enter mobile phone number(s) in the To: field. Use a semicolon to separate
multiple recipients.
TIP: For information on switching to numeric input mode, see Changing
input modes in Text input.
• Select Options > Add recipient > To. Select the type of recipient, then select
the required phone number.
52
Messages
3. Scroll to the message area and enter your message. For information on entering
text, see the Text input section.
TIP: While entering the message, the number of available characters,
along with the current part number of any linked message, (for example,
904/1) is shown in the top right corner of the screen.
TIP: To save time by inserting predefined text:
1. Select Options > Insert > Text template.
2. Scroll to the required text, then select Use.
TIP: To save the text message as a template:
1. Select Options > Save message > As template.
2. Enter a name for the template, then select OK.
Only the body text of the message is saved in the template. Other
information such as recipients and sending options is not saved.
4. Select Send.
TIP: To save the message as a draft, select Options > Save message >
As draft message.
TIP: To delete the message without sending it, select Options > Exit
editor > No. A confirmation message is displayed.
TIP: You can also send a text message to a contact while viewing the
contact by selecting Options > Send message.
Text message sending options
Using the send options, you can select options for the message that you are creating
before sending it.
To set the priority of the message:
1. From the message creation screen, select Options > Sending options.
2. In the Message priority field, select High/Normal/Low as required. A
confirmation message is displayed.
3. Select Back to return to the message creation screen.
3. Select Back to return to the message creation screen.
For information on requesting delivery reports for all sent text messages, see Text
message settings.
For information on viewing delivery reports, see Delivery reports.
To save the message in the Sent items folder when it has been sent:
1. From the message creation screen, select Options > Sending options.
2. In the Save sent message field, select Yes. A confirmation message is
displayed.
3. Select Back to return to the message creation screen.
The message validity is the time for which the text message service centre will
continue to attempt to send the message to the recipients. If delivery of the message
is not successful during this time, the message will be deleted from the service
centre.
The maximum value of the message validity time is set by your service provider.
To set the validity of the message:
1. From the message creation screen, select Options > Sending options.
2. In the Message validity field, select the required time. A confirmation message
is displayed.
3. Select Back to return to the message creation screen.
For information on setting the validity of all sent text messages, see Text message
settings.
To set the message format:
NOTE: This option is only available if it is supported by your service
provider.
1. From the message creation screen, select Options > Sending options.
2. In the Message sent via field, select Text/Paging/Fax as required. A
confirmation message is displayed.
3. Select Back to return to the message creation screen.
For information on setting the message format of all sent text messages, see Text
message settings.
To request a delivery report for the message:
1. From the message creation screen, select Options > Sending options.
2. In the Request report field, select Delivery. A confirmation message is
displayed.
53
Messages
Receiving and reading text messages
Using details from a message
Text messages are automatically received when your Vertu phone is switched on.
When your phone is off, messages are held by your service provider until the next
time your phone is connected to the network.
Your Vertu phone will alert you when a new text message arrives.
To read the message, select View.
To ignore the message and read it later, select Exit.
Received messages are stored in the messages Inbox. To access the Inbox from the
Home screen, select Menu > Messages > Inbox. To read a text message stored in
the Inbox, scroll to the required message, then select Open.
Your Vertu phone can extract information from a message. This information can then
be used for another task. For example, you can save a phone number or e-mail
address that is included in a message.
To use details from a message:
1. From an open message, select Options > Use detail, then select the type of
information you would like to extract from the message.
2. When the extracted information is displayed, you can use it as required.
Viewing message details
To view the details of a received message:
From an open message, select Options > Message details
Replying to a text message
To reply to a text message:
1. From an open text message, select Reply.
TIP: The reply message will be a text message by default. To reply with a
different type of message, select Options > Reply as, then select the
required message type.
2. Enter your message.
3. Select Send.
Forwarding a text message
To forward a text message:
1. From an open text message, select Options > Forward.
2. Add recipients. For details of how to add recipients, see Creating and sending
a text message.
3. If required, edit the message text.
4. Select Send.
Calling the sender of a message
To call the sender of a message:
From an open message, select Options > Call.
54
Editing a message
You can edit a received message before forwarding or saving it.
To edit a message:
1. From an open message, select Options > Edit. The received message is
displayed with the To: field empty.
2. Edit the message as required.
Moving a message
To move a message from the Inbox to the Saved messages folder:
1. From an open message, select Options > Move.
2. Select the Saved messages folder. A confirmation message is displayed.
TIP: By default, only the Saved messages folder is available for moved
messages. You can add extra folders to help organise your messages. To
add an extra folder:
1. From the Home screen, select Menu > Messages > Saved items.
2. Select Options > Add folder.
3. Enter a name for the folder, then select OK. The new folder is added
under the Saved items folder.
Messages
Saving a message to the calendar
To save the information in a message as a calendar note:
1. From an open message, select Options > Copy to Calendar, then select the
type of calendar note required. For further information on calendar notes, see
Calendar notes in Calendar.
2. Add any additional information needed to the calendar note, then select Save. A
confirmation message is displayed.
Copying a text message as a template
You can save a text message as a template to use when creating messages in the
future.
NOTE: Only the body text of the message is saved in the template. Other
information such as recipients and sending options is not saved.
To copy a text message as a template:
1. From an open text message, select Options > Copy as template.
2. Enter a name for the template, then select OK. A confirmation message is
displayed.
Deleting messages
To delete a single message from the Home screen:
1. Select Menu > Messages > Inbox.
2. Scroll to the required message, then select Options > Delete.
3. Select Yes to confirm the deletion. A confirmation message is displayed.
To delete an open message:
1. From an open message, select Options > Delete.
2. Select Yes to confirm the deletion. A confirmation message is displayed.
To delete multiple messages:
1. Select Menu > Messages > Inbox.
2. Scroll to a message to delete, then select Options > Mark.
3. Repeat step 2 for all messages that you wish to delete.
4. Select Options > Delete marked.
5. Select Yes to confirm the deletion. A confirmation message is displayed.
Text message settings
Using the text message settings, you can select options for all text messages.
To request delivery reports for all sent text messages:
1. From the Home screen, select Menu > Messages.
2. Select Message settings > Text messages.
3. In the Delivery reports field, select Yes. A confirmation message is displayed.
For information on viewing delivery reports, see Delivery reports.
To view the details of text message services centres stored on your Vertu phone and
SIM card:
1. From the Home screen, select Menu > Messages.
2. Select Message settings > Text messages.
3. Select Message centres.
4. Select a message centre to view its details.
To set up a new text message service centre:
1. From the Home screen, select Menu > Messages.
2. Select Message settings > Text messages.
3. Select Message centres.
4. Select Add centre.
5. Enter a name and number for the new text message service centre. The number
can be obtained from your service provider.
6. Select Save. A confirmation message is displayed.
7. Select Yes to set this centre as the default text message service centre. A
confirmation message is displayed.
To set up the text message service centre to use:
1. From the Home screen, select Menu > Messages.
2. Select Message settings > Text messages.
3. Select Msg. centre in use.
4. Select the centre to use. This will be the new default text message service centre.
A confirmation message is displayed.
55
Messages
To set the validity of all sent text messages:
1. From the Home screen, select Menu > Messages.
2. Select Message settings > Text messages.
3. In the Message validity field, select the required time. A confirmation message
is displayed.
To set the message format for all sent text messages:
NOTE: This setting is only available if it is supported by your service
provider.
1. From the Home screen, select Menu > Messages.
2. Select Message settings > Text messages.
3. In the Messages sent via field, select Text/Paging/Fax as required. A
confirmation message is displayed.
To change the text message bearer setting to GPRS:
1. From the Home screen, select Menu > Messages.
2. Select Message settings > Text messages.
3. In the Use packet data field, select Yes. A confirmation message is displayed.
You can select the character support required when creating a text message. The
setting can be either Full or Reduced.
Full character support means that the full set of ISA characters is available when
creating and sending a message. All characters in text messages are sent as they
appear when creating the message. This is the default setting.
Reduced character support means that only the 7-bit GSM characters are used when
sending a text message. The character set available when creating a text message
depends on the editor support. Special characters are converted when the message
is sent.
To set the character support for text messages:
1. From the Home screen, select Menu > Messages.
2. Select Message settings > Text messages.
3. In the Character support field, select Full or Reduced as required. A
confirmation message is displayed.
56
You can set the reply path so that if a recipient of a text message that you have sent
replies, the reply will be sent using the same text message service centre that you
used for sending the original message.
NOTE: This setting is only available if it is supported by your service
provider.
NOTE: Problems can occur if the message recipient has a different service
provider.
To set the reply path to be the same as the sending path:
1. From the Home screen, select Menu > Messages.
2. Select Message settings > Text messages.
3. In the Rep. via same centre field, select Yes. A confirmation message is
displayed.
Messages
Multimedia messages
The Multimedia Messaging Service (MMS) enables you to exchange multimedia
messages containing data such as text, pictures, sounds, animation and video clips.
Creating and sending a multimedia message
A multimedia message can consist of multiple pages, known as 'slides'. Each slide
can hold an image, a sound and text, but you do not need to set all of these for each
message.
The maximum amount of content that can be sent in a message is set by your service
provider. If this size is exceeded, the recipient may not be able to receive the
message. When creating a multimedia message, the remaining message space is
shown at the top right of the screen.
Pictures are scaled to fit the display area of the phone.
Copyright protections may prevent some images, ringing tones, and other content
from being copied, modified, transferred, or forwarded.
To create and send a multimedia message from the Home screen:
1. Select Menu > Messages > Create message, or move the Joystick left.
2. Add recipients using one or more of the following methods:
• With the cursor in the To: field, select Add. Select the type of recipient, then
select the required phone number.
• With the cursor in the To: field, enter the first few letters of a contact name, then
select Match. If several matches are displayed, select the required one. Select
the required phone number if the contact has multiple phone numbers.
• Enter mobile phone number(s) in the To: field. Use a semicolon to separate
multiple recipients.
• Select Options > Add recipient > To/Cc/Bcc as required. Select the type of
recipient, then select the required phone number.
3. If you want to add a subject to the message, select Options > Add subject, then
enter the subject in the Subject: field.
4. To add an object, such as an image, video clip or sound clip, to the message,
select Options > Insert. Select the type of object required, then the specific
object.
5. Enter text in the Text: area if required.
TIP: To save time by inserting predefined text:
1. Select Options > Insert > Text template.
2. Scroll to the required text, then select Use.
TIP: To save the message as a template:
1. Select Options > Save message > As template.
2. Enter a name for the template, then select OK.
Only the body text and objects in the message are saved in the template.
Other information such as recipients and sending options is not saved.
6. To set the time that a slide with be displayed for, select Options > Slide options
> Slide timing. Enter the required time, then select OK. For information on
setting the default slide timing for all multimedia messages, see Multimedia
message settings.
7. To change the message layout so that the text is above the other objects, select
Options > Slide options > Place text first.
8. Select Send when the message is ready.
TIP: To preview the message before sending, select Options > Preview.
TIP: To save the message as a draft, select Options > Save message >
As draft message.
TIP: To delete the message without sending it, select Options > Exit
editor > No. A confirmation message is displayed.
Multimedia message sending options
Using the send options, you can select options for the message that you are creating
before sending it.
For information on setting the priority of the message, see Text message sending
options.
To request a delivery report, or delivery and read reports, for the message:
1. From the message creation screen, select Options > Sending options.
2. In the Request report field, select Delivery or Delivery and read. A
confirmation message is displayed.
3. Select Back to return to the message creation screen.
57
Messages
For information on requesting delivery and read reports for all sent multimedia
messages, see Multimedia message settings.
For information on viewing delivery and read reports, see Delivery reports.
For information on saving the message in the Sent items folder when it has been
sent, see Text message sending options.
Receiving and playing multimedia messages
Your Vertu phone will alert you when a new multimedia message arrives.
When your phone is off, messages are held by your service provider until the next
time your phone is connected to the network.
To play the message, select View > Play.
To ignore the message and play it later, select Exit.
Received messages are stored in the messages Inbox. To access the Inbox from the
Home screen, select Menu > Messages > Inbox. To play a multimedia message
stored in the Inbox, scroll to the required message, then select Open > Play.
Depending on your service provider, you may receive a message with a link to an
Internet page where you can go to view the multimedia message.
If a received message contains unsupported attachments, these may be replaced
with a message.
For information of viewing message details, see Viewing message details.
Replying to a multimedia message
To reply to a multimedia message:
1. From an open multimedia message, select Reply to reply to the message sender
only
or select Options > Reply to all to reply to all message recipients.
TIP: The reply message will be a text message by default. To reply with a
different type of message, select Options > Reply as, then select the
required message type.
2. Enter your message.
3. Select Send.
58
Forwarding a multimedia message
To forward a multimedia message:
1. From an open multimedia message, select Options > Forward.
2. Add recipients. For details of how to add recipients, see Creating and sending
a multimedia message.
3. If required, edit the message.
4. Select Send.
For information on calling the sender of a message, see Calling the sender of a
message.
For information on using details from a message, see Using details from a
message.
For information on editing a message, see Editing a message.
For information on moving a message, see Moving a message.
Copying a multimedia message as a template
You can save a multimedia message as a template to use when creating messages
in the future.
NOTE: Only the body text and objects in the message are saved in the
template. Other information such as recipients and sending options is not
saved.
To copy a multimedia message as a template:
1. From an open multimedia message, select Options > Copy as template.
2. Enter a name for the template, then select OK. A confirmation message is
displayed.
Saving the contents of a multimedia message
To save the contents of a multimedia message to the gallery:
1. From an open multimedia message, select Options > Save contents.
2. Either scroll to the item to save, then select Save
or
select Options > Save all. A confirmation message is displayed.
Messages
Viewing the contents of a multimedia message
To view the contents of a multimedia message:
From an open multimedia message, select Options > Show contents. You can then
open or save the items as required.
For information on deleting messages, see Deleting messages.
Multimedia message settings
Using the multimedia message settings, you can select options for all multimedia
messages.
To request a delivery report, or delivery and read reports, for all sent multimedia
messages:
1. From the Home screen, select Menu > Messages.
2. Select Message settings > Multimedia messages.
3. In the Request reports field, select Delivery and read or Delivery. A
confirmation message is displayed.
For information on viewing delivery or read reports, see Delivery reports.
To allow read reports to be sent from your Vertu phone:
1. From the Home screen, select Menu > Messages.
2. Select Message settings > Multimedia messages.
3. In the Allow read report field, select Yes. A confirmation message is displayed.
You can select a message creation mode for multimedia messages. If you select
Restricted mode, you will not be able to add certain types of content to multimedia
messages if that content may not be supported on the recipient’s phone. If you select
Guided mode, you will be notified when you add content to a multimedia message
that would not be permitted in Restricted mode. If you select Free mode, the types of
content that you can add to a multimedia message will not be restricted.
To set the multimedia message creation mode:
1. From the Home screen, select Menu > Messages.
2. Select Message settings > Multimedia messages.
3. In the MMS creation mode field, select Restricted/Guided/Free as required. A
confirmation message is displayed.
You can set the maximum image size that can be added to a multimedia message.
Your Vertu phone resizes the image if needed.
To set the maximum image size for multimedia messages:
1. From the Home screen, select Menu > Messages.
2. Select Message settings > Multimedia messages.
3. In the Image size in MMS field, select the required image size. A confirmation
message is displayed.
To set the default slide timing for all sent multimedia messages:
1. From the Home screen, select Menu > Messages.
2. Select Message settings > Multimedia messages.
3. Select Default slide timing.
4. Enter the required time, then select OK. A confirmation message is displayed.
You can select when multimedia messages will be automatically received.
If you select Automatic reception, then multimedia messages will always be received
automatically.
If you select Automatic in home network reception, then multimedia messages will be
received automatically when you are connected to your home network. If you are
roaming, you will receive notifications of multimedia messages and can then retrieve
them manually if required.
If you select Manual reception, you will receive notifications of multimedia messages
and can then retrieve them manually if required.
If you select Off, then you will not receive multimedia messages or notifications of
multimedia messages.
To set the multimedia message reception:
1. From the Home screen, select Menu > Messages.
2. Select Message settings > Multimedia messages.
3. In the MMS reception field, select Automatic/Auto. in home nw./Manual/Off
as required. A confirmation message is displayed.
To allow reception of advertisements in multimedia message format:
1. From the Home screen, select Menu > Messages.
2. Select Message settings > Multimedia messages.
3. In the Allow adverts field, select Yes. A confirmation message is displayed.
The Configuration sett. item enables you to select the multimedia message
account to use if you have more than one.
59
Messages
Audio messages
For information on replying to a message, see Replying to a multimedia message.
An audio message is a type of multimedia message that contains only an audio clip.
For information on forwarding a message, see Forwarding a multimedia message.
Creating and sending an audio message
For information on calling the sender of a message, see Calling the sender of a
message.
For information on using details from a message, see Using details from a
message.
For information on editing a message, see Editing a message.
To create and send a multimedia message from the Home screen:
1. Select Menu > Messages > Create message, or move the Joystick left.
2. Add recipients. For details of how to add recipients, see Creating and sending
a multimedia message.
3. Select Options > Change msg. type, then select Audio message.
4. Press the Joystick to start recording.
5. Press the Joystick to stop recording.
6. Select Send.
TIP: To preview the message before sending, select Options > Preview.
TIP: To save the message as a draft, select Options > Save message >
As draft message.
TIP: To delete the message without sending it, select Options > Exit
editor > No. A confirmation message is displayed.
For information on the sending options for audio messages, see Multimedia
message sending options.
Receiving and playing audio messages
To play the message, select Play.
To ignore the message and play it later, select Exit.
Received messages are stored in the messages Inbox. To access the Inbox from the
Home screen, select Menu > Messages > Inbox. To play an audio message stored
in the Inbox, scroll to the required message, then select Play.
For further information on receiving audio messages, see Receiving and playing
multimedia messages.
For information of viewing message details, see Viewing message details.
60
For information on moving a message, see Moving a message.
Saving the sound clip of an audio message
To save the sound clip of an audio message:
1. From an open audio message, select Options > Save sound clip.
2. Select the folder to save the sound clip to.
3. Enter a file name for the clip, then select OK. A confirmation message is
displayed.
For information on copying a message as a template, see Copying a multimedia
message as a template.
Adjusting the volume
To adjust the volume of the phone before playing an audio message:
1. From an open audio message, select Options > Volume.
2. Adjust the volume using the Joystick, then select OK.
Muting the audio
To mute the audio:
1. From an open audio message, select Options > Mute audio. A confirmation
message is displayed.
2. To unmute the audio, select Options > Unmute audio. A confirmation message
is displayed.
Switching the loudspeaker on
To switch the loudspeaker on:
1. From an open audio message, select Options > Loudspeaker. A confirmation
message is displayed.
2. To switch the loudspeaker off, select Options > Handset. A confirmation
message is displayed.
Messages
Viewing the details of the audio clip
E-mail messages
To view the contents of the audio clip:
From an open audio message, select Options > Details.
For information on deleting messages, see Deleting messages.
You can compose, send, receive and read e-mails using your Vertu phone.
Your phone supports POP3 and IMAP4 e-mail accounts.
Setting up an e-mail account automatically
To set up an e-mail account automatically:
1. From the Home screen, select Menu > Messages.
2. Select E-mail (if you have not yet set up an e-mail account on your Vertu phone)
or
select Options > Add mailbox (if you are setting up an additional e-mail
account).
3. Enter your e-mail address, then select OK.
TIP: To quickly enter the ‘@’ symbol, press the
-key twice.
4. Select Yes to connect to the internet to search for settings.
5. When the settings have been found, a note is displayed confirming that the
mailbox is ready. Select OK.
NOTE: If the settings cannot be retrieved from the internet, you will need to
set up the e-mail account manually. For information on setting up an e-mail
account manually, see Setting up an e-mail account manually.
6.
7.
8.
9.
Select Yes to connect to the mailbox.
Enter the password for the e-mail account, then select OK.
Enter the password again for verification, then select OK.
Wait for a short time while your Vertu phone connects to your mailbox and
synchronises with the mailbox. Your e-mail messages are displayed.
61
Messages
Setting up an e-mail account manually
NOTE: Before setting up an e-mail account manually, you will need to
obtain the required settings from your e-mail service provider.
1. From the Home screen, select Menu > Messages.
2. Select E-mail (if you have not yet set up an e-mail account on your Vertu phone)
or
select Options > Add mailbox (if you are setting up an additional e-mail
account).
3. Enter your e-mail address, then select OK.
4. Select No so that your Vertu phone does not try to obtain the settings
automatically.
5. Select Yes to confirm that you will enter the e-mail settings manually.
6. To edit the mailbox name, select the Mailbox name field, enter the required
name, then select OK.
7. To enter the name that you want displayed when you send e-mail, select the My
name field, enter the required name, then select OK.
8. In the Incoming server type field, select the type of server that hosts your e-mail
mailbox. This can be POP3 or IMAP4.
9. Select Login information to access the following login settings:
• POP3 authentication/IMAP4 authentication - to set whether authentication
is required for the incoming server.
• POP3 user name/IMAP4 user name - enter the user name assigned to you
by your e-mail service provider.
• POP3 password/IMAP4 password - enter and verify a login password.
NOTE: These settings are dependent on the incoming server type.
Select Back when you have finished editing these settings.
10.Select Downloading sett. to access the following downloading settings:
• Retrieve mode - to set whether to retrieve only header information or complete
e-mails when your Vertu phone connects to the e-mail server. If the incoming
server type is IMAP4, you can also retrieve only text information.
• Retrieval amount - to set the maximum number of e-mails that can be
retrieved at one time.
• Mailbox upd. interval - to set how frequently your Vertu phone connects to the
e-mail server to retrieve e-mails.
62
• Automatic retrieval - to set whether your Vertu phone will automatically
retrieve pushed e-mails.
Select Back when you have finished editing these settings.
11.Select Incoming mail sett. to access the following incoming mail settings:
NOTE: These settings are dependent on the incoming server type.
• Incoming POP3 serv./Incoming IMAP4 serv. - enter the name of the
incoming e-mail server.
• Security - to select the required type of security, if any.
• Port - to enter the number of the port to be used to connect to the incoming
e-mail server.
• User pref. access pt. - to set whether to use the preferred access point.
• POP3 access point/IMAP4 access point - to set the access point to use if
you are not using the preferred access point.
Select Back when you have finished editing these settings.
12.Select Outgoing mail sett. to access the following outgoing mail settings:
• Outgoing SMTP serv. - enter the name of the outgoing e-mail server.
• Reply-to address - enter the e-mail address for replies.
• SMTP authentication - to set whether authentication is required for the
outgoing server.
• SMTP user name - enter the user name assigned to you by your e-mail service
provider.
• SMTP password - enter and verify a password.
• Security - to select the required type of security, if any.
• Port - to enter the number of the port to be used to connect to the outgoing
e-mail server.
• User pref. access pt. - to set whether to use the preferred access point.
• SMTP access point - to set the access point to use if you are not using the
preferred access point.
Select Back when you have finished editing these settings.
13.Select Done when you have finished entering the e-mail settings. A confirmation
message is displayed.
14.Select Yes to connect to the mailbox.
Messages
Adding a new mailbox
Receiving and reading e-mail messages
To add a new mailbox:
1. From the Home screen, select Menu > Messages.
2. Select Options > Add mailbox.
3. Set up the e-mail account as described in the previous sections.
To receive e-mail messages, you need to connect to your e-mail account.
To receive and read e-mail messages:
1. Select Menu > Messages.
2. Select the required e-mail account.
3. If you are not already connected to the mailbox, select Yes to connect. Your
Vertu phone will connect to the e-mail account and synchronise messages.
4. Scroll to the required message, then select Open to read the message.
Creating and sending an e-mail message
To create and send an e-mail message from the Home screen:
1. Select Menu > Messages.
2. Select the e-mail account to use.
3. If you are not already connected to the mailbox, select Yes to connect.
4. Select Options > New e-mail.
5. Add recipients. For information on adding recipients, see Creating and sending
a multimedia message.
6. If you want to add a subject to the message, select Options > Add subject, then
enter the subject in the Subject: field.
7. To add an attachment to the message, select Options > Insert. Select the type
of object required, then the specific object.
8. Enter text in the Text: area if required.
TIP: To save time by inserting predefined text:
1. Select Options > Insert > Text template.
2. Scroll to the required text, then select Use.
TIP: To save the message as a template:
1. Select Options > Save message > As template.
2. Enter a name for the template, then select OK.
Only the body text and objects in the message are saved in the template.
Other information such as recipients and sending options is not saved.
9. Select Send when the message is ready.
TIP: To save the message as a draft, select Options > Save message >
As draft message.
TIP: To delete the message without sending it, select Options > Exit
editor > No. A confirmation message is displayed.
For information on the sending options available for an e-mail message, see Text
message sending options.
For information of viewing message details, see Viewing message details.
Replying to an e-mail message
To reply to an e-mail message:
1. From an open e-mail message, select Reply to reply to the message sender only
or select Options > Reply to all to reply to all message recipients.
TIP: The reply message will be an e-mail message by default. To reply with
a different type of message, select Options > Reply as, then select the
required message type.
2. Enter your message.
3. Select Send.
Forwarding e-mail message
To forward an e-mail message:
1. From an open e-mail message, select Options > Forward.
2. Add recipients. For details of how to add recipients, see Creating and sending
a multimedia message.
3. If required, edit the message.
4. Select Send.
For information on using details from a message, see Using details from a
message.
For information on editing a message, see Editing a message.
For information on moving a message, see Moving a message.
For information on saving a message to the calendar, see Saving a message to the
calendar.
For information on copying a message as a template, see Copying a multimedia
message as a template.
63
Messages
Saving the contents of an e-mail message
To save the contents of an e-mail message to the gallery:
1. From an open e-mail, select Options > Save object.
2. Select Options > Save.
3. Select the folder to save the object to.
4. Enter a file name for the object, then select OK. A confirmation message is
displayed.
Deleting e-mail messages
To delete a single e-mail message from the Home screen:
1. Select Menu > Messages.
2. Select the required e-mail account.
3. Scroll to the required message, then select Options > Delete.
4. Select whether to delete the message from the phone only, or from the phone
and the e-mail server,
5. Select Yes to confirm the deletion. A confirmation message is displayed.
To delete an open e-mail message:
1. From an open message, select Options > Delete > From phone/Also from
server as required.
2. Select Yes to confirm the deletion. A confirmation message is displayed.
To delete multiple e-mail messages:
1. Select Menu > Messages.
2. Select the required e-mail account.
3. Scroll to a message to delete, then select Options > Mark.
4. Repeat step 3 for all messages that you wish to delete.
5. Select Options > Delete marked.
6. Select From phone/Also from server as required
7. Select Yes to confirm the deletion. A confirmation message is displayed.
To delete all e-mail messages from an account:
1. Select Menu > Messages.
2. Select the required e-mail account.
3. Scroll to a message to delete, then select Options > Mark all.
4. Select Options > Delete marked.
5. Select From phone/Also from server as required
6. Select Yes to confirm the deletion. A confirmation message is displayed.
64
E-mail message settings
Using the e-mail message settings, you can select options for all e-mail messages.
To be notified of new e-mails:
1. From the Home screen, select Menu > Messages.
2. Select Message settings > E-mail messages.
3. In the New e-mail notif. field, select On. A confirmation message is displayed.
To select when e-mail messages will be received:
1. From the Home screen, select Menu > Messages.
2. Select Message settings > E-mail messages.
3. In the Allow mail reception field, select Always or In home network as
required. A confirmation message is displayed.
To include the original message when you are replying to an e-mail message:
1. From the Home screen, select Menu > Messages.
2. Select Message settings > E-mail messages.
3. In the Reply with orig. msg. field, select Yes. A confirmation message is
displayed.
To set the image size for e-mail messages:
1. From the Home screen, select Menu > Messages.
2. Select Message settings > E-mail messages.
3. In the Image size in e-mail field, select the required image size. A confirmation
message is displayed.
To edit your e-mail mailboxes:
1. From the Home screen, select Menu > Messages.
2. Select Message settings > E-mail messages.
3. Select Edit mailboxes.
4. Select the required mailbox and edit the settings as required.
Messages
Delivery reports
Smart messages
To view delivery and read reports:
1. From the Home screen, select Menu > Messages.
2. Select Delivery reports.
Smart messages are similar to text messages, and are used for exchanging data
between compatible devices. Smart messages can be used for sending items such
as calendar notes and bookmarks to other phones.
You cannot read smart messages, and they are not stored in any of the folders in the
Messages menu.
Flash messages
Flash messages are text messages that are instantly displayed upon receipt. Flash
messages are not automatically saved.
Voice messages
Creating and sending a flash message
To create and send a flash message from the Home screen:
1. Select Menu > Messages > Create message, or move the Joystick left.
2. Add recipients. For details of how to add recipients, see Creating and sending
a text message.
3. Select Options > Change msg. type, then select Flash message.
4. Scroll to the message area and enter your message. For information on entering
text, see the Text input section.
5. Select Send.
For information on flash message sending options, see Text message sending
options.
Receiving and reading flash messages
Your Vertu phone will alert you when a new flash message arrives.
To read the message, select Read.
To save the message after reading it, select Save, then select the Saved messages
folder. A confirmation message is displayed.
To ignore the message, select Exit. The message is automatically deleted.
Voice messages are also known as voice mail messages. This service is only
available if it is supported by your service provider.
For information on diverting calls to your voice mailbox, see Call divert in Call
functions.
Defining your voice mailbox number
Your voice mailbox number can be obtained from your service provider.
To save your voice mail to your Vertu phone:
1. From the Home screen, select Menu > Messages.
2. Select Voice messages.
3. Select Voice mailbox no.
4. Enter the mailbox number, then select OK. A confirmation message is displayed.
Listening to your voice messages
To listen to your voice messages:
1. From the Home screen, select Menu > Messages.
2. Select Voice messages.
3. Select Listen to voice msgs. A call is made to your voice mailbox.
65
Messages
Info messages
Deleting messages via the Messages menu
Info messages can provide information on a variety of topics. They are sent by your
service provider.
For details of info message available to you, contact your service provider.
You can quickly delete messages via the Messages menu by selecting the Delete
messages item.
To delete messages:
1. From the Home screen, select Menu > Messages.
2. Select Delete messages.
3. Select one of the following options as required:
• By message - to delete messages in a selected folder one at a time.
• By folder - to delete all messages in a selected folder.
• All messages - to delete all messages.
4. Select Yes to confirm the deletion. A confirmation message is displayed.
Instant messages (IMs)
The IMs feature on your Vertu phone enables you to “chat” with other online users.
To use this feature, you need to subscribe to an instant messaging service and log in
via your phone.
To check the availability of services and details of pricing, contact your service
provider.
Service commands
Service commands are part of the unstructured supplementary service data (USSD)
feature.
They enable you to activate a network feature or receive network data, for example to
set up call diverts. You send the service commands by sending specific character
strings to the network. Contact your service provider to details of available service
commands.
To send a service command:
1. From the Home screen, select Menu > Messages.
2. Select Serv. commands.
3. Enter the service command character string, then select Send.
66
Messages
General message settings
Saving sent messages
To save messages in the Sent items folder when they have been sent:
1. From the Home screen, select Menu > Messages.
2. Select Message settings > General settings.
3. In the Save sent messages field, select Yes. A confirmation message is
displayed.
Overwriting sent items
If your phone memory is filled up, you will not be able to send or receive any new
messages.
To avoid this, you can set your phone to automatically overwrite the oldest messages
in the Sent items folder when new messages are sent or received.
To enable overwriting of sent items:
1. From the Home screen, select Menu > Messages.
2. Select Message settings > General settings.
3. In the Overwrite sent items field, select Allowed. A confirmation message is
displayed.
Font size
Your Vertu phone supports different font sizes that can be applied to messages being
created and message that have been received.
The selected font size does not affect how a message that you send is displayed to
the recipient(s).
To set the font size for messages:
1. From the Home screen, select Menu > Messages.
2. Select Message settings > General settings.
3. In the Font size field, select Small font/Normal font/Large font as required. A
confirmation message is displayed.
Graphical smileys
To enable graphical smileys to be displayed in your messages:
1. From the Home screen, select Menu > Messages.
2. Select Message settings > General settings.
3. In the Graphical smileys field, select Yes. A confirmation message is displayed.
Favourite recipient
If you have a single contact, contact group, phone number, or e-mail address that you
frequently send messages to, you can set it as a favourite recipient.
When you add recipients to a message, the favourite recipient(s) will be at the top of
the list when you are selecting recipients.
To save a favourite recipient:
1. From the Home screen, select Menu > Messages.
2. Select Message settings > General settings.
3. Select Favourite recipient.
4. Select the type of recipient required.
5. Select the recipient to select as the favourite. A confirmation message is
displayed.
67
Messages
Service messages
Service messages give service providers the ability to push notifications to your Vertu
phone. Service messages can contain various information, such as changes in stock
prices, flight schedule changes, or news headlines.
Service messages may indicate downloadable content. You can then view this
content by using the Inbox and the Web application.
When you receive a service message, select Show to display the message, or Exit
to save the message to the Inbox.
Service message settings
To enable receiving of service messages:
1. From the Home screen, select Menu > Messages.
2. Select Message settings > Service messages.
3. In the Service messages field, select On. A confirmation message is displayed.
You can filter service messages so that only those from content authors approved by
your service provider are received.
To filter service messages:
1. From the Home screen, select Menu > Messages.
2. Select Message settings > Service messages.
3. In the Message filter field, select On. A confirmation message is displayed.
To set the Web browser to automatically activate when you receive a service
message:
1. From the Home screen, select Menu > Messages.
2. Select Message settings > Service messages.
3. In the Autom. connection field, select On. A confirmation message is displayed.
68
Settings
To set your home location:
1. From the Home screen, select Menu > Settings > Date and time.
2. Select Time management > Home location.
3. Select your home continent and country, then select Save.
Settings
Date & time settings
Date and time
Your Vertu phone has an Accurate Time feature. This feature uses your location to
keep the time on your phone accurate and updated, even when travelling.
NOTE: In order to use the Accurate Time feature, you need to accept the
service terms and conditions. The acceptance option is presented when
running the Setup Wizard. For further information on the Setup Wizard, see
Setup Wizard.
Time management
To activate Accurate Time:
1. From the Home screen, select Menu > Settings > Date and time.
2. Select Time management > Clock mode.
3. Select Accurate time.
To deactivate Accurate Time:
1. From the Home screen, select Menu > Settings > Date and time.
2. Select Time management > Clock mode.
3. Select Single fixed clock.
By setting your home location, the Accurate Time feature can update the Home
screen clock to display both the local time at your current location and the time at your
home location when you are travelling.
If the Accurate Time feature is deactivated, you can set the home location to update
the Home screen clock manually when travelling.
For information on the Home screen clock, see Clock in Getting started.
NOTE: These settings are only available if Accurate Time is not activated.
To set the date and time manually:
1. From the Home screen, select Menu > Settings > Date and time.
2. Select Date & time settings.
3. Set the date and time, then select Save.
TIP: When setting the date, select Options > Select day to select the date
from a calendar month view.
Date and time format
To set the date format:
1. From the Home screen, select Menu > Settings > Date and time.
2. Select Date and time format > Date.
3. Select the date format and separator as required.
To set the Home screen clock type:
1. From the Home screen, select Menu > Settings > Date and time.
2. Select Date and time format > Time.
3. Select Clock.
4. Select Digital/Analogue/Miniature/Hide clock as required. To preview the
different clock types, see Clock in Getting started. Select Hide clock to have
no clock displayed.
To set the time format:
1. From the Home screen, select Menu > Settings > Date and time.
2. Select Date and time format > Time.
3. Select Time format.
4. Select 24-hour or 12-hour as required.
69
Settings
Profiles
The profiles feature enables you to define the type and volume of sounds and alerts
to be used for particular situations. For example, if you do not want to be disturbed,
you may want to use the Silent profile.
Your Vertu phone enables you to select one of seven profiles. Each of these profiles
can be personalised to meet your specific requirements.
The settings controlled by profiles include the incoming call alert, ringing tone, ringing
volume, light effects, vibrating alert, message alert tones and keypad tones.
TIP: You can also change sounds and alerts from the Tones settings. For
further information, see Tones.
Changing the active profile
To change the active profile:
1. From the Home screen, select Menu > Settings > Profiles.
2. Select a profile from the following:
• General - this is the default profile. Tones are played for incoming calls and
alerts. The light effects and vibrating alert are enabled.
• Silent - this profile is useful when you do not want to be disturbed. No tones will
be played. The light effects and vibrating alert are disabled.
TIP: To quickly toggle between the Silent profile and the General profile:
From the Home screen, press and hold the
-key.
• Meeting - this profile is useful if you want to be informed of incoming calls and
messages, while avoiding disturbing those around you. A short tone will be
played for incoming calls and alerts. The light effects and vibrating alert are
disabled.
• Outdoor - this profile has tones played at their loudest. The light effects and
vibrating alert are enabled.
• My style 1 - this profile enables you to set a personalised profile without having
to change any of the preset profiles. The default settings are the same as the
General profile.
• My style 2 - this profile can be used in the same way as the My style 1 profile.
The default settings are the same as the General profile.
70
• Flight - this profile deactivates all radio frequency (RF) functionality, while still
enabling you to access other features such as games, calendar and contacts.
The Flight profile is intended for use in environments sensitive to any radio
emissions e.g. on board aircraft.
3. Select Activate.
TIP: You can also change the active profile by pressing the Power key, then
selecting the required profile.
Setting a timed profile
You can set a profile to expire at a preset time. After the expiry time, the profile returns
to the last non-timed profile.
NOTE: You cannot set the Flight profile as a timed profile.
For example, if the General profile is active, and then the Silent profile is set to end
after a meeting, your Vertu phone will automatically resume using the General profile
when the meeting ends.
To set a timed profile
1. From the Home screen, select Menu > Settings > Profiles.
2. Select the required profile.
3. Select Timed.
4. Enter the expiry time for the profile, then select OK.
Personalising profiles
To personalise a profile:
1. From the Home screen, select Menu > Settings > Profiles.
2. Select the required profile.
3. Select Personalise.
4. Change the profile settings as required, then select Save.
Settings
Themes
Tones
A theme defines the image that is used as the background for all of your Vertu phone
menus. Your Vertu phone comes with various themes containing different images.
The Tones settings include the incoming call alert, ringing tone, ringing volume, light
effects, vibrating alert, message alert tones and keypad tones.
Changing the theme
To change the theme:
1. From the Home screen, select Menu > Settings > Themes.
2. Scroll to the required theme, then select Apply.
TIP: You can also change sounds and alerts from the profiles settings. For
further information, see Profiles.
To change the Tones settings:
1. From the Home screen, select Menu > Settings > Tones.
2. Change the required settings, then select Save. The settings are saved to the
active profile.
Ringing tones
Your Vertu phone comes with a variety of exclusive ringing tones. You can also
download files from a computer or the internet and use them as ringing tones.
NOTE: For information on supported file formats, see the Specifications
section.
To use a ringing tone stored in the Ringing tones, Music files or Received files
folder:
1. From the Home screen, select Menu > Settings > Tones.
2. Scroll to the Ringing tone: field, then select Change. Ringing tones that are
saved in the Ringing tones folder (in the Gallery > Tones folder) are displayed.
3. Scroll through the list of tones to hear previews of each one.
4. Either select a ringing tone from the list
or
scroll to the Music files folder, select Open, then select the required music file
or
scroll to the Received files folder, select Open, then select the required file.
TIP: Files that have been sent to your Vertu phone using Bluetooth are
contained in the Received files folder.
71
Settings
To use a ringing tone stored elsewhere in the gallery:
1. From the Home screen, select Menu > Settings > Tones.
2. Scroll to the Ringing tone: field.
3. Move the Joystick left, then press the Joystick. The gallery is opened with the
Tones folder highlighted. For information on the gallery, see the Gallery section.
4. Select the file to use as the ringing tone.
Display
Setting a wallpaper
The wallpaper is the image used as the background for the Home screen.
By default, the wallpaper on your Vertu phone is set by the theme. For information on
themes, see Themes. You can set a wallpaper that is not defined by a theme.
TIP: If you set a wallpaper that is not defined by a theme, and the Home
screen clock type is set to Digital or Analogue, then the clock type will
change to Miniature. For information on the Home screen clock type, see
Clock in Getting started and Date and time format.
To set an image stored on your Vertu phone as the wallpaper:
1. From the Home screen, select Menu > Settings > Display.
2. Select Wallpaper.
3. Select Image or Slide set. The gallery is opened with the Graphics folder
highlighted.
4. Select the image to use as the wallpaper.
To capture a photo and set it as the wallpaper:
1. From the Home screen, select Menu > Settings > Display.
2. Select Wallpaper.
3. Select Open Camera. The camera is started.
4. Capture a photo to use as the wallpaper. For information on using the Camera,
see the Camera section.
5. Select Set.
Notification details
This setting enables extra details to be displayed in a notification. For example, the
name and number of a contact can be displayed when you have missed a call from
the contact.
To set notification details to be displayed:
1. From the Home screen, select Menu > Settings > Display.
2. Select Notification details.
3. Select Show.
72
Settings
NOTE: Notification details are only shown when there is a single
notification. If multiple or combined notifications are displayed, notification
details are not shown.
Lights
Font size
You can set the font size for the Messages, Contacts and Web features either from
each feature, or from the Settings menu.
To set font sizes from the Settings menu:
1. From the Home screen, select Menu > Settings > Display.
2. Select Font size.
3. Select Messaging/Contacts/Web, then select the required font sizes.
Cell info display
You can set your Vertu phone to indicate when you are connected to a Micro Cellular
Network (MCN). MCN provides GSM services in densely populated areas with small
cells. As the charging may be different within an MCN cell than in a standard GSM
cell, you can view the type of cell you are using.
To set the cell information to be displayed in the Home screen when you are
connected to an MCN:
1. From the Home screen, select Menu > Settings > Display.
2. Select Cell info display.
3. Select On.
NOTE: Cell information cannot be displayed when GPRS is active.
The pulsing indicator on your Vertu phone can indicate various situations. For details,
see Pulsing indicator in Getting started.
The pulsing indicator is active by default.
To deactivate the pulsing indicator:
1. From the Home screen, select Menu > Settings > Lights.
2. Select Pulsing indicator.
3. Select On.
My shortcuts
You can set up shortcuts on your Vertu phone to enable you to quickly access the
features that you use the most. The shortcuts can be set up for the left and right
selection keys and the Joystick.
Setting up selection key shortcuts
To set up selection key shortcuts:
1. From the Home screen, select Menu > Settings > My shortcuts.
2. Select Left selection key/Right selection key, then select the required feature.
Setting up Joystick shortcuts
To set up Joystick shortcuts:
1. From the Home screen, select Menu > Settings > My shortcuts.
2. Select Navigation key.
3. Scroll to the shortcut to change, then select Change.
NOTE: The shortcut to Vertu Feeds cannot be changed.
4. Select the new feature for the shortcut.
73
Settings
Connectivity
Bluetooth
Bluetooth is a short-range wireless communications technology. Devices with
Bluetooth capabilities can exchange data over a distance of approximately 10 metres
without requiring a wired connection.
To ensure interoperability between other devices supporting Bluetooth technology,
use Vertu approved enhancements for this model. Check with the manufacturers of
other devices to determine their compatibility with this device.
Bluetooth on your Vertu phone has three modes: “Off”, “On and Hidden” and “On and
Visible”.
In “Off” mode, you cannot send or receive data using Bluetooth.
In “On and Hidden” mode, your Vertu phone can search for and connect to other
devices. However, your phone will not be visible in searches by other devices.
In “On and Visible” mode, your Vertu phone can search for and connect to other
devices. Your phone will also be visible to other devices.
Changing Bluetooth mode
By default, Bluetooth is in “Off” mode. Bluetooth will remain in the same mode when
turning your Vertu phone off and on.
To change Bluetooth mode from “Off” to “On and Hidden”:
1. From the Home screen, select Menu > Settings > Connectivity.
2. Select Bluetooth > Bluetooth.
3. Select On.
4. If you have not changed the visibility setting, a query will be displayed asking
whether you want to make your phone visible to other devices. Select No.
Otherwise, check that the My phone’s visibilityfield is set to Hidden.
To change Bluetooth mode from “Off” to “On and Visible”:
1. From the Home screen, select Menu > Settings > Connectivity.
2. Select Bluetooth > Bluetooth.
3. Select On.
4. If you have not changed the visibility setting, a query will be displayed asking
whether you want to make your phone visible to other devices. Select Yes.
74
Otherwise, check that the My phone’s visibilityfield is set to Always visible or
Temp. visible.
To change Bluetooth mode to “Off”:
1. From the Home screen, select Menu > Settings > Connectivity.
2. Select Bluetooth > Bluetooth.
3. Select Off.
NOTE: You can conserve battery power by switching off Bluetooth when it
is not in use.
TIP: You can quickly switch Bluetooth on and off using the Go to menu. The
visibility setting will remain the same. For information on the Go to menu,
see Go to menu in Getting started.
Pairing devices
When devices are paired, a relationship is created that enables the exchange of data
between the devices.
The pairing can be set up using a passcode, which helps ensure that exchanged data
is kept secure.
Pairing of devices only needs to be carried out once. After this, the devices can
connect to each other and exchange data without the passcode needing to be
entered again.
Before pairing your Vertu phone with another device, ensure that:
• Your Vertu phone and the other device are within 10 metres of each other.
• Bluetooth on your Vertu phone is set to “On and hidden” or “On and Visible”.
• Bluetooth on the other device is set to “On and Visible”.
To pair your Vertu phone with another device:
1. From the Home screen, select Menu > Settings > Connectivity.
2. Select Bluetooth > Paired devices.
3. Select Add new device. Your Vertu phone searches for other Bluetoothenabled devices and displays them in a list.
4. Scroll to the device to pair with, then select Add.
5. Wait for the other device to accept the pairing. It is then added to the list of paired
devices.
6. Check that the passcodes on the devices match, then select Yes.
Settings
Bluetooth connection settings
Unpairing devices
You can set a paired device to automatically connect to your Vertu phone, without
needing confirmation.
To allow a paired device to connect automatically:
1. From the Home screen, select Menu > Settings > Connectivity.
2. Select Bluetooth > Paired devices.
3. Scroll to the required device, then select Options > Settings.
4. In the Auto-conn., no conf. field, select Yes.
To unpair your Vertu phone from another device:
1. From the Home screen, select Menu > Settings > Connectivity.
2. Select Bluetooth > Paired devices.
3. Scroll to the required device, then select Options > Delete pairing.
4. Select Yes to confirm the deletion.
Connecting a Bluetooth headset
Before connecting a Bluetooth headset to your Vertu phone, ensure that:
• Bluetooth on your Vertu phone is set to “On and Visible”.
• the Bluetooth headset is set to pairing mode.
To connect a Bluetooth headset:
1. From the Home screen, select Menu > Settings > Connectivity.
2. Select Bluetooth > Conn. to audio acc.
3. Select New search. Your Vertu phone searches for Bluetooth-enabled audio
accessories and displays them in a list.
4. Scroll to the Bluetooth headset in the list of devices, then select Connect.
5. Enter the passcode for the headset if required. This will be provided with your
Bluetooth headset.
6. Your Vertu phone will pair with the Bluetooth headset and connect to it.
Sending a file via Bluetooth
To send a file via Bluetooth:
1. Scroll to the required file, then select Options > Send > Via Bluetooth.
2. Select Paired devices.
3. Scroll to the required device, then select Connect.
4. Select OK when the confirmation message is displayed.
Changing the Bluetooth name
You can change the name for your Vertu phone that is displayed to other Bluetooth
devices.
To change the name of your Vertu phone:
1. From the Home screen, select Menu > Settings > Connectivity.
2. Select Bluetooth > My phone’s name.
3. Edit the name, then select OK.
Packet data
Packet-based wireless communication enables data to be sent and received using
mobile phones. You can use packet data connections to connect to the internet or to
send and receive MMS messages using your Vertu phone.
When you use GPRS, you will usually be billed based on the data traffic volume.
However, you should check billing information with your service provider.
Setting availability of packet data services
You can set packet data connections to be always online, or connected only when
needed. If the connections are always online, you will be able to access services
more quickly.
To set the availability of packet data services:
1. From the Home screen, select Menu > Settings > Connectivity.
2. Select Packet data > Packet data conn.
3. Select When needed or Always online as required.
Disconnecting from a Bluetooth device
To disconnect from a Bluetooth device:
1. From the Home screen, select Menu > Settings > Connectivity.
2. Select Bluetooth > Active devices.
3. Scroll to the required device, then select Disconn.
75
Settings
Using your Vertu phone as a modem
USB data cable
To connect to the internet by using your Vertu phone as a modem:
1. Check that Vertu PC Suite is installed on your computer. For information on
installing Vertu PC Suite, see Installing Vertu PC Suite in Getting started.
2. Connect your Vertu phone to your computer using the data cable or Bluetooth.
For information on connecting your Vertu phone to a computer using the data
cable, see Data cable in Accessories. For information on setting up a Bluetooth
connection, see Bluetooth.
3. If you are using the data cable, select PC Suite in Select USB mode: field.
4. Start Vertu PC Suite on your computer.
5. Click on the Connect to the Internet icon.
6. Click the Configure button.
7. Click the Next button.
8. Select your network operator from the list. then click the Finish button.
9. Click the Connect button.
10.Click the Disconnect button when you have finished your browsing session.
You can use the USB data cable in the following ways:
• To connect your Vertu phone to a computer using Vertu PC Suite. For further
information, see Vertu PC Suite in Getting started and Using your Vertu
phone as a modem.
• To connect your Vertu phone to a printer supporting PictBridge.
• To connect your Vertu phone to a computer for the phone to be used as a USB
storage device.
If you always use the USB data cable for the same purpose, you can select this in the
settings on your Vertu phone. If you use the USB cable in different ways, you can set
the phone to request the USB usage mode each time it is connected to a device using
the cable.
To set the USB mode:
1. From the Home screen, select Menu > Settings > Connectivity.
2. Select USB data cable.
3. Select one of the following settings:
• Ask on conn. - to prompt for the USB usage mode whenever connecting.
• PC Suite - to always connect using PC Suite.
• Printing & media - to always connect for printing.
• Data storage - to always connect in data storage mode.
Modifying packet data settings
To modify packet data settings:
1. From the Home screen, select Menu > Settings > Connectivity.
2. Select Packet data > Packet data settings.
3. Modify the access point settings as required.
Enabling high speed packet access
To enable high speed packet access:
1. From the Home screen, select Menu > Settings > Connectivity.
2. Select Packet data > HS packet access.
3. Select Enabled.
GPS
For information on GPS settings, see Setting up an external GPS receiver and
Starting navigation in Navigate.
76
Call
For information on call settings. see Call settings in Call functions.
Settings
Phone
Stereo widening
Language settings
You can change the language of your Vertu phone to any of the languages that are
available in the software.
As well as changing the display texts, the phone language affects several other
properties of phone software, such as date and time formats and separators.
To change the language of your Vertu phone:
1. From the Home screen, select Menu > Settings > Phone.
2. Select Language settings > Phone language.
3. Select the required language. If you select Automatic, the language is selected
from preference lists on the SIM card.
NOTE: The text input language can be set separately. For information, see
Changing writing language in Text input.
The SIM language setting is only available if the SIM card supports a SIM language,
and if this feature is supported by your service provider. The setting enables you to
change the preferred language of the SIM card.
Viewing the memory status
To view the memory status:
1. From the Home screen, select Menu > Settings > Phone.
2. Select Memory status. The memory status of the phone memory and the
internal memory card is displayed.
3. Select an item to view details its memory status.
Automatic keyguard
Stereo widening is an audio setting that enhances the audio output of your Vertu
phone by giving a wider stereo effect.
To activate stereo widening:
1. From the Home screen, select Menu > Settings > Phone.
2. Select Stereo widening.
3. Select On. This setting is applied to all stereo audio content and all stereo output
channels.
Voice recognition
Using voice recognition, your Vertu phone can dial contacts and access phone
features using voice commands.
For information on accessing phone features using voice commands, see
Accessing a phone feature using a voice command in Getting started.
For information on voice dialling, see Making a call using voice dialling in Call
functions.
To listen to a voice command:
1. From the Home screen, select Menu > Settings > Phone.
2. Select Voice recognition > Voice commands.
3. Select the type of voice command to listen to.
4. Scroll to the required voice command, then select Play.
To delete all voice commands:
1. From the Home screen, select Menu > Settings > Phone.
2. Select Voice recognition > Voice commands.
3. Select Options > Remove all.
To reinstate all voice commands:
1. From the Home screen, select Menu > Settings > Phone.
2. Select Voice recognition > Voice commands.
3. Select Options > Add all.
For information on the automatic keyguard, see Automatic keyguard in Getting
started.
Security keyguard
For information on security keyguard, see Security keyguard in Security.
77
Settings
Training voice recognition
You can train the voice recognition feature to best recognise your voice.
To train voice recognition:
1. From the Home screen, select Menu > Settings > Phone.
2. Select Voice recognition > Voice recog. training.
3. Read the instructions, then select Continue.
4. Select Ready, then speak the displayed name or command after the tone.
5. Repeat Step 4 to continue to train the voice recognition feature.
6. Press the End key when you want to finish the training.
Flight query
The flight query asks you if you would like to activate the Flight profile. You can set
this query to be displayed each time you switch on your Vertu phone. This is useful if
you are frequently travelling by air. For information on the Flight profile, see Profiles.
To activate the flight query:
1. From the Home screen, select Menu > Settings > Phone.
2. Select Flight query.
3. Select On.
Phone updates
You can use this setting to update the software on your Vertu phone.
Viewing details of current software
To view the details of the current software on your Vertu phone:
1. From the Home screen, select Menu > Settings > Phone.
2. Select Phone updates.
3. Select Current softw. details. Details of the current software version are
displayed.
Downloading software
To download the latest version of your Vertu phone software:
1. From the Home screen, select Menu > Settings > Phone.
2. Select Phone updates.
3. Select Downl. phone softw.
4. Select the type of connection to use for downloading the software.
78
5. Wait while your phone connects to the Vertu server, checks for updates, and
downloads any later version of the software.
Installing software updates
To install software updates:
1. From the Home screen, select Menu > Settings > Phone.
2. Select Phone updates.
3. Select Install softw. update, then follow the instructions displayed.
Viewing software update provider
To view the provider of the software updates:
1. From the Home screen, select Menu > Settings > Phone.
2. Select Phone updates.
3. Select SW update provider. The software update provider is displayed.
Checking for updates automatically
To set up your Vertu phone to automatically check for software updates:
1. From the Home screen, select Menu > Settings > Phone.
2. Select Phone updates.
3. Select Automatic SW update.
4. Select how frequently you would like your Vertu phone to check for software
updates.
Network mode
The network mode enables you to set the radio system used by your Vertu phone.
The default settings is 3G + GSM, which is also known as dual mode.
Using GSM only will conserve battery power, but will reduce data transfer speeds.
IMPORTANT: Changing the network mode setting may limit the ability of
your Vertu phone to connect to the wireless network, and may result in
signal failure.
To set the network mode:
1. From the Home screen, select Menu > Settings > Phone.
2. Select Network mode.
3. Select 3G + GSM/3G/GSM as required.
Settings
Operator selection
You can select whether your Vertu phone will automatically search and select a
network to connect to, or whether you will be prompted to select one manually.
You may need to manually select a network when you are travelling.
Setting the operator selection type
To set the operator selection type:
1. From the Home screen, select Menu > Settings > Phone.
2. Select Operator selection.
3. Select Automatic or Manual as required.
If you select Automatic, your Vertu phone will register to the default network. This
network is defined by your SIM card.
If you select Manual, you can select the network to connect to.
Confirm SIM actions
NOTE: This setting is only available if it is supported by your service
provider.
To set your Vertu phone to display confirmation messages sent between the phone
and the network when you are using the SIM services:
1. From the Home screen, select Menu > Settings > Phone.
2. Select Confirm SIM actions.
3. Select Yes.
Manually connecting to a network
To manually connect to a network:
1. From the Home screen, select Menu > Settings > Phone.
2. Select Operator selection.
3. Select Manual.
4. Wait for your Vertu phone to search for all available networks.
5. When the list of networks is displayed, select the required network. Your phone
will attempt to register to the selected network.
Start-up tone
To deactivate the tone that is played when your Vertu phone starts up:
1. From the Home screen, select Menu > Settings > Phone.
2. Select Start-up tone.
3. Select Off.
79
Settings
Accessories
NOTE: These settings are only available if your Vertu phone is, or has been,
connected to an accessory, such as a headset or charger.
Setting a default profile for an accessory
You can set a default profile for an accessory. For example, you may want to
automatically activate the Meeting profile when a headset is connected, or the
Outdoor profile when a car kit is connected. For information on profiles, see Profiles.
To set a default profile for an accessory:
1. From the Home screen, select Menu > Settings > Accessories.
2. Select the required accessory.
3. Select Default profile.
4. Select the required profile from the list.
Automatic answer
For information on the automatic answer feature, see Automatic answer in Call
functions.
Setting backlight functionality when charging
To set the backlight functionality when your Vertu phone is connected to a power
source using the charger:
1. From the Home screen, select Menu > Settings > Accessories.
2. Select Charger.
3. Select Lights.
4. Select On to keep the backlight on
or
select Automatic for the backlight to time out as normal.
Configuration
This setting enables you to configure your Vertu phone with settings required for a
number of features to communicate with the network and thus function correctly.
IMPORTANT: In most cases, the configuration settings will be
automatically updated in your Vertu phone from information on the SIM
card. You should only change the configuration settings manually if
absolutely necessary.
For information on receiving settings from the Vertu web site, see Setting up MMS,
e-mail and internet browsing in Getting started.
Viewing configurations and supported applications
To view the configurations stored on your Vertu phone and their supported
applications:
1. From the Home screen, select Menu > Settings > Configuration.
2. Select Default config. sett. The list of configurations is displayed.
3. Scroll to the required configuration, then select Details. Information listing which
applications are supported by the configuration is displayed. For example, you
can see which configuration is used for multimedia messaging.
TIP: If a configuration is never used, you can delete it by scrolling to it, then
selecting Options > Delete. Select Yes to confirm the deletion.
Setting a default configuration
To set a default configuration:
1. From the Home screen, select Menu > Settings > Configuration.
2. Select Default config. sett.
3. Scroll to the required configuration, then select Options > Set as default.
Activating the default configuration for all applications
To activate the default configuration to be used by all applications:
1. From the Home screen, select Menu > Settings > Configuration.
2. Select Act. def. in all apps.
3. Select Yes to confirm the activation.
80
Settings
IMPORTANT: Before activating a configuration for all applications, you
need to ensure that the configuration supports all of the applications that
you need. Some applications may not work if they are not supported by the
default configuration.
Viewing access point details
To view details of the access points stored on your Vertu phone:
1. From the Home screen, select Menu > Settings > Configuration.
2. Select Preferred access pt. The list of access points is displayed.
3. Scroll to the required access point, then select Options > Details.
Setting a default access point
To set a default access point:
1. From the Home screen, select Menu > Settings > Configuration.
2. Select Preferred access pt.
3. Select the required access point.
Downloading configuration settings from your service provider
NOTE: This setting is only available if it is supported by your service
provider.
TIP: To add more configurations, select Options > Add new.
Activating a personal configuration
To activate a personal configuration:
1. From the Home screen, select Menu > Settings > Configuration.
2. Select Personal config. sett.
3. Scroll to the required configuration, then select Options > Activate.
Deleting a personal configuration
To delete a personal configuration:
1. From the Home screen, select Menu > Settings > Configuration.
2. Select Personal config. sett.
3. Scroll to the required configuration, then select Options > Delete.
4. Select Yes to confirm the deletion.
Security
For information on security settings, see the Security section.
To download configuration settings from your service provider:
1. From the Home screen, select Menu > Settings > Configuration.
2. Select Connect to support.
Adding configurations
NOTE: Before adding a configuration, you will need to obtain the required
settings from the relevant service provider.
To add a configuration:
1. From the Home screen, select Menu > Settings > Configuration.
2. Select Personal config. sett.
3. Select Add.
4. Select the type of setting you will add.
5. Enter the required settings.
81
Settings
Workshop reset
Sync and backup
To restore the settings on your Vertu phone to their original values:
Phone switch
NOTE: This setting will not delete any of the personal data on your phone.
1.
2.
3.
4.
From the Home screen, select Menu > Settings > Workshop reset.
Select Restore settings only.
Select Continue.
Enter the security code. For information on the security code, see Security code
in Security.
5. Wait while the settings are restored. The phone will restart after the restore.
6. The Setup Wizard runs after the restart. For information on the Setup Wizard, see
Setup Wizard in Getting started.
7. Select OK when the confirmation message is displayed.
To restore the settings on your Vertu phone to their original values, and delete all of
your personal data:
IMPORTANT: This setting will delete any applications that you have
installed. You will also lose other data such as contacts and messages.
IMPORTANT: We recommend that you back up all of your data before
using this setting.
1.
2.
3.
4.
From the Home screen, select Menu > Settings > Workshop reset.
Select Restore all.
Select Continue.
Enter the security code. For information on the security code, see Security code
in Security.
5. Wait while the settings are restored. The phone will restart after the restore.
6. The Setup Wizard runs after the restart. For information on the Setup Wizard, see
Setup Wizard in Getting started.
7. Select OK when the confirmation message is displayed.
82
This setting enables you to synchronise or transfer data between two Vertu phones.
This is useful for copying information such as contacts from an old phone to a new
one.
The data will be transferred via Bluetooth. For information on setting up the phones
for the data transfer, see Bluetooth.
To synchronise data between phones:
1. From the Home screen, select Menu > Settings > Sync and backup.
2. Select Phone switch.
3. Select Synchronise. The list of items that you can synchronise is displayed.
These items are contacts, calendar notes, text messages, multimedia messages
and notes.
4. Unselect any items that you do not want to synchronise by scrolling to the item
and selecting Unmark. Select Done when you have finished.
5. Your Vertu phone searches for Bluetooth-enabled devices and displays them in
a list.
6. Scroll to the required device, then select Connect.
7. Wait for the other device to accept the synchronisation request. The data is then
synchronised.
To copy data from one phone to another:
1. From the Home screen, select Menu > Settings > Sync and backup.
2. Select Phone switch.
3. Select Copy to this or Copy from this, depending on the direction in which you
want to copy the data. The list of items that you can synchronise is displayed.
These items are contacts, calendar notes, text messages, multimedia messages
and notes.
4. Unselect any items that you do not want to synchronise by scrolling to the item
and selecting Unmark. Select Done when you have finished.
5. Your Vertu phone searches for Bluetooth-enabled devices and displays them in
a list.
6. Scroll to the required device, then select Connect.
Settings
7. Wait for the other device to accept the data transfer request. The data is then
copied.
Create backup
This setting enables you to create a backup of selected content and save it on the
internal memory card.
TIP: You can also back up data from your Vertu phone using Vertu PC Suite
or Vertu Fortress. For information on Vertu PC Suite, see Vertu PC Suite
in Getting started. For information on Vertu Fortress, see Vertu Fortress
in Vertu Services.
To create a backup:
1. From the Home screen, select Menu > Settings > Sync and backup.
2. Select Create backup.
3. Select Continue.
4. Select Synchronise. The list of items that you can synchronise is displayed.
These items are settings, contacts, messages, bookmarks, calendar notes,
gallery files, and applications and games.
5. Unselect any items that you do not want to back up by scrolling to the item and
selecting Unmark. Select Done when you have finished.
6. Wait while the backup is created.
Restore backup
This setting enables you to restore files from a backup that was previously saved on
the internal memory card.
To restore data from a backup:
1. From the Home screen, select Menu > Settings > Sync and backup.
2. Select Restore backup.
3. Select the required backup.
4. Select Continue. The list of items that you can restore is displayed.
5. Unselect any items that you do not want to back up by scrolling to the item and
selecting Unmark. Select Done when you have finished.
6. Wait while the data is restored. The phone then restarts.
7. Select OK when the confirmation message is displayed.
Data transfer
This setting enables you to synchronise contacts, calendar and notes data between
your Vertu phone and a remote server or PC.
Server sync
In order to synchronise your Vertu phone with a remote server, you need to subscribe
to a synchronisation service, such as Vertu Fortress. For information on Vertu
Fortress, see Vertu Fortress in Vertu Services.
You will need to obtain the settings for the synchronisation service from the service
provider. These settings can be sent to you in a configuration message.
To synchronise your Vertu phone with a remote server:
1. From the Home screen, select Menu > Settings > Sync and backup.
2. Select Data transfer > Server sync.
3. Select the data to be synchronised by scrolling to the required items and
selecting Mark. Select Done when you have finished.
4. Select Yes to save changes.
5. Select Yes to start synchronisation.
6. Wait while your Vertu phone connects to the server and synchronises the data.
Server sync settings
To view and edit the server synchronisation settings:
1. From the Home screen, select Menu > Settings > Sync and backup.
2. Select Data transfer.
3. With Server sync highlighted, select Options > Edit.
4. Select Synchronised data to edit the data to be synchronised (from contacts,
calendar and notes).
5. Select Sync settings to edit the settings for the synchronisation service
(configuration account, user name and password).
6. Select Automatic sync to set whether automatic synchronisation is permitted,
and if so, the frequency of the automatic synchronisation (daily, weekly or
monthly).
7. Select Rules for incom. sync to set whether an incoming synchronisation
request should be allowed, rejected, or need confirmation.
Setup wizard
For information on the Setup Wizard, see Setup Wizard in Getting started.
83
Additions
Additions
Collection
TIP: Some of the applications in the collection folder can be updated. To
check for updates, scroll to the required application, then select Options >
Update version. Your Vertu phone will check for available updates. You
can then follow the onscreen instructions to download and install a newer
version if one is available.
You can download new Java applications (including games) using Vertu PC Suite.
For information on Vertu PC Suite, see Vertu PC Suite in Getting started. You can
also download and install applications over-the-air.
IMPORTANT: Only install and use applications and other software from
sources that offer adequate security and protection against viruses and
other malware.
The following collection of applications is pre-installed on your Vertu phone.
• Facebook
• Opera Mini
• Travel
• Vertu Feeds
This collection includes Vertu-exclusive applications as well as popular social
networking tools. For information on Travel and Vertu Feeds, see the Vertu Services
section.
Your Vertu phone comes with the following games pre-installed:
• Sudoku
• Golf
IMPORTANT: If your Vertu phone comes with pre-installed applications
that access web sites not affiliated with Vertu. Vertu does not warrant or
endorse these web sites. If you choose to access them, you should take the
same precautions for security or content as when accessing any web site.
To access the games on your Vertu phone:
1. From the Home screen, select Menu > Additions > Games.
2. Scroll to the required game, then select Open.
NOTE: For information on the availability of services, pricing and tariffs,
contact your service provider.
To access the collection folder:
From the Home screen, select Menu > Additions > Collection.
When you download applications they will also be stored in the collection folder.
Your Vertu phone supports J2ME Java applications. Make sure that the application is
compatible with your phone before downloading it.
84
Games
Additions
Torch
Calculator
Your Vertu phone is equipped with a torch that uses the camera flash LED.
To switch the torch on:
From the Home screen, press and hold the
-key
or
select Menu > Additions > Torch > On.
The torch will remain on for 60 seconds unless you switch it off.
The calculator on your Vertu phone includes a standard calculator, a scientific
calculator and a loan calculator.
To switch the torch off:
From the Home screen, press and hold the
or
select Menu > Additions > Torch > Off.
The keys used to perform calculator functions are described below:
• Number keys - to enter numbers.
• Joystick, move up - to enter a ‘+’ (plus) sign.
• Joystick, move down - to enter a ‘-’ (minus) sign.
• Joystick, move left - to enter a ‘x’ (multiply) sign.
• Joystick, move right - to enter a ‘÷’ (divide) sign.
• Joystick, press - ‘=’ (equals), performs the calculation.
•
-key - to access the following extra functions:
• 1/x - to calculate the reciprocal of a number.
• % - to convert a percentage to a decimal number.
• x2 - to calculate the square of a number.
• √ - to calculate the square root of a number.
• ± = to toggle numbers between positive and negative values, for example
between ‘1’ and ‘-1’.
• MS - to save a number to the memory.
• MR - to recall the number stored in the memory.
• C - to clear the display. The memory is not cleared.
•
-key - to enter a decimal point.
-key
Using the standard calculator
To use the standard calculator:
From the Home screen, select Menu > Additions > Calculator.
Select Clear to clear the last character entered.
Select Options to switch to the scientific or loan calculator, or to view the calculator
instructions.
85
Additions
Media player
Playing music stored on your Vertu phone
You can play a single music track, or multiple tracks in a playlist.
When playing a single track, you can select it either by viewing the list of all music files
stored on your Vertu phone, or by filtering the list of available music files.
Your Vertu phone includes a media player that enables you to play digital audio and
video files that are stored on your phone or on the internet.
You can transfer music to your Vertu phone in a multimedia message, via Bluetooth,
or using Vertu PC Suite. For further information, see Saving the contents of a
multimedia message in Messages, Bluetooth in Settings, and Vertu PC Suite in
Getting started respectively.
Overview of screens
The media player has three primary screens:
• Media menu (library) - enables quick access of files and playlists. Music and video
files pre-installed on your Vertu phone, or transferred to it, are made available from
the Media menu.
TIP: To manually update the Media menu, select Options > Update
library.
TIP: To view details of the Media menu, select Options > Media library
details.
The Media menu also includes an item that enables you to switch to the Media
player screen. To switch to the Media player screen from the Media menu screen,
select Go to Media player.
The Media menu screen will be the default screen displayed when you first use the
media played.
• Media player screen - displays the playback controls and the video window.
TIP: Select Options > Go to Media menu to switch to the Media menu
screen.
TIP: Select Options > Now playing to switch to the Now Playing screen.
• Now playing screen - displays the Now playing playlist. This shows the file
currently playing, as well as any files that are queued up to play next.
Selecting Options from any of these screens will give options relevant to the screen.
86
To select and play music by viewing the list of all music files:
1. From the Home screen, select Menu > Additions > Media player.
2. Scroll to All songs, then select Open.
3. Scroll to the required music track, then select Play.
To select and play music by filtering the list of music files:
1. From the Home screen, select Menu > Additions > Media player.
2. Scroll to the field by which to filter the list of music files (Artists, Albums or
Genres).
3. Scroll to the required item, then select Open.
4. Scroll to the required music track, then select Play.
To create and play playlists:
1. From the Home screen, select Menu > Additions > Media player.
2. Select Playlists.
3. Create a playlist or select one to listen to. You can also quickly select recently
added or recently played music tracks, or tracks that you have listened to most
often.
TIP: To listen to music through a Bluetooth headset, select Options > Play
via Bluetooth while listening to music. Connect to a Bluetooth headset as
detailed in Connecting a Bluetooth headset in Settings.
Playing video clips stored on your Vertu phone
To select and play video clips stored on your phone:
1. From the Home screen, select Menu > Additions > Media player.
2. Scroll to Videos, then select Open.
3. Scroll to the required video clip, then select Play.
TIP: To switch to full-screen playback, press the
-key.
To exit full-screen playback, press the
-key again.
Additions
Playing items stored on a network
Media player settings
To play an item stored on a network:
1. From the Home screen, select Menu > Additions > Media player.
2. Select Options > Downloads > Bookmarks to connect to a web site saved as
a bookmark on your Vertu phone. Select the required bookmark from the list
or
select Options > Downloads > Go to address to connect to an unsaved web
site. Enter the required web site address, then select Go to.
For information on connecting to web sites, see the Web section.
To set tracks in a playlist to play in a random order:
1. From the Media player screen, select Options > Settings.
2. Select Shuffle.
3. Select On. A confirmation message is displayed.
NOTE: To play an item on a network, your Vertu phone must connect to the
network.
For more information about connecting your phone to a network, see the
Web section and contact your service provider.
To set music tracks to repeat:
1. From the Media player screen, select Options > Settings.
2. Select Repeat.
3. Select Current song or All songs as required. A confirmation message is
displayed.
For information on using the equaliser, see Equaliser.
For information on stereo widening, see Stereo widening in Settings.
Media player controls
You can play music and videos in the background while using other features of your
Vertu phone. To end background playback, press and hold the End key.
• Press the Joystick to pause or resume playback.
• Move the Joystick up to increase the volume.
• Move the Joystick down to decrease the volume.
• Move the Joystick left to skip to the previous track.
• Move the Joystick right to skip to the next track.
• To mute the audio, press the
-key or select Options > Mute audio.
• To unmute the audio, press the
-key or select Options > Unmute audio.
87
Additions
Equaliser
Stopwatch
The equaliser feature on your Vertu phones enables you to improve sound quality
when playing music by amplifying or attenuating some frequency bands. You can
activate one of the preset equaliser settings or create your own set of settings and
activate it.
The stopwatch on your Vertu phone enables you to accurately measure times, split/
intermediate times, and lap times.
Activating an equaliser set
To activate an equaliser set:
1. From the Home screen, select Menu > Additions > Equaliser.
2. Scroll to the required set. These are named by music type. The individual
settings are displayed at the top half of the screen.
3. Select Activate. A confirmation message is displayed.
Stopwatch modes
The stopwatch can be displayed in analogue chronograph or digital mode. This mode
is dependent on the currently selected Home screen clock type. For information on
the Home screen clock and setting the Home screen clock type, see Clock in
Getting started and Date and time format in Settings respectively.
If the Home screen clock type is Analogue or Hidden, the analogue chronograph
mode is available. If the clock type is Digital or Miniature, the digital mode is available.
Analogue chronograph mode
Creating a personalised equaliser set
To create a personalised equaliser set:
1. From the Home screen, select Menu > Additions > Equaliser.
2. Scroll to Set 1 or Set 2, then select Options > Edit.
NOTE: Only Set 1 and Set 2 can be personalised.
3. Move the Joystick left and right to move between each individual channel from
bass to treble. Move the Joystick up and down to adjust the level for the channel.
4. Select Save when you have finished adjusting the levels. A confirmation
message is displayed.
Renaming an equaliser set
To rename an equaliser set:
1. From the Home screen, select Menu > Additions > Equaliser.
2. Scroll to Set 1 or Set 2, then select Options > Rename.
NOTE: Only Set 1 and Set 2 can be renamed.
3. Enter a new name, then select OK. A confirmation message is displayed.
88
The analogue chronograph stopwatch has three dials.
The large centre dial continues to display the current time with the white hands. The
red sweeping hand is used for counting 60-second time periods.
The small dial to the left counts minutes, up to a maximum of 30 minutes.
The small dial to the right displays continuous seconds.
There is also a small digital clock to the top left of the screen. This is accurate to one
tenth of a second.
Additions
Digital mode
Viewing recorded times
To view recorded times:
1. From the Home screen, press the Chronograph key or select Menu > Additions
> Stopwatch.
2. Select Options.
3. Select the times you wish to view. These can be the last recorded time, split
times, lap times, and saved times.
TIP: To delete saved times, select Options > Delete times, then select
whether to delete times separately or all at once. Select OK to confirm
deletion.
The digital stopwatch displays three rows of information.
The centre row displays the time measured by the stopwatch.
The top row displays the current time, and the bottom row displays the current date.
Measuring times
To measure times using the chronograph stopwatch:
1. From the Home screen, press the Chronograph key or select Menu > Additions
> Stopwatch.
2. Press the Chronograph key to start and stop timing.
TIP: To measure a split time, press the Concierge key. The split time is
displayed digitally at the top right of the screen.
TIP: A maximum of three split times can be displayed. If you measure more
than three, the three most recent are displayed. Move the Joystick up or
down to scroll and view all of the split times.
3. To save the times, select Save, select Edit, enter a name for the times, then
select Save.
4. Press the Chronograph key to continue timing, or press the Concierge key to
reset the stopwatch.
TIP: If you exit the stopwatch feature without resetting, the last recorded
times will be displayed when you start the stopwatch again.
89
Additions
Timer
10.When the time period has passed, an alarm sounds and the phone backlight
flashes. Press a key or move the Joystick to stop the alarm.
Cancelling the timer
The countdown timer on your Vertu phone works as a reminder that is activated when
a preset time period has passed.
The countdown timer incorporates two separate timers - the normal timer and the
interval timer. The normal timer enables you to count down a single time period. The
interval timer enables you to set multiple time periods for counting down and set the
required one as needed.
Setting the normal timer
To set the normal timer:
1. From the Home screen, select Menu > Additions > Timer.
2. Select Normal timer.
3. Enter the countdown time period, then select OK.
4. Enter a name for the timer if required, then select Start. A confirmation message
is displayed.
5. When the time period has passed, an alarm sounds and the phone backlight
flashes. Press a key or move the Joystick to stop the alarm.
Setting the interval timer
To set the interval timer:
1. From the Home screen, select Menu > Additions > Timer.
2. Select Interval timer.
3. Select Add new timer.
4. Enter a name for the timer, then select Save.
5. Enter a name for the first time period (interval), then select Save.
6. Enter the first countdown time period, then select OK. A confirmation message
is displayed.
7. Select the timer.
8. To add more intervals, select Add period, then repeat steps 5 to 7.
9. To start the timer, select Start timer, then scroll to the required timer and select
Start. A confirmation message is displayed.
90
To cancel the timer:
1. From the Home screen, select Menu > Additions > Timer.
2. Select Stop timer. A confirmation message is displayed.
Video recorder
For information on the video recorder, see the Camera section.
Additions
Voice recorder
The voice recorder on your Vertu phone enables you to record clips of speech and
sound, save them to the gallery, and play them back later.
You can record a voice memo if, for example, you don’t have a pen to write down a
phone number or shopping list.
You can also record an active phone call. In this case, both parties are recorded.
Making a voice recording
To make a voice recording:
1. From the Home screen, select Menu > Additions > Voice recorder.
2. With the record button highlighted, press the Joystick to start recording.
TIP: To pause recording, move the Joystick left to highlight the pause
button, then press the Joystick. To resume recording, with the record
button highlighted, press the Joystick.
3. With the stop button highlighted, press the Joystick to stop recording. A
confirmation message is displayed.
NOTE: Voice recordings will be saved in the Recordings folder on the
internal memory card. For information on managing folders and files on
your Vertu phone, see the Gallery section.
Voice recorder options
To access voice recordings:
1. From the Home screen, select Menu > Additions > Voice recorder.
2. Select Options > Recordings list.
3. Scroll to the required recording, then select Open.
TIP: You can also access voice recordings from the gallery.
4. To play the recording, select Open,
or
select Options and select one of the following options:
• Use tone - to use the recording as a tone. Select the type of tone to use the
recording for.
• Delete - to delete the recording. Select Yes to confirm the deletion. A
confirmation message is displayed.
• Send - to send the recording in a multimedia message, in an e-mail, in an audio
message, or via Bluetooth. For information on sending files in messages, see
the Messages section. For information on sending files via Bluetooth, see
Bluetooth in Settings.
• Rename - to rename the recording. Edit the name, then select OK. A
confirmation message is displayed.
• Details - to view details of the recording.
For information on other options, see the Gallery section.
Recording a phone call
To record a phone call:
1. While in a call, select Options > Record.
2. With the stop button highlighted, press the Joystick to stop recording. A
confirmation message is displayed.
91
Additions
Notes
Deleting notes
The notes feature on your Vertu phone enables you to save, edit and send simple
notes.
NOTE: These notes are not associated with calendar notes.
Creating notes
To create a note:
1. From the Home screen, select Menu > Additions > Notes.
2. Select Add or Options > Make a note.
3. Enter the note text. For information on text input, see the Text input section.
TIP: To add a time stamp to the note, select Options > Insert time and
date.
4. Select Save. A confirmation message is displayed.
Viewing notes
To view a note:
1. From the Home screen, select Menu > Additions > Notes.
2. Scroll to the required note, then select View.
Sending notes
To send a note:
1. From the Home screen, select Menu > Additions > Notes.
2. Scroll to the required note, then select Options > Send note.
3. Select whether to send the note in a message or via Bluetooth. For information
on sending files in messages, see the Messages section. For information on
sending files via Bluetooth, see Bluetooth in Settings.
92
To delete a single note:
1. From the Home screen, select Menu > Additions > Notes.
2. Scroll to the required note, then select Options > Delete.
3. Select Yes to confirm the deletion. A confirmation message is displayed.
To delete all notes:
1. From the Home screen, select Menu > Additions > Notes.
2. Select Options > Delete all notes.
3. Select Yes to confirm the deletion. A confirmation message is displayed.
Calendar
Calendar
3. Scroll to the required note, then select Options > Move.
4. Update the time and/or date, then select Save. A confirmation message is
displayed.
Copying a calendar note
The Calendar feature works like an electronic diary. It enables you to keep track of
your appointments, including meetings and other events, such as birthdays.
You can also display reminders on your Vertu phone, and create to-do lists.
Calendar notes
Events and reminders saved in the calendar are saved as calendar notes.
Saving a new calendar note
To save a new calendar note:
1. From the Home screen, select Menu > Calendar or move the Joystick right.
2. Scroll to the date of the event.
3. Select Options > Make a note, then select the type of event.
4. Enter the details of the calendar note. The availability of items depends on the
type of event.
5. Select Save. A confirmation message is displayed.
Editing a calendar note
By editing a calendar note, you can update any of the note details.
To edit a note:
1. From the Home screen, select Menu > Calendar or move the Joystick right.
2. Scroll to the date of the event, then select View.
3. Scroll to the required note, then select View > Edit.
4. Update the details as required, then select Save. A confirmation message is
displayed.
Moving a calendar note
By moving a calendar note, you can move it to a different date and/or time.
To move a calendar note:
1. From the Home screen, select Menu > Calendar or move the Joystick right.
2. Scroll to the date of the event, then select View.
To copy a calendar note to another date and/or time:
1. From the Home screen, select Menu > Calendar or move the Joystick right.
2. Scroll to the date of the event, then select View.
3. Scroll to the required note, then select Options > Copy.
4. Enter the details for the new copy of the note, then select Save. A confirmation
message is displayed.
TIP: You can also save a calendar note for a recurring event by using the
Repeat: field when creating or editing the note.
Deleting calendar notes
To delete a single calendar note:
1. From the Home screen, select Menu > Calendar or move the Joystick right.
2. Scroll to the date of the event, then select View.
3. Scroll to the required note, then select Options > Delete.
4. If the appointment is recurring, select One occurrence to delete only the next
occurrence or All occurrences to delete all occurrences.
5. Select Yes to confirm the deletion. A confirmation message is displayed.
To delete multiple calendar notes at one time:
1. From the Home screen, select Menu > Calendar or move the Joystick right.
2. Select Options > Delete notes.
3. Select one of the following options:
• All until today - to delete all calendar notes for events that ended before the
current date.
• All in time period - to delete all calendar notes between two dates. If you
select this option, you then enter these dates.
• All notes - to delete all calendar notes,
4. Select Yes to confirm the deletion. A confirmation message is displayed.
NOTE: Recurring calendar notes and notes for events that have some
duration outside of selected dates are not deleted.
93
Calendar
For information on automatically deleting calendar notes for dates that have passed,
see Automatically deleting calendar notes.
Sending calendar notes
You can send a calendar note in the following ways:
• Within the body of a text message or multimedia message. The message type
depends on the details of the calendar note.
• As an attachment to a multimedia message.
• As a calendar note.
• Via Bluetooth.
To send a calendar note in a text message or multimedia message:
1. From the Home screen, select Menu > Calendar or move the Joystick right.
2. Scroll to the date of the event, then select View.
3. Scroll to the required note.
4. Select Options > Send note > Send as message > Text.
5. Add a recipient to the message, then select Send. A confirmation message is
displayed when the calendar note has been sent.
For further information on text messages and multimedia messages, see Text
messages and Multimedia messages in Messages.
To send a calendar note as an attachment to a multimedia message:
1. From the Home screen, select Menu > Calendar or move the Joystick right.
2. Scroll to the date of the event, then select View.
3. Scroll to the required note.
4. Select Options > Send note > Send as message > Attachment.
5. Add a recipient to the message, then select Send. A confirmation message is
displayed when the calendar note has been sent.
For further information on multimedia messages, see Multimedia messages in
Messages.
To send a calendar note as a smart message:
1. From the Home screen, select Menu > Calendar or move the Joystick right.
2. Scroll to the date of the event, then select View.
3. Scroll to the required note.
4. Select Options > Send note > Via calendar.
5. Enter a phone number for the recipient of the note, then select OK. A
confirmation message is displayed when the calendar note has been sent.
94
For further information on multimedia messages, see Smart messages in
Messages.
To send a calendar note via Bluetooth:
1. From the Home screen, select Menu > Calendar or move the Joystick right.
2. Scroll to the date of the event, then select View.
3. Scroll to the required note.
4. Select Options > Send note > Via Bluetooth. Your Vertu phone will search for
nearby Bluetooth devices and display them in a list.
5. Select the device to which you want to send the calendar note. Your Vertu phone
connects to the device and sends the note. A confirmation message is displayed
when the note has been sent.
For further information on Bluetooth, see Bluetooth in Settings.
Receiving calendar notes
When you receive a calendar note, a notification is displayed.
To save a received calendar note:
1. Select Show to view the calendar note.
2. Select Save. A confirmation message is displayed.
To discard a received calendar note without saving it:
1. If you want to view the calendar note before discarding it, select Show.
2. Select Exit or press the End key.
3. Select Yes to discard the calendar note. A confirmation message is displayed.
Calendar
Calendar views
Calendar settings
When you open the calendar, dates with associated calendar notes are shown in bold
type. The current date is highlighted.
You can scroll through the calendar by using the Joystick to move the cursor. Select
View to see the calendar notes for the day indicated by the cursor.
Date and time
TIP: To return the cursor to the current date, select Options > Go to today
or press the
-key.
TIP: To quickly move the cursor to a particular date:
1. Select Options > Go to date.
2. Enter the required date, then select OK.
NOTE: You can only set the date and time from the calendar settings if
automatic updating of date and time is not active. For further information on
data and time settings, see Date and time in Settings.
Default calendar view
Switching between calendar views
When you have a date of interest highlighted with the cursor, you can switch between
viewing the month, week and day of interest. The default calendar view is the month
view.
To switch to month view, select Options > Month view.
To switch to week view, select Options > Week view.
To switch to day view, scroll to the required date, then select View.
TIP: To toggle between month, week and day view, press the
To set the date and time:
1. From the Home screen, select Menu > Calendar or move the Joystick right.
2. Select Options > Settings.
3. Select Date & time settings.
4. Set the date and time, then select Save. A confirmation message is displayed.
-key.
For information on calendar views, see Calendar views.
To set the default calendar view:
1. From the Home screen, select Menu > Calendar or move the Joystick right.
2. Select Options > Settings.
3. Select Default view.
4. Select the default view. A confirmation message is displayed.
First day of week
To set the first day of the week:
1. From the Home screen, select Menu > Calendar or move the Joystick right.
2. Select Options > Settings.
3. Select Week starts on.
4. Select Saturday/Sunday/Monday as required. A confirmation message is
displayed.
Calendar tone
The calendar tone will be played when an alarm is set for a calendar note or to-do list.
To set the calendar tone:
1. From the Home screen, select Menu > Calendar or move the Joystick right.
2. Select Options > Settings.
3. Select Calendar tone.
4. Either select a tone from the list
or
95
Calendar
to add a tone that is stored in the Gallery on your Vertu phone, select Open
Gallery, then select the required tone.
A confirmation message is displayed.
TIP: For information on accessing tones in the Gallery, see Gallery files in
Gallery.
Automatically deleting calendar notes
To set calendar notes to be automatically deleted after a fixed time period:
1. From the Home screen, select Menu > Calendar or move the Joystick right.
2. Select Options > Settings.
3. Select Auto-delete notes.
4. Select the required time period. A confirmation message is displayed.
To-do list
The to-do list feature enables you to create notes for tasks you need to do.
A to-do note has a priority and a deadline time and date. You can also set a status for
the note, depending on whether it has been completed or not.
To-do notes can be saved as calendar notes. They can also be sent using the same
methods as calendar notes. See Sending calendar notes for further information.
Saving a new to-do note
To save a new to-do note:
1. From the Home screen, select Menu > Calendar or move the Joystick right.
2. Select Options > Go to to-do list.
3. Select Add.
4. Enter the details of the task.
TIP: Higher priority notes are displayed at the top of the to-go list.
5. Select Save. A confirmation message is displayed.
Changing the status of a to-do note
When a new to-do note is created, it will be set as not done. When you have
completed the task, you can update its status.
To mark a to-do note as done:
1. From the Home screen, select Menu > Calendar or move the Joystick right.
2. Select Options > Go to to-do list.
3. Scroll to the required note.
4. Select Options > Mark note as done. A confirmation message is displayed, and
a status icon is displayed with the note.
TIP: If you need to reactivate a to-do note, scroll to the required note, then
select Options > Mark as not done.
Deleting to-do notes
To delete a single to-do note:
1. From the Home screen, select Menu > Calendar or move the Joystick right.
2. Select Options > Go to to-do list.
3. Scroll to the required note, then select Options > Delete.
4. Select Yes to confirm the deletion. A confirmation message is displayed.
96
Calendar
To delete multiple to-do notes at one time:
1. From the Home screen, select Menu > Calendar or move the Joystick right.
2. Select Options > Go to to-do list.
3. Select Options > Delete notes.
4. Select one of the following options:
• All until due date - to delete all to-do notes due before a certain date. If you
select this option, you then enter this date.
• All done notes - to delete all to-do notes for tasks that have been completed.
• All notes - to delete all to-do notes,
5. Select Yes to confirm the deletion. A confirmation message is displayed.
97
Alarm clock
Alarm clock
Stopping an alarm
To stop an alarm when it sounds, select Stop.
Activating the snooze function
Your Vertu phone has a simple to use alarm clock feature.
If you are using the Accurate time feature, you do not need to reset the alarm when
you reach your destination. Your Vertu phone automatically adjusts to the local time,
and any preset alarms sound at the usual time.
For information on the Accurate time feature, see Clock in Getting started and Time
management in Settings.
The alarm will sound even if your Vertu phone is switched off.
Setting an alarm
To quickly set an alarm:
1. From the Home screen, select Menu > Alarm clock.
2. Enter the required alarm time, then select OK.
To set a detailed alarm:
1. From the Home screen, select Menu > Alarm clock.
2. Select Options.
3. Edit the following fields as required:
• Alarm: - to set the alarm as on or off.
• Alarm time: - to set the alarm time.
• Repeat: - to set the alarm repeat as on or off. If you select On, you can then
select the days during which to repeat the alarm from the Repeat days: field.
• Alarm tone: - to set the tone played for the alarm.
• Snooze time-out: - to set the snooze time.
4. Select Save. A confirmation message is displayed, informing you of the length of
time until the alarm sounds.
Cancelling an alarm
To cancel an alarm:
1. From the Home screen, select Menu > Alarm clock.
2. Select Turn alarm off. A confirmation message is displayed.
98
When an alarm sounds, you can ignore it for a set period of time using the snooze
function.
To activate the snooze function:
Either select Snooze
or
turn the phone and place it face-down. If it is already face-down, turn it through 360
degrees and place it face-down again.
A confirmation message is displayed.
Web
IMPORTANT: Your device may have some bookmarks loaded for sites not
affiliated with Vertu. Vertu does not warrant or endorse these sites. If you
choose to access them, you should take the same precautions for security
or content as you would with any Internet site.
Web
Accessing Vertu Mobile
You can access mobile internet services with the web browser on your Vertu phone.
Depending on your service provider, your Vertu phone may already have internet
settings installed. If you cannot connect to the internet, please contact Vertu
Concierge or use the link on the CD-ROM to download your settings.
Check the availability of mobile internet services, pricing and tariffs with your service
provider.
NOTE: Depending on your network, your internet connection may be
suspended temporarily if you receive a call or message. Contact your
service provider for more information.
Vertu Mobile is Vertu’s presence on the mobile internet, tailored for handsets and
carefully designed for accessing on the go.
To access Vertu Mobile:
1. From the Home screen, select Menu > Web.
2. Select Bookmarks.
3. Select Vertu Mobile.
Accessing a new web page
Accessing web pages
TIP: Depending on whether you want to view a web page in portrait or
landscape mode, hold your Vertu phone the required way. The screen
orientation will automatically change as you move the phone.
Accessing the home page
To access the home page from the Home screen:
From the Home screen, press and hold the
-key.
To access the home page from another web page, select Options > Home.
To access a new web page:
1. From the Home screen, select Menu > Web.
2. Select Go to address.
3. Enter the web page address, then select OK.
TIP: To save the web page as a bookmark, select Options > Add
bookmark.
Accessing bookmarks
Accessing the last web page
To access a bookmark:
1. From the Home screen, select Menu > Web.
2. Select Bookmarks.
3. Select the required bookmark.
To access the last web page visited:
1. From the Home screen, select Menu > Web.
2. Select Last web addr.
99
Web
Viewing a web page
Web settings
The following actions are available when viewing a web page:
• To scroll a web page, move the Joystick.
• To select a highlighted link, press the Joystick.
Web page options
To adjust the zoom level, select Options > Zoom, then select the required zoom
level.
You can display a miniature version of the web page alongside the normal view. This
can help you to navigate a page that has not been designed for viewing on a mobile
phone.
To view the miniature web page, select Options > Navigation > Show miniature.
To view the browsing history, select Options > Navigation > History.
TIP: To access a web page from the history, scroll to the required web
page, then press the Joystick.
To refresh the current web page, select Options > Navigation > Reload.
To list the images displayed on a web page, select Options > This page > View
images. If these images are not protected, you can then save them to the gallery, or
send them in a message, an e-mail, or via Bluetooth. For information on sending files
in messages, see the Messages section. For information on sending files via
Bluetooth, see Bluetooth in Settings.
To use a detail from a web page, select Options > This page > Use detail, then
select the required detail type.
To send a web address, select Options > This page > Send web address. Select
whether to send the web address as a bookmark or a message.
To clear cookies, select Options > Tools > Clear cookies. A confirmation message
is displayed.
To clear the form history, select Options > Tools > Clear form history. A
confirmation message is displayed.
To clear the password history, select Options > Tools > Clear passwd. history. A
confirmation message is displayed.
100
To access the web settings:
1. From the Home screen, select Menu > Web.
2. Select Web settings.
TIP: All web settings except the configuration settings are also accessible
from the options list when viewing a web page.
Display settings
To select the font size for viewing web pages:
1. From the web settings, select Display > Font size.
2. Select the required font size. A confirmation message is displayed.
Web pages may load faster if images are not displayed.
To stop images being displayed:
1. From the web settings, select Display > Show images.
2. Select No. A confirmation message is displayed.
The web page title is hidden by default to save screen space.
To display web page titles:
1. From the web settings, select Display > Show page title.
2. Select Yes. A confirmation message is displayed.
The minimap feature displays web pages in a zoomed out view when you are
scrolling to help you navigate more easily.
To deactivate minimap:
1. From the web settings, select Display > Minimap.
2. Select Off. A confirmation message is displayed.
To disable text wrapping:
1. From the web settings, select Display > WML text wrapping.
2. Select Off. A confirmation message is displayed.
Web
General settings
Security settings
To set the action when selecting Back from a web page:
1. From the web settings, select General > Backstep. opens hist.
2. Select one of the following options:
• Off - selecting Back reloads the previous page.
• On - selecting Back displays the visual history. You can then select the
required page to reload from the history.
A confirmation message is displayed.
Cookies are small files containing information about your identity and preferences so
that a web page can tailor information to your needs. The page sends the file, and it
is stored on your Vertu phone.
To allow cookies to be saved on your phone:
1. From the web settings, select Security > Cookies.
2. Select Allow. A confirmation message is displayed.
The web browser stores data that you have entered previously for input fields, and
can use this data to “auto-fill” unique instances of input fields when a form is loaded.
To use the “auto-fill” feature:
1. From the web settings, select General > Auto-fill.
2. Select one of the following options:
• Form & passwd. - to automatically fill form and password fields.
• Form data only - to automatically fill form fields only.
A confirmation message is displayed.
To receive alerts when accessing a web page in unsecure mode:
1. From the web settings, select Security > Alert for unsecure.
2. Select Yes. A confirmation message is displayed.
To enable WML scripts from a secure page:
1. From the web settings, select Security > WMLscript.
2. Select Allow. A confirmation message is displayed.
For more information on browser security, see Browser security in Security.
Clearing the cache
To send web addresses in Unicode encoding so that they can be read in any
language:
1. From the web settings, select General > Unicode (UTF-8) addr.
2. Select On. A confirmation message is displayed.
To enable JavaScript:
1. From the web settings, select General > JavaScript.
2. Select Enable. A confirmation message is displayed.
The cache is a location in the memory that is used to store data temporarily. If you
have tried to access, or have accessed, confidential information requiring passwords,
you should clear the cache after each use. Information on services you have
accessed is stored in the cache.
To clear the cache:
From the Home screen, select Menu > Web > Clear the cache. A confirmation
message is displayed.
101
Vertu Services
Vertu Services
Vertu services are exclusive services available only to owners of Vertu phones.
Your Vertu phone comes with complimentary access to Vertu Select and City Brief
content, delivered through the Vertu Feeds application, plus 12 months’
complimentary Vertu Concierge service and 5 years’ complimentary Travel service.
You will need to register with Vertu to enjoy these complimentary services.
To register for use Vertu services:
1. Go to www.verturegistration.com.
2. Register your Vertu phone or login (if you have previously registered). For
information on registering your Vertu phones, see Registering your Vertu
phone in Getting started.
3. Use the menu on the web site to select your choice of services.
To use Vertu services, you also need to have internet settings on your Vertu phone,
and there must be GPRS network coverage in your current location.
Depending on your service provider, your Vertu phone may already have internet
settings installed. If you cannot connect to the internet, please contact Vertu
Concierge or use the link on the CD-ROM to download your settings.
Check the availability of mobile internet services, pricing and tariffs with your service
provider.
Vertu Feeds
Vertu Feeds is a custom created RSS feeds application, designed to deliver Vertu
specific content, including Vertu Select and City Brief. The application can also
deliver RSS feeds from 3rd party organisations.
Vertu Select is a global service delivering the best in luxury online information, news,
reviews, recommendations and exclusive downloads direct to your phone. Vertu
Select aims to inform and inspire, providing first class content from internationally
recognised brands, and is automatically tailored to your location, ensuring that you
always have the latest global and local information, wherever you are in the world.
City Brief provides a digest of essential travel information, automatically adapted to
your location. It ensures that you have the details you need at your fingertips, as soon
as you arrive at your destination.
Accessing Vertu Feeds
You can access Vertu Feeds in the following ways:
• From the Home screen, move the Joystick up.
• From the Home screen, select Menu > Additions > Collection > Vertu Feeds.
• From the Home screen, select Menu > Vertu Services > Vertu Feeds.
The initial page displayed (the landing page) has three main sections:
• Vertu Select
• City Brief
102
Vertu Services
• My Feeds
Vertu Select
The Vertu Select area of the landing page has three selectable items:
• Last received Vertu Select feed. Select Open to view the story summary, if one is
available. If no summary is available, the live story will be displayed via the web
browser.
• Previous Vertu Select feed. This is accessible in the same way as the last received
feed.
• MORE link. Select this to view the full list of received Vertu Select feeds.
City Brief
The City Brief area of the landing page has three selectable items:
• Current location. Scroll to this required item, then select Open to view the page for
this city on the Vertu Select web site.
• Last visited city. Scroll to this required item, then select Open to view the page for
this city on the Vertu Select web site.
NOTE: The last visited city is the last city with a City Brief. This may not be
the last location that you visited.
• MORE CITIES link. Select Open to view the main City Brief page on the Vertu
Select web site.
Unread City Briefs are indicated by a blue star and white text.
Read City Briefs are indicated by a grey star and grey text.
When you leave a location with a City Brief, this city becomes the last visited city. The
star indicator turns grey, irrespective of whether you have read the City Brief.
However, if the City Brief is unread, the text remains white.
When you receive a City Brief update, a notification icon is displayed in the Home
screen.
Scroll to the required feed, then select Open to view the story summary, if one is
available. If no summary is available, the live story will be displayed via the web
browser.
Select Options to hide read feeds or mark feeds as read.
Select Back to return to the landing page.
Unread feeds are indicated by a blue marker and white text.
Read feeds are indicated by a grey marker and grey text.
When you access the Vertu Feeds application, the icon is cleared.
103
Vertu Services
My Feeds
The My Feeds area of the landing page is a simple link. Scroll to this link and select
Open to access the My Feeds screen. This screen lists the feed channels that you
are currently subscribed to.
If there are unread feeds for the channel, the channel name is displayed with white
text.
If there are no unread feeds for the channel, the channel name is displayed with grey
text.
The number of unread feeds for the channel is displayed beside the channel name.
Select Options to subscribe to new feeds, remove existing feed subscriptions,
rename channels or view feed information. You can also update all content within
Vertu Feeds, access settings, and view information about the Vertu Feeds
application. For information on other Vertu Feeds settings, see Vertu Feeds
settings.
Select Back to return to the landing page.
Scroll to the required channel, then select Open to view the feeds received for this
channel.
104
Scroll to the required feed, then select Open to view the story summary, if one is
available. If no summary is available, the live story will be displayed via the web
browser.
Select Options to hide read feeds or mark feeds as read.
Select Back to return to the My Feeds screen.
Unread feeds are indicated by a blue marker and white text.
Read feeds are indicated by a grey marker and grey text.
Adding new 3rd party feeds
Method 1 - by entering the web page address for a feed:
1. Access Vertu Feeds. For information on accessing Vertu Feeds, see Accessing
Vertu Feeds.
2. Scroll to My Feeds, then select Open. The My Feeds screen is displayed.
3. Select Add or Options > Feed subscriptions > Add.
4. Enter the feed address for the required feed, then select OK. The channel is
added to the list in the My Feeds screen.
Vertu Services
Method 2 - from an RSS icon on a web page:
1. Access a web page with RSS links. For information on accessing web pages,
see Accessing web pages in Web.
2. Click on the RSS icon for the required feed. The Vertu Feeds application is
opened.
3. Select OK. The channel is added to the list in the My Feeds screen.
Method 3 - via a search engine:
1. Access you preferred search engine. For information on accessing web pages,
see Accessing web pages in Web.
2. Enter the required feed channel and include RSS in the search, for example,
“BBC Sport RSS”.
3. Select a link ending in “rss.xml” from the returned results. The Vertu Feeds is
opened.
4. Select OK. The channel is added to the list in the My Feeds screen.
Vertu Feeds settings
You can access the settings for Vertu Feeds by selecting Options > Settings.
The settings enable you to activate or deactivate images and links within feeds. You
can also enable or disable automatic updating, and set an update interval.
Travel
The Travel application provides access to the following information:
• Global weather conditions, forecasts and updates for over 250 cities worldwide.
• Currency conversion with online access to exchange rates for more than 160
currencies worldwide.
• Real-time flight information including delays, and gate and terminal information for
over 75 of the world’s leading airlines.
The Travel application has three main screens:
• Weather - to view a five-day weather forecast for the selected city.
• Flights - to view the latest flight information for over 75 leading airlines. You can
view up-to-date information on schedules, gates, terminals, delays and aircraft
types.
• Currency - to convert sums of money between three different currencies.
Move the Joystick left and right to move between screens.
The first time you access the Travel application, you will be asked to select your
current location. Select OK, then scroll to the required city and select OK.
TIP: Enter the first letter of the city to automatically scroll to cities beginning
with that letter.
To access the Travel application:
From the Home screen, select Menu > Vertu Services > Travel or Menu >
Additions > Collection > Travel.
Viewing weather forecast
To view an up-to-date weather forecast:
1. Access the Weather screen of the Travel application.
2. To update the forecast, select Options > Update weather.
TIP: To view the forecast for a different city, select Options > Change city.
Scroll to the required city, then select OK.
TIP: To select the temperature scale used, select Options > Settings >
Temperature, then select the required scale.
105
Vertu Services
Viewing flight information
To view flight information:
1. Access the Flights screen of the Travel application.
2. Select the required airline.
3. Enter the flight number.
4. Select the date of the flight.
5. Select Get flight status.
TIP: To view recent flight queries, select Options > Show recent queries.
Converting currencies
To convert sums of money between different currencies:
1. Access the Currency screen of the Travel application.
2. Enter a sum into the currency that you wish to convert from. The equivalent
amount is displayed for the other currencies on-screen.
TIP: To update currency rates, select Options > Update rates.
TIP: To select the type of decimal point used, select Options > Settings >
Decimal point, then select the required character.
To select different currencies:
1. Access the Currency screen of the Travel application.
2. Select Options, then select the currency you want to replace on the Currency
screen.
3. Scroll to the required currency in the list, then select OK.
Vertu Concierge
Vertu Concierge provides direct access to a service that offers expert local
knowledge and personal assistance, around the clock, around the world.
Vertu Concierge provides you with a wide range of services, including:
• Lifestyle services such as restaurant recommendations and reservations, travel
assistance, and tickets for theatre shows, concerts or sporting events.
• Solving everyday practical problems, such as finding a reputable plumber or
tracking down a gift.
• Assistance with using your Vertu phone.
When you connect to Vertu Concierge, you can speak directly to a team of lifestyle
managers who are available 24 hours a day, 7 days a week to offer personalised
assistance.
Vertu Concierge is an exclusive subscription service available only on Vertu
handsets. The first year's subscription is complimentary.
Calling Vertu Concierge
To call Vertu Concierge:
NOTE: You need network coverage to call Vertu Concierge.
From the Home screen, press the Concierge key, then select Call or press the Send
key
or
From the Home screen, select Menu > Vertu Services > Vertu Concierge.
TIP: Vertu Concierge is also available by calling +448707375535.
106
Vertu Services
Vertu Fortress
Vertu Fortress enables you to wirelessly synchronise your contact and calendar
information on your Vertu phone to servers in Vertu’s high security data storage
facility. Whether transferring your contacts between phones, or creating a secure
backup of your data, Vertu Fortress gives your personal data the highest levels of
protection it needs. This also provides the ultimate in secure storage for your phone's
data in the event of loss, damage or theft of your device.
When you have synchronised your data with the secure server, you can update it from
our web site and, if necessary, transfer it to another phone you have registered.
Access to Vertu services while roaming
If you travel and no longer have network coverage in your home network, you will
need to register with a network with a GPRS roaming agreement with your home
network in order to use some features of Vertu services.
For information on registering to a new network, see Manually connecting to a
network in Settings.
For information on configuring the Vertu Select, Vertu Fortress and the Travel
applications, contact Vertu Concierge.
For information on GPRS coverage and roaming agreements, contact your service
provider.
Using Vertu Fortress
Vertu Fortress can only synchronise contact information stored on your Vertu phone.
For information on copying contact information from a SIM card to your phone, see
Copying and moving contacts in Contacts.
To synchronise data between your Vertu phone and Vertu Fortress:
1. From the Home screen, select Menu > Vertu Services > Vertu Fortress.
2. Select Server sync.
TIP: You can set up the synchronisation to automatically occur at regular
intervals. For information on server sync settings, see Server sync
settings in Settings.
Register
For information on registering your Vertu phone, see Registering your Vertu phone
in Getting started.
107
Navigate
Navigate
Maps
Your Vertu phone comes with global maps pre-installed.
You can also download maps from the internet, or using the Map Loader application
available on the CD-ROM. For information on downloading the Map Loader
application, see Map Loader application in Getting started.
The Navigate feature enables you to do the following:
• view your current location on a map.
• browse maps for different cities and countries.
• search for addresses.
• search for points of interest.
• plan routes from one location to another.
• save locations.
• send locations to compatible devices.
GPS and A-GPS
Your Vertu phone uses the Global Positioning System (GPS) and an internal GPS
receiver to obtain data on your location. GPS is operated by the government of the
United States, which is solely responsible for its accuracy and maintenance. The
accuracy of location data can be affected by adjustments to GPS satellites made by
the United States government and is subject to change with the United States
Department of Defense civil GPS policy and the Federal Radionavigation Plan.
Accuracy can also be affected by poor satellite geometry. Availability and quality of
GPS signals may be affected by your location, buildings, natural obstacles, and
weather conditions. The GPS receiver is best used outdoors to allow reception of
GPS signals.
Any GPS should not be used for precise location measurement, and you should
never rely solely on location data from the GPS receiver and cellular radio networks
for positioning or navigation.
The trip meter has limited accuracy, and rounding errors may occur. Accuracy can
also be affected by availability and quality of GPS signals.
Assisted GPS (A-GPS) is used to retrieve assistance data over a packet data
connection, which assists in calculating the coordinates of your current location when
your device is receiving signals from satellites.
108
NOTE: Downloading maps may involve the transmission of large amounts
of data. For information on data transmission charges, contact your service
provider.
Setting up an external GPS receiver
To set up an external GPS receiver:
1. Switch on the external GPS receiver. Place it in a position with an unobstructed
view to the sky.
2. Set up a Bluetooth connection between your Vertu phone and the GPS receiver.
For information on setting up Bluetooth connections, see Bluetooth in Settings.
3. Select Menu > Settings > Connectivity > GPS.
4. In the Positioning method field, select Bluetooth GPS. A confirmation
message is displayed.
Starting navigation
To start using the Navigate feature:
1. From the Home screen, select Menu > Navigate.
2. Select one of the following options:
• Yes - to enable A-GPS and automatic map downloading from the internet
whenever needed.
• In home network - to enable A-GPS and map downloading from the internet
only when connected to your home network.
• No - to never allow A-GPS or map downloading from the internet.
TIP: For information on disabling this step for each time that you start the
Navigate feature, see Navigation settings.
TIP: You can also enable A-GPS from the Settings menu. To do this:
1. From the Home screen, Select Menu > Settings > Connectivity >
GPS.
2. In the Internet assisted GPS field, select Yes/In home network/No as
required. A confirmation message is displayed.
Navigate
3. To plot your current position on a map, select Current position.
4. Wait while your Vertu phone locates a satellite signal. Your current position is
then displayed.
NOTE: It may take several minutes for the phone to display the current
location. Subsequent connections should be faster, but if you have not
used GPS for several days, or are very far away from the last location where
you used it, it may take several minutes to detect and display your location.
Locating an address
Using an address
Once the Navigate feature has located an address, you can use this location for a
variety of purposes.
To view the details of a location, select Options > Details.
To save the location:
1. Select Options > Save location.
2. Enter a name for the location, and select an icon for the location.
3. Select Save. The location is added to the Saved locations.
To send the location information in a message:
1. Select Options > Send location.
2. Add a recipient to the message, then select Send.
To save the address with your contacts:
1. Select Options > Save address.
2. Add the address to an existing contact, or save it as a new contact. For
information on contacts, see the Contacts section.
To locate an address:
1. Access the Navigate feature.
2. Select Find address.
3. Enter details of the required address.
NOTE: The minimum details needed to search for an address are the
country name, and at least two characters of the city name.
TIP: To import an address from your contacts:
1. Select Options > Insert address.
2. Select the contact whose address you want to find. The address details
are imported.
4. Select Find. Your Vertu phone searches for the address and displays it in full.
5. To view the address on a map, select View map.
TIP: To zoom in when viewing a map, press the
TIP: To zoom out when viewing a map, press the
-key.
To plan a route to the location:
1. Select Options > Plan route to. The location is set as the destination for a route
plan.
2. Select the required starting point for the route.
3. To view the route on a map, select Options > Show route.
To plan a route from the location:
1. Select Options > Plan route from. The location is set as the starting point for a
route plan.
2. Select the required destination for the route.
3. To view the route on a map, select Options > Show route.
To navigate from your current GPS position to the location, select Options >
Navigate to.
-key.
109
Navigate
Navigation settings
To access the navigation settings:
From the Home screen, select Menu > Navigate > Settings.
To select the required type of measurement units:
1. Select General settings.
2. In the Unit of measure field, select Metric or Imperial as required. A
confirmation message is displayed.
To select the points of interest to display on the maps:
1. Select General settings > Points of interest.
2. Scroll to the items that you would like displayed, then select Mark to select them.
3. Select Done when you have finished.
4. Select Yes to save the changes. A confirmation message is displayed.
To select the backlight setting for the Navigate feature:
1. Select General settings.
2. In the Lights field, select one of the following settings:
• Automatic - to set the backlight to follow the usual phone behaviour.
• On for navigation - to set the backlight to be on when you are in a navigation
session. The backlight will time out as normal when you are not in a navigation
session.
• Always on in Maps - to set the backlight to be on whenever you are using the
Navigate feature.
To activate voice guidance:
1. Select General settings.
2. In the Voice guidance field, select the required language. Select OK when the
confirmation message is displayed.
NOTE: The first time you select a new language, you will need you wait for
a short time while the language data is downloaded to your Vertu phone.
110
To select the network usage setting:
1. Select Network settings.
2. In the Allow network usage field, select the required setting. If you select Ask
when opening, you will need to confirm the setting each time you start the
Navigate feature. For details of the other settings, see Starting navigation. A
confirmation message is displayed when you have selected the required setting.
To select the routing settings:
1. Select Routing settings.
2. In the Route selection field, select one of the following actions:
• Shorter by car - to select the route that covers the shortest distance by car.
• Faster by car - to select the route that will take the least time by car.
3. To include ferry routes, select Yes in the Ferry field.
4. To include motorway routes, select Yes in the Motorway field.
5. To include toll roads, select Yes in the Toll road field.
6. To include tunnels, select Yes in the Tunnel field.
Camera
Camera
Your Vertu phone is equipped with a digital camera that can be used to take photos
and record video clips.
Photos are saved in JPEG (.jpg) format, and video clips are saved in 3GPP (.3gp)
format.
Taking a photo
To take a photo:
1. From the Home screen, activate the camera using one of the following methods:
• select Menu > Camera.
• move the Joystick down.
2. Depending on whether you want to take a portrait or landscape photo, hold your
Vertu phone the required way. The camera orientation will automatically change
as you move the phone.
3. Aim the camera at the subject, then select Capture.
TIP: To zoom in or out, move the Joystick up or down respectively.
TIP: The current flash setting is shown at the top middle of the screen. To
change the flash settings, select Options > Flash > Flash off/Flash on
( )/Automatic ( ) as required.
TIP: The number for photos that you can store on your Vertu phone with the
current settings is shown at the top right of the screen. For information on
the settings, see Photo settings.
4. A preview of the photo is displayed. For information on setting the photo preview,
see Photo settings.
5. Either select one of the following options:
• Delete - to delete the photo. Select Yes to confirm the deletion. A confirmation
message is displayed.
• Options > New image - to return to the main camera screen to take a new
photo.
• Options > Send - to send the photo in a multimedia message, in an e-mail or
via Bluetooth. For information on sending files in messages, see the
Messages section. For information on sending files via Bluetooth, see
Bluetooth in Settings.
• Options > View images - to view images saved in the Images folder on the
internal memory card in your Vertu phone. The captured photo is highlighted.
• Options > Rename - to rename the photo. Edit the name, then select OK. A
confirmation message is displayed.
• Options > Use image - to set the photo as wallpaper, or as the image for a
contact or contact group. For information on wallpaper, see Setting a
wallpaper in Settings. For information on adding images to a contact, see
Adding an image to a contact in Contacts.
• Options > Zoom - to view the photo while zoomed in. Select Zoom to zoom in
again. Move the Joystick to scroll through the photo.
• Options > Set contrast - to set the contrast of the photo. Move the Joystick
left and right to adjust the contrast, then select OK.
• Options > Edit image - to edit the photo. You can add text to the photo, add
saved frames, clip-art and images to the photo, and crop the photo.
• Options > Print - to print the photo on an attached compatible printer. For
information on connecting your Vertu phone to a printer, see USB data cable
in Settings.
• Options > Details - to view details of the photo.
or wait for the preview to time out. You can then take a new photo.
Photo options
You can select options for a photo before you take it.
To take a photo using the self-timer:
1. From the camera, select Options > Self-timer, then select the delay for the
photo.
2. Select Start. The timer counts down, and then the photo is captured.
You can capture a sequence of four photos in quick succession.
To capture a sequence of photos:
1. From the camera, select Options > Image sequence on.
2. Select Sequen. The sequence of images is captured.
TIP: You cannot use the flash when capturing a sequence of photos.
111
Camera
To set the brightness for the photo:
1. From the camera, select Options > Brightness.
2. Move the Joystick up to increase the brightness or down to decrease the
brightness.
3. Press the Joystick when the level is correct.
To select effects for the photo:
From the camera, select Options > Effects, then select the required effect from the
following:
• Normal - this is the default option for colour photos.
• Greyscale - to take a black and white photo.
• Sepia - to take a photo with a sepia tone that gives an aged appearance.
• Negative - to take a photo with reversed colours.
To select the white balance for the photo:
From the camera, select Options > White balance, then select the required option
from the following:
• Auto - to adjust the white balance automatically to reproduce natural colours.
• Daylight - for use when taking photos outside in natural daylight.
• Tungsten - for use when taking photos under electric lighting.
• Fluorescent - for use when taking photos under fluorescent lighting.
Photo settings
To set the image quality for photos:
NOTE: Images of higher quality will use more storage space.
1. From the camera, select Options > Settings.
2. Select Image quality.
3. Select High/Normal/Basic as required. A confirmation message is displayed.
To set the image size for photos:
1. From the camera, select Options > Settings.
2. Select Image size, then select the required image size. A confirmation message
is displayed.
112
To set the image preview time for photos:
1. From the camera, select Options > Settings.
2. Select Image preview time.
3. Select a time for the preview if required. Select No preview to return to the main
camera screen immediately after taking a photo. Select End manually for the
preview to not time out automatically. A confirmation message is displayed.
Camera
Recording a video clip
To record a video clip:
1. From the Home screen, start the video recorder using one of the following
methods:
• start the camera, then either move the Joystick right to highlight the video
recorder icon ( ) at the top of the screen, or select Options > Video
recorder.
• select Menu > Additions > Video recorder.
2. Depending on whether you want to record a video clip in portrait or landscape
mode, hold your Vertu phone the required way. The camera orientation will
automatically change as you move the phone.
3. Aim the camera at the subject, then select Record to start recording.
TIP: To zoom in or out, move the Joystick up or down respectively.
TIP: The amount of video clip time that you can store on your Vertu phone
with the current settings is shown at the top right of the screen. For
information on the settings, see Video clip settings.
TIP: Select Pause and Continue to pause and continue recording.
4. Select Stop to stop recording. A preview of the video clip is played. For
information on setting the video preview, see Video clip settings.
5. Either select one of the following options:
• Delete - to delete the video clip. Select Yes to confirm the deletion. A
confirmation message is displayed.
• Options > Play - to play the video.
• Options > Volume - to adjust the volume for video playback.
• Options > New video clip - to return to the main camera screen to record a
new video clip.
• Options > Send - to send the video clip in a multimedia message, in an e-mail
or via Bluetooth. For information on sending files in messages, see the
Messages section. For information on sending files via Bluetooth, see
Bluetooth in Settings.
• Options > View videos - to view video clips saved in the Video clips folder on
the internal memory card in your Vertu phone. The recorded video clip is
highlighted.
• Options > Rename - to rename the video clip. Edit the name, then select OK.
A confirmation message is displayed.
• Options > Mute audio - to mute the audio for video playback.
• Options > Set contrast - to set the contrast of the video clip. Move the
Joystick left and right to adjust the contrast, then select OK.
• Options > Details - to view details of the video clip.
or select Back. You can then record a new video clip.
Video clip options
To record a video clip without sound:
1. From the video recorder, select Options > Mute to mute the audio. A
confirmation message is displayed.
2. Record the video clip.
To set the brightness for the video clip:
1. From the video recorder, select Options > Brightness.
2. Move the Joystick up to increase the brightness or down to decrease the
brightness.
3. Press the Joystick when the level is correct.
To select effects for the video clip:
From the video recorder, select Options > Effects, then select the required effect
from the following:
• Normal - this is the default option for colour video clips.
• Greyscale - to record a black and white video clip.
• Sepia - to record a video clip with a sepia tone that gives an aged appearance.
• Negative - to record a video clip with reversed colours.
To select the white balance for the video clip:
From the video recorder, select Options > White balance, then select the required
option from the following:
• Auto - to adjust the white balance automatically to reproduce natural colours.
• Daylight - for use when recording video clips outside in natural daylight.
• Tungsten - for use when recording video clips under electric lighting.
• Fluorescent - for use when recording video clips under fluorescent lighting.
113
Camera
Video clip settings
General camera settings
To set the video clip length:
1. From the video recorder, select Options > Settings.
2. Select Video clip length.
3. Select whether to record video clips that have their length limited so that they can
be sent in a multimedia messages, or video clips that can have their length
limited only by the storage space available on your Vertu phone. A confirmation
message is displayed.
By default, photos and video clips are automatically named when saved. Photos are
saved with the prefix “Image”, followed by a four-digit number. For example, the first
photo saved is named “Image0000.jpg”. Video clips are saved with the prefix “Video“,
followed by a four-digit number. For example, the first video clip saved is named
“Video0000.3gp”.
To personalise the title for saved photos and video clips:
1. From the camera, select Options > Settings.
2. Select Default title.
3. Select My title.
4. Enter the required prefix, then select OK. A confirmation message is displayed.
Photos and video clips are named using the new prefix followed by a four-digit
number.
To set the video clip quality:
NOTE: Video clips of higher quality will use more storage space.
1. From the video recorder, select Options > Settings.
2. Select Video clip quality.
3. Select High/Normal/Basic as required. A confirmation message is displayed.
To set the video clip resolution:
1. From the video recorder, select Options > Settings.
2. Select Video resolution, then select the required resolution. A confirmation
message is displayed.
To set the video clip preview on or off:
1. From the camera, select Options > Settings.
2. Select Video preview.
3. Select On or Off as required. A confirmation message is displayed.
To change the autofocus setting:
1. From the camera, select Options > Settings.
2. Select Continuous autofocus.
3. Select On or Off as required. A confirmation message is displayed. When the
setting is On, the focus is always maintained on the centre of the viewfinder.
114
To disable camera sounds:
1. From the camera, select Options > Settings.
2. Select Camera & vid. sounds.
3. Select Off. A confirmation message is displayed.
Gallery
Gallery folders
Gallery
Viewing folders in the phone memory
To view the folders in the phone memory:
From the Home screen, select Menu > Gallery. The top level folders are displayed.
The gallery feature enables you to store and manage multimedia content on your
Vertu phone. This content includes images, video clips, themes and tones.
Your Vertu phone has two internal memories - the phone memory and an internal
memory card. You can store files in either memory, but the memory card has more
storage space.
NOTE: The internal memory card cannot be removed from your Vertu
phone.
Accessing the gallery
To access the gallery:
From the Home screen, select Menu > Gallery.
Changing the gallery view
To change the way that the gallery folders and files are displayed:
1. From the gallery, select Options > Type of view.
2. Select List with details/List/Grid as required.
Viewing the memory status
To view the memory status:
1. From the gallery, select Options > Memory status. The memory status of the
phone memory and the internal memory card is displayed.
2. Select an item to view details of its memory status.
Viewing folders on the internal memory card
To view the folders on the internal memory card:
From the Home screen, select Menu > Gallery > Media. The top level folders are
displayed.Viewing details of a folder
TIP: Media is the default name of the internal memory card. For information
on renaming the card, see Renaming the memory card.
To view the name, size, and date and time that a folder was created:
Scroll to the required folder, then select Options > Details.
Viewing contents of a folder
A folder can contain folders and/or files.
To view the contents of a folder:
Scroll to the required folder, then select Open.
Sorting contents of a folder
You can sort the contents of a folder by name, date, format and size.
NOTE: Within a folder, sub-folders will always be listed above files.
To sort the contents of a folder:
1. Scroll to the required folder.
2. Select Options > Sort, then select the property to sort by, and whether to sort in
ascending or descending order.
Filtering contents of a folder
You can filter the contents of a folder by the first characters in their names.
To filter the contents of a folder:
1. Open the required folder.
2. Select Options > Search.
115
Gallery
3. Enter a character. All folders and files with names beginning with that character
are displayed.
4. Enter more characters to filter the contents further.
Adding folders
To add a new folder within the current folder:
1. Select Options > Add folder.
2. Enter a name for the new folder, then select OK. A confirmation message is
displayed.
Renaming folders
To rename a folder:
1. Scroll to the required folder.
2. Select Options > Rename folder.
3. Edit the name of the folder, then select OK. A confirmation message is displayed.
NOTE: You can only rename folders that you have created. Preset folders
cannot be renamed.
Copying folders
To copy a single folder:
1. Scroll to the required folder.
2. Select Options > Copy folder.
3. Scroll to the target folder, then select Copy to. A confirmation message is
displayed.
NOTE: You can only copy folders that you have created. Preset folders
cannot be copied.
For information on copying multiple folders, see Copying multiple gallery items.
116
Moving folders
To move a folder:
1. Scroll to the required folder.
2. Select Options > Move folder.
3. Scroll to the target folder, then select Move to. A confirmation message is
displayed.
NOTE: You can only move folders that you have created. Preset folders
cannot be moved.
For information on moving multiple folders, see Moving multiple gallery items.
Deleting folders
To delete a folder:
1. Scroll to the required folder.
2. Select Options > Delete folder.
3. Select Yes to confirm the deletion. A confirmation message is displayed.
NOTE: You can only delete folders that you have created. Preset folders
cannot be deleted.
For information on deleting multiple folders, see Deleting multiple gallery items.
Gallery
Viewing details of a file
To send multiple files:
1. Scroll to the first required file.
2. Select Options > Mark.
3. Select the other required files by marking them.
4. Select Options > Send marked, then select the required sending method.
To view the name, size, date and time that a file was created, and its format:
Scroll to the required file, then select Options > Details.
For information on sending files in messages, see the Messages section.
For information on sending files via Bluetooth, see Bluetooth in Settings.
Renaming files
Deleting files
To rename a file:
1. Scroll to the required file.
2. Select Options > Rename.
3. Edit the name of the file, then select OK. A confirmation message is displayed.
To delete a file:
1. Scroll to the required file.
2. Select Options > Delete.
3. Select Yes to confirm the deletion. A confirmation message is displayed.
For information on deleting multiple files, see Deleting multiple gallery items.
Gallery files
NOTE: Copyright protections may prevent some files from being copied,
modified, transferred or forwarded.
Copying files
To copy a single file:
1. Scroll to the required file.
2. Select Options > Copy.
3. Scroll to the target folder, then select Copy to. A confirmation message is
displayed.
For information on copying multiple files, see Copying multiple gallery items.
Moving files
To move a file:
1. Scroll to the required file.
2. Select Options > Move.
3. Scroll to the target folder, then select Move to. A confirmation message is
displayed.
For information on moving multiple files, see Moving multiple gallery items.
Sending files
To send a single file:
1. Scroll to the required file.
2. Select Options > Send, then select the required sending method.
117
Gallery
Folder and file options
Copying multiple gallery items
To copy multiple folders and/or files:
1. Scroll to the first required item.
2. Select Options > Mark.
3. Select the other required items by marking them.
4. Select Options > Copy marked.
5. Scroll to the target folder, then select Copy to. A confirmation message is
displayed.
To copy all the contents of a folder:
1. Open the required folder.
2. Select Options > Mark all.
3. Select Options > Copy marked.
4. Scroll to the target folder, then select Copy to. A confirmation message is
displayed.
Moving multiple gallery items
To move multiple folders and/or files:
1. Scroll to the first required item.
2. Select Options > Mark.
3. Select the other required items by marking them.
4. Select Options > Move marked.
5. Scroll to the target folder, then select Move to. A confirmation message is
displayed.
To move all the contents of a folder:
1. Open the required folder.
2. Select Options > Mark all.
3. Select Options > Move marked.
4. Scroll to the target folder, then select Move to. A confirmation message is
displayed.
118
Deleting multiple gallery items
To delete multiple folders and/or files:
1. Scroll to the first required item.
2. Select Options > Mark.
3. Select the other required items by marking them.
4. Select Options > Delete marked.
5. Select Yes to confirm the deletion. A confirmation message is displayed.
To delete all the contents of a folder:
1. Open the required folder.
2. Select Options > Mark all.
3. Select Options > Delete marked.
4. Select Yes to confirm the deletion. A confirmation message is displayed.
Memory card options
Renaming the memory card
To rename the internal memory card:
1. From the Home screen, select Menu > Gallery > Media.
2. Select Options > Mem. card options > Rename media mem.
3. Edit the name if the internal memory card, then select OK. A confirmation
message is displayed.
Formatting the memory card
IMPORTANT: If you reformat the internal memory card, all data stored on it
will be deleted.
To format the internal memory card:
1. From the Home screen, select Menu > Gallery > Media.
2. Select Options > Mem. card options > Format media mem.
3. Select Yes to confirm the deletion. A confirmation message is displayed.
4. Select Yes to confirm the formatting.
5. Select Yes to confirm the deleting all files on the internal memory card. A
confirmation message is displayed.
Accessories
The following accessories are provided with your Vertu phone:
• Battery.
• Wall charger (comprising wall charger plug and data cable).
• Data cable.
Accessories
For more information about accessories approved for use with your Vertu phone,
please contact Vertu Concierge or refer to www.vertu.com.
For safety information relating to your Vertu phone and accessories, see Health and
safety.
For care and maintenance information relating to your Vertu phone and accessories,
see Care and maintenance.
Charging the battery
The battery for your Vertu phone is rechargeable and requires charging at regular
intervals. The battery does not have to be completely discharged before you can
charge it.
To charge the battery:
1. Connect the micro-USB charger
connector to your Vertu phone as
shown. Ensure that the connector is
inserted correctly, with the connector
symbol uppermost.
Battery
Your device is powered by a rechargeable battery. The battery intended for use with
this device is a BL-5C. Vertu may make additional battery models available for this
device. This device is intended to be charged using an AC-31 charger.
The full performance of a new battery is achieved only after two or three complete
charge and discharge cycles.
If a battery is being used for the first time, or if the battery has not been used for a
prolonged period, it may take several minutes before the charging indicator appears
on the display or before any calls can be made.
Battery talk and standby times are estimates only and depend on signal strength,
network conditions, features used, battery age and condition, temperatures to which
battery is exposed, use in digital mode, and many other factors. The amount of time
a device is used for calls will affect the standby time. Likewise, the amount of time that
the device is turned on and in the standby mode will affect the talk time.
You can maximise the performance of the battery by switching off certain functions,
such as Bluetooth, when they are not in use.
2. Connect the charger body to a
powered AC outlet. After a few
seconds, the animated battery
charging indicator is displayed. A
confirmation message is displayed if
your Vertu phone is switched on.
The charging time will vary with different power sources and we recommend that the
Vertu wall charger is always used.
Always charge the battery until it is fully charged. When the battery is fully charged,
the animated battery charging indicator stops. If your Vertu phone is switched on, the
message Battery full. Save energy and remove charger from wall socket. is
briefly displayed.
NOTE: If the battery is removed from your Vertu phone for longer than an
hour, you may need to reset the date and time.
The battery can be charged and discharged hundreds of times, but it will eventually
wear out. When the talk and standby times are noticeably shorter than normal,
replace the battery.
119
Accessories
Vertu battery authentication guidelines
Data cable
For your safety, always use original Vertu batteries. To check that you are getting an
original Vertu battery, purchase it from a Vertu authorised service centre or dealer,
and inspect the holospot label using the following steps:
1. When you look at the holospot on the label, you should see a Vertu symbol and
three characters, similar to those shown below.
The micro-USB data cable enables you to transfer data between your Vertu phone
and a compatible computer, for example when you are using Vertu PC Suite. You can
also transfer data between your Vertu phone and a compatible printer that supports
PictBridge.
To connect the data cable to your Vertu phone:
2. In the background you should see the unique holospot serial number.
Successful completion of these steps is not a total assurance of the authenticity of the
battery. If you cannot confirm authenticity, or if you have any reason to believe that
your Vertu battery with the holospot on the label is not an authentic Vertu battery, you
should refrain from using it and take it to the nearest Vertu authorised service centre
or dealer for assistance.
Wall charger
The wall charger supplied with your Vertu phone should be appropriate for your
region. However, you should always check that the electrical rating of the AC outlet is
appropriate for the charger before you attempt to plug it in.
120
Connect the micro-USB connector of the
data cable to your Vertu phone as shown.
Ensure that the connector is inserted
correctly, with the connector symbol
uppermost.
To connect the data cable to a computer:
Connect the USB connector of the data cable to a
USB port of the computer.
Troubleshooting
Troubleshooting
Problem
Possible cause
Possible solution
Cannot switch phone on
Battery out of power.
Charge the battery (see page 119).
Battery not installed correctly.
Ensure that the battery is inserted correctly (see page 12).
Phone switches off automatically
Battery out of power.
Charge the battery (see page 119).
Cannot charge battery
Battery not installed correctly.
Ensure that the battery is inserted correctly (see page 12).
Charger not connected.
Ensure that the charger is connected to the phone and to a
working power outlet.
Connectors are dirty.
Clean the connectors of the charger and battery.
Battery has worn out.
Replace the battery.
Battery or charger is damaged.
Replace the battery or charger. Contact your dealer for
assistance.
Battery loses power quickly
Bluetooth is active.
Switch off Bluetooth (see page 74).
Network not displayed
SIM card not installed correctly.
Ensure that the SIM card is inserted correctly (see page 12).
Contacts between SIM card and phone are dirty.
Gently clean the contacts of the SIM card and phone.
Network signal is weak.
Move clear of any obstructions that may block the signal.
SIM card is damaged.
Contact your service provider to obtain a replacement SIM
card.
You are outside of your network service area.
Connect to a different network if this is supported by your
service provider (see page 79).
Call barring is active.
Deactivate Call barring (see page 25).
Call divert is active
Deactivate Call divert (see page 35).
Call barring is active.
Deactivate Call barring (see page 25).
Phone is set to not ring for incoming calls.
Change or edit the profile (see page 70)
Cannot make a call
Cannot answer a call
No ringing for an incoming call
Edit the tone settings (see page 71).
121
Troubleshooting
Problem
Possible cause
Possible solution
Poor call quality
Network signal is weak.
Move clear of any obstructions that may block the signal.
Network signal is changing frequently, e.g. when travelling on a Wait until signal strength is consistently high before making or
train.
answering a call.
Other party in a call cannot hear you
Phone is muted.
Unmute the phone (see page 33).
Cannot send or receive text messages
Your service provider is not enabling this service.
Contact your service provider to check your subscription
status.
Service centre number is not correct.
Ensure that the service centre number is correct (see
page 55). To obtain the number, contact your service provider.
Your service provider is not enabling this service.
Contact your service provider to check your subscription
status.
MMS settings are missing or incorrect.
Ensure that the MMS settings are correct (see page 59). To
obtain the settings, contact your service provider.
Your service provider is not enabling this service.
Contact your service provider to check your subscription
status.
Network settings are missing or incorrect.
Ensure that the network settings are correct. To obtain the
settings, contact your service provider.
Too many items stored on the phone.
Delete any unwanted messages, clear the Internet history, and
delete any unwanted files.
Cannot send or receive MMS messages
Cannot access the Internet
Storage memory is low
122
Specifications
Specifications
Memory
Available memory
(internal memory card)
32 GB (Titanium)
8 GB (Aluminium)
Maximum number of contacts
2000
Maximum number of messages 1000 (includes multimedia messages)
Maximum number of calendar
2000
entries
Cellular protocols
Power class
Speech codecs
Physical characteristics
Dimensions (H × W × D)
Volume
Weight (including battery)
Audio/Video codecs
Audio
Video
Bluetooth
Bluetooth ver 2.0 + EDR
Advanced Audio Distribution Profile (A2DP)
Audio/Video Remote Control Profile (AVRCP)
Dial-Up Networking Profile (DUN)
File Transfer Profile (FTP)
General Audio/Video Distribution Profile (GAVDP)
Generic Access Profile (GAP)
Generic Object Exchange Profile (GOEP)
Hands-Free Profile (HFP)
Headset Profile (HSP)
Object Push Profile (OPP)
Personal Area Networking Profile (PAN)
Phone Book Access Profile (PBAP)
Serial Port Profile (SPP)
Service Discovery Application Profile (SDAP)
SIM Access Profile (SAP)
Camera
5 Megapixel
Browser
Java
OSS browser. X-HTML with TCP/IP, WAP 2.0
MIDP Java 2.0
GSM 850/900/1800/1900
EDGE
WCDMA I (2100) II (1900) V (850) VI (800)
HSDPA
HSUPA
WCDMA, Class 3, 24 dBm
WB-AMR, AMR, EFR, FR, HR
117 mm x 46 mm x 19 mm
82.7 cc
Titanium: 170 g
Aluminium (with rubber): 148 g
Aluminium (with leather): 150 g
Interface
Cable, headset and phone
charging
Micro-USB
Battery capacity
1050 mAh
Display
LCD
Resolution
40.8 mm x 30.6 mm (2” active area) TFT
QVGA, 240x320 (16 million colours)
Ringing tones: AAC, AMR, AMRWB, AWB, MID, MP3,
M4A, WAV, WMA
Media player: AAC, AAC+, eAAC+, MP3, WMA
3GP, H.263, H.264, MP4
123
Menu tree
Menu tree
Messages
Create
message
Inbox
E-mail
Drafts
Outbox
Delivery
reports
Voice
messages
Info
messages
Sent items
Saved
items
IMs
Message
settings
Serv.
Delete
commands messages
General settings
Text messages
Multimedia messages
E-mail messages
Service messages
Contacts
Names
Add new
Settings
Groups
Speed dials
My numbers
Service
numbers
Del. all
contacts
Move
contacts
Dialled
numbers
Msg.
recipients
Clear log
lists
Call duration Data counter Data timer
Copy
contacts
Memory status
Call history
All calls
Missed calls
Received
calls
Message log
Positioning
Sync log
Position log
Settings
Date and
time
Profiles
Themes
Tones
Display
Lights
Time management
Date & time settings
Date and time format
My
Connectivity Call
shortcuts
Bluetooth
Packet data
GPS
Call
divert
Phone
Accessories Configuration Security
Language Charger
settings
Memory
status
Workshop Sync and
reset
backup
Call barring service
Access codes
Phone
switch
Data
transfer
Voice recognition
Phone updates
Additions
124
Collection
Games
Torch
Calculator
Media player
Equaliser
Stopwatch
Timer
Video recorder Voice recorder Notes
Menu tree
Web
Bookmarks
Go to address
Last web addr.
Web settings
Clear the cache
Display
General
Security
Downloading sett.
Configuration sett.
Vertu Services
Vertu Feeds
Travel
Vertu Concierge
Vertu Fortress
Navigate
Last map
Find address
Saved locations
Recent locations Current position
Register
Plan route
Extra services
Settings
Starting point
Destination
Camera
Gallery
SIM services
(if supported by your SIM card)
125
Warranty and legal information
Manufacturer’s limited warranty
Warranty and legal information
NOTE: This limited warranty does not affect your legal (statutory) rights
under your applicable national laws relating to the sale of consumer
products.
Vertu provides this limited warranty to purchasers of the Vertu product(s) included in
the sales package ("Product").
Vertu warrants to you that, during the warranty period, Vertu or a Vertu authorised
service company will, in a commercially reasonable time, remedy defects in
materials, design and workmanship free of charge. The Product will be repaired or,
should Vertu in its discretion deem it necessary, replaced in accordance with this
limited warranty (unless otherwise required by law).
Warranty period
The warranty period starts at the time of the Product's original purchase by the first
end user. The Product may consist of several different parts, and different parts may
be covered by a different warranty period (hereinafter "warranty period"). The
different warranty periods are:
a.Twenty-four (24) months for the mobile device, and twelve (12) months for
accessories (whether included in the mobile device sales package or sold
separately) other than the consumable parts and accessories listed in (b) and (c)
below;
b.six (6) months for batteries, chargers, cables and covers; and
c.ninety (90) days for media on which any software is provided,
e.g. CD-ROM.
As far as your national laws permit, the warranty period will not be extended or
renewed or otherwise affected due to subsequent resale, or Vertu authorised repair
or replacement of the Product. However, part(s) repaired or replaced during the
warranty period will be warranted for the remainder of the original warranty period, or
for sixty (60) days from the date of repair or replacement, whichever is longer.
How to get warranty service
If you wish to make a claim under this limited warranty, please return your Product or
the affected part (if it is not the entire Product) to a Vertu authorised service company.
You can call a Vertu customer services (national or premium rates may apply) for
further details on how to make a claim. Information about service companies
authorised by Vertu can be found in the sales package or at local Vertu web pages,
where available.
126
Any claim under this limited warranty is subject to you notifying Vertu or a Vertu
authorised service company of the alleged defect within a reasonable time of it
having come to your attention, and in any event no later than before the expiry of the
warranty period.
When making a claim under this limited warranty, you will be required to provide:
a.the Product (or the affected part) and
b.the original proof of purchase, which clearly indicates the name and address of
the seller, the date and place of purchase, the product type, and the IMEI or other
serial number.
What is not covered?
1. This limited warranty does not cover user manuals or any third party software,
settings, content, data or links, whether included or downloaded in the Product,
whether included during installation, assembly or shipping, or at any other time in
the delivery chain or otherwise, and in any way acquired by you. Vertu does not
warrant that any Vertu software will meet your requirements, will work in
combination with any hardware or software provided by a third party, that the
operation of any software will be uninterrupted or error free, or that any defects in
the software are correctable or will be corrected.
2. This limited warranty does not cover a) normal wear and tear (including, without
limitation, wear and tear of camera lenses, batteries or displays), b) defects
caused by rough handling (including, without limitation, defects caused by sharp
items, by bending, compressing or dropping, etc.), or c) defects or damage caused
by misuse of the Product, including use that is contrary to the instructions provided
by Vertu (e.g. as set out in the Product's User Guide) and/or e) other acts beyond
the reasonable control of Vertu.
3. This limited warranty does not cover defects or alleged defects caused by the fact
that the Product was used with, or connected to, any product, accessory,
software and/or service not manufactured, or supplied by Vertu, or was used
otherwise than for its intended use. Defects can be caused by viruses from your
or from a third party's unauthorised access to services, other accounts, computer
systems or networks. This unauthorised access can take place through hacking,
password mining, or through a variety of other means.
4. This limited warranty does not cover defects caused by the battery being shortcircuited, the seals of the battery enclosure or cells being broken or tampered
with, or the battery being used in equipment other than that for which it has been
specified.
Warranty and legal information
5. This limited warranty is not enforceable if the Product has been opened, modified
or repaired by anyone other than an authorised service centre, if it has been
repaired using unauthorised spare parts, or if the Product's serial number, the
mobile accessory date code or the IMEI number has been removed, erased,
defaced, altered or is illegible in any way. This shall be determined at the sole
discretion of Vertu.
6. This limited warranty is not enforceable if the Product has been exposed to
moisture, dampness, extreme thermal or environmental conditions or rapid
changes in such conditions, corrosion, oxidation, spillage of food or liquid, or
chemical products.
Other important notices
A third party, independent service provider provides the SIM card and cellular and/or
other network or system on which the Product operates. Therefore, Vertu will not
accept responsibility under this warranty for the operation, availability, coverage,
services or range of the cellular or other network or system. Before Vertu or a Vertu
authorised service company can repair or replace the Product, the service provider
may need to remove any SIM lock or other lock that may have been added to lock the
Product to a specific network or operator. In such situations, please contact your
service provider to unlock the Product.
Please remember to make back-up copies or keep written records of all important
content and data stored in your Product, because content and data may be lost
during repair or replacement of the Product. Vertu, in a manner consistent with the
provisions of the section Limitation of Vertu’s liability, shall not under any
circumstances be liable, either expressly or implied, for any damages or losses of any
kind whatsoever resulting from loss of, damage to, or corruption of, content or data
during repair or replacement of the Product.
All parts of the Product or other equipment that Vertu has replaced shall become the
property of Vertu. If the Product is found not to be covered by the terms and
conditions of this limited warranty, Vertu and its authorised service companies
reserve the right to charge a handling fee. When repairing or replacing the Product,
Vertu may use products or parts that are new, equivalent to new or re-conditioned.
Your Product may contain country specific elements, including software. If the
Product has been re-exported from its original destination country to another country,
the Product may contain country specific elements that are not considered to be a
defect under this limited warranty.
Limitation of Vertu’s liability
This limited warranty is your sole and exclusive remedy against Vertu, and Vertu's
sole and exclusive liability in respect of defects in your Product. This limited warranty
replaces all other Vertu warranties and liabilities, whether oral, written, (nonmandatory) statutory, contractual, in tort or otherwise, including, without limitation,
and where permitted by applicable law, any implied conditions, warranties or other
terms as to satisfactory quality or fitness for purpose. However, this limited warranty
shall neither exclude nor limit i) any of your legal (statutory) rights under the
applicable national laws or ii) any of your rights against the seller of the Product.
To the extent permitted by applicable law(s), Vertu does not assume any liability for
loss of or damage to or corruption of data, for any loss of profit, loss of use of Products
or functionality, loss of business, loss of contracts, loss of revenues, loss of
anticipated savings, increased costs or expenses, or for any indirect loss or damage,
consequential loss or damage or special loss or damage.
To the extent permitted by applicable law, Vertu’s liability shall be limited to the
purchase value of the Product. The above limitations shall not apply in case of gross
negligence or intentional misconduct by Vertu, or in case of death or personal injury
resulting from Vertu's proven negligence.
NOTE: Your Product is a sophisticated electronic device. Vertu strongly
encourages you to familiarise yourself with the User Guide and instructions
provided with and for the Product.
NOTE: The Product may contain high precision displays, camera lenses
and other such parts, which could be scratched or otherwise damaged if
not handled very carefully.
Vertu
Keilalahdentie 2-4
FIN-02150 Espoo
Finland
Export controls
Your Vertu phone may contain commodities, technology, or software exported from
the United States in accordance with the Export Administration regulations. Diversion
contrary to U.S. law is prohibited.
127
Warranty and legal information
Licenses
General Public Licence for the software known as MSNTP
Includes RSA BSAFE cryptographic or security protocol software from RSA Security.
(c) Copyright, N.M. Maclaren, 1996, 1997, 2000
(c) Copyright, University of Cambridge, 1996, 1997, 2000
Free use of MSNTP in source and binary forms is permitted, provided that this entire
licence is duplicated in all copies, and that any documentation, announcements, and
other materials related to use acknowledge that the software was developed by N.M.
Maclaren (hereafter referred to as the Author) at the University of Cambridge. Neither
the name of the Author nor the University of Cambridge may be used to endorse or
promote products derived from this material without specific prior written permission.
The Author and the University of Cambridge retain the copyright and all other legal
rights to the software and make it available non-exclusively. All users must ensure that
the software in all its derivations carries a copyright notice in the form:
(c) Copyright N.M. Maclaren,
(c) Copyright University of Cambridge.
Java™ and all Java-based marks are trademarks or registered trademarks of Sun
Microsystems, Inc.
No warranty
WorldMate® is provided by WorldMate Inc.
The third-party applications provided with your device may have been created by, and
may be owned by, persons or entities not affiliated with, or related to, Vertu. Vertu
does not own the copyrights or intellectual property rights to the third-party
applications. As such, Vertu does not take any responsibility for end-user support,
functionality of the applications, or the information in the applications or these
materials. Vertu does not provide any warranty for the third-party applications.
BY USING THE APPLICATIONS, YOU ACKNOWLEDGE THAT THE
APPLICATIONS ARE PROVIDED AS IS, WITHOUT WARRANTY OF ANY KIND,
EXPRESS OR IMPLIED, TO THE MAXIMUM EXTENT PERMITTED BY
APPLICABLE LAW. YOU FURTHER ACKNOWLEDGE THAT NEITHER VERTU
NOR ITS AFFILIATES MAKE ANY REPRESENTATIONS OR WARRANTIES,
EXPRESS OR IMPLIED, INCLUDING, BUT NOT LIMITED TO, WARRANTIES OF
TITLE, MERCHANTABILITY OR FITNESS FOR A PARTICULAR PURPOSE.
NEITHER VERTU NOR ITS AFFILIATES MAKE ANY REPRESENTATIONS OR
WARRANTIES, EXPRESS OR IMPLIED, THAT THE APPLICATIONS WILL NOT
INFRINGE ANY THIRD-PARTY PATENTS, COPYRIGHTS, TRADEMARKS, OR
OTHER RIGHTS.
128
Because the MSNTP software is licensed free of charge, the Author and the
University of Cambridge provide absolutely no warranty, either expressed or implied,
including, but not limited to, the implied warranties of merchantability and fitness for
a particular purpose. The entire risk as to the quality and performance of the MSNTP
software is with you. Should MSNTP prove defective, you assume the cost of all
necessary servicing or repair.
In no event, unless required by law, will the Author or the University of Cambridge, or
any other party who may modify and redistribute this software as permitted in
accordance with the provisions below, be liable for damages for any losses
whatsoever, including but not limited to lost profits, lost monies, lost or corrupted data,
or other special, incidental or consequential losses that may arise out of the use or
inability to use the MSNTP software.
Warranty and legal information
Copying policy
EU recycling notice
Permission is hereby granted for copying and distribution of copies of the MSNTP
source and binary files, and of any part thereof, subject to the following licence
conditions:
1. You may distribute MSNTP or components of MSNTP, with or without additions
developed by you or by others. No charge, other than an "at-cost" distribution fee,
may be charged for copies, derivations, or distributions of this material without the
express written consent of the copyright holders.
2. You may also distribute MSNTP along with any other product for sale, provided
that the cost of the bundled package is the same regardless of whether MSNTP
is included or not, and provided that those interested only in MSNTP must be
notified that it is a product freely available from the University of Cambridge.
3. If you distribute MSNTP software or parts of MSNTP, with or without additions
developed by you or others, then you must either make available the source to all
portions of the MSNTP system (exclusive of any additions made by you or by
others) upon request, or instead you may notify anyone requesting source that it
is freely available from the University of Cambridge.
4. You may not omit any of the copyright notices on either the source files, the
executable files, or the documentation.
5. You may not omit transmission of this License agreement with whatever portions
of MSNTP that are distributed.
6. Any users of this software must be notified that it is without warranty or guarantee
of any nature, express or implied, nor is there any fitness for use represented.
October 1996
April 1997
October 2000
Vertu will comply with European Community requirements for the recycling of Waste
Electrical & Electronic Equipment (WEEE).
This compliance is indicated by the addition of the following symbol to Vertu’s
products where appropriate.
The symbol indicates that the product was put onto the market after the WEEE
legislation was implemented, and that the consumer should not dispose of the item
in normal household waste, but that it should be appropriately recycled.
Should you wish Vertu to recycle your product at the end of its life, please either return
it to the point from which you purchased your product (if known) or return it to Vertu’s
headquarters.
Alternatively, should you purchase a replacement product from another supplier, the
new supplier is obligated to take back the product that is being replaced and recycle
it appropriately.
Background information on the European WEEE directive is available from
http://ec.europa.eu/environment/waste/weee/index_en.htm.
129
Warranty and legal information
Vertu Concierge Terms and Conditions
These terms and conditions apply to Nokia Corporation, a company validly organised
and existing under the laws of Finland, with business identity code 0112038-9,
having registered address at Keilalahdentie 4, 02150 Espoo, Finland, only when
trading as Vertu ("Vertu").
1. Vertu Concierge
As a registered member of Vertu Concierge (“VC”) provided by Vertu and its
associated companies (“Vertu”), you (“you”) agree to abide by these Terms and
Conditions (the “Terms and Conditions”), and, when ordering anything through VC
from a supplier of products and services (a “Supplier”), you agree that the Terms and
Conditions shall apply to your order.
2. Membership Information
You are obliged to provide correct details when you register for membership of VC
and your failure to do so may invalidate your membership and any subsequent
transaction. Your responsibility to provide accurate information is a continuing
obligation and you must notify Vertu in the event that any information provided by you
in the course of registration changes.
3. Subscription
Initial and ongoing subscription fees, if applicable, are due at the time of initial
subscription and annually thereafter (the “Renewal Date”) unless you notify Vertu of
your intention not to renew. Payment must be made annually in advance, and may be
made using any major credit/debit or charge card. Any subscription fee is non
refundable. However, Vertu may, at its sole discretion, elect to refund any subscription
fee in whole or in part, depending on the circumstances relating to the cancellation of
any subscription. You authorise Vertu to deduct renewal subscription fees from your
payment card up to 28 days prior to your Renewal Date. If Vertu does not hold your
payment details, you will be contacted directly to renew your subscription.
Subscription fee rates will be notified to you from time to time, and the subscription
fee payable will be the subscription fee in force at the time of the Renewal Date.
You agree that you will only use your VC membership for the purposes for which it is
issued.
4. VC Services
As a member of VC, you are entitled to all of the products and services as advised by
us from time to time as approved by the relevant product/service Supplier.
5. Services Subject to Change
As a member, note that:
• services are subject to availability and may change from time to time;
• suppliers may change from time to time;
130
• suppliers may impose their own terms and conditions, and you are required to
comply with these at all times.
6. Payment for Services
Please note that some Suppliers may charge you a deposit, entry fee or other sum
for the services they provide. You will be solely liable for payment of any such sums.
At your request, Vertu will authorise Suppliers to debit your nominated payment card
in order for you to take advantage of their services.
7. Availability of Services
Vertu aims to ensure that the services remain available at all times, and will use
reasonable endeavours to ensure that you receive the most from your membership.
If any of the services become unavailable, we will do all we can to ensure that prior
commitments are honoured to the fullest extent possible, but shall not be responsible
for any actions of Suppliers outside Vertu’s reasonable control. From time to time the
procurement or provision of certain services may incur a VC handling charge of which
you will be notified - in these cases you hereby authorise Vertu to debit your
nominated payment card with any such handling charges. Unless otherwise agreed
by the Supplier, you shall not be entitled to cancel any services requested where, on
your instructions, performance has already begun.
8. Right of Withdrawal
Vertu reserves the right to withdraw any service that may be offered and/or to refuse
to supply any service requested.
9. Requests
If Vertu is unable to deal with any request, it will inform you as soon as reasonably
practicable.
10.Dealing with VC Suppliers
Suppliers are responsible for providing you with the goods and services you select.
Vertu will assist you in any way it can in all of your dealings with Suppliers.
11.Personal Membership
VC membership is personal to the registered Vertu phone user. You are responsible
for ensuring that no one (other than your personal assistant, where applicable) uses
your membership to access membership services and benefits.
12.Cancellation of Membership
Vertu reserves the absolute right to cancel or suspend your membership (at its sole
discretion) for any reason whatsoever. If Vertu cancels your membership, it shall
refund the balance of the annual subscription fee, if any, on a time apportionment
basis in respect of the unexpired period to which the annual subscription fee applies.
Warranty and legal information
13.Changes to Terms and Conditions
Vertu may vary these Terms and Conditions from time to time. Vertu will notify you of
any changes in a timely manner. Notification will be by some or all of the following
media:
• newsletter;
• mail;
• e-mail or other personal delivery service.
14.Payment Details
If we do not have your payment card details, we may not be able to provide or procure
those benefits, goods or services that require payment.
You may only make transactions using VC during your period of membership. When
ordering a product or service, you will be required to provide your payment card
details. You undertake that all details you provide to us for the purpose of booking,
ordering or purchasing goods or services are correct, that the payment charge card
you are using is your own, and that there are sufficient funds to cover the cost of the
product or service.
15.Supply of Details
Vertu may pass on details of your payment card and any other essential booking
details to its agents, employees, subcontractors and Suppliers, and you consent to
us passing on such details to deal with your orders. You must inform Vertu as soon as
possible of any changes to the details supplied by you.
16.Payments Due
The purchase price of all products and services obtained through VC is due for
payment on acceptance of your order by Vertu and/or a Supplier, as applicable.
17.Delivery
By placing your order for a product or service through VC, you agree that the time
taken for delivery or performance shall be as stipulated when the purchase is made.
We want you to get your order as soon as possible. If delivery or performance will take
longer than the time set out (or the product or services are unavailable), the Supplier
(or Vertu acting for the Supplier) will notify you of this at the earliest opportunity and
you will have the unequivocal right to withdraw your order and receive a full refund.
18.Limited Warranty
Vertu warrants to you that Vertu shall use its reasonable endeavours to provide the
VC services with reasonable care and skill and, as far as reasonably possible, in
accordance with your request and instructions from time to time. Where Vertu
supplies you with any goods or services supplied by a third party, then Vertu is acting
as your agent in sourcing the goods or services. Vertu will use reasonable care in
selecting the Supplier and ensuring the order is placed in accordance with your
wishes. For the avoidance of doubt, Vertu does not and will not provide any
representations or recommendations in relation to any of the information and
suggestions comprised within the VC services. You are deemed to be responsible
for, and shall use your own skill and judgement as to, the quality, value and suitability
of such information and suggestions in relation to deciding whether to enter into any
contract with any third party for the supply of services or sale of goods.
19.Vertu as Agent
Your contract for the purchase of products or services is made with the relevant
Supplier only. Vertu acts as an agent for the Supplier and, unless expressly provided
otherwise, all your rights and remedies are against the Supplier.
20.Disclaimers
Vertu will not be responsible for products and services offered by Vertu as agents for
the Suppliers, or for any aspect of the relationship between you and any particular
Supplier. Vertu will, however, do everything it reasonably can to assist you in any
dealings you have with the Supplier.
You agree that any contract entered into by you with any of the Suppliers is an
independent contract. Vertu hereby disclaims any and all liability for any act or
omission of any Supplier, or any loss incurred by you as a result of any act or omission
of a Supplier, whether or not arranged through VC.
21.Limitation of Liability
Vertu accepts no liability for any losses or claims arising from any inability to contact
VC or any failure to complete a transaction.
Save in respect of death and personal injury caused by the negligence of Vertu or as
expressly provided for in these Terms and Conditions, Vertu shall not be liable for any
loss, cost, expense or damage of any nature whatever (whether direct or indirect)
resulting from the provision of the Services or your reliance upon the information and
suggestions provided by Vertu hereunder and the resulting supply of goods and
services to you by any third party.
Vertu shall have no liability to you for any loss, damage, costs, expenses or other
claims for compensation arising from requests or instructions supplied by you which
are incomplete, incorrect or inaccurate, or arising from their late arrival or non-arrival,
or any other fault by you.
Vertu shall not be liable to you, or be deemed to be in breach of these Terms and
Conditions, by reason of any delay in performing, or any failure to perform, any of
Vertu’s obligations in relation to the VC services, if the delay or failure was due to any
cause beyond Vertu’s reasonable control.
131
Warranty and legal information
Except in respect of death and personal injury caused by the negligence of Vertu and
subject to the provisions of these Terms and Conditions, Vertu’s maximum liability to
you for breach of any of its obligations hereunder shall be limited to the value of the
annual subscription fee, if any, and the relevant charge for the VC services to be
provided.
The limitations of liabilities set out herein apply only to the maximum extent permitted
by law.
22.Governing Law and Arbitration of Disputes
Any and all claims, except claims for monies due to Vertu, arising out of or relating to
the use of VC, must be commenced within one (1) year after the date either you or
Vertu knew or should have known of the facts giving rise to such claim, after which
such actions shall be barred. If acceptance of your membership request or a
particular service request takes place within Europe, Middle East or Africa, the
governing law shall be Finnish law. All disputes arising out of or in connection with
these Terms and Conditions shall be finally settled under the Rules of Arbitration of
the International Chamber of Commerce by one arbitrator appointed in accordance
with the said Rules. The arbitration proceedings shall be conducted in London,
England in the English language. The arbitration decision shall be final and binding.
Provided that the parties shall have the right to take proceedings in any other
jurisdiction for the purposes of enforcing a judgment or order obtained from the courts
of England and Wales.
If acceptance of your membership request or a particular service request takes place
within Asia Pacific, the governing law of these Terms and Conditions shall be
Singapore law. All disputes arising from or connected to these Terms and Conditions
shall be settled finally and exclusively in Singapore under the Rules of the Singapore
International Arbitration Centre (SIAC Rules). The arbitration shall be conducted in
English in Singapore. The award shall be final and binding on both parties. Provided
that the parties shall have the right to take proceedings in any other jurisdiction for the
purposes of enforcing the arbitral award.
If acceptance of your membership request or a particular service request takes place
within the Americas region, all disputes and matters relating to arbitration shall be
governed by the Federal Arbitration Act (9 U.S.C. §§1 et. seq.). Except to the extent
governed by applicable U.S. federal law, any transactions with VC and its Suppliers
shall be governed by the laws of the State of Texas, excluding its conflict of law rules.
Any and all claims, except claims for monies due to Vertu, arising out of or relating to
your membership and use of VC shall be barred unless an action or legal proceeding
is commenced within eighteen (18) months after the date you or Vertu knew or should
have known of the facts giving rise to such claim. Any dispute relating in any way to
your membership and use of VC, and any orders placed through VC, shall be
132
submitted (together with any counterclaims and disputes under or in connection with
other transactions and/or agreements between you and Vertu) to final and binding,
confidential arbitration to the Dallas, Texas office of the American Arbitration
Association (the “AAA”), with such arbitration to be held in Dallas County, Texas,
except that, to the extent you have in any manner violated or threatened to violate any
Vertu or Vertu affiliates’ or licensors’ intellectual property rights, Vertu may seek
injunctive or other appropriate relief in any state or federal court in the state of Texas
or, at Vertu’s option, any other appropriate state or country, and you consent to
exclusive jurisdiction and venue of such court. Arbitration under these Terms and
Conditions shall be conducted under the then prevailing Wireless Industry Arbitration
Rules of the AAA (except as such rules may be modified by the terms of these Terms
and Conditions), unless otherwise agreed in writing by the parties, and shall be heard
by a single arbitrator. Subject to any terms contained in these Terms and Conditions
limiting or excluding damages, the arbitrator may award any relief that the arbitrator
deems proper, including without limitation equitable relief, provided that no award of
exemplary, special, consequential or punitive damages shall be permitted. The
prevailing party, as determined by the arbitrator, shall pay the AAA arbitration fees
and the arbitrator’s fees and expenses, as applicable. The arbitrator’s award shall be
binding and may be entered as a judgment and enforceable in any court of
competent jurisdiction. To the fullest extent permitted by applicable law, the
arbitration shall be conducted on an individual, not a class-wide basis, and no
arbitration under these Terms and Conditions shall be consolidated with or joined to
an arbitration involving any other person or entity, whether through class arbitration
proceedings or otherwise, without the prior written consent of you and Vertu.
Copyright © Vertu 2010. All rights reserved.
January 2010
Passive Near Field Communication Device
Your Vertu handset contains a Passive Near Field Communication device. This
device enables Vertu to verify the authenticity of the phone if it is presented at a Vertu
branded store or Vertu authorised service company.
Index
Numerics
3G 78
Index
A
About your phone 4
Access points 81
Accessories 80
Accessory profile 80
Accurate Time 15, 69
A-GPS 108
Alarm clock 98
Alarm, cancelling 98
Alarm, setting 98
Alarm, snooze 98
Alarm, stopping 98
Allow adverts 59
Analogue clock 14
Answering calls 32
Anykey answer 32
Attachments 63
Audible indicators 17
Audio codecs 123
Audio messages 60
Audio messages, creating 60
Audio messages, loudspeaker 60
Audio messages, muting 60
Audio messages, playing 60
Audio messages, previewing 60
Audio messages, receiving 60
Audio messages, sending 60
Audio messages, volume 60
Auto-fill 101
Autofocus 114
Automatic answer 32
Automatic keyguard 14
Automatic redialling 31
B
Backlight 80
Backup 83
Battery 6, 8, 12, 119, 121
Battery, authentication 120
Battery, charging 119
Bluetooth 74, 82, 121, 123
Bluetooth connection settings 75
Bluetooth headset 75
Bluetooth mode 74
Bluetooth name 75
Bluetooth, disconnecting 75
Bluetooth, pairing 74
Bluetooth, sending a file via 75
Bluetooth, unpairing 75
Bookmarks 99
Browser 123
Browser security 28
Business cards, receiving 46
Business cards, sending 45
133
Index
C
Cache, clearing 101
Calculator 85
Calendar 55
Calendar notes 93
Calendar settings 95
Calendar views 95
Call barring 25, 121
Call divert 35, 121
Call duration 37
Call duration display 36
Call history 30, 37
Call waiting 36
Caller ID 36
Camera settings 114
Care, ceramics 8
Care, leather 8
Care, metal 9
Care, rubber 9
Care, sapphire 8
CD-ROM 21
Cell info 73
Certificates 28
Character support 56
Charger 6, 80, 120, 121
Chronograph 88
City Brief 103
Clock 14, 69
Closed user group 27
Collection 84
Conference call 34
Configuration 80
Contact groups 48
Contact, adding image 43
134
Contacts 30
Contacts memory 46
Contacts view 47
Contacts, adding details 44
Contacts, copying 50
Contacts, default group 48
Contacts, default phone number 44
Contacts, deleting 45
Contacts, finding 44
Contacts, font size 47
Contacts, memory status 47
Contacts, moving 50
Contacts, name display 47
Contacts, personalising ring tone 43
Contacts, saving 43
Contacts, saving multiple phone numbers 44
Conventions, user guide 4
Currency converter 106
Current software, viewing 78
D
Data cable 120
Data transfer 83
Date 69
Date format 69
Declaration of conformity 7
Deleting messages 66
Delivery reports 53, 55, 57, 59, 65
Digital clock 14
Digital rights management (DRM) 4
Digital signatures 29
Draft messages 53, 57, 60, 63
Index
E
Electronic devices 5
E-mail account, automatic setup 61
E-mail account, manual setup 62
E-mail message settings 64
E-mail messages 61
E-mail messages, contents 64
E-mail messages, creating 63
E-mail messages, deleting 64
E-mail messages, forwarding 63
E-mail messages, image size 64
E-mail messages, reading 63
E-mail messages, receiving 63
E-mail messages, reception 64
E-mail messages, replying 63
E-mail messages, sending 63
Emergency call 30
Ending calls 33
Entering text 39
Equaliser 88
F
Facebook 84
Favourite recipient 67
FCC/Industry Canada notice 7
Fixed dialling 26
Flash messages 65
Flash messages receiving 65
Flash messages, creating 65
Flash messages, reading 65
Flash messages, sending 65
Flight information 106
Flight query 78
Font size 67, 73
G
Gallery files 117
Gallery folders 115
Games 84
General message settings 67
Go to menu 20
GPS 108
Graphical smileys 67
Groups, adding contacts 48
Groups, deleting 49
Groups, removing contacts 49
Groups, saving 48
Groups, viewing and editing details 48
Groups, viewing member details 48
GSM 78
H
Handsfree 33
Hidden clock 15
Home location 69
Home page 99
Home screen 14, 30
I
Icons and indicators 16
Inbox 54
Info messages 66
Instant messages (IMs) 66
Internet 122
iSync plug-in 22
135
Index
J
Java 84, 123
JavaScript 101
Joystick 13, 73
Joystick shortcuts 20
K
Key-character mapping 41
Keypad
unlocking 14
Keypad, locking 13
Keypad-character mapping 41
L
Language, phone 77
M
Main menu 18
Main menu, changing view 20
Making calls 30
Map Loader 22
Maps 108
Media player 86
Memory 123
Memory status 77, 115
Menus 18
Menus, navigating 20
Menus, opening 19
Message details 54
Message log 38
Message priority 53
Message sending path 56
Message validity 53, 56
Messages, deleting 55
Miniature clock 15
136
Minimap 100
MMS creation mode 59
MMS messages 122
Modem, using your Vertu phone as a 76
Multimedia message reception 59
Multimedia message sending options 57
Multimedia message settings 59
Multimedia messages 57
Multimedia messages, contents 58
Multimedia messages, creating 57
Multimedia messages, forwarding 58
Multimedia messages, image size 59
Multimedia messages, playing 58
Multimedia messages, previewing 57
Multimedia messages, receiving 58
Multimedia messages, replying 58
Multimedia messages, sending 57
Multiparty calls 34
Muting a call 33
My Feeds 104
My numbers 49
N
Navigation settings 110
Network mode 78
Notes 92
Notification details 72
Numeric input mode 40
O
Opera Mini 84
Operating environment 5
Operator selection 79
Overwriting sent items 67
Index
P
Package contents 10
Packet data 38, 75
Phone memory 46
Phone switch 82
Phone updates 78
Photo settings 112
PIN code 24
PIN2 code 24
Positioning log 38
Predictive text database 40
Predictive text input mode 39
Profile General 70
Profile, active 70
Profile, Flight 70
Profile, Silent 70
Profile, timed 70
Profiles 70, 121
Profiles, personalising 70
Pulsing indicator 13, 73
Putting a call on hold 33
R
Read reports 57, 59, 65
Recording a video clip 113
Rejecting calls 32
Restore all 82
Restore settings only 82
Ringing tones 71
Roaming 107
S
SAR Notice 6
Security code 27, 82
Security keyguard 28
Security level 27
Selection keys 13, 73
Sent messages 53, 67
Server sync 83
Service commands 66
Service message settings 68
Service messages 68
Service numbers 49
Settings, ordering 22
Setup Wizard 13
Shortcuts 73
SIM card 12, 121
SIM card memory 46
Slide options 57
Slide timing 57, 59
Smart messages 65
Speakerphone 33
Speed dialling 31
Start-up tone 79
Stereo widening 77
Stopwatch 88
Summary after call 36
Switching phone on and off 13
Synchronisation 82
Synchronisation log 38
137
Index
T
Taking a photo 111
Templates 53, 55, 57, 58, 63
Text input mode indicators 40
Text input modes 39
Text message service centre 55
Text message settings 55
Text message, forwarding 54
Text messages 52, 122
Text messages, creating 52
Text messages, reading 54
Text messages, receiving 54
Text messages, replying 54
Text messages, sending 52
Text messages, sending options 53
Themes 71
Time 69
Time format 69
Timer 90
To-do list 96
Tones 71, 121
Torch 85
Traditional text input mode 39
Travel 105
U
USB data cable 76
USB mode 76
USB storage 76
138
V
Vertu Concierge 106
Vertu Feeds 102
Vertu Fortress 83, 107
Vertu Mobile 99
Vertu PC Suite 22, 76
Vertu phone, registering 21
Vertu Select 103
Video clip settings 114
Video codecs 123
Voice clarity 34
Voice commands 21, 77
Voice dialling 31
Voice mailbox number 65
Voice messages 65
Voice recognition 77
Voice recognition, training 78
Voice recorder 91
Volume 33
W
Wallpaper 72, 111
Weather 105
Web pages, accessing 99
Web settings 100
Workshop reset 82
Writing language 41