1
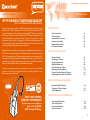
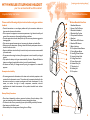
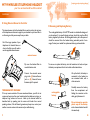
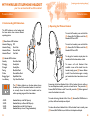
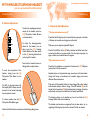
www.accutone.com
Accutone® is a worldwide brand name for professional call
center headsets. Aiming to provide commercial-standard
handsfree solutions to both business and home sectors,
Accutone collaborates quality with affordability. Come visit
our website www.accutone.com to find out more about
© 2012 Accutone Technologies Ltd. All rights reserved.
the wide range of solutions offered by us.
Accutone and the logo device are trademarks of Accutone Technologies Ltd.
[ inspiring people, inspiring change ]
Product Introduction
Table of Contents
WT99 WIRELESS TELEPHONE HEADSET
your true wireless handsfree office solution!
®
Accutone is proud to introduce our DECT wireless headset conforming with the
standard 1.88~1.9GHz requirement. The WT99 wireless headset system is full GAP
compatible meaning it can be paired to any Wireless (GAP) PBx system. But aside
from being a stand-alone wireless headset, the WT99 can also be paired with any
fixed-line telephone by replacing its handset. Using the base station as a signal
transmission base as well as a charging unit, the wireless headset gives user true
mobility during phone calls. Paired with the optional automatic handset lifter users can
conveniently answer and end calls away from their desks.
INTRODUCTION
Designed to meet the reliability requirements of a professional business product, the
WT99 is instead being marketed as an affordable product for the mass consumers as
well. This is because Accutone® believes that good product knows no boundary. With
long traditions of building headsets for the professional market, we not only have the
experience to build the best product in terms of acoustics, mechanics and cosmetics,
but also the ability to build product that is affordable to everyone.
SETUP AND INSTALLATION
So now, please spend some time to read through this entire manual to familiarize
yourself with this device, and again thank you for choosing Accutone® as your
telecommunication headset brand.
Product Introduction
Table of Contents
Important Safety Information
Exemption from Liability
Battery Safety Precautions
Main Interface Overview
Setting up Headset
Connecting to Telephone
Setting up Handset Lifter
Adjusting Handset Lifter
Using External Sensor of Lifter
Removing and Replacing Battery
Pairing the Wireless Headset to Telephone
Registering/Pairing Headset to Base Station
p.1
p.2
p.3
p.3
p.3
p.4
p.5
p.6
p.7
p.8
p.9
p.10
p.11
p.12
UNDERSTANDING AND OPERATING
Understanding LED Indications
Operating the Wireless Headset
Volume Adjustments
DECT 1880-1900MHz
WIRELESS TECHNOLOGY
************************
Generic Access Profile
(GAP) Compatible Design
1
p.13
p.14
p.15
SUPPORT AND OTHER INFORMATION
Frequently Asked Questions
Technical Specifications
Environmental Standards
Terms & Conditions
p.16
p.18
p.18
p.18
2
[ inspiring people, inspiring change ]
WT99 WIRELESS TELEPHONE HEADSET
your true wireless handsfree office solution!
Important Safety Information
Main Interfaces Overview
Please read the following safety instructions before using your wireless
headset.
1
ŸPlace the base station on a non-slippery surface and lay the connection cables out so
2
they cannot be the source of accidents.
3
ŸDo not expose the equipment to extreme temperatures or high relative humidity and
protect it from exposure to direct sunlight and dusty conditions.
ŸClean the equipment with a soft, damp cloth only. Do not use any solvents or aggressive
cleansing agents.
ŸOnly connect approved accessories, such as power plug, adaptors or handset lifter.
ŸNever open up the base station. Opening it annuls all warranty and exposes the user to
the risk of an electric shock.
ŸRepairs to defective units should only be carried out by service centers recommended
by the sales outlet.
ŸWe recommend removing the battery if the equipment is not to be used for prolonged
periods.
ŸOnly replace the battery with types recommended by Accutone. Dispose off defective
battery according to the applicable local laws (not with household waste).
ŸWe assume no liability for damage caused by using the equipment for unintended
purposes.
4
5
6
7
8
9
10
11
Exemption from Liability
12
Wireless Headset Interface:
1. Headband Extension
2. Answer / End Call Button
3. Detachable Headband
4. Detachable Ear Cushion
5. Microphone Mute Button
6. Headrest
7. Base-Station LED Indicator
8. Headset LED Indicator
9. Battery Indicator
10. Microphone Volume Buttons
11. Pairing/Register Button
12. Listening Volume Buttons
13. Listening Volume Knob
14. Configuration Switch
15. Power Adaptor Jack
16. Handset Lifter Jack
17. Telephone Jack
18. Handset Jack
19. Microphone
ŸWe cannot guarantee the information which relates to the technical properties or that
contained in this document is correct. The product and its accessories described in this
document are subject to constant improvement and further development. For this
reason, we reserve the right to modify components, accessories, technical
specifications and related documentation of the product described herein without
notification.
13
14
15
16
Battery Safety Precautions
17
ŸDo not burn, disassemble, mutilate or puncture the battery. Like other battery of this
type, toxic materials could be released by misuse or damaging its surfaces.
ŸTo reduce the risk of fire or personal injury, use only the battery provided by Accutone.
ŸKeep battery out of children’s reach.
ŸRemove battery from the equipment if storing for over 30 days.
18
19
!
3
4
[ inspiring people, inspiring change ]
WT99 WIRELESS TELEPHONE HEADSET
your true wireless handsfree office solution!
Installation
Installation
A. Setting up Headset
B. Connecting to Telephone
Unplug the handset from your telephone
base, and plug the handset into the
Handset Connector (18).
Headband
Headset Body
Ear Cushion
17
18
15
!
16
The headset is composed of three parts: the Headset Body, the Headband
and the leatherette Ear Cushion. Assemble them together as shown below
before you proceed further.
X
Headband
Headset Body
2
Ear Cushion
First connect the headband to
the headset body by pusing the
knob through the hole, you
should feel a “click” sound as
firmly connected.
Y
1
Secondly, connect the ear
cushion to the headset body in a
similar fashion until you can feel
the same “click” sound.
P
Connect one end of the RJ Modular Cable
(X) to the Telephone Connector (17)
under the base station, the other end of
the RJ Modular Cable (Y) goes into the
handset jack of your telephone unit
(where it used to connect to the
telephone handset).
Connect the Power Adaptor (P) to the
Power Adaptor Jack (15), then connect
to any power socket. (Make sure the
voltage specified on the adaptor
corresponds to your local electrical
power supply specifications.)
The power adaptor may come with
country-specific pin-adaptors, select the
one that fit the standard power socket of
your country. Simple install the adaptor by
facing the metal pins on the power
adaptor to the socket on the pin adaptor.
*Place the base station at least 15cm away
from the telephone to avoid interference.
5
6
[ inspiring people, inspiring change ]
WT99 WIRELESS TELEPHONE HEADSET
your true wireless handsfree office solution!
Installation
Installation
C. Setting up Handset Lifter
D. Adjusting Handset Lifter
First of all, connect the Lifter Plug
(W) into the Handset Lifter Jack (16)
located on the back of the base
station.
16
!
Flip over your handset lifter, and you
will find two stickers, one vertical and
one horizontal.
Now test the lifter by wearing the headset and pressing the answer button
on the headset, if there’s no response or the headset hasn’t been charged,
please refer to the next section and come back to here afterwards.
If the handset lifts up and you can hear a dial tone, your lifter setup is
completed. But if lifter lifts up the handset but not enough for picking up the
line signal, you will need to adjust the lifting height as below:
T
S
Lift up the handset and carefully
remove the sticker seals and place the
lifter on top of the speaker area (as
shown below) of the telephone under
the handset.
Not all telephones have a large flat
surface or the speaker area may not be
directly below the handset.
If so, just find any way to fix the lifter
underneath the handset, and follow
the instructions about using an
external sensor in section E.
7
Locate the (S) Lifting Height Switch on the
front side of the lifter as illustrated. There
are 3 selection you can choose with the
top-most being the highest lifting distance.
As the weight and size of handsets vary
across telephones, you may need to use a
lower setting if the handset flies out of its
cradle due to its lightweight.
Rubber or Paper Pads.
But if even the highest setting is not
enough to lift the handset for picking a
line, try adding pads between lifter and
the telephone as shown below to
shorten the lift-distance.
The LED Indicator (T) lights up when
you press the Answer Button (2) on
your headset, indicating online status.
8
[ inspiring people, inspiring change ]
WT99 WIRELESS TELEPHONE HEADSET
your true wireless handsfree office solution!
Installation
Installation
E. Using External Sensor for the Lifter
F. Removing and Replacing Battery
The internal sensor within the handset lifter is used to pick up the ring tone
of the telephone and transmit a signal to your headset so you know there’s
a call coming in while you are away from your desk.
But if the ringer speaker of your
telephone isn’t located below or
close to the lifter, you will need to
use the supplied external sensor.
The rechargeable battery of the WT99 headset is a detachable design and
can be replaced. It is a specific design and user should only use the official
battery supplied by Accutone. All rechargeable battery has a life-span and
should be removed from the headset during extended period of nonusage. Contact your reseller for replacement battery purchase details.
external sensor
J
K
Flip over the handset lifter to
reveal its bottom-side.
To remove or replace the battery, turn the headset on its back, and open
the battery compartment from front to back as illustrated above.
Connect the external sensor
plug to the (J) External Sensor
Jack or (K) External Sensor
Extension Jack if required.
Lift up the hatch, the battery is
connected to the headset via
one connected cable, with a
white connector.
TROUBLESHOOT WARNING!
If for any reasons outside of the ones mentioned above, you still do not
receive any beep tone from your headset when the telephone is ringing, ie.
telephone ring volume too low...etc. Hook up the external sensor as
described and try speaking into the sensor with louder than normal
speaking volume, if this still doesn’t generate any beep tone, contact your
reseller or service center as the sensor may be malfunctioning.
9
rechargeable
battery
Carefully remove the battery
from the compartment and
holding the connector not the
cable, gently disconnect it.
Do not attempt to open the
plastic wrap of the battery
as the chemical inside is harmful
to human body.
10
[ inspiring people, inspiring change ]
WT99 WIRELESS TELEPHONE HEADSET
your true wireless handsfree office solution!
Installation
Installation
G. Pairing Wireless Headset with Telephone
Once you hear a dial-tone, make a call
using your telephone. If the person on
the other end hears you perfectly, the
pairing is completed.
First of all, before proceeding to pairing
the headset, make sure the rechargeable
battery has been installed within the
headset. If not, carefully remove the
battery cover and connect it to the battery
cable connector inside. Follow the
instructions on previous section for help.
Then with the headset firmly sitting inside
the base-station, charge a full 4 hours
before the first use.
14
First Charge - 4h
The reason why we need to pair the
headset to the telephone is because
different telephones have different
settings and pin-alignments for their
handsets.
2
To pair, put on your headset and press
the Answer Button (2) on the headset
for the lifter to uplift the handset, or
manually pick up the handset if you
don’t have a lifter.
If you hear a dial tone, the wireless
headset works with your telephone.
But if you do not hear a dial tone, pair
the two by sliding the Configuration
Switch (14) until you hear a dial-tone.
11
If you hear the caller, but s/he cannot
hear you or the volume is very low,
slide the (14) Configuration Switches,
until you find the best setting. Out of
the 7 possible combinations, there may
be more than one optimal setting.
H. Registering/Pairing Headset to Base Station
Your wireless headset should
already be paired with the base
station, but in case it hasn’t or if the
headset are un-paired for some
reason, press the (11) Pairing/
Register Button for 5 seconds until
the LED indicator on the base
station flashes.
11
Then quickly press the (5) Mute
Button on the headset for 3
seconds until its LED indicator
flashes RED/BLUE. The headset is
paired when both LED indicators
are off.
12
[ inspiring people, inspiring change ]
WT99 WIRELESS TELEPHONE HEADSET
your true wireless handsfree office solution!
Product in Action
Product in Action
I. Understanding LED Indications.
J. Operating the Wireless Headset
The LED Indicators on the headset and
the base station show various different
operating status.
(7) Base-Station LED Indicator
Headset Charging Off
Headset Pairing
Slow Flash
Headset Online
Normal Flash
Headset Muted
Fast Flash
To switch off headset, press and hold the
(2) Answer/End Call Button until the (8)
Headset LED turns OFF.
8
The (9) Battery Indicator on the base station shows
the battery level of the wireless headset. In order for it
to correctly show the level, the headset must be
within operating range with the base station.
13
2
9
(8) Headset LED Indicator
Standby
Slow Blue Flash
Charging
Steady Red
Charged
Steady Blue
Pairing
Blue/Red Flash
Online
Normal Blue Flash
Ringing Signal
Rapid Blue Flash
Low Battery
Very Slow Blue Flash
4 LED:
3 LED:
2 LED:
1 LED:
To switch on headset, press and hold the
(2) Answer/End Call Button until the (8)
Headset LED turns ON.
7
Headset Battery at its Full Capacity
Headset Battery is Above Half Capacity
Headset Batter at Half of its Capacity
Headset Battery is Low, Charge Immediately
8
To charge the headset, simple place the
headset within the base station cradle.
To answer call with Handset Lifter
installed: a tone will be heard from the
headset, simply press (2) Answer Button
to talk. Press the button again or simply
put headset back into base station to end
call.
Answering call without Handset Lifter: Lift the handset from its cradle, or
for some telephone models, press the on-hook button. Then press the (2)
Answer/End Call Button to talk. To end call, press the (2) Button again and
return the handset to its cradle.
To make calls using Handset Lifter: Press (2) Answer/End Call Button to
pick line, dial from the telephone dial pad.
To make calls without Handset Lifter: Lift the handset from its cradle, press
(2) Answer/End Call Button, and dial from the telephone dial pad.
14
[ inspiring people, inspiring change ]
WT99 WIRELESS TELEPHONE HEADSET
your true wireless handsfree office solution!
Product in Action
Troubleshooting
K. Volume Adjustments
10
12
To adjust the speaking/microphone
volume of the headset, press the
(10) Microphone Volume Buttons
on the base station.
To adjust the listening/speaker
volume of the headset, you can
either press the (12) Listening
Volume Buttons of the base station
or the (13) Listening Volume Knob
on the top of the headset.
L. Frequently Asked Questions
“The base station does not work!”
Check that the AC adaptor jack is connected to the proper jack on the back
of the base unit as well as a working power wall-socket.
Make sure you are using the supplied AC adaptor.
Check if third LED bar of the (9) Battery Indicator has flashed once when
connecting the device to a power socket. If not, the setup is improper, try
again or contact your local distributor for support.
“My headset does not work!”
Note that the headset must be in
talking mode to adjust volumes.
To mute the microphone of the
headset, simply press the (5)
Microphone Mute Button on the
headset.
The LED on the base station will
flash rapidly AND a Beep tone will
be heard in the headset indicating
the microphone is muted.
Check that the telephone is connected to the base unit’s (17) Telephone
Jack, and that it’s firmly connected.
Headset may be out of operational range, move closer to the base station
during initial setup, as interference and reception range varies across
different office environments.
13
To unmute, simple press the (5)
Microphone Mute Button again.
Make sure that the headset battery has been charged fully, place headset
inside the base station’s cradle to charge. If the LED indicator (8) on the
headset or the base station (7) fails to indicate battery charging, the battery
maybe dead, contact your local distributor for battery replacement.
The listening volume on the headset may be too low. Rock the (13)
Listening Volume Knob on the headset up.
The headset may have been un-registered from the base station, try reregistering it following the instructions in Section D of this user manual.
Note that the Mute function can only be activated during talking mode.
15
16
[ inspiring people, inspiring change ]
WT99 WIRELESS TELEPHONE HEADSET
your true wireless handsfree office solution!
Troubleshooting
Technical Specifications
“The caller cannot hear what I am saying!”
The headset is muted, press the (5) Microphone Mute Button to unmute the headset.
Microphone volume is too low. Increase the microphone volume by
pressing the “+” button from the two (10) Microphone Volume Buttons
on the base station.
“The sound from the headset is distorted and I can hear echo!”
The microphone is picking up the sound coming from the speaker on the
headset. Reduce the microphone volume or reduce the listening volume
from the loudspeaker. Refer to Section G of this user manual.
If your telephone has a handset volume control, try lowering that until the
distorting/echo sound disappears.
Base station is too close to a computer or a mobile phone, try moving the
base station to another location.
“I can hear a lot of background noise from my headset, why?”
The listening/speaking volume is set too high, reduce the volume by
rocking the Listening Volume Knob on the headset or by pressing the “-”
button on the side of the base station.
“Battery talk-time is shorter than before, even after a full
charge!”
Rechargeable battery is malfunctioning, replace a new battery pack.
17
M. Technical Specifications, Standards and Conditions
Headset Operating Time:
AC Adaptor Specs:
- Input Voltage:
- Output Voltage:
Telephone Interface:
Rechargeable Battery:
7 hours talk time | 120 hours standby time
100-240V
7.5V DC | 800mA
Analog telephone line class TNV3
as defined by EN60950 standard
3.7V DC | 320mAh
Used equipment and used headset battery must be disposed of in
compliance with current environmental protection regulations. You
should return them to your reseller or dispose them at an approved
recycling centre.
Do not attempt to open the battery from its packaging, as they
contain chemical substance that may be harmful to your health. In the event of
leakage, avoid contact with the skin, eyes and mouth. In the event of contact, rinse
the affected part for several minutes in running water. Clean the product with
absorbent paper or a dry cloth and contact your reseller for replacement battery.
We will repair or replace, at our opinion, this product if found defective due to
materials or workmanship within the warranty period beginning from the original
date of purchase. This product is warranted by authorized representative for the
period specified. The orginial dated purchase receipt must be presented to the
authorized service centre when service is rendered. On all carry-in models,
transportation to and from the service station is the responsibility of the purchaser.
This warranty does not cover damage due to accidents, fire, flood, earthquake
and/or other acts of God; misuse, incorrect line voltage, improper installation,
improper or unauthorized repairs, commercial use or damage occured in shipping.
Exterior and interior finish, lamps, glass, plastics parts and temperature probes are
not covered under this warranty. Customer adjustment according to the owner’s
manual are not covered under this warranty. This warranty is automatically void if
the serial number is missing or altered.
18