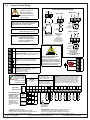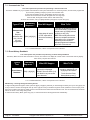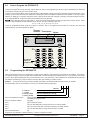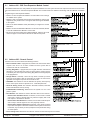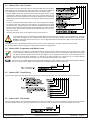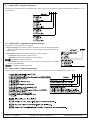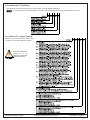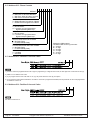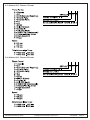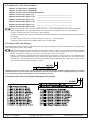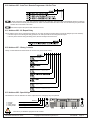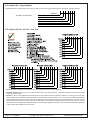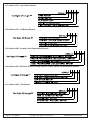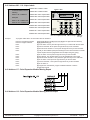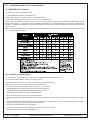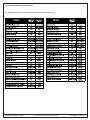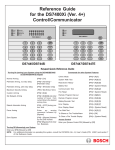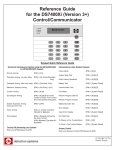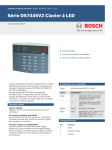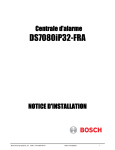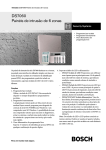
1
Reference Guide
for the
DS7080iP-32 Two Partition
Control/Communicator
Armed
Ready To Arm
Status
Power
Fire
Armed
Perimeter
Status
Power
Supervisory
Bell Silenced
Fire
Trouble
1 2 3 4 5 6 7 8
On
On
1
2
3
Off
1
2
3
Off
4
5
6
Perimeter
Only
4
5
6
Perimeter
Only
7
8
9
No
Entry
7
8
9
No
Entry
*
0
#
Bypass
*
0
#
Bypass
System
Reset
DS7447
System
Reset
DS7445
Keypad Quick Reference Guide
Turning On (Arming) your System
[PIN] + [On]
Normal Arming
[PIN] + [No Entry] [Perimeter Only]
Perimeter Arming, no entry delay
[PIN] + [Perimeter Only]
Perimeter Arming, with entry delay
[PIN] + [No Entry] [On]
Maximum Security Arming
[PIN] + [#] [4]
Custom Arming
[PIN] + [Arming Sequence] + [Bypass]
Force Arming
Set Delayed Arming
[PIN] + [#] [9] [9]
[PIN] + [OFF]
Delay Auto Arm by 15 Minutes
[PIN] + [Bypass] + [2-digit Zone number]
Zone Bypass
Change Partitions
[PIN] + [#] [#]
Turning Off (Disarming) your System
[PIN] + [Off]
Commands for other System Features
Chime Mode
Zone Test
Event History Readback
Battery Test
Communicator Test
Fire Reset
Fire Trouble
Remote Program Dial-out
Remote Program Answer
Local Battery/Sounder Test
Error Display
Error Display Reset
Clear Zone Bypass
[PIN] + [#] [7]
[PIN] + [#] [8] [1]
[PIN] + [#] [8] [9]
[PIN] + [System Reset]
[PIN] + [#] [8] [2]
[PIN] + [System Reset]
[PIN] + [Off] to silence, [PIN] + [System Reset] to clear
[PIN] + [#] [8] [3]
[PIN] + [#] [8] [6]
[PIN] + [#] [8] [5]
[PIN] + [#] [8] [7]
[PIN] + [System Reset]
[PIN] + [Bypass] [*] to clear
Access Control
[Access Control PIN] + [Off]
For additional information on system commands, see the DS7080iP-32 User’s Guide P/N 39425
Table of Contents
1.0 Specifications ............................................................ 4
1.1
1.2
1.3
Enclosure Housing ............................................................. 4
Temperature ....................................................................... 4
Power ................................................................................. 4
1.3.1
1.4
1.5
1.6
1.6.1
1.6.2
1.7
1.8
1.9
1.10
1.11
1.12
Accessory Power ...................................................... 4
Outputs .............................................................................. 4
Zones ................................................................................. 4
Keypads ............................................................................. 4
DS7443 Keypad ........................................................ 4
DS7445/DS7447 Keypads ........................................ 4
Communicator .................................................................... 4
Users ................................................................................. 4
Lightning Protection ............................................................. 4
Burglar/Fire Zone Inputs ..................................................... 4
Fire Signal Initiating Circuit (2-wire mode) ............................ 4
Standby Current Load ......................................................... 5
2.0 Enclosure Installation ............................................... 5
2.1
2.2
Install the Enclosure ............................................................ 5
Install the Control/Communicator ........................................ 5
3.0 Control Terminal Wiring ............................................ 6
4.0 System Worksheet ..................................................... 7
5.0 System Overview ....................................................... 9
6.0 Glossary ................................................................... 10
6.1
6.2
6.3
6.4
6.5
6.6
6.7
6.8
6.9
6.10
6.11
6.12
6.13
6.14
6.15
6.16
6.17
6.18
6.19
Zone Programming ...........................................................
Output Programming .........................................................
General Control Programming ...........................................
Keypad Assignment Programming ....................................
EX8 Expansion Module Programming ...............................
Emergency Key Programming ..........................................
Custom Arming Programming ...........................................
Report Control Programming ............................................
Day Monitor Report Control ..............................................
Phone Number General Control Programming ..................
Phone Answering Programming ........................................
System Timers ..................................................................
Force Arming Programming ..............................................
Report Programming .........................................................
Event History Readback Control .......................................
FCC Compliance Notice ...................................................
FCC Phone Connection Notice To Users ..........................
Canadian Dept. of Communications ...................................
For Installations in New Zealand .......................................
10
11
11
12
12
12
12
12
12
13
13
13
13
13
14
15
15
15
15
7.8
7.9
7.10
7.11
7.12
Fire Safety ........................................................................ 16
7.1.1
7.1.2
7.1.3
7.2
7.3
7.4
Setting the Date ................................................................ 17
Setting the Time ................................................................ 17
Personal Identification Numbers ........................................ 18
7.4.1
7.4.3
7.4.2
7.5
7.6
7.7
Page 2
If Installed in Family Residences ............................ 16
Having and Practicing an Escape Plan .................. 16
Installation Considerations ...................................... 16
General Information ................................................. 18
PIN Authority Levels ................................................ 18
Removing a PIN ...................................................... 18
Automatic Arming .................................................... 19
Delayed Automatic Arming ...................................... 19
Error Displays .................................................................. 20
P/N 39818D
20
21
21
22
22
8.0 How to Program the DS7080iP-32 .......................... 23
9.0 Programming the DS7080iP-32 .............................. 23
9.1
9.2
9.3
9.4
9.5
9.6
9.7
9.8
9.9
9.10
9.11
9.12
9.13
9.14
9.15
9.16
9.17
9.18
9.19
9.20
9.21
9.22
9.23
9.24
9.25
9.26
9.27
9.28
9.29
9.30
9.31
9.32
9.33
9.34
9.35
9.36
7.0 Operating Guide ...................................................... 16
7.1
Remote Program Dial-out and Answer ..............................
Zone Test ..........................................................................
Battery / Sounder Test ......................................................
Communicator Test ...........................................................
Event History Readback ...................................................
9.37
9.38
9.39
9.40
9.41
9.42
9.43
9.44
9.45
9.46
Address 001 - EX8 Zone Expansion Module Control ......... 24
Address 002 - General Control ......................................... 24
Address 003 - User Controls ............................................ 25
Address 004 - Programmer and Master Codes ................. 25
Address 005 - Cross-Zoning ............................................ 25
Address 006 - Trip window ................................................ 25
Address 007 - Keypad Assignment ................................... 26
Address 008 - Language and Arming Controls .................. 26
Address 009 - Output Programming .................................. 26
Address 010 - Time Delays ............................................... 27
Address 011 - Report Controls ......................................... 27
Address 012 - Phone Controls .......................................... 28
Address 013 - Partition 1 Account Codes .......................... 28
Address 014 - Partition 2 Account Codes .......................... 28
Address 015 - Phone # 1 Format ...................................... 29
Address 016 - Phone # 2 Format ...................................... 29
Address 017 - 022 - Phone Numbers ................................ 30
Address 023 - Dial Attempts ............................................. 30
Address 024 - Auto Test / Remote Programmer Call-Out Day
30
Address 025 - Auto Test / Remote Programmer Call-Out Time
31
Address 026 - AC Report Delay ........................................ 31
Address 027 - History Controls ......................................... 31
Address 028 - Special Keys .............................................. 31
Addess 029 - Keypad Reports .......................................... 32
Address 030, 031, 032, 033 - Zone Type ........................... 32
Address 034, 035, 036, 037 - Zone Action ........................ 34
Address 038, 039, 040, 041 - Output Type ........................ 34
Address 042, 043, 044, 045 - Zone Bypass ...................... 35
Address 046, 047, 048, 049 - Custom Arming ................... 35
Address 050, 051, 052, 053 - Zone Partition Assignment .. 35
Addresses 054, 055, 056, 057 - Zone Alarm Reports ........ 36
Addresses 058, 059, 060, 061 - Zone Restoral Reports .... 36
Addresses 062, 063, 064, 065 - Zone Trouble Reports ...... 37
Addresses 066, 067, 068, 069 - Trouble
Restoral Reports .............................................................. 37
Addresses 070, 071, 072, 073 - Zone Bypass Reports .. 37
Addresses 074, 075, 076, 077 - Bypass
Restoral Reports .............................................................. 37
Address 078 - Open/Close Reports ................................ 38
Address 079 - AC/Battery Reports .................................. 38
Address 080 - Remote/Local Programming Reports ...... 38
Address 081 - Exit Error, Recent Closing, System Trouble,
System Trouble Restoral Reports ..................................... 38
Address 082 - Test Reports ............................................. 38
Address 083 - 116 - Alpha Labels ................................... 39
Address 117 - Point Expansion Module Missing Report . 39
Address 118 - Point Expansion Module Missing Restoral
Report ............................................................................... 39
Address 119 - Point Expansion Module Tamper Report .. 40
Address 120 - Point Expansion Module Tamper Restoral
Report ............................................................................... 40
Copyright © 2001 Detection Systems, Inc.
DS7080iP-32 Reference Guide
9.47 Address 121 - Point Expansion Module Fault Report ......... 40
9.48 Address 122 - Point Expansion Module Fault Restoral Report
40
9.49 Address 123 - Octal Relay Control and Reports ............... 40
9.50 Address 124 - Default Programming ................................. 41
10.0 Installation Guide for UL Listed Systems ............. 42
10.1 DS7080iP-32 UL Listings: ................................................. 42
10.2 Installation Considerations ................................................ 42
10.2.1
Special Requirements for Partitioned Systems ...... 43
10.3 Programming the DS7080iP-32 ......................................... 43
10.3.1
10.3.2
10.3.3
10.3.4
10.3.5
Household Fire Alarm .............................................. 43
Grade A Household Burglary Alarm ....................... 43
Local Burglary Alarm ............................................... 43
Police Station Connection ........................................ 44
Central Station Burglary Alarm ................................ 45
10.4 Using the Ademco AB-12 Bell/Housing .............................. 46
11.0 Report Programming Suggested Values ............... 47
11.1 Personal Dialing and Pager Format ................................... 47
11.2 Pager Format ................................................................... 47
11.3 Suggested Values for BFSK and other Pulse Formats ....... 49
12.0 Report Programming Values Sent ......................... 50
12.1 SIA Format ....................................................................... 50
12.2 Contact ID Format Values Sent ......................................... 51
12.3 High Speed 4/9 Format ..................................................... 52
13.0 Programming Addresses ........................................ 54
14.0 Troubleshooting Guide ........................................... 55
Index ................................................................................. 58
DS7080iP-32 Reference Guide
Copyright © 2001 Detection Systems, Inc.
P/N 39818D
Page 3
1.0
Specifications
1.1
Enclosure Housing
1.6
1.6.1 DS7443 Keypad
The standard enclosure is manufactured from 20 Ga., cold-rolled
steel, and measures 12.5 in. Wide, by 14.5 in. High, by 3 in. Deep
(31.8 cm W x 36.8 cm H x 7.6 cm D). A keyed lock is included, and
this enclosure has a provision for an optional tamper switch (required
for Commercial Burglary applications) for monitoring the door.
1.2
• Total number of keypads:
400 feet (122m)
• Maximum wire length total:
1600 feet (488m) in system
• Wire type: 4 conductor, unshielded, #22 AWG (0.8mm) or 18
AWG (1.0mm) "Telephone quad".
Temperature
Power
• Input power:
16.5 VAC, 40 VA, 60 Hz.
• Auxiliary regulated power:
11.8 -12.5 VDC, 1.0 A. (200mA
for UL Listed Systems. 1.0 A
not investigated by UL.)
• Optional Standby battery (P334): 12 V, 7.0 AH
• Control panel current draw:
150 mA
Only one DS7443 is allowed per cable. Each DS7443 must
have a “home run” back to the DS7080iP-32. Do not “daisy
chain” or place two DS7443 keypads on any cable run.
1.6.2 DS7445/DS7447 Keypads
• Total number of keypads:
4 Keypads
• Maximum wire length each run:
1000 feet (305m)
• Maximum wire length total:
4000 feet (1220m) in system
• Wire type: 4 conductor, unshielded, #22 AWG (0.8mm) or 18
AWG (1.0mm) "Telephone quad".
If using #22 AWG (0.8mm) wiring, there can be no more
than two keypads allowed on any 1000 foot (305m) run.
Three keypads are allowed on any 1000 foot (305m) run if
#18 AWG (1.0mm) wire is used. Keypad wiring can be
“daisy-chained” or “home-run,” but the cables can NOT be
shared with other devices (e.g. telephone or siren wiring).
The DS7488 and EX-8 can only be “home-run.”
1.3.1 Accessory Power
•
•
•
•
DS7443
DS7445
DS7447
DS7488
keypad current draw:
keypad current draw:
keypad current draw:
Octal Relay
• EX8 Expansion Module:
45 mA, Standby & Alarm
75 mA, Standby & Alarm
100 mA, Standby & Alarm
10 mA for the module plus 40
mA for each energized relay
35 mA, Standby & Alarm
The total current for all auxiliary devices, including keypads
and smoke detectors = 1.2 A standby and alarm.
1.4
Outputs
• Alarm Output:
Normally Closed, 1.0 Amp contact connected
to auxiliary power. Can be programmed for
steady or pulsed output.
• Programmable Output 1*:
Solid state current sink (1 A max.).
(200mA for UL Listed Systems. 1 A
not investigated by UL.) Can be
used for alarm, arming state, or access control.** This output is generally programmable.
• Programmable Output 2*:
Solid state voltage source (500 mA
max.). (200mA for UL Listed
Systems. 500mA not investigated
by UL.) This is the smoke power
reset for Zone 1 when it is used as
afire zone for 2-wire smoke
detectors. Can be used for alarm,
armingstate, or access control.**
* = Current draw should be subtracted from either maximum
auxiliary or maximum alarm current draw.
** = Not investigated to the requirements of UL294.
1.5
Zones
• 1 or 2 Partitions. Zones may be assigned to one or both partitions.
Zones assigned to both partitions become common zones.
• 8 zones, plus 1 trouble zone on the main control board. The trouble
zone cannot be assigned to a partition.
• 24 Expansion zones using EX8 Zone Expansion Module. Each
EX8 adds 8 additional zones. Up to three EX8 modules can be
added to the system.
4 Keypads
• Maximum wire length each run:
• Storage and Operating Temperature: +32° to +120°F (0° to +49°C)
1.3
Keypads
1.7
Communicator
Will report to two phone numbers with full single, double and backup reporting. Communicates in SIA, 3/1, 3/1 Ext., 4/1, 4/2, BFSK,
Contact ID, High Speed 4/9, and Pager formats.
The ringer equivalence is 0.1B
1.8
Users
The system allows up to 24 individual users. Each user will have his
own PIN number (the 4- or 6-digit code entered at the keypads) and
his own authority level (to determine which functions he may
perform).
1.9
Lightning Protection
MOVs and spark gaps provide protection from lightning surges and
static discharges.
1.10 Burglar/Fire Zone Inputs
• Number of circuits 8 Circuits
• End-of-line resistor 2.21k ohms
1.11 Fire Signal Initiating Circuit (2-wire mode)
The Fire circuit (zone 1) will work with 2- or 4-wire detectors. It has
an optional alarm verification.
• Number of 2-wire circuits:
1 circuit, compatibility identifier A
• Type of circuit:
Class B, latching
• End-of-Line resistor:
2.21k ohms
• Supervisory current:
5 mA
• Maximum current for alarm:
13 mA
• Maximum short circuit current: 25 mA
• Maximum line resistance:
65 ohms
• Circuit voltage range:
8.5 to 14.0 VDC
• Maximum detectors per zone: 20 detectors (2-wire)
• Total detector standby current: 2.5 mA
• On Board Zone Response Time: 300 milliseconds.
Page 4
P/N 39818D
Copyright © 2001 Detection Systems, Inc.
DS7080iP-32 Reference Guide
1.12 Standby Current Load
Battery AH - (20% Storage + 0.375 AH’s Alarm)
The following table is the derated battery divided by hours minus the control standby (150 mA):
Rechargeable
Battery Size
4 AH
7 AH
8 AH
14 AH
15 AH
17.2 AH
2.0
Derated
2.825
5.225
6.025
10.825
11.625
13.385
AH
AH
AH
AH
AH
AH
Max. Standby Max. Standby Max. Standby Max. Standby Max. Standby
for 8 hours
for 24 hours for 48 hours for 60 hours
for 4 hours
590 mA
230 mA
X
X
X
X
1.0 A
530 mA
100 mA
X
X
X
1.0 A
640 mA
130 mA
1.0 A
330 mA
X
X
1.0 A
1.0 A
1.0 A
360 mA
120 mA
X
1.0 A
440 mA
160 mA
100 mA
1.0 A
2.2
Enclosure Installation
The DS7080iP-32 control/communicator and the enclosure are
shipped together. The control, however, still needs to be installed
into the enclosure. Hardware for mounting the enclosure to a wall,
and the control to the enclosure is located in its own hardware pack.
2.1
Install the Enclosure
Install the Control/Communicator
The control is static sensitive. Make sure you touch
earth ground before handling the control. This will
discharge any static electricity in your body. Example:
Run the ground wire to the enclosure before handling
the control. Then keep holding the ground wire while
installing the control.
• Use the enclosure as a template and mark the top mounting holes
on the mounting surface.
• Insert the three support posts into the control retainer holes as
shown in the diagram.
• Pre-start the mounting screws for these two holes. Slide the
enclosure onto these mounting screws so that the screws move
up into the thinner section of the holes. Tighten the screws.
• Slide the top of the control into the retainer tabs (the slots under
the top frame).
• Screw in the remaining two screws in either set of bottom mounting
holes.
• Knock out the desired wire entrances on the enclosure.
• Use knock out bushings if conduit is not used.
• Once in the retainer tabs, the control will rest on the three support
posts.
• Secure the bottom of the enclosure by screwing the bottom three
holes through the support posts and through to the control retainer
holes.
Once the control is installed, be sure to connect its
ground wire to the top hinge of the enclosure (the
unpainted tab).
DS7080iP-32 Reference Guide
Copyright © 2001 Detection Systems, Inc.
P/N 39818D
Page 5
3.0
Control Terminal Wiring
WARNING
Before servicing this
equipment, remove all
power including the
transformer and battery.
Also remove the phone
line connection.
TYPICAL BURGLAR AND FIRE WIRING
Zone
Input Ground
Zone 1 Only
Zone 1 Only
14
14
This System is Power Limited except for the
Battery terminals. All wiring entering this
enclosure must be Power Limited.
CAUTION: Incorrect connections may
result in damage to the unit.
EOL Relay
EOL
Resistor
NC
16
Smoke
Detector
EOL
Resistor
Smoke
Detector
NO
15
15
Zones 2-8 Only
Typical 2-wire
smoke detector
wiring
Typical burglar
alarm loop wiring
CAUTION: An appropriate two pole
disconnect device must be
installed by qualified service
personnel, as part of the
building installation.
(for a list of
compatible 2-wire
smoke detectors,
see Technical Service
Note P/N 41150)
14
Smoke
Detector
EOL
Resistor
1
PO1: Shorts to Auxiliary (-) when activated. Can sink
PO1 up
to 1 A. Programmed in Address 009.
2
+
POWER: Provides 12 VDC, special
AUX AUXILIARY
application, up to 1 A for powering detectors.
–
3
4
5
+
ALARM OUTPUT: Provides 12 VDC, special
–
application, up to 1 A for powering bells, siren
drivers, etc. Function programmed in address
009.
6
EARTH GROUND: Connected to a good earth
7
AC
AC INPUT : Use a listed Class 2,16.5 VAC
8
AC
Typical 4-wire smoke
detector wiring.
For example:
Detection System's DS250
in an MB4W base.
CAUTION
Danger of explosion if battery
is incorrectly replaced.
Replace only with the same or
equivalent type recommended
by the manufacturer. Dispose of
used batteries according to the
manufacturer's instructions.
ground and to the cabinet cover.
IMPORTANT
40 VA transformer Model D1640
requires 60 Hz unswitched
dedicated outlet - do not share.
Shared cable is not
allowed for keypad
expansion modules,
telephone, or siren
wiring.
Do not use shielded
or twisted pair cable.
Option Bus
Quick Connect
TRBL: Trouble Input. For
KEYPAD*:
the connection of any
accessory that provides a dry
contact trouble output.
Up to 4 keypads may be
used.
PO2: PO2 supplies 12-12.5 v
B
G
Y
TRBL
9
10
11
12
13
PO2 1
14
15
16
30
R
29
RH
28
TH
27
T
ZONES 1-8: Zones 1-8 are for connection of NO or
NC alarm contacts. These zones require a 2.21K ohm
resistor (P/N 25899) at the end of the loop. Power is
momentarily removed after a [PIN] [System Reset]
during a fire verification. Only zone 1 may be used for
compatible 2-wire smoke detectors (up to 20). Zone
programming is done in address 034 for zones 1-8.
2
3
17
18
19
4
5
20
21
22
6
7
23
24
8
25
26
Trouble input is
non-supervised.
Do not use an
EOL resistor.
*= Maximum Wire length each.
DS7443: 400 ft. (122m) maximum wire length.
Total in system: 1600 ft. (488M). Each keypad must be
a “home run”. Do not “daisy chain” keypads.
P/N 39818D
and up to 500 mA when
activated. PO2 function
programmed in address 009.
R
DS7488 Octal Relay DS7488
and EX8 Expansion
Octal
Modules. 1000 ft.
Relay
(305m) maximum
wire length. Must be Keypad(s)*
"Home Run". Do not
"Daisy Chain" with
keypads. The
EX8
DS7488 and EX-8
Expansion
can only be “Home
Modules
Run.”
Page 6
EOL Relay
DS7445/DS7447: 1000ft. (305m) maximum wire length.
Total in system: 4000ft. (1220m). Keypads may be
“home run” or “daisy chained”. Maximum of 2 keypads
per run for #22 AWG (.8mm) or 3 keypads for 18 AWG (1.0mm).
Copyright © 2001 Detection Systems, Inc.
DS7080iP-32 Reference Guide
4.0
System Worksheet
DS7080iP-32 Reference Guide
Copyright © 2001 Detection Systems, Inc.
P/N 39818D
Page 7
4.0
Page 8
System Worksheet (continued)
P/N 39818D
Copyright © 2001 Detection Systems, Inc.
DS7080iP-32 Reference Guide
5.0
System Overview
• Description: The DS7080iP-32 Control/Communicator is a fully
integrated hard-wire security and residential fire alarm system.
- It can support up to 8 input zones, two partitions, 24 individual
users, and multiple output options.
- Up to 4 keypads may be used to provide user interface with the
system, as well as programming access for the installer.
• Zone: A zone is an input to the DS7080iP-32 Control/
Communicator. There are 8 hard-wired zones on the main circuit
board.
• Zone 1: This zone can be programmed as a Fire or Burglar zone.
It is the only zone capable of supplying power to 2-wire smoke
detectors.
- When programmed as a Burglar zone, an alarm results on an
open or short when the control panel is armed.
- If trouble is programmed, a trouble report is generated, and the
zone is considered “Not Ready” only when the zone is disarmed.
- For Fire zone operation, see the Fire zone description in the
Glossary.
• Zones 2 - 32: These zones can be programmed as Fire or Burglar
zones.
- When programmed as a Burglar zone, an alarm results on an
open or short when the control panel is armed.
- If trouble is programmed, a trouble report is generated, and the
zone is considered “Not Ready” only when the zone is disarmed.
- For Fire zone operation, see the Fire zone description in the
Glossary.
• Cross-Zoning: Each on-board zone (zones 1-8) may be crosszoned with any or all of the other on-board zones. You cannot
cross-zone with the expansion module (EX8) zones.
When a pair of zones (A and B OR B and A) are cross-zoned, an
alarm condition is not generated unless:
1) Both A and B are in alarm simultaneously, or
2) B is in alarm within N seconds of the clearing of A or A is in
alarm within N seconds of the clearing of B, where N is the time
programmed in address 006. This allows for a one-way trip
pattern.
If two zones are cross-zoned to each other (A with B AND B with A)
an alarm condition is not only generated by conditions 1 and 2 above,
but also if:
3) A is in alarm within N seconds of the clearing of B. This allows
for a two-way trip pattern.
An alarm condition will be generated any time the above
criteria is met.
- Zone overlap required. Each zone shall have the ability to
individually protect the intended area (i.e. motion detector
patterns overlap).
- The following zone types can be cross-zoned:
• Perimeter Instant (1)
• 24 Hour (2)
• Interior Home/Away (6)
• Interior Instant (7)
• Day Monitor (8)
• Interior Delay (D)
• Perimeter Homeguard (E)
DS7080iP-32 Reference Guide
- The following zone types cannot be cross-zoned:
• Disabled (0)
• Entry/Exit Delay #1 (3)
• Entry/Exit Delay #2 (4)
• Interior Entry/Exit Follower (5)
• Keyswitch Toggle (9)
• Keyswitch On/Off(A)
• Fire Zone with Verification (B)
• Fire Zone without verification (C)
• Perimeter Follower Homeguard (F)
4) Cross-zoning across partitions is not supported.
5) Cross-zoning with different zone types is not supported.
6) If the trip window is 000, the cross-zone time will be the duration
of the arm cycle of the crossed non-24 hour zones. 24 hour zones
will have a 24 hour duration.
• Trouble Zone (TRBL): This non-supervised (requires no End Of
Line resistor) zone is intended for the use of simple tamper devices.
If tripped, this zone will generate a Control Trouble/System Fault.
This trouble will clear when the Trouble Zone loop is un-faulted.
- Trouble Zone is disabled by default.
- Trouble Zone has two modes of operation: Normally Open and
Normally Closed.
• EX8 Expansion Module: Up to three (3) EX8 Expansion Modules
(24 additional zones) may be added to the system. They must be
set for Option Bus Addresses 101, 102 and 103 respectively (see
the EX8 Installation Guide P/N 39565 for module addresses). It is
important that each module be set with a different address. Failure
to do so will result in improper communications with the EX8
modules and the zones associated with them.
• DS7488 Octal Relay: If installed, the optional DS7488 Octal Relay
will provide fixed outputs for predetermined panel conditions. The
DS7488 Octal Relay attaches to the keypad bus and must be set
for Option Bus Address 9.
Octal relay outputs will not operate during the first two
minutes after powering up the control panel.
The fixed outputs are:
- Output 1 - Zone Alarm: Follows any zone alarm (except Silent
and Invisible zones). Remains On until the zone restores, the
bell cutoff time expires or [PIN] + [Off] is entered.
- Output 2 - Zone Trouble: Follows any zone trouble. Latches
ON when any zone is in an abnormal condition.
- Output 3 - System Reset: Activates for 8 seconds when the
[PIN] + [System Reset] command is entered at any keypad.
- Output 4 - Panic/Duress: Latches ON when the Panic (C) key
is pressed for 2 seconds on any keypad or when a Duress
Code is entered into any keypad. The relay is released when
the command [PIN] + [Off] is entered at any keypad.
- Output 5 - System Trouble: This relay is ON when a system
trouble has occurred. Releases when the system trouble is
cleared.
- Output 6 - Low Battery: The relay is ON during a Low Battery
condition.
- Output 7 - Partial Arm: In a non-partitioned system the relay
is ON when the system is partially armed (Force Arm, Perimeter
Arm or zones bypassed). In a partitioned system, the relay is
ON when any partition is partially armed. The relay is reset
when the system (or partition) is disarmed or is fully armed.
- Output 8 - Armed: In a non-partitioned system the relay is ON
when the system is armed to any level. In a partitioned system,
the relay is ON when both partitions are armed to any level.
The relay is reset when the system or any partition is disarmed.
Copyright © 2001 Detection Systems, Inc.
P/N 39818D
Page 9
6.0
6.1
- This zone is bypassed when arming only the perimeter.
Glossary
Zone Programming
• Invisible Alarms: This is a zone programmed not to have an
alarm output or an alarm display (except when arming) at any
keypad when activated. Invisible Alarm zones are recommended
for holdup alarms. An alarm signal will be sent, but the keypad
display will not indicate an alarm while this zone is violated.
• Silent Alarms: This is a zone programmed to activate the visual
display at the keypad, but not audible signals.
- If this zone is also an entry zone, an entry tone will sound when
this zone is activated.
• Bypassing Allowed: This zone can be bypassed (shunted). This
is done using the bypass command ([PIN] + [Bypass] + [2-Digit
Zone Number]) or the force arming sequence ([PIN] + [Arming
Sequence] + [Bypass]).
• Alarm on Short: This zone will activate an alarm when its loop is
shorted.
• Alarm on Open: This zone will activate an alarm when its loop is
opened.
• Trouble on Open: This is a zone programmed to activate a trouble
when its loop is opened and the system is disarmed.
- If the system is armed, this zone will activate an alarm if shorted
or opened.
- For 24-hour zones, regardless of the arming state of the panel,
this always remains as a Trouble on Open.
• Trouble on Short: Works like Trouble on Open, but activates a
trouble when shorted and disarmed.
• Perimeter Instant: This is a zone programmed to activate an
alarm even during the entry/exit delay period.
• 24-Hour Zone: This is a zone programmed to activate when its
loop is faulted, even if the system is disarmed.
• Entry/Exit Delay #1: This zone is ignored during the entry/exit
delay period.
- If it is violated while the system is armed, it will activate a delay
for the amount of time programmed in Entry Delay Time #1.
The keypad pre-alert sounders will activate and the system
may be disarmed during this delay period.
- If the system is not disarmed during the entry period, this zone
will activate an alarm.
- If, at the end of an Exit delay, an entry/exit delay zone is faulted,
an exit error condition will activate.
- The Entry delay will begin as above and any outputs
programmed to follow burglar alarms will activate.
- If the system is not disarmed during this delay period, the control
panel will send an alarm report and an exit error report.
- If the system is disarmed during this delay period, the alarm
outputs will deactivate and no alarm report will be sent.
• Entry/Exit Delay #2: Works in the same manner as the Entry/
Exit Delay #1 zone, except that it uses Entry Delay Time #2.
If both Entry/Exit delays have been activated, the control
will use the shorter delay.
• Interior Entry/Exit Follower: This is a zone programmed to be
ignored during an entry/exit delay and then become an interior
instant zone.
- If this zone is violated while the system is armed and no entry/
exit zones have been violated, it will activate an instant alarm.
- If this zone is violated after an entry/exit delay zone is violated,
it will follow that entry/exit delay time.
Page 10
P/N 39818D
• Interior Home/Away: This zone becomes an active interior entry/
exit follower when the system is armed and an entry/exit delay
zone is violated during the exit delay time.
- If the system is armed and an entry/exit delay zone is not
violated, this zone will be bypassed.
- This zone is bypassed when arming only the perimeter.
• Interior Instant: This is an instant zone that does not use entry
delays. This zone is bypassed when arming only the perimeter.
• Day Monitor: This is a perimeter instant zone that activates alarm
outputs when the system is armed, but only activates the keypad
sounders when the system is disarmed.
- When the system is disarmed, any violation of this zone will
activate the keypad sounders which will sound continuously
until a disarming command is entered. The alarm outputs will
not operate. A trouble report (if programmed) will be sent to the
central station.
- A day monitor violation will be recorded in the alarm history.
• Keyswitch Input: This zone allows the system to be armed or
disarmed using a Normally Open momentary keyswitch (toggle
mode) or an on/off switch wired across the keyswitch zone.
- In toggle mode, each time the keyswitch input is shorted, the
arming state of the control panel will toggle.
- In the on/off mode, the control panel will arm when the zone is
shorted and will disarm when the zone is supervised.
- May be programmed to allow force arming.
- In the on/off mode, may be bypassed for keypad arming.
- Keyswitch zones should be programmed for trouble on open.
- If the keyswitch zone circuit is cut, a zone trouble and an alarm
(if armed) will be generated on this zone. Alarm output for this
zone is fixed at on steady.
- An output should be used for an LED to indicate armed/
disarmed status and for a sounder to indicate entry/exit delays.
• Fire Zone: This zone causes a fire alarm when activated, whether
the system is armed or disarmed.
- It can be silenced (but not reset) by entering a valid [PIN with
disarming privileges] + [Off].
- A fire alarm will be displayed on all keypads.
- A fire reset command [PIN] + [System Reset] must be entered
after silencing the alarm to re-enable this zone. It is important
to not use the panel during the 8 second reset period.
- If a fire alarm is not reset within 24 hours of the alarm being
silenced, “Fire Alarm…Not Reset” will appear on the display
with the keypad beeping every 10 seconds.
- If this zone is programmed for trouble and the loop opens, the
keypads will indicate a “Fire Trouble” for this zone and the keypad
sounders will beep once every ten seconds.
- If the system is a combination fire and burglar alarm, the fire
alarm has priority over the burglar alarm.
• Fire Zone with Verification: This zone is identical to a fire zone
except that after the first alarm, it will perform a fire reset and
then wait up to two minutes for a second alarm.
- If a second alarm occurs within this two minute period, the
system will instantly signal a fire alarm.
- If there is no second alarm within this two minute period, the
control panel will reset back to its normal condition.
Use of this control’s alarm verification feature may not be
permitted in your area. Check local codes.
Copyright © 2001 Detection Systems, Inc.
DS7080iP-32 Reference Guide
• Interior Delay: This interior zone follows Entry Delay Time #1.
• Perimeter Homeguard: This zone type is active when the panel
is armed. When the panel is armed perimeter only, this is a delayed
zone. When armed full, this is an instant zone. The Perimeter
Homeguard follows Entry Delay Time #1.
• Perimeter Follower Homeguard: These zones are always
delayed when the panel is armed in the perimeter only mode.
When the panel is fully armed, these zones are delayed if a
delayed zone is violated first, or instant if this zone or an instant
zone is violated first. The Perimeter Follower Homeguard follows
Entry Delay Time #1.
6.2
Output Programming
• Latch ON Any Burglar Alarm: This is an output programmed to
activate upon any zone alarm (including invisible and silent zones).
It will latch until the system has been disarmed.
• ON during Entry Pre-Alert: This is an output programmed to
activate when an entry/exit zone is violated while the system is
armed. It will remain activated until the system is disarmed, or
until the entry delay time has expired.
• On for 8 seconds after [PIN] + [System Reset] is entered:
This is an output programmed to activate only for 8 seconds after
[PIN] + [System Reset] is entered at a keypad or if a fire zone with
verification activates.
- This output is intended to be used to power 4-wire smoke detectors or any other device that requires a power interruption to
reset an alarm condition.
When Programmable Output 2 is programmed this way, it
will normally supply auxiliary power and will turn OFF for 8
seconds when [PIN] + [System Reset] is entered.
• ON when System is Armed: This is an output programmed to
activate when the entire system is armed. If the system is
partitioned, both partitions must be armed to get this output. It will
remain activated until the system (or one of the partitions) is
disarmed.
• Ground Start: This is an output programmed to activate for 3
seconds when the phone line is seized. It is intended for use with
ground start phone systems that require a momentary short to
ground to obtain a dial tone.
- Connect a separate 12 VDC, DPDT relay. Connect both relay
commons to ground, and connect the Normally Open contact
of each to Terminals 27 and 30 (one to Terminal 27, one to
Terminal 30) of the DS7080iP-32.
- Not to be used in UL Listed systems.
- Not for use with phone line monitors.
• System Status (ready to arm): This is an output programmed to
follow the Status Light of the keypad. It will activate when the
system is ready to arm with no zones violated.
• Burglar Zone: This is an output programmed to activate when a
Burgular Zone is in an alarm condition. It will remain activated
until the system is disarmed or the bell cut-off time expires.
- This output is intended to activate bells and sirens.
- This will not activate from Silent or Invisible zones.
• Burglar Zone Delayed by 20 seconds: This is an output
programmed to wait 20 seconds after the zone enters an alarm
condition to activate. It will remain activated until the system is
disarmed or the bell cut-off time expires.
- This output is intended to activate alarm bells and sirens, but
provides a delay to allow the user to silence the system before
it activates.
DS7080iP-32 Reference Guide
• Fire Zone: This is an output programmed to activate when a Fire
Zone is in an alarm condition. It will remain activated until the
system is disarmed, reset or the bell cut-off time expires.
• Fire Zone Delayed by 20 seconds: This is an output programmed
to wait 20 seconds after the zone enters an alarm condition to
activate. It will remain activated until the system is disarmed, reset
or the bell cut-off time expires.
This Feature may not be allowed in your area. Check your
local codes.
• Keypad Sounder Output: This is an output programmed to follow
the keypad sounder. It activates during the entry pre-alert, chime
mode and during any day monitor alarm.
- It does not follow momentary keypad beeps such as keystrokes.
• Access Output: This is an output programmed to activate for 10
seconds when an access control [PIN] + [Off] is entered at the
keypad.
- Not UL Listed for Access Control (UL294).
• Pulsing Fire Zone: This is an output programmed to pulse for a
fire alarm (one second ON, one second OFF).
• California March Time: This is an output programmed to pulse
for a fire alarm in the California Time cadence (ten 1/2 second
pulses, followed by one second of quiet time).
• Temporal: This is an output programmed to pulse for a fire alarm
in the Temporal cadence (three 1/2 second pulses, followed by
one second of quiet time).
6.3
General Control Programming
• Normal Arming - [PIN] + [On]: This command arms the entire
system while allowing for entry/exit delays. It appears in the history
as level 1.
• Perimeter Instant Arming - [PIN] + [No Entry] + [Perimeter
Only]: If programmed, this command arms only the perimeter of
the system and does not allow entry delays for entry/exit zones.
It appears in the history as level 2.
• Perimeter Arming - [PIN] + [Perimeter Only]: If programmed,
this command arms only the perimeter of the system while allowing
for entry/exit delays. It appears in the history as level 3.
• Custom Arming - [PIN] + [#] [4]: If programmed, this command
allows custom arming of the system and bypasses specified zones.
Users with authority to two partitions cannot custom arm a single
partition. It appears in the history as level 4.
• Maximum Security Arming - [PIN] + [No Entry] [On]: If
programmed, this command arms the entire system and does
not allow entry delays for entry/exit zones. It appears in the history
as level 5.
• Level 6 Arming: This is the report left in the history buffer that
shows that the system has been force armed. It appears in the
history as level 6.
• Closing Ring-Back: If programmed, the keypad sounders and
Bell will activate for 2 seconds after the system is armed and the
closing report is successfully sent. This requires Closing RingBack and Closing Report to be programmed.
- If a closing report is not programmed, the control will test for a
dial tone when the system is armed. If the test passes, the
system will arm normally. If the test fails, the system will arm,
but will indicate a trouble condition.
- This can also be used to perform a Bell test upon Arming.
Copyright © 2001 Detection Systems, Inc.
P/N 39818D
Page 11
• Siren on Comm. Failure for Silent Zone: If programmed, a silent
zone will sound the alarm outputs if the zone is in an alarm
condition and the system fails to communicate with the central
station.
6.6
Emergency Key Programming
• Restore when Sounders Silence: If programmed, a zone sends
a restoral report and is ready to activate again only after the
burglary bell cut-off time expires or the bells are silenced.
- The zone can alarm multiple times per armed period.
- Fire zones always restore when the system is reset, regardless
of this selection.
• Restore when Zone Restores: If programmed, a zone sends a
restoral report and is ready to activate again as soon as it
physically restores.
- The zone can alarm multiple times per armed period.
- Fire zones always restore when the system is reset, regardless
of this selection.
• Restore when System is Disarmed: If programmed, a zone
sends a restoral report when the system is disarmed.
- The zone can only alarm once per armed period.
- Fire zones always restore when the system is reset, regardless
of this selection.
• Allow Swinger Shunts: If programmed, a zone can only alarm
or trouble up to three times per armed period. After the third alarm
or trouble, the zone will be bypassed and a bypass report for this
zone will be sent. Fire zones and 24 hour zones cannot be
bypassed in this way.
6.4
- It may be programmed for a steady or pulsed alarm.
• Special Emergency Key (B Key): The emergency key at the
bottom center of the keypad entry area is the Emergency Key. If
programmed, the key will activate a supplementary or an auxiliary
type alarm when pressed for 2 seconds.
- It may be programmed for a silent, steady, or pulsed alarm.
• Panic Key (C Key): The emergency key at the bottom right of
the keypad entry area is the Panic Key. If programmed, the key
will activate a panic alarm when pressed for 2 seconds; nothing
will display at the keypad to indicate an alarm.
- It may be programmed for a silent, steady, or pulsed alarm.
These keys are not intended to substitute for Listed manual
pull boxes.
Keypad Assignment Programming
• Keypad Assignment: The keypad type (LED or Alpha) and its
number (1-4) must be programmed.
- Program Address 007 programs the keypads.
- Data digit 1-4 of Program Address 007 programs keypads 1-4.
- Any keypad has access to any partition.
• Keypad Language: The system can display keypad information
in English, French or Spanish. See Program Address 008.
6.5
• Fire Key (A Key): The emergency key at the bottom left of the
keypad entry area is the Fire Key. If programmed, the key will
activate a fire alarm when pressed for 2 seconds.
EX8 Expansion Module Programming
• Program Address 001 enables the EX8 modules.
• Module 1 is fixed at Option Bus Address 101 and makes zones 9
through 16 available to the system.
• Modules 2 and 3 are fixed at Option Bus Addresses 102 and 103.
They make zones 17 through 24 and 25 through 32 available to
the system.
6.7
Custom Arming Programming
• Custom Arming - [PIN] [#] [4]: If programmed, the [4] key may
be used to custom arm the system by arming only certain zones.
Users with authority to two partitions cannot custom arm a single
partition.
- Example: All Interior zones plus some Perimeter zones may
be bypassed while leaving some of the perimeter armed.
6.8
Report Control Programming
• Open and Close Reports: If programmed, these reports are
sent whenever the system is armed or disarmed.
• Send Bypass at Close for Bypassed Zones: If programmed, a
bypass report will be sent for each zone bypassed when the
system is armed.
• Refer to the EX8 Installation Guide (P/N 39565) to configure a
module’s address.
• Alternate between both Phone Numbers: If programmed, open
and close reports will be sent to Phone #1 first. If Phone #1 does
not pick-up, the control panel will alternate to Phone #2. If Phone
#2 does not pick-up, the control panel will alternate back to Phone
#1. It will alternate between both phone numbers until successful.
• Module 1 must be enabled before Module 2 can be used. Similarly,
Module 2 must be enabled before Module 3 can be used.
6.9
• Be sure to set each module with a different address. Failure to do
so will result in improper communication between the EX8 and
the panel.
Page 12
P/N 39818D
Day Monitor Report Control
Day monitor zones can be programmed to send a trouble report if
they are activated while the system is disarmed.
Programming the Day Monitor zone for “Trouble on Open” and
programming the Day Monitor Report Control to send troubles will
cause a report to be sent each time the Day Monitor zone is activated
when the system is disarmed. The zone will cause an alarm when
activated when the system is armed.
Copyright © 2001 Detection Systems, Inc.
DS7080iP-32 Reference Guide
6.10 Phone Number General Control
Programming
6.13 Force Arming Programming
• Enable Remote Programmer Callback: If programmed, when
the remote programmer tries to initiate a session with the panel,
the panel will hang up and call the remote programmer phone
number.
- This ensures the correct remote programmer is initiating the
call.
• Dial Pulse on all Phone Numbers: If programmed, the panel
will dial to phone number 1, 2, and the remote programmer phone
number 3 using the pulse format.
• Dial Tone on all Phone Numbers: If programmed, the panel will
dial to phone number 1, 2, and the remote programmer phone
number 3 using the tone format.
When dialing through PBX systems, program the phone
control as tone dial only.
• Switch to Pulse: If programmed, the control panel will try to dial
the first digit in tone dial and check to see if the dial tone has
been broken. If it has not been broken, it will try to dial again
using pulse dial.
Do not use this setting for PBX systems.
• Dialer Delay: A Dialer Delay of 15 seconds can be added when
reporting burglar alarms, 24-hour burglar alarms, and fire alarms.
- This delay will help to prevent false alarm reports by giving the
user 15 seconds to disarm the system before a report is sent.
6.11 Phone Answering Programming
• Phone Answering Programming: The control panel can be
programmed to answer the phone after a selected number of rings
for remote programming access. It can also be programmed to
answer the phone after a different number of rings when in armed
or disarmed states. This feature can also be used to call the panel
location and determine its arming state.
• Answering Machine Bypass: This feature allows the control
panel to answer incoming calls when answering machines are
used.
- If the line rings, stops ringing, then rings again within one minute,
the panel will seize the phone line on the first ring.
- To disable this feature, program the control panel to answer on
an even number of rings.
6.12 System Timers
• Entry and Exit Delay Timers are programmed in 5 second
increments up to 250 seconds.
- Example: To obtain an exit delay time of 45 seconds, the
program address must be programmed as 0 4 5.
• Bell Cut-off Timers are programmed from 0 to 99 minutes.
- Programming a Bell Cut-off timer for 0 minutes will result in no
time-out for that output.
- If the output is activated, it will remain activated until it is silenced
from a keypad.
• Automatic Test Reports may be set any time of day and for any
day of the week.
- The time that this report is sent is programmed in real time
(military time, see Address 024 and Address 025).
• Force Arming: If programmed, allows violated zones to be force
armed.
- When force arming, the user must enter the usual arming
command followed by the [Bypass] key. This automatically
bypasses zones that are violated and programmed as
bypassable.
- Fire zones, keyswitch zones, and non-bypassable zones can
not be force armed.
- Not available in UL Listed systems.
6.14 Report Programming
• Reports: For pulse formats, reports are programmed by entering
data in the reporting (left) and extended (right) digits. The report
will send the data programmed for each event. For SIA and Contact
ID, the report formats are fixed and may be activated by placing a
1 in the (left) reporting digit.
- To disable a report, enter a 0 in the reporting digit.
Exception: In Pager Format, 0 may be a valid reporting digit.
See Section 11.2 Pager Format.
- To send the Man Number along with Open and Close reports,
program an "F" (enter [*] [5]) in the extended digit.
• Zone Alarm: An alarm report is sent when a zone alarm occurs.
Program this report for any zones you wish to send an alarm
report for. For local zones (no reports), do not program an alarm
report. The zone number will automatically be sent for this report
in SIA or Contact ID format.
• Zone Alarm Restoral: This report is sent when the zone alarm
is cleared. The zone number will automatically be sent for this
report in SIA or Contact ID format.
• Zone Bypass: This report is sent when a zone bypass occurs. A
report for a non-24 hour zone is sent at arming with the close
report. For a 24 hour zone, the bypass report is sent when the
zone is manually bypassed. When the zone is force bypassed the
bypass report is sent with the partial close report. When a zone is
custom armed a bypass report for a 24 hour and non-24 hour
zone is sent.
• Zone Bypass Restoral: This report is sent when the bypassed
zone is restored. A bypass restoral report for a non-24 hour zone
is sent when the zone physically restores. For a 24 hour zone the
bypass restoral report is sent when the zone is manually restored.
When a force-armed zone is restored a zone restoral report is
sent. When a zone that was custom armed is restored and
disarmed the bypass restoral report is sent for 24 and non-24
hour zones.
• Zone Trouble: This report is sent when a zone trouble condition
occurs. The zone number will automatically be sent for this report
in SIA or Contact ID format.
• Zone Trouble Restoral: This report is sent when the zone trouble
condition is cleared. The zone number will automatically be sent
for this report in SIA or Contact ID format.
• Keypad Fire Alarm: This report is sent when a fire alarm has
been activated using the “A” emergency key.
• Keypad Fire Restoral: This report is sent when a keypad fire
alarm has been restored using the [System Reset] command.
• Keypad Emergency Alarm: This report is sent when an
emergency alarm has been activated using the “B” emergency
key.
• Keypad Panic: This report is sent when an emergency alarm
has been activated using the “C” emergency key.
DS7080iP-32 Reference Guide
Copyright © 2001 Detection Systems, Inc.
P/N 39818D
Page 13
• Open: This report is sent when the system has been disarmed.
In SIA or Contact ID formats, the user number for the person who
disarmed the system will be sent with this report. To send the
user number along with an Open report in other formats, program
the extended digit of the report as *5. The Open report will only
be sent if a Close report was sent previously.
• Close: This report is sent when the system has been armed. In
SIA or Contact ID formats, the user number for the person who
armed the system will be sent with this report. To send the user
number along with a Close report in other formats, program the
extended digit of the report as *5.
• Recent Closing: This report is sent, along with any alarm reports,
when there is an alarm within the first five minutes after the system
has been armed.
• System Test: This report is sent when a system test has been
started using the [#] [8] [1] key sequence.
• System Test Restoral: This report is sent when the system test
([#] [8] [1]) has been completed or has timed-out.
• Point Expansion Module Missing: This report is sent when
one of the Point Expansion Modules (EX8) has either stopped
responding or has been disconnected from the system.
• Duress: This report is sent when the system is disarmed using a
duress code. The user number will not be sent along with this
report.
• Point Expansion Module Missing Restoral: This report is sent
when a missing Point Expansion Module (EX8) has either started
responding or has been reconnected to the system.
• Partial Close: This report is sent when the system is armed
partially, or force armed.
• Point Expansion Module Tamper: This report is sent when a
Point Expansion Module (EX8) experiences a tamper condition
(e.g. the cover is opened).
• First Open After Alarm: This report is sent when the system is
disarmed after a burglar alarm has occurred.
• Low Battery: This report is sent when a low battery condition
occurs.
• Low Battery Restoral: This report is sent when a low battery
condition restores.
• AC Failure: This report is sent after an AC failure condition occurs.
AC failure reports will either be sent along with other reports or
when the AC Fail Timer (Address 026) runs out. The AC power
loss report can be programmed to delay for up to 255 minutes.
- If another report is sent during this delay period, the AC fail
report will be sent along with this report.
- If the AC power restores during the delay period, the AC Failure
report will not be sent.
• AC Failure Restoral: This report is sent when an AC failure
condition restores. This report can be programmed to delay up to
255 minutes.
• Automatic Comm. Test: This report is sent at the predetermined
check-in time.
• Point Expansion Module Tamper Restoral: This report is sent
when a Point Expansion Module (EX8) tamper condition has been
cleared.
• Point Expansion Module Fault: This report is sent when a device
connected to a Point Expansion Module (EX8) Auxiliary Output
terminal has drawn too much current. The Module will
automatically shut off the output and attempt to turn it back on
every minute until it restores. If this fault occurs, it is recommended
that the device be disconnected immediately.
• Point Expansion Module Fault Restoral: This report is sent
when a device connected to a Point Expansion Module (EX8)
Auxiliary Output terminal has stopped drawing too much current
or has been disconnected. The module will reset the fault
automaitcally within one minute once the device is disconnected.
• Octal Relay and Control: This report is sent when the Octal
Relay Module (DS7488) has either stopped responding or has
been disconnected from the system. A restoral report is sent when
the module has either started responding or has been reconnected
to the system.
• Manual Comm. Test: This report is sent at any time using a
keypad command sequence of [PIN] + [#] [8] [2].
6.15 Event History Readback Control
• Remote Programming Successful: This report is sent after a
Remote Program session, if the session was terminated properly.
The control can store up to 100 history events by time and date.
These 100 events will be retained even upon the loss of power.
- The events stored in history are determined at Program Address
027.
- You may select to store or not to store: burglar, fire, and keypad
alarms; zone troubles and restorals; system troubles and
restorals; opens and closes; bypasses; and program accesses.
• Remote Programming Unsuccessful: This report is sent after
a Remote Program session, if some error has occurred or the
session did not terminate properly.
• Local Programming Successful: This report is sent when local
programmer’s mode is exited and there is no error associated
with the programming.
• Local Programming Unsuccessful: This report is sent when
local programmer’s mode is exited and there has been some error
associated with the programming.
• System Trouble: This report is sent when a control trouble
condition occurs.
• System Trouble Restoral: This report is sent when all system
trouble conditions restore.
• Exit Error: This report is sent if an exit error occurs. An exit error
occurs when an entry/exit zone is still violated at the end of the
exit delay. If this happens, the entry delay will begin. If the system
is not disarmed before the entry delay expires, an alarm report
for the affected zone will be sent and the Exit Error report will be
sent. If the Exit Error report is enabled then the Bell Output will go
on to warn the departing user.
Page 14
P/N 39818D
Copyright © 2001 Detection Systems, Inc.
DS7080iP-32 Reference Guide
6.16 FCC Compliance Notice
6.18 Canadian Dept. of Communications
This equipment has been tested and found to comply with the limits
for a Class B digital device, pursuant to Part 15 of the FCC Rules.
These limits are designed to provide reasonable protection against
harmful interference in a residential installation. This equipment
generates, uses and can radiate radio frequency energy and if not
installed and used in accordance with the instructions, may cause
harmful interference to radio communications. However, there is no
guarantee that interference will not occur in a particular installation.
If this equipment does cause harmful interference to radio or
television reception, which can be determined by turning the
equipment off and on, the user is encouraged to try to correct the
interference by one or more of the following measures:
General Installation Requirements:
Notice:
The Canadian Department of Communications label
identifies certified equipment. This certification means
that the equipment meets certain telecommunications
network, protective, operational, and safety
requirements. The Department does not guarantee the
equipment will operate to the user’s satisfaction.
• Re-orient or relocate the receiving antenna.
• Increase the separation between the equipment and the receiver.
• Connect the equipment into an outlet on a circuit different from
that of the receiver.
Before installing this equipment, users should ensure that it is
permissible to be connected to the facilities of the local
telecommunications company. The equipment must also be installed
using an acceptable method of connection. In some cases, the
company’s inside wiring associated with a single line individual
service may be extended by means of a certified connector assembly
(telephone extension cord). The customer should be aware that
compliance with the above conditions may not prevent degradation
of service in some situations.
This control complies with Part 68 of the FCC rules.
Repairs to certified equipment should be made by an authorized
Canadian maintenance facility designated by the supplier. Any
repairs or alterations made by the user to this equipment, or
equipment malfunctions, may give the telecommunications company
cause to request the user to disconnect the equipment.
On the inside of the enclosure is a label that contains, among other
information, the FCC Registration Number and the Ringer
Equivalence Number (REN) for this equipment. You must, upon
request, provide this information to your local telephone company.
Users should ensure, for their own protection, that the electrical
ground connections of the power utility, telephone lines, and internal
metallic water pipe system, if present, are connected together. This
precaution may be particularly important in rural areas.
The REN is useful to determine the quantity of devices that you
may connect to your telephone line and still have all of those devices
ring when your telephone number is called. In most, but not all
areas, the sum of the REN's of all devices connected to one line
should not exceed five (5.0). To be certain of the number of devices
that you may connect to your line, you may want to contact your
local telephone company to determine the maximum REN for your
local calling area.
Users should not attempt to make such connections
themselves, but should contact the appropriate electric
inspection authority, or electrician, as appropriate.
• Consult the dealer or an experienced radio/TV technician for help.
6.17 FCC Phone Connection Notice To Users
This equipment may not be used on coin service provided by the
telephone company. This control should not be connected to party
lines.
Should this equipment cause harm to the telephone network, the
telephone company may discontinue your service temporarily. If
possible, they will notify you in advance. But if advanced notice isn't
practical, you will be notified as soon as possible. You will be informed
of your right to file a complaint with the FCC. The telephone company
may make changes in its facilities, equipment, operations, or
procedures that could affect the proper functioning of your equipment.
If they do, you will be notified in advance to give you an opportunity
to maintain uninterrupted telephone service.
If you experience trouble with this equipment, please contact the
manufacturer for information on obtaining service or repairs.
The telephone company may ask that you disconnect this equipment
from the network until the problem has been corrected or until you
are sure that the equipment is not malfunctioning. The repairs to
this equipment must be made by manufacturer and not by the user.
To guard against accidental disconnection, there is ample room to
mount the Telco jack to the inside of the Control cabinet.
The operation of this Control may also be affected if events such as
accidents or acts of God cause an interruption in telephone service.
DS7080iP-32 Reference Guide
Terminal Requirements:
The Load Number (LN) assigned to each terminal device denotes
the percentage of the total load to be connected to a telephone loop
which is used by the device, to prevent overloading. The termination
on a loop may consist of any combination of devices subject only to
the requirement that the total of the Load Numbers of all the devices
does not exceed 100. The Load Number of the DS7080iP-32 is 2.
RFI Requirements:
This Class A digital apparatus meets all requirements of the
Canadian Interference-Causing Equipment Regulations. [Cet
appareil numerique de la classe A respecte toutes les exigences
du Reglement sur le material broilleur du Canada.]
6.19 For Installations in New Zealand
Two-wire Connection:
The operation of this equipment on the same line as telephones or
other equipment with audible warning devices or automatic ring
detectors will give rise to bell tinkle or noise and may cause false
tripping of the ring detector. Should such problems occur, the user
is not to contact Telecom Faults Service.
“This equipment does not fully meet Telecom’s impedance
requirements. Performance limitations may occur when used in
conjunction with some parts of the network. Telecom will accept no
responsibility should difficulties arise under such circumstances.”
Copyright © 2001 Detection Systems, Inc.
P/N 39818D
Page 15
7.0
7.1
7.1.3 Installation Considerations
Operating Guide
Proper location of detection devices is one of the most critical factors
in a fire alarm system.
Fire Safety
This fire alarm system can provide early warning of a developing
fire. Such a system, however, does not ensure protection against
property damage or loss of life resulting from a fire. Any fire alarm
system may fail to warn for any number of reasons (e.g. smoke not
reaching a detector that is behind a closed door).
When considering detectors for residential applications, refer to
NFPA Standard 72, "The National Fire Alarm Code.” This standard
is available at a nominal cost from: The National Fire Protection
Association, Batterymarch Park, Quincy, MA 02269.
7.1.1 If Installed in Family Residences
Adherence to the NFPA Standard 72 can lead to reasonable fire
safety when the following items are practiced:
• Minimize hazards: Avoid the three traditional fire killers: smoking
in bed, leaving children home alone, and cleaning with flammable
liquids.
• Provide a fire warning system: Most fire deaths occur in the
home, the majority, during sleeping hours. The minimum level of
protection requires smoke detectors to be installed outside of each
separate sleeping area and on each additional story of the
dwelling.
For added early warning protection, it is recommended that detectors
be installed in all separated areas including the basement, bedrooms,
dining room, utility room, furnace room, and hallways.
7.1.2 Having and Practicing an Escape Plan
A fire warning may be wasted unless the family has planned in
advance for a rapid and safe exit from the building.
• Draw a floor plan of the entire house showing two exits from each
bedroom and two from the house. Since stairwells and hallways
may be blocked during a fire, the plan should provide exits from
bedroom windows.
Make copies of the plan and practice it with all family members.
• Pre-arrange a meeting place outside and away from the residence.
Once out of the building, all occupants should immediately go to
the pre-selected location to be accounted for.
The following are some general considerations:
• Smoke detectors should not be installed in "dead air" spaces or
close to ventilating or air conditioning outlets because smoke may
be circulated away from the detector. Locations near air inlets
should be favored.
• Avoid areas subject to normal smoke concentrations such as
kitchens, garages, or near fireplaces.
• Do not install smoke detectors where normal area temperatures
are above 100 degrees F (38 degrees C) or below 32 degrees F
(0 degrees C).
• Areas of high humidity and dust concentrations should be avoided.
• The edge of ceiling mounted detectors should be no closer than
4 inches (10 cm) from any wall.
• Place the top edge of wall mounted detectors between 4 and 12
inches (10 to 30 cm) from the ceiling.
• Provide a barricade between family members and fire, smoke,
and toxic gases (e.g. close all bedroom doors before retiring).
• Children should be instructed on opening their bedroom windows
and exiting safely from the building. If exiting is not possible, they
should be taught to stay at the open window and shout for help
until it arrives.
• In the event of a fire alarm after retiring, wake the children by
shouting to them from behind your closed door. Tell them to keep
their bedroom doors closed.
• If the top of your bedroom door is uncomfortably hot, do not open
it. There is most likely fire, intolerable heat, or smoke on the other
side. Shout to all family members to keep their bedroom doors
closed and to exit the building via alternate routes.
• If the top of the door is not uncomfortably hot, brace the bottom of
the door with your foot, and the top with one hand, then open the
door about one inch. Be prepared to slam the door shut if there is
any pressure against the door or if any hot air rushes in.
• If there is no evidence of excessive heat or pressure, leave the
room and close the door behind you. Shout appropriate
instructions to all family members and immediately leave the
building via the pre-planned routes. If heavy smoke is present,
drop to your hands and knees and crawl to remain below the
smoke level.
Page 16
P/N 39818D
Copyright © 2001 Detection Systems, Inc.
DS7080iP-32 Reference Guide
7.2
Setting the Date
It is recommended that this procedure be performed at a DS7447 Keypad. No visual clues will be given from a DS7445 keypad.
Steps to Change the
Date
# 1.
# 2.
# 3.
Enter the Master Code
Programming Mode
Command Sequence
# 5.
Enter the Day
Enter the Year
(display will scroll to this)
“Enter Month”
[2]
(01 … 12)
[0] [1] through [1] [2]
January
# 4.
“2 Change Date”
[Master Code] + [#] [0]
Enter a 2
Enter the Month
If Accepted, the Display
Reads
“Enter Day”
December
(01 …31)
“Enter Year”
[0] [1] through [3] [1]
(XX) End with [#]
The last two digits of the year,
followed by the [#] button.
“Month, Day, Year”
Entering the command sequence [Master Code] [#] [0] [2] [#] will cause the DS7447 keypad to read back the date.
The control panel will exit from the Master Code Programming Mode approximately 15 seconds after the last keystroke.
If the control panel loses power, the date will need to be set again.
7.3
Setting the Time
It is recommended that this procedure be performed at a DS7447 Keypad. No visual clues will be given from a DS7445 keypad.
Steps to Change the
Time
# 1.
# 2.
# 3.
Enter the Master Code
Programming Mode
Command Sequence
[Master Code] + [#] [0]
Enter a 6
Enter the Day
Enter the Time
(Hour and minute)
# 5.
Enter AM or PM
“6 Change Time”
(display will scroll to this)
“Enter Day”
[6]
(1 … 7)
[1] through [7]
Sunday
# 4.
If Accepted, the Display
Reads
Saturday
[0] [1] [0] [0] through [1] [2] [5] [9]
[4][#] or [#] [6]
(4 = AM, 6 = PM)
“Enter Time”
(0100 …1259)
“Enter AM/PM”
(4/6) End with [#]
“Day - TIme”
Entering the command sequence [Master Code] [#] [0] [6] [#] will cause the DS7447 keypad to read back the time.
The control panel will exit from the Master Code Programming Mode approximately 15 seconds after the last keystroke.
If the control panel loses power, the time will need to be set again.
DS7080iP-32 Reference Guide
Copyright © 2001 Detection Systems, Inc.
P/N 39818D
Page 17
7.4
Attempting to assign the same PIN to multiple User Numbers will
result in the three-beep error tone, and the change will not be made.
Personal Identification Numbers
7.4.1 General Information
• PIN: Personal Identification Number. This is the 4- or 6-digit code
(determined in Address 003) users enter at the keypad to gain
access to the system. A PIN may be assigned to each User
Number 001 - 024.
• Partition (Area): This is the area the User has authority in. You
may select Partition (Area) 1, 2 or both.
• User Number: This number identifies each person using the
system. There are 24 possible User Numbers (001 - 024).
• Authority Level: This number determines which functions each
user will be able to perform (see below).
Your system may have up to 24 PINs, each 4 (or 6) digits long. Each
User Number can have only one PIN.
The PIN length of 4 or 6 digits applies to all PINs (all PINs will be 4
digits or all PINs will be 6 digits) and is determined at the time of
installation. The panel comes from the factory with the PIN length
set for four digits.
User Number 001 is designated as a Master Code. It can be used
to add, delete or change other PINs and will always have access to
both partitions regardless of how it is programmed.
User Number 001 is shipped from the factory with the sequence of
123456. This code should be changed to one of your personal
preference, and must be programmed as a Master Code. PINs should
never be programmed with common sequences such as 1111 or
2468 because they are easily violated.
7.4.2 Removing a PIN
To remove a PIN: enter a [Master Code] [#] [0] [0], the [User Number]
of the PIN to be canceled, and then [#] again.
User Number 001 can not be canceled in this manner.
This chart will guide you through the steps necessary to change a PIN.
It is recommended that this procedure be performed at a DS7447 keypad. No visual clues will be given from a DS7445 keypad.
Steps to Change a PIN
# 1.
# 2.
# 3.
Enter the Master Code
Programming Mode
Enter a 0
Enter the User Number
# 4.
Enter the Authority
Level
# 5.
Enter the Area(s)
(Partitions) this User
has access to
# 6.
Enter the PIN
Command Sequence
[Master Code] + [#] [0]
Enter the PIN again
followed by [#]
“0 User Change”
(display will scroll to this)
“Enter User No.”
[0]
(001 … 024)
[0] [0] [1] through [0] [2] [4]
“Enter Authority”
Level (0 – 6)
[0] through [6]
“Enter Are or # for Both”
[1], [2] or [#] for both
“Enter PIN”
Any 4 or 6 digits.
Do not press [#]
# 7.
If Accepted, the Display
Reads
[PIN] (same 4 or 6 digits as
above) then [#]
“Enter PIN Again. End with #.”
A long beep will sound to signify
acceptance of the new PIN
The control panel will exit you from the Master Code Programming Mode after about 15 seconds without a keystroke.
7.4.3 PIN Authority Levels
0 = Master: Can enter all commands, add or change PINs, change
time and date, bypass, arm, set autoarm, disarm, perform system
tests, system reset, and view history. PIN 01 must be a master
code and must have authority 0. Any or all PINs may be master
codes.
1 = Unlimited: Can enter all commands, bypass, arm, disarm,
system reset, and perform system tests. Can not change PINs.
2 = General: Can bypass, arm, and disarm. Can not change PINs,
perform system reset, or enter the [#] [7] or [#] [8] functions.
Page 18
P/N 39818D
3 = Arm Only: Can arm the system with [#] [On] arming only. Can
not perform any other functions including disarming.
4 = Temporary: Valid only for a limited time. Can arm and disarm
the system, but can not perform any other functions. This code
will automatically be deleted after 15 days if you have not already
done so.
5 = Duress: When the system is disarmed using a duress code, a
silent report is sent to the central station. Duress codes are
intended to be used when the user is forced to disarm the system.
6 = Access: When a PIN with Access Code authority is entered,
any output programmed for Access Output (e.g. door strikes)
will pulse on for 10 seconds (works when the system is armed
or disarmed).
Copyright © 2001 Detection Systems, Inc.
DS7080iP-32 Reference Guide
7.5
Automatic Arming
To inform occupants that the system is about to arm, a pre-arming period will begin 15 minutes before the system arms automatically. If
programmed by the installing company, the keypad sounders, and any outputs programmed to follow the keypad sounders, will pulse five
times every minute. During the last five minutes before arming, these sounders will be on steady. Once per minute the DS7447 keypad will
read, “Arm in nn min./PIN + OFF - extend.”
Automatic Arming will affect only the partitions you have access to.
Each partition can be programmed to automatically arm once per day. To program the Automatic Arming Time, perform the following:
Setting the Automatic
Arming Time
Enter a [Master PIN] + [#] [0]
Notes
Setting the Automatic Arming Time can only be performed with a Master Code PIN.
Enters the Automatic Arm Setup programming
Enter a [1]
Enter the partition number;
Press [#] to exit
The program will prompt you to enter partition 1 or 2 if the system is partitioned and if the use has
access to both partitions. If the system is not partitioned or if the user has access to only one
partition, this selection will not appear.
In a non-partitioned system, the display will automatically go to Sunday.
The user will only be allowed to program the partitions to which they are assigned.
The display will start with Sunday. It will read “Sunday – nn:nn”
Enter a Time for each day
Enter in [0] [1] [0] [0] [#] format
Note:
7.6
Enter the time in 24-hour format. You may move the cursor left or right by pressing the “A” (Fire) or
“C” (Panic) keys. When you have completed the time entry press [#]. The display will then advance
to the next day. You may exit the Set Auto Arm Time Mode at any time by pressing [*] once. The
system will also exit the Auto Arm Time Mode after the time is programmed for Saturday.
Samples of times:
12 midnight = 2400#
12:01am = 0001#
1:00am = 0100#
Disabled = 0000#
12 noon = 1200#
12:01pm = 1201#
1:00pm = 1300#
The panel time and date must be set in order for this feature to work properly.
Delayed Automatic Arming
This section explains how to delay the Automatic Arming Time.
To inform occupants that the system is about to arm, a pre-arming period will begin 15 minutes before the system arms automatically.
If programmed by the installing company, the keypad sounders, and any outputs programmed to follow the keypad sounders, will pulse
five times every minute. During the last five minutes before arming, these sounders will be on steady.
Once per minute the DS7447 keypad will read, “Arm in nn min./PIN + OFF - extend.”
Delayed Automatic Arming will affect only the partitions you have access to.
To extend the Automatic Arming of the system during the automatic arming pre-arming period, perform the following steps:
Extending Automatic Arming *
What Will Happen
Enter a [PIN]
Press [OFF]
The arming time will be extended 30 minutes. A new
pre-arming periof will begin 15 minutes prior to the
new automatic arming time.
* = To extend the Automatic Arming at any time, use the Delayed Arming feature in the “Setting Dealyed Arming” seciton.
Note:
Note:
The keypad volume setting also applies to the Auto Arm tone.
The panel time and date must be set in order for this feature to work.
DS7080iP-32 Reference Guide
Copyright © 2001 Detection Systems, Inc.
P/N 39818D
Page 19
7.7
Error Displays
Control panel problems are indicated by a flashing green Power Light.
The DS7447 display will also read “Control Trouble, Enter [#] [8] [7].” The DS7445 will only flash the green Power Light.
The Error messages may only be read when the control is disarmed.
Contact your installing company if the problems persist.
1. DS7447 - “AC Power Failure”:
DS7445 - LED 1 turns on steady:
There is a power failure and the panel is operating on backup
battery.
2. DS7447 - “Battery Trouble”:
DS7445 - LED 2 turns on steady:
If the system has just been through a power failure, wait at
least two hours for the battery to recharge, then enter [PIN]
+ [System Reset] to perform a battery test.
3. DS7447 - “Communicator Err”:
DS7445 - LED 3 turns on steady:
The communicator failed to communicate with the central
station.
4. DS7447 - “System Fault”:
DS7445 - LED 4 turns on steady:
Internal error in the control circuitry or optional circuitry. These
faults are displayed as follows:
Action Desired
Command Sequence*
Read the Error Display
when the green Power Light
is flashing.
[PIN] + [#] [8] [7]
Clear Error Display**
[PIN] + [System
Reset]
Caution: Clear the error display
or
only on the advice of your installing
company or if you are certain the [PIN] + [#] [8] [7] [*]
problem has been remedied.
* = If in “Residential Mode”, a PIN is not required for these
commands.
** = Battery Trouble and Communicator Err displays must be
cleared by the [System Reset] command sequence even after
the problem has been remedied. These displays will not self
clear. All the other error displays will self clear from the
keypads once the problem has been remedied.
8. DS7447 - “Pt Exp Mssng XXX”:
DS7445 - LED 8 turns on steady:
The EX8 Zone Expansion Module for Address XXX is missing,
defective or not communicating to the Options bus.
5. DS7447 - “Keypad Fault”:
DS7445 - LED 5 turns on steady:
One of the keypads is not responding to the control panel.
6. DS7447 - “Aux Power Fault”:
DS7445 - LED 7 turns on steady:
The auxiliary power has been shorted.
7. DS7447 - “Zone Trouble XX”:
Zone XX (number) is not responding to the control panel or is
not ready. This may also be displayed during power-up (if so,
ignore).
7.8
9. DS7447 - “Pt Exp Tamper XXX”:
DS7445 - LED 8 turns on steady:
The EX8 Zone Expansion Module for Address XXX has a tamper
condition.
10.DS7447 - “Pt Exp Fault”:
DS7445 - LED 8 turns on steady:
The EX8 Zone Expansion Module(s) has had a DC overcurrent
fault.
11.DS7447 - “Keypad Tamper”:
DS7445 - LED 6 turns on steady:
One of the keypad housings has been opened.
Remote Program Dial-out and Answer
Type of Function
Command Sequence *
What Will Happen
Remote Program Dial-Out **
[PIN] + [#] [8] [3]
The panel will call the remote
programmer.
Remote Program Answer
[PIN] + [#] [8] [6]
The panel will answer a call from
the remote programmer.
This chart will help you to call or answer the Remote Programmer.
* = If in “Residential Mode”, a PIN is not required for these commands.
** = Phone numbers 1 and 3 must be programmed. Phone #1 Account Code must be programmed.
Page 20
P/N 39818D
Copyright © 2001 Detection Systems, Inc.
DS7080iP-32 Reference Guide
7.9
Zone Test
This chart explains the procedure for performing a Zone Test.
It is recommended that the system be tested weekly.
The Zone Test is used to confirm that detectors will report alarms.
Zone Test works on all zones, except 24-hour zones and fire zones.
While the keypad is in Zone Test, no control panel alarms will activate an alarm, except 24-hour zone alarms and fire alarms.
These will override the Zone Test function.
The Zone Test tests all zones (except 24 hour and fire zones) regardless of partition assignment.
Type of
Test
Command
Sequence *
What Will Happen
What To Do
DS7447: “Test Zone” will display followed by the zone
number of any zones that have not been tested.
DS7445: The zone LEDs will flash for any zones that have
not been tested.
Zone Test
[PIN] + [#] [8] [1]
DS7447: “Now Testing” will be displayed followed by the
zone number of the zone that is currently being violated
(tested). It returns to “Test Zone” after the violation.
DS7445: The zone LED will turn on steady for the zone that
is currently being violated (tested).
Test each detector
one at a time as
instructed by the
installing company.
To exit the Zone Test
Mode, enter your
[PIN] followed by [#]
* = If in “Residential Mode”, a PIN is not required for this command.
7.10 Battery / Sounder Test
This chart explains the procedure for performing a battery test.
If a power failure occurs, your control panel has a built-in battery that will continue to power the control panel for many hours.
The control panel automatically recharges the battery when power is restored.
In addition to an automatic battery test performed every 24 hours, the battery may also be tested manually.
This test also uses the battery to manually activate all the system sounders for 2 seconds, [#] [8] [5] only.
If the battery voltage is low, a battery fault will occur (see Error Displays).
The Battery Test cannot be performed during the first 2 minutes after the control panel is powered up.
Type of
Test
Local
Battery /
Sounder
Test
Battery
Test
Command
Sequence *
What Will Happen
• All keypad lights will turn on
• The keypad sounder and all alarm
sounding devices will operate for
2 seconds
[PIN] + [#] [8] [5]
[PIN] + [System Reset]
What To Do
If test fails, the control panel will
indicate a control problem. See
Error Displays, section 7.5
If power in your building has been
off recently, wait 2 hours for the
battery to recharge and try again.
• The control panel will perform a
battery test
• The control panel will report a Low
Battery or a Low Battery Restoral
* = If in “Residential Mode”, a PIN is not required for these commands.
DS7080iP-32 Reference Guide
Copyright © 2001 Detection Systems, Inc.
P/N 39818D
Page 21
7.11 Communicator Test
This chart explains the procedure for performing a Communicator Test.
This test is available only if your system transmits alarms and system information to a monitoring service, and has been programmed
by the security installing company to permit communicator tests.
A long beep will initially sound to acknowledge the start of the test.
If the test is successful, the sounder will again issue one long beep.
If the test fails, the keypad sounder will turn ON continuously.
To silence the sounder, enter your [PIN] followed by the [#] key or press the [*] key.
Type of Test
Communicator
Test
Requires
addresses 082,
013, 015 and
017 to be
programmed
Command
Sequence **
[PIN] + [#] [8] [2]
What Will Happen
What To Do
• A long beep will sound
If test fails, the keypad sounder will
sound continuously. To silence the
sounder, enter your [PIN] followed
by [#] key or the [*] key.
• A “Test” report will be
sent to the monitoring
service
Note: This test may take several
minutes to complete because the
control will try up to 10 attempts
(depending on the number of
attempts programmed in Address
023) before it fails this test.
** = If in “Residential Mode”, a PIN is not required for this command.
7.12 Event History Readback
This chart explains the procedure for performing an Event History Readback.
The History Buffer stores the last 100 events in memory. The DS7447 can display all of these events. The DS7445 will only display
those zones (1-8) that have alarmed.
Type of
Test
Event History
Readback
Command
Sequence **
[PIN] + [#] [8] [9]
What Will Happen
What To Do
DS7447: The last event to take
place will be displayed
DS7447: Scroll through the
events by using the [9], [6]
an [#] keys. See below.
DS7445: The zone LEDs (1-8)
will flash for any zones that
have alarmed.
To exit from the Event
History Mode, press [*]
** = If in “Residential Mode”, a PIN is not required for this command.
DS7447 Only: Scrolling through the History Events.
To begin scrolling back through the events, press the [#] key. The [#] key will scroll you back through the history line by line. The [9] key will
scroll you back in reverse chronological order by event. A [6] will scroll you forward through the events (toward the most recent) by event.
Each event consists of two lines or display screens. The first line/screen will be the event title and user. The second line/screen will be the
date of the event or the change being made.
To exit the Event History Mode, press the [*] key or wait 20 seconds and the keypad will exit automatically.
Page 22
P/N 39818D
Copyright © 2001 Detection Systems, Inc.
DS7080iP-32 Reference Guide
8.0
How to Program the DS7080iP-32
To enter the programming mode, the panel must be disarmed. When in the programming mode the control is disabled and no alarms will
be processed, including 24-hour zones and fire zones.
To enter the Programmer’s Mode, enter the [Programmer’s Code] followed by [#] [0]. Shorting the programming pads (see Section 2.2 for
location) on the control panel will also activate the Programmer’s Mode. The default Programmer’s Code is 9876. Enter the Program
Address (i.e. [0] [0] [2]). Press [#] to change the values. After all values have been changed, press [#] to accept the changes and return
to the Program Address. Repeat the above until all addresses are programmed.
Some data digit values are higher than 9. These values are programmed by pressing [*] followed by another number. These
values will display as HEX characters when entered. The HEX character values are:
*0 = A, *1 = B , *2 = C, *3 = D, *4 = E, *5 = F.
To exit the Programmer's Mode, press the [*] key for 2 seconds. Also, if no keypad entries are made for 4 minutes, the control will
automatically exit from the Programmer's Mode.
Program
Address Description
Armed
Values
070 ZONE BYPASS
11111111
Status
Power
Fire
On
SPACE
1,"
&/#!
2ABC
3DEF
Off
1
2
3
4GHI
5JKL
6MNO
4
5
6
7PRS
8TUV
9WXY
7
8
9
No
Entry
#
Bypass
Perimeter
Only
0QZ
Don't Accept
(Hold for 2
seconds to exit)
*
0
System
Reset
Move Cursor Left
9.0
Move Cursor Right
Accept Value
Programming the DS7080iP-32
Most control panel functions are controlled using a single program address. Some functions are grouped into one address. For example:
The keypad emergency keys are programmed in Address 028. The first data digit of this address is for the “A” key (Fire Key), the second
is for the “B” key (Special Emergency Key), and the third is for the “C” key (Panic Key). Other addresses are configured this way also, with
the address representing a group of functions and each data digit controlling a specific function.
Example: To program the Fire Key as Pulsing Audible, the Help Key as Steady Audible and the Panic Key as Invisible.
Use the following chart for each Address to record your selections before programming.
DEFAULT
0 = Disabled
1 = Invisible
2 = Steady Audible
3 = Pulsing Audible
0
0
0
FIRE KEY [A]
SPECIAL EMERGENCY KEY [B]
PANIC KEY [C]
Enter the Programmer's Mode:
[9] [8] [7] [6] [#] [0] (or [9] [8] [7] [6] [5] [4] [#] [0] if 6-digit codes are selected)
will display the program mode
Enter the Program Address:
[0] [2] [8]
Enter:
[#] to change the values
Enter:
[3] in the first data field to change the Fire Key to Pulsing Audible
Enter:
[2] in the second data field to change the Help Key to Steady Audible
Enter:
[1] in the third data field to change the Panic Key to Invisible
Enter the Pound button:
[#]
Program the next Address, a different Address, or exit the Programmer's Mode.
DS7080iP-32 Reference Guide
Copyright © 2001 Detection Systems, Inc.
P/N 39818D
Page 23
9.1
Address 001 - EX8 Zone Expansion Module Control
This Address determines how many EX8 Zone Expansion Modules are in the system and the zone response time for those zones. There
are 8 hard-wired zones on each Zone Expansion Module. The modules need to be enabled in ascending order from Module 1 to Module
3.
Programming the EX8 Expansion Module:
• Module 1 is fixed at Option Bus Address 101 and makes zones 9 through
16 available to the system.
• Modules 2 and 3 are likewise fixed at Option Bus Addresses 102 and 103
respectively. They make zones 17 through 24 and 25 through 32 available
to the system.
• Refer to the EX8 Installation Guide (P/N 39565) to configure the module
addresses.
• Module 1 must be enabled before Module 2 can be used. Likewise, Module
2 must be enabled before Module 3 can be used.
• Be sure and set each module with a different address. Failure to do so will
result in improper communication between the EX8 and the panel.
9.2
Address 002 - General Control
General Control is used to define the following functions:
• Siren on Comm. Failure: If programmed, a silent zone will sound the alarm
outputs if the zone is in an alarm condition and the system fails to
communicate with the central station.
• Closing Ring-Back: If programmed, the keypad sounders and Bell will
activate for 2 seconds after the system is armed and the closing report is
successfully sent. This requires the Closing Ring-Back and Closing Reports
to be programmed.
• Swinger Shunt: If selected, a zone can only alarm or trouble up to three
times per armed period. After the third alarm or trouble, the zone will be
bypassed and a bypass report for this zone will be sent.
• 60Hz/50Hz: The selection is used to determine the primary line frequency
for the control panel. 60 Hz is required for U.L. Listed Requirements.
• Allow All Arming Levels: This selection will allow Perimeter, Perimeter
Instant and Maximum Security Arming.
• Enable/Disable Partitioning: Determines if the system is a one or two
partition system.
• Zone Restore: This selection is used to determine when a zone restores.
- Restore when Sounders Silence: If selected, a zone sends a restoral
report and is ready to activate again only after the burglary bell cut-off
time expires or the bells are silenced.
- Restore when Zone Restores: If selected, a zone sends a restoral report
and is ready to activate again as soon as it physically restores.
- Restore when System is Disarmed: If selected, a zone sends a restoral
report when the system is disarmed. If Restore when System is Disarmed
is selected, only one alarm per zone (except fire zones) will be sent during
an armed period.
• Force Arming Limit: Determines the maximum number of zones that may be force armed.
Page 24
P/N 39818D
Copyright © 2001 Detection Systems, Inc.
DS7080iP-32 Reference Guide
9.3
Address 003 - User Controls
User Controls are used to determine if there is a keypad audible during the exit time,
if the audible devices are tested upon arming the system, whether the Trouble Zone
is Normally Open or Closed and if the PIN numbers are 4 or 6 digits in length.
• Keypad Audible During Exit will activate the keypad sounder (and any outputs
programmed to follow the keypad sounder) once every 5 seconds during the exit
delay. At 10 and 5 seconds remaining, the sounder will activate 3 times. The Keypad
Audible During Exit also determines if the sounders will activate during the Auto
Arm period.
• To inform occupants that the system is about to arm, a pre-arming period will begin
15 minutes before the system arms automatically. If programmed, the keypad
sounders and any outputs programmed to follow the keypad sounders will pulse
five times every minute. During the last five minutes before arming, these sounders
will be on steady. Once per minute the DS7447 keypad will read, “Arm in nn min./
PIN + OFF - extend.”
Automatic Arming will affect only the partitions the user has access to.
If “Six Digit PINs” has been selected and the PIN numbers have been entered, changing to “Four Digit PINs” may cause PIN
entry errors. Changing from 6 to 4 digit PINs will retain the first 4 digits of the existing PINs and drop the last two digits.
Example: 123456 will become 1234. If two or more six digit PINs have the same first four digits, a PIN conflict will exist if
changed to four digits.
Changing from four to six digit PINs will add two zeros to the end of the existing PINs. Example: 1234 will become 123400.
It is recommended that when changing the PIN length that all PINs be reprogrammed.
9.4
Address 004 - Programmer and Master Codes
The display will not show the values entered but the cursor will move to indicate the digit you are changing. If the 4 Digit
mode is selected in Address 003 only digits 1-4 for the programmer’s PIN and 7-10 for the Master PIN need to be changed.
If 6 digits is selected in Address 003 you must enter digits 1-6 for the programmer’s PIN and 7-12 for the Master PIN. You
may move the cursor left by pressing the “C” (Panic) key or right by pressing the “A” (Fire) key. You can change individual
digits in the PIN numbers by moving the cursor to the position and entering a new number.
The use of four or six digits depends on the PIN Length as selected in digit 4 of Address 003. If four digits is selected in Address
003, then only the first four digits of the Programmers and Master PINs will require programming.
9.5
Address 005 - Cross-Zoning
Cross-zoning programming determines which zones may be cross-zoned with each other. Only zones 1-8 may be cross-zoned.
9.6
Address 006 - Trip window
Cross-zoning Trip Window Time programming defines the number of seconds for the Cross-zone Window. If 000 is used the trip window
will be the duration of the arm cycle of the crossed non-24 hour zones. If they are 24 hour zones, then the duration is 24 hours.
DS7080iP-32 Reference Guide
Copyright © 2001 Detection Systems, Inc.
P/N 39818D
Page 25
9.7
Address 007 - Keypad Assignment
This selection is used to determine if a keypad is Alpha (LCD) or LED. Each keypad slot is assigned an Option Bus Address of 1, 2, 3 or
4 respectively.
9.8
Address 008 - Language and Arming Controls
This address is used to determine the following:
• Display Language: This selection is used to determine if system messages are displayed
in English or another language. Selections for other languages will vary, depending on the
model ordered.
• Arming Mode: Determines if a PIN is required for arming the system.
- Commercial: Always requires a PIN for arming.
- Quick Arm: Allows the use of [#] [ON] to arm the system.
Not available in Partitioned systems.
- Residential: Allows the use of the # key in place of the PIN number for all system
functions except Disarming.
Not available in Partitioned systems.
9.9
Address 009 - Output Programming
Output Programming is used to determine the output functions of the Alarm Output and Programmable Outputs 1 & 2.
Page 26
P/N 39818D
Copyright © 2001 Detection Systems, Inc.
DS7080iP-32 Reference Guide
9.10 Address 010 - Time Delays
This address is used to determine the entry and exit delays as well as the bell cutoff times.
If a bell cutoff time is programmed with the maximum value of 099, then the actual cutoff time will be 30 seconds..
9.11 Address 011 - Report Controls
Address 011 is used to determine report routing.
Use options 0-3 for Non-partitioned systems.
Do not select Options “4”
through “C” if “No
Partitioning” is selected in
Address 002 Digit 6.
DS7080iP-32 Reference Guide
Copyright © 2001 Detection Systems, Inc.
P/N 39818D
Page 27
9.12 Address 012 - Phone Controls
DEFAULT 1 0 0 0 0 0 0
TONE/PULSE
0 = Dial Pulse on all Phone Numbers
1 = Dial Tone, switch to Pulse if required
2 = Dial Tone on all Phone Numbers*
CALLBACK
0 = Disable Remote Programmer Callback
1 = Enable Remote Programmer Callback
AUTO ANSWER RINGS - ARMED
0 = Do not answer
1-F = Answer on rings (odd numbers
Bypass Answering Machine)**
AUTO ANSWER RINGS - DISARMED
0 = Do not answer
1-F = Answer on rings (odd numbers
Bypass Answering Machine)**
DIALER DELAY OF 15 SECONDS ON
NON-24-HOUR BURGLAR ALARMS
0 = No Dialer Delay
1 = 15 Second Dialer Delay
DIALER DELAY OF 15 SECONDS ON
24-HOUR BURGLAR AND FIRE ALARMS
0 = No Dialer Delay
1 = 15 Second Dialer Delay
WDSRP BAUD RATE
0 = 110 Baud
1 = 300 Baud
* Required on PBX systems.
** The letters used for the ring counts are:
A = 10 rings
B = 11 rings
C = 12 rings
D = 13 rings
E = 14 rings
F = 15 rings
9.13 Address 013 - Partition 1 Account Codes
1) Account codes are programmed from left to right. If programming a 3-digit Account Code, the last digit of the code must be zero (0).
2) 0000 is not a valid Account Code.
3) If you program the Account Code with an “A” (*0), the panel will send a zero (0) in its place.
4) If one of the Account Codes for Partition 2 or Parition 1 Phone #1 is programmed as 0000, then the panel will use the code programmed
for Partition 1-Phone #1.
9.14 Address 014 - Partition 2 Account Codes
See Note in Section 9.13.
Page 28
P/N 39818D
Copyright © 2001 Detection Systems, Inc.
DS7080iP-32 Reference Guide
9.15 Address 015 - Phone # 1 Format
9.16 Address 016 - Phone # 2 Format
DS7080iP-32 Reference Guide
Copyright © 2001 Detection Systems, Inc.
P/N 39818D
Page 29
9.17 Address 017 - 022 - Phone Numbers
Address 017-018 Phone # 1 (Reporting)
Address 019-020 Phone # 2 (Reporting)
Address 021-022 Phone # 3 (Remote Programmer)
Address 017 Phone # 1 (digits 1-16):
Address 018 Phone # 1 (digits 17-32):
___________________________________________
___________________________________________
Address 019 Phone # 2 (digits 1-16):
Address 020 Phone # 2 (digits 17-32):
___________________________________________
___________________________________________
Address 021 Phone # 3 (digits 1-16):
Address 022 Phone # 3 (digits 17-32):
___________________________________________
___________________________________________
To dial the [*] character, enter *1 (The [*] character is sent as “1” “1” when pulse dialing). The Letter “B” will be displayed.
To dial the [#] character, enter *2 (The [#] character is only valid when tone dialing). The letter “C” will be displayed.
To input a 3 second delay, enter *3. The letter “D” will be displayed.
To wait for the dial tone, enter *4 as the first digit of the phone number. The letter “E” will be displayed (only if it is programmed as
the first digit).
To disable a phone number, enter *5 as the first digit. The underscore “_” will be displayed
To delete the phone number from the display window, enter *5 in all the digits.
9.18 Address 023 - Dial Attempts
Dial Attempts determines the maximum number of times the control panel will attempt to contact the central station on each programmed
phone number before a Comm. Fail is alerted.
After all dial attempts are made, the panel will log a communications failure. It will then wait 30 minutes and attempt to dial again
repeating the programmed number of attempts. If it still fails to connect the panel will then wait 24 hours and make another
attempt. It will continue to attempt to dial once every 24 hours after that until it is successful.
Example: If Address 023 is programmed for 003 (3 dial attempts), the panel will try 3 times to connect. If all 3 attempts fail, the
panel will log the communications failure, wait 30 minutes and try again making 3 more attempts to dial. If the second round of
3 attempts fails, the panel will wait 24 hours and try again making another 3 attempts to dial. It will continue trying to connect
every 24 hours afterward making 3 attempts each time.
PSTN Warning Notice: Under certain adverse conditions on the Public Switched Telephone Network (PSTN), some control/
communicators may require more than two dial attempts to reach the central station receiver. To guard against such a situation,
it is recommended that the Dial Attempts be set to a value between 3 and 10.
9.19 Address 024 - Auto Test / Remote Programmer Call-Out Day
Page 30
P/N 39818D
Copyright © 2001 Detection Systems, Inc.
DS7080iP-32 Reference Guide
9.20 Address 025 - Auto Test / Remote Programmer Call-Out Time
If “Send a Test report every hour” was selected in Address 024, setting the “Auto Test Call-Out Hour/Minute will have no affect on
the call out time. The hourly Auto Test will occur within a few minutes after the start of each hour as defined by the panel’s date
and time set in the master user menu.
This feature requires the panel’s date and time to be set.
9.21 Address 026 - AC Report Delay
The AC Failure report can be programmed to delay for up to 255 minutes (the restoral report can also be delayed up to 255 minutes).
- If another report is sent during this delay period, the AC Fail report will be sent along with this report.
- If the AC power restores during this delay period, the AC Fail report will not be sent.
9.22 Address 027 - History Controls
History Controls determines what events are stored in the panel’s event history.
9.23 Address 028 - Special Keys
This address is used to determine the alarm output when the emergency keys are pressed.
Armed
Status
Power
DEFAULT
0 = Disabled
1 = Invisible
2 = Steady Audible
3 = Pulsing Audible
0
0
0
Fire
1
4
2
5
3
6
TEST WEEKLY
Armed
Status
Power
Fire
On
FIRE KEY [A]
1
4
SPECIAL EMERGENCY KEY [B]
PANIC KEY [C]
7
*
3
Off
5
6
Perimeter
Only
8
9
No
Entry
0
#
Bypass
2
Perimeter
Status
Supervisory
Power
Bell Silenced
Fire
Trouble
1 2 3 4 5 6 7 8
On
1
2
3
Off
1
2
3
Off
4
5
6
Perimeter
Only
4
5
6
Perimeter
Only
7
8
9
No
Entry
7
8
9
No
Entry
*
0
#
Bypass
*
0
#
Bypass
System
Reset
A B C
Armed
On
System
Reset
System
Reset
A
B
C
A
B
C
The Fire key is disabled if programmed as invisible.
DS7080iP-32 Reference Guide
Copyright © 2001 Detection Systems, Inc.
P/N 39818D
Page 31
9.24 Addess 029 - Keypad Reports
Keypad Reports are programmed for the value you wish to send to the central station when the emergency keys are pressed.
DEFAULT
Two Digits, 00 through FF
00 00 00 00 00 00
KEYPAD FIRE REPORT
KEYPAD FIRE RESTORAL REPORT
KEYPAD EMERGENCY ALARM REPORT
KEYPAD PANIC ALARM REPORT
KEYPAD TAMPER REPORT
KEYPAD TAMPER RESTORAL REPORT
9.25 Address 030, 031, 032, 033 - Zone Type
• Disabled: These zones are not monitored, and will not generate alarm or trouble conditions.
• Perimeter Instant: These zones arm and disarm with the panel, and never have entry or exit delays. Violation of this type of zone will
cause an intrusion alarm.
• 24-Hour: This is a zone programmed to activate when its loop is faulted, even if the system is disarmed. An alarm on a 24-hour zone
(fire or intrusion) will be silenced by entering a disarm code whether the control is armed or not. If the 24-hour zone restores and alarms
again the alarm will sound again. 24-hour zones may generate trouble conditions during armed or disarmed periods. All 24-hour zones
that have alarmed and are not restored will show as “Not Ready.” They will prevent arming unless the panel is force armed. 24-hour
zones that have been bypassed manually will remain so until manually unbypassed, even if the control is armed and disarmed. Bypasses
of these zones will be displayed on the keypad.
Page 32
P/N 39818D
Copyright © 2001 Detection Systems, Inc.
DS7080iP-32 Reference Guide
• Entry/Exit Delay #1: A delayed zone is ignored during the programmed times immediately following arming during the exit delay. If the
zone is faulted while the control is armed and not in exit delay then an entry delay cycle will be started, and a continuous entry tone will
be sounded at the keypads. If the control is not disarmed by the end of the entry delay, an alarm will result. There are no keypad tones
during the exit delay unless the feature “Keypad Audible During Exit Delay” is selected. Refer to Section 9.9, Address 009. If an entry
delay is running and another entry delay zone is faulted, the entry delay timer is unaffected and will continue timing from the first entry.
The entry delay time and exit delay time can be set independently.
If a delayed zone remains faulted at the end of an exit delay, the panel will optionally signal an exit error condition. The entry delay will
begin as above, and the alarm output will activate with the pattern selected for that zone. If the control is not disarmed by the end of the
entry delay, an alarm will result, and an exit error report will be sent to the central station (following the alarm report if programmed). The
alarm output will deactivate. If the control is disarmed during the delay period started by the exit error condition, no reports will be sent
to the central station and any outputs on during the exit error will deactivate. The exit error report does not follow the dialer delay option.
• Entry/Exit Delay #2: Works in the same manner as the Entry/Exit Delay #1 zone, except that it uses Entry Delay Time #2.
• Interior Entry/Exit Follower: This is a zone programmed to be ignored during an entry/exit delay and then becomes an interior instant
zone. If this zone is violated while the system is armed and no entry/exit zones have been violated, it will activate an instant alarm. If this
zone is violated after an entry/exit delay zone is violated, it will be ignored for the duration of the entry/exit delay time. This zone is
bypassed when arming only the perimeter.
• Interior Home/Away: This zone becomes an active interior entry/exit follower when the system is armed and an entry/exit delay zone
is violated during the exit delay time.
• Interior Instant: These zones arm and disarm with the panel. They are not active if the panel is armed in the “perimeter only” mode.
They never have entry or exit delays. Violation of this type of zone will cause an intrusion alarm.
• Day Monitor: This is a perimeter instant zone that activates alarm outputs when the system is armed, but only activates the keypad
sounders when the system is disarmed. When the system is disarmed, any violation of this zone will activate the keypad sounders
which will sound continuously until a disarming command is entered. The alarm outputs will not operate. A trouble report (if programmed)
will be sent to the central station.
• Keyswitch Toggle: Each time this zone is closed, it will toggle the armed state of the panel. It has a 300 ms response time. To support
this feature, the keypads will generate a single beep for arm or disarm actions.
In a partitioned system, do not assign common zones if the keyswitch toggle feature will be used. Arming/Disarming from a
keypad by users with access to both partitions will cause the keyswitch partition to toggle between Armed and Disarmed. If
keyswitch operation is desired in a partitioned system, avoiding the use of keypads is recommended.
If “Force Arming for Keyswitch Zones” is enabled (Address 038-041), Keyswitch Toggle will force arm a “Not Ready” zone.
• Keyswitch On/Off: When this zone is closed, it will arm the panel. When it is shunted by an EOL (supervised), the panel will be
disarmed. Opening the zone will not affect the arming state of the control. When this option is selected, keypads can not be used to arm
or disarm the system unless the keyswitch zone is manually bypassed, prior to arming the system, from the keypad. If the keyswitch
zone is bypassed, any keypad can perform all arming and disarming functions.
Only one keyswitch on/off zone is allowed per system. Do not use on partitioned systems. Keypads cannot be used on a
system with the keyswitch on/off feature selected.
If “Force Arming for Keyswitch Zones” is enabled (Address 038-041), Keyswitch On/Off will force arm a “Not Ready” zone.
• Fire Zone with Verification: If a fire zone alarms and it is programmed for verification, the control will interrupt the programmable
output(s) set as a switched power return for 10 seconds. During the 10 second power interruption, and for 15 seconds after power
restoral, it will ignore all zone status on all fire zones (to ignore inrush currents). After fifteen seconds, it will monitor all fire zones for two
minutes. If any fire zone returns to alarm within the two minute window it will create a fire alarm condition. If a fire zone does not go into
alarm within the two minute window it will disregard the initial trip. If another alarm occurs on a fire zone with verification after the two
minutes, it will start the process over. After any fire zone is in alarm, all subsequent fire zones are treated as instant (no verification) until
the next fire reset. This same procedure will be performed when a [SYSTEM RESET] is entered, except that the two minute instant
alarm monitoring period is not observed.
Since alarm and trouble reporting to the central station for fire zones is the same as for burg zones (i.e. it is based on the state of the
zone) it is possible for Fire and Fire Trouble restoral signals to be transmitted even though the panel may still be displaying these zone
conditions. This is because the displays are latched until cleared by an operator action.
The use of the controls fire alarm verification feature may not be permitted in some areas. Check your local fire/building codes.
• Fire Zone without Verification: This zone is active and will alarm all 24 hours of the day regardless of the arming state of the control.
An alarm on a fire zone will be silenced by entering a disarm code whether the control is armed or not. If the fire zone restores and
alarms again the alarm will sound again. An open during the armed or disarmed period will send a trouble report and not an alarm. Fire
zones are never silent, invisible, or swinger shunted. All fire zones that have alarmed will continue to show on all keypads until a fire
reset is performed, even if they have physically restored. Fire zones may not be manually bypassed or force bypassed.
If force arming is enabled (see Programming Address 002), force arming is possible when the fire zone is violated (shorted).
DS7080iP-32 Reference Guide
Copyright © 2001 Detection Systems, Inc.
P/N 39818D
Page 33
• Interior Delay: This interior zone follows Entry Delay Time #1 (Address 010) during normal arming. When arming using the “No Entry”
button, this zone becomes an interior instant.
• Perimeter Homeguard: This zone type is active when the panel is armed. When the panel is armed perimeter only, this acts like an
Entry/Exit Delay #1. When armed full, this is an instant zone.
• Perimeter Follower Homeguard: These zones act like an Entry/Exit Delay #1 zone when the panel is armed in the perimeter only
mode. When the panel is fully armed, these zones are ignored during the entry/exit delay time if this zone or an instant zone is violated
first.
9.26 Address 034, 035, 036, 037 - Zone Action
0 = Alarm on Short, Alarm on Open (Default)
1 = Alarm on Short, Trouble on Open
2 = Alarm on Open, Trouble on Short
9.27 Address 038, 039, 040, 041 - Output Type
For
0=
1=
2=
3=
Intrusion and Fire Zones only:
Invisible (not valid for Fire Zones)
Silent (not valid for Fire Zones)
Steady Alarm Output (Default)
Pulsing Alarm Output
For Keyswitch Zones Only:
0 = Keyswitch does not allow Force Arming
1 = Keyswitch allows Force Arming
• Invisible: This is a zone programmed not to have an alarm output or an alarm display at any keypad when activated. An alarm signal
will be sent, but the keypad display will not indicate an alarm while this zone is violated. Invisible alarm zones are recommended for
holdup alarms.
• Silent: This is a zone programmed to activate the visual display at the kaypad, but not audible signals. If this zone is also an entry zone,
an entry tone will sound when this zone is activated.
• Steady: When this zone alarms the Alarm Output will come on steady, unless it is already pulsing, in which case it will remain pulsing.
• Pulsing: The pattern for the pulsing audible output is determined by the Fire Alarm Cadence as set in Address 009. When zones are
tripped which could cause both pulsing and steady outputs, the pulsing output will prevail. The alarm outputs will continue to be
activated until the bell cutoff timer times out or is reset, then they will silence.
• Keyswitch does not allow Force Arming: The system will not arm if any zones are in the “Not Ready” condition.
• Keyswitch allows Force Arming: The system will be allowed to arm by automatically bypassing “Not Ready” zones. The Force Arming
only works on zones that are set as Bypassable in Address 042-045. The “Force Arm Limit”, set in Address 002, will be ignored when
arming with keyswitches.
Page 34
P/N 39818D
Copyright © 2001 Detection Systems, Inc.
DS7080iP-32 Reference Guide
9.28 Address 042, 043, 044, 045 - Zone Bypass
This determines whether the user can bypass the zone. Zones programmed for bypassing can be bypassed even when in alarm. Fire
zones will not be bypassable, even if programmed as bypass allowed.
0 = No Bypassing Allowed
1 = Bypassing Allowed (Default)
9.29 Address 046, 047, 048, 049 - Custom Arming
Custom Arming Programming allows the [#] [4] key sequence on the keypad to be used for custom arming. The programming determines
which zones will be bypassed (not armed) during custom arming.
Zones programmed as “No Bypassing Allowed” and Fire zones cannot be bypassed when custom arming.
9.30 Address 050, 051, 052, 053 - Zone Partition Assignment
Zone Partition Assignment is used to determine what Zones belong to which Partition. You may choose Partition 1, Partition 2 or both
Partitions for common zones.
1 = Partition 1
2 = Partition 2
3 = Partition 1 & 2
“Enable 2 Partitions” must be set in Address 002, digit 6, prior to Zone Partition Assignment.
DS7080iP-32 Reference Guide
Copyright © 2001 Detection Systems, Inc.
P/N 39818D
Page 35
REPORTS
If a value of 00 is programmed in any of these locations the panel will not send that particular report.
• Pulsed Formats (3/1, 3/1E, 3/1 with Parity, 3/1E with Parity, 4/1, 4/2 and BFSK) will need a unique value placed at each address
location. The digits that is furthest to the left in each location is the primary reporting digit. As a recommendation for the pulsed formats,
the table in Section 11.3 “Suggested Values” gives a baseline from which to program the various addresses. Please note that each
Central Station receiver differs slightly in the report codes that it expects. Therefore, it is best to verify the codes you use with the Central
Station.
Some of the reports that can be sent, such as OPEN, CLOSE, PARTIAL CLOSE can send an associated User Number as the second
digit. To accomplish this, program an F (*5) as the second digit in the program location. When the report is sent the panel will replace
the F with the appropriate user number. (User numbers 15 to 24 will only send 15.) Pulsed formats 3/1, 3/1 with parity, and 4/1 need a
0 for the second digit and cannot send user numbers. If 4/1 is selected, placing a digit other than 0 in the second digit will force the
communicator to change to a 4/1E format. A non-zero in the second digit location indicates an extended 3/1E, 3/1E w/parity or 4/2
format.
• Fixed Report Formats (Contact ID, SIA, High Speed 4/9) have well defined reports that are sent regardless of the value programmed
in the report code location. Any non-zero value programmed in the (left) reporting digit will send the appropriate report. Refer to Section
12.0 for a list of reports that are possible to send based on the report program locations.
• Special Formats (Personal Dialing Format, Pager) are not recommended for primary reporting. If they are used, Personal Dialing
Format could use the same report codes as the Pulsed Formats. Pager has a limitation in that it can’t use the Hex values A (*0), B (*1),
C (*2), D (*3), E (*4), F (*5). These values can not be passed on to a Numeric Pager. See Section 11.1 “Suggested Values” for some
suggested report values for the Pager format.
9.31 Addresses 054, 055, 056, 057 - Zone Alarm Reports
Two Digits, 00 through FF
9.32 Addresses 058, 059, 060, 061 - Zone Restoral Reports
Two Digits, 00 through FF
Page 36
P/N 39818D
Copyright © 2001 Detection Systems, Inc.
DS7080iP-32 Reference Guide
9.33 Addresses 062, 063, 064, 065 - Zone Trouble Reports
Two Digits, 00 through FF
9.34 Addresses 066, 067, 068, 069 - Trouble Restoral Reports
Two Digits, 00 through FF
9.35 Addresses 070, 071, 072, 073 - Zone Bypass Reports
Two Digits, 00 through FF
9.36 Addresses 074, 075, 076, 077 - Bypass Restoral Reports
Two Digits, 00 through FF
DS7080iP-32 Reference Guide
Copyright © 2001 Detection Systems, Inc.
P/N 39818D
Page 37
9.37 Address 078 - Open/Close Reports
9.38 Address 079 - AC/Battery Reports
9.39 Address 080 - Remote/Local Programming Reports
9.40 Address 081 - Exit Error, Recent Closing, System Trouble, System Trouble Restoral Reports
9.41 Address 082 - Test Reports
Page 38
P/N 39818D
Copyright © 2001 Detection Systems, Inc.
DS7080iP-32 Reference Guide
9.42 Address 083 - 116 - Alpha Labels
Hint:
To get an Address Location
for a zone number, use the
following:
Address 083 - Partition 1 Label
Zone # + 84 = Address #
Address 085 - Zone 1 Alpha Label
Examples:
Address 086 - Zone 2 Alpha Label
Zone 9 + 84 = Address 093
Address 087 - Zone 3 Alpha Label
Partition Label
Address 084 - Partition 2 Label
Armed
Ready To Arm
ABC Alarm
Status
Power
Fire
On
SPACE
1,"
&/#!
Zone 20 + 84 = Address 104 Address 088 - Zone 4 Alpha Label
Address 089 - Zone 5 Alpha Label
Don't Accept
(Hold for 2
seconds to exit)
3DEF
1
2
3
4GHI
5JKL
6MNO
4
5
6
8TUV
9WXY
8
9
No
Entry
#
Bypass
0QZ
*
0
System
Reset
Address 092 - Zone 8 Alpha Label
Move Cursor Left
Example:
Off
Perimeter
Only
7PRS
7
Address 090 - Zone 6 Alpha Label
Address 091 - Zone 7 Alpha Label
2ABC
Accept Value
Move Cursor Right
UPPER/lower
case toggle
To program “ABC Alarm” as the Private Label for Partition 1
Enter the Programmer’s Mode:
Enter the Program Address:
Enter:
Enter:
Enter:
Enter:
Enter:
Enter:
Enter:
Enter:
Enter:
Enter:
Enter:
[[9] [8] [7] [6] [#] [0] (or [9] [8] [7] [6] [5] [4] [#] [0] if six digit codes are selected)
[0] [8] [3] followed by [#]
[2] for the letter “A” then press the right arrow key to continue with the next letter
[2] twice for the letter “B” the press the right arrow key for the next letter
[2] three times for the letter “C” then press the right arrow key for the next letter
[1] until you have a blank space (Note: Moving the cursor to the left does not create
a space. Spaces must be programmed into the Alpha using the [1] key)
[2] for the letter “A” then press the right arrow key for the next letter
[System Reset] The “System Reset” key is the UPPER/lower case toggle
[5] three times for the letter “l” then press the right arrow key for the next letter
[2] for the letter “a” then press the right arrow key for the next letter
[7] twice for the letter “r” then press the right arrow key for the next letter
[6] for the letter “m”
[#] Program the next address, program a different address or exit the
Programmer’s Mode.
9.43 Address 117 - Point Expansion Module Missing Report
9.44 Address 118 - Point Expansion Module Missing Restoral Report
DS7080iP-32 Reference Guide
Copyright © 2001 Detection Systems, Inc.
P/N 39818D
Page 39
9.45 Address 119 - Point Expansion Module Tamper Report
9.46 Address 120 - Point Expansion Module Tamper Restoral Report
9.47 Address 121 - Point Expansion Module Fault Report
9.48 Address 122 - Point Expansion Module Fault Restoral Report
9.49 Address 123 - Octal Relay Control and Reports
Page 40
P/N 39818D
Copyright © 2001 Detection Systems, Inc.
DS7080iP-32 Reference Guide
9.50 Address 124 - Default Programming
Defaulting the control panel will result in the loss of all custom programming. This includes Zone programming, Report
programming, Keypad programming (only the keypad set as Option Bus Address 1 will function), Alpha programming,
Telephone numbers and Account codes. If the digit 1 is entered into Address 124 all programming information will be
lost and cannot be recovered.
DS7080iP-32 Reference Guide
Copyright © 2001 Detection Systems, Inc.
P/N 39818D
Page 41
10.0
Installation Guide for UL Listed Systems
10.1 DS7080iP-32 UL Listings:
• Household Fire Alarm, UL Standard UL985
• Household Burglary Alarm, UL Standard UL1023
• Police Station Connection Grades AA and A, UL Standard UL365
• Central Station Burglary Alarm Grades AA, A, B, and C; UL Standard UL1610
The control panel should be installed in accordance with UL Standard UL681, Installation and Classification of Mercantile and Bank
Burglar Alarm Systems, or UL Standard UL1641, Installation and Classification of Residential Burglar Alarm Systems. It should also be
installed in accordance with NFPA 72 for Household installations. This panel has not been investigated to the requirements of UL294
(Access Control).
10.1.1 The following table shows the DS7080iP-32 system configuration for the various types of fire and burglar alarm service for which
the products are UL Listed.
10.2 Installation Considerations
• In order to meet UL requirements, the system must be configured as described in Section 10.
• The maximum standby battery capacity is 21 AH @ 12 VDC.
• The total nominal current must not exceed 1.2 A in alarm and 200 mA in standby.
• The control must be mounted indoors and within the protected area.
• Enclosure tamper switches (if used) must be connected to a 24-hour zone.
• Grounding must be in accordance with article 250 of the NEC (NFPA 70).
• At least one UL Listed keypad with zone display must be connected.
• Zones must be connected to UL Listed, compatible devices.
• 50 Hz. AC input cannot be used for UL Listed Requirements.
• The ground wire provided with the enclosure must be connected between the “Earth GND” connection on the control and the enclosure
tab.
• The keypad panic alarm output must follow the corresponding zone’s programming (e.g. fire = 3-pulse temporal pattern, burglary =
steady). In all cases, the special emergency keys must be silent.
• The ground start feature shall not be programmed.
• The Pager report format must not be employed. Alarm outputs must not be delayed.
• Remote programming has not been investigated by UL.
Page 42
P/N 39818D
Copyright © 2001 Detection Systems, Inc.
DS7080iP-32 Reference Guide
10.2.1 Special Requirements for Partitioned Systems
• The control unit and burglar alarm signal are intended to be
installed in one premesis, under one management, one ownership
and one address which is then partitioned.
D. Alarm Output Programming:
•
Alar m Output (Program Address 009 digit 1) must be
programmed as *0 (A).
E. General Control Programming:
• The indicating device (bell) must be placed where it can be heard
by all partitions.
•
• The local commercial burglar alarm indicating device must be
installed in an area where the Audible Test can be heard by any
of the users in the different partitions.
10.3.2 Grade A Household Burglary Alarm
• The commercial local control unit should be protected by either
being lined and connected to a 24 hour burglar alarm circuit or
they shall be in a protected area which is armed 24 hours a day.
In either case the zone which is protecting the control unit and
power supply must be programmed not to be bypassed.
• Remote programming must not be used to disarm the system.
10.3 Programming the DS7080iP-32
Program Address 002 must be programmed as: Digits 8 & 9 = 0
(do not allow force arming).
Grade A Household Burglary Alarm using Digital Alarm
Communicator Transmitter with local bell. The control must be
installed in accordance with UL Standard UL1641.
Required Accessories:
• At least one Wheelock 46T-G10-12 bell or 34T-12 horn (other
Listed compatible devices with a voltage range of 11.8 to 12.4 V
nominal or better may be used) is required for this application.
• The standard DS7080iP-32 enclosure can be used.
A. Report Programming:
When used for UL Listed Requirements, the control must conform
to certain programming requirements. The following is a list of the
required program entries and required accessories for specific UL
Listed Requirements.
• Burglar Zone Reports must be programmed for those zones used.
• Low Battery Report (Program Address 079, digits 1 & 2) must be
programmed.
• AC Failure Report (Program Address 079, digits 5 & 6) must be
programmed.
10.3.1 Household Fire Alarm
Household Fire Alarm using Digital Alarm Communicator Transmitter
with local bell. The control must be installed in accordance with
NFPA 72.
Required Accessories:
• At least one Detection Systems’ model DS250 Series smoke
detector with an MB Series base, or another Listed compatible
smoke detector.
• At least one DS7480 Bell Supervision Module.
B. Timer Programming:
• Bell Cutoff Times (Program Address 010, digits 10-15) must be
programmed for not less than 4 minutes.
• Entry Delay Timers (Program Address 010, digits 1-6) must be
programmed for not longer than 60 seconds.
• Exit Delay Timer (Program Address 010, digits 7-9) must be
programmed for not longer than 45 seconds.
• One Wheelock 46T-G10-12 bell or 34T-12 horn (will provide 85dB
for UL985 and NFPA 72 requirements; other Listed compatible
devices with a voltage range of 11.8 to 12.4 V nominal or better
may be used) is required for this application and must be installed
inside the protected area.
C. General Control Programming:
• The standard control enclosure can be used.
• Cross zoning time programming (Program Address 006) must be
set to 000.
• At least one DS7447 or DS7445 Keypad must be used.
• Four-wire detectors must be used with Listed power supervision
devices. A compatible Listed 4-wire detector is the Detection
Systems, Inc. DS250 in an MB4W base. A compatible Listed EOL
relay is the Detection Systems, Inc. EOL200.
• All zones must be used with the EOL resistor (P/N 25899),
provided.
•
Fire Zone Report must be programmed.
•
Low Battery Report (Program Address 079, digits 1 & 2) must
be programmed.
•
AC Failure Report (Program Address 079, digits 5 & 6) must be
programmed.
B. Timer Programming:
Bell Cutoff Times (Program Address 010, digits 10-15) must be
programmed for not less than 4 minutes.
C. Zone Programming:
•
• Program Address 002, Force Arming Limit, must be programmed
as: digits 8 & 9 = 0.
• Program Address 008, digit 2, must be programmed for the
Commercial mode (digit 2 = 0).
D. Alarm Output Programming:
• Alarm Output, Program Address 009, digit 1 must be programmed
as *0 (A).
10.3.3 Local Burglary Alarm
A. Report Programming:
•
• Program Address 002, digit 3, must be programmed for no swinger
shunts (enter 0).
Fire zones must be programmed for alarm on short, trouble on
open, not be cross-zoned or be part of custom arming.
The control must be installed in accordance with UL Standards
UL681 and UL609 for all grades of service.
A. Grade A Installations using Digital Alarm Communicator
Transmitter with local bell
Required Accessories:
• The control must be installed in a Detection Systems’ model
AE7080CC enclosure with a cover actuated tamper switch
installed.
• The Ademco Model AB-12 bell/housing (see Section 10.4).
1. Report Programming:
• Burglar Zone Reports must be programmed for those zones used.
• Low Battery Report (Program Address 079, digits 1 & 2) must be
programmed.
DS7080iP-32 Reference Guide
Copyright © 2001 Detection Systems, Inc.
P/N 39818D
Page 43
• AC Failure Report (Program Address 079, digits 5 & 6) must be
programmed.
• Open Report (Program Addresses 011, digit 1, and 078, digits 1
& 2) must be programmed.
• Close Report (Program Addresses 011, digit 1, and 078, digits 3
& 4) must be programmed.
• 24-Hour Check-In Reports (Program Addresses 082, digits 1-4
and 024, all digits) must be programmed.
2. Timer Programming:
• Bell Cutoff Times (Program Address 010, digits 10-15) must be
programmed for not less than 15 minutes.
• Entry, Exit Delay Times (Program Address 010, digits 1-9) must
be programmed for not longer than 60 seconds.
2. Timer Programming:
• Entry, Exit Delay Times (Program Address 010, digits 1-9) must
be programmed for not longer than 60 seconds.
3. General Control Programming:
• Program Address 002, digit 2, must be programmed for Closing
Ringback and digit 3 must be programmed for no swinger shunts.
• Program Address 002, Force Arming Limit, must be programmed
as: digits 8 & 9 = 0.
• Program Address 008, digit 2, must be programmed for the
Commercial mode (digit 2 = 0).
4. Zone Programming:
• The Burglar alarm output signal must be steady.
5. Alarm Output Programming:
3. General Control Programming:
• Program Address 002, digit 2, must be programmed for Closing
Ringback and digit 3 must be programmed for no swinger shunts.
• Alarm Output, Program Address 009, digit 1 must be programmed
as *0 (A).
• Program Address 002, Force Arming Limit, must be programmed
as: digits 8 & 9 = 0.
B. Grade A Installations using Digital Alarm Communicator
Transmitter with local bell
• Program Address 008, digit 2, must be programmed for the
Commercial mode (digit 2 = 0).
4. Zone Programming:
Required Accessories:
• The control must be installed in a Detection Systems’ model
AE7080CC enclosure with a cover actuated tamper switch
installed.
• The Burglar alarm output signal must be steady.
• The Ademco Model AB-12 bell/housing (see Section 10.4).
5. Alarm Output Programming:
1. Report Programming:
• Alarm Output, Program Address 009, digit 1 must be programmed
as *0 (A).
• Burglar Zone Reports must be programmed for those zones used.
10.3.4 Police Station Connection
The control must be installed in accordance with UL Standards
UL611 and UL681 for all grades of service.
A. Grades AA and A Installations using the Applied Spectrum
PAL200 and the DACT
• Low Battery Report (Program Address 079, digits 1 & 2) must be
programmed.
• AC Failure Report (Program Address 079, digits 5 & 6) must be
programmed.
• Open Report (Program Addresses 011, digit 1, and 078, digits 1
& 2) must be programmed.
Required Accessories:
• Close Report (Program Addresses 011, digit 1, and 078, digits 3
& 4) must be programmed.
• The control must be installed in a Detection Systems’ model
AE7080CC enclosure with a cover actuated tamper switch
installed.
• 24-Hour Check-In Reports (Program Addresses 082, digits 1-4,
024 and 025, all digits) must be programmed.
2. Timer Programming:
• The Applied Spectrum PAL200.
• The Spectrum PAL200 must be installed within 3 feet of the control
and the wiring control must be in conduit.
• The Applied Spectrum PAL200 inputs should be connected to
the alarm outputs (the active alarm sounder output may be used).
• Bell Cutoff Times (Program Address 010, digits 10-15) must be
programmed for not less than 15 minutes.
• Entry, Exit Delay Times (Program Address 010, digits 1-9) must
be programmed for not longer than 60 seconds.
3. General Control Programming:
1. Report Programming:
• Programming shall be enabled to allow all alarm signals to be
transmitted via the DACT and PAL200.
• Burglar Zone Reports are not required since the alarms are
transmitted over the PAL200.
• Low Battery Report (Program Address 079, digits 1 & 2) must be
programmed.
• AC Failure Report (Program Address 079, digits 5 & 6) must be
programmed.
• Open Report (Program Addresses 011, digit 1, and 078, digits 1
& 2) must be programmed.
• Close Report (Program Addresses 011, digit 1, and 078, digits 3
& 4) must be programmed.
• Program Address 002, digit 2, must be programmed for Closing
Ringback and digit 3 must be programmed for no swinger shunts.
• Program Address 002, Force Arming Limit, must be programmed
as: digits 8 & 9 = 0.
• Program Address 008, digit 2, must be programmed for the
Commercial mode (digit 2 = 0).
4. Zone Programming:
• The Burglar alarm output signal (whether pulsed or steady) must
be different from the Fire alarm signal.
5. Alarm Output Programming:
• Alarm Output, Program Address 009, digit 1 must be programmed
as *0 (A).
• 24-Hour Check-In Reports (Program Addresses 082, digits 1-4,
024 and 025, all digits) must be programmed.
Page 44
P/N 39818D
Copyright © 2001 Detection Systems, Inc.
DS7080iP-32 Reference Guide
10.3.5 Central Station Burglary Alarm
The control must be installed in accordance with UL Standards
UL611 and UL681 for all grades of service.
A. Grades AA and A Installations using the Applied Spectrum
PAL200 and the DACT
Required Accessories:
• The control must be installed in a Detection Systems’ model
AE7080CC enclosure with a cover actuated tamper switch
installed.
• The Applied Spectrum PAL200.
• The Spectrum PAL200 must be installed within 3 feet of the control
and the wiring to the control must be in conduit.
• The Applied Spectrum PAL200 inputs should be connected to
the alarm outputs (the active alarm sounder output may be used).
1. Report Programming:
• Programming shall be enabled to allow all alarm signals to be
transmitted via the DACT and PAL200.
• Burglar Zone Reports are not required since the alarms are
transmitted over the PAL200.
• Low Battery Report (Program Address 079, digits 1 & 2) must be
programmed.
• AC Failure Report (Program Address 079, digits 5 & 6) must be
programmed.
• Low Battery Report (Program Address 079, digits 1 & 2) must be
programmed.
• AC Failure Report (Program Address 079, digits 5 & 6) must be
programmed.
• Open Report (Program Addresses 011, digit 1, and 078, digits 1
& 2) must be programmed.
• Close Report (Program Addresses 011, digit 1, and 078, digits 3
& 4) must be programmed.
• 24-Hour Check-In Reports (Program Addresses 082, digits 1-4,
024 and 025, all digits) must be programmed.
2. Timer Programming:
• Bell Cutoff Times (Program Address 010, digits 10-15) must be
programmed for not less than 15 minutes.
• Entry, Exit Delay Times (Program Address 010, digits 1-9) must
be programmed for not longer than 60 seconds.
3. General Control Programming:
• Program Address 002, digit 2, must be programmed for Closing
Ringback and digit 3 must be programmed for no swinger shunts.
• Program Address 002, Force Arming Limit, must be programmed
as: digits 8 & 9 = 0.
• Program Address 008, digit 2, must be programmed for the
Commercial mode (digit 2 = 0).
4. Zone Programming:
• Open Report (Program Addresses 011, digit 1, and 078, digits 1
& 2) must be programmed.
• The Burglar alarm output signal (whether pulsed or steady) must
be different from the Fire alarm signal.
• Close Report (Program Addresses 011, digit 1, and 078, digits 3
& 4) must be programmed.
5. Alarm Output Programming:
• 24-Hour Check-In Reports (Program Addresses 082, digits 1-4,
024 and 025, all digits) must be programmed.
• Alarm Output, Program Address 009, digit 1 must be programmed
as *0 (A).
C. Grade C Installations using Digital Alarm Communicator
Transmitter only
2. Timer Programming:
• Entry, Exit Delay Times (Program Address 010, digits 1-9) must
be programmed for not longer than 60 seconds.
3. General Control Programming:
• Program Address 002, digit 2, must be programmed for Closing
Ringback and digit 3 must be programmed for no swinger shunts.
• Program Address 002, Force Arming Limit, must be programmed
as: digits 8 & 9 = 0.
• Program Address 008, digit 2, must be programmed for the
Commercial mode (digit 2 = 0).
Required Accessories:
• The control must be installed in a Detection Systems’ model
AE7080CC enclosure with a cover actuated tamper switch
installed.
1. Report Programming:
• Burglar Zone Reports must be programmed for those zones used.
• Low Battery Report (Program Address 079, digits 1 & 2) must be
programmed.
4. Zone Programming:
• AC Failure Report (Program Address 079, digits 5 & 6) must be
programmed.
• The Burglar alarm output signal (whether pulsed or steady) must
be different from the Fire alarm signal.
• Open Report (Program Addresses 011, digit 1, and 078, digits 1
& 2) must be programmed.
5. Alarm Output Programming:
• Close Report (Program Addresses 011, digit 1, and 078, digits 3
& 4) must be programmed.
• Alarm Output, Program Address 009, digit 1 must be programmed
as *0 (A).
B. Grade B Installations using Digital Alarm Communicator
Transmitter with local bell
Required Accessories:
• The control must be installed in a Detection Systems’ model
AE7080CC enclosure with a cover actuated tamper switch
installed.
• The Ademco Model AB-12 bell/housing (see Section 10.4).
1. Report Programming:
• Burglar Zone Reports must be programmed for those zones used.
DS7080iP-32 Reference Guide
• 24-Hour Check-In Reports (Program Addresses 082, digits 1-4,
024 and 025, all digits) must be programmed.
2. Timer Programming:
• Entry, Exit Delay Times (Program Address 010, digits 1-9) must
be programmed for not longer than 60 seconds.
3. General Control Programming:
• Program Address 002, digit 2, must be programmed for Closing
Ringback and digit 3 must be programmed for no swinger shunts.
• Program Address 002, Force Arming Limit, must be programmed
as: digits 8 & 9 = 0.
Copyright © 2001 Detection Systems, Inc.
P/N 39818D
Page 45
• Program Address 008, digit 2, must be programmed for the
Commercial mode (digit 2 = 0).
4. Zone Programming:
• The Burglar alarm output signal (whether pulsed or steady) must
be different from the Fire alarm signal.
5. Alarm Output Programming:
• Alarm Output, Program Address 009, digit 1 must be programmed
as *0 (A).
10.4 Using the Ademco AB-12 Bell/Housing
1) Disconnect the wire jumper from Terminal 4 to the inner housing of the Bell Box.
2) Connect wiring between the control and Bell Box as shown above.
3) Program Zone 8 as a 24-hour zone. (Program Address 030, digit 8, must be programmed as 2).
Page 46
P/N 39818D
Copyright © 2001 Detection Systems, Inc.
DS7080iP-32 Reference Guide
11.0
Report Programming Suggested Values
11.1 Personal Dialing and Pager Format
This is a 2 pulse per second (PPS) 0/2 (no account code/2 report event digits) format intended for manual reception, i.e. the panel will call
a phone number where a person is expected to answer. After a call is made, the panel will start sending the first report. If the report was
a “Communicator Test” and Program Address 082 had a value of 00850000 the person answering the phone will hear 8 pulses followed by
a 1 second delay, then 5 pulses followed by a 3 second delay. This sequence will repeat for 60 seconds per call. After 60 seconds the
panel will hang up and call again making a total of three calls of 60 seconds duration each. After three calls, the panel considers this a
successful transmission of one report. If any reports still remain to be sent, they will be sent in the same manner.
A way to expedite this report process would be to provide an acknowledge to the panel that the report was heard and understood by the
receiving party. When an acknowledge is provided, the panel will start sending the next report or hang up if no reports remain. To provide
an acknowledge, press the 1 key of the telephone keypad during the 3 second delay of the report transmission. This “Acknowledge
Feature” is an enhancement that will allow the panel to send all reports in one call.
It is recommended that the reporting values for this format be the same as the Pager Format.
11.2 Pager Format
The Pager format allows the control panel to dial a digital pager and leave a numeric message which includes an account ID and report
type. The telephone number is dialed when a report is available. At the completion of the telephone dialing, a fixed time delay equal to 10
seconds occurs. This delay allows time to connect with the pager service, while skipping over any voice announcement. When the delay
has ended, the numeric message is sent. This message includes the account number followed by up to 5 reports. If a delay time greater
than 10 seconds is required, increments of 3 seconds can be added by programming the “*3” character (3 second delay) at the end of the
phone number in Address 017 or 019.
For example, if you call pager number 123-4567 and it takes 20 seconds after you finished dialing before you are allowed to enter the
message, the following digits should be programmed in Address 017: 1 2 3 4 5 6 7 *3 *3 *3 *3. This will give you an overall delay of 22
seconds.
Some paging systems do not have a voice announcement and expect data entry within the first three to five seconds. Due to the
built in 10 second communicator delay, the paging system may hang up before the reports are sent. If this problem occurs,
contact your pager provider about adding a voice announcement or a delay.
For Pager format, it is not advisable to use the HEX character values (*0 = A, *1 = B, *2 = C, *3 = D, *4 = E, *5 = F) in the Report
Programming Addresses 054-082 and 117-123 or as part of the Account Codes (Addresses 013 and 014). These characters
could cause unpredictable results when sent to a pager system that only expects numeric characters between 0-9. This is the
reason that this format will not allow an associated user number with an open and close report. If using a remote programming
program, such as WDSRP, do not use zero (0) as a reporting or account code digit as the remote programmer programs zero (0)
as *0 (A).
The Pager format is an open-loop format which has no acknowledge tone. There is no indication at the control panel that the
signal has been sent. Therefore, the Pager format is not recommended as the primary communication method.
For Additional Information, see Programming Addresses 013-014, 054-082 and 117-123.
The following page has recommended programming values for Addresses 054-082 and 117-123 when using the Pager format.
If sending reports to both a pager and to a central station, Do Not use a zero (0) as the reporting digit as it will disable the
report to the central station.
DS7080iP-32 Reference Guide
Copyright © 2001 Detection Systems, Inc.
P/N 39818D
Page 47
Personal Dialing and Pager Format (suggested values)
4/2 Format (suggested values)
Page 48
P/N 39818D
Copyright © 2001 Detection Systems, Inc.
DS7080iP-32 Reference Guide
11.3 Suggested Values for BFSK and other Pulse Formats
For Additional Information, see Programming Addresses 054-082 and 117-123.
DS7080iP-32 Reference Guide
Copyright © 2001 Detection Systems, Inc.
P/N 39818D
Page 49
12.0
Report Programming Values Sent
12.1 SIA Format
SIA reporting allows the installer to select the type of event each report will send
to the central station. For example, if a burglary zone is used as a 24 hour panic
zone, it can now report as a PA (panic alarm) when using the SIA format.
The event type is programmed in the extended digit of the report (Addresses 054082 and 117-123). To activate a report when using the SIA format, place a “1” in
the first reporting digit. To select the type of event for this report, place one of the
following values in the second digit.
Data Digit 2 value SIA Report
1
PA
2
PR
3
QA
4
QR
5
TA
6
TR
7
UA
8
UR
9
UT
*0
UJ
*1
YP
*2
YQ
*3
YX
Page 50
P/N 39818D
Explanation
Panic Alarm
Panic Restore
Emergency Alarm
Emergency Restore
Tamper Alarm
Tamper Restore
Untyped Zone Alarm
Untyped Zone Restore
Untyped Zone Trouble
Untyped Trouble Restore
Power Supply Trouble
Power Supply Restore
Service Required
Copyright © 2001 Detection Systems, Inc.
DS7080iP-32 Reference Guide
12.2 Contact ID Format Values Sent
For Additional Information, see Programming Addresses 054-082 and 117-123.
DS7080iP-32 Reference Guide
Copyright © 2001 Detection Systems, Inc.
P/N 39818D
Page 51
12.3 High Speed 4/9 Format
For Additional Information, see Programming Addresses 054-082 and 117-123.
Page 52
P/N 39818D
Copyright © 2001 Detection Systems, Inc.
DS7080iP-32 Reference Guide
12.3 High Speed 4/9 Format (continued)
DS7080iP-32 Reference Guide
Copyright © 2001 Detection Systems, Inc.
P/N 39818D
Page 53
13.0
Programming Addresses
Address
Address
50/60 Hz .................................................................................................. 002
AC Failure Report ................................................................................... 079
AC Failure Report Delay ......................................................................... 026
AC Failure Restoral ................................................................................. 079
Alarm Bell Cutoff ..................................................................................... 010
Alarm Output ........................................................................................... 009
Alarm Output on Manual Arming ............................................................ 003
Allow All Arming Levels ........................................................................... 002
Alpha for Zone 1-8 ........................................................................... 085-092
Alpha for Zone 9-16 ......................................................................... 093-100
Alpha for Zone 17-24 ....................................................................... 101-108
Alpha for Zone 25-32 ....................................................................... 109-116
Arming Mode ........................................................................................... 008
Arming Warning Control .......................................................................... 003
Automatic Comm. Test Report ................................................................ 082
Automatic Comm. Test Report Call-Out Day .......................................... 024
Automatic Comm. Test Report Call-Out Time ......................................... 025
Burglary Bell Cutoff ................................................................................. 010
Callback .................................................................................................. 012
Close Report ........................................................................................... 078
Close Report Control .............................................................................. 011
Closing Ringback .................................................................................... 002
Cross-zoning Control .............................................................................. 005
Cross-zoning Trip Window Time .............................................................. 006
Custom Arming Zones 1-8 ...................................................................... 046
Custom Arming Zones 9-16 .................................................................... 047
Custom Arming Zones 17-24 .................................................................. 048
Custom Arming Zones 25-32 .................................................................. 049
Day Monitor Trouble Report Control ........................................................ 011
Defaulting the System ............................................................................. 124
Dial Attempts ........................................................................................... 023
Dialer Delay ............................................................................................. 012
Duress Report ......................................................................................... 078
Emergency Key Control .......................................................................... 028
Emergency Key Report ........................................................................... 029
Entry Delay Time 1 .................................................................................. 010
Entry Delay Time 2 .................................................................................. 010
Exit Delay Time ....................................................................................... 010
Exit Error Report ..................................................................................... 081
Expansion Module .................................................................................. 001
Expansion Module Missing Report ......................................................... 117
Expansion Module Missing Restoral ....................................................... 118
Expansion Module Tamper Report .......................................................... 119
Expansion Module Tamper Restoral ....................................................... 120
Expansion Module Fault Report .............................................................. 121
Expansion Module Fault Restoral ........................................................... 122
Fire Bell Cutoff ........................................................................................ 010
Fire Key Control ...................................................................................... 028
Fire Key Report ....................................................................................... 029
First Open After Alarm Report ................................................................ 078
Force Arming Limit .................................................................................. 002
General Control ....................................................................................... 002
Ground Start ........................................................................................... 009
History Event Control .............................................................................. 027
Keypad Assignment ................................................................................ 007
Keypad Audible During Exit .................................................................... 003
Keypad Control ....................................................................................... 008
Keypad Emergency Alarm Report .......................................................... 029
Keypad Fire Alarm Report ...................................................................... 029
Keypad Fire Restoral .............................................................................. 029
Keypad Language ................................................................................... 008
Keypad Panic Report .............................................................................. 029
Keyswitch Tamper Report ....................................................................... 029
Language Controls .................................................................................. 008
Local Program Successful Report .......................................................... 080
Local Program Unsuccessful Report ...................................................... 080
Low Battery Report ................................................................................. 079
Low Battery Restoral .............................................................................. 079
Manual Comm. Test Report ..................................................................... 082
Master Code ........................................................................................... 004
Octal Relay Control ................................................................................. 123
Octal Relay Missing Report .................................................................... 123
Octal Relay Missing Restoral .................................................................. 123
Open Report ........................................................................................... 078
Open Report Control ............................................................................... 011
Panic Key Control ................................................................................... 028
Panic Key Report .................................................................................... 029
Partial Close Report ................................................................................ 078
Partition 1 Account Codes ...................................................................... 013
Page 54
P/N 39818D
Partition 1 Alpha ..................................................................................... 083
Partition 2 Account Codes ...................................................................... 014
Partition 2 Alpha ..................................................................................... 084
Partitioning .............................................................................................. 002
Phone Answer Rings - Armed ................................................................. 012
Phone Answer Rings - Disarmed ............................................................ 012
Phone Controls ....................................................................................... 012
Phone #1 ................................................................................................. 017
Phone #1 Format .................................................................................... 015
Phone #2 ................................................................................................. 019
Phone #2 Format .................................................................................... 016
Phone #3 ................................................................................................. 021
PIN Length .............................................................................................. 003
Programmable Output 1 .......................................................................... 009
Programmable Output 2 .......................................................................... 009
Programmer's Code ................................................................................ 004
Recent Closing Report ............................................................................ 081
Remote Program Successful Report ...................................................... 080
Remote Program Unsuccessful Report .................................................. 080
Remote Programmer Call-Out Day ......................................................... 024
Remote Programmer Call-Out Time ........................................................ 025
Remote Programmer Phone ................................................................... 021
Siren on Comm. Failure .......................................................................... 002
System in Test Report ............................................................................. 082
System in Test Restoral .......................................................................... 082
System Trouble Report ........................................................................... 081
System Trouble Restoral ......................................................................... 081
Swinger Shunt ......................................................................................... 002
Test Report ............................................................................................. 082
Tone/Pulse .............................................................................................. 012
Trip Window ............................................................................................. 006
Trouble Zone Mode ................................................................................. 003
WDSRP Baud Rate ................................................................................. 012
Zone Action Zones 1-8 ............................................................................ 034
Zone Action Zones 9-16 .......................................................................... 035
Zone Action Zones 17-24 ........................................................................ 036
Zone Action Zones 25-32 ........................................................................ 037
Zone Alarm Report Zones 1-8 ................................................................ 054
Zone Alarm Report Zones 9-16 .............................................................. 055
Zone Alarm Report Zones 17-24 ............................................................ 056
Zone Alarm Report Zones 25-32 ............................................................ 057
Zone Alarm Restoral Zones 1-8 .............................................................. 058
Zone Alarm Restoral Zones 9-16 ............................................................ 059
Zone Alarm Restoral Zones 17-24 .......................................................... 060
Zone Alarm Restoral Zones 25-32 .......................................................... 061
Zone Bypass Zones 1-8 .......................................................................... 042
Zone Bypass Zones 9-16 ........................................................................ 043
Zone Bypass Zones 17-24 ...................................................................... 044
Zone Bypass Zones 25-32 ...................................................................... 045
Zone Bypass Report Zones 1-8 .............................................................. 070
Zone Bypass Report Zones 9-16 ............................................................ 071
Zone Bypass Report Zones 17-24 .......................................................... 072
Zone Bypass Report Zones 25-32 .......................................................... 073
Zone Bypass Restoral Report Zones 1-8 ............................................... 074
Zone Bypass Restoral Report Zones 9-16 ............................................. 075
Zone Bypass Restoral Report Zones 17-24 ........................................... 076
Zone Bypass Restoral Report Zones 25-32 ........................................... 077
Zone Output Zones 1-8 ........................................................................... 038
Zone Output Zones 9-16 ......................................................................... 039
Zone Output Zones 17-24 ....................................................................... 040
Zone Output Zones 25-32 ....................................................................... 041
Zone Partitioning Assignment Zones 1-8 ................................................ 050
Zone Partitioning Assignment Zones 9-16 .............................................. 051
Zone Partitioning Assignment Zones 17-24 ............................................ 052
Zone Partitioning Assignment Zones 25-32 ............................................ 053
Zone Restore Control .............................................................................. 002
Zone Trouble Report Zones 1-8 .............................................................. 062
Zone Trouble Report Zones 9-16 ............................................................ 063
Zone Trouble Report Zones 17-24 .......................................................... 064
Zone Trouble Report Zones 25-32 .......................................................... 065
Zone Trouble Restoral Zones 1-8 ............................................................ 066
Zone Trouble Restoral Zones 9-16 .......................................................... 067
Zone Trouble Restoral Zones 17-24 ........................................................ 068
Zone Trouble Restoral Zones 25-32 ........................................................ 069
Zone Type Zones 1-8 .............................................................................. 030
Zone Type Zones 9-16 ............................................................................ 031
Zone Type Zones 17-24 .......................................................................... 032
Zone Type Zones 25-32 .......................................................................... 033
Copyright © 2001 Detection Systems, Inc.
DS7080iP-32 Reference Guide
14.0
Troubleshooting Guide
#87 Display “AC Power Failure”
1. Not enough AC voltage or current load
too great for transformer.
1. Make sure proper transformer is used
(see AC Input note in Section 3.0).
2. AC not present.
2. Make sure panel is not connected to a
switched outlet that has been turned off.
3. Blown transformer fuse. Replace
transformer.
4. Load too great for transformer. Place
meter on AC scale and select the correct
setting for A or mA. Place meter wires in
correct position for A or mA scale.
Disconnect one side of the AC and place
your meter in series with the transformer
and panel. Current draw should not
exceed 2 Amps under load.
3. No AC out of transformer.
#87 Display “ Battery Trouble”
1. Battery low or missing.
1. Replace or reconnect battery.
After replacing battery perform a System
Reset to see if it will restore. Battery may
take some time to charge.
Battery should be load tested prior to
installation.
Keypad displays “Control Trouble # 87”
but command does not work.
#87 display “Keypad Fault”
1. More than one keypad shares the same
address.
1. Correctly set address jumper(s) for that
keypad.
2. Set for commercial mode.
2. PIN required before #87.
3. Keypad yellow wire missing or shorted.
3. Check keypad wiring
1. Keypad Yellow, Green or Red wire
missing from another keypad
1. Check keypad wiring.
This will not display if this is the
faulted keypad. It is intended to show
status on other keypads.
Keypad displays “DSI Version 2.00
Copyright 1994” or alpha locked up.
1. LCD keypad has been programmed as
an LED keypad.
1. Get into programmers mode by using
programmers code. No visual indication
will be given.
Press [0] [0] [7] followed by the correct
data digits as shown in Address 007; end
with [#]. Keypad alpha should restore.
Keypad displays “Not programmed see
install guide”
#87 displays “Zone Trouble” followed by
zone number.
Refer to “System Faults” for Trouble Zone
trouble shooting.
1. Address jumper not set on keypad.
1. Set address jumper on keypad.
2. Not programmed.
2. Check Program Address 007.
1. Zone is in trouble.
1. Check loop wiring.
Normal loop voltages should read as follows:
Check loop Programming Address 034-037.
short = 0.00 - 1 Vdc
normal = 2.5 - 4.5 Vdc
open = 6 - 7 Vdc
Trouble zone not activating.
Not enabled or wired incorrectly.
Remember N/O devices are alarm
on short, trouble on open. N/C
devices are alarm on open, trouble
on short.
Check Program Address 003.
Check wiring.
DS7080iP-32 Reference Guide
Copyright © 2001 Detection Systems, Inc.
P/N 39818D
Page 55
#87 Displays “Communicator Err”
Automatic Test report not sent.
1. Ground Star t phone line. (Normal
operation referred to as loop start)
1. Requires phone line to short to ground
to access dial tone.
See address 009. See Section 6.2
Ground Start Timer for connection
and explanation on ground start
lines.
2. PBX phone system
PBX: where a number needs to be dialed
to get dial tone. Example: dial (9) followed
by phone number.
2. Check Address 012.
Should be programmed as “Dial Tone on
all phone numbers”.
3. Phone number incorrect or not
programmed.
3. Check Addresses 017-020.
PBX systems may require a 3 second
delay after dialing the first digit.
4. No account number or repor ts are
incorrect.
4. Check to make sure account codes are
programmed, reports are enabled and
routed correctly. Check Addresses 013014 and 054-082 and 117-123.
5. Account codes not properly programmed
for selected format.
5. Check account number (s) and make
sure they are correct for format (s)
selected. Fourth digit in a three digit
format must be 0.
6. RJ-31X jack wired incorrectly. Note:
Typical voltage with no one on-line is 4055 Vdc. With some one on line it is
typically 5-13 Vdc. TIP is positive.
6. Disconnect house phones at Terminals
28 & 29. If dial tone is not present at panel
anymore the street and house lines may
be reversed.
7. Phone line problem
7. Call receiver number with handset to see
if receiver picks up.
1. Time and Date not set.
1. Set time and date. (Can be lost due to
power loss).
2. Report not programmed.
2. Check Address 082.
3. Not programmed to send.
3. Check Address 024 and 025.
Make sure panel is communicating
normally.
1. Not programmed to send.
1. Check Address 078 . Also check
Addresses 078, 013, 014, 015 and 016.
2. Arming system perimeter only or have
bypassed or forced armed system.
2. Does not send reports for perimeter
arming. Will send open close reports
along with trouble for bypass or force
armed zones. Address 011.
Keypad Display “System Fault” sounder is
on or keypad not operating.
1. Keypad wiring error. Green and any other
color keypad wire shorted together or
green wire cut or missing.
1. Check keypad wiring.
#87 Displays “EEPROM FAULT”
1. While in programmers mode lost power.
1. Try to clear by entering and exiting
programmers mode.
2. Internal problem with EEPROM memory.
2. Cycle Panel power.
Open / Close reports not sent.
# 87 Displays “Ram Fault” or “ROM Fault”
Page 56
P/N 39818D
Check EPROM for proper
placement, bent, or mis-inserted
pins. Do not touch while panel is
powered up.
Copyright © 2001 Detection Systems, Inc.
3. If error persists default the panel and
reprogram. See Address 124.
4. If error still persists, replace panel.
DS7080iP-32 Reference Guide
#87 Displays “System Fault” “Trouble
Zone Fault” sounder not on and keypad
operating fine.
1. Trouble zone activated.
With all power removed and after
you have grounded yourself,
visually check EEPROM for bent or
misaligned pins.
1. Check Trouble zone wiring.
2. Check programming in Address 008.
This is an unsupervised connection
and should only be used as a
trouble indication for tamper
devices. Differs from actual zone
trouble.
Keypad blank. AC and battery power is good.
2. Keypad wiring fault
1. Power down and let stand for a few
minutes. Reapply power. Check wiring for
fault.
2. Check wiring for fault.
Bypass does not work
1. Zone not programmed for bypass.
1. Check Address 042-045.
Interior zones do not send alarms.
1. Programmed as a Home / Away zone.
1. You must first violate an entry/exit delay
zone during exit delay.
2. Zone is cross-zoned with another zone
and the other zone has not activated or
activated within programmed window.
2. Check Addresses 005 and 006.
3. System perimeter armed.
3. Arm system using ON key.
1. Programmed as an interior zone.
1. Chime mode only works for perimeter
zones. Also, if the zone has trouble
enabled, it will not activate on a trouble
condition. Check Address 034-037.
2. Chime mode not on.
2. Activate chime mode. [PIN] + [7].
1. Zone programmed as a “ Keyswitch On/
Off”
1. Check Address 034-037.
2. Panel in Residential mode.
2. Does not require PIN to arm.
3. Invalid PIN or does not have authority.
3. Refer to Section 7.4.
4. A zone is programmed as an invisible
zone and is violated.
4. Find violated zone and restore.
To see if an invisible zone is violated enter
[PIN] + [#]. Most likely a panic device.
Check Address 034-037.
1. Programmed as silent output or the
programmable output is not programmed
to follow correct parameters.
1. Check Addresses 038-041 and 009.
2. Alarm output or PO 1, 2 wired incorrectly.
2. Check connections on Terminals 4,5,6,
and 14, see Section 3.0. Observe
polarity.
Check field wiring.
Events not logged in history buffer.
1. Not programmed to store those types of
events.
1. Check Address 027 . Panel can be
programmed not to store certain events.
Zone sends trouble signal when disarmed.
1. Programmed as a Day Monitor with
trouble report.
1. Day Monitor can send a trouble report if
desired. See Address 062-065.
2. Zone programmed for trouble.
2. Check loop wiring. (see zone trouble)
Chime mode does not work when Zone (s)
is faulted.
Keypad displays “Ready To Arm” and can
not arm system. “Entry Error Please Try
Again.”
Zone alarm is sent and keypad displays
alarm but no output present.
DS7080iP-32 Reference Guide
1. Aux. power shorted.
Copyright © 2001 Detection Systems, Inc.
P/N 39818D
Page 57
Index
Symbols
24-Hour Zone 10, 32
3/1 36
3/1 with Parity 36
3/1E 36
3/1E with Parity 36
4/1 36
4/2 36
4/9 Format 52
60Hz/50Hz 24
A
A Key 12
AC Failure Report 14
AC Failure Restoral Report 14
AC Power Failure 20
AC Report Delay 31
AC/Battery Reports 38
Access Control 1
Access Output 11
Access PIN 18
Account Codes 28
Ademco AB-12 Bell/Housing 46
Alarm, Invisible 10
Alarm, Keypad Emergency 13
Alarm, Keypad Fire 13
Alarm on Open 10
Alarm on Short 10
Alarm, Silent 10
Allow All Arming Levels 24
Allow Swinger Shunts 12
Alpha Labels 39
Alternate between both Phone Numbers 12
Answering Machine Bypass 13
Arm Only PIN 18
Arming
Custom 1, 11, 12, 35
Delayed 1
Force 1, 13
Level 6 11
Maximum Security 1, 11
Normal 1, 11
Perimeter 1, 11
Perimeter Instant 11
Arming Controls 26
Arming Mode 26
Authority Levels 18
Auto Test 30, 31
Automatic Comm. Test Report 14, 38
Automatic Test Report 13
Aux Power Fault 20
Chime Mode 1
Clear Zone Bypass 1
Close Report 12, 14
Closing Ring-Back 11, 24
Comm. Fail 30
Commercial Arming Mode 26
Communicator Error 20
Communicator Test 1, 22
Cross-Zoning 9, 25
Custom Arming 1, 11, 12, 35
D
Day Monitor 10, 12
Day Monitor Zone 33
Default Programming 41
Delayed Arming 1
Delayed Zone 33
Delayed Zone Alarm 11
Dial Attempts 30
Dial Pulse on all Phone Numbers 13
Dial Tone on all Phone Numbers 13
Dialer Delay 13
Disabled Zone 32
Display Language 26
DS7488 Octal Relay 9
Duress PIN 18
Duress Report 14
E
Enable Remote Programmer Callback 13
Enable/Disable Partitioning 24
Enclosure 4, 5
Entry Delay Timers 13
Entry/Exit Delay 10, 13
Error Display 1
Error Display Reset 1
Escape Plan 16
Event History Readback 1, 22
Event History Readback Control 14
Exit Delay Timers 13
Exit Error Report 14, 38
F
Fire Key 12
Fire Reset 1
Fire Trouble 1
Fire Zone 10, 11
Fire Zone with Verification 10, 33
Fire Zone without Verification 33
First Open After Alarm Report 14
Force Arming 1, 13
Force Arming Limit 24
French 12
Language 26
Latch ON Any Burglar Alarm 11
Level 6 Arming 11
Local Battery/Sounder Test 1
Local Burglary Alarm 43
Local Programming Successful Report 14
Local Programming Unsuccessful Report 14
Low Battery Report 14
Low Battery Restoral Report 14
M
Manual Comm. Test Report 14, 38
Master PIN 18
Maximum Security Arming 1, 11
N
NFPA Standard 16
Normal Arming 1, 11
O
P
General Control 24
General PIN 18
Grade A Household Burglary Alarm 43
Ground Start 11
P/N 39818D
L
I
B Key 12
Battery / Sounder Test 21
Battery Test 1
Battery Trouble 20
Bell Cut-off timers 13
Burglar Zone 11
Burglar Zone Delayed by 20 seconds 11
Bypass Restoral Reports 37
Bypassing Allowed 10
Page 58
Key, Fire 12
Key, Panic 12
Key, Special Emergency 12
Keypad Assignment 12, 26
Keypad Current 4
Keypad Emergency Alarm Report 13
Keypad Fault 20
Keypad Fire Alarm Report 13
Keypad Fire Restoral Report 13
Keypad Language 12
Keypad Panic Report 13
Keypad Reports 32
Keypad Sounder Output 11
Keypad Tamper 25, 32
Keyswitch Input 10
Keyswitch On/Off Zone 33
Keyswitch Output 34
Keyswitch Toggle Zone 33
HEX character 23
History Controls 31
G
C Key 12
California March Time 11
Central Station Burglary Alarm 45
Change Partitions 1
K
Octal Relay 9
Octal Relay and Control Report 14
Octal Relay Control and Reports 40
ON during Entry Pre-Alert 11
On for 8 seconds 11
ON when System is Armed 11
Open Report 12, 14
Open/Close Reports 38
Operating Temperature 4
Output Programming 11, 26
Output Type 34
Invisible 34
Keyswitch allows Force Arming 34
Keyswitch does not allow Force Arming 34
Pulsing Alarm 34
Silent 34
Steady Alarm 34
B
C
Interior Instant 10
Interior Instant Zone 33
Invisible Alarms 10
Invisible Zone Output 34
H
Interior
Interior
Interior
Interior
Interior
Delay 11
Delay Zone 34
Entry/Exit Follower 10, 33
Home/Away 10
Home/Away Zone 33
Copyright © 2001 Detection Systems, Inc.
Panic Key 12
Partial Close Report 14
Partition 18
Partition 1 Account Codes 28
Partition 2 Account Codes 28
DS7080iP-32 Reference Guide
Partitioning 24
Perimeter Arming 1, 11
Perimeter Follower Homeguard 11
Perimeter Follower Homeguard Zone 34
Perimeter Homeguard 11
Perimeter Homeguard Zone 34
Perimeter Instant 10
Perimeter Instant Arming 11
Perimeter Instant Zone 32
Personal Identification Numbers 18
Phone # 1 Format 29
Phone # 2 Format 29
Phone Answering Programming 13
Phone Controls 28
Phone Numbers 30
PIN 18
PIN Authority Levels 18
Point Expansion Module Fault Report 14, 40
Point Expansion Module Fault Restoral Report
14, 40
Point Expansion Module Missing Report 14, 39
Point Expansion Module Missing Restoral Report
14, 39
Point Expansion Module Tamper Report 14, 40
Point Expansion Module Tamper Restoral Report
14, 40
Police Station Connection 44
Power 4
Programming Addresses 54
Programming the DS7080iP-32 23
Pulsing Fire Zone 11
Pulsing Zone Output 34
Q
Quick Arming Mode 26
R
Recent Closing Report 14, 38
Remote Program Answer 1, 20
Remote Program Dial-Out 1, 20
Remote Programmer Call-Out Day 30
Remote Programmer Call-Out Time 31
Remote Programmer Callback 13
Remote Programming Successful Report 14
Remote Programming Unsuccessful Report 14
Remote/Local Programming Reports 38
Removing a PIN 18
Report Controls 27
Reports 13, 36
AC Failure 14
AC Failure Restoral 14
AC/Battery 38
Automatic Comm. Test 14, 38
Automatic Test 13
Bypass Restoral 37
Close 12, 14
Duress 14
Exit Error 14, 38
First Open After Alarm 14
Keypad Emergency Alarm 13
Keypad Fire Alarm 13
Keypad Fire Restoral 13
Keypad Panic 13
Local Program Successful 14
Local Program Unsuccessful 14
Local Programming Successful 38
Local Programming Unsuccessful 38
Low Battery 14
Low Battery Restoral 14
Manual Comm. Test 14, 38
Octal Relay and Control 14
DS7080iP-32 Reference Guide
Open 12, 14
Open/Close 38
Partial Close 14
Point Expansion Module Fault 14, 40
Point Expansion Module Fault Restoral
14, 40
Point Expansion Module Missing 14, 39
Point Expansion Module Missing Restoral
14, 39
Point Expansion Module Tamper 14, 40
Point Expansion Module Tamper Restoral
14, 40
Recent Closing 14, 38
Remote Program Successful 14
Remote Program Unsuccessful 14
Remote Programming Successful 38
Remote Programming Unsuccessful 38
System Test 14, 38
System Test Restoral 14, 38
System Trouble 14, 38
System Trouble Restoral 14, 38
Trouble Restoral 37
Zone Alarm 13, 36
Zone Alarm Restoral 13
Zone Bypass 13, 37
Zone Bypass Restoral 13
Zone Restoral 36
Zone Trouble 13, 37
Zone Trouble Restoral 13
Residential Arming Mode 26
Restore when Sounders Silence 12, 24
Restore when System is Disarmed 12, 24
Restore when Zone Restores 12, 24
Ringer Equivalence 4
S
Send Bypass at Close for Bypassed Zones 12
Setting the Date 17
Setting the Time 17
Silent Alarms 10
Silent Zone Output 34
Siren on Comm. Failure 12, 24
Spanish 12
Special Emergency Key 12
Special Keys 31
Steady Zone Output 34
Swinger Shunt 12, 24
Switch to Pulse 13
System Fault 20
System Reset 11
System Status 11
System Test Report 14, 38
System Test Restoral Report 14, 38
System Timers 13
System Trouble Report 14, 38
System Trouble Restoral Report 14, 38
Unlimited PIN 18
User Control 27
User Number 18
Z
Zone 9
Type
24-Hour 10, 32
Burglar 11
Day Monitor 33
Disabled 32
Entry/Exit Delay #1 33
Entry/Exit Delay #2 33
Fire Zone with Verification 33
Fire Zone without Verification 33
Interior Delay 34
Interior Home/Away 33
Interior Instant 33
Keyswitch On/Off 33
Keyswitch Toggle 33
Perimeter Follower Homeguard 11, 34
Perimeter Homeguard 11, 34
Perimeter Instant 32
Trouble 9
Zone Action 34
Zone Alarm 11
Zone Alarm Report 13, 36
Zone Alarm Restoral Report 13
Zone Bypass 1, 35
Zone Bypass Report 13, 37
Zone Bypass Restoral Report 13
Zone Partition Assignment 26, 35
Zone Programming 10
Zone Restoral Reports 36
Zone Restore 24
Zone Test 1, 21
Zone Trouble 20
Zone Trouble Report 13, 37
Zone Trouble Restoral Report 13
Zone Type 24, 32
T
Temporal 11
Temporary PIN 18
Terminal Wiring 6
Test Reports 38
Time Delays 27
Trip window 25
Trouble on Open 10
Trouble on Short 10
Trouble Restoral Reports 37
Trouble Zone 9
U
UL Listings 42
Copyright © 2001 Detection Systems, Inc.
P/N 39818D
Page 59
Detection Systems, Inc. 130 Perinton Parkway
Fairport, New York, USA 14450-9199
(585) 223-4060 • (888) 289-0096 • Fax: (585) 223-9180
Copyright © 2001 Detection Systems, Inc.
DS7080iP-32 Reference Guide
P/N: 39818D 11/01 Page 60