1
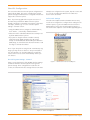
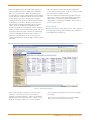
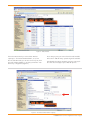
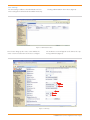
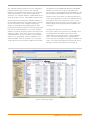
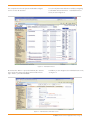
Application Note
ST-10070
April 16, 2008
ShorePhone IP 8000 Conference Phone Configuration Guide
This application note provides the details on adding the IP 8000 conference phone to the ShoreTel Unified
Communications system as a SIP device configured as a system extension. This information applies to
ShoreTel Release 8.0 only – previous releases of ShoreTel require this phone to be configured using SIP
trunks.
Table of Contents
Overview
1
Sites Settings
5
Requirements and Limitations
1
Creating User Extension for SIP Device
6
ShoreTel Requirements
1
IP 8000 Configuration
8
Known Limitations
1
ShoreTel System Settings – General
8
Configuration Overview
1
Retrieving IP Address 8
ShoreTel Configuration
2
Connecting to the IP 8000 Web Interface
8
ShoreTel System Settings - General
2
General Configuration
10
Call Control Settings
2
SIP Configuration
11
Switch Settings
3
Overview
This document describes how to integrate the ShorePhone®
IP 8000 conference phone into the ShoreTel® IP Unified
Communications System.
Requirements and Limitations
The following requirements are necessary to integrate an IP
8000 conference phone to the ShoreTel Unified Communications system.
ShoreTel Requirements
• ShoreWare® Server Software, ShoreTel release 8.0.
• A single ShoreWare SIP device license is required in
addition to an extension only or extension and mailbox
license.
• SIP Proxy resources on ShoreGear® switch
• The IP 8000 must be upgraded to version 2.6.1 (7) or
newer. Please visit www.shoretel.com/support to obtain a
copy of this firmware.
Known Limitations
• Unable to initiate “Make Me” conferences, only supports 3
party conferences. ShoreTel’s Personal Call Manager
application can be associated with the IP 8000 device
allowing it to participate in 6 party “Make Me” conferences.
• Call Transfer is not supported from the phone interface.
Configuration Overview
The following steps are required to configure the IP 8000
conference phone to work with the ShoreTel system:
1. Configure General ShoreTel system settings
a. Call Control Options, Switch and Site settings
b. Create a SIP Individual User extension
2. Configure the IP 8000 to function with the ShoreTel system
ShoreTel Configuration
This section describes the ShoreTel system configuration to
support the IP 8000. The section is divided into general
system settings and individual user configuration needed to
support the conference phone.
Note: If you have upgraded from a previous version of
ShoreTel and you had the IP 8000 conference phone
already configured in a SIP Trunk environment, follow these
next steps, otherwise go on to the “ShoreTel System
Settings – General” section:
• Using ShoreWare Director, navigate to “Administration”,
then “Trunks…”, followed by “Individual Trunks”.
already been configured on the system, skip this section and
go on to the “Creating User Extension for SIP device”
section of this document.
Call Control Settings
The Call Control Options within ShoreWare Director may
need to be reconfigured. To configure these settings for the
ShoreTel system, log into ShoreWare Director and select
Administration, Call Control and then Options (Figure 1).
The “Call Control / Options” screen will then appear (Figure 2).
• Delete ALL of the individual trunks that are currently in use
by the IP 8000 conference phone.
• If you plan on using the extension number currently
assigned to the IP 8000, navigate to the SIP “Trunk
Group” for the IP 8000 and edit the Off System Extension
(OSE) range, to either delete the extension number or edit
the range to exclude the number.
Note: If you don’t plan on using the SIP “Trunk Group” any
longer you may choose to delete it. Keep in mind that if
any “User Groups” are currently utilizing it, you will first
need to remove access to the “Trunk Group” before you
can delete it.
ShoreTel System Settings - General
If this is a new deployment of the IP 8000, the first settings
to address within the ShoreTel system are the general
system settings. These configurations include the call
control, the switch and the site settings. If these items have
Figure 1 – Administration Call Control/Options
Figure 2 – Call Control/Options
IP 8000 Conference Phone Application Note—Page 2
• If this is an upgrade from previous ShoreTel versions you
may see a parameter named “Always Use Port 5004 for
RTP”, if so, you will need to disable this parameter (by
un-checking box), save the setting change. When enabled,
the SIP extension configuration will fail, it is also important
to note that this “one time” setting requires a system
restart (all servers first, then, ShoreGear switches followed
by IP Phones) to take effect. Once the server has been
restarted, this configuration parameter will no longer be
visible. This does not apply to new installations and
therefore the parameter is not visible (as shown in Figure 2).
• Realm: The realm is used in authenticating all SIP devices. It
is typically a description of the computer or system being
accessed. Changing this value will require a reboot of
switches hosting SIP extensions. It is not necessary to
modify this parameter to get the IP 8000 conference phone
functional.
• SIP session interval: Session interval value indicates the
session (call) keep alive period. There is no need to modify
the default value of “3600” seconds.
• SIP session refresher: Refresher setting decides if the user
agent client or the user agent server refreshes the session.
Again, there is no need to modify the default value of
“Caller (UAC)”. This allows the IP 8000 to be in control of
the session timer refresh.
Switch Settings
Next allocate switch ports for SIP extensions. These changes
are modified by selecting “Administration” then “Switches”
in ShoreWare Director (Figure 3).
10.11.12.123
10.11.0.123
10.11.123.246
10.11.12.123
10.11.0.123
10.11.123.246
10.11.123.246
10.11.123.246
10.11.123.246
10.11.12.123
10.11.123.246
Figure 3 – Administration/Switches
This action brings up the “Switches” screen. From the
“Switches” screen select the name of the switch to
configure. The “Edit ShoreGear …Switch” screen will be
displayed. Within the “Edit ShoreGear …Switch” screen
assign the Port Type Setting of one or more available
ports “100 SIP Proxy”(Figure 4), then save the configuration change.
Note: Each port provides proxy resources for 100 SIP
devices. Select as many ports as necessary.
IP 8000 Conference Phone Application Note—Page 3
Figure 4 – Edit Switches
If the ShoreGear switch you selected has “Built In”
capacity (i.e. ShoreGear 50/90/220T1/E1, etc.) for IP
Phones and SIP Trunks you can also remove 5 ports, from
the total number available, to provide you with the “100
SIP Proxy” configuration (Figure 5).
Note: Every 5 ports you remove from the total available
will result in “100 SIP Proxy” ports being made available.
A dedicated ShoreGear 120 switch can act as a proxy for
the entire site and support up to 2400 SIP phones.
10.260.100.500
+1 (616) 234-5678
Figure 5 – ShoreGear Switch Built-in Capacity
IP 8000 Conference Phone Application Note—Page 4
Sites Settings
The next setting to address is the administration of sites.
These settings are modified under ShoreWare Director by
selecting “Administration” then “Sites” (Figure 6).
Figure 6 – Administration/Sites
This selection brings up the “Sites” screen. Within the
“Sites” screen select the name of the site to configure.
The “Edit Site” screen will appear. Scroll down to the “Sip
Proxy” parameters (Figure 7).
Figure 7 – SIP Proxy
IP 8000 Conference Phone Application Note—Page 5
The “Virtual IP Address” parameter is a new configuration
parameter with ShoreTel’s release 8. This “Virtual IP
Address” is an IP address that can be moved to a different
switch during a failure. For each site that supports SIP
extensions, one “Virtual IP Address” is defined that will act
as the SIP Proxy for the site. This IP address must be static.
The ShoreTel server will assign this “Virtual IP Address” to
the ShoreGear switch that is configured as SIP proxy for the
site. Two ShoreGears can be configured as SIP proxy
switches for redundancy and reliability purposes. If the
primary proxy switch goes down, the other proxy switch will
take over the “Virtual IP Address”. Due to this “Virtual IP
Address” mechanism, SIP phones will not know if the proxy
switch goes off-line. Note: If you choose not to define a
“Virtual IP Address” you can only define one Proxy Switch
and there is no redundancy, or failover capabilities. The
switches available in the “Proxy Switch 1 / 2” will only be
shown if proxy resources have been enabled on the switch.
The Admission Control Bandwidth defines the bandwidth
available to and from the site. This is important as SIP
devices may be counted against the site bandwidth. See the
ShoreTel Planning and Installation Guide for more information.
ShoreTel’s release 8 now adds 13 codecs by default, these
codecs can be grouped as “Codec Lists” and defined in the
sites page for “Inter-site” and “Intra-site” calls. See the
ShoreTel release 8 Server Notes for more information. The
default settings will work properly with the IP 8000 conference phone.
Creating User Extension for SIP Device
You need to create a user extension for the IP 8000. This is
accomplished from ShoreWare Director by selecting
“Administration” followed by “Users…” then “Individual
Users”. This action will bring up the “Individual Users”
screen, at the top of the page, to the right of “Add new user
at site:” select the desired site (from the drop down menu)
where the user will reside and select “Go” (Figure 8).
Figure 8 – Trunk Groups Settings
IP 8000 Conference Phone Application Note—Page 6
This action brings up the “Users” “Edit Users” screen (Figure 9).
Figure 9 – Adding Users
Define the “First Name” and “Last Name” as you deem
appropriate. ShoreWare Director will auto-assign the next
available “Number” (i.e. extension), you can modify it to
any available extension. Define the “License Type” as
needed, in this example we chose “Extension and
Mailbox” although it’s not necessary to have a mailbox.
Define the proper “User Group” and set the “Home Port”
to “Any IP Phone”. Save your changes, then scroll down
to the “SIP Password:” section (Figure 10).
Figure 10 – Individual User SIP Settings
IP 8000 Conference Phone Application Note—Page 7
There is no default “SIP Password”, it is masked with the
appearance that there is, but don’t be confused to think
that there’s a default password. You can modify it to any
value you wish, remember this password as you will need
it when configuring the IP 8000 SIP parameters. Save
your changes.
This completes all of the ShoreTel configuration parameters necessary to install the IP 8000 Conference phone
at the Headquarters site (HQ)
If the IP 8000 is being installed at a remote site, you will
also need to create an “IP Address Phone Map”. You can
do so via ShoreWare Director, navigate to the “Administration”, “IP Phones…”, “IP Address Phone Map” screen,
then add an entry for the desire site, with the IP address
of the IP 8000 conference phone.
Note: You may have noticed that ShoreWare Director’s
“Call Control…” section contains a “SIP Profiles” option.
ShoreTel’s release 8 comes standard with a “_System”
and “_ShorePhone IP 8000” SIP profiles, they cannot be
deleted (only disabled). The IP 8000 conference phone
utilizes the “_ShorePhone IP 8000” profile, there is no
need to add a custom profile, do not disable this profile
(or the “_System” profile), otherwise the IP 8000 will not
be added to the ShoreTel system. Refer to the ShoreTel’s
release 8 Server Notes for more information.
IP 8000 Configuration
ShoreTel System Settings – General:
• Refer to the Quick Reference card for detailed information on connecting the required Ethernet cable with PoE
to the unit.
–– Preferences (Menu 1 of 4)
* Location: default setting is United States. If you
wish to change it press the
button, then
use the volume buttons to scroll to the desired
setting, press the
button when you’ve
selected the correct option. Follow this
procedure for changing all of the options.
Press the volume button, negative side (-), to
scroll down to the next option.
* Admin Password: default setting is 1234.
Change this if desired.
–– Preferences (Menu 2 of 4)
* System Name: default setting is ShoreTel. This
is typically set to the name of the room in
which the conference phone is deployed or
some other meaningful value. It can be
changed here or later using the Web interface.
Scroll down to the next option.
* Phone Number: No default value (blank). This
is best set via the Web interface later. Scroll to
the next option.
–– Preferences (Menu 3 of 4)
* DHCP: default is enabled. If static IP configuration is desired, be sure to disable DHCP, and
then scroll down.
* IP Address: no default value (null). Enter a
value if needed and then scroll down to the
next parameter.
* Subnet Mask: default is 255.255.255.0, Change
as needed and scroll down to the next parameter.
–– Preferences ( Menu 4 of 4)––
• After applying power for the 1st time or after a reset to
factory settings, the IP 8000 will require configuration of
its locale and network settings.
* Default Gateway: default is a NULL value.
Configure if necessary and scroll down to the
next option.
• First of all, the preferred language needs to be set. The
languages are selected by pressing one of the digit keys
as shown on screen e.g. to select English, press the digit 2.
* Host Name* : default is NULL. Once you’ve
configured these options, scroll down to the
Save Settings prompt and press the button.
• The LCD display will then show a heading of Initial
Configuration and will display the following: “Configure
your ShoreTel IP 8000 for your locale and network.”
Press the
(mute) button to continue to the next
screen.
• The LCD will then display several screens of help text,
starting with an explanation of how the volume button
works, which acts as an up and down scroll button. Press
the mute button to advance. Additional help screens are
then displayed: for the
button, redial button and
how to access the Admin Login after initial configuration
is complete. Advance through the screens by pressing
the
button.
• Next, the Preferences of the phone need to be configured. This process spans 4 menus :
• Additional configuration is required which is best
performed via the Web interface as described below.
Retrieving IP Address
Before connecting to the IP 8000 Web interface, take
note of the IP address of the phone as displayed in the
bottom left corner of the LCD display.
Connecting to the IP 8000 Web Interface
Access the Web interface for the IP 8000 conference
phone by opening a Web browser and entering the IP
address (previously obtained) as follows: http://<IP
address>
Example: http://10.0.1.51
IP 8000 Conference Phone Application Note—Page 8
If you are using Internet Explorer 7, you may be presented
with the following screen when accessing the Web interface
(figure 11), you may get a different certificate warning with
other browsers:
Figure 11 – Internet Explorer 7 Warning
Click on “Continue to this Website (not recommended).” to
proceed. Or if using another browser acknowledge the
message by selecting OK to continue.
prompted to upgrade if your installed version does not
match what is needed for accessing the IP 8000 Web
interface.
Your Web browser may need to be configured to allow
Pop-Ups from the IP 8000 IP address. In addition, it requires
the installation of the Macromedia Flash Player. You will be
Once you acknowledge the certificate, the screen will
update and a “Password” prompt will be presented as
shown in Figure 12.
Figure 12 – IP 8000 Login Screen
IP 8000 Conference Phone Application Note—Page 9
The default password is “1234” unless changed earlier
during initial configuration. Once the password has been
entered the Home page dialog will be displayed as shown
in Figure 13.
Figure 13 – Configuration Startup Screen
General Configuration
The following configuration steps are not mandatory but are
highly recommended.
Navigate to the Preferences/Appearance section of the menu
as shown in Figure 14 and apply the following settings:
1.Set the System Name to a string of your choice e.g. the name
of the conference room in which the phone is deployed.
2.Set the Phone number to the assigned extension for the
phone. This information appears on the Idle display of the
device. This should also be a number (extension) that was
defined in ShoreWare Director for the user created earlier in
the Individual User section.
3.Click on the “Save Changes” button to apply these settings.
Figure 14 – Preferences/Appearance Screen
IP 8000 Conference Phone Application Note—Page 10
SIP Configuration
Navigate to the Preferences/SIP/Server section of the menu
as shown in Figure 15 and apply the following settings:
1.Set the SIP user name to match one of the previously
defined user extension. This will also be the number that is
sent for 911 calls, use caution when defining this value if
you plan on initiating 911 calls from the IP 8000 phone.
2. Set the Authorization Name to match the previously
defined user extension.
3.Set the Authorization Password to match the SIP password
defined for the SIP user defined earlier.
4.Set the SIP Proxy setting to Disabled.
5.Set the SIP Registrar setting to Enabled.
6.Set the registrar host name to the IP address of the
ShoreTel switch that the conference phone will register with.
7.Set the registrar port setting to 5060.
8.Click on the “Save Changes” button to apply these settings.
Upon successful registration, the screen will show “Registrar
Status: Registered”.
If this message does not appear, review the settings on
both the ShoreTel switch and IP 8000 conference phone
respectively.
Figure 15 – SIP Configuration Screen
IP 8000 Conference Phone Application Note—Page 11
This completes the ShoreTel system and IP 8000 configuration for use as a SIP extension.
You can verify that it was added successfully by navigating
to ShoreWare Director’s IP Phone… Individual IP Phones
screen, as seen in Figure 16.
10.31.265.123
10.33.280.187
10.33.270.108
10.33.261.125
10.33.263.129:4040
10.33.269.145:4141
10.33.265.155:3040
Figure 16 – Individual IP Phones
Notice that the “Name” is preceeded with SIP, the “Current
User” will be the extension defined earlier and the “Phone
Type” will be “_ShorePhoneIP 8000”.
In addition you can navigate to the Individual User’s screen,
see Figure 17.
Figure 17 – Individual Users / Edit Users screen
IP 8000 Conference Phone Application Note—Page 12
Notice that the “Current Port:” matches the “Name” that
was added in the Individual IP Phones screen in Figure 16.
Record of Change
This application note is subject to change. Updates and
corrections are always welcome. Please submit any updates
or corrections to [email protected].
960 Stewart Drive Sunnyvale, CA 94085 USA
Phone +1.408.331.3300
Issue
Author
Reason for Change
Date
1.0
J. Rubio
Initial Release
April 16, 2008
+1.877.80SHORE
Fax +1.408.331.3333
www.shoretel.com
Copyright © 2008 ShoreTel. All rights reserved. The ShoreTel Logo, ShoreTel, ShoreCare, ShoreGear, ShoreWare, and ControlPoint are registered trademark of ShoreTel, Inc. in the United States and/or other countries. ShorePhone is a trademark of ShoreTel, Inc. in the
United States and/or other countries. All other marks are the property of their respective owners. Specifications are subject to change without notice. ST-10070_04.08