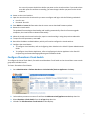
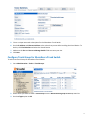
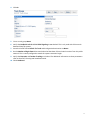
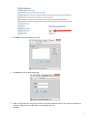
1
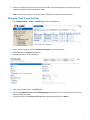
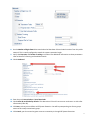
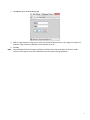
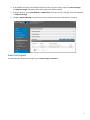
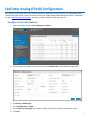
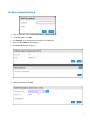
Using FaxFinder® with ShoreTel® Application Notes Using FaxFinder® with ShoreTel® Application Notes ShoreTel Part Number IN-14045, Document Version 0.08 Copyright This publication may not be reproduced, in whole or in part, without prior expressed written permission from Multi-Tech Systems, Inc. All rights reserved. Copyright © 2014 by Multi-Tech Systems, Inc. Multi-Tech Systems, Inc. makes no representations or warranty with respect to the contents hereof and specifically disclaim any implied warranties of merchantability or fitness for any particular purpose. Furthermore, Multi-Tech Systems, Inc. reserves the right to revise this publication and to make changes from time to time in the content hereof without obligation of Multi-Tech Systems, Inc. to notify any person or organization of such revisions or changes. Trademarks Multi-Tech, FaxFinder, and the Multi-Tech logo are registered trademarks of Multi-Tech Systems, Inc. The ShoreTel logo, ShoreTel, ShoreCare, ShoreGear, ShoreWare and ControlPoint are registered trademarks of ShoreTel, Inc. in the United States and/or other countries. ShorePhone is a trademark of ShoreTel, Inc. in the United States and/or other countries. Disclaimer ShoreTel tests and validates the interoperability of the Member's solution with ShoreTel's published software interfaces. ShoreTel does not test, nor vouch for the Member's development and/or quality assurance process, nor the overall feature functionality of the Member's solution(s). ShoreTel does not test the Member's solution under load or assess the scalability of the Member's solution. It is the Member’s responsibility to ensure their solution is current with ShoreTel's published interfaces. The ShoreTel Technical Support organization supports Customers ShoreTel's published software interfaces. This does not imply any support for the Member's solution directly. Customers or reseller partners will need to work directly with the Member to obtain support for their solution. Company Information Multi-Tech Systems, Inc. 2205 Woodale Drive Mounds View, Minnesota 55112 Phone: 763-785-3500 or 800-328-9717 Fax: 763-785-9874 ShoreTel, Inc. 960 Stewart Drive Sunnyvale, California 94085 USA +1.408.331.3300 +1.408.331.3333 fax Contacting Multi-Tech Knowledge Base The Knowledge Base provides immediate access to support information and resolutions for all Multi-Tech products. Visit http://www.multitech.com/kb.go. Support Portal To create an account and submit a support case directly to our technical support team, visit: https://support.multitech.com Support Business Hours: M-F, 9am to 5pm CT Country By Email By Phone Europe, Middle East, Africa: [email protected] +(44) 118 959 7774 U.S., Canada, all others: [email protected] (800) 972-2439 or (763) 717-5863 2 Abstract Integrating the FaxFinder fax server with ShoreTel Voice Switches provides a complete voice and fax telephony solution. This document describes how to integrate the ShoreTel Voice Switch with the FaxFinder fax server (FF240-IP or FFx40). It provides product specifics, interoperability test results, typical setup configurations, troubleshooting steps and other important product-related information. Table of Contents Abstract ................................................................ 3 Multi-Tech Overview and Contact Information . 12 Table of Contents ................................................. 3 FaxFinder IP (FF240-IP) Fax Applications ............. 13 Overview ............................................................. 4 Application 1 – One Main Number for Both Voice and Fax – Fax Redirect ........................................ 13 Features and Benefits ........................................... 4 FaxFinder with ShoreTel Voice Switch ................. 4 FaxFinder IP Fax Server (FF240-IP) ........................... 4 FaxFinder Analog Fax Servers (FFx40)...................... 4 Architecture Overview Using FF240-IP................. 5 Call Flow When Receiving Faxes .............................. 5 Call Flow When Sending Faxes................................. 6 Certification and Limitations ................................ 7 Version Support ....................................................... 7 Special considerations ............................................. 7 Certification Testing Results Summary .................. 8 FaxFinder IP (FF240-IP) and T.38 Test Cases ........ 8 FaxFinder IP (FF240-IP) and G.711 Pass Through Test Cases ............................................................. 9 ShoreTel Configuration .......................................... 13 Application 2 – User with a Unique Voice Extension and a Unique Fax Extension ............... 20 ShoreTel Configuration .......................................... 20 Application 2 – Virtual Trunk Switch (alternate configuration) ..................................................... 26 ShoreTel T.38 Configuration ............................... 34 G.711 Pass Through Configuration...................... 36 FaxFinder IP (FF240-IP) Configuration ................. 38 FaxFinder IP Troubleshooting ................................ 40 FFx40 Fax Application ........................................ 41 FaxFinder Analog (FFx40) Configuration ............. 43 Application Note Feedback ................................ 46 FaxFinder IP (FF240-IP) with ShoreTel Virtual Switch Test Cases ............................................... 10 FaxFinder Analog (FF840) and ShoreGear SIP Proxy Switch Test Cases ..................................... 11 3 Overview The FaxFinder fax server is a network-attached device that replaces legacy paper-based fax machines and allows users to send and receive faxes electronically. The FaxFinder can be set up with the ShoreTel system in one of two ways: Application 1: Fax Redirect - One Main Number for Both Voice and Fax Application 2: User with a Unique Voice Extension and a Unique Fax Extension All inbound faxes can be forwarded to the FaxFinder where they can be routed to a user’s email inbox, a network share, or a network printer. Outbound faxes can be submitted via three methods, Multi-Tech’s print to fax client (for Windows), a web browser, or any existing email client. FaxFinder fax servers combine quality hardware and software designed to integrate with existing and new telephony systems and IP-based networks, providing reduced costs while enhancing productivity by sending and receiving faxes using existing email and network resources. Features and Benefits Replaces legacy paper-based fax equipment and expensive online subscription services Centralizes fax operations to the IT server room Supports industry-specific regulations, such as HIPAA and SOX Integrates fax with other applications using the open-source web services API Send outbound faxes electronically using client software (included), web interface, or existing email client Route inbound faxes to email inbox, network folder, or network printer Manage network settings and fax settings using administrative software FaxFinder with ShoreTel Voice Switch When connected to ShoreTel Voice Switch, the FaxFinder functions as a network fax server with two-way fax service. Multiple extension numbers (DID numbers) are dedicated to incoming fax traffic which is routed to FaxFinder. FaxFinder converts the incoming faxes into graphic files that can be sent as email attachments, to a network share, to a printer, or to trash. Because faxes can be delivered as email, the fax recipient can be at any reachable email address. For example, a sales person can receive faxes while traveling by using a regular company fax number and picking up the email messages remotely. Each fax-dedicated extension number can be associated with a particular email address. FaxFinder IP Fax Server (FF240-IP) The FaxFinder IP is a 2-channel SIP Trunk based fax server, which can be upgraded to a 4-, 6-, or 8-channel server based on an organization’s needs. The SIP Trunk implementation is SIP via UDP, supporting T.38 and G.711 media. DID information can be in the “SIP To” header or the“SIP Diversion” header. FaxFinder Analog Fax Servers (FFx40) The FaxFinder analog fax server is available as a 2-port (FF240), 4-port (FF440), or 8-port (FF840) model, ideal for use in applications that include POTS lines, IP Phone systems with analog station ports, and legacy phone systems. Analog fax models can be expanded up to 24-ports using the FaxFinder Expansion Modules (FFEX8 and FFEX16). DID information is obtained via detecting DTMF tones passed to the FaxFinder by the PBX. Architecture Overview Using FF240-IP Call Flow When Receiving Faxes When the ShoreTel system detects that an inbound call from the PSTN is a fax, ShoreTel routes the call to the SIP trunk that exists between ShoreTel and FaxFinder. FaxFinder answers the call and receives the fax. After the fax transmission completes, FaxFinder delivers the received fax document to the defined destination or destinations. Delivery Destinations are defined within the FaxFinder fax server on a per DID (extension) number basis. A DID number can have one or more destination defined, in any combination of the delivery methods (email, writing to a share or sending to a printer), depending on the inbound routing rules. Figure 1 – FaxFinder IP Receiving Fax Call Flow Diagram 5 Call Flow When Sending Faxes FaxFinder users schedule outbound faxes electronically by submitting PDF or TIFF documents via FaxFinder Client Software, email, or web browser. Windows users can use FaxFinder Client software to fax Microsoft Office documents (a print to fax process that converts the document and allows the user to schedule the outbound fax, define fax to contact details, select a cover page, and set other scheduling options). Users on any platform can use any email client or any web browser to schedule outbound faxes. A scheduled outbound fax resides in the FaxFinder fax server’s outbound queue. The FaxFinder fax server processes outbound faxes based on scheduling details defined by the user and by port availability. To initiate the outbound call, the FaxFinder fax server signals to the ShoreTel via the SIP trunk. The ShoreTel system passes the outbound call request to the Public Switched Telephone Network and ultimately to the fax destination (dialed number). After the fax transmission completes, FaxFinder sends a Fax Status report back to the user who submitted the fax (if the user defined this option). Figure 2 – FaxFinder IP Sending Fax Call Flow Diagram 6 Certification and Limitations Version Support Table 1 - Supported Software Versions ShoreTel Version FF240-IP FFx40 14.2 Build 19.43.1700.0 3.2.7 3.2.7 Special considerations When using the FF240-IP, use the T.38 protocol when possible. If the ShoreTel switch does not support T.38, then use the G.711 Pass Through configuration. The following ShoreTel switches do not support T.38 protocol: ShoreGear – 8 ShoreGear – 12 ShoreGear- 120 ShoreGear – T1 ShoreGear – E1 ShoreGear – TW ShoreGear – 24 and ShoreGear – 24a 7 Certification Testing Results Summary FaxFinder IP (FF240-IP) and T.38 Test Cases Table 2 – Basic feature test cases using T.38 trunk configuration ID Name Description 1.1.1 Sending faxes from FaxFinder to fax machine ShoreTel Certification Lab uses the FaxFinder Client to fax Pass to a fax machine using FF240-IP and the ShoreGear SIP Proxy switch. Results 1.1.2 Receiving faxes from fax machine to FaxFinder and fax delivery ShoreTel Certification Lab sends a fax from a fax machine Pass via the ShoreGear SIP Proxy switch to the FF240-IP. Verify that the correct extension digits were received on the FaxFinder and that it correctly routed the fax. Verify that the email with the fax was received. 1.1.3 Sending multi-page documents. ShoreTel Certification Lab uses the FaxFinder Client to Pass send a 10-page fax to a fax machine using FF240-IP and the ShoreGear SIP Proxy switch. Verify that all pages were received and are of good quality. 1.1.4 Receiving multi-page documents. ShoreTel Certification Lab sends a 10-page fax from a fax machine via the ShoreGear SIP Proxy switch to FF240-IP. Verify that all pages were received and are of good quality. Pass 1.1.5 Sending high resolution image documents. ShoreTel Certification Lab uses the FaxFinder Client to send a Hi Resolution Image fax to a fax machine using FF240-IP and the ShoreGear SIP Proxy switch. Verify that the received fax has good image quality. Pass 1.1.6 Receiving high resolution image documents. ShoreTel Certification Lab sends a high resolution fax image from a fax machine via the ShoreGear SIP Proxy switch to FF240-IP. Verify that the received fax has good image quality. Pass 1.1.7 Send and Receive Faxes Simultaneously ShoreTel Certification Lab uses the FaxFinder Client to Pass send a 3-page fax to a fax machine using FF240-IP and the ShoreGear SIP Proxy switch. While the FF240-IP is sending, the ShoreTel Certification Lab also sends a 3page fax from a fax machine via the ShoreGear SIP Proxy switch to the FF240-IP. Verify that all pages were sent and received, and that the quality of each page was good. Table 3 – Fault insertion using T.38 trunk configuration ID Name Description Results 1.2.1 All FF240-IP channels busy All channels busy should result in a busy signal to caller. Pass 1.2.2 IP connectivity failure between IP connectivity failure should result in easily recognizable ShoreGear SIP Proxy switch and symptoms. FF240-IP Pass 1.2.3 SMTP connection failure Pass SMTP delivery failure should not prevent faxes from being transmitted. 8 Table 4 – Voice/Fax Redirect using T.38 trunk configuration ID Name Description Results 1.3.1 Send fax from FF240-IP configured as a SIP server ShoreTel Certification Lab uses the FaxFinder Client to fax to a fax machine using FF240-IP configured as a SIP Server and the ShoreGear SIP Proxy switch. Pass 1.3.2 Receive fax with voice/fax redirect and with FF240-IP configured as a SIP Server With the ShoreTel configured for Voice/Fax Redirect, the ShoreTel Certification Lab sends a Fax from a fax machine via the ShoreGear SIP Proxy switch to the FaxFinder IP. Pass Verify that the correct extension digits were received on the FaxFinder IP, and that it routed the fax correctly. Verify that the email with the fax was received. 1.3.3 Receive voice call with voice/fax redirect With the ShoreTel configured for voice/fax redirect, the ShoreTel Certification Lab makes a voice call to the ShoreTel System and verify that the voice call is routed correctly. Pass FaxFinder IP (FF240-IP) and G.711 Pass Through Test Cases Table 5 – Basic feature test cases, using G.711 Pass Through SIP trunk configuration ID Name Description Results 2.1.1 Sending faxes from FaxFinder to fax machine ShoreTel Certification Lab uses the FaxFinder Client to fax to a fax machine using FF240-IP and the ShoreGear SIP Proxy switch. Pass 2.1.2 Receiving faxes from fax machine to FF240-IP and fax delivery ShoreTel Certification Lab sends a fax from a fax machine via the ShoreGear SIP Proxy switch to the FF240-IP. Verify that the correct extension digits were received on the FF240-IP, and that it routed the fax correctly. Verify that the email with the fax was received. Pass 2.1.3 Sending multi-page documents ShoreTel Certification Lab uses the FaxFinder Client to send Pass a 10-page fax to a fax machine using FF240-IP and the ShoreGear SIP Proxy switch. Verify that all pages were received and are of good quality. 2.1.4 Receiving multi-page documents ShoreTel Certification Lab sends a 10-page fax from a fax machine via the ShoreGear SIP Proxy switch to the FF240IP. Verify that all pages were received and are of good quality. 2.1.5 Sending high resolution image documents ShoreTel Certification Lab uses the FaxFinder Client to fax a Pass high resolution image to a fax machine using FF240-IP and the ShoreGear SIP Proxy switch. Verify that the received fax has good image quality. 2.1.6 Receiving high resolution image ShoreTel Certification Lab faxes a high resolution image from a fax machine via the ShoreGear SIP Proxy switch to documents the FF240-IP. Verify that the received fax has good image quality. 2.1.7 Send and receive faxes simultaneously Pass Pass ShoreTel Certification Lab uses the FaxFinder Client to send Pass a 3-page fax to a fax machine using FF240-IP and the ShoreGear SIP Proxy switch. While the FF240-IP is sending, the ShoreTel Certification Lab also sends a 3-page fax from a fax machine via the ShoreGear SIP Proxy switch to the FF240-IP. Verify that all pages were sent and received, and that the quality of each page was good. 9 FaxFinder IP (FF240-IP) with ShoreTel Virtual Switch Test Cases Table 6 – ShoreTel Virtual Switch ID Name Description Results 4.1.1 Send T.38 fax ShoreTel Certification Lab uses the FaxFinder Client to fax to a fax machine using FF240-IP and the ShoreTel Virtual Trunk Switch. Verify that T.38 protocol was used. Pass 4.1.2 Receive T.38 fax ShoreTel Certification Lab sends a Fax from a fax machine via the ShoreTel Virtual Trunk Switch to the FF240-IP. Verify that the correct extension digits were received on the FF240-IP and that it routed the fax correctly. Verify that the email with the fax was received. Verify that T.38 protocol was used. Pass 4.1.3 Send G.711 Pass Through fax ShoreTel Certification Lab uses the FaxFinder Client to fax to a fax machine using FF240-IP and the ShoreTel Virtual Trunk Switch. Verify that G.711 Pass Through was used. Pass 4.1.4 Receive G.711 Pass Through fax ShoreTel Certification Lab sends a fax from a fax machine via the ShoreTel Virtual Trunk Switch to the FF240-IP. Verify that the correct extension digits were received by the FF240-IP and that it routed the fax correctly. Verify that the email with the fax was received. Verify that G.711 Pass Through was used. Pass 10 FaxFinder Analog (FF840) and ShoreGear SIP Proxy Switch Test Cases Table 7 – Basic feature test cases ID Name Description 3.1.1 Sending faxes from FF840 to fax ShoreTel Certification Lab uses the FaxFinder Client to fax to a fax machine using FF840 and the ShoreGear SIP Proxy machine switch. Pass 3.1.2 Receiving faxes from fax machine to FaxFinder and fax delivery Pass 3.1.3 Sending multi-page documents. ShoreTel Certification Lab uses the FaxFinder Client to send Pass a 10-page fax to a fax machine using FF840 and the ShoreGear SIP Proxy switch. Verify that all pages were received and are of good quality. 3.1.4 Receiving multi-page Documents ShoreTel Certification Lab sends a 10-page fax from a fax Pass machine via the ShoreGear SIP Proxy switch to the FF840. Verify that all pages were received and are of good quality. 3.1.5 Sending high resolution image documents ShoreTel Certification Lab uses the FaxFinder Client to fax a Pass high resolution image to a fax machine using FF840 and the ShoreGear SIP Proxy switch. Verify that the received fax has good image quality. 3.1.6 Receiving high resolution image ShoreTel Certification Lab faxes a high resolution image from a fax machine via the ShoreGear SIP Proxy switch to documents the FF840. Verify that the received fax has good image quality. 3.1.7 Send and receive faxes simultaneously ShoreTel Certification Lab sends a fax from a fax machine via the ShoreGear SIP Proxy switch to the FF840. Verify that the correct extension digits were received on the FF840, and that it routed the fax correctly. Verify that the email with the fax was received. Results Pass ShoreTel Certification Lab uses the FaxFinder Client to send Pass a 3-page fax to a fax machine using FF840 and the ShoreGear SIP Proxy switch. While the FF840 is sending, the ShoreTel Certification Lab also sends a 3-page Fax from a fax machine via the ShoreGear SIP Proxy switch to the FF840.Verify that all pages were sent and received, and that the quality of each page was good. Table 8 – Fault insertion test cases ID Name Description Results 3.2.1 All ports busy on FaxFinder All ports busy should result in a busy signal to caller. Pass 3.2.2 Connectivity failure between ShoreGear SIP Proxy switch and FF840 Connectivity failure should result in easily recognizable symptoms. Pass 3.2.3 SMTP connection failure SMTP delivery failure should not prevent faxes from being Pass transmitted. 11 Multi-Tech Overview and Contact Information Multi-Tech Systems manufactures award-winning external and embedded modems and Unified Communications products that allow users to connect data over cellular and analog networks from anywhere in the world. As an industry leader for over 40 years, Multi-Tech's reputation for reliability and innovative design is evident with 80+ patents, 20+ million devices being used by thousands of customers worldwide, and certifications from more than 30 carriers and over 80 countries. For general sales questions, please contact your reseller or contact Multi-Tech Systems directly at 800.328.9717 12 FaxFinder IP (FF240-IP) Fax Applications Application 1 – One Main Number for Both Voice and Fax – Fax Redirect In this application, one main number receives all fax and voice communications. The ShoreTel system manages all incoming fax communications, routing them via SIP Redirect Method to the FaxFinder 240-IP. The FaxFinder then routes the fax according to the FaxFinder’s inbound routing configuration. Note: Enable a ShoreGear SIP Proxy switch to be the SIP proxy for the site where you want to add the SIP UM server. This switch is referred to as the site SIP proxy switch. ShoreTel Configuration Use this section describes the ShoreTel system configuration to support Voice/Fax Redirect using the FaxFinder IP. Follow configuration steps in the order listed. Configuring the SIP Profile The first step is to configure the SIP Profile settings for the ShoreTel system: 1. Go to Administration > SIP Servers > SIP Profiles. 2. Click New to enter SIP Server information. 3. Enter the SIP profile information as desribed in the SIP Profile Details table. Fields are case sensitive. 13 4. Save changes. Note: Do not disable the default SIP Profiles. Disabling the system profiles may keep ShoreTel from adding FaxFinder to the system. Refer to the ShoreTel Administration Guide for more information. SIP Profile Details Field Description Name Label the Director uses to refer to the profile User Agent The name ShoreWare uses to identify devices covered by the profile. SIP servers do not use this. Required, you can’t save the profile without a value in this field. You can define it as period asterisk (.*). Priority Lists the profile status. Leave the default value of 100. Enabled Check this box to enable the profile. The default is unchecked (disabled). System Parameters Device characteristics and default settings. Custom Parameters Lists additional device settings or overwrites default settings listed in System Parameters. These are case sensitive and should be set as follows: acceptMWI=notify Accept302=sip HoldSupport=no AddrSupport=diversion EnableSymmetricDtmf=yes UseSipProxyOut=yes OAEMedialessPort=8600 AllowedCodecs=PCMU/8000 OptionsPing=0 Configuring the FaxFinder as a SIP UM Server To configure the FaxFinder as a SIP UM Server: 1. Go to Administration > SIP Servers > SIP Servers. 14 2. Click New. New SIP Server displays. 3. Enter the SIP Server information for the new server as described SIP Server table. 4. Click Save to store your changes SIP Server Information Field Description Name: Enter an appropriate descriptive server name Site: Select the appropriate site location Protocol: Select UDP Host (Name/Address/Domain): Enter the IP address of the FaxFinder IP server Override Default Port: Enter 5060 Allow Ext. Voice Mail for Extension-Only User Leave unchecked Allow Fax Redirect to This Server Check this parameter Extension: The system will automatically assign the next available extension, however you can define a different unused extension. Assigned User Group: Assign an appropriate user group that has access to the necessary trunks, in this example we selected the “Executives” user group. SIP Profile: Enter the SIP profile created in previous step. Digest Authentication: Leave this as <None> User ID: Leave blank Password: Leave blank 15 Enabling SIP Proxy Ports on ShoreGear Switch To allocate proxy ports for SIP extensions: 1. Go to Administration > Platform Hardware > Voice Switches / Service Appliances > Primary. 2. Click a switch name to configure that switch. Edit Switch displays. In the image, the ShoreGear 30 switch was selected. 3. Change one Available Port Types to 100 SIP Proxy. 4. Click Save. Note: If the ShoreGear switch you select has built-in capacity for IP phones and SIP trunks (for example, ShoreGear 50/90/220T1/E1), you can also remove 5 ports from the total number available to provide the 100 SIP Proxy configuration necessary. For every 5 ports that you remove from the total available, the system will make 100 SIP Proxy ports available. One dedicated ShoreGear 120 switch can act as a proxy for the entire site and support up to 2400 SIP phones. 16 Modifying Individual Users for Fax – Creating a SIP Extension To redirect a user’s fax calls to the FaxFinder server: 1. Go to Administration > Users > Individual Users. 2. To redirect fax calls to FaxFinder for an existing user, click that user’s First Name. For a new user, click any existing user name and then click New. 3. For Fax Support, select User – Redirect from the drop down list. 4. Click Save. 5. Repeat these steps for each user whose calls you want redirected to FaxFinder. 17 Modifying the Site Settings To administer the sites: 1. Go to Administration > Sites. 2. To configure an existing site, click the site name where users will use the fax service. In the example, Headquarters is the site where users are located. To create a new site, select the site location in the Add new site drop down and click Go. Enter a name for the site. 18 3. In the Fax Redirect Extension field, click Search and select the FaxFinder server created earlier. In the example, the fax redirection number is the SIP UM server extension created earlier, 165: FaxFinder IP. 4. For Proxy Switch 1, select the ShoreTel SIP Proxy Switch. 5. Click Save. Note: Bandwidth of 1544 is just an example. Please refer to the ShoreTel Planning and Installation Guide for additional information on setting Admission Control Bandwidth. For additional details on configuring SIP Proxy or Virtual IP Address, refer to the ShoreTel Administration Guide. Configuring Codecs for T.38 or G.711 Pass Through Configure the ShoreTel system for either T.38 or G.711 Pass Through. T.38 is recommended, but in cases using full-width switches, please consider using G.711 Pass Through Configuration, as T.38 is not supported on legacy fullwidth switches. For more information, please refer to ShoreTel T.38 Configuration or G.711 Pass Through Configuration. 19 Application 2 – User with a Unique Voice Extension and a Unique Fax Extension ShoreTel requires that the user or voicemail answer the call in order to redirect the fax call to the proper fax extension. Rather than receiving a call with fax tones, you may prefer to have fax calls go to a separate fax number (DNIS/DID) that routes fax calls directly to FaxFinder. FaxFinder then delivers the fax to the user’s email. If you require a fax number that is different from the voice number, configure the ShoreTel system and FaxFinder for SIP trunks using Off System Extensions (OSEs) rather than a SIP UM server. ShoreTel Configuration Use this section to configure the ShoreTel system for faxing using SIP Trunks and Off System Extensions (OSEs). Configuring Switch Settings to Allocate Ports for SIP Trunks To modify switch settings: 1. Login to ShoreWare Director and go to Administration > Switches > Primary. Primary Switches appears. 2. Click a switch name to configure that switch. Edit ShoreGear displays. 20 3. Select the number of SIP trunks from the ports available. Each port designated as a SIP trunk port type enables the support for five individual SIP trunks. Note: ShoreTel trunk groups only support Static IP Address SIP endpoint Individual Trunks. Changing Trunk Group Settings 1. Go to Administration > Trunks > Trunk Groups. Trunk Groups displays. 2. Select a site to configure from the Add new trunk group at site drop down list. 3. Select SIP from the of type drop down list. 4. Click Go. Edit SIP Trunk Group displays. 5. Enter a trunk group name in the Name field. 6. Verify that Enable SIP Info for G.711 DTMF Signaling is not checked. This is only used with SIP tie trunks between ShoreTel systems. 7. Leave the Profile field at Default Tie Trunk and the Digest Authentication at <None>. 21 8. Set the Number of Digits from CO to match what the ShoreGear SIP trunk switch receives from this public network. This is usually configured to match the systems extension length. 9. Verify that Extension and Tandem Trunking are checked. For additional information on these parameters refer to ShoreTel´s Planning and Installation Guide. 10. Check Outbound. 11. Enter the trunk Access Code and Local Area Code. 12. Check Caller ID not blocked by default. This determines if the call is sent out as <unknown> or with caller information (Caller ID). 13. Click Save, so that you can define an Off System Extension. You will be prompted to give all user groups access to this newly created trunk group. 14. Click Cancel; you do not need to grant access as connectivity is through Off System Extensions 22 Granting User Groups Access to New Trunk Group The Off System Extension range can be any extension not currently in use on the ShoreTel system. To define an Off System Extension range, scroll to the Trunk Digit Manipulation section and to the following: 1. Click Edit for Off System Extensions field. 23 2. Click New to open the New Range page. 3. Define a single extension range that is within your ShoreTel PBX extensions. This range must match the extension range of the users defined on the FaxFinder IP server. 4. Click OK. Note: Each individual Off System Extension will be an individual user’s fax destination. Be certain to add a sufficient OSE range to cover all the individual users that require faxing capabilities. 24 Configure Individual Trunks To configure the individual trunks: 1. Go to Administration > Trunks > Individual Trunks. 2. Select the site where you want to add the trunk from the Add new trunk at site drop down list. 3. Select the trunk group from the drop down list. 4. Click Go to display the Edit Trunk window. 5. Enter a trunk Name. We recommend that you give individual trunks the same name as the trunk group so you can easily track the trunk type. 6. Select the ShoreGear switch that you defined to have SIP trunks from the Switch drop down list. 7. Enter the FaxFinder’s IP Address. 8. Click Save to commit the changes. 25 After setting up the trunk groups and individual trunks, refer to the ShoreTel Planning and Installation Guide to make the appropriate changes for the User Group settings. Configure Codecs for T.38 or G.711 Pass Through Configure the ShoreTel system for either T.38 or G.711 Pass Through. T.38 is recommended, but in cases using full-width switches, please consider using G.711 Pass Through Configuration, as T.38 is not supported on legacy fullwidth switches. For more information, please refer to ShoreTel T.38 Configuration or G.711 Pass Through Configuration. Application 2 – Virtual Trunk Switch (alternate configuration) ShoreTel Virtual Trunk Switch requires you to deploy a virtual device using a VMware vSphere client on a vSphere ESXi server. For details, refer to Virtual Switches and Service Appliances in the ShoreTel 14.2 Install Guide. Below are some of the steps used for configuring the ShoreTel Virtual Trunk Switch from that guide. Installing a Virtual Device To install a virtual device, follow these steps: 1. Create a virtual machine (VM) for the switch and allocate the required resources, depending on the capacity of the virtual phone or virtual trunk switch you want to create. 250, 500, or 1000 IP phones 100, 250, or 500 SIP trunks 2. Run vSphere Client and connect to an EXSi server, version 5.0 or higher. 3. Select File > Deploy OVF/OVA. 4. Enter the URL to the OVA file for the type of device you want to install and click Next. To install a ShoreTel Virtual Phone and Virtual Trunk Switch, enter the following URL: http:<HQ or DVS IP address>/ftproot/tsv/BareMetalInstall.ova To install a ShoreTel Virtual Service Appliance, enter the following URL: http:<HQ or DVS IP address>/ftproot/tsu/VMWareShoreTelVSA.ova 5. Enter virtual switch name and click Next. 6. On the Storage page, highlight the datastore1 hard drive and click Next. 7. On the Disk Format page, accept the default option, Thick Provision Lazy Zeroed, and click Next. 8. On the Ready to Complete page, check Power On after deployment. 9. Following the on-screen instructions to finish installing. The installation process creates a virtual machine with the default hardware configuration. For details, refer to Default Configurations in the ShoreTel 14.2 Install Guide. Note: The ShoreTel system analyzes the allocated resources and determines the capacity of the switch. To change the capacity of the switch, you must change the allocated VM resources. You can also download the OVA file directly from ShoreTel Director. Click Download switch image from the Edit ShoreGear vPhone Switch or Edit ShoreGear vTrunk Switch page. 26 You can only increase the disk size before you power on the virtual machine. If you need to have more disk space for conference recording, you must change it before you power on the virtual machine. 10. Power on the virtual machine. 11. Open the console on the virtual switch you want to configure and log in with the following credentials: User ID: root Password: ShoreTel 12. Enter DHCP and server IP information that the server uses to download firmware updates. 13. Restart the virtual switch. The updated firmware begins downloading and installing automatically. After the firmware upgrade completes, the virtual machine reboots automatically. 14. When the virtual switch comes back online, open its console and log in using the previous credentials. 15. To open ShoreTel parameters, enter stcli. 16. Record the IP address and MAC address, which you’ll need to configure the virtual switches. 17. Configure the virtual device. To configure virtual switches, refer to Configuring Voice Switches in the ShoreTel System Administration Guide. To configure virtual Service Appliances, refer to Configuring the Service Appliance in the ShoreTel Conferencing and Instant Messaging Planning and Installation Guide. Configure ShoreGear vTrunk Switch To configure the Virtual Trunk Switch, first add a new ShoreGear vTrunk Switch to the site and then create a trunk group with individual trunks. To Create ShoreGear vTrunk Switch: 1. Go to Administration > Platform Hardware > Voice Switches/Services Appliances > Primary. 2. Select where you want to create a vTrunk from the Add new switch/appliance at site drop down list. 3. Select ShoreGear vTrunk Switch from the of type drop down list. 4. Click Go. The Edit ShoreGear vTrunk Switch window displays. 27 5. Enter a unique name and a description for the ShoreGear vTrunk Switch. 6. Set the IP Address and Ethernet Address to the values that you set while installing the Virtual Device. To do this, click Find Switches and select the Virtual Device. 7. Make sure the Site and Server to Manage Switch fields are set to your site. 8. Click Save. Configure Trunk Group for ShoreGear vTrunk Switch To add a new Trunk Group for ShoreGear vTrunk Switch: 1. Go to Administration > Trunks > Trunk Groups. 2. Select where you want to create a Trunk Group from the Add new trunk group at site drop down list. 3. Set the of type option to SIP. 28 4. Click Go. 5. Enter a trunk group Name. 6. Verify that Enable SIP Info for G.711 DTMF Signaling is not checked. This is only used with SIP tie trunks between ShoreTel systems. 7. Leave the Profile field at Default Tie Trunk and the Digest Authentication at <None>. 8. Set the Number of Digits from CO to match what the ShoreGear SIP trunk switch receives from this public network. This is usually configured to match the systems extension length. 9. Verify that Extension and Tandem Trunking are checked. For additional information on these parameters refer to ShoreTel´s Planning and Installation Guide. 10. Check Outbound. 29 11. Enter the trunk Access Code and Local Area Code. 12. Check Caller ID not blocked by default. This determines if the call is sent out as <unknown> or with caller information (Caller ID). 13. Click Save, so that you can define an Off System Extension. You will be prompted to give all user groups access to this newly created trunk group. 14. Click Cancel; you do not need to grant access as connectivity is through Off System Extensions. Grant User Groups access to new Trunk Group The Off System Extension range can be any extension not currently in use on the ShoreTel system. To define an Off System Extension range, scroll to the Trunk Digit Manipulation section and to the following: 30 1. Click Edit for Off System Extensions field. 2. Click New to open the New Range page. 3. Define a single extension range that is within your ShoreTel PBX extensions. This range must match the extension range of the users defined on the FaxFinder IP server. 4. Click OK. 31 Note: Each individual Off System Extension will be an individual user’s fax destination. Be certain to add a sufficient OSE range to cover all the individual users that require faxing capabilities. Configure Individual Trunks To configure the individual trunks: 1. Go to Administration > Trunks > Individual Trunks. 2. Select the site where you want to add the trunk from the Add new trunk at site drop down list. 3. Select the trunk group from the drop down list. 4. Click Go to display the Edit Trunk window. 5. Enter a trunk Name. We recommended that you give individual trunks the same name as the trunk group so you can easily track the trunk type. 6. Select the ShoreGear switch that you defined to have SIP trunks from the Switch drop down list. 32 7. Enter the FaxFinder’s IP Address. 8. Click Save to commit the changes. After setting up the trunk groups and individual trunks, refer to the ShoreTel Planning and Installation Guide to make the appropriate changes for the User Group settings. Configure Codecs for T.38 or G.711 Pass Through Configure the ShoreTel system for either T.38 or G.711 Pass Through. T.38 is recommended, but in cases using full-width switches, please consider using G.711 Pass Through Configuration, as T.38 is not supported on legacy fullwidth switches. For more information, please refer to ShoreTel T.38 Configuration or G.711 Pass Through Configuration. 33 ShoreTel T.38 Configuration This section describes how to setup ShoreTel for T.38 faxing. T.38 is the recommended codec for faxing; use it if the ShoreTel Switch supports it. When configuring for T.38 faxing, the Codec Lists should include T.38. Create Custom Codec List 1. Login to ShoreWare Director and go to Administration > Call Control > Codec Lists. 2. Click New to create a new codec list. 3. Enter a custom Codec List Name. 4. Select T.38 in the Choose Codecs list and click Add to move it to the Codec List Members. 5. Add any other needed codecs to the Codec List Members. Note: We recommend limiting the codecs to only what is needed. We also recommend including either PCMU/8000 (G.711 Mu-Law) or PCMA/8000 (G.711 A-Law), but not both. 6. Click Save changes. 34 Configuring the Site Bandwidth Options 1. Login to ShoreWare Director and go to Administration > Sites. 2. Click the name of an existing site where users will use the fax service. In the example, Headquarters is the site where the users are located. 3. Set Intra-Site Calls and Inter-Site Calls to the custom Codec List you create. In the example, it is FaxCodecs – Custom. 4. Set Fax and Modem Calls to FaxCodecs – Highbandwidth. 5. Click Save. Note: T.38 is included in the default Codec Lists (Fax Codecs – High Bandwidth and Fax Codecs – Low Bandwidth) 35 G.711 Pass Through Configuration This section describes how to setup the ShoreTel for G.711 Pass Through faxing. Use this only if T.38 isn’t supported on the ShoreTel Switch. Make sure that T.38 is not listed in the Codec Lists used on the Site. Create Custom Codec List 1. Login to ShoreWare Director and go to Administration > Call Control > Codec Lists. 2. Click the site name where the users will use the fax service. In the image, this is Headquarters . 3. Enter a Name for the custom Codec List 4. Add PCMU/8000 to the Codec List Members if not already included. 5. Make sure T.38 is NOT in the Codec List Members. 6. Add other codecs to the Codec List Members as needed. Note: We recommend limiting the codecs to only what is needed. We also recommend including either PCMU/8000 (G.711 Mu-Law) or PCMA/8000 (G.711 A-Law), but not both. 7. Click Save to save the changes made to the Codec List. 36 Configuring the Site Bandwidth Options 1. Login to ShoreWare Director and go to Administration > Sites. 2. Click the site name where the users will use the fax service. 3. Set Intra-Site Calls and Inter-Site Calls to the custom Codec List you created. In the image, this is FaxCodecs – Custom. 4. Set Fax and Modem Calls to FaxCodecs – Highbandwidth Pass Through. 5. Click Save. Note: T.38 is included in the default Codec Lists (Fax Codecs – High Bandwidth and Fax Codecs – Low Bandwidth) 37 FaxFinder IP (FF240-IP) Configuration This section provides a brief overview of FF240-IP needed to work with ShoreTel. For configuration details and help with other options, details, refer to the FaxFinder Fax Server FF240-IP Administrator Guide. To download this, go to www.multitech.com/support and select FaxFinder IP from the drop down list. Install the FF240-IP on an IP network with the ShoreTel Switch. Basic configuration is detailed in the Administrator Guide. To verify configuration, configure inbound fax routing and test fax delivery by sending a fax from the FF240-IP 1. Install the FF240-IP using the basic configuration describe in the FF240-IP Administrator Guide. Verify the fax routing by Sending a Loop Back Test Fax as described in the Administrator Guide. 2. In FF240-IP, go to Fax Configuration > SIP/T.38 and change the SIP Proxy/Gateway to point to the ShoreTel Switch. If using a Virtual Trunk Switch, set this to the IP address of the Virtual Trunk Switch, this appears in the ShoreTel Individual Trunk menu. 3. If you configured ShoreTel to use each extension for both voice and fax, set the T.38 Extension Source to SIP Diversion Header. If using an extension for fax only, set this to SIP To Header. 38 4. If the FF240-IP will not use all the digits ShoreTel sends to it for fax routing, adjust the Extension Digits and Extension Length. Otherwise, leave these fields at the default settings. 5. If using T.38 to fax, set the Fax Method to T.38 Re-Invite. If using G.711 Pass Through, set the Fax Method to T.30 Pass Through. 6. Configure Inbound Routing to match the extension numbers that the ShoreTel Switch is faxing to. View Fax Progress To view inbound or outbound fax progress go to Status & Logs > Fax Status. 39 FaxFinder IP Troubleshooting To troubleshoot FF240-IP, login it’s web interface and go to System Configuration->Debug. Set the log level to INFO. Save and restart the system. Click on logs and save the file in the local computer. You can then contact the MultiTech support as described below and provide them the debug information. 40 FFx40 Fax Application For an analog FaxFinder, create a user in ShoreWare Director for each modem on the fax server. Then configure that user to use the correct extension and set the Fax Method. Modify Individual Users for FaxFinder 1. Go to Administration > Users > Individual Users. 2. If creating a new user, select the site from the Add new user at site drop down list and click Go. For an existing user, click that user’s first name. 3. For a new user, enter the user’s First Name and Last Name. 4. Enter the user’s phone extension in Number. 41 5. Select Ports for Primary Phone Port and select the port to use on the ShoreTel Switch. 6. For Fax Support Field, select Fax Server from the drop down list. This sets the ShoreTel Switch to output the extension’s digits after the FaxFinder answers the call. 7. Enter the Client Username. 8. Click Save. 9. Repeat these steps for each FFx40 modem. 42 FaxFinder Analog (FFx40) Configuration This section provides a brief overview of FFx40 configuration needed to work with ShoreTel. For configuration details and help with other options, refer to the FaxFinder Fax Server FF240, FF440, FF840 Administrator Guide. To download this, go to www.multitech.com/support and select FaxFinder Analog from the drop down list. Configure FaxFinder Modems 1. Login to FaxFinder and go to Fax Configuration > Modem. 2. Check to select the modems you want to edit and click Edit Selected to open Modem Configuration. 3. Set Routing as DTMF Digits. 4. Set a Max Baud Rate of 14400. 5. Set the Max Extension Digits to the number of digits that will be received by the ShoreTel system. 6. Click Save. 43 Configure Inbound Routing 1. Login to FaxFinder and click Fax Configuration > Inbound Routing. 2. Under Recipients, click Add. 3. For Extension, enter the ShoreTel extension for this Recipient. 4. Enter a unique Name for this Recipient. 5. Click Save. Edit Recipients opens. 6. Under Destinations, click Add. 44 7. Select how you want the fax delivered from the Destination Type drop down list. Options are: Email Fax to User Email Notification to User Email Fax Email Notification Share SFTP Print Trash For details on these settings, refer to the FaxFinder FF240, FF440, FF840 Administrator Guide. 8. Depending on your Destination Type, you’ll be prompted to enter a user, email address, share, server, or printer. 9. Click Save. 10. Add additional destinations as needed for this recipient. 11. When you finish adding destinations, click Done. 12. Add additional recipients for each ShoreTel User created for the FaxFinder. View Fax Progress To view inbound or outbound fax progress go to Status & Logs > Fax Status. 45 Application Note Feedback Send any feedback for this document to [email protected]. Include the TPP app note number and the document data when providing feedback. 46