1
Custom Desktop Issuance 6.0
User Guide
September 2012
DATACARD S.A.S.
ZAC des Châtelliers - 200 rue Léonard de Vinci - 45404 Fleury les Aubrais - FRANCE
: + 33 (0) 238 60 76 00 - Fax : + 33 (0) 238 60 76 19
Web site : www.datacard.com
Custom Desktop Issuance 6.0 - User Guide
Table of contents
INTRODUCTION ............................................................................................................................ 4
1.1- Compatible Datacard Equipment ........................................................................................... 5
1.2- Proprietary Notice .................................................................................................................. 5
1.3- Acknowledgments.................................................................................................................. 5
2 INSTALLATION ............................................................................................................................ 6
2.1- PC Requirements .................................................................................................................. 6
2.2- Installation ............................................................................................................................. 6
3 USING CDI ................................................................................................................................ 7
3.1- Logging in .............................................................................................................................. 8
3.2- Data Setup............................................................................................................................. 9
3.2.1- Data Setup for Smartcard (SCS/APM connected) .................................................... 10
3.2.2- Available functions for calculated fields .................................................................... 11
3.3- Card Setup .......................................................................................................................... 13
3.4- Machine Setup ..................................................................................................................... 16
3.4.1- Configure Machine Setup for SCS/APM ................................................................... 18
3.4.2- Configure Machine Setup for Read Lookup .............................................................. 19
3.5- Audit Setup .......................................................................................................................... 20
3.6- Job Setup ............................................................................................................................ 21
3.7- Load Data ............................................................................................................................ 22
3.8- Make Cards ......................................................................................................................... 24
3.9- Make Cards From List ......................................................................................................... 26
3.10- Record Status ...................................................................................................................... 28
3.11- View the production log........................................................................................................ 29
3.11.1- Error Log .................................................................................................................. 30
3.11.2- Error Analysis ........................................................................................................... 31
3.11.3- Audit Trail ................................................................................................................. 32
3.12- Keyboard Input .................................................................................................................... 33
4 SAMPLES OF SETUPS ............................................................................................................... 34
4.1- Datacard CP Plus Printer ..................................................................................................... 34
4.1.1- Hardware Setup for CP Plus Printer ......................................................................... 34
4.1.2- Machine Setup for CP Plus Printer ........................................................................... 34
4.1.3- Data Setup ............................................................................................................... 35
4.1.4- Card Setup for CP Plus Printer ................................................................................. 35
4.1.5- Job Setup for CP Plus Printer ................................................................................... 36
4.1.6- Printing Preferences for CP Plus Printer ................................................................... 36
4.2- Datacard SP Plus Printer ..................................................................................................... 39
4.2.1- Hardware Setup for SP Plus Printer ......................................................................... 39
4.2.2- Machine Setup for SP Plus Printer ........................................................................... 39
4.2.3- Data Setup ............................................................................................................... 40
4.2.4- Card Setup for SP Plus Printer ................................................................................. 40
4.2.5- Audit Setup............................................................................................................... 41
4.2.6- Job Setup for SP Plus Printer ................................................................................... 41
4.3- Datacard CE870 Printer ....................................................................................................... 42
4.3.1- Hardware Setup for CE870 Printer ........................................................................... 42
4.3.2- Machine Setup for CE870 Printer ............................................................................. 42
4.3.3- Data Setup ............................................................................................................... 43
4.3.4- Card Setup for CE870 Printer ................................................................................... 43
4.3.5- Audit Setup............................................................................................................... 44
4.3.6- Job Setup for CE870 Printer ..................................................................................... 45
Name: CDI_0.docx
September 2012
Page 2 / 78
Custom Desktop Issuance 6.0 - User Guide
4.4- Datacard SE48 Printer ......................................................................................................... 46
4.4.1- Hardware Setup for SE48 Printer ............................................................................. 46
4.4.2- Machine Setup for SE48 Printer ............................................................................... 46
4.4.3- Data Setup ............................................................................................................... 47
4.4.4- Card Setup for SE48 Printer ..................................................................................... 47
4.4.5- Job Setup for SE48 Printer ....................................................................................... 48
4.5- Datacard FP65i Printer ........................................................................................................ 49
4.5.1- Hardware Setup for FP65i Printer ............................................................................. 49
4.5.2- Machine Setup for FP65i Printer ............................................................................... 49
4.5.3- Data Setup ............................................................................................................... 50
4.5.4- Card Setup for FP65i Printer .................................................................................... 50
4.5.5- Job Setup for FP65i Printer ...................................................................................... 51
4.6- Datacard DC450 Printer....................................................................................................... 52
4.6.1- Card Setup for DC450 Printer................................................................................... 52
4.7- Datacard DC315GX Printer ................................................................................................. 53
4.7.1- Hardware Setup for DC315GX Printer ...................................................................... 53
4.7.2- Machine setup for DC315GX Printer ........................................................................ 54
4.7.3- Data Setup ............................................................................................................... 54
4.7.4- Card Setup for DC315GX Printer ............................................................................. 55
4.7.5- Job Setup for DC315GX Printer ............................................................................... 56
4.8- Datacard 150i Printer ........................................................................................................... 57
4.8.1- Hardware Setup for 150i Printer ............................................................................... 57
4.8.2- Machine Setup for 150i Printer ................................................................................. 57
4.8.3- Data Setup ............................................................................................................... 58
4.8.4- Card Setup for 150i Printer ....................................................................................... 58
4.8.5- Job Setup for 150i Printer ......................................................................................... 59
4.9- Datacard DC280P Printer .................................................................................................... 60
4.9.1- Hardware Setup for DC208P Printer......................................................................... 60
4.9.2- Machine setup for DC280P Printer ........................................................................... 60
4.9.3- Data Setup ............................................................................................................... 61
4.9.4- Card Setup for DC280P Printer ................................................................................ 61
4.9.5- Job Setup for DC280P Printer .................................................................................. 62
4.10- Machine Setup with Read lookup......................................................................................... 63
5 UTILITIES ................................................................................................................................ 64
5.1- File Management ................................................................................................................. 65
5.1.1- Data Groups ............................................................................................................. 66
5.1.2- Directories ................................................................................................................ 67
5.2- Backup/Restore ................................................................................................................... 68
5.2.1- Backup ..................................................................................................................... 68
5.2.2- Restore .................................................................................................................... 68
5.3- Security 69
5.3.1- User/Password ......................................................................................................... 70
5.3.2- Access Level ............................................................................................................ 71
5.4- System Maintenance ........................................................................................................... 72
5.4.1- Hardware Setup ....................................................................................................... 73
5.4.2- Software Setup ......................................................................................................... 74
5.4.3- CSM Status .............................................................................................................. 74
6 PLUG-IN FOR USING CDI WITH SCS/APM.................................................................................. 75
6.1- Special for DC315GX .......................................................................................................... 76
7 WINLEC TO CDI MIGRATION ...................................................................................................... 78
Name: CDI_0.docx
September 2012
Page 3 / 78
Custom Desktop Issuance 6.0 - User Guide
INTRODUCTION
CDI is a highly efficient production software program which allows data files to
personalize cards.
Embossing
CDI software supports Standard Gothic (A-Z )-9 ‘/-.,), Farrington 7B (0-9) and other
non-standard embossing characters (e.g. tilde N, Russian, Katakana).
Magnetic Stripe Encoding
CDI software supports the following magnetic stripe encoding formats:
IATA
ABA
TTS
NTT3 (J)
The software also supports the following options selected by the user:
switching between high coercivity and low coercivity.
switching between front and rear encoding (internal Smart Card module only)
Indent Printing
CDI software supports MasterCard™ indent (0-9), OCR-B1 (0-9), OCR-A1 (0-9) and
Visa Electron™ character set (OCB-B1 A-Z 0-9., / OCR-B4 0-9 /).
Graphics Printing
CDI software supports the ability to print monochrome and color graphic logos/pictures.
Smart Card Personalization
CDI software provides an easy way to use environment for developing smart card
applications. A driver provides compatibility with T=0 and T=1 cards. It also provides the
capability of reading information from the smart card and returns the results to the
application and with the ability to personalize this information. Up to 4 key readers may
be used (additional COM ports may be needed).
Smart Card Personalization with Datacard® APM/SCS interface
Custom Desktop Issuance software enables to use Syntera® Customization Suite
Software and Datacard® Affina Personalization Manager, Affina Profiles and Scripting,
Affina Data Preparation softwares, and all Datacard® Affina products.
Security
Multi-level security is provided so the supervisor can choose which access option
each user can control.
Audit Trail
The status of each card is traced for cards completed or cards rejected.
Name: CDI_0.docx
September 2012
Page 4 / 78
Custom Desktop Issuance 6.0 - User Guide
1.1- COMPATIBLE DATACARD EQUIPMENT
CDI software is designed to assist in the production of cards for the following card
personalization systems:
Datacard® SP Plus Card Personalization System
Datacard® SD Card Personalization System
Datacard® CP Plus Card Personalization System
Datacard® CD Card Personalization System
Datacard® CE870 Card Personalization System
Datacard® UltraGrafix 800 Card Personalization System
Datacard® DC315GX-FR Card Personalization System
Datacard® FP65i™ Card Personalization System
Datacard® SE48 Card Personalization System
Datacard® 150i Card Personalization System
Datacard® 275 Series Card Personalization System
Datacard® 280P Series Card Personalization System
Datacard® 295 Series Card Personalization System
Datacard® 450 Card Personalization System
1.2- PROPRIETARY NOTICE
All drawings and information herein are confidential and proprietary to Datacard ®
Corporation. All unauthorized use and reproduction is prohibited. Copyright© 2012
Datacard Corporation. All rights reserved.
1.3- ACKNOWLEDGMENTS
Datacard is a registered trademark and CDI is a trademark of Datacard Corporation.
Windows, Windows Server, Windows XP and Windows 7 are registered trademarks of
Microsoft Corporation.
Name: CDI_0.docx
September 2012
Page 5 / 78
Custom Desktop Issuance 6.0 - User Guide
2 Installation
2.1- PC REQUIREMENTS
The minimum PC requirements for using CDI software is as follows:
Pentium 1.5 GHz
512 MB of RAM
Windows XP™, 7™, Server 2003, Server 2008
DVD-ROM drive
Screen size 800x600
2 USB Ports (or 3 with CP/SP Plus Series connected via USB)
2.2- INSTALLATION
Do not connect CDI dongle before installation of drivers has been completed.
To install the CDI software, do the following:
1.
With Windows running, close any open application.
2.
Insert the CDI software CD in the CD-ROM drive.
3.
Select Start from the main Windows menu, then select Run.
4.
Type in D:setup.exe, then select OK. (Where D represents the CD-ROM drive.)
5.
Follow the online prompts until the software is successfully installed.
The install procedure gives the following two options:
Typical Installation: The Online Tutorial will be copied on your hard drive along with
the operating software. (Requires a minimum of 35 Mbytes disk space on your PC.)
Compact Installation: The Online Tutorial will not be copied on your hard drive.
(Requires a minimum of 10 Mbytes disk space on your PC.)
Custom Installation. Use this option if you want to customize the installation of the
CDI software and its Tutorial.
6.
Insert CDI dongle in a free USB port.
7.
When prompted to Enter Your User Name, type in ADMIN. Password for this user is
by default ADMIN.
Once the installation process has been completed, CDI must be configured to a
Datacard printer. See Hardware Setup Configuration.
Name: CDI_0.docx
September 2012
Page 6 / 78
Custom Desktop Issuance 6.0 - User Guide
3 Using CDI
The CDI main window includes 5 drop-down menus:
1-Cards, 2-Data, 3-Reports, 4-Setup, 5-Utilities.
Name: CDI_0.docx
September 2012
Page 7 / 78
Custom Desktop Issuance 6.0 - User Guide
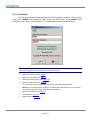
3.1- LOGGING IN
The following window will appear when the CDI program is launched. For first time
users, enter ADMIN in the dialog box under “Enter Your User Name.” Enter ADMIN in the
dialog box under “Enter Your Password.” To change passwords see User/Password.
When using CDI, you must perform the setup operations before starting production.
Here is the logical order for using CDI for the first time:
Define the data setup (see page 9)
Define the card setup (see page 13)
Define the machine setup (see page 16)
Define the audit setup (see page 20)
To create a job setup, you must first perform the four basic setup functions.
Warning: You cannot delete a setup if it is used to define another setup. You must first
delete the setups that include other setups to be deleted.
Define the job setup (see page 21)
Load Data (see page 22)
Make Cards (see page 24)
Name: CDI_0.docx
September 2012
Page 8 / 78
Custom Desktop Issuance 6.0 - User Guide
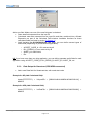
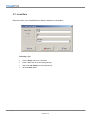
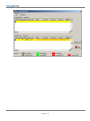
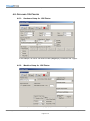
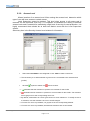
3.2- DATA SETUP
Select any item in the Data Setup window for information.
To create a new Data setup, click the Add button.
Optionally modify the description of the Data setup.
Optional: Enter a File ID Record. The FIR is a special record allowing information to be
transferred to the operator and does not affect production.
When Delete Source File is checked input file will be deleted after being loaded. This is
a security option to avoid producing the same cards twice by loading the same data
twice
Select Separation Method for each record.
Select Computed Data DLL and select a stored DLL name. This DLL computes the data
from the input file during the Load Data operation.
Open a Sample file
Add Fields (Data, Calculated or Audit Variable).
Name: CDI_0.docx
September 2012
Page 9 / 78
Custom Desktop Issuance 6.0 - User Guide
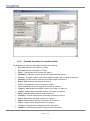
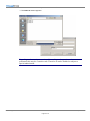
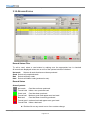
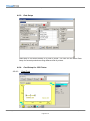
Add a new field. Make sure one of the new field types is checked:
Data: data field extracted from the input file
Calculated: data field extracted from the input file and then combined into a Wizard
Expression as part of the Calculated Field window. Available functions for these
calculated fields are listed in section 3.2.2 page 11.
Audit Variable (for SCS/APM/APS/GP use only): you can define several types of
audit fields (depending on personalization application):
o
o
o
o
o
ACCEPT_CODE_A: OK code sent by dll
DLL_ERROR_A: error code sent by dll
AUDIT_A1: audit field 1
AUDIT_A2: audit field 2
Etc.
NB: if you have more than one chip application, you can define separate audit fields for each
application using: ACCEPT_CODE_B, DLL_ERROR_B, AUDIT_B1, AUDIT_B2, etc.
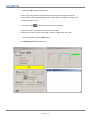
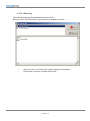
3.2.1- Data Setup for Smartcard (SCS/APM connected)
Add a new Data field for Smartcard data, with usual start code.
Example for GP (add Calculated field):
hexstr('FFFFFFFC') + '<ScpmGP>' + '[2B0601040181900D819C2005230101]' +
#SMC#
Example for APS (add Calculated field):
hexstr('FFFFFFFC') + '<AffinaPS>' + '[2B0601040181900D819C2005230202]' +
#SMC#
Name: CDI_0.docx
September 2012
Page 10 / 78
Custom Desktop Issuance 6.0 - User Guide
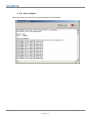
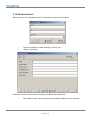
3.2.2- Available functions for calculated fields
The available functions for calculated fields are the following:
PI(): Mathematical Pi constant (3.14159)
E(): Mathematical e constant (2.71828)
Sin(x): Trigonometric sine function for angle x
Random(x): Random function returns an integer between 0 and x
Trunc(x): Truncate function returns the biggest integer lower or equal to decimal x
Round(x): Round function returns the nearest integer to decimal x
Exp(x): Mathematical exponential function ex
Cos(x): Trigonometric cosine function for angle x
Ln(x): Mathematical natural logarithm function of number x
Log10(x): Mathematical logarithm function of number x to base 10
Log2(x): Mathematical logarithm function of number x to base 2
Abs(x): Mathematical absolute value function |x|
ArcTan(x): Inverse trigonometric arctangent function for value x
Sqr(x): Mathematical square function for number x
Sqrt(x): Mathematical square root function for number x
Tan(x): Trigonometric tangent function for angle x
CoTan(x): Trigonometric cotangent function for angle x
ArcSin(x): Inverse trigonometric arcsine function for value x
Name: CDI_0.docx
September 2012
Page 11 / 78
Custom Desktop Issuance 6.0 - User Guide
ArcCos(x): Inverse trigonometric arccosine function for value x
HexStr(x): Returns the binary characters corresponding to the hexadecimal string x
Name: CDI_0.docx
September 2012
Page 12 / 78
Custom Desktop Issuance 6.0 - User Guide
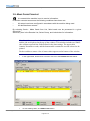
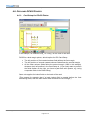
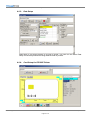
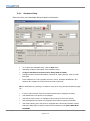
3.3- CARD SETUP
Select any item in the Card Setup window for information.
Because each card and machine hardware setup varies, some options may not be
available.
Below is a display of some of these options (use mouse pointer above below icons to
get informations).
Use this window to define the card setup for the Machine on which you will make the cards.
To create a new card setup, click the Add button.
Choose Data Setup in the right dropdown list
Create the design of the card by selecting a component, then clicking on the card to
insert this component
Select for each component on the card the field name from the card setup in the right
pane (see dropdown list for Data Field entry).
Name: CDI_0.docx
September 2012
Page 13 / 78
Custom Desktop Issuance 6.0 - User Guide
Chip Field
Selecting the Smart Card button allows the inserting of a smart card chip and linking it
to a data field in Data Setup. In Field Name, select the name of the field of the records linked
to the Smart Card module.
Stripe Field
Selecting the Magnetic Stripe button allows inserting magnetic stripe information and
linking it to a data field in Data Setup. In Field Name, select the name of the record fields
corresponding to the magnetic stripe.
The display position of AFNOR and ISO are for visual information only.
Emboss Field
Selecting the Embossing button makes it possible to insert an embossed line and
linking it to a data field in Data Setup. In Field Name, select the name of the record fields to
be linked to the embossed line. The coordinates can be moved manually or by clicking on the
embossed line and moving it with the mouse. A Font must also be selected. The font size is
expressed in cpi (characters per inch): the higher value corresponds to the smaller font.
Same thing for OCR (Optical character recognition) fonts.
Customer Desktop Issuance software allows indent printing. Depending on the
machine you are using (SE48, 150i, FP65i, DC280 or DC315GX-FR), you will be able to print
front indent and/or back indent:
o
OCR7 on the front side of the card
o
OCR10 on the back side of the card
o
OCR14 and OCR15 inverted on the back of the card (if you have specific
Mastercard or Visa font kit installed on your embosser)
Ultragrafix Field
Selecting the Graphics Line button allows inserting a graphics line and linking it to a
data field in Data Setup. In Field Name, select the name of the record fields linked to the
graphics line. The coordinates can be moved manually or by clicking on the graphics line and
moving it with the mouse. The graphics Line can be justified and the font selected.
BarCode Field
Selecting the Barcode button allows inserting a barcode and linking it to a data field in
Data Setup. In Field Name, select the name of the record field linked to the barcode. The
coordinates can be moved manually or by clicking on the Barcode and moving it with the
mouse.
Name: CDI_0.docx
September 2012
Page 14 / 78
Custom Desktop Issuance 6.0 - User Guide
Use this button just for machines working with CPX protocol (SE48, …). For
other printers, if you want to print a BarCode you need to use Color Text Field
and a specific font (you can download BarCode fonts on Internet).
Logo Field
Selecting the Logo button allows inserting a fixed logo/picture. In Picture, select the
path and name of the logo that you want to print on the card. The coordinates can be moved
manually or by clicking on the Logo and moving it with the mouse.
Color Text Field
Selecting the Color Text button allows inserting a color (or monochrome) text line and
linking it to a data field in Data Setup. In Data Field, select the name of the record fields
linked to the text line. The coordinates can be moved manually or by clicking on the text line
and moving it with the mouse. The text line can be justified and the font selected.
The monochrome ribbon for SP/CP printers is considered as Color module in
CDI.
Picture Field
Selecting the Picture button allows inserting a picture and linking it to a data field in
Data Setup. In Data Field, select the name of the picture field linked to the picture. The
coordinates can be moved manually or by clicking on the text line and moving it with the
mouse. The text line can be justified and the font selected.
Name: CDI_0.docx
September 2012
Page 15 / 78
Custom Desktop Issuance 6.0 - User Guide
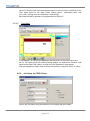
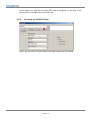
3.4- MACHINE SETUP
Select any item in the Machine Setup window for information.
Use this window to define the setup for the Machine on which you will make the cards.
NB: Depending on the type of the machine, the above window panes may be different.
To create a new machine setup, click the Add button.
Optionally modify the description of the machine setup.
Select the Hardware setup for your machine
Embossing Setup: select Operate on Card to perform embossing (Warning: select this
option anyway if you just want to perform chip personalization)
SmartCard Setup: select Operate on Card to perform chip personalization (and Use
APM if you use Scpm dll application, Affina Profiles and Scripting or Global Platform
Scripting)
Magnetic Stripe Setup: select Operate on Card to write and/or Read Verify magnetic
stripe
Warning: Machine Setup refers to Hardware setup configuration. See 5.4.1- Hardware
Setup
Name: CDI_0.docx
September 2012
Page 16 / 78
Custom Desktop Issuance 6.0 - User Guide
Ultragrafix Setup (for Ultragrafix machines)
Make sure Operate on Card is checked if graphics printing is desired on a production
card.
Embossing Setup (for Embossers)
Make sure Operate on Card is checked if Embossing is desired on a production card.
Topper Setup (depending on the type of the machine)
Make sure Operate on Card is checked if Topping is desired on a production card.
Select a number from 1 to 5 for heat control of the topper platen. Foils require different heat
level settings.
Magnetic Stripe Setup
Make sure Operate on Card is checked if a Magnetic Stripe encoding is desired on a
production card. On 150i printers only, make sure to select the coercivity (Hico or Loco).
SmartCard Setup (if a coupler is used)
Make sure Operate on Card is checked if a Smart Card option is used on a
production card.
Depending on the type of the machine, make sure Front Chip is checked if the Smart
Card is on the front side of the production card or Back Chip is checked if on the backside of
the production card.
SmartCard Module (if a coupler is used)
Selected smart card applications are displayed in this box (not used with Use APM
option).
Control Codes (28X printers only)
Refer to the 28X Operator’s manual for explanation of the control codes or leave
blank as a default.
Options Table (28X printers only)
Allows the selection of the 28X printer option control table. Up to 9 different
configuration options can be selected. Refer the 28X Operators’ manual for details.
Input Hopper (DC315GX-FR only)
Allows to select the DC315GX-FR input hoppers to be used during the
production. Max configuration: 15 input hoppers. Hoppers selected by user
will be activated during the production. If one selected hopper is empty (no
card inside) machine will automatically switch on the next selected hopper.
Name: CDI_0.docx
September 2012
Page 17 / 78
Custom Desktop Issuance 6.0 - User Guide
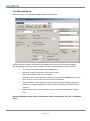
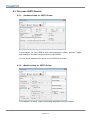
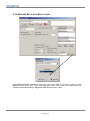
3.4.1- Configure Machine Setup for SCS/APM
In Machine Setup:
Operate on Card and Use APM must be checked.
Operate on Card in Embossing Setup must be checked (use or not
Embossing).
Name: CDI_0.docx
September 2012
Page 18 / 78
Custom Desktop Issuance 6.0 - User Guide
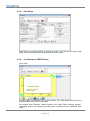
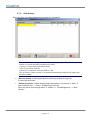
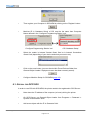
3.4.2- Configure Machine Setup for Read Lookup
Overview:
This solution is used to encode magstripe, write color data on the card, then read
magstripe and emboss the card according to magstripe data.
NB: 2nd step can be used with pre-encoded cards too.
Hardware installation connection:
RS232
Embossing Machine
Custom Desktop Issuance running
USB
Color Machine
Sample file:
0000001[PIC]Ice1.bmp[ENC]%B5132830000000034^CARTE
DE
TEST
XX/
^94091016010361986067
?;5132830000000034=94091016010361986067?[GFX]Name Bank[EMB]Card Holder Name
1[END]
0000002[PIC]Ice2.bmp[ENC]%B5132830000000034^CARTE
DE
TEST
XX/
^94091016010361986067
?;5132830000000034=94091016010361986067?[GFX]Name Bank[EMB]Card Holder Name
2[END]
………..
0000009[PIC]Ice9.bmp[ENC]%B5132830000000034^CARTE
DE
TEST
XX/
^94091016010361986067
?;5132830000000034=94091016010361986067?[GFX]Name Bank[EMB]Card Holder Name
9[END]
Name: CDI_0.docx
September 2012
Page 19 / 78
Custom Desktop Issuance 6.0 - User Guide
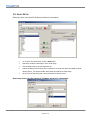
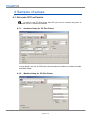
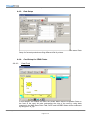
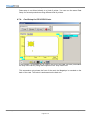
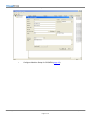
3.5- AUDIT SETUP
Select any item in the Audit Trail Setup window for information.
To create a new Audit setup, click the Add button.
Optionally modify the description of the Audit setup.
Choose Data Setup in the left dropdown list
Add each field (from the left list) to be exported in an Audit File (right list). Note: all fields
starting with D_ are System fields. Other fields are fields from Data Setup.
Click on File to define the path where the audit trail will be saved.
Select any item on the Save Audit to FileName window for information.
Name: CDI_0.docx
September 2012
Page 20 / 78
Custom Desktop Issuance 6.0 - User Guide
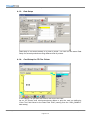
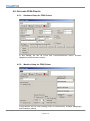
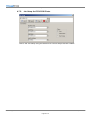
3.6- JOB SETUP
Select any item in the Job Setup window for information.
Use this window to define the job setup for make the cards.
To create a new job machine setup, click the Add button.
Select the appropriate Machine Setup for your setup
Select the appropriate Card Setup for your setup
Select the appropriate Data Setup for your setup
Select the appropriate Audit Trail Setup for your setup
Name: CDI_0.docx
September 2012
Page 21 / 78
Custom Desktop Issuance 6.0 - User Guide
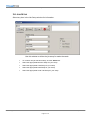
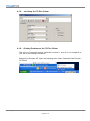
3.7- LOAD DATA
Select any item in the Load Data into System window for information.
Selecting a job
Enter a Group name in the text field.
Enter a Job name in the text field (optional).
Select the Job Setup from the dropdown list.
Click the Start button.
Name: CDI_0.docx
September 2012
Page 22 / 78
Custom Desktop Issuance 6.0 - User Guide
The CDI List window appears:
Depending on the security constraints of the making cards operations to be
performed, this may be a sensitive task. Therefore it can be disabled or subject to
special authorization.
Name: CDI_0.docx
September 2012
Page 23 / 78
Custom Desktop Issuance 6.0 - User Guide
3.8- MAKE CARDS
Production can start as soon as the following conditions have been met:
All setups have been configured in accordance with the machine being used.
All data has been entered.
It is essential the machine is set to receive information.
Select any item in the Start Card Production window for information.
Use this window to start letter production. It includes a Job Selection section for
selecting a group, a job within a group, and the records to be generated. The
Information window displays the contents of the FIR.
Click the Start button to launch production.
The FIR (First Input Record) lets you divide the input data stored in a single input file into
different production jobs.
Selecting a job
Select the Group from the dropdown list.
A group is the unit for loading make cards in CDI.
A group may include one or more input files and several jobs for each file.
Name: CDI_0.docx
September 2012
Page 24 / 78
Custom Desktop Issuance 6.0 - User Guide
Select the Job from the dropdown list.
Only groups and jobs with cards that have not been processed appear in the list.
The number of the first record with the "Not made" status is displayed, as well as the
number of the last record.
Click the arrows
to select the last record to be produced.
The total number of records to be produced is displayed.
The status of these records is "Not made": they are neither "bad" nor "held".
To start production, click the Start button.
The Making Cards window appears.
Name: CDI_0.docx
September 2012
Page 25 / 78
Custom Desktop Issuance 6.0 - User Guide
3.9- MAKE CARDS FROM LIST
It is essential the machine is set to receive information.
Production can start as soon as the following conditions have been met:
All setups have been configured in accordance with the machine being used.
All data has been entered.
By selecting Cards - Make Cards from List, failed cards can be processed in a given
Group/Job.
Select any item in the Remake List, Select Group, and Job window for information.
Use this window to select individual records to be produced. The name of the group
and the job are displayed at the top of the window. This window includes two tables
(the columns represent the fields defined in the data settings. The upper table
contains Not made records, and the bottom table contains the records selected to be
printed.
Each record has a status: a list of status values appears at the bottom of the window.
In the upper table, double-click a record to move it to the Remake list table below.
To start making cards, click Make Cards button.
Name: CDI_0.docx
September 2012
Page 26 / 78
Custom Desktop Issuance 6.0 - User Guide
Name: CDI_0.docx
September 2012
Page 27 / 78
Custom Desktop Issuance 6.0 - User Guide
3.10- RECORD STATUS
Record Status-Filter
To edit a card, select a card status by making sure the appropriate box is checked.
All records are displayed unless one or more of the options below are checked.
Not made
Selects all cards that have not been produced.
Good Selects all completed cards.
Bad Selects all faulty cards.
Held Selects all hidden cards (produced or not).
Record Status
Status Symbols:
Not made
Card has not been produced.
Forced held
Hides a non produced card.
Good card
Forced bad
Card has been produced.
Makes a good card appear as a bad card.
Bad card
Card has been incorrectly produced.
Forced good makes a bad card appear as a good card.
Forced held
Hides a bad card.
Double click on any record row to force a status change.
Name: CDI_0.docx
September 2012
Page 28 / 78
Custom Desktop Issuance 6.0 - User Guide
3.11- VIEW THE PRODUCTION LOG
Select any item on the Reports pull-down menu bar for information.
Name: CDI_0.docx
September 2012
Page 29 / 78
Custom Desktop Issuance 6.0 - User Guide
3.11.1- Error Log
This window display log files generated by custom DLLs.
Select any item in the View Error Log list window to display its content.
Select any item in the View Error Log list window for information.
Press Clear Log button to empty error log file
Name: CDI_0.docx
September 2012
Page 30 / 78
Custom Desktop Issuance 6.0 - User Guide
3.11.2- Error Analysis
Select any item in the View Error Analysis window for information.
Name: CDI_0.docx
September 2012
Page 31 / 78
Custom Desktop Issuance 6.0 - User Guide
3.11.3- Audit Trail
Select any item in the View Audit Trail window for information.
Name: CDI_0.docx
September 2012
Page 32 / 78
Custom Desktop Issuance 6.0 - User Guide
3.12- KEYBOARD INPUT
Select any item in the Keyboard Input (in Data Menu) window for information.
Uses this window to create manually a Group, Job.
Select a Job Setup
Production can start as soon as the following conditions have been met:
Enter data for each record (keyboard input replaces data from any input file)
Name: CDI_0.docx
September 2012
Page 33 / 78
Custom Desktop Issuance 6.0 - User Guide
4 Samples of setups
4.1- DATACARD CP PLUS PRINTER
In order to use CP Plus printer with CDI you need to rename the printer to
‘Datacard Printer’ in Microsoft Windows.
4.1.1- Hardware Setup for CP Plus Printer
In this sample, we use a CP80 with color/monochrome ribbon but without encoder
and SMC reader.
4.1.2- Machine Setup for CP Plus Printer
Name: CDI_0.docx
September 2012
Page 34 / 78
Custom Desktop Issuance 6.0 - User Guide
4.1.3- Data Setup
Data setup is not linked directly to a kind of printer. You can use the same Data
Setup for several productions using different kind of printers.
4.1.4- Card Setup for CP Plus Printer
In this sample, we just print the PAN on the front of the card.
As our CP Printer uses color/monochrome ribbon to print the card, we defined a
‘Color Text’ field linked to the Data Field ‘PAN’ (coming from the ‘VISA_SAMPLE’
data setup).
Name: CDI_0.docx
September 2012
Page 35 / 78
Custom Desktop Issuance 6.0 - User Guide
4.1.5- Job Setup for CP Plus Printer
Here is the Job Setup using the different CP setups that we created.
4.1.6- Printing Preferences for CP Plus Printer
The choice of hologram overlay (laminator modules 1 and 2) is not configured in
CDI, but in the Printing Preferences.
Example for Windows XP: Open the following menu Start / Datacard Card Printers /
CP Printer
Name: CDI_0.docx
September 2012
Page 36 / 78
Custom Desktop Issuance 6.0 - User Guide
Here is the CP Printer Toolbox.
Click on “Printing Preferences…” button.
Name: CDI_0.docx
September 2012
Page 37 / 78
Custom Desktop Issuance 6.0 - User Guide
Click on “Advanced…” button.
Modify the “Apply Laminator 1 and 2 Material” as desired:
Name: CDI_0.docx
September 2012
Page 38 / 78
Custom Desktop Issuance 6.0 - User Guide
4.2- DATACARD SP PLUS PRINTER
4.2.1- Hardware Setup for SP Plus Printer
In this sample, we use a SP55 with color/monochrome ribbon, encoder and internal
SMC reader.
4.2.2- Machine Setup for SP Plus Printer
In this sample, we just setup color printing (color or monochrome).
Name: CDI_0.docx
September 2012
Page 39 / 78
Custom Desktop Issuance 6.0 - User Guide
4.2.3- Data Setup
Data setup is not linked directly to a kind of printer. You can use the same Data
Setup for several productions using different kind of printers.
4.2.4- Card Setup for SP Plus Printer
In this sample, we print the PAN, the Holder Name and the Expiration Date on the
front of the card.
As our SP Printer uses color/monochrome ribbon to print the card, we defined ‘Color
Text’ fields linked to the Data Fields ‘PAN’, ‘HOLDER’ and ‘DATE’ (coming from the
‘VISA_SAMPLE’ data setup ).
Name: CDI_0.docx
September 2012
Page 40 / 78
Custom Desktop Issuance 6.0 - User Guide
4.2.5- Audit Setup
Here is a sample of Audit Setup for SP55.
4.2.6- Job Setup for SP Plus Printer
Here is the Job Setup using the different SP setups that we created.
Name: CDI_0.docx
September 2012
Page 41 / 78
Custom Desktop Issuance 6.0 - User Guide
4.3- DATACARD CE870 PRINTER
4.3.1- Hardware Setup for CE870 Printer
In this sample, we use a CE870 with color/monochrome ribbon, encoder, Topper
and Embosser. We didn’t setup connection to SCS/APM.
You can find IP address of the printer on the CE870 front screen.
4.3.2- Machine Setup for CE870 Printer
In this sample, we setup Topper, Embossing, Magstripe and Input Hopper.
Name: CDI_0.docx
September 2012
Page 42 / 78
Custom Desktop Issuance 6.0 - User Guide
4.3.3- Data Setup
Data setup is not linked directly to a kind of printer. You can use the same Data
Setup for several productions using different kind of printers.
4.3.4- Card Setup for CE870 Printer
Front View:
In this sample, we emboss the account number, the Card Holder Name and the
Expiration Date on the front of the card.
We defined three ‘Emboss’ objects linked to the Data Fields ‘account_number’,
‘cardholder_name’ and ‘space_and_expiry_date’ (coming from the ‘SAMPLE’ data
setup ).
Name: CDI_0.docx
September 2012
Page 43 / 78
Custom Desktop Issuance 6.0 - User Guide
Back View:
On the back view, we defined for this sample to encode Magstripe and to print an
image and the branch name.
We defined ‘Stripe’, ‘Picture’ and ‘Color Text’ objects linked to the corresponding
fields of the Data Fields (coming from the ‘SAMPLE’ data setup ).
4.3.5- Audit Setup
Here is a sample of Audit Setup for CE870.
Name: CDI_0.docx
September 2012
Page 44 / 78
Custom Desktop Issuance 6.0 - User Guide
4.3.6- Job Setup for CE870 Printer
Here is the Job Setup using the different CE870 setups that we created.
Name: CDI_0.docx
September 2012
Page 45 / 78
Custom Desktop Issuance 6.0 - User Guide
4.4- DATACARD SE48 PRINTER
4.4.1- Hardware Setup for SE48 Printer
In this sample, we use a SE48 with Encoder (Magstripe), Embosser, Topper and
SMC reader.
4.4.2- Machine Setup for SE48 Printer
In this sample, we use Encoder (Magstripe), Embosser, Topper and SmartCard.
Name: CDI_0.docx
September 2012
Page 46 / 78
Custom Desktop Issuance 6.0 - User Guide
4.4.3- Data Setup
Data setup is not linked directly to a kind of printer. You can use the same Data
Setup for several productions using different kind of printers.
4.4.4- Card Setup for SE48 Printer
4.4.4.1-
View Front
In this sample, we emboss the PAN, the Holder Name and the Expiration Date on
the front of the card. We also personalize the chip of the card by using data
imported in the SMC Data Field. PAN, DATE and HOLDER fields will be embossed
by using font ‘10_cpi’.
Name: CDI_0.docx
September 2012
Page 47 / 78
Custom Desktop Issuance 6.0 - User Guide
4.4.4.2-
View Back
In this sample, we encode the Magstripe on the back of the card.
4.4.5- Job Setup for SE48 Printer
Here is the Job Setup using the different SE48 setups that we created.
Name: CDI_0.docx
September 2012
Page 48 / 78
Custom Desktop Issuance 6.0 - User Guide
4.5- DATACARD FP65I PRINTER
4.5.1- Hardware Setup for FP65i Printer
In this sample, we use an FP65i with color/monochrome ribbon, Encoder
(Magstripe) and Embosser (Indent).
4.5.2- Machine Setup for FP65i Printer
In this sample, we use color printing (color or monochrome), Encoder (Magstripe)
and Embosser (Indent).
Name: CDI_0.docx
September 2012
Page 49 / 78
Custom Desktop Issuance 6.0 - User Guide
4.5.3- Data Setup
Data setup is not linked directly to a kind of printer. You can use the same Data
Setup for several productions using different kind of printers.
4.5.4- Card Setup for FP65i Printer
4.5.4.1-
View Front
In this sample, we print the branch name, the cardholder name and the bar code on
the front of the card.
Name: CDI_0.docx
September 2012
Page 50 / 78
Custom Desktop Issuance 6.0 - User Guide
As our FP Printer uses color/monochrome ribbon to print the card, we defined ‘Color
Text’ fields linked to the Data Fields ‘branch_name’, ‘cardholder_name’ and
‘bar_code’ (coming from the ‘DataSetup1’ data setup).
Bar code field will be printed by using barcode font ‘EAN-13’.
4.5.4.2-
View Back
In this sample, we encode the Magstripe and the indent on the back of the card.
As our FP Printer uses rear indent printing module, we defined an ‘Emboss’ field
linked to the Data Field ‘indent’ (coming from the ‘DataSetup1’ data setup).
With this equipment, indent fields must be embossed by using font ‘OCR_14’ solely.
4.5.5- Job Setup for FP65i Printer
Here is the Job Setup using the different FP65i setups that we created.
Name: CDI_0.docx
September 2012
Page 51 / 78
Custom Desktop Issuance 6.0 - User Guide
4.6- DATACARD DC450 PRINTER
4.6.1- Card Setup for DC450 Printer
first margin second margin
In this sample, we emboss Field_1 to Field_5 on the front of the card.
DC450 is a dual margin printer, which implies for CDI Card Setup:
The left position of first created emboss field defines the first margin.
The left position of second created emboss field defines the second margin.
All the other emboss fields follow the second margin (1000 in this sample),
whatever their left position in the Card Setup is. (If you really want to position
the fields farther on the right, you have to pad them with spaces, e.g. using
composite fields in the Data Setup.)
Same rule applies for indent fields on the back of the card.
(This means for example that if a back indent field is created before the front
embossing fields, then the back indent field will define the first margin.)
Name: CDI_0.docx
September 2012
Page 52 / 78
Custom Desktop Issuance 6.0 - User Guide
4.7- DATACARD DC315GX PRINTER
4.7.1- Hardware Setup for DC315GX Printer
In this sample, we use a DC315GX with Encoder (Magstripe), Embosser, Topper
and SMC reader with SCS/APM (in this case SCS/APM IP Address must be
entered).
NB: To use CDI with SCS/APM for this printer, go to section 6.1- “Special for
DC315GX” (page 76).
Name: CDI_0.docx
September 2012
Page 53 / 78
Custom Desktop Issuance 6.0 - User Guide
4.7.2- Machine setup for DC315GX Printer
In this sample, we use Encoder (Magstripe), Embosser, Topper and SmartCard.
4.7.3- Data Setup
Name: CDI_0.docx
September 2012
Page 54 / 78
Custom Desktop Issuance 6.0 - User Guide
Data setup is not linked directly to a kind of printer. You can use the same Data
Setup for several productions using different kind of printers.
4.7.4- Card Setup for DC315GX Printer
In this sample, we emboss the ‘id’ field on the front of the card. We also personalize
the chip of the card by using data imported in the ‘chip’ Data Field.
This screenshot only shows the front of the card; the Magstripe is encoded on the
back of the card. The indent is embossed on the back too.
Name: CDI_0.docx
September 2012
Page 55 / 78
Custom Desktop Issuance 6.0 - User Guide
4.7.5- Job Setup for DC315GX Printer
Here is the Job Setup using the different DC315GX setups that we created.
Name: CDI_0.docx
September 2012
Page 56 / 78
Custom Desktop Issuance 6.0 - User Guide
4.8- DATACARD 150I PRINTER
4.8.1- Hardware Setup for 150i Printer
In this sample, we use a 150i with Encoder (Magstripe), Embosser and Topper.
4.8.2- Machine Setup for 150i Printer
In this sample, we use Encoder (Magstripe), Embosser and Topper.
Name: CDI_0.docx
September 2012
Page 57 / 78
Custom Desktop Issuance 6.0 - User Guide
4.8.3- Data Setup
Data setup is not linked directly to a kind of printer. You can use the same Data
Setup for several productions using different kind of printers.
4.8.4- Card Setup for 150i Printer
4.8.4.1-
View Front
Name: CDI_0.docx
September 2012
Page 58 / 78
Custom Desktop Issuance 6.0 - User Guide
In this sample, we emboss the account_number, the cardholder_name and the
expiry_date on the front of the card. Account_number, cardholder_name and
expiry_date fields will be embossed by using font ‘10_cpi’.
4.8.4.2-
View Back
In this sample, we encode the Magstripe on the back of the card.
4.8.5- Job Setup for 150i Printer
Here is the Job Setup using the different 150i setups that we created.
Name: CDI_0.docx
September 2012
Page 59 / 78
Custom Desktop Issuance 6.0 - User Guide
4.9- DATACARD DC280P PRINTER
4.9.1- Hardware Setup for DC208P Printer
In this sample, we use a DC280P with Ultragrafix and SMC reader.
4.9.2- Machine setup for DC280P Printer
In this sample, we use Ultragrafix and SmartCard.
Name: CDI_0.docx
September 2012
Page 60 / 78
Custom Desktop Issuance 6.0 - User Guide
4.9.3- Data Setup
Data setup is not linked directly to a kind of printer. You can use the same Data
Setup for several productions using different kind of printers.
4.9.4- Card Setup for DC280P Printer
Name: CDI_0.docx
September 2012
Page 61 / 78
Custom Desktop Issuance 6.0 - User Guide
In this sample, we emboss the ‘blank_field’ field as Ultragrafix on the front of the
card. We also personalize the chip of the card.
4.9.5- Job Setup for DC280P Printer
Here is the Job Setup using the different DC280P setups that we created.
Name: CDI_0.docx
September 2012
Page 62 / 78
Custom Desktop Issuance 6.0 - User Guide
4.10- MACHINE SETUP WITH READ LOOKUP
Select READLOOKUP application, and check ISO1 and ISO2 if you have 2 tracks in your
Magstripe data (ISO1 only if you have only one track). Then select your data setup and
choose field corresponding to Magstripe data (Encode in this case).
Name: CDI_0.docx
September 2012
Page 63 / 78
Custom Desktop Issuance 6.0 - User Guide
5 Utilities
Select any item on the Utilities pull-down menu bar for information.
Name: CDI_0.docx
September 2012
Page 64 / 78
Custom Desktop Issuance 6.0 - User Guide
5.1- FILE MANAGEMENT
Select any item on the File Management pull-down menu bar for information.
Name: CDI_0.docx
September 2012
Page 65 / 78
Custom Desktop Issuance 6.0 - User Guide
5.1.1- Data Groups
Select any item in the Data Management window for information.
Use this window to manage all the data files in groups or jobs. The table shows the
number of records and their breakdown by status.
A group is created upon each data transfer.
A job is created for each file.
A new job is created for each new FIR in a file.
The job name is either entered, or calculated automatically using the file name plus
an index number.
“Remove Group” erases physically and definitively all data of the group.
It cannot be recovered.
“Delete Group/Job” makes the group/job inaccessible in the menus “2. Data > 3.
Record Status” and “1. Cards > 2. Make Cards from list”.
But it can still be seen through menu “5. Utilities > 1. File Management > 1. Data
Groups”.
Name: CDI_0.docx
September 2012
Page 66 / 78
Custom Desktop Issuance 6.0 - User Guide
5.1.2- Directories
This screen enables you to define default path to folder that contains pictures
and logos (jpg format) for graphic printing. If a picture name (e.g. logo.jpg) is defined
in input file, it will look into ‘Picture Directory’ for this logo.jpg file.
Name: CDI_0.docx
September 2012
Page 67 / 78
Custom Desktop Issuance 6.0 - User Guide
5.2- BACKUP/RESTORE
Select any item on the Backup/Restore pull-down menu bar for information.
5.2.1- Backup
CDI creates a directory named Reserved on the selected backup drive. This
subdirectory contains all the current CDI setup files.
5.2.2- Restore
For security reasons, the Restore function is not included in the CDI software.
Performing an automatic Restore procedure is not recommended because the risk of losing
all setups is high. Use the Windows Explorer Utility for restoring backup setup files (cf.
Reserved folder).
Name: CDI_0.docx
September 2012
Page 68 / 78
Custom Desktop Issuance 6.0 - User Guide
5.3- SECURITY
Select any item on the Security pull-down menu bar for information.
Name: CDI_0.docx
September 2012
Page 69 / 78
Custom Desktop Issuance 6.0 - User Guide
5.3.1- User/Password
Select any item in the Security User Names window for information.
Use this window to manage users, assign them authorization levels for the program,
and define the interface language.
To define a new user, click Add.
Enter the user's Name.
Select the user's level from the dropdown list that appears by clicking in the
corresponding Level field.
Select the language by clicking in the corresponding Language field.
Click the Password button to define the user's password.
Enter the current password in the Enter Current Password field. If the user was just
created, the password is USER.
Enter the new password in the Enter New Password field.
Click the OK button.
Back in the main window, click on another record to ensure that the record you just
created was saved correctly.
Click the Exit button to close the window.
This window is displayed in English. As the language used depends on the user ID,
the system switches to the user's chosen language after the user logs on in this
window.
Name: CDI_0.docx
September 2012
Page 70 / 78
Custom Desktop Issuance 6.0 - User Guide
5.3.2- Access Level
Allows insertion of an access level. After naming the access level, determine which
type of user will have access to certain menus.
Level Supervisor cannot be deleted. This level gives access to all menus and is
reserved for the supervisor level only. It is important to remember the setting of different
access levels and is essential for maintaining a high level of security for card production. It is
highly recommend there should be at least two distinct users with the Level Supervisor
access.
Select any item in the Security Access Level window for information.
Select the Level Name to be configured or click Add to create a new level.
The list allows you to define whether a given menu is accessible to the selected level
(profile).
Click the
symbol to switch it to
and vice-versa.
indicates that the submenu in question is accessible for the Profile.
indicates that the submenu in question is not accessible for the Profile. The submenu
will be grayed out in the corresponding menu bar.
By default, authorization to a menu gives access to all its submenus. To modify access to
a submenu, click the submenu: the icon to its left changes.
If access to a menu is prohibited, it is grayed out in the corresponding Module.
If access to a menu is prohibited, the attached submenus are not accessible.
Name: CDI_0.docx
September 2012
Page 71 / 78
Custom Desktop Issuance 6.0 - User Guide
5.4- SYSTEM MAINTENANCE
Select Hardware Setup on the System Maintenance pull-down menu bar for information.
Name: CDI_0.docx
September 2012
Page 72 / 78
Custom Desktop Issuance 6.0 - User Guide
5.4.1- Hardware Setup
Select any item in the Hardware Setup window for information.
To create a new Hardware setup, click the Add button.
Optionally modify the description of the Hardware setup.
Configure the Machine Communication Setup (USB or RS232).
Configure Device (Protocol Smartdriver, Machine ID, Polling Interval, Time out, Wait
time print)
Enter a Machine ID. This is typically the user’s choice. (Example: DC280 No1) The
Machine ID is a field that can be used in the Audit Trail report.
NB: For SCS/APM use, please go to chapter 6 “Plug-in for using CDI with SCS/APM” (page
75)
If using a 150i machine, enter the machine’s password for magstripe encoding.
Check Embosser if the printer is so equipped.
Check Color if the printer is so equipped (color printing for SPxx Plus Series).
Check Ultragrafix if the printer is so equipped (monochrome printing for DC280).
Check the following one if the printer is equipped with a Smart Card module: Internal,
External or Mag Stripe (contact-less Smart Card module) is used (NOT USED WITH
SCS/APM).
Name: CDI_0.docx
September 2012
Page 73 / 78
Custom Desktop Issuance 6.0 - User Guide
Hardware Setup-Protocol
Click the Protocol arrow and select one of the following protocols specific to the
Datacard printer:
CPX Revision x for DC28x, 150i, SE48, DC450
SmartDriver for SPxx Plus Series
U800 for Ultragrafix
Hardware Setup-Polling Interval
Polling is an interval of time between each PC request to the printer. The default is
Left Empty.
Hardware Setup-Time Out
Time Out is the maximum time allowed for feedback data to be sent from the printer.
The default is Left Empty.
5.4.2- Software Setup
‘User Application’ section enables to add a shortcut to any application in ‘utilities’
menu (e.g. Windows notepad).
‘Job Setup Selection’ section enables you to define FIR Header for your input file and
specific Job Setup ID to be used when loading data.
5.4.3- CSM Status
Card System Management (CSM) is a Datacard® system to manage and allocate
jobs between several printers. The CSM/CDI interface is available in this software version, as
well as interface with Datacard® DPP CPM module.
Name: CDI_0.docx
September 2012
Page 74 / 78
Custom Desktop Issuance 6.0 - User Guide
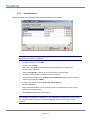
6 Plug-in for using CDI with SCS/APM
If you are using DC315GX, you can skip this section and go to 6.1- “Special for
DC315GX” (page 76).
In order to use CDI with SCS/APM, the SmartCard reader that will be used for chip
personalization needs to be defined:
Run Configure Programming Station from Programs -> Datacard -> Affina
Personalization Manager -> Desktop Utility
In the ‘Configure Programming Station’ tool, enter the IP address of the
SCS/APM server. Then click on the ‘Check if present’ button in order to check
that’s ok. If it’s ok, you will have the following message:
Name: CDI_0.docx
September 2012
Page 75 / 78
Custom Desktop Issuance 6.0 - User Guide
Then register your Computer in SCS/APM by clicking on the ‘Register’ button.
Machine ID in ‘Hardware Setup’ of CDI must be the same than Computer
Name defined in the ‘Configure Programming Station’ tool.
↔
‘Configure Programming Station’ tool
CDI ‘Hardware Setup’
Select the reader in Internal Contact Smart Card or in Internal Contactless
Smart Card (depending of your device and what you want to do).
Click on the save button (you can check within Perso Devices folder from
General Object Loader if equipment name has been correctly saved).
Configure Machine Setup for SCS/APM (page 18)
6.1- SPECIAL FOR DC315GX
In order to use CDI with SCS/APM, the printer needs to be registered to SCS Server:
Note down the IP address of the computer (or boxer) driving the printer
On SCS Server, run General Object Loader from Programs -> Datacard ->
Syntera Customization Suite
Add a new object with the IP in Generator field:
Name: CDI_0.docx
September 2012
Page 76 / 78
Custom Desktop Issuance 6.0 - User Guide
Configure Machine Setup for SCS/APM (page 18)
Name: CDI_0.docx
September 2012
Page 77 / 78
Custom Desktop Issuance 6.0 - User Guide
7 Winlec to CDI migration
You can easily migrate your Winlec setups and application to CDI, and use them the
same way on CDI.
To do so, install CDI (please refer to chapter 2 of this document), then copy your
Winlec Rserved folder (usually installed under C:\Winlec) in your CDI installation folder (it will
replace the current one). Then copy your applications from C:\Winlec\Dll folder to C:\CDI\Dll.
Please note you will have to reload Winlec jobs on CDI so that you can use them.
Name: CDI_0.docx
September 2012
Page 78 / 78