1
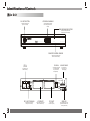
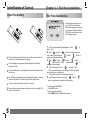
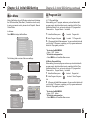
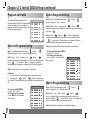
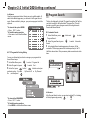
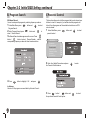
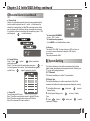
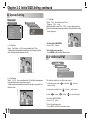
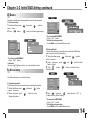
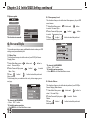
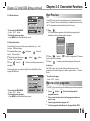
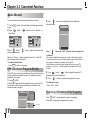
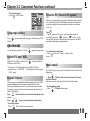
Digital Set Top Box
Operating Manual
DVBT-11
Digital video broadcasting
REMOTE
Digital Terrestrial Receiver
DVB-T PLAYER
Before connecting, operating or adjusting this product,
please read this user's manual carefully and completely.
Table of Contents
Contents
Table of Contents
P1
Safety Precautions
P2
Before Use(Continued)
P2
Chapter 2-2 Initial OSD Setting
Chapter 2-3 Convenient Functions
Identification of Controls
P3-P5
Main Unit
P3
Remote control unit
P4
Insert the battery
P5
Chapter 2-1 First Time Installation
First Time Installation
1
P5
P5
Technical Specification
P6-P16
P16-P18
P19
Safety Precautions
Safety Precautions
Always read the safety instructions carefully
Keep this User s Manual for future reference
Keep this equipment away from humidity
Lay this equipment on a reliable flat surface before setting it up.
Do not stand it on soft furnishings.
If any of the following situation arises, get the equipment checked
by a service technician:
1.The equipment has been exposed to moisture.
2.The equipment has been dropped and damaged.
3.The equipment has obvious sign of breakage.
4.The equipment has not been working well or you cannot get it
work according to User¡¯s Manual.
Warning
To prevent the risk of electric shock, do not open the cover or the
back of the receiver.
Do not block the ventilation holes of the device. Leave appropriate
gap above and around it to allow for adequate ventilation.
Do not place the device in an unventilated cabinet or on top of a
unit which emits heat.
Copyright Statement
No part of this publication may be reproduced in any form by any
means without the prior written permission. Other trademarks or
brand names mentioned here in are trademarks or registered
trademarks of their respective companies.
Disclaimer
Before Use(Continued)
Introduction
This DVB-T player is a Free-To-Air digital terrestrial receiver,
allowing you to access free-to-air digital terrestrial TV channels and radio
broadcasts.Its digital reception covers VHF & UHF band.
Compared with the analog TV programs, digital TV programs eliminate
the noise and interference but offer high quality video and audio. An onscreen initial installation guide is provided so that you can easily start to
enjoy watching the programs. In addition, a fully featured remote
controller is included that offers you access to every feature with a simple
press of a button.
Features
1.Bandwidth of 7/8MHz supported
2.Automatic/manual channel search
3.COFDM demodulator
4.Supports remote control
5.NTSC/PAL converting automatically and manually
6.EPG (Electronic Program Guide) and Teletext function
7.Multiple-language OSD (English, French, German, Italian, Spanish,
Portuguese and Dutch)
8.Channel edit, moving and deletion
9.Parental lock control
10.SDTV only
11.Supports subtitle
12.ETSI EN 300 744 DVB-T Compliance
Information in this document is subject to change without notice.
The manufacturer does not make any representations or warranties
(implied or otherwise) regarding the accuracy and completeness of
this document and shall in no event be liable for any loss of profit or
any commercial damage, including but not limited to special,
incidental, consequential, or other damage.
2
Identification of Controls
Main Unit
ON / OFF BUTTON
UP DOWN CHANNELS
(Used to switch the set
top box on and off)
(Used to change channels
with out using the remote
control)
DVB WORKING INDICATOR
(Used to visually show when
the set top box is turned on)
Digital video broadcasting
REMOTE
Digital Terrestrial Receiver
REMOTE CONTROL SENSOR
(Used to receive the signal
from the remote control)
RF IN
(This socket
connects to your
external aerial)
VCR SCART
IN
ANT
COAXIAL
MAINS CABLE
(This socket connects
to a coaxial socket
on your surround
sound system)
(This is used to
connect to your
mains supply)
TV SCART
OUT
AC IN~110-240V
DIGITAL AUDIO
MODEL:DVBT-11
SERVINGS
www.denver-electronics.com
3
RF LOOP THROUGH
VCR SCART
TV SCART
SERVICE
(This socket connects to
either your tv or video)
(This socket connects to
either a video or dvd)
(This socket
connects your tv)
(This socket is only used
by the manufacturer and
service personnel)
Identification of Controls
Chapter 2-1 First Time Installation
Insert the battery
First Time Installation
No channels are stored in your
unit. A First Time Installation
Wizard will appear automatically
on the screen. Continue with the
OSD (On-Screen-Display) to do
the following setting.
1 A First Time Installation Wizard appears. Press¡°
select¡°YES¡±.
Refer to the drawing, take the back cover of the remote control off
and remove the empty battery receptacle.
Prior to shipping, a separating film was applied to the battery.
Remove this film.
¡± to
2 Press¡°
¡± button / ¡°
¡± button to select the item you
wish to set up, and then press ¡°
¡±button / ¡°
¡±button to
switch to your preferred setting.
3 Press¡°
¡±button / ¡°
¡±button /¡°
¡±button /
¡°
¡±button to select ¡°NEXT¡±, and then press¡° OK ¡±to
continue to the next page.
4
Insert the battery into the receptacle and insert the receptacle into
the remote.
To start Auto Search, press¡° OK
¡± to select ¡°YES¡±.
All the receivable programs (including TV and Music) will be
listed respectively on the screen.
This process may take a few minutes to be done.
For the best results,aim the remote towards at the player, receiving
window. Stay within 15 feet and angles of 60 degrees or less.
5 After Program Search is done, press¡° CH ¡±button / ¡°
¡±button to select and start watching TV programs.
Under normal use the battery will last for one year.
Remove battery during storage or when you are not using the DVD
player for a long time.
5
OK
*To return to the MAIN MENU
---Press EXIT button.
*To finish the setup operation
---Press MENU to exit from Main Menu screen.
CH
Chapter 2-2 Initial OSD Setting
Chapter 2-2 Initial OSD Setting-continued
Main Menu
A. Program List
Most of the Settings of your DVB player can be done by following
the OSD instructions (*Main Menu). For details on how to set up
by using your remote control, please refer to Chapter 5: Remote
Control Guide.
A-1 TV Program Editing
Before editing your TV program, make sure you have finished with
program search, which should be done by completing the First Time
Installation Wizard. If not, you have to set up your TV programs first.
Please refer to ¡°Program Search¡± for details.
In Advance:
Press MENU to display the Main Menu.
1
2
3
MAIN MENU
Game
1
GAME
Mine
Tetris
Gomoku
Calender
5
2
3
OK
System Setting
TV standard
Display TYPE
Video output
Antenna power
Regional setting
Language
Time setting
System schedule
ACCESSORY
System Information
Factory Default
System update
Enter parental PIN
Enter PIN
¡± to select ¡°Program List¡±.
¡±to select ¡°TV Program List¡±.
6
P erso nal S tyl e
Displ ay T ype
ScMenu
ar t Output
Colo r
BLUE
Ant enna Po wer
Countr
y arency L evel
6
T r ansp
OSD L anguage
P aren
R ound
Bo rdtal
er Contro
P atter nl
En tr y A nimation
A-2 Music Program Editing
Before editing your music program, make sure you have finished with
program search, which should be done by completing the First Time
Installation Wizard. If not, you have to set up your TV programs first.
Please refer to ¡°Program Search¡± for details.
1
2
Program Search
Automatic Search
Manual Search
Under Program List, press¡° OK
*To return to the MAIN MENU
---Press ¡°EXIT¡±button.
*To finish the setup operation
---Press MENU to exit from Main Menu screen.
The following is the overview of the seven settings:
Program List
OK
A Program edit table Window appears. You can use this table to edit
your Favorite TV Programs, re-arrange your TV program numbers and
delete the TV programs you dislike.
Program list
Program search
Parental control
System setting
Game(not for sale)
Accessory
Personal style
TV Program List
Music Program List
Sort
Under Main Menu, press¡°
Ri g ht
7
Under Main Menu, press¡°
OK
Under Program List, press¡° OK
List¡±.
¡±to select ¡°Program List¡±.
¡± to select ¡°Music Program
3 A Program edit table Window appears. You can use this table to edit
your Favorite TV Programs, re-arrange your TV program numbers and
delete the TV programs you dislike.
*To return to the MAIN MENU
---Press¡°EXIT¡±button.
*To finish the setup operation
---Press MENU to exit from Main Menu screen.
4
6
Chapter 2-2 Initial OSD Setting-continued
Program edit table
The following table is present in the TV
Program Editing and Music Program Editing
menus. You may freely set your favorite
program list, switch program numbers, and
delete an existing program.
Switch Program Setting
Step 1. In the Program edit table, press ¡°
button to highlight ¡°Move¡± section.
Pr og ra m edit table
No.
1
2
3
4
5
6
7
8
P r ogr am Name
FTV
TTV -1
TTV -2
ST V
Step 3. Press ¡°
¡±button / ¡°
¡±button to highlight the
corresponding program box you wish to exchange, and then press
¡° OK ¡±You will see a ¡°Double-Arrows¡±icon appear on this box,
representing that 2 program numbers are switched.
Step 4. Repeat Step 2 through Step 3 to switch more programs.
Step 1. In the Program edit table, press ¡°
¡±button / ¡°
button to highlight ¡°Favor¡± (Favorite Program) section.
¡±
Step 2. Under ¡°Favor¡± section, press ¡°
¡±button / ¡°
¡±
button to highlight the corresponding box of your favorite Program and
press¡° OK ¡± .You will see a ¡°Heart¡± icon appear on this box,
representing that this program is added to your Favorite Program list.
Step 3. Repeat Step 2 to add more favorite TV programs.
In Advance:
a. You can set up your Favorite Program by using remote control.
b. You can press ¡°
¡±button / ¡°
¡±button to step through
your Favorite Program only after one or more Favorite programs are set
up.
Pr ogram edit table
No.
1
2
3
4
5
6
7
8
Pro gram Name
FT V
FT VN
FT VTES T
TT V-1
TT V-2
STV
Favor Move Del
*To return to the the up level MENU
---Press ¡°EXIT¡±button.
*To finish the setup operation
---Press¡°MENU¡±to exit from Main
Menu screen.
Pr ogr am edit table
No.
1
2
3
4
5
6
7
8
P r ogr am Name
Favor Move Del
FT V
FT V N
F T VT EST
TT V-1
TT V-2
STV
Delete Program Setting
Step 1. In the Program edit table, press ¡°
button to highlight ¡°Del¡± (Delete) section.
¡±button / ¡°
¡±
Step 2. Under ¡°Del¡± section, press ¡°
¡±button / ¡°
¡±
button to highlight the corre sponding program box you wish to
delete,and press¡° OK ¡±.You will see a ¡°Cross¡± icon appear on
this box, representing that the program is deleted.
Step 3. Repeat Step 2 to delete more unwanted programs.
7
¡±
Step 2. Under ¡°Move¡± section, press ¡°
¡±button / ¡°
¡±
button to highlight the corresponding program box you wish to change
and press ¡° OK ¡±.
FTV N
FTV TE S T
Favorite Program Setting
*To return to the MAIN MENU
---Press ¡°EXIT¡±button.
*To finish the setup operation
---Press MENU to exit from Main
Menu screen.
¡±button / ¡°
Favor Move Del
Chapter 2-2 Initial OSD Setting-continued
In Advance:
Once the programs are deleted, there is no way to add them back. To
watch those deleted programs, you will need to do Program Search
again. Please note that by doing so, your previous program list will be
replaced.
*To return to the up level MENU
---Press ¡°EXIT¡± button.
*To finish the setup operation
---Press menu to exit from Main Menu
screen.
B. Program Search
To Enjoy the high quality of digital TV signals through the Set Top Box,
you have to search for all the available TV program first. This unit
provides you with 2 ways of program search, including Automatic
Search and Manual Search.
B-1 Automatic Search
1 Under Main Menu, press¡°
¡°Program Search¡±.
¡±button and¡°
2 Under Program Search, press¡°
Search¡±.
A-3 TV Program List Sorting Setting
OK
OK
¡± to select
¡±to select ¡°Automatic
3 An Automatic Search window appears on the screen. All the
receivable TV/Music programs will be listed respectively in the TV
List/Music boxes below. This process may take several minutes to be
done.
You can use this sorting function to re-arrange your program list in
three different ways.
1 Under Main Menu, press¡° OK ¡±to select ¡°Program List¡±.
2 Under Program List, press¡° OK ¡±to select ¡°Sort¡±.
3 Under Sort, press ¡°
¡±button / ¡°
¡±button to select your
preferred sorting: ¡°By name¡±, ¡°By Service ID¡± or ¡°By Channel
No.¡±, and then press ¡° OK ¡±.
*To return to the MAIN MENU
---Press ¡°EXIT¡± button.
*To finish the setup operation
---Press MENU to exit from Main Menu screen.
In Advance:
After Program Search is done, you can start watching TV or listening
to Music programs by pressing ¡°
¡± / ¡°
¡±.
CH
CH
8
Chapter 2-2 Initial OSD Setting-continued
B. Program Search
C Parental Control
B-2 Manual Search
You can locate specific programs by selecting frequency numbers.
This function allows you to lock the programs that you do not want your
children to view. For example, if you set the selected program to be
locked, then the program can't be watched unless the correct PIN
code is entered.
1 Under Main Menu, press¡°
¡°Program Search¡±.
2 Under Program Search, press¡°
select ¡°Manual Search¡±.
¡± button and¡°
OK
¡±to select
¡± button and¡°
OK
1 Under Main Menu, press¡°
¡°parental control¡±.
¡± to
3 An Manual Search window appears on the screen. Press¡°
button / ¡°
¡±button to select ¡°Channel Number¡±, and the
corresponding frequency number will show from down below.
¡±button and¡°
OK
¡±to select
¡±
MAIN MENU
Program list
Program search
Parental control
System setting
Game(not for sale)
Accessory
Personal style
2 Enter the 4-digital Pin number and press¡°
the Parental Control window.
4
Press ¡°
¡± button to highlight ¡°OK¡±, and press¡°
OK
¡±to enter
OK
¡±
In Advance:
Almost all of the programs are avavilable by Automatic Search.
3 Press¡°
¡±button / ¡°
¡±button and¡°
the preferred Parental Control option.
9
OK
¡±to select
Chapter 2-2 Initial OSD Setting-continued
C Parental Control-continued
a. Channel Lock
Channel Lock allows the parents to prevent younger members of the
family to watch.Any channel can be ¡°locked¡± so that it cannot be
selected for viewing without a 4-digit PIN code being entered. In this
way, any channel not suitable for younger viewers can be protected.
If you want to lock the current channel you are watching, select ¡°YES¡±
and then press¡°
¡±to lock the channel.
OK
*To return to the MAIN MENU
---Press ¡°EXIT¡± button.
*To finish the setup operation
---Press MENU to exit from Main Menu screen.
In Advance:
The default PIN is 8888. You may change your PIN code soon as
you enter this menu.Remember to keep your PIN Code in a
secure place.
The super password is 9999.
b. Parental Setting
Step 1. Press¡°
¡±button / ¡°
¡±button to select the
preferred program.
Step 2. If you want to lock the selected program, press¡° OK ¡±, a
lock icon appear on the Lock box. Then the selected program is
locked. Press¡° OK
¡±again if you want to unlock it.
D. System Setting
This function allows you to set up the normal aspect ratio (picture
display shape) according to source signal and monitor format of your
TV, or your own viewing preference.
D-1 TV Standard
This function enables you to set the TV system format.
D-2 Display Type
This function enables you to set the screen format of the TV set
connected so that those broadcast programs are displayed correctly.
c. Change PIN
You can change the PIN code.
Step 1. Press the numeric button to enter 4-digit old PIN code.
Step 2. Press the numeric button to enter new PIN code.
Step 2. Re-enter new PIN code to confirm it.
1 Under Main Menu, press¡°
¡°System Setting¡±.
¡±button and¡°
2 Under System Setting, press¡°
Type¡±.
OK
3 Press¡°
¡±button / ¡°
a preferred TV display.
¡±button and¡°
OK
¡±to select
¡±to select ¡°Display
OK
¡±to select
10
Chapter 2-2 Initial OSD Setting-continued
D. System Setting
MAIN MENU
System Setting
TV standard
Display type
Video output
Antenna power
Regional setting
Main Me nu
Sys tem Set ti ng
Di spl ay T y pe
4: 3 PS
4:3
4:3
4:
3 LB
16:
16:9
9
C. 16:9 Wide
Select ¡°16:9¡± for a wide-screen TV set.
*Played in ¡°FULL¡± size.
Setting the wide-screen TV to ¡°FULL¡± mode is also necessary.
Each screen shows an example when the video material for a widescreen is played.
Language
Time setting
system schedule
a. 4:3 Pan Scan
Select ¡°Pan & Scan¡± (4:3) for a conventional size TV set.
*Video material formatted in the pan & scan style is played in that
style (the left and right edges are cut off).
*To return to the MAIN MENU
---Press¡°EXIT¡± button.
*To finish the setup operation
---Press MENU to exit from Main Menu screen.
D-2 VIDEO OUTPUT
Video output
CVBS
RGB
b. 4:3 Letter Box
Select ¡°4:3 LB¡± for a conventional size TV set. Black bands appear
at top and bottom of screen (letter-box style).
*Video material not formatted in the pan & scan style is played in the
letter-box style.
This function enables you to set the video output.
° button
¡
±and¡ OK °¡ to select
±
1.under main menu,press¡
¡ system setting
°
¡
±
2.under system setting,Press¡
3.press¡
¡ °button ±/
OK°
± ¡ video
° output¡ . ±
to¡ select
¡ ¡button ±/ °
OK
¡ ¡to set video
± ° output.
To return to the MAIN MENU.
---Press¡°EXIT¡±button.
To finish the setup operation
---Press MENU to exit from main menu screen.
11
Chapter 2-2 Initial OSD Setting-continued
D-3 Antenna Power
MAIN MENU
If you are using passive Antenna Power, set Antenna Power to
¡°OFF¡±; if you are using active Antenna Power, set Antenna Power to
¡°ON¡±.
1 Under Main Menu, press¡
¡°System Setting¡±.
2
Under System Setting, press¡
Power¡±.
° button
¡ / ¡° ±
3 Press¡
initiate antenna power.
° button
¡ and¡°
±
¡±to select
OK
System Setting
TV standard
Display type
Video output
Antenna power
Regional setting
Regional Setting
Country
England
English
OSD Language
Language
OK
° to select
¡
¡°Antenna
±
¡±button/¡°
OK
¡±button to
MAIN MENU
Time setting
Time Zone
GMT+08:00
system schedule
In Advance:
GMT: The current time is set automatically whenever GMT offset
changes.
*To return to the MAIN MENU
---Press ¡°EXIT¡± button.
*To finish the setup operation
---Press MENU to exit from Main Menu screen.
System Setting
TV standard
Display type
Video output
Antenna power
Regional setting
D-5 OSD Language/Audio Language/Teletext language
Language
This function allows you to set the language of your OSD (On-Screen
Display) Menu.
Time setting
system schedule
1 Under Main Menu, press¡°
select ¡°System Setting¡±.
*To return to the MAIN MENU
---Press ¡°EXIT¡± button.
*To finish the setup operation
---Press MENU to exit from Main Menu screen.
OK
¡±button to
select ¡°System Setting¡±.
2 Under System Setting, press¡°
OK
¡±button to select
¡°Regional setting¡±.
3 Press ¡°
¡±button / ¡°
the country where you¡¯re in.
¡±button to
3 Press¡°
¡±button / ¡°
¡±button and¡° OK ¡±to select
the preferred OSD language.Audio language / DVB subtitle language.
This function allows you to set the time zone of your location and
corresponding bandwidth of the digtial signals all at once simply by
selecting the country you are currently in.
¡±button/¡°
OK
2 Under System Setting, press¡° OK ¡±buttonto select ¡°OSD
Language¡±¡°1st Audio language¡ ± ¡ °2st audio language¡±¡°DVB subtitle¡±
D-4 regional settings
1 Under Main Menu, press¡°
¡±button/¡°
MAIN MENU
System Setting
TV standard
Display type
Video output
Antenna power
Regional setting
Language
Time setting
¡±button/¡°
OK
¡±button select
Language
OSD language
1st Audio language
2st Audio language
DVB subtitle
English
English
English
English
system schedule
12
Chapter 2-2 Initial OSD Setting-continued
D-6 OSD Language/Audio Language/Teletext language
1:Under main MENU,press¡°
¡±button and¡° OK ¡±button to
select¡°system setting¡±.
2:Under¡°system setting¡±,press¡° OK ¡±button to select
¡°system schdule¡±.
3:Press¡°
¡± ¡°
¡± button to select Task.
*To return to the MAIN MENU
---Press¡°EXIT¡± button.
*To finish the setup operation
---Press MENU to exit from Main Menu screen.
In advance: Audio language / DVB subtitle is not avaliable on all
channels.
4:Press¡°
D-7 Time setting
5:Press¡°
6:Press¡°
¡± ¡°
OK
¡± button to inactive/active this task.
¡±button to enter in task detail setting.
¡± ¡°
¡± button to select setting item.
Time setting
GMT usage
Time zone
This function allows you setting the time:
1:Under main menu,press¡°
¡±button and¡° OK ¡±button to
select¡°system setting¡±.
2:Under system setting,press¡° OK ¡±button to select¡° Time setting¡±
3:You can set time by pressing¡°
¡ ± ¡ ° ¡ ±/numeric button.
OK
D-8 system schedule
You can set power on/off time and program schedule in system
schedule:
MAIN MENU
System Setting
TV standard
Display type
Video output
Antenna power
Regional setting
Language
Time setting
system schedule
13
Detail
Schedule
ON
GMT TO 0:00
Task1
Task2
Task3
Task4
Task5
Task6
Active
Inactive
Inactive
Inactive
Inactive
Inactive
Mode
Start Date
Start Time
End Time
Channel Type
Channel No
Active
Inactive
Inactive
Inactive
Inactive
Inactive
0001
Detail
Schedule
Task1
Task2
Task3
Task4
Task5
Task6
once
2004/01/01
00:00
00:00
TV
Mode
Start Date
Start Time
End Time
Channel Type
Channel No
once
2004/01/01
00:00
00:00
TV
0001
Press¡°
¡± ¡°
¡± button and use numeric button to set the
information.
To return to the main menu
---Press¡°EXIT¡±button.
To finish the setup operation
---Press MENU to exit from main MENU screen.
Chapter 2-2 Initial OSD Setting-continued
E. Game
This section provides you bonus games for extra fun and enjoyment.
D-1 Game selecting
1
¡±button and¡°
Under Main Menu, press¡°
select ¡°Game¡±.
2
Press¡°
¡±button/¡°
OK
OK
¡±button to
¡±button to select one game to play.
Program list
Program search
Parental control
System setting
Game(not for sale)
Accessory
Personal style
Accessory
*To return to the MAIN MENU
---Press ¡°EXIT¡± button.
*To finish the setup operation
---Press MENU to exit from Main Menu screen.
MAIN MENU
Program list
Program search
Parental control
System setting
Game(not for sale)
Accessory
Personal style
F2 Factory Default
This function allows you to erase the previous/current OSD setting
and to restore Factory Default setting.
*To return to the MAIN MENU
---Press ¡°EXIT¡± button.
In Advance:
By pressing Game <Game> button, you can enter Game mode.
F. Accessory
1 Under Main Menu, press ¡°
select¡°Accessory¡±.
¡±button and¡°
2 Under ¡°Accessory¡±, press¡°
¡°Factory Default¡±.
3 Press¡°
¡±button/¡°
Default window.
OK
F1 System Information
This function allows you to view the version number of the system.
2 Under Accessory , press¡°
¡°System Information¡±.
¡±button and¡°
OK
OK
¡±button to
¡±button to select
¡±button to enter the Factory
Accessory
This feature allows you to set extra functions
1 Under Main Menu, press¡°
to select ¡°Accessory¡±.
¡±and¡°
OK
OK
¡±button
¡±button to select
Program list
Program search
Parental control
System setting
Game(not for sale)
Accessory
Personal style
4 Press¡°
¡±button and¡° OK
go back to Factory Default setting.
¡±button to select ¡°YES¡± to
*To return to the MAIN MENU
---Press ¡°EXIT¡± button.
*To finish the setup operation
---Press MENU to exit from Main Menu screen.
14
Chapter 2-2 Initial OSD Setting-continued
F3 System update
G-2 Transparency Level
This function allows you to set the level of transparency of your OSD
menu frames.
Accessory
1 Under Main Menu, press¡°
to select¡°Personal Style¡±.
System Information
Factory Default
System update
This function is reserved:
System update
2 Under Personal Style, press¡°
to select ¡°Transparency Level¡±.
Status
Timeout,retry 006
Transmission 000%
Burn
000%
¡±button and¡°
OK
¡±button/¡°
¡±button
¡± button
3 Press¡°
¡±button / ¡°
¡±button to select the preferred
level of transparency from 1 to 8.
Press Any Key to Exit
G. Personal Style
This section provides you many additional features to make your OSD
setting more personal and stylish.
G-1 Menu Color
This function allows you to set the colour of your OSD (On-Screen
Display) Menu.
1 Under Main Menu, press¡°
select ¡°Personal Style¡±.
2 Under Personal Style, press¡°
¡°Menu Color¡±.
¡±button and¡°
OK
¡±button to
¡±button /¡°
¡± to select
3 Press¡°
¡±button / ¡°
¡±button to select the preferred
Menu color.
The following is for your selection: blue, red, yellow, orange, green
and gray.
*To return to the MAIN MENU
---Press ¡°EXIT¡± button.
*To finish the setup operation
---Press MENU to exit from Main Menu screen.
15
G-3 Border Pattern
This function allows you to set the border pattern of your OSD (OnScreen Display) Menu frames.
MAIN MENU
Program list
Program search
Parental control
System setting
Game(not for sale)
Accessory
Personal style
*To return to the MAIN MENU
---Press ¡°EXIT¡± button.
*To finish the setup operation
---Press MENU to exit from Main Menu screen.
7
1 Under Main Menu, press¡°
select ¡°Personal Style¡±.
2 Under Personal Style, press¡°
Pattern¡±.
3 Press¡°
¡±button / ¡°
border pattern.
¡±button and¡°
OK
¡±button to
¡±to select ¡°Border
¡±button to select the preferred
Chapter 2-2 Initial OSD Setting-continued
Chapter 2-3 Convenient Functions
G-3 Border Pattern
Fast Preview
7
The DVB-T player provides you fast preview of live broadcasts from
each TV channel. You can use this function to take a fast preview at all
the TV programs in advance of watching it in full screen.
1
*To return to the MAIN MENU
---Press ¡°EXIT¡± button.
*To finish the setup operation
---Press MENU to exit from Main Menu screen.
Press¡° OK ¡±
A TV Channel Menu appears to the left with corresponding live
broadcast of the selected program to the right.
TV Program List
No.
G-4 Entry Animation
1
2
3
4
5
6
7
8
This function allows you to set the entry animation of your ¡°Fast
Preview¡± OSD menu frame.
1 Under Main Menu, press¡°
select ¡°Personal Style¡±.
2
Under Personal Style, press¡°
to select ¡°Entry Animation¡±.
3 Press¡°
animation.
¡±button / ¡°
¡±button and¡°
OK
¡± button/¡°
¡±button to
¡±button
¡±button to select the preferred entry
The following is for your selection: Right, Down, Right Down, Blind
Right and Blind Down.
P ro gram Name
FT V
TT V-1
k
FT V N
2 Press¡°
¡±button / ¡°
and to see its live broadcast.
3
Press¡°
OK
¡±button to toggle each TV channel
¡±to watch your preferred program in full screen.
In Advance:
The DVB-T player also provide a Channel Guide window of live
broadcasts in thumbnail images.For details, please refer to ¡°Channel
Guide¡±.
*To exit from this page
---Press¡°EXIT¡± button.
7
How to select programs
The DVB-T player provides you the following ways to select programs.
*To return to the MAIN MENU
---Press ¡°EXIT¡± button.
*To finish the setup operation
---Press MENU to exit from Main Menu screen.
CH
CH
*
Press¡° ¡±button / ¡°
porgram selection.
*
Press numeric button(s) to enter the program number you
want to view.
*
*
Select program from the program list.
¡±button to step through the
Select program from the Electronic Program Guide (EPG).
16
Chapter 2-3 Convenient Functions
Audio Channel
You can select the preferred audio channel and sound mode.
1
Press
screen.
AUDIO
<Audio> , the Audio Channel window appears on the
2 Press¡°
¡±button to more digital teletext provided by the
selected channel.
Lock
TV Program List
FT V
2 Press¡°
¡±button / ¡°
¡°Sound Mode¡±.
No.
¡±button to select ¡°Channel¡± or
1
1
2
3
4
5
6
7
8
1
P ro gram Name
FT V
TT V-1
FT V N
2004/07/10 00:18
3 Press¡°
¡±button / ¡°
channel or sound mode.
¡±button to select the preferred audio
When the ¡°Channel¡± option is changed, the value of ¡°Audio PID¡±
will also change to the correct value.
*To exit from Audio channel
---Press AUDIO <Audio> button again.
EPG (Electronic Program Guide)
The DVB-T player provides you an Electronic Program Guide to take a
fast preview of live broadcasts from each TV channel in advance of
watching it in full screen.
1
Press EPG <EPG> .
An Electronic Program Guide Menu appears on the screen, with a TV
channel menu to the left and corresponding live broadcast of the
selected program to the right.
TV Program List
No.
1
2
3
4
5
6
7
8
17
¡±button and ¡°EXIT¡±button to return to program list.
Press¡°
In Advance:
The content of digital teletext varies according to the program provider.
It could be pictures and sound for the program, pages of information on
the programs, the weather, the news or other options.
Some channels provide only digital teletext that carry no normal TV
program; if so, you can¡¯t see the preview of the channels with EPG
function.
3 Press¡°
¡±button / ¡°
¡±button to toggle through each TV
channel and to see its live broadcast.
4
Press¡°
OK
¡±to watch your preferred program in full screen.
*To exit from this page
---Press¡°EXIT¡± button.
Displaying Information of the Program
k
P ro gram Name
FT V
TT V-1
Press INFO <INFO.> during playback, and the corresponding
information of the program will appear on the screen.
FT V N
Digital T eletext
Chapter 2-3 Convenient Functions-continued
*To exit from this page
---Press INFO <INFO.> button.
Favorite PR (Favorite Program)
There are some channels that you tend to watch more often and some
only occasionally. Favorite PR allows the most-watched channels to
access more easily, leaving less watched channels acces-sible but
out of way.
Language setting
LANG
Press¡°¡¡¡¡¡±,you can set the OSD language / Audio language / DVB
subtitle.
Press FAV
¡°Fav on¡± appears on the screen, and the favorite program is
activated; by pressing ¡°
¡±button / ¡°
¡±button, you can
only step through the favorite programs. Other programs can still be
accessed by entering the program number.
PAUSE MODE
PAUSE
You can freeze the picture in TV. Press¡°¡¡¡¡¡±,again,exit pause status.
Switch TV and VCR
*To exit from Favorite Program
---Press
button until ¡°Fav off¡± appears on the
FAV
screen.
DTV/VCR
Switch DTV and VCR you can press the ¡°¡¡¡¡¡± button to switch the
DVB output and VCR out.
* Please note: The VCR signal from other set(DVD,VCR,etc.)
connected to the ¡°VCR SCART¡± in the back panel and only support
¡°CVBS¡± signal.
Music mode
The DVB-T player provides you the convenient function to listen to the
digital radio.
TV/RADIO
Digital Teletext
If the program you are watching broadcasts digital teletext, the DVB-T
player can display teletext.The content of digital teletext varies
according to the program provider. It could be pictures and sound for
the program, pages of information on the programs, the weather, the
news or other options.
Press
screen.
Press
TEXT
1 Press
<TV/Radio> button to switch between TV channel
and Music channel.
Wait a few seconds, it will switch from TV mode to Music mode.
*To exit from Music mode
---Press TV/RADIO <TV/Radio> button again.
<Teletext> button, the teletext window appear on the
PAGE
button, turn over the teletext information.
*To exit from teletext
---Press EXIT <EXIT> button to exit from teletext.
18
Technical Specification
Power Supply
Input Voltage
110-240V AC 50Hz.
Power Consumption
Maximum 10W,Standby 5W.
Decoder
Video Formats
SD,4:3/16:9 Switchable.
Audio Format
MPEG Layer I&II,32/44.1/48Khz.
Video Output
CVBS ,RGB(default)
Connection
Main Power Cable
Fixed Type.
Tuner
1 Antenna Input/1 RF Output.
Scart
1 for VCR/1 for TV(Loopthrough).
SPDIF
1 Coaxial.
19