1
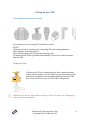
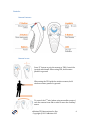
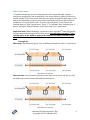
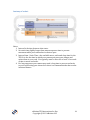
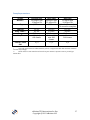
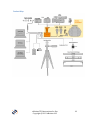
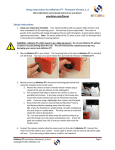
Instruction for Use eMotimo TB3 Black -‐ Firmware Version R1_1_107 eMotimo TB3 Instructions for Use Copyright © 2013 eMotimo LLC 1 Table of Contents Additional References ............................................................................................................ 3 Quick Start Guide .............................................................................................................................. 3 Instructional Videos ........................................................................................................................ 3 Setting up your TB3 ................................................................................................................ 4 Parts included and needed for setup: ........................................................................................ 4 Hardware Setup: ............................................................................................................................... 4 Controls: ............................................................................................................................................... 6 TB3 menu options ................................................................................................................... 7 New 2-‐point move: ........................................................................................................................... 7 New 3-‐point move: ........................................................................................................................... 9 DF slave mode: ................................................................................................................................. 11 Setup Menu: ...................................................................................................................................... 12 Powering your TB3 .............................................................................................................. 14 AC Adapter: ....................................................................................................................................... 14 Battery: ............................................................................................................................................... 14 Tips for setting up your first shot ................................................................................... 15 Camera setup recommendations: ............................................................................................. 15 Anatomy of a shot: .......................................................................................................................... 16 Example parameters: .................................................................................................................... 17 Product Map ..................................................................................................................................... 18 Limited warranty .................................................................................................................. 19 International Warranty: ............................................................................................................... 19 eMotimo TB3 Instructions for Use Copyright © 2013 eMotimo LLC 2 Additional References Quick Start Guide View basic quick start guide here: http://emotimo.com/images/files/TB3_Instructions_For_Use.pdf Instructional Videos eMotimo TB3 quick, basic setup: https://vimeo.com/69392347 eMotimo TB3 detailed, basic setup: https://vimeo.com/69393395 eMotimo TB3 Repeatable shots – VFX: https://vimeo.com/69393387 eMotimo TB3 and Dynamic Perceptions Stage One: https://vimeo.com/69393384 eMotimo 3rd-‐axis: choosing the right motor: https://vimeo.com/69393383 eMotimo TB3 manual trigger mode: https://vimeo.com/69393382 eMotimo TB3 video mode: https://vimeo.com/69393381 eMotimo TB3 Instructions for Use Copyright © 2013 eMotimo LLC 3 Setting up your TB3 Parts included and needed for setup: A B C D E F A) Carrying Case: For carrying TB3 and all accessories B) TB3 C) Remote (wired or wireless): For controlling TB3 and setting parameters D) AC Adapter: Powering the TB3 E) Tool Kit: Keeping your TB3 in prime working order F) Camera Shutter Cable (purchased individually): Controls the cameras shutter from the TB3 Hardware Setup: 1) Mount your TB3 to a sturdy platform. We recommend using a tripod, ball head, dolly, cart, etc. If what you are mounting it to has a quick release mount, we recommend attaching that to the TB3 first. Once the TB3 is secure, level the TB3 to the ground. Warning: Don’t use the TB3 without securing it's base. It can tip over, damaging it and your camera equipment. eMotimo TB3 Instructions for Use Copyright © 2013 eMotimo LLC 4 2) Mount your camera to the TB3. Tighten down the camera to the sliding plate using the thumbscrew and point the camera in line with the sliding plate. Balance your rig by using the sliding plate. Once your have balanced you camera and lens, lock down the sliding plate. 3) Take a test shot. Set your camera to manual mode and take test shots to get the right exposure and focus. Make note of the exposure time, as you will need this to properly set “Static Time”. 4) Connect cables. With the unit powered down, connect the tilt motor cable to the TB3. This cable is coming out from the bottom of the tilt motor and it connects to the “tilt motor” port. Connect camera and TB3 to the camera shutter cable (not required in video mode). If using 3rd-‐axis, connect additional motor to the “Aux Step Port”. WARNING: Always have the unit powered down when you plug in or remove motor cables. The stepper drivers can be damaged if the unit is powered up when you plug it in. 5) Power the TB3 on. Connect power cable. Connect the 12-‐volt DC source to the power port on the side of eMotimo TB3. You may supply eMotimo TB3 with a voltage of 10-‐14 volts DC. The TB3 comes with an AC adapter that will power your unit well. Plug this power supply into the wall and the barrel connector into the side of the TB3. If using the wireless remote, connect the remote by pressing the small "S" button the remote's face. 6) You are now ready to setup your first shot. Skip to TB3 menu options to learn more. eMotimo TB3 Instructions for Use Copyright © 2013 eMotimo LLC 5 Controls: Remote Features: Remote in-‐use: Press “S” button to pair the remote to TB3. Control the joystick with thumb. When using TB3, hold remote parallel to ground. When using the TB3 with the wireless remote, hold wireless remote parallel to ground. To control the 3rd-‐axis (when using an auxiliary motor) rock the remote from side to side to move the auxiliary motor. eMotimo TB3 Instructions for Use Copyright © 2013 eMotimo LLC 6 TB3 menu options New 2-‐point move: A 2-‐point move means you are setting up a shot that moves from a start-‐point to an end-‐point. You define each point on this move profile. During the program the TB3 will travel in a strait-‐line path between their points. Move to start point*: Use the remote joystick to pan and tilt until you have framed the start of the shot. If you are using the 3rd-‐axis, rock the remote to control the aux motor’s position. Once you are satisfied with the start-‐point, hit “C” to continue. Move to end point*: Use the remote joystick to pan and tilt until you have framed the end of the shot. If you are using the 3rd-‐axis, rock the remote to control the aux motor’s position. Once you are satisfied with the end-‐point, hit “C” to continue. *See remote in use section (p. 6) to ensure you are holding the remote correctly WARNING: eMotimo TB3 does not have limits for the Pan and Tilt Axis. During moves on setup, and during the program, watch for interference with: a. The Camera Lens/Body and eMotimo TB3 or other objects. b. The Shutter Release Cable attached to the Camera body and eMotimo TB3 c. The tilt cable wrapping and pulling from eMotimo TB3 d. Shifting camera weight causing an imbalance and tipping over the rig. Interval: Interval is your frame rate. If you select a 2.0 second interval, the eMotimo TB3 will trigger your camera to start a shot every 2.0 seconds. If you want to speed time more, select a longer interval (good for shots taken over a long duration of time). If you want to speed time less, select a smaller interval (good for shots taken over a short duration of time). Interval time always needs to be set longer than the exposure time set on your camera. For more tips on setting interval see Anatomy of a Shot (p.16). Video: Want to shoot video? Scroll all the way down in the interval prompt to “Intval: Video”. Select this option. Instead of moving in a shoot-‐move-‐shoot fashion, video mode will allow the TB3 to travel continuously though your move profile. Please note that for this option you do not need to have the camera shutter cable plugged in and you do not have to worry about static time. Man. Trig: Manual trigger mode allows you to trigger each exposure manually. This mode is great for stop-‐frame animators who may want to alter something in their scene before moving on to their next photo. To access this mode, scroll all the way down in the interval prompt to “Intval: Man. Trig”. Select this option. eMotimo TB3 Instructions for Use Copyright © 2013 eMotimo LLC 7 Once the sequence is running, press both the “C” and “Z” buttons simultaneously to advance to the next shot. Move Duration: Select how many frames or how much time you want your shot to take. Based on what you set your interval at and how many frames you want in your shot, the TB3 will calculate how long your shot will take to complete in real time. Static Time: Static time is the amount of time the TB3 remains stationary while triggering your TB3. As a rule of thumb, take your camera’s exposure time and add 0.1 seconds onto it. For example, if you are shooting a 2.0 second exposure, select a 2.1 second static time. If you are shooting daytime shots with 1/100th sec. exposure, use default of 0.1 seconds static time. Ramp: Ramp controls how smooth your starts and stops in your final footage are going to look. A low ramp means you are going to have an abrupt start and stop and a high ramp means you will have a very smooth start and stop. The number you select for your ramp is the number of frames in the final footage that show accelerating/decelerating. If you have 50 frames of ramp, you will have 50 frames at the beginning of your shot and 50 at the end of your shot where the footage shows acceleration and deceleration. Set Stationary Lead-‐in/out: Stationary lead-‐in/out is the number of stationary shots at the beginning and end of the shot. For example, if you set “24 in 48 out”, your shot will have 24 frames at the start and 48 frames at the end where the camera and TB3 are not moving. If your frame rate is 24 FPS, then you can think of it as 1 second of stationary time at the start of your shot and 2 seconds of stationary time at the end of your shot. Review screen/Program running: Review your settings and press “C” to start your program. In program, the LCD will give you feedback on where it is in the Shoot. It will update once every shot with: Upper Left: Current Shot/Total Shots Upper Right: Program Stage (LeadIn, RampUp, Linear, RampDn, LeadOT) Lower Left: Time Remaining in HH:MM:SS Lower Right: Source Voltage eMotimo TB3 Instructions for Use Copyright © 2013 eMotimo LLC 8 New 3-‐point move: A 3-‐point move means you are setting up a shot that moves through 3 points: a start-‐point, a mid-‐point, and an end-‐point. You choose all three points on this move profile and the TB3 creates an arc from the start-‐point, through the mid-‐point, to the end-‐point. Depending on where you position your mid-‐point, your shots will have dramatic arcs, or very subtle ones. To select a 3-‐point move, scroll down in the starting menu to “New 3-‐point move”. Press “C” to continue. After choosing your 3-‐ points, setting all other parameters is the exact same as a 2-‐point move. Important note: When shooting a 3-‐point move on 3-‐axis, the 3rd-‐axis will only hit the start point and the end point. In other words, the mid-‐point on your 3rd-‐axis will always be at the halfway point in the number of frames selected for the shot. Please see examples A and B below: Example A) Shot setup: The mid-‐point (point 1) is set halfway through the entire 3rd-‐axis move. Shot outcome: The outcome of this shot is the same as the way it was set up, with the mid-‐point exactly halfway through the entire move. eMotimo TB3 Instructions for Use Copyright © 2013 eMotimo LLC 9 Example B) Shot setup: The mid-‐point (point 1) is set ¼ of the way through the entire 3rd-‐axis move. Shot outcome: The outcome of this shot is different from the way it was set it up. Please see below for what the outcome of this move will actually look like. The mid-‐ point of a 3-‐point shot will always be halfway through the entire move. eMotimo TB3 Instructions for Use Copyright © 2013 eMotimo LLC 10 DF slave mode: With DF slave mode you can program your TB3 using the Dragonframe software. To do this, you first plug in your TB3 to your computer using the USB port. This will power on your TB3. You must also plug in the AC adapter, or 12V power source or the motors will not move. Once your TB3 is on and powered, select “DF slave mode” by scrolling down in the starting menu to “DF slave mode”. Press “C” to continue. On your computer, open up the Dragonframe software and configure the ArcMoco connection. Important notes/resources: • More information on connecting to Dragonframe can be found on our forum-‐ http://www.emotimo.com/forum/viewtopic.php?f=10&t=198 • The TB3 LCD and joystick are not active while being used in this mode. • Occasionally, on the MAC OS, when connecting to ArcMoCo #1 in Dragonframe, the TB3 will automatically restart. If you notice this happen, don’t unplug your TB3 or shut down the Dragonframe software. Using the joystick, set the TB3 back to DF slave mode to continue. eMotimo TB3 Instructions for Use Copyright © 2013 eMotimo LLC 11 Setup Menu: In the setup menu, you can choose from general settings for your TB3. To access the setup menu, scroll down in the starting menu to “Setup Menu”. Press “C” to continue. Aux Motor: On/Off: If you are using a 3rd motor (typically for a dolly), you will need to make sure the Aux Motor is turned on. Scroll up or down to switch between on and off. Press “C” to select. Pause: By “Enabling” the pause button, you can pause the TB3 during a sequence. Scroll up and down to change between “enabled” and “disabled”. Press “C” to select. If pause is enabled, press “C” and “Z” at the same time to pause the TB3 during a shot. PT Motors on: How your TB3 manages power for your pan and tilt motors. Shoot (Pwr Save): This means power down at all times except for the move -‐ This saves a lot of power for many types of shots, but could be less precise for long lens shots -‐ This is a great mode if you are really trying to extend your times. Run times can be increased several fold with this mode! Shoot (accuracy): Recommended This means power down when static time (shutter) not engaged -‐ Good for most PT settings. Program: This means power down only at the end of a sequence, but on during the rest of the time. Should rarely/if ever be used for the Pan Tilt motors. Always: This means no power down, even after a shot sequence completes-‐ uses the most power and should only be used on AC (mains) Aux Motors on: How your TB3 manages power for your Aux motor. Shoot (Pwr Save): Recommended (level/flat shots) This means power down at all times except for the move -‐ This saves a lot of power for many types of shots, but could be less precise for long lens shots -‐ This is a great mode if you are really trying to extend your times. Run times can be increased several fold with this mode! Shoot (accuracy): This means power down when static time (shutter) not engaged -‐ Good for most AUX shots if going level or shallow or using the 26:1 in some vertical shots with lighter rigs. eMotimo TB3 Instructions for Use Copyright © 2013 eMotimo LLC 12 Program: This means power down only at the end of a sequence, but on during the rest of the time. This is good for doing steep dolly moves where you want to hold position between shots. Should be used only selectively with the AUX as this can use A LOT (10 to 20x more power is not out of the question) based on your shot types. Always: This means no power down, even after a shot sequence completes-‐ uses the most power and should only be used on AC (mains) eMotimo TB3 Instructions for Use Copyright © 2013 eMotimo LLC 13 Powering your TB3 AC Adapter: The TB3 ships with an AC adapter that plugs from the power supply in your wall to your TB3. This is a 12-‐volt DC source and connects to the TB3 with a 2.1 mm barrel connector. You may supply eMotimo TB3 with a voltage of 11-‐14 volts DC. Battery: If using one of our optional batteries, make sure it is set to 12V and connected correctly. If you want to pick up your own battery, here are some general rules of thumb: • Input Voltage 11-‐14 volts • Current for the TB3 -‐ .80 Amps Pan and Tilt. 0.4 Amp if you unplug the tilt motor. Depending on if you plug in the 3rd motor and how you drive it, current requirements can increase to up to 1.5 Amps. • Connector – 2.1mm x 5.5mm x 12mm Barrel Connectors – center positive. • For more info on power: http://emotimo.com/forum/viewtopic.php?f=6&t=96&p=300&hilit=poweri ng#p294 eMotimo TB3 Instructions for Use Copyright © 2013 eMotimo LLC 14 Tips for setting up your first shot Camera setup recommendations: • • • • • • • • • • • • Turn on camera. Is the battery level full? Always start with a full battery. Set the camera to M (Manual) mode. Set the camera to single shot mode. Rapid fire can result in unexpected results. Set the white balance to the correct manual setting (sky, cloud, indoor). Note: do not set WB to AWB or you will get flickering color changes as the white balance changes during the shot. Set camera ISO setting to a manual setting. Use the lowest possible ISO for your exposure. Set the aperture as desired. Low, if you want a purposeful shallow depth of field or have low light conditions. Choose higher aperture values for sharper focus and a wide depth of field. Set the shutter to expose correctly for the conditions. The goal is keep most pictures exposed within about 1 stop of correct exposure. If you change exposure during the sequence, it will be noticeable in the final film by camera shake and/or jumps in lighting that are almost impossible to correct in post. Put camera in manual focus mode. Take and review a test shot to ensure your subject is sharp. Autofocus should never be used. For those that are just starting off, set the Size/Quality to Small/Fine. Bigger is not necessarily better. We don't need 18 or 21 MP shot to make time lapse high definition movies. It will eat memory and take a lot longer to edit! Use small fine JPGs, or whichever setting will get you as close to high definition footage as possible without going to a resolution of 1920x1080. This equates to about a 2MP picture. Disregard if you are a pro and are going for 4K imagery. Take a couple sample pictures and review the exposure and verify your focus once again. Set LCD Review time to off. This saves the camera battery. Check to make sure the camera trigger cable is seated well in both your camera and the TB3's camera port. eMotimo TB3 Instructions for Use Copyright © 2013 eMotimo LLC 15 Anatomy of a shot: Notes: 1. Interval is the time between shot starts. 2. Set static time slightly longer than camera exposure time to prevent movement while your camera has its shutter open. 3. Interval time -‐ Static Time = the available move, settle and sleep time for the TB3. It is also the time in which your camera processes your images and writes them to your card. You typically want to allow for at least 1.0 seconds of time to move and settle. 4. For long exposures your camera may need a long time to process and write to your card. Setting your interval too short is a common mistake that results in missed frames. eMotimo TB3 Instructions for Use Copyright © 2013 eMotimo LLC 16 Example parameters: Setting Motion * Daylight Shot 135 degree pan 15 degree tilt 1/100 sec. Astro Shot 90 degree pan 35 degree tilt 15.0 sec. Interval Static Time** Ramp Duration/Frames 2.0 sec. 0.1 sec. 50 Frames 20 min / 600 frames Lead In/ Lead Out 5 / 5 30.0 sec. 17.0 sec. 50 Frames 3Hours, 20 min. 400 frames 5 / 5 Camera Exposure HDR Shot 35 degree pan 10 degree tilt 3 shot bracket -‐ takes 7.0 second to complete. 10.0 sec. 8.0 sec. 50 Frames 60 min 360 frames 5/5 * Start with small moves to understand the process. Large moves with low numbers of frames can look very choppy. ** Never choose a static time that is lower that your camera's exposure time or you will get motion blur. eMotimo TB3 Instructions for Use Copyright © 2013 eMotimo LLC 17 Product Map eMotimo TB3 Instructions for Use Copyright © 2013 eMotimo LLC 18 Limited warranty We are a small shop, but stand behind our products. We’ll fix or replace anything that suffers from a defect in manufacturing or assembly for 90 days. If you do have to return something, we’ll do our best to make it right. We do not warranty damage incurred in handling or shipping. If you need to return something, please contact us at [email protected] to receive an RMA number and shipping destination. Returns must have an RMA number clearly printed on the box with all parts safely packed. Items must be returned in their original or equivalent packaging, we will not be able to accept returned items that are not appropriately packaged or damaged due to inappropriate packaging on return transit. Under no conditions will we accept liability for any amount higher than the original purchase price of the product in question. International Warranty: We will warranty anything that goes wrong with the unit for 90 days, but international customers would be responsible for round trip shipping. To date internationally, we have had minor issues. Locally in the US, I am happy to pick up the return shipping for anything that might go wrong, but I can’t take the risk when the international shipping cost is so high. eMotimo TB3 Instructions for Use Copyright © 2013 eMotimo LLC 19