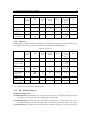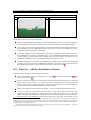
1
Guide to Minolta Cameras or What They
Didn’t Tell Us in Their Docs
Compiled by Petr Holub
2002 – 2003
This guide is based on experiences of people around the Internet – mostly from Minolta Yahoo group.
This guide is dedicated to this group in hope that it could help to bring back discussions to the
photography instead of lost expectations about D-SLRs and similar things.
I WOULD LIKE TO THANK TO
all the people that contributed to this guide in any way and all the people that participate in Minolta Yahoo
group discussions.
P. H.
Contents
I would like to thank to. . .
i
Contents
ii
List of Tables
iv
List of Figures
v
1 Foreword
1
2 Information on bodies and lenses
2.1 Minolta AF bodies . . . . . . . . . . . . . . . . . .
2.1.1 Overview of Minolta AF bodies . . . . . . .
2.1.2 Batteries for Minolta equipment . . . . . . .
2.2 Minolta Dynax/Maxxum 600si (507si, 650si) . . . .
2.2.1 Beyond the Owner’s Manual: Tips and Tricks
2.3 Dynax/Maxxum Lens Chart . . . . . . . . . . . . .
2.3.1 G Series . . . . . . . . . . . . . . . . . . . .
2.3.2 D-Series . . . . . . . . . . . . . . . . . . . .
2.3.3 RS = Re-Styled Lenses . . . . . . . . . . . .
2.3.4 Maxxum Lens Glossary . . . . . . . . . . .
.
.
.
.
.
.
.
.
.
.
.
.
.
.
.
.
.
.
.
.
.
.
.
.
.
.
.
.
.
.
.
.
.
.
.
.
.
.
.
.
.
.
.
.
.
.
.
.
.
.
.
.
.
.
.
.
.
.
.
.
.
.
.
.
.
.
.
.
.
.
.
.
.
.
.
.
.
.
.
.
.
.
.
.
.
.
.
.
.
.
.
.
.
.
.
.
.
.
.
.
.
.
.
.
.
.
.
.
.
.
.
.
.
.
.
.
.
.
.
.
.
.
.
.
.
.
.
.
.
.
.
.
.
.
.
.
.
.
.
.
.
.
.
.
.
.
.
.
.
.
.
.
.
.
.
.
.
.
.
.
2
2
2
3
4
4
7
12
14
14
16
3 Flash-less photography
3.1 Photographing with M42 / Minolta AF lens reduction . . . . .
3.1.1 Comment on M42 . . . . . . . . . . . . . . . . . . .
3.2 More on photographing with M42 / Minolta AF lens reduction
3.3 Alternative testing of vignetting . . . . . . . . . . . . . . . .
3.4 Setting Minolta DiMAGE Scan Dual with VueScan . . . . . .
3.4.1 Scanning Fuji Provia . . . . . . . . . . . . . . . . . .
3.5 Minolta mounts . . . . . . . . . . . . . . . . . . . . . . . . .
3.6 Disabling the lens mount check . . . . . . . . . . . . . . . . .
3.7 Remote release cord . . . . . . . . . . . . . . . . . . . . . . .
3.7.1 Building your own Remote Cord (v. 1) . . . . . . . . .
3.7.2 Building your own Remote Cord (v. 2) . . . . . . . . .
3.7.3 Building your own Remote Cord (v. 3) . . . . . . . . .
.
.
.
.
.
.
.
.
.
.
.
.
.
.
.
.
.
.
.
.
.
.
.
.
.
.
.
.
.
.
.
.
.
.
.
.
.
.
.
.
.
.
.
.
.
.
.
.
.
.
.
.
.
.
.
.
.
.
.
.
.
.
.
.
.
.
.
.
.
.
.
.
.
.
.
.
.
.
.
.
.
.
.
.
.
.
.
.
.
.
.
.
.
.
.
.
.
.
.
.
.
.
.
.
.
.
.
.
.
.
.
.
.
.
.
.
.
.
.
.
.
.
.
.
.
.
.
.
.
.
.
.
.
.
.
.
.
.
.
.
.
.
.
.
.
.
.
.
.
.
.
.
.
.
.
.
.
.
.
.
.
.
.
.
.
.
.
.
.
.
.
.
.
.
.
.
.
.
.
.
17
17
17
18
18
20
20
20
21
22
22
23
23
4 Flash photography
4.1 Flash–Ambient Control
4.1.1 P Mode Flash .
4.1.2 A Mode Flash .
4.1.3 S Mode Flash .
4.1.4 M Mode Flash
4.1.5 Fill Flash . . .
.
.
.
.
.
.
.
.
.
.
.
.
.
.
.
.
.
.
.
.
.
.
.
.
.
.
.
.
.
.
.
.
.
.
.
.
.
.
.
.
.
.
.
.
.
.
.
.
.
.
.
.
.
.
.
.
.
.
.
.
.
.
.
.
.
.
.
.
.
.
.
.
.
.
.
.
.
.
.
.
.
.
.
.
.
.
.
.
.
.
25
25
25
27
27
27
27
.
.
.
.
.
.
.
.
.
.
.
.
.
.
.
.
.
.
.
.
.
.
.
.
.
.
.
.
.
.
.
.
.
.
.
.
.
.
.
.
.
.
.
.
.
.
.
.
.
.
.
.
.
.
.
.
.
.
.
.
.
.
.
.
.
.
.
.
.
.
.
.
.
.
.
.
.
.
.
.
.
.
.
.
.
.
.
.
.
.
.
.
.
.
.
.
.
.
.
.
.
.
.
.
.
.
.
.
.
.
.
.
.
.
.
.
.
.
.
.
.
.
.
.
.
.
.
.
.
.
.
.
.
.
.
.
.
.
.
.
.
.
.
.
.
.
.
.
.
.
.
.
.
.
.
.
.
.
.
.
.
.
.
.
.
.
CONTENTS
.
.
.
.
.
.
.
.
.
.
.
.
.
.
.
.
.
.
.
.
.
.
.
.
.
.
.
.
.
.
.
.
.
.
.
.
.
.
.
.
.
.
.
.
.
.
.
.
.
.
.
.
.
.
.
.
.
.
.
.
.
.
.
.
.
.
.
.
.
.
.
.
.
.
.
.
28
28
28
29
A Flash-less experiments
A.1 INI files for Minolta DiMAGE Scan Dual with VueScan
A.1.1 Settings for Fuji Provia 100F . . . . . . . . . . .
A.1.2 Settings for Konica Centuria 100 . . . . . . . . .
A.1.3 Settings for Konica Centuria 200 . . . . . . . . .
A.1.4 Settings for Konica Centuria 400 . . . . . . . . .
A.1.5 Settings for Konica VX 100 . . . . . . . . . . .
A.1.6 Settings for Fuji Superia 1600 . . . . . . . . . .
A.2 Reciprocity Corrections – Brooks Institute . . . . . . . .
.
.
.
.
.
.
.
.
.
.
.
.
.
.
.
.
.
.
.
.
.
.
.
.
.
.
.
.
.
.
.
.
.
.
.
.
.
.
.
.
.
.
.
.
.
.
.
.
.
.
.
.
.
.
.
.
.
.
.
.
.
.
.
.
.
.
.
.
.
.
.
.
.
.
.
.
.
.
.
.
.
.
.
.
.
.
.
.
.
.
.
.
.
.
.
.
.
.
.
.
.
.
.
.
.
.
.
.
.
.
.
.
.
.
.
.
.
.
.
.
.
.
.
.
.
.
.
.
.
.
.
.
.
.
.
.
.
.
.
.
.
.
.
.
31
31
31
32
32
33
34
35
36
B Flash experiments
B.1 Wireless flash experiment . . . . . . . . . . .
B.1.1 Experiment setup . . . . . . . . . . .
B.1.2 Experiment results and discussion . .
B.2 Flash Test – ADI/Pre-Flash/Bounce/Wireless
4.2
4.3
4.1.6 Slow-Shutter Sync. . . . . . .
4.1.7 Other comment . . . . . . . .
Short summary on using fill-in flash .
Short summary on using wireless flash
iii
.
.
.
.
.
.
.
.
.
.
.
.
.
.
.
.
.
.
.
.
.
.
.
.
.
.
.
.
.
.
.
.
.
.
.
.
.
.
.
.
.
.
.
.
.
.
.
.
.
.
.
.
.
.
.
.
.
.
.
.
.
.
.
.
.
.
.
.
.
.
.
.
.
.
.
.
.
.
.
.
.
.
.
.
.
.
.
.
.
.
.
.
.
.
.
.
.
.
.
.
.
.
.
.
.
.
.
.
.
.
.
.
.
.
.
.
38
38
38
39
42
Bibliography
Literature about Minolta and Minolta-compatible equipment
Web links about Minolta and Minolta-compatible equipment
Camera bodies . . . . . . . . . . . . . . . . . . . . .
Lens . . . . . . . . . . . . . . . . . . . . . . . . . . .
Flash . . . . . . . . . . . . . . . . . . . . . . . . . . .
Interesting books on photography . . . . . . . . . . . . . . .
.
.
.
.
.
.
.
.
.
.
.
.
.
.
.
.
.
.
.
.
.
.
.
.
.
.
.
.
.
.
.
.
.
.
.
.
.
.
.
.
.
.
.
.
.
.
.
.
.
.
.
.
.
.
.
.
.
.
.
.
.
.
.
.
.
.
.
.
.
.
.
.
.
.
.
.
.
.
.
.
.
.
.
.
.
.
.
.
.
.
.
.
.
.
.
.
.
.
.
.
.
.
.
.
.
.
.
.
.
.
.
.
.
.
47
47
47
47
48
48
48
.
.
.
.
.
.
.
.
.
.
.
.
.
.
.
.
List of Tables
2.1
2.2
2.3
2.4
2.5
2.6
2.7
2.8
2.9
2.10
2.11
Minolta AF Bodies in Chronological Release Date Order
Batteries for Minolta equipment . . . . . . . . . . . . .
Fixed focal length lenses . . . . . . . . . . . . . . . . .
Zoom lenses . . . . . . . . . . . . . . . . . . . . . . . .
Macro lenses . . . . . . . . . . . . . . . . . . . . . . .
Teleconvertors . . . . . . . . . . . . . . . . . . . . . . .
xi zoom lenses . . . . . . . . . . . . . . . . . . . . . . .
G lenses (I) . . . . . . . . . . . . . . . . . . . . . . . .
G lenses (II) . . . . . . . . . . . . . . . . . . . . . . . .
G lenses (III) . . . . . . . . . . . . . . . . . . . . . . .
D lenses . . . . . . . . . . . . . . . . . . . . . . . . . .
.
.
.
.
.
.
.
.
.
.
.
.
.
.
.
.
.
.
.
.
.
.
.
.
.
.
.
.
.
.
.
.
.
.
.
.
.
.
.
.
.
.
.
.
.
.
.
.
.
.
.
.
.
.
.
.
.
.
.
.
.
.
.
.
.
.
.
.
.
.
.
.
.
.
.
.
.
.
.
.
.
.
.
.
.
.
.
.
.
.
.
.
.
.
.
.
.
.
.
2
3
8
9
11
11
12
13
13
13
14
3.1
3.2
VueScan parameters for scanning Fuji Provia using Minolta Scan Dual . . . . . . . . . . .
Disabling the lens mount check . . . . . . . . . . . . . . . . . . . . . . . . . . . . . . . .
20
21
4.1
4.2
Flash–ambient compensations performed by camera . . . . . . . . . . . . . . . . . . . . .
Changing Program Flash Control with the Custom xi card . . . . . . . . . . . . . . . . . .
26
26
A.1 Reciprocity Corrections – Brooks Institute (1/2) . . . . . . . . . . . . . . . . . . . . . . .
A.2 Reciprocity Corrections – Brooks Institute (2/2) . . . . . . . . . . . . . . . . . . . . . . .
36
36
B.1
B.2
B.3
B.4
B.5
B.6
38
39
40
43
44
45
Wireless flash experiment setup . . . . . . . . . . . . . . . . . . . . . .
Wireless flash experiment: observations of camera and flashes behavior
Wireless flash experiment: results . . . . . . . . . . . . . . . . . . . .
Flash experiment: 24–85 lens . . . . . . . . . . . . . . . . . . . . . . .
Flash experiment: 28–80D lens . . . . . . . . . . . . . . . . . . . . . .
Flash experiment: Wireless . . . . . . . . . . . . . . . . . . . . . . . .
.
.
.
.
.
.
.
.
.
.
.
.
.
.
.
.
.
.
.
.
.
.
.
.
.
.
.
.
.
.
.
.
.
.
.
.
.
.
.
.
.
.
.
.
.
.
.
.
.
.
.
.
.
.
.
.
.
.
.
.
.
.
.
.
.
.
.
.
.
.
.
.
.
.
.
.
.
.
.
.
.
.
.
.
.
.
.
.
.
.
.
.
.
.
.
.
.
.
.
.
.
.
.
.
.
.
.
.
.
.
.
.
.
.
.
.
.
.
.
.
.
.
.
.
.
.
.
.
.
.
.
.
.
.
.
.
.
.
.
.
.
.
.
.
.
.
.
.
.
.
.
.
.
.
.
.
.
.
.
List of Figures
3.1
3.2
Results of M42 adapter tests (1) . . . . . . . . . . . . . . . . . . . . . . . . . . . . . . .
Results of M42 adapter tests (2) . . . . . . . . . . . . . . . . . . . . . . . . . . . . . . .
18
19
B.1 Wireless flash experiment setup . . . . . . . . . . . . . . . . . . . . . . . . . . . . . . . .
40
Chapter 1
Foreword
As noticed by many photographers around the world Minolta produces high quality products for photographers. What they lack are people capable of writing documentation of reasonable quality. . .
After hearing many discussions like: “My camera of this brand is much better that your of that brand!”
and after seeing many master-pieces of photography shot with some of old all-manual cameras the point I
feel as the most important is to get acquainted with the camera you already have (unless it’s really crippled)
and to know exactly what it will do under (almost) any situation and how to make it do what you need and
want. I hope that this guide will help us at least a bit to have our Minolta cameras working in this manner.
Here’s the list of people whose contributions has been included in this guide:
Chingfeng Au ([email protected])
Phil Brandon (??)
Chuck Cole [email protected])
CyberSimian ([email protected])
Gary Friedman ([email protected])
Petr Holub ([email protected])
Csaba JOZSA (??)
Scott Kimball ([email protected])
Peter Blaise Monahon ([email protected])
Dario Piantanida ([email protected])
Marat R. Safiulin (??)
Magnus Wedberg ([email protected])
I would really appreciate having other people contributing to this guide to help other from the community.
If you have anything what you think could be valuable for others don’t hesitate to contact me. The same
holds if you discover some valuable discussion in Minolta group archives. I will be happy to add your
contributions!
P. H.
Chapter 2
Information on bodies and lenses
2.1 Minolta AF bodies
2.1.1 Overview of Minolta AF bodies
[Author(s): Unknown, taken from Minolta AF FAQ [4].]
Table 2.1: Minolta AF Bodies in Chronological Release Date Order
Released
Europe
Dynax
7000 AF
9000 AF
5000 AF
3000i
7000i
5000i
8000i
1985
1985
1986
1988
1988
1989
1990
1991
1991
3xi
1991
7xi
1992
2xi
1992
5xi
1992
9xi
1993
700si
1994
500si
1995
300si
1995
500si Super
1995
600si (Classic)
1997
800si
1998
505si
1998
505si Super
1998
9
1999
303si
1999
404si
2000
7
2001
5
continued on next page. . .
U.S.
Maxxum
7000 AF
9000 AF
5000 AF
3000i
7000i
5000i
8000i
SPxi
3xi
7xi
2xi
5xi
9xi
700si
400si
500si
600si (Classic)
800si
HTsi
XTsi
9
QTsi
NYA
7
5
Canada
Maxxum
Japan
Alpha (α )
7000 Alpha
9000 Alpha
5000 Alpha
Alpha 7700i
Alpha 5700i
Alpha 8700i
707si
807si
Alpha Sweet
9
STsi
7
5
2.1. MINOLTA AF BODIES
3
. . . continued from previous page
Released
Europe
U.S.
Dynax
Maxxum
2002
4
4
2003
3L
3L
Canada
Maxxum
Japan
Alpha (α )
2.1.2 Batteries for Minolta equipment
[Author(s): Unknown, taken from Minolta AF FAQ [4].]
Table 2.2: Batteries for Minolta equipment
Body or Meter
Dynax/Maxxum AF Bodies
All except below & XTsi
Dynax 5, 505si, XTsi
Dynax 7 and 9 body
VC-700 and VC-800 grips
VC-7 and VC-9 grips
Original AF Bodies
9000
7000 & 5000 with original battery holder
7000 & 5000 with optional BH-70L
MF SLRs
XM, XE-1, XE-5, XD-7, XD-5, XG-1, XG-2, XG-9,
XGM, X-9 X-300, x-300s, X320s, X-500, X-700
SRT-101, 100, 202, 303, 100x, 101b, 303b, SR7, SR1
Meter
Vectis APS Bodies
S-1, S-100
40
300, 30, 25, 200, 20, 10, UC, Weathermatic, GX variants
Himatic Compacts and Earlier Rangefinder Bodies
Minolta AL-F, AL-E, Himatic 7, 7s, 9 and 11
Himatic 7S-II, 5, G, G2, C
Himatic E, F
Himatic S, S2, GF, AF, AF2, AF2M
Minolta CLE (Leica M lensmount)
AF and Focus-free Compacts (modern)
140EX, 135EX, 105EX, Panorama Zoom 28
90EX, 70C, Weathermatic DL
115EX, 75W, 70W, 70EX, RZ 70, Pcio, Mini, Panorama
105i, 90C, Twin 28, AF Zoom 65, AF Zoom 90, AF Tele
Super
AF5, 100AF, AF35EX, AF35, AF35C, Riva 35
AF-101R, AF-20R, F-10/BF, C-10, Memory Maker
FS-E, FS-EII, FS-35, AF-E
AF-C
AF-T
AF-Z, AF-EII, AF-DL, AF Tele 60, AF-SP
continued on next page. . .
Batteries Used
1 2CR5
2 CR2
2 CR123A
4 AA or 1 x 2CR5
4 AA or (1 2CR5 and/or 1
CR123A)
2
4
4
AA
AAA
AA
2
EPX-76 or 2
1
PX625
10L14
2 CR2
2 x CR2
1 CR2
1
1
1
2
2
PX625
PX675
PX640
AA
10L14 or EPX-76
2
1
1
1
CR123A
DL223A
CR123A
2CR5
2
2
2
4
2
4
AA
AA
AA
10L14
AA or DL223A
AAA or DL223A
2.2. MINOLTA DYNAX/MAXXUM 600SI (507SI, 650SI)
. . . continued from previous page
Body or Meter
TC-1
Digital Cameras
Dimge V
RD-175
Exposure Meters
Flashmeter V, Autometer IV F, Spotmeter F
Flashmeter IV
Autometer IIIF, III and II, Spotmeter M
Colormeter II, Flashmeter II
Flashmeter III
Booster II
Viewmeter 9
4
1
Batteries Used
CR123A
4
1
AA
2CR5
1 AA
1 AA and 1 PX28
1 PX28
1 MN1604
6 10L14
1 PX28
1 1.35 V mercury cell: PX1 or
RM1
Notes: PX625 and other PX- type button batteries, as used in many older manual focus SLRs, contain
mercury and slowly being outlawed around the world for obvious environmental reasons. A possible
solution is the ”air cell”, made by Wein in the USA. Ask for WeinCell MRB625 (to replace a PX625),
MRB675 (PX675) or MRB400 (PX400).
Some discontinued AF bodies use a separate internal button battery to provide memory backup for
settings, etc. Although they last a long time, they do eventually need replacing. The individual requirements
of these particualr bodies are not listed in the table above, but I would be glad to add them.
Avoid the cheap types of button cells made for ”virtual pets” or market-stall watches. They are not the
same as those intended for photographic use: their output voltage varies underload and this will lead to
incorrect meter readings.
2.2 Minolta Dynax/Maxxum 600si (507si, 650si)
2.2.1 Beyond the Owner’s Manual: Tips and Tricks
[Author(s): Peter Blaise Monahon, taken from [12].]
LCD Displays Check: On the Minolta 507si, 600si, and 650si camera, to check the valid functioning of
every LCD Liquid Crystal Display element:
1. Set the Drive Mode Selector to Multiple Exposure,
2. Press and hold the ISO Film Speed Button while opening and closing the battery door.
All displays appear in the Body and Viewfinder Data Panels.
3. Open and close the battery door to return the displays to normal.
Auto Exposure Lock: Only the AEL Auto Exposure Lock button will lock exposure when the Minolta
507si, 600si, and 650si camera is set for Center-Weighted Average Metering Mode or Spot Metering Mode.
Pressing the AEL Auto Exposure Lock Button locks the exposure settings and switches the meter to Spot
Metering Mode. The AEL Auto Exposure Lock control has no function in M Manual Exposure Mode.
You have three options for locking and holding the desired exposure value on the Minolta 507si, 600si,
and 650si camera:
1. Using M Manual Exposure Mode, once set, the camera auto functions will not override your Aperture
and Shutter Speed selections.
2.2. MINOLTA DYNAX/MAXXUM 600SI (507SI, 650SI)
5
2. Using 14 Segment Honeycomb Metering Mode and an attached automatic lens in AF Auto Focus
mode, you can lock the exposure reading in P Program Exposure Mode, A Aperture priority Exposure Mode, or in S Shutter Speed Priority Exposure Mode by pressing the Shutter Release Button
part way down.
3. Center-Weighted Metering Mode and Spot Metering Mode readings can be locked using only a third
method – pressing the AEL Auto Exposure Lock Button, marked AEL to the right of the eyepiece.
You can use the AEL Auto Exposure Lock Button to lock the exposure setting in any of the Minolta
507si, 600si, and 650si camera’s three metering systems. AEL Auto Exposure Lock is especially useful in
the automatic exposure modes, Program, A Aperture priority, or S Shutter priority, when you want to take
a meter reading from one part of your chosen photographic subject scene and then focus on another part.
You can do this by focusing, and possibly zooming in, on the detail you want to meter and then pressing
and holding the AEL button. [AEL] appears in the Viewfinder Data Panel. You must maintain pressure on
the AEL button until you release the shutter to the picture. Then aim the focusing target at your subject
and press the shutter release part way down to lock focus. You can then reframe and adjust the lens zoom
if necessary to get the image you want. Then press the shutter release all the way down and make your
exposure.
By Minolta factory default, the AEL Auto Exposure Lock feature is effective only while you hold it
down. To reset the AEL Auto Exposure Lock feature to toggle – AEL on at first press, off at second press
– hold ISO Button switch and tap AEL Auto Exposure Lock Button.
Front and Rear Control Dial Rules: Generally, both front and rear control dials increase the numeric
value being controlled when rotated to the right, and decrease the numeric value being controlled when
rotated to the left.
The Front and Rear dials Control Dials on the Minolta 507si, 600si, and 650si camera can be used
interchangeably to set camera body Shutter speed and an attached automatic lens Aperture in all Exposure
Modes and operations except M Manual Exposure Mode.
In M Manual Exposure Mode, the Front Control Dial sets the camera body Shutter Speed and the Rear
Control Dial sets an attached automatic lens Aperture. For guidance from the Metering system, rotate the
Control Dials in the direction of the arrows in the Viewfinder Data Panel to obtain a Shutter Speed and
attached automatic lens Aperture to correspond with the camera Metering system’s assessment of your
chosen photographic subject.
Viewfinder ”Long Eye Relief”: The viewfinder image and all displays can be seen in their entirety from
a distance of 0.9 inch (22.7 mm), appropriate for photographers wearing glasses.
Setting Viewfinder Diopter: You can easily set the diopter correction without a lens on the camera.
Point it toward a bright light source and turn the small diopter adjustment dial (next to the eyepiece) until
the brackets etched on the viewing screen appear sharpest. The dial sets correction factors between 2 5
and 0 5 diopters.
High Shutter Speed Flash: The Minolta 5400HS accessory flash unit emits a short pre-flash in HSS
High Speed Synchronization Mode, which fires when the camera’s Shutter Release Button is depressed
half way. This allows the camera metering system to measure the subject’s illumination at this instant
and select a flash intensity and Shutter Speed for balanced illumination of the subject and the background.
If, while in P Program or Aperture priority Exposure Mode, a Flash to Shutter synchronization speed
faster than 1 200 second is called for, the system automatically shifts into High Speed Synchronization
Mode. High Speed Synchronization Mode Flash differs from conventional flash by firing a series of highfrequency pulses at 50 k Hz that resemble a constant light source. Even illumination across the film frame
is assured during the entire time the camera’s shutter curtains are open to record the image.
2.2. MINOLTA DYNAX/MAXXUM 600SI (507SI, 650SI)
6
Flash Auto Program: The Minolta 507si, 600si, and 650si camera selects a flash program when the
retractable flash head or an accessory flash unit is activated. However, in Program Exposure Mode with
sufficient available light, the camera will not use the flash unless you press and hold the Flash Control
Button during exposure.
Auto Focus Illuminator: The Minolta 507si, 600si and 650si camera Auto Focus Illuminator light feature of the built in flash or attached accessory flash will not function in C Continuous Auto Focus mode.
Auto Metering Features: The metering system of the Minolta 507si, 600si, and 650si camera starts with
a proven auto focus-integrated computer first introduced by Minolta with the xi series cameras. This computer ensures that the light meter’s main emphasis is on the area in sharp focus. This optimizes exposure
for the primary subject.
The camera meter is calibrated for medium gray, which is equivalent to an 18 %, reflectance. This
value was arrived at with the assumption that ’average’ photographic subject scenes have a contrast range
of 1:32. This is a valid assumption for common outdoor scenes that include grass, dirt, rocks, trees, and
sky, for instance. The various reflectance values average to a median value with a density of 0.75, or 18 %
reflectance.
The camera meter measures light reflected back from the subject through the lens, hence the term TTL
Through The Lens metering. This is also the design of all other modern SLR Single Lens Reflex cameras.
When the camera metering system determines the subject scene to be a landscape, metering emphasis
is on the lower section of the frame. In strong backlighting, such as when shooting toward a bright ocean,
the camera metering and exposure computer automatically compensate for a bright rendition of the scene.
However, with a small subject on bright sand or surf, such as a small boat on a large body of water, expect to
need to dial in a 1 EV Exposure Value compensation factor because the camera metering system interprets
such a scene as a landscape.
When you set the camera to the evaluative 14 Segment Honeycomb Pattern Metering Mode, the camera
computer sets its own Exposure Compensation in an attempt to render a bright scene or dark scene accurately on film. For example, beyond a certain high brightness level, the camera system increases exposure
by one EV Exposure Value stop to render the subject as bright.
Use the Exposure Compensation feature to assist the camera’s Metering system to accurately match
your chosen photographic subject scene brightness dynamic range to your chosen film’s sensitivity dynamic
range:
A white surface reflects more light than a gray surface – approximately two stops more. + Plus EV
Exposure Value Compensation will increase the amount of light reaching the film to render a light photographic subject accurately.
A black surface reflects less light – approximately two stops less. Minus EV Exposure Value Compensation will reduce the amount of light reaching the film, to render a dark photographic subject correctly.
If the range of brightnesses within your chosen photographic subject scene are within the or range
of the Viewfinder Data Panel scale, then they can be recorded accurately within most film’s reproducible
dynamic range. Any index reading of 3 or greater will probably be reproduced as white on film, and any
reading of 3 or beyond will probably be reproduced as black on film.
To toggle on/off the viewfinder LCD indicator for Exposure Compensation, hold the ISO Button and
the Depth Of Field Preview Button.
The center-weighted metering is not linked to the auto focus system, nor does it input exposure corrections of its own. Primary emphasis is placed on the subject area within the brackets etched on the
viewfinder, with much less emphasis on surrounding areas, and none on the top section where sky might
be located.
Auto Focus Features: In the Minolta 507si, 600si, and 650si camera, program modes are aware of an
attached automatic lens focal length. A telephoto lens activates higher shutter speeds, and a wide-angle
lens activates smaller apertures. For example, the camera sets a small aperture for a landscape to achieve
an extensive range of apparent sharpness. If the AF Auto Focus system detects motion, it sets a high
shutter speed such as 1 500 second to stop action. For a portrait, a moderately wide aperture is set to
2.3. DYNAX/MAXXUM LENS CHART
7
blur a distracting background while keeping both the subject’s nose and ears in focus. In selecting an
aperture-shutter speed combination, the system considers such factors as focal length, subject reflectance
and contrast, subject distance and type, and the reproduction ratio, or degree of magnification. The system
then selects an appropriate combination of aperture and shutter speed for the situation, however it will try
to maintain a hand-holdable shutter speed, such as 1 60 second shutter speed with a 50 mm lens, to reduce
the risk of blur from hand held camera shake.
To disable AF Auto Focus lens to Shutter interlock, hold the ISO Button and the Lens Mount Button
while turning the camera ON.
Automatic Exposure Bracketing: Automatic Exposure Bracketing drive mode exposed 3 consecutive
images, one at normal EV Exposure Value, plus one at 1 2 stop EV Exposure Value and then one at
1 2 stop EV Exposure Value, which is a rather narrow exposure range best suited for the sensitivity and
dynamic range of slide film. For other film, you can use manual Exposure Compensation control, perhaps
taking two additional frames, one at +1 or greater and the other at the +2 or greater setting.
Multiple Multiple Exposures: Although you can pre-set a maximum of nine exposures on one frame of
film, you can actually achieve any number. If you want to shoot 16, for example, merely reset the Multiple
Exposure feature to 8 after shooting the first 8.
Body Depth: The depth of the Minolta lens mount to film plane is 44.7mm.
Setting DX Film For More Than 24 or 36 Frames: The Minolta 507si, 600si and 650si camera will
rewind the film immediately after the last frame of 24 or 36 exposures as sensed by the DX coding on
the film can. The selected Aperture and Shutter Speed values will disappear immediately after the last
exposure when rewind begins preventing you from viewing and recording these values.
To wind to the true end of your film and expose additional available frames, scrape the paint off the
film can DX sections 8, 9 and 10. The camera will then rewind only when film advance is not possible due
to reaching the true end of the film, or if you manually press the Rewind Button.
This permits you to manually rewind after recording your Aperture and Shutter Settings after the final
frame, either 24 or 36, or to expose an additional frame. However, be aware that rewind will begin immediately after the final exposure, so watch for and record you final frame Aperture and Shutter Speed before
or during the final exposure.
2.3 Dynax/Maxxum Lens Chart
[Author(s): Minolta Corp.]
Used abbreviations:
* – Discontinued
RS – Restyled
HS – High Speed
For detailed explanation see section 2.3.3 (page 14).
2.3. DYNAX/MAXXUM LENS CHART
8
Table 2.3: Fixed focal length lenses
Lens
Elements /
Groups
Angle
Of
View
180
Min.
Focus
[ft]
.7
Max.
Magnification
1/6.6
16mm f/2.8
Fisheye
*20mm f/2.8
20mm f/2.8
[RS]
*24mm f/2.8
24mm f/2.8
[RS]
28mm f/2
28mm f/2.8
*35mm f/1.4
G
35mm f/1.4 G
[RS]
*35mm f/2
35mm f/2
[RS]
*50mm f/1.4
50mm f/1.4
[RS]
*50mm f/1.7
*50mm f/1.7
[RS]
*50mm f/1.4
[RS]
*85mm f/1.4
11/8
10/9
10/9
94
94
.8
.8
8/8
8/8
84
84
9/9
5/5
10/8
Dimensions (dia.
length) [in]
Weight
[oz]
integral
2–15/16
14–1/8
1/7.7
1/7.7
72 mm
72 mm
3–1/6
3–1/6
20–1/8
2–1/8
10
10
.8
.8
1/6.5
1/6.5
55 mm
55 mm
2–9/16
2–9/16
1–3/4
1–3/4
1–9/16
1–9/16
75
75
63
1
1
1
1/7.7
1/7.7
1/5
55 mm
49 mm
55 mm
10/8
63
1
1/5
55 mm
7/6
7/6
63
63
1
1
1/5.88
1/5.88
55 mm
55 mm
2–5/8
2–5/8
7/6
7/6
47
47
1.5
1.5
1/6.66
1/6.66
49 mm
55 mm
6/5
6/5
47
47
1.5
1.5
1/6.66
1/6.66
7/6
47
1.5
7/6
28
30’
28
30’
24
24
*85mm f/1.4
7/6
G [RS]
*100mm f/2
7/6
100mm f/2.8
7/7
Soft
*135mm f/2.8
5/7
135mm f/2.8
8/6
[T4.5] STF
*200mm f/2.8
8/7
APO
200mm f/2.8
8/7
APO G [HS]
*300mm f/2.8
11/9
APO
300mm f/2.8
11/9
APO G [HS]
300mm f/4
9/7
APO G
continued on next page. . .
Filter
(dia.)
2–5/8
2–5/8 1–15/16
2–9/16 1–11/16
2–9/16 3
2–9/16
10–1/16
6–1/2
16–9/16
3
17–9/16
1–15/16
1–15/16
8–7/16
8–1/2
2–9/16
2–9/16
1–1/2
1–1/2
8–5/16
8–5/16
49 mm
49 mm
2–5/8
2–5/8
1–9/16
1–9/16
6
6
1/6.66
55 mm
2–9/16
1–2/3
8–5/16
2.8
1/7.81
72 mm
3–1/16
2–13/16
19–3/8
2.8
1/7.81
72 mm
3–1/16
2–13/16
19–3/8
3.3
2.62
1/7.7
1/5.88
55 mm
55 mm
2–5/8 3
2–13/16 3–1/16
16–15/16
15–1/2
18
18
3.28
2.85
1/6.25
1/4
55 mm
72 mm
2–9/16 3–1/4
3–1/8 3–15/16
12–7/8
25–3/4
12
30’
12
30’
8 10’
4.9
1/6.25
72 mm
2–3/8
5–1/4
17–7/8
4.9
1/6.25
72 mm
2–3/8
5–1/4
17–7/8
8.2
1/7.14
integral
5–1/16
9–3/8
87–1/2
8 10’
8.2
1/7.14
integral
5–1/16
9–3/8
87–1/2
8 10’
8.2
1/7.14
integral
8–11/16
49–3/4
3–9/16
2.3. DYNAX/MAXXUM LENS CHART
. . . continued from previous page
Lens
EleAngle
ments /
Of
Groups
View
400mm f/4.5
APO G
500mm f/8
Mirror Reflex
*600mm f/4
600mm f/4 G
[HS]
9
9/7
6 10’
Min.
Focus
[ft]
9.9
Max.
Magnification
1/6.5
Filter
(dia.)
7/5
5
13
1/7.7
integral
10/9
10/9
4 10’
4 10’
20
20
1/9
1/9
integral
integral
Dimensions (dia.
length) [in]
integral
4–1/4
10–3/4
67
3–1/8
4–5/8
23–7/16
17–11/16
17–11/16
194
194
Dimensions (dia.
length)
[in]
3–1/4
3–1/5
3 2–3/4
Weight
[oz]
6–5/8
6–5/8
Weight
[oz]
Table 2.4: Zoom lenses
Lens
Elements /
Groups
17–35mm
15/12
f/3.5 G
20–35mm
13/11
f/3.5–4.5
*24–50mm
7/7
f/4
24–50mm
7/7
f/4[RS]
*24–85mm
14/12
f/3.4–4.5
24–85mm
14/12
f/3.4–4.5[RS]
24–105mm
12/11
f/3.4–4.5[D]
28–70mm
16/11
f/2.8 G
*28–80mm
7/7
f/4–5.6 MZ
28–80mm
10/10
f/3.5–5.6 II
28–80mm
8/7
f/3.5–5.6 (D)
(S)
*28–85mm
13/10
f/3.5–4.5
*28–85mm
13/10
f/3.5–4.5
[RS]
*28–105mm
13/10
f/3.5–4.5 MZ
28–105mm
13/10
f/3.5–4.5[RS]
continued on next page. . .
Angle Of
View
Min.
Focus
[ft]
104 – 63
.98
1/6
77 mm
94 – 63
1.6
1/12.3
72 mm
84 – 47
1.1
1/5.55
55 mm
84 – 47
1.1
1/5.55
55 mm
84 – 29
1.6
1/5.88
62 mm
84 – 29
1.6
1/5.88
62 mm
84 – 23
1.6
1.588
62 mm
75 – 34
2.3
1/11
72 mm
75 – 30
Max.
Magnification
Filter
(dia.)
1/9(1/4)
55 mm
75 – 30
2.6(1.2)
1.3
1/3.8
62 mm
75 – 30
1.3
1/4.1
55 mm
75 – 29
2.6(.8)
1/8.3(1/4)
55 mm
75 – 29
2.6(.8)
1/8.3(1/4)
55 mm
75 – 23
1.6
1/4.7
62 mm
75 – 23
1.6
1/4.7
62 mm
21–1/16
11–7/16
2–11/16
2–3/8
2–11/16
2–3/8
2–7/8
2–7/8
2–7/8
2–7/8
2–13/16
2–11/16
3–1/4
4–9/16
2–11/16
2–1/16
2–9/16
2–11/16
2–7/16
2–9/16
10–1/16
2–11/16
3–3/8
2–11/16
3–3/8
17–5/16
2–7/8
3–1/8
2–7/8
3–1/8
17–1/8
10–1/16
14–5/8
14–5/8
13–
15/16
30
8–13/16
8–1/2
6–11/16
17–5/16
17–1/8
2.3. DYNAX/MAXXUM LENS CHART
. . . continued from previous page
Lens
EleAngle Of
ments /
View
Groups
*28–135mm
f/4–5.6
35–70mm
f/3.5–4.5 MZ
35–70mm f/4
10
Min.
Focus
[ft]
Max.
Magnification
Filter
(dia.)
13/16
75 – 18
5 (.82)
1/11(1/4)
72 mm
7/7
63 – 34
1.6
1/6.6
49 mm
6/6
63 – 34
3.3(1)
*35–80mm
8/8
f/4–5.6
35–80mm
8/8
f/4–5.6 II
*35–105mm
12/14
f/3.5–4.5
*35–105mm
12/10
f/3.5–4.5N
*70–210mm
9/12
f/4
*70–210mm
12/12
f/3.5–4.5
*70–210mm
10/10
f/4.5–5.6 MZ
70–210mm
10/10
f/4.5–5.6 II
*75–300mm
13/11
f/4.5–5.6
75–300mm
13/10
f/4.5–5.6
75–300mm
13/10
f/4.5–5.6 II
75–300mm
13/10
f/4.5–5.6 (D)
(S)
*80–200mm
9/9
f/4.5–5.6
*80–200mm
16/13
f/2.8 APO
80–200mm
16/13
f/2.8 APO
G[RS]
*100–200mm
8/7
f/4.5
*100–300mm
11/9
f/4.5–5.6
*100–300mm
11/10
f/4.5–5.6
APO
continued on next page. . .
49 mm
63 – 30
1.6
1/14.3(1/4)
1/5.7
63 – 30
1.25
1/4
63 – 23
5(1.34)
2.8
1/12.5(1/4)
1/6.5
55 mm
34 – 12
3.6
1/4
55 mm
34 – 12
3.6
1/3.9
55 mm
34 – 12
3.6
1/3.84
49 mm
34 – 12
3.6
1/3.84
49 mm
32 – 8
10’
32 – 8
10’
32 – 8
10’
32 – 8
10’
4.9
1/3.84
55 mm
4.9
1/4
55 mm
4.9
1/4
55 mm
4.9
1/4
55 mm
30 – 12
30’
30 – 12
30’
30 – 12
30’
4.9
1/6.4
46 mm
5.9
1/6.9
72 mm
5.9
1/6.9
72 mm
24 – 12
30’
24 – 8
10’
24 – 8
10’
6.2
1/8.3
49 mm
4.9
1/4
55 mm
4.9
1/4
55 mm
63 – 23
46 mm
49 mm
55 mm
Dimensions (dia.
length)
[in]
2–15/16
4–5/16
2–11/16
2–1/2
2–11/16
2–1/16
2–9/16
2–15/16
2–7/16
2–10/16
2–11/16
3–7/16
2–11/16
2–5/16
2–7/8 6
Weight
[oz]
26–7/16
7–3/4
9–1/16
6–7/8
5–3/8
17–1/2
7–3/4
24–1/2
2–7/8
3–15/16
2–3/4
3–11/16
2–3/4
3–11/16
2–7/8
6–7/16
2–13/16
4–13/16
2–13/16
4–13/16
2–13/16
4–13/16
14–
13/16
12–3/8
2–7/8
3–3/16
3–1/2
6–9/16
3–1/2
6–9/16
10–9/16
2–3/4
3–3/4
2–7/8
3–15/16
2–7/8 4
13–1/4
11–1/4
30–1/2
18–1/2
17–1/4
16–1/4
45–1/8
45–1/8
14–7/16
15–3/8
2.3. DYNAX/MAXXUM LENS CHART
11
. . . continued from previous page
Lens
EleAngle Of
ments /
View
Groups
100–300mm
f/4.5–5.6
APO (D)
100–400mm
f/4.5–6.7
APO
Min.
Focus
[ft]
Max.
Magnification
Filter
(dia.)
11/10
24 – 8
10’
4.9
1/4
55 mm
14/11
24 – 6
10’
6.6
1/4
72 mm
Dimensions (dia.
length)
[in]
2–7/8 4
3–1/8
5–7/8
Weight
[oz]
17–1/8
29–1/2
– These lenses have the same glass as the previous MZ models. No Focus scale. No focus lock button.
Table 2.5: Macro lenses
Lens
Elements /
Groups
Angle
Of
View
Max.
Magnification
1/1
1/1
Filter
(dia.)
Dimensions (dia.
length) [in]
Weight
[oz]
47
47
Min.
Focus
[ft]
.65
.65
*50mm f/2.8
50mm f/2.8
[RS]
50mm f/3.5
*100mm f/2.8
100mm f/2.8
[RS]
100mm f/2.8
(D)
200mm f/4
APO G
3 –1
Zoom f/1.7–
2.8
7/6
7/6
55 mm
55 mm
2–11/16 2–5/16
2–3/4 2–3/8
10–5/16
11–7/16
5/5
8/8
8/8
47
24
24
.75
1.2
1.2
1/2
1/1
1/1
55 mm
55 mm
55 mm
2–5/8 2–3/16
2–13/16 3–7/8
2–13/16 3–7/8
7
18–5/16
18–5/16
8/8
24
1.2
1/1
55 mm
2–15/16
13/8
12
30’
8
12 mm
(3X)
24
36 mm
(1X)
12
30’
1”
(3X)
1.6”
(1X)
1/1
72 mm
3–1/8
3/1 1/1
46 mm
7/5
3–7/8
7–2/3
3–3/8 4–5/8
3–3/4 (W H D)
18
40–3/16
38–13/16
– Size of subject that fills the film plane.
Table 2.6: Teleconvertors
Lens
*1.4 APO
1.4 II APO
[HS]
Elements /
Groups
5/4
5/4
Dimensions (dia.
length) [in]
2–1/2 13/16
2–1/2
13/16
Weight [oz]
Compatibility
6–3/16
200 f/2.8 APO G
300 f/2.8 APO G
300 f/4 APO G
400 f/4.5 APO G
600 f/4 APO G
200 f/2.8 APO G
6–3/16
300 f/2.8 APO G
continued on next page. . .
2.3. DYNAX/MAXXUM LENS CHART
12
. . . continued from previous page
Lens
Elements /
Dimensions (dia.
Groups
length) [in]
*2
2
APO
II APO [HS]
Weight [oz]
6/5
2–9/16
1–11/16
7–7/16
6/5
2–9/16
1–11/16
7–7/16
Compatibility
300 f/4 APO G
400 f/4.5 APO G
600 f/4 APO G
200 f/2.8 APO G
300 f/2.8 APO G
300 f/4 APO G
400 f/4.5 APO G
600 f/4 APO G
200 f/2.8 APO G
300 f/2.8 APO G
300 f/4 APO G
400 f/4.5 APO G
600 f/4 APO G
– Manual focus only
Table 2.7: xi zoom lenses
Lens
Lens
Elements /
Groups
Angle Of
View
Min.
Focus
[ft]
Max.
Magnification
Filter
(dia.)
Elements/
Groups
Angle of
View
Min.
Focus
(ft)
Max.
Magnification
Filter
(dia.)
8/8
63 – 30
1.6
1/5.7
49 mm
7/7
75 – 30
2.6
1/10
55 mm
13/10
75 – 23
1/10
62 mm
17/15
63 – 12
30’
30 – 12
30’
24 – 8
10’
1.6
(f/28)
1.6
(f/35)
4.9
1/6.5
62 mm
1/6.4
55 mm
4.9
1/4
55 mm
*35–80mm
f/4–5.6 Power
Zoom
*28–80mm
f/4–5.6
*28–105mm
f/3.5–4.5
*35–200mm
f/4.5–5.6
*80–200mm
f/4.5–5.6
*100–300mm
f/4.5–5.6
9/9
11/9
Dimensions (dia.
length)
[in]
Dimensions (in)
(dia.
length)
2–5/8
2–1/8
Weight
[oz]
Weight
(oz)
6–3/8
2–13/16
2–5/8
2–7/8 3
9–11/16
2–15/16
3–11/16
2–7/8
3–3/16
2–15/16
3–15/16
17–5/8
15–7/8
10–9/16
15–1/2
– Sold with xi cameras. Not true xi lens as zoom drive was camera AF motor. No motor in lens.
2.3.1 G Series
G-series lenses are Minolta’s high-performance class optics. They have the best specifications, feature
special advanced technology, and offer the best image quality of all Minolta lenses. G-series lenses are
designed to meet the high expectations of the most demanding professional. The quality of the image they
produce is among the finest in the industry.
Each G-series lens incorporates one or more of the following features: circular aperture, double floating
and floating-focusing systems, Internal focus, Anomalous Dispersion (AD) glass, aspheric elements, and
2.3. DYNAX/MAXXUM LENS CHART
13
focus-hold buttons.
Minolta will continue to expand its G-series as the needs and demands of professional photographers
grow.
Table 2.8: G lenses (I)
AF 17–35mm
f/3.5 APO
AF 35mm
f/1.4
AF 85mm
f/1.4 (D)
Yes
No
No
Yes
Yes
Yes
No
No
Yes
Yes
Yes
No
Circular Aperture
Floating focus
Internal Focus
Anomalous Dispersion Glass
Asperhic Elements
Focus Hold Button
Yes
Yes
No
No
AF
28–70mm
f/2.8
Yes
Yes
No
No
AF
80–200mm
f/2.8 APO
Yes
No
No
Yes
No
Yes
Yes
Yes
No
Yes
Table 2.9: G lenses (II)
Circular Aperture
Floating focus
Internal Focus
Anomalous Dispersion Glass
Asperhic Elements
Focus Hold Button
AF
200mm
f/2.8 APO
No
No
Yes
Yes
AF Macro
200mm
f/4 APO
Yes
No
Yes
Yes
AF
300mm
f/2.8 APO
No
No
Yes
Yes
AF
300mm
f/4 APO
Yes
No
Yes
Yes
AF
400mm
f/4.5 APO
Yes
No
Yes
Yes
AF
600mm
f/4 APO
No
No
Yes
Yes
No
Yes
No
Yes
No
Yes
No
Yes
No
Yes
No
Yes
Table 2.10: G lenses (III)
Lens
Elements /
Groups
35mm f/1.4 G
10/8
85mm f/1.4 G
7/6
(D)
200mm f/4
13/8
MACRO
APO G
200mm f/2.8
8/7
APO G
300mm f/2.8
11/9
APO G
300mm f/4
9/7
APO G
400mm f/4.5
9/7
APO G
continued on next page. . .
Angle Of
View
Min.
Focus
[ft]
Max.
Magnification
Filter
(dia.)
63
28 30’
1
2.8
f/22
f/22
55 mm
72 mm
12 30’
12
30’
1/1
72 mm
12 30’
4.9
f/32
72 mm
8 10’
8.2
f/32
integral
8 10’
8.2
f/32
integral
6 10’
9.9
f/32
integral
Dimensions (dia.
length)
[in]
2–9/16 3
3–1/16
2–13/16
3–1/8
7–2/3
2–3/8
5–1/4
5–1/16
9–3/8
3–9/16
8–11/16
4–1/4
10–3/4
Weight
[oz]
16–9/16
19–3/4
40–3/16
17–7/8
87–1/2
49–3/4
67
2.3. DYNAX/MAXXUM LENS CHART
. . . continued from previous page
Lens
EleAngle Of
ments /
View
Groups
14
Min.
Focus
[ft]
Max.
Magnification
Filter
(dia.)
600mm f/4 G
10/9
4 10’
20
f/32
integral
17–35mm
f/3.5G
28–70mm
f/2.8 G
80–200mm
f/2.8 APO G
15/12
104 – 63
.98
1/6
77 mm
16/11
75 – 34
2.3
f/22
72 mm
16/13
30 – 12
30’
5.9
f/32
72 mm
Dimensions (dia.
length)
[in]
6–5/8
17–11/16
3–1/4
3–1/5
3–1/4
4–9/16
3–1/2
6–9/16
Weight
[oz]
194
21–1/16
26–7/16
45–1/8
2.3.2 D-Series
D-Series lenses include new distance-encoding device which enables improved calculation for flash exposure with Maxxum 5 and 7 cameras when used with 3600HS D and 5600HS D flashes.
Table 2.11: D lenses
Lens
Elements /
Groups
Angle Of
View
Min.
Focus
[ft]
Max.
Magnification
Filter
(dia.)
Dimensions (dia.
length)
[in]
2–5/8
2–5/8
2–7/16
2–9/16
24–105mm
f/3.5–4.5 (D)
28–80mm
f/3.5–5.6 (D)
(S)
75–300mm
f/4.5–5.6 (D)
(S)
100–300mm
f/4.5–5.6
APO (D)
85mm f/1.4 G
(D)
100mm f/2.8
Macro (D)
12/11
84 – 23
1.6
1/5.88
62 mm
8/7
75 – 30
1.3
1/4.1
55 mm
13/10
32 –
8 10’
4.9
1/4
55 mm
2–13/16
4–13/16
16–1/4
11/10
24 –
8 10’
4.9
1/4
55 mm
2–7/8
17–1/10
7/6
28 30’
4.9
1/7.81
72 mm
8/8
24
6.34”
1/1
55 mm
3–1/5
2–13/16
2–13/16
3–7/8
4
Weight
[oz]
13–
15/16
6–11/16
19–3/4
18
– Manual focus ring does not rotate during AF
2.3.3 RS = Re-Styled Lenses
Fixed Focal Length Lenses
AF 20mm f/2.8 RS Rubber focusing grip. Circular aperture up to f/5.6. Revised Foot/Meter focus scale
in all white paint. The new lens is optically the same as the original.
AF 24mm f/2.8 RS Rubber focusing grip. ABS plastic focusing barrel. Circular aperture up to f/5.6.
Revised Foot/Meter focus scale in all white paint. The new lens is optically the same as the original.
AF 35mm f/1.4 RS AF lock/lens function button on lens. Rubber focusing grip. Circular aperture up to
2.3. DYNAX/MAXXUM LENS CHART
15
f/5.6. Revised Foot/Meter focus scale in all white paint. The new lens is optically the same as the
original.
AF 35mm f/2.0 RS Rubber focusing grip. Circular aperture up to f/5.6. Revised Foot/Meter focus scale
in all white paint. The new lens is optically the same as the original.
AF 50mm f/1.7 RS Rubber focusing grip. ABS plastic focusing barrel. Foot/Meter focus scale in all white
paint. The new lens is optically the same as the original.
AF 50mm f/1.4 RS Wider rubber focusing grip. ABS plastic focusing barrel. Circular aperture. Large,
detachable lens shade. Foot/Meter focus scale in all white paint. 55mm filter thread. The new lens is
optically the same as the original.
AF 85mm f/1.4 RS AF lock/lens function button on lens. Rubber focusing grip. Circular aperture up to
f/5.6. Revised Foot/Meter focus scale in all white paint. The new lens is optically the same as the
original.
Zoom Lenses
24-50mm f/4 RS Rubber focusing grip. ABS plastic focusing barrel. Foot/Meter focus scale in all white
paint. The new lens is optically the same as the original.
24-85mm f/3.5-4.5 RS Circular Aperture. New style rubber focusing and zoom grips. The new lens is
optically the same as the original.
28-85mm f/3.5-4.5 Introduced with 9xi in 1992. Polycarbonate barrel. Faster focusing.*
28-105mm f/3.5-4.5 RS Circular Aperture. New style rubber focusing and zoom grips. The new lens is
optically the same as the original.
80-200mm f/2.8 APO HS The 80-200mm f/2.8 APO received a stronger focusing shaft which enabled
better focus tracking, a rubber focusing grip for easier manual focus, and white paint finish.
Macro Lenses
50mm f/2.8 Macro Rubber focusing grip. ABS plastic focusing barrel. Circular aperture. Focus Range
limiter. Focus hold button.
100mm f/2.8 Macro Rubber focusing grip. ABS plastic focusing barrel. Circular aperture. 40
HS = High Speed APO Lenses
200mm f/2.8 APO
300mm f/2.8 APO
600mm f/4 APO
80–200mm f/2.8 APO
These lenses were redesigned in 1988 for the Maxxum Series-i cameras. Internal changes include a
faster focusing gear and a new IC ROM to enable faster focusing with Series-i, xi, and si cameras.
External changes include AF lock/lens function button (one for 200mm, two for 300mm and 600mm
lenses), and ”High Speed Focus” decal on lens shade.
Additionally, the 80–200mm f/2.8 APO received a stronger focusing shaft which enabled better focus
tracking, a rubber focusing grip for easier manual focus, and white paint finish.
1.4
APO Tele Converter
2.3. DYNAX/MAXXUM LENS CHART
2
16
APO Tele Converter
The converters were redesigned with new gear and IC ROMs. External changes include TYPE II
designation. It is OK to use old-style converters on new lenses. Using a new converter on an old, nonupgraded lens will cause slower focusing
Warning: THE APO CONVERTERS CANNOT BE USED WITH THE 80-200MM APO LENSES. If
mounted together, the front element of the converter will contact back element of the lens and damage both.
2.3.4 Maxxum Lens Glossary
Circular Aperture Defocused background highlights take the shape of the diaphragm in wide-aperture
portrait shots. The 9-blade apertures found in some of the G-lenses is specially designed to provide
a circular opening at widest apertures (small f-numbers). A circular aperture produces softer, more
natural-looking backgrounds at wider apertures than a lens having a standard 5-, 6-, 7-, or 9-bladed
aperture.
Floating Optical Design Rather than moving all lens groups as a single unit, designated optical groups in
some of the G-lenses move independently as the lens focuses. This ”floating” movement provides
an extremely flat image at the film plane thus assuring corner-to-corner sharpness. It also provides
a high degree of control over sagittal flare, and eliminates coma, an aberration that causes off-axis
object points to appear as short ”comet-like” images on film. Reducing sagittal flare and coma
provides an extremely sharp, high-contrast image which more effectively separates the subject from
its background at large apertures.
Internal Focusing The AF 200mm, 300mm, and 600mm APO’s internal focusing system moves lighter
internal lens elements to focus the image instead of the larger front elements used in conventional
systems. This along with a high-ratio lens drive provides quick, accurate focusing of fast moving
subjects. In addition, a focus limiter permits selecting a focusing range for even faster response.
Anomalous Dispersion (AD) Glass Different wavelengths of light come into focus at different planes.
This effect is know as Chromatic aberration and can cause a ”rainbow” halo around points of light
and reduced sharpness. ”Standard” achromatic telephotos are corrected to bring the red and blue
components into focus at the film plane. The Anomalous Dispersion (AD) glass, used G-Series APO
telephotos and zooms as well as the 100-300mm APO and 100-400mm APO virtually eliminates the
effects of lateral and longitudinal chromatic aberration, providing increased sharpness and extremely
accurate color rendition.
Aspheric Design Different than the smooth continuous arc of a normal lens element surface, the curvature
of an aspherical lens element changes shape across its surface. This irregular surface helps to correct
spherical aberration and coma, an aberration that causes off-axis object points to appear as short
”comet-like” images on film. It also reduces sagittal flare. The inclusion of aspheric elements in a
lens design enables designers to reduce the amount of elements in the design. This in turn reduces
the amount of flare producing surfaces, two per element, which increases the contrast and ”snap” to
the final image. The reduction in elements also makes the lens smaller and lighter..
Focus-Hold Button When pressed, it locks focus or can be used to select spot focus or continuous AF
(with Custom Function Card or Customize Function Card xi).
Distance Encoding Distance encoding with new and revised D lenses provides refined multi-segment metering for manual focus operation and depth-of-field display on Navigation Display with the Maxxum
7 as well as ADI flash functions when the new 5600(D) and 3600(D) flashes.
Integral Filters Because a front-mounted filter would be expensive and would cause excessive flare, the
300mm and 600mm Apo lenses have a built-in filter holder. Six filters are provided: NORMAL
(clear), Y52 (yellow), O56 (orange), R60 (red), 1B (skylight) and ND4X (2-stop neutral density).
Achromatic Coating Minolta’s Achromatic, multi-layer coating provides remarkably accurate color rendition and excellent contrast by virtually eliminating reflections between lens elements.
Chapter 3
Flash-less photography
3.1 Photographing with M42 / Minolta AF lens reduction
[Author(s): Petr Holub.]
Needs more testing!!!
Tested in following setup:
Date: 2002–08–13 20:30–23:30. Place: Flamenco concert, Brno, CZ
Minolta Dynax 600si
Russian mirror lens: 500/6.3 – 3M-6A (or ZM-BA – Russian alphabet???) N840247 with M42
M42 / Minolta AF lens reduction
Fuji Superia 1600 (with 4th layer) pushed to 3200 ASA
Testing showed that metering doesn’t work correctly. System tends to underexpose at least 1 EV. Also
working conditions during this experiment were difficult because of overall low-light situation (correct
exposition was about 5.6/20 with 3200 ASA film!) and strong spotlight.
After that I tried to play with it using different metering modes and comparing results to the ones
measured through the standard lens I use (24–85/3.5–4.5 and 70–210/3.5-4.5) but without actually shooting
on the film. I’ve found the measurements through the M42 reduction generally not very reliable (in all
three modes – average, expert, and spot) with tendency to underexpose which matches experiences from
the flamenco concert. To get proper exposure I suggest using either other light measurement (through other
lens or using external exposure meter) or bracket 0 5 through 2 5.
It should be tested more thoroughly, especially influence of different metering modes and the results
should be shot on slide film to get precise results.
3.1.1 Comment on M42
[Author(s): Magnus Wedberg.]
My own testing indicates that using M42 lenses on Minolta bodies is somewhat hit-and-miss. Results seems
to heavily depend on which lens you are using, and on the camera, too. I never use any compensation with
my Super Takumar 55/2.
3.2. MORE ON PHOTOGRAPHING WITH M42 / MINOLTA AF LENS REDUCTION
18
3.2 More on photographing with M42 / Minolta AF lens reduction
[Author(s): Chingfeng Au. Reviewed by: Petr Holub.]
Part 1
This is just a fast test. All metering were segment metering (maybe I should use spot instead of segment)
http://auching.duc.auburn.edu/TEMP/pentax_minolta.htm
In F8.0 test, Pentax SMC Takumar under about 1.5 EV – 2.0 EV. But when I set the aparture to F1.4,
the shutter time seems near correct.
When using flash, it works well though.
F IGURE 3.1: Results of M42 adapter tests (1)
Part 2
Here’s the test base on Minolta 50/1.7 and Pentax SMC Takumar 50/1.4. It looks like you have to +1EV
for F2.8 F5.6, +1.5EV for F8.0 F11.0, and +2EV for F16.0
http://auching.duc.auburn.edu/temp/m50p50.gif
Test using aparture priority mode. (I still don’t know why this happened? Theoretically, using aparture
priority mode and spot metering, the TTL system should get correct amount of light and calculate correct
shutter time, isn’t it?)
3.3 Alternative testing of vignetting
[Author(s): CyberSimian. Reviewed by: Petr Holub.]
This experiment was desribed for 24–105/3.5–4.5 lens in [3] with Hoya filter attached.
Try this experiment when there is no film in the camera:
3.3. ALTERNATIVE TESTING OF VIGNETTING
19
F IGURE 3.2: Results of M42 adapter tests (2)
1. Set the zoom to the 35 mm focal length.
2. Set the exposure mode to M (manual), the shutter speed to “bulb”, and the aperture to the maximum
(f4 at 35 mm focal length). As the maximum aperture varies with focal length on the 24–105 zoom,
remember to set the aperture AFTER setting the focal length.
3. Remove lens cap, lens hood, and filter.
4. Open the camera back and fire the shutter, holding the shutter open (a cable release helps here).
5. Point the camera at a bright wall or the sky and look through the back of the camera with one eye,
about 12–18 inches from the film gate. You will see the rectangular film gate, the black baffling in
the mirror box, and a bright circle (the rear element of the lens).
6. If you are holding the camera horizontally in the normal position and rotate the camera about a
vertical axis, your line of sight through the lens appears to move horizontally towards one edge of
the film gate. However, we actually want to check for vignetting at the corners of the frame, so
instead rotate the camera about an axis displaced somewhat from the vertical, such that your line of
sight through the lens appears to move diagonally from the centre of the film gate towards a corner of
the film gate. It does not matter which corner, but I will assume the lower left corner in the following.
7. As you rotate the camera, you will see in the bright circle an area of darkness emerge from the upper
right. As you rotate the camera more, the area of darkness will move towards the lower left, and you
will be able to see that the area of darkness is an out-of-focus image of the interior baffling in the
lens. Continue rotating the camera until the area of darkness reaches the lower left corner of the film
gate. What you have just seen is the ”normal” behaviour of the lens, and is the reference that we will
use to compare the effect of the lens hood and filters.
8. Attach the lens hood and repeat step (7). What you see will be identical to step (7), i.e. the lens hood
does not obstruct the light falling on the film plane. This is what you would expect if the lens hood
is correctly designed.
3.5. MINOLTA MOUNTS
20
9. Remove the lens hood and attach the filter. I will assume that you are using a Hoya filter with a
standard-thickness mount. Repeat step (7). Now there is a difference – as the area of darkness
approaches the lower left corner, a second area of darkness emerges from the lower left corner and
travels towards the upper right, eventually meeting the darkness approaching from the upper right.
This second area of darkness was not present when there was no filter, and so is the result of adding
the filter.
10. Leave the filter attached and change the focal length to 105 mm and repeat step (7). At this setting
there is no second area of darkness that emerges from the lower left, i.e. adding the filter has not
changed what you see at the 105 mm focal length.
11. Leave the filter attached, change the focal length to 24 mm, and reset the aperture to maximum (f3.5
at 24 mm). Repeat step (7). As the area of darkness from the upper right is about to envelope the
lower left corner, you can see that the second area of darkness is just about to emerge from the lower
left corner, i.e. adding the filter is on the threshhold of changing what you see at 24 mm focal length.
12. Check also the 50 mm and 70 mm settings; 50 mm is affected slightly (more than 24 mm; less than
35 mm), but 70 mm is not affected (same as 105 mm).
13. Repeat steps (7) to (11) for the filters that you want to use (e.g. standard-thickness UV; slim UV;
standard-thickness polarising; slim polarising). If you are not using the standard lens hood, check
that too.
Notes from exemplar testing of 24–104/3.5–4.5 lens with Hoya filter
My conclusion is that a Hoya filter with a standard-thickness mount produces no vignetting at 70–105 mm,
is on the threshhold of producing vignetting at 24 mm, and does produce some vignetting in the range circa
30–60 mm. This is a strange result, as one would expect vignetting to be worst at the shortest focal length,
but is presumably a result of the optical design of the 24–105 zoom.
3.4 Setting Minolta DiMAGE Scan Dual with VueScan
[Author(s): Petr Holub.]
Settings files are listed in App. A.1 (page 31).
3.4.1 Scanning Fuji Provia
Table 3.1: VueScan parameters for scanning Fuji Provia using Minolta
Scan Dual
Parameter
Lock Exposure
Long Exposure Pass
Color Balance
Value
1.95
Yes
None
Notes
Might be increased to 2.2 if needed.
Reduces noise in dark parts of the image.
3.5 Minolta mounts
[Author(s): Chuck Cole.]
Question: How many types of minolta mounts are there?
Answer: Four plus. (I don’t know all the details but had the 9xi problem on a Sigma 400mm).
3.6. DISABLING THE LENS MOUNT CHECK
21
1a) Minolta made some Leica-compatible RF screw mount lenses for various rangefinders (both screw
and focus cams work on both brands)
1b) Minolta made some Leica-thread, incompatible RF screw mount lenses for various rangefinders
2a) early SR/SRT mounts lacked the aperture tab found on all MD mounts and most (or all?) MC mounts:
bayonet fits, but auto-metering doesn’t work.
2b) regular MD/MC mounts with auto tab
2c) one rare 35mm guide number lens (aperture set per focus distance for old bulb flash)
2d) screw-adapter bellows types
3a) early Maxxum mounts (eg, 7000 & 9000) do AF with any version AF lens (early Sigma 400mm f5.6
doesn’t work with 9xi, etc, but works with 7000,9000)
3b) mid Maxxum lenses work with all AF bodies, but lack DOF coupling
3c) newer Maxxum has DOF features
4) Vectis series lenses for R-3000 (digital), etc
Note: some Maxxums (eg, 2xi, 3xi, Spxi) cannot defeat their shutter interlocks so they can use T-mount
lenses or telescopes, etc, but most can (see sec. 3.6).
I think there more RF versions and maybe a twin-lens type or two. Let’s ignore the microscope and
enlarger options that could be used on.
3.6 Disabling the lens mount check
[Author(s): Unknown, taken from Minolta AF FAQ [4].]
Table 3.2: Disabling the lens mount check
Camera
5000, 7000, 9000,
3000i, 5000i, 7000i,
8000i
2xi, 3xi, Spxi
5xi
Procedure
No preparation needed to use T-mount lenses.
Requires circuit modification by Minolta.
Press and hold SPOT and FUNC. buttons and switch
from LOCK to ON.
7xi/9xi
Press and hold AEL and FUNC. buttons and move power
switch from LOCK to ON.
300si
Press and hold FLASH and DRIVE/SELFTIMER
buttons and move power switch from LOCK to ON. (Off
appears in LCD panel)
400si
Press and hold Drive Mode and AV buttons and move
power switch from LOCK to ON.
404si
Press and hold the P and Self Timer switches with
Function Dial at ME while sliding the Main Switch to
ON.
500si
Press and hold Drive Mode and SPOT buttons and move
power switch from LOCK to ON.
continued on next page. . .
3.7. REMOTE RELEASE CORD
22
. . . continued from previous page
Camera
Procedure
505si
Super Press and hold Self Timer and SPOT buttons and
move power switch from LOCK to ON.
XTsi
Press and hold the Selftimer-Drive Mode button and
Spot/AE button while sliding the Main Switch to ON
(OFF appears in LCD panel).
600si
Press and hold the LENS RELEASE button and FILM
SPEED button with the lens removed and move the
power switch from LOCK to ON. (OFF appears in LCD
panel)
700si
Press and hold SPOT and CARD buttons and move
power switch from LOCK to ON.
800si
Press and hold SUBJECT PROGRAM and AEL buttons
and move power switch from LOCK to ON.(OFF
appears in LCD panel)
Vectis S-1
Press ON/OFF to turn camera ON. Open door that
covers hidden buttons. Press the Drive Mode button
(fathest on the left) and the MODE button together.
”ON” will appear in the LCD panel. Press the ”SEL”
button (second from right in hidden buttons). ”OFF”
Will appear in the LCD panel.
Vectis S-100
Subject Program and +/-, then press any other button
to confirm; displays ’on’ in display even with adapted
manual lens attached.
RD-175
Press and hold DRIVE/SELFTIMER and AV buttons
and move power switch from LOCK to ON. (ON appears
in LCD panel)
3.7 Remote release cord
3.7.1 Building your own Remote Cord (v. 1)
[Author(s): Unknown, taken from Minolta AF FAQ [4]; Csaba JOZSA.]
The meaning of each pin is :
Back of the camera
Front of the camera
o
C
o
F
o
S
C for Common
F for Focus
S for Shutter release.
The way to activate focus is to connect C and F, and for the release, C and S.
But there is still a problem: The question of the switch is not so trivial : The Minolta remote cord
allow, on the same switch, to focus, and if pushed a bit more, to release the shutter. And to lock the switch
with shutter released for long pause. It’s possible to implement this with 2 switches, but what appens if the
focus switch is held when the release switch is pushed ? Or if the focus switch is held while the shutter is
released in pause mode ? I don’t want to try this sort of experimentation on my camera.
Scott, did you find a switch with all these functions ? or do you have 2 switches ?
3.7. REMOTE RELEASE CORD
23
Anyway, for the connector, I had another solution from the news : It’s to buy the cord which connect
the camera to the IC R1 infrared remote device. The only problem is that this device only deal with the
shutter release and I’m afraid that this cord only have two pins connected.
November 2002, Csaba JOZSA adds: I would like to add a comment: on the Dynax cameras (at least
on the Maxxum/Dynax 5) the shutter release works only if the focussing is not switched off. Thus, the
procedure is: connect focus pin to common – focussing – , connect shutter pin to common without disconnecting the focus pin – exposing –. It’s a bit unhandy, since you are obliged to always focus before shutter
release, aldo, if you focus with AF and then switch to MF mode, the camera won’t change the focus setting.
(On switching back to AF, he will.)
3.7.2 Building your own Remote Cord (v. 2)
[Author(s): Scott Kimball, taken from Minolta AF FAQ [4].]
The question was asked, Did I find a switch like Minolta uses, or did I use 2 switches.
The answer: I used 2 switches in the following way:
A push-on, push-off single pole, single throw switch enables focus. A momentary single pole, double
throw switch de- activates focus and activates the shutter with one push.
(Pins are drawn in
F
C
S
incorrect order
|
|
|
for ease of
|--/--|
|
|
drawing -(foc) |SPST
| ___|
C F S is the
|--------|_|_|?
correct order)
SPDT
(shutter)
Please forgive the crude drawing. Wired this way, using autofocus mode, you can first press the focus
button to enable the autofocus. Then, when the camera has focused, press the shutter release button (the
SPDT button) to switch instantly from “focus” to “fire” (and back again if you use the momentary switch).
If you are manually focusing, you need not first press the focus button, and the shutter will still trip when
you press the shutter release. If you do first press the focus button and the camera is in manual focus mode,
nothing happens because autofocus is not on.
In a way, I like a 2 button setup better than a 1 button setup, because there is less chance of accidently
firing off a shot. The only thing this doesn’t have is a locking feature to lock the shutter open, but it
shouldn’t be hard to come up with a mechanical method of locking the button down.
As far as experimenting with this and the possibility of damaging the camera, as long as you don’t
introduce any current into the circuit there won’t be a problem. The only other damage you could do is
bending or breaking a pin in the camera socket if you make a connector that doesn’t fit well and try to force
it.
3.7.3 Building your own Remote Cord (v. 3)
[Author(s): Dario Piantanida, taken from Minolta AF FAQ [4].]
(Using an audio cable for the internal connection of CD-ROM drives...)
First cut che cd-rom connctor on the cd-rom side, to have a 20-30cm wire for the RC: on this side you’ll
mount the button or the switch (or both). On the audio card side you’ll find a 4 pin plastic connector made
like this:
1 2 3 4
r - w s
3.7. REMOTE RELEASE CORD
24
where r=red, -=none, w=white, s=shield (colours don’t matter, but it’s just to number the
pins).
You’ll work to obtain:
1 2 3
r - w
With a very little scewdriver push a little thin strip that holds the metal shield contact in the plastic
connector: this way the metal contact should slip off the connector. Now you can cut the shield wire where
it joins red and white ones.
Your next step is to file down the plastic connector to make it fit the camera hole. First of all you can
cut away the old shield contact with a sharp knife (I don’t know the English for the knife I mean), then use
a file or sandpaper to reduce the size of the connector; I started with a grindstone, but be VERY careful: if
you exaggerate you’ll have to start over with a new connector. Here there is little to say: file a bit and try
whether it fits; then file another bit. You’ll have to file a lot on the long side that holds the thin strips of the
metal contacts. You’ll also pay attention to a little notch in the camera hole: try to file the connector to fit
it.
Once you have the connector, I suggest you to strengthen the wires (red and white) that come from it:
I used a glue gun (I hope the English is correct here) to create a “shell” for the wires.
Nothing more. This RC works properly on my 700si, even as a bulb switch.
Chapter 4
Flash photography
4.1 Flash–Ambient Control
[Author(s): Phil Brandon. Reviewed by: Petr Holub.]
This section is copy of one found on the web [16] (hopefuly I don’t violate any copyright by including it in
this guide). It’s written by Phil Brandon from Minolta USA about 700si and paritally 800si but it seems to
work for my 600si as well – so it’s probably general a bit. On the bottom of the web page [16] there are
some other notes – probably about 800si. It would be really nice if somebody who speaks both Thai and
English translates those in English.
Whether using its built-in flash or an attached accessory flash, the Expert Flash system of the 700si is
designed to recognize basic lighting conditions and adjust ambient light settings and flash duration to
achieve the best results automatically. The table 4.1 on page 26 indicates adjustments made for all situations
4.1.1 P Mode Flash
When the flash is up or any dedicated accessory flash is attached to the 700si’s hot shoe, either directly or
through accessory connectors, it will fire automatically in P mode whenever necessary. The shutter speeds
between 1/200 and 1/60 second and apertures within the working range of the lens will be set automatically
depending on the ambient light level. The camera’s TTL flash metering system monitors the amount of
light which reaches the film plane and automatically stops the flash output when it detects that sufficient
exposure has been received.
In backlight conditions requiring flash or when the forced-flash button is pressed, the ambient light
exposure of the subject will be reduced by approximately one stop and the flash brightness will be reduced
from 1/4 to 3/4 stop to maintain proper subject exposure. The background will be up to 1-1/2 stops brighter
than the subject exposure.
When the SPOT button is pressed for slow-sync flash photography, flash brightness is reduced by 3/4
stop and shutter is set to a speed slow enough to allow normal background exposure.
The flash will not fire if the 700si is set for either PA or PS modes. Press the MODE button to resume
normal P Mode flash operation.
Changing Program Flash Control with the Custom xi card
Normally the 700si’s exposure computer will decide when to use flash even if the built-in flash is popped
up or an accessory flash is attached and turned on. If you would like the flash to fire everytime the flash
is lifted, use the Custom xi card to switch the Program flash control to manual switchover. The table 4.2
shows the function number and setting to make.
Function number
5
Control
Program flash
Control
Setting
1
2
Night fill-in
Lowlight fill-in
Frontlight fill-in
Yes
Low light fill-in
0 EV
1 EV or less
No adjust
Yes
Daylight situation when the main subject is much darker
than background
Daylight situation when there is no big difference between subject and background brightness
Dark condition or a situation which may cause blur due
to camera shake
Lowlight situation when background exposure is desired
as much as the main subject.
Yes
Yes
Yes
Frontlight fill-in
0 75
0 25 EV
1 EV
No adjust
Yes
Yes
Yes
Yes
Night scene
0 75 EV
No adjust
0 EV
Backlight fill-in
Yes
Yes
Backlight fill-in
0 75
0 25 EV
1 EV or less
1 5 EV or less
Yes
Mode
and
operation
Exposure
control
Main
Flash light
subject
Ambient light
Backgroud (ambient)
P mode + Auto flash
P mode + Forced flash
A mode + Flash ON
S mode + Flash ON
P mode + SLOW SYNC
A mode + SLOW SYNC
S mode + SLOW SYNC
4.1. FLASH–AMBIENT CONTROL
26
TABLE 4.1: Flash–ambient compensations performed by camera
Action
Auto Switchover
Manual Switchover
TABLE 4.2: Changing Program Flash Control with the Custom xi card
4.1. FLASH–AMBIENT CONTROL
27
4.1.2 A Mode Flash
In A Mode, the photographer sets the aperture and the camera automatically selects the fastest sync speed
between 1/200 and 1/60 second that ambient light levels will allow. This provides the advantages of full
depth-of-field control while the Expert exposure system uses multi-pattern metering or center-weighted
metering to automatically determine ambient exposure and the necessary flash output.
Basically, the system is designed to reduce ambient light exposure by one stop (by increasing the shutter
speed) and, if possible, maintain it at this level for backlight, frontlight, and lowlight fill-in. In backlight
and frontlight conditions, the flash brightness is reduced from 1/4 to 3/4 stop to produce a pleasing subject
exposure.
The background will be up to 1-1/2 stops brighter than the subject exposure.
For indoor photography, flash brightness is at its normal rating while the shutter speed is controlled to
reduce and maintain ambient light brightness by one stop. The slowest shutter speed available in A mode
is 1/60 sec. Ambient levels requiring longer speeds will be underexpose to a greater degree.
When the SPOT button is pressed for slow-sync flash photography, flash brightness is reduced by 3/4
stop and shutter is set to a speed slow enough to allow normal background exposure.
4.1.3 S Mode Flash
In this mode, any shutter speed between 1/200 sec. and 30 seconds can be selected by the photographer.
The 700si Expert Exposure system then automatically selects the appropriate aperture from within the lens’
working range.
Basically, the system is designed to reduce ambient light exposure of the subject by one stop (by closing
the aperture) and, if possible, maintain it at this level for backlight, and frontlight fill-in. In these conditions,
the flash brightness is reduced from 1/4 to 3/4 stop to produce a pleasing subject exposure. The background
will be up to 1-1/2 stops brighter than the subject exposure.
Shutter-priority flash is best used when the ambient front or backlight is equal to or greater than the
subject brightness. If used in normal indoor flash photography where the background is dark, the aperture
will remain wide open until the ambient light level approaches a normal ambient light, exposure. This
provides the least amount of depth of field for the picture. If the indoor brightness is high enough or the
shutter speed selected is low enough to produce an ambient exposure without flash, the metering system
treats the situation like a front- or back-light fill-in situation by reducing both ambient and flash exposure
as described above.
When the SPOT button is pressed, flash brightness is reduced by 3/4 stop and the if the ambient light
is bright enough to require an aperture smaller than the maxxum for the lens in use, the lens’ aperture will
be opened toward achieving better background exposure. Once again, S mode is not recommended for this
procedure.
4.1.4 M Mode Flash
In this mode, both aperture and shutter speed (within maximum x-sync) are set by the photographer. The
flash output is determined by the 700si’s metering system and regulated by its TTL flash control system.
The photographer can manually adjust the ambient exposure by the shutter speed and aperture selected
and control automatic flash brightness by using the camera’s flash exposure override feature. The 5200i,
5400xi, and 5400HS flash units can also be switched to manual operation and the level adjusted for special
applications.
4.1.5 Fill Flash
In P mode, whenever the 700si’s 14-segment honeycomb-pattern metering system detects that conditions
require additional light to balance the subject and background exposures, a dedicated, attached accessory
flash will fire automatically. When not normally called for in P mode, the flash can also be fired manually
by pressing and holding the flash-control button while taking the picture. In A, S, and M modes, fill-flash
4.2. SHORT SUMMARY ON USING FILL-IN FLASH
28
is calculated by the camera’s AE system, but the flash must be activated manually before it will fire. See
the respective sections above for more information.
4.1.6 Slow-Shutter Sync.
In P and A modes, pressing and holding the SPOT button while taking the picture causes the 700si to use
a shutter speed slightly higher than that required for normal ambient light exposure. The flash exposure
is also controlled to provide proper exposure. This technique provides a natural appearance of the main
subject with better ambient-lit background detail.
Note: If the background is bright or a large aperture is set, the shutter speed may not be reduced.
4.1.7 Other comment
This seems to be excerpt from some mail by Phil Brandon. It is useful and clear enough to include it here.
The flash-ambient programming is unchanged between the 700si and 800si.
Back to the thought of the programming for flash: The camera has an Expert System which is the
control for everything. It picks which focus sensor to favor, how to build the exposure pattern, how to set
the shutter speed and aperture for effect, and how to balance flash with ambient.
When flash is used, the most important consideration is NOT overexposing the subject by adding flash
to an ablient light exposure that is already correct. (This is the key). Exposure is AF integrated. Once an
AF sensor is locked in on the subject. An exposure pattern is built around it. The brightness of the subject
is then compared against the background. If the subject is somewhat darker than the background (not a
lot), the ambient light exposure might (probably will) be reduced up to 1 stop. However, the background
in this case will still be greater and thus over exposed. The Flash duration is shortened a bit to reduce
the flash exposure so the addition of flash will not produce a subject exposure that is “overexposed.” As
the subject and background become closer in brightness the flash will power down even more. I would
expect to see a slight shutter speed increase (1/60 to 1/90 or 1/125) when the flash is turned on and camera
is in A mode. The key to the background either over or under is a product of the subject brightness. Sort
of a by-product. It just happens.
With that said: if you adjust the Ambient light exposure, you will affect the flash component as well.
If you like what the flash is doing but want to increase the ambient by 1, you have to adjust the flash
by 1 to make sure its exposure is the same as the unbiased setting (I know this will bring on more
questions). There is no way to really know exactly what the camera is doing by looking at any controls
or readouts. You can infer if you really know the system and really know the brightness levels of subject.
When I am really creating, I use manual exposure mode and spot metering. I read the mid tone of the
background. Compare it to the subject tones. Determine what shutter speed and aperture settings to use
for affect and then dial in my own –EV for flash control. Takes practice but I then “Know” exactly what
to expect. If I am in a hurry and shooting print film, I shoot Program with flash and it looks fine.
4.2 Short summary on using fill-in flash
[Author(s): Petr Holub.]
Based on my experiences and experiences of other people [3] here is a short summary on how to get gentle
fill in flash:
M mode (called Brainer mode by Gary Walts in [15])
– Meter your subject and set aperture and shutter speed for proper exposure with flash turned off.
You can also use results of measurement in P mode again with flash turned off and set those
vaules in M mode.
– Dial-in the desired flash compensation – e.g. dial-in
even no flash compensation at all.
0 5 flash compensation or you can set
4.3. SHORT SUMMARY ON USING WIRELESS FLASH
29
P and A mode (called No-Brainer mode by Gary Walts in [15]). Just press the force flash button on
camera body. The result will habe about one stop underexposed background/ambient light so it’s not
what you usually want as daylight-balanced fill-in flash. But it’s great for backlight. . .
In P and A mode you can use SLOW SYNC method. SLOW SYNC is designed to make your shutter
speed long enough to get proper exposure of ambient light 1 . According to Phil Brandons notes on
flash programing (Table 4.1 on page 26 and 4.1.6 on page 28) the ambient light in this mode should be
exposed without any compensation (in my experiences it is sometimes up to 0 5 EV underexposed)
– the same situation you probably want with daylight fill-in flash. In my experiences it worked O. K.
except for the high-speed sync (HSS mode) when it has usually no effect on shutter speed 2 . When
you want especially subtle fill-in you can dial 1 or even 2 EV flash compensation.
P and A mode
– You need to compensate (ambient) exposure decrease invoked automatically by the camera
in those modes when flash is turned on. Amount of compensation varies on ambient light
level but usualy you need to set about 1 EV. Unless you have Maxxum/Dynax 7 with flash
compensation detached from ambient compensation bear in mind that flash output increases by
the same amount as the ambient compensation set.
– Now you need to compensate flash for both the automatic increase due to ambient exposure
compensation and the flash compensation that you want to dial in. In case of 1 ambient
compensation you need to dial 1 flash compensation to get original flash power. Than you can
go further with your intended flash compensation – if you want to have flash power increased
by 0 5 you need to dial-in 1 5 total flash compensation.
Disadvantage of this approach is in the fact that overall exposure compensation that camera sets
after turning on the flash may be exactely one stop (if camera decides it’s frontlight situation) but it
may be even more so you never know what compensation exactely should be set unless you do the
measurement with flash turned off.
Most precise fill-in flash can be obtained using M (Brainer mode) mode described above but it’s the most
time consuming. For faster work SLOW-SYNC would be probably the choice.
Notes:
When flash is the main (only) source of light you can achieve following results with compentsation
(C) and flash compensation (FC)
– C
0; FC
– C
0; FC
– C
0; FC
– C
1; FC
0 – properly exposed picture
1 – one stop underexposed picture
1 – one stop overexposed picture
1 – properly exposed picture (no effect)
(this is based on tests with Dynax 600si/3600HS(D)/Kodak Ektoachrome E200 slide film).
4.3 Short summary on using wireless flash
[Author(s): Gary Friedman. Reviewed by: Petr Holub.]
Well, embedded within these comments lie two other misconceptions about Minolta’s wireless flash which
will be debunked in the forthcoming article. However, I’ll outline them briefly here:
1 Intent behind described in Minolta manuals is night photography with some foreground object – e. g. person – lit by flash; both
foreground and background should be properly exposed
2 This behavior can be expected because of primary raison d’ˆ
etre of SLOW SYNC mode, i.e. low-light photography, when you
wouldn’t have your flash in HSS mode.
4.3. SHORT SUMMARY ON USING WIRELESS FLASH
30
As misleading as Minolta’s documentation is, you do NOT need to buy the wireless IR flash controller in order to control more than one off-camera flash! Your built-in flash can do this unaided.
Just put all of your off-camera flashes on automatic and aim them at the subject, and during exposure
the camera’s built-in flash will send the “All Off” command whenever it detects that enough light has
hit the film – regardless of which flash (or combination of flashes) produced the light.
Armed with this knowledge you can also set up 1:3, 1:6, or 1:Anything flash ratios just by changing
the flash-to-subject distances, and the camera will send the ”all off” signal when the light is sufficient
(usually this will be the light from the closest flash - the flash that is further away will be turned off
before it has a chance to put out enough light – hence the ratio.) This technique also means you can
achieve automatic flash ratios using HSS off-camera; you’re not tied to Minolta’s built-in 1/60 th of
a second (1/30th of a second on the Maxxum 9) flash synch limitation.
When used as a controller, the built-in flash puts out a negligible amount of light as compared to what
is required for a proper exposure. That is why you can’t see any evidence of the on-camera flash being
present in any of the examples. To prove this to yourself, take a flash meter (in cumulative mode) and
measure the total amount of light coming out of the built-in flash, both when in wireless controller
mode and in ”normal” mode, and compare the results.
Since the Wireless IR flash controller will also PREVENT you from using off-camera high-speed synch
on the Dynax 7, there is no really good reason to buy one. I have found it to be very useful in only one
situation which is not very common: When using Minolta wireless flashes in manual mode (say, in a
studio situation), and you want to use a flashmeter to measure the light hitting the subject, the in-band
signals used to control the off-camera flashes will interfere with the handheld flashmeter’s reading. Since
most flashmeters employ IR filters near the sensor, using the wireless IR flash controller will completely
eliminate this problem.
I have found the 5600HS flashes to be excellent wireless studio flashes, by the way. Check out some
samples at my other website, http://www.NotYourOrdinary.com.
Great examples of using wireless flash can be found on Gary’s web site [18]. Similar experiences of other
people can be found here: [3, 15] and quite thorough guide by Gary Walts [15].
Appendix A
Flash-less experiments
A.1
INI files for Minolta DiMAGE Scan Dual with VueScan
[Author(s): Petr Holub.]
A.1.1 Settings for Fuji Provia 100F
[VueScan]
[Device]
OptionTypes=2
DiskFileName=scan0007.tif
[Device-ScanDual-35mmSlide]
PreviewResolution=3
ScanResolution=2
Rotation=2
NumberOfSamples=3
LongExposurePass=1
LockExposure=1
RGBExposure=1950
InfraredExposure=2508
PreviewExposure=1950
[Crop-ScanDual-35mmSlide]
CropSize=1
XSize=2768
[Color-ScanDual-35mmSlide]
ColorBalance=0
[Color]
SlideVendor=1
[Files-ScanDual-35mmSlide]
ImageUnits=1
ImageSize=18
[Files]
TIFFFileName=scan0001+.tif
TIFFFileType=4
RawFileName=scan0001+.tif
RawFileType=4
[Prefs]
ExternalViewer=0
WindowXOffset=0
WindowYOffset=0
A.1. INI FILES FOR MINOLTA DIMAGE SCAN DUAL WITH VUESCAN
WindowXSize=1280
WindowYSize=1024
A.1.2 Settings for Konica Centuria 100
[VueScan]
[Device]
Mode=1
[Device-ScanDual-35mmFilm]
Rotate=3
[Color]
ColorBalance=1
AutoBlackPoint=0
BlackPointRed=0
BlackPointGreen=0
BlackPointBlue=0
AutoWhitePoint=0
WhitePointRed=40
WhitePointGreen=40
WhitePointBlue=40
[Media]
SlideVendor=1
[Media-ScanDual-35mmFilm]
AutoMask=0
MaskRed=837
MaskGreen=999
MaskBlue=921
[Crop-ScanDual-35mmFilm]
AutoCrop=0
XOffset=750
YOffset=1209
CropSize=0
XSize=23004
YSize=34631
XSpacing=49998
YSpacing=49998
[Options-ScanDual]
RGBExposure=901
NumberOfPasses=4
Filter=2
SizeReduction=4000
[Files]
TIFFFileName=scan01+.tif
[Window]
ExternalViewer=0
BeepWhenDone=1
A.1.3 Settings for Konica Centuria 200
[VueScan]
[Device]
Mode=1
[Device-ScanDual-35mmFilm]
Rotate=3
32
A.1. INI FILES FOR MINOLTA DIMAGE SCAN DUAL WITH VUESCAN
[Color]
ColorBalance=1
AutoBlackPoint=0
BlackPointRed=0
BlackPointGreen=0
BlackPointBlue=0
AutoWhitePoint=0
WhitePointRed=40
WhitePointGreen=40
WhitePointBlue=40
[Media]
SlideVendor=1
[Media-ScanDual-35mmFilm]
AutoMask=0
MaskRed=799
MaskGreen=998
MaskBlue=828
[Crop-ScanDual-35mmFilm]
AutoCrop=0
XOffset=750
YOffset=1209
CropSize=0
XSize=23004
YSize=34631
XSpacing=49998
YSpacing=49998
[Options-ScanDual]
RGBExposure=901
NumberOfPasses=4
Filter=2
SizeReduction=4000
[Files]
TIFFFileName=scan01+.tif
[Window]
ExternalViewer=0
BeepWhenDone=1
A.1.4 Settings for Konica Centuria 400
[VueScan]
[Device]
Mode=1
[Device-ScanDual-35mmFilm]
Rotate=3
[Color]
ColorBalance=1
AutoBlackPoint=0
BlackPointRed=0
BlackPointGreen=0
BlackPointBlue=0
AutoWhitePoint=0
WhitePointRed=40
WhitePointGreen=40
WhitePointBlue=40
33
A.1. INI FILES FOR MINOLTA DIMAGE SCAN DUAL WITH VUESCAN
[Media]
SlideVendor=1
[Media-ScanDual-35mmFilm]
AutoMask=0
MaskRed=800
MaskGreen=880
MaskBlue=774
[Crop-ScanDual-35mmFilm]
AutoCrop=0
XOffset=750
YOffset=1209
CropSize=0
XSize=23004
YSize=34631
XSpacing=49998
YSpacing=49998
[Options-ScanDual]
RGBExposure=977
NumberOfPasses=4
Filter=2
SizeReduction=4000
[Files]
TIFFFileName=scan01+.tif
[Window]
ExternalViewer=0
BeepWhenDone=1
A.1.5 Settings for Konica VX 100
[VueScan]
[Device]
Mode=1
[Device-ScanDual-35mmFilm]
Rotate=3
[Color]
ColorBalance=1
AutoBlackPoint=0
BlackPointRed=0
BlackPointGreen=0
BlackPointBlue=0
AutoWhitePoint=0
WhitePointRed=40
WhitePointGreen=40
WhitePointBlue=40
[Media]
SlideVendor=1
[Media-ScanDual-35mmFilm]
AutoMask=0
MaskRed=685
MaskGreen=993
MaskBlue=820
[Crop-ScanDual-35mmFilm]
AutoCrop=0
XOffset=750
34
A.1. INI FILES FOR MINOLTA DIMAGE SCAN DUAL WITH VUESCAN
YOffset=1209
CropSize=0
XSize=23004
YSize=34631
XSpacing=49998
YSpacing=49998
[Options-ScanDual]
RGBExposure=901
NumberOfPasses=4
Filter=2
SizeReduction=4000
[Files]
TIFFFileName=scan01+.tif
[Window]
ExternalViewer=0
BeepWhenDone=1
A.1.6 Settings for Fuji Superia 1600
[Media]
SlideVendor=1
[Device-ScanDual-35mmFilm]
Rotate=3
[VueScan]
[Device]
Mode=1
[Color]
AutoBlackPoint=0
BlackPointRed=0
BlackPointGreen=0
BlackPointBlue=0
AutoWhitePoint=0
WhitePointRed=40
WhitePointGreen=40
WhitePointBlue=40
ColorBalance=3
ImageBrightness=500
[Media-ScanDual-35mmFilm]
AutoMask=0
MaskRed=658
MaskGreen=925
MaskBlue=648
[Crop-ScanDual-35mmFilm]
XOffset=958
YOffset=1417
XSize=23004
YSize=34631
XSpacing=49998
YSpacing=49998
AutoCrop=0
CropSize=0
[Options-ScanDual]
NumberOfPasses=2
RGBExposure=1559
35
A.2. RECIPROCITY CORRECTIONS – BROOKS INSTITUTE
36
Filter=2
[Files]
TIFFFileName=scan01+.tif
[Window]
ExternalViewer=0
BeepWhenDone=1
A.2
Reciprocity Corrections – Brooks Institute
[Author(s): Unknown.]
Table A.1: Reciprocity Corrections – Brooks Institute (1/2)
M.R.
1.0”
1.2”
1.6”
2.0”
2.5”
3.2”
4.0”
5.0”
6.4”
8.0”
10”
12”
16”
20”
25”
32”
40”
50”
64”
1’21”
1’42”
2’08”
2’42”
3’23”
Ektachrome
64T
NA
NA
NA
NA
NA
NA
NA
NA
NA
NA
NA
NA
NA
NA
NA
NA
NA
NA
67”
1’32”
2’03”
2’39”
3’23”
4’16”
Fujichrome
64 Tung.
1.0”
1.2”
1.6”
2.0”
2.7”
3.5”
4.7”
6.0”
8.0”
10”
13”
16”
22”
29”
37”
50”
66”
1’28”
2’01”
2’52”
4’02”
5’40”
8’02”
12’
Kodachrome
25
1.5”
2.0”
2.5”
3.8”
5.0”
6.5”
9.0”
12”
17”
23”
32”
43”
62”
1’28”
2’05”
3’08”
4’40”
7’07”
12’
17’
27’
42’
65’
99’
Kodachrome
64
1.0”
1.2”
2.0”
3.0”
4.8”
7.0”
11”
15”
22”
30”
42”
56”
1’26”
2’02”
2’55”
4’23”
6’24”
9’25”
15’
23’
35’
54’
84’
129’
Fujichrome
50
1.0”
1.2”
1.6”
2.0”
2.5”
3.4”
4.5”
6”
8”
11”
15”
20”
32”
45”
66”
1’41”
2’30”
3’45”
5’55”
9’10”
15’
23’
35”
54’
Table A.2: Reciprocity Corrections – Brooks Institute (2/2)
M.R. Velvia Ekta100+
1.0”
NA
NA
1.2”
NA
NA
1.6”
NA
1.8”
2.0”
NA
3.0”
2.5”
3.8”
4.5”
3.2”
4.1”
6.6”
continued on next page. . .
Ekta200
1.2”
1.5”
2.2”
2.8”
3.6”
4.8”
Fujichrome
100
1.0”
1.2”
1.6”
2.0”
2.5”
3.3”
4.3”
5.7”
7.5”
9”
12”
17”
27”
39”
58”
1’31”
2’19”
3’32”
5’49
8’53”
13’
19’
29’
45’
A.2. RECIPROCITY CORRECTIONS – BROOKS INSTITUTE
. . . continued from previous page
M.R. Velvia Ekta100+ Ekta200
4.0”
4.9”
9.0”
6.3”
5.0”
6.5”
12”
8.2”
6.4”
8.8”
16”
11”
8.0”
12”
21”
14”
10”
16”
27”
19”
12”
19”
33”
23”
16”
28”
45”
32”
20”
39”
57”
42”
25”
49”
1’13”
55”
32”
1’06”
1’35”
1’13”
40”
1’28”
1’58”
1’35”
50”
1’56”
2’28”
2’03”
64”
2’38”
3’11”
2’45”
1’21” 3’31”
4’02”
3’38”
1’42” 4’42”
5’06”
4’46”
2’08” 6’22”
6’30”
6’14”
2’42” 8’22”
8’07”
8’14”
3’23” 11’06”
10’11”
10’45”
37
Appendix B
Flash experiments
B.1 Wireless flash experiment
B.1.1
Experiment setup
[Author(s): Petr Holub.]
Basic experiment information:
Date: 2002–08–11 11:00am
Place: Brno, CZ
Minolta Dynax 600si, 24–85/3.5–4.5 set to 85
Kodak ProFoto 100 (expiration 07/2004), scanned on Noritsu QSS-2901 digital minilab/scanner in
Base4 resolution (theoretically 1536x1024, actually 1486x1024)
ambient light
5.6/2”
heavy cloudy, spot metering on windows made 5.6/8 on average and 5.6/45 at maximum
experiment performed indoors with setup pictured on Fig. B.1
setup for each picture is summarized in Tab. B.1
observation of camera and flash behavior are summarize in Tab. B.2
resulting pictures are in Tab. B.3
Table B.1: Wireless flash experiment setup
# aperture/speed
position 1
1
5.6/60
–
2
5.6/60
–
3
5.6/60
–
4
5.6/60
5400HS
5
5.6/60
3600HS(D)
6
5.6/60
3600HS(D)
7
5.6/60
5400HS 2:[1]
8
9.5/60
5400HS
9
9.5/60
5400HS 2:[1]
continued on next page. . .
position 2
built-in
5400HS wireless control
5400HS wireless control 2:[1]
built-in
built-in
built-in
built-in
built-in
built-in
position 3
3600HS(D)
3600HS(D)
3600HS(D)
3600HS(D)
5400HS
5400HS 2:[1]
3600HS(D)
3600HS(D)
3600HS(D)
B.1. WIRELESS FLASH EXPERIMENT
. . . continued from previous page
# aperture/speed
position 1
10
9.5/60
–
11
5.6/60
–
12
5.6/60
–
13
5.6/60
–
B.1.2
39
position 2
5400HS wireless control + flash button
5400HS wireless control + flash button
5400HS wireless
5400HS
position 3
3600HS(D)
3600HS(D)
–
–
Experiment results and discussion
Table B.2: Wireless flash experiment: observations of camera and flashes
behavior
#
1
before exposure
blinking alternately
after exposure
blinking
2
glowing
blinking
3
glowing
blinking
4
blinking alternately
blinking
5
blinking alternately
blinking
6
blinking alternately
blinking
7
blinking alternately
blinking
8
blinking alternately
blinking
9
blinking alternately
10
11
12
13
glowing
blinking alternately
glowing
glowing
blinking alternately
glowing
blinking
blinking
blinking
test flash (AEL button)
one starting flash (on-camera) and
one flash (off-camera)
one starting flash (on-camera) and
one flash (off-camera)
one starting flash (on-camera) and
two simultaneous flashes (off- and
on-camera)
one starting flash (on-camera) and
two flashes (off-camera)
one starting flash (on-camera) and
two flashes (off-camera)
one starting flash (on-camera) and
two flashes (off-camera); 5400HS
flashes approx. 0.5 sec after
3600HS(D)
one starting flash (on-camera) and
two flashes (off-camera); 5400HS
flashes approx. 0.5 sec after
3600HS(D)
one starting flash (on-camera) and
two flashes (off-camera)
5400HS flashes approx. 0.5 sec
after 3600HS(D)
undistinguishable from case 1 and
2
undistinguishable from case 1 and
2
–
–
B.1. WIRELESS FLASH EXPERIMENT
40
F IGURE B.1: Wireless flash experiment setup
Table B.3: Wireless flash experiment: results
#
picture
#
1
2
3
4
continued on next page. . .
picture
B.1. WIRELESS FLASH EXPERIMENT
41
. . . continued from previous page
#
picture
#
5
6
7
8
9
10
11
12
continued on next page. . .
picture
B.2. FLASH TEST – ADI/PRE-FLASH/BOUNCE/WIRELESS
. . . continued from previous page
#
picture
#
42
picture
13
To summarize what I got from this experiment:
When placing wireless flashes around your subject be careful about distances you place your flashes
from the subject and the powers of flashes since you can create different ratios unintentionaly 1.
You can have ratio wireless off-camera flashes even without dedicated wireless flash controller despite what Minolta says in 5400HS flash manual. All you have to do is to set 5400HS to 2:[1] ratio
and fire the flashes using built-in camera flash.
If you have 5400HS on-camera and you have your camera swichted to wireless mode (so that you
have WIRELESS word shown on 5400HS display – but not WIRELESS CONTROL!) flash works
just like ordinary on-camera flash and it is unable to fire any wireless flash. You need to set it to
WIRELESS CONTROL mode by pressing and holding OPT button to do so.
If you have 5400HS on-camera flash set to WIRELESS CONTROL and you need to use it as fill light
(2:1) then you need to switch it to WIRELESS CONTROL 2:[1] mode. The way usual for built-in
flash (holding flash button on camera body while shooting) seems not to work 2.
B.2 Flash Test – ADI/Pre-Flash/Bounce/Wireless
[Author(s): Marat R. Safiulin. Reviewed by: Petr Holub.]
There are three tables down there: Flash Tests 24–85 (Tab. B.4), Flash Tests 28–80D (Tab. B.5) and
Flash Tests WL (Tab. B.6).
Pictures in the first two tables were scanned with the exposure lock except for the file “28–80D ADI
5600” which served as a sample, i. e. I scanned it with the AE and then locked exposure for all other
images in order to show exposure differences. Pictures in the third table were scanned with the AE
(on the negative there were almost no differences between them).
Please, do not judge the artistic value of the images— they were made for pure test purpose only.
As long as I had only 4 test pictures for the 28–80/3.5–5.6 D lens (I didn’t make bounce shots
with this lens because I think they would be equal to those made with the 24–85/3.5–4.5) I put two
additional images made with the 24–85 lens instead, but on them the subject is relatively far away
from the camera - focal length was 85 mm, with all other shots, except WL, it was 70 mm. As you
1 I’ve heard rumors that Canon cameras together with Canon flashes can be programmed in such a way that they are distance
independent. The only way I’m able to come up with how to do this sort of thing is that flashes are fired sequentionaly so camera can
balance them to get equal portion of light from each of them. Nota bene: this note is not to provoke any flamewars or brand-wars but
it’s rather because of my technical curiosity!!!
2 The other possibility is that on-camera flash is so weak in this case that I haven’t noticed it on the resulting photos. This shoud
be re-measured using slide film with small exposure latitude.
B.2. FLASH TEST – ADI/PRE-FLASH/BOUNCE/WIRELESS
43
may see, the camera was badly tricked by the fluorescent lighting in the room and the picture “24-85
Preflash 5600 Vertical” is severely underexposed, though the flash still provided some weak light.
:-((.
If we accept the sample picture, “28-80D ADI 5600” as perfectly exposed one, then the 4–segment
metering comes the best after it with about 1/2 overexposure regardless the lens flash combination
used. With the pre-flash metering results are practically unpredictable if a non- D lens is used - in
some cases it gives heavy overexposure (like in “24–85 Preflash 5X00” files) or shows bad underexposure (see the previous comment). With the D-lens even non-D 5400 showed similar results to 4–
segment metering.in the pre-flash mode.
In the wireless mode results should be interpreted the following way: the first flash in the name
stands to the left of the camera while the second one stands to its right. Numbers in parenthesis
indicate the ratio power for each flash. “ctrl” means “Control”, “slv” means “slave” for the pictures
where one of the flashguns was used as a control for another. For getting this work I made a trick
with the OS1100 filling in the whole on the shoe. But as long as the flashes were relatively close to
the subject (I think less than 1 meter) the results in this mode are contradictory to what it should be
in reality— the control flash, even set to (1) ratio power overexposes it’s side of the picture, though it
should be way around. Another note: when the 5600 acts as a controller the camera does not give an
OK signal, though the pictures were apparently exposed properly. With the 5400 set to the controller
everything works as it should and the camera gives OK signals. I think that this is understandable, as
long as the manual for the 5600 warns against using the 5600 as a controller if a non-D flash is used
as a remote because the latter won’t fire. Well, in my tests the 5400 fired all right, though without
OK signal after the shot.
The built-in flash works in fact as a real wireless controller, so it is possible to use 1:2 ratio between
two remote units. Though the it works the best with the 5600 set to (2) and 5400 set to (1). With
reversed setting the effect of the ratio is much less prominent, but this way it is possible to play with
lighting in a more flexible way, IMHO. When both flashes are set to the equal power (i.e. without
any ratio, just plain wireless mode) they provide equal illumination.
>
>
>
>
Thanks for posting the results of your flash test, Marat.
My conclusion is that, contrary to what has been stated
earlier and often on this e-group, Minolta flash results
are very unpredictable unless using a D lens.
Yes, they are. Unpredictable they become only with the pre-flash and a non-D lens. Now, as long
as I don’t have a D-lens, I have switched the flash metering to the 4-segment one - at least it gives very
consistent and predictable results, though it tends to overexpose a bit. But still the 4- segment metering is
much better than the centerweighted one in all Minolta cameras prior to the 9...
Table B.4: Flash experiment: 24–85 lens
continued on next page. . .
#
24–85 Bounce 5600
picture
24–85 Bounce 5400
#
picture
B.2. FLASH TEST – ADI/PRE-FLASH/BOUNCE/WIRELESS
picture
24–85 Preflash 5600
#
24–85 4S 5600
24–85 4S 5400
24–85 Preflash 5400
. . . continued from previous page
#
picture
44
Table B.5: Flash experiment: 28–80D lens
continued on next page. . .
#
24–85 4S 5600 Vertical
picture
24–85 Preflash 5600 Vertical
#
picture
B.2. FLASH TEST – ADI/PRE-FLASH/BOUNCE/WIRELESS
#
picture
28–80D 4S 5600
28–80D 4S 5400
28–80D ADI 5600
28–80D Preflash 5400
. . . continued from previous page
#
picture
45
Table B.6: Flash experiment: Wireless
continued on next page. . .
#
WL 5600ctrl(1) 5400slv(2)
picture
WL 5400ctrl(1) 5600slv(2)
#
picture
B.2. FLASH TEST – ADI/PRE-FLASH/BOUNCE/WIRELESS
WL 5400 = 5600
WL 5600(1) 5400(1) Built-in(1)
WL 5600(1) 5400(2)
#
WL 5400(1) 5600(2)
. . . continued from previous page
#
picture
46
picture
Bibliography
Literature about Minolta and Minolta-compatible equipment
[1] Maschke T., Burian P. K., Magic Lantern Guide to Minolta Maxxum 600si, Magic Lantern Guides
(A Laterna magica R book), 1995, ISBN 1-883403-34-0
[2] Damian Dinning, Complete Minolta User’s Guide: Minolta Dynax/Maxxum 600Si (Hove User’s
Guide), Watson-Guptill Pubns, ASIN: 1874031606, February 1996, ISBN: 1-874031-60-6
Web links about Minolta and Minolta-compatible equipment
[3] Minolta Users Discussion Group, http://groups.yahoo.com/group/minolta/
[4] Minolta Users Group, http://www.35mm.freeserve.co.uk/mug/
[5] Minolta SLR FAQ Tips & Tricks,
http://fotozoom.net/stary_fotozoom/hp/foto/minolta-faq/af-tips.html
[6] Minolta Users Group of Thailand, http://www.geocities.com/minoltacamera/ (in
Thai only :-( )
[7] boonedocks.net Minolta Site, http://boonedocks.net/photo/minolta/
[8] Free Minolta Manuals, http://www.geocities.com/eskoufos/fmm.html
[9] Minolta Dynax System Accessories – Overview,
http://www.minolta.com/cameras/camera_mh/slr/acc/acc_othera.html
Camera bodies
Dynax/Maxxum 600si
[10] Minolta 600si Board – FAQ, http://w3.one.net/˜georgek/minolta/MPG/600SI/
[11] Minolta Dynax 600si Brochure,
http://www.geocities.com/minolta600sibrochure/minolta600si-brochure-01.html
[12] Peter Blaise Monahon, Minolta Alpha 507si and Dynax
Maxxum 600si 650si Classic and Panorama Date Photography,
http://www.geocities.com/minolta507si600si650si/index.html
BIBLIOGRAPHY
48
Lens
[13] Photodo Minolta lens tests,
http://www.photodo.com/prod/lens/minolta.shtml\#Minolta
[14] Minolta 35mm F2.8 SHIFT CA Lens,
http://members.aol.com/cldphoto/shift_ca.html
Flash
[15] Walts, G. Minolta Photographs by Gary Walts Minolta Photographer,
http://home.imcnet.net/˜waltsman/flash.html
[16] Brandon, P. Flash Exposure by Phil Brandon from Minolta USA,
http://www.geocities.com/minoltacamera/tip/0004.html
[17] Greely, J. Tech notes from Glamourcons, http://www.munitions.com/˜jgreely/
[18] Friedman, G. Friedman Archives – Wireless Flash Examples,
http://FriedmanArchives.com/flash.htm
Interesting books on photography
[19] Burian P. K., Caputo R. National Geographic photography field guide: secrets to making great
pictures, National Geography Society (U.S.), 1999, ISBN 0-7922-7498-9 (reg.) or 0-7922-7496-2
(dlx.)