1
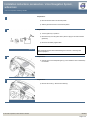
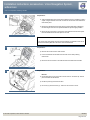
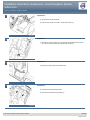
Installation instructions, accessories - Volvo Navigation System,
widescreen
Volvo Car Corporation Göteborg, Sweden
S60
Section Group Weight(Kg/Pounds) Year
3
39
Month
2001 04
S60 2001, S60 2002
© VolvoCar Corporation, 2001 Printed in Sweden
8633842
Page 1 of 21
Installation instructions, accessories - Volvo Navigation System,
widescreen
Volvo Car Corporation Göteborg, Sweden
© VolvoCar Corporation, 2001 Printed in Sweden
8633842
Page 2 of 21
Installation instructions, accessories - Volvo Navigation System,
widescreen
Volvo Car Corporation Göteborg, Sweden
Required tools
A0000162
A0000161
A0801178
M8802509
M3903563
© VolvoCar Corporation, 2001 Printed in Sweden
8633842
Page 3 of 21
Installation instructions, accessories - Volvo Navigation System,
widescreen
Volvo Car Corporation Göteborg, Sweden
M3903565
M8503983
© VolvoCar Corporation, 2001 Printed in Sweden
8633842
Page 4 of 21
Installation instructions, accessories - Volvo Navigation System,
widescreen
Volvo Car Corporation Göteborg, Sweden
Any comments on this publication? Please contact your nearest dealer. Thank you!
Publication no: MA 8633842, Issue: 2001-04
Comments:..........................................................................................................
............................................................................................................................
............................................................................................................................
............................................................................................................................
............................................................................................................................
.............................................................................................................................
From:...................................................................................................................
Address:.............................................................................................................
Telephone no:................................................................................................... .
Telefax:...............................................................................................................
© VolvoCar Corporation, 2001 Printed in Sweden
8633842
Page 5 of 21
Installation instructions, accessories - Volvo Navigation System,
widescreen
Volvo Car Corporation Göteborg, Sweden
INTRODUCTION
●
●
NOTE! Read through the entire text before carrying out
any work.
The front page gives the date of this edition and the edition it
replaces
Cars equipped with SRS/SIPS (Airbag)
Warning!
Extra care must be taken when working on cars equipped with SRS/SIPS
air bags. This is important to prevent:
1. Personal injury
The second page shows the tools needed for the installation and
the contents of the installation kit
2. Damage to or malfunction of the SRS/SIPS system.
●
The illustrations display the procedure in order of operation. The
order of operation is repeated in the text section
Work on the SRS/SIPS systems or related components must always be
carried out by an authorised Volvo workshop.
●
Cut out the text page in order to follow the illustrations and text at
the same time.
Is the car equipped with SRS (supplemental restraint system)?
●
Cars equipped with a driver's airbag have the letters "SRS" imprinted on
the centre panel of the steering wheel. Cars equipped with driver's and
passenger airbags are marked with "SRS" on both the steering wheel
centre panel and also on the dashboard close to the airbag.
If the car is equipped with SIPS (side impact protection system ) a "SIPS"
decal is marked on both the front seats.
Cars equipped with inflatable curtains have the marking "SRS" on one of
the panels along the posts on the inside of the car.
Cars equipped with SRS (supplemental restraint system) also have a
"SRS" decal on the front windscreen.
Do not damage the SRS wiring!
Do not trap, fray, pierce or damage the SRS wiring. SRS wiring has
orange casing and/or is plaited.
Steering and front suspension
The contact reel in the SRS system can easily be damaged when
working on the steering wheel, steering shaft or steering gear. Refer to
the SRS (supplemental restraint system) Service Manual or service
instructions in VIDA for information on carrying out such work. This is to
prevent damage.
SRS warning lamp
If the SRS warning lamp lights after repairs have been carried out, take
the car to an authorised Volvo workshop.
SRS collision sensor control module
S60 / V70 (00-) / S80 / XC90
© VolvoCar Corporation, 2001 Printed in Sweden
8633842
Page 6 of 21
Installation instructions, accessories - Volvo Navigation System,
widescreen
Volvo Car Corporation Göteborg, Sweden
The collision sensor control module is located on the transmission tunnel
in the centre console, in front of the parking brake.
WARNING!
The air bag inflation areas must not be obstructed. Never place
any objects, such as upholstery or accessories, within these
areas. The panels must be able to deploy in the correct manner
at the right time otherwise there is a risk of personal injury in
the event of a collision.
WARNING!
The ignition must be in position "0" and the key removed from
the ignition if any connector in the SRS system is to be
disassembled. Then wait at least one minute. Then disconnect
the battery negative lead before disassembling any of the
connectors. When work is completed the ignition key must be
turned to position "II" before reconnecting the battery negative
lead.
Volvo Navigation System, widescreen
Note!
This accessory is connected to the car's electrical system. It requires
software unique to the car.
© VolvoCar Corporation, 2001 Printed in Sweden
8633842
Page 7 of 21
Installation instructions, accessories - Volvo Navigation System,
widescreen
Volvo Car Corporation Göteborg, Sweden
Preparations
1
●
Move the left front seat to its rearmost position
●
Shift the gear selector lever to the rearmost position.
Preparations
2
●
Turn the ignition key to position 0
●
Remove the key from the ignition switch (does not apply to cars with automatic
gearboxes)
●
Disconnect the battery negative lead.
Note!
A8800136
Wait at least five minutes before disassembling the connectors or removing other
electrical equipment.
Preparations
3
●
Carefully remove the loudspeaker grille (1) on the dashboard. Use a weatherstrip
tool or similar.
M3902612
Preparations
4
●
Remove the screws (1). Remove the bracket (2).
M3902613
© VolvoCar Corporation, 2001 Printed in Sweden
8633842
Page 8 of 21
Installation instructions, accessories - Volvo Navigation System,
widescreen
Volvo Car Corporation Göteborg, Sweden
Preparations
5
●
Applies to cars with a centrally mounted loudspeaker
Remove the four screws in the loudspeaker (1)
●
Lift up the loudspeaker. Disconnect the connector (2)
●
Place the loudspeaker to one side.
M3902614
Preparations
6
●
Pry off the panel in front of the gear selector lever. Use a weatherstrip tool as
illustrated. Remove the panel in front of the gear selector lever.
M8502988
Preparations
7
●
Press in the catches on the front edge of the gear selector lever panel. Lift the
panel upwards, first the front edge and then the rear edge. Remove the panel
around the gear selector lever.
M4302463
Preparations
8
●
Remove the two screws from the dashboard environment panel.
M8503027
© VolvoCar Corporation, 2001 Printed in Sweden
8633842
Page 9 of 21
Installation instructions, accessories - Volvo Navigation System,
widescreen
Volvo Car Corporation Göteborg, Sweden
Preparations
9
●
Angle the dashboard environment panel outwards so that it is possible to insert a
couple of fingers between the centre console and the reverse of the dashboard
environment panel
●
Remove the dashboard environment panel by pulling it downward, maintaining
the same angle. Some force is required because the panel is tightly installed
●
Disconnect the connectors on the reverse of the dashboard environment panel.
Place the dashboard environment panel to one side.
M8503045
Note!
If any of the outer hooks break off, these must be repaired. The method for this can be
found in the Workshop Manual in the section about the dashboard.
Preparations
10
●
Remove the screws from the radio bracket
●
Pull out the bracket with the radio. Pull the lower corner while pressing
downwards
●
Disconnect the connectors on the radio. Remove the bracket with the radio.
M3903036
Preparations
11
●
Remove:
the left side panel (1) from the centre console. First turn the screw clip. Pull the
panel outwards and backwards
●
the sill trim panel (2) at the left front door
●
the covers (3) and the screws (4). There are new screws in the kit.
D8502410
© VolvoCar Corporation, 2001 Printed in Sweden
8633842
Page 10 of 21
Installation instructions, accessories - Volvo Navigation System,
widescreen
Volvo Car Corporation Göteborg, Sweden
Preparations
12
●
Tip the left front seat backwards
●
Push the floor carpet to one side to access the air ducts (1).
D8502411
Preparations
13
●
Remove the rear seat cushion (1). First pull the front edge of the seat cushion
up. Pull the cushion forwards. Then lift the seat cushion out.
D8503390
Preparations
14
●
Remove the sill trim panel at the left rear door.
M8502823
Preparations
15
●
Fold both the rear backrests forward
●
Remove the seat belts from the guides (1).
M8503545
© VolvoCar Corporation, 2001 Printed in Sweden
8633842
Page 11 of 21
Installation instructions, accessories - Volvo Navigation System,
widescreen
Volvo Car Corporation Göteborg, Sweden
Preparations
16
●
Remove the clip (1) at the side of the left-hand side cushion
●
Pull the top edge of the left-hand front cargo compartment panel out to access
the upper lock for the side cushion
●
Repeat the operation on the right-hand side.
M8503511
Preparations
17
M8503546
●
Remove the left-hand side cushion. First press in the catches (1) at the top edge
of the reverse of the side cushion. Pull the cushion out slightly
●
Grasp the cushion using both hands. Twist anti-clockwise until the catches on
the inside release
●
Remove the side cushion. First pull out the upper edge of the side cushion. Then
pull upwards
●
Repeat the operation on the other side.
Preparations
18
●
Remove the cover and the screw for the left-hand C-post
●
Repeat the operation on the other side.
M8503596
Preparations
19
●
Remove the rubber strip at the rear edge on the left-hand rear door frame
●
Grasp the top edge of the C-post panel. Pull (A) the panel inwards until the three
clips (1) release
●
Then pull (B) the panel straight up. Place the panel to one side
●
Repeat the operation on the other side.
M8503597
© VolvoCar Corporation, 2001 Printed in Sweden
8633842
Page 12 of 21
Installation instructions, accessories - Volvo Navigation System,
widescreen
Volvo Car Corporation Göteborg, Sweden
Preparations
20
●
Carefully lift the front edge of the parcel shelf panel until the clips (1) release
●
Lift up the panel further until the locating pins (2) release from their holes
●
Pull out the parcel shelf. Lay the parcel shelf on the folded backrests.
M8503598
Preparations
21
●
Remove the cargo compartment carpet at the rear edge. First turn the two knobs
(1) 90°.
M8503480
Preparations
22
●
Pull up the front of the cargo compartment carpet. Fold the front half back over
the rear half of the cargo compartment carpet.
M8503481
Preparations
23
●
Slide the entire cargo compartment carpet forward slightly. Twist slightly to
remove the carpet through the tailgate opening
●
Remove the cargo compartment carpet.
M8503482
© VolvoCar Corporation, 2001 Printed in Sweden
8633842
Page 13 of 21
Installation instructions, accessories - Volvo Navigation System,
widescreen
Volvo Car Corporation Göteborg, Sweden
Preparations
24
●
Press the centre of the clips at the lower edge of the foldable side panel on the
left-hand side until they click
●
Remove the two clips
●
Remove the plastic nut at the front and lower edges of the side panel
●
Repeat the operation on the right-hand side.
M8902133
Preparations
25
M8503264
●
Turn the handle (1) on the right and left-hand sides through 90°.
●
Fold the side panels down. Lift the panels out. Place the left-hand side panel to
one side. A new panel is in the kit
●
Pull the tailgate sill trim panel (2) forwards on the right and left-hand sides until
the clips on each side release. Pull hard but carefully. The panel is securely
positioned
●
Remove the wiring (3) for the cargo compartment lighting
●
Pull the sill trim panel straight up until the four clips on the underneath release.
Remove the sill trim panel.
Preparations
26
●
Remove:
the clips (1) in the left front side panel in the cargo compartment
●
the front side panel and place to one side.
M8503515
© VolvoCar Corporation, 2001 Printed in Sweden
8633842
Page 14 of 21
Installation instructions, accessories - Volvo Navigation System,
widescreen
Volvo Car Corporation Göteborg, Sweden
Cable routing
27
●
Route the wiring (A in the kit illustration) for the display screen and the radio, and
the loose cable for the display screen with the ten pin connectors (B in the kit
illustration) for the radio socket between the air duct (1) and the stay (2). Ensure
that the straight connector on the loose cable (B) is routed to the hole for the
radio
●
Route the display screen green 5-pin power supply connector (3) and the cable
(B) to the left of the air ducts above the hole for the radio. Continue up through
the cut out for the dashboard loudspeaker
●
Secure the wiring in the stay (2) using a tie strap (4)
●
Route the wiring above and along the air duct (1) to the member (5)
●
Clamp the wiring at the existing cable harness (6) using a tie strap.
M3702809
Cable routing
28
●
Route the cables (1) under the carpet along the left side of the car to the rear
door
●
Install protective caps on the lugs (2) for the cable ducts
●
Route the wiring further above and along the front cable duct (3). Continue along
the right hand side of the rear cable duct (4)
●
Connect the cable in the rear ground terminal (5) at the left side of the rear seat.
M3702379
Cable routing
29
●
Route the wiring (1):
out along the right-hand side of the cable duct (2) and under the wiring which is
connected there. Remove the connectors if necessary
●
up along the top of the wheel arch and out through the hole at the top of the
wheel arch
●
down along the wheel arch. Position the wiring as illustrated.
M3702807
© VolvoCar Corporation, 2001 Printed in Sweden
8633842
Page 15 of 21
Installation instructions, accessories - Volvo Navigation System,
widescreen
Volvo Car Corporation Göteborg, Sweden
Terminals in the fuse holder
30
●
Remove the rear electronic module. First open the catch (1) on the top of the
module. Fold the module forward. Lift the module from the mountings (2).
M3702263
Terminals in the fuse holder
31
●
Connect the new routed red and white cable to the outer terminal (1) on the
reverse of fuse socket number 10 on the fuse holder. Remove the decal (2).
Carefully pry up the red secondary locking on the face in the end nearest
terminal 10. At the same time press the cable into position.
If there is a problem inserting the cable the fuses on the outer side must be removed in
order to open the red secondary locking further.
●
Reinstall the decal
●
Install a 10A fuse in fuse socket 10 on the fuse holder.
M3702808
Terminals in the fuse holder
32
●
Remove the screw (1)
●
Pull out the cover (2) using the four connectors
●
Remove the cover from the four connectors by bending the three hooks to one
side.
D3701827
Terminals in the fuse holder
33
M3702569
© VolvoCar Corporation, 2001 Printed in Sweden
●
Insert a small screwdriver in the socket on connector A as illustrated
●
Twist the screwdriver so that the holders open. At the same time press the
connector out to the side
●
Connect the white (W) cable to terminal 15 and the green (GN) cable to terminal
17.
●
Reinstall:
the connector
8633842
Page 16 of 21
Installation instructions, accessories - Volvo Navigation System,
widescreen
Volvo Car Corporation Göteborg, Sweden
●
the cover on the connector
●
the connectors on the rear electronic module. Tighten the screw
●
the rear electronic module.
Installing and connecting the Global Positioning System (GPS) aerial
34
●
Install the new Global Positioning System (GPS) aerial (1) in the guide hole. Press
the Global Positioning System (GPS) aerial into place using the clip in the hole in
the centre of the rear edge of the parcel shelf as illustrated
●
Route the new cable (C in the kit illustration) for the Global Positioning System
(GPS) aerial. Follow the routing of the existing loudspeaker cable inside the seat
belt holder (2)
●
Connect the cable to the Global Positioning System aerial
●
Secure at the points (3)
●
Route the cable through the lead-in (4) to the rear edge of the wheel arch.
M3702381
Installing the DVD reader
35
●
Does not apply to USA
Remove the existing antenna amplifier (if applicable)
●
Connect the cable (2) for the new antenna amplifier (1) to the connector (3) for
the antenna in the rear bumper by the right-hand tail lamp
●
Position the aerial amplifier on the panel edge in front of the right-hand tail lamp
●
Tighten the antenna amplifier onto the edge of the panel.
M3903315
Installing the DVD reader
36
●
Route the new transparent single cable (D in the kit illustration) from the lower
terminal (1) for the aerial amplifier, along the existing cable harness in the rear
crossmember and to the rear edge of the left-hand rear wheel well
●
Clamp the cable at the existing cable harness using tie straps (2)
●
If the existing aerial amplifier has been removed, reinstall the disconnected black
cable in the upper socket (3) in the aerial amplifier.
M3903567
© VolvoCar Corporation, 2001 Printed in Sweden
8633842
Page 17 of 21
Installation instructions, accessories - Volvo Navigation System,
widescreen
Volvo Car Corporation Göteborg, Sweden
Installing the DVD reader
37
●
Take four screws, the bracket and the DVD reader from the kit. Tighten the DVD
reader at the bracket.
M3903564
Installing the DVD reader
38
●
Take the spring nut (1) from the kit. Press the spring nut on the panel edge on the
underneath of the socket (2) in the panel.
M3903568
Connecting the DVD reader
39
M3903569
●
Connect:
the display screen cable (1)
●
the power supply cable (2)
●
the cable (3) for the Global Positioning System (GPS) aerial
●
the aerial amplifier cable (4).
Note!
If the TV is to be installed carry out the operation now. Use installation Instructions
8637033.
© VolvoCar Corporation, 2001 Printed in Sweden
8633842
Page 18 of 21
Installation instructions, accessories - Volvo Navigation System,
widescreen
Volvo Car Corporation Göteborg, Sweden
Connecting the DVD reader
40
●
Install the bracket with the DVD reader in the rear edge of the rear wheel well
using three screws (1) from the kit. Tighten the screws. Tighten to 10 Nm (7 lbf.
ft)
●
Clamp the blue excess connector and other wiring at the DVD reader using two
tie straps.
M3903572
Installing and connecting the display screen
41
●
Applies to cars without a centrally mounted loudspeaker
Install the bracket (1) on the display (2). Use the screws (3) (from the kit).
●
Applies to cars with a centrally mounted loudspeaker
Install the bracket (1) on the display screen (2). Use the front screw (3).
M3903055
Installing and connecting the display screen
42
●
Applies to cars without a centrally mounted loudspeaker
Connect the wiring for the DVD reader (1) to the display (2)
●
Install the display screen with the bracket in the dashboard using the existing
screws (3)
●
Press the new loudspeaker grille (from the kit) into place on the dashboard.
M3903566
Installing and connecting the display screen
43
●
Applies to cars with a centrally mounted loudspeaker
Install the centrally mounted loudspeaker in the cut out in the bracket for the
display screen
●
Tighten the loudspeaker into place using the four screws
●
Press the connector (1) for the centre loudspeaker into the bracket on the lefthand under side of the display screen bracket.
M3903539
© VolvoCar Corporation, 2001 Printed in Sweden
8633842
Page 19 of 21
Installation instructions, accessories - Volvo Navigation System,
widescreen
Volvo Car Corporation Göteborg, Sweden
Installing and connecting the display screen
44
●
Applies to cars with a centrally mounted loudspeaker
Connect the three cables (1) to the display screen and the centrally mounted
loudspeaker
●
Press the display screen and bracket into the dashboard. Tighten using the four
existing screws (2)
●
Press the new loudspeaker grille (from the kit) into place on the dashboard.
M3903541
45
© VolvoCar Corporation, 2001 Printed in Sweden
Finishing work
●
Connect the green female connector on the new cable harness, to the green
male connector disconnected from the radio
●
Connect the other two large connectors to the radio
●
Connect the other connectors removed from the radio
●
Reinstall the radio
●
Connect the connectors to the dashboard environment panel. Reinstall the panel
●
Reinstall the panel and gear selector lever boot around the gear selector lever
●
Reinstall the panel in front of the gear selector lever
●
Fold back the carpet
●
Reinstall the side panel on the centre console
●
Reinstall the sill trim panels on the left-hand side
●
Fold the left-hand front seat back into position
●
Tighten the front edge of the seat. Tighten the seat using the two new screws
from the kit. Tighten the nut. Tighten to 40 Nm (30 lbf. ft). Reinstall the covers
over the screws
●
Reinstall the parcel shelf
●
Reinstall the C-post panels. Press the rubber mouldings into position
●
Reinstall the front side panel in the cargo compartment
●
Connect the cargo compartment lighting connectors to the tailgate sill trim panel.
Reinstall the sill trim panel
●
Install a new left-hand folding panel from the kit. Reinstall the right-hand panel
8633842
Page 20 of 21
Installation instructions, accessories - Volvo Navigation System,
widescreen
Volvo Car Corporation Göteborg, Sweden
●
Reinstall the side cushion
●
Fold the backrest back into place
●
Fold the seat cushion back into place.
Finishing work
46
●
Turn the ignition key to position II
●
Reconnect the battery negative lead
●
Reinstall the cargo compartment carpet
●
Program the software according to the service information in VIDA.
A8800137
© VolvoCar Corporation, 2001 Printed in Sweden
8633842
Page 21 of 21