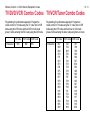
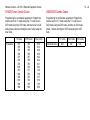
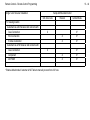
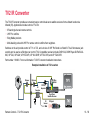
1
6.3/6.4 Remote Equipment Codes
These tables contain the manufacturer codes for programming the remote to control your TV, a VCR, DVD player, or
audio amplifier. Every attempt has been made to include all codes. If your equipment brand is not listed or if the codes do
not work, the remote may not control your equipment. In some cases codes may operate some but not all buttons shown
in this guide.
TV Codes
Programming in AUX mode: Use these codes to program in TV mode; however, if programming in AUX mode, press 0
before entering the TV code.
Abex 230
Action 662
Admiral 521 605 675
Aiko 727
Akai 570 573
Alleron 682
A-Mark 620
Amtron 657
Anam National 509 541 620 651 657 698AOC 505
506 519 520 573 620 627 652 653 654
Apex 743 744 745 757 814 815
Archer 620
Audiovox 620 657 662
Baycraft 536
Belcor 652
Bell & Howell 590 675 683
Bradford 657
Brockwood 627 652
Broksonic 562 748 752
Candle 506 523 525 536 627 652 654
Candle/Citizen 573
Capehart 519 627
Circuit City 627
Citizen 506 516 523 524 525 526 590 652 654 657
658 680 727
Colortyme 573 627 652 654
Concerto 523 652 654
Contec Cony 662
Contec/Cony 541 655 657 726
Craig 536 541 657 662 694
Crown 526 536 657
Curtis Mathes 506 516 526 573 590 641 645 650 652
654 658 680 683 703 708
CXC 541 657 662
Cytron 903 904
Dimensia 645 650
DISH Network 722, 742, 763
Dixi 566 620
Dumont 501 627 652
Daewoo 505 524 526 529 530 531 573 630 652 653
654 658 684 698 719 727 816
Daytron 526 627 652 654 658
Dell 772 773 774
GE 508 509 543 544 630 645 646 650 651 652 654
676 690 691 698 701 715 716 725 728 742 779
809 859
General Electric 627
Remote Controls - 6.3/6.4 Remote Equipment Codes
Electrohome 526 573 651 652 654 656 709 728
Emerson 526 534 536 541 573 590 627 636 642 648
652 654 655 657 658 662 682 683 692 696 699
720 816
Envision 506 573 652 654
Fisher 542 590 683
Fortress 573
Fujitsu 534 682 694
Funai 534 541 657 662 682 694
Futuretech 541 657 694
13 - 1
Receivers - Remote Controls - 6.3/6.4 Remote Equipment Codes
13 - 2
TV Codes (Continued)
Gibralter 501 652
Goldstar 505 523 526 545 546 566 573 652 653 654
655 656 658 693 730
Granada 627
Grand 627
Grunpy 657 682
Hallmark 627 652 654
Harmon/Kardon 561
Harvard 657
Hinari 534
Hisense 759
Hitachi 523 526 548 549 553 554 555 585 597 626
636 638 643 648 652 654 655 702 718 726 786
788 789 790 791 792 801 802
IMA 657
Infinity 566
JBL 566
JC Penney 505 506 516 525 526 543 546 631 645
646 650 652 653 654 658 676
680 690 691 701 725 726 728 730
Jensen 556 573 652 654
JVC 508 557 559 642 649 655 676 726 735 736 737
812 817
Kawasho 548 561 573 652 654
Kenwood 506 573 652 654 656
Kloss 561 610
Kloss Novabeam 657 698 723 724
KTV 526 541 573 657 658 662 696
LG 653 766
Lloyds 627
Lloytron 526
Loewe 566
Logik 675
Luxman 523 652 654
LXI 563 566 590 595 617 631 635 645 646 650 654
683 691 701 725
M. Wards 500 505 506 534 543 567 568
Magnasonic 573
Magnavox 506 520 525 536 566 567 568 573 610
652 654 656 723 724 729 762
818 887 888
Majestic 675
Marantz 506 566 573 652 654
Megatron 627 654
Memorex 590 627 653 654 675 683 720
MGA 504 505 506 542 571 573 627 652 653 654
656 728
Midland 501 646 658 676 725 730
Mitsubishi 504 505 542 570 571 572 573 597 623 627
652 653 654 656 705 728
787 799 804
Mitsui 769
Montgomery Ward 675
Motorola 521 605 651
MTC 505 506 516 523 573 627 652 653 654 680
Multitech 657
NAD 502 617 627 631 635 637 654
National 509
NEC 505 506 507 517 523 573 627 651 652 653 654
731 732
Nikkai 612
Nikko 654 727
Normandic 717
Novabeam 561
NTC 727
Nyon 701
Olevia 766 773
Onwa 541 657
Optimus 637
Optonica 521 605 607
Orion 694
Osaki 612
Panasonic 508 509 512 566 644 651 662 676 685
689 698 700 716 734 761 765 780 784 811 819
820 821 822 823 867 868 869 870 871 872 873
874 875 876 877 878 879 880 881 882 883 884
885 886 889 890 900
Philco 505 506 525 536 568 573 610 651 652 653
654 655 656 723 724 729
Philips 525 566 651 652 655 656 690 723 724 729
770 782 824 825 826 827 828 891 892 893 894
Philips Magnavox 782 826 827 828 829
Pilot 652 658
Pioneer 502 548 576 636 637 648 652 654 708
Portland 505 526 573 652 653 654 658 727
Price Club 680
Prism 676
Proscan 645 646 650 691 725 742 857
Proton 513 519 526 536 585 627 652 654 655
Pro View 902
Pulsar 501 652
Quasar 508 509 651 676 698 700 860 861 862 895
896
Radio Shack 526 541 590 607 612 645 662 683 698
Radio Shack/Realistic 590 607 650 652 654 655 657
658 683 730
RCA 503 505 548 630 633 634 636 641 645 646 648
650 651 652 653 654 656 691
698 701 708 715 716 725 742 749 763 776 805 830
831 832 863 864
Realistic 590 645 683
Runco 501
TV Codes (Continued)
Sampo 506 519 652 654 658 698 730 746
Samsung 505 506 516 523 526 566 573 612 627 647
652 653 654 655 656 658 680 704 717 730 738
755 833 858 897
Samwon 620
Sansui 754 834
Sanyo 542 590 652 683
SBR 566
Schneider 566
Scotch 654
Scott 526 534 541 600 652 654 655 657 662 682
696 701
Sears 523 534 542 563 590 595 601 604 617 627
631 635 645 646 650 652 654 656
682 683 688 691 703 725 726Seimitsu 627
Sharp 521 526 585 605 607 628 629 652 654 655
658 739 740 741 777 794 803 835 836 898
Shogun 652
Signature 675
Silver 573
Simpson 525
Solavox 612
Sony 500 578 640 690 758 781 783 795 796 797 798
806 807 808 810 837 838 839 840 841 842 843
844 845
Soundesign 525 536 541 627 652 654 657 682
Spectricon 520 620
Squareview 694
SSS 505 541 573 652 657
Starlite 657
Supra 523
SVA 901 905
Sylvania 506 525 536 566 568 569 573 600 610 652
654 656 723 724 729 733 756 764
Symphonic 632 657 662 692 694 846
Tandy 521 605
Tatung 509 651 698
Technics 508 676
Techwood 523 573 652 654 676
Teknika 504 505 512 516 523 524 525 526 534 536
541 573 644 652 653 654 655 657 658 662 675
680 682 685 726 727
Tera 513
Thomas 627
Thompson 709
TMK 523 573 627 652 654
Toshiba 516 590 617 631 635 680 683 688 750 771
785 793 847 848 849 850 851 852 853 854 855
856 865 866
Totevision 526 658
Toyomenko 627
Universal 543 690
Vector Research 506
Victor 557
Video Concepts 570
Vidtech 505 573 627 652 653 654
Viewsonic 760
Wards 536 573 607 645 650 652 653 654 656 675
682 690 715 723 724 729
White Westinghouse 816
Yamaha 505 506 573 652 653 654 656
York 627
Zenith 501 520 639 652 675 693 775 778 813 899
Zonda 620
VCR Codes
Programming in AUX mode: Use these codes to program in VCR mode; if programming in AUX mode, press 1 before
entering the VCR code.
Adventura 588
Aiwa 588 622 623
Akai 513 515 516 517 518 568 682
American High 678
Amstrad 588
ASA 556
Asha 675
Audio Dynamics 592 600
Audiovox 676
Beaumark 675
Bell & Howell 581
Broksonic 559
Calix 676
Candle 534 594 675 676
Remote Controls - 6.3/6.4 Remote Equipment Codes
Canon 554 678 679
Citizen 534 591 592 594 675 676
Colortyme 592
Craig 591 675 676
Curtis Mathes 554 592 594 605 607 675 678 679
Cybernex 675
Daewoo 534 547 559 588
13 - 3
Remote Controls - 6.3/6.4 Remote Equipment Codes
13 - 4
VCR Codes (Continued)
DBX 592 600
Dimensia 607
Dumont 549
Dynatech 588
JVC 561 562 563 581 592 594 600 682
Electrohome 512 676
Electrophonic 676
Emerson 505 508 509 511 512 518 534 559 568 588
590 618 676 678
LG 676
Luxor 518
Lloyd’s 588
LXI 676
Finlandia 549
Finlux 549 556 588
Fisher 549 581 584 588 610
Fuji 678
Funai 588
M. Wards 512 554 585 590 591
Maganvox 797
Magnavox 527 533 554 556 678 679 797 798
Magnin 676
Marantz 554 556 581 585 592 594 600 678
Marta 676
Matsushita 678
MEI 554 678
Memorex 533 549 554 566 581 585 588 675 676 678
MGA 512 567 568
MGN Technology 675
Midland 579
Minolta 595
Mitsubishi 512 562 567 568 570 571 595
Motorola 678
MTC 544 588 675
Multitech 579 588 675
Mutitech 591
Garrard 588
GE 551 552 554 572 591 605 607 675 678 679
Go Video 557 558 620
Goldstar 592 594 676
Goodmans 585
Gradiente 588
Granada 549 581
Grundig 556
Harley Davidson 588
Harman Kardon 592
Harmon/Kardon 568 592
Headquarter 581
Hitachi 536 538 539 540 588 595 597 682
Instant Replay 678
ITT 518
JC Penney 554 581 591 592 594 595 600 675 676
678 679
JCL 678
Jensen 595 682
Kenwood 562 581 592 594 600 682
Kodak 676 678
NEC 562 581 592 594 600 682
Nikko 676
Noblex 675
Olympus 678
Optimus 676
Optonica 585
Panasonic 523 554 598 614 628 633 678 679 777
780 781 782 783 784 785 786 787 788 789 790
791 792 793 794 795 796 799 808 809 810
Pentax 592 595
Pentex Research 594
Perdio 588
Philco 554 678 679
Philips 554 556 585 678 801 802 803 804
Pilot 676
Pioneer 562 574 575 576 600
Proscan 605 607
Pulsar 533
Quarter 581
Quartz 581
Quasar 554 678 679 770 771 772 805 806
Radio Shack 512 607 610 676
Radio Shack/Realistic 581 584 588 675 676 678 679
Radix 676
Randex 676
RCA 518 525 527 528 591 595 605 607 615 631 649
675 678 773 774 775
Realistic 534 549 554 581 584 585 588 675 676 678
679
Ricoh 502
Runco 533
Salora 567 581
Samsung 515 517 534 579 591 675 755 807
Sanky 533
Sansui 544 562 600 682
Sanyo 549 581 583 675
SBR 556
Scott 508 534 559 590
Sears 549 581 584 595 610 676 678
Sharp 512 585 595 607 625
Shintom 595
Shogun 675
VCR Codes (Continued)
Singer 678
Sony 500 501 502 504 768 778
STS 678
Sylvania 554 556 567 588 678 679 756
Symphonic 588 594
Tandy 581 588
Tashiko 676
Tatung 594 682
Teac 588 594 682
Technics 554 633 678
Teknika 554 588 676 678
TMK 675
Toshiba 534 535 567 584 590 769 776Totevision 591
675 676
Unitech 675
Vector Research 534 592 600
Victor 561 562 600
Video Concepts 534 568 592 600
Videosonic 591 675
Wards 534 588 595 675 676 678
XR-1000 588 678
Yamaha 581 592 594 600 682
Zenith 500 501 533 779
DVD Player Codes
Programming in AUX mode: Use these codes to program in VCR mode; if programming in AUX mode, press 1 before
entering the DVD Player code.
Aiwa 634 694
Alpine 653
Apex 654 655 744 757 835 839
Archos 885
Funai 658
Oritron 723
GE 702 703
Go Video 692 693 822
GPX 704
Hitachi 660 705 706 707 740 823 860 668
Panasonic 639 663 699 714 715 716 734 765 813 840
841 855 856 868 869 870 871 872 873 882
Philips 766 874
Pioneer 665 719 812 876 877 878 879 880
Proscan 720
Clarion 696
Classic 695
CyberHome 833
Cytron 904
JVC 689 711 850 861 862 863
Qwestar 723
Konka 637 638 753
Koss 745
Daewoo 657 859
Denon 697 699 700
Magnavox 661
Memorex 709
Mintek 710
Mitsubishi 767 867
RCA 666 690 749 816 842 854
Sampo 724
Samsung 652 667 668 691 740 741 820 821 844 845
866 875 881 705
Sansui 725 754
Sanyo 643
Sharp 669 727 865
Sony 617 645 670 671 729 730 731 768 817 818 830
831 832 836 837 838 843 847 848 849 851 852
853 857 858 864 883 884
BOSE 758 811
Broksonic 656 752
EchoStar 722
Emerson 658
Fisher 659
Norcent 711
Remote Controls - 6.3/6.4 Remote Equipment Codes
13 - 5
Remote Controls - 6.3/6.4 Remote Equipment Codes
13 - 6
VCR Codes (Continued)
Sylvania 658 764 829
Teac 732
Technics 733
Techwood 664
Toshiba 616 646 672 735 736 814 815 819 825 826
827 828 834 846
Yamaha 737 739
Zenith 673 824
Tuner/Amplifier Codes
Programming in AUX mode: Press 2 before entering the tuner/amplifier code.
Aiwa 636 641 656 687 718 720 724 725 726
Marantz 651 764
Soundmatters 763
BOSE 761 780
Nakamichi 671
NEC 716
Teac 684
Technic 652
Technics 643 644 652 768 804 805 843
Toshiba 710
Carver 653
Citizen 709
Denon 647 674 759 760 762 807 809 814 835
Fisher 653
GE 711
Goldstar 677 690
Harman Kardon 640 751
Harmon/Kardon 672
Hitachi 717
JBL 640
JVC 637 683 703 725 786 827
Kenwood 676 691 726 728 774 795 828 829 830 831
832 840 842
Magnavox 654 705
Onkyo 642 660 662 678 785 788 790 791 792 796
801
Optimus 648 664
Panasonic 643 644 652 783 797 798 799 808 810
815 816 817 818 819 820 821 822 824 825 826
833 836 837 838 839
Pioneer 658 667 668 679 702 767 770 772 779 802
806 844
Proton 654 705
Quasar 652
RCA 635 638 704 727
Sharp 712 713 714 715
Sherwood 646 670
Sony 639 645 687 728 729 730 765 766 769 771 773
775 776 777 778 781 782 784 787 789 793 794
803 811 812 813
Victor 703
Yamaha 663 730 731 732 733 823 834 841
TV/VCR Combo Codes
TV/DVD Combo Codes
Programming for combination equipment: Program the
remote control in TV mode using the TV code and then in
VCR mode using the VCR code.
Programming for combination equipment: Program the
remote control in TV mode using the TV code and then
in VCR mode (or AUX—press 1 before entering the DVD
code) using the DVD code.
TV Code
VCR Code
Magnavox
887
888
797
798
Philips
891
892
893
894
801
802
803
804
860
861
862
895
896
770
771
772
805
806
RCA
863
864
773
774
Samsung
755
897
755
807
Sylvania
756
756
Quasar
Remote Controls - 6.3/6.4 Remote Equipment Codes
TV Code
DVR Code
Apex
757
757
Broksonic
752
752
Cytron
904
904
Panasonic
734
765
734
765
RCA
749
749
Sansui
754
754
Sylvania
764
764
Toshiba
865
866
814
815
13 - 7
Remote Controls - 6.3/6.4 Remote Equipment Codes
13 - 8
TV/DVD/VCR Combo Codes TV/VCR/Tuner Combo Codes
Programming for combination equipment: Program the
remote control in TV mode using the TV code, then in VCR
mode using the VCR code, and then DVD in AUX mode
(press 1 before entering the DVD code) using the DVD code.
TV Code
Panasonic
900
Programming for combination equipment: Program the
remote control in TV mode using the TV code, then in VCR
mode using the VCR code, and then tuner in AUX mode
(press 2 before entering the tuner code) using the tuner code.
DVR Code VCR Code
882
810
TV Code
Panasonic
867
868
869
870
871
872
873
874
875
876
877
878
879
880
881
882
883
884
885
889
DVR Code VCR Code
796
799
808
780
781
782
783
784
785
786
787
788
789
790
791
792
793
794
795
809
797
798
799
839
838
837
836
833
826
825
824
822
821
820
819
818
817
816
815
808
20.0/21.0 Remote Control Additional Features
Remote Controls - 20.0/21.0 Remote Control Additional Features
13 - 9
Remote Controls - 20.0/21.0 Remote Equipment Codes
13 - 10
20.0/21.0 Remote Equipment Codes
These tables contain the manufacturer codes for programming the remote to control your TV, a VCR, DVD player, or
audio amplifier. Every attempt has been made to include all codes. If your equipment brand is not listed or if the codes do
not work, the remote may not control your equipment. In some cases codes may operate some but not all buttons shown
in this guide.
TV Codes
Programming in AUX mode: Use these codes to program in TV mode; however, if programming in AUX mode, press 0
before entering the TV code.
Abex 658 730
Acer 511
Action 662
Admiral 521 572 675 739 834 835
Advent 653 842 912
Adventura 840
Aiko 727 778
Akai 570 573 592 612 627 652 754 795 807 808 906
907 908
Albatron 692 804
Alleron 534
A-Mark 620 804
Ambassador 686
America Action 682
Amtron 657
Anam 682
Anam National 509 541 620 651 657 698
AOC 505 506 519 520 573 582 620 627 653 654
Apex 552 595 743 744 745 757 771 802 815
Archer 620 804
Astar 594
Audiovox 528 565 620 623 624 657 662 682 778 832
Aventura 733
Axion 636
Bang & Olufsen 514 665
Baycraft 536
Belcor 627 773
Bell & Howell 590 675 683
Benq 511 535
Bradford 657 682
Brillian 558
Brockwood 627
Broksonic 682 748 750 752 754 834 899 908
ByD:sign 792
Candle 506 523 525 536 627 654 840
Candle/Citizen 573
Capehart 519 627
Carnivale 627
Carver 761
CCE 528 816
Celebrity 652 795 797 798 807
Celera 744 745
Changhong 744 745
Cineral 697
Circuit City 627
Citizen 506 516 523 524 525 526 590 627 654 657
658 664 680 727 778
Clairtone 698
Coby 626 633
Colortyme 573 627 654
Colt 660
Commercial Solutions 645 650
Concerto 523 652 654
Contec 682
Contec/Cony 541 655 657 658 662
Craig 536 541 657 662 682 694
Crosley 761
Crown 526 536 657
CTX 804
Curtis Mathes 503 506 516 528 572 573 590 627 641
645 650 654 658 680 683 739 761 830 832
CXC 541 657 662 682
Cytron 903 904
TV Codes (Continued)
Daewoo 505 524 528 530 531 573 627 630 653 654
658 684 719 727 778 816 832
Daytron 627 654 658
Dell 518 676 772 773 774
Denon 786
DiamondVision 546 643 659
Dimensia 503 645 830
DISH Network 742 763
Dixi 566 620 761 897
Dumont 501 627 711 813
Durabrand 533 627 682 733 834 843
Dwin 572 739
Electroband 652 795 797 798 807
Electrograph 507
Electrohome 573 627 651 652 654 709 728 795 807
Element 591 669
Emerson 528 534 536 541 573 590 618 627 636 642
646 654 655 657 658 662 664 682 683 733 777
816 832 834 846 899
Emprex 597
Envision 506 573 627 654
Epson 708
ESA 733
Fisher 542 590 595 683 802
Fortress 573
Fujitsu 534 602 603 694
Funai 534 541 587 657 662 682 694 733 756
Futuretech 541 657 662 682 694
Gateway 507 511 710
GE 503 508 509 528 543 544 627 645 650 651 654
661 690 728 742 749 779 830 832 857 859
General Electric 627
Gibralter 501 627 711 813
Go Video 696
Goldstar 505 523 545 566 573 627 653 654 655 658
693 720 730 761 897
Gradiente 540
Granada 627
Grand 627
Grunpy 534 657 682
Hallmark 627 654
Harley Davidson 756
Harman/Kardon 561 627 761
Harvard 657 682
Havermy 572 739
Helios 901
Hello Kitty 528 832
Hewlett Packard 712 911
Hinari 534
Hisense 759
Hitachi 523 549 554 555 585 627 638 654 655 658
756 786 788 789 790 791
HP 599 712 721 911
Hyundai 695
iLo 559 596 625
IMA 657
Infinity 566 656 761 897
InFocus 616
Initial 625
Insignia 538 539 751
Inteq 501 711 813
Janeil 840
JBL 566 656 761 897
JCB 652 795 797 798 807
JC Penney 503 505 506 508 516 525 543 595 627
631 645 653 654 658 680 690
728 730 802 830 857
Jensen 502 537 556 573 627 653 654 842 912
JVC 508 557 559 642 649 655 676 726 735 736 737
812 817
Remote Controls - 20.0/21.0 Remote Equipment Codes
Kawasho 561 573 627 652 654 795 807
Kaypani 519
KEC 682
Kenwood 506 573 627 654 716
KLH 595 744 745 802
Kloss 561 627
Kloss Novabeam 657 723 724 840
Konka 510
KTV 541 573 627 657 658 662 682
LG 553 627 653 654 693 718 766 773 804
Lloyd’s 627 756
Lloytron 658
Loewe 566 656 761 897
Logik 675
Luce 699
Luxman 523 627 654
LXI 503 566 590 595 627 631 635 645 650 654 656
683 744 761 771 802 830 897
M. Wards 500 505 506 534 543 567 568 795 807
Magnasonic 573 664
Magnavox 506 520 525 536 550 560 566 567 568
573 625 627 646 654 656 723 724 756 761 762
777 818 827 828 829 838 839 887 888 891 892
893 894 897
Magnin 661
Majestic 675
Marantz 506 566 573 604 627 654 656 761 897
Matsushita 689
Maxent 507 581
Media Center 721
Megapower 804
Megatron 627 654
MEI 698
Memorex 529 590 627 648 653 654 675 683 834
MGA 504 505 506 542 571 573 627 653 654 661 728
Midland 501 508 645 650 658 711 730 813
13 - 11
Remote Controls - 20.0/21.0 Remote Equipment Codes
13 - 12
TV Codes (Continued)
Mintek 625
Minutz 857
Mitsubishi 504 505 542 570 571 572 573 613 614 627
653 654 725 728 739 787 799
Mitsui 769
Monivision/Monovision 692 804
Montgomery Ward 675
Motorola 521 572 651 739 835
MTC 505 506 516 523 573 627 653 654 680
Multitech 657 682
Multivision 810
NAD 595 627 631 635 637 654 744 771 802
National 509
NEC 505 506 507 517 523 573 627 651 652 653 654
731 732
Net-TV 517 586 609 801
Nikkai 613
Nikko 627 654 727 778
Norcent 579
Normandic 717
Noshi 681
Novabeam 561 627
NTC 727 778
Nyon 627
Olevia 564 578 580 910
Onwa 541 657 662 682
Optimus 590 637 689
Optonica 521 572 607 739 835
Orion 694 726 834 899
Osaki 687
Panasonic 508 509 512 566 577 619 634 644 647
651 656 662 685 689 700 729 734 761 765 780
784 811 819 820 821 822 823 860 861 862 867
868 869 870 871 872 873 874 875 876 877 878
879 880 881 882 883 884 885 886 889 890895
896 897 900
Panavision 734 811
Penney 595 627 645 650 661 744 771 802
Philco 505 506 525 532 536 568 573 627 651 653
654 655 656 658 723 724 761
Philips 525 527 548 550 563 566 621 625 627 651
655 656 658 690 723 724 747
761 770 782 824 825 826 827 828 839 887 888 891
892 893 894 897
Philips Magnavox 527 550 761 782 826 827 828
Pilot 627 658
Pioneer 547 576 627 637 654
PlasmSync 610
Polaroid 591 627 669 670 671 678 744 745 751 766
773 814
Portland 505 573 627 653 654 658 727 778
Price Club 680
Prima 653 673 674 842 912
Princeton 562 804
Prism 508
Proscan 503 645 650 742 749 830
Proton 513 519 536 585 627 654 655 658
Protron 589
Proview 902
Pulsar 501 627 711 813
Quasar 508 509 651 689 700 784 860 861 862 867
868 869 870 871 872 873 874 875 876 877 878
879 880 881 882 883 884 885 886 889 890 895
896
Radio Shack 503 541 590 627 645 650 662 682 683
756 830
Radio Shack/Realistic 590 607 650 652 654 655 657
658 683 730 830
RCA 503 505 522 627 630 636 641 645 650 651 653
654 661 742 749 776 779 805 830 831 863 864
902
Realistic 503 590 627 645 682 683 830
Rhapsody 701
Runco 501 627 711 813
Sampo 506 507 519 627 654 658 730 746 753 763
Samsung 505 506 516 523 526 566 573 601 627 653
654 655 658 680 707 717 730 738 755 761 794
833 858 897
Samsux 702
Samwon 620
Sansei 697
Sansui 726 754 756 834 899 908
Sanyo 590 611 627 661 683
SBR 566 761 897
Sceptre 677
Schneider 566 761 897
Scimitsu 773
Scotch 627 654
Scott 534 541 627 654 655 657 658 662 682
Sears 503 523 534 541 542 558 590 595 627 631
635 645 650 654 658 683 733 744 756 761 771
802 830 841 846
Seimitsu 627
Semivox 682
Semp 595 771
Sharp 521 572 585 605 607 627 628 629 654 655
658 739 740 803 835 836 898
Sharper Image 703
Sheng Chia 572 739
Shogun 627
Signature 675
Silver 573
Simpson 525
Solavox 613
Sony 500 640 652 756 758 781 783 795 796 797 798
806 807 837 844 845
Soundesign 525 534 536 541 627 654 657 662 682
Spectricon 520 620 627
TV Codes (Continued)
Squareview 694 733 841 846
SSS 505 541 573 627 657 662 682
Starlite 657 682
Studio Experience 692
Supra 523 627
Supre-Macy 840
Supreme 652 795 797 798 807
Susumu 687
SVA 515 901 905
Sylvania 506 525 536 566 568 569 573 618 627 646
654 656 672 679 723 724 733 756 761 764 777
897
Symphonic 632 657 662 679 682 694 733 756 841
846
Syntax 564
Syntax-Brillian 558 564
Tandy 521 572 739 835
Tatung 509 588 651
Technics 508 689
Technol ACE 534
Techview 590 683
Techwood 508 523 573 627 654
Teco 704
Teknika 504 505 512 516 523 524 525 534 536 541
573 644 653 654 655 657 658 662 675 680 682
685 727 761 778
Telecaption 688
Telefunken 794
Tera 513
Thomas 627 756
Thompson 709
Thomson 705
TMK 523 573 627 654
TNCi 501 711 813
Toshiba 516 526 590 595 617 622 631 635 666 680 683
688 744 750 754 768 771 785 793 800 802 847 848
849 850 851 852 854 855 865 866 908 909
Tosonic 698
Totevision 658
Toyomenko 627
Trical 706
Trutech 584
TVS 834
Universal 543 690 857
Universum 687
Victor 557
Video Concepts 570
Vidikron 761
Vidtech 505 573 627 653 654
Viewsonic 507 551 562 575 583 600 606 760 796
Viking 840
Viore 907
Vizio 511 535 562 575 593 598 773
Wards 503 534 536 573 595 607 627 645 653 654
656 675 690 715 723 724 761 802 830 857
Waycon 595 744 771 802
Westinghouse 528 562 574 575 795 797 798 807 809
832 856
White Westinghouse 528 816 832 834
Yamaha 505 506 573 627 653 654
York 627
Zenith 501 553 555 615 627 639 675 693 711 748 752
756 766 773 775 778 813 834 853 899
Zonda 620 804
V Inc. 562 575
Vector Research 506 627
VCR Codes
Programming in AUX mode: Use these codes to program the VCR in the DVD mode on your remote control. If
programming the VCR in AUX mode on your remote control, press 1 before entering the VCR code.
ABS 792
Adventura 588 594
Aiwa 501 588 594 676 678
Akai 513 518 568 682 772
Alienware 792
American High 554
Americast 917
Apex 517
ASA 556 801
Asha 675
Remote Controls - 20.0/21.0 Remote Equipment Codes
Audio Dynamics 592
Audiovox 676 678
Bang & Olufsen 537 794
Beaumark 675
13 - 13
Remote Controls - 20.0/21.0 Remote Equipment Codes
13 - 14
VCR Codes (Continued)
Bell & Howell 581
Broksonic 511 515 516 525 559
Calix 676 678
Candle 534 592 594 675 676 678
Candle/Citizen 675 676
Canon 554
Canon 554
CineVision 529
Colortyme 592
Colt 535
Craig 591 676 678 789
Curtis Mathes 554 585 592 594 605 607 649
Cybernex 675
Cyberpower 792
Daewoo 534 536 559 588 796
DBX 592
Dell 792
DiamondVision 532
Dimensia 585 607 649
Dumont 549
Durabrand 533
Dynatech 588 594
Electrohome 512 676 678
Electrophonic 676 678
Emerson 508 512 518 534 536 554 559 568 588 594
676 678 798 804
ESA 502
Finlandia 549
Finlux 549 556 801
Fisher 549 581 789
Fuji 554 772
Funai 588 594 804
Garrard 588 594
GE 541 554 585 591 605 607 649 675
Go Video 522 524
Goldstar 592 594 676 678
Goodmans 585
Gradiente 588 594
Granada 549
Grundig 556 801
Harley Davidson 588 594
Harman/Kardon 568 592
Headquarter 581
Hewlett Packard/HP 792
Hi-Q 789
Hitachi 536 538 539 540 588 595 597 682
Howard Computers 792
Hush 792
iBuyPower 792
Insignia 507
Instant Replay 554
ITT 675
JCL 554
Jensen 595 682 776
JVC 503 504 523 526 527 545 561 562 581 592 594
682 795
Kenwood 562 581 592 594 682
Kodak 554 676 678
LG 507 676 678
Linksys 792
Lloyd’s 588 594
Luxor 567
LXI 676 678
M. Wards 512 554 585 591
Magnasonic 536
Magnavox 533 554 556 594 797 798 801 803 804
Magnin 675 676 678
Marantz 554 556 581 585 592 594 801
Marta 676 678
Matsushita 554
Media Center PC/Microsoft 792
MEI 554
Memorex 515 516 533 549 550 554 581 585 588 594
676 678 786 789
MGA 512 567 568 675
MGN Technology 675
Midland 591
Minolta 595 776
Mitsubishi 512 562 567 568 595 607 776
Motorola 554
MTC 544 594
Multitech 588 591 594
NEC 562 581 592 594 682
Nikko 676 678
Niveus Media 792
Noblex 675
Northgate 792
Olympus 554
Optimus 676 678 786
Optonica 585
Orion 550
Panasonic 554 614 628 770 777 780 781 782 783
784 786 787 788 799 809 810
Penney 675 676 678
Pentax 592 776
Pentex Research 592 594
Philco 554
Philips 554 556 585 801 803 804
Philips Magnavox 801
Pilot 676 678
VCR Codes (Continued)
Pioneer 562 776
Polaroid 517 530
Presidian 804
Proscan 585 605 607 649
Pulsar 533
Quarter 581
Quartz 581
Quasar 554 770 771 772 786 806
Radio Shack 512 594 676 678
Radio Shack/Realistic 554 581 588 676 678 789
Radix 676 678
Randex 676 678
RCA 518 528 541 554 585 591 595 605 607 649 675
773 774 775 776
Realistic 534 549 554 581 585 588 594 676 678 789
Ricavision 792
Ricoh 791
Runco 533
Salora 567
Samsung 506 524 534 591 755 807
Sanky 533
Sansui 515 516 544 550 562 594 682
Sanyo 549 581 675 789
SBR 556 801
Scott 534 559
Sears 549 554 581 594 595 676 678 776 789
Sharp 512 585 595 607 918
Shintom 595 772
Shogun 675
Singer 554 791
Sony 500 594 768 772 778 790 791 792 919
Stack 792
Stack 9 792
STS 554
Superscan 531 798 804
Sylvania 519 554 556 567 588 594 756 798 801 804
Symphonic 588 594 804
Systemax 792
Toshiba 534 538 542 543 567 769 776 783 792
Totevision 591 676 678
Touch 792
Tagar Systems 792
Tandy 581
Tashiko 676 678
Tatung 682
Teac 588 594 682
Technics 554
Teknika 554 588 594 676 678
TMK 675
XR-1000 554 588 594
UltimateTV 649
Unitech 675
Vector Research 534 592
Victor 561 562
Video Concepts 534 568 592
Videomagic 676 678
Videosonic 591
Viewsonic 792
Wards 534 554 588 594 595 676 678 776 789
White Westinghouse 588
Yamaha 581 592 594 682
Zenith 500 507 533 594 772 779 791
ZT Group 792
DVD Player Codes
Programming in AUX mode: Use these codes to program your remote control in DVD mode. If programming in AUX mode
on your remote control, press 1 before entering the listed DVD Player code.
Accurian 602
Advent 572
Aiwa 694
Akai 656 752 815
Alco 765
Allegro 683
Alpine 653
Amphion MediaWorks 586
AMW 586
Anaba 687
Anam 688
Apex 654 655 744 757 835 839 851
Remote Controls - 20.0/21.0 Remote Equipment Codes
Apple 642
Archos 885
Arrgo 833
Aspire 558
Astar 612
Audiologic 698
13 - 15
Remote Controls - 20.0/21.0 Remote Equipment Codes
13 - 16
DVR Codes (Continued)
Audiovox 580 630 765 826 837
Axion 867
B&K 701
Bang & Olufsen 569 580
Bel Canto Design 719
Blaupunkt 835
Blue Parade 719
BOSE 758 811
BOSS 576
Broksonic 656 752 815
California Audio Labs 699 716
Cambridge SoundWorks 870
CAVS 708
CineVision 626
Clarion 696
Classic 695 826 882
Coby 557 634
Criterion 712
Curtis 685
Curtis Mathes 684
CyberHome 833
Cytron 904
Daewoo 626 657 859
Denon 578 697 699 700 716 737 892
Desay 598
DiamondVision 637 641
Disney 617
Dual 871
Durabrand 826
DVD2000 699 716
Eclipse 574
Eltax 685
Emerson 658
Enterprise 824
ESA 570 587
Jwin 742
Farenheit 713
Fisher 659
Flex Vision 717
Fun TV 718
Funai 570 617 658 829
Karcher 864
Kawasaki 765
Kendo 848
Kenwood 579 699 700 716 737
KLH 765 835
Konka 753
Koss 564 723 745 873
Gateway 610
GE 702 703 720 749 816 835
Go Video 610 692 693 822 826
GPX 704 826 882
Gradiente 699 716
Greenhill 835
Grundig 565 577
Harman/Kardon 715
Hitachi 606 660 668 705 706 707 823 860
Hiteker 654 655 744
Honda 721
Honyas 726
iLive 856
iLo 837
Ingelen 876
Initial 835
Insignia 570 673 824 871
Integra 551 779
Irradio 608
Jamo 728
Jaton 738
JBL 715
Jeken 878
Jensen 557
JMB 656 815
JVC 553 603 604 620 621 622 623 625 689 850 861
862 863 872 898
Lasonic 593
Lenoxx 560 826
Lexia 857
Lexicon 743
LG 615 673 824 899
Lifetec 634
Limit 857
Liquid Video 564
LiteOn 602 610
Loewe 746
LogicLab 857
Logix 852
Lumatron 673 824
Luxman 844
Luxor 848
Magnavox 565 570 577 601 617 650 658 661 672 674
679 854
Malata 747
Marantz 565 577
Memorex 709
Microsoft 703 720 749 816
Mintek 710
Mitsubishi 767
Momitsu 748
NAD 673 824
Nakamichi 596
DVR Codes (Continued)
Nesa 835
Next Base 680
Nexxtech 599
Niro 750
Nissoho Iwai 718
Norcent 634 711
RCA 616 666 690 703 719 720 749 765 816 835 842
901
Regent 560
Rio 683
Rotel 553 850 861
Rowa 555
Onkyo 551 672
Oppo 566
Optiview 687
Oritron 564 723
Saba 762
Sampo 724
Samsung 571 606 643 644 652 667 668 691 699 716
740 741 805 820 821 844 845 849 866 869 875
881 895 896 900
Sansui 656 725 754 815
Sanyo 609 656 659 815
Sensory Science 610
Sharp 573 617 669 727 865 903
Sharper Image 763
Sherwood 870
Shinco 589
Shinsonic 731
Sigma Designs 760
SonicBlue 683
Sony 582 613 618 632 670 671 729 730 731 817 818
827 830 831 832 836 838 843 846 847 858 868
883 884 902
Sungale 597
Superscan 570
SVA 800
Sylvania 570 617 619 631 639 645 658 764 829
Panasonic 624 627 638 662 663 672 699 714 716
734 737 813 840 841 855
Philco 686
Philips 565 572 577 617 672 764 766 873 874
Pioneer 665 719 812 877 879 880
Polk Audio 565 577
Portland 751
Presidian 617
Prima 759
Princeton 760
Proceed 654 655 744
Proscan 703 720 749 816
Provision 761
Pye 674
Qwestar 723
Remote Controls - 20.0/21.0 Remote Equipment Codes
Symphonic 617 658
Teac 732 765
Technics 699 716 733
Techwood 664
Terapin 887
Theta Digital 719
TiVo 888
Toshiba 575 583 584 646 648 656 672 735 736 814
815 819 825 828 834 893 894
Tredex 889
Trutech 833
TView 687
Urban Concepts 672
US Logic 681
Venturer 765
Vizio 897
Vocopro 890
Westinghouse 629
Xbox 703 720 749 816
Xwave 891
Yamaha 565 577 699 716 737 739 853
13 - 17
Remote Controls - 20.0/21.0 Remote Equipment Codes
13 - 18
Tuner/Amplifier Codes
Programming in AUX mode: Press 2 before entering the code for your tuner/amplifier or other audio device on your
remote control.
Acoustic Research 703 853
Acurus 691
ADC 652
Adcom 690
Admiral 747
ADS 748
Aiwa 636 667 681 718 720 725 730 839
Akai 740
Alco 659
Alpine 749
Altec Lansing 738
AMC 855
Amphion Media Works 660
Amplifier Technologies 710
AMW 660
Anam 653
Angstrom 692
Anthem 750
Apex 812
Aragon 691
Arcam 726
Atlantic Technology 712
Audio Research 751
Audio Source 693
Audiotronic 685
Audiovox 669 826
B&K 752
Bang & Olufsen 676
Bel Canto Design 690
Biamp 695
Blaupunkt 854
BOSE 639 656 761
Boston Acoustics 713
Brix 744
Brumester 647
California Audio Labs 686
Cambridge SoundWorks 831
Capetronic 652
Carver 685 725
Cary Audio Design 689
Casio 717
CCE 802
Chase Technologies 687
Cinema Sound 696
Clarinette 717
Clarion 753
Classe 697
Classic 819
Coby 811
Counterpoint 754
Craig 856
Creative 723
Criterion 734
Crown 857
Curtis 815
Curtis Mathes 772
Daewoo 727
Dell 729
Delphi 755
Denon 669 670 680 759 760 762 809
Digital Audio Control 688
Durabrand 698
Dynalab 858
EAD 756
Eclipse 665
Elan 699
Emerson 820
ESA 757
Fisher 850
Fosgate 700
Garrard 851
Gateway 743
GE 638
Glory Horse 728
Go Video 742
Goldstar 814
GPX 834
Gradiente 682
Harman/Kardon 640 685 725
Hitachi 850
Honyas 770
iLive 835
Initial 735
Inkel 714
Insignia 825
Integra 650
Jamo 837
JBL 642
Jensen 775
JVC 637 663 786 827 848
Kenwood 658 662 668 774 795 828 829 830 840
KLH 659
Knoll Systems 701
Koss 739
Tuner/Amplifier Codes (Continued)
Lasonic 746
Left Coast 640
Lenoxx 736
Lexicon 724
LG 836
Linn 685 725
Liquid Video 739
Lloyds 717
Logitech 702
Luxman 704
LXI 716
Magnadyne 776
Magnavox 652 654 685 725
Marantz 640 645 685 725 764
Mark Levinson 705
McIntosh 706
Memorex 777
Midland 707
Mitsubishi 859
Modulaire 717
Motorola 737
NAD 648
Nakamichi 649
NEC 641
Nexxtech 711
Nikko 708
Niro 779
Norcent 731
Nova 780
Omnifi 745
Onkyo 671 785 788 790 791 838
Optimus 635 652 653 772 845
Oritron 739
Panasonic 643 677 678 783 797 799 808 810 817
818 821
Parasound 647
Penney 717
Philco 781
Philips 640 685 725
Philips Magnavox 860
Pioneer 635 652 664 666 767 772 806 813 844 845
Polaroid 679
Polk Audio 640 645 685 764
Proscan 704 853
Proton 654
Pyle 782
Quasar 799
Radio Shack 728
RCA 635 652 653 659 675 703 772 842 845 852 853
RCA & Dimensia 703 853
Realistic 717
Regent 736
Rio 661
Rotel 674
Saba 741
Samsung 807
Sansui 685 725
Sanyo 824 850
Schneider 787
Scientific Atlanta 721
Scott 715
Sharp 832
Sharper Image 728
Remote Controls - 20.0/21.0 Remote Equipment Codes
Sherwood 833
Shinsonic 789
Shure 641
Sonic Blue 661
Sony 683 730 765 766 769 771 773 778 784 793 794
803 846
Soundesign 638
Soundmatters 763
Soundstream 709
Stereophonics 635 845
STS 792
Sunfire 658 840
Symphonic 747
Tag McLaren 796
Teac 653 659
Technics 643 672 768 804 805 808
Techwood 798
Thomson 800
Thorens 685
Toshiba 822
Vector Research 801
Venturer 659
Victor 637 827
Wards 635 638 685 725
Yamaha 646 650 651 655 657 663 684 732 733 786
823 841 847 848 849
Yorx 717
Zenith 814
13 - 19
Remote Controls - 20.0/21.0 Remote Equipment Codes
13 - 20
TV/DVD Combo Codes
Programming for combination equipment: Program the remote control in TV mode using the TV code and then in VCR
mode (or AUX—press 1 before entering the DVD code) using the DVD code.
TV Code
VCR Code
Apex
757
757
Audiovox
624
630
Axion
636
867
Broksonic
750
752
Cytron
904
904
Magnavox
839
838
650
679
Panasonic
811
734
Polaroid
671
678
745
647
677
635
RCA
830
830
830
816
749
703
Sansui
754
754
Sharp
605
898
576
573
TV Code
VCR Code
Sylvania
764
672
777
733
764
645
639
764
Toshiba
622 815
800 646
908 815
865 814
866 815
750 815
815
646
815
814
815
815
TV/DVD/Tuner Combo Codes
DVD/VCR Combo Codes
Programming for combination equipment: Program the
remote control in TV mode using the TV code, then in
DVD mode using the DVD code, and then in AUX mode
(press 2 before entering the tuner code) using the tuner
code.
Programming for combination equipment: Program the
remote control in DVD mode using one of the listed DVD
codes, and then in AUX mode, first pressing 1 and then
using the listed VCR code.
Panasonic
TV Code
DVR Code
811
734
Tuner code
678
Remote Controls - 20.0/21.0 Remote Equipment Codes
DVD Code
VCR Code
GoVideo
693
822
522
524
Panasonic
734
734
780
777
RCA
690
528
Sansui
815
515
Sony
817
778
RCA
690
528
Sansui
815
515
Sony
817
778
13 - 21
Remote Controls - 20.0/21.0 Remote Equipment Codes
13 - 22
TV/VCR/Tuner Combo Codes
V/DVD/VCR Combo Codes
Programming for combination equipment: Program the
remote control in TV mode using the TV code, then in
VCR mode using the VCR code, and then tuner in AUX
mode (press 2 before entering the tuner code) using the
tuner code.
Programming for combination equipment: Program the
remote control in TV mode using the TV code, then in
DVD mode using the DVD code, and then in AUX mode
(press 1 before entering the VCR code) using the VCR
code.
Panasonic
TV Code
VCR Code
Tuner code
873
874
875
876
877
878
879
880
881
882
883
884
885
889
783
784
785
786
787
788
789
790
791
792
793
794
795
809
836
833
826
825
824
822
821
820
819
818
817
816
815
808
DiamondVision
TV Code
DVR Code
VCR Code
659
532
641
Remote Control Programming
The programming instructions included in this section are for the following remote control versions: 3.0, 3.1, 3.2, 4.0,
5.0, 5.2, 5.3, 6.0, 6.2, 6.3, 6.4, 8.0, 8.1, 10.1, 20.0, and 21.0. While these instructions work for the 20.0, and 21.0 remote
controls, there may be even easier options.
Changing the Remote Control Address
1.
Press SYSTEM INFO on the receiver’s front panel (or turn the receiver off and press CHANNEL UP). The System
Information screen displays. Notice the current Remote Address.
2. Press and hold the SAT mode button until all mode buttons light up, then release.
3. Use the NUMBER PAD to enter any number between 1 and 16, but not the one you saw in step 1.
4. Press POUND (#). If you entered the address correctly, SAT will flash three times.
5. Press RECORD. Make sure the Remote Address you see on the System Information screen is the same as the one
you entered in step 3. If it isn’t, the remote cannot control the receiver.
6. Press SELECT to close the System Information screen.
Reading Back the Codes
The following steps will help you determine the code programmed into a remote. If you need to replace the remote
control, use these steps to find out the codes for your new remote. Our example is for the TV, but VCR/DVD and AUX can
also be read back; see step 3 for details about the AUX mode code.
1.
Press and hold the TV mode button until all mode buttons light up, then release.
2. Press POUND (#) two times.
Remote Controls - Remote Control Programming
13 - 23
Remote Controls - Remote Control Programming
3. Begin to count the flashes—the mode button flashes a number of times for each digit of the device code, with a
pause between the groups of flashes. A quick flash is zero. If Limited Mode was programmed for a TV or VCR, the
mode button flashes once at the end of the flash sequence. For AUX mode, the first group of flashes tells you what
the AUX mode controls. A quick flash (0) before the three-digit code is for a TV, one regular flash is for a VCR/DVD,
and two flashes is for a tuner or amplifier. If a satellite receiver was operated using AUX mode, the AUX mode button
will flash the same number of times as the receiver’s address number.
Scanning for Device Code (Power Scan)
Use the steps below to scan the remote control’s memory for the code that operates the device (for example, TV).
1.
Turn the device on.
2. Press and hold the appropriate mode button on the remote control until all mode buttons light up, then release. The
mode button flashes.
3. FOR AUX MODE ONLY: Press 0 for a second TV, 1 for a second VCR or DVD, or 2 for a tuner or amplifier. Then
press the STAR/FORMAT (*) button.
4. Press POWER (not TV Power).
5. Press only UP ARROW (or just DOWN ARROW, but not both) repeatedly until the TV turns off—a new code is sent
each time you press the button.
6. Press POUND (#).
7.
Turn the device on and confirm the remote operates it.
Note: Power Scan may work faster if you first use the steps in Entering a Code Directly to enter code 500. If starting at
code 500, use only the UP ARROW during Power Scan, since code 500 is the bottom of the database. This tip is not
applicable to the 20.0 and 21.0 remote controls.
13 - 24
Limited Mode
Programming Limited Mode for TV
Limited Mode keeps the customer from accidentally changing the channel on their TV. When Limited Mode is enabled,
only the POWER, MUTE, and VOLUME buttons will work with the TV. The steps below show how to program Limited
Mode for a TV. You can also program Limited Mode for a connected VCR using the same procedure (use the VCR or
DVD mode instead of TV mode).
1.
Turn the TV on.
2. Press and hold the TV mode button until all mode buttons light up, then release.
3. Enter one of the three-digit codes for your TV model from the User’s Guide table. Or read back the TV code from the
remote control. See Reading Back the Codes.
4. Press 1 to program Limited Mode.
5. Press POUND (#).
6. Confirm that only the remote POWER, MUTE, and VOLUME buttons work with the TV.
Easy Limited Mode Setup
Only available in remote control models 3.2, some 5.2, 5.3, some 6.2, 6.3, 6.4, 20.0, and 21.0.
1.
Program the mode button with the device code (for example, TV mode).
2. Press and hold that MODE button until all four mode lights are lit, then release.
3. Press PAGE UP once.
4. Press POUND (#).
To remove Limited Mode on these remotes, follow the steps above, but press PAGE DOWN in Step 3, instead. This
procedure can be used on TV mode, VCR or DVD mode, and TVs and VCRs programmed into AUX mode.
Remote Controls - Remote Control Programming
13 - 25
Remote Controls - Remote Control Programming
Recover or
The customer uses Recover to restore satellite TV if they accidentally change the TV channel or video input. The remote
control must be programmed to operate the TV (and if used in-line, the VCR). The steps below describe how to use
Recover and how to program the RECOVER button on Remote Control 2 for TV2. You can also program RECOVER for a
connected VCR using the same procedure (use VCR or DVD mode instead of TV mode).
Using RECOVER
1.
Make sure the TV is on.
2. Press and hold RECOVER until all four mode buttons light up, then release. The SAT mode button flashes twice and
then all four mode buttons flash three times.
3.
Press RECOVER. Wait for the TV, VCR, or DVD mode button to flash once and then all four mode buttons to flash once.
4.
If you see the System Information screen, press SELECT to close the screen. You have recovered your satellite video.
5. If you do not see the System Information screen, repeat steps 3 and 4 until you do.
Programming RECOVER for Remote Control 2
1.
Program Remote Control 2 to control your TV.
2. Press and hold the TV mode button until all mode buttons light up.
3. Press STAR (*).
4. Enter your TV2 Agile channel using 3 digits (for example, 0-6-0 for Channel 60).
5. Press POUND (#).
13 - 26
Programming the Remote in AUX Mode
Programming a Second TV, Second VCR, Tuner or Amplifier
1. Press and hold the AUX mode button until all mode buttons light up, and then release.
2. Press 0 for a second TV, 1 for a second VCR, or 2 for a tuner or amplifier.
3. Enter one of the three-digit codes for your audio/video component from the User’s Guide table (or read the code
from another remote using the steps in the Reading Back the Codes).
4. Press 1 to program Limited Mode (recommended).
5. Press POUND (#).
6. Confirm that the remote buttons operate the device.
Programming a Second DISH Network Receiver
Only available in remote control models 3.2, 5.2, 5.3, 6.2, 6.3, 6.4, 20.0, and 21.0.
When you program the remote to control another receiver in AUX mode, the remote will send out IR and UHF (not UHF
Pro) signals to the receiver (IR only for the 3.2, 5.2, 5.3, 20.0 and 21.0). You can program the remote control to operate
any DISH Network receiver, except for the following:
• TV2 on DISH 322, ViP 222, ViP 622 DVR, ViP 722 DVR, ViP 722k DVR, and DISH Player-DVRs 522, 625, and 942
• DishPlayer 7100/7200
1. Using the receiver you want to control with the AUX mode button, open the System Information screen using the
receiver’s front panel button. Note the current remote address.
2. Press and hold AUX until all mode buttons light up, then release. AUX flashes.
3. Press 3.
4. Enter the two digit address you noted in step 1.
5. Press POUND (#). AUX blinks three times.
6. Press RECORD to make sure the address in the remote matches the address on the receiver.
Remote Controls - Remote Control Programming
13 - 27
Remote Controls - Remote Control Programming
Switching Between TV and Device Volume Control
Set the remote to control the AUX mode device’s (for example, tuner or amplifier) volume:
1.
Press and hold AUX until all mode buttons light up, then release. The AUX mode button flashes.
2. Press POUND (#).
3. Press the plus (+) side of VOLUME.
4. Press ZERO (0).
5. Press POUND (#). AUX flashes three times.
6. Press SAT.
7.
Press the plus (+) and minus (-) sides of VOLUME. The device’s volume changes and the AUX mode button lights up
when using VOLUME UP/DOWN instead of TV.
Set the remote to control the TV volume:
1.
Press and hold TV until all mode buttons light up, then release. The TV mode button flashes.
2. Press POUND (#).
3. Press the plus (+) side of VOLUME.
4. Press ZERO (0).
5. Press POUND (#). TV flashes three times.
6. Press SAT.
7.
Press the plus (+) and minus (-) sides of VOLUME. The TV’s volume changes and the TV mode button lights up
when using VOLUME UP/DOWN instead of AUX.
13 - 28
Discrete Codes For Learning Remotes
Sending Discrete Power On and Off
Remote control discrete power ON and power OFF IR commands are used by installers when programming macro
commands into learning remotes. Using an ON-only or OFF-only command is more effective than a toggle ON/OFF
command when trying to ensure the satellite receiver is reliably in one state or the other.
Most newer DISH Network remote controls support discrete power commands in satellite (SAT) mode using the remote’s
programmed address. To send discrete power commands to a learning remote, complete the following:
1. Program the DISH Network remote control to the desired remote address.
2. Hold the SAT mode button down until all mode buttons light up, then release.
3. Press POWER (not TV Power).
4. Press VOLUME UP to send the discrete power on command, or VOLUME DOWN to send the discrete power off
command.
5. Press any other button when done to end this procedure.
Teaching Learning Remotes
• The IR address from the learning remote must match the IR address of the receiver. For example, if the DISH Network
IR remote control used to teach the learning remote is set to address 4, the address of the receiver must also be set to
address 4.
• Because the DISH 811 & DISH Player-DVR 921 receivers include UHF Pro-only remote controls, both receivers
have a Teach Remote feature (available in the receivers’ menus), so that the UHF Pro remote can be used to tell the
receiver to blast IR commands out to a learning remote.
• IR commands from any of our past remotes (except 7100/7200) can be used to program an IR learning remote.
• The EZ Remote uses a broadcast IR address. A broadcast address can operate a DISH Network IR-capable receiver
regardless of the address the receiver is set to. Therefore, if an EZ Remote is used to teach a learning remote, it will
not matter what address the receiver is set to.
Remote Controls - Remote Control Programming
13 - 29
Remote Controls - Remote Control Programming
13 - 30
Extended Remote Control Addresses
Note: For all remotes except 20.0 and 21.0 which have an easier way to program these higher addresses.
The standard set of remote control addresses are 1 to 16. Extended remote control addresses provide the installer with
another group of addresses (17 to 31), to reduce the chance of remote control conflicts with nearby satellite receivers. For
example, some Multiple Dwelling Units (MDU) would be a possible application. To program a remote control to operate in
the extended range (17 to 31), use the following steps:
1.
Open the receiver's System Information screen using the front panel SYSTEM INFO button (or turn the receiver off
and press CHANNEL UP).
2. Hold the SAT mode button until all mode buttons light up, then release.
3. Press POUND (#) then press CHANNEL UP.
4. Choose an extended remote address (a number from 17 to 31), then subtract 16 from that address. Enter the result.
Extended Remote
Address
Step 5 Result
Extended Remote
Address
Step 5 Result
Extended Remote
Address
Step 5 Result
17
1
22
6
27
11
18
2
23
7
28
12
19
3
24
8
29
13
20
4
25
9
30
14
21
5
26
10
31
15
5. Press POUND (#). If the address was entered correctly, the SAT mode button flashes three times.
6. Press RECORD. Make sure the extended remote address you now see on the System Information screen is the
same as what you wanted in step 5 (17 to 31). If it isn’t, the remote cannot control the receiver.
Upgrading TV1 IR to UHF Pro
TV1 of all dual-tuner, two-TV satellite receivers can be operated using UHF Pro instead of infrared (IR) by purchasing a
replacement remote control kit. Follow the procedure (on this or the following page) for your particular receiver model to
make TV1 operate using a UHF Pro remote control.
Note: See the 20.0 and 21.0 remote controls.
For ViP222, ViP622 DVR, ViP722 DVR, and DISH Player-DVR 942
1.
Purchase a 6.3 or 6.4 replacement remote control.
2. Locate the key/side with the green UHF Pro logo and black 1.
3.
Remove the battery cover, remove the blue 2 UHF Pro key from the replacement remote control, and then insert the green key.
4. Display the receiver's System Information screen using the front panel SYS INFO button.
5. Press RECORD on the replacement remote control. The Primary Remote Address listed in the System Information
screen will change from “IR” to “IR/UHF Pro.”
For More Information
• 6.3 or 6.4 Replacement Remote Control Kit User's Guide
• Replacement Remote Control Selection Guide
Kit Part Number Information
• 6.3 Replacement Remote Control Kit, 149714
(or 6.4 Replacement Remote Control Kit, 156926)
Remote Controls - Remote Control Programming
13 - 31
Remote Controls - Remote Control Programming
Upgrading TV1 IR to UHF Pro (Continued)
For DISH 322, DISH Player-DVR 522, and DISH Player-DVR 625
1.
Purchase a replacement remote control.
a. For the 322, use the 4.0 Kit.
b. For the 522 and 625, use the 6.3 Kit.
2. Locate the key/side with the green UHF Pro logo and green 1.
3.
Remove the battery cover, remove the blue 2 UHF Pro key from the replacement remote control, and then insert the green key.
4.
Use the original TV1 remote to open the TV1 UHF Pro Setup screen (MENU 6-1-8 for 322; MENU 6-1-6 for 522 and 625).
5. Select Enable, then select the System Info option to view the System Information screen.
6. IMPORTANT: Press CHANNEL UP on the original TV1 remote to highlight the TV1 remote address area.
7.
Press RECORD on the replacement remote control. The Primary Remote Address listed in the System Information
screen will change from “IR” to “UHF Pro” (or “UHF Pro and IR”).
For More Information
• 3.0, 3.1, 3.2 & 4.0 Replacement Remote Control Kit User's Guide
• 6.3 or 6.4 Replacement Remote Control Kit User's Guide
• Replacement Remote Control Selection Guide
Kit Part Number Information
• 4.0 Replacement Remote Control Kit, 128579
• 6.3 Replacement Remote Control Kit, 149714
(or 6.4 Replacement Remote Control Kit (late 2008), 156926)
13 - 32
Upgrading TV1 IR to UHF Pro (Continued)
For ViP 222k and ViP 722k
Through the System Information screen:
1.
Purchase a replacement remote control
a. For the ViP 222k and ViP722k use the 21.0 kit.
2. Flip the key to TV1.
3. Change the switch in the battery compartment to UHF.
4. Access the System Info screen via the front panel button.
5. (Optional) Address the remote to the preferred remote address
6. Press RECORD
7.
Confirm the address entered is displayed on screen and TV1 now shows UHF Pro.
Using the Wizard:
1.
Purchase a replacement remote control
a. For the ViP 222k and ViP722k use the 21.0 kit.
2. Flip the key to TV1.
3. Change the switch in the battery compartment to UHF.
4. (Optional) Address the remote to the preferred remote address
5. Hold down the 0 button until the Wizard appears.
6. Follow the on screen instructions.
Remote Controls - Remote Control Programming
13 - 33
Remote Controls - SAT Auto-Tune
SAT Auto-Tune
• The SAT Auto-Tune feature on newer DISH Network remote controls provides the ability to send the correct TV
channel for viewing satellite TV when the SAT mode button is pressed. This feature helps customers by ensuring they
are on the correct channel and helps CSRs and installers to quickly solve problems.
• The SAT Auto-Tune feature on newer DISH Network remote controls lets an installer or CSR program into the remote
control the correct TV channel used for satellite viewing. When the SAT button is pressed, the remote sends that
channel to the TV. Most snowy, blue, or black screen issues occur because the customer is on the wrong channel,
especially on TV2, and the use of SAT Auto-Tune helps prevent that issue from occurring.
• To use SAT Auto-Tune, first program the remote to operate the TV, then program in the correct channel for the TV,
and finally enable SAT Auto-Tune (for 5.3 and 6.3 remote controls).
Setting SAT Auto-Tune Channel
Note: These steps can also be used to change the channel used for SAT Auto-Tune.
1.
Program the remote control to operate the TV.
2. Press and hold TV until all four mode buttons are lit.
3. Press and STAR (*), then enter the channel used for viewing satellite TV. For example, if the TV needs to be on
channel 60, enter *60.
4. Press POUND (#). The TV button flashes three times to indicate programming was successful.
13 - 34
Enabling SAT Auto-Tune
1.
Press and hold SAT for three seconds until all four mode buttons are lit.
2. Press STAR (*), the press VOLUME UP.
3. Press POUND (#). The SAT button flashes three times to indicate SAT Auto-Tune was enabled.
Disabling SAT Auto-Tune
1.
Press and hold SAT for three seconds until all four mode buttons are lit.
2. Press STAR (*), then press VOLUME DOWN.
3. Press POUND (#). The SAT button flashes three times to indicate SAT Auto-Tune was disabled.
Removing SAT Auto-Tune Channel
1.
Press and hold TV until all four mode buttons are lit.
2. Press STAR (*), then enter 00.
3. Press POUND (#). The TV button flashes three times to indicate programming was removed.
Remote Controls - SAT Auto-Tune
13 - 35
Remote Controls - SAT Auto-Tune
Compatible Remote Controls
•
•
•
•
•
•
5.3 IR*
5.4 IR
6.3 IR/UHF Pro*
6.4 IR/UHF Pro
20.0 IR
21.0 IR/UHF Pro
Considerations
• SAT Auto-Tune is disabled by default on the 5.3 and 6.3 remote controls.
• SAT Auto-Tune is enabled by default on the 5.4, 6.4, 20.0, and 21.0 remote controls.
• For SAT Auto-Tune to function correctly, the correct channel for the installation must be
programmed into the remote using the steps under Setting SAT Auto-Tune Channel.
• SAT Auto-Tune can only send a channel to the TV, not an input. Because of this, SAT AutoTune is most useful for TV2. If used for TV1, channel 3 or 4 should be programmed using the
steps under Setting SAT Auto-Tune Channel.
• The TV channel programmed for SAT Auto-Tune is also the channel that will be sent to the
TV if the RECOVER button is used. The steps in Setting SAT Auto-Tune Channel can also be
used in VCR mode to program the channel sent to a VCR during the Recover process.
*Earlier versions of the 5.3 and 6.3 remotes (part numbers 142301, 142037, and 143129) do not
support SAT Auto-Tune
13 - 36
Two-Way Remote Controls (20.0 and 21.0)
The two-way remote controls (Models 20.0 for IR, and 21.0 for UHF Pro/IR convertible) provide many benefits, including:
• A “System Wizard” used during installation (or for replacement receivers) provides quick and easy remote control and
receiver setup. Press and hold 0 to activate.
• Two-way communication between the receiver and the remote control.
–– The receiver stores remote control information to update replacement remote controls, and the remote control
stores receiver information to update a replacement receiver.
–– The receiver detects if the wrong remote control is being used.
• The remote can “learn” codes from another device’s remote control (for example, a TV or DVD player), and add those
codes to the remote control.
• Easy extended remote address entry: for codes 1 to 28, simply press and hold SAT until all the mode lights are lit,
enter the number, and then press POUND (#).
• No keys are used to change the remote to operate via IR or UHF Pro. Uses a switch inside the battery compartment.
Note: these remotes cannot output legacy UHF.
Considerations
• The typical ways to program the remote control such as address and device codes, Limited Mode, and Recover will
work with these remote controls.
• Mode lights flashing after pressing and holding SAT indicates a low-battery condition.
Remote Controls - Two-Way Remote Controls (20.0 and 21.0)
13 - 37
Remote Controls - Two-Way Remote
13 - 38
Two-way remote controls can use the System Wizard on compatible receivers to make troubleshooting and replacing the
receiver or remote control easier than ever.
To open the System Wizard, press and hold “0” (zero) on the remote control. Note: Any compatible remote control can be
used to open the System Wizard on a compatible receiver.
Compatible Remote Controls
Compatible Receivers
• 20.0 IR
• ViP® 222k
• 21.0 IR/UHF Pro
• ViP® 722k
The System Wizard has four components: Pairing Confirmation, Settings Backup, Restore Receiver, and Restore
Remote.
Pairing Confirmation
If the remote control used to open the System Wizard is not recognized by the receiver (for example, it might be paired
with another receiver in the home, or might be a replacement remote control), the System Wizard offers the opportunity to
pair the new remote with that receiver (see Figure A).
Settings Backup
Settings Backup (Figure B) provides an opportunity to store the receiver’s settings (see list below in Replacement
Receiver) into the remote, and store the remote control’s settings (see list below in Replacement Remote) into the
receiver. Storing settings provides a quick and easy installation later if the receiver or remote control need to be replaced.
Replacement Receiver
The Replacement Receiver option is used when a replacement receiver is brought into the home. The remote used with
the original receiver can restore most of the receiver settings, to make installations easier (Figure C). The remote must
have already stored the original receiver’s backup information prior to being used to update the replacement receiver (see
Settings Backup).
Remote Controls - Two-Way Remote
13 - 39
Remote Controls - Two-Way Remote
System Wizard for Two-Way Remotes (Continued)
Settings from the receiver include (for both TV1 and TV2):
• Timers: Timers list, minutes early and l • ate, hide/show skipped.
• Parental Controls: ratings locks, channel locks, PPV lock status, Hide Adult, Hide Locked, Front Panel Lock.
• Preferences: Guide display, Channel Order, and selection popup; Favorites lists; Audio Language; nightly update time;
user mode, Record Plus, Shared View; Inactivity Standby; Mode Reminder.
• Closed Captioning: on/off, font and font size, colors, edge style, service, opacity.
• Additional Settings: Caller ID; phone system prefix digits and dial type; Modulator mode and channel, Ch. 3-4
modulator channel; TV Enhancements; Dolby setup and mode;
• HDTV setup: analog type, TV type, and aspect ratio; DVR sort order.
Replacement Remote
The Replacement Remote option is used when a replacement remote control is brought into the home. The receiver
currently in the home can restore the remote’s device codes, name, and address settings, to make installations easier.
The receiver must have already stored the original remote’s backup information prior to being used to update the
replacement remote control (see Settings Backup).
13 - 40
Using the System Wizard
Opening the System Wizard
1.
Press and hold “0” (1. zero) on the remote control. Note: If you move the remote control, or the IR sensor on the
receiver is blocked, you will get an error message.
2. System Wizard opens.
Pairing Confirmation
1.
Access the System Wizard
2. If remote is paired already, A screen will pop up confirming this. Select Continue to return to programming.
Note: from this screen you can select Advanced to back up settings, or Restore Remote or Restore Receiver.
3. If the remote is not paired, a screen will appear asking you to confirm settings and select continue to pair the remote
control to the receiver.
4. Select Continue
5. If you need to change settings, for example to TV1 UHF Pro, select Reconfigure.
6. The Setup is Complete screen appears
7.
Select Continue to return to programming
Remote Controls - Two-Way Remote
13 - 41
Remote Controls - Remote Control Programming
13 - 42
Using the System Wizard (Continued)
Remote and Receiver Backup
Remote or Receiver Restoration
1.
1.
Access the System Wizard
2. Remote pairing screen will appear.
3. Select Advanced, the options screen will appear.
Access the System Wizard.
2. On the Warning Screen that appears, select
Continue.
4. Select “Back up my settings”.
3. A screen will appear with instructions on how to
proceed. Select Continue.
5. Select Next, the back up options screen will appear.
4. A transferring data message will appear.
6. Select Full System Backup. This screen also has
“Back up receiver settings” or “Back up remote
settings”.
5. A screen summarizing the settings to be changed will
appear, select Continue.
7.
Select Next, the progress screen will appear. If
there are any problems a pop up will appear with
suggestions on how to resolve errors.
8. The Complete screen will appear.
9. Select Continue to return to programming.
6. A progress bar and screen indicating that the settings
are being transferred displays. If there are any
problems a pop up will appear with suggestions on
how to resolve errors.
7.
After settings are transferred, a Setup is complete
screen will appear, from here select Continue to exit
out to programming.
Remote Control Audio/Visual Restoration Table
DISH Network remote controls have many features to enhance customers’ viewing experience. Being able to select the
most beneficial feature(s) to setup and discuss them with your customers is key to improving their satellite TV enjoyment.
Use the table on the following pages to select which feature(s) to enable, configure and educate your customers on,
based on the Audio/Video connections used.
Dual Tuner Receiver Installation
Setup and Education Action
SAT Auto-Tune
Recover
Limited Mode
TV1 viewing location
Customer has a SD Receiver and connects with:
Coax Connection
X
X*
RCA Connection
X
X*
S-Video Connection
X
X*
Customer has a HD Receiver and connects with:
Coax Connection
X
X*
Component
X
X*
DVI/HDMI
X
X*
TV2 viewing location
TV2 Home Distribution
X
X*
* Enable Limited mode if customer is NOT able to manually recover from A/V loss
AV Restoration Table
13 - 43
Remote Controls - Remote Control Programming
13 - 44
Single Tuner Receiver Installation
Setup and Education Action
SAT Auto-Tune
Recover
Limited Mode
TV1 viewing location
Customer has a SD Receiver and connects with:
Coax Connection
X
X*
RCA Connection
X
X*
S-Video Connection
X
X*
Customer has a HD Receiver and connects with:
Coax Connection
X
X*
Component
X
X*
DVI/HDMI
X
X*
* Enable Limited mode if customer is NOT able to manually recover from A/V loss
Remote Control Operation Tips
Remote Antenna
The remote control antenna MUST be connected to the REMOTE ANTENNA port on the back panel of each applicable
receiver for proper UHF and UHF Pro remote/receiver operation.
UHF Pro Remotes
• UHF Pro technology is not compatible with UHF technology. A UHF Pro receiver cannot be controlled using the UHF
signal from a UHF remote, and a UHF receiver cannot be controlled by the UHF Pro signal of a UHF Pro remote.
• For UHF Pro remotes with an A/B switch inside the battery compartment: If you use a UHF Pro remote near another
UHF Pro remote on the same frequency (for example, another receiver in the home, or a neighbor has one), selecting
the other band tells the remote to use a different remote frequency, and eliminates conflicts with the other remote
control(s). DISH 322, DISH 811, and DISH Player-DVRs 522, 625, and 921 will not operate with Band B.
• For 20.0 and 21.0 remotes: There is an IR and UHF (UHF Pro) switch to assign to the TV1 and TV2 remote controls.
Dual-Tuner Receivers
• TV1 of dual-tuner, two-TV receivers, except the 922, can be configured to accept either IR or UHF Pro commands. A
TV1 UHF Pro key must be installed in the remote (not for 20.0 and 21.0 remotes—see information in section above).
Use the replacement remote's User’s Guide to ensure the correct TV1 UHF Pro key is used (DISH 322s, and DISH
Player-DVRs 522 and 625 use a different key than other receiver models).
• TV2 of dual-tuner, two-TV receivers is UHF Pro ONLY. To operate TV2 via IR, see TV2 IR Converter.
• The TV2 remote control for dual-tuner, two-TV receivers can be configured for use as an IR remote control for TV1 or
as a UHF Pro remote control for TV2 (the TV2 remote ships with the blue UHF Pro key installed).
Remote Controls - Remote Control Operation Tips
13 - 45
Remote Controls - UHF/UHF Pro Remote Control Reception Tips
UHF/UHF Pro Remote Control Reception Tips
• Make sure the satellite receiver’s remote control antenna and tip are away from metal objects, wiring, and electronics
(such as DVD players) located on a shelf above or below the satellite receiver. The remote control antenna should be
angled away so the tip is separated from the electronics by a couple of inches, if possible. Also, shifting the position of
the satellite receiver on the shelf may help.
• It may help to move the remote control antenna away from the back of entertainment center wiring and other
electronics using a length of RG-6 cable (3 to 5 feet).
• A 6 to 15 dB F-connector attenuator can be installed between the REMOTE ANTENNA port and the remote control
antenna to improve performance in certain circumstances. This works best for distances of up to approximately 75
feet within a residence.
• Combining the RG-6 cable extension with the attenuator may be necessary if the prior steps are not effective.
• If the previous tips do not help, or in cases of extreme distance or excessive obstructions between the receiver and
the distant TV location, review TIB number 144445 for additional steps to extend the remote control range (available
on the Retailer Care Site > Info Center Service, Hardware and Technology > Technical Information Bulletins (TIB)).
13 - 46
Extending UHF and UHF Pro Remote Control Range
This section provides ways of extending UHF and UHF Pro remote control range to make remote controls work reliably in
difficult installations, where attempts to improve remote control range have been unsuccessful using easier methods.
The solutions shown use additional approved parts to “back-feed” the remote control antenna onto the same cable as
the HOME DISTRIBUTION (CH 21-69 or 73-125) Out or CH 3-4 Out for the distant TV location. This allows the remote
control antenna to be placed in the room with the TV, extending the range of the UHF or UHF Pro remote control.
Installation Diagrams
The following installation diagrams are the approved configurations for extending the UHF and UHF Pro remote control
range. Choose the diagram that best matches your installation and follow it closely.
Note: If an over-the-air antenna is installed, the remote control signal cannot be combined onto the same cable as the
over-the-air signal.
Extending UHF and UHF Pro Remote Control Range
13 - 47
Extending UHF and UHF Pro Remote Control Range
Diagram 1:
Dual-tuner, two-TV receiver with remote control antenna combined with HOME DISTRIBUTION (Ch 21-69 or 73-125)
output.
13 - 48
Diagram 2:
Single-TV receiver with UHF or UHF Pro Remote Control and remote control antenna combined with CH 3-4 output .
Extending UHF and UHF Pro Remote Control Range
13 - 49
Extending UHF and UHF Pro Remote Control Range
Diagram 3:
Dual-tuner, two-TV receiver with remote control antenna, HOME DISTRIBUTION (Ch 21-69 or 73-125) output, and
Satellite In combined on a single cable.
13 - 50
Diagram 4:
Dual-tuner, two-TV receiver with remote control antenna combined with HOME DISTRIBUTION (Ch 21-69 or 73-125)
output. Over-the-Air antenna and Satellite In combined using diplexers on a separate cable.
Extending UHF and UHF Pro Remote Control Range
13 - 51
Extending UHF and UHF Pro Remote Control Range
Diagram 5:
Single-TV receiver using IR-UHF Pro or IR-UHF Upgrade Kit and remote control antenna combined with CH 3-4 output.
13 - 52
UHF Remote Interference
If an approved external device is connected to a DISH Network ViP receiver and you notice degradation in the response
of the receiver to the UHF remote control, try the following steps, in the order presented, to correct the issue.
After performing each step, try using the remote again to see if operation has improved.
1.
Placement and Cables
Placement:
External devices should not be placed on top of the receiver, as close proximity can cause UHF remote interference.
Move the external device away from the receiver and the UHF remote antenna connection points.
•
•
•
•
Increase the separation between the receiver and the external device
Place the device on a separate shelf from the receiver
Place the Sling Adapter flat on the rubber feet off to the side of the receiver
Do not position an accessory so that it will block the ventilation openings on the receiver
As a general rule, the further apart you can get the attached device and the UHF antenna the better.
USB Extension Cables:
Sling Adapter and External Hard Drive:
• USB extension cables can increase interference if used on a Sling Adapter or an external hard drive
–– Do not use USB extension cable with these devices
• Wi-Fi Adapter
–– The USB extension cable can be used with the Wi-Fi Adapter
–– One USB extension cable is included with the device
UHF Remote Interference
13 - 53
Remote Controls - Remote Control Programming
2. Change the frequency band for the UHF remote control to use UHF Pro Band B as follows:
• On a 6.3 or 6.4 remote control:
–– Remove the battery cover and slide the small switch inside the compartment to position B, changing the transmitted
RF characteristics of the remote control
–– Replace the battery cover and re-link the remote with the receiver using the System Information screen
–– See the Remote Control User Guide for detailed instructions
• On a 21.0 remote:
–– Select an even-numbered remote address (for example, address 2, 4, or 6) which sets this remote to Band B and
re-link the remote with the receiver using the System Information screen
–– See the Remote Control User Guide for detailed instructions
–– Note: This step does not apply to ViP211 or ViP211k receivers. It applies to the ViP612 DVR receiver only if a UHF
remote control is being used
3. UHF Remote Antenna
Move the UHF antenna away from the externally connected device and the receiver using a UHF remote-antenna
extension cable
–– Use a coaxial jumper cable to relocate the antenna
–– RG-6 or RG-59 cable
–– This jumper should be four to six feet in length
–– Use a barrel connector to attach the UHF antenna to the jumper
• You may need to try several locations for the UHF remote antenna to find the one that works best in your installation
–– Route the cable and place the antenna in such a way that it is aesthetically pleasing to the customer
–– Remember when relocating the UHF antenna to be careful not to damage the customer’s furnishings
13 - 54
4. USB Port
• If an external device is connected to the USB port on the receiver’s rear panel, try plugging the device into the frontpanel USB port instead
–– Make sure the IR sensor on the front of the receiver is not blocked
5. Customer Education
–– Educate the customer on the actions you have taken to improve their Remote Control’s operation
–– Inform the customer that the interference could re-occur if they rearrange the devices
6. If none of these actions corrects the problem, refer to your manager.
Remote Control Technology By Receiver
Features
ViP211,
TV1
ViP211k,
ViP222, ViP222k, ViP622,
301, 311, 411
ViP722, ViP722k, 322,
522/625, 942
TV2
ViP222, ViP222k, ViP622,
ViP722, ViP722k, 322,
522/625, 942
ViP 612,
811, 921
501, 508,
510, 721
Receives IR
Yes
Yes
No***
Yes
Yes
Receives UHF
No
No
No
No
Yes
Receives UHF Pro
No*
Yes**
Yes
Yes
No
*The IR-to-UHF Pro Upgrade Kit can be purchased to provide remote control operation from a distance.
**TV1 can be controlled by UHF Pro when using the applicable replacement remote control with the correct TV1 UHF Pro key installed.
***TV2 can be controlled by IR when a TV2 IR Converter is used.
Remote Controls - UHF/UHF Pro Remote Control Reception Tips
13 - 55
Remote Controls - UHF/UHF Pro Remote Control Reception Tips
13 - 56
Remote Control Replacements
These replacement options represent the current best choice (for product compatibility and providing the latest device
database). Information subject to change without notice.
Receiver Model
111
211, 211k, 411
Replacement Remote Part Number
1.5 Non-database
120714*
5.3 Kit or 5.4 Kit (late
2008)
150031*
159120*
301, 311
3.2
142923
322
4.0
128579
222, 381, 501,
508, 510, 522,
622, 625, 721,
722, 921, 942
6.3 Kit or 6.4 Kit (late
2008)
149714
156926
612
6.3 Silver UHF Pro or
6.4 Kit (late 2008)
157739*
156926
21.0 Kit
161256
ViP222k,
ViP722k
Receiver Model
1000, 2700,
2800
Replacement Remote Part Number
1.5 Non-database
2000
120714*
1.5 UHF
120415
3.2
142923
4000,
4700/4900, 5000
1.5 UHF
120415
6000
1.5 UHF
120725*
7100/7200
7100/7200 IR
137950*
JVC-DVHS (IRR)
JVC IRR UHF
120874*
3000, 3700,
3800/3900
*Only available through Service
*Only available through Service
The 6.3 and 6.4 Kit includes a configurable remote and five keys:
• Silver IR/black 1 green TV1 UHF Pro
• Black 2 blue TV2 UHF Pro with black IR-UHF
• Green 1 green TV1 UHF Pro with black IR-UHF
(installed with blue TV2 showing)
• Green 1 green TV1 IR with black 1 green TV1 UHF Pro
• Silver UHF Pro with black IR-UHF
IR-to-UHF Pro Upgrade Kit
The IR-to-UHF Pro Upgrade Kit lets you use an ultra-high frequency (UHF) remote to control an infrared (IR) DISH
Network satellite TV receiver from much farther away than is possible with an IR remote control, even through walls that
lock IR signals.
Kit Includes:
• 10.1 UHF Pro remote control
• Converter
• IR extender cable and clip
• AC adapter
• UHF Antenna
• Batteries
IR-to-UHF Pro Upgrade Kit
• Part number 137682
• 10.1 remote only: part number 146361
(Back)
Remote Controls - IR-to-UHF Pro Upgrade Kit
13 - 57
Remote Controls - IR-to-UHF Pro Upgrade Kit
Compatible Receivers
The remote control/converter combination included in the IR-to-UHF Pro Upgrade kit works only with compatible DISH
Network receivers. Compatible DISH Network receivers include all models except 4000, 5000, JVC-DVHS(IRR), and
DISHPlayer 7100/7200.
Remote Control
• The 10.1 has a configurable key to provide a choice between two communication frequencies.
• The communication frequencies used by the remote in this kit are different than other DISH Network UHF Pro remote
controls, to help avoid remote conflicts.
Installation Considerations
• Ensure the switch setting on the back of the converter matches the color of remote control key you are using. If you
are using the 8.1 remote control from the original kit, move the switch to the black key position.
• Use the IR extender cable to ensure IR reception from the converter to the receiver.
• If you are experiencing interference from other sources and you're using a 10.1 remote control, try the other frequency
by flipping the key to the other side and moving the converter switch.
• Because of the remote’s unique frequencies, the converter must be used to operate a compatible DISH Network
receiver—the remotes cannot be used alone.
• Although the 10.1 remote looks like a 6.3 remote, it does not have the easy Limited Mode programming option, the A/B
band switch or the increased code database.
For more information: IR-to-UHF Pro Upgrade Kit User's Guide.
13 - 58
TV2 IR Converter
The TV2 IR Converter provides a convenient way to control dual-tuner satellite receivers from a distant location via
infrared (IR). Applications include control of TV2 for:
•
•
•
•
IR learning/universal remote controls
UHF Pro conflicts
Sling Media products
Multi-dwelling units with UHF Pro remote control conflicts from neighbors.
Switches on the unit provide control of TV1 or TV2, and a choice of UHF Pro Band A or Band B. The 2.5mm stereo jack
override port is used so a Slingbox can control TV2. Compatible receivers include: DISH 322, DISH Player-DVRs 522 &
625, ViP 222, ViP222k, ViP 612 DVR, ViP 622 DVR, ViP 722 DVR, and ViP 722k DVR.
Part number: 161403. For more information: TV2 IR Converter Installation Instructions.
Example Installation at TV2 Location
Diplexer
Diplexer
2-Way
Splitter
DP Plus
IR
Separator
Converter
REMOTE
ANTENNA
SATELLITE
IN
HOME DISTRIBUTION
OUTPUT
HDMI
TV1 OUT
Dual-Tuner
Satellite Receiver
IR
Sensor
Remote Controls - TV2 IR Converter
IR Signal
13 - 59
Remote Controls - TV2 IR Converter
Remote Control Troubleshooting
Description Procedure
The remote 1.
control
does not
2.
operate
the satellite
receiver.
Verify the remote is in SAT mode. Press SAT then the GUIDE button to see if the
Program Guide is displayed.
Verify the remote you are using is the correct remote for the location. If you are
troubleshooting a dualtuner, two-TV receiver, TV1 remote has a green key, and TV2 remote has a
blue key. For other receivers, refer to Receivers to verify you have the correct remote. DISH PlayerDVRs 522 and 625 use the green 1 UHF Pro key; other receivers use the black 1 UHF Pro key.
3. Verify the remote has fresh batteries. Try pressing the SAT button. If it does not light up, or the
receiver displays Low Batteries in the information banner, you may need to change the batteries.
4. Verify the batteries are installed according to the diagram in the battery compartment.
5. If the UHF Pro remote control has an A/B switch next to the battery compartment, ensure the switch
is not set to B for DISH 322, DISH 381, and DISH Player-DVRs 522, 625, and 921.
13 - 60
Description
Procedure
The remote
control does
not operate
the satellite
receiver.
6. Open the System Info screen (refer to the receiver’s User Guide). Look at the
Remote Address field, and press the remote control’s RECORD button.
Exit the System Info screen, then test to see if the remote operates the receiver.
7.
For IR remotes, verify there is no IR interference. Point the remote control directly at
the receiver and try to operate it. Be sure there are no solid objects in the way, or lights shining
directly on the front of the receiver.
Turn off florescent lights in the room to reduce the chance of interference, then try to operate the
receiver.
8. For UHF and UHF Pro receivers, verify the remote control antenna is connected to the REMOTE
ANTENNA port on the back panel of the satellite receiver, and is not touching any other
equipment.
Try moving the antenna. Review UHF/UHF Pro Remote Control Reception Tips.
9. Perform a front panel reset by pressing and holding the POWER button on the front panel of
the receiver for five seconds. If the problem continues, turn the receiver off, unplug it from the
electrical outlet and wait 30 seconds, then plug it back in. Turn the receiver back on and see if
the remote control operates the receiver.
10. Some LCD TVs can cause interference with the IR remote control signal. This can be resolved
by using UHF instead of IR. See Upgrading TV1 to UHF Pro for more information.
Remote Controls - TV2 IR Converter
13 - 61
Remote Controls - TV2 IR Converter
The remote control does
not operate the satellite
receiver.
1.
Verify the remote is in the correct mode for that device. Press the MODE button for
the device you are trying to control.
2. Verify the remote has fresh batteries. Try pressing the SAT button. If it does not light
up, or the receiver displays Low Batteries in the information banner, you may need
to change the batteries.
3. Using the manufacturer’s codes for that device from the receiver or remote control’s
User’s Guide, try re-programming the remote to the device. If you are unable to
13 - 62
The available keys are shown and explained in the following chart. It’s important to note that the 6.2/6.3/6.4 tabs are not
interchangeable with 4.0/6.0 tabs. So in the instance where a customer receives a 6.4 tab to replace their 6.0 tab, they
can not use the original tab on the new remote.
Receivers
211, 211k, 411,
222, 322, 522,
625 TV1
222, 222k,
322, 522, 625
622, 722, 722k, only TV1
only TV1
222, 522, 622,
625, 722, TV2
501, 508, 510
Color
Green key with
green 1
Green key with
black 1 and
UHF Pro icon
Green key with
black 1 and
UHF Pro icon
Blue key with
black 2 and
UHF Pro icon
Black key with
UHF icon
Silver key with
UHF Pro icon
SAT mode
Sends Out:
IR
UHF Pro only
UHF Pro only
UHF Pro only
UHF & IR
UHF Pro only
SAT In AUX
Mode
Sends Out:
IR
UHF & IR
UHF & IR
UHF & IR
UHF & IR
UHF & IR
• The tabs can be broken down into the following:
• TV1 IR: Used for any IR configuration.
• TV1 UHF Pro: Used for TV1 of duo receivers when there is something preventing an IR remote from working orrectly;
this can include instances of IR interference or a customer having the receiver in a different room from the TV. There
are two different
Remote Troubleshooting
13 - 63
Remote Troubleshooting
• TV1 UHF Pro tabs. Green ‘1’ and UHF Pro Icon: This tab should be used for setting up TV1 UHF Pro on a 322, 522
or 625 only. This tab sends out the same signals as a TV2 tab, relying on the receiver’s TV1 UHF PRO Setup to
recognize it as a TV1 command.
• Black ‘1’ and UHF Pro Icon: Used for setting up TV1 UHF on VIP Duo receivers. No menu setup is required.
• TV2 UHF Pro: Used to program a remote for TV2 on any Duo receiver.
• UHF Pro: Used for any uhf pro receiver. This should normally be used for UHF Pro solo receivers, but can also be used
for duo receivers; this should be avoided so as to prevent confusion stemming from the lack of numbers on the tab.
• IR/UHF: Used for receivers that support UHF rather than UHF Pro. With this tab, the remote sends out both UHF and IR
signals in satellite mode. This allows the remote to be used with any IR receiver if we are unable to locate the TV1 IR tab.
Remote A/B Switch Overview
• The internal A/B switch allows selection between two frequencies to help in instances of UHF interference; this can
include conflicts with another UHF Pro remote or UHF interference in general. The A/B toggle is located in the battery
compartment of the remote control.
• Band A: In band A, the remote uses the 369.5 MHz frequency for TV1, while using 375.3 MHz for TV2. This is the
band of UHF Pro recognized by all Dish Network UHF Pro receivers. With 21.0 remotes, odd remote addresses use
band A. For this reason, when addressing a remote to a non-VIP receiver we need to ensure the switch is in the ‘A’
position or if we are using a 21.0 remote we need to ensure we use an odd remote address.
• Band B: In band B, the remote uses the 394.3 MHz frequency for TV1, while using 388.3 MHz for TV2. With 21.0
remotes, even remote addresses use band B. This band is only recognized by VIP series receivers.
13 - 64