1
reference
guide
hp StorageWorks
fabric OS version 3.1.x/4.1.x
Product Version: 3.1.x and 4.1.x
Third Edition (June 2003)
Part Number: AA–RS24C–TE
This reference guide provides a detailed description of the Fabric OS commands. Although this
guide is primarily about 4.1.x, it also covers 3.1.x that runs on the StorageWorks SAN Switch
2/16, 2/16 power pak, 2/8-EL, and 2/8 power pack switches.
© Copyright 1999-2003 Hewlett-Packard Development Company, L.P.
Hewlett-Packard Company makes no warranty of any kind with regard to this material, including, but not limited to,
the implied warranties of merchantability and fitness for a particular purpose. Hewlett-Packard shall not be liable for
errors contained herein or for incidental or consequential damages in connection with the furnishing, performance,
or use of this material.
This document contains proprietary information, which is protected by copyright. No part of this document may be
photocopied, reproduced, or translated into another language without the prior written consent of Hewlett-Packard.
The information contained in this document is subject to change without notice.
BROCADE, the Brocade B weave logo, Brocade: the Intelligent Platform for Networking Storage, SilkWorm, and
SilkWorm Express, are trademarks or registered trademarks of Brocade Communications Systems, Inc. or its
subsidiaries in the United States and/or in other countries.
Java™ is a U.S. trademark of Sun Microsystems, Inc.
Microsoft®, Windows®, and Windows NT® are U.S. registered trademarks of Microsoft Corporation.
UNIX® is a registered trademark of The Open Group.
Hewlett-Packard Company shall not be liable for technical or editorial errors or omissions contained herein. The
information is provided “as is” without warranty of any kind and is subject to change without notice. The warranties
for Hewlett-Packard Company products are set forth in the express limited warranty statements for such products.
Nothing herein should be construed as constituting an additional warranty.
Printed in the U.S.A.
Fabric OS Version 3.1.x/4.1.x Reference Guide
Third Edition (June 2003)
Part Number: AA–RS24C–TE
contents
Contents
About this Guide. . . . . . . . . . . . . . . . . . . . . . . . . . . . . . . . . . . . . . . . . . . . . . . . . . .15
Overview. . . . . . . . . . . . . . . . . . . . . . . . . . . . . . . . . . . . . . . . . . . . . . . . . . . . . . . . . . . . . . . . . 16
Intended Audience . . . . . . . . . . . . . . . . . . . . . . . . . . . . . . . . . . . . . . . . . . . . . . . . . . . . . . 16
Related Documentation . . . . . . . . . . . . . . . . . . . . . . . . . . . . . . . . . . . . . . . . . . . . . . . . . . 16
Conventions . . . . . . . . . . . . . . . . . . . . . . . . . . . . . . . . . . . . . . . . . . . . . . . . . . . . . . . . . . . . . . 17
Document Conventions . . . . . . . . . . . . . . . . . . . . . . . . . . . . . . . . . . . . . . . . . . . . . . . . . . 17
Text Symbols . . . . . . . . . . . . . . . . . . . . . . . . . . . . . . . . . . . . . . . . . . . . . . . . . . . . . . . . . . 17
Getting Help . . . . . . . . . . . . . . . . . . . . . . . . . . . . . . . . . . . . . . . . . . . . . . . . . . . . . . . . . . . . . . 19
HP Technical Support . . . . . . . . . . . . . . . . . . . . . . . . . . . . . . . . . . . . . . . . . . . . . . . . . . . 19
HP Storage Website . . . . . . . . . . . . . . . . . . . . . . . . . . . . . . . . . . . . . . . . . . . . . . . . . . . . . 19
HP Authorized Reseller . . . . . . . . . . . . . . . . . . . . . . . . . . . . . . . . . . . . . . . . . . . . . . . . . . 20
1
Fabric OS Commands . . . . . . . . . . . . . . . . . . . . . . . . . . . . . . . . . . . . . . . . . . . . . . .21
agtcfgDefault . . . . . . . . . . . . . . . . . . . . . . . . . . . . . . . . . . . . . . . . . . . . . . . . . . . . . . . . . . . . . 22
agtcfgSet . . . . . . . . . . . . . . . . . . . . . . . . . . . . . . . . . . . . . . . . . . . . . . . . . . . . . . . . . . . . . . . . . 26
agtcfgShow . . . . . . . . . . . . . . . . . . . . . . . . . . . . . . . . . . . . . . . . . . . . . . . . . . . . . . . . . . . . . . . 32
aliasDelete. . . . . . . . . . . . . . . . . . . . . . . . . . . . . . . . . . . . . . . . . . . . . . . . . . . . . . . . . . . . . . . . 36
aliasJoin . . . . . . . . . . . . . . . . . . . . . . . . . . . . . . . . . . . . . . . . . . . . . . . . . . . . . . . . . . . . . . . . . 38
aliasPurge . . . . . . . . . . . . . . . . . . . . . . . . . . . . . . . . . . . . . . . . . . . . . . . . . . . . . . . . . . . . . . . . 40
aliasShow . . . . . . . . . . . . . . . . . . . . . . . . . . . . . . . . . . . . . . . . . . . . . . . . . . . . . . . . . . . . . . . . 42
aliAdd . . . . . . . . . . . . . . . . . . . . . . . . . . . . . . . . . . . . . . . . . . . . . . . . . . . . . . . . . . . . . . . . . . . 44
aliCreate . . . . . . . . . . . . . . . . . . . . . . . . . . . . . . . . . . . . . . . . . . . . . . . . . . . . . . . . . . . . . . . . . 46
aliDelete . . . . . . . . . . . . . . . . . . . . . . . . . . . . . . . . . . . . . . . . . . . . . . . . . . . . . . . . . . . . . . . . . 49
aliRemove . . . . . . . . . . . . . . . . . . . . . . . . . . . . . . . . . . . . . . . . . . . . . . . . . . . . . . . . . . . . . . . . 51
aliShow . . . . . . . . . . . . . . . . . . . . . . . . . . . . . . . . . . . . . . . . . . . . . . . . . . . . . . . . . . . . . . . . . . 53
backplanetest. . . . . . . . . . . . . . . . . . . . . . . . . . . . . . . . . . . . . . . . . . . . . . . . . . . . . . . . . . . . . . 55
backPort . . . . . . . . . . . . . . . . . . . . . . . . . . . . . . . . . . . . . . . . . . . . . . . . . . . . . . . . . . . . . . . . . 58
backSpace . . . . . . . . . . . . . . . . . . . . . . . . . . . . . . . . . . . . . . . . . . . . . . . . . . . . . . . . . . . . . . . . 62
bannerset . . . . . . . . . . . . . . . . . . . . . . . . . . . . . . . . . . . . . . . . . . . . . . . . . . . . . . . . . . . . . . . . . 63
bannershow . . . . . . . . . . . . . . . . . . . . . . . . . . . . . . . . . . . . . . . . . . . . . . . . . . . . . . . . . . . . . . . 65
Fabric OS Version 3.1.x/4.1.x Reference Guide
3
Contents
bcastShow . . . . . . . . . . . . . . . . . . . . . . . . . . . . . . . . . . . . . . . . . . . . . . . . . . . . . . . . . . . . . . . . 66
bladeBeacon . . . . . . . . . . . . . . . . . . . . . . . . . . . . . . . . . . . . . . . . . . . . . . . . . . . . . . . . . . . . . . 68
bladeDiag . . . . . . . . . . . . . . . . . . . . . . . . . . . . . . . . . . . . . . . . . . . . . . . . . . . . . . . . . . . . . . . . 70
bladeDiagShort . . . . . . . . . . . . . . . . . . . . . . . . . . . . . . . . . . . . . . . . . . . . . . . . . . . . . . . . . . . . 73
bladedisable . . . . . . . . . . . . . . . . . . . . . . . . . . . . . . . . . . . . . . . . . . . . . . . . . . . . . . . . . . . . . . 77
bladeenable . . . . . . . . . . . . . . . . . . . . . . . . . . . . . . . . . . . . . . . . . . . . . . . . . . . . . . . . . . . . . . . 79
bladePropShow . . . . . . . . . . . . . . . . . . . . . . . . . . . . . . . . . . . . . . . . . . . . . . . . . . . . . . . . . . . . 81
bsn. . . . . . . . . . . . . . . . . . . . . . . . . . . . . . . . . . . . . . . . . . . . . . . . . . . . . . . . . . . . . . . . . . . . . . 83
camTest. . . . . . . . . . . . . . . . . . . . . . . . . . . . . . . . . . . . . . . . . . . . . . . . . . . . . . . . . . . . . . . . . . 84
centralMemoryTest. . . . . . . . . . . . . . . . . . . . . . . . . . . . . . . . . . . . . . . . . . . . . . . . . . . . . . . . . 87
cfgactvshow . . . . . . . . . . . . . . . . . . . . . . . . . . . . . . . . . . . . . . . . . . . . . . . . . . . . . . . . . . . . . . 95
cfgAdd . . . . . . . . . . . . . . . . . . . . . . . . . . . . . . . . . . . . . . . . . . . . . . . . . . . . . . . . . . . . . . . . . . 97
cfgClear. . . . . . . . . . . . . . . . . . . . . . . . . . . . . . . . . . . . . . . . . . . . . . . . . . . . . . . . . . . . . . . . . . 99
cfgCreate. . . . . . . . . . . . . . . . . . . . . . . . . . . . . . . . . . . . . . . . . . . . . . . . . . . . . . . . . . . . . . . . 101
cfgDelete. . . . . . . . . . . . . . . . . . . . . . . . . . . . . . . . . . . . . . . . . . . . . . . . . . . . . . . . . . . . . . . . 103
cfgDisable . . . . . . . . . . . . . . . . . . . . . . . . . . . . . . . . . . . . . . . . . . . . . . . . . . . . . . . . . . . . . . . 105
cfgEnable . . . . . . . . . . . . . . . . . . . . . . . . . . . . . . . . . . . . . . . . . . . . . . . . . . . . . . . . . . . . . . . 107
cfgRemove . . . . . . . . . . . . . . . . . . . . . . . . . . . . . . . . . . . . . . . . . . . . . . . . . . . . . . . . . . . . . . 109
cfgSave . . . . . . . . . . . . . . . . . . . . . . . . . . . . . . . . . . . . . . . . . . . . . . . . . . . . . . . . . . . . . . . . . 111
cfgShow . . . . . . . . . . . . . . . . . . . . . . . . . . . . . . . . . . . . . . . . . . . . . . . . . . . . . . . . . . . . . . . . 113
cfgsize . . . . . . . . . . . . . . . . . . . . . . . . . . . . . . . . . . . . . . . . . . . . . . . . . . . . . . . . . . . . . . . . . . 117
cfgTransAbort. . . . . . . . . . . . . . . . . . . . . . . . . . . . . . . . . . . . . . . . . . . . . . . . . . . . . . . . . . . . 119
cfgtransshow . . . . . . . . . . . . . . . . . . . . . . . . . . . . . . . . . . . . . . . . . . . . . . . . . . . . . . . . . . . . . 121
chassisName . . . . . . . . . . . . . . . . . . . . . . . . . . . . . . . . . . . . . . . . . . . . . . . . . . . . . . . . . . . . . 123
chassisShow . . . . . . . . . . . . . . . . . . . . . . . . . . . . . . . . . . . . . . . . . . . . . . . . . . . . . . . . . . . . . 125
chippropshow . . . . . . . . . . . . . . . . . . . . . . . . . . . . . . . . . . . . . . . . . . . . . . . . . . . . . . . . . . . . 128
chipregshow . . . . . . . . . . . . . . . . . . . . . . . . . . . . . . . . . . . . . . . . . . . . . . . . . . . . . . . . . . . . . 130
cmemRetentionTest . . . . . . . . . . . . . . . . . . . . . . . . . . . . . . . . . . . . . . . . . . . . . . . . . . . . . . . 132
cmiTest . . . . . . . . . . . . . . . . . . . . . . . . . . . . . . . . . . . . . . . . . . . . . . . . . . . . . . . . . . . . . . . . . 135
configDefault . . . . . . . . . . . . . . . . . . . . . . . . . . . . . . . . . . . . . . . . . . . . . . . . . . . . . . . . . . . . 139
configDownload . . . . . . . . . . . . . . . . . . . . . . . . . . . . . . . . . . . . . . . . . . . . . . . . . . . . . . . . . . 141
configShow . . . . . . . . . . . . . . . . . . . . . . . . . . . . . . . . . . . . . . . . . . . . . . . . . . . . . . . . . . . . . . 144
configUpload . . . . . . . . . . . . . . . . . . . . . . . . . . . . . . . . . . . . . . . . . . . . . . . . . . . . . . . . . . . . 147
configure . . . . . . . . . . . . . . . . . . . . . . . . . . . . . . . . . . . . . . . . . . . . . . . . . . . . . . . . . . . . . . . . 150
crossPortTest. . . . . . . . . . . . . . . . . . . . . . . . . . . . . . . . . . . . . . . . . . . . . . . . . . . . . . . . . . . . . 163
dataTypeShow . . . . . . . . . . . . . . . . . . . . . . . . . . . . . . . . . . . . . . . . . . . . . . . . . . . . . . . . . . . 172
date . . . . . . . . . . . . . . . . . . . . . . . . . . . . . . . . . . . . . . . . . . . . . . . . . . . . . . . . . . . . . . . . . . . . 174
dbgshow . . . . . . . . . . . . . . . . . . . . . . . . . . . . . . . . . . . . . . . . . . . . . . . . . . . . . . . . . . . . . . . . 177
4
Fabric OS Version 3.1.x/4.1.x Reference Guide
Contents
diagClearError . . . . . . . . . . . . . . . . . . . . . . . . . . . . . . . . . . . . . . . . . . . . . . . . . . . . . . . . . . .
diagCommandShow . . . . . . . . . . . . . . . . . . . . . . . . . . . . . . . . . . . . . . . . . . . . . . . . . . . . . . .
diagDisablePost . . . . . . . . . . . . . . . . . . . . . . . . . . . . . . . . . . . . . . . . . . . . . . . . . . . . . . . . . .
diagEnablePost . . . . . . . . . . . . . . . . . . . . . . . . . . . . . . . . . . . . . . . . . . . . . . . . . . . . . . . . . . .
diagesdports . . . . . . . . . . . . . . . . . . . . . . . . . . . . . . . . . . . . . . . . . . . . . . . . . . . . . . . . . . . . .
diagfaillimit. . . . . . . . . . . . . . . . . . . . . . . . . . . . . . . . . . . . . . . . . . . . . . . . . . . . . . . . . . . . . .
diagHelp . . . . . . . . . . . . . . . . . . . . . . . . . . . . . . . . . . . . . . . . . . . . . . . . . . . . . . . . . . . . . . . .
diagloopid . . . . . . . . . . . . . . . . . . . . . . . . . . . . . . . . . . . . . . . . . . . . . . . . . . . . . . . . . . . . . . .
diagmodepr . . . . . . . . . . . . . . . . . . . . . . . . . . . . . . . . . . . . . . . . . . . . . . . . . . . . . . . . . . . . . .
diagpost. . . . . . . . . . . . . . . . . . . . . . . . . . . . . . . . . . . . . . . . . . . . . . . . . . . . . . . . . . . . . . . . .
diagretry . . . . . . . . . . . . . . . . . . . . . . . . . . . . . . . . . . . . . . . . . . . . . . . . . . . . . . . . . . . . . . . .
diagsetburnin. . . . . . . . . . . . . . . . . . . . . . . . . . . . . . . . . . . . . . . . . . . . . . . . . . . . . . . . . . . . .
diagsetcycle. . . . . . . . . . . . . . . . . . . . . . . . . . . . . . . . . . . . . . . . . . . . . . . . . . . . . . . . . . . . . .
diagshow . . . . . . . . . . . . . . . . . . . . . . . . . . . . . . . . . . . . . . . . . . . . . . . . . . . . . . . . . . . . . . . .
diagshowtime . . . . . . . . . . . . . . . . . . . . . . . . . . . . . . . . . . . . . . . . . . . . . . . . . . . . . . . . . . . .
diagsilkworm . . . . . . . . . . . . . . . . . . . . . . . . . . . . . . . . . . . . . . . . . . . . . . . . . . . . . . . . . . . .
diagskiptests . . . . . . . . . . . . . . . . . . . . . . . . . . . . . . . . . . . . . . . . . . . . . . . . . . . . . . . . . . . . .
diagstopburnin . . . . . . . . . . . . . . . . . . . . . . . . . . . . . . . . . . . . . . . . . . . . . . . . . . . . . . . . . . .
dlsReset. . . . . . . . . . . . . . . . . . . . . . . . . . . . . . . . . . . . . . . . . . . . . . . . . . . . . . . . . . . . . . . . .
dlsSet. . . . . . . . . . . . . . . . . . . . . . . . . . . . . . . . . . . . . . . . . . . . . . . . . . . . . . . . . . . . . . . . . . .
dlsShow. . . . . . . . . . . . . . . . . . . . . . . . . . . . . . . . . . . . . . . . . . . . . . . . . . . . . . . . . . . . . . . . .
dnsconfig. . . . . . . . . . . . . . . . . . . . . . . . . . . . . . . . . . . . . . . . . . . . . . . . . . . . . . . . . . . . . . . .
errClear . . . . . . . . . . . . . . . . . . . . . . . . . . . . . . . . . . . . . . . . . . . . . . . . . . . . . . . . . . . . . . . . .
errDump . . . . . . . . . . . . . . . . . . . . . . . . . . . . . . . . . . . . . . . . . . . . . . . . . . . . . . . . . . . . . . . .
errNvLogSizeSet. . . . . . . . . . . . . . . . . . . . . . . . . . . . . . . . . . . . . . . . . . . . . . . . . . . . . . . . . .
errNvLogSizeShow. . . . . . . . . . . . . . . . . . . . . . . . . . . . . . . . . . . . . . . . . . . . . . . . . . . . . . . .
errSaveLvlSet . . . . . . . . . . . . . . . . . . . . . . . . . . . . . . . . . . . . . . . . . . . . . . . . . . . . . . . . . . . .
errSaveLvlShow . . . . . . . . . . . . . . . . . . . . . . . . . . . . . . . . . . . . . . . . . . . . . . . . . . . . . . . . . .
errShow. . . . . . . . . . . . . . . . . . . . . . . . . . . . . . . . . . . . . . . . . . . . . . . . . . . . . . . . . . . . . . . . .
exit . . . . . . . . . . . . . . . . . . . . . . . . . . . . . . . . . . . . . . . . . . . . . . . . . . . . . . . . . . . . . . . . . . . .
fabportshow . . . . . . . . . . . . . . . . . . . . . . . . . . . . . . . . . . . . . . . . . . . . . . . . . . . . . . . . . . . . .
fabretryshow . . . . . . . . . . . . . . . . . . . . . . . . . . . . . . . . . . . . . . . . . . . . . . . . . . . . . . . . . . . . .
fabricprincipal. . . . . . . . . . . . . . . . . . . . . . . . . . . . . . . . . . . . . . . . . . . . . . . . . . . . . . . . . . . .
fabricShow . . . . . . . . . . . . . . . . . . . . . . . . . . . . . . . . . . . . . . . . . . . . . . . . . . . . . . . . . . . . . .
fabstateclear . . . . . . . . . . . . . . . . . . . . . . . . . . . . . . . . . . . . . . . . . . . . . . . . . . . . . . . . . . . . .
fabstateshow . . . . . . . . . . . . . . . . . . . . . . . . . . . . . . . . . . . . . . . . . . . . . . . . . . . . . . . . . . . . .
fabStatsShow . . . . . . . . . . . . . . . . . . . . . . . . . . . . . . . . . . . . . . . . . . . . . . . . . . . . . . . . . . . .
fabswitchshow . . . . . . . . . . . . . . . . . . . . . . . . . . . . . . . . . . . . . . . . . . . . . . . . . . . . . . . . . . .
Fabric OS Version 3.1.x/4.1.x Reference Guide
179
181
183
185
187
189
191
193
195
197
199
201
203
205
208
210
212
214
216
218
220
221
223
225
227
229
230
232
233
239
240
243
245
247
249
250
252
254
5
Contents
fanDisable . . . . . . . . . . . . . . . . . . . . . . . . . . . . . . . . . . . . . . . . . . . . . . . . . . . . . . . . . . . . . . .
fanEnable . . . . . . . . . . . . . . . . . . . . . . . . . . . . . . . . . . . . . . . . . . . . . . . . . . . . . . . . . . . . . . .
fanShow . . . . . . . . . . . . . . . . . . . . . . . . . . . . . . . . . . . . . . . . . . . . . . . . . . . . . . . . . . . . . . . .
fashow. . . . . . . . . . . . . . . . . . . . . . . . . . . . . . . . . . . . . . . . . . . . . . . . . . . . . . . . . . . . . . . . . .
faStatsShow . . . . . . . . . . . . . . . . . . . . . . . . . . . . . . . . . . . . . . . . . . . . . . . . . . . . . . . . . . . . .
fastboot . . . . . . . . . . . . . . . . . . . . . . . . . . . . . . . . . . . . . . . . . . . . . . . . . . . . . . . . . . . . . . . . .
fazoneAdd. . . . . . . . . . . . . . . . . . . . . . . . . . . . . . . . . . . . . . . . . . . . . . . . . . . . . . . . . . . . . . .
fazoneCreate . . . . . . . . . . . . . . . . . . . . . . . . . . . . . . . . . . . . . . . . . . . . . . . . . . . . . . . . . . . . .
fazoneDelete . . . . . . . . . . . . . . . . . . . . . . . . . . . . . . . . . . . . . . . . . . . . . . . . . . . . . . . . . . . . .
fazoneRemove . . . . . . . . . . . . . . . . . . . . . . . . . . . . . . . . . . . . . . . . . . . . . . . . . . . . . . . . . . .
fazoneShow. . . . . . . . . . . . . . . . . . . . . . . . . . . . . . . . . . . . . . . . . . . . . . . . . . . . . . . . . . . . . .
fcpprobeshow . . . . . . . . . . . . . . . . . . . . . . . . . . . . . . . . . . . . . . . . . . . . . . . . . . . . . . . . . . . .
fcprlsshow. . . . . . . . . . . . . . . . . . . . . . . . . . . . . . . . . . . . . . . . . . . . . . . . . . . . . . . . . . . . . . .
fdmicacheshow . . . . . . . . . . . . . . . . . . . . . . . . . . . . . . . . . . . . . . . . . . . . . . . . . . . . . . . . . . .
fdmishow . . . . . . . . . . . . . . . . . . . . . . . . . . . . . . . . . . . . . . . . . . . . . . . . . . . . . . . . . . . . . . .
filterTest . . . . . . . . . . . . . . . . . . . . . . . . . . . . . . . . . . . . . . . . . . . . . . . . . . . . . . . . . . . . . . . .
firmwareCommit. . . . . . . . . . . . . . . . . . . . . . . . . . . . . . . . . . . . . . . . . . . . . . . . . . . . . . . . . .
firmwareDownload . . . . . . . . . . . . . . . . . . . . . . . . . . . . . . . . . . . . . . . . . . . . . . . . . . . . . . . .
firmwaredownloadstatus. . . . . . . . . . . . . . . . . . . . . . . . . . . . . . . . . . . . . . . . . . . . . . . . . . . .
firmwarerestore. . . . . . . . . . . . . . . . . . . . . . . . . . . . . . . . . . . . . . . . . . . . . . . . . . . . . . . . . . .
firmwareshow . . . . . . . . . . . . . . . . . . . . . . . . . . . . . . . . . . . . . . . . . . . . . . . . . . . . . . . . . . . .
fporttest . . . . . . . . . . . . . . . . . . . . . . . . . . . . . . . . . . . . . . . . . . . . . . . . . . . . . . . . . . . . . . . . .
fspfShow . . . . . . . . . . . . . . . . . . . . . . . . . . . . . . . . . . . . . . . . . . . . . . . . . . . . . . . . . . . . . . . .
fwAlarmsFilterSet. . . . . . . . . . . . . . . . . . . . . . . . . . . . . . . . . . . . . . . . . . . . . . . . . . . . . . . . .
fwAlarmsFilterShow. . . . . . . . . . . . . . . . . . . . . . . . . . . . . . . . . . . . . . . . . . . . . . . . . . . . . . .
fwClassInit . . . . . . . . . . . . . . . . . . . . . . . . . . . . . . . . . . . . . . . . . . . . . . . . . . . . . . . . . . . . . .
fwConfigReload . . . . . . . . . . . . . . . . . . . . . . . . . . . . . . . . . . . . . . . . . . . . . . . . . . . . . . . . . .
fwConfigure . . . . . . . . . . . . . . . . . . . . . . . . . . . . . . . . . . . . . . . . . . . . . . . . . . . . . . . . . . . . .
fwFruCfg. . . . . . . . . . . . . . . . . . . . . . . . . . . . . . . . . . . . . . . . . . . . . . . . . . . . . . . . . . . . . . . .
fwHelp . . . . . . . . . . . . . . . . . . . . . . . . . . . . . . . . . . . . . . . . . . . . . . . . . . . . . . . . . . . . . . . . .
fwMailCfg. . . . . . . . . . . . . . . . . . . . . . . . . . . . . . . . . . . . . . . . . . . . . . . . . . . . . . . . . . . . . . .
fwsamshow . . . . . . . . . . . . . . . . . . . . . . . . . . . . . . . . . . . . . . . . . . . . . . . . . . . . . . . . . . . . . .
fwSetToCustom . . . . . . . . . . . . . . . . . . . . . . . . . . . . . . . . . . . . . . . . . . . . . . . . . . . . . . . . . .
fwSetToDefault. . . . . . . . . . . . . . . . . . . . . . . . . . . . . . . . . . . . . . . . . . . . . . . . . . . . . . . . . . .
fwShow . . . . . . . . . . . . . . . . . . . . . . . . . . . . . . . . . . . . . . . . . . . . . . . . . . . . . . . . . . . . . . . . .
gbicShow . . . . . . . . . . . . . . . . . . . . . . . . . . . . . . . . . . . . . . . . . . . . . . . . . . . . . . . . . . . . . . .
h ......................................................................
haDisable . . . . . . . . . . . . . . . . . . . . . . . . . . . . . . . . . . . . . . . . . . . . . . . . . . . . . . . . . . . . . . .
6
256
257
259
261
264
266
268
270
274
276
278
280
282
284
286
288
291
293
298
300
302
304
308
311
313
314
316
318
323
325
327
330
332
333
334
338
341
343
Fabric OS Version 3.1.x/4.1.x Reference Guide
Contents
hadump . . . . . . . . . . . . . . . . . . . . . . . . . . . . . . . . . . . . . . . . . . . . . . . . . . . . . . . . . . . . . . . . .
haEnable . . . . . . . . . . . . . . . . . . . . . . . . . . . . . . . . . . . . . . . . . . . . . . . . . . . . . . . . . . . . . . . .
haFailover . . . . . . . . . . . . . . . . . . . . . . . . . . . . . . . . . . . . . . . . . . . . . . . . . . . . . . . . . . . . . . .
haShow . . . . . . . . . . . . . . . . . . . . . . . . . . . . . . . . . . . . . . . . . . . . . . . . . . . . . . . . . . . . . . . . .
hasyncstart . . . . . . . . . . . . . . . . . . . . . . . . . . . . . . . . . . . . . . . . . . . . . . . . . . . . . . . . . . . . . .
hasyncstop. . . . . . . . . . . . . . . . . . . . . . . . . . . . . . . . . . . . . . . . . . . . . . . . . . . . . . . . . . . . . . .
help . . . . . . . . . . . . . . . . . . . . . . . . . . . . . . . . . . . . . . . . . . . . . . . . . . . . . . . . . . . . . . . . . . . .
historyLastShow . . . . . . . . . . . . . . . . . . . . . . . . . . . . . . . . . . . . . . . . . . . . . . . . . . . . . . . . . .
historymode . . . . . . . . . . . . . . . . . . . . . . . . . . . . . . . . . . . . . . . . . . . . . . . . . . . . . . . . . . . . .
historyShow . . . . . . . . . . . . . . . . . . . . . . . . . . . . . . . . . . . . . . . . . . . . . . . . . . . . . . . . . . . . .
i. . . . . . . . . . . . . . . . . . . . . . . . . . . . . . . . . . . . . . . . . . . . . . . . . . . . . . . . . . . . . . . . . . . . . . .
ifModeSet . . . . . . . . . . . . . . . . . . . . . . . . . . . . . . . . . . . . . . . . . . . . . . . . . . . . . . . . . . . . . . .
ifModeShow . . . . . . . . . . . . . . . . . . . . . . . . . . . . . . . . . . . . . . . . . . . . . . . . . . . . . . . . . . . . .
ifShow. . . . . . . . . . . . . . . . . . . . . . . . . . . . . . . . . . . . . . . . . . . . . . . . . . . . . . . . . . . . . . . . . .
interfaceShow . . . . . . . . . . . . . . . . . . . . . . . . . . . . . . . . . . . . . . . . . . . . . . . . . . . . . . . . . . . .
iodReset . . . . . . . . . . . . . . . . . . . . . . . . . . . . . . . . . . . . . . . . . . . . . . . . . . . . . . . . . . . . . . . .
iodSet . . . . . . . . . . . . . . . . . . . . . . . . . . . . . . . . . . . . . . . . . . . . . . . . . . . . . . . . . . . . . . . . . .
iodShow . . . . . . . . . . . . . . . . . . . . . . . . . . . . . . . . . . . . . . . . . . . . . . . . . . . . . . . . . . . . . . . .
ipAddrSet . . . . . . . . . . . . . . . . . . . . . . . . . . . . . . . . . . . . . . . . . . . . . . . . . . . . . . . . . . . . . . .
ipAddrShow . . . . . . . . . . . . . . . . . . . . . . . . . . . . . . . . . . . . . . . . . . . . . . . . . . . . . . . . . . . . .
islshow . . . . . . . . . . . . . . . . . . . . . . . . . . . . . . . . . . . . . . . . . . . . . . . . . . . . . . . . . . . . . . . . .
itemlist . . . . . . . . . . . . . . . . . . . . . . . . . . . . . . . . . . . . . . . . . . . . . . . . . . . . . . . . . . . . . . . . .
killtelnet . . . . . . . . . . . . . . . . . . . . . . . . . . . . . . . . . . . . . . . . . . . . . . . . . . . . . . . . . . . . . . . .
ledtest . . . . . . . . . . . . . . . . . . . . . . . . . . . . . . . . . . . . . . . . . . . . . . . . . . . . . . . . . . . . . . . . . .
licenseAdd . . . . . . . . . . . . . . . . . . . . . . . . . . . . . . . . . . . . . . . . . . . . . . . . . . . . . . . . . . . . . .
licenseHelp . . . . . . . . . . . . . . . . . . . . . . . . . . . . . . . . . . . . . . . . . . . . . . . . . . . . . . . . . . . . . .
licenseIdShow. . . . . . . . . . . . . . . . . . . . . . . . . . . . . . . . . . . . . . . . . . . . . . . . . . . . . . . . . . . .
licenseRemove . . . . . . . . . . . . . . . . . . . . . . . . . . . . . . . . . . . . . . . . . . . . . . . . . . . . . . . . . . .
licenseShow . . . . . . . . . . . . . . . . . . . . . . . . . . . . . . . . . . . . . . . . . . . . . . . . . . . . . . . . . . . . .
linkCost. . . . . . . . . . . . . . . . . . . . . . . . . . . . . . . . . . . . . . . . . . . . . . . . . . . . . . . . . . . . . . . . .
login . . . . . . . . . . . . . . . . . . . . . . . . . . . . . . . . . . . . . . . . . . . . . . . . . . . . . . . . . . . . . . . . . . .
logout . . . . . . . . . . . . . . . . . . . . . . . . . . . . . . . . . . . . . . . . . . . . . . . . . . . . . . . . . . . . . . . . . .
loopPortTest . . . . . . . . . . . . . . . . . . . . . . . . . . . . . . . . . . . . . . . . . . . . . . . . . . . . . . . . . . . . .
LSDbShow . . . . . . . . . . . . . . . . . . . . . . . . . . . . . . . . . . . . . . . . . . . . . . . . . . . . . . . . . . . . . .
mcastShow . . . . . . . . . . . . . . . . . . . . . . . . . . . . . . . . . . . . . . . . . . . . . . . . . . . . . . . . . . . . . .
memshow . . . . . . . . . . . . . . . . . . . . . . . . . . . . . . . . . . . . . . . . . . . . . . . . . . . . . . . . . . . . . . .
mscapabilityshow . . . . . . . . . . . . . . . . . . . . . . . . . . . . . . . . . . . . . . . . . . . . . . . . . . . . . . . . .
msConfigure . . . . . . . . . . . . . . . . . . . . . . . . . . . . . . . . . . . . . . . . . . . . . . . . . . . . . . . . . . . . .
Fabric OS Version 3.1.x/4.1.x Reference Guide
344
346
347
349
351
352
353
355
357
359
361
364
367
369
371
376
378
380
381
385
388
389
392
395
396
398
400
402
404
406
409
410
412
418
422
424
426
429
7
Contents
msPlatShow . . . . . . . . . . . . . . . . . . . . . . . . . . . . . . . . . . . . . . . . . . . . . . . . . . . . . . . . . . . . .
msPlClearDB . . . . . . . . . . . . . . . . . . . . . . . . . . . . . . . . . . . . . . . . . . . . . . . . . . . . . . . . . . . .
msPlMgmtActivate . . . . . . . . . . . . . . . . . . . . . . . . . . . . . . . . . . . . . . . . . . . . . . . . . . . . . . . .
msPlMgmtDeactivate . . . . . . . . . . . . . . . . . . . . . . . . . . . . . . . . . . . . . . . . . . . . . . . . . . . . . .
msTdDisable . . . . . . . . . . . . . . . . . . . . . . . . . . . . . . . . . . . . . . . . . . . . . . . . . . . . . . . . . . . . .
msTdEnable . . . . . . . . . . . . . . . . . . . . . . . . . . . . . . . . . . . . . . . . . . . . . . . . . . . . . . . . . . . . .
msTDReadConfig . . . . . . . . . . . . . . . . . . . . . . . . . . . . . . . . . . . . . . . . . . . . . . . . . . . . . . . . .
myid . . . . . . . . . . . . . . . . . . . . . . . . . . . . . . . . . . . . . . . . . . . . . . . . . . . . . . . . . . . . . . . . . . .
nbrStatsClear. . . . . . . . . . . . . . . . . . . . . . . . . . . . . . . . . . . . . . . . . . . . . . . . . . . . . . . . . . . . .
nbrStateShow . . . . . . . . . . . . . . . . . . . . . . . . . . . . . . . . . . . . . . . . . . . . . . . . . . . . . . . . . . . .
nodefind . . . . . . . . . . . . . . . . . . . . . . . . . . . . . . . . . . . . . . . . . . . . . . . . . . . . . . . . . . . . . . . .
nsaliasshow . . . . . . . . . . . . . . . . . . . . . . . . . . . . . . . . . . . . . . . . . . . . . . . . . . . . . . . . . . . . . .
nsAllShow. . . . . . . . . . . . . . . . . . . . . . . . . . . . . . . . . . . . . . . . . . . . . . . . . . . . . . . . . . . . . . .
nscamshow . . . . . . . . . . . . . . . . . . . . . . . . . . . . . . . . . . . . . . . . . . . . . . . . . . . . . . . . . . . . . .
nsShow . . . . . . . . . . . . . . . . . . . . . . . . . . . . . . . . . . . . . . . . . . . . . . . . . . . . . . . . . . . . . . . . .
nsstatshow. . . . . . . . . . . . . . . . . . . . . . . . . . . . . . . . . . . . . . . . . . . . . . . . . . . . . . . . . . . . . . .
nszonemember . . . . . . . . . . . . . . . . . . . . . . . . . . . . . . . . . . . . . . . . . . . . . . . . . . . . . . . . . . .
parityCheck. . . . . . . . . . . . . . . . . . . . . . . . . . . . . . . . . . . . . . . . . . . . . . . . . . . . . . . . . . . . . .
passwd. . . . . . . . . . . . . . . . . . . . . . . . . . . . . . . . . . . . . . . . . . . . . . . . . . . . . . . . . . . . . . . . . .
pdshow . . . . . . . . . . . . . . . . . . . . . . . . . . . . . . . . . . . . . . . . . . . . . . . . . . . . . . . . . . . . . . . . .
perfAddEEMonitor . . . . . . . . . . . . . . . . . . . . . . . . . . . . . . . . . . . . . . . . . . . . . . . . . . . . . . . .
perfAddIPMonitor . . . . . . . . . . . . . . . . . . . . . . . . . . . . . . . . . . . . . . . . . . . . . . . . . . . . . . . .
perfAddReadMonitor . . . . . . . . . . . . . . . . . . . . . . . . . . . . . . . . . . . . . . . . . . . . . . . . . . . . . .
perfAddRWMonitor . . . . . . . . . . . . . . . . . . . . . . . . . . . . . . . . . . . . . . . . . . . . . . . . . . . . . . .
perfAddSCSIMonitor . . . . . . . . . . . . . . . . . . . . . . . . . . . . . . . . . . . . . . . . . . . . . . . . . . . . . .
perfAddUserMonitor . . . . . . . . . . . . . . . . . . . . . . . . . . . . . . . . . . . . . . . . . . . . . . . . . . . . . .
perfAddWriteMonitor. . . . . . . . . . . . . . . . . . . . . . . . . . . . . . . . . . . . . . . . . . . . . . . . . . . . . .
perfCfgClear . . . . . . . . . . . . . . . . . . . . . . . . . . . . . . . . . . . . . . . . . . . . . . . . . . . . . . . . . . . . .
perfCfgRestore . . . . . . . . . . . . . . . . . . . . . . . . . . . . . . . . . . . . . . . . . . . . . . . . . . . . . . . . . . .
perfCfgSave . . . . . . . . . . . . . . . . . . . . . . . . . . . . . . . . . . . . . . . . . . . . . . . . . . . . . . . . . . . . .
perfcleareemonitor . . . . . . . . . . . . . . . . . . . . . . . . . . . . . . . . . . . . . . . . . . . . . . . . . . . . . . . .
perfclearfiltermonitor . . . . . . . . . . . . . . . . . . . . . . . . . . . . . . . . . . . . . . . . . . . . . . . . . . . . . .
perfClrAlpaCrc . . . . . . . . . . . . . . . . . . . . . . . . . . . . . . . . . . . . . . . . . . . . . . . . . . . . . . . . . . .
perfDelEEMonitor . . . . . . . . . . . . . . . . . . . . . . . . . . . . . . . . . . . . . . . . . . . . . . . . . . . . . . . .
perfDelFilterMonitor . . . . . . . . . . . . . . . . . . . . . . . . . . . . . . . . . . . . . . . . . . . . . . . . . . . . . .
perfHelp . . . . . . . . . . . . . . . . . . . . . . . . . . . . . . . . . . . . . . . . . . . . . . . . . . . . . . . . . . . . . . . .
perfSetPortEEMask . . . . . . . . . . . . . . . . . . . . . . . . . . . . . . . . . . . . . . . . . . . . . . . . . . . . . . .
perfShowAlpaCrc . . . . . . . . . . . . . . . . . . . . . . . . . . . . . . . . . . . . . . . . . . . . . . . . . . . . . . . . .
8
432
434
436
438
440
442
444
445
447
449
451
453
456
458
460
463
465
467
469
473
475
478
480
482
484
486
490
492
494
496
498
500
502
504
506
508
510
513
Fabric OS Version 3.1.x/4.1.x Reference Guide
Contents
perfShowEEMonitor. . . . . . . . . . . . . . . . . . . . . . . . . . . . . . . . . . . . . . . . . . . . . . . . . . . . . . .
perfShowFilterMonitor . . . . . . . . . . . . . . . . . . . . . . . . . . . . . . . . . . . . . . . . . . . . . . . . . . . . .
perfShowPortEEMask . . . . . . . . . . . . . . . . . . . . . . . . . . . . . . . . . . . . . . . . . . . . . . . . . . . . .
pkicreate . . . . . . . . . . . . . . . . . . . . . . . . . . . . . . . . . . . . . . . . . . . . . . . . . . . . . . . . . . . . . . . .
pkiremove . . . . . . . . . . . . . . . . . . . . . . . . . . . . . . . . . . . . . . . . . . . . . . . . . . . . . . . . . . . . . . .
pkishow. . . . . . . . . . . . . . . . . . . . . . . . . . . . . . . . . . . . . . . . . . . . . . . . . . . . . . . . . . . . . . . . .
portcamshow. . . . . . . . . . . . . . . . . . . . . . . . . . . . . . . . . . . . . . . . . . . . . . . . . . . . . . . . . . . . .
portcfgdefault . . . . . . . . . . . . . . . . . . . . . . . . . . . . . . . . . . . . . . . . . . . . . . . . . . . . . . . . . . . .
portCfgEport . . . . . . . . . . . . . . . . . . . . . . . . . . . . . . . . . . . . . . . . . . . . . . . . . . . . . . . . . . . . .
portCfgGport. . . . . . . . . . . . . . . . . . . . . . . . . . . . . . . . . . . . . . . . . . . . . . . . . . . . . . . . . . . . .
portcfgislmode . . . . . . . . . . . . . . . . . . . . . . . . . . . . . . . . . . . . . . . . . . . . . . . . . . . . . . . . . . .
portCfgLongDistance . . . . . . . . . . . . . . . . . . . . . . . . . . . . . . . . . . . . . . . . . . . . . . . . . . . . . .
portCfgLport . . . . . . . . . . . . . . . . . . . . . . . . . . . . . . . . . . . . . . . . . . . . . . . . . . . . . . . . . . . . .
portcfgpersistentdisable . . . . . . . . . . . . . . . . . . . . . . . . . . . . . . . . . . . . . . . . . . . . . . . . . . . .
portcfgpersistentenable . . . . . . . . . . . . . . . . . . . . . . . . . . . . . . . . . . . . . . . . . . . . . . . . . . . . .
portCfgShow. . . . . . . . . . . . . . . . . . . . . . . . . . . . . . . . . . . . . . . . . . . . . . . . . . . . . . . . . . . . .
portCfgSpeed . . . . . . . . . . . . . . . . . . . . . . . . . . . . . . . . . . . . . . . . . . . . . . . . . . . . . . . . . . . .
portCfgTrunkport . . . . . . . . . . . . . . . . . . . . . . . . . . . . . . . . . . . . . . . . . . . . . . . . . . . . . . . . .
portdebug . . . . . . . . . . . . . . . . . . . . . . . . . . . . . . . . . . . . . . . . . . . . . . . . . . . . . . . . . . . . . . .
portDisable . . . . . . . . . . . . . . . . . . . . . . . . . . . . . . . . . . . . . . . . . . . . . . . . . . . . . . . . . . . . . .
portEnable. . . . . . . . . . . . . . . . . . . . . . . . . . . . . . . . . . . . . . . . . . . . . . . . . . . . . . . . . . . . . . .
portErrShow . . . . . . . . . . . . . . . . . . . . . . . . . . . . . . . . . . . . . . . . . . . . . . . . . . . . . . . . . . . . .
portflagsshow . . . . . . . . . . . . . . . . . . . . . . . . . . . . . . . . . . . . . . . . . . . . . . . . . . . . . . . . . . . .
portLEDTest . . . . . . . . . . . . . . . . . . . . . . . . . . . . . . . . . . . . . . . . . . . . . . . . . . . . . . . . . . . . .
portLogClear. . . . . . . . . . . . . . . . . . . . . . . . . . . . . . . . . . . . . . . . . . . . . . . . . . . . . . . . . . . . .
portLogDump . . . . . . . . . . . . . . . . . . . . . . . . . . . . . . . . . . . . . . . . . . . . . . . . . . . . . . . . . . . .
portLogDumpPort. . . . . . . . . . . . . . . . . . . . . . . . . . . . . . . . . . . . . . . . . . . . . . . . . . . . . . . . .
portloginshow . . . . . . . . . . . . . . . . . . . . . . . . . . . . . . . . . . . . . . . . . . . . . . . . . . . . . . . . . . . .
portlogpdisc . . . . . . . . . . . . . . . . . . . . . . . . . . . . . . . . . . . . . . . . . . . . . . . . . . . . . . . . . . . . .
portLogShow . . . . . . . . . . . . . . . . . . . . . . . . . . . . . . . . . . . . . . . . . . . . . . . . . . . . . . . . . . . .
portlogshowport . . . . . . . . . . . . . . . . . . . . . . . . . . . . . . . . . . . . . . . . . . . . . . . . . . . . . . . . . .
portLoopbackTest . . . . . . . . . . . . . . . . . . . . . . . . . . . . . . . . . . . . . . . . . . . . . . . . . . . . . . . . .
portname . . . . . . . . . . . . . . . . . . . . . . . . . . . . . . . . . . . . . . . . . . . . . . . . . . . . . . . . . . . . . . . .
portPerfShow . . . . . . . . . . . . . . . . . . . . . . . . . . . . . . . . . . . . . . . . . . . . . . . . . . . . . . . . . . . .
portRegTest. . . . . . . . . . . . . . . . . . . . . . . . . . . . . . . . . . . . . . . . . . . . . . . . . . . . . . . . . . . . . .
portRouteShow . . . . . . . . . . . . . . . . . . . . . . . . . . . . . . . . . . . . . . . . . . . . . . . . . . . . . . . . . . .
portShow. . . . . . . . . . . . . . . . . . . . . . . . . . . . . . . . . . . . . . . . . . . . . . . . . . . . . . . . . . . . . . . .
portstatsclear . . . . . . . . . . . . . . . . . . . . . . . . . . . . . . . . . . . . . . . . . . . . . . . . . . . . . . . . . . . . .
Fabric OS Version 3.1.x/4.1.x Reference Guide
515
519
522
525
527
529
530
533
535
537
539
541
547
549
551
553
556
558
560
561
563
565
567
569
571
573
576
579
581
582
585
587
592
594
596
600
603
607
9
Contents
portStatsShow . . . . . . . . . . . . . . . . . . . . . . . . . . . . . . . . . . . . . . . . . . . . . . . . . . . . . . . . . . . .
portswap . . . . . . . . . . . . . . . . . . . . . . . . . . . . . . . . . . . . . . . . . . . . . . . . . . . . . . . . . . . . . . . .
portswapdisable . . . . . . . . . . . . . . . . . . . . . . . . . . . . . . . . . . . . . . . . . . . . . . . . . . . . . . . . . .
portswapenable . . . . . . . . . . . . . . . . . . . . . . . . . . . . . . . . . . . . . . . . . . . . . . . . . . . . . . . . . . .
portswapshow . . . . . . . . . . . . . . . . . . . . . . . . . . . . . . . . . . . . . . . . . . . . . . . . . . . . . . . . . . . .
porttest . . . . . . . . . . . . . . . . . . . . . . . . . . . . . . . . . . . . . . . . . . . . . . . . . . . . . . . . . . . . . . . . .
porttestshow . . . . . . . . . . . . . . . . . . . . . . . . . . . . . . . . . . . . . . . . . . . . . . . . . . . . . . . . . . . . .
powerofflistset . . . . . . . . . . . . . . . . . . . . . . . . . . . . . . . . . . . . . . . . . . . . . . . . . . . . . . . . . . .
powerofflistshow . . . . . . . . . . . . . . . . . . . . . . . . . . . . . . . . . . . . . . . . . . . . . . . . . . . . . . . . .
psShow . . . . . . . . . . . . . . . . . . . . . . . . . . . . . . . . . . . . . . . . . . . . . . . . . . . . . . . . . . . . . . . . .
ptdatashow . . . . . . . . . . . . . . . . . . . . . . . . . . . . . . . . . . . . . . . . . . . . . . . . . . . . . . . . . . . . . .
ptphantomshow. . . . . . . . . . . . . . . . . . . . . . . . . . . . . . . . . . . . . . . . . . . . . . . . . . . . . . . . . . .
ptpropshow . . . . . . . . . . . . . . . . . . . . . . . . . . . . . . . . . . . . . . . . . . . . . . . . . . . . . . . . . . . . . .
ptregshow . . . . . . . . . . . . . . . . . . . . . . . . . . . . . . . . . . . . . . . . . . . . . . . . . . . . . . . . . . . . . . .
ptrouteshow. . . . . . . . . . . . . . . . . . . . . . . . . . . . . . . . . . . . . . . . . . . . . . . . . . . . . . . . . . . . . .
ptstatsshow . . . . . . . . . . . . . . . . . . . . . . . . . . . . . . . . . . . . . . . . . . . . . . . . . . . . . . . . . . . . . .
qlDisable . . . . . . . . . . . . . . . . . . . . . . . . . . . . . . . . . . . . . . . . . . . . . . . . . . . . . . . . . . . . . . . .
qlEnable . . . . . . . . . . . . . . . . . . . . . . . . . . . . . . . . . . . . . . . . . . . . . . . . . . . . . . . . . . . . . . . .
qloopAdd . . . . . . . . . . . . . . . . . . . . . . . . . . . . . . . . . . . . . . . . . . . . . . . . . . . . . . . . . . . . . . .
qloopCreate. . . . . . . . . . . . . . . . . . . . . . . . . . . . . . . . . . . . . . . . . . . . . . . . . . . . . . . . . . . . . .
qloopDelete. . . . . . . . . . . . . . . . . . . . . . . . . . . . . . . . . . . . . . . . . . . . . . . . . . . . . . . . . . . . . .
qloopRemove . . . . . . . . . . . . . . . . . . . . . . . . . . . . . . . . . . . . . . . . . . . . . . . . . . . . . . . . . . . .
qloopShow . . . . . . . . . . . . . . . . . . . . . . . . . . . . . . . . . . . . . . . . . . . . . . . . . . . . . . . . . . . . . .
qlPartner . . . . . . . . . . . . . . . . . . . . . . . . . . . . . . . . . . . . . . . . . . . . . . . . . . . . . . . . . . . . . . . .
qlPortDisable . . . . . . . . . . . . . . . . . . . . . . . . . . . . . . . . . . . . . . . . . . . . . . . . . . . . . . . . . . . .
qlPortEnable . . . . . . . . . . . . . . . . . . . . . . . . . . . . . . . . . . . . . . . . . . . . . . . . . . . . . . . . . . . . .
qlPortShowAll . . . . . . . . . . . . . . . . . . . . . . . . . . . . . . . . . . . . . . . . . . . . . . . . . . . . . . . . . . .
qlShow . . . . . . . . . . . . . . . . . . . . . . . . . . . . . . . . . . . . . . . . . . . . . . . . . . . . . . . . . . . . . . . . .
qlStatsShow . . . . . . . . . . . . . . . . . . . . . . . . . . . . . . . . . . . . . . . . . . . . . . . . . . . . . . . . . . . . .
quietMode . . . . . . . . . . . . . . . . . . . . . . . . . . . . . . . . . . . . . . . . . . . . . . . . . . . . . . . . . . . . . . .
ramTest . . . . . . . . . . . . . . . . . . . . . . . . . . . . . . . . . . . . . . . . . . . . . . . . . . . . . . . . . . . . . . . . .
reboot . . . . . . . . . . . . . . . . . . . . . . . . . . . . . . . . . . . . . . . . . . . . . . . . . . . . . . . . . . . . . . . . . .
routeHelp . . . . . . . . . . . . . . . . . . . . . . . . . . . . . . . . . . . . . . . . . . . . . . . . . . . . . . . . . . . . . . .
savecore . . . . . . . . . . . . . . . . . . . . . . . . . . . . . . . . . . . . . . . . . . . . . . . . . . . . . . . . . . . . . . . .
secfabricshow . . . . . . . . . . . . . . . . . . . . . . . . . . . . . . . . . . . . . . . . . . . . . . . . . . . . . . . . . . . .
secfcsfailover . . . . . . . . . . . . . . . . . . . . . . . . . . . . . . . . . . . . . . . . . . . . . . . . . . . . . . . . . . . .
sechelp . . . . . . . . . . . . . . . . . . . . . . . . . . . . . . . . . . . . . . . . . . . . . . . . . . . . . . . . . . . . . . . . .
secmodedisable . . . . . . . . . . . . . . . . . . . . . . . . . . . . . . . . . . . . . . . . . . . . . . . . . . . . . . . . . . .
10
609
613
615
616
618
620
624
627
629
631
633
635
637
639
641
643
645
647
649
651
653
655
657
659
661
663
665
667
670
672
674
677
679
681
683
685
687
689
Fabric OS Version 3.1.x/4.1.x Reference Guide
Contents
secmodeenable . . . . . . . . . . . . . . . . . . . . . . . . . . . . . . . . . . . . . . . . . . . . . . . . . . . . . . . . . . .
secmodeshow . . . . . . . . . . . . . . . . . . . . . . . . . . . . . . . . . . . . . . . . . . . . . . . . . . . . . . . . . . . .
secnonfcspasswd. . . . . . . . . . . . . . . . . . . . . . . . . . . . . . . . . . . . . . . . . . . . . . . . . . . . . . . . . .
secpolicyabort . . . . . . . . . . . . . . . . . . . . . . . . . . . . . . . . . . . . . . . . . . . . . . . . . . . . . . . . . . . .
secpolicyactivate. . . . . . . . . . . . . . . . . . . . . . . . . . . . . . . . . . . . . . . . . . . . . . . . . . . . . . . . . .
secpolicyadd . . . . . . . . . . . . . . . . . . . . . . . . . . . . . . . . . . . . . . . . . . . . . . . . . . . . . . . . . . . . .
secpolicycreate . . . . . . . . . . . . . . . . . . . . . . . . . . . . . . . . . . . . . . . . . . . . . . . . . . . . . . . . . . .
secpolicydelete . . . . . . . . . . . . . . . . . . . . . . . . . . . . . . . . . . . . . . . . . . . . . . . . . . . . . . . . . . .
secpolicydump . . . . . . . . . . . . . . . . . . . . . . . . . . . . . . . . . . . . . . . . . . . . . . . . . . . . . . . . . . .
secpolicyfcsmove . . . . . . . . . . . . . . . . . . . . . . . . . . . . . . . . . . . . . . . . . . . . . . . . . . . . . . . . .
secpolicyremove . . . . . . . . . . . . . . . . . . . . . . . . . . . . . . . . . . . . . . . . . . . . . . . . . . . . . . . . . .
secpolicysave . . . . . . . . . . . . . . . . . . . . . . . . . . . . . . . . . . . . . . . . . . . . . . . . . . . . . . . . . . . .
secpolicyshow. . . . . . . . . . . . . . . . . . . . . . . . . . . . . . . . . . . . . . . . . . . . . . . . . . . . . . . . . . . .
secstatsreset. . . . . . . . . . . . . . . . . . . . . . . . . . . . . . . . . . . . . . . . . . . . . . . . . . . . . . . . . . . . . .
secstatsshow . . . . . . . . . . . . . . . . . . . . . . . . . . . . . . . . . . . . . . . . . . . . . . . . . . . . . . . . . . . . .
sectemppasswdreset . . . . . . . . . . . . . . . . . . . . . . . . . . . . . . . . . . . . . . . . . . . . . . . . . . . . . . .
sectemppasswdset . . . . . . . . . . . . . . . . . . . . . . . . . . . . . . . . . . . . . . . . . . . . . . . . . . . . . . . . .
sectransabort . . . . . . . . . . . . . . . . . . . . . . . . . . . . . . . . . . . . . . . . . . . . . . . . . . . . . . . . . . . . .
secversionreset . . . . . . . . . . . . . . . . . . . . . . . . . . . . . . . . . . . . . . . . . . . . . . . . . . . . . . . . . . .
sensorShow . . . . . . . . . . . . . . . . . . . . . . . . . . . . . . . . . . . . . . . . . . . . . . . . . . . . . . . . . . . . . .
setdbg . . . . . . . . . . . . . . . . . . . . . . . . . . . . . . . . . . . . . . . . . . . . . . . . . . . . . . . . . . . . . . . . . .
setesdmode . . . . . . . . . . . . . . . . . . . . . . . . . . . . . . . . . . . . . . . . . . . . . . . . . . . . . . . . . . . . . .
setgbicmode . . . . . . . . . . . . . . . . . . . . . . . . . . . . . . . . . . . . . . . . . . . . . . . . . . . . . . . . . . . . .
setsfpmode . . . . . . . . . . . . . . . . . . . . . . . . . . . . . . . . . . . . . . . . . . . . . . . . . . . . . . . . . . . . . .
setSplbMode . . . . . . . . . . . . . . . . . . . . . . . . . . . . . . . . . . . . . . . . . . . . . . . . . . . . . . . . . . . . .
setverbose . . . . . . . . . . . . . . . . . . . . . . . . . . . . . . . . . . . . . . . . . . . . . . . . . . . . . . . . . . . . . . .
sfpShow . . . . . . . . . . . . . . . . . . . . . . . . . . . . . . . . . . . . . . . . . . . . . . . . . . . . . . . . . . . . . . . .
slotOff . . . . . . . . . . . . . . . . . . . . . . . . . . . . . . . . . . . . . . . . . . . . . . . . . . . . . . . . . . . . . . . . . .
slotOn . . . . . . . . . . . . . . . . . . . . . . . . . . . . . . . . . . . . . . . . . . . . . . . . . . . . . . . . . . . . . . . . . .
slotpoweroff . . . . . . . . . . . . . . . . . . . . . . . . . . . . . . . . . . . . . . . . . . . . . . . . . . . . . . . . . . . . .
slotpoweron. . . . . . . . . . . . . . . . . . . . . . . . . . . . . . . . . . . . . . . . . . . . . . . . . . . . . . . . . . . . . .
slotShow . . . . . . . . . . . . . . . . . . . . . . . . . . . . . . . . . . . . . . . . . . . . . . . . . . . . . . . . . . . . . . . .
snmpMibCapSet . . . . . . . . . . . . . . . . . . . . . . . . . . . . . . . . . . . . . . . . . . . . . . . . . . . . . . . . . .
spinFab . . . . . . . . . . . . . . . . . . . . . . . . . . . . . . . . . . . . . . . . . . . . . . . . . . . . . . . . . . . . . . . . .
spinSilk . . . . . . . . . . . . . . . . . . . . . . . . . . . . . . . . . . . . . . . . . . . . . . . . . . . . . . . . . . . . . . . . .
sramRetentionTest . . . . . . . . . . . . . . . . . . . . . . . . . . . . . . . . . . . . . . . . . . . . . . . . . . . . . . . .
snn. . . . . . . . . . . . . . . . . . . . . . . . . . . . . . . . . . . . . . . . . . . . . . . . . . . . . . . . . . . . . . . . . . . . .
statsTest . . . . . . . . . . . . . . . . . . . . . . . . . . . . . . . . . . . . . . . . . . . . . . . . . . . . . . . . . . . . . . . .
Fabric OS Version 3.1.x/4.1.x Reference Guide
691
695
697
699
701
703
707
712
715
719
721
725
727
731
734
737
739
741
743
745
747
748
750
752
754
756
757
760
761
762
763
764
766
768
775
784
787
789
11
Contents
stopporttest . . . . . . . . . . . . . . . . . . . . . . . . . . . . . . . . . . . . . . . . . . . . . . . . . . . . . . . . . . . . . .
supportShow . . . . . . . . . . . . . . . . . . . . . . . . . . . . . . . . . . . . . . . . . . . . . . . . . . . . . . . . . . . . .
switchBeacon . . . . . . . . . . . . . . . . . . . . . . . . . . . . . . . . . . . . . . . . . . . . . . . . . . . . . . . . . . . .
switchcfgpersistentdisable . . . . . . . . . . . . . . . . . . . . . . . . . . . . . . . . . . . . . . . . . . . . . . . . . .
switchcfgpersistentenable . . . . . . . . . . . . . . . . . . . . . . . . . . . . . . . . . . . . . . . . . . . . . . . . . . .
switchCfgSpeed . . . . . . . . . . . . . . . . . . . . . . . . . . . . . . . . . . . . . . . . . . . . . . . . . . . . . . . . . .
switchCfgTrunk . . . . . . . . . . . . . . . . . . . . . . . . . . . . . . . . . . . . . . . . . . . . . . . . . . . . . . . . . .
switchDisable . . . . . . . . . . . . . . . . . . . . . . . . . . . . . . . . . . . . . . . . . . . . . . . . . . . . . . . . . . . .
switchEnable. . . . . . . . . . . . . . . . . . . . . . . . . . . . . . . . . . . . . . . . . . . . . . . . . . . . . . . . . . . . .
switchName . . . . . . . . . . . . . . . . . . . . . . . . . . . . . . . . . . . . . . . . . . . . . . . . . . . . . . . . . . . . .
switchReboot . . . . . . . . . . . . . . . . . . . . . . . . . . . . . . . . . . . . . . . . . . . . . . . . . . . . . . . . . . . .
switchShow. . . . . . . . . . . . . . . . . . . . . . . . . . . . . . . . . . . . . . . . . . . . . . . . . . . . . . . . . . . . . .
switchShutdown . . . . . . . . . . . . . . . . . . . . . . . . . . . . . . . . . . . . . . . . . . . . . . . . . . . . . . . . . .
switchStart . . . . . . . . . . . . . . . . . . . . . . . . . . . . . . . . . . . . . . . . . . . . . . . . . . . . . . . . . . . . . .
switchStatusPolicySet. . . . . . . . . . . . . . . . . . . . . . . . . . . . . . . . . . . . . . . . . . . . . . . . . . . . . .
switchStatusPolicyShow. . . . . . . . . . . . . . . . . . . . . . . . . . . . . . . . . . . . . . . . . . . . . . . . . . . .
switchStatusShow . . . . . . . . . . . . . . . . . . . . . . . . . . . . . . . . . . . . . . . . . . . . . . . . . . . . . . . . .
switchuptime. . . . . . . . . . . . . . . . . . . . . . . . . . . . . . . . . . . . . . . . . . . . . . . . . . . . . . . . . . . . .
syslogdIpAdd . . . . . . . . . . . . . . . . . . . . . . . . . . . . . . . . . . . . . . . . . . . . . . . . . . . . . . . . . . . .
syslogdIpRemove . . . . . . . . . . . . . . . . . . . . . . . . . . . . . . . . . . . . . . . . . . . . . . . . . . . . . . . . .
syslogdIpShow . . . . . . . . . . . . . . . . . . . . . . . . . . . . . . . . . . . . . . . . . . . . . . . . . . . . . . . . . . .
systemtest . . . . . . . . . . . . . . . . . . . . . . . . . . . . . . . . . . . . . . . . . . . . . . . . . . . . . . . . . . . . . . .
systemverification. . . . . . . . . . . . . . . . . . . . . . . . . . . . . . . . . . . . . . . . . . . . . . . . . . . . . . . . .
tempShow . . . . . . . . . . . . . . . . . . . . . . . . . . . . . . . . . . . . . . . . . . . . . . . . . . . . . . . . . . . . . . .
timeout . . . . . . . . . . . . . . . . . . . . . . . . . . . . . . . . . . . . . . . . . . . . . . . . . . . . . . . . . . . . . . . . .
topologyShow . . . . . . . . . . . . . . . . . . . . . . . . . . . . . . . . . . . . . . . . . . . . . . . . . . . . . . . . . . . .
trackChangesHelp. . . . . . . . . . . . . . . . . . . . . . . . . . . . . . . . . . . . . . . . . . . . . . . . . . . . . . . . .
trackChangesSet . . . . . . . . . . . . . . . . . . . . . . . . . . . . . . . . . . . . . . . . . . . . . . . . . . . . . . . . . .
trackChangesShow . . . . . . . . . . . . . . . . . . . . . . . . . . . . . . . . . . . . . . . . . . . . . . . . . . . . . . . .
trunkDebug . . . . . . . . . . . . . . . . . . . . . . . . . . . . . . . . . . . . . . . . . . . . . . . . . . . . . . . . . . . . . .
trunkShow. . . . . . . . . . . . . . . . . . . . . . . . . . . . . . . . . . . . . . . . . . . . . . . . . . . . . . . . . . . . . . .
tsclockserver . . . . . . . . . . . . . . . . . . . . . . . . . . . . . . . . . . . . . . . . . . . . . . . . . . . . . . . . . . . . .
tshelp. . . . . . . . . . . . . . . . . . . . . . . . . . . . . . . . . . . . . . . . . . . . . . . . . . . . . . . . . . . . . . . . . . .
tstimezone . . . . . . . . . . . . . . . . . . . . . . . . . . . . . . . . . . . . . . . . . . . . . . . . . . . . . . . . . . . . . . .
turboRamTest . . . . . . . . . . . . . . . . . . . . . . . . . . . . . . . . . . . . . . . . . . . . . . . . . . . . . . . . . . . .
txdpathtest. . . . . . . . . . . . . . . . . . . . . . . . . . . . . . . . . . . . . . . . . . . . . . . . . . . . . . . . . . . . . . .
uptime . . . . . . . . . . . . . . . . . . . . . . . . . . . . . . . . . . . . . . . . . . . . . . . . . . . . . . . . . . . . . . . . . .
uRouteConfig . . . . . . . . . . . . . . . . . . . . . . . . . . . . . . . . . . . . . . . . . . . . . . . . . . . . . . . . . . . .
12
792
794
800
802
804
806
808
810
812
814
816
818
824
826
828
831
833
835
836
838
840
841
843
846
848
850
853
854
856
857
859
861
863
864
866
870
873
875
Fabric OS Version 3.1.x/4.1.x Reference Guide
Contents
uRouteRemove . . . . . . . . . . . . . . . . . . . . . . . . . . . . . . . . . . . . . . . . . . . . . . . . . . . . . . . . . . .
uRouteShow . . . . . . . . . . . . . . . . . . . . . . . . . . . . . . . . . . . . . . . . . . . . . . . . . . . . . . . . . . . . .
version. . . . . . . . . . . . . . . . . . . . . . . . . . . . . . . . . . . . . . . . . . . . . . . . . . . . . . . . . . . . . . . . . .
wwn. . . . . . . . . . . . . . . . . . . . . . . . . . . . . . . . . . . . . . . . . . . . . . . . . . . . . . . . . . . . . . . . . . . .
zoneAdd . . . . . . . . . . . . . . . . . . . . . . . . . . . . . . . . . . . . . . . . . . . . . . . . . . . . . . . . . . . . . . . .
zoneCreate . . . . . . . . . . . . . . . . . . . . . . . . . . . . . . . . . . . . . . . . . . . . . . . . . . . . . . . . . . . . . .
zoneDelete . . . . . . . . . . . . . . . . . . . . . . . . . . . . . . . . . . . . . . . . . . . . . . . . . . . . . . . . . . . . . .
zoneHelp . . . . . . . . . . . . . . . . . . . . . . . . . . . . . . . . . . . . . . . . . . . . . . . . . . . . . . . . . . . . . . . .
zoneRemove . . . . . . . . . . . . . . . . . . . . . . . . . . . . . . . . . . . . . . . . . . . . . . . . . . . . . . . . . . . . .
zoneShow . . . . . . . . . . . . . . . . . . . . . . . . . . . . . . . . . . . . . . . . . . . . . . . . . . . . . . . . . . . . . . .
877
879
882
884
886
888
891
893
895
897
2
Fabric OS Commands for Licensed Products . . . . . . . . . . . . . . . . . . . . . . . . . . . . . .899
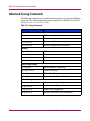
Advanced Zoning Commands . . . . . . . . . . . . . . . . . . . . . . . . . . . . . . . . . . . . . . . . . . . . . . . 900
QuickLoop Fabric Assist Mode Commands. . . . . . . . . . . . . . . . . . . . . . . . . . . . . . . . . . . . . 902
Extended Fabric Command . . . . . . . . . . . . . . . . . . . . . . . . . . . . . . . . . . . . . . . . . . . . . . . . . 903
Fabric Watch Commands . . . . . . . . . . . . . . . . . . . . . . . . . . . . . . . . . . . . . . . . . . . . . . . . . . . 904
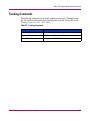
Trunking Commands . . . . . . . . . . . . . . . . . . . . . . . . . . . . . . . . . . . . . . . . . . . . . . . . . . . . . . 905
Advanced Performance Monitoring Commands . . . . . . . . . . . . . . . . . . . . . . . . . . . . . . . . . 906
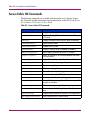
Secure Fabric OS Commands. . . . . . . . . . . . . . . . . . . . . . . . . . . . . . . . . . . . . . . . . . . . . . . . 908
3
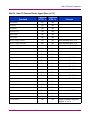
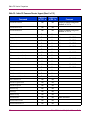
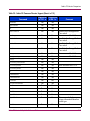
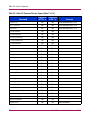
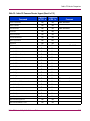
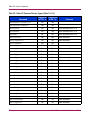
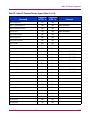
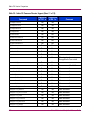
Fabric OS Version Comparison . . . . . . . . . . . . . . . . . . . . . . . . . . . . . . . . . . . . . . .911
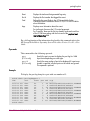
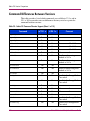
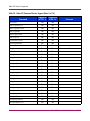
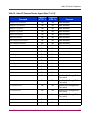
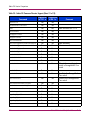
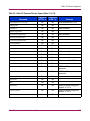
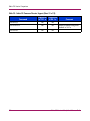
Command Differences Between Versions . . . . . . . . . . . . . . . . . . . . . . . . . . . . . . . . . . . . . . 912
4
Fabric and Switch Management. . . . . . . . . . . . . . . . . . . . . . . . . . . . . . . . . . . . . . .927
Overview. . . . . . . . . . . . . . . . . . . . . . . . . . . . . . . . . . . . . . . . . . . . . . . . . . . . . . . . . . . . . . . . 928
User Access Level . . . . . . . . . . . . . . . . . . . . . . . . . . . . . . . . . . . . . . . . . . . . . . . . . . . . . . . . 929
Fabric OS Command Line Interface. . . . . . . . . . . . . . . . . . . . . . . . . . . . . . . . . . . . . . . . . . . 930
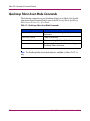
Web Tools. . . . . . . . . . . . . . . . . . . . . . . . . . . . . . . . . . . . . . . . . . . . . . . . . . . . . . . . . . . . . . . 931
Fabric Manager. . . . . . . . . . . . . . . . . . . . . . . . . . . . . . . . . . . . . . . . . . . . . . . . . . . . . . . . . . . 932
Fabric Watch. . . . . . . . . . . . . . . . . . . . . . . . . . . . . . . . . . . . . . . . . . . . . . . . . . . . . . . . . . . . . 934
Fabric OS Access Layer (API) . . . . . . . . . . . . . . . . . . . . . . . . . . . . . . . . . . . . . . . . . . . . . . . 935
Management Server . . . . . . . . . . . . . . . . . . . . . . . . . . . . . . . . . . . . . . . . . . . . . . . . . . . . . . . 936
5
Control Processor Commands . . . . . . . . . . . . . . . . . . . . . . . . . . . . . . . . . . . . . . . .937
Active CP Commands. . . . . . . . . . . . . . . . . . . . . . . . . . . . . . . . . . . . . . . . . . . . . . . . . . . . . . 938
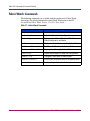
Standby CP Commands . . . . . . . . . . . . . . . . . . . . . . . . . . . . . . . . . . . . . . . . . . . . . . . . . . . . 939
6
Security Commands . . . . . . . . . . . . . . . . . . . . . . . . . . . . . . . . . . . . . . . . . . . . . . .941
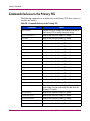
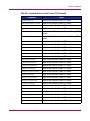
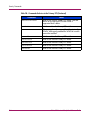
Commands Exclusive to the Primary FCS . . . . . . . . . . . . . . . . . . . . . . . . . . . . . . . . . . . . . . 942
Fabric OS Version 3.1.x/4.1.x Reference Guide
13
Contents
Glossary. . . . . . . . . . . . . . . . . . . . . . . . . . . . . . . . . . . . . . . . . . . . . . . . . . . . . . . .945
Index . . . . . . . . . . . . . . . . . . . . . . . . . . . . . . . . . . . . . . . . . . . . . . . . . . . . . . . . . .977
Tables
1 Document Conventions . . . . . . . . . . . . . . . . . . . . . . . . . . . . . . . . . . . . . . . . . . . . . . . . . . 17
2 Configure Command Fabric Parameters . . . . . . . . . . . . . . . . . . . . . . . . . . . . . . . . . . . . 151
3 Configure Command Virtual Channel Settings . . . . . . . . . . . . . . . . . . . . . . . . . . . . . . . 154
4 Configure Command Arbitrated Loop Settings . . . . . . . . . . . . . . . . . . . . . . . . . . . . . . . 156
5 Configure Command System Services Parameters . . . . . . . . . . . . . . . . . . . . . . . . . . . . 157
6 Configure Command Portlog Events Parameters . . . . . . . . . . . . . . . . . . . . . . . . . . . . . 158
7 Diagnostic Error Codes . . . . . . . . . . . . . . . . . . . . . . . . . . . . . . . . . . . . . . . . . . . . . . . . . 234
8 List of Filter Test Numbers, Definitions, and Action Types . . . . . . . . . . . . . . . . . . . . . 289
9 Display Fields. . . . . . . . . . . . . . . . . . . . . . . . . . . . . . . . . . . . . . . . . . . . . . . . . . . . . . . . . 308
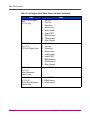
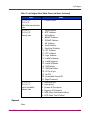
10 fwConfigure Fabric Watch Classes and Areas. . . . . . . . . . . . . . . . . . . . . . . . . . . . . . . . 318
11 Command Field Description . . . . . . . . . . . . . . . . . . . . . . . . . . . . . . . . . . . . . . . . . . . . . 361
12 Object Descriptions . . . . . . . . . . . . . . . . . . . . . . . . . . . . . . . . . . . . . . . . . . . . . . . . . . . . 391
13 LSDbShow Display Fields. . . . . . . . . . . . . . . . . . . . . . . . . . . . . . . . . . . . . . . . . . . . . . . 418
14 Group Fields. . . . . . . . . . . . . . . . . . . . . . . . . . . . . . . . . . . . . . . . . . . . . . . . . . . . . . . . . . 423
15 PortShow Display Fields . . . . . . . . . . . . . . . . . . . . . . . . . . . . . . . . . . . . . . . . . . . . . . . . 603
16 Contributor Value and Status . . . . . . . . . . . . . . . . . . . . . . . . . . . . . . . . . . . . . . . . . . . . . 828
17 Contributor Value and Status . . . . . . . . . . . . . . . . . . . . . . . . . . . . . . . . . . . . . . . . . . . . . 831
18 Zoning Commands . . . . . . . . . . . . . . . . . . . . . . . . . . . . . . . . . . . . . . . . . . . . . . . . . . . . . 900
19 QuickLoop Fabric Assist Mode Commands . . . . . . . . . . . . . . . . . . . . . . . . . . . . . . . . . 902
20 Extended Fabric Command . . . . . . . . . . . . . . . . . . . . . . . . . . . . . . . . . . . . . . . . . . . . . . 903
21 Fabric Watch Commands. . . . . . . . . . . . . . . . . . . . . . . . . . . . . . . . . . . . . . . . . . . . . . . . 904
22 Trunking Commands . . . . . . . . . . . . . . . . . . . . . . . . . . . . . . . . . . . . . . . . . . . . . . . . . . . 905
23 Performance Monitoring Commands. . . . . . . . . . . . . . . . . . . . . . . . . . . . . . . . . . . . . . . 906
24 Secure Fabric OS Commands . . . . . . . . . . . . . . . . . . . . . . . . . . . . . . . . . . . . . . . . . . . . 908
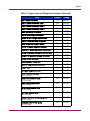
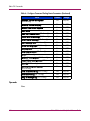
25 Fabric OS Command Version Support . . . . . . . . . . . . . . . . . . . . . . . . . . . . . . . . . . . . 912
26 StorageWorks Core switch User Access Maximum Sessions . . . . . . . . . . . . . . . . . . . . 929
27 StorageWorks Core switch Standby CP Commands . . . . . . . . . . . . . . . . . . . . . . . . . . . 939
28 Commands Exclusive to the Primary FCS. . . . . . . . . . . . . . . . . . . . . . . . . . . . . . . . . . . 942
14
Fabric OS Version 3.1.x/4.1.x Reference Guide
about this
guide
About this Guide
This reference guide provides information to help you:
■
Understand and use Fabric
commands
About OS
this Guide
■
Manage a switch or fabric
■
Contact technical support for additional assistance
“About this Guide” topics include:
■
Overview, page 16
■
Conventions, page 17
■
Getting Help, page 19
Fabric OS Version 3.1.x/4.1.x Reference Guide
15
About this Guide
Overview
This section covers the following topics:
■
Intended Audience
■
Related Documentation
Intended Audience
This book is intended for use by administrators who are experienced with the
following:
■
StorageWorks Fibre Channel SAN switches
■
Fabric Operating System V3.1.x or later
Related Documentation
For a list of related documents included with this product, see the Related
Documents section of the Release Notes that came with your switch.
For the latest information, documentation, and firmware releases, please visit the
following StorageWorks website: http://www.hp.com/country/us/eng/
prodserv/storage.html
For information about Fibre Channel standards, visit the Fibre Channel
Association website, located at: http://www.fibrechannel.org.
16
Fabric OS Version 3.1.x/4.1.x Reference Guide
About this Guide
Conventions
Conventions consist of the following:
■
Document Conventions
■
Text Symbols
Document Conventions
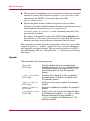
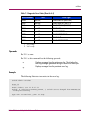
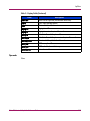
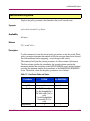
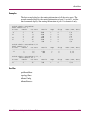
The document conventions included in Table 1 apply in most cases.
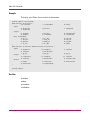
Table 1: Document Conventions
Element
Convention
Cross-reference links
Blue text: Figure 1
Key and field names, menu items,
buttons, and dialog box titles
Bold
File names, application names, and text
emphasis
Italics
User input, command and directory
names, and system responses (output
and messages)
Monospace font
COMMAND NAMES are uppercase
monospace font unless they are
case-sensitive
Variables
<monospace, italic font>
Website addresses
Blue, underlined sans serif font text:
http://www.hp.com
Text Symbols
The following symbols may be found in the text of this guide. They have the
following meanings.
WARNING: Text set off in this manner indicates that failure to follow
directions in the warning could result in bodily harm or death.
Caution: Text set off in this manner indicates that failure to follow directions
could result in damage to equipment or data.
Fabric OS Version 3.1.x/4.1.x Reference Guide
17
About this Guide
Note: Text set off in this manner presents commentary, sidelights, or interesting points
of information.
18
Fabric OS Version 3.1.x/4.1.x Reference Guide
About this Guide
Getting Help
If you still have a question after reading this guide, contact an HP authorized
service provider or access our website: http://www.hp.com.
HP Technical Support
Telephone numbers for worldwide technical support are listed on the following
HP website: http://www.hp.com/support/. From this website, select the country
of origin.
Note: For continuous quality improvement, calls may be recorded or monitored.
Be sure to have the following information available before calling:
■
Firmware version running on the switch
■
A printed output of the switchshow command from the problem switch.
■
A configuration diagram showing hardware interconnections.
■
Technical support registration number (if applicable)
■
Product serial numbers
■
Product model names and numbers
■
Applicable error messages
■
Operating system type and revision level
■
Detailed, specific questions
HP Storage Website
The HP website has the latest information on this product, as well as the latest
drivers. Access storage at: http://www.hp.com/country/us/eng/prodserv/
storage.html. From this website, select the appropriate product or solution.
Fabric OS Version 3.1.x/4.1.x Reference Guide
19
About this Guide
HP Authorized Reseller
For the name of your nearest HP authorized reseller:
20
■
In the United States, call 1-800-345-1518
■
In Canada, call 1-800-263-5868
■
Elsewhere, see the HP website for locations and telephone numbers:
http://www.hp.com.
Fabric OS Version 3.1.x/4.1.x Reference Guide
Fabric OS Commands
1
This chapter lists the Fabric OS commands. It also shows their syntax and
operands, and provides examples of their usage.
Fabric OS Version 3.1.x/4.1.x Reference Guide
21
Fabric OS Commands
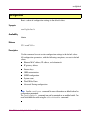
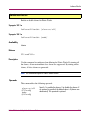
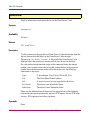
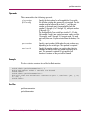
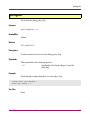
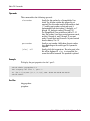
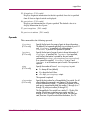
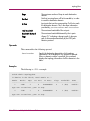
agtcfgDefault
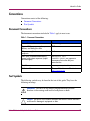
Reset the SNMP agent configuration to default values.
Synopsis
agtcfgDefault
Availability
AdminAdmin
Release
V3.1.x and V4.1.x
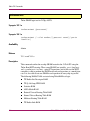
Description
Use this command to reset the configuration of the SNMP agent to default values.
Note: In the StorageWorks Core switch, there is one SNMP agent per logical switch.
This command is specific to the logical switch you are logged into.
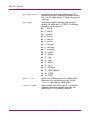
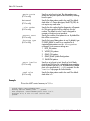
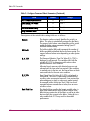
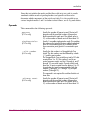
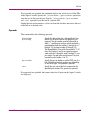
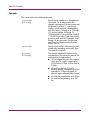
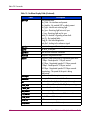
The following values are reset to default:
22
sysDescr
The system description. The default value is Fibre Channel
Switch.
sysLocation
The location of the system. The default value is End User
Premise.
sysContact
The contact information for the system. The default value is
Field Support.
Fabric OS Version 3.1.x/4.1.x Reference Guide
agtcfgDefault
swEventTrapLevel
The event trap level in conjunction with the event's severity
level. When an event occurs and if its severity level is at or
below the set value, the SNMP trap, swEventTrap, is sent to
configured trap recipients. By default, this value is set at 0,
implying that no swEventTrap is sent. Possible values are:
0 - none
1 - critical
2 - error
3 - warning
4 - informational
5 - debug
authTraps
When enabled, the authentication trap, authenticationFailure,
is transmitted to a configured trap recipient in the event the
agent received a protocol message that is not properly
authenticated. In the context of SNMPv1 and SNMPv2c, this
means that a request contains a community string that is not
known to the agent. The default value for this parameter is 0
(disabled).
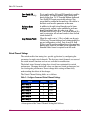
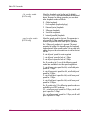
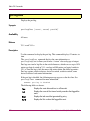
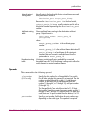
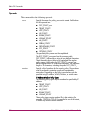
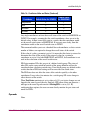
There are six communities and respective trap recipients supported by the agent.
The first three communities are for read-write access (rw) and the last three are for
read-only access (ro). Note that the factory default value for the trap recipient of
each community is “0.0.0.0.” The factory default values for the community strings
are:
■
Community 1: Secret Code
■
Community 2: OrigEquipMfr
■
Community 3: private
■
Community 4: public
■
Community 5: common
■
Community 6: FibreChannel
Note: In order for an SNMP Management Station to receive a trap generated by the
agent in the switch, the administrator must configure a trap recipient value to
correspond to the IP address of the Management Station.
In addition, for V4.1.x, the trap recipient must be able to pass the Access Control List
(ACL) check.
Fabric OS Version 3.1.x/4.1.x Reference Guide
23
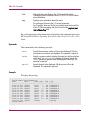
Fabric OS Commands
There are six Access Control Lists (ACLs) to restrict SNMP get/set/trap
operations to hosts under a host-subnet-area. Host-subnet-area is defined by
comparing non-zero IP octets. For example, an ACL of “192.168.64.x” enables
access for any hosts that start with the specified octets. The connecting host is
enabled as “192.168.64.xx,” where xx is any number from 0 to99. All ACL entries
also have a flag to set each host-subnet-area to be read-write or read-only. The
highest privilege matched out of six entries is given to the access. An ACL check
is turned off when all six entries contain “0.0.0.0.”
Note: When secure mode is enabled, the Access Control List feature is incorporated
into the WSNMP (WinSNMP) and Reliable SNMP (RSNMP) security policies.
Community strings can be changed on the primary FCS switch only and will propagate
changes across the fabric. See “Security Commands” on page 941.
Operands
None.
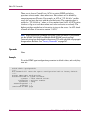
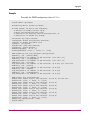
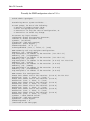
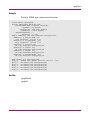
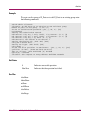
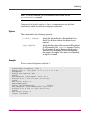
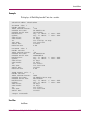
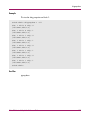
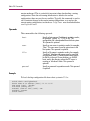
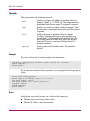
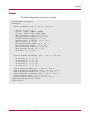
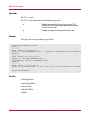
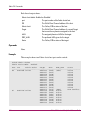
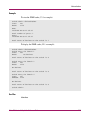
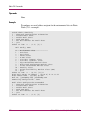
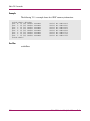
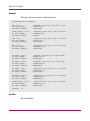
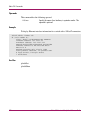
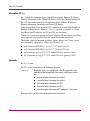
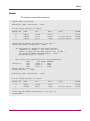
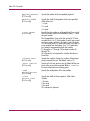
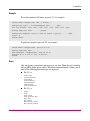
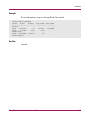
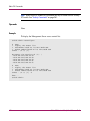
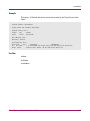
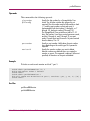
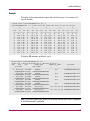
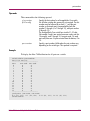
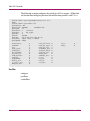
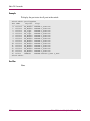
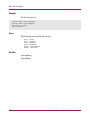
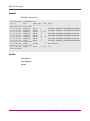
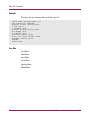
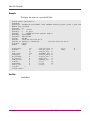
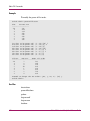
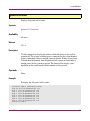
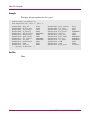
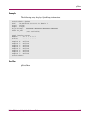
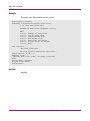
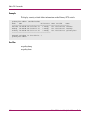
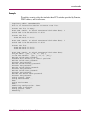
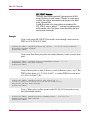
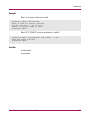
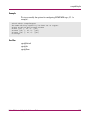
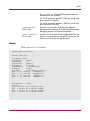
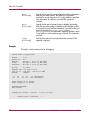
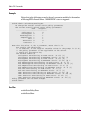
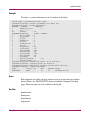
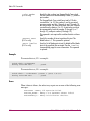
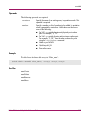
Example
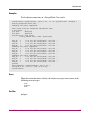
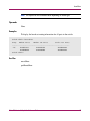
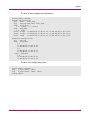
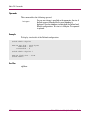
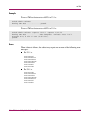
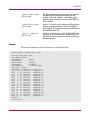
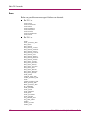
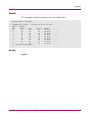
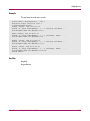
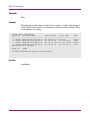
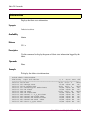
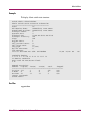
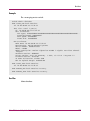
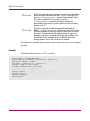
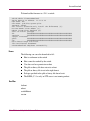
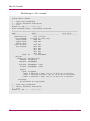
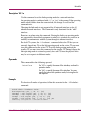
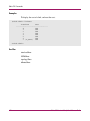
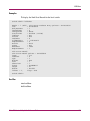
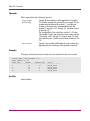
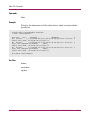
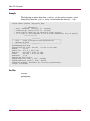
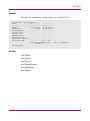
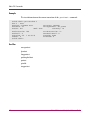
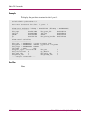
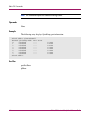
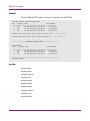
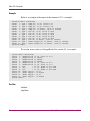
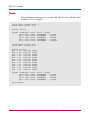
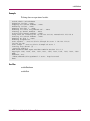
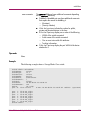
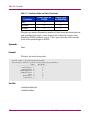
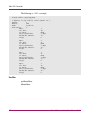
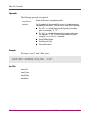
To set the SNMP agent configuration parameters to default values, and verify they
were set:
switch:admin> agtcfgDefault
*****
This command will reset the agent's configuration back to factory default
*****
Current SNMP Agent Configuration
Customizable MIB-II system variables:
sysDescr = Fibre Channel Switch.
sysLocation = End User Premise
sysContact = sweng
sweventTrapLevel = 0
authTraps = 1
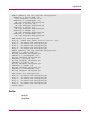
(continued on next page)
24
Fabric OS Version 3.1.x/4.1.x Reference Guide
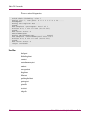
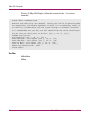
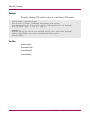
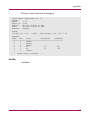
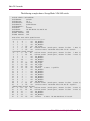
agtcfgDefault
SNMPv1 community and trap recipient configuration:
Community 1: Secret C0de (rw)
Trap recipient: 192.168.15.41
Community 2: OrigEquipMfr (rw)
No trap recipient configured yet
Community 3: private (rw)
No trap recipient configured yet
Community 4: public (ro)
No trap recipient configured yet
Community 5: common (ro)
No trap recipient configured yet
Community 6: FibreChannel (ro)
No trap recipient configured yet
SNMP access list configuration:
Entry 0: Access host subnet area 192.168.64.x (rw)]
Entry 1: No access host configured yet
Entry 2: No access host configured yet
Entry 3: No access host configured yet
Entry 4: No access host configured yet
Entry 5: No access host configured yet
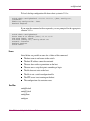
SNMPv1 community and trap recipient configuration:
Community 1: Secret Code (rw)
No trap recipient configured yet
Community 2: OrigEquipMfr (rw)
No trap recipient configured yet
Community 3: private (rw)
No trap recipient configured yet
Community 4: public (ro)
No trap recipient configured yet
Community 5: common (ro)
No trap recipient configured yet
Community 6: FibreChannel (ro)
No trap recipient configured yet
SNMP access list configuration:
Entry 0: No access host configured
Entry 1: No access host configured
Entry 2: No access host configured
Entry 3: No access host configured
Entry 4: No access host configured
Entry 5: No access host configured
switch:admin>
yet
yet
yet
yet
yet
yet
See Also
agtcfgSet
agtcfgShow
Fabric OS Version 3.1.x/4.1.x Reference Guide
25
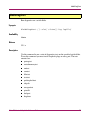
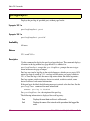
Fabric OS Commands
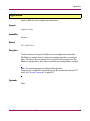
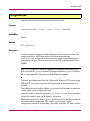
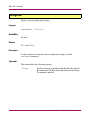
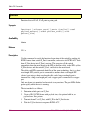
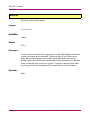
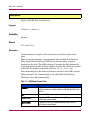
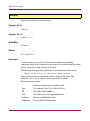
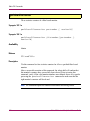
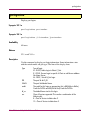
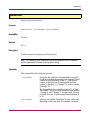
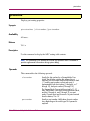
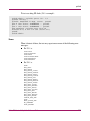
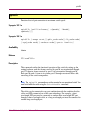
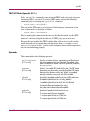
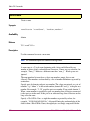
agtcfgSet
Modify the SNMP agent configuration.
Synopsis
agtcfgSet
Availability
Admin
Release
V3.1.x and V4.1.x
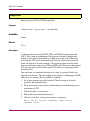
Description
Use this command to modify the configuration of the SNMP agent in the switch.
Note: In the StorageWorks Core switch, there is one SNMP agent per logical switch.
This command is specific to the logical switch you are logged into.
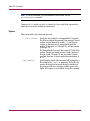
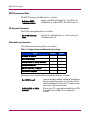
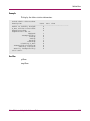
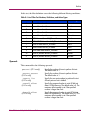
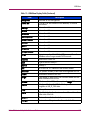
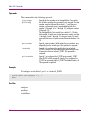
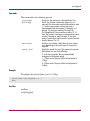
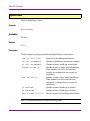
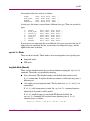
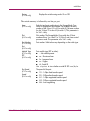
Set the values for the following items:
26
sysDescr
The system description. The default value is Fibre Channel
Switch.
sysLocation
The location of the system. The default value is End User
Premise.
sysContact
The contact information for the system. The default value is
Field Support.
Fabric OS Version 3.1.x/4.1.x Reference Guide
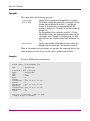
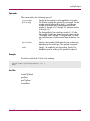
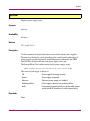
agtcfgSet
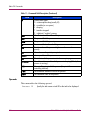
swEventTrapLevel
The event trap level in conjunction with the event's severity
level. When an event occurs and if its severity level is at or
below the set value, the SNMP trap, swEventTrap, is sent to
configured trap recipients. By default, this value is set at 0,
implying that no swEventTrap is sent. Possible values are:
0 - none
1 - critical
2 - error
3 - warning
4 - informational
5 - debug
authTraps
When enabled, the authentication trap, authenticationFailure,
is transmitted to a configured trap recipient in the event the
agent received a protocol message that is not properly
authenticated. In the context of SNMPv1 and SNMPv2c, this
means that a request contains a community string that is not
known to the agent. The default value for this parameter is 0
(disabled).
There are six communities and respective trap recipients supported by the agent.
The first three communities are for read-write access (rw) and the last three are for
read-only access (ro). Note that the factory default value for the trap recipient of
each community is “0.0.0.0.” The factory default values for the community strings
are:
■
Community 1: Secret Code
■
Community 2: OrigEquipMfr
■
Community 3: private
■
Community 4: public
■
Community 5: common
■
Community 6: FibreChannel
Note that in order for an SNMP Management Station to receive a trap generated
by the agent, the administrator must configure a trap recipient value to correspond
to the IP address of the Management Station. In addition, for V4.1.x, the trap
recipient must be able to pass the Access Control List (ACL) check.
There are six ACLs to restrict SNMP get/set operations to hosts under a
host-subnet-area. Host-subnet-area is defined by comparing non-zero IP octets.
For example, an ACL of “192.168.64.x” enables access for any hosts that start
with the specified octets. The connecting host is enabled as “192.168.64.xx.” All
Fabric OS Version 3.1.x/4.1.x Reference Guide
27
Fabric OS Commands
ACL entries also have a flag to set each host-subnet-area to be read-write or
read-only. Highest privilege matched out of six entries is given to the access. An
ACL check is turned off when all six entries contain “0.0.0.0.”
Note: When secure mode is enabled, the Access Control List feature is incorporated
into the WSNMP and RSNMP security policies. Community strings can be changed on
the primary FCS switch only and will propagate changes across the fabric. See
“Security Commands” on page 941.
Operands
None.
28
Fabric OS Version 3.1.x/4.1.x Reference Guide
agtcfgSet
Example
To modify the SNMP configuration values in V3.1.x:
switch:admin> agtcfgSet
Customizing MIB-II system variables ...
At each prompt, do one of the following:
o <Return> to accept current value,
o enter the appropriate new value,
o <Control-D> to skip the rest of configuration, or
o <Control-C> to cancel any change.
To correct any input mistake:
<Backspace> erases the previous character,
<Control-U> erases the whole line,
sysDescr: [FC Switch]
sysLocation: [End User Premise]
sysContact: [Field Support.]
swEventTrapLevel: (0..5) [3]
authTrapsEnabled (true, t, false, f): [true]
SNMP community and trap recipient configuration:
Community (rw): [Secret C0de]
Trap Recipient's IP address in dot notation: [192.168.1.51]
Community (rw): [OrigEquipMfr]
Trap Recipient's IP address in dot notation: [192.168.1.26]
Community (rw): [private]
Trap Recipient's IP address in dot notation: [0.0.0.0] 192.168.64.88
Community (ro): [public]
Trap Recipient's IP address in dot notation: [0.0.0.0]
Community (ro): [common]
Trap Recipient's IP address in dot notation: [0.0.0.0]
Community (ro): [FibreChannel]
Trap Recipient's IP address in dot notation: [0.0.0.0]
SNMP access list configuration:
Access host subnet area in dot notation:
Read/Write? (true, t, false, f): [true]
Access host subnet area in dot notation:
Read/Write? (true, t, false, f): [true]
Access host subnet area in dot notation:
Read/Write? (true, t, false, f): [true]
Access host subnet area in dot notation:
Read/Write? (true, t, false, f): [true]
Access host subnet area in dot notation:
Read/Write? (true, t, false, f): [true]
Access host subnet area in dot notation:
Read/Write? (true, t, false, f): [true]
Committing configuration...done.
switch:admin>
Fabric OS Version 3.1.x/4.1.x Reference Guide
[0.0.0.0] 192.168.64.x
[0.0.0.0]
[0.0.0.0]
[0.0.0.0]
[0.0.0.0]
[0.0.0.0]
29
Fabric OS Commands
To modify the SNMP configuration values in V4.1.x:
switch:admin> agtcfgSet
Customizing MIB-II system variables ...
At each prompt, do one of the following:
o <Return> to accept current value,
o enter the appropriate new value,
o <Control-D> to skip the rest of configuration, or
o <Control-C> to cancel any change.
To correct any input mistake:
<Backspace> erases the previous character,
<Control-U> erases the whole line,
sysDescr: [FC Switch]
sysLocation: [End User Premise]
sysContact: [Field Support.]
swEventTrapLevel: (0..5) [3]
authTrapsEnabled (true, t, false, f): [true]
SNMP community and trap recipient configuration:
Community (rw): [Secret C0de]
Trap Recipient's IP address in dot notation: [192.168.1.51]
Community (rw): [OrigEquipMfr]
Trap Recipient's IP address in dot notation: [192.168.1.26]
Community (rw): [private]
Trap Recipient's IP address in dot notation: [0.0.0.0] 192.168.64.88
Community (ro): [public]
Trap Recipient's IP address in dot notation: [0.0.0.0]
Community (ro): [common]
Trap Recipient's IP address in dot notation: [0.0.0.0]
Community (ro): [FibreChannel]
Trap Recipient's IP address in dot notation: [0.0.0.0]
SNMP access list configuration:
Access host subnet area in dot notation: [0.0.0.0] 192.168.64.0
Read/Write? (true, t, false, f): [true] t
Access host subnet area in dot notation: [0.0.0.0]
Read/Write? (true, t, false, f): [true]
Access host subnet area in dot notation: [0.0.0.0]
Read/Write? (true, t, false, f): [true]
Access host subnet area in dot notation: [0.0.0.0]
Read/Write? (true, t, false, f): [true]
Access host subnet area in dot notation: [0.0.0.0]
Read/Write? (true, t, false, f): [true]
Access host subnet area in dot notation: [0.0.0.0]
Read/Write? (true, t, false, f): [true]
sysDescr = Fibre Channel Switch.
sysLocation = End User Premise
sysContact = Field Support.
swEventTrapLevel = 0
(continued on the next page)
30
Fabric OS Version 3.1.x/4.1.x Reference Guide
agtcfgSet
authTraps = 0 (OFF)
SNMPv1 community and trap recipient configuration:
Community 1: Secret C0de (rw)
Trap recipient: 192.168.15.41
Community 2: OrigEquipMfr (rw)
No trap recipient configured yet
Community 3: private (rw)
No trap recipient configured yet
Community 4: public (ro)
No trap recipient configured yet
Community 5: common (ro)
No trap recipient configured yet
Community 6: FibreChannel (ro)
No trap recipient configured yet
SNMP access list configuration:
Entry 0: Access host subnet area 192.168.64.0 (rw)]
Entry 1: No access host configured yet
Entry 2: No access host configured yet
Entry 3: No access host configured yet
Entry 4: No access host configured yet
Entry 5: No access host configured yet
Committing configuration...done.
switch:admin>
See Also
agtcfgDefault
agtcfgShow
Fabric OS Version 3.1.x/4.1.x Reference Guide
31
Fabric OS Commands
agtcfgShow
Displays the SNMP agent configuration.
Synopsis
agtcfgShow
Availability
All users.
Release
V3.1.x and V4.1.x
Description
Use this command to display the configuration of the SNMP agent in the switch.
Note: In the StorageWorks Core switch, there is one SNMP agent per logical switch.
This command is specific to the logical switch you are logged into.
The following information is displayed:
32
sysDescr
The system description. The default value is Fibre Channel
Switch.
sysLocation
The location of the system. The default value is End User
Premise.
sysContact
The contact information for the system. The default value is
Field Support.
Fabric OS Version 3.1.x/4.1.x Reference Guide
agtcfgShow
swEventTrapLevel
The event trap level in conjunction with the event's severity
level. When an event occurs and if its severity level is at or
below the set value, the SNMP trap, swEventTrap, is sent to
configured trap recipients. By default, this value is set at 0,
implying that no swEventTrap is sent. Possible values are:
0 - none
1 - critical
2 - error
3 - warning
4 - informational
5 - debug
authTraps
When enabled, the authentication trap, authenticationFailure,
is transmitted to a configured trap recipient in the event the
agent received a protocol message that is not properly
authenticated. In the context of SNMPv1 and SNMPv2c, this
means that a request contains a community string that is not
known to the agent. The default value for this parameter is 1
(enabled).
There are six communities and respective trap recipients supported by the agent.
The first three communities are for read-write access (rw) and the last three are for
read-only access (ro). Note that the factory default value for the trap recipient of
each community is “0.0.0.0.” The factory default values for the community strings
are:
■
Community 1: Secret Code
■
Community 2: OrigEquipMfr
■
Community 3: private
■
Community 4: public
■
Community 5: common
■
Community 6: FibreChannel
Note: In order for an SNMP Management Station to receive a trap generated by the
agent, the administrator must configure a trap recipient value to correspond to the IP
address of the Management Station.
In addition, for V4.1.x, the trap recipient must be able to pass the Access Control List
(ACL) check.
Fabric OS Version 3.1.x/4.1.x Reference Guide
33
Fabric OS Commands
There are six ACL (Access Control List) to restrict SNMP get/set operations to
hosts under a host-subnet-area. Host-subnet-area is defined by comparing
non-zero IP octets. For example, an ACL of “192.168.64.x” enables access for any
hosts that start with the specified octets. The connecting host is enabled as
“192.168.64.xx,” where xx is any number from 0 to 99. All ACL entries also have
a flag to set each host-subnet-area to be read-write or read-only. The highest
privilege matched out of six entries is given to the access. An ACL check is turned
off when all six entries contain “0.0.0.0.”
Note: When secure mode is enabled, the Access Control List feature is incorporated
into the WSNMP and RSNMP security policies. Community strings can be changed on
the primary FCS switch only and will propagate changes across the fabric. See
“Security Commands” on page 941.
Operands
None.
34
Fabric OS Version 3.1.x/4.1.x Reference Guide
agtcfgShow
Example
To display SNMP agent configuration information:
switch:admin> agtcfgShow
Current SNMP Agent Configuration
Customizable MIB-II system variables:
sysDescr = FC Switch
sysLocation = End User Premise
sysContact = Field Support.
swEventTrapLevel = 3
authTraps = 1 (ON)
SNMPv1 community and trap recipient configuration:
Community 1: Secret C0de (rw)
Trap recipient: 192.168.1.51
Community 2: OrigEquipMfr (rw)
Trap recipient: 192.168.1.26
Community 3: private (rw)
No trap recipient configured yet
Community 4: public (ro)
No trap recipient configured yet
Community 5: common (ro)
No trap recipient configured yet
Community 6: FibreChannel (ro)
No trap recipient configured yet
SNMP access list configuration:
Entry 0: Access host subnet area 192.168.64.x (rw)]
Entry 1: No access host configured yet
Entry 2: No access host configured yet
Entry 3: No access host configured yet
Entry 4: No access host configured yet
Entry 5: No access host configured yet
See Also
agtcfgDefault
agtcfgSet
Fabric OS Version 3.1.x/4.1.x Reference Guide
35
Fabric OS Commands
aliasDelete
Delete a port from all local groups.
Synopsis
aliasDelete portID
Availability
Admin
Release
V4.1.x
Description
Use this command to delete a local port from all local alias groups. A group is
automatically deleted if it becomes empty after deleting the local port.
Use the aliasShow command to show the existing groups with their
corresponding N_Ports.
Operands
This command has the following operand:
portID
Specify the port ID (in hexadecimal) to be deleted from an
alias group. This operand is required.
Example
To delete a port from an existing group:
switch:admin> aliasdelete 0x19c00
aliasDelete: succeeded
36
Fabric OS Version 3.1.x/4.1.x Reference Guide
aliasDelete
Exit Status
0
Indicates successful operation.
Non Zero
Indicates that the operation has failed.
See Also
aliasJoin
aliasShow
fabricShow
switchShow
Fabric OS Version 3.1.x/4.1.x Reference Guide
37
Fabric OS Commands
aliasJoin
Create or add a member to a group of N_Ports.
Synopsis
aliasJoin
Availability
Admin
Release
V4.1.x
Description
Use this command to create an alias group of N_Ports or to add N_Ports to an
existing group. Any online N_Port defined in the fabric can be part of a group. An
N_Port can be added from any switch that is part of the fabric.
This command is interactive, and prompts you to enter data to create or add to the
alias group.
To get a list of online ports currently defined in the fabric use the nsAllShow
command. If the user wants to add only local ports associated with the local
switch then use the nsShow command to get list of ports associated with the
local switch.
Operands
None.
38
Fabric OS Version 3.1.x/4.1.x Reference Guide
aliasJoin
Example
To create an alias group of N_Ports or to add N_Ports to an existing group enter
the following command.
switch:admin> aliasJoin
aliasJoin: To add ports to an existing or new multicast group
Number of ports in the group: (1..64) [1]
To set an authorization password? (yes, y, no, n): [no]
no password
Setting the authorization control
Add control: 0 by any, 1 only itself, 2 by creator: (0..2) [0]
Del control: 0 by any, 1 only itself, 2 by creator: (0..2) [0]
Lsn control: 0 by any, 1 by none: (0..1) [1]
Add control 0, Del control 0 Lsn control 1
Setting the Routing Bit: (0x0..0xc) [0x0]
using FC-4 Device Data ...
Setting FC-4 Type: (0x0..0x5d) [0x5]
using 0x05 ...
To set the alias qualifier in WWN format? (yes, y, no, n): [yes]
Qualifier (in hex): [10:00:00:60:69:80:02:28]
Port ID (in hex): (0x0..0xeffa00) [0] 0x19c00
npList[0] = 0x19c00
aliasJoin: Join request to Group Address 0xfffb00 succeeds
Exit Status
0
Indicates successful operation.
Non Zero
Indicates that the operation has failed.
See Also
aliasShow
fabricShow
nsShow
nsAllShow
aliasDelete
aliasPurge
Fabric OS Version 3.1.x/4.1.x Reference Guide
39
Fabric OS Commands
aliasPurge
Remove an alias group.
Synopsis
aliasPurge groupID
Availability
Admin
Release
V4.1.x
Description
Use this command to remove an alias group. The alias group must be identified by
its hexadecimal value.
Operands
This command has the following operand:
groupID
Specify in hexadecimal the alias group to be removed. This
operand is required.
Example
To remove an alias group:
switch:admin> aliasPurge 0xfffb00
aliasPurge: succeeded
Exit Status
40
0
Indicates successful operation.
Non Zero
Indicates that the operation has failed.
Fabric OS Version 3.1.x/4.1.x Reference Guide
aliasPurge
See Also
aliasJoin
aliasShow
fabricShow
switchShow
Fabric OS Version 3.1.x/4.1.x Reference Guide
41
Fabric OS Commands
aliasShow
Displays local alias server information.
Synopsis
aliasShow
Availability
All users.
Release
V3.1.x and V4.1.x
Description
Use this command to display local alias server information. If there is no local
alias group, the following message is displayed:
There is no entry in the Local Alias Server
If there are multiple entries in the local alias group, they are displayed.
The following fields are displayed:
Alias ID
(V3.1.xonly)
Multicast address presented in format FFFBxx, where xx is
the name of the multicast group.
Alias ID Creator
Token (V4.1.xonly)
Multicast address presented in format FFFBxx, where xx is
the name of the multicast group.
Creator
Fibre Channel address ID of Nx_Port that created alias
group.
Creator token
Alias token provided to map to the alias group; it consists of
the following entries:
Member list
42
rb
Routing bits.
type
Upper level application type.
grptype
Alias group type; can only be 10 for multicast.
qlfr
Alias qualifier of group.
A list of member address IDs.
Fabric OS Version 3.1.x/4.1.x Reference Guide
aliasShow
Operands
None.
Example
The following example is for V3.1.x:
switch:admin> aliasShow
The Local Alias Server has 1 entry
Alias ID Creator Token [rb, type, grptype, qlfr] Member List
fffb01 fffffd [40, 05, 10, 60000010 12000069] {021200 020800}
The following example is for V4.1.x:
switch:admin> aliasShow
AliasID Creator Token [rb, type, grptype, qlfr] Member List
fffb00 fffffd [00, 05, 10, 10000060 69800228] { 019c00 }
The Local Alias Server has 1 entry
switch:admin>
Exit Status
0
Successful operation.
Non Zero
Indicates that the operation has failed.
See Also
fabricShow
switchShow
Fabric OS Version 3.1.x/4.1.x Reference Guide
43
Fabric OS Commands
aliAdd
Add a member to a zone alias.
Synopsis
aliAdd “aliName”,”member;member”
Availability
Admin
Release
V3.1.x and V4.1.x
Description
Use this command to add one or more members to an existing zone alias. The
alias member list cannot contain another zone alias.
This command changes the Defined Configuration. For the change to be preserved
across switch reboots, it must be saved to non-volatile memory using the
cfgSave command. For the change to become effective, an appropriate zone
configuration must be enabled using the cfgEnable command.
Note: This command requires an Advanced Zoning License.
When security is enabled, this command can only be issued from the Primary FCS
switch. See “Security Commands” on page 941.
44
Fabric OS Version 3.1.x/4.1.x Reference Guide
aliAdd
Operands
This command has the following operands:
aliName
Specify the name of a zone alias in quotation marks. This
operand is required.
member
Specify a member or list of members to be added to the
alias, in quotation marks, separated by semicolons. An
alias member can be specified by one or more of the
following methods:
■ For V3.1.x, a switch domain and physical port
number pair.
■ For V4.1.x, a switch domain and port area number
pair. View the area numbers for ports using the
switchShow command.
■ WWN
■ QuickLoop AL_PAs
This operand is required.
Example
To add members to the following aliases:
switch:admin> aliAdd “array2”, “1,2”
switch:admin> aliAdd “array1”", “21:00:00:20:37:0c:72:51”
switch:admin> aliAdd “loop1”, “0x02; 0xEF”
See Also
aliCreate
aliDelete
aliRemove
aliShow
Fabric OS Version 3.1.x/4.1.x Reference Guide
45
Fabric OS Commands
aliCreate
Create a zone alias.
Synopsis
aliCreate “aliName”,”member;member”
Availability
Admin
Release
V3.1.x and V4.1.x
Description
Use this command to create a new zone alias.
The zone alias member list must have at least one member (empty lists are not
allowed). The alias member list cannot contain another zone alias. Refer to the
zonecreate command for more information on name and member
specifications.
Zone alias members can be specified using the area number to represent a specific
port and slot combination. Area numbers are automatically assigned to a port by
the Fabric OS. You can view the area numbers using the switchShow
command.
For V4.1.x, this command changes the Defined Configuration. For the change to
be preserved across switch reboots, it must be saved to non-volatile memory using
the cfgsave command. For the change to become effective, an appropriate
zone configuration must be enabled using the cfgenable command.
Note: This command requires an Advanced Zoning License.
When security is enabled, this command can only be issued from the Primary FCS
switch. See “Security Commands” on page 941.
46
Fabric OS Version 3.1.x/4.1.x Reference Guide
aliCreate
Operands
This command has the following operands:
aliName
Specify a name for the zone alias in quotation marks. This
operand is required. A zone alias name must begin with a
letter and can be followed by any number of letters, digits,
and underscore characters (up to a maximum of 64
characters). Names are case-sensitive, for example,
“Ali_1” and “ali_1” are different zone aliases. Blank
spaces are ignored. This operand is required.
member
Specify a member or list of members to be added to the
alias, in quotation marks, separated by semicolons. An
alias member can be specified by one or more of the
following methods:
■ For V3.1.x, a switch domain and physical port
number pair.
■ For V4.1.x, a switch domain and port area number
pair. View the area numbers for ports using the
switchShow command.
■ WWN
■ QuickLoop AL_PAs
This operand is required.
Example
To create zone aliases in V3.1.x:
switch:admin> aliCreate "array1", "3,5; 3,8"
switch:admin> aliCreate "array2", "21:00:00:20:37:0c:66:23"
switch:admin> aliCreate "loop1", "0x02; 0xEF; 5,4"
The following example shows how to create zone aliases in V4.1.x. Notice that the
first example uses area numbers.
switch:admin> alicreate “array1”, “2,32; 2,33; 2,34”
switch:admin> alicreate “array2”, “21:00:00:20:37:0c:66:23’
switch:admin> alicreate “loop1”", “0x02; 0xEF; 5,4”
Fabric OS Version 3.1.x/4.1.x Reference Guide
47
Fabric OS Commands
See Also
aliAdd
aliDelete
aliRemove
aliShow
48
Fabric OS Version 3.1.x/4.1.x Reference Guide
aliDelete
aliDelete
Delete a zone alias.
Synopsis
aliDelete “aliName”
Availability
Admin
Release
V3.1.x and V4.1.x
Description
Use this command to delete a zone alias.
This command changes the Defined Configuration. For the change to be preserved
across switch reboots, it must be saved to non-volatile memory using the
cfgSave command. For the change to become effective, an appropriate zone
configuration must be enabled using the cfgEnable command.
Note: This command requires an Advanced Zoning License.
When security is enabled, this command can only be issued from the Primary FCS
switch. See “Security Commands” on page 941.
Operands
This command has the following operand:
aliName
Fabric OS Version 3.1.x/4.1.x Reference Guide
Specify the name of zone alias to be deleted. This operand
must be enclosed in quotation marks. This operand is
required.
49
Fabric OS Commands
Example
To delete the zone alias array2:
switch:admin> aliDelete “array2"“
See Also
aliAdd
aliCreate
aliRemove
aliShow
50
Fabric OS Version 3.1.x/4.1.x Reference Guide
aliRemove
aliRemove
Remove a member from a zone alias.
Synopsis
aliRemove “aliName”,”member;member”
Availability
Admin
Release
V3.1.x and V4.1.x
Description
Use this command to remove one or more members from an existing zone alias.
If all members are removed, the zone alias is deleted.
This command changes the Defined Configuration. For the change to be preserved
across switch reboots, it must be saved to non-volatile memory using the
cfgSave command. For the change to become effective, an appropriate zone
configuration must be enabled using the cfgEnable command.
Note: This command requires an Advanced Zoning License.
When security is enabled, this command can only be issued from the Primary FCS
switch. See “Security Commands” on page 941.
Fabric OS Version 3.1.x/4.1.x Reference Guide
51
Fabric OS Commands
Operands
This command has the following operands:
aliName
Specify the name of the zone alias to have members
removed in quotation marks. This operand is required.
member
Specify a member or list of members to be removed
from the alias, in quotation marks, separated by
semicolons. An alias member can be specified by one
or more of the following methods:
■ For V3.1.x, a switch domain and physical port
number pair.
■ For V4.1.x, a switch domain and port area
number pair. View the area numbers for ports
using the switchShow command.
■ WWN
■ QuickLoop AL_PAs
This operand is required. The member list is located
by an exact string match, therefore, it is important to
maintain the order when removing multiple members.
For example, if a zone alias contains “1,2; 1,3; 1,4”
then removing “1,3; 1,4” succeeds, but removing
“1,4; 1,3” fails.
Example
To remove a World Wide Name from “array1”:
switch:admin> aliRemove “array1”, “3,5”
switch:admin> aliRemove “array1”, “21:00:00:20:37:0c:76:8c”
switch:admin> aliRemove “array1”, “0xEF”
See Also
aliAdd
aliCreate
aliDelete
aliShow
52
Fabric OS Version 3.1.x/4.1.x Reference Guide
aliShow
aliShow
Displays zone alias information.
Synopsis
aliShow “pattern”
Availability
All users.
Release
V3.1.x and V4.1.x
Description
Use this command to display zone configuration information.
If a parameter is specified, it is used as a pattern to match zone alias names; those
that match in the defined configuration are displayed.
Note: This command requires an Advanced Zoning License.
When security is enabled, this command can only be issued from the Primary FCS
switch. See “Security Commands” on page 941.
Fabric OS Version 3.1.x/4.1.x Reference Guide
53
Fabric OS Commands
Operands
This command has the following operands:
pattern
A POSIX style regular expression used to match zone alias
names. This operand must be enclosed in quotation
marks. Patterns may contain:
■ Question mark (?) that matches any single character
■ Asterisk (*) that matches any string of characters
■ Ranges that match any character within the range.
Ranges must be enclosed in brackets, for example,
[0-9] or [a-f]
This operand is optional.
mode (V4.1.x only)
Specify 0 to display the contents of the transaction buffer
(the contents of the current transaction), or specify 1 to
display the contents of the non-volatile memory. The
default value is 0. This operand is optional.
If no parameters are specified, all zone configuration information (both defined
and effective) is displayed. See cfgShow for a description of this display.
Example
To show all zone aliases beginning with “arr”:
switch:admin> aliShow “arr*”
alias: array1 21:00:00:20:37:0c:76:8c
alias: array2 21:00:00:20:37:0c:66:23
See Also
aliAdd
aliCreate
aliDelete
aliRemove
54
Fabric OS Version 3.1.x/4.1.x Reference Guide
backplanetest
backplanetest
Backplane connection test for multiple blade configured system.
Synopsis
backplanetest [-slot number][-passcnt count][-payload
value][-pat type][-ports list][-verbose mode]
Availability
Admin
Release
V4.1.x
Description
Use this command to verify the function of the backplane connection of the blades
through the backend external ports. This command is for the StorageWorks Core
switch only. This command is not part of blade diagnostics; it is used to verify
backplane connection by using the blade's frame transmitter/receiver features.
When this test is run, no other diagnostic can be executed until this test completes.
Options
This command has the following operands:
-slot number
Specify the slot number for a StorageWorks Core
switch. For all other switches this operand is not
required. The slot number must be followed by a slash
( / ) and the port number, so that each port is
represented by both slot number (1 through 4, or 7
through 10), and port number (0 through 15).
The StorageWorks Core switch has a total of 10 slots.
Slots number 5 and 6 are control processor cards, and
slots 1 through 4, and 7 through 10, are port cards. On
each port card, there are 16 ports counted from the
bottom, 0 to 15.
-passcnt count
Specify the number of times to perform this test. The
default value is 1. This operand is optional.
Fabric OS Version 3.1.x/4.1.x Reference Guide
55
Fabric OS Commands
56
-payload value
Specify the byte size of the test frame payload. The
payload size must be in multiples of 4 and the minimum
size is 16. The default value is 512 bytes. This operand
is optional.
-pat type
Specify the test pattern type used in the test frame
payload. The default test is 17(jCRPAT). The following
test patterns can be specified:
■ 1 byte fill
■ 2 word fill
■ 3 quad fill
■ 4 byte not
■ 5 word not
■ 6 quad not
■ 7 byte ramp
■ 8 word ramp
■ 9 quad ramp
■ 10 byte lfsr
■ 11 random
■ 12 crpat
■ 13 cspat
■ 14 chalf sq
■ 15 cqtr sq
■ 16 rdram pat
■ 17 jCRPAT (default)
■ 18 jCJTPAT
■ 19 jCSPAT
-ports list
Specify a list of blade ports to test. By default, all the
blade ports in the specified slot are used. See the
itemlist help pages for further details.
-verbose mode
Specify verbose mode with a value of 1, to have this
command display more detailed information. The
default value is 0. This operand is optional.
Fabric OS Version 3.1.x/4.1.x Reference Guide
backplanetest
Examples
Test backplane connections on a StorageWorks Core switch:
switch:admin> backplanetest -ports 1/16, 18, 20 -payload 2048 -verbose 1
Running Backplane Conn Test .....
Checking for ports segmented
Test frame info for Backplane Connection Test:
# of frames: 1
sid data:
0xfffffd
did data:
0xfffffd
payload size: 2048 bytes
(using jCRPAT data, seed: 0xa363c42b)
BPC_TX
1
P->B Sl3 Ch2 cPt0(bPt16)->Sl1
BPC_RX
1
P->B Sl3 Ch2 cPt0(bPt16)->Sl1
BPC_TX
1
B->P Sl1 Ch2 cPt0(bPt16)->Sl3
BPC_RX
1
B->P Sl1 Ch2 cPt0(bPt16)->Sl3
Checking for ports segmented
BPC_TX
1
P->B Sl4 Ch2 cPt2(bPt18)->Sl1
BPC_RX
1
P->B Sl4 Ch2 cPt2(bPt18)->Sl1
BPC_TX
1
B->P Sl1 Ch2 cPt2(bPt18)->Sl4
BPC_RX
1
B->P Sl1 Ch2 cPt2(bPt18)->Sl4
Checking for ports segmented
BPC_TX
1
P->B Sl2 Ch2 cPt4(bPt20)->Sl1
BPC_RX
1
P->B Sl2 Ch2 cPt4(bPt20)->Sl1
BPC_TX
1
B->P Sl1 Ch2 cPt4(bPt20)->Sl2
BPC_RX
1
B->P Sl1 Ch2 cPt4(bPt20)->Sl2
passed.
Test Complete: “backplanetest” Pass 1 of 1
Duration 0 hr, 0 min & 5 sec (0:0:5:429).
switch:admin>
Ch2
Ch2
Ch2
Ch2
...
...
...
...
Ch2
Ch2
Ch2
Ch2
...
...
...
...
Ch2
Ch2
Ch2
Ch2
...
...
...
...
Errors
When this command detects failures, the subtest may report one or more of the
following error messages:
DATA
TIMEOUT
XMIT
See Also
backport
Fabric OS Version 3.1.x/4.1.x Reference Guide
57
Fabric OS Commands
backPort
Test for back-end miniswitch to miniswitch links.
Synopsis
backport [-nframes num][-ports list][-lb_mode mode]
[-fr_type type][-extonly enable]
Availability
Admin
Release
V4.1.x
Description
Use this command to test the backplane routing and VC allocation. This test
applies to single blade as well as multi-blade systems.
The following items are tested:
■
Proper back-end port domain routing setup such that every user port has a
valid path to every other user port. If a valid path does not exist between any
two user ports then that path will fail to transmit the first frame between the
two ports.
■
Proper VC mapping such that an arbitrarily large number of frames may be
transmitted without running out of credit. If the VC credit mapping is not
correct then the test will fail after enough frames have been sent to exhaust the
initial credit. VC mapping is not tested if the extonly operand is enabled.
■
Proper Trunking of backend ports. The frames are sent in bursts. If the
trunking is not set up properly the burst of frames will not arrive in order.
Note: Since the frames are received without “spinning” first, this test is not as
exhaustive as spinFab.
58
Fabric OS Version 3.1.x/4.1.x Reference Guide
backPort
■
ASIC errors along each path. The test will check for CRC and ENC errors for
each port used between the source and destination ports to help isolate
failures. It will also check that each member of every trunk group along the
path has sent or received at least one frame.
Note: Area routing between user ports is not tested.
Operands
This command has the following operands:
-nframes num
Specify the number of frame sequences to send. The
default value is 100.
-ports list
Specify a list of user ports. The default value is all user
ports.
-lb_mode mode
Specify the loopback mode for source and destination
standard meanings. The default mode is 5. The valid
modes are:
0 cable loopback
1 plug loopback
2 external loopback (SERDES)
5 internal loopback (ASIC)
-fr_type type
Specify the frame types to send. The default type is 1.
The valid types are:
0 single frame
1 spinFab frames
2 spinFab 1K frames
Fabric OS Version 3.1.x/4.1.x Reference Guide
59
Fabric OS Commands
-extonly enable
Specify 1 to enable external test only mode. The
default value is 0. This command normally sends
bursts of frames from each port under test to every
other port in the list. In extonly mode, backPort
will send only one burst of frames to each port from
each miniswitch to miniswitch link. This tests all of the
external connections with only (K*N) frames instead
of the N2 frames required in the all to all mode.
This mode is intended to be used in ESS/burn-in
testing to optimize test time. This command tests only
the external connections between each miniswitch
and txdpath is used to test the internal ASIC to ASIC
paths. In this mode the test does NOT check all of the
VC allocation so it should not be used for software
regression test.
Valid values are:
0 Send frames from all ports to all other ports.
1 Send only one burst of frames to each link.
Example
To test for back-end miniswitch to miniswitch links:
switch:admin> backport
Running Backport Test .....
switch:admin>
Errors
When the command detects failures, the test may report one or more of the
following error messages:
0x3a
0x28
0x29
0x2c
0x2e
0x38
60
INIT
ERR_STAT
XMIT
PORT_DIED
PORT_STOPPED
ERR_STATS
Fabric OS Version 3.1.x/4.1.x Reference Guide
backPort
See Also
crossporttest
portloopbacktest
spinsilk
spinfab
Fabric OS Version 3.1.x/4.1.x Reference Guide
61
Fabric OS Commands
backSpace
Set an alternate backspace character.
Synopsis
backSpace [mode]
Availability
All users (display).
Admin (modify).
Release
V3.1.x
Description
This command changes the backspace character used by the shell between the
default value of BACKSPACE (hex 08) and an alternate value of DEL (hex 7F).
Operands
This command has the following operand:
mode
Specify 0 to use the standard backspace character
(BACKSPACE). Specify 1 to use the alternate
backspace character (DEL). This operand is optional.
Specify the command with no operand to display the current setting.
Example
To display the current backspace character and change it to DEL:
switch:admin> backSpace
BackSpace character is BACKSPACE (hex 08)
switch:admin> backSpace 1
Committing configuration...done.
BackSpace character is DEL (hex 7F)
62
Fabric OS Version 3.1.x/4.1.x Reference Guide
bannerset
bannerset
Set the banner on the local switch.
Synopsis
bannerset [banner]
Availability
Admin
Release
V3.1.x and V4.1.x
Description
Use this command to set the banner on the local switch.
The banner is a string of alphanumeric characters. It is displayed whenever a user
tries to log into a switch.
The banner can be created using the banner operand or by entering the
bannerset command without an operand, making the session interactive.
If you enter the banner text using the interactive method, the maximum length is
1022 characters. If the banner text length exceeds the maximum allowed, the
software truncates the input. To close the banner text string, enter a period at the
beginning of a new line.
Operands
This command has the following operand:
banner
Fabric OS Version 3.1.x/4.1.x Reference Guide
Specify a text string to be displayed when a user logs
in. If you enter the banner text using the banner
operand, the maximum length is only 116 characters.
This operand is optional.
63
Fabric OS Commands
Examples
To set a new banner for a switch:
switch:admin> bannerset “my banner”
Please input context of security banner (press “.” RETURN at the beginning of
a newline to finish input): Do not log into this switch if you are not an
authorized administrator.
.
switch:admin>
See Also
bannershow
64
Fabric OS Version 3.1.x/4.1.x Reference Guide
bannershow
bannershow
Displays the banner text.
Synopsis
bannershow
Availability
Admin
Release
V3.1.x and V4.1.x
Description
Use this command to display the contents of the banner.
Operands
None.
Examples
To display the banner for a switch:
switch:admin> bannershow
Banner:
Do not log into this switch if you are not an authorized administrator.
switch:admin>
See Also
bannerset
Fabric OS Version 3.1.x/4.1.x Reference Guide
65
Fabric OS Commands
bcastShow
Displays broadcast routing information.
Synopsis
bcastShow
Availability
All users.
Release
V3.1.x and V4.1.x
Description
Use this command to display the broadcast routing information for all ports in the
switch. The broadcast routing information indicates all ports that are members of
the broadcast distribution tree, that is, ports that are able to send and receive
broadcast frames.
Normally, all F_Ports and FL_Ports are members of the broadcast distribution
tree. The broadcast path selection protocol selects the E_Ports that are part of the
broadcast distribution tree. The E_Ports are chosen in such a way to prevent
broadcast routing loops.
The following fields are displayed:
Group
The multicast group ID of the broadcast group.
Member Ports
A map of all ports in broadcast tree.
Member ISL Ports
A map of all E_Ports in broadcast tree.
Static ISL Ports
Reserved.
The broadcast routing information for the ports is displayed as a set of
hexadecimal bit maps. For more information on reading hexadecimal bit maps,
refer to the HP StorageWorks Fabric Operating System Procedures Version
3.1.x/4.1.x User Guide.
66
Fabric OS Version 3.1.x/4.1.x Reference Guide
bcastShow
Note: The output from this command varies depending on switch type.
Operands
None.
Examples
To display the broadcast routing information for all ports in the switch:
switch:admin> bcastShow
Group
Member Ports
Member ISL Ports
Static ISL Ports
---------------------------------------------------------------256
0x00012083
0x00002080
0x00000000
0x00000000
0x00000000
0x00000000
0x00000000
0x00000000
0x00000000
switch:admin>
See Also
mcastShow
portRouteShow
Fabric OS Version 3.1.x/4.1.x Reference Guide
67
Fabric OS Commands
bladeBeacon
Set blade beaconing mode on or off.
Synopsis
bladeBeacon [slotnumber] mode
Availability
Admin
Release
V4.1.x
Description
Use this command to set the blade beaconing mode on or off. Specify mode 1 to
enable beaconing mode or specify mode 0 to disable beaconing.
Note: This command is only available on the StorageWorks Core switch.
When beaconing mode is enabled, the port LEDs will flash amber in a running
pattern from port 0 through port 15 and back again. The pattern continues until the
user turns it off. This can be used to locate a physical unit.
Beaconing mode only takes over the port LEDs, it does not change the switch’s
functional behavior. The normal flashing LED pattern (associated with an active,
faulty or disabled port for example) is suppressed and only the beaconing pattern
is displayed. If a diagnostic frame based test (such as portLoopbackTest,
crossPortTest, or spinSilk) is executed, the two LED patterns are
inter-woven. The diagnostic test flickers the LEDs green and the beaconing mode
runs the LEDs amber.
The switchShow command can be used to display if the status of blade
beaconing mode is on or off.
68
Fabric OS Version 3.1.x/4.1.x Reference Guide
bladeBeacon
Operands
This command has the following operands:
slotnumber
Specify the slot number on which to enable
bladeBeacon.
mode
Specify a value of 1 to set beaconing mode ON. Specify a
value of 0 to set beaconing mode OFF. This operand is
required.
Example
To turn the blade in slot 2 beaconing mode ON and then OFF:
switch:admin> bladeBeacon 2 1
switch:admin> bladeBeacon 2 1
See Also
switchShow
Fabric OS Version 3.1.x/4.1.x Reference Guide
69
Fabric OS Commands
bladeDiag
Run diagnostics on a switch blade.
Synopsis
bladediag [[--slot] slotno][-log logfile]
Availability
Admin
Release
V4.1.x
Description
Use this command to run a suite of diagnostics tests on the specified switch blade.
To run this command, you must install loopback plugs on every port. The tests
executed are:
70
■
portregtest
■
centralmemorytest
■
cmitest
■
camtest
■
filtertest
■
statstest
■
portloopbacktest
■
txdpath
■
crossporttest
■
turboramtest
■
spinsilk
■
backport
■
diagshow
Fabric OS Version 3.1.x/4.1.x Reference Guide
bladeDiag
Note: To run this command, you must disable the entire switch with the
switchdisable command.
Compared to bladediagshort, this is a comprehensive test for blade
functionality which also involves backplane connections.
Options
This command has the following operands:
[--slot] slotno
Specify the slot number for a StorageWorks Core
switch. For all other switches this operand is not
required.
-log logfile
Specify that the output of the command will be placed
in a file named by the logfile argument. The log
file will contain all activity that occurred during the
execution of the command. All error messages are
also saved in the logfile. If this option is not specified,
no log file is created.
Example
To run a suite of diagnostics on blade 1:
switch:admin> bladediag --slot 1
Testing slot: 1, user ports: 0 1 2 3 4 5 6 7 8 9 10 ......
PortRegTest
Running Port Register Test ....
passed.
Test Complete: "portregtest" Pass 1 of 1
Duration 0 hr, 2 min & 14 sec (0:2:14:655).
passed.
Test return status: 0
CentralMemoryTest
Running centralmemorytest ............ passed.
Test Complete: "centralmemorytest" Pass 1 of 1
Duration 0 hr, 0 min & 18 sec (0:0:18:415).
passed.
Test return status: 0
<output truncated>
Fabric OS Version 3.1.x/4.1.x Reference Guide
71
Fabric OS Commands
To run a suite of diagnostics:
switch:admin> bladediag --slot 1
Testing slot: 1, user ports: 0 1 2 3 4 5 6 7 8 9 10 ......
PortRegTest
Running Port Register Test ....
passed.
Test Complete: "portregtest" Pass 1 of 1
Duration 0 hr, 2 min & 14 sec (0:2:14:655).
passed.
Test return status: 0
CentralMemoryTest
Running centralmemorytest ............ passed.
Test Complete: "centralmemorytest" Pass 1 of 1
Duration 0 hr, 0 min & 18 sec (0:0:18:415).
passed.
Test return status: 0
<output truncated>
See Also
backport
bladediagshort
camtest
centralmemorytest
cmitest
crossporttest
diagshow
filtertest
portloopbacktest
portregtest
spinsilk
statstest
txdpath
72
Fabric OS Version 3.1.x/4.1.x Reference Guide
bladeDiagShort
bladeDiagShort
Run diagnostics on a switch blade.
Synopsis
bladediagshort [[--slot] slotno][-log logfile]
Availability
Admin
Release
V4.1.x
Description
Use this command to run a suite of diagnostics tests on the specified switch blade.
To run this command you must install loopback plugs on every port. The tests
executed are:
■
portregtest
■
centralmemorytest
■
cmitest
■
camtest
■
filtertest
■
statstest
■
portloopbacktest
■
txdpath
■
crossporttest
■
spinsilk
■
backport
■
diagshow
Fabric OS Version 3.1.x/4.1.x Reference Guide
73
Fabric OS Commands
Note: To run this command, you must disable the entire switch with the
switchdisable command.
Compared to bladediag, this is a limited test for single blade functionality,
which does not involve backplane connections.
Options
This command has the following operands:
74
[--slot] slotno
Specify the slot number for a StorageWorks Core switch.
For all other switches this operand is not required. The slot
number must be followed by a slash ( / ) and the port
number, so that each port is represented by both slot
number (1 through 4, or 7 through 10), and port number
(0 through 15).
The StorageWorks Core switch has a total of 10 slots. Slots
number 5 and 6 are control processor cards, and slots 1
through 4, and 7 through 10, are port cards. On each
port card, there are 16 ports counted from the bottom, 0
to 15.
-log logfile
Specify that the output of the command will be placed in a
file named by the logfile argument. The log file will
contain all activity that occurred during the execution of
the command. All error messages are also saved in the
logfile. If this option is not specified, no log file is created.
Fabric OS Version 3.1.x/4.1.x Reference Guide
bladeDiagShort
Example
To run a suite of diagnostics on blade 1:
switch:admin> bladediagshort --slot 1
Testing slot: 1, user ports: 0 1 2 3 4 5 6 7 8 9 10 ......
PortRegTest
Running Port Register Test ....
passed.
Test Complete: "portregtest" Pass 1 of 1
Duration 0 hr, 2 min & 14 sec (0:2:14:655).
passed.
Test return status: 0
CentralMemoryTest
Running centralmemorytest ............ passed.
Test Complete: "centralmemorytest" Pass 1 of 1
Duration 0 hr, 0 min & 18 sec (0:0:18:415).
passed.
Test return status: 0
<output truncated>
To run a suite of diagnostics on blade 1:
switch:admin> switchdiagshort
Testing user ports: 0 1 2 3 4 5 6 7 8 9 10 ......
PortRegTest
Running Port Register Test ....
passed.
Test Complete: "portregtest" Pass 1 of 1
Duration 0 hr, 2 min & 14 sec (0:2:14:655).
passed.
Test return status: 0
CentralMemoryTest
Running centralmemorytest ............ passed.
Test Complete: "centralmemorytest" Pass 1 of 1
Duration 0 hr, 0 min & 18 sec (0:0:18:415).
passed.
Test return status: 0
<output truncated>
Fabric OS Version 3.1.x/4.1.x Reference Guide
75
Fabric OS Commands
See Also
backport
bladediag
camtest
centralmemorytest
cmitest
crossporttest
diagshow
filtertest
portloopbacktest
portregtest
spinsilk
statstest
txdpath
76
Fabric OS Version 3.1.x/4.1.x Reference Guide
bladedisable
bladedisable
Disable a blade.
Synopsis
bladedisable [slotnumber]
Availability
Admin
Release
V4.1.x
Description
Use this command to disable a blade. All Fibre Channel ports are taken offline. If
the switch was connected to a Fabric through this blade, the remaining switches
reconfigure, and this switch will configure based on the other blade ports.
A blade must be disabled before making configuration changes or before running
many of the diagnostic tests.
A blade does not need to be disabled before rebooting or powering off.
To observe and verify the disable process, watch the front panel LEDs change to
slow flashing yellow as each port of the blade is disabled.
Note: A blade cannot be disabled or enabled when the switch is disabled.
Operands
This command has the following operand:
[slotnumber]
Fabric OS Version 3.1.x/4.1.x Reference Guide
Specify the slot number to be disabled.
77
Fabric OS Commands
Example
Disable a blade in slot 2:
switch:admin> bladedisable 2
See Also
switchshow
bladeenable
portdisable
protenable
78
Fabric OS Version 3.1.x/4.1.x Reference Guide
bladeenable
bladeenable
Enable a blade.
Synopsis
bladeenable [slotnumber]
Availability
Admin
Release
V4.1.x
Description
Use this command to enable a blade. All Fibre Channel ports within the blade
which did not fail POST are enabled. These ports may come online if connected to
a device, or remain offline if disconnected. The switch may need to be enabled if it
was previously disabled to make configuration changes or to run diagnostics.
If the switch is connected to a Fabric, it rejoins the Fabric. After this command is
issued, the 10-second Fabric stability countdown is displayed. If this switch
remains the Principal switch at the end of the countdown, then it assigns itself a
Domain Id. If another switch assumes the Principal role, then this switch becomes
a Subordinate switch, and accepts a Domain Id from the Principal.
To observe and verify the enable process, watch the front panel LEDs change from
slow flashing yellow as each port is enabled. The LEDs change to green for online
ports, may remain black for disconnected ports, or change to yellow for ports that
do not initialize.
Note: A blade cannot be disabled or enabled when the switch is disabled.
Operands
This command has the following operand:
slotnumber
Fabric OS Version 3.1.x/4.1.x Reference Guide
Specify the slot number to be enabled.
79
Fabric OS Commands
Example
Enable a blade in slot 2:
switch:admin> bladeenable 2
10 9 8 7 6 5 4 3 2 1
fabric Principal switch
See Also
switchshow
bladedisable
portdisable
portenable
80
Fabric OS Version 3.1.x/4.1.x Reference Guide
bladePropShow
bladePropShow
Displays blade property.
Synopsis
bladePropShow
[-slot slot]
Availability
All users.
Release
V4.1.x
Description
Use this command to display the properties of a blade.
Operands
This command has the following operand:
-slot slot
Specify the slot number of the blade you want to run
diagnostics on.
Example
To display the blade properties for blade 7:
switch:admin> bladepropshow -slot 7
Slot: 7
[2,4/8/64]
<0,1657/0001 1,1657/0001>
<2,1657/0001 3,1657/0001>
<4,1657/0001 5,1657/0001>
<6,1657/0001 7,1657/0001>
<0,8>=<1,9> <0,10>=<2,9> <0,6>=<3,7>
<1,9>=<0,8> <1,6>=<2,7> <1,10>=<3,9>
<2,9>=<0,10> <2,7>=<1,6> <2,10>=<3,11>
<3,7>=<0,6> <3,9>=<1,10> <3,11>=<2,10>
Fabric OS Version 3.1.x/4.1.x Reference Guide
81
Fabric OS Commands
See Also
chippropshow
ptpropshow
82
Fabric OS Version 3.1.x/4.1.x Reference Guide
bsn
bsn
Displays the serial number.
Synopsis
bsn
Availability
Admin
Release
V3.1.x
Description
Use this command to display the serial number.
Note: To display the serial number for a component in V4.1.x, use the
chassisshow command.
Operands
None.
Examples
To display the serial number:
switch:admin> bsn
FT00X800506
See Also
ssn
Fabric OS Version 3.1.x/4.1.x Reference Guide
83
Fabric OS Commands
camTest
Functional test of the CAM memory. Verify QuickLoop's Content Addressable
Memory (CAM) SID translation.
Synopsis: V3.1.x
camtest [passcnt]
Synopsis: V4.1.x
camtest [--slot number][-passcnt count][-txport
itemlist]
Availability
Admin
Release
V3.1.x and V4.1.x
Description
Use this command to verify that the Content Addressable Memory (CAM) is
functionally OK by performing hit and miss tests. The CAM is used by
QuickLoop to translate the SID.
When a CAM is presented with data, it checks if the data is present in its memory.
A hit means the data is found in the CAM. A miss means the data is not found.
In this test, the CAM is filled with 4 kinds of data patterns:
1. A walking 1
2. A walking 0
3. A random pattern
4. An inverted version of the random pattern above
Once filled with each of the patterns above, a frame is sent and looped back
internally. If a hit is expected (when the random or inverted random pattern is
used) the original SID in the frame transmitted is received translated with the
84
Fabric OS Version 3.1.x/4.1.x Reference Guide
camTest
domain and area fields of the SID zeroed. If a miss is expected (when the walking
1 or walking 0 pattern is used) the original SID in the frame transmitted is
received unchanged.
Note: This command may not be executed on an enabled switch. You must first disable
the switch using the switchDisable command.
Operands
This command has the following operand:
passcnt
(V3.1.x only)
Specify the number of times to perform this test. The
default value is 1.
--slot number
(V4.1.x only)
Specify the slot number that the diagnostic will operate
on. The ports specified will be relative to this slot
number. The default is set to 0 and is designed to
operate on fixed port count products.
-passcnt count
Specify the number of times to perform this test. The
default value is 1.
-txport itemlist
Specify a list of blade ports to test. By default, all the
blade ports in the specified slot (--slot) will be used.
See the itemlist help pages for further details.
(V4.1.x only)
(V4.1.x only)
Example
To verify that Content Addressable Memory (CAM) is functioning correctly in
V3.1.x:
switch:admin> camtest
Running CAM Test .............. passed.
To verify that CAM is functioning correctly in V4.1.x:
switch:admin> camtest -txports 1/1
Running CAM Test ..............Test Complete: "camtest" Pass 1 of 1
Duration 0 hr, 0 min & 5 sec (0:0:5:14).
passed.
Fabric OS Version 3.1.x/4.1.x Reference Guide
85
Fabric OS Commands
Errors
When failures are detected, the subtest may report one or more of the following
error messages:
■
For V3.1.x
DIAG-CAMINIT
DIAG-XMIT
DIAG-CAMSID
■
For V4.1.x
DIAG-CAMFLTR
DIAG-CAMINIT
DIAG-CAMSID
DIAG-CAMSTAT
DIAG-CAMXMIT
See Also
centralmemorytest
cmemretentiontest
cmitest
crossporttest
itemlist
portloopbacktest
portregtest
ramtest
spinsilk
sramretentiontest
86
Fabric OS Version 3.1.x/4.1.x Reference Guide
centralMemoryTest
centralMemoryTest
Test ASIC central memory operation.
Synopsis: V3.1.x
centralMemoryTest [passcount, datatype, dataseed]
Synopsis: V4.1.x
centralmemorytest [--slot number][-passcnt
count][-datatype type][-ports itemlist][-seed value]
Availability
Admin
Release
V3.1.x and V4.1.x
Description
Use this command to execute an address and data bus verification of the ASIC
SRAMs which serve as the Central Memory.
Note: This command cannot be executed on an enabled switch. You must first disable
the switch using the switchDisable command.
Note: Subtest 3 is not available on 2 Gbps-capable products.
Fabric OS Version 3.1.x/4.1.x Reference Guide
87
Fabric OS Commands
The test consists of 6 subtests:
Subtest 1
The BISR subtest executes the Built-In-Self-Repair (BISR) circuitry in each
ASIC. The BISR executes its own BIST, and cells found bad are replaced by
redundant rows provided in each SRAM in the ASIC. Once replaced, the BIST is
executed again.
The firmware merely sets up the hardware for the BISR/BIST operation and
checks the results. If the done bit in each SRAM is not set within a time-out
period, it reports the DIAG-CMBISRTO. If any of the SRAMs within the ASIC
fails to map out the bad rows, its fail bit is set and the DIAG-CMBISRF error
generated.
For V4.1.x, the firmware merely sets up the hardware for the BISR/BIST
operation and checks the results. If the done bit in each SRAM is not set within a
time-out period, it reports the DIAG-CMBISRTO.
If any of the SRAMs within the ASIC fails to map out the bad rows, its fail bit is
set and the DIAG-CMBISRF error is generated.
Subtest 2
The data write/read subtest executes the address and data bus verifications by
running a specified unique ramp pattern D to all SRAMs in all ASICs in the
switch. When all SRAMs are written with pattern D, the SRAMs are read and
compared against the data previously written. The above step is repeated with the
complemented pattern ~D to ensure that each data bit is toggled during the test.
For V3.1.x, the default pattern used (by POST also) is a QUAD_RAMP with a
seed value randomly obtained by reading the current content of the cpu timer
counter.
For example, the pattern D could take the form of:
ASIC #1: 0x41176, 0x41177, 0x41178, 0x41179, ...
ASIC #2: 0x51ef6, 0x51ef7, 0x51ef8, 0x51ef9, ...
ASIC #3: 0x62c76, 0x62c77, 0x62c78, 0x62c79, ...
ASIC #4: 0x739f6, 0x739f7, 0x739f8, 0x739f9, ...
The complemented pattern ~D would then be:
ASIC #1: 0xfffbee89, 0xfffbee88, 0xfffbee87, ...
ASIC #2: 0xfffae109, 0xfffae108, 0xfffae107, ...
88
Fabric OS Version 3.1.x/4.1.x Reference Guide
centralMemoryTest
ASIC #3: 0xfff9d389, 0xfff9d388, 0xfff9d387, ...
ASIC #4: 0xfff8c609, 0xfff8c608, 0xfff8c607, ...
For V4.1.x, the default pattern used (by POST also) is a QUAD_RAMP with a
seed value of 0.
Subtest 3
The ASIC-to-ASIC connection subtest verifies that any port can read the data
from any of the ASICs in the switch; thus verifying both the logic transmitting and
receiving the data and the physical transmit data paths on the main board
connecting all the ASICs to each other.
Note: Subtest 3 is not available on 2 G based switches.
The test method is as follows:
1. Fill the Central Memory of all ASICs with unique frames.
2. Set up the hardware such that each ASIC is read by all of the MAX number of
ports in the switch. Data received is compared against the frame written into
the ASIC.
— Port 0 reads the Central Memory in ASIC 0
— Port 1 reads the Central Memory in ASIC 0
— Port 14 reads the Central Memory in ASIC 0
— Port 15 reads the Central Memory in ASIC 0
— Port 0 reads the Central Memory in ASIC 1
— Port 1 reads the Central Memory in ASIC 1
— Port 14 reads the Central Memory in ASIC 1
— Port 15 reads the Central Memory in ASIC 1
— Port 15 reads the Central Memory in ASIC 2
— Port 15 reads the Central Memory in ASIC 3
3. Repeat the steps above for the complemented pattern.
4. Repeat for each ASIC pair in the blade under test.
The pattern used is generated similarly as in subtest 2 above except that only 2112
bytes are generated.
Fabric OS Version 3.1.x/4.1.x Reference Guide
89
Fabric OS Commands
Subtest 4
The forced bad parity error subtest verifies that a bad parity can be detected, and
that its error flag and interrupt bits are set.
The test method is as follows:
1. Clear the error and interrupt bits of all ASICs.
2. Write 64 bytes with bad parity to all ASICs at offset 0.
3. Read each of the ASICs at offset 0 and check that the error and interrupt bits
are set.
4. Repeat the steps above for offset 1, 2, 3, ... 10.
Subtest 5
The forced bad buffer number error subtest verifies that the bad buffer number in
the data packet can be detected, its error flag and interrupt bits are set.
The test method is as follows:
1. Clear the error and interrupt bits of all ASICs.
2. Set up the hardware so that transmission of data includes a bad buffer number.
3. For each ASIC X in the switch, do:
For each of the 11 possible offsets, do:
a. Write a 64 byte pattern in the Central Memory.
b. Read X from all ASIC Y in the switch.
c. Check that X has:
— Its interrupt status bits set.
— An error type of buffer number error.
— The port number in error is the receiver port (which is the base port of
asic Y).
d. Check that all other ASICs (~X) DO NOT get:
— An interrupt, or
— An error flagged
e. Reading the error register clears the CMEM interrupt bit; ready for the
next offset to test.
90
Fabric OS Version 3.1.x/4.1.x Reference Guide
centralMemoryTest
Subtest 6
The forced bad chip number error subtest verifies that the bad buffer number in
the data packet can be detected, its error flag and interrupt bits are set.
The test method is as follows:
1. Clear the error and interrupt bits of all ASICs.
2. Set up the hardware so that transmission of data includes a bad buffer number.
3. For each ASIC X in the switch, do:
For each of the 11 possible offsets, do:
a. Write a 64 byte pattern in the Central Memory.
b. Read X from all ASIC Y in the switch.
c. Check that all ASIC Y has its:
— Its interrupt status are set.
— An error type of chip number error.
— The port number in error is the receiver port (which is the base port of
asic Y).
d. Reading the error register clears the CMEM interrupt bit; ready for the
next offset to test.
Operands
This command has the following operands:
passcount
Specify the number of test passes to run. By default the
test will be run one time. The passcount parameter
may be used to run the specified number of passes.
datatype
Specify the type of data pattern to use. By default, type
9, QUAD_RAMP is used. For a complete list of
supported data patterns, run the dataTypeShow
command. Some common settings are:
■ 1 Byte fill pattern.
■ 2 Word fill pattern.
■ 3 Quad fill pattern.
■ 9 Quad ramp (Addr=Data) pattern.
■ 11 Random data.
(V3.1.x only)
(V3.1.x only)
Fabric OS Version 3.1.x/4.1.x Reference Guide
91
Fabric OS Commands
-ports ports
Specify a set of ports to test. The data patterns are
written into the ports specified and verified by reading
from the ports.
dataseed
Specify the data pattern seed to be used. The default
seed value is 0. Some data types, like BYTE_LFSR, do
not require any seed value.
--slot number
(V4.1.x only)
Specify the slot number that the diagnostic will operate
on. The ports specified will be relative to this slot
number. The default is set to 0 and is designed to
operate on fixed port count products.
-passcnt count
(V4.1.x only)
Specify the number of test passes to run. By default the
test will be run one time.
-datatype type
(V4.1.x only)
Specify the type of data pattern to use. By default, type
9, QUAD_RAMP is used. For a complete list of
supported data patterns run the datatypeshow
command. Some common settings are:
1 BYTE_FILL pattern.
2 WORD_FILL pattern.
3 QUAD_FILL pattern.
9 QUAD_RAMP (Addr=Data) pattern.
11 RANDOM pattern.
-ports itemlist
(V4.1.x only)
Specify a set of ports to test. Specify a list of blade
ports to test. The Ports list is translated into a matching
quad list before the test is run. By default all the blade
ports in the specified slot (--slot) are tested. See the
itemlist help pages for further details.
-seed value
(V4.1.x only)
Specify the data pattern seed to be used. The default
seed value is 0.
(V3.1.x only)
(V3.1.x only)
Example
To test the ASIC central memory in V3.1.x:
switch:admin> centralMemoryTest
Running Central Memory Test ... passed.
Test complete: "centralmemorytest" Pass 1 of 1.
Duration 0 hr, 0 min & 19 sec (0:0:19:500)
passed.
92
Fabric OS Version 3.1.x/4.1.x Reference Guide
centralMemoryTest
To test the ASIC central memory in V4.1.x:
switch:admin> centralmemorytest -ports 1/0-1/15
Running centralmemorytest ............ passed.
Test Complete: "centralmemorytest" Pass 1 of 1
Duration 0 hr, 0 min & 5 sec (0:0:5:412).
passed.
Errors
When this command detects failures, each subtest may report one or more of the
following error messages:
■
For V3.1.x:
Subtest 1
1) DIAG-CMBISRF
Subtest 2
1) DIAG-LCMTO
2) DIAG-LCMRS
3) DIAG-LCMEM
Subtest 3
1) DIAG-CMNOBUF
2) DIAG-LCMTO
3) DIAG-LCMRS
4) DIAG-LCMEMTX
Subtest 4
1) DIAG-TIMEOUT
2) DIAG-BADINT
3) DIAG-CMERRTYPE
4) DIAG-CMERRPTN
Subtest 5
1) DIAG-TIMEOUT
2) DIAG-BADINT
3) DIAG-CMERRTYPE
4) DIAG-CMERRPTN
Subtest 6
1) DIAG-TIMEOUT
2) DIAG-BADINT
3) DIAG-CMERRTYPE
4) DIAG-CMERRPTN
Fabric OS Version 3.1.x/4.1.x Reference Guide
93
Fabric OS Commands
■
For V4.1.x:
Subtest 2
LCMEM_ERR
LCMRS_ERR
LCMTO_ERR
Subtest 3
CM_NO_BUF
LCMEMTX_ERR
LCMRS_ERR
LCMTO_ERR
Subtest 4
BAD_INT
CM_ERR_PTN
CM_ERR_TYPE
TIMEOUT
Subtest 5
BAD_INT
CM_ERR_PTN
CM_ERR_TYPE
TIMEOUT
Subtest 6
BAD_INT
CM_ERR_PTN
CM_ERR_TYPE
TIMEOUT
See Also
camtest
cmemretentiontest
cmitest
crossporttest
filtertest
portloopbacktest
portregtest
ramtest
spinsilk
sramretentiontest
94
Fabric OS Version 3.1.x/4.1.x Reference Guide
cfgactvshow
cfgactvshow
Displays Effective zone configuration information.
Synopsis
cfgactvshow
Availability
All users.
Release
V3.1.x and V4.1.x
Description
Use this command to display the Effective zone configuration information.
The Effective configuration is a single zone configuration that is currently in
effect. The devices that an initiator sees are based on this configuration. The
Effective configuration is built when a specified zone configuration is enabled.
Note: This command requires an Advanced Zoning license.
When security is enabled, this command can only be issued from the Primary FCS
switch. See “Security Commands” on page 941.
Operands
None.
Fabric OS Version 3.1.x/4.1.x Reference Guide
95
Fabric OS Commands
Example
To show the Effective zone configuration information:
switch:admin> cfgactvshow
Effective configuration:
cfg:
c4
zone: z3
33:07:06:05:04:03:02:01
zone: z4
44:01:23:45:67:89:a0:bc
switch:admin>
See Also
cfgclear
cfgcreate
cfgdelete
cfgremove
cfgsave
cfgshow
96
Fabric OS Version 3.1.x/4.1.x Reference Guide
cfgAdd
cfgAdd
Add a member to a zone configuration.
Synopsis
cfgAdd “cfgName”,”member;member”
Availability
Admin
Release
V3.1.x and V4.1.x
Description
Use this command to add one or more members to an existing zone.
This command changes the Defined Configuration. For the change to be preserved
across switch reboots, it must be saved to non-volatile memory using the
cfgSave command. For the change to become effective, an appropriate zone
configuration must be enabled using the cfgEnable command.
Note: This command requires an Advanced Zoning license.
When security is enabled, this command can only be issued from the Primary FCS
switch. See “Security Commands” on page 941.
Fabric OS Version 3.1.x/4.1.x Reference Guide
97
Fabric OS Commands
Operands
This command has the following operands:
cfgName
Specify a name for the zone configuration in
quotation marks. This operand is required.
member
Specify a zone member or a list of zone members to
be added to the configuration, in quotation marks,
separated by semicolons. Members can be specified
in one or more of the following ways:
■ Zone names
■ QuickLoop names
■ FA (Fabric Assist) zone names
This operand is required.
Example
To add two new zones to the configuration “Test_cfg”:
switch:admin> cfgAdd “Test_cfg”, “redzone; bluezone”
See Also
cfgClear
cfgCreate
cfgDelete
cfgDisable
cfgEnable
cfgRemove
cfgSave
cfgShow
cfgTransAbort
cfgtransshow
98
Fabric OS Version 3.1.x/4.1.x Reference Guide
cfgClear
cfgClear
Clear all zone configurations.
Synopsis
cfgClear
Availability
Admin
Release
V3.1.x and V4.1.x
Description
Use this command to clear all zone information in the transaction buffer. All
defined zone objects in the transaction buffer are deleted. If an attempt is made to
commit the empty transaction buffer while a zone configuration is enabled, a
warning is displayed, to first disable the enabled zone configuration or to provide
a valid configuration with the same name.
After clearing the transaction buffer using the cfgClear command, use the
cfgDisable command to commit the transaction, and disable and clear the
zone configuration in non-volatile memory for all the switches in the fabric,
across reboots.
Note: This command requires an Advanced Zoning license.
When security is enabled, this command can only be issued from the Primary FCS
switch. See “Security Commands” on page 941.
Operands
None.
Fabric OS Version 3.1.x/4.1.x Reference Guide
99
Fabric OS Commands
Example
To clear all zones, and then clear non-volatile memory:
switch:admin> cfgClear
Do you really want to clear all configurations?
(Yes, y, no, n): [no] yes
switch:admin> cfgdisable
See Also
cfgAdd
cfgCreate
cfgDelete
cfgDisable
cfgEnable
cfgRemove
cfgSave
cfgShow
cfgTransAbort
cfgtransshow
100
Fabric OS Version 3.1.x/4.1.x Reference Guide
cfgCreate
cfgCreate
Create a zone configuration.
Synopsis
cfgCreate “cfgName”,”member;member”
Availability
Admin
Release
V3.1.x and V4.1.x
Description
Use this command to create a new zone configuration.
A zone configuration name must begin with a letter and can be followed by any
number of letters, numbers, and the underscore character. Names are case
sensitive, for example, “Cfg_1” and “cfg_1” are different zone configurations.
Blank spaces are ignored.
The zone configuration member list must have at least one member. Empty
member lists are not allowed.
This command changes the Defined Configuration. For the change to be preserved
across switch reboots, it must be saved to non-volatile memory using the
cfgSave command. For the change to become effective, an appropriate zone
configuration must be enabled using the cfgEnable command.
Refer to the zonecreate command for more information on name and
member specifications.
Note: This command requires an Advanced Zoning license.
When security is enabled, this command can only be issued from the Primary FCS
switch. See “Security Commands” on page 941.
Fabric OS Version 3.1.x/4.1.x Reference Guide
101
Fabric OS Commands
Operands
This command has the following operands:
cfgName
Specify a name for the zone configuration in quotation
marks. This operand is required.
member
Specify a member or list of members to be added to zone
configuration, in quotation marks, separated by
semicolons. Members can be specified in one or more of
the following methods:
■ Zone names
■ QuickLoop names
■ FA (Fabric Assist) zone names
This operand is required.
Example
To create a configuration containing three zones:
switch:admin> cfgCreate “Test_cfg”, “redzone; bluezone; greenzone”
See Also
cfgAdd
cfgClear
cfgDelete
cfgDisable
cfgEnable
cfgRemove
cfgSave
cfgShow
cfgTransAbort
cfgtransshow
102
Fabric OS Version 3.1.x/4.1.x Reference Guide
cfgDelete
cfgDelete
Delete a zone configuration.
Synopsis
cfgDelete “cfgName”
Availability
Admin
Release
V3.1.x and V4.1.x
Description
Use this command to delete a zone configuration.
This command changes the Defined Configuration. For the change to become
effective, an appropriate zone configuration must be enabled using the
cfgEnable command.
This command changes the Defined Configuration. For the change to be preserved
across switch reboots, it must be saved to non-volatile memory using the
cfgSave command. For the change to become effective, an appropriate zone
configuration must be enabled using the cfgEnable command.
Note: This command requires an Advanced Zoning license.
When security is enabled, this command can only be issued from the Primary FCS
switch. See “Security Commands” on page 941.
Operands
This command has the following operand:
cfgName
Fabric OS Version 3.1.x/4.1.x Reference Guide
Specify the name of zone configuration to be deleted
in quotation marks. This operand is required.
103
Fabric OS Commands
Example
To delete a zone configuration:
switch:admin> cfgDelete “Test_cfg”
See Also
cfgAdd
cfgClear
cfgCreate
cfgDisable
cfgEnable
cfgRemove
cfgSave
cfgShow
cfgTransAbort
cfgtransshow
104
Fabric OS Version 3.1.x/4.1.x Reference Guide
cfgDisable
cfgDisable
Disable a zone configuration.
Synopsis
cfgDisable
Availability
Admin
Release
V3.1.x and V4.1.x
Description
Use this command to disable the current zone configuration. The fabric returns to
non-zoning mode where all devices see each other. It also commits the zone
configuration in the transaction buffer to volatile and non-volatile memory.
This command ends and commits the current zoning transaction. If a transaction is
open on a different switch in the fabric when this command is run, the transaction
on the other switch is automatically aborted. A message is displayed on the other
switch notifying the transation abort.
Note: This command requires an Advanced Zoning license.
When security is enabled, this command can only be issued from the Primary FCS
switch. See “Security Commands” on page 941.
Operands
None.
Fabric OS Version 3.1.x/4.1.x Reference Guide
105
Fabric OS Commands
Example
To disable the current zone configuration:
switch:admin> cfgDisable
Updating flash...
switch:admin>
See Also
cfgAdd
cfgClear
cfgCreate
cfgDelete
cfgEnable
cfgRemove
cfgSave
cfgShow
cfgTransAbort
cfgtransshow
106
Fabric OS Version 3.1.x/4.1.x Reference Guide
cfgEnable
cfgEnable
Enable a zone configuration.
Synopsis
cfgEnable “cfgName”
Availability
Admin
Release
V3.1.x and V4.1.x
Description
Use this command to commit any zone configuration in the transaction buffer to
the volatile and non-volatile memory and enable the specified zone configuration.
This command ends the current zoning transaction.
The specified zone configuration is built by checking for undefined zone names,
zone alias names, or other inconsistencies by expanding zone aliases, removing
duplicate entries, and then installing the effective configuration.
If the build fails, the previous state is preserved (zoning remains disabled, or the
previous Effective configuration remains in effect). If the build succeeds, the new
configuration replaces the previous configuration. See the cfgShow command
for a description of defined and effective configurations.
This command ends and commits the current transaction. If a transaction is open
on a different switch in the fabric when this command is run, the transaction on
the other switch is automatically aborted. A message is displayed on the other
switch notifying the transaction abort.
For V3.1.x, this command changes the Effective Configuration. For the change to
be preserved across switch reboots, it must be saved to non-volatile memory using
the cfgSave command.
Fabric OS Version 3.1.x/4.1.x Reference Guide
107
Fabric OS Commands
Note: This command requires an Advanced Zoning license.
When security is enabled, this command can only be issued from the Primary FCS
switch. See “Security Commands” on page 941.
Operands
This command has the following operand:
cfgName
Specify the name of a zone configuration to enable in
quotation marks. This operand is required.
Example
To enable the zone configuration “Test_cfg”:
switch:admin> cfgEnable “Test_cfg”
zone config “Test_cfg” is in effect
See Also
cfgAdd
cfgClear
cfgCreate
cfgDelete
cfgDisable
cfgRemove
cfgSave
cfgShow
cfgTransAbort
cfgtransshow
108
Fabric OS Version 3.1.x/4.1.x Reference Guide
cfgRemove
cfgRemove
Remove a member from a zone configuration.
Synopsis
cfgRemove “cfgName”,”member;member”
Availability
Admin
Release
V3.1.x and V4.1.x
Description
Use this command to remove one or more members from an existing zone
configuration.
The member list is located by an exact string match, therefore, it is important to
maintain the order when removing multiple members. For example, if a zone
configuration contains “zone2; zone3; zone4” then removing “zone3; zone4”
succeeds, but removing “zone4; zone3” fails.
If all members are removed, the zone configuration is deleted.
For V4.1.x, this command changes the Defined Configuration. For the change to
be preserved across switch reboots, it must be saved to non-volatile memory using
the cfgsave command. For the change to become effective, an appropriate
zone configuration must be enabled using the cfgenable command.
Note: This command requires an Advanced Zoning license.
When security is enabled, this command can only be issued from the Primary FCS
switch. See “Security Commands” on page 941.
Fabric OS Version 3.1.x/4.1.x Reference Guide
109
Fabric OS Commands
Operands
The following operands are required:
cfgName
Specify a name of a zone configuration, in quotation
marks.
member
Specify one or more members to be deleted from the
zone configuration, in quotation marks, separated by
semicolons. Members can be specified in one or more
of the following methods:
■ Zone names
■ QuickLoop names
■ FA (Fabric Assist) zone names
This operand is required.
Example
To remove a zone from a configuration:
switch:admin> cfgRemove “Test_cfg”, “redzone”
See Also
cfgAdd
cfgClear
cfgCreate
cfgDelete
cfgDisable
cfgEnable
cfgSave
cfgShow
cfgTransAbort
cfgtransshow
110
Fabric OS Version 3.1.x/4.1.x Reference Guide
cfgSave
cfgSave
Save zone configuration to non-volatile memory.
Synopsis
cfgSave
Availability
Admin
Release
V3.1.x and V4.1.x
Description
Use this command to save the current zone configuration. The defined
configuration and the name of the enabled configuration are written to
non-volatile memory in all switches in the fabric.
The saved configuration is automatically reloaded by the switch on power up and,
if a configuration was in effect at the time it was saved, the same configuration is
reinstalled with an automatic cfgEnable command.
Because the saved configuration is reloaded at power on, only valid configurations
are saved. The cfgSave command verifies that the enabled configuration is
valid by performing the same tests as cfgEnable. If the tests fail, an error is
displayed and the configuration is not saved. Tests may fail if a configuration has
been modified since the last cfgEnable.
This command ends and commits the current transaction. If a transaction is open
on a different switch in the fabric when this command is run, the transaction on
the other switch is automatically aborted. A message is displayed on the other
switch notifying the transaction abort.
Note: This command requires an Advanced Zoning license.
When security is enabled, this command can only be issued from the Primary FCS
switch. See “Security Commands” on page 941.
Fabric OS Version 3.1.x/4.1.x Reference Guide
111
Fabric OS Commands
Operands
None.
Example
To enable a zone configuration, then save it:
switch:admin> cfgEnable “Test_cfg”
zone config “Test_cfg” is in effect
switch:admin> cfgSave
Updating flash...
See Also
cfgAdd
cfgClear
cfgCreate
cfgDelete
cfgDisable
cfgEnable
cfgRemove
cfgShow
cfgTransAbort
cfgtransshow
112
Fabric OS Version 3.1.x/4.1.x Reference Guide
cfgShow
cfgShow
Displays zone configuration information.
Synopsis: V3.1.x
cfgShow [“pattern”]
Synopsis: V4.1.x
cfgShow [“pattern”][, mode]
Availability
All users.
Release
V3.1.x and V4.1.x
Description
Use this command to display zone configuration information.
If no operand is specified, all zone configuration information (both Defined and
Effective) is displayed.
If an operand is specified, it is used as a pattern to match zone configuration
names in the defined configuration; those that match the pattern are displayed.
The Defined configuration is the complete set of all zone objects that have been
defined in the fabric. There can be multiple zone configurations defined, but only
one can be enabled at a time. There may be inconsistencies in the definitions,
zones or aliases that are referenced but not defined, or there may be duplicate
members. The Defined configuration is the current state of the administrator input.
The Effective configuration is the single zone configuration that is currently
enabled. The devices that an initiator sees in the fabric are based on this
configuration. The Effective configuration is built when a specific zone
configuration is enabled and all error checking has been completed successfully.
Fabric OS Version 3.1.x/4.1.x Reference Guide
113
Fabric OS Commands
Note: This command requires an Advanced Zoning license.
When security is enabled, this command can only be issued from the Primary FCS
switch. See “Security Commands” on page 941.
Operands
This command has the following operand:
pattern (V3.1.x only)
Specify a string of characters enclosed in quotation
marks used to match zone configuration names. This
operand must be in quotation marks. Patterns can
contain:
■ Question mark “?” that matches any single
character
■ Asterisk “*” that matches any string of characters
■ Ranges which match any character within the
range. For example, [0-9] or [a-f].
This operand is optional.
pattern (V4.1.x only)
A POSIX style regular expression used to match zone
configuration names. The pattern must be enclosed in
quotation marks. Patterns may contain:
■ Question mark “?” that matches any single
character
■ Asterisk “*” that matches any string of characters
■ Ranges which match any character within the
range. For example, [0-9] or [a-f].
This operand is optional.
mode (V4.1.x only)
Specify 0 to display the contents of the transaction
buffer (the contents of the current transaction), or
specify 1 to display the contents of the non-volatile
memory. The default value is 0. This operand is
optional.
Example
To show all zone configuration configurations that start with “Test”:
switch:admin> cfgShow “Test”
cfg:
Test1 Blue_zone
cfg:
Test_cfg Red_zone; Blue_zone
114
Fabric OS Version 3.1.x/4.1.x Reference Guide
cfgShow
To show all zone configuration information:
switch:admin> cfgShow
Defined configuration:
cfg:
USA1
Blue_zone
cfg:
USA_cfg Red_zone; Blue_zone
zone: Blue_zone
1,1; array1; 1,2; array2
zone: Red_zone
1,0; loop1
alias: array1 21:00:00:20:37:0c:76:8c; 21:00:00:20:37:0c:71:02
alias: array2 21:00:00:20:37:0c:76:22; 21:00:00:20:37:0c:76:28
alias: loop1
21:00:00:20:37:0c:76:85; 21:00:00:20:37:0c:71:df
Effective configuration:
cfg:
USA_cfg
zone: Blue_zone
1,1
21:00:00:20:37:0c:76:8c
21:00:00:20:37:0c:71:02
1,2
21:00:00:20:37:0c:76:22
21:00:00:20:37:0c:76:28
zone: Red_zone
1,0
21:00:00:20:37:0c:76:85
21:00:00:20:37:0c:71:df
To show only configuration names:
switch:admin> cfgshow *
cfg:
a_cfg1 zone1; zone2
cfg:
b_cfg2 zone1; zone2; zone3
switch:admin>
Fabric OS Version 3.1.x/4.1.x Reference Guide
115
Fabric OS Commands
See Also
cfgAdd
cfgClear
cfgCreate
cfgDelete
cfgDisable
cfgEnable
cfgRemove
cfgSave
cfgTransAbort
cfgtransshow
116
Fabric OS Version 3.1.x/4.1.x Reference Guide
cfgsize
cfgsize
Displays size details of the zone database.
Synopsis
cfgsize [integer]
Availability
All users.
Release
V3.1.x and V4.1.x
Description
Use this command to display the size details of the zone database.
The size details include the Zone DB max size, the committed size, and the
transaction size. All sizes are in bytes.
The “Zone DB max size” is the upper limit for the Defined configuration,
determined by the amount of flash memory available for storing the Defined
configuration.
The “committed size” is the size of the Defined configuration currently stored in
flash.
The “transaction size” is the size of the uncommitted Defined configuration. This
value will be non-zero if the Defined configuration is being modified by programs
such as telnet or API; otherwise it is 0.
See cfgshow for a description of Defined and Effective configurations.
Note: This command requires an Advanced Zoning license.
When security is enabled, this command can only be issued from the Primary FCS
switch. See “Security Commands” on page 941.
Fabric OS Version 3.1.x/4.1.x Reference Guide
117
Fabric OS Commands
Operands
This command has the following operand:
integer
If a non-zero integer is specified as the parameter, the size of
the flash memory allocated for the zone database is
displayed. The zone database includes both the Defined and
Effective configurations. This size is in kilobytes. This operand
is optional.
Example
To display size details of the Defined configuration:
switch:admin> cfgsize
Zone DB max size - 98232 bytes
committed - 8812
transaction - 0
switch:admin> cfgsize 1
Zone DB flash size - 96 KB
switch:admin>
See Also
cfgShow
118
Fabric OS Version 3.1.x/4.1.x Reference Guide
cfgTransAbort
cfgTransAbort
Abort the current zoning transaction.
Synopsis
cfgTransAbort
Availability
All users.
Release
V3.1.x and V4.1.x
Description
Use this command to abort the current zoning transaction without committing it.
All changes made since the transaction was started will be removed and the zone
configuration database restored to the state before the transaction was started.
If a transaction is open on a different switch in the fabric when this command is
run, the transaction on the other switch remains open and unaffected.
Note: This command requires an Advanced Zoning license.
When security is enabled, this command can only be issued from the Primary FCS
switch. See “Security Commands” on page 941.
Operands
For V3.1.x: none.
For V4.1.x: this command has the following operand:
token
Specify the token ID of an abortable transaction. Use the
cfgtransshow command to obtain the token ID of a
transaction.
Fabric OS Version 3.1.x/4.1.x Reference Guide
119
Fabric OS Commands
Example
To abort the current transaction:
switch:admin> cfgtransshow
Current transaction token is 271010736
It is abortable
switch:admin> cfgtransabort
Warning: Current Zoning Transaction was aborted. Reason code = User Command
switch:admin>
See Also
cfgAdd
cfgClear
cfgCreate
cfgDelete
cfgDisable
cfgEnable
cfgRemove
cfgSave
cfgShow
cfgtransshow
120
Fabric OS Version 3.1.x/4.1.x Reference Guide
cfgtransshow
cfgtransshow
Displays information about current zoning transaction.
Synopsis
cfgtransshow
Availability
All users.
Release
V3.1.x and V4.1.x
Description
Use this command to show the ID of the current zoning transaction. It will also
give the information about whether the transaction can be aborted or not. The
transaction can not be aborted if it is an internal zoning transaction.
Note: This command requires an Advanced Zoning license.
When security is enabled, this command can only be issued from the Primary FCS
switch. See “Security Commands” on page 941.
Operands
None.
Fabric OS Version 3.1.x/4.1.x Reference Guide
121
Fabric OS Commands
Example
To show the current transaction:
switch:admin> cfgtransshow
There is no outstanding zone transactions
switch:admin> cfgclear
Do you really want to clear all configurations?
Clearing All zoning configurations...
switch:admin> cfgtransshow
Current transaction token is 271010736
It is abortable
(yes, y, no, n): [no] y
switch:admin>
See Also
cfgAdd
cfgClear
cfgCreate
cfgDelete
cfgDisable
cfgEnable
cfgRemove
cfgSave
cfgShow
cfgTransAbort
122
Fabric OS Version 3.1.x/4.1.x Reference Guide
chassisName
chassisName
Displays or sets the chassis name for a StorageWorks Core switch.
Synopsis
chassisName [name]
Availability
All users (display).
Admin (set).
Release
V4.1.x
Description
Use this command to change the name associated with the chassis of a
StorageWorks Core switch. In the StorageWorks Core switch there are two logical
switches associated with a single chassis.
Enter this command with no parameter to display the current name.
Enter this command with a name specified to set the chassis name to the new
value.
Operands
This command has the following operand:
name
Specify a new name for the chassis. Chassis names can be up
to 16 characters long and must begin with a letter. The name
must consist of letters, digits or underscore characters.
Fabric OS Version 3.1.x/4.1.x Reference Guide
123
Fabric OS Commands
Example
The following command changes the chassis's name to “SW12K”:
switch:admin> chassisname
Silkworm12000
switch:admin> chassisname SW12K
switch:admin> chassisname
SW12K
switch:admin>
See Also
switchName
124
Fabric OS Version 3.1.x/4.1.x Reference Guide
chassisShow
chassisShow
Displays all Field Replaceable Units (FRUs).
Synopsis
chassisShow
Availability
All users.
Release
V4.1.x
Description
Use this command to inventory and display the field replaceable unit (FRU)
header content for each object in the chassis. On some platforms for certain FRU
types, a few items may not be available. In these cases the lines will be
suppressed. Possibly affected are lines 2, 3, 4, 5, 6, 8, and 10 through 13. In
addition, for lines 10 through 13, if there is no data set, these lines will be
suppressed.
The header data is formatted into a record consisting of (up to) 13 lines. The lines
and their meaning are described below:
1. The first line of each record contains the object ID:
Object type:
CHASSIS, FAN, POWER SUPPLY, SW BLADE
(switch), CP BLADE (control processor), WWN
(World Wide Name), or UNKNOWN; and
Object number:
Slot <nn> (for blades), Unit <nn> (for
everything else).
If the FRU is part of an assembly, a brief description in parentheses will be
displayed.
2. This line displays the FRU header version number:
Header Version:
Fabric OS Version 3.1.x/4.1.x Reference Guide
<x>
125
Fabric OS Commands
3. This line displays the value used to calculate the object's power consumption,
positive for power supplies, negative for consumers:
Power Consume Factor: <-xxx>
4. This line displays the part number (up to 14 characters):
Part Num:
<xx-yyyyyyy-zz>
5. This line displays the serial number (up to 12 characters):
Serial Num:
<xxxxxxxxxx>
6. This line displays the date the FRU was manufactured:
Manufacture:
Day: <dd> Month: <mm> Year: <yyyy>
7. This line displays the date the FRU header was last updated:
Update:
Day: <dd> Month: <mm> Year: <yyyy>
8. This line displays the cumulative time, in days, that the FRU has been
powered on:
Time Alive:
<dddd> days
9. This line displays the current time, in days, since the FRU was last powered
on:
Time Awake:
<ddd> days
10. This line displays the externally supplied ID (up to 10 characters):
ID:
<xxxxxxxxxx>
11. This line displays the externally supplied part number (up to 20 characters):
Part Num:
<xxxxxxxxxxxxxxxxxxxx>
12. This line displays the externally supplied serial number (up to 20 characters):
Serial Num:
<xxxxxxxxxxxxxxxxxxxx>
13. This line displays the externally supplied revision number (up to 4
characters):
Revision Num:
<xxxx>
Operands
None.
126
Fabric OS Version 3.1.x/4.1.x Reference Guide
chassisShow
Example
To displays all Field Replaceable Units for a switch:
switch12k:admin> chassisshow
SW BLADE Slot: 3
Header Version:
Power Consume Factor:
Brocade Part Num:
Brocade Serial Num:
Manufacture:
Update:
Time Alive:
Time Awake:
ID:
Part Num:
Serial Num:
Revision Num:
1
-180
60-0001532-03
1013456800
Day: 12 Month: 6 Year: 2001
Day: 15 Month: 7 Year: 2001
28 days
16 days
555-374757q> to stop
234-294-12345
2734658
A.00
CP BLADE Slot: 6
Header Version:
Power Consume Factor:
Brocade Part Num:
Brocade Serial Num:
Manufacture:
Update:
Time Alive:
Time Awake:
ID:
Part Num:
Serial Num:
Revision Num:
1
-40
60-0001604-02
FP00X600128
Day: 12 Month:
Day: 15 Month:
61 days
16 days
555-374757
236-296-12350
2836542
A.00
POWER SUPPLY Unit: 2
Header Version:
Power Consume Factor:
Brocade Part Num:
Brocade Serial Num:
Manufacture:
Update:
Time Alive:
Time Awake:
ID:
Part Num:
Serial Num:
1
1000
60-0001536-02to stop
A013450700
Day: 14 Month: 6 Year: 2001
Day: 15 Month: 7 Year: 2001
50 days
16 days
555-374757
238-298-12360
1234567
6
7
Year: 2001
Year: 2001
<output truncated>
See Also
slotShow
Fabric OS Version 3.1.x/4.1.x Reference Guide
127
Fabric OS Commands
chippropshow
Displays ASIC chip property contents.
Synopsis
chippropshow [slotnumber/]chip | [slotnumber] [all]
Availability
All users.
Release
V4.1.x
Description
Use this command to display the ASIC chip property contents for the specified
chip on the specified blade slot.
Operands
This command has the following operands:
128
slotnumber
Specify the slot number for a StorageWorks Core switch.
For all other switches this operand is not required.
chip
Specify the index of the chip within the blade to be
displayed. This operand is optional.
-all
Specify this operand to display the properties for all minis
on the blade. This operand is optional.
Fabric OS Version 3.1.x/4.1.x Reference Guide
chippropshow
Example
To view the chip properties on blade 2:
switch:admin> chippropshow
2 -all
switch:admin>
chippropshow 7 -all
Looking for chip 0 in path: /proc/fabos/blade/7
Slot: 2 minis: 0 slot:
chip: 7,
0 minis: 0, chip: 0
[1657/0001,0104,2/8]
[1657/0001,0104,2/8]
slot: 7, minis: 0, chip: 1
Slot: 2 minis: 0 [1657/0001,0104,2/8]
chip: 1
[1657/0001,0104,2/8]
slot: 7, minis: 1, chip: 0
[1657/0001,0104,2/8]
Slot: 2 minis: 1 slot:
chip: 7,
0 minis: 1, chip: 1
[1657/0001,0104,2/8]
[1657/0001,0104,2/8]
slot: 7, minis: 2, chip: 0
Slot: 2 minis: 1 [1657/0001,0104,2/8]
chip: 1
[1657/0001,0104,2/8]
slot: 7, minis: 2, chip: 1
[1657/0001,0104,2/8]
Slot: 2 minis: 2 slot:
chip: 7,
0 minis: 3, chip: 0
[1657/0001,0104,2/8]
[1657/0001,0104,2/8]
slot: 7, minis: 3, chip: 1
Slot: 2 minis: 2 [1657/0001,0104,2/8]
chip: 1
[1657/0001,0104,2/8]
san95:admin>
Slot: 2 minis: 3 chip: 0
[1657/0001,0104,2/8]
Slot: 2 minis: 3 chip: 1
[1657/0001,0104,2/8]
switch:admin>
See Also
ptpropshow
Fabric OS Version 3.1.x/4.1.x Reference Guide
129
Fabric OS Commands
chipregshow
Displays port registers of a given chip number.
Synopsis
chipregshow [slotnumber/]chip [filter]
Availability
All users.
Release
V4.1.x
Description
Use this command to display the ASIC register contents for the specified chip on
the specified blade slot.
Operands
This command has the following operands:
130
slotnumber
Specify the slot number of the chip you want to test.
chip
Specify the index of the chip within the blade to be
displayed.
filter
Specify a filter string.
Fabric OS Version 3.1.x/4.1.x Reference Guide
chipregshow
Example
To display the port registers of chip 1 on blade 2:
switch:admin> chipregshow 2/1
Port Registers for Slot: 2 port: 8
0xca6ed000: chip_id
0104
0xca6ed004: did_vc_map
0800
0xca6ed00a: int_status
1020
0xca6ed00e: vc_config
00c0
0xca6ed014: mem_bufline
00080008
0xca6ed01a: mem_offset
0000
0xca6ed01e: quad_imask
c00f
0xca6ed024: lli_status
00040000
0xca6ed02c: lli_def
00000000
0xca6ed034: prescaler0
000a
0xca6ed038: toc0
0007
0xca6ed03c: toc_ctl
0000
0xca6ed04c: flist_stat
0018037e
0xca6ed05c: plist_stat
ffffffff
0xca6ed06c: aulist_stat
ffffffff
0xca6ed072: tfr_status
2000
0xca6ed076: available
01b4
0xca6ed07c: lli_flag
00000000
0xca6ed0a2: quad_no
0002
0xca6ed0a6: debug
0000
0xca6ed0ae: tcci
0000
0xca6ed0d8: holdoff_toc
0000
0xca6ed180: link_table_mask0fff
0xca6ef854: port2vc
07df0b1a
<output truncated>
0xca6ed002:
0xca6ed008:
0xca6ed00c:
0xca6fd010:
0xca6ed018:
0xca6ed01c:
0xca6ed020:
0xca6ed028:
0xca6ed030:
0xca6ed036:
0xca6ed03a:
0xca6ed044:
0xca6ed054:
0xca6ed064:
0xca6ed070:
0xca6ed074:
0xca6ed078:
0xca6ed0a0:
0xca6ed0a4:
0xca6ed0aa:
0xca6ed0d0:
0xca6ed0da:
0xca6ef850:
0xca6ef8a0:
port_config
int_mask
err_status
buf_error
mem_ctl
port_ctl
port_addr
lli_ctl
lli_mask
tod0
toc1
putq_stat
tolist_stat
cflist_stat
tfr_ctl
min_free
cmi_st
quad_istat
led
fbpc
fm_thrsh
holdoff_fc
r2t_qctl
sharable_bufs
0a38
064f
0002
00000000
13c0
0000
00041000
00081180
30020000
011f
0000
ffffffff
ffffffff
000b037f
2000
0000
00000000
0000
0000
0000
255 15 1
0000
10bc0000
0066(102)
See Also
chippropshow
ptregshow
Fabric OS Version 3.1.x/4.1.x Reference Guide
131
Fabric OS Commands
cmemRetentionTest
Test the data retention of the central memory SRAMs.
Synopsis: V3.1.x
cmemRetentionTest [passcount]
Synopsis: V4.1.x
cmemretentiontest [--slot number][-passcnt count][-datatype
type][-ports itemlist][-seed value]
Availability
Admin
Release
V3.1.x and V4.1.x
Description
Use this command to verify data retention in the central memory SRAMs in the
ASIC.
The method used is to write a fill pattern to all SRAMs, wait 10 seconds, and then
read all SRAMs checking that data read should match data previously written.
Repeat using the inverted version of the pattern. The patterns used are as follows:
1)
2)
3)
4)
5)
0xffffffff (and 0x00000000)
0x55555555 (and 0xaaaaaaaa)
0x33333333 (and 0xcccccccc)
0x0f0f0f0f (and 0xf0f0f0f0)
QUAD_RAMP with a random seed value (and its invert)
Note: This command may not be executed on an enabled switch. You must first disable
the switch using the switchDisable command.
132
Fabric OS Version 3.1.x/4.1.x Reference Guide
cmemRetentionTest
Operands
This command has the following operands:
passcount
(V3.1.x only)
Specify the number of times to execute this test. The default
value is 1. This operand is optional.
--slot number
(V4.1.x only)
Specify the slot number that the diagnostic will operate
on. The ports specified will be relative to this slot number.
The default is set to 0 and designed to operate on fixed
port count products.
-passcnt count
Specify the number of test passes to run. By default the test
will be run one time.
-datatype type
(V4.1.x only)
Specify the type of data pattern to use. By default, type 9,
QUAD_RAMP is used. For a complete list of supported
data patterns run the datatypeshow command. Some
common settings are:
(V4.1.x only)
Pattern
type
example
BYTE_FILL 1
00 00 00 00 00 00 00 00
00 00 00 00 00 00 00 00
WORD_FILL 2
0000 0000 0000
0000
0000
0000
0000
0000
QUAD_FILL
00000000
3
00000000
00000000
00000000
QUAD_RAMP
00000002
9
00000000
00000003
00000001
RANDOM
11
55 16 fc d7 17 65 a9 87
5f 44 be 5a d0 de bc a5
-ports itemlist
(V4.1.x only)
Specify a set of ports to test. Specify a list of blade ports to
test. The Ports list is translated into a matching quad list
before the test is run. By default all the blade ports in the
specified slot (--slot) are tested. See the itemlist
help pages for further details.
-seed value
Specify the data pattern seed to be used. The default seed
value is 0.
(V4.1.x only)
Example
To run the data retention test on the central memory SRAMS:
switch:admin> cmemRetentionTest
Running CMEM Retention Test ... passed.
Fabric OS Version 3.1.x/4.1.x Reference Guide
133
Fabric OS Commands
Errors
Listed below are possible error messages if failures are detected:
■
For V3.1.x:
DIAG-LCMRS
DIAG-LCMTO
DIAG-LCMEM
■
For V4.1.x:
LCMEM_ERR
LCMRS_ERR
LCMTO_ERR
See Also
camTest
centralMemoryTest
cmiTest
crossPortTest
datatypeshow
itemlist
portLoopbackTest
ramTest
spinSilk
sramRetentionTest
134
Fabric OS Version 3.1.x/4.1.x Reference Guide
cmiTest
cmiTest
Verify the Control Message Interface (CMI) bus between ASICs.
Synopsis V3.1.x
cmitest [passcnt]
Synopsis V4.1.x
cmitest [--slot number][-passcnt count][-txports
list][-rxports list][-skip mask]
Availability
Admin
Release
V3.1.x and V4.1.x
Description
Use this command to verify that the multiplexed 4-bit CMI point-to-point
connection between two ASICs is OK. It also verifies that a message sent with a
bad checksum will set the error and interrupt status bits of the destination ASIC
and that a message with a good checksum will not set any error or interrupt bit in
any ASIC.
The CMI is used to send transmission requests or completion messages between
the ACIC transmitter and receiver.
The test method is as follows.
1. For each destination ASIC X or Y in the switch, skip ASIC if X = Y.
2. Generate the CMI data D.
3. Send data from source X to destination Y.
4. Check that destination Y has its:
■
Capture flag set.
■
Data received is as expected (D).
Fabric OS Version 3.1.x/4.1.x Reference Guide
135
Fabric OS Commands
■
If a good checksum test, check that:
— CMI error bit is not set.
— CMI error interrupt status bit is not set.
■
if a bad checksum test, check that:
— CMI error bit is set.
— CMI error interrupt status bit is set.
5. Check that all other ASICs (~Y) do not have its:
■
Capture flag set.
■
CMI error bit set.
■
CMI error interrupt status bit set.
Operands
This command has the following operands:
passcnt
Specify the number of times to perform this test. The
default value is 1. This operand is optional.
--slot number
Specify the slot number to test. The default is set to 0 and
designed to operate on fixed port count products.
-passcnt count
Specify the number of test passes to run. By default the test
will be run one time.
-txports list
Specify a list of ports to transmit data. By default all the
ports in the specified slot (--slot number) will be
used. See itemlist help pages for further details. This
operand is optional.
-rxports list
Specify a list of ports to receive data. By default all the
ports in the specified slot (--slot number) will be
used. See itemlist help pages for further details.This
operand is optional.
-skip mask
Specify the particular test by using the following bit weight
data:
1 CMI data test (ignore checksum)
2 CMI checksum test
3 Enable all tests
This operand is optional.
(V3.1.x only)
(V4.1.x only)
(V4.1.x only)
(V4.1.x only)
(V4.1.x only)
(V4.1.x only)
136
Fabric OS Version 3.1.x/4.1.x Reference Guide
cmiTest
Example
To run a CMI test between two ASICs in V3.1.x:
switch:admin> cmiTest
Running CMI Test .............. passed.
To run a CMI test between two ASICs in V4.1.x:
switch:admin> cmitest -txports 1/0-1/7 -rxports 1/8-1/15
Running CMI Test ..............Test Complete: “cmitest” Pass 1 of 1
Duration 0 hr, 0 min & 2 sec (0:0:2:563).
passed.
Errors
When it detects failures, the subtest may report one or more of the following error
messages:
■
For V3.1.x:
DIAG-CMISA1
DIAG-CMINOCAP
DIAG-CMICKSUM
DIAG-CMIINVCAP
DIAG-CMIDATA
DIAG-INTNIL
DIAG-BADINT
■
For V4.1.x:
DIAG-BADINT
DIAG-CMICKSUM
DIAG-CMIDATA
DIAG-CMIINVCAP
DIAG-CMINOCAP
DIAG-CMISA1
DIAG-INTNIL
Fabric OS Version 3.1.x/4.1.x Reference Guide
137
Fabric OS Commands
See Also
camtest
centralmemorytest
cmemretentiontest
crossporttest
itemlist
portloopbacktest
portregtest
ramtest
spinsilk
sramretentiontest
138
Fabric OS Version 3.1.x/4.1.x Reference Guide
configDefault
configDefault
Reset a subset of configuration settings to the default values.
Synopsis
configDefault
Availability
Admin
Release
V3.1.x and V4.1.x
Description
Use this command to reset certain configuration settings to the default values.
All configuration parameters, with the following exceptions, are reset to default
values:
■
Ethernet MAC address, IP address, and subnetmask
■
IP gateway address
■
License keys
■
OEM customization
■
SNMP configuration
■
System name
■
World Wide Name
■
Advanced Zoning configuration
Note: See the configure command for more information on default values for
configuration parameters.
The configDefault command may not be executed on an enabled switch. You
must first disable the switch using the switchDisable command.
Fabric OS Version 3.1.x/4.1.x Reference Guide
139
Fabric OS Commands
Some configuration parameters are cached by the system. To avoid unexpected
switch behavior, reboot the system after executing this command.
Operands
None.
Example
To restore the system configuration to default values:
switch:admin> configDefault
Committing Configuration ...done.
See Also
agtcfgDefault
configure
switchDisable
switchEnable
140
Fabric OS Version 3.1.x/4.1.x Reference Guide
configDownload
configDownload
Download the switch configuration file from a host system.
Synopsis
configDownload [“host”,”user”,”file”,”passwd”]
Availability
Admin
Release
V3.1.x and V4.1.x
Description
Use this command to load the switch configuration file from a host system. The
configuration file is ASCII text and may have been generated using
configUpload, or it may have been created by a user to download specific
configuration changes. The download process uses FTP or Remote Shell Server
(RSHD).
Note: V3.1.x supports FTP and RSHD protocol for configuration downloads. RSHD
does not require the passwd operand. FTP always requires the passwd operand.
V4.1.x only supports FTP. No spaces are allowed between operands.
To restore the configuration file from a Microsoft® Windows NT® system using
FTP, the FTP server may have to be installed from the distribution media and
enabled.
This command can be invoked without any operands, and becomes an interactive
session where you are prompted for input.
A switch’s identity cannot be changed by configDownload. These parameters
(such as the switch’s name and IP address) are ignored.
The download process is additive; that is, the lines read from the file are added to
the current switch configuration. This enables you to change a single
configuration variable by downloading a file with a single line. All other variables
Fabric OS Version 3.1.x/4.1.x Reference Guide
141
Fabric OS Commands
remain unchanged. This is particularly important when downloading a zoning
configuration. Since the new zoning information is added to the current
configuration, there may not be any conflicts. Typically this command is used to
add a consistent change to the current zoning configuration, or to replace the
current zoning configuration, in which case cfgClear must be invoked before
configDownload.
Operands
This command has the following operands:
host
Specify a host name or IP address in quotation marks;
for example, “citadel” or “11.22.33.44.” The
configuration file is downloaded from this host system.
This operand is optional.
user
Specify a user name in quotation marks; for example,
“jdoe.” This user name is used to gain access to the
host system. This operand is optional.
file
Specify a file name in quotation marks; for example,
“config.txt.” Absolute path names may be specified
using forward slash (/). Relative path names search
for the file in the user’s home directory on UNIX®
hosts, and in the directory where the FTP server is
running on Windows® hosts. This operand is
optional.
passwd
Specify a password in quotation marks. This operand
is optional.
Example
To load a backup configuration file from a host system in V3.1.x:
switch:admin> configdownload
Server Name or IP Address [host]: 11.22.33.44
User Name [user]: johndoe
File Name [config.txt]:
Protocol (RSHD or FTP) [rshd]: FTP
Password: xxxxxxx
switch:admin>
142
Fabric OS Version 3.1.x/4.1.x Reference Guide
configDownload
To load a backup configuration file from a host system in V4.1.x:
switch:admin> configdownload "123.123.123.123","jdoe","config.txt",
“password1”
Committing configuration...done.
download complete
If you enter the command with no operands, you are prompted for the appropriate
valuesin V4.1.x:
switch:admin> configdownload
Server Name or IP Address [host]: 11.22.33.44
User Name [None]: user21
File Name [config.txt]: config-switch.txt
Password: xxxxxxxxx
download complete
switch:admin>
Errors
Listed below are possible reasons for a failure of this command:
■
The host name is not known to the switch
■
The host IP address cannot be contacted
■
The user does not have permission on the host
■
The user runs a script that prints something at login
■
The file does not exist on the host
■
The file is not a switch configuration file
■
The FTP server is not running on the host
■
The configuration data contains errors.
See Also
configDefault
configUpload
configShow
configure
Fabric OS Version 3.1.x/4.1.x Reference Guide
143
Fabric OS Commands
configShow
Displays system configuration settings.
Synopsis
configShow [“filter”]
Availability
All users.
Release
V3.1.x and V4.1.x
Description
Use this command to view the system configuration settings set by the
configure command.
Operands
This command has the following operand:
filter
144
Specify a text string in quotation marks that limits the output of
the command to only those entries that contain the text string.
This operand is optional.
Fabric OS Version 3.1.x/4.1.x Reference Guide
configShow
Example
To display system configuration settings:
switch:admin> configshow
Ethernet addresses: 0:60:69:c0:e:88
Nvram datadata: fei(0,0)host:/usr/switch/firmware e=10.32.225.190:
fffff000 g=10.
32.224.1 u=user tn=switch
Type <CR> to continue, Q<CR> to stop:
diag.postDisable:
0
fabric.domain: 14
fabric.ops.BBCredit:
5
fabric.ops.E_D_TOV:
2000
fabric.ops.R_A_TOV:
10000
fabric.ops.dataFieldSize:
2112
fabric.ops.max_hops:
7
fabric.ops.mode.SeqSwitching:
0
fabric.ops.mode.fcpProbeDisable:
fabric.ops.mode.isolate:
0
fabric.ops.mode.longDistance:
0
fabric.ops.mode.noClassF:
0
fabric.ops.mode.pidFormat:
1
fabric.ops.mode.sync:
0
fabric.ops.mode.unicastOnly:
0
fabric.ops.mode.useCsCtl:
0
fabric.ops.mode.vcEncode:
0
fabric.ops.vc.class.2: 2
fabric.ops.vc.class.3: 3
fabric.ops.vc.config:
0xc0
fabric.ops.vc.linkCtrl: 0
fabric.ops.vc.multicast:
7
fabric.ops.wan_rtt_dly_max:
200
0
Type <CR> to continue, Q<CR> to stop:
Note: Configuration parameters vary depending on system model and configuration.
Fabric OS Version 3.1.x/4.1.x Reference Guide
145
Fabric OS Commands
See Also
agtcfgShow
configure
diagDisablePost
diagEnablePost
ipAddrShow
licenseShow
syslogdIpShow
146
Fabric OS Version 3.1.x/4.1.x Reference Guide
configUpload
configUpload
Create a backup file of switch configuration information on a host workstation.
Synopsis
configUpload [“host”,”user”,”file”[,”passwd”]]
Availability
Admin
Release
V3.1.x and V4.1.x
Description
Use this command to upload the switch configuration to a host file. The upload
process uses FTP or RSHD.
If the command is entered without operands, it becomes interactive and prompts
the user for input.
The configuration file is written as three sections. The first section contains the
switch boot parameters. It has variables such as the switch's name and IP address.
This section corresponds to the first few lines of output of the configShow
command.
The second section contains general switch configuration variables, such as
diagnostic settings, fabric configuration settings, and SNMP settings. This section
corresponds to the output of the configShow command (after the first few
lines), although there are more lines uploaded than shown by the command.
The third section contains the zoning configuration parameters.
Note: V3.1.x supports FTP and RSHD protocol for configuration uploads. RSHD does
not require the passwd operand.
In V4.1.x, no spaces are allowed between operands.
Fabric OS Version 3.1.x/4.1.x Reference Guide
147
Fabric OS Commands
Operands
This command has the following operands:
host
Specify a host name or IP address in quotation marks; for
example, “citadel” or “11.22.33.44.” The configuration file is
downloaded from this host system. This operand is optional.
user
Specify a user name in quotation marks; for example, “jdoe.”
This user name is used to gain access to the host. This operand
is optional.
file
Specify a file name in quotation marks; for example,
“config.txt.” Absolute path names may be specified using
forward slash (/). Relative path names create the file in the
user’s home directory on UNIX hosts, and in the directory
where the FTP server is running on Windows hosts. This
operand is optional.
passwd
Specify a password in quotation marks. This operand is
optional.
Example
To create a backup file of switch configuration information:
swd5:admin> configUpload “citadel”,”jdoe”,”config.txt”,”passwd”
upload complete
switch:admin>
If you enter the command with no operands, you are prompted for the appropriate
values:
switch:admin> configUpload
Server Name or IP Address [host]: 11.22.33.44
User Name [None]: user21
File Name [config.txt]: config-switch.txt
Password: xxxxxx
upload complete
switch:admin>
Errors
Listed below are possible reasons for a failure of this command:
148
■
The host name is not known to the switch
■
The host IP address cannot be contacted
Fabric OS Version 3.1.x/4.1.x Reference Guide
configUpload
■
The user does not have permission on the host
■
The user runs a script that prints something at login
■
The FTP server is not running on the host
See Also
configDefault
configDownload
configShow
configure
Fabric OS Version 3.1.x/4.1.x Reference Guide
149
Fabric OS Commands
configure
Modify system configuration settings.
Synopsis
configure
Availability
Admin
Release
V3.1.x and V4.1.x
Description
Use this command to change the following system configuration settings:
■
Fabric parameters
■
Virtual channel settings
■
Zoning operation parameters
■
RSCN transmission mode
■
NS pre-zoning mode
■
Arbitrated Loop parameters
■
System services
■
Portlog events enable
Note: For V3.1.x, do not run this command on an operational switch. First disable the
switch using the switchDisable command.
For V4.1.x, this command can now be executed on an enabled switch. If executed on
an enabled switch only a subset of the full parameter set is available. To access all
parameters controlled by this command, you must disable the switch.
150
Fabric OS Version 3.1.x/4.1.x Reference Guide
configure
The configure command is navigated using a series of menus. Top level
menus and associated submenus consist of a text prompt, a list of acceptable
values, and a default value (in brackets).
Use the following options to control input:
Return
When entered at a prompt with no preceding input, accepts
the default value (if applicable) and moves to the next
prompt.
Interrupt (Ctrl-C)
Aborts the command immediately and ignores all changes
made. This keystroke is common on many computers, but
can be different on your system.
End-of-file (Ctrl-D)
When entered at a prompt with no preceding input,
terminates the command and saves changes made. This
keystroke is common on many computers, but may be
different on your system.
Fabric Parameters
There are a number of settings which control the overall behavior and operation of
the Fabric. Some of these values, such as the domain, are assigned automatically
by the Fabric and may differ from one switch to another in the fabric. Other
parameters, such as the BB credit, can be changed for specific applications or
operating environments, but must be in agreement among all switches to allow
formation of the fabric.
The Fabric parameters are as follows:
Table 2: Configure Command Fabric Parameters
Field
Default
Range
Domain
1
1..239
BB Credit
16
V3.1.x = 1 to 27
V4.1.x = 1 to 16
R_A_TOV
10000
4000..120000
E_D_TOV
2000
1000 to 5000
Data Field Size
2112
256 to 2112
Sequence Level Switching
0
0 or 1
Disable Device Probing
0
0 or 1
Suppress Class F Traffic
0
0 or 1
Sync IO Mode (V3.1.x only)
0
0 or 1
Fabric OS Version 3.1.x/4.1.x Reference Guide
151
Fabric OS Commands
Table 2: Configure Command Fabric Parameters (Continued)
Field
Default
Range
VC Encoded Address Mode
0
0 or 1
Core Switch PID Format
(V3.1.x only)
0
0 or 1
Per-frame Route Priority
0
0 or 1
Long Distance Fabric
0
0 or 1
Descriptions of the switch fabric setting fields are as follows:
152
Domain
The domain number uniquely identifies the switch in a
fabric. This value is automatically assigned by the fabric.
The range of valid values varies depending on the switch
model and other system parameter settings (see VC
Encoded Address Mode).
BB Credit
The buffer-to-buffer (BB) credit represents the number of
buffers available to attached devices for frame receipt. The
range of allowed values varies depending on other system
settings.
R_A_TOV
The Resource Allocation Time Out Value (R_A_TOV) is
displayed in milliseconds. This variable works with the
variable E_D_TOV to determine switch actions when
presented with an error condition.
Allocated circuit resources with detected errors are not
released until the time value has expired. If the condition
is resolved prior to the time out, the internal time out clock
resets and waits for the next error condition.
E_D_TOV
Error Detect Time Out Value (E_D_TOV) is displayed in
milliseconds. This timer is used to flag a potential error
condition when an expected response is not received (an
acknowledgment or reply in response to packet receipt,
for example) within the set time limit. If the time for an
expected response exceeds the set value, then an error
condition occurs.
Data Field Size
The data field size specifies the largest possible value, in
bytes, and advertises this value to other switches in the
fabric during construction of the fabric as well as to other
devices when they connect to the fabric. Setting this to a
value smaller than 2112 may result in decreased
performance.
Fabric OS Version 3.1.x/4.1.x Reference Guide
configure
Sequence Level
Switching
When Sequence Level Switching is set to 1, frames of the
same sequence from a particular source are transmitted
together as a group. When this feature is set to 0, frames
are transmitted interleaved among multiple sequences.
Under normal conditions, Sequence Level Switching
should be disabled for better performance. However,
some host adapters have performance issues when
receiving interleaved frames from multiple sequences.
When there are such devices attached to the fabric,
Sequence Level Switching should be enabled.
Disable Device Probing
When Disable Device Probing is set to 1, devices that do
not register with the Name Server are not present in the
Name Server data base. Set this mode only if the switch
N_Port discovery process (PLOGI, PRLI, INQUIRY) causes
an attached device to fail.
Disable RLS Probing
When RLS Probing is not selected (enabled or “0”), the
switch port will issue RLS Extended Link Service to the
attached devices every four seconds to collect link status
data. Otherwise, RLS will not be sent to the devices. RLS
Probing is selected by default (disabled or “1”).
Suppress Class F
Traffic
When this mode is set to 1, all class F interswitch frames
are transmitted as class 2 frames. This is to support remote
fabrics which involve ATM gateways which don't support
class F traffic.
Sync IO Mode
(V3.1.x only)
When Sync IO mode is set to 1, FSPF frames are sent in
synchronous mode (expecting ACKs back from the other
side for every frame) which helps in detecting the failures
in the link between the ATM gateways in remote fabrics.
VC Encoded Address
Mode
When VC Encoded Address Mode is set to 1, frame
source and destination address utilize an address format
compatible with StorageWorks SAN switches. Set this
mode only if the fabric includes this type of switch.
Note: For V4.1.x, the VC Encoded Address Mode
parameter can only be modified from the Primary FCS
when security is installed and enabled. See “Security
Commands” on page 941.
Fabric OS Version 3.1.x/4.1.x Reference Guide
153
Fabric OS Commands
Core Switch PID
Format (V3.1.x only)
This is used to set the 256 port PID format that is used for
core switches. This option enables single Domain port
density higher than 16. VC Encoded Address Mode and
Core Switch PID Format are mutually exclusive. They
cannot both be enabled at the same time. All switches in
the fabric must have this parameter set the same.
Per-frame Route
Priority
In addition to the eight virtual channels used in frame
routing priority, support is also available for per-frame
based prioritization when this value is set. When
Per-frame Route Priority is set to 1, the virtual channel ID is
used in conjunction with a frame header to form the final
virtual channel ID.
Long Distance Fabric
When this mode is set to 1, ISLs in a fabric can be up to
100Km long. The exact distance level is determined by the
per-port configuration on the E_Ports of each ISL. Both
E_Ports in an ISL must be configured to run the same long
distance level, otherwise, the fabric will be segmented. The
Extended Fabric License is required to set this mode.
Virtual Channel Settings
The switch enables fine tuning for a specific application, by configuring the
parameters for eight virtual channels. The first two virtual channels are reserved
for switch internal functions and are not available for modification.
The default virtual channel settings have already been optimized for switch
performance. Changing the default values can improve switch performance, but
can also degrade performance. Do not change these settings without fully
understanding the effects of the changes.
The Virtual Channel Setting fields are as follows:
Table 3: Configure Command Virtual Channel Settings
Field
Default
Range
VC Priority 2
2
2 to 3
VC Priority 3
2
2 to 3
VC Priority 4
2
2 to 3
VC Priority 5
2
2 to 3
VC Priority 6
3
2 to 3
VC Priority 7
3
2 to 3
:A description of the Virtual Channel Setting field follows:
154
Fabric OS Version 3.1.x/4.1.x Reference Guide
configure
VC Priority
Specifies the class of frame traffic given priority for a
Virtual Channel.
Zoning Operation Parameters
The Zoning Operation Parameter field is as follows:
Disable NodeName
Zone Checking
Fabric OS Version 3.1.x/4.1.x Reference Guide
Specify 1 to disable using Node WWN when specifying
nodes in the zone database, or specify 0 to enable using
Node WWN when specifying nodes in the zone data. The
default value is 0.
155
Fabric OS Commands
RSCN Transmission Mode
The RSCN Transmission Mode field is as follows:
End-device RSCN
Transmission Mode
Specify 0 for RSCN with single PID, 1 for RSCN with
multiple PIDs, or 2 fabric RSCN. The default value is 0.
NS Operation Parameters
The NS Pre-zoning Mode field is as follows:
Pre-zoned Responses
Mode
Specify 0 for Standard Mode, or 1 for Pre-zoning On.
The default value is 0.
Arbitrated Loop Parameters
The Arbitrated Loop Setting fields are as follows:
Table 4: Configure Command Arbitrated Loop Settings
Field
Default
Range
Alternate BB Credit? (V4.1.x only)
0
0 or 1
Send FAN frames?
1
0 or 1
Enable CLOSE on OPEN received?
0
0 or 1
Always send RSCN?
1
0 or 1
Do Not Allow AL_PA 0x00?
0
0 or 1
Initialize All Looplets? (V3.1.x only)
0
0 or 1
Descriptions of the Arbitrated Loop Parameter fields are as follows:
156
Send FAN frames?
Specifies that fabric address notification (FAN) frames
be sent to public loop devices to notify them of their
node ID and address. When set to 1, frames are sent;
when set to 0, frames are not sent.
Enable CLOSE on OPEN
received?
If this is set, a CLS is returned immediately to an OPN
if no buffers are available. This is required for
TachLite.
Fabric OS Version 3.1.x/4.1.x Reference Guide
configure
Always send RSCN?
Following the completion of loop initialization, a
remote state change notification (RSCN) is issued
when FL_Ports detect the presence of new devices or
the absence of pre-existing devices. When set, a
RSCN is issued upon completion of loop initialization,
regardless of the presence or absence of new or
preexisting devices.
Do Not Allow AL_PA
0x00?
This option disallows AL_PA values from being 0.
Initialize All Looplets?
When this is set, all looplets including the ones not in
the same zone are always re-initialized. This is
required for certain RAID subsystems to work properly
during failover.
(V3.1.x only)
System Services
The System Services fields are as follows:
Table 5: Configure Command System Services Parameters
Field
Default
Range
rstatd
Off
On/Off
rusersd
Off
On/Off
telnetd (V4.1.x only)
On
On/Off
rapid
On
On/Off
thad
On
On/Off
Disable RLS probing
On
On/Off
Descriptions of the system service setting fields are as follows:
rstatd
Fabric OS Version 3.1.x/4.1.x Reference Guide
Dynamically enables or disables a server that returns
information about system operation information through
remote procedure calls (RPC). The protocol provides for
a wide-range of system statistics.
The retrieval of this information is supported by a
number of operating systems which support RPC. Most
UNIX-based systems (HP-UX, Irix, Linux, Solaris, etc.)
use the rup and rsysinfo commands to retrieve the
information. See your local system documentation for
the appropriate usage of the these or equivalent
commands.
157
Fabric OS Commands
rusersd
Dynamically enables or disables a server that returns
information about the user logged into the system
through remote procedure calls (RPC). The information
returned includes user login name, the system name,
login protocol or type, login time, idle time, and remote
login location (if applicable).
The retrieval of this information is supported by a
number of operating systems which support RPC. On
most UNIX-based systems (HP-UX, Irix, Linux, Solaris,
etc.) the command to retrieve the information is rusers.
See your local system documentation for the
appropriate usage of this or equivalent command.
telnetd (V4.1.x only)
Used to enable or disable the telnet interface to a
switch. If you are using SSH to manage a switch you
can disable the telnet interface for greater security. The
default value is on (telnet is enabled).
rapid
Dynamically enables or disables a service that handles
RPC requests for the API server. The default value is on.
thad
Dynamically enables or disables the threshold monitor.
The default value is on.
Disable RLS probing
This disables Read Link Error Status probing of the
AL_PAs. The default value is on, that is Disable RLS
probing is disabled.
Portlog Events Enable
Use these parameters to specify which events create an entry in the port log. The
Portlog Events fields are as follows:
Table 6: Configure Command Portlog Events Parameters
Field
158
Default
Range
start: a switch start or re-start event
On
On/Off
disable: a port is disabled
On
On/Off
enable: a port is enabled
On
On/Off
ioctl: a port I/O control is executed
On
On/Off
Tx: a frame is transmitted
On
On/Off
Tx1: a frame is transmitted, class 1
On
On/Off
Tx2: a frame is transmitted, class 2
On
On/Off
Tx3: a frame is transmitted, class 3
On
On/Off
Fabric OS Version 3.1.x/4.1.x Reference Guide
configure
Table 6: Configure Command Portlog Events Parameters (Continued)
Field
Default
Range
Rx: a frame is received
On
On/Off
Rx1: a frame is received, class 1
On
On/Off
Rx2: a frame is received, class 2
On
On/Off
Rx3: a frame is received, class 3
On
On/Off
stats: port status or statistics
On
On/Off
scn: a state change notification
On
On/Off
pstate: a port changes physical state
On
On/Off
reject: a received frame is rejected
On
On/Off
busy: a received frame is busied
On
On/Off
ctin: a CT based request is received
On
On/Off
ctout: a CT based response is transmitted
On
On/Off
errlog: a message is added to the error log
On
On/Off
loopscn: a loop state change notification
On
On/Off
create: a task is created
On
On/Off
debug: generic debug info
On
On/Off
nbrfsm: neighbor state transition
On
On/Off
timer: timer
On
On/Off
sn: speed negotiation state
On
On/Off
fcin: Fibre Channel input
(V4.1.x only)
On
On/Off
fcout: Fibre Channel ouput
(V4.1.x only)
On
On/Off
read: Fibre Channel read
(V4.1.x only)
On
On/Off
write: Fibre Channel write
(V4.1.x only)
On
On/Off
err: Fibre Channel error
(V4.1.x only)
On
On/Off
frame: Fibre Channel frame payload
(V4.1.x only)
On
On/Off
msRemQ: inter-sw MS query
(V4.1.x only)
On
On/Off
Fabric OS Version 3.1.x/4.1.x Reference Guide
159
Fabric OS Commands
Table 6: Configure Command Portlog Events Parameters (Continued)
Field
Default
Range
msRemR: inter-sw MS response
(V4.1.x only)
On
On/Off
nsRemQ: inter-sw NS query
On
On/Off
nsRemR: inter-sw NS response
On
On/Off
rscn: RSCN
On
On/Off
state: Fibre Channel state (V4.1.x only)
On
On/Off
xalloc: alloc an exchange (V4.1.x only)
On
On/Off
xfree: free an exchange (V4.1.x only)
On
On/Off
xerr: exchange error (V4.1.x only)
On
On/Off
xstate: exchange state (V4.1.x only)
On
On/Off
seq: sequence (V4.1.x only)
On
On/Off
seqst: sequence state (V4.1.x only)
On
On/Off
iu: iu (V4.1.x only)
On
On/Off
payload: frame payload (V4.1.x only)
On
On/Off
reconf: fabric reconfiguration (V3.1.x only)
On
On/Off
LR1: LR2 (V3.1.x only)
On
On/Off
zone: zone requrest/response
(V4.1.x only)
On
On/Off
cmd: fss command log (V4.1.x only)
On
On/Off
event fss event log (V4.1.x only)
On
On/Off
msg: fss message log (V4.1.x only)
On
On/Off
Operands
None.
160
Fabric OS Version 3.1.x/4.1.x Reference Guide
configure
Example
To set the configuration parameters for a switch:
switch:admin> configure
Configure...
Fabric parameters (yes, y, no, n): [no] yes
Domain: (1..239) [1]
R_A_TOV: (4000..120000) [10000]
E_D_TOV: (1000..5000) [2000] 5000
Data field size: (256..2112) [2112]
Sequence Level Switching: (0..1) [0]
Disable Device Probing: (0..1) [0]
Suppress Class F Traffic: (0..1) [0] 1
SYNC IO mode: (0..1) [0]
VC Encoded Address Mode: (0..1) [0] 1
Core Switch PID Format: (0..1) [0]
Per-frame Route Priority: (0..1) [0]
Long Distance Fabric: (0..1) [0]
BB credit: (1..27) [16]
Virtual Channel parameters (yes, y, no, n): [no] yes
VC
VC
VC
VC
VC
Priority
Priority
Priority
Priority
Priority
2:
3:
4:
5:
6:
(2..3)
(2..3)
(2..3)
(2..3)
(2..3)
[2]
[2]
[2]
[2]
[3]
Switch Operating Mode (yes, y, no, n): [no] n
Zoning Operation parameters (yes, y, no, n): [no] n
RSCN Transmission Mode (yes, y, no, n): [no] n
Arbitrated Loop parameters (yes, y, no, n): [no] n
System services (yes, y, no, n): [no] n
Portlog events enable (yes, y, no, n): [no] n
Committing configuration...done.
switch:admin>
Fabric OS Version 3.1.x/4.1.x Reference Guide
161
Fabric OS Commands
See Also
configDefault
configShow
ifShow
ipAddrSet
syslogdIp
syslogdipshow
162
Fabric OS Version 3.1.x/4.1.x Reference Guide
crossPortTest
crossPortTest
Functional test of port external transmit and receive path.
Synopsis: V3.1.x
crossporttest [passcount, singleportalso]
Synopsis: V4.1.x
crossporttest [--slot number][-nframes count][-lb_mode
mode][-spd_mode mode][-gbic_mode mode] [-norestore
mode][-ports itemlist]
Availability
Admin
Release
V3.1.x and V4.1.x
Description
Use this command to verify the functional operation of the switch. This command
verifies operation by sending frames from a port M’s transmitter and looping the
frames back through an external fiber cable into another port N’s receiver. This
exercises all of the switch components from the main board to the SFP, from the
SFP to the fiber cable, from the fiber cable to the SFP, and from the SFP back to
the main board.
With the lb_mode operand set to 1 it is also possible to test ports with loopback
plugs that connect each port back to itself.
The cables can be connected to any port combination as long as the cables and
SFPs connected are of the same technology. For example, a short wavelength SFP
port is connected to another short wavelength SFP port using a short wavelength
cable, or a long wavelength port is connected to another long wavelength port, and
a copper port is connected to a copper port.
For complete testing, ports connected should be from different ASICs.
Only one frame is transmitted and received at a given time. The port LEDs flicker
green rapidly while the test is running.
Fabric OS Version 3.1.x/4.1.x Reference Guide
163
Fabric OS Commands
The test method is as follows:
1. Determine which ports are connected to each other.
2. Enable ports for cabled loopback mode.
3. Create a frame F of maximum data size (2112 bytes).
4. Transmit frame F via port M.
5. Pick up the frame from its cross connected port N. Complain if port other than
N actually received the frame.
6. Check if any of the 8 statistic error counters are non-zero: ENC_in, CRC_err,
TruncFrm, FrmTooLong, BadEOF, Enc_out, BadOrdSet, DiscC3.
7. Check if the transmit, receive or class 3 receiver counters are stuck at some
value.
8. Check if the number of frames transmitted is not equal to the number of
frames received.
9. Repeat steps 3 through 8 for all ports present until:
a. The number of frames requested is reached
b. All ports are marked bad
At each pass, the frame is created from a different data type. There are seven data
types:
1)
2)
3)
4)
5)
6)
7)
CSPAT:
BYTE_LFSR:
CHALF_SQ:
QUAD_NOT:
CQTR_SQ:
CRPAT:
RANDOM:
0x7e,
0x69,
0x4a,
0x00,
0x78,
0xbc,
0x25,
0x7e,
0x01,
0x4a,
0xff,
0x78,
0xbc,
0x7f,
0x7e,
0x02,
0x4a,
0x00,
0x78,
0x23,
0x6e,
0x7e,...
0x05,...
0x4a,...
0xff,...
0x78,...
0x47,...
0x9a,...
If seven passes are requested, the seven different data types are used in the test. If
eight passes are requested, the first seven frames use unique data types, and the
eighth is the same as the first.
Note: The crossPortTest command behaves differently according to the modes
activated.
164
Fabric OS Version 3.1.x/4.1.x Reference Guide
crossPortTest
V3.1.x: SwitchEnable and SwitchDisabled Mode /
V4.1.x: SwitchOnline and SwitchOffline Mode
The crossPortTest command can be executed when the switch is
enabled/online or disabled/offline.
In SwitchEnabled/SwitchOnline mode (where the switch is enabled prior to
executing the crossPortTest command) only ports which are cable
loopbacked to ports in the same switch are tested. Ports connected outside of the
switch are ignored.
To run the crossPortTest command successfully the test must find at least
one port (lb_mode = 1, this is the default) or two ports (lb_mode = 0) cable
loopbacked to each other. If this criteria is not met, one of the following messages
is displayed:
Need at least one port(s) connected to run this test
Need at least two port(s) cross-connected to run this test
In SwitchDisabled/SwitchOffline mode (when the switch is disabled prior to
executing the crossPortTest command) all ports are assumed to be cable
loopbacked to different ports in the same switch. If one or more ports are not
connected, the test aborts.
The test determines which port is connected to which port transmitting frames. If
any ports are not properly connected (improperly seated SFPs or cables, bad SFPs
or cables, or improper connection or improper connection of SWL to LWL), the
following message is displayed:
One or more ports is not active, please double check fibres on
all ports.
V3.1.x: singlePortAlso Mode
The singlePortAlso mode is specified by executing crossporttest
command with the singleportalso operand specified as a value of 1. For
example:
switch:admin> crossporttest 100, 1
In this mode, crossporttest enables a port to be cable loopbacked to itself
(port M is connected to port M) in addition to the cross connection supported (port
M is connected to port N). This can be used to isolate bad ports.
Fabric OS Version 3.1.x/4.1.x Reference Guide
165
Fabric OS Commands
V3.1.x: SFP Mode
Use the setgbicmode command (setGBICMode) to activate SFP mode by
executing the following command prior to executing the crossPortTest
command:
switch:admin> setgbicmode 1
When activated, only ports with SFPs present are tested by the
crossporttest command. For example, if only port 0 and port 3 contain
SFPs and the SFP mode is activated, the crossporttest command limits
testing to port 0 and 3.
The state of SFP mode is saved in non-volatile memory and remains active after
reboots or power cycles until it is disabled as follows:
switch:admin> setSFPMode 0
V4.1.x: SFP Mode
Use the setafpmode command (setsfpmode) to activate SFP mode by
executing the following command prior to executing the crossPortTest
command:
switch:admin> setsfpmode 1
When activated, only ports with SFPs present are tested by the
crossporttest command. For example, if only port 0 and port 3 contain
SFPs and the SFP mode is activated, the crossporttest command limits
testing to port 0 and 3.
The state of SFP mode is saved in non-volatile memory and remains active after
reboots or power cycles until it is disabled as follows:
switch:admin> setsfpmode 0
V4.1.x: Example Operation
An example mode of operation would be to disable the switch, set the GBIC mode
to 1, and execute crossporttest with -lb_mode 1 activated and the
crossporttest would then limit its testing to:
166
■
Only ports which are stuffed with media, and
■
Ports with media which are properly cable looped back, and
■
Ports are allowed to be connected to itself (single port connections).
Fabric OS Version 3.1.x/4.1.x Reference Guide
crossPortTest
Since this test includes the media and the fiber cable in its test path, its results
combined with the results of portloopbacktest and spinsilk can be used to
determine which components of the switch are faulty. It is also possible to use
various loopback modes 3 and 5 to further isolate failures, see to -lb_mode below.
Operands
This command has the following operands:
passnum
Specify the number of frames to send. The test will
progress until the specified number of frames has
been transmitted on each port. The default value is
10, so the number of frames sent will be at least 10.
singleportalso
Specify 1 to enable singleportalso mode. This enables
the command to test ports that are cable loopbacked
(port M is connected to port M) in addition to the
cross connection ports (port M is connected to port
N).
--slot number
Specify the slot number in a StorageWorks Core
switch. The slot number must be followed by a slash
( / ) and the port number.
The StorageWorks Core switch has a total of 10 slots
counted from 1 to 10. Slot number 5 and 6 are
control processor cards, and slot 1 through 4, and 7
through 10, are switch cards. On each switch card,
there are 16 ports counted from the bottom, 0 to 15.
A particular port must be represented by both slot
number (1 through 4, or 7 through 10), and port
number (0 through 15).
This operand is not required for switches that do not
have slots.
-nframes count
Specify the number of frames to send. The test will
progress until the specified number of frames has
been transmitted on each port. The default value is
10, so the number of frames sent will be at least 10.
(V3.1.x only)
(V3.1.x only)
(V4.1.x only)
(V4.1.x only)
Fabric OS Version 3.1.x/4.1.x Reference Guide
167
Fabric OS Commands
-lb_mode mode
Select the loopback point for the test. By default,
crossporttest uses cable loopback as described
above. However for debug purposes you can select
other loopback modes as follows:
0 Cable Loopback.
1 Port Loopback (loopback plugs).
2 External (series) loopback.
3 Silkscreen loopback.
4 Serial link wrapback.
5 Internal (parallel) loopback.
-spd_mode mode
Select the speed mode for the test. This parameter is
only used for 2-Gbps capable products where it
controls the speed at which each port is operated.
For 1-Gbps only products it is ignored. The exact
operation of modes 3-6 depends upon the loopback
mode selected. When speed modes 3-6 are used with
cables, they must be connected even to odd or the test
will fail.
0 - set all ports' speed for auto-negotiate
1 - set all ports' speed to lock at 1 Gbps
2 - set all port's speed to lock at 2 Gbps
(V4.1.x only)
(V4.1.x only)
For -lb_mode set to 0, one of the following speed
modes are available to test the speed negotiation:
3 - set all even ports speed for AN, set all odd ports
speed for 1 Gbps.
4 - set all even ports' speed for AN, set all odd ports'
speed for 2 Gbps.
5 - set all odd ports' speed for AN, set all even ports'
speed for 1 Gbps.
6 - set all odd ports' speed for AN, set all even ports'
speed for 2 Gbpsc.
For -lb_mode set to 2, the following speed modes are
available to test FIFO underrun:
3,5 - set all even ports' speed for 2 Gbps, set all odd
ports' speed for 1-Gbps.
4,6 - set all even ports' speed for 1 Gbps, set all odd
ports' speed for 2 Gbps
168
Fabric OS Version 3.1.x/4.1.x Reference Guide
crossPortTest
-gbic_mode mode
The gbic_mode parameter may be used to override
the global GBIC mode described above for the
duration of this test. Specify 1 enable gbic_mode,
and the testing is limited to user ports with GBICs or
SFPs installed.
-norestore mode
Specify 1 to force the test to skip part of the post-test
cleanup normally performed. This may be helpful
during debug. This parameter should normally be left
at the default value of 0.
-ports itemlist
Specify a list of user ports to test. By default all of the
user ports in the current switch or logical switch will
be tested. This option may be used to restrict testing to
the specified ports.
(V4.1.x only)
(V4.1.x only)
(V4.1.x only)
Example
To execute a functional test of all the ports on a switch 100 times:
switch:admin> crossporttest 100, 1
Running Cross Port Test .......
One moment please ...
switchName:
switch
switchType:
2.2
switchState:
Testing
switchRole:
Disabled
switchDomain:
1 (unconfirmed)
switchId: fffc01
switchWwn: 10:00:00:60:69:00:73:71
port 0: cu Testing
Loopback->15
port 1: sw Testing
Loopback->11
port 2: sw Testing
Loopback->6
port 3: lw Testing
Loopback->4
port 4: lw Testing
Loopback->3
port 5: sw Testing
Loopback->8
port 6: sw Testing
Loopback->2
port 7: sw Testing
Loopback->12
port 8: sw Testing
Loopback->5
port 9: sw Testing
Loopback->14
port 10: sw Testing
Loopback->13
port 11: sw Testing
Loopback->1
port 12: sw Testing
Loopback->7
port 13: sw Testing
Loopback->10
port 14: sw Testing
Loopback->9
port 15: cu Testing
Loopback->0
Passed.
switch:admin>
Fabric OS Version 3.1.x/4.1.x Reference Guide
169
Fabric OS Commands
Errors
Below are possible error messages if failures are detected:
■
For V3.1.x:
DIAG-INIT
DIAG-PORTDIED
DIAG-XMIT
DIAG-TIMEOUT
DIAG-ERRSTAT
DIAG-STATS
DIAG-PORTWRONG
DIAG-DATA
■
For V4.1.x:
DATA
EPI1_STATUS_ERR
ERR_STAT
ERR_STATS
ERR_STATS_2LONG
ERR_STATS_BADEOF
ERR_STATS_BADOS
ERR_STATS_C3DISC
ERR_STATS_CRC
ERR_STATS_ENCIN
ERR_STATS_ENCOUT
ERR_STATS_TRUNC
ERR_STAT_2LONG
ERR_STAT_BADEOF
ERR_STAT_BADOS
ERR_STAT_C3DISC
ERR_STAT_CRC
ERR_STAT_ENCIN
ERR_STAT_ENCOUT
ERR_STAT_TRUNC
FDET_PERR
FINISH_MSG_ERR
FTPRT_STATUS_ERR
INIT
LESSN_STATUS_ERR
MBUF_STATE_ERR
MBUF_STATUS_ERR
NO_SEGMENT
PORT_ABSENT
PORT_DIED
PORT_ENABLE
PORT_M2M
PORT_STOPPED
PORT_WRONG
RXQ_FRAME_ERR
RXQ_RAM_PERR
STATS
STATS_C3FRX
STATS_FRX
170
Fabric OS Version 3.1.x/4.1.x Reference Guide
crossPortTest
STATS_FTX
TIMEOUT
XMIT
See Also
camTest
centralmemorytest
cmemretentiontest
emitest
portLoopbackTest
portRegTest
ramTest
spinSilk
sramRetentionTest
Fabric OS Version 3.1.x/4.1.x Reference Guide
171
Fabric OS Commands
dataTypeShow
Displays sample data stream types used in some diagnostic commands.
Synopsis: V3.1.x
dataTypeShow
Synopsis: V4.1.x
dataTypeShow [-seed value]
Availability
All users.
Release
V3.1.x and V4.1.x
Description
Displays sample data streams types used in diagnostic commands. There are 19
different sample data types. The command displays an example of each data
stream.
Operands
For V3.1.x, none.
For V4.1.x, this command has the following operand:
-seed value
172
Specify the data pattern seed value. If no seed is specified,
then a seed value of 0 is used.
Fabric OS Version 3.1.x/4.1.x Reference Guide
dataTypeShow
Example
Displays the types of sample data streams you can use with diagnostics:
switch:admin> datatypeshow
Pattern
type
Byte Fill
1
Word Fill
2
Quad Fill
3
Byte Not
4
Word Not
5
Quad Not
6
Byte Ramp
7
Word Ramp
8
Quad Ramp
9
Byte LFSR
10
Random
11
CRPAT
12
CSPAT
13
CHALF_SQ
14
CQTR_SQ
15
RDRAM_PAT
16
jCRPAT
17
jCJTPAT
18
jCSPAT
19
switch:admin>
example
00 00 00 00
0000 0000
00000000
00 ff 00 ff
0000 ffff
00000000
00 01 02 03
0000 0001
00000000
69 01 02 05
62 39 29 18
bc bc 23 47
7e 7e 7e 7e
4a 4a 4a 4a
78 78 78 78
ff 00 ff 00
be d7 23 47
7e 7e 7e 7e
7f 7f 7f 7f
00 00 00 00
0000 0000
00000000
00 ff 00 ff
0000 ffff
ffffffff
04 05 06 07
0002 0003
00000001
0b 17 2f 5e
08 01 e8 d9
6b 8f b3 d7
7e 7e 7e 7e
4a 4a 4a 4a
78 78 78 78
ff 00 ff 00
6b 8f b3 14
7e 7e 7e 7e
7f 7f 7f 7f
00 00 00 00
0000 0000
00000000
00 ff 00 ff
0000 ffff
00000000
08 09 0a 0b
0004 0005
00000002
bd 7b f6 ec
c9 ba aa 9b
fb 14 36 59
7e 7e 7e 7e
4a 4a 4a 4a
78 78 78 78
ff 00 ff 00
5e fb 35 59
7e 7e 7e 7e
7f 7f 7f 7f
00 00 00 00
0000 0000
00000000
00 ff 00 ff
0000 ffff
ffffffff
0c 0d 0e 0f
0006 0007
00000003
d8 b0 60 c0
8b 84 94 a5
bc bc 23 47
7e 7e 7e 7e
4a 4a 4a 4a
78 78 78 78
ff 00 ff 00
be d7 23 47
7e 7e 7e 7e
7f 7f 7f 7f
See Also
centralMemoryTest
Fabric OS Version 3.1.x/4.1.x Reference Guide
173
Fabric OS Commands
date
Displays or sets the switch date and time.
Synopsis
date [“newDate”]
Availability
All users (display) .
Admin (set).
Release
V3.1.x and V4.1.x
Description
Use this command to set the date and time for a switch (unless security mode is
enabled). All switches maintain the current date and time in non-volatile memory.
If the Security feature (Secure Mode) is not enabled, switch operation does not
depend on the date and time. A switch with incorrect date values continues to
function properly. The date and time are only used to recording events in the
various logs, for example, the error log and the port log.
In order to enable Secure Mode the fabric must be synchronized. Every switch in
the fabric must receive a fabric timestamp from the Primary FCS switch.
Use this command with no operands to display the local switch date and time. Use
the newdate operand to set the date and time.
This command sets the a common date and time for the entire fabric. If Secure
Mode is not enabled, a change in date or time to one switch is forwarded to the
Principal switch and distributed to the fabric. If Secure Mode is enabled, date or
time changes can be made only on the Primary FCS switch and distributed to the
fabric.
Note: This command becomes read only if external NTP synchronization is enabled.
For more information, see tsclockserver.
174
Fabric OS Version 3.1.x/4.1.x Reference Guide
date
It may take up to 64 seconds for the switches in the fabric to be synchronized.
The date specified is always the local switch time taking into account daylight
saving time and the time zone setup of the switch. Each switch takes care of
converting the GMT time distributed fabric-wide to its local time.
Date and time are specified as a string in the format:
“mmddhhmmyy”
where:
mm is the month, valid values are 01-12
dd is the date, valid values are 01-31
hh is the hour, valid values are 00-23
mm is minutes, valid values are 00-59
yy is the year, valid values are 00-99
Year values greater than 69 are interpreted as 1970-1999, year values less than 70
are interpreted as 2000-2069.
The date function does not support daylight saving time or time zones.
All switches maintain current date and time in non-volatile memory. Date and
time are used for logging events. Switch operation does not depend on the date
and time; a switch with an incorrect date value still functions properly.
Operands
This command has the following operand:
newDate
Specify the new date and time in quotation marks. This
operand is optional.
Example
To display the current date and time, then change it to Feb 27 12:30:00 2003:
switch:admin> date
Fri Jan 29 17:01:48 1999
switch:admin> date “0227123003”
Thu Feb 27 12:30:00 2003
Fabric OS Version 3.1.x/4.1.x Reference Guide
175
Fabric OS Commands
See Also
errLogShow
portLogShow
tsclockserver
tstimezone
uptime
176
Fabric OS Version 3.1.x/4.1.x Reference Guide
dbgshow
dbgshow
Displays current values of debug and verbosity levels of the specified module.
Synopsis
dbgshow module_name
Availability
Admin
Release
V3.1.x and V4.1.x
Description
Use this command to display the current values of debug and verbosity levels of
the specified module. If no module name is specified, display debug and
verbosity levels of all modules.
Operands
This command has the following operand:
module_name
Specify the name of the module where you want to view
the debug and verbosity levels. Module names are case
sensitive. This operand is optional.
Example
The following example shows how to use dbgshow to display information about a
specific module named NS:
switch:admin> dbgshow TRUNK
Module TRUNK,
debug level = 0, verbose level = 0
switch:admin> dbgshow NS
Module NS,
debug level = 1, verbose level = 1
switch:admin>
Fabric OS Version 3.1.x/4.1.x Reference Guide
177
Fabric OS Commands
See Also
setdbg
178
Fabric OS Version 3.1.x/4.1.x Reference Guide
diagClearError
diagClearError
Clear the diag software flag to allow for retest.
Synopsis: V3.1.x
diagclearerror [port]
Synopsis: V4.1.x
diagclearerror [[-slot] slot][-switch switch] | -all
Availability
Admin
Release
V3.1.x and V4.1.x
Description
Use this command to clear the diagnostic software flag that indicates whether a
port is BAD or OK. The current flag settings are displayed by using the
diagShow command. This command resets the flag to allow the bad port to be
retested; otherwise the test skips the port.
This command does not clear the error log entry. Instead, it generates the
following DIAG-CLEAR_ERR message for each port software flag cleared. For
example, the following message is for a sample message displayed in the error
cleared log when you clear and error for a port 3:
0x10f9d560 (tShell): Apr 9 08:35:50
Error DIAG-CLEAR_ERR, 3,
Pt13 (Lm3) Diagnostics Error Cleared
Err# 0001
Fabric OS Version 3.1.x/4.1.x Reference Guide
179
Fabric OS Commands
Operands
This command has the following operands:
port
Specify the port where you want to clear diagnostic error
messages. This operand is optional.
-slot slot
Specify the slot to clear the diagnostic failure status. This
operand is optional.
-switch switch
(V4.1.x only)
Specify the logical switch number to operate on. If
omitted, then all blades will be cleared. This operand is
optional.
-all
If specified, all blades will be cleared.
(V3.1.x only)
(V4.1.x only)
(V4.1.x only)
If no operand is specified, the default is to clear all bad port flags.
Example
To clear the diag software flag:
switch:admin> > diagclearerror 1
0x1bcb (fabos): Switch: 0, Error DIAG-CLEARERR, 3,
Pt5 Sl1 Ch0 Qd1 Diagnostics Error Cleared
Err# 0120041 0105
See Also
diagShow
180
Fabric OS Version 3.1.x/4.1.x Reference Guide
diagCommandShow
diagCommandShow
Displays a list of diagnostic commands.
Synopsis
diagCommandShow
Availability
Admin
Release
V4.1.x
Description
Use this command to display a list of diagnostic commands.
Operands
None.
Fabric OS Version 3.1.x/4.1.x Reference Guide
181
Fabric OS Commands
Example
To display a list of diagnostic commands:
switch:admin> diagcommandshow
diagCommandShow - Display diagnostics command parameter and error info.
To show the parameters for a diagnostic test enter:
diagCommandShow -name <test_name>
LIST OF DIAGNOSTIC COMMANDS WITH DESCRIPTION:
diagmodeshow
Display diagnostic burnin controls
statsclear
Clear statistics counters
diagclearerror
Clear diagnostics errors
diagshow
Display diagnostics status of ports
diagcommandshow
Display diagnostics help info
diaghelp
Display diagnostics help info
diagstatus
Display info about running diagnostics
diagreset
Clear errors and reset blades
diagoktorun
Check to see if it is ok to run diagnostics
datatypeshow
Display available data patterns
portregtest
Port register diagnostic
mulregdump
Dump the contents of the general purpose registers
ramdump
Dump the contents of specified RAM register or all
sramretentiontest
SRAM Data Retention diagnostic
spinsilk
Cross-connected line-speed exerciser
spinjitter
line-speed jitter measurement
crossporttest
Cross-connected port diagnostic
portloopbacktest
Port internal loopback diagnostic
txdpath
Miniswitch TX data path diagnostic
spinfab
circulates frames between live switches
backport
backplane routing and VC allocation test
centralmemorytest
Central memory diagnostic
cmemretentiontest
Central Mem Data Retention diagnostic
cmitest
CMI bus connection diagnostic
camtest
Quickloop CAM diagnostic
turboramtest
Turbo speed asic SRAM diagnostic
statstest
Statistics counter diagnostic
portledtest
User Ports LED exerciser
filtertest
Frame filter diagnostic
backplanetest
Backplane connection diagnostic
switch:admin>
See Also
None.
182
Fabric OS Version 3.1.x/4.1.x Reference Guide
diagDisablePost
diagDisablePost
Disable POST execution at reboot.
Synopsis
diagDisablePost
Availability
Admin
Release
V3.1.x and V4.1.x
Description
Use this command to disable Power On Self Test (POST) execution at switch
reboot. This mode is saved in non-volatile memory and POST remains disabled
until it is enabled using the diagEnablePost command. A reboot is not
required for this command to take effect.
A switch rebooted without POST enabled issues the following
DIAG-POSTSKIPPED error message:
0x10fc0c10 (tSwitch): Apr 6 13:24:42
Error DIAG-POST_SKIPPED, 3,
Skipped POST tests: assuming all ports are healthy,
Err# 0004
It is recommended that POST always be enabled to ensure the operational status
of the switch during the power on stage.
Operands
None.
Fabric OS Version 3.1.x/4.1.x Reference Guide
183
Fabric OS Commands
Example
To disable the POST execution at reboot:
switch:admin> diagdisablepost
Committing configuration...done.
On next reboot, POST will be skipped.
switch:admin>
See Also
diaghelp
diagEnablePost
184
Fabric OS Version 3.1.x/4.1.x Reference Guide
diagEnablePost
diagEnablePost
Enable POST execution at next reboot.
Synopsis
diagEnablePost
Availability
Admin
Release
V3.1.x and V4.1.x
Description
Use this command to enable POST execution at the next switch reboot. This mode
is saved in non-volatile memory and POST remains enabled until it is disabled
using the diagDisablePost command.
POST executed after a cold boot (a power cycle of the switch) runs longer than
POST executed after warm boot (executing reboot on a powered up switch).
The cold boot POST runs more data patterns during the ramtest.
Diagnostic POST divides into two separate phases, POST Phase I and POST
Phase II. POST Phase I mainly tests hardware soundness and POST Phase II tests
system functionality.
A reboot is not required for this command to take effect.
The following tests are executed during POST:
1. ramtest
2. portregtest
3. centralmemorytest
4. cmitest
5. camtest
6. portloopbacktest
Fabric OS Version 3.1.x/4.1.x Reference Guide
185
Fabric OS Commands
It is recommended that POST always be enabled to ensure the operational status
of the switch during the power on stage. The factory default enables POST
execution.
Operands
None.
Example
To enable the POST during future power ups:
switch:admin> diagenablepost
Committing configuration...done.
On next reboot, POST will be executed.
switch:admin>
See Also
camtest
centralmemorytest
cmitest
diaghelp
diagDisablePost
ramtest
portloopbacktest
portregtest
186
Fabric OS Version 3.1.x/4.1.x Reference Guide
diagesdports
diagesdports
Set ESD skip ports list.
Synopsis
diagesdports [itemlist | -show]
Availability
Admin
Release
V4.1.x
Description
Use this command to set the ESD IDLE PORTS list. The list is saved in
non-volatile memory and stays in that mode until the next execution of
diagesdports.
The ESD IDLE ports are used by several of the functional test methods to disable
testing on the specified list of ports when ESD mode is enabled (see
setesdmode). The exact type of port list and the exact use of this list are
determined by each test method.
The mode becomes active as soon as this command is executed. It does not require
a reboot to take effect.
Operands
This command has the following operands:
itemlist
Specify the range of ports to be set to ESD idle. For proper
syntax, see itemlist help page.
-show
Specify this operand to display ESD idle ports list. This
operand is optional.
Fabric OS Version 3.1.x/4.1.x Reference Guide
187
Fabric OS Commands
Example
To add ports 1 through 3 to the ESD Idle port list:
switch:admin>
ESD Idle Port
Config update
switch:admin>
ESD Idle Port
diagesdports 1-3
list is now 1-3.
Succeeded
diagesdports -show
list is 1-3.
See Also
diaghelp
188
Fabric OS Version 3.1.x/4.1.x Reference Guide
diagfaillimit
diagfaillimit
Set diagnostics fail limit to a specified value.
Synopsis
diagfaillimit [limit | -show]
Availability
Admin
Release
V4.1.x
Description
Use this command to set the diagnostics fail limit to a specified value. The fail
limit controls the number of failures before certain diagnostics test methods will
abort. The normal setting is 1 so that the tests will abort on the first failure. The
exact use of this configuration setting depends on the test method. The new fail
limit mode becomes active as soon as this command is executed. It does not
require a reboot to take effect.
Operands
This command has the following operands:
limit
Specify the number of failures before a diagnostic test
aborts. The limit value must be 1 or greater. This operand
is optional.
-show
Specify this operand to display the current fail limit setting.
This operand is optional.
If no operand is specified the current value is displayed.
Fabric OS Version 3.1.x/4.1.x Reference Guide
189
Fabric OS Commands
Example
To change the fail limit from 1 to 5:
switch:admin>
Fail Limit is
switch:admin>
Fail Limit is
Config update
switch:admin>
diagfaillimit
1.
diagfaillimit 5
now 5.
Succeeded
See Also
diaghelp
190
Fabric OS Version 3.1.x/4.1.x Reference Guide
diagHelp
diagHelp
Displays diagnostic command information.
Synopsis: V3.1.x
diagHelp
Synopsis: V4.1.x
diagHelp [-name command]
Availability
All users.
Release
V3.1.x and V4.1.x
Description
Use this command to display diagnostic command information.
Operands
For V3.1.x, none.
For V4.1.x, this command has the following operand:
-name command
Fabric OS Version 3.1.x/4.1.x Reference Guide
Specify a command name to display more detailed
information. This operand displays a parameter list, and
subtest information and diagnostic error codes if
available.
191
Fabric OS Commands
Example
To display information about diagnostic commands:
switch:admin> diagHelp
ramTest
portRegTest
centralMemoryTest
cmiTest
camTest
statsTest
filterTest
portLoopbackTest
sramRetentionTest
turboRamTest
cmemRetentionTest
crossPortTest
txdPathTest
spinSilk
diagClearError
diagDisablePost
diagEnablePost
setGbicMode
setSplbMode
supportShow
diagShow
parityCheck
spinFab
loopPortTest
fPortTest
portTest
stopPortTest
portTestShow
System DRAM diagnostic
Port register diagnostic
Central memory diagnostic
CMI bus connection diagnostic
Quickloop CAM diagnostic
Statistics counter diagnostic
Frame Filtering Test
Port internal loopback diagnostic
SRAM Data Retention diagnostic
ASIC built in Turbo RAM Test
Central Mem Data Retention diagnostic
Cross-connected port diagnostic
TXA, TXD connection diagnostic
Cross-connected line-speed exerciser
Clear diag error on specified port
Disable Power-On-Self-Test
Enable Power-On-Self-Test
Enable tests only on ports with GBICs
Enable 0=Dual, 1=Single port LB mode
Print version, error, portLog, etc.
Print diagnostic status information
Dram Parity 0=Disabled, 1=Enable
ISL link diagnostic.
L-Port cable loopback diagnostic
F-Port cable diagnostic
Start portTest
Stop portTest
Get current portTest snapshot information
switch:admin>
See Also
None.
192
Fabric OS Version 3.1.x/4.1.x Reference Guide
diagloopid
diagloopid
Set the diagnostics loop ID.
Synopsis
diagloopid [id | -show]
Availability
Admin
Release
V4.1.x
Description
Use this command to select the loop ID to be used by FL mode diagnostics. The
value entered will be converted from a loop ID to the corresponding AL_PA and
used as the port address for any diagnostics that operate in FL port mode.
The mode becomes active as soon as this command is executed. It does not require
a reboot to take effect.
Operands
This command has the following operands:
id
Specify the loop Id for FL mode diagnostics. This operand
is optional.
-show
Specify this operand to display the current loop ID. This
operand is optional.
If no operand is specified the current value is displayed.
Fabric OS Version 3.1.x/4.1.x Reference Guide
193
Fabric OS Commands
Example
To change the loop id from 125 to 120:
switch:admin> diagloopid
FL mode Loop ID is 125.
switch:admin> diagloopid 120
FL mode Loop ID is now 120.
Config update Succeeded
switch:admin>
See Also
diaghelp
194
Fabric OS Version 3.1.x/4.1.x Reference Guide
diagmodepr
diagmodepr
Enable or disable mode messages.
Synopsis
diagmodepr [mode | -show]
Availability
Admin
Release
V4.1.x
Description
Use this command to enable print mode. The mode is saved in non-volatile
memory and stays in that mode until the next execution of diagmodepr.
The mode becomes active as soon as this command is executed. It does not require
a reboot to take effect.
Print mode, when enabled, will cause extra messages to be displayed in the
burn-in and post scripts. The exact behavior varies depending on the script being
run.
Operands
This command has the following operands:
mode
Specify 1 to enable print mode, specify 0 to disable
print mode. This operand is optional.
-show
Specify this operand to display the current mode. This
operand is optional.
If no operand is specified the current value is displayed.
Fabric OS Version 3.1.x/4.1.x Reference Guide
195
Fabric OS Commands
Example
To enable print mode messages:
switch:admin> diagmodepr
Diagnostic Print Mode is
switch:admin> diagmodepr
Config update Succeeded
Diagnostic Print Mode is
switch:admin>
-show
currently disabled.
1
now enabled.
See Also
diaghelp
196
Fabric OS Version 3.1.x/4.1.x Reference Guide
diagpost
diagpost
Enable or disable POST testing.
Synopsis
diagpost [mode | -show]
Availability
Admin
Release
V4.1.x
Description
Use this command to enable or disable POST testing. The mode is saved in
non-volatile memory and stays in that mode until the next execution of
diagpost.
The mode becomes active as soon as this command is executed. It does not require
a reboot to take effect.
Post mode modifies the behavior of the diagnostics daemon program to inhibit
testing of switch blades when the system is first powered on or a new blade is
added.
Operands
This command has the following operands:
mode
Specify 1 to enable POST test, specify 0 to disable
POST test. This operand is optional.
-show
Specify this operand to display the current mode. This
operand is optional.
If no operand is specified the current value is displayed.
Fabric OS Version 3.1.x/4.1.x Reference Guide
197
Fabric OS Commands
Example
To enable and then disable the POST test:
switch:admin> diagpost 1
Config update Succeeded
Post disable is now 0 (Enabled).
san95:admin> diagpost 0
Config update Succeeded
Post disable is now 1 (Disabled).
See Also
diagdisablepost
diagenablepost
198
Fabric OS Version 3.1.x/4.1.x Reference Guide
diagretry
diagretry
Enable or disable retry mode.
Synopsis
diagretry [mode | -show]
Availability
Admin
Release
V4.1.x
Description
Use this command to enable or disable retry mode. The mode is saved in
non-volatile memory and stays in that mode until the next execution of
diagretry.
The mode becomes active as soon as this command is executed. It does not require
a reboot to take effect.
Retry mode, when enabled, modifies the behavior of the diagnostic test methods,
POST, and burn-in scripts. The exact behavior depends on the tests and scripts that
are run, but the most common result is that spinsilk tests are skipped when
retry mode is enabled.
Operands
This command has the following operands:
mode
Specify 1 to enable retry mode, specify 0 to disable
retry mode. This operand is optional.
-show
Specify this operand to display the current mode
setting. This operand is optional.
If no operand is specified the current value is displayed.
Fabric OS Version 3.1.x/4.1.x Reference Guide
199
Fabric OS Commands
Example
To view the current retry mode value:
switch:admin> diagretry -show
Diagnostic Retry Mode is currently disabled.
switch:admin> diagretry 1
Config update Succeeded
Diagnostic Retry Mode is now enabled.
switch:admin>
See Also
diaghelp
200
Fabric OS Version 3.1.x/4.1.x Reference Guide
diagsetburnin
diagsetburnin
Initializes the blade for a burn-in run.
Synopsis
diagsetburnin [--slot slotnumber][script | -current]
Availability
Admin
Release
V4.1.x
Description
This sets up the blade burnin parameters for the registered burnin script. The name
of burnin script can be set with burninname command alternatively. The
burnin will start at the next run of POST on the designated blades.
The errors and activity logs are stored in non-volatile memory. The activity log of
the script is saved in /var/log/scriptname.slot.log. The errors
produced are available from burninerrshow command on a per blade basis.
When power cycles occur, the burnin activity is restarted at the test that was
interrupted at the time of the power cycle. This command does not require a
reboot to take effect.
Operands
This command has the following operands:
--slot slotnumber
Specify which slot number to to update. If this option is
not specified at all, then all slots on the switch are setup
for burnin.
script
Specify the name of the burnin script to run.
-current
Set the name of burnin script to current burnin script.
Fabric OS Version 3.1.x/4.1.x Reference Guide
201
Fabric OS Commands
Example
To view the current burn-in settings for a switch:
switch:admin> diagsetburnin --slot 1 -current
existing script is: /fabos/share/switchess.sh
Burnin mode is Enabled.
Removing all log files in /var/log for slot 1
Slot 1 burnin name is now /fabos/share/switchess.sh
Config update Succeeded
switch:admin>
See Also
diagsetcycle
diagstopburnin
202
Fabric OS Version 3.1.x/4.1.x Reference Guide
diagsetcycle
diagsetcycle
Set diagnostic script parameters.
Synopsis
diagSetCycle script [-show | -default | [-keyword
value]]
Availability
Admin
Release
V4.1.x
Description
This command provides interactive way of updating diagnostic command
parameters. With only script specified, it will display all configuration variables
used by the specified script and go into an interactive session. Using the full
stretched option parameters, variables can be updated non interactively too.
In interactive mode, the current value, default value, and description of purpose of
the variable are displayed for each variable. If no new value is specified, then the
current value is left unchanged. If a new value is entered, then its value is updated,
and stored in the configuration database for that blade type. It does not require a
reboot to take effect.
Operands
This command has the following operands:
script
Specify which script's parameters to edit.
-show
Specify this operand to display the parameters for a
diagnostic script specified by script.
-default
Specify this operand to set the script parameters to
default values.
Fabric OS Version 3.1.x/4.1.x Reference Guide
203
Fabric OS Commands
-keyword value
The script parameters can be updated non-interactively
using this style of option list. keyword is the keyword to
update and the value should be specified manually in
this case.
Example
To view the parameters for a script:
switch:admin> diagsetcycle switchburnin.sh -show
CURRENT - KEYWORD
: DEFAULT
1
- number_of_runs : 1
2
- vib
: 2
10
- thermal
: 10
BURNIN - label
: BURNIN
1
- tbr_passes
: 1
1
- prt_on
: 1
1
- cntmem_on
: 1
1
- cmi_on
: 1
1
- cam_on
: 1
50
- flt_passes
: 50
25
- sta_passes
: 25
100
- plb_nframes
: 100
50
- txd_nframes
: 50
200
- xpt_nframes
: 200
20
- bpt_nframes
: 20
50
- slk_nmegs
: 50
30
- bpt_all_nframes: 30
50
- slk_all_nmegs : 50
switch:admin>
See Also
None.
204
Fabric OS Version 3.1.x/4.1.x Reference Guide
diagshow
diagshow
Displays diagnostics status.
Synopsis: V3.1.x
diagshow [nSeconds]
Synopsis: V4.1.x
diagshow [--slot slotnumber][-uports itemlist][-bports
itemlist][-use_bports value]
Availability
All users.
Release
V3.1.x and V4.1.x
Description
For V3.1.x, use this command to display the diagnostics status for switch was last
rebooted.
For V4.1.x, use this command to display the diagnostics status for the specified
list of blade or user ports.
The following information is displayed:
■
The state of all ports in the switch based on the results of diagnostic
executions since the last reboot. Ports which passed diag testing are marked
OK. Ports which failed one or more diag tests are marked BAD.
■
The current state of the ports: active ports are shown as UP and inactive ports
are shown as DN.
■
The frame counts of active ports. The number of frames transmitted are
indicated by “frTx” and the number of frames received are indicated by
“frRx.” The “LLI_errs” is the sum of the port’s 8 statistic error counters:
ENC_in, CRC_err, TruncFrm, FrmTooLong, BadEOF, Enc_out,
BadOrdSet, DiscC3
Fabric OS Version 3.1.x/4.1.x Reference Guide
205
Fabric OS Commands
■
The state of the Central Memory based on the results of diagnostic executions
since the last reboot. OK is displayed if previous centralmemorytest
executions passed. FAULTY is displayed if the switch failed
centralmemorytest.
■
The total diagnostic frames transmitted and received since last reboot.
The sums represent the cumulative number of frames transmitted and received
by the diagnostic functional tests (portloopbacktest,
crossporttest, or spinsilk for the transmitted count only) for all
ports since the last reboot.
For example, if the switch is rebooted with POST disabled, diagshow will
show the total as 0. The values are not necessarily equal. They are not equal
when an error occurs in one of the ports during one of the tests above.
This command may also be looped by specifying the nSeconds operand. For
example, diagshow 4 executes diagshow every 4 seconds continuously
until stopped by a keyboard interrupt. This may be used to isolate a bad SFP. A
port with changing “LLI_errs” value prefixed by “**” indicates port is detecting
more errors.
Operands
This command has the following operands:
nSeconds
Specify the display interval (in seconds) between
repeated executions of diagShow. The default value
if no operand is specified or operand value is 0 is to
print the information once only. This operand is
optional.
--slot slotnumber
(V4.1.x only)
Specify the slot to display. If no slot is specified this
command executes on all slots in the logical switch.
This operand is optional.
-uports itemlist
(V4.1.x only)
Specify a list of user ports to display. This operand is
optional.
-bports itemlist
(V4.1.x only)
Specify a list of blade ports to display. This operand is
optional.
-use_bports value
(V4.1.x only)
If value is set to none zero, then the diagnostics status
for the blade ports specified in use_bports will be
displayed, otherwise the UI ports specified in
-uports is displayed. The default value is 0. This
operand is optional.
(V3.1.x only)
206
Fabric OS Version 3.1.x/4.1.x Reference Guide
diagshow
Example
V4.1.x example to display diagnostic status on switch blade 7:
switch:admin> diagshow
Diagnostics Status: Fri Feb 08 15:25:24 2002
Slot: 1 UPORTS
Port
BPort
Diag
Active
Speed
0
15
OK
UP
2G Auto
1
14
OK
UP
2G Auto
2
13
OK
UP
2G Auto
3
12
OK
UP
2G Auto
4
31
OK
UP
2G Auto
5
30
OK
UP
2G Auto
6
29
OK
UP
2G Auto
7
28
OK
UP
2G Auto
8
47
OK
UP
2G Auto
--- <output truncated> ---
......
......
......
......
......
......
......
......
......
......
See Also
diaghelp
Fabric OS Version 3.1.x/4.1.x Reference Guide
207
Fabric OS Commands
diagshowtime
Enable or disable elapsed time messages.
Synopsis
diagshowtime [mode | -show]
Availability
Admin
Release
V4.1.x
Description
Use this command to enable or disable show time mode. The mode is saved in
non-volatile memory and stays in that mode until the next execution of
diagshowtime.
The mode becomes active as soon as this command is executed. It does not require
a reboot to take effect.
Displays the time mode, when enabled, causes each test to display elapsed time
messages. It is normally used during burn-in and for test method debug.
Operands
This command has the following operands:
mode
Specify 1 to enable show time mode, specify 0 to
disable show time mode. This operand is optional.
-show
Specify this operand to display the current mode
setting. This operand is optional.
If no operand is specified the current value is displayed.
208
Fabric OS Version 3.1.x/4.1.x Reference Guide
diagshowtime
Example
To enable show time mode:
switch:admin> diagshowtime
Show Time mode is 0 (Disabled).
switch:admin> diagshowtime 1
Config update Succeeded
Show Time mode is now 1 (Enabled).
switch:admin>
See Also
diaghelp
Fabric OS Version 3.1.x/4.1.x Reference Guide
209
Fabric OS Commands
diagsilkworm
Enable or disable silkworm mode.
Synopsis
diagsilkworm [mode | -show]
Availability
Admin
Release
V4.1.x
Description
Use this command to enable or disable silkworm mode. The mode is saved in
non-volatile memory and stays in that mode until the next execution of
diagsilkworm.
The mode becomes active as soon as this command is executed. It does not require
a reboot to take effect.
Silkworm mode, when enabled, notifies the diagnostics environment and test
methods that the tests are running in silkworm mode. For proper operation FCSW
mode must also be disabled.
Caution: This mode may not be used by burn-in or POST scripts for
multi-bladed products because it is a switch-wide configuration.
210
Fabric OS Version 3.1.x/4.1.x Reference Guide
diagsilkworm
Operands
This command has the following operands:
mode
Specify 1 to enable silkworm mode, specify 0 to
disable silkworm mode. This operand is optional.
-show
Specify this operand to display the current mode
setting. This operand is optional.
If no operand is specified the current value is displayed.
Example
To enable silkworm mode:
switch:admin>
Silkworm mode
switch:admin>
Config update
Silkworm mode
san95:admin>
diagsilkworm
is 0 (Disabled).
diagsilkworm 1
Succeeded
is now 1 (Enabled).
See Also
diaghelp
Fabric OS Version 3.1.x/4.1.x Reference Guide
211
Fabric OS Commands
diagskiptests
Enable or disable diagnostics skip test flags.
Synopsis
diagskiptests [value | -show]
Availability
Admin
Release
V4.1.x
Description
Use this command to enable or disable the diagnostics skip test flags. The skip test
flags are saved in non-volatile memory and stay set until the next execution of
diagskiptests.
The mode becomes active as soon as this command is executed. It does not require
a reboot to take effect.
The skip test flags are used to skip the execution of certain POST tests that may
prove hazardous to normal switch operation. The exact use of this flag is
determined by the post scripts and the specific test methods that are used.
Operands
This command has the following operands:
value
Specify a bit mask for tests to be skipped.
-show
If specified or no value is given, the current skip test
flags will be displayed.
If no operand is specified the current value is displayed.
212
Fabric OS Version 3.1.x/4.1.x Reference Guide
diagskiptests
Example
The following is an example of the diagskiptests command:
switch:admin>
Skip tests is
switch:admin>
Config update
Skip tests is
switch:admin>
diagskiptests -show
0.
diagskiptests 1
Succeeded
now 1.
See Also
diaghelp
Fabric OS Version 3.1.x/4.1.x Reference Guide
213
Fabric OS Commands
diagstopburnin
Terminate a blade burn-in run.
Synopsis
diagstopburnin [-slot slot]
Availability
Admin
Release
V4.1.x
Description
Use this command to determine which PID is running burn-in on a blade and
terminate that activity. It is expected that the burn-in script handles the logging
cleanup.
This command does not require a reboot to take effect.
Operands
This command has the following operand:
-slot slot
214
Specify the slot to stop burn-in. If no slot is specified this
command executes on all slots in the logical switch.
This operand is optional.
Fabric OS Version 3.1.x/4.1.x Reference Guide
diagstopburnin
Example
To stop burn-in mode on a switch:
switch:admin> diagstopburnin --slot 1
No burnin script active on slot 1
1 burninErrShow output:
0x1eea (fabos): Dec 19 14:42:18
Switch: 0, Error DIAG-MANUAL1, 1, " 1 Starting switchess ...
Err# 0140042 0100:101:000:001:24:37:
0xc84 (fabos): Dec 20 08:57:27
Switch: 0, Error DIAG-MANUAL1, 1, " 1 switchess: ABORT
Err# 0140042 0100:101:000:000:25:41:
...
0x1b61 (fabos): Feb 07 19:02:28
Switch: 0, Error DIAG-MANUAL1, 1, " 1 Starting switchess ...
Err# 0140042 0100:101:000:001:26:39:
0x47ff (fabos): Feb 07 21:45:36
Switch: 0, Error DIAG-MANUAL1, 1, " 1 switchess: ABORT
Err# 0140042 0100:101:000:002:26:41:1N
switch:admin>
...
See Also
diaghelp
diagsetburnin
Fabric OS Version 3.1.x/4.1.x Reference Guide
215
Fabric OS Commands
dlsReset
Disable Dynamic Load Sharing (DLS) option.
Synopsis
dlsReset
Availability
Admin
Release
V3.1.x and V4.1.x
Description
Use this command to turn off Dynamic Load Sharing (DLS) when a fabric change
occurs. Refer to dlsset for a full description of load sharing.
Routing is generally based on the incoming port and the destination domain. This
means that all the traffic coming in from a port (either E_Port or Fx_Port) directed
to the same remote domain is routed through the same output E_Port.
To optimize fabric routing, when there are multiple equivalent paths to a remote
switch, traffic is shared among all the paths. Load sharing is recomputed when a
switch is booted up or every time a change in the fabric occurs. A change in the
fabric is defined as an E_Port going up or down, or an Fx_Port going up or down.
If DLS is turned off (using dlsReset), load sharing is performed only at boot
time or when an Fx_Port comes up. Optimal load sharing is rarely achieved with
DLS disabled.
If DLS is turned on (using dlsSet), routing changes can affect working ports.
For example, if an Fx_Port goes down, another Fx_Port may be rerouted from one
E_Port to a different E_Port. The switch minimizes the number of routing
changes, but some are necessary in order to achieve optimal load sharing.
These changes can further affect the performance of the fabric if the in-order
delivery (IOD) option is on. With the IOD option (see the iodSet command),
routes are not available for a few seconds after a fabric change. The time needed to
reset the fabric routing varies based on the size of the fabric. Some frame loss may
occur because as the fabric is recalculating routes, frames are dropped to avoid
216
Fabric OS Version 3.1.x/4.1.x Reference Guide
dlsReset
being delivered out of order. No frame loss occurs if IOD is off, but there is still a
short period of time when traffic is not forwarded. This period of time is
significantly shorter than when IOD is on, and is usually less than 1 second.
Use this command only if devices connected to the fabric cannot handle
occasional routing changes.
Operands
None.
Examples
To disable the dynamic load sharing option:
switch:admin> dlsReset
Committing configuration...done.
switch:admin> dlsShow
DLS is not set
switch:admin>
See Also
dlsSet
dlsShow
Fabric OS Version 3.1.x/4.1.x Reference Guide
217
Fabric OS Commands
dlsSet
Enable Dynamic Load Sharing (DLS) option.
Synopsis
dlsSet
Availability
Admin
Release
V3.1.x and V4.1.x
Description
Use this command to turn on DLS when a fabric change occurs.
Routing is generally based on the incoming port and the destination domain. This
means that all the traffic coming in from a port (either E_Port or Fx_Port) directed
to the same remote domain is routed through the same output E_Port.
To optimize fabric routing, when there are multiple equivalent paths to a remote
switch, traffic is shared among all the paths. Load sharing is recomputed when a
switch is booted up or every time a change in the fabric occurs. A change in the
fabric is defined as an E_Port going up or down, or an Fx_Port going up or down.
If DLS is turned off (using dlsReset), load sharing is performed only at boot
time or when an Fx_Port comes up. Optimal load sharing is rarely achieved with
DLS disabled.
If DLS is turned on (using dlsSet), routing changes can affect working ports.
For example, if an Fx_Port goes down, another Fx_Port may be rerouted from one
E_Port to a different E_Port. The switch minimizes the number of routing
changes, but some are necessary in order to achieve optimal load sharing.
These changes can further affect the performance of the fabric if the in-order
delivery (IOD) option is on. With the IOD option (see the iodSet command),
routes are not available for a few seconds after a fabric change. The time needed to
reset the fabric routing varies based on the size of the fabric. Some frame loss may
occur because as the fabric is recalculating routes, frames are dropped to avoid
218
Fabric OS Version 3.1.x/4.1.x Reference Guide
dlsSet
being delivered out of order. No frame loss occurs if IOD is off, but there is still a
short period of time when traffic is not forwarded. This period of time is
significantly shorter than when IOD is on, and is usually less than 1 second.
Operands
None.
Examples
To enable the dynamic load sharing option:.
switch:admin> dlsSet
Committing configuration...done.
switch:admin> dlsShow
DLS is set
switch:admin>
See Also
dlsReset
dlsShow
Fabric OS Version 3.1.x/4.1.x Reference Guide
219
Fabric OS Commands
dlsShow
Displays the setting of the DLS option.
Synopsis
dlsShow
Availability
All users.
Release
V3.1.x and V4.1.x
Description
Use this command to display whether DLS is on or off. There can be two
messages displayed:
DLS is set
The DLS option is turned on. Load sharing is reconfigured with
every change in the fabric.
DLS is not
set
The DLS option is turned off. Load sharing is only reconfigured
when the switch is rebooted or an Fx_Port comes up.
Operands
None.
Example
To display the current DLS option setting:
switch:admin> dlsShow
DLS is set
See Also
dlsSet
dlsReset
220
Fabric OS Version 3.1.x/4.1.x Reference Guide
dnsconfig
dnsconfig
Set or display Domain name service parameters.
Synopsis
dnsconfig
Availability
Admin
Release
V3.1.x and V4.1.x
Description
Use this command to display or set the domain name service parameters.
The domain name service parameters are namely domain name and the name
server IP address for primary and secondary name servers.
Operands
None.
Example
To set the DNS parameters for the system:
switch:admin> dnsconfig
Enter option
1 to display current Domain Name Service configuration
2 to set DNS configuration
Enter choice:2
Enter Domain Name : [(none)] mydomain.com
Enter nameserver IP address in dot notation: [] 11.22.33.44
Enter nameserver IP address in dot notation: [] 11.22.33.45
DNS parameters saved successfully
switch:admin>
Fabric OS Version 3.1.x/4.1.x Reference Guide
221
Fabric OS Commands
See Also
ipaddrset
ipaddrshow
222
Fabric OS Version 3.1.x/4.1.x Reference Guide
errClear
errClear
Clear the switch error log.
Synopsis: V3.1.x
errClear
Synopsis: V4.1.x
errClear [-p]
Availability
Admin
Release
V3.1.x and V4.1.x
Description
Use this command to clear the error log for a particular switch instance. If no
operand is specified, this command clears the error log in RAM; The persistent
error log is not cleared. However, if -p option is specified, ONLY the persistent
error log is cleared and the error log in RAM is not cleared.
Operands
For V3.1.x, none.
For V4.1.x, this command has the following operand:
-p
Fabric OS Version 3.1.x/4.1.x Reference Guide
Clear messages ONLY from the persistent error log.
Error log in RAM is not cleared.
223
Fabric OS Commands
Example
The following example shows how to clear the error log:
switch:admin> errclear
0x102ed690 (tShell): Nov 22 15:09:38
INFO SYS-LOGCLRD, 4, Error log cleared
switch:admin>
To clear the persistent error log on the Active CP using V4.1.x, use the -p
operand.
See Also
errDump
errNvLogSizeSet
errNvLogSizeShow
errShow
224
Fabric OS Version 3.1.x/4.1.x Reference Guide
errDump
errDump
Displays the error log without page breaks.
Synopsis: V3.1.x
errDump
Syntax: V4.1.x
errDump [-a][-p]
Availability
Admin
Release
V3.1.x and V4.1.x
Description
Use this command to display the error log; the entries in the log are displayed
without any page breaks. It is identical to errshow, except that errshow
prompts the user to type return between each log entry.
The output of the errdump command includes the display of errors/events
history recorded in the persistent error log and error/events logged in the current
run time cycle. This command also provides options to display ONLY those
error/event messages that are saved in the persistent error log, or ONLY those
messages generated during the current run time cycle.
All important error log messages, regardless of their message severity level, are
stored in a persistent storage as they are logged. Both the persistent error log and
the run time log are limited in space and managed as circular buffers. When either
log overflows, old entries are replaced by new entries.
The persistent error log is saved across system reboots and power cycles and can
be resized at run time.
Fabric OS Version 3.1.x/4.1.x Reference Guide
225
Fabric OS Commands
Operands
For V3.1.x, none.
For V4.1.x, this command has the following operands:
-a
Displays messages from the active error log. This
displays the error log messages generated during the
current run time cycle.
-p
Displays messages from the persistent error log.
Example
To display the error log without page breaks:
switch:switch:admin> errDump
Error 03
-------0x2a5 (fabos): Jun 14 12:03:51
Switch: 0, Debug HAMKERNEL-IP_UP, 5, (session=3) Heartbeat up from Standby CP
Error 02
-------0x2a5 (fabos): Jun 14 12:03:50
Switch: 0, Info HAM-REDUNDANT_INFO, 4,
(Heartbeat Up) System in REDUNDANT state
Error 01
-------0x28b (fabos): Jun 14 12:01:27
Switch: 0, Error EM-CP_ERR, 2, CP in slot 5 set to faulty because of CP ERROR
switch:switch:admin>
See Also
errNvLogSizeSet
errNvLogSizeShow
errSaveLvlSet
errSaveLvlShow
errShow
226
Fabric OS Version 3.1.x/4.1.x Reference Guide
errNvLogSizeSet
errNvLogSizeSet
Resize the persistent error log.
Syntax
errNvLogSizeSet number_of_entries
Availability
Admin
Release
V4.1.x
Description
Use this command to resize the persistent error log of a switch to a new size
specified by the operand number_of_entries. The persistent error log is
resized immediately after the successful execution of this command.
Operands
This command has the following operand:
number_of_entries
Specify the new persistent error log size in unit of
number of error log entries. The error log can be
resized within the specified limits. This command fails
if an attempt is made to change the persistent error
log beyond the range of valid values. Valid values are
from 1024 to 2048.
Example
The following example shows how to resize the persistent error log to 1500
entries:
switch:admin> errnvlogsizeset 1500
Persistent error log is
resized to store 1500 entries
switch:admin>
Fabric OS Version 3.1.x/4.1.x Reference Guide
227
Fabric OS Commands
See Also
errNvLogSizeShow
errSaveLvlShow
errShow
228
Fabric OS Version 3.1.x/4.1.x Reference Guide
errNvLogSizeShow
errNvLogSizeShow
Displays the current persistent (non-volatile) error log configuration of a switch.
Syntax
errNvLogSizeShow
Availability
Admin
Release
V4.1.x
Description
Use this command to show the current maximum size of the persistent error log.
Note: The configuration of the persistent error log on the active CP is independent of
the configuration on the standby CP.
Operands
None.
Example
The following example shows how to display persistent error log configuration:
switch:admin> errNvLogSizeShow
Persistent Error Log can store 1024 entries
See Also
errNvLogSizeSet
errSaveLvlShow
errShow
Fabric OS Version 3.1.x/4.1.x Reference Guide
229
Fabric OS Commands
errSaveLvlSet
Set the error saving level of a switch.
Syntax
errSaveLvlSet lvl
Availability
Admin
Release
V4.1.x
Description
Use this command to control types of messages that are saved in the persistent
error log. Message types are based on the message severity levels. By default, all
messages of type Panic and Critical are saved in the persistent log. If you want to
save messages of log levels less severe than Critical, use this command to specify
a new message save level. This new message save level is not persistent across a
reboot. It is in effect only for that run time cycle.
Operands
This command has the following operand:
lvl
230
Message severity level. Save those error log messages whose
message severity level is less than (more severe) or equal to
this level. The valid values are:
1 - Critical
2 - Error
3 - Warning
4 - Info
5 - Debug
Fabric OS Version 3.1.x/4.1.x Reference Guide
errSaveLvlSet
Example
The following example shows how to enable saving of Warning, Critical, Error,
and Panic messages in the persistent error log.
switch:admin> errSaveLvlSet 3
See Also
errDump
errNvLogSizeSet
errSaveLvlSet
errSaveLvlShow
Fabric OS Version 3.1.x/4.1.x Reference Guide
231
Fabric OS Commands
errSaveLvlShow
Show current error save level setting of a switch.
Syntax
errSaveLvlShow
Availability
Admin
Release
V4.1.x
Description
Use this command to find out the current value of the persistent error log save
level for a given switch instance.
Operands
None.
Example
Following example shows how to display current error log save level.
switch:admin> errsavelvlshow
Current message save level is = 1
switch:admin>
See Also
errNvLogSizeSet
errNvLogSizeShow
errSaveLvlSet
errShow
232
Fabric OS Version 3.1.x/4.1.x Reference Guide
errShow
errShow
Displays the error log.
Synopsis: V3.1.x
errShow
Synopsis: V4.1.x
errShow [-a][-p]
Availability
Admin
Release
V3.1.x and V4.1.x
Description
Use this command to display the error log, prompting the user to type return
between each log entry. It is identical to errdump, except that errdump
displays all entries without page breaks. The output of errshow command
includes the display of errors/events recorded in the persistent error log during
previous run time cycles and the display of error/event messages logged in the
current run time cycle.
This command also provides options to display ONLY those error log messages
that are saved in the persistent log and to display ONLY those messages that are
logged during the current run time cycle.
All important error log messages, regardless of their message severity level, are
stored in a persistent storage as they are logged. Both the persistent error log and
the run time log are limited in space and managed as circular buffers. When either
log overflows, old entries are replaced by new entries.
The persistent error log is saved across system reboots and power cycles and can
be resized at run time.
Fabric OS Version 3.1.x/4.1.x Reference Guide
233
Fabric OS Commands
Diagnostic Error Codes
Table 7 lists the error code numbers, the POST test that generates this error
number, and the type of error.
Table 7: Diagnostic Error Codes (Sheet 1 of 4)
Error Number
Error Type
0001
N/A
DIAG-CLEAR_ERR
0002
N/A
DIAG-BURNIN_START
0003
N/A
DIAG-BURNIN_STOP
0004
N/A
DIAG-POST_SKIPPED
0110
ramTest
DIAG-MEMORY
0111
ramTest
DIAG-MEMSZ
0112
ramTest
DIAG-MEMNULL
040F
portRegTest
DIAG-BUS_TIMEOUT
0415
portRegTest
DIAG-REGERR
0416
portRegTest
DIAG-REGERR_UNRST
0B0F
sramRetentionTest
DIAG-BUS_TIMEOUT
0B15
sramRetentionTest
DIAG-REGERR
0B16
sramRetentionTest
DIAG-REGERR_UNRST
turboRamTest
1
DIAG-TBRAM_WTEST
0FA1
turboRamTest
1
DIAG-TBRAM_INC_WRTEST
0FA2
turboRamTest1
DIAG-TBRAM_DEC_WRTEST
1020
centralMemoryTest
DIAG-CMBISRTO
1021
centralMemoryTest
DIAG-CMBISRF
1025
centralMemoryTest
DIAG-LCMRS
1026
centralMemoryTest
DIAG-LCMTO
1027
centralMemoryTest
DIAG-LCMEM
1028
centralMemoryTest
DIAG-LCMEMT
1029
centralMemoryTest
DIAG-CMNOBUF
102A
centralMemoryTest
DIAG-CMERRTYPE
102B
centralMemoryTest
DIAG-CMERRPTN
102C
centralMemoryTest
DIAG-INTNOTCLR
0FA0
234
Test
Fabric OS Version 3.1.x/4.1.x Reference Guide
errShow
Table 7: Diagnostic Error Codes (Sheet 2 of 4)
Error Number
Test
Error Type
1030
centralMemoryTest
DIAG-BADINT
106F
centralMemoryTest
DIAG-TIMEOUT
1F25
cmemRetentionTest
DIAG-LCMRS
1F26
cmemRetentionTest
DIAG-LCMTO
1F27
cmemRetentionTest
DIAG-LCMEM
2030
cmiTest
DIAG-BADINT
2031
cmiTest
DIAG-INTNIL
2032
cmiTest
DIAG-CMISA1
2033
cmiTest
DIAG-CMINOCAP
2034
cmiTest
DIAG-CMIINVCAP
2035
cmiTest
DIAG-CMIDATA
2036
cmiTest
DIAG-CMICKSUM
223B
camTest
DIAG-CAMINIT
223C
camTest
DIAG-CAMSID
2271
camTest
DIAG-XMIT
2640
portLoopbackTest
DIAG-ERRSTAT (ENCIN)
2641
portLoopbackTest
DIAG-ERRSTAT (CRC)
2642
portLoopbackTest
DIAG-ERRSTAT (TRUNC)
2643
portLoopbackTest
DIAG-ERRSTAT (2LONG)
2644
portLoopbackTest
DIAG-ERRSTAT (BADEOF)
2645
portLoopbackTest
DIAG-ERRSTAT (ENCOUT)
2646
portLoopbackTest
DIAG-ERRSTAT (BADORD)
2647
portLoopbackTest
DIAG-ERRSTAT (DISCC3)
264F
portLoopbackTest
DIAG-INIT
265F
portLoopbackTest
DIAG-PORTDIED
2660
portLoopbackTest
DIAG-STATS (FTX)
2661
portLoopbackTest
DIAG-STATS (FRX)
2662
portLoopbackTest
DIAG-STATS (C3FRX)
266E
portLoopbackTest
DIAG-DATA
Fabric OS Version 3.1.x/4.1.x Reference Guide
235
Fabric OS Commands
Table 7: Diagnostic Error Codes (Sheet 3 of 4)
Error Number
236
Test
Error Type
266F
portLoopbackTest
DIAG-TIMEOUT
2670
portLoopbackTest
DIAG-PORTABSENT
2671
portLoopbackTest
DIAG-XMIT
3040
crossPortTest
DIAG-ERRSTAT (ENCIN)
3041
crossPortTest
DIAG-ERRSTAT (CRC)
3042
crossPortTest
DIAG-ERRSTAT (TRUNC)
3043
crossPortTest
DIAG-ERRSTAT (2LONG)
3044
crossPortTest
DIAG-ERRSTAT (BADEOF)
3045
crossPortTest
DIAG-ERRSTAT (ENCOUT)
3046
crossPortTest
DIAG-ERRSTAT (BADORD)
3047
crossPortTest
DIAG-ERRSTAT (DISCC3
304F
crossPortTest
DIAG-INIT
305F
crossPortTest
DIAG-PORTDIED
3060
crossPortTest
DIAG-STATS (FTX)
3061
crossPortTest
DIAG-STATS (FRX)
3062
crossPortTest
DIAG-STATS (C3FRX)
306E
crossPortTest
DIAG-DATA
306F
crossPortTest
DIAG-TIMEOUT
3070
crossPortTest
DIAG-PORTABSENT
3071
crossPortTest
DIAG-XMIT
3078
crossPortTest
DIAG-PORTWRONG
3840
spinSilk
DIAG-ERRSTAT (ENCIN)
3841
spinSilk1
3842
spinSilk
1
DIAG-ERRSTAT (TRUNC)
841
spinSilk
2
DIAG-ERRSTAT (CRC)
842
spinSilk2
DIAG-ERRSTAT (TRUNC)
3843
spinSilk
DIAG-ERRSTAT (2LONG)
3844
spinSilk
DIAG-ERRSTAT (BADEOF)
3845
spinSilk
DIAG-ERRSTAT (ENCOUT)
DIAG-ERRSTAT (CRC)
Fabric OS Version 3.1.x/4.1.x Reference Guide
errShow
Table 7: Diagnostic Error Codes (Sheet 4 of 4)
Error Number
3846
Test
spinSilk
Error Type
DIAG-ERRSTAT (BADORD)
spinSilk
1
DIAG-ERRSTAT (DISCC3)
847
spinSilk
2
DIAG-ERRSTAT (DISCC3)
384F
spinSilk
DIAG-INIT
385F
spinSilk
DIAG-PORTDIED
3870
spinSilk
DIAG-PORTABSENT
3871
spinSilk
DIAG-XMIT
3874
spinSilk
DIAG-PORTSTOPPED
3847
1.
2.
V3.1.x only.
V4.1.x only.
Operands
For V3.1.x, none.
For V4.1.x, this command has the following operands:
-a
Displays messages from the active error log. This displays the
error log messages generated during the current run time cycle.
-p
Displays messages from the persistent error log.
Example
The following illustrates two entries in the error log:
switch:admin> errshow
Error 14
-------0x304 (fabos): Jun 14 11:57:52
Switch: 0, Warning FW-STATUS_SWITCH, 3, Switch status changed from HEALTHY/OK
to Marginal/Warning
Type <CR> to continue, Q<CR> to stop:
Fabric OS Version 3.1.x/4.1.x Reference Guide
237
Fabric OS Commands
See Also
errDump
errNvLogSizeSet
errNvLogSizeShow
errSaveLvlSet
errSaveLvlShow
uptime
238
Fabric OS Version 3.1.x/4.1.x Reference Guide
exit
exit
Logout from a shell session.
Synopsis
exit
Availability
All users.
Release
V3.1.x and V4.1.x
Description
Use this command to logout from a telnet, rlogin or serial port session. Telnet and
rlogin connections are closed, the serial port returns to the “login:” prompt.
The commands “exit” and “quit” are accepted as synonyms for logout, as is a
Ctrl-D typed at the beginning of a line.
Operands
None.
Example
To exit from a shell session:
switch:admin> exit
Connection to host lost.
See Also
logout
Fabric OS Version 3.1.x/4.1.x Reference Guide
239
Fabric OS Commands
fabportshow
Displays fabric port information.
Synopsis
fabportshow [slotnumber/]portnumber
Availability
All users.
Release
V4.1.x
Description
Use this command to display the contents of a particular port data and also any
pending commands (if applicable). The following information is displayed:
240
Port
Displays the port number.
State
The state of the port:
P0 - Port Offline
P1 - Port Online
P2 - ELP ACC Received
P3 - Link Reset Done
I0 - Trunk Initiator: EMT Sent
I1 - Trunk Initiator: ETP ACC Received
I2 - Trunk Initiator: ETP Sent
I3 - Trunk Initiator: Link Reset
T0 - Trunk Target: EMT Received
T1 - Trunk Target: ETP Received
T2 - Trunk Target: Link Reset
List
IU list pointer.
Fabric OS Version 3.1.x/4.1.x Reference Guide
fabportshow
Flags
Port flags:
0x00000001
0x00000002
0x00000004
0x00000008
0x00000010
0x00000020
0x00000040
0x00000080
0x00000200
0x00000800
0x00001000
0x00002000
0x00004000
0x00008000
0x00010000
0x00020000
0x00040000
0x00080000
0x00100000
0x00200000
0x00400000
0x00800000
0x01000000
0x02000000
nbrWWN
Neighboring switch's WWN
red_ports
All E-Ports that are connected to the same neighboring switch.
slave connection
loop back connection
incompatible connection
overlapping domains
overlapping zones
done PTIO ioctl
sent a RJT to ELP
BF received from the port
segmented by routing code
zoning has completed
segmented by Platform Management
segmented due to no license
segmented due to E_Port disabling
DIA already sent for that port
RDI already sent
port is true T port
Port received an ELP
Port received an ELP RJT
LR Pending due to ELP RJT rcv
Received a DIA on this port
Port is the EMT Initiator
Security violation
Security incompatibility
Rcv a DIA ACC
Operands
This command has the following operands:
slotnumber
Specify the slot number for a StorageWorks Core switch. For all
other switches this operand is not required. The slot number must
be followed by a slash ( / ) and the port number, so that each
port is represented by both slot number (1 through 4, or 7
through 10), and port number (0 through 15).
The StorageWorks Core switch has a total of 1–10 slots. Slot
number 5 and 6 are control processor cards, and slot 1 through
4, and 7 through 10, are port cards. On each port card, there
are 16 ports counted from the bottom, 0 to 15.
portnumber
Specify a port number. Valid values for port number vary
depending on the switch type. This operand is required.
Fabric OS Version 3.1.x/4.1.x Reference Guide
241
Fabric OS Commands
Example
To display fabric port information:
switch:admin> fabportshow 4/14
Fabric Port Information:
========================
Port:
State:
List:
List Count:
Flags:
nbrWWN:
red_ports:
10 11 62 63
62
P3
0x10068418
0
0x280120
10:00:00:60:69:80:06:cf
Open commands pending:
======================
No commands pending
switch:admin>
See Also
portshow
242
Fabric OS Version 3.1.x/4.1.x Reference Guide
fabretryshow
fabretryshow
Displays the retry count of the fabric commands.
Synopsis
fabretryshow
Availability
All users.
Release
V3.1.x and V4.1.x
Description
Use this command to display the retry count of the fabric commands. The first line
of display shows:
SW_ISL ISL ports
Each line below shows the retry count for the following fabric commands:
■
ELP
Exchange Link Parameters
■
EFP
Exchange Fabric Parameters
■
DIA
Domain Identifier Assigned
■
RDI
Request Domain Identifier
■
BF
Build Fabric
■
RSCN
Remote State Change Notification
■
FWD
Fabric Controller Forward
■
EMT
Fabric Controller Mark Timestamp
■
GAID
Get Address IDentifier
■
INQ
Inquiry command
Operands
None.
Fabric OS Version 3.1.x/4.1.x Reference Guide
243
Fabric OS Commands
Example
To display the retry count of Fabric OS commands:
switch:user> fabretryshow
E_Ports
SW_ILS
0
1
ELP
0
0
EMT
0
0
ETP
0
0
EFP
0
0
AAI
0
0
RDI
0
0
BF
0
0
2
0
0
0
0
0
0
0
3
0
0
0
0
0
0
0
4
0
0
0
0
0
0
0
5
0
0
0
0
0
0
0
6
0
0
0
0
0
0
0
7
0
0
0
0
0
0
0
See Also
fabstatsshow
244
Fabric OS Version 3.1.x/4.1.x Reference Guide
fabricprincipal
fabricprincipal
Set the Principal Switch Selection mode.
Synopsis
fabricprincipal [-fhq][ 1 | 0 ]
Availability
All users can display current setting.
Admin can modify current setting.
Release
V4.1.x
Description
Use this command to set Principal Switch Selection Mode for the switch.
The implementation of the fabricprincipal command is based solely on
mechanisms specified in the Fibre Channel standards. These mechanisms provide
a preference for a switch requesting to be the principal switch in a fabric, but they
do not provide an absolute guarantee that a switch requesting to be the principal
switch will actually achieve this status.
When dealing with larger fabrics, the selection of the principal switch is less
deterministic. In these cases, to help ensure that the desired switch is selected as
the principal switch, a small selection of switches should be connected together
first, followed by the addition of the rest of the fabric.
Operands
This command has the following operands:
-f
Specify the -f option to force a fabric rebuild. This option is
required with when enabling principal switch mode.
-h
Specify the -h option to display out command usage summary.
-q
Specify the -q option to display the current mode state.
Fabric OS Version 3.1.x/4.1.x Reference Guide
245
Fabric OS Commands
1 | 0
Specify 1 to enable principal switch mode, or specify 0 to disable
principal switch mode (the mode activates when the fabric
rebuilds). This operand is optional.
Example
To display the current mode setting:
switch:admin> fabricprincipal -q
Principal Selection Mode: Enable
To disable the mode setting:
switch:admin> fabricprincipal 0
Principal Selection Mode disaable
To enable the mode setting:
switch:admin> fabricprincipal 1
Principal Selection Mode enabled
To enable the mode setting and force fabric rebuild:
switch:admin> fabricprincipal -f 1
Principal Selection Mode enabled (Forcing fabric rebuild)
See Also
fabricshow
246
Fabric OS Version 3.1.x/4.1.x Reference Guide
fabricShow
fabricShow
Displays fabric membership information.
Synopsis
fabricShow
Availability
All users.
Release
V4.1.x
Description
Use this command to display information about switches and multicast alias
groups in the fabric.
If the switch is initializing, or disabled, the message “no fabric” is displayed. If
the fabric is reconfiguring, some or all switches may not be shown. Otherwise, the
following fields are shown:
Switch ID
The switch Domain_ID and embedded port D_ID.
World Wide Name
The switch WWN.
Enet IP Addr
The switch Ethernet IP address.
FC IP Addr
The switch FC IP address.
Name
The switch symbolic name. An arrow (>) indicates the
principal switch.
Multicast alias groups are created on demand by request from N_Ports attached to
the alias server; typically no groups are listed. If multicast alias groups exist, the
following information is shown:
Group ID
The alias group number and D_ID.
Token
The alias group token (assigned by the N_Port).
Fabric OS Version 3.1.x/4.1.x Reference Guide
247
Fabric OS Commands
Operands
None.
Example
The following example shows a fabric of four switches. “sw180” is the principal
switch. Three of the switches are configured to run IP over Fibre Channel. There
is one multicast alias group.
switch:admin> fabricShow
Switch ID
Worldwide Name
Enet IP Addr
FC IP Addr
Name
------------------------------------------------------------------------3: fffc43 10:00:00:60:69:10:60:1f 192.168.64.187 0.0.0.0
"sw187"
2: fffc42 10:00:00:60:69:00:05:91 192.168.64.60
192.168.65.60
"sw60"
1: fffc41 10:00:00:60:69:00:02:0b 192.168.64.180 192.168.65.180 >"sw180"
0: fffc40 10:00:00:60:69:00:06:56 192.168.64.59
192.168.65.59
"sw5"
The Fabric has 4 switches
Group ID
Token
----------------0: fffb01 40:05:00:00:10:00:00:60:69:00:00:15
See Also
switchShow
248
Fabric OS Version 3.1.x/4.1.x Reference Guide
fabstateclear
fabstateclear
Clears the fabric state information.
Synopsis
fabstateclear
Availability
Admin
Release
V4.1.x
Description
Use this command to clear the queue of fabric state information logged by the
fabric.
Operands
None.
Example
To clear the fabric state information:
switch:admin> fabstateclear
switch:admin> fabstateshow
Time Stamp
Input and *Action
S, P
Sn,Pn Port Xid
===========================================================================
switch:admin>
See Also
fabstateshow
Fabric OS Version 3.1.x/4.1.x Reference Guide
249
Fabric OS Commands
fabstateshow
Displays the fabric state information.
Synopsis
fabstateshow
Availability
Admin
Release
V4.1.x
Description
Use this command to display the queue of fabric state information logged by the
fabric.
Operands
None.
Example
To display the fabric state information:
switch:admin> fabstateshow
Time Stamp
Input and *Action
S, P
Sn,Pn Port Xid
===========================================================================
10:58:35.185 BF Rcv
A2,P3 A2,P3 4
0x287
10:58:35.185 *Change State
A2,NA F0,NA NA
NA
10:58:35.185 BF sending ACC
F0,P3 F0,P3 4
0x287
10:58:35.197 *Canceling All Node Timers
F0,NA F0,NA NA
NA
10:58:35.198 *BF Flood
F0,NA F0,NA NA
NA
10:58:35.200 *BF Send
F0,P3 F0,P3 40
0x253
10:58:35.200 *BF Flood Done
F0,NA F0,NA NA
NA
10:58:35.200 *Cancel 2 * F_S_TOV Timer
F0,NA F0,NA NA
NA
10:58:35.204 *Cancel EFP Flood Timer
F0,NA F0,NA NA
NA
10:58:35.204 *Cancel RDI Receive Timer
F0,NA F0,NA NA
NA
10:58:35.205 *Cancel RDI Send Timer
F0,NA F0,NA NA
NA
10:58:35.205 *Start F_S_TOV Timer
F0,NA F0,NA NA
NA
250
Fabric OS Version 3.1.x/4.1.x Reference Guide
fabstateshow
See Also
fabstateclear
fabportshow
Fabric OS Version 3.1.x/4.1.x Reference Guide
251
Fabric OS Commands
fabStatsShow
Displays the fabric statistics information.
Synopsis
fabStatsShow
Availability
All users.
Release
V3.1.x and V4.1.x
Description
Use this command to display the statistics information of fabric. The information
displayed is as follows:
■
Number of times a switch domain ID has been forcibly changed
■
Number of E_Port offline transitions
■
Number of fabric reconfigurations
■
Number of fabric segmentations due to:
Loopback
Incompatibility
Overlap
Zoning
Routing
Licensing
Disabling E_Port
Operands
None.
252
Fabric OS Version 3.1.x/4.1.x Reference Guide
fabStatsShow
Example
To display the fabric statistics information:
switch:admin> fabstatsshow
Description
Count Port Time
--------------------------------------------------------------Domain ID forcibly changed:
0
E_Port offline transitions:
0
Reconfigurations:
0
Segmentations due to:
Loopback:
2
Incompatibility:
0
Overlap:
0
Zoning:
3
Routing:
6
Licensing:
0
Disabling E_Port:
0
Incompatible platform DB:
0
Security violation:
0
Security incompatibility:
0
switch:admin>
See Also
psShow
tempShow
Fabric OS Version 3.1.x/4.1.x Reference Guide
253
Fabric OS Commands
fabswitchshow
Displays the fabric switch state structure information.
Synopsis
fabswitchshow
Availability
All users.
Release
V4.1.x
Description
Use this command to display the fabric switch state structure information. This
command is strictly for debugging purpose. It is not intended as a user command.
Operands
None.
254
Fabric OS Version 3.1.x/4.1.x Reference Guide
fabswitchshow
Example
To display fabric switch state structure:
switch:admin> fabswitchshow
Fabric Switch State Structure Information
=========================================
State:
A2
Rdi Receive Timer:
0x10051b48, IDLE STATE
Unconfirmed Sw Timer: 0x10051c50, IDLE STATE
Principal Domain:
4
Upstream Port:
4
Principal Wwn:
10:00:00:60:69:00:54:e8
Principal Prioritry:
0x2
Flags:
0x8
inq_sem count:
1
dbg_sem count:
1
fab_q current count:
0
fab_q high water:
16
fab_q age:
0 (sec)
dup xid occurance:
0
last message:
14:47:57.029 RSCN Rcv addr: 0x51080b00
A2,NA
A2,NA
NA
NA
reachable domains:
1 2 4 5 6 7 8 9 10 11 12 14 15 16 17 18
16 domains reachable
Ports used for EFP/BF/DIA flood:
4 42
Command Statistics:
command
high(ms) low(ms)
ave(ms)
total
dropped
=========================================================
fc_write 151
1
0
655
N/A
P Timer
0
0
0
0
N/A
BF Timer 42
31
35
9
N/A
<output truncated>
switch:admin>
See Also
supportshow
Fabric OS Version 3.1.x/4.1.x Reference Guide
255
Fabric OS Commands
fanDisable
Disable a fan unit.
Synopsis
fanDisable unit
Availability
Admin
Release
V4.1.x
Description
Use this command to disable a non-faulty fan unit by setting the RPM speed to 0.
Operand
This command has the following operand:
unit
Specify the fan's unit number. View the fan unit numbers using the
fanShow command. This operand is required.
Example
To disable a fan unit:
san95:admin> fandisable 1
Fan unit 1 has been disabled
switch:admin>
See Also
fanShow
fanEnable
256
Fabric OS Version 3.1.x/4.1.x Reference Guide
fanEnable
fanEnable
Enable a fan unit.
Synopsis
fanEnable unit
Availability
Admin
Release
V4.1.x
Description
Use this command to set the fan unit back to the default RPM speed only if the fan
unit has been previously disabled using the fanDisable command.
Operand
This command has the following operand:
unit
Specify the fan's unit number. View the fan unit numbers using the
fanShow command. This operand is required.
Example
To enable a fan that has been disabled:
switch:admin> fanenable 1
Fan unit 1 has been enabled
switch:admin> fanshow
Fan #1 is OK, speed is 2237 RPM
Fan #2 is OK, speed is 2500 RPM
Fan #3 is OK, speed is 2445 RPM
Fabric OS Version 3.1.x/4.1.x Reference Guide
257
Fabric OS Commands
See Also
fanShow
fanDisable
258
Fabric OS Version 3.1.x/4.1.x Reference Guide
fanShow
fanShow
Displays fan status.
Synopsis
fanShow
Availability
All users.
Release
V3.1.x and V4.1.x
Description
Use this command to display the current status of the switch fans.The format of
the display varies according to the switch model and number of fans. Some switch
models show fan speed measured in RPM (revolutions per minute).
Fan status is shown as:
OK
Fan is functioning correctly.
absent
Fan is not present.
below minimum
Fan is present but rotating too slowly or stopped.
unknown
Unknown fan unit installed.
faulty
Fan has exceeded hardware tolerance.
Note: The output from this command varies depending on switch type and number of
fans present.
Operands
None.
Fabric OS Version 3.1.x/4.1.x Reference Guide
259
Fabric OS Commands
Example
To display the status and RPMs for the fans:
switch:admin>
Fan #1 is OK,
Fan #2 is OK,
Fan #3 is OK,
switch:admin>
fanShow
speed is 2721 RPM
speed is 2721 RPM
speed is 2657 RPM
See Also
fanDisable
fanEnable
psShow
tempShow
260
Fabric OS Version 3.1.x/4.1.x Reference Guide
fashow
fashow
Displays Fabric Assist Information.
Synopsis
fashow
Availability
All users.
Release
V3.1.x
Description
This command displays information about Fabric Assist host ports. This
command will display the port number and PID for each Fabric Assist host port
located on this switch. It will also display a listing of each Target that has a Fabric
Assist phantom on the host's port. The target's PID, assigned phantom AL_PA,
preferred AL_PA and current online/offline status will all be displayed.
The message “No Fabric Assist Host Ports on this Switch” is displayed if Fabric
Assist is disabled, or if there are no Fabric Assist host ports on the switch.
If the switch was unable to assign a phantom for the target then the message “No
Phantom” will be displayed in the Status column. This switch will be unable to
create a phantom if there are no available AL_PAs on the loop, or if there are more
than 125 phantoms zoned to hosts on any one switch.
If the preferred AL_PA can not be assigned as the target's AL_PA, then the
AL_PA field of the target will be left blank and “AL_PA Conflict” will be
displayed in the Status column. In this situation the target's phantom won't be
created.
Fabric OS Version 3.1.x/4.1.x Reference Guide
261
Fabric OS Commands
Each line of output shows:
Fabric Assist Mode: Enabled or Disabled
port
The port number of the Fabric Assist host
PID
The 24-bit Fibre Channel address of the host.
Fabric Assist
The Online/Offline status of the host.
Target
The 24-bit Fibre Channel address of a zoned Target
that current has a phantom assigned to the host.
ALPA
The assigned phantom ALPA for the target.
PREF_ALPA
The preferred ALPA given for the target.
Status
The Online/Offline status of the target.
Operands
None.
Example
This example shows two Fabric Assist host ports on the switch.:
switch:admin> fashow
Fabric Assist Mode: Enabled
Port PID
Fabric Assist
Target
ALPA
PREF_ALPA
Status
---------------------------------------------------------------------------00
0x011001 Online
0x011498 (0xef) (0xef)
Online
0x011497 (0x97)
Online
0x011490 (0x90)
Online
0x01148f (0x8f)
Online
0x011488 (0x88)
Online
0x011484 (0x84)
Online
0x011482 (0x82)
Online
0x011481 (0x81)
Online
0x011480 (0x80)
Online
0x01147c (0x7c)
Online
0x01147a (0x7a)
Online
0x011475 (0x75) (0xef)
ALPA Conflict
01
0x0111ef Online
0x0115ab (0xab) Online
0x0115b4 (0xb4) Online
0x0115b3 (0xb3) Online
0x0115b2 (0xb2) Online
0x0115b1 (0xb1) Online
0x0115ae (0xae) Online
0x0115ad (0xad) Online
0x0115ac (0xac) Online
262
Fabric OS Version 3.1.x/4.1.x Reference Guide
fashow
See Also
fazonecreate
fastatsshow
Fabric OS Version 3.1.x/4.1.x Reference Guide
263
Fabric OS Commands
faStatsShow
Displays statistics about Fabric Assist.
Synopsis
faStatsShow
Availability
All users.
Release
V3.1.x
Description
Use this command to display statistical information about Fabric Assist host ports.
This command displays the port number for each Fabric Assist host port located
on the switch. It also displays the total number of LIPs performed by the port
since activation of Fabric Assist zoning.
This command also displays the total number of LIPs that were initiated by Fabric
Assist, and which Fabric Assist PID caused the LIP to be sent.
The message No Fabric Assist Host Ports on this Switch is
displayed if Fabric Assist is disabled, or if there are no Fabric Assist host ports on
the switch.
Each line of output shows:
port
The port number of the Fabric Assist host.
Total LIPs
The total number of LIPs detected on the port since
Fabric Assist was enabled.
Fabric Assist LIPs
Total number of LIPs initiated by Fabric Assist.
Last Caused by
The PID of the port that caused the last Fabric Assist
initiated LIP.
Operands
None.
264
Fabric OS Version 3.1.x/4.1.x Reference Guide
faStatsShow
Example
This example shows three Fabric Assist host ports on the switch.
sw1:admin> faStatsShow
Port Total LIPs
Fabric Assist LIPs Last Caused by
-----------------------------------------------------00
3
1
0x011001
01
1
1
0x0511ef
03
1
1
0x0511ef
See Also
fazoneCreate
faShow
Fabric OS Version 3.1.x/4.1.x Reference Guide
265
Fabric OS Commands
fastboot
Reboot the switch, bypassing POST.
Synopsis
fastboot
Availability
Admin
Release
V3.1.x and V4.1.x
Description
Use this command to reboot the switch, bypassing Power On Self Test (POST).
The reboot takes effect immediately as the switch resets and executes normal
power-on booting sequence. However, POST is skipped. This reduces boot time
significantly.
If POST has been disabled using the diagDisablePost command, then
fastboot is the same as reboot. However, fastboot skips the POST on the
current reboot, while diagDisablePost skips POST on all future reboots
until cancelled by diagEnablePost.
Because fastboot reboots the CP a WARNING message and a confirmation
are displayed. The command only takes place if the user responds positively.
Note: For the StorageWorks Core switch, the fastboot command will reboot both
logical switches and both CPs.
Operands
None.
266
Fabric OS Version 3.1.x/4.1.x Reference Guide
fastboot
Example
This example is for the StorageWorks Core switch:
switch:admin>fastboot
Warning: This command is being run on a control processor (CP)
based system and will cause the active CP to reboot. This will
cause disruption to devices attached to both switch 0 and switch 1.
To just reboot a logical switch on this system, use command
switchreboot(1M) on the logical switch you intend to reboot.
Are you sure you want to reboot the active CP [y/n]?y
See Also
diagDisablePost
diagEnablePost
switchreboot
reboot
Fabric OS Version 3.1.x/4.1.x Reference Guide
267
Fabric OS Commands
fazoneAdd
Add a member to a Fabric Assist zone.
Synopsis
fazoneAdd “fazoneName”,“member;member”
Availability
Admin
Release
V3.1.x and V4.1.x
Description
This command adds one or more members to an existing Fabric Assist zone.
This command does not change the defined configuration (which you can view
using the cfgShow command) until the cfgSave command is issued. For
the change to become effective, an appropriate Fabric Assist zone configuration
must be enabled using the cfgEnable command. For the change to be
preserved across switch reboots, it must be saved to non-volatile memory using
the cfgSave command.
Note: When security is enabled, this command can only be issued from the Primary
FCS switch. See “Security Commands” on page 941.
268
Fabric OS Version 3.1.x/4.1.x Reference Guide
fazoneAdd
Operands
This command has the following operands:
fazoneName
Specify the name for the Fabric Assist zone in quotation
marks. This operand is required.
member
Specify a list of Fabric Assist Zone members. The list
must be enclosed in quotation marks, and each
member must be separated by a semicolon. A member
can be specified by one or more of the following
methods:
■ For V3.1.x, enter a fabric domain and physical
port number pair.
■ For V4.1.x, enter a fabric domain and area
number pair. View the area numbers for ports
using the switchShow command.
■ WWNs.
■ Fabric Assist zone alias names.
■ Exactly one Fabric Assist host member.
This operand is required.
Example
To add aliases for some disk arrays to “Blue_fazone”:
switch:admin> fazoneAdd “Blue_fazone”, “array3; array4; array5”
To add a Fabric Assist host member to “Blue_fazone”:
switch:admin> fazoneAdd “Blue_fazone”, “H{5,6}”
See Also
fazoneCreate
fazoneDelete
fazoneRemove
fazoneShow
Fabric OS Version 3.1.x/4.1.x Reference Guide
269
Fabric OS Commands
fazoneCreate
Create a Fabric Assist zone.
Synopsis
fazoneCreate “fazoneName”,“member;member”
Availability
Admin
Release
V3.1.x and V4.1.x
Description
This command creates a new Fabric Assist zone (fazone). You must specify a
name and member list for a Fabric Assist zone. The FA zone name must be unique
from any previously used Fabric Assist zone object. The member list must be
enclosed in quotation marks and each member must be separated by a semicolon.
A Fabric Assist zone name is a C language-style name. It must begin with a letter
and be followed by any number of letters, digits, and underscore characters.
Names are case sensitive, for example, “Zone_1” and “zone_1” are different
Fabric Assist zones. White space is ignored.
The Fabric Assist zone member list must have at least one member. Empty lists
are not allowed.
When a Fabric Assist zone member is specified by physical fabric port number,
then any and all devices connected to that port are in the Fabric Assist zone. If this
port is an arbitrated loop, then all devices on the loop are in the Fabric Assist zone.
WWNs are specified as eight hex numbers separated by colons, for example,
“10:00:00:60:69:00:00:8a”. Zoning has no knowledge of the fields within a
WWN; the eight bytes are simply compared with the Node and Port Names
presented by a device in a login frame (FLOGI or PLOGI).
When a Fabric Assist zone member is specified by Node Name, then all ports on
that device are in the Fabric Assist zone. When a Fabric Assist zone member is
specified by Port Name, only that single device port is in the Fabric Assist zone.
270
Fabric OS Version 3.1.x/4.1.x Reference Guide
fazoneCreate
Zone alias names have the same format as Fabric Assist zone names and are
created with the alicreate command. The alias must resolve to a list of one
or more physical fabric port numbers, WWNs, or a Fabric Assist host.
When a Fabric Assist zone member is specified by Node Name, then all ports on
that device are in the Fabric Assist zone. When a Fabric Assist zone member is
specified by Port Name, only that single device port is in the Fabric Assist zone.
Zone alias names have the same format as Fabric Assist zone names and are
created with the aliCreate command. The alias must resolve to a list of one
or more physical fabric port numbers, WWNs, QuickLoop AL_PAs, or an
Initiator member.
A Fabric Assist host member is defined by wrapping the physical fabric port or a
physical device (a WWN) between “H{” and “}”. For example, “H{5,6}” or
“H{10:00:00:60:69:00:00:8a}” is a Fabric Assist host. The type of Fabric Assist
zone members used to define a Fabric Assist zone may be mixed and matched. For
example, a Fabric Assist zone defined with the following members: “2,12; 2,14;
10:00:00:60:69:00:00:8a” would contain devices connected to switch 2, ports 12
and 14, and the device with a WWN of “10:00:00:60:69:00:00:8a” (either Node
Name or Port Name - whichever port in the fabric it is connected to.)
Each target listed within the fazone definition shall be assigned an ALPA when
the private host performs loop initialization. When the private host communicates
with this assigned ALPA the private loop frame shall be translated into a public
format and then delivered to the target's location within the fabric.
Loop devices that are zoned with the private host shall be assigned the same
ALPA that they claimed during their own loop initialization, provided that it is
still available on the private host's loop. Other public devices zoned with the
private host shall be assigned the lowest available ALPA during the private host's
loop initialization.
If however, the ALPA by which the fazoned target must be identified by does not
conform to the default ALPA assignment process, then a preferred ALPA may be
assigned to each target within the fazone definition. The identified preferred
ALPA shall be the ALPA value that is assigned to the target during the private
host's loop initialization, provided that it is not claimed by the private host or
another preferred ALPA assignment.
To assign a preferred ALPA add to the definition of the target (Domain, Port, or
WWN) the preferred ALPA within square brackets [ ]. For example, a fazone
defined as:
"H{1,1}; 2,12[0xe2]; 2,14[0xe8]; 10:00:00:60:69:00:00:8a[0xef]"
Fabric OS Version 3.1.x/4.1.x Reference Guide
271
Fabric OS Commands
would contain all devices connected to switch 2, ports 12 and 14, and the device
with a WWN of "10:00:00:60:69:00:00:8a" (either Node Name or Port Name)
whichever port in the fabric it is connected to. The target connected to switch 2,
port 12 would be assigned an ALPA value of 0xE2, and the target connected to
port switch 2, port 14 would be assigned an ALPA value of 0xE8. Finally, the
ALPA assigned to the target identified by the WWN would be assigned a value of
0xEF.
Preferred ALPA assignments given to a Domain Port that is not a public N_Port
device are ignored, and the fazone is created without error.
Note: This command does not change the defined configuration (which you can view
using the cfgShow command) until the cfgSave command is issued. For the
change to become effective, an appropriate Fabric Assist zone configuration must be
enabled using the cfgEnable command. For the change to be preserved across
switch reboots, it must be saved to non-volatile memory using the cfgSave
command.
When security is enabled, this command can only be issued from the Primary FCS
switch. See “Security Commands” on page 941.
Operands
The following operands are required:
272
fazoneName
Specify a name for the Fabric Assist zone. The
name must be enclosed in quotation marks. This
operand is required.
member
Specify a member or list of members to add to a
Fabric Assist zone. The list must be enclosed in
quotation marks, and each member must be
separated by a semicolon. A member can be
specified by one or more of the following methods:
■ For V3.1.x, enter a fabric domain and
physical port number pair.
■ For V4.1.x, enter a fabric domain and area
number pair. View the area numbers for ports
using the switchShow command.
■ WWNs.
■ Fabric Assist zone alias names.
■ Exactly one Fabric Assist host member.
This operand is required.
Fabric OS Version 3.1.x/4.1.x Reference Guide
fazoneCreate
Example
To create three Fabric Assist zones using a mixture of port numbers and Fabric
Assist zone aliases:
switch:admin> fazoneCreate “fazone1”, “H{1,0}; loop1”
switch:admin> fazoneCreate “fazone2”, “H{1,1}; array1; 1,2; array2”
switch:admin> fazoneCreate “fazone3”, “1,0; loop1; H{1,2}; array2”
See Also
fazoneAdd
fazoneDelete
fazoneRemove
fazoneShow
Fabric OS Version 3.1.x/4.1.x Reference Guide
273
Fabric OS Commands
fazoneDelete
Delete a Fabric Assist mode zone.
Synopsis
fazoneDelete “fazoneName”
Availability
Admin
Release
V3.1.x and V4.1.x
Description
Use this command to delete an existing Fabric Assist mode zone on a fabric.
This command does not change the defined configuration (which you can view
using the cfgShow command) until the cfgSave command is issued. For
the change to become effective, an appropriate Fabric Assist zone configuration
must be enabled using the cfgEnable command. For the change to be
preserved across switch reboots, it must be saved to non-volatile memory using
the cfgSave command.
Note: When security is enabled, this command can only be issued from the Primary
FCS switch. See “Security Commands” on page 941.
Operands
The following operand is required:
fazoneName
274
Specify the name of the zone to be deleted, in
quotation marks.
Fabric OS Version 3.1.x/4.1.x Reference Guide
fazoneDelete
Example
To delete a Fabric Assist zone:
switch:admin> fazoneDelete “Blue_fazone”
See Also
fazoneCreate
faShow
faStatsShow
Fabric OS Version 3.1.x/4.1.x Reference Guide
275
Fabric OS Commands
fazoneRemove
Remove members from a Fabric Assist mode zone.
Synopsis
fazoneRemove “fazoneName”,“member;member”
Availability
Admin
Release
V3.1.x and V4.1.x
Description
This command removes one or more members from an existing Fabric Assist
zone.
Each deleted member must be found by an exact string match. Order is important
when removing multiple members of a Fabric Assist zone. For example, if a
Fabric Assist zone contains “array2; array3; array4” then removing “array4;
array3” fails, but removing “array3; array4” succeeds. If issuing this command
results in all members being removed, the Fabric Assist zone is deleted.
Note: This command does not change the defined configuration (which you can view
using the cfgShow command) until the cfgSave command is issued. For the
change to become effective, an appropriate Fabric Assist zone configuration must be
enabled using the cfgEnable command. For the change to be preserved across
switch reboots, it must be saved to non-volatile memory using the cfgSave
command.
When security is enabled, this command can only be issued from the Primary FCS
switch. See “Security Commands” on page 941.
276
Fabric OS Version 3.1.x/4.1.x Reference Guide
fazoneRemove
Operands
The following operands are required:
fazoneName
Specify a name for the Fabric Assist zone in
quotation marks. This operand is required.
member
Specify a member or list of members to remove
from a Fabric Assist zone. The list must be enclosed
in quotation marks, and each member must be
separated by a semicolon. A member can be
specified by one or more of the following methods:
■ For V3.1.x, enter a fabric domain and
physical port number pair.
■ For V4.1.x, enter a fabric domain and area
number pair. View the area numbers for ports
using the switchShow command.
■ WWNs.
■ Fabric Assist zone alias names.
■ Exactly one Fabric Assist host member.
This operand is required.
Example
To remove “array2” from “Blue_fazone”:
switch:admin> fazoneRemove “Blue_fazone”, “array2”
See Also
fazoneAdd
fazoneCreate
fazoneDelete
fazoneShow
Fabric OS Version 3.1.x/4.1.x Reference Guide
277
Fabric OS Commands
fazoneShow
Displays fazone information.
Synopsis
fazoneShow ["pattern"[, transflag]]
Availability
All users.
Release
V3.1.x and V4.1.x
Description
Use this command to display fazone information. Specifying this command with
no parameters or with the second parameter set to zero displays all fazone
configuration information for both Defined and Effective configurations. Defined
configuration information is shown from the transaction buffer. See the
cfgShow command for a description of this display.
Note: The pattern operand must be in quotation marks for V3.1.x. Quotation marks
are not required for V4.1.x.
If a parameter is specified, it is used as a pattern to match fazone names, and those
that match in the Defined configuration are displayed.
Note: When security is enabled, this command can only be issued from the Primary
FCS switch. See “Security Commands” on page 941.
278
Fabric OS Version 3.1.x/4.1.x Reference Guide
fazoneShow
Operands
This command has the following operands:
pattern
Specify a value to search for the name of an fazone.
This can be any POSIX style expression. This operand
must be in quotation marks for V3.1.x. Patterns can
contain:
■ Question mark “?” that matches any single
character
■ Asterisk “*” that matches any string of characters
■ Ranges which match any character within the
range. For example, [0-9] or [a-f].
This operand is optional.
transflag
Specify 0 to display the information from the current
transaction, or specify 1 to display information from the
original buffer. This operand must be preceded by a
pattern.
Example
To display all fazones beginning with the letters A through C:
switch:admin> fazoneShow “[A-C]*”
fazone: Blue_fazone
1,1; array1; 1,2; array2
See Also
fazoneAdd
fazoneCreate
fazoneDelete
fazoneRemove
Fabric OS Version 3.1.x/4.1.x Reference Guide
279
Fabric OS Commands
fcpprobeshow
Displays the FCP probe information.
Synopsis: V3.1.x
fcpprobeshow portnumber
Synopsis: V4.1.x
fcpprobeshow [slotnumber/]portnumber
Availability
All users.
Release
V3.1.x and V4.1.x
Description
Use this command to display the FCP probing information for a particular device
which should be of type F/FL port. If the given port is not either of the above
types, then the following message displays:
port x is not an FL_Port or an F_Port
280
Fabric OS Version 3.1.x/4.1.x Reference Guide
fcpprobeshow
Operands
This command has the following operands:
slotnumber
(V4.1.x only)
Specify the slot number for a StorageWorks Core
switch. For all other switches this operand is not
required. The slot number must be followed by a slash
( / ) and the port number, so that each port is
represented by both slot number (1 through 4, or 7
through 10), and port number (0 through 15).
The StorageWorks Core switch has a total of 1–10
slots. Slot number 5 and 6 are control processor cards,
and slot 1 through 4, and 7 through 10, are port
cards. On each port card, there are 16 ports counted
from the bottom, 0 to 15.
portnumber
Specify a port number. Valid values for port number
vary depending on the switch type. This operand is
required.
Example
To display FCP probe information:
switch:admin> fcpprobeshow 4
port 4 is L-Port and it is online.
nodes probed:
2
successful PLOGIs:
2
successful PRLIs:
2
successful INQUIRies:
2
successful LOGOs:
2
outstanding IUs:
0
list of devices(may include old devices on the loop):
0x2b4e2: IBM
DDYF-T09170R
F60N
0x2b4e4: IBM
DDYF-T09170R
F60N
See Also
portloginshow
portshow
Fabric OS Version 3.1.x/4.1.x Reference Guide
281
Fabric OS Commands
fcprlsshow
Displays the fcp rls information.
Synopsis: V3.1.x
fcprlsshow portnumber
Synopsis: V4.1.x
fcprlsshow [slotnumber/]portnumber
Availability
All users.
Release
V3.1.x and V4.1.x
Description
Use this command to display the fcp rls (read link state) information for a
particular device which should be of type F/FL port. If the given port is not either
of the above types, then the following is displayed:
port x is not an FL_Port or an F_Port
282
Fabric OS Version 3.1.x/4.1.x Reference Guide
fcprlsshow
Operands
This command has the following operands:
slotnumber
(V4.1.x only)
Specify the slot number for a StorageWorks Core
switch. For all other switches this operand is not
required. The slot number must be followed by a slash
( / ) and the port number, so that each port is
represented by both slot number (1 through 4, or 7
through 10), and port number (0 through 15).
The StorageWorks Core switch has a total of 1–10
slots. Slot number 5 and 6 are control processor cards,
and slot 1 through 4, and 7 through 10, are port
cards. On each port card, there are 16 ports counted
from the bottom, 0 to 15.
portnumber
Specify a port number. Valid values for port number
vary depending on the switch type. This operand is
required.
Example
To display the fcp rls information (V4.1.x example):
switch:admin> fcprlsshow 9/1
link fail
loss sync
loss sig
prtc err
bad word
crc err
switch:admin>
See Also
portloginshow
portshow
Fabric OS Version 3.1.x/4.1.x Reference Guide
283
Fabric OS Commands
fdmicacheshow
Displays abbreviated remote FDMI device information according to remote
domain ID.
Synopsis
fdmicacheshow
Availability
All users.
Release
V3.1.x and V4.1.x
Description
Use this command to displays FDMI cache information for remote domains only.
The state of each remote domain, identified by its domain ID is shown to be either
UNKNOWN, KNOWN or ERROR.
The revision of FDMI supported is also shown followed by the identifiers of all
the HBAs at the domain and the corresponding registered port list of the HBA
attributes.
For HBAs, only the HBA identifiers and registered port lists are show. No detailed
HBA attributes are displayed. For registered ports, only its port identifiers and the
HBA identifier of which the port is registered for are shown. No detailed port
attributes are displayed.
Operands
None.
284
Fabric OS Version 3.1.x/4.1.x Reference Guide
fdmicacheshow
Example
To view the FDMI cache (V3.1.x example):
switch:admin> fdmicacheshow
state
rev
KNOWN
v310
HBAs:
10:00:00:00:c9:25:9b:96
Total number of ports: 1
Ports:
10:00:00:00:c9:25:9b:96
Total count of devices on the switch is 1
To display the FDMI cache (V4.1.x example):
switch:admin> fdmicacheshow
state entry
Switch
rev for domain 1
KNOWN
state
v310
rev
KNOWN
No devices.
HBAs:
10:00:00:00:c9:25:9b:96
Total
count of devices on the switch is 0
Switchnumber
Total
entry for
of ports:
domain12
Ports:
state
rev
10:00:00:00:c9:25:9b:96
KNOWN
v410
Total
No
devices.
count of devices on the switch is 1
Total count of devices on the switch is 0
Switch entry for domain 4
state
rev
UNKNOWN v260
No devices.
Total count of devices on the switch is 0
switch:admin>
See Also
fdmishow
Fabric OS Version 3.1.x/4.1.x Reference Guide
285
Fabric OS Commands
fdmishow
Displays detailed FDMI device information.
Synopsis
fdmishow
Availability
All users.
Release
V3.1.x and V4.1.x
Description
Use this command to display FDMI information for all HBAs and ports.
Detailed FDMI information are displayed for local HBAs and ports. These
includes HBA and port identifiers, HBA registered port list, and all the detailed
attributes for HBA and ports.
Only abbreviated FDMI information are shown for HBA and ports on remote
switches.
Operands
None.
286
Fabric OS Version 3.1.x/4.1.x Reference Guide
fdmishow
Example
For a managing master switch:
switch:admin> fdmishow
FDMI LOCAL_HBA hash contains:
Id: 10:00:00:00:c9:25:9b:96
Port List: total 1 port(s)
Id: 10:00:00:00:c9:25:9b:96
Port attributes:
FC4 Types: 0x000100000100000000000000000000000000000000000000000000...
Supported Speed: 0x00000001
Port Speed: 0x00000001
Frame Size: 0x00000800
HBA attributes:
Node Name: 20:00:00:00:c9:25:9b:96
Manufacturer: Emulex Network Systems
Serial Number: 0000c9259b96
Model: LP9000
Model Description: Emulex LightPulse LP9000 1 Gigabit PCI Fibre Channel
Adapter
Hardware Version: 00000001
Driver Version: SLI-2 SW_DATE:May 3 2002, v5-2.11a2 **CT_TEST 1**
Firmware Version: 03814101
OS Name and Version: Window 2000
Max CT Payload Length: 0x00061300
FDMI LOCAL_PORT hash contains:
Id: 10:00:00:00:c9:25:9b:96
FDMI REMOTE_HBA hash contains no entry.
FDMI REMOTE_PORT hash contains no entry.
See Also
fdmicacheshow
Fabric OS Version 3.1.x/4.1.x Reference Guide
287
Fabric OS Commands
filterTest
Frame Filter test.
Synopsis: V3.1.x
filterTest [passcnt]
Synopsis: V4.1.x
filtertest [-passcnt passcnt][-txports list][-scamoff
offset][-dcamoff offset][-fdefoff offset]
Availability
Admin
Release
V3.1.x and V4.1.x
Description
Use this command to verify that the ASIC frame level filtering logic includes
every type of filter actions:
■
FLTACT_LIST_A - action to handle the subgroup A based filtering
■
FLTACT_LIST_B - action to handle the subgroup B based filtering
■
FLTACT_FROZEN - action to handle the frame frozen process
■
FLTACT_DISCARD - action to discard frame
■
FLTACT_FORWARD - action to forward frame
This command can be run on every port, and send the frame in internal loop back
mode. The filter test requires two different ports in same quadrant due to the fact
that the filter logic sits in transmitter port can not work if frame is sent directly
from the embedded port.
This command may not be executed on an operational switch. You must first
disable the switch using the switchdisable command.
288
Fabric OS Version 3.1.x/4.1.x Reference Guide
filterTest
In this test, the filter definition covers the following different filtering conditions:
Table 8: List of Filter Test Numbers, Definitions, and Action Types
Number
Filter Definition
Action Type
0
unconditional match
Forward
1
unconditional match
List A
2
unconditional match
List B
3
unconditional match
Frozen
4
unconditional match
Discard
5
SCAM no match and AL_PA match
List A
6
SCAM&DCAM match and AL_PA match
List A
7
Zone A match and AL_PA match
List A
8
Zone B match and AL_PA match
List B
9
Zone A&B match and AL_PA match
List B
10
Zone A|B match and AL_PA match
Frozen
11
Zone A|B match and AL_PA match
Discard
Operands
This command has the following operands:
passcnt (V3.1.x only)
Specify the number of times to perform this test.
The default value is 1.
-passcnt passcnt
(V4.1.x only)
Specify the number of times to perform this test.
The default value is 1.
-txports list
(V4.1.x only)
Specify the user port numbers to perform this test.
All user ports are set in default.
-scamoff offset
(V4.1.x only)
Specify the program location to write SCAM test
data in SCAM memory. The default value is 0. The
maximum offset number is set if the specified
number is larger than limit.
-dcamoff offset
(V4.1.x only)
Specify the program location to write DCAM test
data in DCAM memory. The default value is 0. The
maximum offset number is set if the specified
number is larger than limit.
Fabric OS Version 3.1.x/4.1.x Reference Guide
289
Fabric OS Commands
-fdefoff offset
(V4.1.x only)
Specify the program location to write filter test
definition data in filter definition memory. The
default value is 0. The maximum offset number is
set if the specified number is larger than limit.
Errors: V4.1.x
When it detects failures, the subtest may report one or more of the following error
messages:
DIAG-FLTINIT
DIAG-FLTXMIT
DIAG-FLTRCV
DIAG-ACTTEST
DIAG-NUMTEST
Example
To run the filterTest (V4.1.x example):
switch:admin> filterTest -txports 2/1-2/3
Running Filter Test ........... passed.
See Also
camTest
centralMemoryTest
cmemretentiontest
crossporttest
cmiTest
itemlist
portLoopbackTest
portRegTest
ramTest
spinSilk
sramRetentionTest
290
Fabric OS Version 3.1.x/4.1.x Reference Guide
firmwareCommit
firmwareCommit
Commit switch firmware update.
Synopsis
firmwareCommit
Availability
Admin
Release
V4.1.x
Description
Use this command to commit a firmware download to a CP. This command copies
an updated firmware image on the primary partition to the secondary partition and
commits both partitions of a CP to an updated version of the firmware. This must
be done after each firmwaredownload, and after the switch has been
rebooted and a sanity check is performed to make sure the new image is fine.
For switches which have flash memory set into two equal partitions, the primary
partition is the where the system boots from, the secondary partition is where a
copy of the firmware is stored, in case the primary partition is damaged.
To maintain the integrity of the firmware image in the flash memory, the
firmwaredownload command updates both partitions at once. When
firmwaredownload completes successfully and the CP is rebooted, the
system switches the primary partition (with the old firmware) to the secondary,
and the secondary partition (with the new firmware) to the primary.
The default behavior of the firmwaredownload command automatically
runs the firmwarecommit command after the reboot. For the cautious, the
firmwaredownload command has an option to disable auto-commit of the
new firmware. If you decide to disable the auto-commit option when running
firmwaredownload, then, after the CP is rebooted, you must execute one of
two commands:
■
Run the firmwarecommit command to copy the primary partition (with
new firmware) to the secondary, and commit the new firmware to both
partitions of the CP, or
Fabric OS Version 3.1.x/4.1.x Reference Guide
291
Fabric OS Commands
■
Run the firmwarerestore command to copy the secondary partition
(with the old firmware) to the primary, and back out of the new firmware
download.
Operands
None.
Example
To commit a new version of the firmware:
switch:admin> firmwarecommit
Doing firmwarecommit now.
Please wait ...
........................................
........................................
........................................
........................................
........................................
........................................
........................................
........................................
........................................
........................................
........................................
........................................
........................................
........................................
........................................
........................................
........................................
........................................
........................................
Replicating kernel image.
................
FirmwareCommit completes successfully.
switch:admin>
See Also
firmwareDownload
firmwarerestore
292
Fabric OS Version 3.1.x/4.1.x Reference Guide
firmwareDownload
firmwareDownload
Download switch firmware from a remote host or from a local directory.
Synopsis: V3.1.x
firmwareDownload [host, user, file [,passwd]]
Synopsis: V4.1.x
firmwareDownload [[-sbni] host,user,pfile [,passwd]]
Availability
Admin
Release
V3.1.x and V4.1.x
Description: V3.1.x
Use this command to download switch firmware from a remote host or from a
local directory to the switch's non-volatile storage area. The firmware download
process uses FTP.
Note: V3.1 supports RSHD and FTP protocol for firmware downloads.
The V3.1 firmware is in the form of a single binary file. This package is made
available periodically to add features or to remedy defects. Contact customer
support to obtain information about available firmware versions.
This command supports both non-interactive and interactive modes. If no
operands are specified, or if there is any syntax error in the operands, the
command will go into the interactive mode and prompt you for input. In the
interactive mode, all of the optional operands are presented to the user.
The package list file (that is, plist file) is a binary file which contains specific
firmware information such as the release version, time stamp, and platform code,
and the names of packages to be downloaded.
Fabric OS Version 3.1.x/4.1.x Reference Guide
293
Fabric OS Commands
For the StorageWorks Core switch, each CP has two partitions of non-volatile
storage. The firmwareDownload command will always load the image into
the secondary partition and then will swap the secondary to be the new primary.
After the system successfully boots up from this partition, run
firmwareCommit to replicate the downloaded image in the primary partition to
the secondary partition.
If the previous firmware version is preferred after firmwareDownload and
reboot, but before firmwareCommit, then run firmwareRestore to
restore the old firmware image now saved in the secondary partition.
Description: V4.1.x
Use this command to download switch firmware from a FTP server or from a local
(NFS) directory to the switch's non-volatile storage area.
Note: V4.1 supports only FTP protocol for firmware downloads.
The new firmware is in the form of RPM packages with names defined in a pfile.
pfile is a binary file which contains specific firmware information (time stamp,
platform code, version, etc.) and the names of packages of the firmware to be
downloaded. These packages are made available periodically to add features or to
remedy defects. Contact customer support to obtain information about available
firmware versions.
In the StorageWorks Core switch, this command by default downloads firmware
image to both CPs in a rollover mode to prevent disruption to application services.
This operation depends on HA support. If HA is not available, a user will still be
able to upgrade the CPs one at a time using “-s” option.
The StorageWorks 2 Gb SAN switch and each CP of the StorageWorks Core
switchhave two partitions of non-volatile storage areas, a primary and a
secondary, to store two firmware images. Firmwaredownload will always
load the new image into the secondary partition and will swap the secondary
partition to be the primary. It will then reboot the CP and activate the new image.
Finally, it will perform firmwarecommit automatically to copy the new
image to the other partition unless “-s” is used.
The command supports both non-interactive and interactive modes. If it is invoked
without any command line parameters, or if there is any syntax error in the
parameters, the command will go into the interactive mode in which the user is
prompted for input.
294
Fabric OS Version 3.1.x/4.1.x Reference Guide
firmwareDownload
Note: The default action in V4.1 is a full install instead of an incremental install.
Operands
This command has the following operands:
host
Specify a host server name or IP address; for example, “tower” or
“11.22.33.44”. The configuration file or pfile is downloaded from
this host system. If this operand is not used, the pfile is considered
to be accessible through a local directory. This operand is
required.
user
Specify a user name for FTP or RSHD server access; for example,
“jdoe”. This user name is used to gain access to the host. This
operand is required.
file
(V3.1.x only)
Specify a path and file name; for example,
/pub/dist/v2.6.0. Absolute path names may be specified
using forward slash (/). Relative path names create the file in the
user’s home directory on UNIX hosts, and in the directory where
the FTP server is running on Windows hosts. This operand is
required.
pfile
(V4.1.x only)
Specify a fully qualified path and file name; for example,
/pub/dist/system.plist. Absolute path names may be
specified using forward slash (/). Relative path names create the
file in the user’s home directory on UNIX hosts, and in the directory
where the FTP server is running on Windows hosts. This operand is
required.
passwd
Specify a password. This operand is required, but may be NULL.
-s
(V4.1.x only)
Specify this operand to enable Single CP Mode. In the
StorageWorks Core switch, this mode enables a user to upgrade a
single CP and to select full-install, auto-reboot, and auto-commit.
In the StorageWorks 2 Gb SAN switch, this mode enables a user to
select full-install, auto- reboot, and auto-commit.
-b
(V4.1.x only)
Specify this operand to activate auto-reboot mode. After
downloading firmware the system must be rebooted. If this
operand is not specified, the user must issue the reboot
command manually in order to activate the downloaded image. If
auto-reboot mode is enabled, the switch reboots automatically
after the firmwareDownload command has been run.
Fabric OS Version 3.1.x/4.1.x Reference Guide
295
Fabric OS Commands
-n
(V4.1.x only)
Specify this operand to de-activate auto-commit mode. By default,
after running this command and after reboot, the switch will
perform a firmwareCommit command automatically. When
this mode is disabled, the user needs to issue the
firmwareCommit command manually to replicate the
downloaded image from the primary partition to the secondary
partition of a CP.
-i
(V4.1.x only)
Specify this operand to enable Incremental Install Mode. By
default, firmwareDownload will do a full install of the whole
firmware regardless of what the original firmware version was on
the system. In Incremental Install Upgrade Mode the names of
packages in pfile are compared to what already installed on the
switch and only the packages which are different from those
already stored or not on the switch yet are installed.
If no operand is specified the operation becomes interactive and you are prompted
for input.
Example
To download the firmware to a V3.1.x switch:
Switch:admin> firmwaredownload
Server Name or IP Address [jsmith-sun]: fjones-sun
User Name [jsmith]: fjones
File Name [~jsmith/V3.1]: ~fjones/V3.1
Protocol (RSHD or FTP) [rshd]:
3869708+301460+1119124, csum 6edc
................................
................................
writing flash 0 ................................
writing flash 1 ................................
download complete
Switch:admin>
296
Fabric OS Version 3.1.x/4.1.x Reference Guide
firmwareDownload
To download the firmware to a V4.1.x switch:
switch:admin> firmwaredownload
Server Name or IP Address: 11.22.33.44
User Name: foo
File Name: /pub/dist/system.plist
Password: xxxxxx
Full Install (otherwise only install the difference) [Y]:
Do Auto-Commit after Reboot [Y]:
Reboot system after download [N]:
Start to install packages......
dir
##################################################
terminfo
##################################################
<output truncated>
glibc
##################################################
sin
##################################################
Write kernel image into flash.
file verification SUCCEEDED
Firmwaredownload completes successfully.
Errors
The following can cause the download to fail:
■
Host is not known to the switch
■
Host cannot be reached by the switch
■
User does not have permission on host
■
The pfile or binary file does not exist on host
■
The pfile or binary file is not in the right format
■
Package specified in the pfile or binary file doesn't exist
■
The RSHD (V3.1.x only) or FTP server is not running on host
See Also
fastboot
reboot
switchReboot
version
Fabric OS Version 3.1.x/4.1.x Reference Guide
297
Fabric OS Commands
firmwaredownloadstatus
Displays the status of a firmware download.
Synopsis
firmwaredownloadstatus
Availability
Admin
Release
V4.1.x
Description
Use this command to display an event log that records the progress and status of
the current firmwaredownload command. The event log is created by the
current firmwaredownload command and is kept until another
firmwaredownload command is issued. There is a timestamp associated
with each event.
In a StorageWorks Core switch, when firmwaredownloadstatus is run,
the event logs in the two CPs are synchronized. The command can be run from
either CP.
Operands
None.
298
Fabric OS Version 3.1.x/4.1.x Reference Guide
firmwaredownloadstatus
Example
To display the status of a firmware download:
switch:admin> firmwaredownloadstatus
[1]: Mon Jan 24 13:32:07 2005
cp0: FirmwareDownload has completed successfully on Standby CP.
[2]: Mon Jan 24 13:32:10 2005
cp0: Standby CP reboots.
[3]: Mon Jan 24 13:34:43 2005
cp0: Standby CP boots up.
[4]: Mon Jan 24 13:34:45 2005
cp0: Standby CP booted up with new firmware.
[5]: Mon Jan 24 13:37:50 2005
cp1: Active CP failed over. Now this CP is becoming Active.
... (output truncated)
[11]: Mon Jan 24 13:49:57 2005
cp1: FirmwareCommit has completed successfully on Active CP.
[12]: Mon Jan 24 13:49:58 2005
cp1: FirmwareDownload has completed successfully.
switch:admin>
See Also
firmwarecommit
firmwaredownload
firmwarerestore
firmwareshow
Fabric OS Version 3.1.x/4.1.x Reference Guide
299
Fabric OS Commands
firmwarerestore
Restore old active firmware image.
Synopsis
firmwarerestore
Availability
Admin
Release
V4.1.x
Description
Use this command to restore the old active firmware image.
After a firmwareDownload and a reboot, the downloaded firmware will
become active. If you then do not want to commit the firmware, and instead want
to restore the old firmware, run firmwareRestore. After running
firmwareRestore, you can run firmwareDownload again.
This command will reboot the system and make the old firmware active. After
reboot, both active and backup images should be restored to the old firmware.
This command will only take action if the system is booted after a
firmwareDownload. Otherwise, it will return with an error code.
Operands
None.
Example
To restore old active firmware image:
switch:admin> firmwarerestore
Restore Kernel Image...
................................
No firmware undo is needed
switch:admin>
300
Fabric OS Version 3.1.x/4.1.x Reference Guide
firmwarerestore
See Also
firmwareCommit
firmwareDownload
Fabric OS Version 3.1.x/4.1.x Reference Guide
301
Fabric OS Commands
firmwareshow
Displays the Fabric OS versions on both partitions of the local and remote CPs.
Synopsis
firmwareshow
Availability
Admin
Release
V4.1.x
Description
Use this command to display the Fabric OS versions on primary and secondary
partitions on the local CP and on the remote CP. This command identifies the
status for each CP as Active or Standby, and will also identify the slot number for
each CP.
If there is only one CP available, the command displays the Fabric OS versions for
the primary and secondary partitions on that CP.
Operands
None.
Example
To display the firmware version of a StorageWorks 2 Gb SAN switch:
switch:admin> firmwareshow
Local CP (Slot 5, CP0): Active
Primary partition:
v4.1.x
Secondary Partition:
v4.1.x
Remote CP is Non-redundant.
switch:admin>
302
Fabric OS Version 3.1.x/4.1.x Reference Guide
firmwareshow
To display the firmware version of a StorageWorks Core switch:
switch:admin> firmwareshow
Local CP (Slot 5, CP0): Active
Primary partition:
v4.1.x
Secondary Partition:
v4.1.x
Remote CP (Slot 6, CP1): Standby
Primary partition:
v4.1.x
Secondary Partition:
v4.1.x
switch:admin>
See Also
firmwaredownloadstatus
Fabric OS Version 3.1.x/4.1.x Reference Guide
303
Fabric OS Commands
fporttest
Functional test of F->N, N->F point to point path.
Synopsis
fporttest [-nframes count][-ports itemlist][-seed
payload_pattern][-width pattern_width][-size
pattern_size]
Availability
Admin
Release
V4.1.x
Description
Use this command to verify the functional operation of the switch by sending els
ECHO frames from switch F_Port's transmitter, and receive els ECHO ACC back
from N_Port device into F_Port's receiver. This exercises all the switch
components from the main board to the SFP, to the fiber cable, to the SFPs (of the
N_Port devices and the switch F_Port), and back to the main board.
The cables and SFPs connected should be of the same technology; that is, a short
wavelength SFP (switch) port is connected to another short wavelength SFP
(device) port using a short wavelength cable; and a long wavelength port is
connected to a long wavelength port; and a copper port is connected to a copper
port.
Only one frame is transmitted and received at any one time. The port LEDs flicker
green rapidly while the test is running.
The test method is as follows:
1. Determine which ports are F_Port
2. Create a ELS_ECHO frame with payload size, data pattern build in, or
payload size, data pattern.
3. Transmit frame F via F_Port, with D_ID to the N_Port device.
4. Wait for N_Port device to response ECHO ACC.
304
Fabric OS Version 3.1.x/4.1.x Reference Guide
fporttest
5. Compare ECHO data transmitted is equal to the ECHO data received.
6. Repeat step 3 through step 5 for all ports present until:
a. The number of frames requested is reached,
b. All ports are marked bad.
You can specify a payload pattern to be used when executing this test. If the
pattern is not user specified, then at every 30 pass, a different data type from a
palette of seven is used to generate different data pattern to create the frame. The
data pattern will be generated based on each data type. Some data types may
generate different data pattern on every pass, and other data type may not change
the data pattern in every pass. These seven data types will be repeated every 210
pass. The data palette is as follows:
1)
2)
3)
4)
5)
6)
7)
CSPAT:
BYTE_LFSR:
CHALF_SQ:
QUAD_NOT:
CQTR_SQ:
CRPAT:
RANDOM:
0x7e,
0x69,
0x4a,
0x00,
0x78,
0xbc,
0x25,
0x7e,
0x01,
0x4a,
0xff,
0x78,
0xbc,
0x7f,
0x7e,
0x02,
0x4a,
0x00,
0x78,
0x23,
0x6e,
0x7e,...
0x05,...
0x4a,...
0xff,...
0x78,...
0x47,...
0x9a,...
Operands
This command has the following operands:
-nframes count
Specify the number of times (or number of frames per
port) to execute this test. If omitted, the default value
used is 10. This operand is optional.
-ports itemlist
Specify the ports to run to test on. If omitted, the test will
be executed on all online F_ports in the specified slot.
This operand is optional.
-seed
payload_pattern
Specify the pattern of the test packets payload. When
payload_pattern is set to 0, all seven different data
types will be used. This operand is optional.
-width
pattern_width
Specify the width of the pattern which user specified.
When payload_pattern is set to 0x00,
pattern_width will be ignored. Valid values are:
1 = byte
2 = word
4 = quad
This operand is optional.
-size
pattern_size
Specify the number of words of the test packets
payload. If omitted, the default value is 512. This
operand is optional.
Fabric OS Version 3.1.x/4.1.x Reference Guide
305
Fabric OS Commands
Errors: V4.1.x
When it detects failures, the test may report one or more of the following error
messages:
DATA
INIT
PORT_DIED
EPI1_STATUS_ERR
ERR_STAT
ERR_STATS
ERR_STATS_2LONG
ERR_STATS_BADEOF
ERR_STATS_BADOS
ERR_STATS_C3DISC
ERR_STATS_CRC
ERR_STATS_ENCIN
ERR_STATS_ENCOUT
ERR_STATS_TRUNC
ERR_STAT_2LONG
ERR_STAT_BADEOF
ERR_STAT_BADOS
ERR_STAT_C3DISC
ERR_STAT_CRC
ERR_STAT_ENCIN
ERR_STAT_ENCOUT
ERR_STAT_TRUNC
FDET_PERR
FINISH_MSG_ERR
FTPRT_STATUS_ERR
LESSN_STATUS_ERR
MBUF_STATE_ERR
MBUF_STATUS_ERR
NO_SEGMENT
PORT_ABSENT
PORT_ENABLE
PORT_M2M
PORT_STOPPED
PORT_WRONG
RXQ_FRAME_ERR
RXQ_RAM_PERR
STATS
STATS_C3FRX
STATS_FRX
STATS_FTX
TIMEOUT
XMIT
306
Fabric OS Version 3.1.x/4.1.x Reference Guide
fporttest
Example
To run an fporttest:
switch:admin> fporttest -ports 1/0-1/15
Running fPortTest .......
Test Complete: "fporttest" Pass 10 of 10
Duration 0 hr, 0 min & 1 sec (0:0:0:127).
assed.
switch:admin>
See Also
itemlist
crossporttest
loopporttest
spinsilk
porttest
Fabric OS Version 3.1.x/4.1.x Reference Guide
307
Fabric OS Commands
fspfShow
Displays FSPF protocol information.
Synopsis
fspfShow
Availability
All users.
Release
V3.1.x and V4.1.x
Description
Use this command to display the Fibre Channel Shortest Path First (FSPF)
protocol information, and internal data structures. FSPF is implemented by a
single task, called tFspf.
The display shows the following fields:
Table 9: Display Fields
Field
308
Description
version
Version of FSPF protocol.
domainID
Domain number of local switch.
switchOnline
State of the local switch. V4.1.x only.
domainvalid
Domain of the local switch is currently confirmed.
isl_ports
Bit map of all E_Ports.
trunk_ports
Bit map of all the trunk ports. V4.1.x only.
f_ports
Bit map of all the Fx_Ports. V4.1.x only.
seg_ports
Bit map of all the segmented ports. V4.1.x only.
active_ports
Bit map of all the ONLINE ports. V4.1.x only.
minLSArrival
FSPF constant.
minLSInterval
FSPF constant.
LSoriginCount
Internal variable.
Fabric OS Version 3.1.x/4.1.x Reference Guide
fspfShow
Table 9: Display Fields (Continued)
Field
Description
startTime
Start time of tFspf task (milliseconds from boot).
fspfQ
FSPF input message queue.
fabP
Pointer to fabric data structure.
agingTID
Aging timer ID.
agingTo
Aging time out value, in milliseconds.
lsrDlyTID
Link State Record delay timer ID.
lsrDelayTo
Link State Record delay time out value, in milliseconds.
lsrDelayCount
Counter of delayed Link State Records.
ddb_sem
FSPF semaphore ID.
event_sch
FSPF scheduled events bit map.
lsrRefreshCnt
Internal variable.
Operands
None.
Fabric OS Version 3.1.x/4.1.x Reference Guide
309
Fabric OS Commands
Examples
To display FSPF protocol information (V4.1.x example):
switch:admin> fspfshow
version
domainID
switchOnline
domainValid
isl_ports[0]
isl_ports[1]
trunk_ports[0]
f_ports[0]
seg_ports[0]
active_ports[0]
minLSArrival
minLSInterval
LSoriginCount
startTime
fspfQ
fabP
agingTID
agingTo
lsrDlyTID
lsrDelayTo
lsrDelayCount
ddb_sem
=
=
=
=
=
=
=
=
=
=
=
=
=
=
=
=
=
=
=
=
=
=
2
1
TRUE
TRUE
0x00000000
0x74000000
0x00000000
0x00000000
0x00000000
0x00000000
3
5
0
50222
0x1003e640
0x1003e630
0x1004ca28
10000
0x100507a8
5000
1
0x1003e6e8
fabP:
event_sch
lsrRefreshCnt
= 0x0
= 0
switch:admin>
See Also
bcastShow
mcastShow
topologyShow
uRouteShow
310
Fabric OS Version 3.1.x/4.1.x Reference Guide
fwAlarmsFilterSet
fwAlarmsFilterSet
Enable or disable alarms for Fabric Watch.
Synopsis: V3.1.x
fwAlarmsFilterSet [alarm-on/off]
Synopsis: V4.1.x
fwAlarmsFilterSet [mode]
Availability
Admin
Release
V3.1.x and V4.1.x
Description
Use this command to configure alarm filtering for Fabric Watch. By turning off
the alarms, all non-environment class alarms are suppressed. By turning on the
alarms, all class alarms are generated.
Note: This command requires a Fabric Watch License.
Operands
This command has the following operands:
alarm-on/off
(V3.1.x only)
mode
Specify 1 to enable the alarms, 0 to disable the alarms. If
no operand is specified, the default value is 0 (alarms are
deactivated). This operand is optional.
(V4.1.x only)
Fabric OS Version 3.1.x/4.1.x Reference Guide
311
Fabric OS Commands
Example
To enable alarms in Fabric Watch (V3.1.x example):
switch:admin> fwalarmsfilterset
Committing configuration...done.
FW: Alarms are disabled
switch:admin> fwalarmsfilterset 1
Committing configuration...done.
FW: Alarms are enabled
switch:admin>
To enable alarms in Fabric Watch (V4.1.x example):
switch:admin> fwalarmsfilterset
FW: Alarms are disabled
switch:admin> fwalarmsfilterset 1
FW: Alarms are enabled
switch:admin>
See Also
fwAlarmsFilterShow
312
Fabric OS Version 3.1.x/4.1.x Reference Guide
fwAlarmsFilterShow
fwAlarmsFilterShow
Displays alarm filtering for Fabric Watch.
Synopsis
fwAlarmsFilterShow
Availability
All users.
Release
V3.1.x and V4.1.x
Description
Use this command to display whether alarm filtering is enabled or disabled.
Note: This command requires a Fabric Watch License.
Operands
None.
Example
To display the status of alarm filtering in Fabric Watch:
switch:admin> fwAlarmsFilterShow
FW: Alarms are enabled
switch:admin> fwAlarmsFilterShow
FW: Alarms are disabled
See Also
fwAlarmsFilterSet
Fabric OS Version 3.1.x/4.1.x Reference Guide
313
Fabric OS Commands
fwClassInit
Initialize all classes under Fabric Watch.
Synopsis
fwClassInit
Availability
Admin
Release
V3.1.x and V4.1.x
Description
Use this command to initialize all classes under Fabric Watch. This command
should only be used after installing a Fabric Watch license to enable the licensed
classes.
Note: This command requires a Fabric Watch License.
Operands
None.
Example
To initialize all classes under Fabric Watch:
switch:admin> fwClassInit
fwClassInit: Fabric Watch is updating...
fwClassInit: Fabric Watch has been updated
switch:admin>
314
Fabric OS Version 3.1.x/4.1.x Reference Guide
fwClassInit
See Also
fwConfigReload
fwConfigure
fwShow
Fabric OS Version 3.1.x/4.1.x Reference Guide
315
Fabric OS Commands
fwConfigReload
Reload the Fabric Watch configuration.
Synopsis
fwConfigReload
Availability
Admin
Release
V3.1.x and V4.1.x
Description
Use this command to reload the Fabric Watch configuration. This command
should only be used after downloading a new Fabric Watch configuration file from
a host.
Note: This command requires a Fabric Watch License.
Operands
None.
Example
To reload the saved Fabric Watch configuration:
switch:admin> fwConfigReload
fwConfigReload: Fabric Watch configuration reloaded.
316
Fabric OS Version 3.1.x/4.1.x Reference Guide
fwConfigReload
See Also
configUpload
configDownload
fwClassInit
fwConfigure
fwShow
Fabric OS Version 3.1.x/4.1.x Reference Guide
317
Fabric OS Commands
fwConfigure
Displays and modifies the Fabric Watch configuration and status.
Synopsis
fwConfigure
Availability
Admin
Release
V3.1.x and V4.1.x
Description
Use this command to display and modify threshold information for the Fabric
Watch configuration. Switch elements monitored by Fabric Watch are divided into
classes, which are further divided into areas. In addition, each area can include
multiple thresholds.
Note: This command requires a Fabric Watch License.
The Fabric Watch classes and areas are provided in the following list.
Table 10: fwConfigure Fabric Watch Classes and Areas
Class
318
Area
1 : Environmental class
1 : Temperature
2 : Fan
2 : SFP class
1 : Temperature
2 : RXP
3 : TXP
4 : Current
5 : Voltage
Fabric OS Version 3.1.x/4.1.x Reference Guide
fwConfigure
Table 10: fwConfigure Fabric Watch Classes and Areas (Continued)
Class
Area
3 : Port class
1 : Link loss
2 : Sync loss
3 : Signal loss
4 : Protocol error
5 : Invalid words
6 : Invalid CRCS
7 : RXPerformance
8 : TXPerformance
9 : State Changes
4 : Fabric class
1 : E-Port downs
2 : Fabric reconfigure
3 : Domain ID changes
4 : Segmentation changes
5 : Zone changes
6 : Fabric<->QL
7 : Fabric logins
8 : SFP state changes
5 : E-Port class
1 : Link loss
2 : Sync loss
3 : Signal loss
4 : Protocol error
5 : Invalid words
6 : Invalid CRCS
7 : RXPerformance
8 : TXPerformance
9 : State Changes
Fabric OS Version 3.1.x/4.1.x Reference Guide
319
Fabric OS Commands
Table 10: fwConfigure Fabric Watch Classes and Areas (Continued)
Class
320
Area
6 : F/FL Port (Copper)
class
(V3.1.x only)
1
2
3
4
5
6
7
8
9
: Link loss
: Sync loss
: Signal loss
: Protocol error
: Invalid words
: Invalid CRCS
: RXPerformance
: TXPerformance
: State Changes
(V3.1.x) 7 :
(V4.1.x) 6 :
F/FL Port (Optical) class
1
2
3
4
5
6
7
8
9
: Link loss
: Sync loss
: Signal loss
: Protocol error
: Invalid words
: Invalid CRCS
: RXPerformance
: TXPerformance
: State Changes
(V3.1.x) 8 :
(V4.1.x) 7 :
Alpa Performance
Monitor class
1 : Invalid CRCS
(V3.1.x) 9 :
(V4.1.x) 8 :
End-to-End Performance
Monitor class
1 : Invalid CRCS
2 : RXPerformance
3 : TXPerformance
Fabric OS Version 3.1.x/4.1.x Reference Guide
fwConfigure
Table 10: fwConfigure Fabric Watch Classes and Areas (Continued)
Class
Area
(V3.1.x) 10 :
(V4.1.x) 9 :
Filter Performance Monitor
class
1 : Customer Define
(V3.1.x) 11 :
(V4.1.x) 10 :
Security class
1 : Telnet Violations
2 : HTTP Violations
3 : API Violations
4 : RSNMP Violations
5 : WSNMP Violations
7 : MS Violations
8 : Serial Violations
9 : Front Panel Violations
10 : SCC Violations
11 : DCC Violations
12 : Login Violations
13 : Invalid Timestamps
14 : Invalid Signatures
15 : Invalid Certificates
16 : SLAP Failures
17 : SLAP Bad Packets
18 : TS Out of Sync
19 : No-FCS
20 : Incompatible Security DB
21 : Illegal Command
(V3.1.x) 12 :
(V4.1.x) 11 :
Switch Availability
Monitor class
1 : Total Down time
2 : Total Up time
3 : Duration of Occurrences
4 : Fequency of Occurrences
5 : MTBF (Mean Time Between Failure)
6 : MTTF (Mean Time To Failure)
Operands
None.
Fabric OS Version 3.1.x/4.1.x Reference Guide
321
Fabric OS Commands
Example
To display the Fabric Watch configuration and status:
switch:admin> fwConfigure
1 : Environment class
2 : SFP class
3 : Port class
4 : Fabric class
5 : E-Port class
6 : F/FL Port (Copper) class
7 : F/FL Port (Optical) class
8 : Alpa Performance Monitor class
9 : End-to-End Performance Monitor class
10 : Filter Performance Monitor class
11 : Security class
12 : Switch Availability Monitor class
13 : quit
Select a class => : (1..13) [13] 1
1
2
3
4
:
:
:
:
Temperature
Fan
Power Supply
return to previous page
Select an area => : (1..3) [3] 1
Index ThresholdName
Status
CurVal
LastEvent
LastEventTime
LastVal
LastState
============================================================================
1
envTemp001
enabled
32 C
inBetween
23:04:42 on 10/01/2002
35 C
Normal
2
envTemp002
enabled
30 C
inBetween
23:04:42 on 10/01/2002
32 C
Normal
3
envTemp003
enabled
28 C
inBetween
23:04:42 on 10/01/2002
31 C
Normal
1 : refresh
2 : disable a threshold
3 : enable a threshold
4 : advanced configuration
5 : return to previous page
Select choice => : (1..5) [5]
See Also
fwClassInit
fwConfigReload
fwShow
322
Fabric OS Version 3.1.x/4.1.x Reference Guide
fwFruCfg
fwFruCfg
Displays or modifies FRU state alert configuration.
Synopsis
fwFruCfg
Availability
Admin
Release
V4.1.x
Description
Use this command to configure FRU states and actions. Based on these
configuration settings Fabric Watch generates action when FRU state changes. To
configure e-mail alerts use fwMailCfg.
Note: This command requires a Fabric Watch License.
Operands
None.
Fabric OS Version 3.1.x/4.1.x Reference Guide
323
Fabric OS Commands
Example
To change FRU state alert configuration:
switch:admin> fwFruCfg
1 : Slot
2 : Power Supply
3 : Fan
4 : WWN
5 : Configure All
6 : Set All to Default
7 : Quit
Select an item => : (1..7) [7] 1
Alarm
Id
Label
Status
State
Action
Freq
TimeBase
=======================================================================
1
Slot #1
enable
48
17
5
Minute
2
Slot #2
enable
8
16
1
Minute
3
Slot #3
enable
16
16
1
Minute
4
Slot #4
enable
48
17
5
Minute
1
2
3
4
:
:
:
:
change
change
change
change
fru alarm state
fru alarm level
alarm frequency
fru timebase
5
6
7
8
:
:
:
:
change fru status
apply fru configuration
cancel fru configuration changes
return to previous page
Select Id => : (1..8) [8] 1
Enter Slot Number : (1..4) [4] 1
Absent-1, Inserted-2, Ready-4
Up-8, On-16, Off-32, Faulty-64
Enter fru alarm state => : (1..127) [48] 32
Alarm
Id
Label
Status
State
Action
Freq
TimeBase
=======================================================================
1
Slot #1
enable
32
17
5
Minute
2
Slot #2
enable
8
16
1
Minute
3
Slot #3
enable
16
16
1
Minute
4
Slot #4
enable
48
17
5
Minute
1
2
3
4
:
:
:
:
change
change
change
change
fru alarm state
fru alarm level
alarm frequency
fru timebase
5
6
7
8
:
:
:
:
change fru status
apply fru configuration
cancel fru configuration changes
return to previous page
See Also
fwMailCfg
fwConfigure
324
Fabric OS Version 3.1.x/4.1.x Reference Guide
fwHelp
fwHelp
Displays Fabric Watch command information.
Synopsis
fwHelp
Availability
All users.
Release
V3.1.x and V4.1.x
Description
Use this command to display information on commands used to configure Fabric
Watch.
Operands
None.
Fabric OS Version 3.1.x/4.1.x Reference Guide
325
Fabric OS Commands
Example
To display a summary of Fabric Watch telnet commands (V3.1.x example):
switch:admin> fwHelp
fwAlarmsFilterSet
fwAlarmsFilterShow
fwClassInit
fwConfigure
fwConfigReload
fwSetToCustom
fwSetToDefault
fwShow
fwMailCfg
fwSamShow
Configure alarms filtering for Fabric Watch
Show alarms filtering for Fabric Watch
Initialize all Fabric Watch classes
Configure Fabric Watch
Reload Fabric Watch configuration
Set boundary & alarm level to custom
Set boundary & alarm level to default
Show thresholds monitored by Fabric Watch
Email Alert by Fabric Watch
Show Switch Availability monitored by Fabric Watch
NOTE: don't run help command after firmwaredownload without reboot.
It will give you wrong information.
switch:admin>
See Also
diagHelp
fwconfigure
326
Fabric OS Version 3.1.x/4.1.x Reference Guide
fwMailCfg
fwMailCfg
Configure e-mail alerts in Fabric Watch.
Synopsis
fwMailCfg
Availability
Admin
Release
V3.1.x and V4.1.x
Description
Use this command to display or modify the configuration and status of e-mail
alerts in Fabric Watch.
Switch elements monitored by Fabric Watch are divided into Classes. You can
configure one email address recipient for the alert messages from each class.
Note: This command requires a Fabric Watch License.
When configuring an e-mail alert for a specific class you must specify the
following information:
Mail Server IP address
Specify the IP address of the mail server.
Domain Name
Specify the domain name of the mail server. For
example, hp.com.
Mail To
Specify the name of the users who will be notified. The
format should be [email protected]. For example,
[email protected].
Note: If the switch is rebooted using switchboot, reboot, or fastboot, the
e-mail alert is set to disabled and must be re-enabled again.
Fabric OS Version 3.1.x/4.1.x Reference Guide
327
Fabric OS Commands
Operands
None.
Example
To configure an e-mail address recipient for the environmental class in Fabric
Watch (V3.1.x example):
switch:admin> fwMailCfg
1 : Show Mail Configuration Information
2 : Disable Email Alert
3 : Enable Email Alert
4 : Send Test Mail
5 : Set Mail Address for Email Alert
6 : Quit
Select an item => : (1..6) [6] 5
Mail Config Menu
____________________________________
0 : Environment class
1 : SFP class
2 : Port class
3 : Fabric class
4 : E-Port class
5 : F/FL Port (Copper) class
6 : F/FL Port (Optical) class
7 : Alpa Performance Monitor class
8 : End-to-End Performance Monitor class
9 : Filter Performance Monitor class
10 : Security class
11 : Switch Availability Monitor class (SAM)
12 : quit
Select an item => : (0..12) [12] 0
Enter Mail Server IP address : [0.0.0.0] 11.22.33.44
Enter Domain Name : [hp.com] hp.com
Mail To: [[email protected]] [email protected]
Committing configuration...done.
Email Alert configuration Succeeded!
1 : Show Mail Configuration Information
2 : Disable Email Alert
3 : Enable Email Alert
4 : Send Test Mail
5 : Set Mail Address for Email Alert
6 : Quit
Select an item => : (1..6) [6]
328
Fabric OS Version 3.1.x/4.1.x Reference Guide
fwMailCfg
See Also
fwconfigure
fwclassinit
fwshow
fwconfigreload
Fabric OS Version 3.1.x/4.1.x Reference Guide
329
Fabric OS Commands
fwsamshow
Displays the switch availability monitor information.
Synopsis
fwsamshow
Availability
All users.
Release
V3.1.x and V4.1.x
Description
Use this command to displays information about port availability. The information
displayed includes: total uptime, total down time, number of faulty occurrences,
MTBF (Mean Time Before Failure), and MTTF (Mean Time To Failure) for each
port.
Note: This command requires a Fabric Watch License.
Operands
None.
330
Fabric OS Version 3.1.x/4.1.x Reference Guide
fwsamshow
Example
The following example shows the summary information for an StorageWorks 2
Gb SAN switch:
switch:admin> fwsamshow
Port#
Type
Total
UpTime
(Percent)
Total
DownTime
(Percent)
Number Of
Occurences
(Times)
MTBF
(Hours)
Total
MTTF
OffTime
(Hours) (Percent)
============================================================================
0
E_PORT
89
1
1
1
0
8
1
U_PORT
0
0
0
0
0
100
2
U_PORT
0
0
0
0
0
100
3
U_PORT
0
0
0
0
0
100
4
U_PORT
0
0
0
0
0
100
5
G_PORT
0
0
0
0
0
100
6
U_PORT
0
0
0
0
0
100
7
U_PORT
0
0
0
0
0
100
switch:admin>
See Also
switchshow
Fabric OS Version 3.1.x/4.1.x Reference Guide
331
Fabric OS Commands
fwSetToCustom
Set boundary and alarm levels to custom values.
Synopsis
fwSetToCustom
Availability
Admin
Release
V3.1.x and V4.1.x
Description
Use this command to set boundary and alarm levels to custom for all classes and
areas for Fabric Watch.
Note: This command requires a Fabric Watch License.
Operands
None.
Example
To set alarm levels to custom values:
switch:admin> fwSetToCustom
Committing configuration...done.
See Also
fwSetToDefault
332
Fabric OS Version 3.1.x/4.1.x Reference Guide
fwSetToDefault
fwSetToDefault
Set boundary and alarm levels to the default values.
Synopsis
fwSetToDefault
Availability
Admin
Release
V3.1.x and V4.1.x
Description
Use this command to set boundary and alarm levels to default for all classes and
areas for Fabric Watch.
Note: This command requires a Fabric Watch License.
Operands
None.
Example
To set alarm levels to default values:
switch:admin> fwSetToDefault
Committing configuration...done.
See Also
fwSetToCustom
Fabric OS Version 3.1.x/4.1.x Reference Guide
333
Fabric OS Commands
fwShow
Displays the thresholds monitored by Fabric Watch.
Synopsis
fwShow
Availability
All users.
Release
V3.1.x and V4.1.x
Description
Use this command to display the thresholds monitored by Fabric Watch.
In V3.1.x, if no parameters are entered, a summary of all thresholds is displayed
and printed. If a valid threshold name is entered as a parameter, detailed
information pertaining only to that threshold is displayed and printed.
In V4.1.x, this command can display a synopsis of thresholds for a particular class
or more detailed information for an individual threshold.
Note: This command requires a Fabric Watch License.
The display of fwshow for Root user could be different than Admin user. The Root
user can see all inactive and active thresholds, but the Admin user can only see active
threshold.
Operands
None.
334
Fabric OS Version 3.1.x/4.1.x Reference Guide
fwShow
Example
The following in a V3.1.x example:
Switch:admin> fwshow
=========================================================================
Name
Label
Last value
---------------- ------------------------ ----------------------------envFan001
Env Fan 1
5880 RPM
envFan002
Env Fan 2
5910 RPM
envFan003
Env Fan 3
5880 RPM
envFan004
Env Fan 4
5970 RPM
envFan005
Env Fan 5
6060 RPM
envTemp001
Env Temperature 1
33 C
envTemp002
Env Temperature 2
32 C
fabricDI000
Fabric Domain ID
0 DID Change(s)
fabricED000
Fabric E-port down
0 Down(s)
fabricFL000
Fabric Fabric login
0 Login(s)
fabricFQ000
Fabric Fabric<->QL
0 Change(s)
fabricFR000
Fabric Reconfigure
0 Reconfig(s)
<output truncated>
Fabric OS Version 3.1.x/4.1.x Reference Guide
335
Fabric OS Commands
The following is a V4.1.x example:
switch:admin> fwShow
1 : Show class thresholds
2 : Detail threshold information
3 : Quit
Select an item => : (1..3) [3] 2
Enter Threshold Name : [envFan001] envFan002
=========================================================================
Name
Label
Last value
-------------------- ---------------------------------------------Monitored for:
2369 (39 mins)
Last checked:
19:48:00 on 12/03/1999
Lower bound:
2000 RPM
Upper bound:
3400 RPM
Buffer Size:
3
Value history:
3013 RPM
Raw history:
3013 RPM
3013 RPM
3013 RPM
3013 RPM
3013 RPM
Flags: 0x
40 TRIGGERED
Counter:
Access via: Function call
Address: 0x100187dc
Argument: 0x00000002
Previous: 0x00000bc5 (3013)
Current: 0x00000bc5 (3013)
Events:
Style: Triggered
Event 0 occurred 1 time, last at 19:08:31 on 12/03/1999
Event 1 occurred 80 times, last at 19:47:06 on 12/03/1999
* Event 5 occurred 1 time, last at 19:08:37 on 12/03/1999
Callbacks:
No callbacks are registered.
1 : Show class thresholds
2 : Detail threshold information
3 : Quit
Select an item => : (1..3) [3] 3
336
Fabric OS Version 3.1.x/4.1.x Reference Guide
fwShow
See Also
fwClassInit
fwConfigReload
fwConfigure
Fabric OS Version 3.1.x/4.1.x Reference Guide
337
Fabric OS Commands
gbicShow
Displays serial ID GBIC information.
Synopsis: V3.1.x
gbicShow [portnumber]
Synopsis: V4.1.x
gbicShow [slotnumber][portnumber]
Availability
All users.
Release
V3.1.x and V4.1.x
Description: V3.1.x
Use this command to display information about Serial Identification GBICs (also
known as module definition “4” GBICs). These GBICs provide extended
information that describes the GBICs capabilities, interfaces, manufacturer, and
other information.
Use this command with no operand to display a summary of all GBICs in the
switch. The summary shows the GBIC type (see switchShow for an
explanation of the two letter codes) and, for Serial ID GBIC, the vendor name and
GBIC serial number.
Use this command with the slot and portnumber operand to display detailed
information about the Serial ID GBIC in that port.
For Finisar "smart" GBICs, five additional fields are displayed: module
temperature, received optical power, transmitted optical power (longwave only),
laser diode drive current, and GBIC Voltage.
338
Fabric OS Version 3.1.x/4.1.x Reference Guide
gbicShow
Description: V4.1.x
Use this command to display information about SFPs.
Note: The current technology in the StorageWorks Core switch, and StorageWorks 2
Gb SAN switch use SFPs instead of GBICs. This command is now replaced by the
sfpshow command. The command is included in the current Fabric OS for backward
compatibility of scripts used by some customers.
SFPs are polled by a background process. The gbicshow command retrieves
the latest information from cache. The cache values for each SFP are updated
when the SFP is hot plugged, when it is removed, or when the Fabric OS polls the
SFPs. In the StorageWorks Core switch, if there is a lot of activity on the switch,
poll updates may take several minutes.
Use this command with no operand to display a summary of all SFPs in the
switch. The summary shows the SFP type (see switchshow for an explanation
of the two letter codes) and, for Serial ID SFP, the vendor name and SFP serial
number.
Use this command with the slotnumber and portnumber operands to
display detailed information about the SFP in that port.
Operands
This command has the following operands:
slotnumber
Specify the slot number for a StorageWorks Core switch.
For all other switches this operand is not required. The slot
number must be followed by a slash ( / ) and the port
number, so that each port is represented by both slot
number (1 through 4, or 7 through 10), and port number
(0 through 15).
The StorageWorks Core switch has a total of 1–10 slots.
Slot number 5 and 6 are control processor cards, and slot
1 through 4, and 7 through 10, are port cards. On each
port card, there are 16 ports counted from the bottom, 0 to
15.
portnumber
Specify a port number. Valid values for port number vary
depending on the switch type. This operand is optional.
(V4.1.x only)
Fabric OS Version 3.1.x/4.1.x Reference Guide
339
Fabric OS Commands
Example
The following V3.1.x example shows first GBIC summary information:
switch:admin> gbicshow
port 0: id (sw) Vendor:
port 1: id (sw) Vendor:
port 2: id (sw) Vendor:
port 3: id (sw) Vendor:
port 4: id (sw) Vendor:
port 5: id (sw) Vendor:
port 6: id (sw) Vendor:
port 7: id (sw) Vendor:
switch:admin>
AGILENT
AGILENT
AGILENT
AGILENT
AGILENT
AGILENT
AGILENT
AGILENT
Serial
Serial
Serial
Serial
Serial
Serial
Serial
Serial
No:
No:
No:
No:
No:
No:
No:
No:
A00128928
A00128983
A00128966
A00128929
A00128988
A00127279
A00127399
A00127264
See Also
switchShow
340
Fabric OS Version 3.1.x/4.1.x Reference Guide
h
h
Displays shell history.
Synopsis
h
Availability
All users.
Release
V3.1.x and V4.1.x
Description
Use this command to view the shell history. The shell history mechanism is
similar to the UNIX Korn shell history facility. It has a built-in line editor similar
to UNIX vi that allows previously typed commands to be edited. The command h
displays the 20 most recent commands typed into the shell; old commands fall off
the top as new ones are entered.
To edit a command, press ESC to access edit mode, then use vi commands. The
ESC key switches the shell to edit mode. The Enter key gives the line to the shell
from either editing or input mode.
Basic vi commands:
k
get the previous shell command
j
get the next command
h
move the cursor left
l
move the cursor right
a
append
i
insert
x
delete
u
undo
Fabric OS Version 3.1.x/4.1.x Reference Guide
341
Fabric OS Commands
Operands
None.
Example
To display previous shell commands:
switch:admin> h
1 version
2 switchShow
3 portDisable 2
4 portEnable 2
5 switchShow
See Also
None.
342
Fabric OS Version 3.1.x/4.1.x Reference Guide
haDisable
haDisable
Disable the High Availability feature in the switch.
Synopsis
haDisable
Availability
Admin
Release
V4.1.x
Description
Use this command to disable the High Availability feature in the Switch. If the HA
feature is already disabled, this command does nothing.
Operands
None.
Example
To disable the High Availability feature:
switch:admin> haDisable
Disabling HA ...
Done.
See Also
haEnable
hafailover
hashow
Fabric OS Version 3.1.x/4.1.x Reference Guide
343
Fabric OS Commands
hadump
Displays High Availability feature information.
Synopsis
hadump
Availability
All users.
Release
V4.1.x
Description
Use this command to display information about the status of the High Availability
feature in the Switch. This command displays the following information:
■
Local CP state (slot number and CP id);
■
Remote CP state (slot number and CP id);
■
High Availability Enabled/Disabled
■
Heartbeat Up/Down
■
Health of Standby CP. The Health of Standby CP can show one of the
following values:
■
Healthy
The Standby CP is running and the background health
diagnostic has not detected any errors.
Failed
The Standby CP is running, but the background health
diagnostic has discovered a problem with the blade. The logs
should be checked to determine the appropriate repair action.
Fail-over will be disabled until the Standby CP can be repaired.
HA Synchronization Status. The HA Synchronization Status field can show
one of the following values:
HA State
Synchronized
344
The system is currently fully synchronized. If a fail-over were
necessary at this time, the fail-over would be non-disruptive.
Fabric OS Version 3.1.x/4.1.x Reference Guide
hadump
HA State Not
In Sync
■
The system is unable to synchronize the two CPs, due to the
Standby CP being faulty or another system error. If a fail-over
were to take place at this time, the Standby CP would be
rebooted, and the fail-over will be disruptive.
IP and Fibre Channel addresses configured for the switch.
Operands
None.
Example
To displays High Availability feature information:
switch:admin> hadump
Dump HA Data ...
Local CP (Slot 5, CP0): Active
Remote CP (Slot 6, CP1): Standby, Healthy
HA enabled, Heartbeat Up, HA State not in sync
<output truncated>
See Also
haenable
haFailover
haShow
Fabric OS Version 3.1.x/4.1.x Reference Guide
345
Fabric OS Commands
haEnable
Enable the High Availability feature in the switch.
Synopsis
haEnable
Availability
Admin
Release
V4.1.x
Description
Use this command to enable the High Availability (HA) feature in the switch. If
the HA feature is already enabled, this command is ignored.
Operands
None.
Example
To enable the High Availability feature in the switch:
switch:admin> haEnable
Enabling HA ...
Done.
See Also
haDisable
haFailover
haShow
346
Fabric OS Version 3.1.x/4.1.x Reference Guide
haFailover
haFailover
Forces the failover mechanism so that the Standby CP becomes the Active CP.
Synopsis
haFailover
Availability
Admin
Release
V4.1.x
Description
Use this command to force the failover mechanism to occur so that the Standby
CP becomes the Active CP. Because haFailover results in CP reboot, a
warning message and a confirmation are displayed. If the user answers positively,
then the failover takes place.
On a StorageWorks Core switch, when HA synchronization is enabled and the
CPs are in sync, if a failover is initiated, the port traffic light will not flash during
the failover, even while traffic is continuing to flow.
Operands
None.
Fabric OS Version 3.1.x/4.1.x Reference Guide
347
Fabric OS Commands
Example
To force the failover of the active CP to the standbyCP in the switch:
switch:admin> hafailover
Local CP (Slot 6, CP1): Active
Remote CP (Slot 5, CP0): Standby, Failed
HA enabled, Heartbeat Up, HA State Not in Sync
Warning: This command is being run on a control processor(CP) based system.
If the above status does not indicate HA State synchronized then this
operation will cause the active CP to reset. This will cause disruption to
devices attached to both switch 0 and switch 1 and will require that existing
telnet sessions be restarted. To just reboot a logical switch on this system,
use command switchreboot(1M) on the logical switch you intend to reboot.
Are you sure you want to reboot the active CP [y/n]? Y
See Also
haDisable
haEnable
haShow
348
Fabric OS Version 3.1.x/4.1.x Reference Guide
haShow
haShow
Displays control processor (CP) status.
Synopsis
haShow
Availability
Admin
Release
V4.1.x
Description
Use this command to display the control processor status, which includes:
■
Local CP state (slot number and CP id)
■
Remote CP state (slot number and CP id)
■
High Availability Enabled/Disabled
■
Heartbeat Up/Down
■
Health of Standby CP. The Health of Standby CP can show one of the
following values:
■
Healthy
The Standby CP is running and the background health
diagnostic has not detected any errors.
Failed
The Standby CP is running, but the background health
diagnostic has discovered a problem with the blade. The logs
should be checked to determine the appropriate repair action.
Fail-over will be disabled until the Standby CP can be repaired.
HA Synchronization Status. The HA Synchronization Status field can show
one of the following values:
HA State
Synchronized
The system is currently fully synchronized. If a fail-over were
necessary at this time, the fail-over would be non-disruptive.
Fabric OS Version 3.1.x/4.1.x Reference Guide
349
Fabric OS Commands
HA State Not
In Sync
The system is unable to synchronize the two CPs, due to the
Standby CP being faulty or another system error. If a fail-over
were to take place at this time, the Standby CP would be
rebooted, and the fail-over will be disruptive.
Operands
None.
Example
To display control processor (CP) status:
switch:admin> haShow
Local CP (Slot 6, CP1): Active
Remote CP (Slot 5, CP0): Standby
HA Enabled, Heartbeat Up, HA State not in sync
See Also
haDisable
haEnable
haFailover
haShow
350
Fabric OS Version 3.1.x/4.1.x Reference Guide
hasyncstart
hasyncstart
Enable the HA state synchronizing process.
Synopsis
hasyncstart
Availability
Admin
Release
V4.1.x
Description
Use this command to re-activate the HA State Synchronizing process.
Operands
None.
Example
To enable the HA state synchronizing process:
switch:admin> hasyncstart
HA State synchronization has started
switch:admin> hashow
Local CP (Slot 6, CP1): Active
Remote CP (Slot 5, CP0): Standby, Healthy
HA enabled, Heartbeat Up, HA State synchronized
switch:admin>
See Also
hasyncstop
haFailover
haShow
Fabric OS Version 3.1.x/4.1.x Reference Guide
351
Fabric OS Commands
hasyncstop
Disable the HA state synchronizing process.
Synopsis
hasyncstop
Availability
Admin
Release
V4.1.x
Description
Use this command to temporarily de-activate the HA Synchronization
process.The next fail-over that takes place after may be disruptive as this
command will deactivate the synchronization process.
Operands
None.
Example
To disable the HA state synchronizing process:
Switch:admin> hasyncstop
Stop synchronize 0x228 (fabos):
out of sync!
Switch: 0, Info FSS_ME-FORCELOG, 4, HA State
See Also
hasyncstart
haFailover
haShow
352
Fabric OS Version 3.1.x/4.1.x Reference Guide
help
help
Displays help information for commands.
Synopsis
help [command]
Availability
All users.
Release
V3.1.x and V4.1.x
Description
Use this command without an operand to display an alphabetical list of
commands. At the end of the list are additional commands that display groups of
commands; for example, diagHelp displays a list of diagnostic commands.
The list shows only commands that are available to the current user; this can vary
according to:
■
Login user level
■
License key
■
Switch model
To access help information for a specific command, enter the command name as
an operand.
Operands
This command has the following operand:
command
Fabric OS Version 3.1.x/4.1.x Reference Guide
Specify the command name, with or without quotation
marks. This operand is optional.
353
Fabric OS Commands
Example
The first example provides help information on the login command. The second
example provides help information on the configure command.
switch:admin> help login
...
switch:admin> help "configure"
...
See Also
diagHelp
licenseHelp
routeHelp
354
Fabric OS Version 3.1.x/4.1.x Reference Guide
historyLastShow
historyLastShow
Displays last history log record.
Synopsis
historyLastShow
Availability
All users.
Release
V4.1.x
Description
Use this command to display the contents of the last history log record. A history
record contains three lines of information:
The first line of each record contains the following data sets:
■
Object type: CHASSIS, FAN, POWER SUPPLY, SW BLADE (switch), CP
BLADE (control processor), WWN (World Wide Name), or UNKNOWN.
■
Object number: Slot <nn> (for blades), Unit <nn> (for everything else).
■
Event: Inserted, Removed, or Invalid.
■
Time of the event: at <Dow> <Mon> <dd> <hh:mm:ss> <yyyy>
The second and third lines of a record each contain one data set, preceded by its
name:
HP Part Number: <xx-yyyyy-zz> or Unknown
HP Serial Number: <xxxxxxxxxxxx> or Unknown
Operands
None.
Fabric OS Version 3.1.x/4.1.x Reference Guide
355
Fabric OS Commands
Example
To display the last history record:
switch12K:admin> historyLastShow
POWER SUPPLY Unit 2
Inserted at Tue Aug 14 15:52:10 2001
HP Part Number:
60-0001536-02
HP Serial Number: 1013456800
Records:
11
See Also
historyShow
356
Fabric OS Version 3.1.x/4.1.x Reference Guide
historymode
historymode
Displays or sets the mode of the history log.
Synopsis
historymode [mode]
Availability
Admin
Release
V4.1.x
Description
Use this command to display or set the mode (as rotating or first-in) of the history
buffer.
The history log buffer can have two modes of accepting new entries after it has
reached its maximum size:
■
Rotating mode: new messages overwrite the oldest messages in the log.
■
First-in mode: once the log is full, all additional logs are discarded, so that the
first set of logs to fill the buffer is preserved.
This command enables you to display the current history log mode and change
between them. It also enables you to clear the history log buffer whenever the
mode is changed.
This command, with no operand, displays the current history mode value.
This command, with an operand specified, sets the history mode to the new value.
Operands
This command has the following operands:
mode
Fabric OS Version 3.1.x/4.1.x Reference Guide
Specify rot for a rotating buffer, or fi for First-in mode. This
operand is optional.
357
Fabric OS Commands
Example
The following command sequence changes the history mode to first-in from
rotating:
switch:admin> historymode rot
History Mode is: Rotating.
See Also
historyshow
historyLastShow
358
Fabric OS Version 3.1.x/4.1.x Reference Guide
historyShow
historyShow
Displays the history log.
Synopsis
historyShow
Availability
All users.
Release
V4.1.x
Description
Use this command to display the history log. Each history record contains three
lines of information:
1. The first line of each record contains the following data sets:
■
Object type: CHASSIS, FAN, POWER SUPPLY, SW BLADE (switch),
CP BLADE (control processor), WWN (World Wide Name), or
UNKNOWN.
■
Object number: Slot <nn> (for blades), Unit <nn> (for everything
else).
■
Event: Inserted, Removed, or Invalid.
■
Time of the event: at <Dow> <Mon> <dd> <hh:mm:ss> <yyyy>
2. The second contains one data set, HP Part Number:
■
HP Part Number: <xx-yyyyy-zz> or Unknown
3. The third line contains one data set, HP Serial Number:
■
HP Serial Number: <xxxxxxxxxxxx> or Unknown
Operands
None.
Fabric OS Version 3.1.x/4.1.x Reference Guide
359
Fabric OS Commands
Example
To display the entire contents of the history file:
switch:admin> historyShow
FAN Unit 3
HP Part Number:
HP Serial Number:
Removed at Tue Aug 14 10:05:37 1970
20-123456-12
1013456800
POWER SUPPLY Unit 1
HP Part Number:
HP Serial Number:
Inserted at Tue Aug 14 10:52:10 1970
60-0001536-02
Unknown
FAN Unit 3
HP Part Number:
HP Serial Number:
Inserted at Tue Aug 14 10:23:45 2001
20-123456-12
1013456800
WWN Unit 1
HP Part Number:
HP Serial Number:
Inserted at Tue Aug 14 11:03:45 2001
40-0000031-03
1013456800
. . .
SW BLADE Slot 3
HP Part Number:
HP Serial Number:
Removed at Tue Aug 14 12:10:09 2001
60-0001532-03
1013456800
CP BLADE Slot 6
HP Part Number:
HP Serial Number:
Removed at Tue Aug 14 13:45:07 2001
60-0001604-02
FP00X600128
SW BLADE Slot 3
HP Part Number:
HP Serial Number:
Inserted at Tue Aug 14 13:53:40 2001
60-0001532-03
1013456800
CP BLADE Slot 6
HP Part Number:
HP Serial Number:
Inserted at Tue Aug 14 13:59:50 2001
60-0001604-02
FP00X600128
POWER SUPPLY Unit 2
HP Part Number:
HP Serial Number:
Inserted at Tue Aug 14 15:52:10 2001
60-0001536-02
1013456800
Records:
11
See Also
historyLastShow
360
Fabric OS Version 3.1.x/4.1.x Reference Guide
i
i
Displays task summary.
Synopsis
i [Process ID]
Availability
All users.
Release
V3.1.x and V4.1.x
Description
This command displays information of all of the processes or of a specific process
if a process ID is supplied. One line is displayed per process. The following table
explains the fields displayed with this commands.
Table 11: Command Field Description
Field
F
Description
Process Flags:
ALIGNWARN 001 print alignment warning messages
STARTING 002 being created
EXITING
004 getting shut down
PTRACED
010 set if ptrace (0) has been called
TRACESYS 020 tracing system calls
FORKNOEXEC 040 forked but didn't exec
SUPERPRIV 100 used super-user privileges
DUMPCORE 200 dumped core
SIGNALED 400 killed by a signal
Fabric OS Version 3.1.x/4.1.x Reference Guide
361
Fabric OS Commands
Table 11: Command Field Description (Continued)
Field
Description
S
Process state codes:
D uninterruptible sleep (usually IO)
R runnable (on run queue)
S sleeping
T traced or stopped
Z a defunct ("zombie") process
UID
The effective user ID number of the process.
PID
The process ID of the process.
PPID
The process ID of the parent process.
C
Processor utilization for scheduling.
PRI
Priority number of the process. Higher numbers mean lower
priority.
NI
Nice value used in priority computation.
ADDR
Memory address of the process.
SZ
The total size of the process in virtual memory in pages.
WCHAN
The address of an event for which process is sleeping (if blank, the
process is running.).
TTY
The controlling terminal of the process (? is printed for no
controlling terminal).
TIME
The cumulative execution time for the process.
CMD
The command name of the process.
Operands
This command has the following operand:
Process ID
362
Specify the task name or task ID for the task to be displayed.
Fabric OS Version 3.1.x/4.1.x Reference Guide
i
Example
To display information about process name tSRL:
switch:admin> i tSRL
NAME
ENTRY
TID
PRI
STATUS
PC
SP
ERRNO DELAY
-------- ------------ -------- --- ---------- -------- -------- ------- ----tSRL
_nssrl_svr
11f9be20 170 PEND
1088a160 11f9c1b0
0
0
switch:admin>
See Also
diagHelp
routeHelp
Fabric OS Version 3.1.x/4.1.x Reference Guide
363
Fabric OS Commands
ifModeSet
Set the link operating mode for a network interface.
Synopsis
ifModeSet [“interface”]
Availability
Admin
Release
V3.1.x and V4.1.x
Description: V3.1.x
Use this command to set the link operating mode for a network interface.
The “interface” argument is of the form <name><physical-unit>, where
<name> is the name of the network interface and <physical-unit> is the
instance of that interface, for example, “fei0.”
The network interfaces available on the system can be listed with the ifshow
command.
The command begins by prompting the current operating mode and continues
prompting other possible operating modes until one has been selected or until all
the possibilities have been displayed. An operating mode is confirmed with a “y”
or “yes” at a prompt. If an operating mode is selected different from the current
mode, the change is saved and the command exits.
Note: Rebooting is required for the changes of this command to take effect.
Changing the link mode is not supported for all network interfaces and not necessarily
for all Ethernet network interfaces. At present, this command is only functional for “fei”
interfaces.
Exercise care when using this command. Forcing the link to an operating mode not
supported by the network equipment to which it is attached may result in an inability to
communicate with the system via its Ethernet interface.
364
Fabric OS Version 3.1.x/4.1.x Reference Guide
ifModeSet
Description: V4.1.x
Use this command to set the link operating mode for a network interface.
An operating mode is confirmed with a “y” or “yes” at the prompt. If the operating
mode selected differs from the current mode, the change is saved and the
command exits.
Changing the link mode is not supported for all network interfaces or for all
ethernet network interfaces. This command is only functional for the “eth0”
interface.
Exercise care when using this command. Forcing the link to an operating mode
not supported by the network equipment to which it is attached may result in an
inability to communicate with the system through its ethernet interface.
For dual-CP systems, the ifmodeset command affects the CP that you are
currently logged into. To set the link operating mode on the active CP you must
issue this command on the active CP. To set the link operating mode on the
standby CP you must issue this command on the standby CP. During failover the
link operating mode is retained separately for each CP, since the physical links
may be set to operate in different modes.
Operands
This command has the following operand:
interface
For V3.1.x, specify the name of the interface, enclosed in
quotation marks.
For V4.1.x, specify the name of the interface. You may
specify the name with quotation marks, but using them is
not required.
Example
To advertise all modes of operation, follow this scenario for the ifModeSet
command:
switch:admin> ifmodeset “fei0”
Auto-negotiate (yes, y, no, n): [no]
100 Mbps / Full Duplex (yes, y, no, n): [no]
100 Mbps / Half Duplex (yes, y, no, n): [no]
10 Mbps / Full Duplex (yes, y, no, n): [no]
10 Mbps / Half Duplex (yes, y, no, n): [no] yes
Committing configuration...done.switch:admin>
Fabric OS Version 3.1.x/4.1.x Reference Guide
365
Fabric OS Commands
To force 10 Mbps Half Duplex, follow this scenario for the ifmodeset
command:
switch:admin> ifModeSet eth0
Exercise care when using this command. Forcing the link to an operating mode
not supported by the network equipment to which it is attached may result in
an inability to communicate with the system through its ethernet interface.
It is recommended that you only use this command from the serial console port.
Are you sure you really want to do this? (yes, y, no, n): [no] y
Proceed with caution.
Auto-negotiate (yes, y, no, n): [no] n
Force 100 Mbps / Full Duplex (yes, y, no, n): [no]
Force 100 Mbps / Half Duplex (yes, y, no, n): [no]
Force 10 Mbps / Full Duplex (yes, y, no, n): [no]
Force 10 Mbps / Half Duplex (yes, y, no, n): [no] y
Committing configuration...done.
switch:admin>
See Also
ifModeShow
ifShow
366
Fabric OS Version 3.1.x/4.1.x Reference Guide
ifModeShow
ifModeShow
Displays the link operating mode for a network interface.
Synopsis
ifModeShow [“interface”]
Availability
All users.
Release
V3.1.x and V4.1.x
Description
Use this command to display the link operating mode for a network interface.
The network interfaces available on the system can be listed with the ifshow
command.
Note: The link operating mode is not changeable for all network interfaces and not
necessarily for all Ethernet network interfaces. For those interfaces in which this is not
supported, the output for the link mode is “Not applicable.”
Operands
This command has the following operand:
interface
Fabric OS Version 3.1.x/4.1.x Reference Guide
For V3.1.x, specify the name of the interface. The interface
value must be enclosed in quotation marks. The “interface”
argument is of the form <name><physical-unit>,
where <name> is the name of the network interface and
<physical-unit> is the instance of that interface, for
example, “fei0.”
For V4.1.x, specify the name of the interface. You may
specify the name with quotation marks, but using them is
not required.
367
Fabric OS Commands
Example
To display the link operating mode for the “fei0” Ethernet interface:
switch:admin> ifModeShow "fei0"
fei (unit number 0):
Link mode: Auto-negotiate
switch:admin>
See Also
ifModeSet
ifShow
368
Fabric OS Version 3.1.x/4.1.x Reference Guide
ifShow
ifShow
Displays network interface information.
Synopsis
ifShow [“ifName”]
Availability
All users.
Release
V3.1.x
Description
Use this command to display network interface status. If the operand ifName is
provided, only that interface is displayed. If ifName is omitted, all interfaces
are displayed. Each switch has three interfaces:
“ei” or “fei” is the 10BaseT or 100BaseT Ethernet interface
“lo” is the loopback interface
“fc” is the Fibre Channel interface
The “fc” interface is displayed for switches running IP over Fibre Channel that
have been assigned an FC-IP address. For each interface selected, the following
information is displayed:
■
Flags (for example, loopback, broadcast, arp, running, debug)
■
Internet address
■
Broadcast address
■
Netmask and subnetmask
■
Ethernet address
■
Route metric
■
Maximum transfer unit
■
Number of packets received and sent
■
Number of input errors, output errors, and collisions
Fabric OS Version 3.1.x/4.1.x Reference Guide
369
Fabric OS Commands
Operands
This command has the following operand:
ifName
Specify the name of an interface, in quotation marks. This
operand is optional.
Example
To display Ethernet interface information for a switch with a 10BaseT connection:
switch:admin> ifShow "ei"
ei (unit number 0):
Flags: (0x63) UP BROADCAST ARP RUNNING
Internet address: 192.168.1.65
Broadcast address: 192.168.1.255
Netmask 0xffffff00 Subnetmask 0xffffff00
Ethernet address is 00:60:69:00:00:8a
Metric is 0
Maximum Transfer Unit size is 1500
42962 packets received; 127 packets sent
0 input errors; 0 output errors
7 collisions
See Also
ipAddrSet
ipAddrShow
370
Fabric OS Version 3.1.x/4.1.x Reference Guide
interfaceShow
interfaceShow
Displays FSPF interface information.
Synopsis: V3.1.x
interfaceShow [portnumber]
Synopsis: V4.1.x
interfaceShow [slotnumber/][portnumber]
Availability
All users.
Release
V3.1.x and V4.1.x
Description
Use this command to display data structures associated with FSPF interfaces
(E_Ports) on the switch.
There are two data structures that save data associated with FSPF interfaces:
■
The permanently allocated Interface Descriptor Block (IDB).
■
The neighbor data structure. This data structure is allocated when a switch
port becomes an E_Port. The neighbor data structure contains all the
information relating to the switch that is connected to an adjacent switch.
This command displays the content of both data structures, if they have been
allocated.
Use this command without specifying a port number to display the interface
information for all ports on the switch (including non E_Ports).
The following fields are displayed:
idbP
Pointer to IDB.
nghbP
Pointer to neighbor data structure.
ifNo
Interface number.
Fabric OS Version 3.1.x/4.1.x Reference Guide
371
Fabric OS Commands
372
masterPort
Port number of the trunk master port, if present, of the
trunk group this port is a part of.
defaultCost
The default cost of sending a frame over the ISL
connection to this interface.
cost
Cost of sending a frame over the ISL connected to this
interface. A value of 1000 indicates a 1 Gb/s link. A
value of 500 indicates a 2 Gb/s link.
delay
Conventional delay incurred by a frame transmitted on
this ISL. A fixed value required by the FSPF protocol.
lastScn
Type of the last State Change Notification received on
this interface.
lastScnTime
Time the last State Change Notification was received on
this interface.
upCount
Number of times this interface came up, with respect to
FSPF.
lastUpTime
Last time this interface came up.
downCount
Number of times this interface went down.
lastDownTime
Last time this interface went down.
downReason
Type of last State Change Notification that caused this
interface to go down.
iState
Current state of this interface. The state can be UP or
DOWN. An interface in DOWN state does not have an
allocated neighbor data structure and cannot be used to
route traffic to other switches.
state
Current state of this interface. This E_Port is used to route
traffic to other switches only if the state is “NB_ST_FULL.”
nghbCap
Neighbor capabilities. Should be 0.
nghbId
Domain ID of the neighbor (adjacent) switch.
idbNo
IDB number. Should be equal to portnumber
remPort
Port number on the remote switch connected to this port.
nflags
Internal FSPF flags.
initCount
Number of times this neighbor was initialized, without
the interface going down.
&dbRetransList
Pointer to the database retransmission list.
&lsrRetransList
Pointer to the Link State Records (LSR) retransmission list.
&lsrAckList
Pointer to the Link State Acknowledgements (LSA)
retransmission list.
Fabric OS Version 3.1.x/4.1.x Reference Guide
interfaceShow
inactTID
Inactivity timer ID.
helloTID
Hello timer ID.
dbRtxTID
Database retransmission timer ID.
lsrRtxTID
LSR retransmission timer ID.
inactTo
Inactivity time out value, in milliseconds. When this time
out expires, the adjacency with the neighbor switch is
broken and new paths are computed to all possible
destination switches in the fabric.
helloTo
Hello time out value, in milliseconds. When this time out
expires, a Hello frame is sent to the neighbor switch
through this port.
rXmitTo
Retransmission time out value, in milliseconds. It is used
to transmit topology information to the neighbor switch.
If no acknowledgement is received within rXmitTo,
frame is retransmitted.
nCmdAcc
Total number of commands accepted from the neighbor
switch. Number includes Hellos, Link State Updates
(LSUs) and Link State Acknowledgements.
nInvCmd
Number of invalid commands received from the
neighbor switch. Usually commands with an FSPF
version number higher than the one running on the local
switch.
nHloIn
Number of Hello frames received from the neighbor
switch.
nInvHlo
Number of invalid Hello frames (Hello frames with
invalid parameters) received from the neighbor switch.
nLsuIn
Number of LSUs received from the neighbor switch.
nLsaIn
Number of LSAs received from the neighbor switch.
attHloOut
Number of attempted transmissions of Hello frames to
the neighbor switch.
nHloOut
Number of Hello frames transmitted to the neighbor
switch.
attLsuOut
Number of attempted transmissions of LSUs to the
neighbor switch.
nLsuOut
Number of LSUs transmitted to the neighbor switch.
attLsaOut
Number of attempted transmissions of LSAs to the
neighbor switch.
nLsaOut
Number of LSAs transmitted to the neighbor switch.
Fabric OS Version 3.1.x/4.1.x Reference Guide
373
Fabric OS Commands
Operands
This command has the following operands:
slotnumber
(V4.1.x only)
Specify the slot number for a StorageWorks Core switch.
For all other switches this operand is not required. The slot
number must be followed by a slash ( / ) and the port
number, so that each port is represented by both slot
number (1 through 4 or 7 through 10) and port number (0
through 15).
The StorageWorks Core switch has a total of 1–10 slots.
Slot number 5 and 6 are control processor cards, and slot
1 through 4, and 7 through 10, are port cards. On each
port card, there are 16 ports counted from the bottom, 0 to
15.
portnumber
Specify a port number. Valid values for port number vary
depending on the switch type. This operand is optional.
When no slot number and port number are specified, this command displays the
interface information for all ports on the switch (including non E_Ports).
Examples
To display FSPF interface information:
switch:admin> interfaceShow 4/0
idbP
= 0x10f61f40
Interface 4 data structure:
nghbP
= 0x10f61d90
ifNo
= 4
cost
= 1000
delay
= 1
lastScn
= 5
lastScnTime = Mar 29 12:57:52.833
upCount
= 2
lastUpTime
= Mar 29 12:57:52.833
downCount
= 1
lastDownTime = Mar 29 12:57:47.566
downReason
= 2
iState
= UP
Type <CR> to continue, Q<CR> to stop:
< sample output truncated >
374
Fabric OS Version 3.1.x/4.1.x Reference Guide
interfaceShow
See Also
portShow
switchShow
Fabric OS Version 3.1.x/4.1.x Reference Guide
375
Fabric OS Commands
iodReset
Turn off the In-order Delivery (IOD) option.
Synopsis
iodReset
Availability
Admin
Release
V3.1.x and V4.1.x
Description
Use this command to turn off the IOD option. The IOD option is turned off by
default. If the IOD option was turned on using iodSet, this command can be
used to turn it off again. Setting the IOD option to its default value will result in
fast re-routing after a fabric topology change.
This command may cause out-of-order delivery of frames during fabric topology
changes.
Note: This command should not be used in HP configurations.
Operands
None.
376
Fabric OS Version 3.1.x/4.1.x Reference Guide
iodReset
Examples
To turn off the IOD option:
switch:admin> iodshow
IOD is set
switch:admin> iodreset
done.
switch:admin> iodshow
IOD is not set
switch:admin>
See Also
iodSet
iodShow
Fabric OS Version 3.1.x/4.1.x Reference Guide
377
Fabric OS Commands
iodSet
Enable the In Order Delivery (IOD) option.
Synopsis
iodSet
Availability
Admin
Release
V3.1.x and V4.1.x
Description
Use this command to enforce in order delivery of frames during a fabric topology
change.
In a stable fabric, frames are always delivered in order, even when the traffic
between switches is shared among multiple paths. However, when topology
changes occur in the fabric (for instance, a link goes down), traffic is rerouted
around the failure. When topology changes occur, generally, some frames are
delivered out of order. This command insures that frames are not delivered
out-of-order, even during fabric topology changes.
The default behavior is for the IOD option to be off. HP configurations require
that IOD be set to a 1 to ensure in order delivery of frames.
This command should be used with care, because it can cause a delay in the
establishment of a new path when a topology change occurs. Only if there are
devices connected to the fabric that do not tolerate occasional out of order delivery
of frames, should this command be used.
Operands
None.
378
Fabric OS Version 3.1.x/4.1.x Reference Guide
iodSet
Examples
To turn on the IOD option:
switch:admin> iodSet
Committing configuration...done.
switch:admin>
See Also
iodReset
iodShow
Fabric OS Version 3.1.x/4.1.x Reference Guide
379
Fabric OS Commands
iodShow
Displays the In Order Delivery (IOD) option setting.
Synopsis
iodShow
Availability
All users.
Release
V3.1.x and V4.1.x
Description
Use this command to display whether the IOD option is enabled or disabled.
Operands
None.
Example
To display the current setting of the IOD option:
switch:admin> iodShow
IOD is not set
switch:admin>
See Also
iodSet
iodReset
380
Fabric OS Version 3.1.x/4.1.x Reference Guide
ipAddrSet
ipAddrSet
Set the IP Address details for a switch or Control Processor.
Synopsis: V3.1.x
ipAddrSet
Synopsis: V4.1.x
ipAddrSet [option]
Availability
Admin
Release
V3.1.x and V4.1.x
Description
Use this command to set the Ethernet and Fibre Channel IP addresses on the
switch.
Note: The option operand is only available on the StorageWorks Core switch. This
operand is not available on the StorageWorks 2 Gb SAN switch.
Parameters: V3.1.x
For V3.1.x, use this command to set the Ethernet and Fibre Channel IP and
Subnetmask addresses. You are also prompted to set the Gateway IP Address. The
option operand is not available in V3.1.x.
In V3.1.x, you are prompted to set the following values:
Ethernet IP Address
Set the Ethernet IP address of the switch.
Ethernet Subnetmask
Set the Ethernet subnetmask IP of the switch.
Fibre Channel IP
Address
Set the Fibre Channel address of the switch.
Fabric OS Version 3.1.x/4.1.x Reference Guide
381
Fabric OS Commands
Fibre Channel
Subnetmask
Set the Fibre Channel subnetmask of the switch.
Gateway Address
Set the gateway IP address for the switch.
Parameters: V4.1.x
For a StorageWorks Core switch, you must set values for both logical switches
and both CP cards. Use the option operand to select the logical switch or CP
where you want to configure an IP address. The option operand is only
available for the StorageWorks Core switch. If the option operand is not
specified for a StorageWorks Core switch, the command becomes interactive.
Each Logical switch has:
■
Ethernet IP Address
■
Ethernet Subnetmask
■
Fibre Channel IP Address
■
Fibre Channel Subnetmask
Each CP has:
■
Ethernet IP Address
■
Ethernet Subnetmask
■
Host Name
■
Gateway IP Address
The default values for hostname, ipaddress, subnet address (for CP only), mask
(for switch only), and gateway address (for CPs only) are:
■
sw0 = hostname SW12000_1, ip 10.77.77.77, mask 255.0.0.0
■
sw1 = hostname SW12000_2, ip 10.77.77.76, mask 255.0.0.0
■
cp0 = hostname cp0, ip 10.77.77.75, subnet 255.0.0.0, gateway 0.0.0.0
■
cp1 = hostname cp1, ip 10.77.77.74, subnet 255.0.0.0, gateway 0.0.0.0
Entering Values and Saving Changes
After each prompt the current value is shown. You may:
382
■
Press Enter to retain the current value
■
Enter an IP address in conventional dot notation
■
Enter none
Fabric OS Version 3.1.x/4.1.x Reference Guide
ipAddrSet
■
Press Ctrl-C to cancel changes
■
Press Ctrl-D to accept changes and end input
The final prompt allows you to set the new IP addresses immediately. Enter Y to
set new addresses immediately; enter N to delay the changes until the next switch
reboot. Entering Y closes the telnet session.
A change to these values issues a domain address format RSCN; see FC-FLA for
a description of RSCNs.
Operands
For V3.1.x, none.
For V4.1.x, this command has the following operand:
option
Specify which option you would like to configure. This operand
is only available for the StorageWorks Core switch. Valid
options are as follows:
■ 0 sets the Ethernet IP address, Ethernet subnetmask, Fibre
Channel IP address, and Fibre Channel subnetmask of
logical switch 0.
■ 1 sets the Ethernet IP address, Ethernet subnetmask, Fibre
Channel IP address, and Fibre Channel subnetmask of
logical switch 1.
■ 2 sets the Ethernet IP address, Ethernet subnetmask,
gateway IP address, and hostname of CP0.
■ 3 sets the Ethernet IP address, Ethernet subnetmask,
gateway IP address, and hostname of CP1.
If no operand is specified the command becomes interactive.
Example
To set the IP address details for a switch (V3.1.x example):
switch:admin> ipAddrSet
Ethernet IP Address [0.0.0.0]: 192.168.166.148
Ethernet Subnetmask [0.0.0.0]: 255.255.255.0
Fibre Channel IP Address [0.0.0.0]: 192.168.58.135
Fibre Channel Subnetmask [0.0.0.0]: 192.168.166.134
Gateway IP Address [0.0.0.0]: 192.168.166.135
Committing configuration...Done...
switch:admin>
Fabric OS Version 3.1.x/4.1.x Reference Guide
383
Fabric OS Commands
To set the IP address details for logical switch number 1 (V4.1.x example):
switch:admin> ipaddrset 1
Ethernet IP Address [10.77.77.77]: 192.168.166.148
Ethernet Subnetmask [10.77.77.76]: 255.255.255.0
Fibre Channel IP Address [0.0.0.0]: 192.168.58.135
Fibre Channel Subnetmask [0.0.0.0]: 192.168.166.134
Gateway IP Address [0.0.0.0]:
IP address being changed...
Committing configuration...Done.
switch:admin>
See Also
ipAddrShow
384
Fabric OS Version 3.1.x/4.1.x Reference Guide
ipAddrShow
ipAddrShow
Displays the IP address for a switch or Control Processor.
Synopsis: V3.1.x
ipAddrShow
Synopsis V4.1.x
ipAddrShow [option]
Availability
All users.
Release
V3.1.x and V4.1.x
Description
Use this command to display the Ethernet and FC IP addresses configured in the
system.
Note: The option operand is only available on the StorageWorks Core switch. This
operand is not available on the StorageWorks 2 Gb SAN switch.
Information: V3.1.x
This command shows the Ethernet IP Address, Ethernet Subnetmask, Fibre
Channel IP Address, Fibre Channel Subnetmask, and Gateway IP address for the
switch.
The FC IP Address shows “none” if the switch is not configured to run IP over
Fibre Channel. Note that all Fibre Channel ports on a switch have the same IP
address and subnet mask.
All IP addresses are displayed in conventional dot (.) notation or by the special
value “none.” Subnet Masks show “none” if IP sub netting is not in effect.
Fabric OS Version 3.1.x/4.1.x Reference Guide
385
Fabric OS Commands
Information: V4.1.x
For a switch, this command displays the following details: Ethernet IP Address,
Ethernet Subnetmask, Fibre Channel IP Address, and Fibre Channel Subnetmask.
For a CP, this command displays the following details: Ethernet IP Address,
Ethernet Subnetmask, Hostname and Gateway IP address.
In the StorageWorks Core switch the CPs communicate to each other through an
Ethernet in the backplane. When the option operand is specified as a 4, the
fixed Backplane IP addresses for CP0 and CP1 are also shown.
Use the option operand to specify the logical switch or CP you want to view. If the
option operand is not specified, then the command becomes interactive.
The default values for hostname, ipaddress, subnet address (for CP only), mask
(for switch only), and gateway address (for CPs only) are:
■
sw0 = hostname SW12000_1, ip 10.77.77.77, mask 255.0.0.0
■
sw1 = hostname SW12000_2, ip 10.77.77.76, mask 255.0.0.0
■
cp0 = hostname cp0, ip 10.77.77.75, subnet 255.0.0.0, gateway 0.0.0.0
■
cp1 = hostname cp1, ip 10.77.77.74, subnet 255.0.0.0, gateway 0.0.0.0
Operands
For V3.1.x, none.
For V4.1.x, this command has the following operand:
option
Specify the option you would like to view. This operand is only
available for theStorageWorks Core switch. Valid option values
are:
■
0 means display information for switch0.
■
1 means display information for switch1.
■
2 means display information for CP0.
■
3 means display information for CP1.
■
4 means display information all IP addresses in the system.
If no operand is specified the command becomes interactive.
386
Fabric OS Version 3.1.x/4.1.x Reference Guide
ipAddrShow
Example
To display the IP configuration details for the switch (V3.1.x example):
switch:admin> ipAddrShow
Ethernet IP Address: 11.22.33.44
Ethernet Subnetmask: 55.66.77.88
Fibre Channel IP Address: none
Fibre Channel Subnetmask: none
Gateway Address: 12.34.56.78
switch:admin>
To display the IP address for logical switch number 0 (V4.1.x example):
switch:admin> ipAddrShow 0
Ethernet IP Address: 11.22.33.44
Ethernet Subnetmask: 55.66.77.88
Fibre Channel IP Address: none
Fibre Channel Subnetmask: none
switch:admin>
See Also
ipAddrSet
Fabric OS Version 3.1.x/4.1.x Reference Guide
387
Fabric OS Commands
islshow
Displays ISL information.
Synopsis
islshow
Availability
All users.
Release
V3.1.x and V4.1.x
Description
Use this command to display the current connections and status of the ISL of each
port on this switch. The WWN where the ISL is connected to, the speed of the
connection, and whether this ISL is trunked, are displayed.
Operands
None.
Example
To display the ISL connections for the switch:
switch:admin>
1: 3 -> 5
2: 6 -> 11
3: 11 -> 6
islshow
10:00:00:60:69:20:3a:a5
10:00:00:60:69:04:11:25
10:00:00:60:69:04:11:25
Cylon_13
Cylon_22
Cylon_22
sp: 2G
sp: 2G
sp: 2G
bw: 1G
bw: 2G
bw: 2G
See Also
switchshow
388
Fabric OS Version 3.1.x/4.1.x Reference Guide
itemlist
itemlist
List parameter syntax and grammar information.
Synopsis
<item_list> = <element> | <element> <white> <item_list>
<element> = <item> | <item> - <item>
<item> = <num> | <slot> [ <white> ] / [ <white> ] <num>
<slot> = <num>
<num> = <hex> | <int>
<int> = <int> <digit> | <digit>
<hex> = 0x <hex digit> | <hex> <hex digit>
<digit> = 0|1|2|3|4|5|6|7|8|9
<hex digit> = <digit> |A|B|C|D|E|F|a|b|c|d|e|f
<white> = *[“\t\f\r ,”]
Release
V4.1.x
Description
All kernel diagnostics have at least one item list parameter to specify which ports
to test. The normal default value for this parameter is to select everything.
Note: This is not a command, rather it is a common parameter to many commands. To
view the help page for this command type help itemlist.
If you wish to restrict the items to be tested to a smaller set the parameter value is
an item list with the following characteristics:
■
It is a comma separated list of items.
■
Each item in the list may be a single element or a range of elements separated
with a “-” character.
Fabric OS Version 3.1.x/4.1.x Reference Guide
389
Fabric OS Commands
■
white space like spaces, and tab stops are skipped.
■
ranges using “-” can be mixed with individual values.
■
Each item may be proceeded by an optional slot number and “/”. for example,
“0,3,4-6,1”, “0,1,3,4,5,6”, “0 3 4 - 6 1" will all select items 0, 1, 3, 4, 5, 6 and
7.
Besides the syntax rules, there are also some grammatical restrictions on the slot
numbers:
■
Once specified a slot selection will apply to all following items to the right of
the slot selection until the next slot selection or the end of the item list. For
example, “1/0 - 15" and “1/0 - 1/15” are equivalent.
■
If no slot number is specified then User port lists will be specified by area
number. For instance “0, 16, 32" and “1/0, 2/0, 3/0” specify the same ports on
a 16 port/blade system. On that same system “1/0, 16, 32" is not a legal list.
Even though it is legal syntax the ports do not exist.
■
If no slot number is specified then all lists except user port lists will use the
default slot 0.
■
No list type except for user port lists may specify multiple conflicting slot
numbers. For instance “1/0, 2/0, 3/0” is a legal user port list but is not legal for
any other type of list.
■
In the case of conflicting settings within a single itemlist an error will be
generated as described above. In the case of multiple item list parameters, the
last one on the command line will override any previous settings.
The exact type of list varies depending on the test and the parameter but the most
common are Blade ports and User ports. A list of Blade ports is most commonly
used by the ASIC level tests such as cmitest or turboramtest and represents which
ports on the current blade (specified with --slot # parameter) will be tested. A list
of User ports is used by the higher level tests such as spinsilk or crossporttest to
specify which user accessible external ports within the current switch (selected
during telnet login) will be tested. When specified in an item list user ports may be
specified by either the area portion of the ports fibre channel address or with
slot/port notation. For non-bladed systems the port number on the silkscreen is the
area number so the two notations are identical.
The exact type of list required for any input parameter may be determined with the
diagcommandshow <test> command. For item list parameters the
parameter type will be PT_LIST and the list type will be one of the following:
390
Fabric OS Version 3.1.x/4.1.x Reference Guide
itemlist
Table 12: Object Descriptions
Type
Grouping
Description
BPORTS
Blade
Blade ports, internal and external ports.
UPORTS
Switch
User ports, ports with external connections.
QUADS
Blade
Quadrants, group of (normally 4) ports.
CHIPS
Blade
Chips, Asics within a blade.
MINIS
Blade
Mini switches.
SLOTS
Chassis
Slots.
INDEX
N/A
Anything.
Operands
None.
See Also
backport
camtest
centralmemorytest
cmemretentiontest
cmitest
crossporttest
diagcommandshow
portloopbacktest
portregtest
spinsilk
sramretentiontest
Fabric OS Version 3.1.x/4.1.x Reference Guide
391
Fabric OS Commands
killtelnet
Terminate an open telnet session.
Synopsis
killtelnet
Availability
Admin
Release
V4.1.x
Description
Use this command to terminate an open telnet session. The killtelnet command is
an interactive menu driven command. Upon invocation, it lists all the current
telnet and serial port login sessions. It lists information such as the session
number, login name, the idle time, the IP address of the connection, and the time
stamp of when the login session was opened. A prompt is then displayed where
you can specify the session number of the connection you wish to terminate.
Operands
None.
392
Fabric OS Version 3.1.x/4.1.x Reference Guide
killtelnet
Example
To terminate an open telnet connection:
switch:admin> killtelnet
Collecting login information....Done
List of telnet sessions (3 found)
____________________________________________________________________________
Session No
USER
TTY
IDLE
FROM
LOGIN@
~~~~~~~~~~~~~~~~~~~~~~~~~~~~~~~~~~~~~~~~~~~~~~~~~~~~~~~~~~~~~~~~~~~~~~~~~~~~
0
root0
ttyS0
1:17m
5:13pm
1
admin0
pts/0
16.00s
192.168.130.29
6:29pm
2
admin0
pts/1
3.00s
192.168.130.29
6:31pm
~~~~~~~~~~~~~~~~~~~~~~~~~~~~~~~~~~~~~~~~~~~~~~~~~~~~~~~~~~~~~~~~~~~~~~~~~~~~
Enter Session Number to terminate (q to quit) 1
Collecting process information... Done.
You have opted to terminate the telnet session:logged in as "admin0 ", from "192.168.130.29 "
since " 6:29pm" and has been inactive for "16.00s ",
the current command executed being: "-rbash ".
The device entry is: "pts/0 ".
This action will effectively kill these process(es):USER
PID ACCESS COMMAND
/dev/pts/0
root
12868 f.... login
root
12869 f.... login
root
12877 f.... rbash
Please Ensure (Y/[N]): y
killing session.... Done!
Collecting login information....Done
List of telnet sessions (2 found)
____________________________________________________________________________
Session No
USER
TTY
IDLE
FROM
LOGIN@
~~~~~~~~~~~~~~~~~~~~~~~~~~~~~~~~~~~~~~~~~~~~~~~~~~~~~~~~~~~~~~~~~~~~~~~~~~~~
0
root0
ttyS0
1:17m
5:13pm
1
admin0
pts/1
7.00s
192.168.130.29
6:31pm
~~~~~~~~~~~~~~~~~~~~~~~~~~~~~~~~~~~~~~~~~~~~~~~~~~~~~~~~~~~~~~~~~~~~~~~~~~~~
Enter Session Number to terminate (q to quit) q}
switch:admin>
Fabric OS Version 3.1.x/4.1.x Reference Guide
393
Fabric OS Commands
Note: The list of open sessions displayed with killtelnet includes the user’s current
session. Make sure you do not kill your own telnet session.
See Also
None.
394
Fabric OS Version 3.1.x/4.1.x Reference Guide
ledtest
ledtest
Run LED diagnostics on a switch blade and WWN.
Synopsis
ledtest
Availability
Admin
Release
V4.1.x
Description
Use this command to run a suite of LED tests.
Operands
None.
Example
To test the LEDs:
switch:admin> ledtest
Disabling switch
launch ledScript.tmp script in background (PID is 17974)
Enter <cr> to ABORT
See Also
portledtest
Fabric OS Version 3.1.x/4.1.x Reference Guide
395
Fabric OS Commands
licenseAdd
Add license key to switch.
Synopsis
licenseAdd “license”
Availability
Admin
Release
V3.1.x and V4.1.x
Description
Use this command to add license keys to the system.
Some features of the switch and of the fabric to which it is connected are optional
licensed products. Without a license installed for such products, the services are
not available.
A license key is a string of approximately 16 upper and lower case letters and
numbers. Case is significant.
The license must be entered into the system exactly as issued. If mistyped, the
license may be accepted, but licensed products will not function. After entering
the license, use the licenseShow command to check for correct function. If
no licensed products are shown, then the license is invalid.
After entering a license, the licensed product is available immediately and the
system does not need to be rebooted. The exception is a QuickLoop only system;
these must be rebooted after adding a fabric license to allow fabric logins. For a
trunking license to become effective, the trunk ports need to be refreshed using the
commands portdisable and portenable or the switch must be
refreshed using the commands switchdisable and switchenable.
396
Fabric OS Version 3.1.x/4.1.x Reference Guide
licenseAdd
Operands
This command has the following operand:
license
Specify a license key in quotation marks. This operand
is required.
Example
To add a license key to the switch:
switch:admin> licenseAdd “bQebzbRdScRfc0iK”
adding license key “bQebzbRdScRfc0iK”
done.
See Also
licenseHelp
licenseIdShow
licenseRemove
licenseShow
portdisable
portenable
switchdisable
switchenable
Fabric OS Version 3.1.x/4.1.x Reference Guide
397
Fabric OS Commands
licenseHelp
Commands used to administer license keys.
Synopsis
licenseHelp
Availability
Admin
Release
V3.1.x and V4.1.x
Description
Use this command to display a list of the commands used to administer license
keys.
Operands
None.
Example
To display license commands:
switch:admin> licenseHelp
licenseAdd
licenseIdShow
licenseRemove
licenseShow
switch:admin>
Add a license key to this switch
Show system license ID
Remove a license key from this switch
Show current license key
Note: The licenseIdShow command is available in V4.1.x only.
398
Fabric OS Version 3.1.x/4.1.x Reference Guide
licenseHelp
See Also
licenseAdd
licenseIdShow
licenseRemove
licenseShow
Fabric OS Version 3.1.x/4.1.x Reference Guide
399
Fabric OS Commands
licenseIdShow
Displays system license ID.
Synopsis
licenseIdShow
Availability
All users.
Release
V4.1.x
Description
Use this command to display the license ID of StorageWorks 2 Gb SAN switch or
a StorageWorks Core switch chassis.
Some features of the switch and the fabric are optional, licensed products. Without
a license installed for such products, the services provided by these features are
not available.
For the StorageWorks Core switch0 a single license enables both logical switches
to use these products. That is, the chassis is assigned a license ID from which a
license is generated.
Such licenses are locked and are only functional on the specific system for which
they were issued.
This command displays to standard output the system license ID used for both
generating and validating licenses on the system. The license ID format is 8 pairs
of hexadecimal values separated by colons. Each hexadecimal value is between 00
(0) and FF (255).
Note: While the format of this identifier may be similar or identical to other identifiers
in the system, no inferences should be made about the relationships between them as
they are subject to change independent of one another.
400
Fabric OS Version 3.1.x/4.1.x Reference Guide
licenseIdShow
Operands
None.
Example
To display the license ID:
switch:admin> licenseIdShow
a4:f8:69:33:22:00:ea:18
See Also
licenseAdd
licenseHelp
licenseRemove
licenseShow
Fabric OS Version 3.1.x/4.1.x Reference Guide
401
Fabric OS Commands
licenseRemove
Remove the license key from a switch.
Synopsis
licenseRemove “license”
Availability
Admin
Release
V3.1.x and V4.1.x
Description
Use this command to remove an existing license key from a switch. The existing
license key must be entered exactly as shown by licenseShow, including case.
When the key has been entered, use the licenseShow command to verify that the
key has been removed and the licensed product uninstalled.
After removing a license key, the switch must be rebooted. With no license key,
licenseshow displays “No licenses.”
Operands
The following operand is required:
license
Specify the license key in quotation marks. This operand is
required.
Example
To remove a license key from the switch:
switch:admin> licenseRemove “bAaAabRdScRfc0iK”
removing license key “bAaAabRdScRfc0iK”
Committing configuration...done.
For license to take effect, Please reboot switch now....
402
Fabric OS Version 3.1.x/4.1.x Reference Guide
licenseRemove
See Also
licenseAdd
licenseHelp
licenseIdShow
licenseShow
Fabric OS Version 3.1.x/4.1.x Reference Guide
403
Fabric OS Commands
licenseShow
Displays current license keys.
Synopsis
licenseShow
Availability
All users.
Release
V3.1.x and V4.1.x
Description
Use this command to display current license keys along with a list of licensed
products enabled by these keys. The message No license installed on
this switch is displayed when no licenses are installed.
Operands
None.
Example
To display the installed license keys on a switch:
switch:admin> licenseshow
beQRRcQzeQcfRSSE:
Web license
ccySQc9yeddzTRa:
Zoning license
Rbeebe9Re9Scffcw:
Fabric license
R9becSccQUAcfd5:
Fabric Watch license
S99zcSeRdSTAA0dN:
QuickLoop license
switch:admin>
404
Fabric OS Version 3.1.x/4.1.x Reference Guide
licenseShow
See Also
licenseAdd
licenseHelp
licenseIdShow
licenseRemove
Fabric OS Version 3.1.x/4.1.x Reference Guide
405
Fabric OS Commands
linkCost
Set or print the FSPF cost of a link.
Synopsis: V3.1.x
linkCost [portnumber][, cost]
Synopsis: V4.1.x
linkCost [slotnumber/][portnumber][, cost]
Availability
Admin
Release
V3.1.x and V4.1.x
Description
Use this command to set or display the cost of an Inter-Switch Link (ISL). The
cost of a link is a dimensionless positive number. It is used by the FSPF path
selection protocol to determine the path that a frame takes going from the source
to the destination switch. The chosen path is the path with minimum cost. The cost
of a path is the sum of the costs of all the ISLs traversed by the path. The cost of a
path is also known as the "metric."
FSPF supports load sharing over a number of equal cost paths.
Every ISL has a default cost that is inversely proportional to the bandwidth of the
ISL. For a 1Gb per second ISL, the default cost is 1000. For a 2Gb per second
ISL, the default cost is 500.
All currently active ISLs have an additional suffix of E_PORT attached to their
interface numbers. If the link has a static cost assigned to it, then the link cost for
that link has a suffix of STATIC attached to its link cost.
This command changes the actual link cost only; it does not affect the default cost.
The interfaceShow command displays both the default and the actual cost.
406
Fabric OS Version 3.1.x/4.1.x Reference Guide
linkCost
If no operands are specified, the command displays the actual cost of all the ISLs
in the (logical) switch. Specify the [slotnumber/]portnumber operand to
view the cost of that specific port. Specify [slotnumber/]portnumber
and cost operands to set the cost of a specific ISL.
Setting the cost to zero removes a static cost from the database and reverts the cost
of the link to its default value.
Operands
This command has the following operands:
slotnumber
(V4.1.x only)
Specify the slot number for a StorageWorks Core
switch. For all other switches this operand is not
required. The slot number must be followed by a
slash ( / ) and the port number, so that each port is
represented by both slot number (1 through 4, or 7
through 10), and port number (0 through 15).
The StorageWorks Core switch has a total of 1–10
slots. Slot number 5 and 6 are control processor
cards, and slot 1 through 4, and 7 through 10, are
port cards. On each port card, there are 16 ports
counted from the bottom, 0 to 15.
portnumber
Specify the port to display or set the FSPF cost of a
link. Valid values for port number vary depending
on the switch type. This operand is optional.
cost
Specify the new cost of the link connected to the
specified port number. This operand is optional.
If no operands are specified, the current values for all ports on the (logical) switch
are displayed.
Fabric OS Version 3.1.x/4.1.x Reference Guide
407
Fabric OS Commands
Examples
To display the cost of a link, and reset the cost:
switch:admin> linkcost
Interface
Cost
----------------------------------0
500
1
500
2
500
3
500
4
500
5
500
6
500
7 (E_PORT)
500
switch:admin>
See Also
interfaceShow
LSDbShow
topologyShow
uRouteShow
408
Fabric OS Version 3.1.x/4.1.x Reference Guide
login
login
Log in as a new user.
Synopsis
login
Availability
All users.
Release
V3.1.x and V4.1.x
Description
Use this command to log in to the switch with another user name and password,
without first logging out from the original session. If the user was originally
connected using a telnet or rlogin session, that session is left open.
This command allows you to access commands that you cannot access at your
current user level.
Operands
None.
Example
To log in as the Admin:
switch:user> login
login: admin
Password: xxxxxx
switch:admin>
See Also
logout
Fabric OS Version 3.1.x/4.1.x Reference Guide
409
Fabric OS Commands
logout
Log out from a shell session.
Synopsis
logout
Availability
All users.
Release
V3.1.x and V4.1.x
Description
Use this command to log out from a shell session. Remote login connections are
closed, local serial connections return to the login prompt.
The command exit is accepted as synonym for logout, as is a Ctrl-D typed
at the beginning of a line.
Note: If you close a session by clicking the “X” in the upper right hand corner, the
window closes but the session stays open until it times out. Trying to open another
session before the time-out has completed causes an error message to display.
Operands
None.
Example
To log out from an rlogin session:
switch:admin> logout
Connection to host lost.
410
Fabric OS Version 3.1.x/4.1.x Reference Guide
logout
See Also
login
Fabric OS Version 3.1.x/4.1.x Reference Guide
411
Fabric OS Commands
loopPortTest
Tests the L_port M->M path on a loop.
Synopsis: V3.1.x
loopPortTest [passcount, port_number, payload_pattern,
pattern_width]
Synopsis: V4.1.x
loopporttest [--slot number][-nframes count][-ports
itemlist][-seed payload_pattern][-width pattern_width]
Availability:
Admin
Release
V3.1.x and V4.1.x
Description:
Use this command to verify the functional operation of the switch by sending
frames from port M's transmitter, and looping the frames back using an external
fiber cable, including all the devices on the loop, into port M's receiver. This
exercises all the switch components from the main board to the SFP to the fiber
cable to the SFPs (of the devices and the switch) and back to the main board.
The cables and SFPs connected should be of the same technology: that is a short
wavelength SFP (switch) port should be connected to another short wavelength
SFP (device) port using a short wavelength cable; and a long wavelength port is
connected to a long wavelength port; and a copper port is connected to a copper
port.
Only one frame is transmitted and received at any one time. The port LEDs flicker
green rapidly while the test is running.
The test method is as follows:
1. Determine which ports are L-ports.
2. Enable ports for cabled loopback mode.
412
Fabric OS Version 3.1.x/4.1.x Reference Guide
loopPortTest
3. Create a frame F of data size (1024 bytes).
4. Transmit frame F via port M, with D_ID to the FL port (ALPA = 0).
5. Pick up the frame from port M, the FL port.
6. Check if any of the 8 statistic error counters are non-zero:
ENC_in, CRC_err, TruncFrm, FrmTooLong, BadEOF, Enc_out,
BadOrdSet, DiscC3.
7. Check if the transmit, receive or class 3 receiver counters are stuck at some
value.
8. Check if the number of frames transmitted is not equal to the number of
frames received.
9. Repeat step 3 through step 8 for all ports present until:
a. The number of frames requested is reached.
b. All ports are marked bad.
You can specify a payload pattern to be used when executing this test. If the
pattern is not user specified, then at every 30 pass, a different data type from a
palette of seven is used to generate different data pattern to create the frame. The
data pattern will be generated based on each data type. Some data types may
generate different data pattern on every pass, and other data type may not change
the data pattern in every pass. These seven data types will be repeated every 210
pass. The data palette is as follows:
1)
2)
3)
4)
5)
6)
7)
CSPAT:
BYTE_LFSR:
CHALF_SQ:
QUAD_NOT:
CQTR_SQ:
CRPAT:
RANDOM:
0x7e,
0x69,
0x4a,
0x00,
0x78,
0xbc,
0x25,
0x7e,
0x01,
0x4a,
0xff,
0x78,
0xbc,
0x7f,
0x7e,
0x02,
0x4a,
0x00,
0x78,
0x23,
0x6e,
0x7e,...
0x05,...
0x4a,...
0xff,...
0x78,...
0x47,...
0x9a,...
Operands
This command has the following operands:
(V3.1.x only)
passcount
Specify the number of times (or number of frames per
port) to execute this test. If omitted, the default value
used is 0xfffffffe (or almost infinite for practical
purposes) as passCount.
port_number
Specify the port to run to test on. If omitted, the test will
be executed on all online L-ports
(V3.1.x only)
Fabric OS Version 3.1.x/4.1.x Reference Guide
413
Fabric OS Commands
payload_pattern
Specify the pattern of the test packets payload.
pattern_width
Specify the width of the pattern which user specified.
Valid values are:
1 = byte
2 = word
4 = quad
--slot number
(V4.1.x only)
Specify the slot number in a StorageWorks Core switch.
The slot number must be followed by a slash ( / ) and
the port number.
The StorageWorks Core switch has a total of 10 slots
counted from 1 to 10. Slot number 5 and 6 are control
processor cards, and slot 1 through 4, and 7 through
10, are switch cards. On each switch card, there are 16
ports counted from the bottom, 0 to 15. A particular
port must be represented by both slot number
(1 through 4 or 7 through 10) and port number (0
through 15).
This operand is not required for switches that do not
have slots.
-nframes count
(V4.1.x only)
Specify the number of times (or number of frames per
port) to execute this test. The default value is 10.
-ports itemlist
(V4.1.x only)
Specify a list of user ports to test. By default all the user
ports in the current slot are tested. Refer to itemlist
for more information on selecting ports.
-seed
payload_pattern
(V4.1.x only)
Specify the seed pattern of the test packets.
-width
pattern_width
(V4.1.x only)
Specify the width of the test pattern. Valid values
include:
1 for byte
2 for word
3 for quad
This operand is optional.
(V3.1.x only)
(V3.1.x only)
414
Fabric OS Version 3.1.x/4.1.x Reference Guide
loopPortTest
Example
To run this command 100 times on port 8 (V3.1.x example):
switch:admin> loopporttest 100, 8, 0xaa55, 2
Configuring L-port 7 to CableLoopback Port........done.
Will use pattern: aa55 aa55 aa55 aa55 aa55 aa55 aa55
aa55
Running Loop Port Test ........ passed.
Configuring Loopback L-port(s) back to normal L-port(s)........done.
value = 0
switch:admin>
To perform a loopback port test (V4.1.x example):
switch:admin> loopporttest -ports 1/0-1/15
Running Loop Port Test .......
Test Complete: “loopporttest” Pass 10 of 10
Duration 0 hr, 0 min & 1 sec (0:0:0:127).
passed.
Errors
Only one frame is transmitted and received at any time. When the test is running,
the port LEDs flicker green rapidly. When this command detects a failure, one or
more of the following error messages are displayed:
■
For V3.1.x:
DIAG-INIT
DIAG-PORTDIED
DIAG-XMIT
DIAG-TIMEOUT
DIAG-ERRSTAT
DIAG-STATS
DIAG-PORTWRONG
■
For V4.1.x:
DATA
INIT
PORT_DIED
EPI1_STATUS_ERR
ERR_STAT
ERR_STATS
ERR_STATS_2LONG
ERR_STATS_BADEOF
Fabric OS Version 3.1.x/4.1.x Reference Guide
415
Fabric OS Commands
ERR_STATS_BADOS
ERR_STATS_C3DISC
ERR_STATS_CRC
ERR_STATS_ENCIN
ERR_STATS_ENCOUT
ERR_STATS_TRUNC
ERR_STAT_2LONG
ERR_STAT_BADEOF
ERR_STAT_BADOS
ERR_STAT_C3DISC
ERR_STAT_CRC
ERR_STAT_ENCIN
ERR_STAT_ENCOUT
ERR_STAT_TRUNC
FDET_PERR
FINISH_MSG_ERR
FTPRT_STATUS_ERR
LESSN_STATUS_ERR
MBUF_STATE_ERR
MBUF_STATUS_ERR
NO_SEGMENT
PORT_ABSENT
PORT_ENABLE
PORT_M2M
PORT_STOPPED
PORT_WRONG
RXQ_FRAME_ERR
RXQ_RAM_PERR
STATS
STATS_C3FRX
STATS_FRX
STATS_FTX
TIMEOUT
XMIT
416
Fabric OS Version 3.1.x/4.1.x Reference Guide
loopPortTest
See Also
camtest
centralmemorytest
cmemretentiontest
cmitest
crossporttest
itemlist
portloopbacktest
portregtest
ramtest
spinsilk
sramretentiontest
Fabric OS Version 3.1.x/4.1.x Reference Guide
417
Fabric OS Commands
LSDbShow
Displays the FSPF Link State Database.
Synopsis
LSDbShow [domain]
Availability
All users.
Release
V3.1.x and V4.1.x
Description
Use this command to display a link state database record for switches in the
fabric.
There are two data structures - the permanently allocated Link State Database
Entry and the Link State Record (LSR) that are allocated when a switch is
connected to the fabric. The LSR for domain N describes the links between the
switch with domain number N and its neighbor switches. For a link to be reported
in the LSR, the neighbor for that link must be in NB_ST_FULL state.
This command displays the content of both data structures, if the LSR is present.
Without operands, this command displays the whole Link State Database.
The display shows the following fields:
Table 13: LSDbShow Display Fields
Field
418
Description
Domain
Domain number described by this LSR. A (self) keyword
after the domain number indicates LSR describes the local
switch.
lsrP
Pointer to LSR.
earlyAccLSRs
Number of LSRs accepted even though they were not
sufficiently spaced apart.
ignoredLSRs
Number of LSRs not accepted because they were not
sufficiently spaced apart.
Fabric OS Version 3.1.x/4.1.x Reference Guide
LSDbShow
Table 13: LSDbShow Display Fields (Continued)
Field
Description
lastIgnored
Last time an LSR was ignored.
installTime
Time this LSR was installed in the database, in seconds
since boot.
lseFlags
Internal variable.
uOutIfs
Internal variable
uPathCost
Internal variable.
uOldHopCount
Internal variable.
uHopsFromRoot
Internal variable.
mOutIfs
Internal variable.
parent
Internal variable.
mPathCos
Internal variable.
mHopsFromRoot
Internal variable.
lsAge
Age, in seconds, of this LSR. An LSR is removed from the
database when its age exceeds 3600 seconds.
reserved
Reserved for future use.
type
Type of the LSR. Always 1.
options
Always 0.
lsId
ID of this LSR. It is identical to the domain number.
advertiser
ID (domain number) of the switch that originated this LSR.
incarn
Incarnation number of this LSR.
length
Total length (in bytes) of this LSR. Includes header and link
state information for all links.
chksum
Checksum of total LSR, with exception of lsAge field.
linkCnt
Number of links in this LSR. Each link represents a
neighbor in NB_ST_FULL state.
flags
Always 0.
LinkId
ID of this link. It is the domain number of the switch on the
other side of the link.
out port
Port number on the local switch.
rem port
Port number of the port on the other side of the link.
Fabric OS Version 3.1.x/4.1.x Reference Guide
419
Fabric OS Commands
Table 13: LSDbShow Display Fields (Continued)
Field
Description
cost
Cost of this link. The default cost for a 1 Gb/s link is 1000.
costCnt
Always 0.
type
Always 1.
Operands
This command has the following operand:
domain
420
Specify the domain number of the LSR to be displayed.
This operand is optional.
Fabric OS Version 3.1.x/4.1.x Reference Guide
LSDbShow
Examples
To display the Link State Record for the local switch:
switch:admin> lsdbshow
Domain = 7 (self),
lsrP
=
earlyAccLSRs
=
ignoredLSRs
=
lastIgnored
=
installTime
=
lseFlags
=
uOutIfs
=
uPathCost
=
uOldHopCount
=
uHopsFromRoot
=
mOutIfs
=
parent
=
mPathCost
=
mHopsFromRoot
=
Link State Database Entry pointer = 0x103946a0
0x1035bb30
1
0
Never
0x4f20a (324106)
0xa
0x0
0
-1161889074
0
0x20
0x4
2000
2
Link State Record:
Link State Record pointer = 0x1035bb30
lsAge
= 138
reserved
= 0
type
= 1
options
= 0x0
lsId
= 7
advertiser
= 7
incarn
= 0x80000217
length
= 92
chksum
= 0x2fdd
linkCnt = 4,
flags = 0x0
switch:admin>
See Also
interfaceShow
nbrStateShow
Fabric OS Version 3.1.x/4.1.x Reference Guide
421
Fabric OS Commands
mcastShow
Displays multicast routing information.
Synopsis
mcastShow [group_ID]
Availability
All users.
Release
V3.1.x
Description
Use this command to display the multicast routing information, as it is known by
the FSPF path selection and routing task, for all ports in the switch. The multicast
routing information indicates, for each multicast group, all the ports that are
members of that group; that is, ports that are able to send and receive multicast
frames on that group.
The multicast routing information is shown for all the multicast groups, or for a
specific group if a group ID is supplied.
Normally, an F_Port or FL_Port is a member of the multicast group only if it has
joined the group using the Alias Server protocol. On the other hand, E_Ports that
are part of the multicast group are selected by the multicast path selection
protocol. They are chosen in a way that prevents multicast routing loops.
The multicast paths are active for all the multicast groups at all times, regardless
of whether a multicast group contains any members.
The multicast routing information is shown as a set of bit maps. Each bit in the bit
map represents a port, with the least significant bit representing port 0. A bit set to
1 indicates that a port is part of the multicast distribution tree.
422
Fabric OS Version 3.1.x/4.1.x Reference Guide
mcastShow
The following fields are displayed:
Table 14: Group Fields
Groups Fields
Multicast Group ID
Member Ports
Bit map of all ports in the multicast tree for that multicast
group.
Member ISL Ports
Bit map of all E_Ports in the multicast tree for that multicast
group.
Static ISL Ports
Reserved. It should be all zeroes.
Operands
This command has the following operand:
group_ID
Specify the multicast group to be displayed. This
operand is optional.
Examples
To display multicast routing information:
switch:admin> mcastShow 5
Group
Member Ports
Member ISL Ports
Static ISL Ports
---------------------------------------------------------------5
0x00000000
0x00000000
0x00000000
See Also
bcastShow
portRouteShow
Fabric OS Version 3.1.x/4.1.x Reference Guide
423
Fabric OS Commands
memshow
Displays the amount of free and used memory in switch.
Synopsis: V3.1.x
memshow
Synopsis: V4.1.x
memshow [ -b | -k | -m ]
Availability
All users.
Release
V3.1.x and V4.1.x
Description
Use this command to display free and used memory on the system as well as the
shared memory and buffers used by the kernel. By default the memory usage is
displayed in bytes.
Operands
For V3.1.x, none.
For V4.1.x, this command has the following operands:
-b
Specify this operand to display memory usage in bytes.
-k
Specify this operand to display memory usage in kilobytes.
-m
Specify this operand to display memory usage in megabytes.
By default the memory usage is displayed in bytes.
424
Fabric OS Version 3.1.x/4.1.x Reference Guide
memshow
Example
To view the memory usage in a StorageWorks Core switch:
switch:admin> memshow
status
bytes
blocks
avg block max block
------ --------- -------- ---------- ---------current
free
22187312
19
1167753
22179008
alloc
5311888
4258
1247
cumulative
alloc 314330064 5666735
55
switch:admin>
See Also
savecore
Fabric OS Version 3.1.x/4.1.x Reference Guide
425
Fabric OS Commands
mscapabilityshow
Displays the service support capability.
Synopsis
mscapabilityshow
Availability
All users.
Release
V3.1.x and V4.1.x
Description
Use this command to query a fabric for service support capability. This command
provides information on what services are supported fabric wide.
The following capabilities are shown:
426
■
Bit 0: Basic Fabric Configuration Service Supported.
This bit displays the fabric capability to support Management Server. This
service is available on all switches. This service is described in the FC-GS MS
specification.
■
Bit 1: Platform Service Supported.
This bit displays the fabric capability to support the Management Server
Platform Service. If the service is supported, you can enable it through the
msplmgmtactivate command. This service is described in the FC-GS MS
specification.
■
Bit 2: Topology Discovery Service Supported.
This bit displays the fabric capability to support the Management Server
Topology Discovery Service. If the service is supported, you can enable it
through the mstdenable “all” command. This service is described in
the FC-GS MS specification.
■
Bit 3: Unzoned Name Service Supported.
This bit displays the fabric capability to support the Unzoned Name Server.
This service is described in the FC-GS MS specification.
Fabric OS Version 3.1.x/4.1.x Reference Guide
mscapabilityshow
■
Bit 4: Fabric Zone Service Supported.
This bit displays the fabric capability to support the Fabric Zone Service. This
service is described in the FC-GS MS specification.
■
Bit 5: Fabric Lock Service Supported.
This service is not currently supported in switches, and defaults to 0. This
service is described in the FC-GS MS specification.
■
Bit 6: Time Service Supported.
This bit displays the fabric capability to support the Time Service. For more
information refer to the tsclockserver command. This service is
described in the FC-GS MS specification.
■
Bit 7: RSCN Small Payload Supported.
This bit displays the fabric capability to support the RSCN Small Payload
used by Name Server.
■
Bit 8: Reliable Commit Service (RCS) Supported.
The Reliable Commit Service (RCS) is an enhanced fabric wide commit
service used by Security, Zoning, and Management Server.
To read the capability, the hexadecimal value must be converted into binary. The
binary value is read from right to left. A value of 1 means the switch is capable of
supporting a given service, a value of 0 means the switch is not capable of
supporting that service. For example, a capability value of 0x0000019f would
correspond to the following values:
Capability
8 7654 3210
Binary Value 1 1001 1111
In the above example, only Bit 5, Fabric Lock Service, and Bit 6, Time Service are
not supported switch.
Operands
None.
Fabric OS Version 3.1.x/4.1.x Reference Guide
427
Fabric OS Commands
Example
To display Management Server capability on a fabric:
switch:admin> mscapabilityshow
Switch WWN
========================
10:00:00:60:69:90:03:f0
10:00:00:60:69:90:24:f0
10:00:00:60:69:90:31:f0
Capability
==========
0x0000019f
0x0000019f
0x0000008f
Switch Name
===========
“switch”*
“switch123”
“switch321”
Capability Bit Definitions:
Bit 0: Basic Fabric Configuration Service Supported.
Bit 1: Platform Service Supported.
Bit 2: Topology Discovery Service Supported.
Bit 3: Unzoned Name Service Supported.
Bit 4: Fabric Zone Service Supported.
Bit 5: Fabric Lock Service Supported.
Bit 6: Time Service Supported.
Bit 7: RSCN Small Payload Supported.
Bit 8: Reliable Commit Service(RCS) Supported.
Others: Reserved.
Done.
switch:admin>
See Also
msplmgmtactivate
msplmgmtdeactivate
msplatshow
msplcleardb
mstdenable
mstddisable
mstdreadconfig
428
Fabric OS Version 3.1.x/4.1.x Reference Guide
msConfigure
msConfigure
Configure the Management Server.
Synopsis
msConfigure
Availability
Admin
Release
V3.1.x and V4.1.x
Description
Use this command to display and configure parameters used to access the
Management Server. The Management Server allows a storage area network
(SAN) management application to retrieve and administer fabric and interconnect
elements such as switches. It is located at the Fibre Channel address, FFFFFAh.
If the Access Control List (ACL) is empty (this is the default value), the
Management Server is accessible to all systems connected in-band to the fabric.
To restrict access, specify the World Wide Name (WWN) for one or more
management applications; access is then restricted to those WWNs. Up to 16
maximum WWNs are supported in ACL.
The ACL is implemented on a per switch basis and should be configured on the
switch to which the management application station is directly connected.
This command is interactive and provides the following choices:
0 Done (with the administration)
1 Displays the Access Control List (ACL)
2 Add member based on its Port/Node WWN
3 Delete member based on its Port/Node WWN
If a change is made, you are prompted to save the changed ACL to non-volatile
memory. The saved ACL is restored on future reboot.
Fabric OS Version 3.1.x/4.1.x Reference Guide
429
Fabric OS Commands
Note: When security is enabled, this command can only be issued from the Primary
FCS switch. See “Security Commands” on page 941.
Operands
None.
Example
To display the Management Server access control list:
switch:admin> msConfigure
0 Done
1 Display the access list
2 Add member based on its Port/Node WWN
3 Delete member based on its Port/Node WWN
select : (0..3) [1]
MS Access List consists of (5): {
20:01:00:60:69:00:60:10
20:02:00:60:69:00:60:10
20:03:00:60:69:00:60:10
20:02:00:60:69:00:60:03
20:02:00:60:69:00:60:15
0 Done
1 Display the access list
2 Add member based on its Port/Node WWN
3 Delete member based on its Port/Node WWN
select : (0..3) [1] 0
done ...
switch:admin>
430
Fabric OS Version 3.1.x/4.1.x Reference Guide
msConfigure
See Also
msCapabilityShow
msPlMgmtActivate
msPlMgmtDeactivate
msPlatShow
msPlClearDB
msTdDisable
msTdEnable
msTdReadConfig
Fabric OS Version 3.1.x/4.1.x Reference Guide
431
Fabric OS Commands
msPlatShow
Displays the Management Server Platform database.
Synopsis
msPlatShow
Availability
All users.
Release
V3.1.x and V4.1.x
Description
Use this command to display information from the Management Server Platform
database. The display shows the Platform name and associated attributes of each
Platform object in the database.
Platform service is available in firmware v2.3 and above. Lower level firmware
releases do not support it.
Operands
None.
432
Fabric OS Version 3.1.x/4.1.x Reference Guide
msPlatShow
Example
To display the Management Server Platform database for a fabric:
switch:admin> msPlatShow
----------------------------------------------------------Platform Name: [9] "first obj"
Platform Type: 5 : GATEWAY
Number of Associated M.A.: 1
Associated Management Addresses:
[35] "http://java.sun.com/products/plugin"
Number of Associated Node Names: 1
Associated Node Names:
10:00:00:60:69:20:15:71
------------------------------------------------------------Platform Name: [10] "second obj"
Platform Type: 7 : HOST_BUS_ADAPTER
Number of Associated M.A.: 1
Associated Management Addresses:
[30] "http://java.sun.com/products/1"
Number of Associated Node Names: 2
Associated Node Names:
10:00:00:60:69:20:15:79
10:00:00:60:69:20:15:75
See Also
msCapabilityShow
msPlMgmtActivate
msPlMgmtDeactivate
msPlClearDB
Fabric OS Version 3.1.x/4.1.x Reference Guide
433
Fabric OS Commands
msPlClearDB
Clear the Management Server Platform database on all switches in the fabric.
Synopsis
msPlClearDB
Availability
Admin
Release
V3.1.x and V4.1.x
Description
This command enables an Admin user to clear the entire Management Server
Platform database on all switches in the fabric. Since this operation is
non-recoverable (once issued, the database will be erased), it should not be used
unless it is intended to resolve a database conflict between two joining fabrics or
to establish an entire new fabric with an empty database.
Platform service is available in firmware v2.3 and above. Lower level firmware
releases do not support it.
Note: When security is enabled, this command can only be issued from the Primary
FCS switch. See “Security Commands” on page 941.
Operands
None.
434
Fabric OS Version 3.1.x/4.1.x Reference Guide
msPlClearDB
Example
To clear the Management Server Platform database on all switches in the fabric:
switch:admin> msplcleardb
This will erase MS Platform Service Database in the entire fabric.
Would you like to continue this operation? (yes, y, no, n): [no] y
Request to MS Platform DB Clear operation in progress.....
*Fabric-wide MS Platform DB Clear operation in progress.....
switch:admin>
See Also
msPlMgmtDeactivate
msPlatShow
msCapabilityShow
msPlMgmtActivate
Fabric OS Version 3.1.x/4.1.x Reference Guide
435
Fabric OS Commands
msPlMgmtActivate
Activate the Management Server Platform service on all switches in the fabric.
Synopsis
msPlMgmtActivate
Availability
Admin
Release
V3.1.x and V4.1.x
Description
This command enables an Admin user to activate the Management Server
Platform service on all switches in the fabric. HP recommends that you run the
msCapabilityShow command before issuing this command. If any switch
within the fabric is not capable of handling the Platform service, the
msPlMgmtActivate command is rejected. When this command is issued, all
the switches in the fabric will have the Platform service ENABLED.
Once activated, the activation is saved to the non-volatile storage of each switch,
so after a reboot, a switch will boot up with Platform service ENABLED. By
default, the Platform service is DISABLED.
Platform service is available in firmware v2.3 and above. Lower level firmware
releases do not support it.
Note: When security is enabled, this command can only be issued from the Primary
FCS switch. See “Security Commands” on page 941.
Operands
None.
436
Fabric OS Version 3.1.x/4.1.x Reference Guide
msPlMgmtActivate
Example
To activate Platform service on all switches in the fabric (V4.1.x example):
switch:admin> msplmgmtactivate
Request to activate MS Platform Service in progress......
*Completed activating MS Platform Service in the fabric!
switch:admin>
See Also
msPlMgmtDeactivate
msPlatShow
msCapabilityShow
msPlClearDB
Fabric OS Version 3.1.x/4.1.x Reference Guide
437
Fabric OS Commands
msPlMgmtDeactivate
Deactivate the Management Server Platform service on all switches in the fabric.
Synopsis
msPlMgmtDeactivate
Availability
Admin
Release
V3.1.x and V4.1.x
Description
Use this command to deactivate the Platform service on all switches in the fabric.
This command deactivates the Platform service of each switch in the fabric and
commits the changes to the non-volatile storage of each switch.
Once deactivated, even in the event of a reboot, the switch will initialize with the
Platform service DISABLED. By default, the Platform service is DISABLED.
Platform service is available in firmware v2.3 and above. Lower level firmware
releases do not support it.
Note: When security is enabled, this command can only be issued from the Primary
FCS switch. See “Security Commands” on page 941.
Operands
None.
438
Fabric OS Version 3.1.x/4.1.x Reference Guide
msPlMgmtDeactivate
Example
To deactivate the Platform service on all switches in the fabric:
switch:admin> msplmgmtdeactivate
MS Platform Service is currently enabled.
This will erase MS Platform Service configuration information as well as
database in the entire fabric.
Would you like to continue this operation? (yes, y, no, n): [no] y
Request to deactivate MS Platform Service in progress......
*Completed deactivating MS Platform Service in the fabric!
switch:admin>
See Also
msPlatShow
msCapabilityShow
msPlMgmtActivate
msPlClearDB
Fabric OS Version 3.1.x/4.1.x Reference Guide
439
Fabric OS Commands
msTdDisable
Disable the Management Server Topology Discovery service.
Synopsis
msTdDisable [“ALL”]
Availability
Admin
Release
V3.1.x and V4.1.x
Description
Use this command to disable the Management Server Topology Discovery service
locally or fabric-wide. This command will disable the topology service of the
local switch and commit the changes to non-volatile memory of the local switch.
If the optional parameter “ALL” is given, then the command is executed on the
entire fabric.
Once disabled, even in the event of a power boundary, the switch will boot up with
the Topology Discovery service DISABLED.
Note: Topology Discovery service requires the attached devices which include attached
switches to support the RNID ELS command.
When security is enabled, and using the “ALL” operand, this command can only be
issued from the Primary FCS switch. See “Security Commands” on page 941.
Operands
This command has the following operand:
ALL
440
Specify ALL to disable the Topology Discovery service on all
switches in the fabric. For V3.1.x, the operand ALL must be
enclosed in quotation marks. The operand ALL must be in capital
letters. This operand is optional.
Fabric OS Version 3.1.x/4.1.x Reference Guide
msTdDisable
Example
To disable the Management Server Topology Discovery service locally or
fabric-wide:
switch:admin> mstddisable
This may erase all NID entries. Are you sure?
(yes, y, no, n): [no] y
Request to disable MS Topology Discovery Service in progress....
*MS Topology Discovery disabled locally.
switch:admin>
switch:admin> mstddisable ALL
This may erase all NID entries. Are you sure?
(yes, y, no, n): [no] y
Request to disable MS Topology Discovery Service in progress....
*MS Topology Discovery disabled locally.
*MS Topology Discovery Disable Operation Complete!!
switch:admin>
See Also
msTdEnable
msTdReadConfig
Fabric OS Version 3.1.x/4.1.x Reference Guide
441
Fabric OS Commands
msTdEnable
Enable the Management Server Topology Discovery service.
Synopsis
msTdEnable [“ALL”]
Availability
Admin
Release
V3.1.x and V4.1.x
Description
Use this command to enable the Management Server Topology Discovery service
locally or fabric-wide. This command enables the Topology Discovery service on
the local switch and commits the change to the non-volatile memory of the local
switch. If the optional operand “ALL” is given, then the command is executed on
the entire fabric.
Once enabled, even in the event of a reboot, the switch will be boot up with the
Management Server Topology Discovery service enabled.
Topology Discovery service requires the attached devices which include attached
switches to support the RNID ELS command.
Note: When security is enabled, and using the “ALL” operand, this command can
only be issued from the Primary FCS switch. See “Security Commands” on page 941.
Operands
This command has the following operand:
ALL
442
Specify ALL to enable the topology discovery service on all
switches in the fabric. For V3.1.x, the operand ALL must be
enclosed in quotation marks. The operand ALL must be in capital
letters. This operand is optional.
Fabric OS Version 3.1.x/4.1.x Reference Guide
msTdEnable
Example
To enable the Management Server Topology Discovery service locally or
fabric-wide:
switch:admin> mstdenable
Request to enable MS Topology Discovery Service in progress....
*MS Topology Discovery enabled locally.
switch:admin>
switch:admin> mstdenable ALL
Request to enable MS Topology Discovery Service in progress....
*MS Topology Discovery enabled locally.
*MS Topology Discovery Enable Operation Complete!!
switch:admin>
See Also
msTdDisable
msTdReadConfig
Fabric OS Version 3.1.x/4.1.x Reference Guide
443
Fabric OS Commands
msTDReadConfig
Displays the status of Management Server Topology Discovery service.
Synopsis
msTdReadConfig
Availability
All users.
Release
V3.1.x and V4.1.x
Description
Use this command to check whether or not the Management Server Topology
Discovery service is enabled.
Operands
None.
Example
To display the status of the Topology Discovery service:
switch:admin> msTdReadConfig
*MS Topology Discovery is Enabled.
switch:admin>
See Also
msTdEnable
msTdDisable
444
Fabric OS Version 3.1.x/4.1.x Reference Guide
myid
myid
Displays the current login session details.
Synopsis
myid
Availability
Admin
Release
V4.1.x
Description
Use this command to display the status of the system and the login session details.
The Status displays if the system is Redundant or Non-Redundant or Unknown.
The login session gives details of the following:
■
Which CP/Switch (or console/serial port) was used to log in
■
The IP address of the current login session for telnet or the name of the
current Console port or the Serial port (if modem login used)
■
The Current CP's mode (Active or Standby or Unknown)
■
The Current System Status (Redundant or Non-Redundant or Unknown)
Operands
None.
Example
To display current login information:
switch:admin> myid
Current Switch: switch0
Session Detail: Console Port (/dev/ttyS0) Active
Fabric OS Version 3.1.x/4.1.x Reference Guide
Redundant
445
Fabric OS Commands
See Also
version
446
Fabric OS Version 3.1.x/4.1.x Reference Guide
nbrStatsClear
nbrStatsClear
Reset FSPF interface counters.
Synopsis: V3.1.x
nbrStatsClear [portnumber]
Synopsis: V4.1.x
nbrStatsClear [slotnumber/][portnumber]
Availability
Admin
Release
V3.1.x and V4.1.x
Description
Use this command to reset the counters of FSPF frames transmitted and received
on an interface.
Use this command with no operand to reset counters on all interfaces.
Operands
This command has the following operand:
slotnumber
(V4.1.x only)
Specify the slot number for a StorageWorks Core switch. For
all other switches this operand is not required. The slot number
must be followed by a slash ( / ) and the port number, so that
each port is represented by both slot number (1 through 4, or
7 through 10), and port number (0 through 15).
The StorageWorks Core switch has a total of 1–10 slots. Slot
number 5 and 6 are control processor cards, and slot 1
through 4, and 7 through 10, are port cards. On each port
card, there are 16 ports counted from the bottom, 0 to 15.
portnumber
Specify a port number. Valid values for port number vary
depending on the switch type. This operand is optional.
Fabric OS Version 3.1.x/4.1.x Reference Guide
447
Fabric OS Commands
When this command is specified with no operand, the statistics are cleared for all
interfaces.
Examples
To display how to reset the counters on slot 1 port 4:
switch:admin> nbrstatsclear 1/4
See Also
interfaceShow
portShow
switchShow
448
Fabric OS Version 3.1.x/4.1.x Reference Guide
nbrStateShow
nbrStateShow
Displays FSPF neighbor's state.
Synopsis: V3.1.x
nbrStateShow [portnumber]
Synopsis: V4.1.x
nbrStateShow [slotnumber/][portnumber]
Availability
All users.
Release
V3.1.x and V4.1.x
Description
Use this command to display information about neighbors to the local switch, or
information about a specific neighbor if a port number is supplied. A neighbor is a
switch that is directly attached to the local switch. The display shows the
following fields:
Local Domain ID
Domain number of local switch.
Local Port
E_Port (interface) on local switch.
Domain
Domain number of remote switch.
Remote Port
E_Port (interface) on remote switch.
State
State of the neighbor. The E_Port is used to route
frames only if the neighbor is in NB_ST_FULL
state.
Fabric OS Version 3.1.x/4.1.x Reference Guide
449
Fabric OS Commands
Operands
This command has the following operand:
slotnumber
(V4.1.x only)
Specify the slot number for a StorageWorks Core switch.
For all other switches this operand is not required. The slot
number must be followed by a slash ( / ) and the port
number, so that each port is represented by both slot
number (1 through 4, or 7 through 10), and port number
(0 through 15).
The StorageWorks Core switch has a total of 1–10 slots.
Slot number 5 and 6 are control processor cards, and slot
1 through 4, and 7 through 10, are port cards. On each
port card, there are 16 ports counted from the bottom, 0 to
15.
portnumber
Specify a port number. Valid values for port number vary
depending on the switch type. This operand is optional.
Examples
To display information about switches directly connected to the local switch:
switch:admin> nbrStateShow 2/0
Local Domain ID: 15
Local Port
Domain
Remote Port
State
------------------------------------------------------2
13
13
NB_ST_FULL
6
13
9
NB_ST_FULL
7
13
8
NB_ST_FULL
13
3
7
NB_ST_FULL
See Also
interfaceShow
450
Fabric OS Version 3.1.x/4.1.x Reference Guide
nodefind
nodefind
Displays all the device PIDs matching a given WWN.
Synopsis
nodefind “WWN”
Availability
All users.
Release
V3.1.x and V4.1.x
Description
Use this command to display the 24-bit Fibre Channel addresses of all the devices
in the fabric that have either port world wide name or node world wide name
matching with the given world wide name.
The message No device is found with wwn xxxxxxxx is displayed
if there is no device matching the given WWN. If matches are found, the command
displays the number of devices found.
Operands
This command has the following operand:
WWN
Specify the world wide name which can be used to match
the real device's port WWN or node WWN. The world
wide name must have eight colon separated fields each
consisting of 1 or 2 hexadecimal digits between 0 and ff,
with no spaces.
Examples
To display all the device PIDs matching a given WWN:
switch:admin> nodefind “50:05:07:65:05:04:08:e5”
1 device is found with wwn 50:05:07:65:05:04:08:e5
switch:admin>
Fabric OS Version 3.1.x/4.1.x Reference Guide
451
Fabric OS Commands
See Also
nsshow
nsallshow
nscamshow
452
Fabric OS Version 3.1.x/4.1.x Reference Guide
nsaliasshow
nsaliasshow
Displays local name server information with aliases.
Synopsis: V3.1.x
nsaliasshow
Synopsis: V4.1.x
nsaliasshow [-r]
Availability
All users.
Release
V3.1.x and V4.1.x
Description
This command is a duplicate of the command nsshow with the added feature of
displaying the defined configuration aliases that the device belongs to.
The message There is no entry in the Local Name Server is
displayed if there is no information in this switch, but there still may be devices
connected to other switches in the Fabric. The command nsallshow shows
information from all switches.
The display is identical to the command nsshow with the exception that an
additional line is added for the aliases that the device belongs to after all other
fields for the device. If there are no defined configuration aliases for that device,
no alias is shown.
Fabric OS Version 3.1.x/4.1.x Reference Guide
453
Fabric OS Commands
Operands
For V3.1.x, none.
For V4.1.x, this command has the following operand:
-r
Specify this option to replace the TTL attribute output with
SCR (state change registration) information in the display.
SCR is the state change registration of a device. This value
indicates what type of RSCN a device registers to receive.
Examples
This example shows a cached entry and six local entries, with two of the devices
having aliases:
switch:admin> nsAliasShow
The Local Name Server has 7 entries {
Type Pid
COS
PortName
NodeName
TTL(sec)
*N
011200;
2,3;10:00:00:60:69:00:ab:ba;10:00:00:60:69:00:ab:ba; 60
FC4s: FCIP
Fabric Port Name: 20:02:00:60:69:00:68:19
Aliases:
N
021200;
2,3;10:00:00:60:69:00:03:19;30:00:00:60:69:00:03:19; na
FC4s: FCIP
Fabric Port Name: 20:02:00:60:69:01:44:22
Aliases:
N
021300;
3;10:00:00:60:69:00:02:d6;20:00:00:60:69:00:02:d6; na
Fabric Port Name: 20:03:00:60:69:01:44:22
Aliases: DeviceAlias
NL
0214e2;
3;21:00:00:fa:ce:00:21:1e;20:00:00:fa:ce:00:21:1e; na
FC4s: FCP [STOREX RS2999FCPH3
MT09]
Fabric Port Name: 20:04:00:60:69:01:44:22
Aliases:
NL
0214e4;
3;21:00:00:fa:ce:00:21:e1;20:00:00:fa:ce:00:21:e1; na
FC4s: FCP [STOREX RS2999FCPH3
CD09]
Fabric Port Name: 20:04:00:60:69:01:44:22
Aliases: MyAlias1 MyAlias2
NL
0214e8;
3;21:00:00:fa:ce:04:83:c9;20:00:00:fa:ce:04:83:c9; na
FC4s: FCP [STOREX RS2999FCPH3
NS09]
Fabric Port Name: 20:04:00:60:69:01:44:22
Aliases:
NL
0214ef;
3;21:00:00:ad:bc:04:6f:70;20:00:00:ad:bc:04:6f:70; na
FC4s: FCP [STOREX RS2999FCPH3
JB09]
Fabric Port Name: 20:04:00:60:69:01:44:22
Aliases:
454
Fabric OS Version 3.1.x/4.1.x Reference Guide
nsaliasshow
See Also
nsshow
nsallshow
switchshow
Fabric OS Version 3.1.x/4.1.x Reference Guide
455
Fabric OS Commands
nsAllShow
Displays global Name Server information.
Synopsis
nsAllShow [type]
Availability
All users.
Release
V3.1.x and V4.1.x
Description
Use this command to display the 24-bit Fibre Channel addresses of all devices in
all switches in the fabric. If the operand type is supplied, only devices of
specified FC-PH type are displayed. If type is omitted, all devices are displayed.
Note: Specifying the type operand causes the switch to send out a query to every
switch in the fabric. On a large fabric it is recommended not to run a script that
repeatedly issues the nsAllShow command with a type operand specified.
Operands
This command has the following operand:
type
456
Specify the FC-PH type code. This operand is optional. The valid
values for this operand are 0 to 255. Below are two specific FC-PH
device type codes:
8 = FCP type device
4 , 5 = FC-IP type device
Other FC-PH types are displayed in the format “x ports supporting
FC4 code” where x is the number of ports of a type, and code is
the FC-PH type code.
Fabric OS Version 3.1.x/4.1.x Reference Guide
nsAllShow
Example
To display all devices in the Fabric, followed by all type 8 (SCSI-FCP) devices
and all type 5 (SCSI-FCIP) devices:
switch:admin> nsAllShow
12 Nx_Ports in the Fabric {
011200 0118e2 0118e4 0118e8 0118ef 021200
0214e2 0214e4 0214e8 0214ef
}
switch:admin> nsAllShow 8
8 FCP Ports {
0118e2 0118e4 0118e8 0118ef 0214e2 0214e4 0214e8 0214ef
}
switch:admin> nsAllShow 5
2 FC-IP Ports in the Fabric {
011200 021200}
See Also
nsShow
switchShow
Fabric OS Version 3.1.x/4.1.x Reference Guide
457
Fabric OS Commands
nscamshow
Displays information about remote devices in the Name Server Cache.
Synopsis
nscamshow
Availability
All users.
Release
V3.1.x and V4.1.x
Description
Use this command to display the local Name Server Cache information about the
devices discovered in the fabric by the Name Server Cache manager.
The message No Entry found! is displayed if the Name Server Cache
Manager hasn't discovered new switches and any new devices in the fabric.
For each remote switch found the output of this command shows the domain
number, state, revision, owner, the list of cold and hot devices for that domain
number. For each device found in the cold or hot devices list, the following
information is displayed:
Type
U for unknown, N for N_Port, NL for NL_Port.
Pid
The 24-bit Fibre Channel address.
COS
A list of classes of service supported by the device.
PortName
The device's port Worldwide Name.
NodeName
The device's node Worldwide Name.
There may be additional lines if the device has registered any of the following
information (the switch automatically registers SCSI inquiry data for FCP target
devices): FC4s supported and fabric port name.
Operands
None.
458
Fabric OS Version 3.1.x/4.1.x Reference Guide
nscamshow
Example
To displays all Switch and device entries discovered by the Name Server in the
fabric:
switch:admin> nscamshow
nscam show for remote switches:
Switch entry for 2
state
rev
owner
cold
v250+
0xfffc01
Hot device list:
No Entry found!
Cold device list:
Type Pid
COS
PortName
NodeName
N
021200;
2,3;10:00:00:60:69:00:ab:ba;10:00:00:60:69:00:ab:ba;
FC4s: FCIP
Fabric Port Name: 20:02:00:60:69:00:68:19
See Also
nsshow
nsallshow
switchshow
Fabric OS Version 3.1.x/4.1.x Reference Guide
459
Fabric OS Commands
nsShow
Displays local Name Server information.
Synopsis: V3.1.x
nsShow
Synopsis: V4.1.x
nsShow [-r]
Availability
All users.
Release
V3.1.x and V4.1.x
Description
Use this command to display local Name Server information, including
information about devices connected to this switch, and cached information about
devices connected to other switches in the fabric.
The following message is displayed if there is no information in this switch:
There is no entry in the Local Name Server
There still may be devices connected to other switches in the fabric. The
command nsAllShow displays information from all switches.
Each line of output shows:
460
*
Indicates a cached entry from another switch.
Type
U for unknown, N for N_Port, NL for NL_Port.
PID
24-bit Fibre Channel address.
COS
List of classes of service supported by device.
PortName
Device port World Wide Name.
NodeName
Device node World Wide Name.
Fabric OS Version 3.1.x/4.1.x Reference Guide
nsShow
TTL
Time-to-live (in seconds) for cached entries, or NA (not applicable)
if the entry is local.
SCR
(V4.1.x only)
State change registration of the device. This is displayed if "-r"
option is given.
There may be additional lines if the device has registered any of the following
information (the switch automatically registers SCSI inquiry data for FCP target
devices):
■
FC4s supported
■
IP address
■
IPA
■
Port and node symbolic names
■
Fabric Port Name—This is the WWN of the port on the switch that the device
is physically connected to.
■
Hard address and port IP address
Operands
For V3.1.x, none.
For V4.1.x, this command has the following operand:
-r
Specify this option to replace the TTL attribute output with
SCR (state change registration) information in the display.
SCR is the state change registration of a device. This value
indicates what type of RSCN a device registers to receive.
Example
To display local name server information:
switch:admin> nsshow
The Local Name Server has 1 entry {
Type Pid
COS
PortName
NodeName
TTL(sec)
N
060300;
2,3;10:00:00:00:c9:24:0d:b3;20:00:00:00:c9:24:0d:b3; na
FC4s: FCP
Fabric Port Name: 20:03:00:60:69:00:54:e9
Fabric OS Version 3.1.x/4.1.x Reference Guide
461
Fabric OS Commands
See Also
nsAllShow
switchShow
462
Fabric OS Version 3.1.x/4.1.x Reference Guide
nsstatshow
nsstatshow
Displays local Name Server statistical information.
Synopsis
nsstatshow
Availability
All users.
Release
V3.1.x and V4.1.x
Description
This command displays local Name Server statistical information.
Operands
None.
Fabric OS Version 3.1.x/4.1.x Reference Guide
463
Fabric OS Commands
Example
To display local Name Server statistical information:
switch:admin> nsstatshow
Name Server Statistics {
69 invoked
2
Input
0 discards
0
0 rejected
Output
0 request
0
0 cached
0
Req. breakdown
0 G?_ID
0
1 GID_FT
4
0 GPN_FT
0
1 R?_ID
0
}
Name Server to Server Communication
Input
0 requests
48
0 informs
0
2 ge_id
0
Output
52 requests
52
0 informs
0
Errors
0 nobuf
0
0 outErrors
0
}
invokedErr
0 noBuf
errors
3 accepted
errors
timedout
0 unexpected
0 truncated
G?_NN
GID_PT
GNN_FT
R?_NN
0
0
0
0
GID_NN
GID_FF
GA_NXT
other
Statistics {
accepts
deletions
ge_pn
4 rejects
0 ge_nn
accepts
deletions
15 rejects
0 truncations
inErrors
unexpected
0 inDiscards
switch:admin>
See Also
nsallshow
nsshow
nscamshow
switchshow
464
Fabric OS Version 3.1.x/4.1.x Reference Guide
nszonemember
nszonemember
Displays the information of all the online devices which are zoned with the given
device.
Synopsis
nszonemember “PID”
Availability
All users.
Release
V3.1.x and V4.1.x
Description
Use this command to display the information of all the online devices which are
zoned with the given device. Each line of output shows:
Type
U for unknown, N for N_Port, NL for NL_Port.
Pid
24-bit Fibre Channel address.
COS
List of classes of service supported by device.
PortName
Device port World Wide Name.
NodeName
Device node World Wide Name.
There may be additional lines if the device has registered any of the following
information (the switch automatically registers SCSI inquiry data for FCP target
devices):
■
FC4s supported
■
IP address
■
IPA
■
Port and node symbolic names (local device only)
■
Fabric Port Name
■
Hard address and/or port IP address
Fabric OS Version 3.1.x/4.1.x Reference Guide
465
Fabric OS Commands
Operands
None.
Example
To display the information of all the online devices which are zoned with the
given device:
switch:admin> nszonemember 0x0416e2
3 local zoned members:
Type Pid
COS
PortName
NodeName
NL
041901;
2,3;10:00:00:00:c9:26:0e:ae;20:00:00:00:c9:26:0e:ae;
Fabric Port Name: 20:09:00:60:69:50:06:78
NL
0416e2;
3;22:00:00:20:37:d9:6b:b3;20:00:00:20:37:d9:6b:b3;
FC4s: FCP [SEAGATE ST318304FC
0005]
Fabric Port Name: 20:06:00:60:69:50:06:78
NL
0416e4;
3;22:00:00:20:37:d9:61:ac;20:00:00:20:37:d9:61:ac;
FC4s: FCP [SEAGATE ST318304FC
0005]
Fabric Port Name: 20:06:00:60:69:50:06:78
T
n
n
n
No remote zoned members
See Also
nsshow
nscamshow
cfgshow
466
Fabric OS Version 3.1.x/4.1.x Reference Guide
parityCheck
parityCheck
Enable or disable DRAM parity checking.
Synopsis
parityCheck [mode]
Availability
Admin
Release
V3.1.x
Description
Use this command to enable DRAM parity checking. The mode is saved in
non-volatile memory and stays in that mode until the next execution of
parityCheck.
The mode becomes active as soon as this command is executed. It does not require
a reboot to take effect.
The DRAM parity checking, when enabled, causes ramTest to perform several
additional tests of the parity memory. It also enables the parity checking hardware
to verify proper parity on all DRAM read operations. DRAM parity checking is
only available on specific switch models. If the current switch does not support
parity checking an error is displayed.
Operands
This command has the following operand:
mode
Specify a 1 to enable DRAM parity checking or specify a 0 to
disable it. The default (if no operand is specified) is to disable
parity checking. This operand is optional.
Fabric OS Version 3.1.x/4.1.x Reference Guide
467
Fabric OS Commands
Example
To enable and disable DRAM parity checking:
switch:admin> parityCheck 1
Committing configuration...done.
Parity check is now ON.
switch:admin> parityCheck 0
Committing configuration...done.
Parity check is now OFF.
switch:admin> parityCheck 0
Parity not supported on system model: 4
Parity check already OFF.
See Also
ramTest
468
Fabric OS Version 3.1.x/4.1.x Reference Guide
passwd
passwd
Change system login name and password.
Synopsis: V3.1.x
passwd [“username”]
Synopsis: V4.1.x
passwd [“user”]
Availability
All users.
Release
V3.1.x and V4.1.x
Description
Use this command to change the password for the user currently logged in, or, for
another user. To change the password for a specific user, enter the command with
the optional operand.
The hierarchy of user levels are (from greatest access to least) is Root, Factory,
Admin, and User. Typically, all fabric management should be performed from the
Admin user.
If the fabric is not in secure mode, the behavior of the command is as follows:
■
If you are changing your own user level password, you are prompted to enter
the old password, and if it is valid, then the new password.
■
If a you are changing another user level password, you are prompted to enter
that user level’s old password, and if it is valid, then the new password.
■
If you are logged in as the Root user when changing another user level
password, you are not prompted to enter the old password.
■
The command is disabled until you have changed all the login passwords from
the manufacture default values.
Fabric OS Version 3.1.x/4.1.x Reference Guide
469
Fabric OS Commands
If the fabric is in secure mode, the behavior of the command is as follows:
■
If you change your current login level password, you are also prompted to
change the passwords of all the user levels below your current level in the user
level hierarchy. For example, if you execute this command as the Admin user,
you are prompted to change the password of the User account, as User is
below Admin in the hierarchy. If you execute this command as the Root level,
then you are prompted to change the passwords of Factory, Admin, and User.
If the command is aborted at any point, the current passwords are not changed
for any user level.
■
The command can only be run on the primary FCS switch. The changed
passwords will be distributed to all FCS switches. Non-FCS switches will be
updated if the password of the user account is changed.
■
Changing the password of any user level will cause the login session of that
account (if logged in) to be terminated.
Note: If the Security option is enabled on the fabric this command is disabled on all
switches except the Primary FCS. See “Security Commands” on page 941. Refer to the
HP StorageWorks Extended Fabric Version 3.1.x/4.1.x User Guide for more
information.
The new password must fulfill these rules:
■
For V3.1.x, the password must have 6 to 8 characters. If more than 8
characters are entered, only the first 8 characters are used for password
validation at user login.
■
For V4.1.x, the password must have 8 to 40 characters.
■
Must not be the same as the previous password.
■
Must not match either the username or any word of the realname, either in
normal or in reverse order, or at the beginning or at the end.
■
Must contain characters out of at least two of the following classes: upper and
lower case letters, digits, or non-alphanumeric characters.
The currently logged in user can change the passwords for their own security
level, and any security level below. The hierarchy of user login levels is as
follows:
1. Root
2. Factory
470
Fabric OS Version 3.1.x/4.1.x Reference Guide
passwd
3. Admin
4. User
Input Control
Use the following to control input:
Enter
When entered at a prompt with no preceding input,
accepts the default value (if applicable) and moves to
the next prompt.
Ctrl-D (end of file)
When entered at a prompt with no preceding input, it
terminates the command without changing password.
This is valid on most computers, however, your settings
could be different.
Operands
This command has the following operands:
username
(V3.1.x only)
Specify the name of the user, in quotation marks, where you
want to modify the password. You can also modify the name
of the user login ID. This operand is optional.
user
(V4.1.x only)
Specify the name of the user, in quotation marks, where you
want to modify the password. This operand is optional. Valid
values are: Root, Factory, Admin, or User. You can only
specify this operand when you are logged in as Root, Factory,
or Admin. If you try to change the password of a user level
who is higher in hierarchy (for example: Admin changing the
Root password), you are prompted to enter the current
password of that level. If you try to change the password of a
user level who is lower in hierarchy, you are not prompted to
enter the current password.
Example
To change the Admin user name and password using V3.1.x:
switch:admin> passwd "admin"
New username [admin]: maint
Old password: ********
New password: ********
Re-enter new password: ********
Password changed.
Saving password to stable storage.
Password saved to stable storage successfully.
Fabric OS Version 3.1.x/4.1.x Reference Guide
471
Fabric OS Commands
To change the password for the Admin user using V4.1.x:
switch:admin> passwd “admin”
Changing password for admin
Enter new password:
Re-type new password:
Password changed.
Saving password to stable storage.
Password saved to stable storage successfully.
switch:admin>
Errors
When failures are detected, the subtest may report one or more of the following
error messages:
“user” is not a valid
user name.
You have not specified a user name that is a valid, recognized
user name on the system.
Permission denied.
You do not have permission to change the login name or
password specified.
That user name is already
being used. (V3.1.x only)
You cannot change the user name to that of a previously
existing user.
Incorrect password.
You have not entered the correct password when prompted for
the old password.
Password unchanged.
You have entered the carriage return special input case,
choosing not to change the password.
Passwords do not match.
You have not correctly verified the new password.
See Also
login
logout
472
Fabric OS Version 3.1.x/4.1.x Reference Guide
pdshow
pdshow
Displays data from a panic dump file.
Synopsis
pdshow [panic-dump-file]
Availability
Admin
Release
V4.1.x
Description
Use this command to display data from a panic dump file. The panic dump file
contains information that may be useful to determine the cause of the system
panic.
When executed without any arguments, this command displays output from the
latest panic dump file available on the switch.
If a panic dump file is specified as an argument, the contents of that specific file
are displayed.
Operands
This command has the following operands:
panic-dump-file
Fabric OS Version 3.1.x/4.1.x Reference Guide
Specify the full path name of a panic dump file. This
operand is optional.
473
Fabric OS Commands
Example
The following example shows how pdshow can be used to examine a panic
dump file by the name panic_dump located under the directory /tmp:
switch:admin> pdshow /tmp/panic_dump
*
*
*
*
*** CAUTION ***
Host PLATFORM (current) is: 'Unknown'
PLATFORM got from pd file is: 'Ulysses'
Some restuls shown may be incorrect and/or missing
It is best if this command is run on same PLATFORM as that of pdfile
**************
_______________________********________________________
*
File
:/core_files/panic/core.pd1038932352
*
*
SECTION:PD_MISC
*
-----------------------********-----------------------WatchDogRegister=0x0
Section=Startup time: Tue Dec 3 16:06:11 UTC 2002
Kernel=
2.4.19
Fabric OS= v4.1.0_j_dist_1103
Made on=
Tue Dec 3 19:07:13 2002
Flash=
Tue Dec 3 13:19:06 2002
BootProm=
3.2.0
Section=HA show Output
haShow=Local CP (Slot 6, CP1): Standby
haShow=Remote CP (Slot 5, CP0): Active
haShow=HA enabled, Heartbeat Up, HA State synchronized
<output truncated>
See Also
savecore
portlogdump
474
Fabric OS Version 3.1.x/4.1.x Reference Guide
perfAddEEMonitor
perfAddEEMonitor
Add end-to-end monitor to a port.
Synopsis: V3.1.x
perfAddEEMonitor portnumber, “SourceID”, “DestID”
Synopsis: V4.1.x
perfAddEEMonitor [slotnumber/]portnumber, “SourceID”,
“DestID”
Availability
Admin
Release
V3.1.x and V4.1.x
Description
Use this command to add an end-to-end performance monitor to a port. The
monitor counts the number of words received, number of words transmitted and
number of CRC errors detected with frames qualified using either of following
two conditions:
■
For frames received at the port (with end-to-end monitor installed) the frame
SID is the same as “SourceID” and frame DID is the same as “DestID.” Both
RX_COUNT and CRC_COUNT will be updated accordingly and are
associated with frames received at port.
■
For frames transmitted from the port (with end-to-end monitor installed) the
frame DID is the same as “SourceID” and frame SID is the same as “DestID,”
TX_COUNT will be updated accordingly and are associated with frames
received at port.
Depending on the application, any port along the routing path can be selected for
such monitoring.
For example, to monitor traffic flowing from point A, receiving at port C and
transmitting at port D to reach point B, and the traffic flowing back from B to A.
You can install a monitor on port C, specify point A as “SourceID” and point B as
Fabric OS Version 3.1.x/4.1.x Reference Guide
475
Fabric OS Commands
“DestID.” Then RX_COUNT counts the traffic flow from A to B, CRC_COUNT
counts the frames with CRC error from A to B. TX_COUNT counts the traffic
from B to A.
Similarly, you can install a monitor on port D, specify point B as “SourceID” and
point A as “DestID.” Then RX_COUNT counts the traffic from B to A,
CRC_COUNT counts the frames with CRC errors from B to A and TX_COUNT
counts the traffic from A to B.
End-to-end monitors traffic on receiving port, respective to “SourceID,” only,
which implies in the above example, install a monitor on port D with point A as
“SourceID” and point B as “DestID” will not generate any counts.
After a successful execution of this command, a monitor number is displayed. The
monitor number is provided for easy manipulation of these performance monitors.
Note: This command requires an Advanced Performance Monitoring license.
Operands
This command has the following operands:
476
slotnumber
(V4.1.x only)
Specify the slot number for a StorageWorks Core switch.
For all other switches this operand is not required. The slot
number must be followed by a slash ( / ) and the port
number, so that each port is represented by both slot
number (1 through 4, or 7 through 10), and port number
(0 through 15).
The StorageWorks Core switch has a total of 1–10 slots.
Slot number 5 and 6 are control processor cards, and slot
1 through 4, and 7 through 10, are port cards. On each
port card, there are 16 ports counted from the bottom, 0 to
15.
portnumber
Specify a port number. Valid values for port number vary
depending on the switch type. This operand is required.
SourceID
Specify the 3-byte SID (Source ID) of the originator device.
It should be in “0xDDAAPP” format, where DD is Domain
ID, AA is Area ID and PP is AL_PA ID. For example,
0x058e0f, has a Domain ID of “5,” an Area ID of ”8e,”
and an AL_PA ID of “f.”
Fabric OS Version 3.1.x/4.1.x Reference Guide
perfAddEEMonitor
DestID
Specify the 3-byte DID (Destination ID) of the destination
device. It should be in “0xDDAAPP” format, where DD is
Domain ID, AA is Area ID and PP is AL_PA ID. For
example, 0x058e0f, has a Domain ID of “5,” an Area ID of
“8e,” and an AL_PA ID of “f.”
Example
To add an end-to-end monitor to blade 7 port 2:
switch:admin> perfAddEEMonitor 7/2, "0x058e0f", "0x1182ef"
End-to-End monitor number 0 added.
switch:admin>
See Also
perfAddIPMonitor
perfAddReadMonitor
perfAddRWMonitor
perfAddSCSIMonitor
perfAddUserMonitor
perfAddWriteMonitor
Fabric OS Version 3.1.x/4.1.x Reference Guide
477
Fabric OS Commands
perfAddIPMonitor
Add a filter-based monitor for IP frame count.
Synopsis: V3.1.x
perfAddIPMonitor portnumber[, “alias”]
Synopsis: V4.1.x
perfAddIPMonitor [slotnumber/]portnumber[, “alias”]
Availability
Admin
Release
V3.1.x and V4.1.x
Description
Use this command to define filter-based monitors to count the number of IP traffic
frames.
After a successful execution of this command, a monitor number is displayed. The
monitor number is provided for easy manipulation of these filter-based
performance monitors. The optional user defined alias is also displayed if one was
specified. All valid monitor numbers and user-defined aliases can be displayed
with the perfShowFilterMonitor command.
There is no need to define multiple IP frame monitors on a port.
Note: This command requires an Advanced Performance Monitoring license.
478
Fabric OS Version 3.1.x/4.1.x Reference Guide
perfAddIPMonitor
Operands
This command has the following operands:
slotnumber
(V4.1.x only)
Specify the slot number for a StorageWorks Core switch.
For all other switches this operand is not required. The slot
number must be followed by a slash ( / ) and the port
number, so that each port is represented by both slot
number (1 through 4, or 7 through 10), and port number
(0 through 15).
The StorageWorks Core switch has a total of 1–10 slots.
Slot number 5 and 6 are control processor cards, and slot
1 through 4, and 7 through 10, are port cards. On each
port card, there are 16 ports counted from the bottom, 0 to
15.
portnumber
Specify a port number. Valid values for port number vary
depending on the switch type. This operand is required.
alias
Specify a name for this monitor. This character string can
be a maximum of 10 characters long and must be enclosed
in quotation marks. This operand is optional. The default
alias is IP FRAME.
Example
To add an IP monitor to blade 2 port 4:
switch:admin> perfAddIPMonitor 2/4, “IP”
IP traffic frame monitor #0 added
switch:admin>
See Also
perfAddEEMonitor
perfAddReadMonitor
perfAddRWMonitor
perfAddSCSIMonitor
perfAddUserMonitor
perfAddWriteMonitor
Fabric OS Version 3.1.x/4.1.x Reference Guide
479
Fabric OS Commands
perfAddReadMonitor
Add a filter-based monitor for the SCSI Read command.
Synopsis: V3.1.x
perfAddReadMonitor portnumber[, “alias”]
Synopsis: V4.1.x
perfAddReadMonitor [slotnumber/]portnumber[, “alias”]
Availability
Admin
Release
V3.1.x and V4.1.x
Description
Use this command to define filter-based monitors to count the number of SCSI
FCP Read commands in Fibre Channel frames.
After a successful execution of this command, a monitor number is displayed. The
monitor number is provided for easy manipulation of these filter-based
performance monitors. The optional user defined alias is also displayed if one was
specified. All valid monitor numbers and user-defined aliases can be retrieved
with the perfShowFilterMonitor command.
The maximum number of filters is 8 per port including user-defined filters, read
filters, write filters, and read/write filters.
Note: This command requires an Advanced Performance Monitoring license.
480
Fabric OS Version 3.1.x/4.1.x Reference Guide
perfAddReadMonitor
Operands
This command has the following operands:
slotnumber
(V4.1.x only)
Specify the slot number for a StorageWorks Core switch.
For all other switches this operand is not required. The slot
number must be followed by a slash ( / ) and the port
number, so that each port is represented by both slot
number (1 through 4, or 7 through 10), and port number
(0 through 15).
The StorageWorks Core switch has a total of 1–10 slots.
Slot number 5 and 6 are control processor cards, and slot
1 through 4, and 7 through 10, are port cards. On each
port card, there are 16 ports counted from the bottom, 0 to
15.
portnumber
Specify a port number. Valid values for port number vary
depending on the switch type. This operand is required.
alias
Specify a name for this monitor. This character string can
be a maximum of 10 characters long and is truncated if
more characters are specified. This operand must be
enclosed in quotation marks. This operand is optional. The
default alias is SCSI READ.
Example
To add a SCSI Read monitor to blade 2 port 4:
switch:admin> perfAddReadMonitor 2/4, “SCSI_R”
SCSI Read filter monitor #2 added
switch:admin>
See Also
perfAddEEMonitor
perfAddIPMonitor
perfAddRWMonitor
perfAddSCSIMonitor
perfAddUserMonitor
perfAddWriteMonitor
Fabric OS Version 3.1.x/4.1.x Reference Guide
481
Fabric OS Commands
perfAddRWMonitor
Add a monitor for the SCSI Read and Write commands.
Synopsis: V3.1.x
perfAddRWMonitor portnumber[, “alias”]
Synopsis: V4.1.x
perfAddRWMonitor [slotnumber/]portnumber[, “alias”]
Availability
Admin
Release
V3.1.x and V4.1.x
Description
Use this command to define filter-based monitors to count the number of SCSI
FCP Read and Write commands in Fibre Channel frames.
After a successful execution of this command, a monitor number is displayed. The
monitor number is provided for easy manipulation of these filter-based
performance monitors. The optional user defined alias is also displayed if one was
specified. All valid monitor numbers and user-defined aliases can be retrieved
with the perfShowFilterMonitor command.
The maximum number of filters is 8 per port including user-defined filters, read
filters, write filters, and read/write filters.
Note: This command requires an Advanced Performance Monitoring license.
482
Fabric OS Version 3.1.x/4.1.x Reference Guide
perfAddRWMonitor
Operands
This command has the following operands:
slotnumber
(V4.1.x only)
Specify the slot number for a StorageWorks Core
switch. For all other switches this operand is not
required. The slot number must be followed by a slash
( / ) and the port number, so that each port is
represented by both slot number (1 through 4, or 7
through 10), and port number (0 through 15).
The StorageWorks Core switch has a total of 1–10
slots. Slot number 5 and 6 are control processor cards,
and slot 1 through 4, and 7 through 10, are port
cards. On each port card, there are 16 ports counted
from the bottom, 0 to 15.
portnumber
Specify a port number. Valid values for port number
vary depending on the switch type. This operand is
required.
alias
Specify a name for this monitor. This character string
can be a maximum of 10 characters long and is
truncated if more characters are specified. This
operand must be enclosed in quotation marks. This
operand is optional. The default alias is SCSI R/W.
Example
To add a SCSI Read and Write monitor to blade 2 port 4:
switch:admin> perfAddRWMonitor 2/4, “SCSI_RW”
SCSI Read/Write monitor #1 is added
switch:admin>
See Also
perfAddEEMonitor
perfAddIPMonitor
perfAddReadMonitor
perfAddSCSIMonitor
perfAddUserMonitor
perfAddWriteMonitor
Fabric OS Version 3.1.x/4.1.x Reference Guide
483
Fabric OS Commands
perfAddSCSIMonitor
Add a monitor for SCSI frame count.
Synopsis: V3.1.x
perfAddSCSIMonitor portnumber[, “alias”]
Synopsis: V4.1.x
perfAddSCSIMonitor [slotnumber/]portnumber[, “alias”]
Availability
Admin
Release
V3.1.x and V4.1.x
Description
Use this command to define filter-based monitors to count the number of SCSI
traffic frames.
After a successful execution of this command, a monitor number is displayed. The
monitor number is provided for easy manipulation of these filter-based
performance monitors. The optional user defined alias is also displayed if one was
specified. All valid monitor numbers and user-defined aliases can be retrieved
with the perfShowFilterMonitor command.
There is no need to define multiple SCSI frame counters on a port.
Note: This command requires an Advanced Performance Monitoring license.
484
Fabric OS Version 3.1.x/4.1.x Reference Guide
perfAddSCSIMonitor
Operands
This command has the following operands:
slotnumber
(V4.1.x only)
Specify the slot number for a StorageWorks Core
switch. For all other switches this operand is not
required. The slot number must be followed by a slash
( / ) and the port number, so that each port is
represented by both slot number (1 through 4, or 7
through 10), and port number (0 through 15).
The StorageWorks Core switch has a total of 1–10
slots. Slot number 5 and 6 are control processor cards,
and slot 1 through 4, and 7 through 10, are port
cards. On each port card, there are 16 ports counted
from the bottom, 0 to 15.
portnumber
Specify a port number. Valid values for port number
vary depending on the switch type. This operand is
required.
alias
Specify a name for this monitor. This character string
can be a maximum of 10 characters long and is
truncated if more characters are specified. This
operand must be enclosed in quotation marks. This
operand is optional. The default alias is SCSI FRAME.
Example
To add a SCSI traffic frame monitor to blade 2 port 4:
switch:admin> perfAddSCSIMonitor 2/4, “SCSI_FR”
SCSI traffic frame monitor #0 added
switch:admin>
See Also
perfAddEEMonitor
perfAddIPMonitor
perfAddReadMonitor
perfAddRWMonitor
perfAddUserMonitor
perfAddWriteMonitor
Fabric OS Version 3.1.x/4.1.x Reference Guide
485
Fabric OS Commands
perfAddUserMonitor
Add a user-defined filter-based monitor.
Synopsis: V3.1.x
perfAddUserMonitor portnumber, “grouplist”[,”alias”]
Synopsis: V4.1.x
perfAddUserMonitor [slotnumber/]portnumber,
“grouplist”[,”alias”]
Availability
Admin
Release
V3.1.x and V4.1.x
Description
Use this command to define a special mechanism to qualify frames for statistics
gathering to fit your own special need.
Each group of elements with same offset will have their comparison result
(OR-ed) together before the combined result of each group get (AND-ed) together
for final comparison result. If the final result is logic 1, then the monitor counter
will be increased by one.
After a successful execution of this command, a monitor number is displayed. The
monitor number is provided for easy manipulation of these filter-based
performance monitors. The optional user-defined alias is also displayed if one was
specified. All valid monitor numbers and user-defined aliases can be retrieved
with the perfShowFilterMonitor command.
The maximum number of filters is 8 per port including user defined filters, read
filters, write filters, and read/write filters. In addition there should be no more than
6 different Offsets for each filter and no more than 4 different values per Offset
defined by user.
486
Fabric OS Version 3.1.x/4.1.x Reference Guide
perfAddUserMonitor
Note: This command requires an Advanced Performance Monitoring license.
Operands
This command has the following operands:
slotnumber
(V4.1.x only)
Specify the slot number for a StorageWorks Core
switch. For all other switches this operand is not
required. The slot number must be followed by a slash
( / ) and the port number, so that each port is
represented by both slot number (1 through 4, or 7
through 10), and port number (0 through 15).
The StorageWorks Core switch has a total of 1–10
slots. Slot number 5 and 6 are control processor cards,
and slot 1 through 4, and 7 through 10, are port
cards. On each port card, there are 16 ports counted
from the bottom, 0 to 15.
portnumber
Specify a port number. Valid values for port number
vary depending on the switch type. This operand is
required.
Fabric OS Version 3.1.x/4.1.x Reference Guide
487
Fabric OS Commands
488
grouplist
Specify up to 6 sets of Offset, Mask, and ValueList
separated by a semicolon (;). The entire grouplist
operand must be enclosed in quotation marks. This
operand is required.
The grouplist operand must be specified in the
following format:
“offset, Mask, ValueList; offset, Mask, ValueList”
For example:
“4, 0xff, 0x22; 12, 0xff, 0x01”
The grouplist component values are as follows:
■ Offset - Specify the offset within the frame. Offset 0
is the first byte of the SOF, and offset 4 is the first
byte of the frame header. The Offset must be in
decimal format. Valid values for Offset are 0,
[4-63]. Offset 0 is a special case which can be
used to monitor the first 4 bytes of SOFx frames.
EOF can not be monitored.
■ Mask - Specify the mask value to be applied
(ANDed) to frame contents.
■ ValueList - Specify up to four values that need to be
captured from frame contents. The ValueList can be
either hexadecimal or decimal format.
■ SOFx frames are considered a special case. The
Offset is specified as 0x0 and valueList is specified
with:
0 - SOFf
1 - SOFc1
2 - SOFi1
3 - SOFn1
4 - SOFi2
5 - SOFn2
6 - SOFi3
7 - SOFn3
alias
Specify a name for this monitor. This character string
can be a maximum of 10 characters long and is
truncated if more characters are specified. This
operand must be enclosed in quotation marks. This
operand is optional.
Fabric OS Version 3.1.x/4.1.x Reference Guide
perfAddUserMonitor
Example
To add a filter based monitor for all Extended Link Service request (R_CTL=0x22
and TYPE=0x01) to blade 2 port 4:
switch:admin> perfAddUserMonitor 2/4, “4, 0xff, 0x22; 12, 0xff, 0x01”
User monitor #0 added
switch:admin>
As a special case, to add a filter based monitor for SOFi3 on blade 2 port 4:
switch:admin> perfAddUserMonitor 2/4, “0, 0xff, 6”
User monitor #1 added
switch:admin>
See Also
perfAddEEMonitor
perfAddIPMonitor
perfAddReadMonitor
perfAddRWMonitor
perfAddSCSIMonitor
perfAddWriteMonitor
Fabric OS Version 3.1.x/4.1.x Reference Guide
489
Fabric OS Commands
perfAddWriteMonitor
Add a filter-based monitor for the SCSI Write command.
Synopsis: V3.1.x
perfAddWriteMonitor portnumber[, “alias”]
Synopsis: V4.1.x
perfAddWriteMonitor [slotnumber/]portnumber[, “alias”]
Availability
Admin
Release
V3.1.x and V4.1.x
Description
Use this command to define filter-based monitors to count the number of SCSI
FCP Write commands in Fibre Channel frames.
After a successful execution of this command, a monitor number is displayed. The
monitor number is provided for easy manipulation of these filter-based
performance monitors. The optional user-defined alias is also displayed if one was
specified. All valid monitor numbers and user-defined aliases can be retrieved
with the perfShowFilterMonitor command.
The maximum number of filters is 8 per port including user-defined filters, read
filters, write filters and read/write filters.
Note: This command requires an Advanced Performance Monitoring license.
490
Fabric OS Version 3.1.x/4.1.x Reference Guide
perfAddWriteMonitor
Operands
This command has the following operands:
slotnumber
(V4.1.x only)
Specify the slot number for a StorageWorks Core switch.
For all other switches this operand is not required. The slot
number must be followed by a slash ( / ) and the port
number, so that each port is represented by both slot
number (1 through 4, or 7 through 10), and port number
(0 through 15).
The StorageWorks Core switch has a total of 1–10 slots.
Slot number 5 and 6 are control processor cards, and slot
1 through 4, and 7 through 10, are port cards. On each
port card, there are 16 ports counted from the bottom, 0 to
15.
portnumber
Specify a port number. Valid values for port number vary
depending on the switch type. This operand is required.
alias
Specify a name for this monitor. This character string can
be a maximum of 10 characters long and is truncated if
more characters are specified. This operand must be
enclosed in quotation marks. This operand is optional. The
default alias is SCSI_Write.
Example
To add a SCSI Write command monitor to blade 2 port 4:
switch:admin> perfAddWriteMonitor 2/4, “SCSI_W”
SCSI Write filter monitor #0 added
switch:admin>
See Also
perfAddEEMonitor
perfAddIPMonitor
perfAddReadMonitor
perfAddRWMonitor
perfAddSCSIMonitor
perfAddUserMonitor
Fabric OS Version 3.1.x/4.1.x Reference Guide
491
Fabric OS Commands
perfCfgClear
Clear the previously saved performance monitoring configuration settings from
non-volatile memory.
Synopsis
perfCfgClear
Availability
Admin
Release
V3.1.x and V4.1.x
Description
Use this command to clear the previously saved end-to-end and filter
configuration settings of performance monitoring from non-volatile memory.
Note: This command requires an Advanced Performance Monitoring license.
Operands
None.
Example
To clear the performance monitoring information from non-volatile memory:
switch:admin> perfcfgClear
This will clear Performance Monitoring settings in FLASH ROM.
The RAM settings won’t change. Do you want to continue? [y|n]y
Please wait ...
Committing configuration...done.
Performance Monitoring configuration cleared from FLASH.
switch:admin>
492
Fabric OS Version 3.1.x/4.1.x Reference Guide
perfCfgClear
See Also
perfCfgRestore
perfCfgSave
Fabric OS Version 3.1.x/4.1.x Reference Guide
493
Fabric OS Commands
perfCfgRestore
Restore performance monitoring configuration settings from non-volatile
memory.
Synopsis
perfCfgRestore
Availability
Admin
Release
V3.1.x and V4.1.x
Description
Use this command to restore the performance monitoring configuration
information from non-volatile memory.
Note: This command requires an Advanced Performance Monitoring license.
Operands
None.
Example
To restore the performance monitoring configuration information from
non-volatile memory:
switch:admin> perfCfgRestore
This will overwrite current Performance Monitoring settings in RAM. Do you
want to continue? [y|n]y
Please wait ...
Performance monitoring configuration restored from FLASH ROM.
switch:admin>
494
Fabric OS Version 3.1.x/4.1.x Reference Guide
perfCfgRestore
See Also
perfCfgClear
perfCfgSave
Fabric OS Version 3.1.x/4.1.x Reference Guide
495
Fabric OS Commands
perfCfgSave
Save performance monitoring configuration settings to non-volatile memory.
Synopsis
perfCfgSave
Availability
Admin
Release
V3.1.x and V4.1.x
Description
Use this command to save the current end-to-end and filter configuration settings
of performance monitoring into non-volatile memory. This enables the
performance monitoring configuration to be saved over power off cycles.
Note: This command requires an Advanced Performance Monitoring license.
Operands
None.
Example
To save the current performance monitoring configuration to firmware:
switch:admin> perfCfgSave
This will overwrite previously saved Performance Monitoring settings in FLASH
ROM. Do you want to continue? [y|n]y
Please wait ...
Committing configuration...done.
Performance monitoring configuration saved in FLASH ROM.
switch:admin>
496
Fabric OS Version 3.1.x/4.1.x Reference Guide
perfCfgSave
See Also
perfCfgClear
perfCfgRestore
Fabric OS Version 3.1.x/4.1.x Reference Guide
497
Fabric OS Commands
perfcleareemonitor
Clears statistics counters of an end-to-end monitor on a port.
Synopsis: V3.1.x
perfcleareemonitor portnumber[, monitorId]
Synopsis: V4.1.x
perfcleareemonitor [slotnumber/]portnumber[,
monitorId]
Availability
Admin
Release
V3.1.x and V4.1.x
Description
Use this command to clear statistics counters for all or a specified End-to-End
monitor on a port.
After a successful execution of this command, the telnet shell will confirm that
this monitor's counters have successfully been cleared. Prior to issuing this
command, verify all the valid End-to-End monitor numbers on a specific port
using the perfshoweemonitor command to make sure that the right
monitor's counters will be cleared.
Note: This command requires an Advanced Performance Monitoring license.
498
Fabric OS Version 3.1.x/4.1.x Reference Guide
perfcleareemonitor
Operands
This command has the following operands:
slotnumber
(V4.1.x only)
Specify the slot number for a StorageWorks Core switch.
For all other switches this operand is not required. The slot
number must be followed by a slash ( / ) and the port
number, so that each port is represented by both slot
number (1 through 4, or 7 through 10), and port number
(0 through 15).
The StorageWorks Core switch has a total of 1–10 slots.
Slot number 5 and 6 are control processor cards, and slot
1 through 4, and 7 through 10, are port cards. On each
port card, there are 16 ports counted from the bottom, 0 to
15.
portnumber
Specify a port number. Valid values for port number vary
depending on the switch type. This operand is required.
monitorId
Specify the monitor number you want to clear. Monitor
numbers are defined when you create the monitor on a
port. This operand is optional. If not specified, all
monitors's counters on the port will be cleared.
Example
To clear statistics counters for an End-to-End monitor:
switch:admin> perfcleareemonitor 2, 5
End-to-End monitor number 5 counters are cleared
switch:admin>
switch:admin> perfcleareemonitor 2
This will clear ALL EE monitors' counters on port 2, continue? (yes, y, no,
n): [no] y
switch:admin>
See Also
perfshoweemonitor
perfaddeemonitor
Fabric OS Version 3.1.x/4.1.x Reference Guide
499
Fabric OS Commands
perfclearfiltermonitor
Clears statistics counters of a filter-based monitor.
Synopsis: V3.1.x
perfclearfiltermonitor portnumber [, monitorId]
Synopsis: V4.1.x
perfclearfiltermonitor [slotnumber/]portnumber [,
monitorId]
Availability
Admin
Release
V3.1.x and V4.1.x
Description
Use this command to clear statistics counters for all or a specified filter-based
monitor.
After a successful execution of this command, the telnet shell will confirm that
this monitor's counters have successfully been cleared. Prior to issuing this
command, verify all the valid monitor numbers user-defined aliases on a specific
port using the pershowfiltermonitor command to make sure that the
right monitor's counters will be cleared.
Note: This command requires an Advanced Performance Monitoring license.
500
Fabric OS Version 3.1.x/4.1.x Reference Guide
perfclearfiltermonitor
Operands
This command has the following operands:
slotnumber
(V4.1.x only)
Specify the slot number for a StorageWorks Core switch.
For all other switches this operand is not required. The slot
number must be followed by a slash ( / ) and the port
number, so that each port is represented by both slot
number (1 through 4, or 7 through 10), and port number
(0 through 15).
The StorageWorks Core switch has a total of 1–10 slots.
Slot number 5 and 6 are control processor cards, and slot
1 through 4, and 7 through 10, are port cards. On each
port card, there are 16 ports counted from the bottom, 0 to
15.
portnumber
Specify a port number. Valid values for port number vary
depending on the switch type. This operand is required.
monitorId
Specify the monitor number you want to clear. Monitor
numbers are defined when you create the monitor on a
port. This operand is optional. If not specified, all
monitors's counters on the port will be cleared.
Example
To clear statistics counters for a filter-based monitor 4 on port 2:
switch:admin> perfclearfiltermonitor 1/2, 4
Filter-based monitor number 4 counters are cleared
switch:admin>
switch:admin> perfclearfiltermonitor 1/2
This will clear ALL filter-based monitors' counters on port 2, continue?
(yes, y, no, n): [no] y
switch:admin>
See Also
perfshowfiltermonitor
perfaddusermonitor
Fabric OS Version 3.1.x/4.1.x Reference Guide
501
Fabric OS Commands
perfClrAlpaCrc
Clear an AL_PA device’s CRC count by the port and AL_PA.
Synopsis: V3.1.x
perfClrAlpaCrc portnumber[, ALPA]
Synopsis: V4.1.x
perfClrAlpaCrc [slotnumber/]portnumber[, ALPA]
Availability
Admin
Release
V3.1.x and V4.1.x
Description
Use this command to clear a specific AL_PA device's CRC error counter. If the
AL_PA is provided as an operand only the counters for that device are reset; if no
AL_PA is specified this command clears the CRC counters for all AL_PA devices
on the specified port.
Note: This command requires an Advanced Performance Monitoring license.
502
Fabric OS Version 3.1.x/4.1.x Reference Guide
perfClrAlpaCrc
Operands
This command has the following operands:
slotnumber
(V4.1.x only)
Specify the slot number for a StorageWorks Core
switch. For all other switches this operand is not
required. The slot number must be followed by a slash
( / ) and the port number, so that each port is
represented by both slot number (1 through 4, or 7
through 10), and port number (0 through 15).
The StorageWorks Core switch has a total of 1–10
slots. Slot number 5 and 6 are control processor cards,
and slot 1 through 4, and 7 through 10, are port
cards. On each port card, there are 16 ports counted
from the bottom, 0 to 15.
portnumber
Specify a port number. Valid values for port number
vary depending on the switch type. This operand is
required.
ALPA
Specify the AL_PA address if you want to clear the CRC
error counter for a particular device. This operand is
optional.
Example
To clear CRC count on a particular AL_PA on blade 2 port 15, and then clear CRC
count for all AL_PAs on blade 2 port 15:
switch:admin> perfClrAlpaCrc 2/15, 0x59
CRC error count at ALPA 0x59 on port 15 is cleared.
switch:admin>
switch:admin> perfClrAlpaCrc 2/15
This will clear all ALPA CRC Counts on port 15
Do you want to continue? [y|n]y
Please wait ...
All alpa CRC counts are cleared on port 15.
switch:admin>
See Also
perfShowAlpaCrc
Fabric OS Version 3.1.x/4.1.x Reference Guide
503
Fabric OS Commands
perfDelEEMonitor
Delete an end-to-end monitor on port.
Synopsis: V3.1.x
perfDelEEMonitor portnumber[, monitorId]
Synopsis: V4.1.x
perfDelEEMonitor [slotnumber/]portnumber[, monitorId]
Availability
Admin
Release
V3.1.x and V4.1.x
Description
Use this command to delete an End-to-End monitor on a port.
After a successful execution of this command, a message displays confirming that
this monitor has successfully been deleted. Prior to issuing this command, verify
all the valid end-to-end monitor numbers on a specific port using the
perfshowfiltermonitor command to make sure that the right monitor is
deleted.
Note: This command requires an Advanced Performance Monitoring license.
504
Fabric OS Version 3.1.x/4.1.x Reference Guide
perfDelEEMonitor
Operands
This command has the following operands:
slotnumber
(V4.1.x only)
Specify the slot number for a StorageWorks Core
switch. For all other switches this operand is not
required. The slot number must be followed by a slash
( / ) and the port number, so that each port is
represented by both slot number (1 through 4, or 7
through 10), and port number (0 through 15).
The StorageWorks Core switch has a total of 1–10
slots. Slot number 5 and 6 are control processor cards,
and slot 1 through 4, and 7 through 10, are port
cards. On each port card, there are 16 ports counted
from the bottom, 0 to 15.
portnumber
Specify a port number. Valid values for port number
vary depending on the switch type. This operand is
required.
monitorId
Specify the monitor number you want to delete.
Monitor numbers are defined when you create the
monitor on a port. This operand is optional. When not
specified, all monitors on the port are deleted.
Example
To delete an end-to-end monitor on blade 7 port 2:
switch:admin> perfDelEEMonitor 7/2, 5
End-to-End monitor number 5 deleted
switch:admin>
switch:admin> perfdeleemonitor 2
This will remove ALL EE monitors on port 2, continue? (yes, y, no, n): [no] y
switch:admin>
See Also
perfShowEEMonitor
perfAddEEMonitor
Fabric OS Version 3.1.x/4.1.x Reference Guide
505
Fabric OS Commands
perfDelFilterMonitor
Delete a filter-based monitor.
Synopsis: V3.1.x
perfDelFilterMonitor portnumber[, monitorId]
Synopsis: V4.1.x
perfDelFilterMonitor [slotnumber/]portnumber[,
monitorId]
Availability
Admin
Release
V3.1.x and V4.1.x
Description
Use this command to delete a filter-based monitor.
After a successful execution of this command, the telnet shell confirms that this
monitor has successfully been deleted. Prior to issuing this command, verify all
the valid monitor numbers and user-defined aliases on a specific port using the
perfShowFilterMonitor command to make sure that the right monitor
will be deleted.
Note: This command requires an Advanced Performance Monitoring license.
506
Fabric OS Version 3.1.x/4.1.x Reference Guide
perfDelFilterMonitor
Operands
This command has the following operands:
slotnumber
(V4.1.x only)
Specify the slot number for a StorageWorks Core
switch. For all other switches this operand is not
required. The slot number must be followed by a slash
( / ) and the port number, so that each port is
represented by both slot number (1 through 4, or 7
through 10), and port number (0 through 15).
The StorageWorks Core switch has a total of 1–10
slots. Slot number 5 and 6 are control processor cards,
and slot 1 through 4, and 7 through 10, are port
cards. On each port card, there are 16 ports counted
from the bottom, 0 to 15.
portnumber
Specify a port number. Valid values for port number
vary depending on the switch type. This operand is
required.
monitorId
Specify the monitor number you want to delete.
Monitor numbers are defined when you create the
monitor on a port. This operand is optional. If no
operand is specified, all monitors on the port are
deleted.
Example
To delete filter monitor 4 on blade 2 port 3:
switch:admin> perfDelFilterMonitor 2/3, 4
The specified filter-based monitor is deleted.
switch:admin>
switch:admin> perfdelfiltermonitor 3
This will remove ALL monitors on port 3, continue? (yes, y, no, n): [no] y
switch:admin>
See Also
perfShowFilterMonitor
perfAddUserMonitor
Fabric OS Version 3.1.x/4.1.x Reference Guide
507
Fabric OS Commands
perfHelp
Displays performance monitoring help information.
Synopsis
perfHelp
Availability
All users.
Release
V3.1.x and V4.1.x
Description
Use this command to display the available performance monitoring help
commands.
Note: This command requires an Advanced Performance Monitoring license.
Operands
None.
508
Fabric OS Version 3.1.x/4.1.x Reference Guide
perfHelp
Example
To display commands related to performance monitoring:
switch:admin> perfHelp
perfCfgSave
perfCfgRestore
perfCfgClear
perfClrAlpaCrc
perfShowAlpaCrc
perfAddEEMonitor
perfDelEEMonitor
perfClearEEMonitor
perfShowEEMonitor
perfSetPortEEMask
perfShowPortEEMask
perfAddUserMonitor
perfAddReadMonitor
perfAddWriteMonitor
perfAddRWMonitor
perfAddSCSIMonitor
perfAddIPMonitor
perfDelFilterMonitor
perfClearFilterMonitor
perfShowFilterMonitor
Save Performance configuration
Restore Performance configuration
Clear Performance settings from flash
Clear ALPA device's CRC count
Get ALPA CRC count by port and ALPA
Add end-to-end monitor to a port
Delete an end-to-end monitor on port
Clear an end-to-end monitor's counters on port
Show user-defined end-to-end monitors
Set overall mask for E-to-E monitors
Show the current end-to-end mask
Add filter-based monitor
Add filter-based monitor - SCSI Read
Add filter-based monitor - SCSI Write
Add monitor - SCSI Read and Write
Add monitor for SCSI frame count
Add monitor for IP traffic frame count
Delete filter-based monitor
Clear filter-based monitor's counters on port
Show filter-based monitors
NOTE: Don't run help command after firmwaredownload without reboot.
It will give you wrong information.
switch:admin>
See Also
None.
Fabric OS Version 3.1.x/4.1.x Reference Guide
509
Fabric OS Commands
perfSetPortEEMask
Set overall mask for end-to-end (EE) monitors.
Synopsis: V3.1.x
perfSetPortEEMask portnumber, “TxSIDMsk”,”TxDIDMsk”,
”RxSIDMsk”,”RxDIDMsk”
Synopsis: V4.1.x
perfSetPortEEMask [slotnumber/]portnumber, “TxSIDMsk”,
”TxDIDMsk”,”RxSIDMsk”,”RxDIDMsk”
Availability
Admin
Release
V3.1.x and V4.1.x
Description
Use this command to set the mask for the EE monitors of a port. This command
enables a user to selectively choose the kind of Fibre Channel frames in which the
number of words are to be counted.
EE monitors are defined by the perfAddEEMonitor command using SID
and DID pairs. This command can be used to match the entire SID or DID to
trigger the monitor to count Fibre Channel words. It can also be used to match one
or two of the three fields (Domain ID, Area ID and AL_PA ID) in SID and DID
pair to trigger the monitor.
The EE mask is used to set up a flag on each field to control whether the field is
used to trigger the monitor.
When a flag bit is set (ff), the corresponding field will be used to qualify the
triggering of the monitor. If a flag is reset (00), then that field is ignored and its
value will not be used to qualify monitor-triggering.
There is only one EE mask per port. The mask is applied to all eight EE monitors
available on a port. The default EE mask value upon power-on is all eight EE
monitors set. When you reset mask, the counters are also reset to 0.
510
Fabric OS Version 3.1.x/4.1.x Reference Guide
perfSetPortEEMask
Note: This command requires an Advanced Performance Monitoring license.
Operands
This command has the following operands:
slotnumber
(V4.1.x only)
Specify the slot number for a StorageWorks Core switch. For
all other switches this operand is not required. The slot
number must be followed by a slash ( / ) and the port
number, so that each port is represented by both slot number
(1 through 4, or 7 through 10), and port number (0 through
15).
The StorageWorks Core switch has a total of 1–10 slots. Slot
number 5 and 6 are control processor cards, and slot 1
through 4, and 7 through 10, are port cards. On each port
card, there are 16 ports counted from the bottom, 0 to 15.
portnumber
Specify a port number. Valid values for port number vary
depending on the switch type. This operand is required.
TxSIDMsk
Specify the source ID mask in “dd:aa:pp“ format, where “dd“
is Domain ID mask, “aa“ is Area ID mask and “pp“ is AL_PA
ID mask. For example, “00:ff:00“ uses TxSID Area ID to
trigger EE monitor comparison.
Specify the following values to turn on or off a specific field:
00 - Specifies that the field does not trigger EE monitors.
ff - This specifies that the field triggers EE monitors.
This operand must be enclosed in quotation marks. This
operand is required.
TxDIDMsk
Specify the destination ID mask in “dd:aa:pp“ format. This
operand must be enclosed in quotation marks. This operand
is required.
RxSIDMsk
Specify the source ID mask in “dd:aa:pp“ format. This
operand must be enclosed in quotation marks. This operand
is required.
RxDIDMsk
Specify the destination ID mask in “dd:aa:pp“ format. This
operand must be enclosed in quotation marks. This operand
is required.
Fabric OS Version 3.1.x/4.1.x Reference Guide
511
Fabric OS Commands
Example
To set the overall mask for end-to-end monitors on blade 2 port 4:
switch:admin> perfsetporteemask 2/4, "00:00:00", "ff:ff:ff", "00:00:ff",
"ff:00:00"
The EE mask on port 6 is set and EE counters are reset.
switch:admin>
See Also
perfAddEEMonitor
512
Fabric OS Version 3.1.x/4.1.x Reference Guide
perfShowAlpaCrc
perfShowAlpaCrc
Displays the AL_PA CRC count by port or by AL_PA.
Synopsis: V3.1.x
perfShowAlpaCrc portnumber[, ALPA]
Synopsis: V4.1.x
perfShowAlpaCrc [slotnumber/]portnumber[, ALPA]
Availability
All users.
Release
V3.1.x and V4.1.x
Description
Use this command to display a specific AL_PA device CRC error count by the
port or AL_PA. If the AL_PA operand is specified, only the CRC count for that
AL_PA device is displayed. If the AL_PA operand is not specified, the CRC
counts for all the AL_PA devices on a specified port are displayed. CRC count is a
64-bit counter. When the count is over 32 bits, the CRC count value is displayed in
hexadecimal. Otherwise, CRC count is displayed in decimal format.
Note: This command requires an Advanced Performance Monitoring license.
Fabric OS Version 3.1.x/4.1.x Reference Guide
513
Fabric OS Commands
Operands
This command has the following operands:
slotnumber
(V4.1.x only)
Specify the slot number for a StorageWorks Core switch.
For all other switches this operand is not required. The slot
number must be followed by a slash ( / ) and the port
number, so that each port is represented by both slot
number (1 through 4, or 7 through 10), and port number
(0 through 15).
The StorageWorks Core switch has a total of 1–10 slots.
Slot number 5 and 6 are control processor cards, and slot
1 through 4, and 7 through 10, are port cards. On each
port card, there are 16 ports counted from the bottom, 0 to
15.
portnumber
Specify a port number. Valid values for port number vary
depending on the switch type. This operand is required.
ALPA
Specify the AL_PA address if you want to get the CRC
errors for a particular device. This operand is optional.
Example
To display the CRC error count for all AL_PA devices on blade 2 port 4:
switch:admin> perfShowAlpaCrc 2/4
ALPA
CRC count
------------------0x01
0
switch:admin>
See Also
perfClrAlpaCrc
514
Fabric OS Version 3.1.x/4.1.x Reference Guide
perfShowEEMonitor
perfShowEEMonitor
Displays end-to-end monitor information and frame traffic on a port.
Synopsis: V3.1.x
perfShowEEMonitor portnumber[, interval]
Synopsis: V4.1.x
perfShowEEMonitor [slotnumber/]portnumber[, interval]
Availability
All users.
Release
V3.1.x and V4.1.x
Description
Use this command to display end-to-end monitor information and frame traffic on
a port. This command can display (if no interval operand is specified):
■
Key - the monitor number
■
SID - Sending ID
■
DID - Destination ID
■
Owner_app - TELNET or WEB_TOOLS
■
Owner_ip_addr - the IP address of the owner of the filter monitor
■
Tx_count - Number of FC words transmitted
■
Rx_count - Number of FC words received
■
Crc_count - Number of frames with CRC errors
If you do not specify a value for the interval operand this command displays
end-to-end monitor information and a cumulative count of the traffic detected by
the monitor. If you specify a value for the interval operand, this command
displays a snapshot of the traffic at the specified interval.
Fabric OS Version 3.1.x/4.1.x Reference Guide
515
Fabric OS Commands
Note: This command requires an Advanced Performance Monitoring license.
Operands
This command has the following operands:
516
slotnumber
(V4.1.x only)
Specify the slot number for a StorageWorks Core
switch. For all other switches this operand is not
required. The slot number must be followed by a slash
( / ) and the port number, so that each port is
represented by both slot number (1 through 4, or 7
through 10), and port number (0 through 15).
The StorageWorks Core switch has a total of 1–10
slots. Slot number 5 and 6 are control processor cards,
and slot 1 through 4, and 7 through 10, are port
cards. On each port card, there are 16 ports counted
from the bottom, 0 to 15.
portnumber
Specify a port number. Valid values for port number
vary depending on the switch type. This operand is
required.
interval
Specify an interval in seconds. This operand is
optional.
Fabric OS Version 3.1.x/4.1.x Reference Guide
perfShowEEMonitor
Example
To display end-to-end monitor frame traffic on blade 4 port 5 at an interval of
every 6 seconds:
switch:admin> perfShowEEMonitor 4/5, 6
perfShowEEMonitor 4 1: Tx/Rx are # of bytes and crc is # of
0
1
2
3
------------- ------------- ------------- ------------crc
Tx
Rx crc
Tx
Rx crc
Tx
Rx crc
Tx
Rx
============= ============= ============= =============
0
0
0
0
0
0
0
0
0
0
0
0
0
53m 4.9m
0
53m 4.9m
0
53m 4.9m
0
53m 4.9m
0
53m 4.4m
0
53m 4.4m
0
53m 4.4m
0
53m 4.4m
0
53m 4.8m
0
53m 4.8m
0
53m 4.8m
0
53m 4.8m
0
53m 4.6m
0
53m 4.6m
0
53m 4.6m
0
53m 4.6m
0
53m 5.0m
0
53m 5.0m
0
53m 5.0m
0
53m 5.0m
0
53m 4.8m
0
53m 4.8m
0
53m 4.8m
0
53m 4.8m
0
53m 4.5m
0
53m 4.5m
0
53m 4.5m
0
53m 4.5m
0
52m 4.5m
0
52m 4.5m
0
52m 4.5m
0
52m 4.5m
0
52m 5.0m
0
52m 5.0m
0
52m 5.0m
0
52m 5.0m
0
52m 4.5m
0
52m 4.5m
0
52m 4.5m
0
52m 4.5m
0
52m 4.6m
0
52m 4.6m
0
52m 4.6m
0
52m 4.6m
crc errors
4
------------crc
Tx
Rx
=============
0
0
0
0
53m 0
0
53m 0
0
53m 0
0
53m 0
0
53m 0
0
53m 0
0
53m 0
0
52m 0
0
52m 0
0
52m 0
0
52m 0
To display EE monitors on blade 4 port 5:
switch:admin> perfshoweemonitor 4/5
There are 7 end-to-end monitor(s) defined on port 5.
KEY
SID
DID
OWNER_APP
OWNER_IP_ADDR
TX_COUNT
RX_COUNT
CRC_COUNT
-----------------------------------------------------------------------------0
0x21300
0x21dda
TELNET
N/A
0x00000004d0ba9915
0x0000000067229e65 0x0000000000000000
1
0x21300
0x21ddc
TELNET
N/A
0x00000004d0baa754
0x0000000067229e65 0x0000000000000000
2
0x21300
0x21de0
TELNET
N/A
0x00000004d0bab3a5
0x0000000067229e87 0x0000000000000000
3
0x21300
0x21de1
TELNET
N/A
0x00000004d0bac1e4
0x0000000067229e87 0x0000000000000000
4
0x21300
0x21de2
TELNET
N/A
0x00000004d0bad086
0x0000000067229e87 0x0000000000000000
5
0x11000
0x21fd6
WEB_TOOLS
192.168.169.40 0x00000004d0bade54
0x0000000067229e87 0x0000000000000000
6
0x11000
0x21fe0
WEB_TOOLS
192.168.169.40 0x00000004d0baed41
0x0000000067229e98 0x0000000000000000
Note: If you do not specify an interval, the EE based monitor traffic count is displayed
in 64 bit format and is cumulative.
Fabric OS Version 3.1.x/4.1.x Reference Guide
517
Fabric OS Commands
See Also
perfAddEEMonitor
518
Fabric OS Version 3.1.x/4.1.x Reference Guide
perfShowFilterMonitor
perfShowFilterMonitor
Displays filter-based monitor information and frame traffic for a port.
Synopsis: V3.1.x
perfShowFilterMonitor portnumber[, interval]
Synopsis: V4.1.x
perfShowFilterMonitor [slotnumber/]portnumber[,
interval]
Availability
All users.
Release
V3.1.x and V4.1.x
Description
Use this command to display all the filter-based monitors defined on the specified
port and the traffic count values. This command can display (if no interval
operand is specified):
■
Key - the monitor number
■
Alias - the monitor alias name
■
Owner_app - Telnet or Web_Tools
■
Owner_ip_addr - the IP address of the owner of the filter monitor
■
Frame_count - cumulative 64 bit frame count
If you do not specify a value for the interval operand, this command displays
a cumulative count of the traffic detected by the monitor. If you specify a value for
the interval operand, this command displays a snapshot of the traffic at the
specified interval.
Note: This command requires an Advanced Performance Monitoring license.
Fabric OS Version 3.1.x/4.1.x Reference Guide
519
Fabric OS Commands
Operands
This command has the following operand:
slotnumber
(V4.1.x only)
Specify the slot number for a StorageWorks Core switch.
For all other switches this operand is not required. The slot
number must be followed by a slash ( / ) and the port
number, so that each port is represented by both slot
number (1 through 4, or 7 through 10), and port number
(0 through 15).
The StorageWorks Core switch has a total of 1–10 slots.
Slot number 5 and 6 are control processor cards, and slot 1
through 4, and 7 through 10, are port cards. On each port
card, there are 16 ports counted from the bottom, 0 to 15.
portnumber
Specify a port number. Valid values for port number vary
depending on the switch type. This operand is required.
interval
Specify an interval in seconds. This operand is optional.
Example
To display filter monitor traffic on blade 2 port 5 at an interval of every 6 seconds:
switch:admin> perfshowfiltermonitor 2/5, 6
perfShowFilterMonitor 2/5, 6
0
1
2
3
4
5
6
#Frames
#CMDs
#CMDs
#Frames #Frames
#CMDs
#CMDs
--------------------------------------------------------------0
0
0
0
0
0
0
26k
187
681
682
682
494
187
26k
177
711
710
710
534
176
26k
184
734
734
734
550
184
26k
182
649
649
649
467
182
26k
188
754
755
755
567
184
26k
183
716
716
717
534
183
26k
167
657
656
655
488
167
26k
179
749
749
749
570
179
26k
164
752
752
752
588
164
26k
190
700
700
700
510
190
26k
181
701
701
701
520
181
26k
200
750
750
751
550
201
26k
180
692
692
691
512
179
26k
179
696
696
696
517
179
26k
187
720
720
720
533
187
26k
200
722
722
722
522
200
26k
204
717
717
717
513
204
520
Fabric OS Version 3.1.x/4.1.x Reference Guide
perfShowFilterMonitor
To display filter monitor information on blade 2 port 5:
switch:admin> perfshowfiltermonitor 2/5
There are 7 filter-based monitors defined on port 5.
KEY
ALIAS
OWNER_APP
OWNER_IP_ADDR
FRAME_COUNT
----------------------------------------------------------------0 SCSI_Frame TELNET
N/A
0x00000000002c2229
1 SCSI_WR
TELNET
N/A
0x000000000000464a
2 SCSI_RW
TELNET
N/A
0x000000000000fd8c
3 SCSI_RW
WEB_TOOLS
192.168.169.40 0x0000000000007ba3
4 SCSI_RW
WEB_TOOLS
192.168.169.190 0x0000000000004f0e
5 SCSI_RD
WEB_TOOLS
192.168.169.40 0x0000000000002208
6 SCSI_WR
WEB_TOOLS
192.168.169.40 0x000000000000033a
switch:admin>
Note: If you do not specify an interval the filter based monitor frame count is displayed
in 64 bit format and is cumulative.
See Also
perfAddUserMonitor
Fabric OS Version 3.1.x/4.1.x Reference Guide
521
Fabric OS Commands
perfShowPortEEMask
Displays the current end-to-end mask of a port.
Synopsis: V3.1.x
perfShowPortEEMask portnumber
Synopsis: V4.1.x
perfShowPortEEMask [slotnumber/]portnumber
Availability
All users.
Release
V3.1.x and V4.1.x
Description
Use this command to display the current end-to-end mask of a port. There are only
two commands that can modify the value of the EE mask,
perfSetPortEEMask and perfCfgRestore.
The end-to-end mask has 12 fields:
TxSID
TxSID
TxSID
TxDID
TxDID
TxDID
RxSID
RxSID
RxSID
RxDID
RxDID
RxDID
Domain:
Area:
ALPA:
Domain:
Area:
ALPA:
Domain:
Area:
ALPA:
Domain:
Area:
ALPA:
on
on
on
on
on
on
on
on
on
on
on
on
The fields that are marked on are used to trigger end-to-end monitors. The default
value of the EE mask is all fields set on.
522
Fabric OS Version 3.1.x/4.1.x Reference Guide
perfShowPortEEMask
Note: This command requires an Advanced Performance Monitoring license.
Operands
This command has the following operand:
slotnumber
(V4.1.x only)
Specify the slot number for a StorageWorks Core
switch. For all other switches this operand is not
required. The slot number must be followed by a slash
( / ) and the port number, so that each port is
represented by both slot number (1 through 4, or 7
through 10), and port number (0 through 15).
The StorageWorks Core switch has a total of 1–10
slots. Slot number 5 and 6 are control processor cards,
and slot 1 through 4, and 7 through 10, are port
cards. On each port card, there are 16 ports counted
from the bottom, 0 to 15.
portnumber
Specify a port number. Valid values for port number
vary depending on the switch type. This operand is
required.
Example
To display the port end-to-end mask on blade 2 port 4:
switch:admin> perfShowPortEEMask 2/4
TxSID Domain: on
TxSID
TxSID
TxDID
TxDID
TxDID
RxSID
RxSID
RxSID
RxDID
RxDID
RxDID
Area:
ALPA:
Domain:
Area:
ALPA:
Domain:
Area:
ALPA:
Domain:
Area:
ALPA:
on
off
on
on
off
on
on
off
on
on
off
switch:admin>
Fabric OS Version 3.1.x/4.1.x Reference Guide
523
Fabric OS Commands
See Also
perfAddEEMonitor
perfDelEEMonitor
perfShowEEMonitor
perfSetPortEEMask
perfShowPortEEMask
524
Fabric OS Version 3.1.x/4.1.x Reference Guide
pkicreate
pkicreate
Create pki objects.
Synopsis
pkicreate
Availability
Admin
Release
V4.1.x
Description
Use this command in non-secure mode to create pki objects:
■
Switch private key and CSR
■
Private key passphrase
■
Install root certificate
This command does not create the switch certificate. The switch certificate should
be obtained offline from Certificate Authority.
In secure mode this command will exit with a warning and will not create pki
objects.
Operands
None.
Example
To create pki objects in non-secure mode:
switch:admin> pkicreate
Installing Private Key and Csr...
Switch key pair and CSR generated...
Installing Root Certificate...
switch:admin>
Fabric OS Version 3.1.x/4.1.x Reference Guide
525
Fabric OS Commands
If run in secure mode the following error message is displayed:
switch:admin> pkicreate
Warning !! Switch is in secure mode.
Can not create new Pki Objects. Exiting...
See Also
None.
526
Fabric OS Version 3.1.x/4.1.x Reference Guide
pkiremove
pkiremove
Remove existing pki objects.
Synopsis
pkiremove
Availability
Admin
Release
V4.1.x
Description
Use this command to remove of pki objects in non secure mode. It removes switch
private key, private key passphrase, CSR, root certificate and switch certificate.
In secure mode, it displays a message and does not remove pki objects.
Operands
None.
Example
To remove pki objects in non-secure mode:
switch:admin> pkiremove
WARNING!!!
Removing Pki objects will impair the security functionality of this fibre
channel switch. If you want secure mode enabled, you will need to get the
switch certificate again.
About to remove Pki objects.
ARE YOU SURE (yes, y, no, n): [no] y
All PKI objects removed.
switch:admin>
Fabric OS Version 3.1.x/4.1.x Reference Guide
527
Fabric OS Commands
If run in secure mode the following error message is displayed:
switch:admin> pkiremove
This Switch is in secure mode.
Removing Pki objects is not allowed. Exiting...
See Also
None.
528
Fabric OS Version 3.1.x/4.1.x Reference Guide
pkishow
pkishow
Displays existing pki objects.
Synopsis
pkishow
Availability
Admin
Release
V4.1.x
Description
Use this command to display existence of pki objects i.e. switch private key,
private key passphrase, CSR, root certificate and switch certificate.
Operands
None.
Example
To view pki objects:
switch:admin> pkishow
Passphrase
: Exist
Private Key
: Exist
CSR
: Exist
Certificate
: Empty
Root Certificate: Exist
switch:admin>
See Also
None.
Fabric OS Version 3.1.x/4.1.x Reference Guide
529
Fabric OS Commands
portcamshow
Displays port based filter CAM utilization.
Synopsis: V3.1.x
portcamshow [portnumber]
Synopsis: V4.1.x
portcamshow [slotnumber/][portnumber]
Availability
Admin
Release
V3.1.x and V4.1.x
Description
Use this command to display the current filter CAM utilization of all ports or one
port specified at input.
The following information is displayed:
530
SID used
Displays the total number of CAM entries used by this port. Please
note that each CAM entry (either SID or DID CAM) can be shared
among ports in the same quad.
DID used
Displays the total number of CAM entries used by this port. Please
note that each CAM entry (either SID or DID CAM) can be shared
among ports in the same quad.
SID entries
Displays all existing Source ID entries within the CAM per quad.
Please note that each CAM entry (either SID or DID CAM) can be
shared among ports in the same quad.
DID entries
Displays all existing Destination ID entries within the CAM per
quad. Please note that each CAM entry (either SID or DID CAM)
can be among ports in the same quad.
SID Free
Displays the total number of free SID CAM entries per quad.
DID Free
Displays the total number of free DID CAM entries per quad.
Fabric OS Version 3.1.x/4.1.x Reference Guide
portcamshow
Operands
This command has the following operand:
slotnumber
(V4.1.x only)
Specify the slot number for a StorageWorks Core switch.
For all other switches this operand is not required. The slot
number must be followed by a slash ( / ) and the port
number, so that each port is represented by both slot
number (1 through 4, or 7 through 10), and port number
(0 through 15).
The StorageWorks Core switch has a total of 1–10 slots.
Slot number 5 and 6 are control processor cards, and slot
1 through 4, and 7 through 10, are port cards. On each
port card, there are 16 ports counted from the bottom, 0 to
15.
portnumber
Specify a port number. Valid values for port number vary
depending on the switch type. This operand is required.
Example
To display the filter CAM utilization for all ports on a switch:
switch:admin> portcamshow
Port 0 to Port 15:
----------------------------Port
SID used DID used
0
0
0
1
0
0
2
0
0
3
0
0
4
0
0
5
0
0
6
0
0
7
0
0
8
0
0
9
0
0
10
0
0
11
0
0
12
0
0
13
0
0
14
0
0
15
0
0
----------------------------Quad ports (SID Free, DID Free)
0-3 (64, 512) 4-7 (64, 512) 8-11 (64, 512)
switch:admin>
Fabric OS Version 3.1.x/4.1.x Reference Guide
12-15 (64, 512)
531
Fabric OS Commands
To display the filter CAM utilization for a single port on a switch:
switch:admin> portcamshow 3
-------------------------------------------------Area SID used DID used SID entries DID entries
3
3
4
220100
2b23e8
220800
2b23e2
220c00
2b23e0
2b23e4
-------------------------------------------------Quad ports (SID Free, DID Free)
0-3 (61, 508)
switch:admin>
See Also
portzoneshow
switchshow
532
Fabric OS Version 3.1.x/4.1.x Reference Guide
portcfgdefault
portcfgdefault
Restore the port configuration to default values.
Synopsis: V3.1.x
portcfgdefault portnumber
Synopsis: V4.1.x
portcfgdefault [slotnumber/]portnumber
Availability
Admin
Release
V3.1.x and V4.1.x
Description
Use this command to reset any special configuration values on a port to their
factory defaults. You can view the current port configuration using the
portcfgshow command.
Operands
This command has the following operand:
slotnumber
(V4.1.x only)
Specify the slot number for a StorageWorks Core switch.
For all other switches this operand is not required. The slot
number must be followed by a slash ( / ) and the port
number, so that each port is represented by both slot
number (1 through 4, or 7 through 10), and port number
(0 through 15).
The StorageWorks Core switch has a total of 1–10 slots.
Slot number 5 and 6 are control processor cards, and slot
1 through 4, and 7 through 10, are port cards. On each
port card, there are 16 ports counted from the bottom, 0 to
15.
portnumber
Specify a port number. Valid values for port number vary
depending on the switch type. This operand is required.
Fabric OS Version 3.1.x/4.1.x Reference Guide
533
Fabric OS Commands
Example
The following example configures switch port 3 on blade 1 to factory defaults:
switch:admin> portcfgdefault 1/3
Committing configuration...done.
See Also
portcfgeport
portcfggport
portcfglongdistance
portcfgpersistentdisable
portcfgpersistentenable
portcfglport
portcfgspeed
portcfgshow
portcfgtrunkport
534
Fabric OS Version 3.1.x/4.1.x Reference Guide
portCfgEport
portCfgEport
Enable or disable a port from becoming an E_Port.
Synopsis: V3.1.x
portCfgEport portnumber, mode
Synopsis: V4.1.x
portCfgEport [slotnumber/]portnumber, mode
Availability
Admin
Release
V3.1.x and V4.1.x
Description
This command allows a user to enable or disable a port from becoming an E_Port.
The E_Port capability is enabled by default unless this command is used to disable
it.
When a port is configured as a non-E_Port through this command, an ISL
connected to this port will be segmented. No data traffic between two switches
will be routed through this port. Fabric management data, such as zoning
information, will not be exchanged through this port either.
The configuration is saved in the non-volatile memory and is persistent across
switch reboot or power cycle.
Fabric OS Version 3.1.x/4.1.x Reference Guide
535
Fabric OS Commands
Operands
This command has the following operands:
slotnumber
(V4.1.x only)
Specify the slot number for a StorageWorks Core switch.
For all other switches this operand is not required. The slot
number must be followed by a slash ( / ) and the port
number, so that each port is represented by both slot
number (1 through 4, or 7 through 10), and port number
(0 through 15).
The StorageWorks Core switch has a total of 1–10 slots.
Slot number 5 and 6 are control processor cards, and slot
1 through 4, and 7 through 10, are port cards. On each
port card, there are 16 ports counted from the bottom, 0 to
15.
portnumber
Specify a port number. Valid values for port number vary
depending on the switch type. This operand is required.
mode
Specify 1 to enable the port to become an E_Port. This is
the default port state. Specify 0 to disable the port from
becoming an E_Port. When the port_number operand is
present, this operand must also be present.
When no operands are specified, the command reports a list of ports that are
disabled from becoming E_Ports.
Example
To disable blade 2 port 3 from becoming an E_Port:
switch:admin> portCfgEport 2/3, 0
Committing configuration...done.
switch:admin> portCfgEport
Ports:
0
1
2
3
4
5
6
7
-------------------------------NO -
See Also
portShow
switchShow
536
Fabric OS Version 3.1.x/4.1.x Reference Guide
portCfgGport
portCfgGport
Designate a port as a locked G_Port.
Synopsis: V3.1.x
portCfgGport portnumber, mode
Synopsis: V4.1.x
portCfgGport [slotnumber/]portnumber, mode
Availability
Admin
Release
V3.1.x and V4.1.x
Description
This command enables a user to designate a port as a locked G_Port. Once this is
done, the switch attempts to initialize that port as an F_Port only, and does not
attempt loop initialization (FL_Port) on the port. However, if the device attached
to the port initiates loop communication, then the switch responds accordingly
and the port can then become an FL_Port. Similarly, a port designated as a G_Port
can become an E_Port.
Locking a port as a G_Port only changes the actions initiated by the switch; it does
not change how the switch responds to initialization requests.
The configuration is saved in the non-volatile memory and is persistent across
switch reboot or power cycle.
Fabric OS Version 3.1.x/4.1.x Reference Guide
537
Fabric OS Commands
Operands
This command has the following operands:
slotnumber
(V4.1.x only)
Specify the slot number for a StorageWorks Core
switch. For all other switches this operand is not
required. The slot number must be followed by a slash
( / ) and the port number, so that each port is
represented by both slot number (1 through 4, or 7
through 10), and port number (0 through 15).
The StorageWorks Core switch has a total of 1–10
slots. Slot number 5 and 6 are control processor cards,
and slot 1 through 4, and 7 through 10, are port
cards. On each port card, there are 16 ports counted
from the bottom, 0 to 15.
portnumber
Specify a port number. Valid values for port number
vary depending on the switch type. This operand is
required.
mode
Specify a value of 1 to designate the port as a G_Port
or specify a value of 0 to remove the G_Port
designation from the port. A value of 0 is the default
port state. This operand is required.
Example
The following example configures blade 2 port 3 as a locked G_Port:
switch:admin> portCfgGport 2/3, 1
done.
See Also
configure
portCfgShow
portShow
switchShow
538
Fabric OS Version 3.1.x/4.1.x Reference Guide
portcfgislmode
portcfgislmode
Enable or disable ISL R_RDY Mode on a port.
Synopsis: V3.1.x
portcfgislmode portnumber, [1 | 0]
Synopsis: V4.1.x
portcfgislmode [slotnumber/]portnumber, [1 | 0]
Availability
Admin
Release
V3.1.x and V4.1.x
Description
Use this command to enable or disable ISL R_RDY Mode on a port. If enabling
ISL R_RDY Mode on a port make sure the PID format is consistent across the
entire fabric. Refer to the configure command for more information on the
Core PID format.
Use the portcfgshow command to view the enabled modes on a port.
Operands
This command has the following operands:
slotnumber
(V4.1.x only)
Fabric OS Version 3.1.x/4.1.x Reference Guide
Specify the slot number for a StorageWorks Core
switch. For all other switches this operand is not
required. The slot number must be followed by a slash
( / ) and the port number, so that each port is
represented by both slot number (1 through 4, or 7
through 10), and port number (0 through 15).
The StorageWorks Core switch has a total of 1–10
slots. Slot number 5 and 6 are control processor cards,
and slot 1 through 4, and 7 through 10, are port
cards. On each port card, there are 16 ports counted
from the bottom, 0 to 15.
539
Fabric OS Commands
portnumber
Specify a port number. Valid values for port number
vary depending on the switch type. This operand is
required.
[1 | 2]
Specify 1 to enable ISL R_RDY mode. Specify 0 to
disable ISL R_RDY mode. This operand is required.
Example
To enable ISL R_RDY mode on switch port 3:
switch:admin> portcfgislmode 3, 1
Committing configuration...done.
ISL R_RDY Mode is enabled for port 3. Please make sure the PID
formats are consistent across the entire fabric.
switch:admin>
To disable ISL R_RDY mode on switch port 3:
switch:admin> portcfgislmode 3, 0
Committing configuration...done.
switch:admin>
See Also
portCfgShow
540
Fabric OS Version 3.1.x/4.1.x Reference Guide
portCfgLongDistance
portCfgLongDistance
Configure a port to support long distance links.
Synopsis: V3.1.x
portCfgLongDistance portnumber[, "distance"]
Synopsis: V4.1.x
portcfglongdistance [slotnumber/]portnumber
[distance_level][vc_translation_link_init]
Availability
Admin
Release
V3.1.x and V4.1.x
Description V3.1.x
Use this command to specify the allocation of enough full size frame buffers on a
particular port to support a long distance link of up to 100 km. The port is used as
an E_Port. The configuration is saved in the non-volatile memory and is persistent
across switch reboot or power cycle.
When this command is invoked without the optional operand, you are prompted to
enter the long distance level number. The level value must be one of the following:
■
L0: Deconfigure the port to be a regular switch port. This option supports up
to 10-km links for 1 Gbps, or 5-km links for 2 Gbps.
■
LE: Level E mode is for E_Ports for distances beyond 5 km and up to 10 km,
especially for 2 Gbps link speeds. LE does not require extended fabric license.
■
L1: Level one long distance, up to 50 km.
■
L2: Level two long distance, up to 100 km.
When a port is configured to be a long distance port, the output of portShow
and switchShow displays the long distance level. In the portShow output,
the long distance level is indicated as “medium” for level 1 long distance, and
Fabric OS Version 3.1.x/4.1.x Reference Guide
541
Fabric OS Commands
“long” for level 2 long distance. In the switchShow output, the format is Lx,
where x is the long distance level number, except for level 0, which is not
displayed in switchShow.
The vc_translation_link_init operand only applies to long distance
setup, it does not affect normal link. It is added to ensure the long distance link
initialization sequence. It is not required for long distance, but may be useful
when initiating L1 and L2 links.
Note: The Extended Fabrics license key is required to use the full functionality of this
command. Refer to the HP StorageWorks Extended Fabric Version 3.1.x/4.1.x User
Guide for more information.
Description V4.1.x
Use this command to allocate enough full size frame buffers on a particular port to
support a long distance link up to 100km. The port can only be used as an E_Port.
The configuration is saved in the non-volatile memory and is persistent across
switch reboot or power cycle.
The value of distance_level can be one of the following (the numerical
value representing each distance_level is shown in parentheses):
542
■
L0 (0): Re-configure the port to be a regular switch port. The number of
buffers reserved for the port supports up to 10km links.
■
L0.5: Level 0.5 (switchshow and portcfgshow show two letter code
as LM) long distance, up to 25km. A total of 15 or 30 full size frame buffers
will be reserved for the port at speeds of 1 Gbit/sec and 2 Gbit/sec
respectively.
■
L1 (1): Level one long distance, up to 50km. A total of 24 or 50 full size frame
buffers will be reserved for the port at speeds of 1 Gbit/sec and 2 Gbit/sec
respectively.
■
L2 (2): Level two long distance, up to 100km. A total of 58 or 63 full size
frame buffers will be reserved for the port at speeds of 1 Gbit/sec and 2
Gbit/sec respectively.
■
LE (3): Level E mode is for E ports for distances beyond 5km and up to 10km
especially for 2G link speeds. A total of 7 or 13 full size frame buffers will be
reserved for the port at speeds of 1 Gbit/sec and 2 Gbit/sec respectively. LE
does not require extended fabric license.
Fabric OS Version 3.1.x/4.1.x Reference Guide
portCfgLongDistance
■
LD: Dynamic long distance configuration. The buffer credits for the given
E-port are automatically configured based on the actual link distance. Up to a
total of 63 full size frame buffers will be reserved depending upon the
distance measured during E-port initialization.
The option “VC Translation Link Init” is used to enable the long distance link
initialization sequence. By default this option is set to 0 (disabled).
An input of Ctrl-D cancels the configuration update.
When a port is configured to be a long distance port, the output of portshow
and switchshow will print the long distance level. In the portshow output,
the long distance level is indicated as follows,
■
L0 - normal
■
LE - standard <= 10km
■
L0.5(LM) - medium long <= 25km
■
L1 - long <= 50km
■
L2 - super long <= 100km
■
LD - auto
In the switchshow output, the long distance mode is displayed as “Lx,” where
x is the second letter in two letter distance level code described above.
Note: Trunking is not supported with LE, L1, and L2 portcfglongdistance
modes. Trunking is supported for normal E_Ports (referred to as L0 in
portcfglongdistance command) with LWL media up to 5km at the full speed
permitted by the link. With LWL media, the throughput begins to fall off beyond 5km,
due to normal latency effects.
Refer to the HP StorageWorks Extended Fabric Version 3.1.x/4.1.x User Guide for
more information.
Fabric OS Version 3.1.x/4.1.x Reference Guide
543
Fabric OS Commands
Operands
This command has the following operands:
544
slotnumber
(V4.1.x only)
Specify the slot number for a StorageWorks
Core switch. For all other switches this
operand is not required. The slot number must
be followed by a slash ( / ) and the port
number, so that each port is represented by
both slot number (1 through 4, or 7 through
10), and port number (0 through 15).
The StorageWorks Core switch has a total of
1–10 slots. Slot number 5 and 6 are control
processor cards, and slot 1 through 4, and 7
through 10, are port cards. On each port
card, there are 16 ports counted from the
bottom, 0 to 15.
portnumber
Specify a port number. Valid values for port
number vary depending on the switch type.
This operand is required.
distance
(V3.1.x only)
This operand indicates the distance to the
connected port. This operand is required. The
valid values for this operand are:
■ L0: Deconfigure the port to be a regular
switch port. This option supports up to
10-km links for 1 Gbps, or 5-km links for
2 Gbps.
■ LE: Level E mode is for E_Ports for
distances beyond 5 km and up to 10 km
especially for 2 Gbps link speeds. LE
does not require extended fabric license.
■ L1: Level one long distance, up to 50 km.
■ L2: Level two long distance, up to 100
km.
Fabric OS Version 3.1.x/4.1.x Reference Guide
portCfgLongDistance
distance_level
(V4.1.x only)
This operand indicates the distance to the
connected port. This operand is required. The
valid values for this operand are:
L0: Re-configure the port to be a regular
switch port. The number of buffers reserved
for the port supports up to 10km links.
LE: Level E mode is for E ports for distances
beyond 5km and up to 10km especially for
2G link speeds.
L0.5 (LM): Level 0.5 long distance, up to
25km.
L1: Level one long distance, up to 50km. A
total of 26 full size frame buffers will be
reserved for the port.
L2: Level two long distance, up to 100km. A
total of 60 full size frame buffers will be
reserved for the port.
LD: Automatic long distance configuration.
VC_Translation_Link_Init
(V4.1.x only)
Specify 1 to activate long distance link
initialization sequence. Specify 0 to
deactivate this mode. The default value is 0
(disabled). This operand is optional.
Limitations
Since the total number of frame buffers is limited in quad, when one of the ports in
the quad is configured as a long distance port, all remaining ports must be level
zero ports only (i.e., none of the remaining ports in the quad can be a long distance
port). Further more, if one port is configured as a level 2 long distance port, none
of the remaining ports in the quad can be used as an E_Port.
A quad is defined as a group of four adjacent ports that share a common pool of
frame buffers. Port 0-3 belong to a quad, so do port 4-7, etc.
Refer to the HP StorageWorks Extended Fabric Version 3.1.x/4.1.x User Guide for
more information on limitations in port configurations.
Example
The following example is for a 50 km link on a port in a V3.1.x switch:
switch:admin> portCfgLongDistance 3, “L1”
done.
Fabric OS Version 3.1.x/4.1.x Reference Guide
545
Fabric OS Commands
The following example configures the switch port 4/15 to support a 100km link
and be initialized using long distance link initialization protocol. with V4.1.x:
switch:admin> portcfglongdistance
portCfgLongDistance 4/15
2/3, L2 1
done.
switch:admin> portshow 4/15
portCFlags: 0x1
portFlags: 0x20001
PRESENT LED
portType: 1.1
portState: 2
Offline
portPhys: 4
No_Light
portScn:
0
portId:
013f00
portWwn:
20:3f:00:60:69:00:02:48
Distance: super long <= 100km
portSpeed: 2Gbps
Interrupts:
Unknown:
Lli:
Proc_rqrd:
Timed_out:
Rx_flushed:
Tx_unavail:
Free_buffer:
Overrun:
Suspended:
Parity_err:
2_parity_err:
CMI_bus_err:
9
0
9
0
0
0
0
0
0
0
0
0
0
Link_failure:
Loss_of_sync:
Loss_of_sig:
Protocol_err:
Invalid_word:
Invalid_crc:
Delim_err:
Address_err:
Lr_in:
Lr_out:
Ols_in:
Ols_out:
0
0
9
0
0
0
0
0
0
0
0
0
Frjt:
Fbsy:
0
0
See Also
configure
portShow
switchShow
546
Fabric OS Version 3.1.x/4.1.x Reference Guide
portCfgLport
portCfgLport
Lock a port as an L_PORT.
Synopsis: V3.1.x
portCfgLport portnumber, lockmode[, privatemode]
Synopsis: V4.1.x
portCfgLport [slotnumber/]portnumber, lockmode[,
privatemode]
Availability
Admin
Release
V3.1.x and V4.1.x
Description
Use this command to designate a port as an L_PORT. The switch will then only
attempt to initialize that port as an FL_PORT. The switch never attempts
point-to-point (F_PORT) initialization on the port. However, if the device attached
to the port initiates point-to-point communication, then the switch will respond
accordingly, and the port may then become an F_PORT.
Similarly, being locked as an L_PORT will not prevent the port from becoming an
E_PORT. Locking a port as an L_PORT only affects what actions the switch
initiates. It does not change how the switch responds to initialization requests.
Fabric OS Version 3.1.x/4.1.x Reference Guide
547
Fabric OS Commands
Operands
This command has the following operands:
slotnumber
(V4.1.x only)
Specify the slot number for a StorageWorks Core switch.
For all other switches this operand is not required. The slot
number must be followed by a slash ( / ) and the port
number, so that each port is represented by both slot
number (1 through 4, or 7 through 10), and port number
(0 through 15).
The StorageWorks Core switch has a total of 1–10 slots.
Slot number 5 and 6 are control processor cards, and slot
1 through 4, and 7 through 10, are port cards. On each
port card, there are 16 ports counted from the bottom, 0 to
15.
portnumber
Specify a port number. Valid values for port number vary
depending on the switch type. This operand is required.
lockmode
Specify 1 to configure the specified port as a locked
L_PORT. Specify 0 to de-configure the specified port from
its previous role as a locked L_PORT. This operand is
required.
privatemode
Specify 1 to configure the L_PORT as a private L_PORT
(then FLOGI will be rejected). Specify 0 to configure the
L_PORT as a normal public L_PORT. The default value is 0.
This operand is optional.
Example
To configure switch blade 2 port 3 as a locked L_PORT:
switch:admin> portCfgLport 2/3, 1
done.
See Also
configure
portShow
switchShow
548
Fabric OS Version 3.1.x/4.1.x Reference Guide
portcfgpersistentdisable
portcfgpersistentdisable
Disable a port persistently.
Synopsis
portcfgpersistentdisable portnumber
Availability
Admin
Release
V3.1.x and V4.1.x
Description
Use this command to persistently disable a port. Persistently disabled ports remain
disabled across power cycles, switch reboots, and switch enables. By default a
port is enabled persistently. The change in configuration is effective immediately.
The persistent disable configuration overrides all other port configurations but it
does not change the configuration of any other port settings. Use the
portcfgpersistentenable command to enable a port persistently. A
persistent enabled port re-enables all previously set port configurations of that
port.
The switch will still run the power on diagnostics and initialize a persistently
disabled port. A persistently disabled port can temporarily be enabled by
portenable command. The switchenable command will not enable the
persistently disabled ports of that switch.
The persistent switch disable or enable configuration does not alter the persistent
disable or enable configurations of the ports within the switch.
Like all other configurable port attributes, port persistent disable will not be
affected by configdefault command. But it will be cleared by
portcfgdefault command, because a port, by default, is enabled
persistently.
Fabric OS Version 3.1.x/4.1.x Reference Guide
549
Fabric OS Commands
Operands
This command has the following operands:
portnumber
Specify a port number. Valid values for port number vary
depending on the switch type. This operand is required.
When no operand is specified, the command reports the current port persistent
disable status for all ports in the switch. The value of YES is displayed for ports
that are persistently disabled.
Example
To configure port 3 as persistently disabled:
switch:admin> portcfgpersistentdisable 3
Committing configuration...done.
switch:admin> portcfgpersistentdisable
Ports:
0
1
2
3
4
5
6
7
-------------------------------Disabled YES switch:admin>
See Also
configure
configshow
configdefault
portcfgdefault
portcfgpersistentenable
portcfgshow
portshow
switchshow
550
Fabric OS Version 3.1.x/4.1.x Reference Guide
portcfgpersistentenable
portcfgpersistentenable
Enable a port persistently.
Synopsis
portcfgpersistentenable portnumber
Availability
Admin
Release
V3.1.x and V4.1.x
Description
Use this command to persistently enable a port. Persistently enabled ports remain
enabled across power cycles, switch reboots, and switch enables. By default a port
is enabled persistently. The change in configuration is effective immediately.
The persistent disable configuration overrides all other port configurations but it
does not change the configuration of any other port settings. A persistent port
enable will re-enable all previously set port configurations of that port. A
persistently enabled port can temporarily be disabled by portdisable or
switchdisable command. The switchdisable command will also
disable the persistently enabled ports of that switch.
The persistent switch disable or enable configuration does not alter the persistent
disable or enable configurations of the ports within the switch.
The configuration commands, configdefault and portcfgdefault, do
not modify the persistent enable attribute of a port.
Operands
This command has the following operands:
portnumber
Fabric OS Version 3.1.x/4.1.x Reference Guide
Specify a port number. Valid values for port number vary
depending on the switch type. This operand is required.
551
Fabric OS Commands
When no operand is specified, the command reports the current port persistent
enabled status for all ports in the switch. The value of YES is displayed for ports
that are persistently enabled.
Example
To configure port 3 as persistently enabled:
switch:admin> portcfgpersistentenable 3
Committing configuration...done.
switch:admin> portcfgpersistentenable
Ports:
0
1
2
3
4
5
6
7
-------------------------------Enabled YES switch:admin>
See Also
configure
configshow
configdefault
portcfgdefault
portcfgpersistentdisable
portcfgshow
portshow
switchshow
552
Fabric OS Version 3.1.x/4.1.x Reference Guide
portCfgShow
portCfgShow
Displays port configuration settings.
Synopsis: V3.1.x
portCfgShow [portnumber]
Synopsis: V4.1.x
portCfgShow [slotnumber/][portnumber]
Availability
All users.
Release
V3.1.x and V4.1.x
Description
Use this command to display the current configuration of all ports. If no operand
is specified, all the port configuration settings are displayed for that switch, or for
the StorageWorks Core logical switch.
The following configuration information is displayed:
■
Port Speed is displayed as 1G, 2G, or AN (when in Auto speed Negotiation
mode). This value is set by the portCfgSpeed command.
■
Trunk Port is displayed as ON when port is set for trunking or blank (--) when
trunking is disabled on the port. This value is set by the
portCfgTrunkport command.
■
The Long Distance setting of the port is shown as blank (--) when long
distance mode is off, L1 when the link is up to 50 Km, or L2 when the link is
up to 100 Km. This value is set by the portCfgLongDistance
command.
■
VC Link Init setting of the port is shown as blank (..) when the long distance
link initialization option is turned off and (ON) when it is turned on for long
distance mode. This value is set by the portcfglongdistance
command.
Fabric OS Version 3.1.x/4.1.x Reference Guide
553
Fabric OS Commands
■
Locked L_Port is displayed as ON when port is locked to L_Port only or
blank (--) when L_Port lock mode is disabled (and it behaves as a U_Port).
This value is set by the portCfgLport command.
■
Locked G_Port is displayed as ON when port is locked to G_Port only or
blank (--) when G_Port lock mode is disabled (and it behaves as a U_Port).
This command is set by the portCfgGport command.
■
Disabled E_Port is displayed as ON when port is not allowed to be an E_Port
or blank (--) when the port is allowed to function as an E_Port. This command
is set by the portCfgEport command.
■
Mcast LoopBack mode (V4.1.x only) is displayed as blank (..) when Mcast
LoopBack mode is off, and (ON) when Mcast LoopBack mode is enabled.
■
Persistent Disable is displayed as ON when the port is disabled across reboots
or power cycles or (..) when the port is allowed to function normally. This
mode is set by the portcfgpersistentdisable command.
■
ISL R_RDY Mode is displayed as ON when the port has been R_RDY mode
enabled or blank (--) when the port is allowed to function as an E_Port. This
mode is set by the portcfgislmode command.
Operands
This command has the following operands:
554
slotnumber
(V4.1.x only)
Specify the slot number for a StorageWorks Core switch.
For all other switches this operand is not required. The slot
number must be followed by a slash ( / ) and the port
number, so that each port is represented by both slot
number (1 through 4, or 7 through 10), and port number
(0 through 15).
The StorageWorks Core switch has a total of 1–10 slots.
Slot number 5 and 6 are control processor cards, and slot
1 through 4, and 7 through 10, are port cards. On each
port card, there are 16 ports counted from the bottom, 0 to
15.
portnumber
Specify a port number. Valid values for port number vary
depending on the switch type. This operand is optional.
Fabric OS Version 3.1.x/4.1.x Reference Guide
portCfgShow
Example
To display the configuration settings of ports on a switch in V3.1.x:
switch:admin> portcfgshow
Ports
0 1 2 3
4 5 6 7
-------------------+--+--+--+--+----+--+--+-Speed
2G 2G 2G 2G
2G 2G 2G 2G
Trunk Port
.. .. ON ON
ON ON ON ON
Long Distance
.. .. .. ..
.. .. .. ..
VC link init
.. .. .. ..
.. .. .. ..
Locked L_Port
.. .. .. ..
.. .. .. ..
Locked G_Port
.. .. .. ..
.. .. .. ..
Disabled E_Port
.. .. .. ..
.. .. .. ..
Persistent Disable .. .. .. ..
.. .. .. ..
ISL R_RDY Mode
.. .. .. ..
ON .. ON ..
where AN:AutoNegotiate, ..:OFF, ??:INVALID.
LM:L0.5
switch:admin>
See Also
portCfgEport
portCfgGport
portCfgLport
portCfgLongDistance
portCfgTrunkport
portCfgSpeed
Fabric OS Version 3.1.x/4.1.x Reference Guide
555
Fabric OS Commands
portCfgSpeed
Configure the port speed level.
Synopsis: V3.1.x
portCfgSpeed portnumber, speed_level
Synopsis: V4.1.x
portCfgSpeed [slotnumber/]portnumber, speed_level
Availability
Admin
Release
V3.1.x and V4.1.x
Description
Use this command to configure the speed of a port to a particular level. After this
command is issued, the port is disabled and enabled so that the port comes up with
the new speed setting. The configuration is saved in the non-volatile memory and
is persistent across switch reboots or power cycles.
If the command is specified without an operand, you are prompted to enter the
speed value.
The output of the portShow command displays the current achieved speed of a
port and the portCfgShow command displays the user desired speed setting
for a port.
556
Fabric OS Version 3.1.x/4.1.x Reference Guide
portCfgSpeed
Operands
This command has the following operands:
slotnumber
(V4.1.x only)
Specify the slot number for a StorageWorks Core
switch. For all other switches this operand is not
required. The slot number must be followed by a slash
( / ) and the port number, so that each port is
represented by both slot number (1 through 4, or 7
through 10), and port number (0 through 15).
The StorageWorks Core switch has a total of 1–10
slots. Slot number 5 and 6 are control processor cards,
and slot 1 through 4, and 7 through 10, are port
cards. On each port card, there are 16 ports counted
from the bottom, 0 to 15.
portnumber
Specify a port number. Valid values for port number
vary depending on the switch type. This operand is
required.
speed_level
Specify the speed of a port. This operand is required.
Valid values are one of the following:
0 - Auto-sensing mode. The port automatically
configures for the highest speed.
1 - 1Gbps mode. The port will be at fixed speed of
1 Gbps.
2 - 2Gbps mode. The port will be at fixed speed of
2 Gbps.
Example
To configure the speed of blade 2 port 5 to 2 Gbps:
switch:admin> portCfgSpeed 2/5, 2
done.
See Also
portShow
switchCfgSpeed
Fabric OS Version 3.1.x/4.1.x Reference Guide
557
Fabric OS Commands
portCfgTrunkport
Configure a port to be enabled or disabled for trunking.
Synopsis: V3.1.x
portCfgTrunkport portnumber, mode
Synopsis: V4.1.x
portCfgTrunkport [slotnumber/]portnumber, mode
Availability
Admin
Release
V3.1.x and V4.1.x
Description
Use this command to enable or disanble a port for trunking.
Note: This command requires a Trunking license.
558
Fabric OS Version 3.1.x/4.1.x Reference Guide
portCfgTrunkport
Operands
This command has the following operand:
slotnumber
(V4.1.x only)
Specify the slot number for a StorageWorks Core switch.
For all other switches this operand is not required. The slot
number must be followed by a slash ( / ) and the port
number, so that each port is represented by both slot
number (1 through 4, or 7 through 10), and port number
(0 through 15).
The StorageWorks Core switch has a total of 1–10 slots.
Slot number 5 and 6 are control processor cards, and slot
1 through 4, and 7 through 10, are port cards. On each
port card, there are 16 ports counted from the bottom, 0 to
15.
portnumber
Specify a port number. Valid values for port number vary
depending on the switch type. This operand is required.
mode
Specify 1 to enable this port for trunking. Specify 0 to
disable this port for trunking. This operand is required.
Example
To enable switch blade 2 blade 5 for trunking:
switch:admin> portCfgTrunkport 2/5, 1
done.
See Also
switchCfgTrunk
portShow
portCfgShow
switchShow
Fabric OS Version 3.1.x/4.1.x Reference Guide
559
Fabric OS Commands
portdebug
Set debug level and verbose level of port modules.
Synopsis
portdebug dbg_lvl, vbs_lvl
Availability
Admin
Release
V3.1.x and V4.1.x
Description
Use this command to set the debug level and verbose level of port modules.
Operands
This command has the following operands:
dbg_lvl
Specify the debug level to be set for port modules. Valid
values are 1–5.
vbs_lvl
Specify the verbose level to be set for port modules. Valid
values are 1–5.
Example
The following example shows how portdebug can be used to set debug level and
verbose level of port modules:
switch:admin> portdebug 3, 4
See Also
dbgshow
setdbg
560
Fabric OS Version 3.1.x/4.1.x Reference Guide
portDisable
portDisable
Disable a switch port.
Synopsis: V3.1.x
portDisable portnumber
Synopsis: V4.1.x
portDisable [slotnumber/]portnumber
Availability
Admin
Release
V3.1.x and V4.1.x
Description
Use this command to disable a switch port. If the port is connected to another
switch, the fabric may reconfigure. If the port is connected to one or more devices,
the devices can no longer communicate with the fabric.
If the port was online before being disabled, a state transition will be indicated in
the following ways: RSCN, SNMP trap, Web pop-up window.
The front panel LED of a disabled port flashes yellow with a two second cycle.
Fabric OS Version 3.1.x/4.1.x Reference Guide
561
Fabric OS Commands
Operands
This command has the following operands:
slotnumber
(V4.1.x only)
Specify the slot number for a StorageWorks Core switch.
For all other switches this operand is not required. The slot
number must be followed by a slash ( / ) and the port
number, so that each port is represented by both slot
number (1 through 4, or 7 through 10), and port number
(0 through 15).
The StorageWorks Core switch has a total of 1–10 slots.
Slot number 5 and 6 are control processor cards, and slot
1 through 4, and 7 through 10, are port cards. On each
port card, there are 16 ports counted from the bottom, 0 to
15.
portnumber
Specify a port number. Valid values for port number vary
depending on the switch type. This operand is required.
Example
To disable blade 2 port 4:
switch:admin> portDisable 2/4
See Also
portEnable
portcfgpersistentdisable
portcfgpersistentenable
portShow
switchShow
562
Fabric OS Version 3.1.x/4.1.x Reference Guide
portEnable
portEnable
Enable a switch port.
Synopsis: V3.1.x
portEnable portnumber
Synopsis: V4.1.x
portEnable [slotnumber/]portnumber
Availability
Admin
Release
V3.1.x and V4.1.x
Description
Use this command to enable a switch port. If the port is connected to another
switch, the fabric may reconfigure. If the port is connected to one or more devices,
the devices can communicate with the fabric.
For ports that come online after being enabled, the following indications may be
sent to indicate a state transition: RSCN, SNMP trap, Web pop-up window.
The front panel LED of an enabled and online port is green.
Fabric OS Version 3.1.x/4.1.x Reference Guide
563
Fabric OS Commands
Operands
This command has the following operands:
slotnumber
(V4.1.x only)
Specify the slot number for a StorageWorks Core switch.
For all other switches this operand is not required. The slot
number must be followed by a slash ( / ) and the port
number, so that each port is represented by both slot
number (1 through 4, or 7 through 10), and port number
(0 through 15).
The StorageWorks Core switch has a total of 1–10 slots.
Slot number 5 and 6 are control processor cards, and slot
1 through 4, and 7 through 10, are port cards. On each
port card, there are 16 ports counted from the bottom, 0 to
15.
portnumber
Specify a port number. Valid values for port number vary
depending on the switch type. This operand is required.
Example
To enable blade 2 port 4:
switch:admin> portEnable 2/4
See Also
portDisable
portcfgpersistentdisable
portcfgpersistentenable
portShow
switchShow
564
Fabric OS Version 3.1.x/4.1.x Reference Guide
portErrShow
portErrShow
Displays port error summary.
Synopsis
portErrShow
Availability
All users.
Release
V3.1.x and V4.1.x
Description
Use this command to display an error summary for all ports. The display contains
one output line per port and shows error counters in ones, thousands (K), or
millions (M).
The following fields are displayed:
frames tx
Frames transmitted.
frames rx
Frames received.
enc in
Encoding errors inside frames.
crc err
Frames with CRC errors.
too shrt
Frames shorter than minimum.
too long
Frames longer than maximum.
bad eof
Frames with bad end-of-frame delimiters.
enc out
Encoding error outside of frames.
disc c3
Class 3 frames discarded.
link fail
Link failures (LF1 or LF2 states).
loss sync
Loss of synchronization.
loss sig
Loss of signal.
Fabric OS Version 3.1.x/4.1.x Reference Guide
565
Fabric OS Commands
frjt
Frames rejected with F_RJT.
fbsy
Frames busied with F_BSY.
Operands
None.
Example
Notice in the example below that port 6 has a high number of errors and should be
examined:
switch:admin> portErrShow
frames
enc crc too too bad enc disc link loss loss frjt fbsy
tx
rx
in err shrt long eof out
c3 fail sync
sig -------------------------------------------------------------------0:
0
0
0
0
0
0
0
0
0
0
0
1
0
0
1:
0
0
0
0
0
0
0
0
0
0
0
1
0
0
2:
0
0
0
0
0
0
0
0
0
0
0
1
0
0
3:
0
0
0
0
0
0
0
0
0
0
0
1
0
0
4:
0
0
0
0
0
0
0
0
0
0
0
1
0
0
5:
0
0
0
0
0
0
0
0
0
0
0
1
0
0
6:
61k 48
2 15
0
0
0
3k
0
0
2
0
0
0
7:
0
0
0
0
0
0
0
0
0
0
0
1
0
0
8:
0
0
0
0
0
0
0
0
0
0
0
1
0
0
9:
0
0
0
0
0
0
0
0
0
0
0
1
0
0
10:
0
0
0
0
0
0
0
0
0
0
0
1
0
0
11:
0
0
0
0
0
0
0
0
0
0
0
1
0
0
12:
0
0
0
0
0
0
0
0
0
0
0
1
0
0
13:
0
0
0
0
0
0
0
0
0
0
0
1
0
0
14:
0
0
0
0
0
0
0
0
0
0
0
1
0
0
15:
0
0
0
0
0
0
0
0
0
0
0
1
0
0
See Also
portShow
portStatsShow
566
Fabric OS Version 3.1.x/4.1.x Reference Guide
portflagsshow
portflagsshow
Displays the port status bitmaps for all ports in a switch
Synopsis
portflagsshow
Availability
All users.
Release
V3.1.x and V4.1.x
Description
Use this command to display the following status for a port:
SNMP
Displays whether the port is online or offline.
Physical
Displays the port physical status. Valid values are In_Sync and
No_Light.
Flags
Displays whether there is a SFP inserted in the port, whether
the port is active, and the port type.
Options
None.
Fabric OS Version 3.1.x/4.1.x Reference Guide
567
Fabric OS Commands
Example
To display the port status for all ports in the switch:
switch:admin> portflagsshow
Port SNMP
Physical
Flags
------------------------------0: Offline
No_Module PRESENT
1: Offline
No_Module PRESENT
2: Offline
No_Light
PRESENT
3: Offline
No_Light
PRESENT
4: Offline
No_Light
PRESENT
5: Offline
No_Module PRESENT
6: Offline
No_Module PRESENT
7: Offline
No_Module PRESENT
8: Offline
No_Module PRESENT
9: Offline
No_Module PRESENT
10: Offline
No_Module PRESENT
11: Offline
No_Module PRESENT
12: Offline
No_Module PRESENT
13: Offline
No_Module PRESENT
14: Offline
No_Module PRESENT
15: Offline
No_Module PRESENT
16: Online
UNKNOWN
PRESENT
switch:admin>
U_PORT
U_PORT
U_PORT
U_PORT
U_PORT
U_PORT
U_PORT
U_PORT
U_PORT
U_PORT
U_PORT
U_PORT
U_PORT
U_PORT
U_PORT
U_PORT
ACTIVE
LED
LED
LED
LED
LED
LED
LED
LED
LED
LED
LED
LED
LED
LED
LED
LED
G_PORT U_PORT
See Also
None.
568
Fabric OS Version 3.1.x/4.1.x Reference Guide
portLEDTest
portLEDTest
Exercise the user port LEDs.
Synopsis
portLEDTest [-npass count][-ports itemlist]
Availability
Admin
Release
V4.1.x
Description
Use this command to exercise the user port LEDs in the current switch ON/OFF
by setting the ATTN LEDs to green for the ON condition and black for the OFF
condition. The SPEED LEDs are initially set to black before the command
execution. The SPEED LEDs are set to green once the command is executing.
You must disable the current switch (using the switchdisable command)
before running this command. After the command had completed, the ATTN
LEDs flash amber indicating the command has finished and exited. You can
enable the current switch (using the switchenable command) to set the
ATTN LEDs back to black.
Options
This command has the following operands:
-npass count
Specify the number of times to perform this test. The
default value is 10.
-ports itemlist
Specify a list of user ports to run the test. If omitted, all
the active ports in the switch are assumed. For more
information refer to the itemlist command.
Fabric OS Version 3.1.x/4.1.x Reference Guide
569
Fabric OS Commands
Example
To test port LEDs:
switch:admin> portledtest -ports 1/1-1/5
passed.
switch:admin>
See Also
itemlist
ledtest
switchdisable
switchenable
570
Fabric OS Version 3.1.x/4.1.x Reference Guide
portLogClear
portLogClear
Clear the port log.
Synopsis
portLogClear
Availability
Admin
Release
V3.1.x and V4.1.x
Description
Use this command to clear the port log.
You may want to clear the port log before triggering an activity so that the log
displays only the activity related to that activity. See portLogShow for a
description of the port log.
If the port log is disabled, the following message appears as the first line.
WARNING: port log is disabled
If the port log is disabled, portLogClear enables it. Certain errors
automatically disable the port log to preserve information needed to understand
the error (new events are not collected so that existing information is not
overwritten).
Operands
None.
Fabric OS Version 3.1.x/4.1.x Reference Guide
571
Fabric OS Commands
Example
To clear the port log:
switch:admin> portLogClear
switch:admin> portLogShow
port log is empty
switch:admin>
Errors
The following errors disable the port log:
FCIU, IUBAD
FCIU, IUCOUNT
FCPH, EXCHBAD
FCPH, EXCHFREE
NBFSM, DUPEPORTSCN
UCAST, RELICPDB
See Also
portLogDump
portLogShow
572
Fabric OS Version 3.1.x/4.1.x Reference Guide
portLogDump
portLogDump
Displays the port log without page breaks.
Synopsis
portLogDump [count[, saved[, portid]]]
Availability
All users.
Release
V3.1.x and V4.1.x
Description
Use this command to display the port log, listing all entries in the log without page
breaks. This command displays the same information as portLogShow, but
portLogShow prompts the user to enter “returns” between each page.
Port logs are circular log files in the switch firmware, which can save up to 1024
entries per logical switch in V3.1.x and up to 8000 entries per logical switch in
V4.1.x. Once the log is full, the newest log entries delete the oldest log entries.
Port logs capture switch-to-device, device-to-switch, switch-to-switch, some
device-to-device1 and control information.
See portLogShow for a description of the port log.
If the port log is disabled, the following message appears as the first line (see
portLogClear for details):
WARNING: port log is disabled
The following information is displayed for each log entry:
Time
Displays the event date and time in milliseconds.
Task
Displays the name of the internal switch procedure that logged the
event.
Event
Displays the task event that generated log entry.
Port #
Displays the Port number that logged the event.
Fabric OS Version 3.1.x/4.1.x Reference Guide
573
Fabric OS Commands
Cmd
Defined by the event. Refer to the HP StorageWorks Fabric
Operating System Procedures Version 3.1.x/4.1.x User Guide for
more information.
Args
Displays more information about the event.
For ioctl events, these are the I/O control arguments
For Tx and Rx, these are the first two header words and word four
of the FC-PH frame along with the first word of the payload and
internal decoding field.
For a full explanation of the information displayed by this command refer to the
HP StorageWorks Fabric Operating System Procedures Version 3.1.x/4.1.x User
Guide.
Operands
This command has the following operands:
count
Specify the maximum number of lines to be displayed. Only the
most recent count entries are displayed. This operand is optional.
saved
Specify a nonzero value to display the saved port log from the last
switch fault. See uptime for conditions that cause a fault. The
count operand is ignored when displaying the saved log. This
operand is optional.
portid
Specify the port to be displayed. All other ports will not be
displayed. This operand is optional.
Example
To display the port log:
switch:admin> portlogdump 10
time
task
event port cmd args
----------------------------------------------------16:51:15.499 tShell
ioctl
7
de 10f9bb90,0
16:51:15.499 tShell
ioctl
8
de 10f9bb90,0
16:51:15.499 tShell
ioctl
9
de 10f9bb90,0
16:51:15.499 tShell
ioctl
10
de 10f9bb90,0
16:51:15.499 tShell
ioctl
11
de 10f9bb90,0
16:51:15.499 tShell
ioctl
12
de 10f9bb90,0
16:51:15.499 tShell
ioctl
13
de 10f9bb90,0
16:51:15.499 tShell
ioctl
14
de 10f9bb90,0
16:51:15.499 tShell
ioctl
15
de 10f9bb90,0
16:58:28.383 tShell
create
tSyslog
switch:admin>
574
Fabric OS Version 3.1.x/4.1.x Reference Guide
portLogDump
See Also
portLogClear
portLogShow
uptime
Fabric OS Version 3.1.x/4.1.x Reference Guide
575
Fabric OS Commands
portLogDumpPort
Displays the port log of specified port, without page breaks.
Synopsis: V3.1.x
portLogDumpPort port
Synopsis: V4.1.x
portLogDumpPort portid
Availability
All users.
Release
V3.1.x and V4.1.x
Description
Use this command to display the port log of specified port. The command displays
all entries in the log without any page breaks. It is identical to
portLogShowPort, except that portLogShow prompts the user to type
return between each page of output.
Port logs are circular log files in the switch firmware, which can save up to 1024
entries per logical switch in V3.1.x and up to 8000 entries per logical switch in
V4.1.x. Once the log is full, the newest log entries delete the oldest log entries.
Port logs capture switch-to-device, device-to-switch, switch-to-switch, some
device-to-device1 and control information.
If the port log is disabled, the following message is printed as the first line. See the
portLogClear command for more information.
WARNING: port log is disabled
See portLogShow for a description of the port log.
The following information is displayed for each log entry:
576
Time
Displays the event date and time in milliseconds.
Task
Displays the name of the internal switch procedure that logged the
event.
Fabric OS Version 3.1.x/4.1.x Reference Guide
portLogDumpPort
Event
Displays the task event that generated log entry.
Port #
Displays the Port number that logged the event.
Cmd
Defined by the event. Refer to the HP StorageWorks Fabric
Operating System Procedures Version 3.1.x/4.1.x User Guide for
more information.
Args
Displays more information about the event.
For ioctl events, these are the I/O control arguments
For Tx and Rx, these are the first two header words and word four
of the FC-PH frame along with the first word of the payload and
internal decoding field.
For a full explanation of the information displayed by this command refer to the
HP StorageWorks Fabric Operating System Procedures Version 3.1.x/4.1.x User
Guide.
Operands
This command has the following operands:
port
(V3.1.x only)
Specify the port you want to display the port log for. Valid
input varies depending on switch type.
portid
(V4.1.x only)
Specify the area number of port to be displayed. If a port area
number is specified, all other ports on the switch are ignored.
This operand is optional.
Example
To display the port log dump for a port with area number of 5:
switch:admin> portlogdumpport 5
time
task
event port cmd args
------------------------------------------------16:43:35.963 PORT
Rx
5
40 02fffffd,00fffffd,0a3bffff,14000000
16:43:35.963 PORT
Tx
5
0 c0fffffd,00fffffd,0a3b0536
16:43:35.967 PORT
Tx
5
40 02fffffd,00fffffd,0537ffff,14000000
16:43:35.970 PORT
Rx
5
0 c0fffffd,00fffffd,05370a3c
16:43:55.974 PORT
Rx
5
40 02fffffd,00fffffd,0a3fffff,14000000
16:43:55.974 PORT
Tx
5
0 c0fffffd,00fffffd,0a3f053a
16:43:55.978 PORT
Tx
5
40 02fffffd,00fffffd,053bffff,14000000
16:43:55.980 PORT
Rx
5
0 c0fffffd,00fffffd,053b0a40
16:43:57.772 PORT
Tx
5
20 02fffc08,00fffc04,053cffff,01000000
16:43:57.776 PORT
Rx
5
0 c0fffc04,00fffc08,053c002a
16:43:57.781 PORT
Rx
5 132 03fffc04,00fffc08,053c002a,01000000
switch:admin>
Fabric OS Version 3.1.x/4.1.x Reference Guide
577
Fabric OS Commands
See Also
portLogClear
portLogShow
uptime
578
Fabric OS Version 3.1.x/4.1.x Reference Guide
portloginshow
portloginshow
Displays port logins.
Synopsis: V3.1.x
portloginshow portnumber
Synopsis: V4.1.x
portloginshow [slotnumber/]portnumber
Availability
All users.
Release
V3.1.x and V4.1.x
Description
Use this command to display port login information. Some information varies
with the switch model and port type. The lines of the display show:
Type
Type of login:
fe - FLOGI, Fabric Login to Fabric F_Port.
ff - PLOGI, Process Login to specific N- Ports or well-known address
like Name Server.
fd - FDISC, Virtual N_Port login.
PID
The port 24-bit D_ID.
WWN
The port Worldwide Name.
credit
The credit for this login as appropriate, this is BB (Buffer to Buffer)
Credit for FLOGIs and EE (End to End) Credit for PLOGIs.
df_sz
The default frame size for this login.
cos
Class of Services supported. This can be a combination of the
following bit:
8 - Class of Service includes class 2.
10 - Class of Service includes class 3.
Fabric OS Version 3.1.x/4.1.x Reference Guide
579
Fabric OS Commands
There is further information about the login after the above columns. This can
include the DID (Destination Identifier) that the port is logged on to.
Operands
This command has the following operands:
slotnumber
(V4.1.x only)
Specify the slot number for a StorageWorks Core
switch. For all other switches this operand is not
required. The slot number must be followed by a slash
( / ) and the port number, so that each port is
represented by both slot number (1 through 4, or 7
through 10), and port number (0 through 15).
The StorageWorks Core switch has a total of 1–10 slots.
Slot number 5 and 6 are control processor cards, and
slot 1 through 4, and 7 through 10, are port cards. On
each port card, there are 16 ports counted from the
bottom, 0 to 15.
portnumber
Specify a port number. Valid values for port number
vary depending on the switch type. This operand is
optional.
Example
The following example shows an N_Port with one FLOGI and two PLOGIs:
switch:admin> portloginshow 2
Type PID
World Wide Name
credit df_sz cos
=====================================================
fe 201700 21:00:00:e0:8b:05:a3:c9
3 2048
8 scr=1
ff 201700 21:00:00:e0:8b:05:a3:c9
0
0
8 d_id=FFFC20
ff 201700 21:00:00:e0:8b:05:a3:c9
0
0
8 d_id=FFFFFC
See Also
portshow
fcpprobeshow
580
Fabric OS Version 3.1.x/4.1.x Reference Guide
portlogpdisc
portlogpdisc
Set or clear the debug_pdisc_flag.
Synopsis
portlogpdisc lvl
Availability
Admin
Release
V3.1.x and V4.1.x
Description
Use this command to set or clear the debug_pdisc_flag.
Operands
This command has the following operand:
lvl
Specify either 0 to clear the flag or 1 to set the
pdisc_flag.
Example
The following example shows how to set the pdisc_flag:
switch:admin> portlogpdisc 1
PDISC log setting = 1
See Also
None.
Fabric OS Version 3.1.x/4.1.x Reference Guide
581
Fabric OS Commands
portLogShow
Displays the port log.
Synopsis
portLogShow [count, saved, portid]
Availability
All users.
Release
V3.1.x and V4.1.x
Description
Use this command to display the port log. This command displays 22 entries at a
time.
The portLogShow command displays the same information as
portLogDump, but it allows you to enter a “return” after each page of output.
Port logs are circular log files in the switch firmware, which can save up to 1024
entries per logical switch in V3.1.x and up to 8000 entries per logical switch in
V4.1.x. Once the log is full, the newest log entries delete the oldest log entries.
Port logs capture switch-to-device, device-to-switch, switch-to-switch, some
device-to-device1 and control information.
If the port log is disabled, the following message appears as the first line. See
portLogClear command for more information.
WARNING: port log is disabled
The following fields are shown:
582
Time
Displays the event date and time in milliseconds.
Task
Displays the name of the internal switch procedure that logged the
event.
Event
Displays the task event that generated log entry.
Port #
Displays the Port number that logged the event.
Fabric OS Version 3.1.x/4.1.x Reference Guide
portLogShow
Cmd
Defined by the event. Refer to the HP StorageWorks Fabric
Operating System Procedures Version 3.1.x/4.1.x User Guide for
more information.
Args
Displays more information about the event.
For ioctl events, these are the I/O control arguments
For Tx and Rx, these are the first two header words and word four
of the FC-PH frame along with the first word of the payload and
internal decoding field.
For a full explanation of the information displayed by this command refer to the
HP StorageWorks Fabric Operating System Procedures Version 3.1.x/4.1.x User
Guide.
Operands
This command has the following operands:
count
Specify the maximum number of lines to display. Only the most
recent count entries are displayed. This operand is optional.
saved
Specify a non-zero value to display the saved port log from the
last switch fault. See uptime for a list of conditions that cause a
fault. The count is ignored when displaying the saved log. This
operand is optional.
portid
For V3.1.x, specify a non-zero value that specifies which port will
be displayed.
For V4.1.x, specify the area number of port to be displayed. If a
port area number is specified, all other ports on the switch are
ignored. This operand is optional.
Fabric OS Version 3.1.x/4.1.x Reference Guide
583
Fabric OS Commands
Example
To display the port log:
switch:admin> portlogshow 10
Oct 16
task
event port cmd args
---------------------------------------------WED OCT 16 12:35:24 2002
12:35:24.199 tReceive
debug
5
efd00020,00000102,00000000,00000000
12:35:24.199 tReceive
debug
5
dede0001,00000f37,00000000,00000000
12:35:24.199 tReceive
pstate
5 LR3
12:35:24.199 tReceive
debug
5
00acedd6,00000000,00000006,00009601
12:35:24.199 tReceive
debug
5
00acedd5,00000000,00000000,00009601
12:35:24.199 tReceive
pstate
5
AC
12:35:24.199 tReceive
debug
5
aceeee05,00000003,00000000,300082d7
12:35:25.166 tFcph
debug
5
aceace55,00008601,00000000,00000000
THU OCT 17 11:26:44 2002
11:26:44.749 tShell
errlog
4 SEC-SECVIOL_
MON OCT 21 13:27:45 2002
13:27:45.549 tShell
ioctl
0 129 1,0
switch:admin>
See Also
portLogClear
portLogDump
uptime
584
Fabric OS Version 3.1.x/4.1.x Reference Guide
portlogshowport
portlogshowport
Displays the port log of specified port, with page breaks.
Synopsis: V3.1.x
portlogshowport [portid [, count [, saved]]]
Synopsis: V4.1.x
portlogshowport [portid]
Availability
All users.
Release
V3.1.x and V4.1.x
Description
Use this command to display the port log, showing 22 entries at a time. It is
identical to portlogdump, except that portlogdump does not prompts the
user to type return between each page of output.
If the port log is disabled, the following message is printed as the first line (see
portlogclear for details):
WARNING: port log is disabled
Refer to the portlogdump command for more information on the data
returned by this command.
Operands
This command has the following operands:
count
(V3.1.x only)
Specify the maximum number of lines to display. Only the most
recent count entries are displayed. This operand is optional.
saved
(V3.1.x only)
Specify a non-zero value to display the saved port log from the
last switch fault. See uptime for a list of conditions that cause a
fault. The count is ignored when displaying the saved log. This
operand is optional.
Fabric OS Version 3.1.x/4.1.x Reference Guide
585
Fabric OS Commands
portid
Specify a non-zero value that specifies which port will be
displayed.
Example
The following example shows a section of the port log with an E_Port coming
online. The ELP and EFP exchanges are shown; a name service request was
processed.
switch:admin> portlogshowport 24
Feb 6
task
event port cmd args
-----------------------------------------------------08:35:27.899 tShell
pstate 14 OL1
08:35:27.899 tReceive
pstate 14 LR2
08:35:27.916 tReceive
pstate 14
AC
08:35:28.416 interrupt
scn
14
1
08:35:28.433 tFabric
ioctl
14
90 101d9910,0
08:35:28.433 tFabric
Tx
14 164 02fffffd,00fffffd,0005ffff,10000000
08:35:28.433 tReceive
Rx
14
0 c0fffffd,00fffffd,00050006
08:35:28.433 tReceive
Rx
14 164 03fffffd,00fffffd,00050006,02000000
<output truncated>
See Also
portlogclear
portlogdump
portlogshow
uptime
586
Fabric OS Version 3.1.x/4.1.x Reference Guide
portLoopbackTest
portLoopbackTest
Functional test of port N->N path.
Synopsis: V3.1.x
portLoopbackTest [passCount]
Synopsis: V4.1.x
portLoopbackTest [--slot number][-nframes count]
[-lb_mode mode][-spd_mode mode][-ports itemlist]
Availability
Admin
Release
V3.1.x and V4.1.x
Description
Use this command to verify the functional operation of the switch by sending
frames from the port N transmitter, and looping the frames back into the same port
N receiver. The loopback is done at the parallel loopback path. The path exercised
in this test does not include the media, SFP, nor the fiber cable.
Only one frame is transmitted and received at any one time. No external cable is
required to run this test. The port LEDs flicker green rapidly while the test is
running.
Below is the test method:
1. Set all ports for parallel loopback.
2. Create a frame F of maximum data size (2112 bytes).
3. Transmit frame F through port N.
4. Pick up the frame from the same port N.
5. Check the 8 statistic error counters for nonzero values:
ENC_in, CRC_err, TruncFrm, FrmTooLong, BadEOF, Enc_out,
BadOrdSet, DiscC3
Fabric OS Version 3.1.x/4.1.x Reference Guide
587
Fabric OS Commands
6. Check if the transmit, receive or class 3 receiver counters are stuck at
some value.
7. Check if the number of frames transmitted is not equal to the number of
frames received.
8. Repeat steps 2 through 7 for all ports present until:
— The number of frames (or passCount) requested is reached.
— All ports are marked bad.
At each pass, the frame is created from a different data type. If seven passes are
requested, seven different data types are used in the test. If eight passes are
requested, the first seven frames use unique data types, and the eighth is the same
as the first. The seven data types are:
1)
2)
3)
4)
5)
6)
7)
CSPAT:
BYTE_LFSR:
CHALF_SQ:
QUAD_NOT:
CQTR_SQ:
CRPAT:
RANDOM:
0x7e,
0x69,
0x4a,
0x00,
0x78,
0xbc,
0x25,
0x7e,
0x01,
0x4a,
0xff,
0x78,
0xbc,
0x7f,
0x7e,
0x02,
0x4a,
0x00,
0x78,
0x23,
0x6e,
0x7e,...
0x05,...
0x4a,...
0xff,...
0x78,...
0x47,...
0x9a,...
Because this test does not include the media, SFP, or the fiber cable in its test path,
use the results from this test in conjunction with the results from
crossPortTest and spinSilk (both of which loop frames using an
external loopback cable) test to determine those switch components that are not
functioning properly.
Operands
This command has the following operands:
588
passCount
(V3.1.x only)
Specify the number of times (or number of frames per
port) to execute this test. The default value is 0xfffffffe. This
operand is optional.
--slot number
(V4.1.x only)
Specify the slot number that the diagnostic will operate on.
The ports specified will be relative to this slot number. The
default is set to 0 and designed to operate on fixed port
count products.
-nframes count
(V4.1.x only)
Specify the number of frames to send. The test will
progress until the specified number of frames has been
transmitted on each port. The default value is 10.
Fabric OS Version 3.1.x/4.1.x Reference Guide
portLoopbackTest
-lb_mode mode
(V4.1.x only)
Specify the loopback mode for the test. By default, this
test uses internal loopback. Valid values are as follows:
1 Port Loopback (loopback plugs)
2 External (SERDES) loopback
5 Internal (parallel) loopback
-spd_mode mode
(V4.1.x only)
Specify the speed mode for the test. For 1 Gbit/sec only
products it is ignored. The exact operation of modes 3
through 6 depends upon the loopback mode selected.
When speed modes 3 through 6 are used with cables,
they must be connected EVEN to ODD or the test will fail.
■ 0: set all ports' speed for auto-negotiate.
■ 1: set all ports' speed to lock at 1 Gbit/sec.
■ 2: set all port's speed to lock at 2 Gbit/sec.
For lb_mode == 0,1 the following speed modes are
available to test the speed negotiation:
■ 3: set all even ports' speed for auto-negotiate, set all
odd ports' speed for
1 Gbit/sec.
■ 4: set all even ports' speed for auto-negotiate, set all
odd ports' speed for
2 Gbit/sec.
■ 5: set all odd ports' speed for auto-negotiate, set all
even ports' speed for
1 Gbit/sec.
■ 6: set all odd ports' speed for auto-negotiate, set all
even ports' speed for
2 Gbit/sec.
For lb_mode== 2,3 the following speed modes are
available to test fifo underrun.
■ 3,5: set all even ports' speed for 2 Gbit/sec, set all
odd ports' speed for 1 Gbit/sec.
■ 4,6: set all even ports' speed for 1 Gbit/sec, set all
odd ports' speed for 2 Gbit/sec.
-ports itemlist
(V4.1.x only)
Specify a list of user ports to test. By default all of the user
ports in the current switch are tested. This option may be
used to restrict testing to the specified ports.
Fabric OS Version 3.1.x/4.1.x Reference Guide
589
Fabric OS Commands
Example
To run the portLoopbackTest 100 times (V3.1.x example):
switch:admin> portLoopbackTest 100
Running Port Loopback Test .... passed.
To run the portLoopbackTest (V4.1.x example):
switch:admin> portloopbacktest -ports 1/38-1/45 -nframes 1 -lb_mode 1
Running Port Loopback Test ....
passed.
Errors
Below are possible error messages if failures are detected:
■
For V3.1.x:
DIAG-INIT
DIAG-PORTDIED
DIAG-XMIT
DIAG-TIMEOUT
DIAG-ERRSTAT
DIAG-STATS
DIAG-DATA
■
For V4.1.x:
DATA
ERRSTAT
INIT
PORTDIED
STATS
TIMEOUT
XMIT
590
Fabric OS Version 3.1.x/4.1.x Reference Guide
portLoopbackTest
See Also
camtest
centralmemorytest
cmemretentiontest
cmitest
crossporttest
filtertest
portloopbacktest
portregtest
ramtest
spinsilk
sramretentiontest
Fabric OS Version 3.1.x/4.1.x Reference Guide
591
Fabric OS Commands
portname
Assign or display a port name.
Synopsis: V3.1.x
portname port_number, “port_name”
Synopsis: V4.1.x
portname [slotnumber/]portnumber, “portname”
Availability
Admin
Release
V3.1.x and V4.1.x
Description
Use this command to assign or display a port name. Both operands are optional
for this command.
With both the operands present, the port name string will be assigned to the port.
With only the port name operand, the previously assigned port name will be
displayed. With no operands, the port names of all the ports present will be
displayed.
The port name is a string of length 32 characters or less. It may consist of white
spaces or printable characters, excluding the characters comma and semi-colon.
By default, a port has no name until it is explicitly assigned by the user.
A null string (that is no port name operand specified) is used as the default port
name when a port had no user assigned name. A port name can be reset to the
default value by executing the portname command with the second operand as
a null string.
Like all other configurable port attributes, port name will be persistent across
reboots and power cycles. It will not be affected by configdefault
command but it will be cleared by portcfgdefault.
592
Fabric OS Version 3.1.x/4.1.x Reference Guide
portname
Operands
This command has the following operands:
slotnumber
(V4.1.x only)
Specify the slot number for a StorageWorks Core switch. For
all other switches this operand is not required. The slot
number must be followed by a slash ( / ) and the port
number, so that each port is represented by both slot
number (1 through 4, or 7 through 10), and port number
(0 through 15).
The StorageWorks Core switch has a total of 1–10 slots. Slot
number 5 and 6 are control processor cards, and slot 1
through 4, and 7 through 10, are port cards. On each port
card, there are 16 ports counted from the bottom, 0 to 15.
port_number
(V3.1.x only)
Specify the port number to name. This operand is required.
portnumber
(V4.1.x only)
Specify a port number. Valid values for port number vary
depending on the switch type. This operand is optional.
port_name
(V3.1.x only)
portname
(V4.1.x only)
Specify a port name. The port name is a character string
from 1 to 32 characters. This operand must be enclosed in
quotation marks. This operand is required.
Example
To assign a name to a port:
switch:admin> portname 1/3, “Tape drive 5”
Committing configuration...done.
Tape drive 5
switch:admin> portname 1/3
Tape drive 5
See Also
configdefault
portcfgdefault
portshow
Fabric OS Version 3.1.x/4.1.x Reference Guide
593
Fabric OS Commands
portPerfShow
Displays port throughput performance in bytes, kilobytes, or megabytes.
Synopsis
portPerfShow [interval]
Availability
All users.
Release
V3.1.x and V4.1.x
Description
Use this command to display throughput information for all ports on the switch (8
or 16 columns depending on the switch model). One output line is displayed per
interval (or second if no interval is specified) until Enter, Ctrl-C, or Ctrl-D is
entered.
Shown are the number of bytes received plus the number of bytes transmitted per
interval. Throughput numbers are shown as either bytes, kilobytes (k), or
megabytes (m).
Operands
This command has the following operand:
interval
594
Specify the interval, in seconds, between each sample. This
operand is optional.
Fabric OS Version 3.1.x/4.1.x Reference Guide
portPerfShow
Example
To display port throughput for a 16 port switch:
switch:admin> portperfshow
0
1
2
3
4
5
6
7
8
9
10
11
12
13
14
15
-----------------------------------------------------------------------------0
0
0
0
0
0
0
76m
0
0
0
0
0
0
0
76m
96
0
96
0
0
96
0
76m
0
0
0
0
0
0
0
76m
0
0
0
0
0
0
0
76m
0
0
0
0
0
0
0
76m
To display port throughput for a StorageWorks Core switch:
switch:admin> portPerfShow
0
1
2
3
4
5
6
7
8
9
10
==============================================================
slot 1: 0
0
0
0
0
0
0
0
0
0
0
slot 2: 0
0
0
0
0
0
0
0
0
0
0
See Also
portStatsShow
Fabric OS Version 3.1.x/4.1.x Reference Guide
595
Fabric OS Commands
portRegTest
Bit write/read test of the ASIC SRAMs and registers.
Synopsis: V3.1.x
portRegTest
Synopsis: V4.1.x
portRegTest [--slot number][-ports itemlist]
[-skiptests mask][-verbose mode]
Availability
Admin
Release
V3.1.x and V4.1.x
Description
Use this command to verify that SRAM and register data bits in each ASIC can be
independently written and read.
The method used is to write a walking pattern to each location. The command
writes 0x00000001 to register N, then reads the data, and compares it to make sure
that the same pattern previously written is read back. Then the command shifts the
pattern leftward by 1 bit (to 0x00000002), repeats the write, read and compare
cycle. This continues until the last writable bit in register N is reached
(0x80000000 for a 32-bit register).
For example, a 6-bit register is effectively tested with the following pattern for
V3.1.x:
1. 0x0001
2. 0x0002
3. 0x0004
4. 0x0008
5. 0x0010
596
Fabric OS Version 3.1.x/4.1.x Reference Guide
portRegTest
6. 0x0020
7. 0x0040
8. 0x0080
9. 0x0100
10. 0x0200
11. 0x0400
12. 0x0800
13. 0x1000
14. 0x2000
15. 0x4000
16. 0x8000
The 6-bit register is tested with the following pattern for V4.1.x:
0x0001
0x0010
0x0100
0x1000
0x0002
0x0020
0x0200
0x2000
0x0004
0x0040
0x0400
0x4000
0x0008
0x0080
0x0800
0x8000
Repeat the above steps until all ASIC SRAMs and registers have been tested.
Operands
For V3.1.x, none.
For V4.1.x, this command has the following operands:
--slot number
Specify the slot number that the diagnostic will operate on.
The ports specified will be relative to this slot number. The
default is 0.
-ports itemlist
Specify a list of blade ports to test. By default all the blade
ports in the specified slot will be used. See itemlist
help pages for further details.
Fabric OS Version 3.1.x/4.1.x Reference Guide
597
Fabric OS Commands
-skiptests mask
A bit mask that defines which of the register test subtests to
skip. By default, all subtests will be performed. Valid mask
values include one or more of the following:
Value Description
0x2
Skip retry register test.
0x4
Skip statistics register test.
0x8
Skip walk-1 test.
0x10 Skip credit counter test.
-verbose mode
Specify a non-zero value to enable verbose mode. The
default value is to disable this mode.
Example
To run bit write/read test of the ASIC SRAMs and registers (V3.1.x example):
switch:admin> portRegTest
Running Port Register Test .... passed.
To run bit write/read test of the ASIC SRAMs and registers (V4.1.x example):
switch:admin> portregtest -ports 1/0-1/15
Running Port Register Test ....
Test Complete: “portregtest” Pass 1 of 1
Duration 0 hr, 0 min & 33 sec (0:0:33:447).
passed.
Errors
When this command detects failures, the test may report one or more of the
following error messages:
■
For V3.1.x:
DIAG-REGERR
DIAG-REGERR_UNRST
DIAG-BUS_TIMEOUT
■
For V4.1.x:
BUS_TIMEOUT
REGERR
REGERR_UNRST
598
Fabric OS Version 3.1.x/4.1.x Reference Guide
portRegTest
See Also
camtest
centralmemorytest
cmemretentiontest
cmitest
crossporttest
filtertest
itemlist
portloopbacktest
spinsilk
sramretentiontest
statstest
Fabric OS Version 3.1.x/4.1.x Reference Guide
599
Fabric OS Commands
portRouteShow
Displays routing tables for a port.
Synopsis: V3.1.x
portRouteShow portnumber
Synopsis: V4.1.x
portRouteShow [slotnumber/]portnumber
Availability
All users.
Release
V3.1.x and V4.1.x
Description
Use this command to display the port address ID and the contents of the following
port routing tables:
External unicast
routing table
Shows unicast frame routing to another switch element in the
fabric. Output format is
domain_number: ports_bitmap
where:
domain_number is the switch element number that a
unicast frame can reach from the portnumber port.
ports_bitmap contains all output ports, in bitmap hex
format, that can forward unicast frames from port number to
domain number.
This table contains at least one entry for each active port:
local_switch_domain_number: 0x10000
This is for routing unicast frames designated to the embedded
port of the local switch element.
600
Fabric OS Version 3.1.x/4.1.x Reference Guide
portRouteShow
Internal unicast
routing table
Lists all ports in the local switch that a unicast frame can reach
from portnumber. Format is
destination_port: output_ports_bitmap
Because the destination_port is in the local switch,
output_ports_bitmap usually contains one bit with a
bit position number representing the destination_port
number.
Multicast routing
table
Shows multicast frame routing to the destination multicast
group. Output format is:
mcast_group_number: (mcast_group_id)
ports_bitmap
where
mcast_group_number is the multicast group
number
mcast_group_id is the multicast frame destination ID
ports_bitmap is a hex bitmap of all output port
numbers that can forward a multicast frame from the
portnumber to mcast_group_id
Broadcast routing
table
A bitmap, containing all ports reachable by a received
broadcast frame. Bit 16 of the bitmap is always set to allow the
switch element to receive broadcast frames.
Operands
This command has the following operand:
slotnumber
(V4.1.x only)
Specify the slot number for a StorageWorks Core switch.
For all other switches this operand is not required. The slot
number must be followed by a slash ( / ) and the port
number, so that each port is represented by both slot
number (1 through 4, or 7 through 10), and port number
(0 through 15).
The StorageWorks Core switch has a total of 1–10 slots.
Slot number 5 and 6 are control processor cards, and slot 1
through 4, and 7 through 10, are port cards. On each port
card, there are 16 ports counted from the bottom, 0 to 15.
portnumber
Specify a port number. Valid values for port number vary
depending on the switch type. This operand is required.
Fabric OS Version 3.1.x/4.1.x Reference Guide
601
Fabric OS Commands
Example
To display the port routing tables for blade 4 port 15:
switch:admin> portRouteShow 4/15
port address ID: 0x02bf00
external unicast routing table:
1: 0x4 (vc=3)
2: 0x10000 (vc=0)
internal unicast routing table:
60: 0x8000 (vc=2)
63: 0x1000 (vc=5)
multicast routing table:
0-255: (all mcast aliases) 0x40
broadcast routing table:
0x19040
san116:user>
See Also
bcastShow
fabricShow
mcastShow
switchShow
topologyShow
uRouteShow
602
Fabric OS Version 3.1.x/4.1.x Reference Guide
portShow
portShow
Displays port status.
Synopsis: V3.1.x
portShow portnumber
Synopsis: V4.1.x
portShow [slotnumber/]portnumber
Availability
All users.
Release
V3.1.x and V4.1.x
Description
Use this command to display status information for a port. Information varies with
the switch model and port type. The display shows:
Table 15: PortShow Display Fields
Field
Description
portCFlags
Port control flags.
portFlags
Bit map of port status flags.
portType
Port type and revision numbers.
portState
Port SNMP state:
Online - Up and running
Offline - Not online, portPhys gives details
Testing - Running diagnostics
Faulty - Failed diagnostics
Fabric OS Version 3.1.x/4.1.x Reference Guide
603
Fabric OS Commands
Table 15: PortShow Display Fields (Continued)
Field
604
Description
portPhys
Port physical state:
No_Card - No interface card present
No_Module - No module (SFP or other) present
No_Light - Module not receiving light
No_Sync - Receiving light but out of sync
In_Sync - Receiving light and in sync
Laser_Flt - Module is signaling a laser fault
Port_Flt - Port marked faulty
Diag_Flt - Port failed diagnostics
Lock_Ref - Locking to the reference signal
portScn
Last state change notification for port.
portId
24-bit D_ID for port.
portWwn
Port WWNs of devices connected.
Distance
The port's long distance level.
Speed
The port's fixed speed level or negotiated speed level:
1 Gbps - Fixed speed of 1 Gb per second.
N1 Gbps - Negotiated speed of 1 Gb per second.
2 Gbps - Fixed speed of 2 Gb per second.
N2 Gbps - Negotiated speed of 2 Gb per second.
Negotiating - The speed of the port is being
determined.
Interrupts
Total number of interrupts.
Unknown
Interrupts that are not counted elsewhere.
Lli
Low-level interface (physical state, primitive seqs).
Proc_rqrd
Frames delivered for embedded N_Port processing.
Timed_out
Frames that have timed out.
Rx_flushed
Frames requiring translation.
Tx_unavail
Frames returned from an unavailable transmitter.
Free_buffer
Free buffer available interrupts.
Overrun
Buffer overrun interrupts.
Suspended
Transmission suspended interrupts.
Fabric OS Version 3.1.x/4.1.x Reference Guide
portShow
Table 15: PortShow Display Fields (Continued)
Field
Description
Parity_err
Real Tx data parity error.
2ndary_parity_err
Secondary Tx data parity error. These are not real Tx
data parity errors but rather forced by the ASIC due to
certain central memory errors so that the transmitter will
abort the frame. This field will only be displayed when
there are errors.
CMI_bus_err
Control message interface errors.
The second column shows Link Error Status Block counters.
The third column shows the number of F_RJTs and F_BSYs generated. For
L_Ports, the third column also shows the number of LIPs received, number of
LIPs transmitted, and the last LIP received.
Operands
This command has the following operands:
slotnumber
(V4.1.x only)
Specify the slot number for a StorageWorks Core switch.
For all other switches this operand is not required. The slot
number must be followed by a slash ( / ) and the port
number, so that each port is represented by both slot
number (1 through 4, or 7 through 10), and port number
(0 through 15).
The StorageWorks Core switch has a total of 1–10 slots.
Slot number 5 and 6 are control processor cards, and slot
1 through 4, and 7 through 10, are port cards. On each
port card, there are 16 ports counted from the bottom, 0 to
15.
portnumber
Specify a port number. Valid values for port number vary
depending on the switch type. This operand is required.
Fabric OS Version 3.1.x/4.1.x Reference Guide
605
Fabric OS Commands
Example
To display the status for a specified E_Port:
switch:admin> portshow 15
portName:
switch:admin> portShow 2/15
portFlags: portCFlags:
0x300082d7 portLbMod:
0x0
0x10 PRESENT ACTIVE E_PORT G_PORT U_PORT SEG
MENTED CBL_LBportFlags:
LOGIN
0x20001
PRESENT DISABLED LED
portType: 4.1
portType: 1.1
portState: 1 portState:
Online 2
Offline
portPhys: 6 portPhys:
In_Sync 2
No_Module
portScn:
7 portScn:
Segmented
0 Flow control mode 0
portRegs: 0x81050000
portId:
815f00
portData: 0x11efc2d0
portWwn:
20:1f:00:60:69:80:04:30
portId:
021500
Distance: normal
portWwn:
20:05:00:60:69:c0:06:71
portSpeed: 2Gbps
portWwn of device(s) connected:
20:05:00:60:69:c0:06:71
Distance: normal
Interrupts:
0
Link_failure: 0
Frjt: 0
Speed:
2Gbps
Unknown:
0
Loss_of_sync: 0
Fbsy: 0
Lli:
0
Loss_of_sig: 0
Interrupts: Proc_rqrd:
227
Link_failure:
0
Protocol_err:
0
Frjt:
0
0
Unknown:
Timed_out:
28
Loss_of_sync:
0
Invalid_word:
7
Fbsy:
0
0
Lli:
Rx_flushed:
63
Loss_of_sig:
0
Invalid_crc:
0
0
Proc_rqrd:
Tx_unavail:
150
Protocol_err:
0
Delim_err:
0
0
Timed_out:
Free_buffer:
0
Invalid_word:
0
Address_err:
0
0
Rx_flushed: Overrun:
0
Invalid_crc:
0
Lr_in:
0
0
Tx_unavail: Suspended:
0
Delim_err:
0
Lr_out:
0
0
Free_buffer: Parity_err:
0
Address_err:
0
Ols_in:
0
0
Overrun:
2_parity_err:
0
Lr_in:
0
Ols_out:
14
0
Suspended:
CMI_bus_err:
0
Lr_out:
0
14
Parity_err:
switch:admin>0
Ols_in:
7
Ols_out:
7
switch:admin>
See Also
switchShow
606
Fabric OS Version 3.1.x/4.1.x Reference Guide
portstatsclear
portstatsclear
Clear the hardware statistics of a specified switch port.
Synopsis: V3.1.x
portstatsclear portnumber
Synopsis: V4.1.x
portstatsclear [slotnumber/]portnumber
Availability
Admin
Release
V3.1.x and V4.1.x
Description
This command clears the hardware statistics for a specified switch port. At the
same time, this command also clears the hardware statistics for the associated
ports in the target port quad.
Operands
This command has the following operands:
slotnumber
(V4.1.x only)
Specify the slot number for a StorageWorks Core switch.
For all other switches this operand is not required. The slot
number must be followed by a slash ( / ) and the port
number, so that each port is represented by both slot
number (1 through 4, or 7 through 10), and port number
(0 through 15).
The StorageWorks Core switch has a total of 1–10 slots.
Slot number 5 and 6 are control processor cards, and slot
1 through 4, and 7 through 10, are port cards. On each
port card, there are 16 ports counted from the bottom, 0 to
15.
portnumber
Specify a port number. Valid values for port number vary
depending on the switch type. This operand is required.
Fabric OS Version 3.1.x/4.1.x Reference Guide
607
Fabric OS Commands
Example
To clear the hardware statistics for slot 8 port 5:
switch:admin> portstatsclear 8/5
switch:admin>
See Also
portstatshow
608
Fabric OS Version 3.1.x/4.1.x Reference Guide
portStatsShow
portStatsShow
Displays port hardware statistics.
Synopsis: V3.1.x
portStatsShow portnumber
Synopsis: V4.1.x
portStatsShow [slotnumber/]portnumber
Availability
All users.
Release
V3.1.x and V4.1.x
Description
Use this command to display port hardware statistics counters.
stat_wtx
4-byte words transmitted.
stat_wrx
4-byte words received.
stat_ftx
Frames transmitted.
stat_frx
Frames received.
stat_c2_frx
Class 2 frames received.
stat_c3_frx
Class 3 frames received.
stat_lc_rx
Link control frames received.
stat_mc_rx
Multicast frames received.
stat_mc_to
Multicast timeouts.
stat_mc_tx
Multicast frames transmitted.
tim_rdy_pri
Time R_RDY high priority.
tim_txcrd_z
Time BB_credit zero.
er_enc_in
Encoding errors inside frames.
Fabric OS Version 3.1.x/4.1.x Reference Guide
609
Fabric OS Commands
610
er_crc
Frames with CRC errors.
er_trunc
Frames shorter than minimum.
er_toolong
Frames longer than maximum.
er_bad_eof
Frames with bad end-of-frame.
er_enc_out
Encoding error outside frames.
er_disc_c3
Class 3 frames discarded.
fl_open
Number of OPNyx sent.
fl_opened
Number of OPNyx received.
fl_openfr
Number of OPNfr sent.
fl_cls_idle
CLS sent due to loop idle.
fl_cls_rx
CLS received when OPEN.
fl_bb_stall
OPN/CLS BB_Credit stalls.
fl_cf_alloc
Number of CFIFOs allocated.
fl_cf_opn
CFIFOs delivered when OPENED.
fl_cf_full
Number of CFIFOs full stalls.
fl_cf_na
CFIFO not available stalls.
fl_trig_age
Number of age count triggers.
fl_trig_lp
Number of loop not busy triggers.
open
Number of times the FL_Port entered OPEN state.
transfer
Number of times the FL_Port entered TRANSFER state.
opened
Number of times the FL_Port entered OPENED state.
starve_stop
Loop tenancies stopped due to starvation.
fl_tenancy
Number of times FL_Port had loop tenancy.
nl_tenancy
Number of times NL_Port had loop tenancy.
frame_nozone
Frames rejected due to zone protection.
Fabric OS Version 3.1.x/4.1.x Reference Guide
portStatsShow
Operands
This command has the following operands:
slotnumber
(V4.1.x only)
Specify the slot number for a StorageWorks Core switch.
For all other switches this operand is not required. The slot
number must be followed by a slash ( / ) and the port
number, so that each port is represented by both slot
number (1 through 4, or 7 through 10), and port number
(0 through 15).
The StorageWorks Core switch has a total of 1–10 slots.
Slot number 5 and 6 are control processor cards, and slot
1 through 4, and 7 through 10, are port cards. On each
port card, there are 16 ports counted from the bottom, 0 to
15.
portnumber
Specify a port number. Valid values for port number vary
depending on the switch type. This operand is required.
Fabric OS Version 3.1.x/4.1.x Reference Guide
611
Fabric OS Commands
Example
To display the basic set of statistics for blade 2 port 3:
switch:admin> portstatsshow 2/5
stat_wtx
24081
4-byte words transmitted
stat_wrx
24081
4-byte words received
stat_ftx
141
Frames transmitted
stat_frx
141
Frames received
stat_c2_frx
0
Class 2 frames received
stat_c3_frx
117
Class 3 frames received
stat_lc_rx
12
Link control frames received
stat_mc_rx
0
Multicast frames received
stat_mc_to
0
Multicast timeouts
stat_mc_tx
0
Multicast frames transmitted
tim_rdy_pri
0
Time R_RDY high priority
tim_txcrd_z
0
Time BB_credit zero
er_enc_in
0
Encoding errors inside of frames
er_crc
0
Frames with CRC errors
er_trunc
0
Frames shorter than minimum
er_toolong
0
Frames longer than maximum
er_bad_eof
0
Frames with bad end-of-frame
er_enc_out
612
Encoding error outside of frames
er_disc_c3
0
Class 3 frames discarded
open
0
loop_open
transfer
0
loop_transfer
opened
0
FL_Port opened
starve_stop
0
tenancies stopped due to starvation
fl_tenancy
0
number of times FL has the tenancy
nl_tenancy
0
number of times NL has the tenancy
frame_nozone
0
frames rejected due to zone protection
switch:admin>
See Also
portErrShow
portShow
612
Fabric OS Version 3.1.x/4.1.x Reference Guide
portswap
portswap
Swap area numbers of two switch ports.
Synopsis
portswap [slotnumber/]port1 [slotnumber/]port2
Availability
Admin
Release
V4.1.x
Description
Use this command to swap area numbers for a pair of switch ports. Both switch
ports must be disabled prior to executing this command. The portswap
command cannot be used unless the feature is first enabled with the
portswapenable command.
Operands
This command has the following operands:
slotnumber
Specify the slot number for a StorageWorks Core switch.
For all other switches this operand is not required. The slot
number must be followed by a slash ( / ) and the port
number, so that each port is represented by both slot
number (1 through 4, or 7 through 10), and port number
(0 through 15).
The StorageWorks Core switch has a total of 1–10 slots.
Slot number 5 and 6 are control processor cards, and slot
1 through 4, and 7 through 10, are port cards. On each
port card, there are 16 ports counted from the bottom, 0 to
15.
port1
Specify the port number where you want to swap the area
ID number.
port2
Specify the port number where you want to swap the port1
area ID number.
Fabric OS Version 3.1.x/4.1.x Reference Guide
613
Fabric OS Commands
Example
The following command swaps area numbers between port 2 on slot1 with port5
on slot2:
switch:admin> portswap 1/2 2/5
See Also
switchshow
portshow
portenable
portdisable
portswapshow
614
Fabric OS Version 3.1.x/4.1.x Reference Guide
portswapdisable
portswapdisable
Disable the portswap feature.
Synopsis
portswapdisable
Availability
Admin
Release
V4.1.x
Description
Use this command to disable the portswap feature. The portswap command
cannot be used once this feature is disabled.
Operands
None.
Example
The following command disables the portswap feature:
switch:admin> portswapdisable
done.
See Also
portenable
portdisable
portshow
portswapenable
portswapshow
switchshow
Fabric OS Version 3.1.x/4.1.x Reference Guide
615
Fabric OS Commands
portswapenable
Enable the portswap feature.
Synopsis
portswapenable
Availability
Admin
Release
V4.1.x
Description
Use this command to enable the portswap feature. The portswap command
cannot be used unless the feature is first enabled with this command.
Operands
None.
Example
The following command enables the portswap feature:
switch:admin> portswapenable
done.
switch:admin>
616
Fabric OS Version 3.1.x/4.1.x Reference Guide
portswapenable
See Also
portenable
portdisable
portshow
portswapenable
portswapshow
switchshow
Fabric OS Version 3.1.x/4.1.x Reference Guide
617
Fabric OS Commands
portswapshow
Displays information for any ports where area ID numbers have been swapped.
Synopsis
portswapshow
Availability
Admin
Release
V4.1.x
Description
Use this command to displays port and area information for those ports whose
area number is different from the default area number. The default area number of
a port is same as its switch port number.
Operands
None.
Example
To display information for port area IDs that have been swapped:
switch:admin> portswapshow
PortSwap is enabled
No ports have been swapped
switch:admin>
618
Fabric OS Version 3.1.x/4.1.x Reference Guide
portswapshow
See Also
errshow
portenable
portdisable
portshow
portswap
portswapdisable
portswapenable
switchshow
Fabric OS Version 3.1.x/4.1.x Reference Guide
619
Fabric OS Commands
porttest
Functional test of a switch in a live fabric.
Synopsis: V3.1.x
porttest [ports, iteration, delay, timeout, pattern,
patsize, seed]
Synopsis: V4.1.x
porttest [-ports itemlist][-iteration count]
[-userdelay time][-timeout time][-pattern pattern]
[-patsize size][-seed seed][-listtype porttype]
Availability
Admin
Release
V3.1.x and V4.1.x
Description
Use this command to isolate problems to a single replaceable element and isolate
problems to near-end terminal equipment, far-end terminal equipment, or
transmission line. Diagnostics can be executed every day, and also on demand to
troubleshoot a failure.
This command verifies the intended functional operation of the switch by sending
frames from port M's transmitter, and looping the frames back via an external
fiber cable into port M's receiver; thus exercising all the switch components from
the main board to the GBIC to the fiber cable to the SFPs (of the devices and the
switch) and back to the main board.
The cables and SFPs connected should be of the same technology: meaning a
short wavelength SFP (switch) port is connected to another short wavelength SFP
(device) port using a short wavelength cable; and a long wavelength port is
connected to a long wavelength port; and a copper port is connected to a copper
port.
620
Fabric OS Version 3.1.x/4.1.x Reference Guide
porttest
Only one frame is transmitted and received at any one time. The port LEDs flicker
green while the test is running.
The following port types are supported:
■
E_ports
■
F_ports. (Must support ELS ECHO)
■
L_ports
■
N->N Loopback ports
This command will not run on any other port type.
The command performs the following actions:
1. Initiate tests on certain ports (porttest command)
2. Stop active tests on certain ports (stopporttest command)
3. Get the snapshot of the test result. (porttestshow command)
Once porttest is triggered, you can use stopporttest to stop the test.
See the stopporttest command for more information.
Once porttest is triggered, you can use stopporttest to stop the test.
Current progress of porttest can be viewed by running porttestshow.
See the porttestshow command for more information.
If the port type changes during porttest execution, the test will continue on a
given port as long as it is supported. If a request is made to test all possible ports
on a given switch, the command will start a new test using the new port type to
start the appropriate test.
Operands
This command has the following operands:
ports
(V3.1.x only)
Fabric OS Version 3.1.x/4.1.x Reference Guide
Specify the port to run the test on. If omitted, the test will
be executed on all possible ports. Default value is All
ports enable. Valid values are:
-1 All ports.
-2 All E_ports.
-3 All L_ports.
-4 All F_ports.
-5 All N->N Loopback ports.
This operand is optional.
621
Fabric OS Commands
iteration
(V3.1.x only)
Specify the number of times (or number of frames per
port) to execute this test. Default value is -1 that is set
the test to run until stopped. Valid values are:
0 Run the test on timeout mode.
-1 Run the test until stopped.
This operand is optional.
delay
(V3.1.x only)
Specify the time delay in minutes between frames being
sent. The default value is 20 minutes. This operand is
optional.
timeout
(V3.1.x only)
Specify the maximum number of seconds to allow for
the test to run. Setting the iteration to 0 will set
this command into timeout mode. The default value
is 0. This operand is optional.
pattern
(V3.1.x only)
Specify the pattern of the test packets payload. The
default pattern type is random. Nineteen types of
predefined patterns are provided with the test. Refer to
the datatypeshow command to view the types of
patterns that are supported with porttest. This
operand is optional.
patsize
(V3.1.x only)
Specify the size of the pattern. The default value is
2112. This operand is optional.
seed
(V3.1.x only)
Specify the seed value to be used with the pattern. The
default seed value is 0xaa. This operand is optional.
-ports itemlist
Specify a list of user ports to test. By default all the user
ports in the current slot will be assumed. See
itemlist help pages for further details.
-iteration count
Specify the number of times (or number of frames per
port) to execute this test. Default value is 20. Valid
values are:
0 Run the test on timeout mode.
-1 Run forever.
-userdelay time
Specify the delay between frames sent by porttest
in minutes. The default value is 10 minutes.
-timeout time
Specify the number of seconds to run the test. Setting
the iteration to 0 will set the porttest into timeout
mode. The default value is 0.
-pattern
Specify the pattern of the test packets payload. Default
pattern type is random. Twenty types of predefined
patterns are provided with the test. Use the
datatypeshow command to see the types of pattern that
are supported with portTest.
(V4.1.x only)
(V4.1.x only)
(V4.1.x only)
(V4.1.x only)
(V4.1.x only)
622
Fabric OS Version 3.1.x/4.1.x Reference Guide
porttest
-patsize size
(V4.1.x only)
Specify the size of the pattern. Default size of the
pattern is 1024 bytes. Valid rang of values are 4 bytes
through 2112 bytes.
-seed seed
Specify the seed pattern to be used with pattern.
Default seed value is 0xaa.
-listtype
porttype
Specify the type of ports to run porttest. The
default value is -1. Valid values are:
-1 All ports.
-2 All E_ports.
-3 All L_ports.
-4 All F_ports.
-5 All Loopback ports.
(V4.1.x only)
(V4.1.x only)
Example
To run a functional test on an active switch (V3.1.x example):
switch:admin> porttest -1,1000
To run a functional test on an active switch (V4.1.x example):
switch:admin> porttest -ports 1/1-1/3
See Also
crossporttest
fporttest
loopporttest
portloopbacktest
porttestshow
spinfab
stopporttest
Fabric OS Version 3.1.x/4.1.x Reference Guide
623
Fabric OS Commands
porttestshow
Retrieve information from the current execution of the porttest command.
Synopsis: V3.1.x
porttestshow [ports]
Synopsis: V4.1.x
porttestshow [-ports itemlist]
Availability
Admin
Release
V3.1.x and V4.1.x
Description
Use this command to retrieve a snapshot of information from porttest
command.
Following information is displayed:
■
Pass/Fail information on a given port.
■
Port type tested.
■
Current State of portTest:
— NO TEST
— TESTING
— TEST DONE
■
Type of ports asked to test:
— ALL_PORTS
— ALL_E_PORTS
— ALL_L_PORTS
— ALL_F_PORTS
624
Fabric OS Version 3.1.x/4.1.x Reference Guide
porttestshow
— ALL_LB_PORTS
— SINGLE_PORT
■
pattern used in testing.
■
seed used in testing.
■
User Delay value.
■
Total iteration value.
■
Current test iteration.
■
Total Fails on this test.
■
Consecutive Fails on this test.
■
porttest Start Time.
■
porttest Stop Time.
■
Timeout value.
■
Error code if any.
Operands
This command has the following operands:
ports
(V3.1.x only)
Specify the port to stop the test on. If omitted, the test
will be executed on all possible ports. Default value is
-1 stop the test on all ports.This operand is optional.
-ports itemlist
(V4.1.x only)
Specify a list of user ports to test. By default all the user
ports in the current slot will be assumed. See
itemlist help pages for further details.
Fabric OS Version 3.1.x/4.1.x Reference Guide
625
Fabric OS Commands
Example
To view information on the current execution of the porttest command:
switch:admin> porttestshow 6
Port 6 : PASS
PortType: LOOPBACK PORT
PortState: TESTING
PortState: TX
PortTypeToTest: ALL_PORTS
Pattern: 0x1
Seed: 0xaa
UserDelay: 10
TotalIteration: 100
TotalFail: 0
StartTime: Jul 1 09:03:49
Timeout: 0
switch:admin>
CurrentIteration: 22
ConsecutiveFail: 0
StopTime: NONE
ErrorCode: 0
See Also
crossporttest
fporttest
loopporttest
portloopbacktest
porttest
spinfab
stopporttest
626
Fabric OS Version 3.1.x/4.1.x Reference Guide
powerofflistset
powerofflistset
Sets slot power off list order.
Synopsis
powerofflistset
Availability
Admin
Release
V4.1.x
Description
Use this command to set the physical power off slot order. The system available
power is compared to the system demand power to determine if there is enough
power to operate. If there is less power available than the demand, then the power
off list is processed until there is enough power for the system to operate. The
format of the display varies depending on the switch model and the number of
slots present.
When this command is executed, the first item displayed is the current power off
list order. Then you are prompted to make any changes, and finally, the new power
off list order is displayed. The command then prompts to verify and commit the
changes.
Operands
None.
Fabric OS Version 3.1.x/4.1.x Reference Guide
627
Fabric OS Commands
Example
To modify the power off list order:
switch:admin> powerofflistset
Slot
Current POL
------------------10
1st
9
2nd
8
3rd
7
4th
4
5th
3
6th
2
7th
1
8th
1st
2nd
3rd
4th
5th
6th
7th
8th
slot
slot
slot
slot
slot
slot
slot
slot
to
to
to
to
to
to
to
to
be
be
be
be
be
be
be
be
power
power
power
power
power
power
power
power
off:
off:
off:
off:
off:
off:
off:
off:
(1..10) [10] 7
(1..10) [9] 8
(1..10) [9]
(1..10) [10]
(1..4) [4] 1
(2..4) [3] 2
(3..4) [3]
(4..4) [4]
Old POL
New POL
Power Off Order
------------------------------------10
7
1st
9
8
2nd
8
9
3rd
7
10
4th
4
1
5th
3
2
6th
2
3
7th
1
4
8th
Proceed to change the POL order? (yes, y, no, n): [no] y
switch:admin>
See Also
chassisshow
powerofflistshow
psshow
slotpoweroff
slotpoweron
slotshow
628
Fabric OS Version 3.1.x/4.1.x Reference Guide
powerofflistshow
powerofflistshow
Displays slot power off list order.
Synopsis
powerofflistshow
Availability
All users.
Release
V4.1.x
Description
Use this command to displays the order in which the physical slots will be
powered off. The system available power is compared to the system demand
power to determine if there is enough power to operate. If there is less power
available than the demand, then the power off list is processed until there is
enough power for the system to operate. The format of the display varies
depending on the switch model and the number of slots present.
Operands
None.
Example
To display the slot power off list order:
switch12k:admin> powerofflistshow
Slot 10 will be powered off 1st
Slot 9 will be powered off 2nd
Slot 8 will be powered off 3rd
Slot 7 will be powered off 4th
Slot 4 will be powered off 5th
Slot 3 will be powered off 6th
Slot 2 will be powered off 7th
Slot 1 will be powered off 8th
switch12k:admin>
Fabric OS Version 3.1.x/4.1.x Reference Guide
629
Fabric OS Commands
See Also
chassisshow
powerofflistset
psshow
slotpoweroff
slotpoweron
slotshow
630
Fabric OS Version 3.1.x/4.1.x Reference Guide
psShow
psShow
Displays power supply status.
Synopsis
psShow
Availability
All users.
Release
V3.1.x and V4.1.x
Description
Use this command to display the current status of the switch power supplies.
The format of the display varies according to the switch model and number of
power supplies present. Optionally, depending upon switch model, the OEM
Serial ID Data is displayed after each power supply status line.
The StorageWorks Core switch cannot display power supply status:
Power Supply status not available on this switch model.
The status of each supply is shown as:
OK
Power supply functioning correctly.
absent
Power supply not present.
Unknown
Unknown power supply unit installed.
Predicting Failure
Power supply is present, but predicting failure.
faulty
Power supply present but faulty (no power cable, power
switch turned off, fuse blown, or other internal error).
Operands
None.
Fabric OS Version 3.1.x/4.1.x Reference Guide
631
Fabric OS Commands
Example
To view the status of the power supply for the current switch:
switch:admin> psShow
Power Supply #1 is OK
DELTA DPS-1001AB-1E 23000000601 S1
Power Supply #2 is faulty
DELTA DPS-1001AB-1E 23000000601 S1
Power Supply #3 is OK
DELTA DPS-1001AB-1E 23000000601 S1
Power Supply #4 is absent
IXD0111000088
IXD0111000162
IXD0111000120
See Also
fanShow
tempShow
632
Fabric OS Version 3.1.x/4.1.x Reference Guide
ptdatashow
ptdatashow
Displays port data structures.
Synopsis
ptdatashow [slotnumber/]portnumber
Availability
All users.
Release
V4.1.x
Description
Use this command to display port data structures.
Note: This command is not intended for normal user operation and is available to
provide supplemental information during system debug.
Operands
This command has the following operands:
slotnumber
Specify the slot number for a StorageWorks Core switch.
For all other switches this operand is not required. The slot
number must be followed by a slash ( / ) and the port
number, so that each port is represented by both slot
number (1 through 4, or 7 through 10), and port number
(0 through 15).
The StorageWorks Core switch has a total of 1–10 slots.
Slot number 5 and 6 are control processor cards, and slot
1 through 4, and 7 through 10, are port cards. On each
port card, there are 16 ports counted from the bottom, 0
to 15.
portnumber
Specify a port number. Valid values for port number vary
depending on the switch type. This operand is required.
Fabric OS Version 3.1.x/4.1.x Reference Guide
633
Fabric OS Commands
Example
To display the port data structure for slot 1 port 1:
switch:admin> ptdatashow 1/1
Port Data Structure for slot: 1, port: 1
Bloom Data Pointers: bloomp = 0xc6eb7200 (fbloomp
------------------blm_regs
0xc9b17000
blm_proc_dir
fab_ptr
0xc04f0000
fab_Iop
qdblm
0xc5702c00
chblm
pt
0xc5701760
blm_miniS_handle
= 0x00000000)
0xc50d9f20
0xc04f0050
0xc661b5a0
0xc57012e0
Bloom Local Variables
--------------------blm_type = 0x00000012 G_PORT E_PORTto stop
blm_state = 0x00000001 ONLINE p_phstate = IN_SYNC
blm_flags = 0x00000000 NORMAL
lab_mode = 0x00
EFD
blm_port_type = Intra-blade
blm_rev
1
blm_initialized
0
my_domain
1
blm_quad_idx
1
blm_chip_idx
1
blm_miniS_idx
1
blm_blade_idx
1
--- <output truncated> ---
See Also
None.
634
Fabric OS Version 3.1.x/4.1.x Reference Guide
ptphantomshow
ptphantomshow
Displays the quick-loop CAM tables.
Synopsis
ptphantomshow [slotnumber/]portnumber
Availability
All users..
Release
V4.1.x
Description
Use this command to display the quick-loop CAM (Content Addressable
Memory) tables.
Note: This command is not intended for normal user operation and is available to
provide supplemental information during system debug.
Fabric OS Version 3.1.x/4.1.x Reference Guide
635
Fabric OS Commands
Operands
This command has the following operands:
slotnumber
Specify the slot number for a StorageWorks Core
switch. For all other switches this operand is not
required. The slot number must be followed by a slash
( / ) and the port number, so that each port is
represented by both slot number (1 through 4, or 7
through 10), and port number (0 through 15).
The StorageWorks Core switch has a total of 1–10
slots. Slot number 5 and 6 are control processor cards,
and slot 1 through 4, and 7 through 10, are port cards.
On each port card, there are 16 ports counted from the
bottom, 0 to 15.
portnumber
Specify a port number. Valid values for port number
vary depending on the switch type. This operand is
required.
Example
To display the port routing tables for slot 2 port 1:
switch:admin> ptphantomshow 2/1
Port Routing table for slot: 2, port: 1
The following alpas are private on some switch ports:
(alpa, UI port bitmap on the blade)
plt_cam table and plt_alpa table:
index
sid
plt_alpas
......
plt_did table for this port:
ali alpa sid
ali alpa
......
sid
See Also
None.
636
Fabric OS Version 3.1.x/4.1.x Reference Guide
ptpropshow
ptpropshow
Displays port properties.
Synopsis
ptpropshow [slotnumber/]portnumber | [slot] -all
Availability
All users..
Release
V4.1.x
Description
Use this command to display the ASIC port properties contents for the specified
port.
Note: This command is not intended for normal user operation and is available to
provide supplemental information during system debug.
Fabric OS Version 3.1.x/4.1.x Reference Guide
637
Fabric OS Commands
Operands
This command has the following operands:
slotnumber
Specify the slot number for a StorageWorks Core
switch. For all other switches this operand is not
required. The slot number must be followed by a slash
( / ) and the port number, so that each port is
represented by both slot number (1 through 4, or 7
through 10), and port number (0 through 15).
The StorageWorks Core switch has a total of 1–10
slots. Slot number 5 and 6 are control processor cards,
and slot 1 through 4, and 7 through 10, are port
cards. On each port card, there are 16 ports counted
from the bottom, 0 to 15.
portnumber
Specify a port number. Valid values for port number
vary depending on the switch type. This operand is
required.
[slot] -all
Specify which slot to operate on. The entire ports in the
slot will be displayed. If slot is not specified, the
current slot will be assumed. This operand is optional.
Example
To display the port properties for slot 1 port 2:
switch:admin> ptpropshow 1/2
Port Property for slot: 1, port: 2
P2: [be,3,2],SP,CAP:[1,1,1,(1,1,0)],WWN: 00:00:00:00:00:00:00:00
switch:admin>
See Also
chippropshow
ptregshow
638
Fabric OS Version 3.1.x/4.1.x Reference Guide
ptregshow
ptregshow
Displays ASIC port registers.
Synopsis
ptpropshow [slotnumber/]portnumber
Availability
All users..
Release
V4.1.x
Description
Use this command to display the contents of port registers.
Note: This command is not intended for normal user operation and is available to
provide supplemental information during system debug.
Operands
This command has the following operands:
slotnumber
Specify the slot number for a StorageWorks Core
switch. For all other switches this operand is not
required. The slot number must be followed by a slash
( / ) and the port number, so that each port is
represented by both slot number (1 through 4, or 7
through 10), and port number (0 through 15).
The StorageWorks Core switch has a total of 1–10
slots. Slot number 5 and 6 are control processor cards,
and slot 1 through 4, and 7 through 10, are port
cards. On each port card, there are 16 ports counted
from the bottom, 0 to 15.
portnumber
Specify a port number. Valid values for port number
vary depending on the switch type. This operand is
required.
Fabric OS Version 3.1.x/4.1.x Reference Guide
639
Fabric OS Commands
Example
To display the port registers for slot 1 port 1:
switch:admin> ptregshow 1/1
Port Registers for slot: 1, port: 1
0xc9b17000:
0xc9b17004:
0xc9b1700a:
0xc9b1700e:
0xc9b17014:
0xc9b1701a:
0xc9b1701e:
0xc9b17024:
0xc9b1702c:
0xc9b17034:
0xc9b17038:
0xc9b1703c:
--- <output
chip_id
did_vc_map
int_status
vc_config
mem_bufline
mem_offset
quad_imask
lli_status
lli_def
prescaler0
toc0
toc_ctl
truncated> ---
0104
0800
1020
00c0
00080008
0000
c003
00040007
00000000
000a
0007
0000
0xc9b17002:
0xc9b17008:
0xc9b1700c:
0xc9b17010:
0xc9b17018:
0xc9b1701c:
0xc9b17020:
0xc9b17028:
0xc9b17030:
0xc9b17036:
0xc9b1703a:
0xc9b17044:
port_config
int_mask
err_status
buf_error
mem_ctl
port_ctl
port_addr
lli_ctl
lli_mask
tod0
toc1
putq_stat
0a38
064f
0003
00000000
1024
0000
00010000
00080180
00020000
0104
0000
ffffffff
See Also
None.
640
Fabric OS Version 3.1.x/4.1.x Reference Guide
ptrouteshow
ptrouteshow
Displays port routing properties.
Synopsis
ptrouteshow [slotnumber/]portnumber
Availability
All users..
Release
V4.1.x
Description
Use this command to display the ASIC routing table contents.
Note: This command is not intended for normal user operation and is available to
provide supplemental information during system debug.
Operands
This command has the following operands:
slotnumber
Specify the slot number for a StorageWorks Core
switch. For all other switches this operand is not
required. The slot number must be followed by a slash
( / ) and the port number, so that each port is
represented by both slot number (1 through 4, or 7
through 10), and port number (0 through 15).
The StorageWorks Core switch has a total of 1–10
slots. Slot number 5 and 6 are control processor cards,
and slot 1 through 4, and 7 through 10, are port
cards. On each port card, there are 16 ports counted
from the bottom, 0 to 15.
portnumber
Specify a port number. Valid values for port number
vary depending on the switch type. This operand is
required.
Fabric OS Version 3.1.x/4.1.x Reference Guide
641
Fabric OS Commands
Example
To display the port routing properties for slot 1 port 3:
switch:admin> ptrouteshow 1/3
Port Routing table for slot: 1, port: 3
port address ID: 0x130000
external unicast routing table:
internal unicast routing table:
multicast routing table:
broadcast routing table:
See Also
ptrouteshow
642
Fabric OS Version 3.1.x/4.1.x Reference Guide
ptstatsshow
ptstatsshow
Displays port statistics properties.
Synopsis
ptstatsshow [slotnumber/]portnumber
Availability
All users..
Release
V4.1.x
Description
Use this command to display the port statistic properties for the specified port.
Note: This command is not intended for normal user operation and is available to
provide supplemental information during system debug.
Operands
This command has the following operands:
slotnumber
Specify the slot number for a StorageWorks Core
switch. For all other switches this operand is not
required. The slot number must be followed by a slash
( / ) and the port number, so that each port is
represented by both slot number (1 through 4, or 7
through 10), and port number (0 through 15).
The StorageWorks Core switch has a total of 1–10
slots. Slot number 5 and 6 are control processor cards,
and slot 1 through 4, and 7 through 10, are port
cards. On each port card, there are 16 ports counted
from the bottom, 0 to 15.
portnumber
Specify a port number. Valid values for port number
vary depending on the switch type. This operand is
required.
Fabric OS Version 3.1.x/4.1.x Reference Guide
643
Fabric OS Commands
Example
To view port statistics properties on slot 1 port 3:
switch:admin> ptstatsshow 1/3
Port Statistics for slot: 1, port: 3
Connection type: BE
Configured Speed: 2
Interrupts:
60
Unknown:
2
Lli:
20
Proc_rqrd:
40
Timed_out:
0
Rx_flushed:
0
Tx_unavail:
0
Free_buffer:
0
Overrun:
0
Suspended:
0
Parity_err:
0
2_parity_err:
0
CMI_bus_err:
0
--- <output truncated> ---
Link_failure:
Loss_of_sync:
Loss_of_sig:
Protocol_err:
Invalid_word:
Invalid_crc:
Delim_err:
Address_err:
Lr_in:
Lr_out:
Ols_in:
Ols_out:
0
0
0
0
0
0
0
0
0
0
0
0
See Also
ptstatsshow
644
Fabric OS Version 3.1.x/4.1.x Reference Guide
qlDisable
qlDisable
Disable QuickLoop mode.
Synopsis
qlDisable
Availability
Admin
Release
V3.1.x
Description
Use this command to disable QuickLoop mode on a switch. All QuickLoop ports
are re-initialized to fabric mode, allowing public devices to perform fabric login.
If QuickLoop is being run on dual switches, this command disables the local
switch and causes the partner switch to re-initialize to a single-switch QuickLoop,
containing only the devices connected to the partner switch.
Note: If Advanced Zoning is in use the qlDisable, qlEnable, and qlPartner
commands are not in effect. In this case, the qlPortDisable command can be
used to disable individual ports.
This command requires an Advanced Zoning license.
Operands
None.
Fabric OS Version 3.1.x/4.1.x Reference Guide
645
Fabric OS Commands
Example
The following entry disables QuickLoop mode:
switch:admin> qldisable
Setting switch to Fabric mode,
Committing configuration...done.
Re-enable FL_Ports
switch:admin>
See Also
qlEnable
qlPortDisable
qlShow
646
Fabric OS Version 3.1.x/4.1.x Reference Guide
qlEnable
qlEnable
Enable QuickLoop mode.
Synopsis
qlEnable
Availability
Admin
Release
V3.1.x
Description
Use this command to enable QuickLoop mode on a switch. All devices connected
to QuickLoop ports are re-initialized to form a single loop.
If a partner switch is configured, qlEnable causes re-initialization of the
partner if it is in QuickLoop mode. The devices on the two switches are then
combined to form a single loop (using a single AL_PA space).
QuickLoop combines arbitrated loop and fabric topologies. It consists of multiple
private arbitrated loops (looplets) interconnected by a fabric, with the existence of
the fabric and the physical locations of the devices transparent. All NL_Ports
share a single AL_PA space, and operate in accordance with FC-AL.
QuickLoop initialization includes the following two steps:
1. Pass 1: Sequential looplet initialization. Allows each device in a looplet to
obtain a unique AL_PA.
2. Pass 2: Full QuickLoop initialization. Brings the QuickLoop up to operation.
Fabric OS Version 3.1.x/4.1.x Reference Guide
647
Fabric OS Commands
Note: If the qlPortDisable command has been entered for a specific port, the
qlEnable command cannot re-enable that port, because it has been removed from
QuickLoop management. The port must be specifically re-enabled using the
qlPortEnable command.
If Advanced Zoning is in use the qlDisable, qlEnable, and qlPartner
commands are not in effect. In this case, the qlPortEnable command can be used
to enable individual ports.
This command requires an Advanced Zoning license.
Operands
None.
Example
The following entry enables QuickLoop mode:
switch:admin> qlenable
Setting switch to Quick Loop mode,
Committing configuration...done.
switch:admin>
See Also
qlDisable
qlPortEnable
qlShow
648
Fabric OS Version 3.1.x/4.1.x Reference Guide
qloopAdd
qloopAdd
Add a member to a QuickLoop.
Synopsis
qloopAdd “qloopname”, “member;member”
Availability
Admin
Release
V3.1.x and V4.1.x
Description
Use this command to add one or more members to an existing QuickLoop.
When a configuration is enabled, all QuickLoops defined in the configuration
must resolve to one or two switch World Wide Names.
Zone alias names entered as members of this QuickLoop must be defined with
WWNs. Zone alias names that are defined by domain and port number, or AL_PA
are not accepted as members of the QuickLoop.
Note: This command requires an Advanced Zoning license.
When security is enabled, this command can only be issued from the Primary FCS
switch. See “Security Commands” on page 941.
Fabric OS Version 3.1.x/4.1.x Reference Guide
649
Fabric OS Commands
Operands
The following operands are required:
qloopname
Specify the name of QuickLoop, in quotation marks.
member
Specify a list of QuickLoop members, in quotation
marks, separated by semicolons. Include one or more
of the following:
■ World Wide Names
■ Zone alias names
Example
To add an alias for a second World Wide Name to “qlp1”:
switch:admin> qloopAdd “qlp1”, “wwn2”
See Also
qloopCreate
qloopDelete
qloopRemove
qloopShow
650
Fabric OS Version 3.1.x/4.1.x Reference Guide
qloopCreate
qloopCreate
Create a QuickLoop.
Synopsis
qloopCreate “qloopname”, “member;member”
Availability
Admin
Release
V3.1.x and V4.1.x
Description
Use this command to create a QuickLoop.
A QuickLoop name must begin with a letter and be followed by any number of
letters, digits, and underscore characters. Names are case sensitive, for example,
“Qloop_1” indicates a different QuickLoop than “qloop_1”. Blank spaces are
ignored.
The QuickLoop member list must have one or two members; an empty list is not
allowed.
When a configuration is enabled, all QuickLoops defined in the configuration
must resolve to a maximum of two switch World Wide Names.
Zone alias names entered as members of this QuickLoop must be defined with
WWNs. Zone alias names that are defined by domain and port number, or AL_PA
are not accepted as members of the QuickLoop.
Note: This command requires an Advanced Zoning license.
When security is enabled, this command can only be issued from the Primary FCS
switch. See “Security Commands” on page 941.
Fabric OS Version 3.1.x/4.1.x Reference Guide
651
Fabric OS Commands
Operands
The following operands are required:
qloopname
Specify the name of QuickLoop to be created, in
quotation marks. The qloopname cannot be used for
another zone object.
member
Specify a list of members to be added to QuickLoop,
in quotation marks, separated by semicolons. Include
one or more of the following:
■ World Wide Names
■ Zone alias names
Example
To create two QuickLoops, a single switch and one dual switch:
switch:admin> qloopCreate “qlp1”, “10:00:00:60:69:00:60:11”
switch:admin> qloopCreate “qlp2”, “wwn2; wwn3”
See Also
qloopAdd
qloopDelete
qloopRemove
qloopShow
652
Fabric OS Version 3.1.x/4.1.x Reference Guide
qloopDelete
qloopDelete
Delete a QuickLoop.
Synopsis: V3.1.x
qloopDelete “qloopName”
Synopsis: V4.1.x
qloopDelete “name”
Availability
Admin
Release
V3.1.x and V4.1.x
Description
Use this command to delete a QuickLoop.
This command changes the Defined Configuration. For the change to be preserved
across switch reboots, it must be saved to non-volatile memory using the
cfgSave command. For the change to become effective, an appropriate zone
configuration must be enabled using the cfgEnable command.
Note: This command requires an Advanced Zoning license.
When security is enabled, this command can only be issued from the Primary FCS
switch. See “Security Commands” on page 941.
Operands
The following operands are required:
qloopName
(V3.1.x only)
name
(V4.1.x only)
Fabric OS Version 3.1.x/4.1.x Reference Guide
Specify the name of QuickLoop, in quotation marks.
653
Fabric OS Commands
Example
To delete QuickLoop “qloop2”:
switch:admin> qloopDelete “qloop2”
See Also
qloopAdd
qloopCreate
qloopRemove
qloopShow
654
Fabric OS Version 3.1.x/4.1.x Reference Guide
qloopRemove
qloopRemove
Remove a member from a QuickLoop.
Synopsis
qloopRemove “qloopName”, “member;member”
Availability
Admin
Release
V3.1.x and V4.1.x
Description
Use this command to remove one or more members from a QuickLoop.
The member list is identified through an exact string match; therefore, when
removing multiple members, order is important. For example, if a QuickLoop
contains “wwn3; wwn4”, removing “wwn3; wwn4” succeeds, but removing
“wwn4; wwn3” fails.
If all members are removed, the QuickLoop is deleted.
When a configuration is enabled, all QuickLoops defined in the configuration
must resolve to one or two switch World Wide Names.
This command changes the Defined Configuration. For the change to be preserved
across switch reboots, it must be saved to non-volatile memory using the
cfgSave command. For the change to become effective, an appropriate zone
configuration must be enabled using the cfgEnable command.
Note: This command requires an Advanced Zoning license.
When security is enabled, this command can only be issued from the Primary FCS
switch. See “Security Commands” on page 941.
Fabric OS Version 3.1.x/4.1.x Reference Guide
655
Fabric OS Commands
Operands
The following operands are required:
qloopName
Specify the name of QuickLoop, in quotation marks.
member
Specify the list of QuickLoop members to be removed,
in quotation marks, separated by semicolons. Include
one or more of the following:
■ World Wide Names
■ Zone alias names
Example
To remove member “wwn2” from “qlp1”:
switch:admin> qloopRemove “qlp1”, “wwn2”
See Also
qloopAdd
qloopCreate
qloopDelete
qloopShow
656
Fabric OS Version 3.1.x/4.1.x Reference Guide
qloopShow
qloopShow
Displays QuickLoop information.
Synopsis
qloopShow [pattern][, mode]
Availability
All users.
Release
V3.1.x and V4.1.x
Description
Use this command to display QuickLoop configuration information.
If no parameters are specified, all zone configuration information (defined and
enabled) is displayed. See cfgShow for a description of this display.
If a parameter is specified, it is used as a pattern to match QuickLoop names;
those that match in the defined configuration are displayed.
This command changes the Defined Configuration. For the change to be preserved
across switch reboots, it must be saved to non-volatile memory using the
cfgSave command. For the change to become effective, an appropriate zone
configuration must be enabled using the cfgEnable command.
Note: This command requires an Advanced Zoning license.
When security is enabled, this command can only be issued from the Primary FCS
switch. See “Security Commands” on page 941.
Fabric OS Version 3.1.x/4.1.x Reference Guide
657
Fabric OS Commands
Operands
The following operands are optional:
pattern
Specify a POSIX style expression used to match QuickLoop
names. Patterns may contain the following special
characters:
■ Question mark “?” that matches any single character
■ Asterisk “*” that matches any string of characters
■ Ranges “[0-9a-f]” that match any character within the
range
mode
Specify 1 to display the contents of RAM, specify 0 to
display the contents of the transaction buffer. The default
value is 0.
Example
To display all QuickLoops beginning with the letter “q”:
switch:admin> qloopShow “q*”
qloop: qlp1
10:00:00:60:69:00:60:11
10:00:00:60:69:00:30:02
qloop: qlp2
10:00:00:60:69:00:60:13
See Also
qloopAdd
qloopCreate
qloopDelete
qloopRemove
658
Fabric OS Version 3.1.x/4.1.x Reference Guide
qlPartner
qlPartner
Set a QuickLoop partner or display information about a partner.
Synopsis
qlpartner [0|wwn]
Availability
Admin
Release
V3.1.x
Description
Use this command to set the QuickLoop to single/dual switch mode or to display
the QuickLoop scope setting.
If no argument is specified, this command displays the current QuickLoop mode,
which can be single or dual switch. If in dual switch mode, the partner’s WWN
also displays.
If 0 is used as argument, this command sets the QuickLoop to run in single switch
mode, and restarts the switch if this causes a change in mode.
If a non-zero and valid WWN (a WWN that is part of the fabric) for a switch is
specified, that switch becomes the QuickLoop partner. The switch is then restarted
to run in dual switch mode.
The partner setting is updated in non-volatile memory.
Note: If Advanced Zoning is in use the qlDisable, qlEnable, and qlPartner
commands are not in effect. In this case, dual switch QuickLoops can be managed
using the telnet commands available through Advanced Zoning.
This command requires an Advanced Zoning license.
Fabric OS Version 3.1.x/4.1.x Reference Guide
659
Fabric OS Commands
Operands
This command has the following operand:
0|wwn
Specify 0 to set the QuickLoop to run on a single switch.
Specify a WWN to set the QuickLoop to run on dual switches.
This operand is optional.
If no operand is specified the current value is displayed.
Example
To set another switch as a QuickLoop partner switch:
switch:admin> qlPartner “10:00:00:60:69:10:10:ec”
See Also
configShow
qlShow
660
Fabric OS Version 3.1.x/4.1.x Reference Guide
qlPortDisable
qlPortDisable
Disable a QuickLoop port.
Synopsis
qlPortDisable port
Availability
Admin
Release
V3.1.x
Description
Use this command to change the specified port from QuickLoop mode to fabric
mode. This excludes any devices connected to the port from the QuickLoop, and
causes the switch to re-initialize the QuickLoop. If the switch that the port belongs
to has a partner that is running in QuickLoop mode, both switches re-initialize the
QuickLoop to form a loop that excludes any devices connected to the specified
port.
If the qlPortDisable command is entered for a port, the qlEnable
command has no effect on that port, because it has been removed from QuickLoop
management. The port must be re-enabled using the qlPortEnable
command.
The specified port must be in QuickLoop mode for this command to have effect.
Note: This command requires an Advanced Zoning license.
Operands
This command has the following operand:
port
Specify the port number to be modified from QuickLoop mode to
fabric mode. Valid values for port number vary depending on the
switch type. This operand is required.
Fabric OS Version 3.1.x/4.1.x Reference Guide
661
Fabric OS Commands
Example
To change port 4 from QuickLoop mode to fabric mode:
switch:admin> qlPortDisable 4
See Also
qlDisable
qlPortEnable
qlShow
662
Fabric OS Version 3.1.x/4.1.x Reference Guide
qlPortEnable
qlPortEnable
Enable a QuickLoop port.
Synopsis
qlPortEnable port
Availability
Admin
Release
V3.1.x
Description
Use this command to change the specified port from fabric mode to QuickLoop
mode. This includes any devices connected to this port in the QuickLoop, and
causes the switch to re-initialize the QuickLoop.
If the switch that the port belongs to has a partner, and the partner is running in
QuickLoop mode, both switches re-initialize their QuickLoops to form a new loop
that includes the devices connected to this port.
The specified port must be in fabric mode for this command to have effect.
Note: This command requires an Advanced Zoning license.
Operands
This command has the following operand:
port
Specify the port number to be modified from fabric mode to
QuickLoop mode. Valid values for port number vary depending on
the switch type. This operand is required.
Fabric OS Version 3.1.x/4.1.x Reference Guide
663
Fabric OS Commands
Example
To change port 4 from fabric mode to QuickLoop mode:
switch:admin> qlPortEnable 4
See Also
qlEnable
qlPortDisable
qlShow
664
Fabric OS Version 3.1.x/4.1.x Reference Guide
qlPortShowAll
qlPortShowAll
Displays QuickLoop port information.
Synopsis
qlPortShowAll
Availability
All users.
Release
V3.1.x
Description
Use this command to display the QuickLoop port information. The following
information is displayed:
QuickLoop Mode:
Enabled
QuickLoop mode enabled
Disabled
QuickLoop mode disabled
Looplet state:
Online
Completed loop initialization
Lipped
NL_Port lipped
Lipping
FL_Port lipped
Initializing
Loop initialization in progress
Bypassed
Looplet being bypassed
Error
Error found in this looplet
Offline
Looplet offline
Fabric
OLD_PORT state
Not in QuickLoop Mode:
Port is not in QuickLoop mode
Fabric OS Version 3.1.x/4.1.x Reference Guide
665
Fabric OS Commands
Note: This command requires an Advanced Zoning license.
Operands
None.
Example
The following entry displays QuickLoop port information:
switch:admin> qlPortShowAll
PortNum QuickLoop Mode Port State
0
Disabled
---1
Disabled
---2
Disabled
---3
Disabled
---4
Disabled
---5
Disabled
---6
Disabled
---7
Disabled
---switch:admin>
E
E
E
E
E
E
E
E
PORT
PORT
PORT
PORT
PORT
PORT
PORT
PORT
See Also
portStatShow
qlShow
666
Fabric OS Version 3.1.x/4.1.x Reference Guide
qlShow
qlShow
Displays QuickLoop information.
Synopsis
qlShow
Availability
All users.
Release
V3.1.x
Description
Use this command to display the following QuickLoop information:
Self:
World Wide Name and domain ID of this switch.
Peer:
World Wide Name and domain ID of partner switch.
Peer is displayed only if the switch has a partner
configured.
State:
The state of the QuickLoop:
■
■
■
■
■
■
Master - Master switch in dual switch QuickLoop
Non-master - Non-master in dual switch QuickLoop
Local Lip - Looplet on local switch lipped
Remote Lip - Looplet on partner switch lipped
Online - Switch is online
Offline - Switch is offline
Scope:
Dual or single (indicating dual or single switch
QuickLoop)
AL_PA bitmap:
The AL_PA bitmaps of devices on the QuickLoop.
Remote AL_PAs
AL_PAs of devices on partner switch. AL_PAs are
listed per port base.
Local AL_PAs
AL_PAs of devices connected to this switch. AL_PAs
are listed per port base.
Fabric OS Version 3.1.x/4.1.x Reference Guide
667
Fabric OS Commands
Local looplet state
Indicates state of local looplet.
Member:
Current QuickLoop member ports.
Online:
Current online ports in the QuickLoop.
Looplet:
The state of each looplet. The possible states are:
Online:
Lipped:
Lipping:
Initializing:
Bypassed:
Error:
Offline:
Loop initialization completed
NL_Port initiated LIPs
FL_Port initiated LIPs
Looplet initialization in progress
Looplet being bypassed
Error found in this looplet
Looplet offline
Note: This command requires an Advanced Zoning license.
Operands
None.
668
Fabric OS Version 3.1.x/4.1.x Reference Guide
qlShow
Example
The following entry displays QuickLoop information:
switch:admin> qlShow
Self:
10:00:00:60:69:20:26:2a domain 1
State: Online
Scope: single
AL_PA bitmap:
00000000 00000000 00000000 00000000
Local AL_PAs
(not available)
Local looplet states
Member:
0 1 2 3 4 5 6 7
Online:
- - - - - - - Looplet 0: offline
Looplet 1: offline
Looplet 2: offline
Looplet 3: offline
Looplet 4: offline
Looplet 5: offline
Looplet 6: offline
Looplet 7: offline
switch:admin>
See Also
qlStatsShow
Fabric OS Version 3.1.x/4.1.x Reference Guide
669
Fabric OS Commands
qlStatsShow
Displays QuickLoop statistics.
Synopsis
qlStatsShow
Availability
All users.
Release
V3.1.x
Description
Use this command to display the following QuickLoop switch statistics:
Last QL init time:
Time of last QuickLoop initialization.
QL init attempted:
Number of QuickLoop initialization attempts.
QL init succeeded:
Number of times QuickLoop is initialized.
Single switch QL:
Number of times as single switch QuickLoop.
These numbers are only valid when two
switches are configured to run as peers in
QuickLoop.
Dual switch QL:
Number of times as dual switch QuickLoop.
These numbers are only valid when two
switches are configured to run as peers in
QuickLoop.
QL enabled:
Number of times QuickLoop is enabled.
QL disabled:
Number of times QuickLoop is disabled.
Port caused QL init:
Port that caused last QuickLoop initialization.
Note: This command requires an Advanced Zoning license.
670
Fabric OS Version 3.1.x/4.1.x Reference Guide
qlStatsShow
Operands
None.
Example
The following entry displays QuickLoop switch statistics:
switch:admin> qlStatsShow
Quick loop statistics for switch 2
Last QL init time
: Jan 1 00:00:00.000
QL init attempted
: 0
QL init succeeded
: 0
Single switch QL
: 0
Dual switch QL
: 0
QL enabled
: 0
QL disabled
: 0
Port started last init
: 0 on switch 2
switch:admin>
See Also
portStatShow
qlShow
Fabric OS Version 3.1.x/4.1.x Reference Guide
671
Fabric OS Commands
quietMode
Toggle the shell quiet mode on and off.
Synopsis
quietMode [mode]
Availability
All users (display).
Admin (set/clear).
Release
V3.1.x
Description
Use this command to change the output displayed on the switch console (serial
port or telnet session).
By default, quiet mode is off and all switch tasks can send output to the console,
including output caused by asynchronous events, such as the fabric reconfiguring,
or devices logging in.
When quiet mode is on, only output produced by shell commands is shown;
asynchronous output produced by other tasks is suppressed.
Turn quiet mode on when driving a telnet session using a script that does not
expect asynchronous output.
Operands
This command has the following operand:
mode
672
Specify 0 to disable quiet mode where all tasks are printed in the
console. Specify 1 to set quiet mode where only shell commands
are displayed in the console. This operand is optional. If no
operand is specified the current value is displayed.
Fabric OS Version 3.1.x/4.1.x Reference Guide
quietMode
Example
To display the current mode, then reset to ON:
switch:admin> quietMode
Quiet Mode is OFF
switch:admin> quietMode 1
Committing configuration...done.
Quiet Mode is now ON
switch:admin>
See Also
ramTest
Fabric OS Version 3.1.x/4.1.x Reference Guide
673
Fabric OS Commands
ramTest
Bit write and read test of SDRAMs in the switch.
Synopsis
ramTest [patternSize]
Availability
Admin
Release
V3.1.x
Description
Use this command to verify the address and data bus of the SDRAMs that serve as
CPU memory in the switch.
The test consists of two subtests:
1. The address subtest verifies that SDRAM locations can be uniquely accessed.
The method used is to write a unique pattern to each location in the SDRAMs.
When all are written, the data is read back from each location and compared
against the data previously written. A failure in the test implies that the
address path between the CPU and the SDRAMs is faulty resulting in failures
to program unique values.
Following is the ramp pattern used in the test:
0x57626f42, 0x57626f43, 0x57626f44, 0x57626f45, ...
2. The data subtest verifies that each cell in the SDRAMs can be independently
written and read, and that there are no short, stuck-at-1, or stuck-at-0 faults
between data cells.
674
Fabric OS Version 3.1.x/4.1.x Reference Guide
ramTest
The method used is to write pattern D to location N, write the complementary
pattern D to location N+1, and then read and compare location N to location
N+1. Bump the location to test: N=N+1. Repeat the double write and read
until all locations are tested with the following patterns:
—
0x55555555
—
0x69696969
—
0x3c3c3c3c
—
0x1e1e1e1e
—
0x87878787
—
0x14284281
—
0x137ffec8
—
0x0f0f0f0f
—
0x00000000
Since the test requires the operating system to operate, it does not and cannot
test all 16 MB of the memory. Instead it tests the largest portion as given by
the OS, which is typically about 13 MB.
Operands
This command has the following operand:
patternSize
Specify a number from 0 to 9 to determine the number of
patterns used for the data subtest. The default value is 0
which runs all nine patterns. A value from 1 to 9 will
execute the specified number of patterns. Any value over 9
is truncated to 9. Only the data subtest is configurable. The
address subtest is always executed. This operand is
optional.
Example
To run the RAM test on a switch:
switch:admin> ramTest
Running System DRAM Test ...... passed.
Fabric OS Version 3.1.x/4.1.x Reference Guide
675
Fabric OS Commands
Errors
Listed below are possible error messages if failures are detected:
DIAG-MEMORY
DIAG-MEMSZ
DIAG-MEMNULL
See Also
camtest
centralmemorytest
cmemretentiontest
crossporttest
cmitest
filtertest
portloopbacktest
portregtest
spinsilk
sramretentiontest
statstest
676
Fabric OS Version 3.1.x/4.1.x Reference Guide
reboot
reboot
Reboot the switch.
Synopsis
reboot
Availability
Admin
Release
V3.1.x and V4.1.x
Description
Use this command to reboot the switch. The reboot takes effect immediately as the
switch resets, then executes the normal power-on booting sequence.
While the switch is rebooting, the telnet session is closed and all Fibre Channel
ports are inactive. If the switch was part of a fabric, the remaining switches
reconfigure.
Note: For the StorageWorks Core switch, the reboot command will reboot both
logical switches and both CPs. A confirmation message is displayed to verify that you
want to reboot the switch.
Operands
None.
Fabric OS Version 3.1.x/4.1.x Reference Guide
677
Fabric OS Commands
Example
This example is for the StorageWorks Core switch:
switch:admin> reboot
Warning: This command is being run on a control processor (CP) based system
and will cause the active CP to reboot. This will cause disruption to devices
attached to both switch 0 and switch 1.
To just reboot a logical switch on this system, use command switchreboot(1M)
on the logical switch you intend to reboot.
Are you sure you want to reboot the active CP [y/n]? y
See Also
fastboot
switchreboot
678
Fabric OS Version 3.1.x/4.1.x Reference Guide
routeHelp
routeHelp
Displays routing help commands.
Synopsis
routeHelp
Availability
All users.
Release
V3.1.x and V4.1.x
Description
Use this command to display routing help commands.
Operands
None.
Fabric OS Version 3.1.x/4.1.x Reference Guide
679
Fabric OS Commands
Example
To view a list of routing related commands:
switch:admin> routeHelp
bcastShow
dlsReset
dlsSet
dlsShow
fspfShow
interfaceShow
iodReset
iodSet
iodShow
linkCost
LSDbShow
mcastShow
nbrStateShow
nbrStatsClear
topologyShow
uRouteConfig
uRouteRemove
uRouteShow
Print broadcast tree information
Turn off Dynamic Load Sharing
Turn on Dynamic Load Sharing
Print state of Dynamic Load Sharing
Print FSPF global information
Print FSPF interface information
Turn off In-Order Delivery
Turn on In-Order Delivery
Print state of In-Order Delivery
Set or print the FSPF cost of a link
Print Link State Database entry
Print multicast tree information
Print neighbor's summary information
Reset FSPF neighbor's counters
Print paths to domain(s)
Configure static unicast route
Remove static unicast route
Print port's unicast routing info
switch:admin>
See Also
bcastShow
interfaceShow
uRouteShow
680
Fabric OS Version 3.1.x/4.1.x Reference Guide
savecore
savecore
Save or remove core files created by daemons.
Synopsis
savecore [-h host_name][-u user_name][-p password]
[-d remote_directory]
Availability
Admin
Release
V4.1.x
Description
Use this command to FTP or delete core files that were created by daemons during
signal processing such as SIGSEGV, SIGILL etc. The flags are useful only during
FTP process and will be used as default value while taking these parameters
interactively, except for -p password, which will not be prompted for if given
in the command line.
Operands
This command has the following operands:
-h host_name
Specify a host-name if FTP requires it.
-u user_name
Specify a user-name for login in the above
host-name default will be anonymous.
-p password
Specify a password for the above user-name.
-d remote_directory
Specify the name of the remote directory into which
the core files are copied into. The directory will be
created if it does not already exists. It is assumed
that the user has sufficient privilege to create files at
this location.
Fabric OS Version 3.1.x/4.1.x Reference Guide
681
Fabric OS Commands
Example
To remove core files from the current switch:
switch:admin> savecore
following 1 directories contains core files:
[ ]0: /mnt/core_files/secd
Welcome to core files management utility.
Menu
1(or
2(or
3(or
4(or
5(or
6(or
9(or
R):
F):
r):
f):
m):
u):
e):
Remove all core files
FTP all core files
Remove marked files
FTP marked files
Mark Files for action
Un Mark Files for action
Exit
Your choice: 1
/mnt/core_files/secd
You have opted to remove ALL core files:Please confirm (Y/[N]): y
Removing files....
removing core files under: /mnt/core_files/secd
Done!
switch:admin> savecore
No core files found!
switch:admin>
See Also
diaghelp
682
Fabric OS Version 3.1.x/4.1.x Reference Guide
secfabricshow
secfabricshow
Displays security related fabric information.
Synopsis
secfabricshow
Availability
Admin
Release
V3.1.x and V4.1.x
Description
This command displays the security related information about the fabric.
The information displayed is as follows:
Role
Displays whether the switch is the Primary FCS, Backup FCS,
or Non FCS.
WWN
Displays the world wide name of the switch.
DId
Displays the Domain of the switch.
Status
Displays the security state of the switch.
Ready - This switch is in a stable state.
Busy - This switch is updating its security database.
Error - This switch's security database is inconsistent with the
Primary FCS.
Enet IP Addr
Displays the Ethernet IP address.
Name
Displays the switch name.
Note: When security is enabled, this command can only be issued from the Primary
FCS switch. See “Security Commands” on page 941.
Operands
None.
Fabric OS Version 3.1.x/4.1.x Reference Guide
683
Fabric OS Commands
Example
To display security related fabric information on the Primary FCS switch:
primaryfcs:admin> secfabricshow
Role
WWN
DId Status Enet IP Addr
Name
================================================================
non-FCS 10:00:00:60:69:10:03:23
1 Ready
192.168.100.148 "nonfcs"
Backup 10:00:00:60:69:00:12:53
2 Ready
192.168.100.147 "backup"
Primary 10:00:00:60:69:22:32:83
3 Ready
192.168.100.135 "primaryfcs"
___________________________________________
Secured switches in the fabric: 3
primaryfcs:admin>
See Also
secpolicydump
secpolicyshow
684
Fabric OS Version 3.1.x/4.1.x Reference Guide
secfcsfailover
secfcsfailover
Enables a Backup FCS switch to take over as Primary FCS switch.
Synopsis
secfcsfailover
Availability
Admin
Release
V3.1.x and V4.1.x
Description
Use this command to enable a Backup FCS switch to take over as the Primary
FCS switch.
This command can only be issued on a Backup FCS switch. After this command
is issued, the current Primary FCS switch will abort its current transaction and
move the Backup FCS switch where this command is issued to be the first
member in the FCS list. The current Primary FCS switch will then activate the
new policy set and the Backup FCS switch which issued this command will
become the new Primary FCS switch in the fabric.
The purpose of this command is to recover from a scenario where all available
access to the Primary FCS switch is lost, such as the Ethernet and serial
connections.
Operands
None.
Fabric OS Version 3.1.x/4.1.x Reference Guide
685
Fabric OS Commands
Example
To enable a Backup FCS switch to take over as the Primary FCS switch:
switch:admin> secfcsfailover
This switch is about to become the Primary FCS switch.
All transactions of the current Primary FCS switch will be aborted.
ARE YOU SURE (yes, y, no, n): [no] y
WARNING!!!
The FCS policy of Active and Defined Policy sets have been changed.
Review them before you issue secPolicyActivate again.
switch:admin>
See Also
secfabricshow
secmodedisable
secmodeenable
secmodeshow
686
Fabric OS Version 3.1.x/4.1.x Reference Guide
sechelp
sechelp
Displays information about security telnet commands.
Synopsis
sechelp
Availability
Admin
Release
V3.1.x and V4.1.x
Description
Use this command to display a list of security telnet commands. See “Security
Commands” on page 941.
Operands
None.
Fabric OS Version 3.1.x/4.1.x Reference Guide
687
Fabric OS Commands
Example
To display a list of security telnet commands:
switch:admin> sechelp
secFabricShow
secFCSFailover
secModeEnable
secModeDisable
secModeShow
secNonFCSPasswd
secPolicyAbort
secPolicyActivate
secPolicyAdd
secPolicyCreate
secPolicyDelete
secPolicyFCSMove
secPolicyRemove
secPolicySave
secPolicyShow
secPolicyDump
secStatsReset
secStatsShow
secTempPasswdSet
secTempPasswdReset
secTransAbort
secVersionReset
Display security related fabric information
Force primary role to this FCS switch
Enable security mode
Disable security mode
Show current mode of security
Set non FCS password
Abort changes to defined policy
Activate all policy sets
Add members to a policy
Create a policy
Delete a policy
Move a FCS member in the FCS list
Remove members from a policy
Save all policy sets and send to switches
Show members of one or more policies
Dump all policies
Reset security statistics
Display security statistics
Set temporary password
Reset temporary password
Abort current transaction
Reset version stamp
switch:admin>
See Also
None.
688
Fabric OS Version 3.1.x/4.1.x Reference Guide
secmodedisable
secmodedisable
Disable security mode.
Synopsis
secmodedisable
Availability
Admin
Release
V3.1.x and V4.1.x
Description
Use this command to disable security mode on all switches in the fabric. This
command deletes both the defined and active security database.
Note: This command must be issued from the Primary FCS switch. See “Security
Commands” on page 941.
Operands
None.
Fabric OS Version 3.1.x/4.1.x Reference Guide
689
Fabric OS Commands
Example
To disable security mode:
primaryfcs:admin> secmodedisable
Warning!!!
About to disable security.
ARE YOU SURE (yes, y, no, n): [no] y
Committing configuration...done.
Removing Active FMPS...
done
Removing Defined FMPS...
done
Disconnecting current session.
See Also
secfabricshow
secmodeenable
secmodeshow
690
Fabric OS Version 3.1.x/4.1.x Reference Guide
secmodeenable
secmodeenable
Enable security mode.
Synopsis
secmodeenable [“fcsmember;fcsmember”]
Availability
Admin
Release
V3.1.x and V4.1.x
Description
Use this command to enable security mode on all switches in the fabric. This
command fails if any switch in the fabric is not capable of enforcing the security
policies defined in the security database. If no operand is specified the command
becomes interactive.
Note: sectelnet must be used to open a secure telnet session into a switch.
This command sets up security in the fabric by executing the following:
■
Activates security mode on all switches in the fabric
■
Creates the security database populated with a list of FCS switches in the
FCS_POLICY
■
Distributes the security database to all switches in the fabric
■
Resets the Root, Factory, Admin, and User account passwords on all FCS
switches
■
Resets the Admin account password on all Non FCS switches
■
Disables the Root, Factory, and User accounts on all non-FCS switches in the
fabric
Fabric OS Version 3.1.x/4.1.x Reference Guide
691
Fabric OS Commands
The administrator is prompted to enter passwords for the following accounts:
■
Factory
■
Root
■
Admin
■
User
If the fabric is not in secure mode and one or more specified FCS switches are
present in the fabric, the command must be issued on the first active FCS in the
list.
If the fabric is not in secure mode and no specified FCS switches are present in the
fabric, the command can be issued on any switch.
If the fabric is not in secure mode and this command is issued, the switch reboots.
If the fabric is in secure mode and no FCS switches are present in the fabric, the
command can be issued on any switch. This is used to recover a secure fabric that
has no FCS switch.
Note: Make sure that all users (using Fabric OS CLI or Web Tools) are logged off the
fabric before enabling security mode. All users who are logged into the fabric on
non-FCS switches when this command executes have their telnet sessions terminated.
When security is enabled, this command can only be issued from the Primary FCS
switch. See “Security Commands” on page 941.
Operands
This command has the following operand:
fcsmember
Specify a list of FCS switches. The list of member switches must
be enclosed in quotation marks and each member switch must
be separated by semicolons. The members can be specified
using Domain, WWN, or switch name format. For example:
“5; 10:00:00:60:69:00:00:20; star1“
If a member is specified by Domain, or switch name, the switch
must be in the fabric or the command fails. This operand is
optional. If no operand is specified the session becomes
interactive and you are prompted to enter FCS member values.
692
Fabric OS Version 3.1.x/4.1.x Reference Guide
secmodeenable
Example
To enable a security policy that includes three FCS switches specified by Domain,
WWN address, and switch name:
fcsprimary:admin> secmodeenable
This is an interactive session to create a FCS list.
Current FCS list is empty
Enter WWN, Domain, or switch name(Leave blank when done): 2
Switch WWN is 10:00:00:60:69:11:fc:53
Current FCS list:
10:00:00:60:69:11:fc:53
Enter WWN, Domain, or switch name(Leave blank when done): 1
Switch WWN is 10:00:00:60:69:11:fc:55
Current FCS list:
10:00:00:60:69:11:fc:53
10:00:00:60:69:11:fc:55
Enter WWN, Domain, or switch name(Leave blank when done):
Are you done? (yes, y, no, n): [no] y
Is the FCS correct? (yes, y, no, n): [no] y
New FCS switch root password:
Password must differ by at least 1 position
New FCS switch root password:
Re-enter new password:
New FCS switch factory password:
Re-enter new password:
New FCS switch admin password:
Re-enter new password:
New FCS switch user password:
Re-enter new password:
New Non FCS switch admin password:
Re-enter new password:
Saving passwd...done.
Saving Defined FMPS ...
done
Saving Active FMPS ...
done
Committing configuration...done.
Secure mode is enabled.
Saving passwd...done.
Rebooting...
Fabric OS Version 3.1.x/4.1.x Reference Guide
693
Fabric OS Commands
See Also
secfabricshow
secmodedisable
secmodeshow
694
Fabric OS Version 3.1.x/4.1.x Reference Guide
secmodeshow
secmodeshow
Displays if security mode is enabled or disabled.
Synopsis
secmodeshow
Availability
Admin
Release
V3.1.x and V4.1.x
Description
Use this command to display the current security mode of the fabric. The fabric
can be in secure mode or non secure mode. If the fabric is in secure mode, the
following information is displayed:
■
Version stamp - Displays the current version and build date and time of the
security database.
■
FCS switches - Displays a list of FCS switches.
■
Primary - Displays whether the switch is a Primary FCS or Backup FCS.
■
WWN - Displays the WWN of the FCS switch.
■
Did - Displays the Domain of the FCS switch.
■
swName - Displays the alias name of the FCS switch.
Note: This command must be issued from the Primary FCS switch. See “Security
Commands” on page 941.
Operands
None.
Fabric OS Version 3.1.x/4.1.x Reference Guide
695
Fabric OS Commands
Example
To display the current security mode of a fabric:
primaryfcs:admin> secmodeshow
Secure Mode: ENABLED.
Version Stamp: 9182, Wed Mar 13 16:37:01 2001.
POS Primary WWN
DId
swName.
====================================================
1
Yes
10:00:00:60:69:00:00:5a 21
SW47.
2
No
12:00:00:60:60:03:23:5b
5
SW12.
primaryfcs:admin>
See Also
secfabricshow
secmodedisable
secmodeenable
696
Fabric OS Version 3.1.x/4.1.x Reference Guide
secnonfcspasswd
secnonfcspasswd
Set the Admin password for non-FCS switches.
Synopsis
secnonfcspasswd
Availability
Admin
Release
V3.1.x and V4.1.x
Description
Use this command to change the Admin password on all non-FCS switches in the
fabric. This command can only be issued from the Primary FCS switch in secure
mode. The changed passwords are persistent across reboots. All non-FCS
switches that join the fabric in the future will inherit this new password.
This command also disables the root and factory accounts on all non-FCS
switches in the fabric.
The password must be between 8 and 40 characters long, and may consist of any
combination of alpha-numeric characters.
Note: Make sure no users are logged into the network when this command is
executed. All users logged into the fabric as Admin on non-FCS switches will have their
telnet sessions terminated.
When security is enabled, this command can only be issued from the Primary FCS
switch. See “Security Commands” on page 941.
Operands
None.
Fabric OS Version 3.1.x/4.1.x Reference Guide
697
Fabric OS Commands
Example
To set the Admin password for all non-FCS switches in the fabric:
primaryfcs:admin> secnonfcspasswd
Non FCS switch password:
Re-enter new password:
Committing configuration...done.
primaryfcs:admin>
See Also
passwd
secmodeenable
secmodedisable
secmodeshow
sectemppasswdset
698
Fabric OS Version 3.1.x/4.1.x Reference Guide
secpolicyabort
secpolicyabort
Aborts all changes to the defined database that have not been saved.
Synopsis
secpolicyabort
Availability
Admin
Release
V3.1.x and V4.1.x
Description
Use this command to abort all changes to the defined security database that have
not been saved to flash memory.
Note: When security is enabled, this command can only be issued from the Primary
FCS switch. See “Security Commands” on page 941.
Operands
None.
Example
To abort all changes that have not been saved to flash memory:
primaryfcs:admin> secpolicyabort
Unsaved data has been aborted.
primaryfcs:admin> secpolicyabort
No new data to abort.
Fabric OS Version 3.1.x/4.1.x Reference Guide
699
Fabric OS Commands
See Also
secpolicyactivate
secpolicyadd
secpolicycreate
secpolicydelete
secpolicydump
secpolicyremove
secpolicysave
secpolicyshow
700
Fabric OS Version 3.1.x/4.1.x Reference Guide
secpolicyactivate
secpolicyactivate
Apply defined policy set to all switches in the fabric.
Synopsis
secpolicyactivate
Availability
Admin
Release
V3.1.x and V4.1.x
Description
Use this command to activate the current defined security policy to all switches in
the fabric. After activation the defined policy set becomes the active policy set.
Note: When security is enabled, this command can only be issued from the Primary
FCS switch. See “Security Commands” on page 941.
Operands
None.
Example
To activate the defined security policy set to all switches in the fabric:
primaryfcs:admin> secpolicyactivate
About to overwrite the current Active data.
ARE YOU SURE (yes, y, no, n): [no] y
Committing configuration...done.
Saving Defined FMPS ...
done
Saving Active FMPS ...
done
primaryfcs:admin>
Fabric OS Version 3.1.x/4.1.x Reference Guide
701
Fabric OS Commands
See Also
secpolicyabort
secpolicyadd
secpolicycreate
secpolicydelete
secpolicydump
secpolicyremove
secpolicysave
secpolicyshow
702
Fabric OS Version 3.1.x/4.1.x Reference Guide
secpolicyadd
secpolicyadd
Add members to an existing policy.
Synopsis
secpolicyadd “name”, “member;member”
Availability
Admin
Release
V3.1.x and V4.1.x
Description
Use this command to add members to an existing access policy. The new members
must not already be members within the policy or the command fails.
Each policy corresponds to a management method. The list of members of a
policy acts as an access control list for that management method. When security is
first enabled using the secmodeenable command only the FCS_POLICY
exists. Before a policy is created, there is no enforcement for that management
method, that is, all access is granted. After a policy has been created and a
member has been added to the policy, that policy becomes closed to all access
except from included members. If all members are then deleted from the policy,
all access is denied for that management access method (the DCC_POLICY and
OPTIONS_POLICY are exceptions).
Note: When security is enabled, this command can only be issued from the Primary
FCS switch. See “Security Commands” on page 941.
Fabric OS Version 3.1.x/4.1.x Reference Guide
703
Fabric OS Commands
Operands
This command has the following operands:
name
Specify the name of an existing policy you want to add
members to. Valid values for this operand are:
■ DCC_POLICY_nnn
■ FCS_POLICY
■ TELNET_POLICY
■ HTTP_POLICY
■ API_POLICY
■ RSNMP_POLICY
■ WSNMP_POLICY
■ MS_POLICY
■ SERIAL_POLICY
■ FRONTPANEL_POLICY
■ SCC_POLICY
■ OPTIONS_POLICY
The specified policy name must be capitalized.
The DCC_POLICY_nnn name has the common prefix
DCC_POLICY_ followed by a string of user defined characters.
These characters do not have to be capitalized like regular
policy names, but are case sensitive.
member
Specify a list of member switches for the security policy. The
members must be enclosed in quotation marks and separated
by semicolons. Depending on the Policy type members can be
specified using IP address, WWN, Domain, switch name, or
other.
IP Address Member Policy Types
The following policy types require members be specified by IP
address:
■ TELNET_POLICY
■ HTTP_POLICY
■ API_POLICY
■ RSNMP_POLICY
■ WSNMP_POLICY
These policy types require member IPs to be specified in dot
notation (for example, 124.23.56.122). If 0 is specified in one
of the octets, it means any number can be matched.
704
Fabric OS Version 3.1.x/4.1.x Reference Guide
secpolicyadd
WWN Member Policy Types
The following policy types require members be specified by
WWN address:
■ FCS_POLICY
■ MS_POLICY
■ SERIAL_POLICY
■ FRONTPANEL_POLICY
■ SCC_POLICY
These policy types require members be specified as WWN
strings, Domain ID, or switch names. If Domain ID or switch
names are used, the switches associated must be present in the
fabric or the command fails.
DCC_POLICY Members
The DCC_POLICY_nnn is a list of devices associated with a
specific switch and port combination. An empty DCC_POLICY
does not stop access to the switch. The device is specified with a
WWN string. The switch and port combination must be in the
following format:
<switch><port>
where:
<switch> can be specified using WWN, Domain, or switch
name.
<port> can be specified by port number separated by
commas, and enclosed in either brackets or parenthesis. For
example, (2, 4, 6). Ports enclosed in brackets will include the
devices currently attached to those ports. The following
examples show several ways to specify the port values:
(1-6) = selects ports 1 through 6.
(*) = selects all ports on the switch.
[3, 9] = selects ports 3 and 9 and all devices attached to those
ports.
[1-3, 5] = selects ports 1 though 3 and 5 and all devices
attached to those ports.
[*] = selects all ports on the switch and devices currently
attached to those ports.
OPTIONS_POLICY members
“NoNodeWWNZoning” is the only option.
Fabric OS Version 3.1.x/4.1.x Reference Guide
705
Fabric OS Commands
Example
Adding a member to the MS_POLICY using the device WWN:
primaryfcs:admin> secpolicyadd “MS_POLICY”, “12:24:45:10:0a:67:00:40”
Member(s) have been added to MS_POLICY.
primaryfcs:admin>
Adding an SNMP manager to WSNMP_POLICY:
primaryfcs:admin> secpolicyadd “WSNMP_POLICY”, “192.168.5.21”
Member(s) have been added to WSNMP_POLICY.
primaryfcs:admin>
See Also
secpolicyabort
secpolicyactivate
secpolicycreate
secpolicydelete
secpolicydump
secpolicyremove
secpolicysave
secpolicyshow
706
Fabric OS Version 3.1.x/4.1.x Reference Guide
secpolicycreate
secpolicycreate
Create a new policy.
Synopsis
secpolicycreate name[, “member;member”]
Availability
Admin
Release
V3.1.x and V4.1.x
Description
Use this command to create a new policy. All policies can be created only once,
except for the DCC_POLICY_nnn. Each DCC_POLICY_nnn must each have a
unique name.
Adding members while creating a policy is optional. You may add members to a
policy later, using the secpolicyadd command.
Each policy corresponds to a management method. The list of members of a
policy acts as an access control list for that management method. When security is
first enabled using the secmodeenable command only the FCS_POLICY
exists. Before a policy is created, there is no enforcement for that management
method, that is, all access is granted. After a policy has been created and a
member has been added to the policy, that policy becomes closed to all access
except from included members. If all members are then deleted from the policy,
all access is denied for that management access method.
Note: The FCS_POLICY can only be created when enabling security mode using the
secmodeenable command.
When security is enabled, this command can only be issued from the Primary FCS
switch. See “Security Commands” on page 941.
If a TELNET_POLICY or SERIAL_POLICY is created that will end the current sectelnet or
serial session, a warning is issued.
Fabric OS Version 3.1.x/4.1.x Reference Guide
707
Fabric OS Commands
Operands
This command has the following operands:
name
Specify the name of a policy you want to create. Valid values
for this operand are:
■ DCC_POLICY_nnn
■ TELNET_POLICY
■ HTTP_POLICY
■ API_POLICY
■ RSNMP_POLICY
■ WSNMP_POLICY
■ MS_POLICY
■ SERIAL_POLICY
■ FRONTPANEL_POLICY
■ SCC_POLICY
■ OPTIONS_POLICY
The specified policy name must be capitalized.
The DCC_POLICY_nnn name has the common prefix
DCC_POLICY_ followed by a string of user defined characters.
These characters do not have to be capitalized like regular
policy names. Valid values for DCC_POLICY_nnn are user
defined alphanumeric or underscore characters. The maximum
length is 30 characters, including the prefix DCC_POLICY_.
member
Specify a list of members for the security policy. The members
must be enclosed in quotation marks and separated by
semicolons. Depending on the Policy type members can be
specified using IP address, WWN, Domain, or switch name.
IP Address Member Policy Types
The following policy types require members be specified by IP
address:
■ TELNET_POLICY
■ HTTP_POLICY
■ API_POLICY
■ RSNMP_POLICY
■ WSNMP_POLICY
These policy types require member IDs in dot notation (for
example, 124.23.56.122). If 0 is specified in one of the octets,
it means any number can be matched.
708
Fabric OS Version 3.1.x/4.1.x Reference Guide
secpolicycreate
WWN Member Policy Types
The following policy types require members be specified by
WWN address:
■ MS_POLICY
■ SERIAL_POLICY
■ FRONTPANEL_POLICY
These policy types require member IDs be specified as WWN
strings, Domains, or switch names. If Domain or switch names
are used, the switches associated must be present in the fabric
or the command fails.
DCC_POLICY Members
The DCC_Policy_nnn is a list of devices associated with a
specific switch and port combination. The device is specified
with a WWN string. The switch and port combination must be
in the following format:
<switch><port>
where:
<switch> can be specified using WWN, Domain, or switch
name.
<port> can be specified by port number separated by
commas, and enclosed in either brackets or parenthesis. For
example, (2, 4, 6). Ports enclosed in brackets will include the
devices currently attached to those ports. The following
examples show several ways to specify the port values:
(1-6) = selects ports 1 through 6.
(*) = selects all ports on the switch.
[3, 9] = selects ports 3 and 9 and all devices attached to those
ports.
[1-3, 5] = selects ports 1 though 3 and 5 and all devices
attached to those ports.
[*] = selects all ports on the switch and devices currently
attached to those ports.
OPTIONS_POLICY members
“NoNodeWWNZoning” is the only option.
Fabric OS Version 3.1.x/4.1.x Reference Guide
709
Fabric OS Commands
SCC_POLICY Members
This policy type requires member IDs be specified as WWN
strings, Domains, or switch names. If Domain or switch names
are used, the switches associated must be present in the fabric
or the command fails.
To add all switches in the current fabric as members of the
SCC_POLICY enter an asterisk “*” enclosed in quotation marks
as the member value. This feature cannot be used by the other
security telnet commands.
Example
Create a new single MS_POLICY that enables access through a device that has
WWN of 12:24:45:10:0a:67:00:40:
primaryfcs:admin> secpolicycreate “MS_POLICY”, “12:24:45:10:0a:67:00:40”
MS_POLICY has been created.
primaryfcs:admin>
Create a new Front Panel policy that only enables Domains 3 and 4 to use the front
panel:
primaryfcs:admin> secpolicycreate “FRONTPANEL_POLICY”, “3; 4”
FRONTPANEL_POLICY has been created.
primaryfcs:admin>
Create a Device policy to allow 2 devices to attach to Domain 3 ports 1 and 3. The
WWN of first device is 11:22:33:44:55:66:77:aa, and the WWN of second device
is 11:22:33:44:55:66:77:bb:
primaryfcs:admin> secpolicycreate “DCC_POLICY_aB_7”,
“11:22:33:44:55:66:77:aa;11:22:33:44:55:66:77:bb;3[1,3]”
DCC_POLICY_abc has been created.
primaryfcs:admin>
Create a Telnet policy to allow anyone on the 192.168.5.0/24 network to access
the fabric through sectelnet:
primaryfcs:admin> secpolicycreate “TELNET_POLICY”, “192.168.5.0”
TELNET_POLICY has been created.
primaryfcs:admin>
710
Fabric OS Version 3.1.x/4.1.x Reference Guide
secpolicycreate
See Also
secpolicyabort
secpolicyactivate
secpolicyadd
secpolicydelete
secpolicydump
secpolicyremove
secpolicysave
secpolicyshow
Fabric OS Version 3.1.x/4.1.x Reference Guide
711
Fabric OS Commands
secpolicydelete
Delete an existing policy.
Synopsis
secpolicydelete “name”
Availability
Admin
Release
V3.1.x and V4.1.x
Description
Use this command to delete an existing defined policy. The FCS_POLICY can not
be deleted through this command, since this policy must exist to maintain security
mode.
Each policy corresponds to a management method. The list of members of a
policy acts as an access control list for that management method. When security is
first enabled using the secmodeenable command only the FCS_POLICY
exists. Before a policy is created, there is no enforcement for that management
method, that is, all access is granted. After a policy has been created and a
member has been added to the policy, that policy becomes closed to all access
except from included members. If the policy is deleted all access is granted.
Note: When security is enabled, this command can only be issued from the Primary
FCS switch. See “Security Commands” on page 941.
712
Fabric OS Version 3.1.x/4.1.x Reference Guide
secpolicydelete
Operands
This command has the following operand:
name
Specify the name of a security policy to delete. The policy name
must be enclosed in quotation marks. Valid security policy
names are:
■ DCC_POLICY_nnn
■ TELNET_POLICY
■ HTTP_POLICY
■ API_POLICY
■ RSNMP_POLICY
■ WSNMP_POLICY
■ MS_POLICY
■ SERIAL_POLICY
■ FRONTPANEL_POLICY
■ SCC_POLICY
■ OPTIONS_POLICY
The specified policy name must be capitalized.
The DCC_POLICY_nnn name has the common prefix
DCC_POLICY_ followed by a string of user defined characters.
These characters do not have to be capitalized like regular
policy names.
This operand is required.
Note: Once a Security policy is deleted, fabric wide switch access through that method
is unrestricted.
Example
To delete an existing security policy:
primaryfcs:admin> secpolicydelete “MS_POLICY”
About to delete policy MS_POLICY.
Are you sure (yes, y, no, n):[no] y
MS_POLICY has been deleted.
primaryfcs:admin>
Fabric OS Version 3.1.x/4.1.x Reference Guide
713
Fabric OS Commands
See Also
secpolicyabort
secpolicyactivate
secpolicyadd
secpolicycreate
secpolicydump
secpolicyremove
secpolicysave
secpolicyshow
714
Fabric OS Version 3.1.x/4.1.x Reference Guide
secpolicydump
secpolicydump
Show all members of existing policies.
Synopsis
secpolicydump [listtype[, name]]
Availability
Admin
Release
V3.1.x and V4.1.x
Description
Use this command to display the members of an existing policy in the Active and
Defined (saved) databases with no page breaks.
Note: When security is enabled, this command can only be issued from the Primary
FCS switch. See “Security Commands” on page 941.
Fabric OS Version 3.1.x/4.1.x Reference Guide
715
Fabric OS Commands
Operands
This command has the following operands:
716
listtype
Specify which database to display. The name for active
database is “Active”; the name for saved, defined database is
“Defined.” If not specified, all databases are displayed. This
operand is optional. An asterisk (*) can be used to specify both
Active and Defined.
name
Specify the name of a security policy you would like to view.
Valid values for this operand are:
■ DCC_POLICY_nnn
■ FCS_POLICY
■ TELNET_POLICY
■ HTTP_POLICY
■ API_POLICY
■ RSNMP_POLICY
■ WSNMP_POLICY
■ MS_POLICY
■ SERIAL_POLICY
■ FRONTPANEL_POLICY
■ SCC_POLICY
■ OPTIONS_POLICY
The specified policy name must be capitalized.
The DCC_POLICY_nnn name has the common prefix
DCC_POLICY_ followed by a string of user defined characters.
These characters do not have to be capitalized like regular
policy names.
This operand is optional.
Fabric OS Version 3.1.x/4.1.x Reference Guide
secpolicydump
Example
To view all security policy information from all databases (active, updating,
defined) without page breaks:
primaryfcs:admin> secpolicydump
____________________________________________________
DEFINED POLICY SET
FCS_POLICY
Pos
Primary WWN
DId swName
__________________________________________________
1
Yes
10:00:00:60:69:30:15:5c
1 primaryfcs
HTTP_POLICY
IpAddr
__________________________________________________
192.155.52.0
____________________________________________________
____________________________________________________
ACTIVE POLICY SET
FCS_POLICY
Pos
Primary WWN
DId swName
__________________________________________________
1
Yes
10:00:00:60:69:30:15:5c
1 primaryfcs
HTTP_POLICY
IpAddr
__________________________________________________
192.155.52.0
192.155.53.1
192.155.54.2
192.155.55.3
____________________________________________________
primaryfcs:admin>
Fabric OS Version 3.1.x/4.1.x Reference Guide
717
Fabric OS Commands
To view all security policy information for the TELNET_POLICY without page
breaks:
primaryfcs:admin> secpolicydump “*”, “TELNET_POLICY”
____________________________________________________
DEFINED POLICY SET
TELNET_POLICY
IpAddr
__________________________________________________
192.155.52.13
192.155.52.11
____________________________________________________
____________________________________________________
ACTIVE POLICY SET
TELNET_POLICY
IpAddr
__________________________________________________
192.155.52.0
____________________________________________________
primaryfcs:admin>
See Also
secpolicyabort
secpolicyactivate
secpolicyadd
secpolicycreate
secpolicydelete
secpolicyremove
secpolicysave
secpolicyshow
718
Fabric OS Version 3.1.x/4.1.x Reference Guide
secpolicyfcsmove
secpolicyfcsmove
Move a member in the FCS policy.
Synopsis
secpolicyfcsmove [From, To]
Availability
Admin
Release
V3.1.x and V4.1.x
Description
Use this command to move an FCS member from one position to another position
in the FCS list. Only one FCS can be moved at a time. The first FCS switch in the
list that is also present in the fabric is the Primary FCS.
If no parameters are specified, the command becomes interactive and prompts for
valid values for the operands.
Note: This command must be issued from the Primary FCS switch. If a Backup FCS is
moved to the first position, then it becomes the Primary FCS after activation.
Operands
This command has the following operands:
From
Specify the position number of the FCS switch you want to move.
To
Specify the position that you want to move the FCS switch to.
If no operand is specified the command becomes interactive and you are prompted
for values.
Fabric OS Version 3.1.x/4.1.x Reference Guide
719
Fabric OS Commands
Example
To move Backup FCS switch at position 2 to position 3 in the FCS list:
switch5:admin> secpolicyfcsmove
Pos
Primary WWN
DId swName.
=================================================
1
Yes
10:00:00:60:69:10:02:18
1 switch5.
2
No
10:00:00:60:69:00:00:5a
2 switch60.
3
No
10:00:00:60:69:00:00:13
3 switch73.
Please enter position you'd like to move from
Please enter position you'd like to move to
: (1..3) [1] 2
: (1..3) [1] 3
____________________________________________________
DEFINED POLICY SET
FCS_POLICY
Pos
Primary WWN
DId swName
__________________________________________________
1
Yes
10:00:00:60:69:10:02:18
1 switch5.
2
No
10:00:00:60:69:00:00:13
3 switch73.
3
No
10:00:00:60:69:00:00:5a
2 switch60.
____________________________________________________
switch5:admin>
See Also
secfabricshow
secpolicyabort
secpolicyactivate
secpolicyadd
secpolicycreate
secpolicydelete
secpolicydump
secpolicyremove
secpolicysave
secpolicyshow
720
Fabric OS Version 3.1.x/4.1.x Reference Guide
secpolicyremove
secpolicyremove
Remove members from an existing policy.
Synopsis
secpolicyremove “name”, “member;member”
Availability
Admin
Release
V3.1.x and V4.1.x
Description
Use this command to remove members from an existing security policy. If a policy
is empty after removing all members, all accesses to the policy are disallowed (the
DCC_POLICY and OPTIONS_POLICY are an exception). You cannot remove
all members from the FCS_POLICY, and you cannot remove the FCS members
from the SCC_POLICY.
Note: When security is enabled, this command can only be issued from the Primary
FCS switch. See “Security Commands” on page 941.
Fabric OS Version 3.1.x/4.1.x Reference Guide
721
Fabric OS Commands
Operands
This command has the following operands:
name
Specify the name of an existing policy you want to remove
members from. Valid values for this operand are:
■ DCC_POLICY_nnn
■ FCS_POLICY
■ TELNET_POLICY
■ HTTP_POLICY
■ API_POLICY
■ RSNMP_POLICY
■ WSNMP_POLICY
■ MS_POLICY
■ SERIAL_POLICY
■ FRONTPANEL_POLICY
■ SCC_POLICY
■ OPTIONS_POLICY
The specified policy name must be capitalized.
The DCC_POLICY policy name has the common prefix
DCC_POLICY_ followed by a string of user defined characters.
These characters do not have to be capitalized like regular
policy names, but are case sensitive.
This operand is required.
member
Specify a member or list of members to delete from the policy.
The members must be enclosed in quotation marks and
separated by semicolons. This operand is required. Depending
on the policy type, members can be specified using IP address,
WWN, Domain, or switch name.
IP Address Member Policy Types
The following policy types require members be specified by IP
address:
■ TELNET_POLICY
■ HTTP_POLICY
■ API_POLICY
■ RSNMP_POLICY
■ WSNMP_POLICY
These policy types require member IDs in dot notation (for
example, 124.23.56.122). If 0 is specified in one of the octets,
it means any number can be matched.
722
Fabric OS Version 3.1.x/4.1.x Reference Guide
secpolicyremove
WWN Member Policy Types
The following policy types require members be specified by
WWN address:
■ FCS_POLICY
■ MS_POLICY
■ SERIAL_POLICY
■ FRONTPANEL_POLICY
■ SCC_POLICY
These policy types require member IDs be specified as WWN
strings, Domains, or switch names. If Domain or switch names
are used, the switches associated must be present in the fabric
or the command fails.
DCC_POLICY Members
The DCC_Policy_nnn is a list of devices associated with a
specific switch and port combination. The device is specified
with a WWN string. The switch and port combination must be
in the following format:
<switch><port>
where:
<switch> can be specified using WWN, Domain, or switch
name.
<port> can be specified by port number separated by
commas, and enclosed in either brackets or parenthesis. For
example, (2, 4, 6). Ports enclosed in brackets will include the
devices currently attached to those ports. The following
examples show several ways to specify the port values:
(1-6) = selects ports 1 through 6.
(*) = selects all ports on the switch.
[3, 9] = selects ports 3 and 9 and all devices attached to those
ports.
[1-3, 5] = selects ports 1 though 3 and 5 and all devices
attached to those ports.
[*] = selects all ports on the switch and devices currently
attached to those ports.
OPTIONS_POLICY members
“NoNodeWWNZoning” is the only option.
Fabric OS Version 3.1.x/4.1.x Reference Guide
723
Fabric OS Commands
Example
Remove a member that has a WWN of 12:24:45:10:0a:67:00:40 from MS policy:
primaryfcs:admin> secpolicyremove “MS_POLICY”, “12:24:45:10:0a:67:00:40”
Member(s) have been removed from MS_POLICY. .
primaryfcs:admin>
See Also
secpolicyabort
secpolicyactivate
secpolicyadd
secpolicycreate
secpolicydelete
secpolicydump
secpolicysave
secpolicyshow
724
Fabric OS Version 3.1.x/4.1.x Reference Guide
secpolicysave
secpolicysave
Save a defined security policy to flash memory on all switches in the fabric.
Synopsis
secpolicysave
Availability
Admin
Release
V3.1.x and V4.1.x
Description
Use this command to save a defined security policy to flash memory of all
switches in the fabric.
Note: When security is enabled, this command can only be issued from the Primary
FCS switch. See “Security Commands” on page 941.
Operands
None.
Example
To save new policy set in all switches in the fabric:
primaryfcs:admin> secpolicysave
Committing configuration...done.
Saving Define FMPS ...
done
primaryfcs:admin>
Fabric OS Version 3.1.x/4.1.x Reference Guide
725
Fabric OS Commands
See Also
secpolicyabort
secpolicyactivate
secpolicyadd
secpolicycreate
secpolicydelete
secpolicydump
secpolicyremove
secpolicyshow
726
Fabric OS Version 3.1.x/4.1.x Reference Guide
secpolicyshow
secpolicyshow
Show an existing security policy.
Synopsis
secpolicyshow [listtype[, name]]
Availability
Admin
Release
V3.1.x and V4.1.x
Description
Use this command to display the members of an existing policy in the Active, or
Defined security policy database. Users can specify which database to display. If
not specified, all database are displayed.
Users can specify to view a security policy by name. If no name is specified, all
policies are displayed.
This command displays the policy database one page at a time. Use
secpolicydump to display the policy database without page breaks.
Note: When security is enabled, this command can only be issued from the Primary
FCS switch. See “Security Commands” on page 941.
Fabric OS Version 3.1.x/4.1.x Reference Guide
727
Fabric OS Commands
Operands
This command has the following operands:
728
listtype
Specify which database to display. The name for active
database is “Active”; the name for saved, defined database is
“Defined.” This operand must be enclosed in quotation marks. If
not specified, all databases are displayed. This operand is
optional. Use an asterisk (*) to specify both Active and Defined.
name
Specify the name of a security policy you would like to view.
Valid values for this operand are:
■ DCC_POLICY_nnn
■ FCS_POLICY
■ TELNET_POLICY
■ HTTP_POLICY
■ API_POLICY
■ RSNMP_POLICY
■ WSNMP_POLICY
■ MS_POLICY
■ SERIAL_POLICY
■ FRONTPANEL_POLICY
■ SCC_POLICY
■ OPTIONS_POLICY
The specified policy name must be capitalized.
The DCC_POLICY_nnn name has the common prefix
DCC_POLICY_ followed by a string of user defined characters.
These characters do not have to be capitalized like regular
policy names, but are case sensitive.
This operand is optional.
Fabric OS Version 3.1.x/4.1.x Reference Guide
secpolicyshow
Example
Show all security policies from all databases:
primaryfcs:admin> secpolicyshow “active”
____________________________________________________
ACTIVE POLICY SET
FCS_POLICY
Pos
Primary WWN
DId swName
__________________________________________________
1
Yes
10:00:00:60:69:30:15:5c
1 primaryfcs
HTTP_POLICY
IpAddr
__________________________________________________
192.155.52.0
____________________________________________________
primaryfcs:admin>
primaryfcs:admin> secPolicyShow “defined”
____________________________________________________
DEFINED POLICY SET
FCS_POLICY
Pos
Primary WWN
DId swName
__________________________________________________
1
Yes
10:00:00:60:69:30:15:5c
1 primaryfcs
HTTP_POLICY
IpAddr
__________________________________________________
192.155.52.0
192.155.53.1
192.155.54.2
192.155.55.3
192.155.56.4
____________________________________________________
primaryfcs:admin>
Fabric OS Version 3.1.x/4.1.x Reference Guide
729
Fabric OS Commands
See Also
secpolicyabort
secpolicyactivate
secpolicyadd
secpolicycreate
secpolicydelete
secpolicydump
secpolicyremove
secpolicysave
730
Fabric OS Version 3.1.x/4.1.x Reference Guide
secstatsreset
secstatsreset
Reset security statistic for a policy or all policies to zero.
Synopsis
secstatsreset [name][,list]
Availability
Admin
Release
V3.1.x and V4.1.x
Description
Use this command to reset statistic data for a particular policy or all policies to
zero. This command can be issued to any switch. If issued on the Primary FCS
switch, this command can reset security statistics for any or all switches in the
fabric.
Fabric OS Version 3.1.x/4.1.x Reference Guide
731
Fabric OS Commands
Operands
This command has the following operands:
732
name
Specify the name of a security statistic you would like to reset. If
executed on the Primary FCS, specify an asterisk (*) to represent
all security policies. Valid values for this operand are:
■ TELNET_POLICY
■ HTTP_POLICY
■ API_POLICY
■ RSNMP_POLICY
■ WSNMP_POLICY
■ MS_POLICY
■ SERIAL_POLICY
■ FRONTPANEL_POLICY
■ SCC_POLICY
■ DCC_POLICY
■ LOGIN
■ INVALID_TS
■ INVALID_SIGN
■ INVALID_CERT
■ SLAP FAIL
■ SLAP_BAD_PKT
■ TS_OUT_SYNC
■ NO_FCS
■ INCOMP_DB
■ ILLEGAL_CMD
The specified policy name must be all capitalized.
To access DCC policies, enter DCC_POLICY. Violations are not
tracked for individual DCC policies. The statistics for all
DCC_POLICY violations are grouped together.
This operand is optional and the default is all statistics. If the
list operand is specified, then this operand is required.
list
Specify a list of domains to reset the security statistics on.
Specify an asterisk (*) to represent all switches in the fabric or,
specify a list of domains separated by semicolons. This operand
is optional and the default value is the local switch.
Fabric OS Version 3.1.x/4.1.x Reference Guide
secstatsreset
Example
Reset all statistics on the local switch:
primaryfcs:admin> secstatsreset
About to reset all security counters.
Are you sure (yes, y, no, n):[no] y
Security statistics reset to zero.
primaryfcs:admin>
Reset DCC_POLICY statistics on domains 1 and 69:
primaryfcs:admin> secstatsreset “DCC_POLICY”, “1;69”
Reset DCC_POLICY statistic.
primaryfcs:admin>
See Also
secfabricshow
secstatsshow
Fabric OS Version 3.1.x/4.1.x Reference Guide
733
Fabric OS Commands
secstatsshow
Displays security statistic for a policy or for all policies.
Synopsis
secstatsshow [name][, list]
Availability
Admin
Release
V3.1.x and V4.1.x
Description
Use this command to display security statistics for one or all security policies.
This command can be issued to any switch. If issued on the Primary FCS switch,
this command can retrieve and display the security statistics for any or all switches
in the fabric.
This command can be issued to any switch.
734
Fabric OS Version 3.1.x/4.1.x Reference Guide
secstatsshow
Operands
This command has the following operands:
name
Specify the name of a security statistic you would like to view. If
executed on the Primary FCS, specify an asterisk (*) to represent
all security policies. Valid values for this operand are:
■ TELNET_POLICY
■ HTTP_POLICY
■ API_POLICY
■ RSNMP_POLICY
■ WSNMP_POLICY
■ MS_POLICY
■ SERIAL_POLICY
■ FRONTPANEL_POLICY
■ SCC_POLICY
■ DCC_POLICY
■ LOGIN
■ INVALID_TS
■ INVALID_SIGN
■ INVALID_CERT
■ SLAP FAIL
■ SLAP_BAD_PKT
■ TS_OUT_SYNC
■ NO_FCS
■ INCOMP_DB
■ ILLEGAL_CMD
The specified policy name must be all capitalized.
To access DCC policies, enter DCC_POLICY. Violations are not
tracked for individual DCC policies. The statistics for all
DCC_POLICY violations are grouped together.
This operand is optional and the default is all statistics. If the
list operand is specified, then this operand is required.
list
Specify a list of domains to reset the security statistics on.
Specify an asterisk (*) to represent all switches in the fabric or,
specify a list of domains separated by semicolons. This operand
is optional and the default value is the local switch.
Fabric OS Version 3.1.x/4.1.x Reference Guide
735
Fabric OS Commands
Example
Show MS_POLICY statistics on the local switch:
primaryfcs:admin> secstatsshow “MS_POLICY”
Name Value
====================
MS 20
primaryfcs:admin>
Displays statistic information for the “TELNET_POLICY” for all switches in the
fabric:
primaryfcs:admin> secstatsshow “TELNET_POLICY”, “*”
Fabric Statistics:
Domain 1:
Name
Value
=========================================
TELNET_POLICY
0
Domain 69:
Name
Value
=========================================
TELNET_POLICY
0
Domain 70:
Name
Value
=========================================
TELNET_POLICY
0
primaryfcs:admin>
See Also
secfabricshow
secstatsreset
736
Fabric OS Version 3.1.x/4.1.x Reference Guide
sectemppasswdreset
sectemppasswdreset
Reset a password on a remote switch.
Synopsis
sectemppasswdreset [domain[, login_name]]
Availability
Admin
Release
V3.1.x and V4.1.x
Description
This command allows the user to remove temporary passwords that had been set
up using sectemppasswdset command. The password is restored to the
default password set up on non-FCS switches.
If a login name is not supplied, all passwords on the switch identified by the
specified Domain are refreshed. If the Domain is also not supplied, all temporary
passwords for all login levels are removed from every switch in the fabric.
Each switch has four accounts, Root, Factory, Admin and User. Root and Factory
accounts are disabled for non-FCS switches. If they are temporarily activated by
sectemppasswdset, those accounts are disabled by
sectemppasswdreset or rebooting the switch.
Note: When security is enabled, this command can only be issued from the Primary
FCS switch. See “Security Commands” on page 941.
Fabric OS Version 3.1.x/4.1.x Reference Guide
737
Fabric OS Commands
Operands
This command has the following operands:
domain
Specify the Domain of the switch from which the temporary
passwords are to be removed. This operand is optional.
login_name
Specify the name of the login account from which the
temporary password are removed. This operand is optional.
Example
To remove temporary passwords:
primaryfcs:admin> sectemppasswdreset 2, “root”
Account root has been successfully disabled on domain 2
primaryfcs:admin> sectemppasswdreset 2
Restoring password of every account on domain 2
Temporary password of each account on domain 2 has been successfully reset
(if switch is non fcs switch it will further display).
Root and factory accounts on domain 2 have been disabled.
primaryfcs:admin> sectemppasswdreset
All temporary passwords or account settings have been restored to
fabric-wide secure settings.
Passwords of permanent accounts have been reset to fabric-wide
values. Root and factory accounts on each Non FCS switch have
been disabled.
See Also
secmodeenable
secmodeshow
secnonfcspasswd
secswitchpasswd
738
Fabric OS Version 3.1.x/4.1.x Reference Guide
sectemppasswdset
sectemppasswdset
Set a temporary password on a remote switch.
Synopsis
sectemppasswdset domain, login_name
Availability
Admin
Release
V3.1.x and V4.1.x
Description
Use this command to set a unique temporary password for a given account on a
specific switch in the fabric. Use the sectemppasswdreset command to
remove the temporary password or reboot the switch.
You can change any password on any switch. In order to the change the password
of an account which has higher level than that of the current user logged into the
primary FCS switch, you must enter the password of the same level account on the
primary FCS switch.
The password setup on the target is not persistent and will be reset to the secure
fabric-wide setting when this target switch is rebooted or when
sectemppasswdreset is run on primary FCS switch.
Each switch has four accounts; Root, Factory, Admin and User. Root and Factory
accounts are disabled for non-FCS switches. This command can enable the Root
or Factory account on a non-FCS switch when you specify a password for those
accounts.
The password should be at least 8 characters long and no more than 40 characters.
Note: When security is enabled, this command can only be issued from the Primary
FCS switch. See “Security Commands” on page 941.
Fabric OS Version 3.1.x/4.1.x Reference Guide
739
Fabric OS Commands
Operands
This command has the following operands:
domain
Specify the Domain of a switch where you want to change the
password. This operand is required.
login_name
Specify the login name where you want to change the
password. This operand is required.
Example
To set the password on a remote switch with a Domain of 2:
primaryfcs:admin> sectemppasswdset 2, “root”
Please provide password of root on primary FCS switch
in order to change this password: ********
Set remote switch root password: ********
Re-enter new password: ********
Account root has been successfully enabled on domain 2
See Also
passwd
secmodedisable
secmodeenable
secmodeshow
secnonfcspasswd
sectemppasswdreset
740
Fabric OS Version 3.1.x/4.1.x Reference Guide
sectransabort
sectransabort
Abort current security transaction.
Synopsis
sectransabort
Availability
Admin
Release
V3.1.x and V4.1.x
Description
Use this command to abort the current transaction. This command is used to
recover from management application problems. This command will abort all
current changes that have not been committed or activated.
Note: This command can be issued from any switch in the fabric.
When security is enabled, this command can only be issued from the Primary FCS
switch. See “Security Commands” on page 941.
Operands
None.
Example
To abort the current security transaction:
primaryfcs:admin> sectransabort
Transaction has been aborted.
primaryfcs:admin>
Fabric OS Version 3.1.x/4.1.x Reference Guide
741
Fabric OS Commands
See Also
secpolicyabort
secpolicyactivate
secpolicyadd
secpolicycreate
secpolicydelete
secpolicydump
secpolicyremove
secpolicysave
secpolicyshow
742
Fabric OS Version 3.1.x/4.1.x Reference Guide
secversionreset
secversionreset
Reset the version stamp to zero.
Synopsis
secversionreset
Availability
Admin
Release
V3.1.x and V4.1.x
Description
Use this command to reset the version stamp of all switches in a fabric to zero, so
that it can be joined to the another secure fabric.
When merging two or more secure fabrics, the following steps should be taken:
1. Determine which secure fabric will become the FCS_POLICY controller
fabric, that is the dominant fabric to which all other secure fabrics will be
merged.
2. Use the secpolicyadd, secpolicyremove, and
secpolicyactivate commands to modify the FCS_POLICY of the
merging fabrics to match the FCS_POLICY of the controller fabric. All
secure fabrics to be merged must have identical FCS_POLICY lists. The FCS
policies of merged fabrics must match exactly, that is, they must contain the
same FCS members and in the same order, or the merge will fail.
3. Reset the version stamp using the secversionreset command on each
secure fabric to be merged into the controller fabric. The controller fabric does
not require a version reset.
4. Cascade the fabrics together. When the secure fabrics are merged, the primary
FCS switch in the controller fabric will propagate its security policies across
the newly formed fabric.
Fabric OS Version 3.1.x/4.1.x Reference Guide
743
Fabric OS Commands
Note: When security is enabled, this command can only be issued from the Primary
FCS switch. See “Security Commands” on page 941.
Operands
None.
Example
To reset the version stamp to zero:
primaryfcs:admin> secversionreset
About to reset version stamp to 0.
Are you sure (yes, y, no, n):[no] y
Committing configuration... done.
Security Policy Version Stamp has been set to 0.
primaryfcs:admin>
See Also
secfabricshow
secmodedisable
secmodeenable
secmodeshow
sectransabort
744
Fabric OS Version 3.1.x/4.1.x Reference Guide
sensorShow
sensorShow
Displays sensor readings.
Synopsis
sensorShow
Availability
All users.
Release
V3.1.x and V4.1.x
Description
Use this command to display the current temperature, fan and power supply
status, and readings from sensors located on the switch. The actual location of the
sensors varies depending on the switch type.
Using V4.1.x with the StorageWorks Core switch, the information returned with
sensorShow is specific to the logical switch you are logged into:
■
If you are logged into Logical switch 0, sensors 1 through 4 are for switch
blade slots 1 through 4, respectively. Sensors 5 and 6 are for the two CPs in
slots 5 and 6, respectively.
■
If you are logged into Logical switch 1, sensors 1 and 2 are for the two CPs in
slots 5 and 6, respectively. Sensors 3 through 6 are for switch blade slots 7
through 10, respectively.
■
If you are logged into the Active CP through the console port, you are
prompted to specify the logical switch this command is executed on. If you
log in to the Active CP through the Fabric OS shell, this command always
executes on the default switch (logical switch 0).
■
Regardless of logical switch, sensors 7 through 9 are for the three chassis fans,
left to right, and sensors 10 through 13 are for the four chassis power supplies,
bottom to top.
Operands
None.
Fabric OS Version 3.1.x/4.1.x Reference Guide
745
Fabric OS Commands
Example
Below is an example of the output of this command (V3.1.x example):
switch30:admin>
sensor 1: type
sensor 2: type
sensor 3: type
sensor 4: type
sensor 5: type
sensor 6: type
sensor 7: type
sensor 8: type
sensor 9: type
sensor 10: type
sensor 11: type
sensor 12: type
sensor 13: type
switch30:admin>
sensorshow
1 (Temp #1) is OK, value is 32
1 (Temp #2) is OK, value is 31
1 (Temp #3) is OK, value is 30
1 (Temp #4) is absent, value is unknown
1 (Temp #5) is absent, value is unknown
2 (Fan #1) is OK, value is 5820
2 (Fan #2) is OK, value is 5940
2 (Fan #3) is OK, value is 5910
2 (Fan #4) is OK, value is 5970
2 (Fan #5) is OK, value is 6030
2 (Fan #6) is absent, value is unknown
3 (Power Supply #1) is absent, value is unknown
3 (Power Supply #2) is absent, value is unknown
To view the sensor values in a StorageWorks Core switch (V4.1.x example):
switch:admin> sensorshow
sensor 1: (Temperature)
sensor 2: (Temperature)
sensor 3: (Temperature)
sensor 4: (Temperature)
sensor 5: (Temperature)
sensor 6: (Temperature)
sensor 7: (Fan
)
sensor 8: (Fan
)
sensor 9: (Fan
)
sensor 10: (Power Supply
sensor 11: (Power Supply
sensor 12: (Power Supply
sensor 13: (Power Supply
switch:admin>
is Ok, value
is Absent
is Absent
is Absent
is Ok, value
is Ok, value
is Ok, speed
is Ok, speed
is Ok, speed
) is Ok
) is Absent
) is Ok
) is Absent
is 39 C
is
is
is
is
is
26 C
27 C
2537 RPM
2537 RPM
2556 RPM
See Also
fanShow
tempShow
746
Fabric OS Version 3.1.x/4.1.x Reference Guide
setdbg
setdbg
Set debug level of the specified module.
Synopsis
setdbg module_name level
Availability
Admin
Release
V3.1.x and V4.1.x
Description
Use this command to set the debug level of a specified module.
Operands
This command has the following operands:
module_name
Specify the name of the module where you want to view the
debug and verbosity levels. Module names are case sensitive.
This operand is optional.
level
Specify the debug level for the specified module. This operand
is required.
Example
The following example shows how set debug level of module named NS to
value 3:
switch:admin> setdbg NS 3
See Also
dbgshow
Fabric OS Version 3.1.x/4.1.x Reference Guide
747
Fabric OS Commands
setesdmode
Enable or disable ESD mode.
Synopsis
setesdmode [mode | -show]
Availability
Admin
Release
V4.1.x
Description
Use this command to enable or disable ESD mode. The mode is saved in
non-volatile memory and stays in that mode until the next execution of
setesdmode.
The mode becomes active as soon as this command is executed. It does not require
a reboot to take effect.
ESD mode, when enabled, modifies the behavior of the diagnostic test methods
and post scripts. The exact behavior varies but most commonly consists of
disabling the ports defined with diagsetports when spinsilk or other
functional tests are run for ESD or EMI testing purposes.
Operands
This command has the following operands:
mode
Specify 1 to enable ESD mode, specify 0 to disable ESD mode.
This operand is optional.
-show
Specify this operand to display the current mode setting. This
operand is optional.
If no operand is specified the current value is displayed.
748
Fabric OS Version 3.1.x/4.1.x Reference Guide
setesdmode
Example
To set ESD mode:
switch:admin> setesdmode
Esd Mode is 0 (Disabled).
switch:admin> setesdmode 1
Config update Succeeded
Esd Mode is now 1 (Enabled).
switch:admin>
See Also
spinsilk
Fabric OS Version 3.1.x/4.1.x Reference Guide
749
Fabric OS Commands
setgbicmode
Enable or disable GBIC mode.
Synopsis: V3.1.x
setgbicmode [mode]
Synopsis: V4.1.x
setgbicmode [mode | -show]
Availability
Admin
Release
V3.1.x and V4.1.x
Description
Use this command to enable or disable the GBIC mode. If the mode operand is 1,
GBIC mode is enabled; if the mode operand is 0, GBIC mode is disabled. The
mode is saved in non-volatile memory and the GBIC remains in that mode until
the next execution of setgbicmode.
The mode becomes active as soon as this command is executed. It does not require
a reboot to take effect.
The GBIC mode, when enabled, forces crossPortTest and spinSilk to
limit testing to ports with GBICs present. Consequently, testing is limited to those
ports with a suspected problem.
Note: The current technology in the StorageWorks Core switch and StorageWorks 2
Gb SAN switch use SFPs instead of GBICs. This command is now replaced by the
setsfpmode command. The command is included in the current Fabric OS for
backward compatibility of scripts used by some customers.
750
Fabric OS Version 3.1.x/4.1.x Reference Guide
setgbicmode
Operands
This command has the following operands:
mode
Specify 1 to enable GBIC mode or 0 to disable GBIC mode. For
V4.1.x, if no mode is specified the current value is displayed.
The mode is saved in non-volatile memory and remains
unchanged until the next execution of the setgbicmode
command. This operand is optional.
-show
(V4.1.x only)
Specify the -show operand to display the current setting. This
operand is optional.
Example
To enable or disable GBIC mode (V3.1.x example):
switch:admin> setgbicmode 1
Committing configuration...done.
GBIC mode is now ON.
switch:admin> setgbicmode 0
Committing configuration...done.
GBIC mode is now OFF.
switch:admin>
To enable or disable GBIC mode (V4.1.x example):
switch:admin> setgbicmode 1
GBIC mode is now 1 (Enabled).
switch:admin> setgbicmode 0
GBIC mode is now 0 (disabled).
switch:admin> setgbicmode -show
GBIC mode is now 0 (disabled).
See Also
crossPortTest
spinSilk
Fabric OS Version 3.1.x/4.1.x Reference Guide
751
Fabric OS Commands
setsfpmode
Enable or disable SFP mode.
Synopsis
setsfpmode [mode | -show]
Availability
Admin
Release
V4.1.x
Description
Use this command to enable or disable the SFP mode. If the mode operand is 1,
SFP mode is enabled; if the mode operand is 0, SFP mode is disabled. The mode
is saved in non-volatile memory and the SFP remains in that mode until the next
execution of setsfpmode.
The mode becomes active as soon as this command is executed. It does not require
a reboot to take effect.
The SFP mode, when enabled, forces crossPortTest and spinSilk to
limit testing to ports with SFPs present. Consequently, testing is limited to those
ports with a suspected problem.
Operands
This command has the following operands:
752
mode
Specify 1 to enable SFP mode or 0 to disable SFP mode. If no mode
is specified the current value is displayed. The mode is saved in
non-volatile memory and remains unchanged until the next
execution of the setsfpmode command. This operand is
optional.
-show
Specify the -show operand to display the current setting. This
operand is optional.
Fabric OS Version 3.1.x/4.1.x Reference Guide
setsfpmode
Example
To enable or disable SFP mode:
switch:admin> setSFPMode 1
SFP mode is now 1 (Enabled).
switch:admin> setSFPMode 0
SFP mode is now 0 (disabled).
switch:admin> setSFPMode -show
SFP mode is now 0 (disabled).
See Also
crossPortTest
spinSilk
Fabric OS Version 3.1.x/4.1.x Reference Guide
753
Fabric OS Commands
setSplbMode
Enable or disable two port loopback.
Synopsis: V3.1.x
setSplbMode [mode]
Synopsis: V4.1.x
setSplbMode [mode | -show]
Availability
Admin
Release
V3.1.x and V4.1.x
Description
Use this command to enable or disable SPLB mode. The mode is saved in
non-volatile memory and stays in that mode until the next execution of
setSplbMode. The mode becomes active as soon as this command is executed.
It does not require a reboot to take effect.
The SPLB mode, when enabled, forces the spinSilk command to disable two
port loopback for M->M connected ports. This may be useful to isolate internal
switch problems from SFP problems since the internal paths are used much less
with SPLB mode enabled.
The SPLB mode, when disabled, forces the spinSilk command to circulate
frames between pairs of M->M connected ports as follows:
P1 TX >>> P1 RX -> P2 TX >>> P2 RX -> P1 TX
where:
>>> is a cable or internal loopback
-> is a routing table entry
754
Fabric OS Version 3.1.x/4.1.x Reference Guide
setSplbMode
The connections between pairs of M->M ports will be chosen to exercise the
connections between as many chips (or bloom quadrants) as possible subject to
the setting of allow_intra_chip and the availability of pairs of M->M ports.
Any ports that are cross-cabled will be routed to each other in the normal manner
regardless of the setting of SPLB mode:
P1 TX >>> P2 RX -> P1 TX
P2 TX >>> P1 RX -> P2 TX
Operands
This command has the following operands:
mode
Specify 1 to enable SPLB mode or 0 to disable SPLB mode. For
V3.1.x, the default (if no operand specified) is 0, SPLB
disabled. For V4.1.x, if no mode is specified the current value
is displayed. This operand is optional.
-show
Specify the -show operand to display the current setting.
This operand is optional.
(V4.1.x only)
Example
To enable or disable a two port loopback:
switch:admin> setsplbmode 1
Committing configuration...done.
SPLB mode is now ON.
switch:admin> setsplbmode 0
Committing configuration...done.
SPLB mode is now OFF.
switch:admin>
See Also
setgbicmode
setSfpMode
spinSilk
Fabric OS Version 3.1.x/4.1.x Reference Guide
755
Fabric OS Commands
setverbose
Set verbose level of the module to specified level.
Synopsis
setverbose module_name, level
Availability
Admin
Release
V3.1.x and V4.1.x
Description
Use this command to set the verbose level of the specified module.
Operands
This command has the following operands:
module_name
Specify the name of the module for which verbose level is
to be set.
-level
Specify the verbose level to be set for the specified
module.
Example
The following example shows how to set the verbose level of module named NS
to value 3:
switch:admin> setverbose NS 3
See Also
dbgshow
756
Fabric OS Version 3.1.x/4.1.x Reference Guide
sfpShow
sfpShow
Displays serial ID SFP information.
Synopsis: V3.1.x
sfpShow [portnumber]
Synopsis: V4.1.x
sfpShow [slotnumber/][portnumber]
Availability
All users.
Release
V3.1.x and V4.1.x
Description
Use this command to display information about Serial Identification SFPs (also
known as module definition “4” SFPs). These SFPs provide extended information
that describes the SFPs capabilities, interfaces, manufacturer, and other
information.
Note: SFPs are polled by a background process. The sfpshow command retrieves
the latest information from cache. The cache values for each SFP are updated when the
SFP is hot plugged, when it is removed, or when the Fabric OS polls the SFPs. In the
StorageWorks Core switch, if there is a lot of activity on the switch, poll updates may
take several minutes.
Use this command with no operand to display a summary of all SFPs in the
switch. The summary shows the SFP type (see switchShow for an explanation
of the two letter codes) and, for Serial ID SFP, the vendor name and SFP serial
number.
Use this command with the slot and portnumber operand to display
detailed information about the Serial ID SFP in that port.
Fabric OS Version 3.1.x/4.1.x Reference Guide
757
Fabric OS Commands
For Finisar “smart” SFPs, five additional fields are displayed:
■
Module temperature
■
Voltage
■
Received optical power
■
Transmitted optical power (longwave only)
■
Laser diode drive current
Operands
This command has the following operands:
slotnumber
(V4.1.x only)
Specify the slot number for a StorageWorks Core switch. For
all other switches this operand is not required. The slot number
must be followed by a slash ( / ) and the port number, so that
each port is represented by both slot number (1 through 4, or
7 through 10), and port number (0 through 15).
The StorageWorks Core switch has a total of 1–10 slots. Slot
number 5 and 6 are control processor cards, and slot 1
through 4, and 7 through 10, are port cards. On each port
card, there are 16 ports counted from the bottom, 0 to 15.
portnumber
Specify a port number. Valid values for port number vary
depending on the switch type. This operand is optional.
Example
The example below shows SFP summary information:
switch:admin> sfpshow
port 0: id (sw) Vendor:
port 1: id (sw) Vendor:
port 2: id (sw) Vendor:
port 3: id (sw) Vendor:
port 4: id (sw) Vendor:
port 5: id (sw) Vendor:
port 6: id (sw) Vendor:
port 7: id (sw) Vendor:
switch:admin>
758
AGILENT
AGILENT
AGILENT
AGILENT
AGILENT
AGILENT
AGILENT
AGILENT
Serial
Serial
Serial
Serial
Serial
Serial
Serial
Serial
No:
No:
No:
No:
No:
No:
No:
No:
A00128928
A00128983
A00128966
A00128929
A00128988
A00127279
A00127399
A00127264
Fabric OS Version 3.1.x/4.1.x Reference Guide
sfpShow
This example shows detailed SFP information for a StorageWorks Core switch:
switch:admin> sfpshow 1/3
Identifier: 3
SFP
Connector:
7
LC
Transceiver: 050c402000000000 100,200_MB/s M5,M6 sw Inter_dist
Encoding:
1
8B10B
Baud Rate:
21
(units 100 megabaud)
Length 9u:
0
(units 100 meters)
Length 50u: 30
(units 10 meters)
Length 625u: 13
(units 10 meters)
Length Cu:
0
(units 1 meter)
Vendor Name: FINISAR CORP.
Vendor OUI: 00:90:65
Vendor PN:
FTRJ-8519-3-2.5
Vendor Rev: X1
Options:
0012 Loss_of_Sig,Tx_Disable
BR Max:
0
BR Min:
0
Serial No:
H112YFR
Date Code:
010418
switch:admin>
See Also
switchShow
Fabric OS Version 3.1.x/4.1.x Reference Guide
759
Fabric OS Commands
slotOff
Disable a blade slot.
Synopsis
slotOff slot
Availability
Admin
Release
V4.1.x
Description
Use this command to disable a non-faulty blade unit while leaving the blade unit
powered on.
Operands
This command has the following operand:
slot
Specify the physical slot number of the blade to be disabled.
This operand is required.
Example
To power off blade unit 3:
switch:admin> slotOff 3
Slot 3 is being disabled.
See Also
slotOn
slotShow
760
Fabric OS Version 3.1.x/4.1.x Reference Guide
slotOn
slotOn
Enable a blade slot.
Synopsis
slotOn slot
Availability
Admin
Release
V4.1.x
Description
Use this command to re-enable a blade unit that was previously disabled.
Operands
This command has the following operand:
slot
Specify the physical slot number of the blade to be enabled. This
operand is required.
Example
To power off blade unit 3:
switch:admin> sloton 3
Slot 3 is being enabled.
See Also
slotOff
slotShow
Fabric OS Version 3.1.x/4.1.x Reference Guide
761
Fabric OS Commands
slotpoweroff
Power off a blade unit.
Synopsis
slotPowerOff slot
Availability
Admin
Release
V4.1.x
Description
Use this command to turn off the power to a blade unit. The slot must have a valid
blade unit present and the blade unit must be of a type that can be powered off.
Operands
This command has the following operand:
slot
Specify the physical slot number of the blade to be powered
down. This operand is required.
Example
To power off blade unit 3:
switch:admin> slotPowerOff 3
Slot 3 is being powered off
See Also
slotPowerOn
slotShow
762
Fabric OS Version 3.1.x/4.1.x Reference Guide
slotpoweron
slotpoweron
Power on a blade unit.
Synopsis
slotPowerOn slot
Availability
Admin
Release
V4.1.x
Description
Use this command to turn on the power to a blade unit. The slot must have a valid
blade unit present and the blade unit must be currently powered off.
Operands
This command has the following operand:
slot
Specify the physical slot number of the blade to be powered on.
This operand is required.
Example
To power on blade unit 3:
switch:admin> slotPowerOn 3
Powering on slot 3.
See Also
slotPowerOff
slotShow
Fabric OS Version 3.1.x/4.1.x Reference Guide
763
Fabric OS Commands
slotShow
Displays slot status.
Synopsis
slotShow
Availability
All users.
Release
V4.1.x
Description
Use this command to inventory and display the current status of each slot in the
system. The format of the display includes a header and four fields for each slot.
This command is only supported on the StorageWorks Core switch. The fields and
their possible values are as follows:
764
Slot
Displays the physical slot number.
Blade Type
Displays the blade type:
SW BLADE—The blade is a switch.
CP BLADE—The blade is a Control Processor.
UNKNOWN—Blade not present or its type is not recognized.
ID
Displays the hardware ID of the blade type.
Status
Displays the status of the blade:
VACANT
The slot is empty.
INSERTED, NOT POWERED ON
The blade is present in the slot but is turned off.
DIAG RUNNING POST1
The blade is present, powered on, and running the post
initialization power on self tests.
DIAG RUNNING POST2
The blade is present, powered on, and running the POST
(power on self tests)
Fabric OS Version 3.1.x/4.1.x Reference Guide
slotShow
ENABLED
The blade is on and enabled.
DISABLED
The blade is powered on but disabled.
FAULTY
The blade is faulty because an error was detected.
UNKNOWN
The blade is inserted but its state cannot be determined.
Operands
None.
Example
To display a blade inventory and status:
switch:admin> slotShow
Slot
Blade Type
ID
Status
--------------------------------1
SW BLADE
2
FAULTY
2
SW BLADE
2
DISABLED
3
SW BLADE
2
ENABLED
4
SW BLADE
2
DIAG RUNNING POST2
5
CP BLADE
1
ENABLED
6
CP BLADE
1
ENABLED
7
UNKNOWN
VACANT
8
SW BLADE
2
DIAG RUNNING POST1
9
SW BLADE
2
INSERTED, NOT POWERED ON
10
UNKNOWN
VACANT
See Also
chassisShow
slotOff
slotOn
slotPowerOff
slotPowerOn
Fabric OS Version 3.1.x/4.1.x Reference Guide
765
Fabric OS Commands
snmpMibCapSet
View and modify options for configuring SNMP MIB trap capability.
Synopsis
snmpMibCapSet
Availability
Admin
Release
V3.1.x and V4.1.x
Description
This command enables a user to turn on or off certain MIBS and TRAPS. This
command also enables a user to turn on or off group information and SSN in SW
trap messages. It first displays current settings and then prompts the user to
change the values for each parameter.
■
FA-MIB - Specifying yes means the user can access FA-MIB variables with
an SNMP manager. The default value is yes.
■
HA-MIB - (V4.1.x only) Specifying yes means the user can access HA-MIB
variables with an SNMP manager. The default value is yes.
■
SW-TRAP - Specifying yes means the SNMP management application can
receive SW-TRAPS from the switch. The default value is yes.
■
FA-TRAP - Specifying yes means the SNMP management application can
receive FA-TRAPS from the switch. The default value is yes.
■
SW-EXTTRAP - (V4.1.x only) Specifying yes means the SNMP management
application can receive SW-EXTTRAPS from the switch. The default value is
yes.
■
HA-TRAP - (V4.1.x only) Specifying yes means the SNMP management
application can receive HA-TRAPS from the switch. The default value is yes.
Operands
None.
766
Fabric OS Version 3.1.x/4.1.x Reference Guide
snmpMibCapSet
Example
To view or modify the options for configuring SNMP MIB traps (V3.1.x
example):
switch:admin> snmpmibcapset
The SNMP Mib/Trap Capability has been set to support
FE-MIB SW-MIB FA-MIB SW-TRAP FA-TRAP
FA-MIB (yes, y, no, n): [yes]
SW-TRAP (yes, y, no, n): [yes]
FA-TRAP (yes, y, no, n): [yes]
no change
See Also
agtcfgDefault
agtcfgSet
agtcfgShow
Fabric OS Version 3.1.x/4.1.x Reference Guide
767
Fabric OS Commands
spinFab
Test for Cascaded switch ISL links.
Synopsis: V3.1.x
spinFab [nMillionFrames [, ePortBeg[, ePortEnd[,
failmode]]]]
Synopsis: V4.1.x
spinfab [-nmegs count][-ports list][-setfail mode]
[-domain value]
Availability
Admin
Release
V3.1.x and V4.1.x
Description
Used to verify the intended functional operation of the ISL links between switches
at the maximum speed of 2 Gbps by setting up the routing hardware such that test
frames received by each E_Port are retransmitted on the same E_Port. Several
frames are then sent to the neighbor port attached to each active E_Port specified.
Since the default action for such frames (which never occur for normal traffic) is
to route them back to the sender, the frames that are sent in this manner will
circulate until the test stops them.
The following conditions must be met before spinfab can execute a
successful run.
768
■
Trunking license needs to be present for the switch.
■
Ports must be configured into 4 port trunk groups. It is recommended that
Port n of a local switch is connected to port n of a remote switch. Use the
switchshow command to verify that there is only 1 trunk master per quad
before spinfab is run.
Fabric OS Version 3.1.x/4.1.x Reference Guide
spinFab
The frames are continuously transmitted and received to all ports in parallel. The
port LEDs flicker green rapidly while the test is running. While the frames are
circulating, the RX frame count and port CRC and encoder error statistics are
monitored and errors will be generated if a port stops or a low level error occurs.
Every one million frames the circulating frames will be captured to verify that
they are still circulating and that they are still in-order. In this manner the entire
path to the remote switch may be verified.
Note: When trunk groups are present, then entire trunk group must be included in the
range of ports to test or false failures may occur. If multiple ISL links are present
between two switches that support trunking then it is likely that trunk groups are present
and all ports between the two switches should be tested at the same time.
The switch will remain in normal operation while this test is running; however
some performance degradation will occur due to the ISL links being saturated
with test frames. Because of this you should use caution when running this test on
live fabrics, consider only testing one ISL link at a time, and do not run the tests
for extended periods of time.
This test is best combined with the online crossPorttest for ISL link
failure isolation. If this test fails, replace the cable with a loopback plug and run
crossporttest to verify the local switch and SFP. If these tests pass then the
fault lies in the cable or remote switch/SFP.
The frames are continuously transmitted and received in all ports in parallel. The
port LEDs flicker green rapidly while the test is running.
Note: When trunk groups are present, then entire trunk group must be included in the
range of ports to test or false failures may occur. If multiple ISL links are present
between two switches that support trunking then it is likely that trunk groups are present
and all ports between the two switches should be tested at the same time.
Fabric OS Version 3.1.x/4.1.x Reference Guide
769
Fabric OS Commands
Operands
This command has the following operands:
770
nMillionFrames
(V3.1.x only)
Number of million frames to send. The test will progress
until the specified number of frames has been transmitted
on each port. The default value for nmill is 10, so the
number of frames sent will be at least 10 million. The
counting is not exact so the actual number of frames sent
will tend to be slightly larger, particularly at 2-Gbps link
speeds.
ePortBeg
(V3.1.x only)
Specify the first port to test, if omitted 0 will be used. This
operand is optional.
ePortEnd
(V3.1.x only)
Specify the last port to test. The test will be performed on
ePortBeg to ePortEnd inclusive. If ePortEnd is omitted then
the default will be to test all ports. This operand is
optional.
failmode
(V3.1.x only)
This parameter may be used to cause spinfab to mark
failing ports as bad like a normal diagnostic.
1 = Mark failing ports as BAD
0 = do not mark failed ports as bad.
To minimize the impact on live fabrics this test normally
logs errors, but does not set the port status to FAILED. This
parameter is provided to force the failing ports to be
marked as BAD, in the same manner as other diagnostics.
In test or qualification environments without live traffic this
may be useful with large values of nmil. This mode is
disabled by default.
-nmegs count
(V4.1.x only)
Specify the number of frames to send in millions. The test
will progress until the specified number of frames has
been transmitted on each port. The default value is 10,
that is, 10 million frames. This command only
approximately counts the frames and the actual number of
frames sent will be slightly larger, particularly at 2G link
speeds.
-ports list
(V4.1.x only)
Specify a list of user ports to test. By default all of the ISL
ports in the current switch will be tested. This option may
be used to restrict testing to the specified ports. This
operand is optional. See the itemlist command for
more information.
Fabric OS Version 3.1.x/4.1.x Reference Guide
spinFab
-setfail mode
(V4.1.x only)
This parameter may be used to cause spinfab to mark
failing ports as bad. Specify a value 1 to mark failing
ports as BAD, specify a value of 0 to not mark failed ports
as bad. To minimize the impact on live fabrics this test
normally logs errors but does not set the port status to
FAILED. This parameter is provided to force the failing
ports to be marked as BAD in the same manner as other
diagnostics. In test or qualification environments without
live traffic this may be useful with large values of nmil. This
mode is disabled by default.
-domain value
(V4.1.x only)
The domain parameter is used to specify a specific remote
domain that the switch is connected to. The default is to
automatically determine the remote domain number. This
operand is optional.
Fabric OS Version 3.1.x/4.1.x Reference Guide
771
Fabric OS Commands
Example
In the following examples ports 0-3 are active ISL links. Port 4 is an F-Port so the
test skips it (V3.1.x example):
switch:admin> setdbg “DIAG”, 0
switch:admin> spinfab 3,0,4
spinFab running...
spinFab: Completed 3 megs, status: passed.
port 0 test status: 0x00000000 -- passed.
port 1 test status: 0x00000000 -- passed.
port 2 test status: 0x00000000 -- passed.
port 3 test status: 0x00000000 -- passed.
port 4 test status: 0x02000000 -- SKIPPED!
switch:admin> setdbg “DIAG”, 2
switch:admin> spinfab 3,0,3
spinFab
port 1
port 0
port 2
port 3
port 1
port 0
port 2
port 3
port 1
port 0
port 2
port 3
running...
Rx 1 million
Rx 1 million
Rx 1 million
Rx 1 million
Rx 2 million
Rx 2 million
Rx 2 million
Rx 2 million
Rx 3 million
Rx 3 million
Rx 3 million
Rx 3 million
frames.
frames.
frames.
frames.
frames.
frames.
frames.
frames.
frames.
frames.
frames.
frames.
spinFab: Completed 3 megs, status: passed.
port 0 test status: 0x00000000 -- passed.
port 1 test status: 0x00000000 -- passed.
port 2 test status: 0x00000000 -- passed.
port 3 test status: 0x00000000 -- passed.
switch:admin>
772
Fabric OS Version 3.1.x/4.1.x Reference Guide
spinFab
To test cascading ISL links (V4.1.x example):
switch:admin> > spinfab -ports 1/0 - 1/2
spinfab running...
spinfab: Completed 11 megs, status: passed.
port 0 test status: 0x00000000 -- passed.
port 1 test status: 0x00000000 -- passed.
port 2 test status: 0x00000000 -- passed.
Test Complete: "spinfab" Pass 10 of 10
Duration 0 hr, 0 min & 41 sec (0:0:41:877).
passed.
switch:admin>
Errors
When it detects failures, the test may report one or more of the following error
messages:
■
For V3.1.x:
DIAG-INIT
DIAG-PORTDIED
DIAG-XMIT
DIAG-PORTSTOPPED
DIAG-ERRSTATS
DIAG-ERRSTAT
■
For V4.1.x:
DATA
ERR_STAT
ERR_STATS
ERR_STATS_2LONG
ERR_STATS_BADEOF
ERR_STATS_BADOS
ERR_STATS_C3DISC
ERR_STATS_CRC
ERR_STATS_ENCIN
ERR_STATS_ENCOUT
ERR_STATS_TRUNC
ERR_STAT_2LONG
ERR_STAT_BADEOF
ERR_STAT_BADOS
ERR_STAT_C3DISC
ERR_STAT_CRC
ERR_STAT_ENCIN
ERR_STAT_ENCOUT
ERR_STAT_TRUNC
FINISH_MSG_ERR
INIT
MBUF_STATE_ERR
NO_SEGMENT
PORT_ABSENT
Fabric OS Version 3.1.x/4.1.x Reference Guide
773
Fabric OS Commands
PORT_DIED
PORT_ENABLE
PORT_M2M
PORT_STOPPED
PORT_WRONG
RXQ_RAM_PERR
STATS
STATS_C3FRX
STATS_FRX
STATS_FTX
TIMEOUT
XMIT
See Also
camtest
centralmemorytest
cmemretentiontest
cmitest
crossporttest
itemlist
portloopbacktest
setDbg
spinsilk
sramretentiontest
774
Fabric OS Version 3.1.x/4.1.x Reference Guide
spinSilk
spinSilk
Functional test of port connection at maximum switch speed.
Synopsis: V3.1.x
spinSilk [nmillionframes[, sfpmode[, lbmode[,
spdmode]]]]
Synopsis: V4.1.x
spinSilk [-nmegs count][-gbic_mode mode][-lb_mode mode]
[-spd_mode mode][-verbose mode][-ports itemlist]
Availability
Admin
Release
V3.1.x and V4.1.x
Description
This command verifies the functional operation of the switch by setting up the
routing hardware such that frames received by port M are retransmitted through
port N. Likewise frames received by port N are retransmitted through port M.
Each port M sends 1 frame to its partner port N through an external fiber cable,
exercising all the switch components.
Note: The spinsilk command may not be executed on an operational switch. You
must first disable the switch using the switchDisable command.
The cables can be connected to any port combination with the condition that the
cables and SFPs connected are of the same technology. For example, a short
wavelength SFP port must be connected to another short wavelength SFP port
through a short wavelength cable; or a long wavelength port must be connected to
another long wavelength port.
Fabric OS Version 3.1.x/4.1.x Reference Guide
775
Fabric OS Commands
Optimum test coverage occurs with lbmode 1, M->M loopback plugs and
splbMode disabled. In this case every port will exchange frames with every
other port and all of the ASIC to ASIC connections are tested.
The frames are continuously transmitted and received in all ports in parallel. The
port LEDs flicker green rapidly while the test is running.
The test method is as follows:
1. Determine which ports are connected to each other.
2. Enable ports for cabled loopback mode.
3. Set up the routing table such that when port M receives frames, they are
routed to its partner port N; and vice versa.
4. Transmit 4 frames of various lengths via port M. The 4 frames used are as
follows:
a. 2112 bytes of BYTE_LFSR,
b. 1000 bytes of CSPAT,
c. 128 bytes of RANDOM, and
d. 512 bytes of RDRAM_PAT.
The partner port N eventually sends 4 similar frames as follows:
a. 2112 bytes of BYTE_LFSR,
b. 928 bytes of CSPAT,
c. 200 bytes of RANDOM, and
d. 480 bytes of RDRAM_PAT.
5. Periodically check that each port has not died, each port's frames transmitted
counter is still incrementing, each port's statistic error counters are non-zero:
ENC_in, CRC_err, TruncFrm, FrmTooLong, BadEOF, Enc_out,
BadOrdSet, DiscC3
until one of the following is met:
a. The number of million frames requested per port are met,
b. All ports are eventually marked bad,
c. The user sends a keyboard (or push button) interrupt to abort.
The data is not read and checked as is done in portloopbacktest and
crossporttest. There is no CPU intervention beyond the periodic checks of
the hardware counters.
776
Fabric OS Version 3.1.x/4.1.x Reference Guide
spinSilk
An example of the data used are as follows:
CSPAT:
BYTE_LFSR:
RANDOM:
RDRAM_PAT:
0x7e,
0x69,
0x25,
0xff,
0x7e,
0x01,
0x7f,
0x00,
0x7e,
0x02,
0x6e,
0xff,
0x7e,
0x05,
0x9a,
0x00,
...
...
...
...
At each pass, the frame is created from a different data type. There are seven data
types:
1)
2)
3)
4)
5)
6)
7)
CSPAT:
BYTE_LFSR:
CHALF_SQ:
QUAD_NOT:
CQTR_SQ:
CRPAT:
RANDOM:
0x7e,
0x69,
0x4a,
0x00,
0x78,
0xbc,
0x25,
0x7e,
0x01,
0x4a,
0xff,
0x78,
0xbc,
0x7f,
0x7e,
0x02,
0x4a,
0x00,
0x78,
0x23,
0x6e,
0x7e,...
0x05,...
0x4a,...
0xff,...
0x78,...
0x47,...
0x9a,...
If seven passes are requested, the seven different data types are used in the test. If
eight passes are requested, the first seven frames use unique data types, and the
eighth is the same as the first.
spinSilk Modes
These are the test modes. These modes can be used together to test specific ports.
■
Loopback mode
■
SFP mode
LoopBack Mode (lbmode)
There are four loopback modes that can be used when executing the spinSilk
command. The modes are specified by entering:
■
0 for cable mode. This loopback mode is the default mode and tests only
M->N connections. It requires that the user connect a cable from one port to a
different port.
■
1 for single port also loopback mode. This lb_mode tests M->N and M->M
connections.
If M->N cable connections are used, the spinsilk command operates
identically in lb_mode 0 and lb_mode 1.
If M->M loopback plugs are used with SPLB mode disabled, the
spinsilk command will circulate frames between pairs of M->M
connected ports as follows:
P1 TX >>> P1 RX -> P2 TX >>> P2 RX -> P1 TX
Fabric OS Version 3.1.x/4.1.x Reference Guide
777
Fabric OS Commands
where:
>>> is a cable or internal loopback
-> is a routing table entry
The connections between pairs of M->M ports are chosen to exercise the
connections between as many ASICs as possible subject to the availability of
pairs of M->M ports.
In mode 1 with SPLB mode disabled the spinsilk command only
circulates frames within each single port and none of the ASIC to ASIC
connections are tested. This mode should only be used for fault isolation.
■
2 for external loopback mode. The external loopback test creates a test loop
between two ports on different ASICs and also tests the Serializer Deserializer
functionality.
■
5 for internal loopback mode. The internal loopback test creates a test loop
between two ports on a single ASIC.
See the setSplbmode command for more information on how the loopback
mode setting changes the execution of this command.
GBIC/SFP Mode (sfpmode): V3.1.x
If the spinSilk command is executed with SFP mode activated, only ports
containing SFPs are tested. To activate SFP mode, execute the following
command prior to executing the spinSilk command:
switch:admin> setgbicmode 1
The state of the SFP mode is saved in non-volatile memory and remains active
over a reboot until it is disabled as follows:
switch:admin> setgbicmode 0
An example mode of operation would be to disable the switch, set the SFP mode
to 1, and execute spinsilk which would limit its testing to ports which are
using SFPs, and all SFP ports that are properly cable loopbacked.
Because this test includes the SFPs and the fiber cable in its test path, use the
results from this test in conjunction with the results of the portloopbacktest
can be used to determine those switch components that are not functioning
properly.
778
Fabric OS Version 3.1.x/4.1.x Reference Guide
spinSilk
GBIC/SFP Mode (sfpmode): V4.1.x
If the spinSilk command is executed with GBIC mode activated, only ports
containing GBICs are tested. To activate GBIC mode, execute the following
command prior to executing the spinSilk command:
switch:admin> setsfpmode 1
The state of the SFP mode is saved in non-volatile memory and remains active
over a reboot until it is disabled as follows:
switch:admin> setsfpmode 0
Prior to running this command make sure you disable the switch, set the GBIC
mode to 1, and install loopback cables on all GBIC ports you want to test.
Because this test includes the GBICs and the fiber cable in its test path, use the
results from this test in conjunction with the results from crossporttest
and portloopbacktest can be used to determine those switch components
that are not functioning properly.
Operands
This command has the following operands:
nmillionframes
(V3.1.x only)
Specify a number of times, representing a million frames
per port, to execute this test. If omitted, the default value
used is 0xfffffffe (or almost infinite for practical purposes)
as passcount.
sfpmode
(V3.1.x only)
Specify 1 to enable SFP mode for the test. The SFP mode
parameter may be used to override the global SFP mode
setting for the duration of this test. When it is enabled,
testing is limited to user ports with SFPs installed.
lbmode
(V3.1.x only)
Specify the loopback mode for the test. Valid values are:
0 cabled loopback Port M<->N only (default)
1 cabled loopback Port M->M & M<->N allowed
3 external silkscreen loopback (no retry)
Any other value selects internal loopback.
spdmode
(V3.1.x only)
Specify the speed at which the test is run:
0 set port speed for auto-negotiate.
1 set port speed to lock at 1 Gbit/sec.
2 set port speed to lock at 2 Gbit/sec.
Fabric OS Version 3.1.x/4.1.x Reference Guide
779
Fabric OS Commands
780
-nmegs count
(V4.1.x only)
Specify the number of million frames to send. The test will
progress until the specified number of frames has been
transmitted on each port. The default value for nmill is 10,
so the number of frames sent will be at least 10 million.
-gbic_mode mode
(V4.1.x only)
Specify the GBIC mode for the test. The -gbic_mode
parameter may be used to override the global GBIC mode
described above for the duration of this test. When it is
enabled (1) testing is limited to user ports with GBICs or
SFPs installed.
-lb_mode mode
(V4.1.x only)
Specify the loopback point for the test. By default,
spinsilk uses loopback plugs as described above.
However for debug purposes you can select other
loopback modes as follows:
0: Cable Loopback.
1: Port Loopback (loopback plugs).
2: External (SERDES) loopback.
3: Silkscreen loopback.
4: Serial link wrapback.
5: Internal (parallel) loopback.
-spd_mode mode
(V4.1.x only)
Specify the speed mode for the test. For 1 Gbit/sec only
products it is ignored. The exact operation of modes 3
through 6 depends upon the loopback mode selected.
When speed modes 3 through 6 are used with cables,
they must be connected EVEN to ODD or the test will fail.
■ 0: set all ports' speed for auto-negotiate.
■ 1: set all ports' speed to lock at 1 Gbit/sec.
■ 2: set all port's speed to lock at 2 Gbit/sec.
For lb_Mode == 0,1 the following speed modes are
available to test the speed negotiation:
■ 3: set all even ports' speed for auto-negotiate, set all
odd ports' speed for 1 Gbit/sec.
■ 4: set all even ports' speed for auto-negotiate, set all
odd ports' speed for 2 Gbit/sec.
■ 5: set all odd ports' speed for auto-negotiate, set all
even ports' speed for 1 Gbit/sec.
■ 6: set all odd ports' speed for auto-negotiate, set all
even ports' speed for 2 Gbit/sec.
Fabric OS Version 3.1.x/4.1.x Reference Guide
spinSilk
For lb_Mode == 2,3 the following speed modes are
available to test fifo underrun.
3,5: set all even ports' speed for 2 Gbit/sec, set all odd
ports' speed for 1 Gbit/sec.
4,6: set all even ports' speed for 1 Gbit/sec, set all odd
ports' speed for 2 Gbit/sec.
-verbose mode
(V4.1.x only)
Specify a non-zero value, to display more detailed
information during the test. This mode should be used for
debugging purpose. This operand is optional.
-ports itemlist
(V4.1.x only)
Specify a list of user ports to test. By default all of the user
ports in the current switch are tested. This option may be
used to restrict testing to the specified ports.
Example
To run spinsilk on a switch:
switch:admin> spinsilk 2
Running Spin Silk .............
One moment please ...
switchName:
switch
switchType:
2.2
switchState:
Testing
switchRole:
Disabled
switchDomain:
1 (unconfirmed)
switchId:
fffc01
switchWwn:
10:00:00:60:69:00:73:71
port 0: cu Testing
Loopback->15
port 1: sw Testing
Loopback->11
port 2: sw Testing
Loopback->6
port 3: lw Testing
Loopback->4
.
.
.
Transmitting ... done.
Spinning ...
port 0 Rx/Tx 1 of 1 million frames.
port 1 Rx/Tx 1 of 1 million frames.
port 2 Rx/Tx 1 of 1 million frames.
port 3 Rx/Tx 1 of 1 million frames.
.
.
.
Fabric OS Version 3.1.x/4.1.x Reference Guide
781
Fabric OS Commands
Errors
Below are the possible error messages if failures are detected:
■
For V3.1.x:
DIAG-INIT
DIAG-PORTDIED
DIAG-XMIT
DIAG-PORTSTOPPED
DIAG-ERRSTAT
DIAG-ERRSTATS
■
For V4.1.x:
DATA
EPI1_STATUS_ERR
ERR_STAT
ERR_STATS
ERR_STATS_2LONG
ERR_STATS_BADEOF
ERR_STATS_BADOS
ERR_STATS_C3DISC
ERR_STATS_CRC
ERR_STATS_ENCIN
ERR_STATS_ENCOUT
ERR_STATS_TRUNC
ERR_STAT_2LONG
ERR_STAT_BADEOF
ERR_STAT_BADOS
ERR_STAT_C3DISC
ERR_STAT_CRC
ERR_STAT_ENCIN
ERR_STAT_ENCOUT
ERR_STAT_TRUNC
FDET_PERR
FINISH_MSG_ERR
FTPRT_STATUS_ERR
INIT
LESSN_STATUS_ERR
MBUF_STATE_ERR
MBUF_STATUS_ERRBAR>
NO_SEGMENT
PORT_ABSENT
PORT_DIED
PORT_ENABLE
PORT_M2M
PORT_STOPPED
PORT_WRONG
RXQ_FRAME_ERR
RXQ_RAM_PERR
STATS
STATS_C3FRX
STATS_FRX
STATS_FTX
782
Fabric OS Version 3.1.x/4.1.x Reference Guide
spinSilk
TIMEOUT
XMIT
See Also
backport
camtest
centralmemorytest
cmemretentiontest
cmitest
crossporttest
itemlist
portloopbacktest
portregtest
ramtest
sramretentiontest
statstest
Fabric OS Version 3.1.x/4.1.x Reference Guide
783
Fabric OS Commands
sramRetentionTest
Data retention test of the miscellaneous SRAMs in ASIC.
Synopsis: V3.1.x
sramRetentionTest [passCount]
Synopsis: V4.1.x
sramRetentionTest [--slot number][-passcnt count]
[-ports itemlist][-skip bitmask][-delay value]
Availability
Admin
Release
V3.1.x and V4.1.x
Description
Use this command to verify that data written into the miscellaneous SRAMs in the
ASIC are retained after a 10 second wait. The test method is to write a fill pattern
to all SRAMs, wait 10 seconds, and then read all SRAMs checking that data read
matches data previously written. Then the test is repeated using the
complementary version of the pattern. For V4.1.x, the test will use four
QUAD_FILL patterns and one QUAD_RAMP pattern with random seed.
The following patterns are used:
0xffffffff (and 0x00000000)
0x55555555 (and 0xaaaaaaaa)
0x33333333 (and 0xcccccccc)
0x0f0f0f0f (and 0xf0f0f0f0)
QUAD_RAMP with a random seed value (and its invert) (V4.1.x only)
Note: The sramRetentionTest command may not be executed on an
operational switch. You must first disable the switch using the switchDisable
command.
784
Fabric OS Version 3.1.x/4.1.x Reference Guide
sramRetentionTest
For details about the patterns used in diagnostic tests, see the datatypeshow
command.
Operands
This command has the following operand:
passCount
(V3.1.x only)
Specify the number of times to execute the test. The default
value is 1. This operand is optional.
--slot number
(V4.1.x only)
Specify the slot number that the diagnostic will operate
on. The ports specified will be relative to this slot number.
The default is set to 0 and designed to operate on fixed
port count products.
-passcnt count
(V4.1.x only)
Specify the number of times to execute this test. The default
value is 1. <q> to stop
-ports itemlist
(V4.1.x only)
Specify a list of blade ports to test. By default all the blade
ports in the specified slot will be used. See itemlist
for more details.
-skip bitmask
(V4.1.x only)
Specify a patterns to skip in the test. This command will
use the data patterns described above by default. Using
this option, the user can intentionally skip one or more
pattern(s) if needed.
-delay value
(V4.1.x only)
Specify the delay between the read and write in seconds.
The default value is 10, which is 10 seconds.
Example
To run a data retention test:
switch:admin> sramRetentionTest
Running SRAM Retention Test ... passed.
Errors
Below are the possible error messages if failures are detected:
■
For V3.1.x:
DIAG-REGERR
DIAG-REGERR_UNRST
DIAG-BUS_TIMEOUT
Fabric OS Version 3.1.x/4.1.x Reference Guide
785
Fabric OS Commands
■
For V4.1.x:
BUS_TIMEOUT
REGERR
REGERR_UNRST
See Also
camtest
centralmemorytest
cmemretentiontest
cmitest
crossporttest
filterTest
portloopbacktest
portRegTest
ramtest
spinsilk
786
Fabric OS Version 3.1.x/4.1.x Reference Guide
snn
snn
Displays and sets the soft serial number.
Synopsis
ssn [“soft-serial-number”]
Availability
Admin
Release
V3.1.x
Description
Use this command to display or set the soft serial number. When ssn is entered
without any operand, this command displays the current soft serial number. When
ssn is entered with the operand specified, it sets the soft serial number to a user
specified value, which can be a numeric value from 1 to 122 bytes.
Operands
This command has the following operand:
soft-serial-number
Specify the soft serial number between 1 and 122
characters in length. This operand is optional.
Example
The following example displays the current soft serial number:
switch:admin> ssn
10:00:00:60:69:50:02:7b
Fabric OS Version 3.1.x/4.1.x Reference Guide
787
Fabric OS Commands
The following example sets the soft serial number:
switch:admin> ssn “BRCD_101”
Committing configuration...done.
switch:admin> ssn
BRCD_101
See Also
None.
788
Fabric OS Version 3.1.x/4.1.x Reference Guide
statsTest
statsTest
Run a statistics counter diagnostic test.
Synopsis V3.1.x
statsTest [passcount]
Synopsis V4.1.x
statsTest [-passcnt count][-ports itemlist]
Availability
Admin
Release
V3.1.x and V4.1.x
Description
Use this command to verify the ASIC statistics counter logic. It can run on every
base port of quadrant, and send the frame through internal loopback with no CRC
data to induce the CRC error. This command is also called from camtest.
This test covers the following statistics counter functionality.
1. The number of received frames with the CRC error that matched the SID-DID
pair specified in the LINK table. There are a total 16 of these statistics
counters (0-15), respectively.
2. The number of received words in frames that matched the SID-DID pair
specified in the LINK table. There are a total 16 of these statistics counters
(0-15), respectively.
3. The number of transmitted words in frames that matched the SID-DID pair
specified in the LINK table. There are a total of 16 of these statistics counters
(0-15), respectively.
4. The number of frames with the CRC error that matched the corresponding
ALI (0-127), respectively.
This command may not be executed on an operational switch. You must first
disable the switch using the switchDisable command.
Fabric OS Version 3.1.x/4.1.x Reference Guide
789
Fabric OS Commands
Note: There is a LINK table that stores 16 pairs of SID-DID address. Each of the
SID-DID pairs is named a LINK. This table is used for gathering statistics that match the
LINK.
Operands
This command has the following operands:
passcount
(V3.1.x only)
-passcnt count
(V4.1.x only)
Specify the number of times to perform this test. The default
value is 1. This operand is optional.
-ports itemlist
(V4.1.x only)
Specify a list of user ports to run the test. If omitted, all the
user ports in the switch will be assumed. See itemlist
for more information about selecting ports. This operand is
optional.
Example
To run a statistics counter test on a switch (V3.1.x example):
switch:admin> statsTest
Running Statistics Cnt Test ... passed.
switch:admin>
To run a statistics counter test on a switch (V4.1.x example):
switch:admin> statstest -passcnt 1 -ports 1/0-15
Running Statistics Counter Test ....... passed.
switch:admin>
Errors: V4.1.x
When it detects failure(s), the subtest may report one or more of the following
error messages:
DIAG-STSINIT
DIAG-STSNULL
DIAG-STSSID
DIAG-STSXMIT
DIAG-STSRCV
DIAG-STSFRMCNT
790
Fabric OS Version 3.1.x/4.1.x Reference Guide
statsTest
DIAG-STSWRDCNT
DIAG-STSALPACNT
See Also
camtest
centralmemorytest
cmemretentiontest
cmitest
crossporttest
filtertest
portloopbacktest
portregtest
ramtest
spinsilk
sramretentiontest
turboramtest
Fabric OS Version 3.1.x/4.1.x Reference Guide
791
Fabric OS Commands
stopporttest
Terminate the running porttest.
Synopsis: V3.1.x
stopporttest [ports]
Synopsis: V4.1.x
stopporttest [-ports itemlist]
Availability
Admin
Release
V3.1.x and V4.1.x
Description
Use this command to stop the currently running porttest command. See
porttest command for more information. If porttest is running on a
non-singlemode, use stopporttest to stop the test.
Operands
This command has the following operands:
792
ports
(V3.1.x only)
Specify the port to stop the test on. If omitted, the test will
be executed on all possible ports. Default value is -1 stop
the test on all ports. Valid values are:
-1 Stop the test on all ports.
This operand is optional.
-ports itemlist
(V4.1.x only)
Specify a list of user ports to test. By default all the user
ports in the current slot will be assumed. See itemlist
help pages for further details.
Fabric OS Version 3.1.x/4.1.x Reference Guide
stopporttest
Example
To stop the porttest on an active switch:
switch:admin> stopporttest
switch:admin>
See Also
crossporttest
fporttest
loopporttest
portloopbacktest
porttest
porttestshow
spinfab
Fabric OS Version 3.1.x/4.1.x Reference Guide
793
Fabric OS Commands
supportShow
Print switch information for debugging purposes.
Synopsis: V3.1.x
supportShow [firstPort, lastPort, nLog]
Synopsis: V4.1.x
supportShow slotnumber[/port1-port2] [lines]
Availability
All users.
Release
V3.1.x and V4.1.x
Description
Use this command to print the switch information for debugging purposes.
Note: The output of this command can be very long.
This command executes the listed commands in the following order:
1. fabstateshow (V4.1.x only)
2. fabswitchshow (V4.1.x only)
3. version
4. uptime
5. tempshow
6. psshow
7. licenseshow
8. diagshow (V3.1.x only)
794
Fabric OS Version 3.1.x/4.1.x Reference Guide
supportShow
9. errdump
Runs errdump -a, followed by errdump -p.
10.switchshow
11.fspfshow (V4.1.x only)
12.portflagsshow
13.porterrshow
14.mqshow (V3.1.x only)
15.portsemshow (V3.1.x only)
16.portshow <each port> (V3.1.x only)
17.portregshow <each port> (V3.1.x only)
18.portrouteshow <each port> (V3.1.x only)
19.portstructshow <each port> (V3.1.x only)
20.bloomdatashow <each port> (V3.1.x only)
21.fabricshow
22.trunkshow
23.topologyshow
24.qlshow (V3.1.x only)
25.fashow (V3.1.x only)
26.portcfglport (V3.1.x only)
27.nsshow
28.nsallshow
29.nscamshow (V3.1.x only)
30.cfgshow
31.slotshow (V4.1.x only)
32.chassisshow (V4.1.x only)
33.fanshow (V4.1.x only)
34.historyshow (V4.1.x only)
35. /sbin/bootenv (V4.1.x only)
Displays boot prom parameters and which partition boot attempt should be
made from first.
Fabric OS Version 3.1.x/4.1.x Reference Guide
795
Fabric OS Commands
36. /sbin/sin (V4.1.x only)
Displays hardware listing of CP components.
37. /bin/df (V4.1.x only)
Displays file systems available.
38. /sbin/ifconfig (V4.1.x only)
Displays all IP addresses. Eth0 is the IP address of the active CP.
39./sbin/route (V4.1.x only)
40. mii-tool -vv (V4.1.x only)
Displays output from 10baseT Full duplex information
41. /usr/bin/du -xh / | /bin/sort (V4.1.x only)
Calculates directory sizes, can use diff to see if something is missing or
different.
42. /bin/ps -elfH (V4.1.x only)
Displays Process list PID, and which daemons switch is running.
43. /bin/rpm -qa (V4.1.x only)
Displays package manager.exe with which you can query all packages
running on switch.
44. /bin/cat /var/log/dmesg (V4.1.x only)
Displays the messages file.
45. /bin/cat /etc/fstab (V4.1.x only)
Displays the mount points.
46. /bin/cat /etc/mtab (V4.1.x only)
Displays current mount points.
47. printing proc entries (V4.1.x only)
Displays all devices.
48.configshow
49.faultshow (V3.1.x only)
50.traceshow (V3.1.x only)
51.memshow (V3.1.x only)
52.mallocshow (V3.1.x only)
53.fastcheckheap (V3.1.x only)
54.portlogdump
796
Fabric OS Version 3.1.x/4.1.x Reference Guide
supportShow
55. diagshow (V4.1.x only)
Displays diagnostic information for the slot specified, if no slot is specified
then all slots on logical switch are displayed.
56. portshow (V4.1.x only)
Displays port information for all ports specified. The default value is to
display information for all ports.
57. portregshow (V4.1.x only)
58. portrouteshow (V4.1.x only)
Operands
This command has the following operands:
firstPort
(V3.1.x only)
Specify the first port of a range of ports to dump information.
The default (if no operand specified) is to print state of port 0. If
only firstPort is specified, only information for
firstPort is printed. This operand is optional.
lastPort
(V3.1.x only)
Specify the last port of range of ports to dump information. If
firstPort is specified, but lastPort is not specified,
only firstPort information is printed for the port based
commands (portShow, portRegShow, portRouteShow).
If no operand is supplied, firstPort is set to 0 and
lastPort is set to maximum port of switch. This operand is
optional.
nLog
(V3.1.x only)
Specify the number of lines of PortLogDump to print:
■ 0 = dump all lines (default)
■ N = dump the last N lines
■ <0 = skip portLogDump output
This operand is optional.
slotnumber
(V4.1.x only)
Specify the slot number for a StorageWorks Core switch. For all
other switches this operand is not required. The slot number
must be followed by a slash ( / ) and the port number, so that
each port is represented by both slot number (1 through 4, or 7
through 10), and port number (0 through 15).
The StorageWorks Core switch has a total of 1–10 slots. Slot
number 5 and 6 are control processor cards, and slot 1
through 4, and 7 through 10, are port cards. On each port
card, there are 16 ports counted from the bottom, 0 to 15.
Fabric OS Version 3.1.x/4.1.x Reference Guide
797
Fabric OS Commands
port1
(V4.1.x only)
Specify the first port of a range of ports to display information.
Enter the port area number. The default (if no operand
specified) is to print state of port 0. If only startPort is specified,
only information for startPort is printed. This operand is
required.
port2
(V4.1.x only)
Specify the last port of range of ports to display information.
Enter the port area number. If startPort is specified but endPort
is not specified, only endPort information is printed for the port
based commands (portshow, portregshow,
portrouteshow). If no operand is supplied, startPort is set to
0 and endPort is set to maximum port of switch. This operand is
required.
lines
(V4.1.x only)
Specify the number of lines output from this command. This
operand is optional.
Example
To display switch information for debugging:
switch:admin> supportshow
Kernel:
Fabric OS:
Made on:
Flash:
BootProm:
5.3.1
v3.1
Tue Apr 6 16:57:22 PDT 2002
Thu Apr 1 10:23:43 PST 2002
Thu Oct 1 13:34:29 PDT 2002
Up for:
12 secs
Powered for: 472 days, 19:15
Last up at: Tue May 2 10:48:21 2000
Reason:
Reboot
37
98
34
93
37
98
45
113
49
120
Centigrade
Fahrenheit
Power Supply #1 is absent
Power Supply #2 is absent
byRdzdSRxyczSe0D:
Web license
Diagnostics Status:
Tue Apr
6 16:22:34 1999
< ... sample output truncated ... >
798
Fabric OS Version 3.1.x/4.1.x Reference Guide
supportShow
To display switch information for debugging:
switch:admin> supportshow 4/0, 15
version:
Kernel:
2.4.2
Fabric OS: 4.0.0
Made on:
Thu Oct 25 00:58:55 2001
Flash:
Thu Oct 25 00:58:55 2001
BootProm:
Unknown
uptime:
11:46pm
up
4:39,
3 users,
load average: 1.85, 1.45, 1.15
tempshow:
Index
Slot
State
Centigrade
Fahrenheit
=========================================================
1
1
Absent
2
2
Absent
3
3
Absent
4
4
Ok
40
104
5
5
Ok
27
80
6
6
Absent
< ... sample output truncated ... >
See Also
switchShow
Fabric OS Version 3.1.x/4.1.x Reference Guide
799
Fabric OS Commands
switchBeacon
Set switch beaconing mode on or off.
Synopsis
switchBeacon [mode]
Availability
Admin
Release
V3.1.x and V4.1.x
Description
Use this command to set the switch beaconing mode on (if the operand is 1) or off
(if the operand is 0).
When beaconing mode is turned on, the port LEDs flash amber in a running
pattern from port 0 to port 15, and then back again. The user sees a running pattern
in amber LEDs, from left to right and right to left. The pattern continues until
turned off by the user.
Beaconing mode affects only the port LEDs. Other commands are still executable
and functional. The normal flashing LED pattern (associated with an active, faulty
or disabled port) is suppressed and the beaconing pattern is shown. However, if
diagnostic frame based tests (portLoopbackTest, crossPortTest, and
spinSilk) are executed, two patterns are interleaved. The diagnostic test
flickers the LEDs green and simultaneously the beaconing mode runs the LEDs
amber.
Use the switchShow command to display the status of beaconing.
Operands
This command has the following operand:
mode
Specify 1 to enable beaconmode or 0 to disable beaconmode.
This operand is optional.
If no operand is specified the current value is displayed.
800
Fabric OS Version 3.1.x/4.1.x Reference Guide
switchBeacon
Example
To turn beaconing mode ON:
switch:admin> switchBeacon 1
To turn beaconing mode OFF:
switch:admin> switchBeacon 0
See Also
switchShow
Fabric OS Version 3.1.x/4.1.x Reference Guide
801
Fabric OS Commands
switchcfgpersistentdisable
Disable switch persistently.
Synopsis
switchcfgpersistentdisable
Availability
Admin
Release
V3.1.x and V4.1.x
Description
Use this command to persistently disable the switch. The persistently disabled
switch remains disabled across power cycles and switch reboots. It will not
participate in fabric reconfiguration and will remain isolated from the rest of the
topology. By default a switch is enabled persistently.
When this command is executed, it will become effective immediately by
disabling the switch, if it is not already disabled.
The persistent switch disable configuration overrides all other switch
configurations but it does not alter any of them. The
switchcfgpersistentenable command will enable the switch
persistently. The persistent switch enable will also re-enable all previously set
switch configurations.
The persistent switch disable configuration will override port persistent enable
configurations but it will not alter them.
The persistently disabled switch will still run the power on diagnostics and
initialize all the ports.
A persistently disabled switch can temporarily be enabled by switchenable
command until the next switch disable, power cycle, or switch reboot.
Operands
None.
802
Fabric OS Version 3.1.x/4.1.x Reference Guide
switchcfgpersistentdisable
Example
To disable a switch persistently:
switch:admin> switchcfgpersistentdisable
Committing configuration...done.
Command in progress . . . . . . . . done
See Also
configure
configshow
portcfgpersistentdisable
portcfgpersistentenable
portcfgshow
portshow
switchcfgpersistentenable
switchshow
Fabric OS Version 3.1.x/4.1.x Reference Guide
803
Fabric OS Commands
switchcfgpersistentenable
Enable a switch persistently.
Synopsis
switchcfgpersistentenable
Availability
Admin
Release
V3.1.x and V4.1.x
Description
Use this command to persistently enable the switch. The persistently enabled
switch remains enabled across power cycles and switch reboots. By default a
switch is enabled persistently.
When this command is executed, it will be effective immediately by enabling the
switch, if it is not already enabled.
The persistent switch disable configuration overrides all other switch
configurations but it does not alter any of them. The persistent switch enable will
also re-enable all previously set switch configurations.
A persistently enabled switch can temporarily be disabled by switchdisable
command until next switch enable, power cycle or switch reboot.
The persistent switch disable or enable configuration does not alter the persistent
disable or enable configurations of the ports within the switch.
Operands
None.
804
Fabric OS Version 3.1.x/4.1.x Reference Guide
switchcfgpersistentenable
Example
The following example configures the switch as persistently enabled:
switch:admin> switchcfgpersistentenable
Committing configuration...done.
Command in progress . . . . . . . . done
See Also
configure
configshow
portcfgpersistentdisable
portcfgpersistentenable
portcfgshow
portshow
switchcfgpersistentdisable
switchshow
Fabric OS Version 3.1.x/4.1.x Reference Guide
805
Fabric OS Commands
switchCfgSpeed
Configure all ports of the switch to a particular speed level.
Synopsis
switchCfgSpeed speed_level
Availability
Admin
Release
V3.1.x and V4.1.x
Description
Use this command to configure the speed of all the ports on a switch to a
particular level. The configuration is saved in the non-volatile memory and
persists across switch reboot or power cycle.
The output of portShow displays achieved speed level and portCfgShow
displays the user's desired speed setting. In the portShow output, the speed
level is indicated as the current port speed of “1-Gbps” or “2-Gbps.” In the
portCfgShow output, the speed level is indicated as “1G,” “2G,” or “AN”
(Auto-Negotiate).
Operands
This command has the following operand:
speed_level
806
Specify the speed of a port. This operand is required. Valid
values are one of the following:
0: Auto-sensing mode. The port automatically configures for
the highest speed.
1: 1-Gbps mode. The port will be at fixed speed of 1-Gbps.
2: 2-Gbps mode. The port will be at fixed speed of 2-Gbps.
Fabric OS Version 3.1.x/4.1.x Reference Guide
switchCfgSpeed
Example
To set the speed level for all ports on a switch:
switch:admin> switchCfgSpeed 2
done.
switch:admin>
See Also
portCfgSpeed
switchShow
Fabric OS Version 3.1.x/4.1.x Reference Guide
807
Fabric OS Commands
switchCfgTrunk
Enable or disable trunking on all the ports of a switch.
Synopsis
switchCfgTrunk mode
Availability
Admin
Release
V3.1.x and V4.1.x
Description
Use this command to enable or disable trunking on all the ports of a switch.
Note: This command requires the Trunking license.
Operands
This command has the following operand:
mode
Specify 1 to enable trunking on all the ports on this switch. Specify
0 to disable trunking on all the ports on this switch. This operand is
required.
Example
To enable trunking on a switch:
switch:admin> switchCfgTrunk 1
done.
808
Fabric OS Version 3.1.x/4.1.x Reference Guide
switchCfgTrunk
See Also
portCfgShow
portCfgTrunkPort
portShow
switchShow
Fabric OS Version 3.1.x/4.1.x Reference Guide
809
Fabric OS Commands
switchDisable
Disable the switch.
Synopsis
switchDisable
Availability
Admin
Release
V3.1.x and V4.1.x
Description
Use this command to disable the switch. All Fibre Channel ports are taken offline;
if the switch was part of a fabric, the remaining switches reconfigure.
The switch must be disabled before making configuration changes (using
configure or configDefault) or before running many of the diagnostic
tests. All commands that require the switch to be disabled send an error if invoked
while the switch is enabled.
The switch does not need to be disabled before rebooting or powering off.
As each port is disabled, the front panel LED changes to a slow flashing yellow.
Operands
None.
Example
To disable the switch:
switch:admin> switchDisable
810
Fabric OS Version 3.1.x/4.1.x Reference Guide
switchDisable
See Also
switchEnable
switchShow
Fabric OS Version 3.1.x/4.1.x Reference Guide
811
Fabric OS Commands
switchEnable
Enable the switch.
Synopsis
switchEnable
Availability
Admin
Release
V3.1.x and V4.1.x
Description
Use this command to enable the switch. All Fibre Channel ports that passed POST
are enabled. They can come online if connected to a device, or remain offline if
disconnected. A switch may need to be enabled if it was previously disabled to
make configuration changes or to run diagnostics.
If the switch is connected to a fabric, it rejoins the fabric. When this command is
issued, the 10 second fabric stability count down is displayed. If this switch
remains the principal switch at the end of the countdown, then it assigns itself a
domain ID. If another switch assumes the principal role, then this switch becomes
a subordinate switch, and accepts a domain ID from the principal. See FC-SW for
a complete description of this process.
As each port is enabled, the front panel LED changes to green for online ports,
black for disconnected ports, or yellow for uninitialized ports.
Operands
None.
812
Fabric OS Version 3.1.x/4.1.x Reference Guide
switchEnable
Example
To enable a switch:
switch:admin> switchEnable
10 9 8 7 6 5 4 3 2
fabric: Principal switch
fabric: Domain 1
1
See Also
switchDisable
switchShow
Fabric OS Version 3.1.x/4.1.x Reference Guide
813
Fabric OS Commands
switchName
Displays or sets the switch name.
Synopsis
switchName [“newName”]
Availability
All users (display).
Admin (set).
Release
V3.1.x and V4.1.x
Description
Use this command without an operand to display the current switch name. All
switches have a symbolic name that is primarily used for switch management.
This name is also shown in the telnet prompt, under each switch icon on the Web
Tools Fabric View, and in the output of many telnet commands, such as
fabricshow.
Enter this command with no operand to display the current switch name.
Use this command with the newName operand to assign a new switch name.
Switch names can be up to 15 characters long, must begin with an alpha character,
and can consist of a combination of alpha, numeric, and underscore characters.
Changing the switch name causes a domain address format RSCN to be issued
(see FC-FLA for a description of RSCNs).
The switch's name may also be changed using Web Tools.
Operands
This command has the following operand:
newName
814
Specify a new name for the switch, in quotation marks. This
operand is optional.
Fabric OS Version 3.1.x/4.1.x Reference Guide
switchName
Example
To change a switch name to sw10:
switch:admin> switchName “sw10”
Committing configuration...
Done.
sw10:admin>
See Also
fabricShow
switchShow
Fabric OS Version 3.1.x/4.1.x Reference Guide
815
Fabric OS Commands
switchReboot
Halt and bring down the operational switch.
Synopsis
switchReboot
Availability
Admin
Release
V4.1.x
Description
This command reboots the operational switch without disrupting the other switch
in the StorageWorks Core switch chassis. The administrator uses this command
when the problem with the switch cannot be determined. Using this command
brings the switch back to an operational state without disturbing the software state
of the system in general.
This command is equal to running switchShutdown and switchStart.
Note: For the StorageWorks Core switch, the switchreboot command will reboot only
the logical switch you are currently logged into. The other logical switch and both CPs
remain unaffected.
Operands
None.
816
Fabric OS Version 3.1.x/4.1.x Reference Guide
switchReboot
Example
To bring down an operational switch:
switch:admin> switchreboot
Selecting i2c bus...Done.
Stopping all switch daemons...Done.
Releasing i2c bus...Done.
Powering off slot 7...Done.
Checking all slots are powered off....Done.
Cleaning up kernel modules...Done.
Initializing kernel modules...Done.
setup FCIP IP: ifconfig fc1 ip=192.168.69.190, netmask=255.255.255.0
Starting all switch daemons...Done.
Powering on slot 7...Done.
Checking diagnostics...............
Start Apache -- /etc/rc.d/init.d/httpd.sh start 1 192.168.174.95
192.168.69.190
Start snmpd -- /etc/rc.d/init.d/snmpd.sh start 1
starting http server [1] ...
.Starting snmpd:\n
SNMP Research SNMP Agent Resident Module Version 15.2.1.3
Copyright 1989, 1990, 1991, 1992, 1993, 1994, 1995, 1996, 1997, 1998, 1999
SNMP
Research, Inc..
/fabos/webtools/bin/apachectl.1 start: httpd started
done.
See Also
switchShutdown
switchStart
Fabric OS Version 3.1.x/4.1.x Reference Guide
817
Fabric OS Commands
switchShow
Displays switch and port status.
Synopsis
switchShow
Availability
All users.
Release
V3.1.x and V4.1.x
Description
Use this command to display switch and port status information. Information may
vary by switch model. Below is the information provided. The first section
provides switch summary information; it is followed by a section covering
summary information by port.
Switch summary information:
818
switchName
Displays the switch symbolic name.
switchType
Displays the switch model and firmware revision number.
switchState
Displays the switch state: online, offline, testing, faulty.
switchMode
(V3.1.x only)
Displays the switch mode: native.
switchRole
Displays the switch role: principal, subordinate, disabled.
switchDomain
Displays the switch domain ID: 0-31 or 1-239.
switchId
Displays the switch embedded port D_ID.
switchWwn
Displays the switch World Wide Name.
switchBeacon
Displays the switch's beaconing state (either ON or OFF).
blade_n:Beacon
(V4.1.x only)
Displays the blade’s beaconing state (either ON or OFF).
Each blade is numbered by its position in the StorageWorks
Core switch chassis (from 1 to 10).
Fabric OS Version 3.1.x/4.1.x Reference Guide
switchShow
Zoning
(V3.1.x only)
Displays the switch zoning mode: On or Off.
The switch summary is followed by one line per port:
Area
(V4.1.x only)
Each slot and port combination in the StorageWorks Core
switch is assigned an area number. For example, the area
number of slot 3/port 15 is 63 (in switch 0), the area number
for slot 10/port 15 is also 63 (in switch 1). This parameter is
for V4.1.x only.
Slot
(V4.1.x only)
Slot number. The StorageWorks Core switch has 10 slots
numbered from 1 to 4 and 7 to 10. Slots 5 and 6 are control
processor cards. This parameter is for V4.1.x only.
Port Number
(V3.1.x only)
Port
(V4.1.x only)
Port number. Valid values vary depending on the switch type.
Module Type
(V3.1.x only)
SFP
(V4.1.x only)
Port module type (SFP or other):
■ -- No module present
■ sw - Shortwave laser
■ lw - Longwave laser
■ cu - Copper
■ id - Serial ID
Use sfpshow to view whether a serial ID SFP is sw/lw/cu.
Port Speed
(V3.1.x only)
Speed
(V4.1.x only)
The speed of the port:
■ 1G - 1-Gbps fixed transfer speed
■ 2G - 2-Gbpsvfixed transfer speed
■ N1 - 1-Gbps negotiated transfer speed
■ N2 - 2-Gbps negotiated transfer speed
■ AN - Auto negotiating
Fabric OS Version 3.1.x/4.1.x Reference Guide
819
Fabric OS Commands
Port State
(V3.1.x only)
State
(V4.1.x only)
820
Port state information:
No_Card - No interface card present
■ No_Module - No module (SFP or other) present
■ No_Light - Module not receiving light
■ No_Sync - Module receiving light but out of sync
■ In_Sync - Module receiving light and in sync
■ Laser_Flt - Module signaling a laser fault
■ Port_Flt - Port marked faulty
■ Diag_Flt - Port failed diagnostics
■ Lock_Ref - Locking to the reference signal
■ Testing - Running diagnostics
■ Online - Port is up and running
■
Port Distance
(V3.1.x only)
The port's long distance mode. If a port is configured as a long
distance port, the long distance level is shown in the format of
“Lx,” x being the long distance level number. See
portcfglongdistance for the level description.
comment
The comment field may be blank, or it may display:
■ Disabled - The port is disabled
■ Bypassed - Port is bypassed (loop only)
■ Loopback - Port is in loopback mode
■ E_Port - Fabric port, shows WWN and name of attached
switch
■ F_Port - Point-to-point port, shows WWN of attached
N_Port
■ G_Port - Point-to-point but not yet E_Port or F_Port
■ L_Port - Loop port, shows number of NL_Ports
■ (Trunk master) - This port is the master port in a group of
trunking ports
■ (Trunk port, master is port #x) - This port is configured as a
trunking port, the master port is port number x.
■ (upstream) - This E-port is an upstream path towards the
principal switch of the fabric.
■ (downstream) - This E-port is a downstream path away
from the principal switch of the fabric.
■ WWN - This is the WWN of the switch connected to the
E-port.
■ “switch_name” - This is the switch name of the connected
switch.
Fabric OS Version 3.1.x/4.1.x Reference Guide
switchShow
more comments
The comment field may have additional comments depending
on the comment field entry.
■ Disabled: A disabled port may have additional comments
that explain the reason for disabling it.
— (Persistent)
— (Security violation)
■ L-Port: An L-port may indicate the number for public,
private and phantom devices in the loop.
■ E-Port: An E-port may display one or more of the following.
— WWN of the switch connected.
— Switch name of the switch connected.
— One or more inter-switch-link attributes.
— Trunking information.
■ F-Port: An F-port may display the port WWN of the device
attached to it.
Operands
None.
Example
The following example shows a StorageWorks Core switch:
switch:admin> switchshow
switchName:
switch
switchType:
16.2
switchState:
Online
switchMode:
Native
switchRole:
Subordinate
switchDomain:
7
switchId:
fffc07
switchWwn:
10:00:00:60:69:c0:0e:88
switchBeacon:
OFF
Zoning:
ON (cfg1)
port 0: id N2 Online
E-Port 10:00:00:60:69:c0:0f:04 “web189” (upstream)
port 1: id N2
port 2: id N2
port 3: id N2
port 4: id N2
port 5: id N2
port 6: id N2
port 7: id N2
switch:admin>
No_Light
No_Light
No_Light
No_Light
No_Light
No_Light
No_Light
Fabric OS Version 3.1.x/4.1.x Reference Guide
821
Fabric OS Commands
The following example shows a StorageWorks 2 Gb SAN switch:
switch:admin> switchshow
switchName:
switch
switchType:
10.1
switchState:
Online
switchRole:
Subordinate
switchDomain:
4
switchId:
fffc04
switchWwn:
10:00:00:60:69:00:54:e9
switchBeacon:
OFF
blade7 Beacon: OFF
blade9 Beacon: OFF
Area Slot Port Gbic Speed State
=====================================
0
7
0
-N2
No_Module
1
7
1
-N2
No_Module
2
7
2
-N2
No_Module
3
7
3
id
N2
No_Light
4
7
4
id
N2
Online E-Port (Trunk port, master is Slot 7 Port
5
7
5
id
N2
Online E-Port 10:00:00:60:69:00:54:e8 "san94"
(upstream)(Trunk master)
6
7
6
id
N2
Online E-Port (Trunk port, master is Slot 7 Port
7
7
7
id
N2
Online E-Port (Trunk port, master is Slot 7 Port
8
7
8
-N2
No_Module
9
7
9
-N2
No_Module
10
7
10
-N2
No_Module
11
7
11
-N2
No_Module
12
7
12
id
N2
No_Light
13
7
13
id
N2
No_Light
14
7
14
id
N2
No_Light
15
7
15
id
N2
Online
L-Port 8 public
32
9
0
-N2
No_Module
33
9
1
-N2
No_Module
34
9
2
-N2
No_Module
35
9
3
-N2
No_Module
36
9
4
-N2
No_Module
37
9
5
-N2
No_Module
38
9
6
-N2
No_Module
39
9
7
-N2
No_Module
40
9
8
id
N2
Online E-Port (Trunk port, master is Slot 9 Port
41
9
9
id
N2
Online E-Port 10:00:00:60:69:50:08:d5 "sqad11"
(downstream)(Trunk master)
42
9
10
id
N2
Online E-Port (Trunk port, master is Slot 9 Port
43
9
11
id
N2
Online E-Port (Trunk port, master is Slot 9 Port
44
9
12
-N2
No_Module
45
9
13
-N2
No_Module
46
9
14
-N2
No_Module
47
9
15
id
N2
Online
F-Port 10:00:00:00:c9:27:2e:9b
822
5)
5)
5)
9)
9)
9)
Fabric OS Version 3.1.x/4.1.x Reference Guide
switchShow
See Also
switchDisable
switchEnable
switchName
Fabric OS Version 3.1.x/4.1.x Reference Guide
823
Fabric OS Commands
switchShutdown
Halt the operational switch.
Synopsis
switchShutdown
Availability
Admin
Release
V4.1.x
Description
This command halts the switch operation without disrupting the other switch in
the StorageWorks Core switch chassis. This command disables a logical switch in
a StorageWorks Core switch without disturbing the software state of the system in
general.
This command has to be used in combination with switchStart.
This command brings down all the daemons associated with the switch, frees the
resources and object states associated with the switch to a clear state, and disables
all the ports and blades associated with the switch.
Note: This command is not supported on non-blade systems.
Operands
None.
824
Fabric OS Version 3.1.x/4.1.x Reference Guide
switchShutdown
Example
To bring down the current logical switch without disrupting the other switch in the
chassis:
switch:admin> switchshutdown
Stopping all switch daemons...Done.
Powering off slot 1...Done.
Powering off slot 4...Done.
Checking all slots are powered off...Done.
Cleaning up kernel modules...Done.
See Also
switchReboot
switchStart
Fabric OS Version 3.1.x/4.1.x Reference Guide
825
Fabric OS Commands
switchStart
Initialize the switch to operational.
Synopsis
switchStart
Availability
Admin
Release
V4.1.x
Description
This command initializes a logical switch without disrupting the other switch in
the StorageWorks Core switch chassis. This command enables a logical switch in
a StorageWorks Core switch without disturbing the software state of the system in
general.
This command has to be used in combination with switchShutdown.
This command starts all the daemons associated with the switch, initializes the
object states associated with the switch to a clear state, and enables all the
ports/blades associated with the switch.
Note: This command is not supported on non-blade systems.
Operands
None.
826
Fabric OS Version 3.1.x/4.1.x Reference Guide
switchStart
Example
To initialize the logical switch to operational:
switch:admin> switchstart
Initializing kernel modules...Done.
Starting all switch daemons...Done.
Powering on slot 1...Done.q> to stop
Powering on slot 4...Done.q> to stop
Checking diagnostics...Done.
setup FCIP IP: ifconfig fc0 ip=0.0.0.0, netmask=255.255.255.0
See Also
switchReboot
switchShutdown
Fabric OS Version 3.1.x/4.1.x Reference Guide
827
Fabric OS Commands
switchStatusPolicySet
Set the policy parameters that determine the overall switch status.
Synopsis
switchStatusPolicySet
Availability
Admin
Release
V3.1.x and V4.1.x
Description
Use this command to set the policy parameters for calculating the overall status of
the switch enclosure. The policy parameter values determine how many failed or
faulty units of each contributor are allowed before triggering a status change in the
switch from HEALTHY to MARGINAL or DOWN.
The command will print the current parameters in a three column table format.
The first column specifies the contributor; the second column specifies the
minimum number that contributes to the DOWN/FAILED status; the third column
specifies the minimum number that contributes to the MARGINAL/WARNING
status. This command then prompts the user to change the values for each policy
parameter. The default values for the policy parameters are as follows:
Table 16: Contributor Value and Status
Default Value for DOWN
Default Value
for MARGINAL
FaultyPorts
2
1
MissingSFPs
0
0
2 (V3.1.x only)
2 in the StorageWorks 2 Gb
SAN switch (V4.1.x only)
3 in the StorageWorks Core
switch (V4.1.x only)
1
Contributor
PowerSupplies
828
Fabric OS Version 3.1.x/4.1.x Reference Guide
switchStatusPolicySet
Table 16: Contributor Value and Status (Continued)
Default Value for DOWN
Default Value
for MARGINAL
Temperatures
2
1
Fans
2
1
PortStatus
0
0
ISLStatus
2
1
Contributor
Any single contributor can force the overall status of the switch to MARGINAL or
DOWN. For example, assuming that the switch contributor values are set to the
default values, if there is one faulty port in a switch, then this contributor would
set the overall switch status to MARGINAL. If two ports were faulty, then this
contributor would set the overall switch status to DOWN.
This command enables you to set a threshold for each contributor, so that a certain
number of failures are required to change the overall status of the switch.
If the value of a policy parameter is set to 0, it means that this factor is not used to
determine the status of the switch. If the range of values for a particular
contributor are set to 0 for both MARGINAL and DOWN, that contributor is not
used in the calculation of the overall switch status.
ISLStatus monitors ISLs that are part of a defined switch group. The status of
other ISLs on the same switch but outside of the group definition will not be
considered when calculating switch status. If no switch groups are defined on this
switch, then these ISLStatus settings will have no effect on switch status.
The ISLStatus does not affect the status of the switch as quickly as the other
contributors. It may take a few minutes for a switch group ISL status change to
affect the state of the switch.
When PortStatus monitoring is set to values of (0,0), port status changes are not
logged to the event log and console. Similarly, SFP removal does not generate a
message to the event log and console if MissingSFPs is set to (0,0). By
configuring these options, the user can more closely monitor for port status and
removal of SFPs.
Operands
None.
Fabric OS Version 3.1.x/4.1.x Reference Guide
829
Fabric OS Commands
Example
Notice that in the following example, the only parameter modified is the number
of MissingSFPS allowed before a MARGINAL status is triggered:
switch:admin> switchStatusPolicySet
To change the overall switch status policy parameters
The current overall switch status policy parameters:
Down
Marginal
---------------------------------FaultyPorts 1
0
MissingSFPs 0
1
PowerSupplies 2
1
Temperatures 2
1
Fans 2
1
PortStatus 0
0
ISLStatus 2
1
Note that the value, 0, for a parameter, means that it is
NOT used in the calculation.
** In addition, if the range of settable values in the prompt is (0..0),
** the policy parameter is NOT applicable to the switch.
** Simply hit the Return key.
The minimum number of
FaultyPorts contributing to DOWN status: (0..64) [2]
FaultyPorts contributing to MARGINAL status: (0..64) [1]
MissingSFPs contributing to DOWN status: (0..64) [0]
MissingSFPs contributing to MARGINAL status: (0..64) [0] 1
Bad PowerSupplies contributing to DOWN status: (0..4) [2]
Bad PowerSupplies contributing to MARGINAL status: (0..4) [1]
Bad Temperatures contributing to DOWN status: (0..8) [2]
Bad Temperatures contributing to MARGINAL status: (0..8) [1]
Bad Fans contributing to DOWN status: (0..3) [2]
Bad Fans contributing to MARGINAL status: (0..3) [1]
Down PortStatus contributing to DOWN status: (0..64) [0]
Down PortStatus contributing to MARGINAL status: (0..64) [0]
Down ISLStatus contributing to DOWN status: (0..64) [2]
Down ISLStatus contributing to MARGINAL status: (0..64) [1]
Policy parameter set has been changed
switch:admin>
See Also
switchStatusPolicyShow
switchStatusShow
830
Fabric OS Version 3.1.x/4.1.x Reference Guide
switchStatusPolicyShow
switchStatusPolicyShow
Displays the policy parameters that determine the overall switch status.
Synopsis
switchStatusPolicyShow
Availability
All users.
Release
V3.1.x and V4.1.x
Description
Use this command to view the current policy parameters set for the switch. These
policy parameters determine the number of failed or non-operational units allowed
for each contributor before triggering a status change in the switch.
The command will print the current parameters in a three column table format.
The first column specifies the contributor; the second column specifies the
minimum number that contributes to the DOWN/FAILED status; the third column
specifies the minimum number that contributes to the MARGINAL/WARNING
status. The default values for the policy parameters are as follows:
Table 17: Contributor Value and Status
Default Value for
DOWN
Default Value
for MARGINAL
FaultyPorts
2
1
MissingSFPs
0
0
PowerSupplies
2 (V3.1.x only)
2 in the StorageWorks 2
Gb SAN switch (V4.1.x
only)
3 in the StorageWorks
Core switch (V4.1.x
only)
1
Temperatures
2
1
Contributor
Fabric OS Version 3.1.x/4.1.x Reference Guide
831
Fabric OS Commands
Table 17: Contributor Value and Status (Continued)
Default Value for
DOWN
Default Value
for MARGINAL
Fans
2
1
PortStatus
0
0
ISLStatus
2
1
Contributor
The policy parameters determine the number of failed or non-operational units for
each contributor that trigger a status change in the switch. For example, if the
FaultyPorts DOWN parameter is set to 3, and 3 ports fail in the switch, then the
status of the switch changes to DOWN.
Operands
None.
Example
To display the switch status policy:
switch:admin> switchStatusPolicyShow
The current overall switch status policy parameters:
Down
Marginal
---------------------------------FaultyPorts 1
0
MissingSFPs 0
1
PowerSupplies 2
1
Temperatures 3
1
Fans 3
1
PortStatus 0
0
ISLStatus 2
1
See Also
switchStatusPolicySet
switchStatusShow
832
Fabric OS Version 3.1.x/4.1.x Reference Guide
switchStatusShow
switchStatusShow
Displays the overall status of the switch.
Synopsis
switchStatusShow
Availability
All users.
Release
V3.1.x and V4.1.x
Description
Use this command to display the overall status of the switch. The overall status is
calculated based on the most severe status of all contributors:
■
Internal Switch Status
■
Faulty Ports
■
Missing SFPs
■
Power Supplies
■
Fans
■
Temperatures
■
Port Status
The overall status can be one of the following:
■
Healthy/OK - every contributor is healthy
■
Marginal/Warning - one or more components are causing a warning status
■
Down/Failed - one or more contributors have failed
If the overall status is not HEALTHY/OK, the contributing factors are listed.
Operands
None.
Fabric OS Version 3.1.x/4.1.x Reference Guide
833
Fabric OS Commands
Example
There are two examples below. The first shows a switch with a status of
MARGINAL, the second shows the same switch after all the errors have been
fixed.
switch:admin> switchStatusShow
The overall switch status is Marginal/Warning
Contributing factors:
* 1 missing power supply triggered the Marginal/Warning status
* 1 bad fans, 2 good fans triggered the Marginal/Warning status
* 1 missing SFP triggered the Marginal/Warning status
switch:admin> switchStatusShow
The overall switch status is HEALTHY/OK
See Also
switchStatusPolicySet
switchStatusPolicyShow
834
Fabric OS Version 3.1.x/4.1.x Reference Guide
switchuptime
switchuptime
Displays the amount of time the switch has been operating.
Synopsis
switchuptime
Availability
All users.
Release
V4.1.x
Description
Use this command to display the current time and the amount of time the switch
has been operational.
Operands
None.
Example
To view the uptime for the switch:
switch:admin> switchuptime
2:00pm
up for 17 hrs 44 mins
sqab14:admin>
See Also
switchReboot
switchShutdown
switchStart
Fabric OS Version 3.1.x/4.1.x Reference Guide
835
Fabric OS Commands
syslogdIpAdd
Add the IP address of a syslog daemon.
Synopsis: V3.1.x
syslogdIpAdd “IPaddr”
Synopsis: V4.1.x
syslogdIpAdd “ip_address”
Availability
Admin
Release
V3.1.x and V4.1.x
Description
Use this command to add the IP address of a syslog daemon, that is, the IP address
of the server which is running the syslogd process. The syslog daemon
(syslogd) is a process available on most UNIX systems that reads and forwards
system messages to the appropriate log files and users, depending on the system
configuration.
When one or more IP addresses are configured, the switch forwards all error log
entries to the syslogd on the specified servers. Up to six servers are supported.
Operands
This command has the following operands:
836
IPaddr
(V3.1.x only)
Specify the IP address, enclosed in quotation marks, of the
server running syslogd. This operand is required.
ip_address
(V4.1.x only)
Specify the IP address of the server running syslogd. This
operand is required.
Fabric OS Version 3.1.x/4.1.x Reference Guide
syslogdIpAdd
Example
To add the address 11.22.33.44 to the list of machines to which system messages
are sent (V3.1.x example):
switch:admin> syslogdIpAdd “11.22.33.44”
See Also
errShow
syslogdIpRemove
syslogdIpShow
Fabric OS Version 3.1.x/4.1.x Reference Guide
837
Fabric OS Commands
syslogdIpRemove
Remove the IP address of a syslog daemon.
Synopsis: V3.1.x
syslogdIpRemove “IPaddress”
Synopsis: V4.1.x
syslogdIpRemove “ip_address”
Availability
Admin
Release
V3.1.x and V4.1.x
Description
Use this command to remove the IP address of a syslog daemon, that is, the IP
address of the server which is running the syslogd process.
Operands
This command has the following operand:
IPaddress
(V3.1.x only)
Specify the IP address, enclosed in quotation marks, of the
server running syslogd. This operand is required.
ip_address
(V4.1.x only)
Specify the IP address of the server running syslogd. This
operand is required.
Example
To remove the address 11.22.33.44 from the list of machines to which system
messages are sent (V4.1.x example):
switch:admin> syslogdIpRemove 11.22.33.44
Committing configuration...done.
838
Fabric OS Version 3.1.x/4.1.x Reference Guide
syslogdIpRemove
See Also
errShow
syslogdIpAdd
syslogdIpShow
Fabric OS Version 3.1.x/4.1.x Reference Guide
839
Fabric OS Commands
syslogdIpShow
Displays all syslog daemon IP addresses.
Synopsis
syslogdIpShow
Availability
All users.
Release
V3.1.x and V4.1.x
Description
Use this command to display all syslog daemon IP addresses in the configuration
database.
Operands
None.
Example
To display all syslog daemon IP addresses:
switch:admin> syslogdIpShow
syslog.IP.address.1:
11.22.33.44
syslog.IP.address.2:
11.22.33.45
syslog.IP.address.3:
11.22.33.46
See Also
errShow
syslogdIpAdd
syslogdIpRemove
840
Fabric OS Version 3.1.x/4.1.x Reference Guide
systemtest
systemtest
Run a series of diagnostic tests on a switch blade.
Synopsis
systemtest [[--slot] slotno][-log logfile]
Availability
Admin
Release
V4.1.x
Description
This command will run a suite of diagnostic tests on the specified switch blade. It
is not required to install loop-back plugs on every port as in the case of
bladediag and bladediagshort.
Note: This command is provided just for compatibility and may be removed in the
future releases.
Operands
This command has the following operands:
[--slot] slotno
Specify which slot to operate on. If this option is not
specified, the current slot will be assumed.
-log logfile
Indicates that the output of the command will be placed in
a file named by the logfile argument. The log file will
contain all activity that occurred during the execution of the
command. All error messages are also saved in the logfile.
If this option is not specified, no log file is created.
Fabric OS Version 3.1.x/4.1.x Reference Guide
841
Fabric OS Commands
Example
To run a suite of diagnostics on blade 7:
switch:admin> systemtest -slot 7
Testing slot: 7, user ports: 3 2 1 0 7 6 5 4 11 10 9 8 15 14 13 12
PortRegTest
Running Port Register Test ....
passed.
Test Complete: "portregtest" Pass 1 of 1
Duration 0 hr, 2 min & 23 sec (0:2:23:443).
passed.
Test return status: 0
CentralMemoryTest
Running centralmemorytest ............ passed.
Test Complete: "centralmemorytest" Pass 1 of 1
Duration 0 hr, 0 min & 19 sec (0:0:19:611).
passed.
Test return status: 0
<output truncated>
See Also
bladediag
bladediagshort
842
Fabric OS Version 3.1.x/4.1.x Reference Guide
systemverification
systemverification
Run a suit of diagnostic tests on all switches in a fabric.
Synopsis
systemverification [-parameters | -short]
Availability
Admin
Release
V4.1.x
Description
Use this command to run a comprehensive system wide test of all switches in a
fabric. It will initiate a burnin run on all switches within the current system.
The run can be terminated by issuing a control “c” <Ctrl-c> character from
the initiating terminal. All of the burnin features are operational during the
systemverification command. The burninerrshow will display the
stored burnin errlogs, the logs by blade are saved in
/var/log/switchburnin.<switch>.<slot> files. On the fixed port
count products, the slot defaults to 0.
The command monitors the testing, and will terminate the burnin activity if all the
elements have failed. Each failing slot will only output the first observed fail.
Since this monitoring is a polling activity, the command number output may not
be the exact command number that failed. After the testing has terminated,
burninstatus command is output, and the burninerrshow messages
for the failing slots are output. If all slots pass, then only the burninstatus
command output is displayed.
The burnin tests are designed to operate with switches connected to a fabric and
restricts the frame loopback to inside the unit. If loopback plugs are installed in all
ports, the burnin parameter min_lb_mode can be changes to 1 to test the fibre
channel through the loopback plug.
Fabric OS Version 3.1.x/4.1.x Reference Guide
843
Fabric OS Commands
Operands
This command has the following operands:
844
-parameters
Invokes the diagsetcycle command before starting
the burnin run. This will allow users to modify the burnin
parameters prior to the run. These diagsetcycle
parameters are copied to all switches in the system and
override the original settings in the database. If the
diagsetcycle parameter is not specified, then the run
will use the previously stored values. This option does not
performs a burninerrclear operation prior to
starting the testing operation.
-short
Sets the burnin parameters that control the number of
frames to 1. The primary use for this command is for
software regression testing, or a quick validation that all
hardware is operational. The shorter test cycle will not have
enough test time to detect intermittent errors. This option
performs a burninerrclear operation prior to
starting the testing operation.
Fabric OS Version 3.1.x/4.1.x Reference Guide
systemverification
Example
To initiate a system verification test on all switches in the fabric:
switch:admin> systemverification -short
systemverification: Setting parameters for short run.
systemverification: burnin parameters.
CURRENT - KEYWORD
: DEFAULT
1
- number_of_runs
: 1
2
- vib
: 2
10
- thermal
: 10
SYSTEMVERIFICATION
- label : BURNIN
2
- min_lb_mode
: 2
1
- tbr_passes
: 1
1
- prt_on
: 1
1
- cntmem_on
: 1
1
- cmi_on
: 1
1
- retention_on : 1
1
- cam_on
: 1
1
- flt_passes
: 50
1
- sta_passes
: 25
1
- plb_nframes
: 100
1
- txd_nframes
: 50
1
- xpt_nframes
: 200
1
- bpt_nframes
: 20
1
- slk_nmegs
: 50
1
- bpt_all_nframes
: 30
1
- slk_all_nmegs : 50
systemverification: Arming the burnin run on switch 0.
systemverification: Starting burnin on Switch 0
systemverification: Monitoring progress of the burnin activity.
systemverification: Outputting Status
State
Status Run
Cmd
TotCmds Script
COMPLETED
PASS
1
22
22
switchburnin.sh
Errors
Each diagnostic test in this suit may report its own set of error messages when it
detects failures. See DIAGNOSTICS section of individual diagnostic test help
pages. These messages are only available in the log file.
See Also
burninerrclear
burninstatus
diagsetburnin
diagsetcycle
Fabric OS Version 3.1.x/4.1.x Reference Guide
845
Fabric OS Commands
tempShow
Displays temperature readings.
Synopsis
tempShow
Availability
All users.
Release
V3.1.x and V4.1.x
Description
Use this command to display the current temperature readings of all temperature
sensors in a switch. Each temperature sensor has an index. The indices start
from 1. There can be more than one sensor per slot. The slot number to which a
sensor belongs is displayed in the column next to the index. The temperature
readings are given in both Centigrade and Fahrenheit.
Refer to the Hardware Reference Manual for your switch to determine the normal
temperature range values.
Operands
None.
Example
To display the temperature readings of a switch (V3.1.x example):
switch:admin> tempshow
32
30
28 Centigrade
89
86
82 Fahrenheit
switch:admin>
846
Fabric OS Version 3.1.x/4.1.x Reference Guide
tempShow
This example shows a StorageWorks Core switch (V4.1.x example):
switch:admin> tempshow
Index
Slot
State
Centigrade
Fahrenheit
=========================================================
1
1
Ok
47
116
2
2
Absent
3
3
Absent
4
4
Ok
46
114
5
5
Ok
33
91
6
6
Ok
33
91
switch:admin>
Note: For the StorageWorks Core switch, this command only returns the temperature
sensor values for the logical switch you are logged into, not for the entire chassis.
This example shows a StorageWorks 2 Gb SAN switch:
switch:admin> tempshow
Index
Slot
State
Centigrade
Fahrenheit
=========================================================
1
0
Ok
39
102
2
0
Ok
41
105
3
0
Ok
27
80
4
0
Ok
39
102
5
0
Ok
42
107
switch:admin>
See Also
fanShow
psShow
sensorShow
slotShow
Fabric OS Version 3.1.x/4.1.x Reference Guide
847
Fabric OS Commands
timeout
Set or show the IDLE timeout value for a login session.
Synopsis
timeout [timeval]
Availability
All users (for viewing only).
Admin (show/set).
Release
V3.1.x and V4.1.x
Description
Use this command with no operands to display the current telnet timeout value.
Use this command with an operand to sets the idle timeout value to the specified
minutes. Using a timeout value of zero will disable the timeout functionality so
that login sessions would never be disconnected.
Operands
This command has the following operand:
timeval
Specify the number of minutes for the telnet timeout value. This
operand is optional.
Example
The following sets the idle timeout to 10 minutes (V3.1.x example):
switch:admin> timeout 10
Committing configuration...done.
TimeOut is now 10 minutes
switch:admin>
848
Fabric OS Version 3.1.x/4.1.x Reference Guide
timeout
See Also
None.
Fabric OS Version 3.1.x/4.1.x Reference Guide
849
Fabric OS Commands
topologyShow
Displays the unicast fabric topology.
Synopsis
topologyShow [domainnumber]
Availability
All users.
Release
V3.1.x and V4.1.x
Description
Use this command to display the fabric topology, as it appears to the local switch.
This includes:
■
A list of all domains that are part of the fabric, and to each of those domains,
all possible paths from the local switch.
■
For each path - cost, the number of hops from the local switch to the
destination switch, and a summary of all ports are routed through that path.
A path is described by the output port that a frame addressed to a certain domain
will be forwarded to by the switches’ routing hardware, in order to reach the
domain.
With the domain number specified, this command displays the topology
information for the specified destination domain.
The display contains the following fields:
850
Local Domain ID
Domain number of local switch.
Domain
Domain number of destination switch.
Metric
Cost of reaching destination domain.
Name
The name of the destination switch.
Path Count
The number of currently active paths to the destination
domain.
Fabric OS Version 3.1.x/4.1.x Reference Guide
topologyShow
Hops
The maximum number of hops to reach destination
domain.
Out Port
Port that incoming frame will be forwarded to, in order
to reach the destination domain.
In Ports
Input ports that use the corresponding Out Port to reach
the destination domain. This is the same information
provided by portRouteShow and uRouteShow.
Total Bandwidth
The maximum bandwidth of the out port.
Bandwidth Demand
The maximum bandwidth demand by the in ports.
Flags
Always “D,” indicating a dynamic path. A dynamic
path is discovered automatically by the FSPF path
selection protocol.
Operands
This command has the following operand:
Specify the destination domain for which topology
information is to be displayed. This operand is optional.
When no domain number is specified, this command
displays the topology information of all the domains in the
fabric.
domainnumber
Examples
The following is a V3.1.x example:
switch:admin> topologyshow
11 domains in the fabric; Local Domain ID: 7
Domain
Metric
Hops
Out Port
In Ports
Flags
Bandwidth
Name
-------------------------------------------------------------------------2
2000
4
0
0x00000000
D
2 (Gbs)
“web131”
Type <CR> to continue, Q<CR> to stop:
4
1500
3
0
0x00000000
D
2 (Gbs)
"web188"
Type <CR> to continue, Q<CR> to stop:
Fabric OS Version 3.1.x/4.1.x Reference Guide
851
Fabric OS Commands
The following is a V4.1.x example:
switch:admin> topologyShow
2 domains in the fabric; Local Domain ID: 1
Domain:
6
Metric:
500
Name:
cylon218
Path Count:
4
Hops:
1
Out Port:
60
In Ports:
None
Total Bandwidth:
2 Gbps
Bandwidth Demand:
0 %
Flags:
D
Hops:
Out Port:
In Ports:
Total Bandwidth:
Bandwidth Demand:
Flags:
1
61
None
2 Gbps
0 %
D
Hops:
Out Port:
In Ports:
Total Bandwidth:
Bandwidth Demand:
Flags:
1
62
None
2 Gbps
0 %
D
Hops:
Out Port:
In Ports:
Total Bandwidth:
Bandwidth Demand:
Flags:
1
58
None
2 Gbps
0 %
D
See Also
portRouteShow
uRouteShow
852
Fabric OS Version 3.1.x/4.1.x Reference Guide
trackChangesHelp
trackChangesHelp
Displays information on track-changes feature commands.
Synopsis
trackchangeshelp
Availability
All users.
Release
V3.1.x and V4.1.x
Description
Use this command to display information about the track-changes commands.
Operands
None.
Example
To display information on the track-changes feature commands:
switch:admin> trackchangeshelp
trackChangesSet
Configure alert for login/logout/config update
trackChangesShow
Displays status of track changes
See Also
trackchangesset
trackchangesshow
Fabric OS Version 3.1.x/4.1.x Reference Guide
853
Fabric OS Commands
trackChangesSet
Enable configuring of track-changes feature.
Synopsis: V3.1.x
trackChangesSet [mode], [snmptrapmode]
Synopsis: V4.1.x
trackChangesSet [mode][,snmptrapmode]
Availability
Admin
Release
V3.1.x and V4.1.x
Description
This command enables or disables the track-changes feature. An SNMP-TRAP
mode can also be enabled. Trackable changes are:
■
Successful login
■
Unsuccessful login
■
Logout
■
Config file change from task
■
Track-changes on
■
Track-changes off
The output from the track-changes feature is dumped to the error log for the
switch. Use the errDump command or errShow command to view the error
log.
854
Fabric OS Version 3.1.x/4.1.x Reference Guide
trackChangesSet
Operands
This command has the following operands:
mode
Specify 1 to enable the track-changes feature or specify 0 to
disable the feature. The default (if no operand is specified) is
to disable the track-changes feature. This operand is optional.
snmptrapmode
Specify 1 to enable errors to be sent to the SNMP-TRAP in
addition to the errlog or specify 0 to disable the SNMP-TRAP
messages. The default (if no operand is specified) is to disable
SNMP-TRAP messages. This operand is optional.
Example
To set the track changes feature in (V3.1.x example):
switch:admin> trackchangesset 1, 1
0x10276600 (tShell): Sep 12 17:59:10
INFO TRACK-TRACK_ON, 4, Track-changes on
Committing configuration...done.
0x10276600 (tShell): Sep 12 17:59:13
INFO TRACK-CONFIG_CHANGE, 4, Config file change from task:tShell
switch:admin>
The following shows how to use this command in (V4.1.x example):
switch12k:admin> trackchangesset 1, 1
Committing configuration...done.
switch12k:admin> trackchangesshow
Track changes status: ON
Track changes generate SNMP-TRAP: YES
switch12k:admin>
See Also
agtcfgSet
agtcfgShow
trackChangesHelp
trackChangesShow
Fabric OS Version 3.1.x/4.1.x Reference Guide
855
Fabric OS Commands
trackChangesShow
Displays status of track-changes feature.
Synopsis
trackChangesShow
Availability
All users.
Release
V3.1.x and V4.1.x
Description
Use this command to display status of the track-changes feature. It shows if the
feature is turned on or off and if SNMP traps are generated.
The output from the track-changes feature is dumped to the error log for the
switch. Use the errDump command or errShow command to view the error
log.
Operands
None.
Example
To display the status of the track-changes feature:
switch:admin> trackChangesShow
Track changes status: ON
Track changes generate SNMP-TRAP: YES
See Also
trackChangesHelp
trackChangesSet
856
Fabric OS Version 3.1.x/4.1.x Reference Guide
trunkDebug
trunkDebug
Debug a trunk link failure.
Synopsis
trunkDebug port1, port2
Availability
Admin
Release
V3.1.x and V4.1.x
Description
Use this command to debug a trunk link failure. This command reports one of the
following messages based on the trunking properties of the two specified ports:
■
Switch does not support trunking
■
Trunking license required
■
port x is not E_Port
■
port x trunking disabled
■
port x peed is not 2G
■
port x and port y are not on same quad
■
port x and port y connect to different switches
■
port x is not Trunking port due to: E_Port being disabled, or trunking may be
disabled at remote port
■
port x and port y cannot trunk, please check link length to make sure
difference is less than 400 m
Fabric OS Version 3.1.x/4.1.x Reference Guide
857
Fabric OS Commands
Operands
This command has the following operands:
port1
For V3.1.x, specify the first port number of a trunk connection
where you want to debug a trunking link error.
For V4.1.x, use the area number to specify port1. Use the
switchshow command to view the area numbers for a port. This
operand is required.
port2
For V3.1.x, specify the second port number of a trunk connection
where you want to debug a trunking link error.
For V4.1.x, use the area number to specify port2. Use the
switchshow command to view the area numbers for a port. This
operand is required.
Example
To debug a trunk connection:
switch:admin> trunkdebug 5,6
port 5 and 6 connect to different switches
port 5 connecting to switch 10:00:00:60:69:50:02:81
port 6 connecting to switch 10:00:00:60:69:80:0f:bd
switch:admin>
See Also
portCfgTrunkport
switchCfgTrunk
trunkShow
858
Fabric OS Version 3.1.x/4.1.x Reference Guide
trunkShow
trunkShow
Displays trunking information.
Synopsis
trunkShow
Availability
All users.
Release
V3.1.x and V4.1.x
Description
Use this command to display trunking information. The fields displayed are as
follows:
Trunking Group Number
Displays each trunking group on a switch. All the
ports that are part of this trunking group are
displayed.
Port to port connections
Displays the port-to-port trunking connections.
WWN
Displays the WWN of the connected port.
deskew
Displays the single trip time difference between
trunked links. Each number corresponds to 10 ns.
Master
Displays whether this trunking port connection is the
master port connection for the trunking group.
Operands
None.
Fabric OS Version 3.1.x/4.1.x Reference Guide
859
Fabric OS Commands
Example
To display trunking information for a switch:
switch:admin> trunkShow
1: 1 -> 1
10:00:00:60:69:04:10:83
0 -> 0
10:00:00:60:69:04:10:83
2: 4 -> 4
10:00:00:60:69:04:01:94
5 -> 5
10:00:00:60:69:04:01:94
7 -> 7
10:00:00:60:69:04:01:94
6 -> 6
10:00:00:60:69:04:01:94
3:14 -> 14
10:00:00:60:69:04:10:83
15 -> 15
10:00:00:60:69:04:10:83
deskew
deskew
deskew
deskew
deskew
deskew
deskew
deskew
16
55
45
34
22
65
46
33
MASTER
MASTER
MASTER
See Also
portCfgTrunkport
switchCfgTrunk
860
Fabric OS Version 3.1.x/4.1.x Reference Guide
tsclockserver
tsclockserver
Displays or sets the NTP Server address.
Synopsis
tsclockserver [ipaddr]
Availability
All users (display).
Admin (set).
Release
V3.1.x and V4.1.x
Description
Use this command to synchronize the local time of the Principal or Primary FCS
switch to an external NTP server.
The Time Server daemon synchronizes fabric time by sending updates of the
Principal or Primary FCS local switch time periodically to every switch in the
fabric. The Time Server daemon runs on all switches in the fabric, but only the
Principal switch (when the Security feature not enabled), or the Primary FCS
switch (when the Security feature is enabled) connect to the NTP server, and
broadcast Time Service updates.
All switches in the fabric maintain the current clock server IP address in
non-volatile memory. By default this value is “LOCL.” Changes to the clock
server IP address on the Principal or Primary FCS switch are propagated to all
switches in the fabric.
Use this command with no parameters to display the current clock server IP
address being used. Specify the ipaddr operand to set the clock server IP
address, and enable fabric wide clock synchronization with the specified clock
server.
Fabric OS Version 3.1.x/4.1.x Reference Guide
861
Fabric OS Commands
The NTP server used MUST support a full NTP client. Fabric OS V3.1.x and
v2.6.1 have an SNTP client and hence will accept an SNTP or NTP server, but
V4.1.x has an NTP client. So for the proper functioning of a mixed fabric with
external time synchronization it is necessary that an NTP server that supports a
full NTP client be used.
The ipaddr specified should be the IP address of an NTP server and should be
accessible from the switch. When a clock server IP address other than LOCL is
specified but is not used by the fabric, a warning is displayed and logged. When a
clock server IP address other than LOCL is specified, the date command will
be restricted to display only. See the date command for more details.
Operands
This command has the following operand:
ipaddr
Specify the IP address of the NTP server. This operand is
optional. By default this value is “LOCL.”
If no operand is specified the current value is displayed.
Example
The following example shows how to display the current clock server value
(LOCL), set the value to an NTP server at the specified IP address, and then verify
that the new IP address was saved:
switch:admin> tsclockserver
LOCL
switch:admin> tsclockserver “11.22.33.44”
switch:admin> tsclockserver
11.22.33.44
switch:admin>
See Also
date
862
Fabric OS Version 3.1.x/4.1.x Reference Guide
tshelp
tshelp
Displays the time service commands.
Synopsis
tshelp
Availability
All users.
Release
V3.1.x and V4.1.x
Description
Use this command to display a list of time service commands.
Operands
None.
Example
To display a list of time service commands:
switch:admin> tshelp
tsTimeZone
tsClockServer
Set time zone
Set/Get External NTP Server address
NOTE: don't run help command after firmwaredownload without reboot.
It will give you wrong information.
switch:admin>
See Also
None.
Fabric OS Version 3.1.x/4.1.x Reference Guide
863
Fabric OS Commands
tstimezone
Displays or sets the system time zone.
Synopsis
tstimezone [hourOffset [, minuteOffset]]
Availability
All users (display).
Admin (set).
Release
V3.1.x and V4.1.x
Description
Use this command to display or set the system time zone.
All switches maintain the current time zone setup in non-volatile memory.
Changing the Time Zone on a switch updates the local time zone setup and is
reflected in local time calculations.
All switches are by default in the 0,0 time zone, that is GMT. If all switches in a
fabric are in one time zone, it is possible to leave the time zone setup at the
default.
Time zone is used only in computing local time which is used for error reporting
and logging. An incorrect time zone setup will not affect the switch operation in
any way.
Enter this command with no parameters, to display the time zone setup. With the
valid parameters, it sets the time zone for an individual switch.
Negative hourOffset values mean the local time is behind GMT.
Example: -8,0 is GMT-08:00
Positive hourOffset values mean the local time is ahead of GMT.
Example: 3, 0 is GMT+03:00
864
Fabric OS Version 3.1.x/4.1.x Reference Guide
tstimezone
Operands
This command has the following operands:
hourOffset
Specify the number of hours relative to GMT. This operand
must be specified as an integer. Valid values are -12 through
12. This operand is optional.
minuteOffset
Specify the number of minutes relative to the hourOffset.
This operand must be specified as an integer. Valid values
are -30, 0, or 30. This operand is optional.
Example
To display the current time zone setup, then changes them to GMT-3:30:
switch:admin> tsTimeZone
Time Zone Hour Offset: 0
Time Zone Minute Offset: 0
switch:admin> tsTimeZone -3, -30
switch:admin> tsTimeZone
Time Zone Hour Offset: -3
Time Zone Minute Offset: -30
See Also
date
Fabric OS Version 3.1.x/4.1.x Reference Guide
865
Fabric OS Commands
turboRamTest
Turbo SRAM logic test for 2-Gbps ASICs.
Synopsis: V3.1.x
turboramtest [passcount]
Synopsis: V4.1.x
turboramtest [--slot number][-passcnt count][-ports
itemlist]
Availability
Admin
Release
V3.1.x and V4.1.x
Description
This command verifies the on-chip SRAM located in the 2-Gb ASIC using the
Turbo-Ram BIST circuitry. These same SRAMS are tested by portRegTest
and sramRetentionTest using PCI operations, but for this test the BIST
controller is able to perform the SRAM write and read operations at a much faster
rate. It is also able to test one SRAM in each quadrant of every chip in parallel.
The following RAMs/CAMs are tested using TurboRAM test logic:
866
■
TX Buffer List Descriptor RAM
■
TX Q Arb Loop FIFO RAM
■
Statistics RAM
■
ALPA Match RAM
■
External Unicast Routing Table RAM
■
Internal Unicast Routing Table RAM
■
Multicast Routing Table RAM
■
TX Buffer Link RAM
Fabric OS Version 3.1.x/4.1.x Reference Guide
turboRamTest
■
RX Buffer Frame Tail RAM
■
RX Buffer Frame Link RAM
■
TX Buffer Descriptor RAM (Output/Input Frame Tracking, Buffer State)
■
Private RAM
■
Phantom CAM
■
Phantom DID RAM
■
Phantom ALPA RAM
■
Frame Filtering Destination Group Table RAM
■
Frame Filtering Source Group Table RAM
■
Field Definition Block RAM
■
Frame Filtering Destination CAM
■
Frame Filtering Source CAM
■
Special Memory RAM
The test flow for each SRAM is as follows:
1. Fill RAM with alternating FFFF 0000 pattern. (Subtest 1: turboram memory
fill)
2. For each incrementing address read FFFF 0000 pattern and write 0000 FFFF.
(Subtest 2: turboram r-m-w inc 1)
3. For each incrementing address read 0000 FFFF pattern and write FFFF 0000.
(Subtest 3: turboram r-m-w inc 2)
4. For each decrementing address read FFFF 0000 pattern and write 0000 FFFF.
(Subtest 4: turboram r-m-w dec 1)
5. For each decrementing address read 0000 FFFF pattern and write FFFF 0000.
(Subtest 5: turboram r-m-w dec 2)
6. Repeat steps 1-5 with AAAA 5555 pattern.
Operands
This command has the following operands:
passcount
(V3.1.x only)
Fabric OS Version 3.1.x/4.1.x Reference Guide
Specify the number of times to perform this test. The
default value is 1. This operand is optional.
867
Fabric OS Commands
--slot number
(V4.1.x only)
Specify the slot number in a StorageWorks Core switch.
The slot number must be followed by a slash ( / ) and the
port number.
The StorageWorks Core switch has a total of 10 slots
counted from 1 to 10. Slot number 5 and 6 are control
processor cards, and slot 1 through 4, and 7 through 10,
are switch cards. On each switch card, there are 16 ports
counted from the bottom, 0 to 15. A particular port must
be represented by both slot number (1 through 4, or 7
through 10), and port number (0 through 15).
This operand is not required for switches that do not have
slots.
-passcnt count
(V4.1.x only)
Specify the number of times to perform this test. The
default value is 1. This operand is optional.
-ports itemlist
(V4.1.x only)
Specify a list of blade ports to test. By default all the blade
ports in the specified slot are tested. See the itemlist
command help page for more information. This operand
is optional.
Example
To execute this test (V3.1.x example):
switch:admin> turboRamTest
Running Turbo RAM Test ........ passed.
To execute this test (V4.1.x example):
switch:admin> > turboramtest -passcnt 2 -ports 2/0-2/63
Running Turbo RAM Test ........ passed.
Errors
When it detects failures, the subtest may report one or more of the following error
messages:
DIAG-WTEST - Memory fill
DIAG-INC_RWTEST - Memory
DIAG-DEC_RWTEST - Memory
DIAG-RAMINIT_TO - Memory
868
operation failed.
r-m-w increment subtest failed.
r-m-w decrement subtest failed.
initialization timed out.
Fabric OS Version 3.1.x/4.1.x Reference Guide
turboRamTest
See Also
camtest
centralmemorytest
cmemretentiontest
cmitest
portregtest
ramtest
sramretentiontest
Fabric OS Version 3.1.x/4.1.x Reference Guide
869
Fabric OS Commands
txdpathtest
Functional test of TXA and TXD connections.
Synopsis
txdpathtest [passcount, speedmode]
Availability
Admin
Release
V3.1.x
Description
Use this command to verify the TXA, TXD, and CMI data paths between the
ASICs. This is done by configuring all of the ports for internal loopback and
sending a frame from each quadrant to all other port on the switch. The frame
starts from the CPU and is transmitted by the first port which also receives the
frame and deposits it in central memory. The second port then reads the frame
from central memory using its own TXA and TXD path. The frame is then looped
back one more time and is sent back to the CPU where it is compared with the
transmitted data.
Only one frame is transmitted and received at a time. An external cable is not
required to run this test. The port sending frames displays a flickering green LED
while the test is running. The test method is as follows:
1. Set all ports present for parallel loopback. Then for each pair of source
quadrants and destination ports
2. Set up source port to route frames to destination port and destination port to
route frames to CPU.
3. Transmit frame F via source port.
4. Pick up the frame from destination port.
5. Check if any of the 8 statistic error counters are non-zero:
ENC_in, CRC_err, TruncFrm, FrmTooLong, BadEOF, Enc_out,
BadOrdSet, DiscC3.
870
Fabric OS Version 3.1.x/4.1.x Reference Guide
txdpathtest
6. Repeat steps 2 through 5 for all ports present until:
a. The number of frames (or passcount) requested is reached,
b. All ports are marked bad.
At each pass, a different data type is used to create the frame from a palette of 7;
meaning if a pass of 7 is requested, 7 different frames are used in the test. If 8
passes, the first 7 frames are unique, and the 8th is the same as the first. The data
palette of 7 are:
1)
2)
3)
4)
5)
6)
7)
CSPAT:
BYTE_LFSR:
CHALF_SQ:
QUAD_NOT:
CQTR_SQ:
CRPAT:
RANDOM:
0x7e,
0x69,
0x4a,
0x00,
0x78,
0xbc,
0x25,
0x7e,
0x01,
0x4a,
0xff,
0x78,
0xbc,
0x7f,
0x7e,
0x02,
0x4a,
0x00,
0x78,
0x23,
0x6e,
0x7e,...
0x05,...
0x4a,...
0xff,...
0x78,...
0x47,...
0x9a,...
Since this test requires that two ports can send and receive frames it is strongly
suggested that you run portloopbacktest before attempting to run this
test.
Operands
This command has the following operands:
passcount
Specify the number of times to perform this test. The default
value is 0xfffffffe. This operand is optional.
speedmode
Specify the speed mode for the test. Valid values are 0, 1,
or 2. This parameter is only used for 2-Gbps based products
where it controls the speed at which each port is operated.
For 1-Gbps only products it is ignored.
0 Run test at both 1-Gbps and 2-Gps (default).
1 Set all ports speed to lock at 1-Gbps.
2 Set all ports speed to lock at 2-Gbps.
Example
To run a functional test of TXA and TXD connections:
switch:admin> txdpathtest
Running Tx Data Path Test ..... passed.
Fabric OS Version 3.1.x/4.1.x Reference Guide
871
Fabric OS Commands
Errors
When it detects failures, the test may report one or more of the following error
messages:
DIAG-INIT
DIAG-PORTDIED
DIAG-XMIT
DIAG-TIMEOUT
DIAG-ERRSTAT
DIAG-STATS
DIAG-DATA
See Also
camtest
centralmemorytest
cmemretentiontest
cmitest
crossporttest
portloopbacktest
portregtest
ramtest
spinsilk
sramretentiontest
872
Fabric OS Version 3.1.x/4.1.x Reference Guide
uptime
uptime
Displays length of time the system has been operational.
Synopsis
uptime
Availability
All users.
Release
V3.1.x and V4.1.x
Description
Use this command to display the length of time the system has been in operation
(also known as “up time”), the total cumulative amount of “up time” since the
system was first powered-on, the date and time of the last reboot, and the reason
for the last reboot.
For up and powered-on times less than 60 seconds, the time is displayed in
seconds. For times greater than or equal to 60 seconds, the time is displayed in
minutes. The output format adjusts accordingly.
The reason for the last switch reboot is also recorded in the error log. Reasons are
listed below. Not all the below responses are applicable to all switch models:
Unknown
Reason is unknown.
Bus time-out*
Port ASIC was accessed and no response was received.
Bus error*
Non-existent system address was accessed.
Panic*
Firmware detected a critical hardware error or an internal
inconsistency.
Fault*
CPU signaled a fault condition (critical firmware error).
Power-on
Last reboot was caused by a power-on.
Watchdog*
Watchdog timer caused a reset.
PushButtons
Push buttons 1 and 3 were depressed for two seconds, causing
a system reset.
Fabric OS Version 3.1.x/4.1.x Reference Guide
873
Fabric OS Commands
Reboot
Last reboot was caused by a user (from any management
interface).
Powerfail
NMI*
Power supply caused a nonmaskable interrupt.
Watchdog NMI*
Watchdog timer caused a nonmaskable interrupt.
PushButton
NMI*
Push buttons 2 and 4 were depressed for two seconds, causing
a nonmaskable interrupt.
Software NMI*
Firmware caused a nonmaskable interrupt.
Note: The items marked with an asterisk (*) are usually caused by hardware or
firmware failures. Information on the failure is stored in the switch. Follow the
procedures in the switch manual.
Operands
None.
Example
To display the uptime for a V3.1.x switch:
Switch:admin> uptime
Up for:
6 days, 1:34
Powered for: 69 days, 11:39
Last up at: Wed Jan 30 09:10:09 2002
Reason:
Reboot
Switch:admin>
To display the length of time the system has been operational (V4.1.x example):
switch:admin> uptime
12:03am up 4:56, 3 users,
load average: 1.17, 1.08, 1.08
See Also
date
errShow
fastboot
reboot
874
Fabric OS Version 3.1.x/4.1.x Reference Guide
uRouteConfig
uRouteConfig
Configure a static route.
Synopsis
uRouteConfig InArea Domain OutArea
Availability
Admin
Release
V3.1.x and V4.1.x
Description
Use this command to configure static routes. A static route is a route that is
assigned to a specific path, and will not change when a topology change occurs,
unless the path used by the route becomes unavailable.
After this command is issued, and if OutArea is a usable port, all frames
coming in from InArea port addressed to Domain will be forwarded through
OutArea port.
If OutArea port is not usable, then the routing assignment is not affected by
this command. When OutArea port becomes usable again, the static route
assignment for InArea is enforced.
OutArea port is usable if it is on a minimum cost path to the destination
domain.
InArea port can be either an F_Port or an E_Port.
Note: When using static routes, load sharing may be affected. The switch attempts to
achieve optimum load sharing, but if too many routes are statically configured to use
the same output port, a fair load sharing may not be achievable.
In order to prevent routing loops, a static route configuration using a non-minimum cost
path is not allowed. If an attempt is made to configure such a route, the user is queried
on whether or not the entry should be saved in the database.
Fabric OS Version 3.1.x/4.1.x Reference Guide
875
Fabric OS Commands
Operands
This command has the following operands:
InArea
Specify the port to be statically routed. This operand is required.
Domain
Specify the destination domain. This operand is required.
OutArea
Specify the output port where traffic is forwarded. This operand
is required.
Examples
To configures a static route for all traffic coming in from port 1 and addressed to
domain 2 to go through port 5:
switch:admin> uRouteConfig 1 2 5
done.
switch:admin> configShow
route.ucastRoute.1.2:
5
route.ucastRouteCount:
1
See Also
configShow
interfaceShow
uRouteRemove
uRouteShow
876
Fabric OS Version 3.1.x/4.1.x Reference Guide
uRouteRemove
uRouteRemove
Remove a static route.
Synopsis
uRouteRemove InArea Domain
Availability
Admin
Release
V3.1.x and V4.1.x
Description
Use this command to remove a previously configured static route.
After this command is issued, the route to Domain for InArea may or may
not change. It changes if the previous static route was not along a minimum cost
path. Also, after this command is issued, the load sharing to Domain is
re-evaluated.
InArea can be either an F_Port or an E_Port.
Operands
This command has the following operands:
InArea
The port that is statically routed. This operand is required.
Domain
The destination domain. This operand is required.
Examples
To remove a static route for all traffic coming in from port 1 and addressed to
domain 2:
switch:admin> uRouteRemove 1 2
done.
Fabric OS Version 3.1.x/4.1.x Reference Guide
877
Fabric OS Commands
See Also
configShow
uRouteConfig
uRouteShow
878
Fabric OS Version 3.1.x/4.1.x Reference Guide
uRouteShow
uRouteShow
Displays unicast routing information.
Synopsis: V3.1.x
uRouteShow [portnumber][, domainnumber]
Synopsis: V4.1.x
uRouteShow [slotnumber/][portnumber][, domainnumber]
Availability
All users.
Release
V3.1.x and V4.1.x
Description
Use this command to display the unicast routing information for a port, as it is
known by the FSPF path selection and routing task. The routing information
describes how a frame that is received from a port on the local switch is to be
routed to reach a destination switch.
When no operand is specified, this command displays the routing information for
all the active ports on the local switch, to all the domains in the fabric.
When only the slot number and port number are specified, this command displays
the routing information for the specified port to all the domains connected to it.
When the slot number, port number, and domain number are all specified, this
command only displays the routing information for the specified port to the
specified domain.
The following information is displayed:
Local Domain ID:
Domain number of local switch.
In Port:
Port from which a frame is received.
Domain:
Destination domain of incoming frame.
Out Port:
Port to which the incoming frame is to be forwarded.
Fabric OS Version 3.1.x/4.1.x Reference Guide
879
Fabric OS Commands
Metric:
Cost of reaching the destination domain.
Hops:
Maximum number of hops required to reach the
destination domain.
Flags:
Indicates if route is dynamic (D) or static (S). A dynamic
route is discovered automatically by the FSPF path
selection protocol. A static route is assigned using the
command uRouteConfig.
Next (Dom, Port):
Domain and port number of the next hop. These are the
domain number and the port number of the switch to
which Out Port is connected.
The information provided by this command should match what is provided by
portRouteShow and topologyShow.
Operands
This command has the following operands:
slotnumber
(V4.1.x only)
Specify the slot number for a StorageWorks Core
switch. For all other switches this operand is not
required. The slot number must be followed by a slash
( / ) and the port number, so that each port is
represented by both slot number (1 through 4, or 7
through 10), and port number (0 through 15).
The StorageWorks Core switch has a total of 1–10
slots. Slot number 5 and 6 are control processor cards,
and slot 1 through 4, and 7 through 10, are port
cards. On each port card, there are 16 ports counted
from the bottom, 0 to 15.
portnumber
Specify a port number. Valid values for port number
vary depending on the switch type. This operand is
optional.
domainnumber
Displays routing information for the specified domain.
This operand is optional. This operand should only be
specified when the port number is specified.
If no operand is specified, this command displays routing information for all
active ports on the local switch, to all the domains in the fabric.
880
Fabric OS Version 3.1.x/4.1.x Reference Guide
uRouteShow
Examples
The first example displays the routing information of all the active ports, The
second command displays the routing information of port 11 on slot 1, and the
third command displays the routing information of port 11 to domain 4 only:
switch:admin> urouteshow
Local Domain ID: 3
In Port
Domain
Out Port
Metric
Hops
Flags
Next (Dom, Port)
--------------------------------------------------------------------------0
1
11
1000
1
D
1,0
11
2
0
1500
2
D
4,0
4
0
500
1
D
4,0
16
1
27
1000
1
D
1,1
27
2
16
1500
2
D
4,16
4
0
500
1
D
4,0
switch:admin> urouteshow 1/11
Local Domain ID: 3
In Port
Domain
Out Port
Metric
Hops
Flags
Next (Dom, Port)
---------------------------------------------------------------------------11
2
16
1500
2
D
4,16
4
16
500
1
D
4,16
switch:admin> urouteshow 1/11, 4
Local Domain ID: 3
In Port
Domain
Out Port
Metric
Hops
Flags
Next (Dom, Port)
---------------------------------------------------------------------------11
4
16
500
1
D
4,16
See Also
portRouteShow
topologyShow
uRouteConfig
uRouteRemove
Fabric OS Version 3.1.x/4.1.x Reference Guide
881
Fabric OS Commands
version
Displays firmware version information.
Synopsis
version
Availability
All users.
Release
V3.1.x and V4.1.x
Description
Use this command to display firmware version information and build dates.
The following fields are displayed:
Kernel:
Displays the version of switch kernel operating system.
Fabric OS:
Displays the version of switch Fabric OS.
Made on:
Displays the build date of firmware running in switch.
Flash:
Displays the build date of firmware stored in flash PROMs.
BootProm:
For V3.1.x, this field displays the build date of firmware stored
in boot PROM
For V4.1.x, this field displays the version of the firmware
stored in the boot PROM.
Usually the Made on and Flash dates are the same, since the switch starts running
flash firmware at power-on. However, in the time period between
firmwareDownload and the next reboot, the dates can differ.
Operands
None.
882
Fabric OS Version 3.1.x/4.1.x Reference Guide
version
Example
The following example shows the firmware version information on a
StorageWorks Core switch:
switch:admin> version
Kernel:
2.4.2
Fabric OS: V4.1.x
Made on:
Fri Feb 1 23:02:08 2002
Flash:
Fri Feb 1 18:03:35 2002
BootProm:
3.1.13b
switch:admin>
See Also
firmwareDownload
reboot
Fabric OS Version 3.1.x/4.1.x Reference Guide
883
Fabric OS Commands
wwn
View a switch WWN.
Synopsis
wwn
Availability
For V3.1.x: All users.
For V4.1.x:
■
Factory or Root only (set).
■
All users (display).
Release
V3.1.x and V4.1.x
Description
Use this command to modify or display the WWN of a switch. All switches have a
numeric address that is the unique Fibre Channel address used for communicating
with the switch. The WWN is shown in the output of the switchShow
command.
This command with no parameters displays the current WWN value.
This command with a parameter sets the switch's WWN to the new value. WWN
names must have eight colon separated fields each consisting of 1 or 2
hexadecimal digits between 0 and off, with no spaces.
After the world wide name is changed, the user is prompted to reboot the switch.
The name will not take effect until the switch restarts.
Note: When security is enabled, this command can only be issued from the Primary
FCS switch. See “Security Commands” on page 941.
884
Fabric OS Version 3.1.x/4.1.x Reference Guide
wwn
Operands
None.
Example
To display the switch WWN:
switch:admin> wwn
10:00:00:60:69:00:54:e9
switch:admin>
See Also
switchShow
Fabric OS Version 3.1.x/4.1.x Reference Guide
885
Fabric OS Commands
zoneAdd
1
Add a member to the zone.
Synopsis
zoneAdd “zoneName”, “member;member”
Availability
Admin
Release
V3.1.x and V4.1.x
Description
Use this command to add one or more members to an existing zone.
This command changes the Defined Configuration. For the change to be preserved
across switch reboots, it must be saved to non-volatile memory using the
cfgsave command. For the change to become effective, an appropriate zone
configuration must be enabled using the cfgenable command.
Note: This command requires an Advanced Zoning license.
When security is enabled, this command can only be issued from the Primary FCS
switch. See “Security Commands” on page 941.
886
Fabric OS Version 3.1.x/4.1.x Reference Guide
zoneAdd
Operands
The following operands are required:
zoneName
Specify the name of an existing zone, in quotation marks. This
operand is required.
member
Specify a member or list of members to be added, in quotation
marks, separated by semicolons. Valid values can be one or
more of the following:
■ For V3.1.x, a switch domain and physical port number
pair. For example, “2, 12.”
■ For V4.1.x, a switch domain and port area number pair.
For example, “2, 20.” View the area numbers for ports
using the switchShow command.
■ Node or port WWN.
■ QuickLoop AL_PA.
■ Zone alias name.
Example
To add aliases for three disk arrays to “Blue_zone”:
switch:admin> zoneAdd “Blue_Zone”, “array3; array4; array5”
See Also
zoneCreate
zoneDelete
zoneRemove
zoneShow
Fabric OS Version 3.1.x/4.1.x Reference Guide
887
Fabric OS Commands
zoneCreate
Create a zone.
Synopsis
zoneCreate “zoneName”, “member;member”
Availability
Admin
Release
V3.1.x and V4.1.x
Description
Use this command to create a new zone.
Note: This command requires an Advanced Zoning license.
A zone name is a C-style name beginning with a letter and followed by any
number of letters, digits, and underscore characters. Names are case sensitive; for
example, “Zone_1” indicates a different zone than “zone_1”. Blank spaces are
ignored.
The zone member list must have at least one member (empty lists are not
allowed). The members are described by a list of member definitions separated by
semicolons.
Specify ports by domain and port area number. The values are entered as a pair of
numbers “s,p” where "s" is the switch number (domain ID) and “p” is the port area
number. For example, “2, 20” specifies port area number 20 on switch domain 2.
When a zone member is specified by port area number, then all devices connected
to that port are in the zone. If this port is an arbitrated loop, then all devices on the
loop are in the zone.
Specify a World Wide Name as eight hex numbers separated by colons, for
example, “10:00:00:60:69:00:00:8a.” Advanced Zoning has no knowledge of the
fields within a World Wide Name; the eight bytes are simply compared with the
888
Fabric OS Version 3.1.x/4.1.x Reference Guide
zoneCreate
Node and Port Names presented by a device in a login frame (FLOGI or PLOGI).
When a zone member is specified by Node Name, then all ports on that device are
in the zone. When a zone member is specified by Port Name, then only that single
device port is in the zone.
Specify a QuickLoop AL_PA as a QuickLoop name followed by a list of AL_PAs,
for example, “qloop1[01,02].” QuickLoop names have the same format as zone
names, and are created with the qloopCreate command to define a switch or
pair of switches that form the QuickLoop.
Specify a zone alias name using the same format as a zone name. It is created with
the aliCreate command. The alias must resolve to a list of one or more of the
following:
■
A switch domain and port area number pair. View the area numbers for ports
using the switchShow command.
■
World Wide Names
■
QuickLoop AL_PAs
The types of zone members used to define a zone may be mixed. For example, a
zone defined with the following members: “2,12; 2,14; 10:00:00:60:69:00:00:8a”
would contain all devices connected to switch 2, ports 12 and 14, and to the device
with the World Wide Name “10:00:00:60:69:00:00:8a” (either node name or port
name), at the port in the fabric to which it is connected.
This command changes the Defined Configuration. For the change to be preserved
across switch reboots, it must be saved to non-volatile memory using the
cfgsave command. For the change to become effective, an appropriate zone
configuration must be enabled using the cfgenable command.
Note: Use this command to create a “broadcast” zone. This is a special zone used to
specify those nodes that can receive broadcast traffic. Broadcast traffic is usually meant
for servers and not for storage devices. This zone must be named “broadcast.” Only
one “broadcast”" zone can exist within a fabric. This type of zone is hardware
enforced; the switch controls data transfer to a port.
When security is enabled, this command can only be issued from the Primary FCS
switch. See “Security Commands” on page 941.
Fabric OS Version 3.1.x/4.1.x Reference Guide
889
Fabric OS Commands
Operands
The following operands are required:
zoneName
Name for a zone to be created, in quotation marks. This
name cannot be used for any other zone object.
member
List of members to be included in zone, in quotation marks,
separated by semicolons. Can be one or more of the
following:
■ For V3.1.x, a switch domain and physical port number
pair. For example, “2, 12.”
■ For V4.1.x, a switch domain and port area number
pair. For example, “2, 20” View the area numbers for
ports using the switchShow command.
■ World Wide Names
■ QuickLoop AL_PAs
■ Zone alias names
Example
To create three zones using a combination of port numbers and zone aliases:
switch:admin> zoneCreate “Red_zone”, “1,0; loop1”
switch:admin> zoneCreate “Blue_zone”, “1,1; array1; 1,2; array2”
switch:admin> zoneCreate “Green_zone”, “1,0; loop1; 1,2; array2”
See Also
zoneAdd
zoneDelete
zoneRemove
zoneShow
890
Fabric OS Version 3.1.x/4.1.x Reference Guide
zoneDelete
zoneDelete
Delete a zone.
Synopsis
zoneDelete “zoneName”
Availability
Admin
Release
V3.1.x and V4.1.x
Description
Use this command to delete a zone.
This command changes the Defined Configuration. For the change to be preserved
across switch reboots, it must be saved to non-volatile memory using the
cfgsave command. For the change to become effective, an appropriate zone
configuration must be enabled using the cfgenable command.
Note: This command requires an Advanced Zoning license.
When security is enabled, this command can only be issued from the Primary FCS
switch. See “Security Commands” on page 941.
Operands
This command has the following operand:
zoneName
Fabric OS Version 3.1.x/4.1.x Reference Guide
Name of the zone to be deleted, in quotation marks. This
operand is required.
891
Fabric OS Commands
Example
To delete the zone “Blue_zone”:
switch:admin> zoneDelete “Blue_zone”
See Also
zoneAdd
zoneCreate
zoneRemove
zoneShow
892
Fabric OS Version 3.1.x/4.1.x Reference Guide
zoneHelp
zoneHelp
Displays help information on zone commands.
Synopsis
zoneHelp
Availability
All users.
Release
V3.1.x and V4.1.x
Description
Use this command to display help information on zone commands.
Operands
None.
Fabric OS Version 3.1.x/4.1.x Reference Guide
893
Fabric OS Commands
Example
To display zone command help information:
switch:admin> zonehelp
aliAdd
aliCreate
aliDelete
aliRemove
aliShow
Add a member to a zone alias
Create a zone alias
Delete a zone alias
Remove a member from a zone alias
Print zone alias information
cfgAdd
cfgCreate
cfgDelete
cfgRemove
cfgShow
Add a member to a configuration
Create a zone configuration
Delete a zone configuration
Remove a member from a configuration
Print zone configuration information
qloopAdd
qloopCreate
qloopDelete
qloopRemove
qloopShow
Add a member to a qloop
Create a qloop
Delete a qloop
Remove a member from a qloop
Print qloop information
zoneAdd
zoneCreate
zoneDelete
zoneRemove
zoneShow
Add a member to a zone
Create a zone
Delete a zone
Remove a member from a zone
Print zone information
fazoneAdd
fazoneCreate
fazoneDelete
fazoneRemove
fazoneShow
Add a member to a fabric assist zone
Create a fabric assist zone
Delete a fabric assist zone
Remove a member from a fabric assist zone
Print Fabric Assist Zone information
cfgClear
cfgDisable
cfgEnable
cfgSave
Clear all zone configurations
Disable a zone configuration
Enable a zone configuration
Save zone configurations in flash
cfgSize
cfgActvShow
cfgTransAbort
cfgTransClearFlag
Print
Print
Abort
Clear
size details of zone database
effective zone configuration
zone configuration transaction
block new transaction flag
switch:admin>
See Also
None.
894
Fabric OS Version 3.1.x/4.1.x Reference Guide
zoneRemove
zoneRemove
Remove a member from a zone.
Synopsis
zoneRemove “zoneName”, “member;member”
Availability
Admin
Release
V3.1.x and V4.1.x
Description
Use this command to remove one or more members from an existing zone.
The member list is located by an exact string match; therefore, it is important to
maintain the order when removing multiple members. For example, if a zone
contains “array2; array3; array4,” removing “array3; array4” succeeds. but
removing “array4; array3” fails.
If all members are removed, the zone is deleted.
This command changes the Defined Configuration. For the change to be preserved
across switch reboots, it must be saved to non-volatile memory using the
cfgsave command. For the change to become effective, an appropriate zone
configuration must be enabled using the cfgenable command.
Note: This command requires an Advanced Zoning license.
When security is enabled, this command can only be issued from the Primary FCS
switch. See “Security Commands” on page 941.
Fabric OS Version 3.1.x/4.1.x Reference Guide
895
Fabric OS Commands
Operands
The following operands are required:
zoneName
Name of the zone, in quotation marks.
member
List of members to be removed from zone, in quotation marks,
separated by semicolons. Can be one or more of the following:
■ For V3.1.x, a switch domain and physical port number
pair. For example, “2, 12.”
■ For V4.1.x, a switch domain and port area number pair.
For example, “2, 20” View the area numbers for ports
using the switchShow command.
■ World Wide Names
■ QuickLoop AL_PAs
■ Zone alias names
Example
To remove “array2” from “Blue_zone”:
switch:admin> zoneRemove “Blue_zone”, “array2”
switch:admin> zoneRemove “Blue_zone”, “2,20”
See Also
zoneAdd
zoneCreate
zoneDelete
zoneShow
896
Fabric OS Version 3.1.x/4.1.x Reference Guide
zoneShow
zoneShow
Displays zone information.
Synopsis
zoneShow [“pattern”][, mode]
Availability
All users.
Release
V3.1.x and V4.1.x
Description
Use this command to display zone configuration information.
If no parameters are specified, all zone configuration information (both defined
and enabled) is displayed. See cfgShow for a description of this display.
If a parameter is specified, it is used as a pattern to match zone configuration
names, and those that match in the defined configuration are displayed.
Note: This command requires an Advanced Zoning license.
When security is enabled, this command can only be issued from the Primary FCS
switch. See “Security Commands” on page 941.
Fabric OS Version 3.1.x/4.1.x Reference Guide
897
Fabric OS Commands
Operands
The following operands are optional:
pattern
A POSIX style regular expression used to match zone
configuration names. The pattern must be enclosed in quotation
marks. Patterns may contain:
■ Question mark “?” that matches any single character
■ Asterisk “*” that matches any string of characters
■ Ranges “[0-9a-f]” that match any character within the
range
mode
For V3.1.x, specify 1 to display the contents of the transaction
buffer, or specify 0 to display the contents of the RAM. The
default value is 0.
For V4.1.x, specify 0 to display the contents of the transaction
buffer (the contents of the current transaction), or specify 1 to
display the contents of the non-volatile memory. The default
value is 0. This operand is optional.
Example
To show all zones beginning with the letters “A” through “C”:
switch:admin> zoneShow “[A-C]*”
zone: Blue_zone 1,1; array1; 1,2; array2
See Also
zoneAdd
zoneCreate
zoneDelete
zoneRemove
898
Fabric OS Version 3.1.x/4.1.x Reference Guide
Fabric OS Commands for
Licensed Products
2
This chapter summarizes the commands that are only available with a license key.
■
Advanced Zoning Commands, page 900
■
QuickLoop Fabric Assist Mode Commands, page 902
■
Extended Fabric Command, page 903
■
Fabric Watch Commands, page 904
■
Trunking Commands, page 905
■
Advanced Performance Monitoring Commands, page 906
■
Secure Fabric OS Commands, page 908
Note: For more information about Zoning, QuickLoop, Extended Fabrics, Fabric
Watch, Trunking, or Performance Monitoring refer to the specific user guide for that
feature.
Fabric OS Version 3.1.x/4.1.x Reference Guide
899
Fabric OS Commands for Licensed Products
Advanced Zoning Commands
The following commands are available with the purchase of an Advanced Zoning
license key. For detailed information about zoning refer to the HP StorageWorks
Zoning Version 3.1.x/4.1.x User Guide.
Table 18: Zoning Commands
Command
Description
Zone Alias
aliAdd
Add a member to a zone alias.
aliCreate
Create a zone alias.
aliDelete
Delete a zone alias.
aliRemove
Remove a member from a zone alias.
Zoning
zoneAdd
Add a member to a zone.
zoneCreate
Create a zone.
zoneDelete
Delete a zone.
zoneRemove
Remove a member from a zone.
QuickLoop Zoning
qloopAdd
Add a member to a QuickLoop.
qloopCreate
Create a QuickLoop.
qloopDelete
Delete a QuickLoop.
qloopRemove
Remove a member from a QuickLoop.
Zone Configuration
900
cfgAdd
Add a zone to a zone configuration.
cfgCreate
Create a zone configuration.
cfgDelete
Delete a zone configuration.
cfgRemove
Remove a zone from a zone configuration.
Fabric OS Version 3.1.x/4.1.x Reference Guide
Fabric OS Commands for Licensed Products
Table 18: Zoning Commands (Continued)
Command
Description
Zone Management
cfgClear
Clear all zone configurations.
cfgDisable
Disable a zone configuration.
cfgEnable
Enable a zone configuration.
cfgSave
Save zone configurations in flash memory.
cfgTransAbort
Aborts the current zoning transaction.
Fabric OS Version 3.1.x/4.1.x Reference Guide
901
Fabric OS Commands for Licensed Products
QuickLoop Fabric Assist Mode Commands
The following commands are for QuickLoop Fabric Assist Mode. For detailed
information about Extended Fabrics refer to the HP StorageWorks QuickLoop
Fabric Assist Version 3.1.x User Guide.
Table 19: QuickLoop Fabric Assist Mode Commands
Command
Description
fazoneAdd
Add members to an existing QuickLoop Fabric
Assist zone.
fazoneCreate
Create a QLFA zone.
fazoneDelete
Delete an existing QuickLoop Fabric Assist zone.
fazoneRemove
Remove member or members from an existing
QuickLoop Fabric Assist zone.
Note: The Quickloop Fabric Assist Mode feature is available on Fabric OS V3.1.x
only.
902
Fabric OS Version 3.1.x/4.1.x Reference Guide
Fabric OS Commands for Licensed Products
Extended Fabric Command
The following command is available with the purchase of an Extended Fabrics
license key. For detailed information about Extended Fabrics refer to the HP
StorageWorks QuickLoop Fabric Assist Version 3.1.x User Guide.
Table 20: Extended Fabric Command
Command
portCfgLongDistance
Fabric OS Version 3.1.x/4.1.x Reference Guide
Description
Configure a port to support long distance links.
903
Fabric OS Commands for Licensed Products
Fabric Watch Commands
The following commands are available with the purchase of a Fabric Watch
license key. For detailed information about Fabric Watch refer to the HP
StorageWorks Fabric Watch Version 3.1.x/4.1.x User Guide.
Table 21: Fabric Watch Commands
Command
904
Description
fwClassInit
Initialize all classes under Fabric Watch.
fwConfigReload
Reload the Fabric Watch configuration.
fwConfigure
Display and enable modification of the Fabric
Watch configuration and status.
fwShow
Display the thresholds monitored by Fabric Watch.
fwAlarmsFilterSet
Enable or disable alarms for Fabric Watch.
fwAlarmsFilterShow
Display alarm filtering for Fabric Watch.
fwFruCfg
Display and change FRU state alert configuration.
fwMailCfg
Configure e-mail alerts in Fabric Watch.
fwSetToDefault
Set boundary and alarm levels to the default values.
fwSetToCustom
Set boundary and alarm levels to custom values.
Fabric OS Version 3.1.x/4.1.x Reference Guide
Fabric OS Commands for Licensed Products
Trunking Commands
The following commands are available with the purchase of a Trunking license
key. For detailed information about trunking refer to the HP StorageWorks ISL
Trunking Version 3.1.x/4.1.x User Guide.
Table 22: Trunking Commands
Command
Description
portCfgTrunkport
Configure a port for trunking.
switchCfgTrunk
Configure a switch for trunking.
trunkDebug
Debug a trunk link failure.
Fabric OS Version 3.1.x/4.1.x Reference Guide
905
Fabric OS Commands for Licensed Products
Advanced Performance Monitoring Commands
The following commands are available with the purchase of an Advanced
Performance Monitoring license key. For more detailed information about
Performance Monitoring refer to the HP StorageWorks Advanced Performance
Monitoring Version 3.1.x/4.1.x User Guide.
Table 23: Performance Monitoring Commands
Command
906
Description
perfAddEEMonitor
Add an end-to-end monitor to a port.
perfAddIPMonitor
Add an IP monitor to a port.
perfAddReadMonitor
Add a SCSI Read monitor to a port.
perfAddRWMonitor
Add a SCSI Read and Write monitor to a port.
perfAddSCSIMonitor
Add a SCSI traffic frame monitor to a port.
perfAddUserMonitor
Add a user-defined monitor to a port.
perfAddWriteMonitor
Add a SCSI Write monitor to a port.
perfCfgClear
Clear the performance monitoring settings
from flash memory.
perfCfgRestore
Restore performance monitoring settings from
flash memory.
perfCfgSave
Save the current performance monitoring
settings to flash memory.
perfcleareemonitor
Clear statistics counters of an end- to-end
monitor on a port.
perfclearfiltermonitor
Clear statistics counters of a filter-based
monitor.
perfClrAlpaCrc
Clear an AL_PA device CRC count by the port
and AL_PA.
perfDelEEMonitor
Delete an end-to-end monitor on port.
perfDelFilterMonitor
Delete a filter-based monitor.
perfSetPortEEMask
Set overall mask for end-to-end (EE) monitors.
perfShowAlpaCrc
Display the AL_PA CRC count by port or by
AL_PA.
Fabric OS Version 3.1.x/4.1.x Reference Guide
Fabric OS Commands for Licensed Products
Table 23: Performance Monitoring Commands (Continued)
Command
Description
perfShowEEMonitor
Display user-defined end-to-end monitors on a
port.
perfShowFilterMonitor
Display filter-based monitors for a port.
perfShowPortEEMask
Display the current end-to-end mask of a port.
Fabric OS Version 3.1.x/4.1.x Reference Guide
907
Fabric OS Commands for Licensed Products
Secure Fabric OS Commands
The following commands are available with the purchase of a Security license
key. For more detailed information about trunking refer to the HP StorageWorks
Secure Fabrics OS Version 1.0 User Guide.
Table 24: Secure Fabric OS Commands
Command
908
Description
secfabricshow
Displays security related fabric information.
secfcsfailover
Enables a Backup FCS switch to take over as Primary
FCS switch.
sechelp
Display information about security telnet commands.
secmodeenable
Enable security mode.
secmodedisable
Disable security mode.
secmodeshow
Display if security mode is enabled or disabled.
secnonfcspasswd
Set the admin password for non-FCS switches.
secpolicyabort
Aborts all changes to the defined database that have
not been saved.
secpolicyactivate
Apply defined policy set to all switches in the fabric.
secpolicyadd
Add members to an existing policy.
secpolicycreate
Create a new policy.
secpolicydelete
Delete an existing policy.
secpolicydump
Show all members of existing policies.
secpolicyfcsmove
Move a member in the FCS policy.
secpolicyremove
Remove members from an existing policy.
secpolicysave
Save a defined security policy to flash memory on all
switches in the fabric.
secpolicyshow
Show an existing security policy.
secstatsreset
Reset security statistic for a policy or all policies to
zero.
secstatsshow
Display security statistic for a policy or for all policies.
sectemppasswdreset
Reset a password on a remote switch.
Fabric OS Version 3.1.x/4.1.x Reference Guide
Fabric OS Commands for Licensed Products
Table 24: Secure Fabric OS Commands (Continued)
Command
Description
sectemppasswdset
Set a temporary password on a remote switch.
sectransabort
Abort current security transaction.
secversionreset
Reset the version stamp to zero.
Fabric OS Version 3.1.x/4.1.x Reference Guide
909
Fabric OS Commands for Licensed Products
910
Fabric OS Version 3.1.x/4.1.x Reference Guide
Fabric OS Version
Comparison
3
This chapter summarizes the commands available in V3.1.x and V4.1.x.
Fabric OS Version 3.1.x/4.1.x Reference Guide
911
Fabric OS Version Comparison
Command Differences Between Versions
This table provides a list of which commands are available in V3.1.x and in
V4.1.x. It also provides notes on differences that may exist for a particular
command between versions.
Table 25: Fabric OS Command Version Support (Sheet 1 of 15)
Supported
in V3.1.x
Supported
in V4.1.x
agtcfgDefault
Yes
Yes
agtcfgSet
Yes
Yes
agtcfgShow
Yes
Yes
aliasDelete
No
Yes
New command for V4.1.x
aliasJoin
No
Yes
New command for V4.1.x
aliasPurge
No
Yes
New command for V4.1.x
aliasShow
Yes
Yes
New command
aliAdd
Yes
Yes
Specify members using area
number in V4.1.x
aliCreate
Yes
Yes
Specify members using area
number in V4.1.x
aliDelete
Yes
Yes
aliRemove
Yes
Yes
aliShow
Yes
Yes
backplanetest
No
Yes
Specific to the StorageWorks
Core switch
backPort
No
Yes
Specific to the StorageWorks
Core switch
backSpace
Yes
No
bannerset
Yes
Yes
New command
bannershow
Yes
Yes
New command
bcastShow
Yes
Yes
bladeBeacon
No
Yes
Specific to the StorageWorks
Core switch
bladeDiag
No
Yes
Specific to the StorageWorks
Core switch
Command
912
Comment
Specify members using area
number in V4.1.x
Fabric OS Version 3.1.x/4.1.x Reference Guide
Fabric OS Version Comparison
Table 25: Fabric OS Command Version Support (Sheet 2 of 15)
Supported
in V3.1.x
Supported
in V4.1.x
bladeDiagShort
No
Yes
Specific to the StorageWorks
Core switch
bladeDisable
No
Yes
New command for V4.1.x
bladeEnable
No
Yes
New command for V4.1.x
bladePropShow
No
Yes
Specific to the StorageWorks
Core switch
bsn
Yes
No
Functionality was replaced by
the chassisshow
command in V4.1.x.
camTest
Yes
Yes
Not supported with the
StorageWorks Core switch
centralMemoryTest
Yes
Yes
cfgAdd
Yes
Yes
cfgClear
Yes
Yes
cfgCreate
Yes
Yes
cfgDelete
Yes
Yes
cfgDisable
Yes
Yes
cfgEnable
Yes
Yes
cfgRemove
Yes
Yes
cfgSave
Yes
Yes
cfgShow
Yes
Yes
cfgsize
Yes
Yes
cfgTransAbort
Yes
Yes
cfgtransshow
Yes
Yes
New command
chassisName
No
Yes
Specific to the StorageWorks
Core switch
chassisShow
No
Yes
Specific to the StorageWorks
Core switch
chippropshow
No
Yes
chipregshow
No
Yes
cmemRetentionTest
Yes
Yes
Command
Fabric OS Version 3.1.x/4.1.x Reference Guide
Comment
New command
913
Fabric OS Version Comparison
Table 25: Fabric OS Command Version Support (Sheet 3 of 15)
Supported
in V3.1.x
Supported
in V4.1.x
cmiTest
Yes
Yes
configDefault
Yes
Yes
configDownload
Yes
Yes
configShow
Yes
Yes
configUpload
Yes
Yes
configure
Yes
Yes
crossPortTest
Yes
Yes
dataTypeShow
Yes
Yes
date
Yes
Yes
dbgshow
Yes
Yes
diagClearError
Yes
Yes
diagCommandShow
No
Yes
diagDisablePost
Yes
Yes
diagEnablePost
Yes
Yes
diagesdPorts
No
Yes
diagfailLimit
No
Yes
diagHelp
Yes
Yes
diagloopid
No
Yes
diagmodepr
No
Yes
diagpost
No
Yes
diagretry
No
Yes
diagsetburnin
No
Yes
diagsetcycle
No
Yes
diagShow
Yes
Yes
diagshowtime
No
Yes
diagsilkworm
No
Yes
diagskiptests
No
Yes
diagstopburnin
No
Yes
Command
914
Comment
New command
Fabric OS Version 3.1.x/4.1.x Reference Guide
Fabric OS Version Comparison
Table 25: Fabric OS Command Version Support (Sheet 4 of 15)
Supported
in V3.1.x
Supported
in V4.1.x
dlsReset
Yes
Yes
dlsSet
Yes
Yes
dlsShow
Yes
Yes
dnsconfig
Yes
Yes
errclear
Yes
Yes
errDump
Yes
Yes
errnvlogsizeset
No
Yes
New command for V4.1.x
errnvlogsizeshow
No
Yes
New command for V4.1.x
errsavelvlset
No
Yes
New command for V4.1.x
errsavelvlshow
No
Yes
New command for V4.1.x
errShow
Yes
Yes
exit
Yes
Yes
New command
fabportshow
No
Yes
New command for V4.1.x
fabretryshow
Yes
Yes
New command
fabricprincipal
No
Yes
New command for V4.1.x
fabricshow
No
Yes
New command for V4.1.x
fabstateclear
No
Yes
New command for V4.1.x
fabStateShow
No
Yes
fabstatsshow
Yes
Yes
New command for V4.1.x
fabswitchshow
No
Yes
New command for V4.1.x
fanDisable
No
Yes
fanEnable
No
Yes
fanshow
Yes
Yes
faShow
Yes
No
fastatsshow
Yes
Yes
fastboot
Yes
Yes
fazoneAdd
Yes
Yes
Command
Fabric OS Version 3.1.x/4.1.x Reference Guide
Comment
New command for V3.1.x
Specify members using area
number in V4.1.x
915
Fabric OS Version Comparison
Table 25: Fabric OS Command Version Support (Sheet 5 of 15)
Supported
in V3.1.x
Supported
in V4.1.x
fazoneCreate
Yes
Yes
fazoneDelete
Yes
Yes
fazoneRemove
Yes
Yes
fazoneShow
Yes
Yes
fcpprobeshow
Yes
Yes
New command for V3.1.x
fcprlsshow
Yes
Yes
New command for V3.1.x
fdmicacheshow
Yes
Yes
New command for V3.1.x
fdmishow
Yes
Yes
New command for V3.1.x
filterTest
Yes
Yes
firmwareCommit
No
Yes
firmwareDownload
Yes
Yes
firmwaredownloadstatus
No
Yes
firmwareRestore
No
Yes
firmwareshow
No
Yes
New command for V4.1.x
fporttest
Yes
No
New command for V3.1.x
fspfShow
Yes
Yes
fwAlarmsFilterSet
Yes
Yes
fwAlarmsFilterShow
Yes
Yes
fwClassInit
Yes
Yes
fwConfigReload
Yes
Yes
fwConfigure
Yes
Yes
fwFruCfg
No
Yes
fwHelp
Yes
Yes
fwMailCfg
Yes
Yes
fwsamshow
Yes
Yes
fwSetToCustom
Yes
Yes
fwSetToDefault
Yes
Yes
Command
916
Comment
Specify members using area
number in V4.1.x
Specify members using area
number in V4.1.x
New command for V4.1.x
New command for V4.1.x
New command
Fabric OS Version 3.1.x/4.1.x Reference Guide
Fabric OS Version Comparison
Table 25: Fabric OS Command Version Support (Sheet 6 of 15)
Supported
in V3.1.x
Supported
in V4.1.x
fwShow
Yes
Yes
gbicshow
Yes
Yes
h
Yes
Yes
haDisable
No
Yes
Specific to the StorageWorks
Core switch
hadump
No
Yes
New command for V4.1.x
haEnable
No
Yes
Specific to the StorageWorks
Core switch
haFailover
No
Yes
Specific to the StorageWorks
Core switch
haShow
No
Yes
Specific to the StorageWorks
Core switch
hasyncstart
No
Yes
New command for V4.1.x
hasyncstop
No
Yes
New command for V4.1.x
help
Yes
Yes
historyLastShow
No
Yes
historymode
No
Yes
historyShow
No
Yes
i
Yes
Yes
ifModeSet
Yes
Yes
ifModeShow
Yes
Yes
ifShow
Yes
No
interfaceShow
Yes
Yes
iodReset
Yes
Yes
iodSet
Yes
Yes
iodShow
Yes
Yes
ipAddrSet
Yes
Yes
ipAddrShow
Yes
Yes
This command displays
unique information based on
switch type
islshow
Yes
Yes
New command
Command
Fabric OS Version 3.1.x/4.1.x Reference Guide
Comment
New command for V4.1.x
917
Fabric OS Version Comparison
Table 25: Fabric OS Command Version Support (Sheet 7 of 15)
Supported
in V3.1.x
Supported
in V4.1.x
itemlist
No
Yes
New command for V4.1.x
killtelnet
No
Yes
New command for V4.1.x
ledtest
No
Yes
New command for V4.1.x
licenseAdd
Yes
Yes
licenseHelp
Yes
Yes
licenseIdShow
No
Yes
licenseRemove
Yes
Yes
licenseShow
Yes
Yes
linkCost
Yes
Yes
login
Yes
Yes
logout
Yes
Yes
loopporttest
Yes
Yes
LSDbShow
Yes
Yes
mcastShow
Yes
No
memshow
Yes
Yes
msCapabilityShow
Yes
Yes
msConfigure
Yes
Yes
msPlatShow
Yes
Yes
msPlClearDB
Yes
Yes
msPlMgmtActivate
Yes
Yes
msPlMgmtDeactivate
Yes
Yes
msTdDisable
Yes
Yes
msTdEnable
Yes
Yes
msTdReadConfig
No
Yes
myid
No
Yes
nbrStatsClear
Yes
Yes
nbrStateShow
Yes
Yes
nodefind
Yes
Yes
Command
918
Comment
New command
Fabric OS Version 3.1.x/4.1.x Reference Guide
Fabric OS Version Comparison
Table 25: Fabric OS Command Version Support (Sheet 8 of 15)
Supported
in V3.1.x
Supported
in V4.1.x
nsaliasshow
Yes
Yes
nsAllShow
Yes
Yes
nscamshow
Yes
Yes
nsShow
Yes
Yes
nsstatshow
Yes
Yes
nszonemember
Yes
Yes
parityCheck
Yes
No
passwd
Yes
Yes
pdshow
No
Yes
perfAddEEMonitor
Yes
Yes
perfAddIPMonitor
Yes
Yes
perfAddReadMonitor
Yes
Yes
perfAddRWMonitor
Yes
Yes
perfAddSCSIMonitor
Yes
Yes
perfAddUserMonitor
Yes
Yes
perfAddWriteMonitor
Yes
Yes
perfCfgClear
Yes
Yes
perfCfgRestore
Yes
Yes
perfCfgSave
Yes
Yes
perfcleareemonitor
Yes
Yes
New command
perfclearfiltermonitor
Yes
Yes
New command
perfClrAlpaCrc
Yes
Yes
perfDelEEMonitor
Yes
Yes
perfDelFilterMonitor
Yes
Yes
perfHelp
Yes
Yes
perfSetPortEEMask
Yes
Yes
perfShowAlpaCrc
Yes
Yes
perfShowEEMonitor
Yes
Yes
Command
Fabric OS Version 3.1.x/4.1.x Reference Guide
Comment
New command
New command
New command for V4.1.x
919
Fabric OS Version Comparison
Table 25: Fabric OS Command Version Support (Sheet 9 of 15)
Supported
in V3.1.x
Supported
in V4.1.x
perfShowFilterMonitor
Yes
Yes
perfShowPortEEMask
Yes
Yes
pkicreate
No
Yes
New command for V4.1.x
pkiremove
No
Yes
New command for V4.1.x
pkishow
No
Yes
New command for V4.1.x
portcamshow
Yes
No
New command
portcfgdefault
Yes
Yes
New command
portCfgEport
Yes
Yes
portCfgGport
Yes
Yes
portcfgislmode
Yes
Yes
portCfgLongDistance
Yes
Yes
portCfgLport
Yes
Yes
portcfgpersistentdisable
Yes
Yes
New command
portcfgpersistentenable
Yes
Yes
New command
portCfgShow
Yes
Yes
portCfgSpeed
Yes
Yes
portCfgTrunkport
Yes
Yes
portdebug
Yes
Yes
portDisable
Yes
Yes
portEnable
Yes
Yes
portErrShow
Yes
Yes
portflagshow
Yes
Yes
portLEDtest
No
Yes
portLogClear
Yes
Yes
portLogDump
Yes
Yes
portLogDumpPort
Yes
Yes
portloginshow
Yes
Yes
New command
portlogpdisc
Yes
Yes
New command
Command
920
Comment
New command
New command
New command
Fabric OS Version 3.1.x/4.1.x Reference Guide
Fabric OS Version Comparison
Table 25: Fabric OS Command Version Support (Sheet 10 of 15)
Supported
in V3.1.x
Supported
in V4.1.x
portLogShow
Yes
Yes
portlogshowport
Yes
Yes
portLoopbackTest
Yes
Yes
portname
Yes
Yes
portPerfShow
Yes
Yes
portRegTest
Yes
Yes
portRouteShow
Yes
Yes
portShow
Yes
Yes
portstatsclear
Yes
Yes
portStatsShow
Yes
Yes
portswap
No
Yes
New command for V4.1.x
portswapdisable
No
Yes
New command for V4.1.x
portswapenable
No
Yes
New command for V4.1.x
portswapshow
No
Yes
New command for V4.1.x
porttest
Yes
Yes
New command
porttestshow
Yes
Yes
New command
powerOffListSet
No
Yes
New command for V4.1.x
powerOffListShow
No
Yes
New command for V4.1.x
psShow
Yes
Yes
ptdatashow
No
Yes
ptphantomshow
No
Yes
ptpropshow
No
Yes
ptregshow
No
Yes
ptrouteshow
No
Yes
ptstatsshow
No
Yes
qlDisable
Yes
No
qlEnable
Yes
No
qloopAdd
Yes
Yes
Command
Fabric OS Version 3.1.x/4.1.x Reference Guide
Comment
New command
New command
New command
921
Fabric OS Version Comparison
Table 25: Fabric OS Command Version Support (Sheet 11 of 15)
Supported
in V3.1.x
Supported
in V4.1.x
qloopCreate
Yes
Yes
qloopDelete
Yes
Yes
qloopRemove
Yes
Yes
qloopShow
Yes
Yes
qlPartner
Yes
No
qlPortDisable
Yes
No
qlPortEnable
Yes
No
qlPortShowAll
Yes
No
qlShow
Yes
No
qlStatsShow
Yes
No
quietMode
Yes
No
ramTest
Yes
No
reboot
Yes
Yes
routeHelp
Yes
Yes
savecore
No
Yes
New command for V4.1.x
secfabricshow
Yes
Yes
New command
secfcsfailover
Yes
Yes
New command
sechelp
Yes
Yes
New command
secmodedisable
Yes
Yes
New command
secmodeenable
Yes
Yes
New command
secmodeshow
Yes
Yes
New command
secnonfcspasswd
Yes
Yes
New command
secpolicyabort
Yes
Yes
New command
secpolicyactivate
Yes
Yes
New command
secpolicyadd
Yes
Yes
New command
secpolicycreate
Yes
Yes
New command
secpolicydelete
Yes
Yes
New command
secpolicydump
Yes
Yes
New command
Command
922
Comment
Reboots entire chassis in
StorageWorks Core switch
Fabric OS Version 3.1.x/4.1.x Reference Guide
Fabric OS Version Comparison
Table 25: Fabric OS Command Version Support (Sheet 12 of 15)
Supported
in V3.1.x
Supported
in V4.1.x
secpolicyfcsmove
Yes
Yes
New command
secpolicyremove
Yes
Yes
New command
secpolicysave
Yes
Yes
New command
secpolicyshow
Yes
Yes
New command
secstatsreset
Yes
Yes
New command
secstatsshow
Yes
Yes
New command
sectemppasswdreset
Yes
Yes
New command
sectemppasswdset
Yes
Yes
New command
sectransabort
Yes
Yes
New command
secversionreset
Yes
Yes
New command
sensorShow
Yes
Yes
setdbg
Yes
Yes
setesdmode
No
Yes
setgbicmode
Yes
Yes
setSfpMode
No
Yes
setSplbMode
Yes
Yes
setverbose
Yes
Yes
sfpShow
Yes
Yes
slotOff
No
Yes
Specific to the StorageWorks
Core switch
slotOn
No
Yes
Specific to the StorageWorks
Core switch
slotpoweroff
No
Yes
Specific to the StorageWorks
Core switch
slotpoweron
No
Yes
Specific to the StorageWorks
Core switch
slotShow
No
Yes
Specific to the StorageWorks
Core switch
snmpMibCapSet
Yes
Yes
spinFab
Yes
Yes
Command
Fabric OS Version 3.1.x/4.1.x Reference Guide
Comment
New command
923
Fabric OS Version Comparison
Table 25: Fabric OS Command Version Support (Sheet 13 of 15)
Supported
in V3.1.x
Supported
in V4.1.x
spinSilk
Yes
Yes
sramRetentionTest
Yes
Yes
ssn
Yes
No
statsTest
Yes
Yes
stopporttest
Yes
Yes
supportShow
Yes
Yes
switchBeacon
Yes
Yes
switchcfgpersistentdisable
Yes
Yes
New command
switchcfgpersistentenable
Yes
Yes
New command
switchCfgSpeed
Yes
Yes
switchCfgTrunk
Yes
Yes
switchDisable
Yes
Yes
switchEnable
Yes
Yes
switchName
Yes
Yes
switchReboot
No
Yes
switchShow
Yes
Yes
switchShutdown
No
Yes
Specific to the StorageWorks
Core switch
switchStart
No
Yes
Specific to the StorageWorks
Core switch
switchStatusPolicySet
Yes
Yes
switchStatusPolicyShow
Yes
Yes
switchStatusShow
Yes
Yes
switchuptime
No
Yes
syslogdIpAdd
Yes
Yes
syslogdIpRemove
Yes
Yes
syslogdIpShow
Yes
Yes
systemtest
No
Yes
Command
924
Comment
New command for V3.1.x
Reboots the current logical
switch in StorageWorks Core
switch
Fabric OS Version 3.1.x/4.1.x Reference Guide
Fabric OS Version Comparison
Table 25: Fabric OS Command Version Support (Sheet 14 of 15)
Supported
in V3.1.x
Supported
in V4.1.x
ssytemverification
No
Yes
tempShow
Yes
Yes
timeout
Yes
Yes
topologyShow
Yes
Yes
trackchangeshelp
Yes
Yes
trackChangesSet
Yes
Yes
trackChangesShow
Yes
Yes
trunkDebug
Yes
Yes
trunkShow
Yes
Yes
tsclockserver
Yes
Yes
New command
tshelp
Yes
Yes
New command
tstimezone
Yes
Yes
New command
turboRamTest
Yes
Yes
txdpathtest
Yes
No
uptime
Yes
Yes
uRouteConfig
Yes
Yes
Addition of the area
parameter
uRouteRemove
Yes
Yes
Addition of the area
parameter
uRouteShow
Yes
Yes
version
Yes
Yes
wwn
Yes
Yes
zoneAdd
Yes
Yes
Specify members using area
number in V4.1.x
zoneCreate
Yes
Yes
Specify members using area
number in V4.1.x
zoneDelete
Yes
Yes
Command
Fabric OS Version 3.1.x/4.1.x Reference Guide
Comment
New command for V4.1.x
New command
New command
New command for V3.1.x
925
Fabric OS Version Comparison
Table 25: Fabric OS Command Version Support (Sheet 15 of 15)
Supported
in V3.1.x
Supported
in V4.1.x
zoneHelp
Yes
Yes
zoneRemove
Yes
Yes
zoneShow
Yes
Yes
Command
926
Comment
Specify members using area
number in V4.1.x
Fabric OS Version 3.1.x/4.1.x Reference Guide
Fabric and Switch
Management
4
This chapter explains the different methods used to manage an HP StorageWorks
SAN switch. In order to manage a switch, you must have access to one of the
available management methods.
■
Overview, page 928
■
User Access Level, page 929
■
Fabric OS Command Line Interface, page 930
■
Web Tools, page 931
■
Fabric Manager, page 932
■
Fabric Watch, page 934
■
Fabric OS Access Layer (API), page 935
■
Management Server, page 936
Fabric OS Version 3.1.x/4.1.x Reference Guide
927
Fabric and Switch Management
Overview
The HP switch can be managed using several local and remote access methods. In
order to manage a switch, you must have access to one of the following
management methods:
■
Fabric OS command line interface
■
WebTools
■
Fabric Manager
■
Fabric Watch
■
Fabric OS Access Layer (API)
■
Management Server
Telnet, SNMP and Web Tools require that the switch be accessible using a
network connection. The network connection can be from the switch Ethernet port
(out of band) or from Fibre Channel (in band). The switch must be configured
with an IP address to allow for the network connection. Refer to the hardware
manual for your specific switch for information on physically connecting to the
switch.
Before changing any of the factory default settings, become familiar with the
operations described in this chapter, including both the switch functions and
interactive characteristics.
Note: Switches can be accessed simultaneously from different connections. If this
happens, changes from one connection may not be updated to the other, and some
modifications may be lost. Make sure when connecting with simultaneous multiple
connections that you do not overwrite the work of another connection.
928
Fabric OS Version 3.1.x/4.1.x Reference Guide
Fabric and Switch Management
User Access Level
There are four levels of user access for the HP switch:
■
Root
■
Factory
■
Admin
■
User
In Fabric OS V4.1.x, each user access level can have the following number of
simultaneous sessions:
Table 26: StorageWorks Core switch User Access Maximum Sessions
User Name
Maximum Number
of Simultaneous Sessions
Root
4
Factory
4
Admin
2
User
4
Web Tools
4
Note: In Fabric OS V3.1.x and earlier, multiple user access to a switch is limited. Each
switch allows only a single session per management access method, regardless of user
level. Switches can, however, be accessed simultaneously from different connections (for
example, through the CLI and Web Tools). If this happens, changes from one
connection may not be updated to the other, and some changes may be lost. Make sure
when connecting with simultaneous multiple connections that you do not overwrite the
work of another connection.
Fabric OS Version 3.1.x/4.1.x Reference Guide
929
Fabric and Switch Management
Fabric OS Command Line Interface
The Fabric OS command line interface (CLI) accessed through telnet or serial
console provides the user with the full range of management capability on an HP
switch. The Fabric OS CLI enables an administrator to monitor and manage entire
fabrics, individual switches, and ports from a standard workstation. The entire
suite of Fabric OS features and capabilities is available across an entire fabric,
from a single access point.
Access is controlled by a switch level password for each user level (factory, root,
admin, user). The commands available through the CLI are based on the user’s
login level, and the license keys used to unlock certain features.
Generally speaking, all configuration, and management tasks are available using
the admin or user level ID. The root and factory levels should be used with
caution. This manual lists all the commands available to the user and admin level
login IDs.
Fabric OS CLI is the complete fabric management tool for HP SANs, and
provides the following advantages to administrators:
930
■
Access to the full range of Fabric OS features, based on which license keys
you purchase
■
A full set of tools to assist administrators with the configuration, monitoring,
dynamic provisioning, and daily management of every aspect of Storage Area
Networks.
■
A deeper view of the tasks involved with managing an HP switch.
■
Ability to configure and manage the HP fabric on multiple efficient levels.
■
Ability to identify, isolate and manage SAN events across every switch in the
fabric.
■
Ability to manage switch licenses.
■
Ability to perform Fabric Stamping.
Fabric OS Version 3.1.x/4.1.x Reference Guide
Fabric and Switch Management
Web Tools
Web Tools provides a graphical interface that allows the administrator to monitor
and manage entire fabrics and individual switches and ports from a standard
workstation. It is an optionally licensed product that runs on Fabric OS. All
switches in the fabric are displayed in the main window of Web Tools, including
switches that do not have a Web Tools license. However, only switches that have a
Web Tools license installed can be managed through Web Tools (other switches
must be managed through Telnet).
Web Tools is an excellent partner to the traditional Fabric OS CLI commands, and
in many ways can provide faster and more effective results than can be achieved
strictly through the CLI. Following are some of the features that make Web Tools
an important part of the switch management and administration process:
■
Web Tools can be used simultaneously with Fabric OS CLI commands.
Simply open a second window and you can take advantage of the benefits of
both interfaces at the same time.
■
Web Tools can help you find the appropriate Fabric OS CLI command to
perform a desired function. For instance, you can perform a function using
Web Tools, and watch in a second window as the Fabric OS CLI commands
are displayed.
■
Web Tools can be used from a standard workstation and provides the user the
advantage of being “virtually” in front of any fabric, switch, or port.
■
Web Tools makes zoning a simple “click and drag” process, rather than
having to tediously type out IP addresses and port numbers to put in a
configuration.
■
Web Tools provides the “Performance Monitor” feature. This feature allows
you to view the status and traffic of a switch or port in seconds by easily
creating a variety of effective graphs.
■
Web Tools is easy and intuitive to use.
Fabric OS Version 3.1.x/4.1.x Reference Guide
931
Fabric and Switch Management
Fabric Manager
Fabric Manager provides a graphical interface that allows the administrator to
monitor and manage an entire fabric from a standard workstation. Fabric Manager
can be used to manage fabrics containing integrated Fabrics, in addition to
individual HP switches. Fabric Manager provides high-level information about all
switches in the fabric, launching the Web Tools application when more detailed
information is required. The launching of Web Tools is transparent, providing a
seamless user interface. In addition to the ability to view the switches as a group,
Fabric Manager provides improved performance over Web Tools alone. Fabric
Manager is installed on the workstation, and can be used to manage any HP
switches that have Fabric OS v2.2 or later. and Web Tools v2.2 or later installed.
All switches in the fabric are represented in the main window of Fabric Manager,
but only those with a Web Tools license can be managed through Fabric Manager.
Fabric Manager is the complete SAN management power tool for HP SANs, and
provides the following advantages to administrators:
932
■
Provides a highly scalable Java™-based application that manages multiple
switches and multiple fabrics (up to 8) in real-time.
■
Assists SAN administrators with the configuration, monitoring, dynamic
provisioning and daily management of Storage Area Networks.
■
Lowers the cost of SAN ownership by intuitively facilitating SAN
management tasks.
■
Saves time by enabling the global integration and execution of processes
across multiple fabrics, through its single-point SAN management platform.
■
Allows more effective management by providing rapid access to critical SAN
information across both Fabric OS SANs and enhanced Fabric OS SANs.
■
Provides the ability to configure and manage the HP fabric on multiple
efficient levels.
■
Provides the ability to intelligently group multiple SAN objects and SAN
management functions to provide ease and time-efficiency in administering
tasks.
■
Provides the ability to identify, isolate and manage SAN events across
multiple switches and fabrics.
■
Provides drill-down capability to individual SAN components through tightly
coupled Web Tools and Fabric Watch integration.
■
Provides the ability to discover all SAN components and view the real-time
state of all HP fabrics.
Fabric OS Version 3.1.x/4.1.x Reference Guide
Fabric and Switch Management
■
Provides the ability to execute multi-fabric administration of Secure Fabric
OS SANs through a single encrypted console.
■
Provides the ability to implement scalable SAN management tasks through
functionality and tools that intelligently span 8 fabrics and 200 switches.
■
Provides the ability to monitor Inter Switch Links (ISLs)
■
Provides the ability to manage switch licenses
■
Provides the ability to perform Fabric Stamping
Fabric OS Version 3.1.x/4.1.x Reference Guide
933
Fabric and Switch Management
Fabric Watch
Fabric Watch software monitors the performance and status of Fibre Channel
networks and HP switches, and can alert SAN managers when problems arise.
The real-time alerts from Fabric Watch software help SAN managers solve
problems before they become costly failures. SAN managers can configure Fabric
Watch software to monitor any of the following:
■
Fabric events (such as topology re-configurations and zone changes)
■
Physical switch conditions (such as fans, power supplies, and temperature)
■
Port behavior (such as state changes, errors, and performance)
■
SFPs behavior
With Fabric Watch software, SAN managers can place limits, or thresholds, on the
behavior of different switch and fabric elements. Fabric Watch then monitors
these behavior variables, or counters, and issues an alarm to address problems
when a counter exceeds a threshold. An alarm may e-mail the SAN manager or
lock out a port log, depending on how the manager configures the alarm.
934
Fabric OS Version 3.1.x/4.1.x Reference Guide
Fabric and Switch Management
Fabric OS Access Layer (API)
The Fabric OS Access Layer is an application programming interface (API) that
enables any application to access critical information about an HP SAN. With
Fabric Access, an application can query or control individual switches or the
entire fabric.
The Fabric OS Access Layer has the following advantages
■
Ability to use third party software to manage an HP fabric
■
Ability to create SAN management applications specific to your needs, using
the tools available in the Fabric OS
Fabric OS Version 3.1.x/4.1.x Reference Guide
935
Fabric and Switch Management
Management Server
The Management Server is a Fibre Channel native in-band management interface.
This interface allows a SAN management application to retrieve and administer
the fabric and interconnect elements such as switches, servers, and storage
devices. This interface runs directly over Fibre Channel through the HBA.
An ACL of WWN addresses determines which systems have access to the
Management Server database. If the list is empty (default), the Management
Server is accessible to all systems connected in-band to the Fabric. For a more
secured access, an administrator may specify WWNs in the ACL. These WWNs
are usually associated with the management applications. If any WWNs are
entered into the ACL then access to the Management Server is restricted to only
those WWNs listed in the ACL.
936
Fabric OS Version 3.1.x/4.1.x Reference Guide
Control Processor Commands
5
This chapter lists the commands that may be available, depending upon the Fabric
OS version (V3.1.x or V4.1.x), when logged into the Active CP and Standby CP
in a StorageWorks Core switch.
Fabric OS Version 3.1.x/4.1.x Reference Guide
937
Control Processor Commands
Active CP Commands
When you are logged into the Active CP, the full suite of commands are supported
(subject to which license keys are installed).
HP recommends that you log into a specific logical switch, when performing
management functions, rather than the Active CP. This method guarantees that
any commands you execute are run on the desired logical switch.
When you open a telnet session to the Active CP IP Address, commands execute
by default on logical switch 0. When you open a connection through the Console
or Modem port, a prompt requires you to specify which logical switch you are
connecting to.
938
Fabric OS Version 3.1.x/4.1.x Reference Guide
Control Processor Commands
Standby CP Commands
The commands in Table 27 are supported when logged into the Standby CP.
Table 27: StorageWorks Core switch Standby CP Commands
Command
Notes
date
Print/set the system date and time.
errclear
Clear error log.
errDump
Print error log with no page breaks.
errnvlogsizeset
Resize non-volatile (persistent) error log.
errnvlogsizeshow
Show persistent error log configuration.
errsavelvlset
Set error save level.
errsavelvlshow
Get error save level.
errshow
Print error log (with page breaks).
fastboot
Reboot switch, bypassing the POST.
firmwarecommit
Commit firmware to stable storage.
firmwaredownload
Download firmware into the switch.
firmwaredownloadstatus
Display the progress and status of
firmwaredownload.
firmwarerestore
Restore previous firmware into the switch.
firmwareshow
Display firmware versions in the switch.
h
Display shell history.
hashow
Display high availability status.
help
Display help commands available in the
standby CP.
ifmodeset
Set the link operating mode for a network
interface.
ifmodeshow
Display the link operating mode for a network
interface.
killtelnet
Terminate telnet/serial login sessions
interactively.
login
Login as a new user.
logout
Logout from remote session
memshow
Display memory usage in the system.
Fabric OS Version 3.1.x/4.1.x Reference Guide
939
Control Processor Commands
Table 27: StorageWorks Core switch Standby CP Commands (Continued)
Command
940
Notes
myrid
Display current login ID details.
reboot
Reboot this processor. When executed from
the Standby CP, only the Standby CP is
rebooted.
savecore
FTP or Remove core files generated by
daemons.
timeout
Set or display the idle timeout value for a
login session.
uptime
Display how long switch has been up.
version
Display firmware version information.
Fabric OS Version 3.1.x/4.1.x Reference Guide
Security Commands
6
This chapter summarizes the commands that are only available on the Primary
FCS when the security feature is installed and enabled.
Fabric OS Version 3.1.x/4.1.x Reference Guide
941
Security Commands
Commands Exclusive to the Primary FCS
The following commands are available only on the Primary FCS when security is
installed and enabled.
Table 28: Commands Exclusive to the Primary FCS
Command
942
Notes
agtcfgset
Can be run on all switches, but it needs to be run on
the Primary FCS to modify community strings
agtcfgdefault
Must be run from the Primary FCS switch.
aliadd
Must be run from the Primary FCS switch.
alicreate
Must be run from the Primary FCS switch.
alidelete
Must be run from the Primary FCS switch.
aliremove
Must be run from the Primary FCS switch.
alishow
Must be run from the Primary FCS switch.
cfgadd
Must be run from the Primary FCS switch.
cfgclear
Must be run from the Primary FCS switch.
cfgcreate
Must be run from the Primary FCS switch.
cfgdelete
Must be run from the Primary FCS switch.
cfgdisable
Must be run from the Primary FCS switch.
cfgenable
Must be run from the Primary FCS switch.
cfgremove
Must be run from the Primary FCS switch.
cfgsave
Must be run from the Primary FCS switch.
cfgshow
Must be run from the Primary FCS switch.
cfgtransabort
Must be run from the Primary FCS switch.
cfgtransshow
Must be run from the Primary FCS switch.
date
This command can be run on all switches to view the
current date. You can only modify the date from the
Primary FCS switch.
fazoneadd
Must be run from the Primary FCS switch.
fazonecreate
Must be run from the Primary FCS switch.
fazonedelete
Must be run from the Primary FCS switch.
fazoneremove
Must be run from the Primary FCS switch.
fazoneshow
Must be run from the Primary FCS switch.
Fabric OS Version 3.1.x/4.1.x Reference Guide
Security Commands
Table 28: Commands Exclusive to the Primary FCS (Continued)
Command
Notes
msconfigure
Must be run from the Primary FCS switch.
msplmgmtdeactivate
Must be run from the Primary FCS switch.
msplmgmtactivate
Must be run from the Primary FCS switch.
msplcleardb
Must be run from the Primary FCS switch.
mstddisable
mstddisable "ALL" must be run from the Primary FCS
switch.
mstdenable
mstdenable "ALL" must be run from the Primary FCS
switch.
passwd
Must be run from the Primary FCS switch.
qloopadd
Must be run from the Primary FCS switch.
qloopcreate
Must be run from the Primary FCS switch.
qloopdelete
Must be run from the Primary FCS switch.
qloopremove
Must be run from the Primary FCS switch.
qloopshow
Must be run from the Primary FCS switch.
secfabricshow
Must be run from the Primary FCS switch.
secmodedisable
Must be run from the Primary FCS switch.
secnonfcspasswd
Must be run from the Primary FCS switch.
secpolicyabort
Must be run from the Primary FCS switch.
secpolicyactivate
Must be run from the Primary FCS switch.
secpolicyadd
Must be run from the Primary FCS switch.
secpolicycreate
Must be run from the Primary FCS switch.
secpolicydelete
Must be run from the Primary FCS switch.
secpolicydump
Must be run from the Primary FCS switch.
secpolicyfcsmove
Must be run from the Primary FCS switch.
secpolicyremove
Must be run from the Primary FCS switch.
secpolicysave
Must be run from the Primary FCS switch.
secpolicyshow
Must be run from the Primary FCS switch.
sectemppasswdset
Must be run from the Primary FCS switch.
sectemppasswdreset
Must be run from the Primary FCS switch.
Fabric OS Version 3.1.x/4.1.x Reference Guide
943
Security Commands
Table 28: Commands Exclusive to the Primary FCS (Continued)
Command
944
Notes
secversionreset
Must be run from the Primary FCS switch. Can also
be run on a single non-FCS switch which is
segmented from a fabric.
tsclockserver
Must be run from the Primary FCS switch.
wwn
This command can be run on all switches to view the
WWN. With security enabled the WWN of a switch
cannot be modified.
zoneadd
Must be run from the Primary FCS switch.
zonecreate
Must be run from the Primary FCS switch.
zonedelete
Must be run from the Primary FCS switch.
zoneremove
Must be run from the Primary FCS switch.
zoneshow
Must be run from the Primary FCS switch.
Fabric OS Version 3.1.x/4.1.x Reference Guide
glossary
Glossary
This glossary defines terms used in this guide or related to this product and is not
a comprehensive glossary of computer terms.
Glossary
16-port card
The Fibre Channel port card provided with the StorageWorks Core switch. Contains 16 Fibre
Channel ports and the corresponding LEDs indicating port status and speed.
See also port card.
8b/10b Encoding
An encoding scheme that converts each 8-bit byte into 10 bits. Used to balance ones and zeros in
high-speed transports.
Access Control List
Enables an organization to bind a specific WWN to a specific switch port or set of ports, preventing
a port in another physical location from assuming the identity of a real WWN. May also refer to a
list of the Read/Write access of a particular community string.
See also device connection controls.
Account Level Switches
Refers to switches that have four login accounts into the operating system (in descending order):
root, factory, admin, and user.
See also root account, factory account, admin account, and user account.
Address Identifier
A 24-bit or 8-bit value used to identify the source or destination of a frame.
Admin Account
A login account intended for use by the customer to control switch operation.
See also account level switches.
AL_PA
Arbitrated Loop Physical Address. A unique 8-bit value assigned during loop initialization to a
port in an arbitrated loop.
Fabric OS Version 3.1.x/4.1.x Reference Guide
945
Glossary
Alias
An alternate name for an element or group of elements in the fabric. Aliases can be used to
simplify the entry of port numbers and WWNs when creating zones.
Alias Address Identifier
An address identifier recognized by a port in addition to its standard identifier. An alias address
identifier may be shared by multiple ports.
See also alias.
Alias AL_PA
An AL_PA value recognized by an L_Port in addition to the AL_PA assigned to the port.
See also AL_PA.
Alias Server
A fabric software facility that supports multicast group management.
ANSI
American National Standards Institute. The governing body for Fibre Channel standards in the
U.S.A.
API
Application Programming Interface. Defined protocol that allows applications to interface with a
set of services.
Arbitrated Loop
A shared 100 or 200 MBps Fibre Channel transport structured as a loop. Can support up to 126
devices and one fabric attachment.
See also topology.
Arbitrating State
The state in which a port has become the loop master. This state is only available from the Open
state.
Area Number
A number assigned to each potential port location in the StorageWorks Core switch. Used to
distinguish StorageWorks Core switch ports that have the same port number but are on different
port blades.
ASIC
Application Specific Integrated Circuit.
946
Fabric OS Version 3.1.x/4.1.x Reference Guide
Glossary
ATM
Asynchronous Transfer Mode. A transport used for transmitting data over LANs or WANs that
transmit fixed-length units of data. Provides any-to-any connectivity, and allows nodes to transmit
simultaneously.
Auto-negotiate Speed
Process that allows two devices at either end of a link segment to negotiate common features, speed
(e.g., 1 or 2 Gbps) and functions.
Autosense
Process during which a network device automatically senses the speed of another device.
AW_TOV
Arbitration Wait Time-out Value. The minimum time an arbitrating L_Port waits for a response
before beginning loop initialization.
Backup FCS Switch
Backup fabric configuration server switch. The switch or switches assigned as backup in case the
primary FCS switch fails.
See also FCS switch, primary FCS switch.
Bandwidth
The total transmission capacity of a cable, link, or system. Usually measured in bps (bits per
second). May also refer to the range of transmission frequencies available to a network.
See also throughput.
BB_Credit
Buffer-to-buffer credit. The number of frames that can be transmitted to a directly connected
recipient or within an arbitrated loop. Determined by the number of receive buffers available.
See also Buffer-to-buffer Flow Control, EE_Credit.
Beacon
When all the port LEDs on a switch are set to flash from one side of the switch to the other, to
enable identification of an individual switch in a large fabric. A switch can be set to beacon by
telnet command or through Web Tools.
Beaconing
The state of the switches LEDs when the switch is set to Beacon.
See also Beacon.
Fabric OS Version 3.1.x/4.1.x Reference Guide
947
Glossary
Beginning Running Disparity
The disparity at the transmitter or receiver when the special character associated with an ordered
set is encoded or decoded.
See also disparity.
BER
Bit Error Rate. The rate at which bits are expected to be received in error. Expressed as the ratio of
error bits to total bits transmitted.
See also error.
BISR
Built-In Self Repair. Refers to the range of algorithms and circuit techniques to replace fault
elements in a VLSI circuit with redundant fault-free ones.
See also BIST, CMBISR.
BIST
Built-In Self Test. The technique of designing circuits with additional logic which can be used to
test proper operation of the primary (functional) logic.
See also BISR, CMBISR.
Bit Synchronization
See BER.
Blade
See 16-port card.
Blind-mate Connector
A two-way connector used in some switches to provide a connection between the motherboard and
the power supply.
Block
As applies to Fibre Channel, upper-level application data that is transferred in a single sequence.
Blower Assembly
A fan that prevents a switch (or individual elements within a switch) from overheating.
Boot Flash
Flash memory that stores the boot code and boot parameters. The processor executes its first
instructions from boot flash. Data is cached in RAM.
948
Fabric OS Version 3.1.x/4.1.x Reference Guide
Glossary
Boot Monitor
Code used to initialize the CP (control processor) environment after powering on. Identifies the
amount of memory available and how to access it, and retrieves information about system buses.
Broadcast
The transmission of data from a single source to all devices in the fabric, regardless of zoning.
See also multicast, unicast.
Buffer-to-buffer Flow Control
Management of the frame transmission rate in either a point-to-point topology or in an arbitrated
loop.
See also BB_Credit.
Cascade
Two or more interconnected Fibre Channel switches. StorageWorks 1 Gb SAN switches (running
Fabric OS V2) and later can be cascaded up to 239 switches, with a recommended maximum of
seven interswitch links (no path longer than eight switches).
See also fabric, ISL.
Chassis
The metal frame in which the switch and switch components are mounted.
Circuit
An established communication path between two ports. Consists of two virtual circuits capable of
transmitting in opposite directions.
See also link.
Class 1
Service that provides a dedicated connection between two ports (also called connection-oriented
service), with notification of delivery or non-delivery.
Class 2
Service that provides multiplex and connectionless frame switching service between two ports,
with notification of delivery or non-delivery.
Class 3
Service that provides a connectionless frame switching service between two ports, without
notification of delivery or non-delivery of data. This service can also be used to provide a multicast
connection between the originator and recipients, with notification of delivery or non-delivery.
Fabric OS Version 3.1.x/4.1.x Reference Guide
949
Glossary
Class F
Connectionless service for control traffic between switches, with notification of delivery or
non-delivery of data between the E_Ports.
Class of Service
A specified set of delivery characteristics and attributes for frame delivery.
CLI
Command line interface. Interface that depends entirely on the use of commands, such as through
telnet or SNMP, and does not involve a Graphic User Interface (GUI).
CLS
Close Primitive Signal. Only in an Arbitrated Loop; sent by an L_Port that is currently
communicating on the loop, to close communication to an other L_Port.
CMBISR
Central Memory Built-In Self Repair. Test and repair bad cells in the central memory. If a "fail" is
reported, inform Tech Support and replace the board.
See also BIST, BISR.
Comma
A unique pattern (either 1100000 or 0011111) used in 8b/10b encoding to specify character
alignment within a data stream.
See also K28.5.
Community (SNMP)
A relationship between a group of SNMP managers and an SNMP agent, in which authentication,
access control, and proxy characteristics are defined.
See also SNMP.
Compact Flash
Flash memory that stores the run-time operating system and is used like hard disk storage. Not
visible within the processor's memory space. Data is stored in file system format.
950
Fabric OS Version 3.1.x/4.1.x Reference Guide
Glossary
Configuration
How a system is set up. May refer to hardware or software.
■
Hardware: The number, type, and arrangement of components that make up a system or
network.
■
Software: The set of parameters that guide switch operation. May include general system
parameters, IP address information, Domain ID, and other information. Modifiable by any
login with administrative privileges.
May also refer to a set of zones.
See also zone configuration.
Connection Initiator
A port that has originated a Class 1 dedicated connection and received a response from the
recipient.
Connection Recipient
A port that has received a Class 1 dedicated connection request and transmitted a response to the
originator.
Control Panel
Refers to the left-side panel of Web Tools, which accesses fabric-wide functions such as Zoning
and Events.
Core Switch
A switch whose main task is to interconnect other switches.
See also SAN switch.
CP Card
Control Processor Card. The central processing unit of the StorageWorks Core switch, which
contains two CP Card slots to provide redundancy. Provides Ethernet, serial, and modem ports with
the corresponding LEDs.
CRC
Cyclic Redundancy Check. A check for transmission errors included in every data frame.
Credit
As applies to Fibre Channel, the number of receive buffers available for transmission of frames
between ports.
See also BB_Credit, EE_Credit.
Fabric OS Version 3.1.x/4.1.x Reference Guide
951
Glossary
CT_HDR
Common Transport Header. A header that conforms to the Fibre Channel Common Transport
(FC_CT) protocol.
CT_IU
Common Transport Information Unit. An information unit that conforms to the Fibre Channel
Common Transport (FC_CT) protocol.
Current Fill Word
The fill word currently selected by the LPSM.
See also fill word, LPSM.
Cut-through
A switching technique that allows the route for a frame to be selected as soon as the destination
address is received.
See also route.
Data Word
Type of transmission word that occurs within frames. The frame header, data field, and CRC all
consist of data words.
See also frame, ordered set, transmission word.
DB-9 connector
A 9-pin version of the RS-232C port interface. May be either the male of female interface.
See also RS-232 port.
dBm
Logarithmic unit of power used in electronics. Indicates signal strength in decibels above the
reference level, which is 1 milliwatt for dBm. An increase of 10 dBm or represents a 10-fold
increase in power.
DCE port
A data communications equipment port capable of interfacing between a DTE (data terminal
equipment) port and a transmission circuit. DTE devices with an RS-232 (or EIA-232) port
interface transmit on pin 3, and receive on pin 2.
See also DTE port, RS-232 port.
Defined Zone Configuration
The set of all zone objects defined in the fabric. May include multiple zone configurations.
See also enabled zone configuration, zone configuration.
952
Fabric OS Version 3.1.x/4.1.x Reference Guide
Glossary
Device Connection Controls
Enables organizations to bind an individual device port to a set of one or more switch ports. Device
ports are specified by a WWN and typically represent HBAs (servers).
See also access control lists.
Device
A disk, a RAID, or an HBA.
Disparity
The relationship of ones and zeros in an encoded character. “Neutral disparity” means an equal
number of each, “positive disparity” means a majority of ones, and “negative disparity” means a
majority of zeros.
DLS
Dynamic Load Sharing. Dynamic distribution of traffic over available paths. Allows for
recomputing of routes when an Fx_Port or E_Port changes status.
Domain ID
As applies to HP StorageWorks switches, a unique number between 1 and 239 that identifies the
switch to the fabric and is used in routing frames. Usually automatically assigned by the switch, but
can be manually assigned.
DTE port
A data terminal equipment port capable of interfacing to a transmission circuit through a
connection to a DCE (data communications equipment) port. DTE devices with an RS-232 (or
EIA-232) port interface transmit on pin 3, and receive on pin 2 in a 9-pin connector (reversed in
25-pin connectors).
See also DCE port, RS-232 port.
DWDM
Dense Wavelength Multiplexing. A means to concurrently transmit more than one stream of data
through a single fiber by modulating each stream of data onto a different wavelength of light.
E_D_TOV
Error Detect Time-out Value. The minimum amount of time a target waits for a sequence to
complete before initiating recovery. Can also be defined as the maximum time allowed for a
round-trip transmission before an error condition is declared.
See also R_A_TOV, RR_TOV.
Fabric OS Version 3.1.x/4.1.x Reference Guide
953
Glossary
E_Port
Expansion Port. A type of switch port that can be connected to an E_Port on another switch to
create an ISL.
See also ISL.
EE_Credit
End-to-end Credit. The number of receive buffers allocated by a recipient port to an originating
port. Used by Class 1 and 2 services to manage the exchange of frames across the fabric between
source and destination.
See also End-to-end Flow Control, BB_Credit.
EIA Rack
A storage rack that meets the standards set by the Electronics Industry Association.
ELWL
Extra Long Wavelength. Laser light with a periodic length greater than 1300 nm (e.g., 1420 or
1550). ELWL lasers are used to transmit Fibre Channel data over distances greater than 10 Km.
Also known as XLWL.
Enabled Zone Configuration
The currently enabled zone configuration. Only one configuration can be enabled at a time.
See also defined zone configuration, zone configuration.
End-to-end Flow Control
Governs flow of class 1 and 2 frames between N_Ports.
See also EE_Credit.
Entry Fabric
Basic HP license that allows one E_Port per switch. Not supported by StorageWorks Core
switches.
Error
As applies to Fibre Channel, a missing or corrupted frame, time-out, loss of synchronization, or
loss of signal (link errors).
See also loop failure.
ESD
Electrostatic Discharge.
954
Fabric OS Version 3.1.x/4.1.x Reference Guide
Glossary
Exchange
The highest level Fibre Channel mechanism used for communication between N_Ports. Composed
of one or more related sequences, and can work in either one or both directions.
Extended Fabric
An HP product that runs on Fabric OS and allows creation of a Fibre Channel fabric interconnected
over distances of up to 100 kilometers.
Extended Fabric is a means of allowing the implementation and management of SANs over
extended distances. This is achieved by adjusting the Buffer-to-Buffer Credits to guaranteed
allocation of buffers to specific ports.
F_Port
Fabric Port. A port that is able to transmit under fabric protocol and interface over links. Can be
used to connect an N_Port to a switch.
See also FL_Port, Fx_Port.
Fabric
A Fibre Channel network containing two or more interconnected switches in addition to hosts and
devices. May also be referred to as a switched fabric.
See also topology, SAN, cascade.
Fabric Access
An HP product that consists of a set of APIs that allow third party applications to interface with
Fabric OS.
Fabric Access allows the application to control the fabric directly for functions such as discovery,
access (zoning), management, performance, and switch control. Consists of a host-based library
that interfaces the application to switches in the fabric over an out-of-band TCP/IP connection or
in-band using an IP-capable Host Bus Adapter (HBA).
Fabric Assist
An HP feature that enables private and public hosts to access public targets anywhere on the fabric,
provided they are in the same Fabric Assist zone. This feature is available only when both
QuickLoop and Zoning are installed on the switch.
Fabric Assist is a means of allowing private hosts to communicate with public targets across a
switched fabric. Fabric Assist also allows private hosts to communicate with private targets that are
not resident on the same switch across a switched fabric.
See also QuickLoop.
Fabric OS Version 3.1.x/4.1.x Reference Guide
955
Glossary
Fabric Configuration Server
One or more designated HP switches that store and manage the configuration and security
parameters for all other switches in the fabric. These switches are designated by WWN, and the list
of designated switches is known fabric-wide.
Fabric Manager
An HP product that works in conjunction with Web Tools to provide a graphical user interface for
managing switch groups (such as the SAN Switch Integrated/32) as a single unit, instead of as
separate switches. Fabric Manager is installed on and run from a computer workstation.
Fabric Name
The unique identifier assigned to a fabric and communicated during login and port discovery.
Fabric OS
The proprietary operating system on HP StorageWorks switches.
Fabric Watch
An HP product that runs on Fabric OS and allows monitoring and configuration of fabric and
switch elements.
Allows the SAN manager to monitor key fabric and switch elements, making it easy to quickly
identify and escalate potential problems. It monitors each element for out-of-boundary values or
counters and provides notification when defined boundaries are exceeded. The SAN manager can
configure which elements, such as error, status, and performance counters, are monitored within an
HP switch.
See also Fabric Manager.
Factory Account
A login used during manufacturing to initialize and test a switch and is not intended for customer
use.
See also account level switches.
Failover
The act that causes control to pass from one redundant unit to another. In the StorageWorks Core
switch one may failover from the currently Active Control Processor (CP) to the Standby CP.
FAN
Fabric access notification. Retains the AL_PA and fabric address when loop re-initializes (if the
switch supports FAN).
FC-AL-3
The Fibre Channel Arbitrated Loop standard defined by ANSI. Defined on top of the FC-PH
standards.
956
Fabric OS Version 3.1.x/4.1.x Reference Guide
Glossary
FC-FLA
The Fibre Channel Fabric Loop Attach standard defined by ANSI.
FCIA
Fibre Channel Industry Association. An international organization of Fibre Channel industry
professionals. Among other things, provides oversight of ANSI and industry developed standards.
FCP
Fibre Channel Protocol. Mapping of protocols onto the Fibre Channel standard protocols. For
example, SCSI FCP maps SCSI-3 onto Fibre Channel.
FC-PH-1, 2, 3
The Fibre Channel Physical and Signaling Interface standards defined by ANSI.
FC-PI
The Fibre Channel Physical Interface standard defined by ANSI.
FC-PLDA
The Fibre Channel Private Loop Direct Attach standard defined by ANSI. Applies to the operation
of peripheral devices on a private loop.
FCS switch
Fabric configuration server switch. One or more designated HP switches that store and manage the
configuration and security parameters for all switches in the fabric. FCS switches are designated by
WWN, and the list of designated switches is communicated fabric-wide.
See also backup FCS switch, primary FCS switch.
FC-SW-2
The second generation of the Fibre Channel Switch Fabric standard defined by ANSI. Specifies
tools and algorithms for the interconnection and initialization of Fibre Channel switches in order to
create a multi-switch Fibre Channel fabric.
Fibre Channel Transport
A protocol service that supports communication between Fibre Channel service providers.
See also FSP.
FIFO
First In, First Out. May also refer to a data buffer that follows the first in, first out rule.
Fill Word
An IDLE or ARB ordered set that is transmitted during breaks between data frames to keep the
Fibre Channel link active.
Fabric OS Version 3.1.x/4.1.x Reference Guide
957
Glossary
Firmware Download
Loading firmware down from a server into a switch.
Firmware
The basic operating system provided with the hardware.
FL_Port
Fabric Loop Port. A port that is able to transmit under fabric protocol and also has arbitrated loop
capabilities. Can be used to connect an NL_Port to a switch.
See also F_Port, Fx_Port.
Flash Partition
Two redundant usable areas, called “partitions,” into which firmware can be downloaded in the
StorageWorks Core switch.
Flash
Programmable NVRAM memory that maintains its contents.
FLOGI
Fabric Login. The process by which an N_Port determines whether a fabric is present, and if so,
exchanges service parameters with it.
See also PLOGI.
Frame
The Fibre Channel structure used to transmit data between ports. Consists of a start-of-frame
delimiter, header, any optional headers, the data payload, a cyclic redundancy check (CRC), and an
end-of-frame delimiter. There are two types of frames: Link control frames (transmission
acknowledgements, etc.) and data frames.
See also Data Word.
FRU
Field Replaceable Unit. A component that can be replaced on site.
FS_ACC
Fibre Channel Services Accept. The information unit used to indicate acceptance of a request for a
Fibre Channel service.
FS_IU
Fibre Channel Services Information Unit. An information unit that has been defined by a Fibre
Channel service.
958
Fabric OS Version 3.1.x/4.1.x Reference Guide
Glossary
FS_REQ
Fibre Channel Services Request. A request for a Fibre Channel services function, or notification of
a fabric condition or event.
FS_RJT
Fibre Channel Services Reject. An indication that a request for Fibre Channel services could not be
processed.
FS
Fibre Channel Service. A service that is defined by Fibre Channel standards and exists at a
well-known address. For example, the Simple Name Server is a Fibre Channel service.
See also FSP.
FSPF
Fabric Shortest Path First. HP routing protocol for Fibre Channel switches.
FSP
Fibre Channel Service Protocol. The common protocol for all fabric services, transparent to the
fabric type or topology.
See also FS.
Full Fabric
The HP license that allows multiple E_Ports on a switch, making it possible to create multiple ISL
links.
Full-duplex
A mode of communication that allows the same port to simultaneously transmit and receive
frames.
See also half-duplex.
Fx_Port
A fabric port that can operate as either an F_Port or FL_Port.
See also F_Port, FL_Port.
G_Port
Generic Port. A port that can operate as either an E_Port or F_Port. A port is defined as a G_Port
when it is not yet connected or has not yet assumed a specific function in the fabric.
Gateway
Hardware that connects incompatible networks by providing translation for both hardware and
software. For example, an ATM gateway can be used to connect a Fibre Channel link to an ATM
connection.
Fabric OS Version 3.1.x/4.1.x Reference Guide
959
Glossary
GBIC
Gigabit interface converter. A removable serial transceiver module that allows gigabaud
physical-level transport for Fibre Channel and gigabit Ethernet. Typically refers only to the
SC-form factor transceivers.
See also SFP.
Gbps
Gigabits per second (1,062,500,000 bits/second).
GBps
Gigabytes per second (1,062,500,000 bytes/second).
Half-duplex
A mode of communication that allows a port to either transmit or receive frames at any time, but
not simultaneously (with the exception of link control frames, which can be transmitted at any
time).
See also full-duplex.
Hard Address
The AL_PA that an NL_Port attempts to acquire during loop initialization.
Hardware Translative Mode
A method for achieving address translation. The following two hardware translative modes are
available to a QuickLoop-enabled switch:
■
Standard Translative Mode: Allows public devices to communicate with private devices that
are directly connected to the fabric.
■
QuickLoop Mode: Allows initiator devices to communicate with private or public devices that
are not in the same loop.
HBA
Host Bus Adapter. The interface card between a server or workstation bus and the Fibre Channel
network.
High Availability
An attribute of equipment that identifies it as being capable of conducting customer operations well
in excess of 99% of the time. Typically High Availability is identified by the number of nines in
that percentage. “Five Nines” means the equipment is rated as being capable of conducting
customer operations 99.999% of the time without failure.
960
Fabric OS Version 3.1.x/4.1.x Reference Guide
Glossary
Host
A computer that accesses storage devices over the fabric. May also be referred to as a server.
See also workstation.
Hot Pluggable
A FRU capability that indicates it may be extracted or installed while customer data is otherwise
flowing in the chassis.
Hub
A Fibre Channel wiring concentrator that collapses a loop topology into a physical star topology.
Nodes are automatically added to the loop when active and removed when inactive.
IBTA
The InfiniBand Trade Association (IBTA). The IBTA is an industry consortium of more than 200
companies working together to develop a new common I/O specification designed to bring greater
scalability and performance to server I/O. InfiniBand defines a new channel based, switched-fabric
technology for server-to-server and server-to-I/O interconnection that is expected to improve
scalability and performance over existing PCI Bus technologies.
Idle
Continuous transmission of an ordered set over a Fibre Channel link when no data is being
transmitted, to keep the link active and maintain bit, byte, and word synchronization.
InfiniBand
See IBTA.
Initiator
A server or workstation on a Fibre Channel network that initiates communications with storage
devices.
See also Target.
Integrated Fabric
The fabric created by a SAN Switch Integrated/32 and SAN Switch Integrated/64, consisting of six
SAN Switch 16-EL switches cabled together and configured to handle traffic as a seamless group.
IOD
In-order Delivery. A parameter that, when set, guarantees that frames are either delivered in order
or dropped.
IPA
Initial Process Associator. An identifier associated with a process at an N_Port.
Fabric OS Version 3.1.x/4.1.x Reference Guide
961
Glossary
Isolated E_Port
An E_Port that is online but not operational due to overlapping Domain IDs or nonidentical
parameters (such as E_D_TOVs).
See also E_Port.
ISL
Interswitch Link. a Fibre Channel link from the E_Port of one switch to the E_Port of another.
See also E_Port, cascade, ISL Trunking.
ISL Trunking
An HP feature that enables distribution of traffic over the combined bandwidth of up to four ISLs
(between adjacent switches), while preserving in-order delivery. A set of trunked ISLs is called a
trunking group; each port employed in a trunking group is called a trunking port.
See also Master Port.
IU
Information Unit. A set of information as defined by either upper-level process protocol definition
or upper-level protocol mapping.
JBOD
Just a Bunch Of Disks. Indicates a number of disks connected in a single chassis to one or more
controllers.
See also RAID.
K28.5
A special 10-bit character used to indicate the beginning of a transmission word that performs
Fibre Channel control and signaling functions. The first seven bits of the character are the comma
pattern.
See also comma.
Kernel Flash
Flash memory that stores the bootable kernel code and is visible within the processor's memory
space. Data is stored as raw bits.
Key Pair
In public key cryptography, a pair of keys consisting of an entity's public and private key. The
public key can be publicized, but the private key must be kept secret.
962
Fabric OS Version 3.1.x/4.1.x Reference Guide
Glossary
L_Port
Loop Port. A node port (NL_Port) or fabric port (FL_Port) that has arbitrated loop capabilities. An
L_Port can be in one of two modes:
■
Fabric mode: Connected to a port that is not loop capable, and using fabric protocol.
■
Loop mode: In an arbitrated loop and using loop protocol. An L_Port in loop mode can also be
in participating mode or non-participating mode.
See also Non-participating Mode, Participating Mode.
Latency
The period of time required to transmit a frame, from the time it is sent until it arrives. Together,
latency and bandwidth define the speed and capacity of a link or system.
LED
Light Emitting Diode. Used on HP switches to indicate the status of various switch elements.
Link Services
A protocol for link-related actions.
Link
As applies to Fibre Channel, a physical connection between two ports, consisting of both transmit
and receive fibers.
See also Circuit.
LIP
Loop Initialization Primitive. The signal used to begin initialization in a loop. Indicates either loop
failure or resetting of a node.
LIS_HOLD_TIME
Loop Initialization Sequence Hold Time. The maximum period of time for a node to forward a
loop initialization sequence.
LM_TOV
Loop Master Time-out Value. The minimum time that the loop master waits for a loop initialization
sequence to return.
Login BB_Credit
The number of receive buffers a receiving L_Port has available when a circuit is first established.
See also BB_Credit.
Loop Circuit
A temporary bidirectional communication path established between L_Ports.
Fabric OS Version 3.1.x/4.1.x Reference Guide
963
Glossary
Loop Failure
Loss of signal within a loop for any period of time, or loss of synchronization for longer than the
time-out value.
See also error.
Loop Initialization
The logical procedure used by an L_Port to discover its environment. Can be used to assign AL_PA
addresses, detect loop failure, or reset a node.
Loop_ID
A hex value representing one of the 127 possible AL_PA values in an arbitrated loop.
Looplet
A set of devices connected in a loop to a port that is a member of another loop.
LPSM
Loop Port State Machine. The logical entity that performs arbitrated loop protocols and defines the
behavior of L_Ports when they require access to an arbitrated loop.
LWL
Long Wavelength. A type of fiber optic cabling that is based on 1300-mm lasers and supports link
speeds of 1.0625 Gbps. May also refer to the type of GBIC or SFP.
See also SWL.
Master Port
As relates to trunking, the port that determines the routing paths for all traffic flowing through the
trunking group. One of the ports in the first ISL in the trunking group is designated as the master
port for that group.
See also ISL Trunking.
Media
See transceiver.
MIB
Management Information Base. An SNMP structure to help with device management, providing
configuration and device information.
964
Fabric OS Version 3.1.x/4.1.x Reference Guide
Glossary
Modem Serial Port
The upper serial port on the CP Card of the StorageWorks Core switch. Can be used to connect the
CP Card to a modem with a standard 9-pin modem cable. Consists of a DB-9 connector wired as a
RS-232 device, and can be connected by serial cable to a DCE device. A Hayes-compatible modem
or Hayes-emulation is required. The device name is ttyS1.
See also DB-9 connector, DCE port, terminal serial port.
Monitoring State
The state in which a port is monitoring the flow of information for data relevant to the port.
Multicast
The transmission of data from a single source to multiple specified N_Ports (as opposed to all the
ports on the network).
See also broadcast, unicast.
Multimode
A fiber optic cabling specification that allows up to 500 meters between devices for 1 Gb, or 300
meters between devices for 2 Gb.
N_Port
Node Port. A port on a node that can connect to a Fibre Channel port or to another N_Port in a
point-to-point connection.
See also NL_Port, Nx_Port.
NAA
Network Address Authority. An identifier that indicates the format of a network address.
Name Server
Frequently used to indicate Simple Name Server.
See also SNS.
Native Address Identifier
A unique, 64-bit address is assigned to each port, and is referred to as its World-Wide Name
(WWN). If a port connects to an arbitrated loop, it will also be assigned a dynamic 8-bit address,
referred to as its arbitrated loop physical address, or AL_PA. If it connects to a fabric, it will be
assigned a dynamic 24-bit address, referred to as its Native Address Identifier.
Negotiate
See auto-negotiate speed and autosense.
Fabric OS Version 3.1.x/4.1.x Reference Guide
965
Glossary
NL_Port
Node Loop Port. A node port that has arbitrated loop capabilities. Used to connect an equipment
port to the fabric in a loop configuration through an FL_Port.
See also N_Port, Nx_Port.
Node Name
The unique identifier for a node, communicated during login and port discovery.
Node
A Fibre Channel device that contains an N_Port or NL_Port.
Non-participating Mode
A mode in which an L_Port in a loop is inactive and cannot arbitrate or send frames, but can
retransmit any received transmissions. This mode is entered if there are more than 127 devices in a
loop and an AL_PA cannot be acquired.
See also L_Port, Participating Mode.
Nx_Port
A node port that can operate as either an N_Port or NL_Port.
Open Originator
The L_Port that wins arbitration in an arbitrated loop and sends an OPN ordered set to the
destination port, then enters the Open state.
Open Recipient
The L_Port that receives the OPN ordered set from the open originator, and then enters the Open
state.
Open State
The state in which a port can establish a circuit with another port. A port must be in the Open state
before it can arbitrate.
OPN
Open Primitive Signal.
966
Fabric OS Version 3.1.x/4.1.x Reference Guide
Glossary
Ordered Set
A transmission word that uses 8B/10B mapping and begins with the K28.5 character. Ordered sets
occur outside of frames, and include the following items:
■
Frame delimiters: Mark frame boundaries and describe frame contents.
■
Primitive signals: Indicate events.
■
Primitive sequences: Indicate or initiate port states.
Ordered sets are used to differentiate Fibre Channel control information from data frames and to
manage the transport of frames.
Packet
A set of information transmitted across a network.
See also Frame.
Participating Mode
A mode in which an L_Port in a loop has a valid AL_PA and can arbitrate, send frames, and
retransmit received transmissions.
See also L_Port, Non-participating Mode.
Path Selection
The selection of a transmission path through the fabric. HP StorageWorks switches use the FSPF
protocol.
Performance Monitor
Comprehensive HP tool for monitoring the performance of networked storage resources.
Performance Monitoring
An HP product that provides error and performance information to the administrator and end user
for use in storage management.
Phantom Address
An AL_PA value that is assigned to an device that is not physically in the loop.
Also known as phantom AL_PA.
Phantom Device
A device that is not physically in an arbitrated loop, but is logically included through the use of a
phantom address.
PLOGI
Port Login. The port-to-port login process by which initiators establish sessions with targets.
See also FLOGI.
Fabric OS Version 3.1.x/4.1.x Reference Guide
967
Glossary
Point-to-point
A Fibre Channel topology that employs direct links between each pair of communicating entities.
See also topology.
Port Cage
The metal casing extending out of the optical port on the switch, and in which the SFP can be
inserted.
Port Card
A Fibre Channel card that contains optical or copper port interfaces, and acts like a switch module.
See also 16-port card.
Port Module
A collection of ports in a switch.
Port_Name
The unique identifier assigned to a Fibre Channel port. Communicated during login and port
discovery.
POST
Power On Self-Test. A series of tests run by a switch after it is turned on.
Primary FCS Switch
Primary fabric configuration server switch. The switch that actively manages the configuration and
security parameters for all switches in the fabric.
See also backup FCS switch, FCS switch.
Private Device
A device that supports arbitrated loop protocol and can interpret 8-bit addresses, but cannot log
into the fabric.
Private Loop
An arbitrated loop that does not include a participating FL_Port.
Private NL_Port
An NL_Port that communicates only with other private NL_Ports in the same loop and does not
log into the fabric.
Protocol
A defined method and a set of standards for communication.
PSU
Power Supply Unit.
968
Fabric OS Version 3.1.x/4.1.x Reference Guide
Glossary
Public Device
A device that supports arbitrated loop protocol, can interpret 8-bit addresses, and can log into the
fabric.
Public Loop
An arbitrated loop that includes a participating FL_Port, and may contain both public and private
NL_Ports.
Public NL_Port
An NL_Port that logs into the fabric, can function within either a public or a private loop, and can
communicate with either private or public NL_Ports.
Quad
A group of four adjacent ports that share a common pool of frame buffers.
QuickLoop
An HP StorageWorks product that makes it possible to allow private devices within loops to
communicate with public and private devices across the fabric through the creation of a larger loop.
May also refer to the arbitrated loop created using this software. A QuickLoop can contain a
number of devices or looplets; all devices in the same QuickLoop share a single AL_PA space.
A means of allowing private hosts to communicate with private targets across a switched fabric.
The QuickLoop/Fabric Assist feature also allows:
■
Private hosts to communicate with public targets across a switched fabric
■
Private hosts to communicate with private targets that are not resident on the same switch
across a switched fabric
See also Fabric Access, fabric assist, and translative mode.
QuickLoop Zoning
Protects devices from disruption by unrelated devices during critical processes; for example,
during a tape backup session.
R_A_TOV
Resource Allocation Time-out Value. The maximum time a frame can be delayed in the fabric and
still be delivered.
See also E_D_TOV, RR_TOV.
R_RDY
Receiver ready. A primitive signal indicating that the port is ready to receive a frame.
Fabric OS Version 3.1.x/4.1.x Reference Guide
969
Glossary
RAID
Redundant Array of Independent Disks. A collection of disk drives that appear as a single volume
to the server and are fault tolerant through mirroring or parity checking.
See also JBOD.
Remote Fabric
A fabric that spans across WANs by using protocol translation (a process also known as tunneling)
such as Fibre Channel over ATM or Fibre Channel over IP.
Remote Switch
Bridges two switches into a SAN as large as 3000KM or more through protocol encapsulation in
ATM networks via the Computer Network Technologies (CNT) UltraNet Open Systems Gateway.
Request Rate
The rate at which requests arrive at a servicing entity.
See also service rate.
RLS Probing
Read link status of the AL_PAs.
Root Account
A login used for debugging purposes by HP engineers and is not intended for customer use.
See also account level switches.
Route
As applies to a fabric, the communication path between two switches. May also apply to the
specific path taken by an individual frame, from source to destination.
See also FSPF.
Routing
The assignment of frames to specific switch ports, according to frame destination.
RR_TOV
Resource Recovery Time-out Value. The minimum time a target device in a loop waits after a LIP
before logging out a SCSI initiator.
See also E_D_TOV, R_A_TOV.
RS-232 port
A port that conforms to a set of Electrical Industries Association (EIA) standards. Used to connect
DTE and DCE devices for communication between computers, terminals, and modems.
See also DCE port, DTE port.
970
Fabric OS Version 3.1.x/4.1.x Reference Guide
Glossary
RSCN
Registered State Change Notification. A switch function that allows notification of fabric changes
to be sent from the switch to specified nodes.
RX_ID
Responder Exchange Identifier. A 2-byte field in the frame header used by the responder of the
Exchange to identify frames as being part of a particular exchange.
SAN
Storage Area Network. A network of systems and storage devices that communicate using Fibre
Channel protocols.
See also fabric.
SAN Switch
A switch whose main task is to connect nodes into the fabric.
See also core switch.
SCSI
Small Computer Systems Interface. A parallel bus architecture and protocol for transmitting large
data blocks to a distance of 15 - 25 meters.
SDRAM
Synchronous Dynamic Random Access Memory. The main memory for the switch. Used for
volatile storage during switch operation.
See also flash.
Sequence
A group of related frames transmitted in the same direction between two N_Ports.
Service Rate
The rate at which an entity can service requests.
See also request rate.
SFF
Small Form Factor.
SFP Cable
The latest innovation in high-speed copper cabling for Fibre Channel and InfiniBand. It
incorporates the SFP module directly onto the cable assembly, eliminating the need for a separate
SFP copper module and an HSSDC2 cable assembly.
Fabric OS Version 3.1.x/4.1.x Reference Guide
971
Glossary
SFP
Small form factor pluggable. A transceiver used on 2 Gbps switches that replaces the GBIC. Refers
to the LC-form factor transceiver.
See also GBIC.
SID/DID
Source identifier/Destination identifier. S_ID is a 3-byte field in the frame header that is used to
indicate the address identifier of the N_Port from which the frame was sent.
Single Mode
The fiber optic cabling standard that, when used in conjunction with a 1300 nm laser light, can
transfer data up to 10 km between devices. When used in conjunction with a 1550 nm laser light,
single mode cabling can transfer data over 10 km.
See also multimode, LWL, ELWL, and XLWL.
SI
Sequence Initiative.
SNMP
Simple Network Management Protocol. An internet management protocol that uses either IP for
network-level functions and UDP for transport-level functions, or TCP/IP for both. Can be made
available over other protocols, such as UDP/IP, because it does not rely on the underlying
communication protocols.
See also Community (SNMP).
SNMPv1
The original SNMP, now labeled v1.
SNS
Simple Name Server. A switch service that stores names, addresses, and attributes for up to 15
minutes, and provides them as required to other devices in the fabric. SNS is defined by Fibre
Channel standards and exists at a well-known address. May also be referred to as directory service.
See also FS.
StorageWorks SAN switch
The brand name for the HP family of switches.
Switch Name
The arbitrary name assigned to a switch.
Switch Port
A port on a switch. Switch ports can be E_Ports, F_Ports, or FL_Ports.
972
Fabric OS Version 3.1.x/4.1.x Reference Guide
Glossary
Switch
Hardware that routes frames according to Fibre Channel protocol and is controlled by software.
SWL
Short Wavelength. A type of fiber optic cabling that is based on 850-mm lasers and supports
1.0625-Gbps link speeds. May also refer to the type of GBIC or SFP.
See also LWL.
Tachyon
A chip developed by Hewlett-Packard, and used in various devices. This chip has FC-0 through
FC-2 on one chip.
Target
A storage device on a Fibre Channel network.
See also Initiator.
Tenancy
The time from when a port wins arbitration in a loop until the same port returns to the monitoring
state. Also referred to as loop tenancy.
Terminal Serial Port
May also be referred to as the console port. The lower serial port on the CP Card of the
StorageWorks Core switch. This port sends switch information messages and can receive
commands. Can be used to connect the CP Card to a computer terminal. Has an RS-232 connector
wired as a DTE device, and can be connected by serial cable to a DCE device. The connector pins
two and three are swapped so that a straight-through cable can be used to connect to a terminal.
The device name is ttyS0.
See also DCE port, modem serial port.
Throughput
The rate of data flow achieved within a cable, link, or system. Usually measured in bps (bits per
second).
See also bandwidth.
Topology
As applies to Fibre Channel, the configuration of the Fibre Channel network and the resulting
communication paths allowed. There are three possible topologies:
■
Point to point: A direct link between two communication ports.
■
Switched fabric: Multiple N_Ports linked to a switch by F_Ports.
■
Arbitrated loop: Multiple NL_Ports connected in a loop.
Fabric OS Version 3.1.x/4.1.x Reference Guide
973
Glossary
Transceiver
Device that converts one form of signaling to another for transmission and reception; in fiber
optics, it refers to optical and electrical.
Transfer State
The state in which a port can establish circuits with multiple ports without reentering the
arbitration cycle for each circuit. This state can only be accessed by an L_Port in the Open state.
Translative Mode
A mode in which private devices can communicate with public devices across the fabric.
Transmission Character
A 10-bit character encoded according to the rules of the 8B/10B algorithm.
Transmission Word
A group of four transmission characters.
See also data word.
Trap (SNMP)
The message sent by an SNMP agent to inform the SNMP management station of a critical error.
See also SNMP.
Trunking
See ISL Trunking.
Tunneling
A technique for enabling two networks to communicate when the source and destination hosts are
both on the same type of network, but are connected by a different type of network.
U_Port
Universal Port. A switch port that can operate as a G_Port, E_Port, F_Port, or FL_Port. A port is
defined as a U_Port when it is not connected or has not yet assumed a specific function in the
fabric.
UDP
User Datagram Protocol. A protocol that runs on top of IP and provides port multiplexing for
upper-level protocols.
ULP_TOV
Upper-level Time-out Value. The minimum time that a SCSI ULP process waits for SCSI status
before initiating ULP recovery.
974
Fabric OS Version 3.1.x/4.1.x Reference Guide
Glossary
ULP
Upper-level Protocol. The protocol that runs on top of Fibre Channel. Typical upper-level protocols
are SCSI, IP, HIPPI, and IPI.
Unicast
The transmission of data from a single source to a single destination.
See also broadcast, multicast.
user account
A login intended for use by the customer to monitor, but not control, switch operation.
See also account level switches.
VC
Virtual circuit. A one-way path between N_Ports that allows fractional bandwidth.
Web Tools
An HP product that runs on Fabric OS and provides a graphical interface to allow monitoring and
management of individual switches or entire fabrics from a standard workstation running a
browser.
Well-known Address
As pertaining to Fibre Channel, a logical address defined by the Fibre Channel standards as
assigned to a specific function, and stored on the switch.
Workstation
A computer used to access and manage the fabric. May also be referred to as a management station
or host.
WWN
World-Wide Name. An identifier that is unique worldwide. Each entity in a fabric has a separate
WWN.
XLWL
Xtra Long Wave Length. Laser light with a periodic length greater than 1300 nm (e.g., 1420 or
1550). XLWL lasers are used to transmit Fibre Channel data over distances greater than 10 Km.
Also known as ELWL.
Xmitted Close State
The state in which an L_Port cannot send messages, but can retransmit messages within the loop.
A port in the XMITTED CLOSE state cannot attempt to arbitrate.
Fabric OS Version 3.1.x/4.1.x Reference Guide
975
Glossary
Zone
A set of devices and hosts attached to the same fabric and configured as being in the same zone.
Devices and hosts within the same zone have access permission to others in the zone, but are not
visible to any outside the zone.
See also Zoning.
Zone Alias
A name assigned to a device or group of devices in a zone. Aliases can greatly simplify the zone
administrative process.
See also alias.
Zone Configuration
A specified set of zones. Enabling a configuration enables all zones in that configuration.
See also defined zone configuration, enabled zone configuration.
Zone Member
A port, node, WWN, or alias, which is part of a zone.
Zone Schemes
The level of zoning granularity selected. For example, zoning may be done by switch/port, WWN,
AL_PA, or a mixture.
See also zone configuration.
Zone Set
See zone configuration.
Zoning
An HP product that runs on Fabric OS and allows partitioning of the fabric into logical groupings
of devices. Devices in a zone can only access and be accessed by devices in the same zone.
See also zone.
976
Fabric OS Version 3.1.x/4.1.x Reference Guide
index
agtcfgDefault 22
agtcfgSet 26
agtcfgShow 32
aliAdd 44
aliasDelete 36
aliasJoin 38
aliasPurge 40
aliasShow 42
aliCreate 46
aliDelete 49
aliRemove 51
aliShow 53
audience 16
authorized reseller, HP 20
camTest 84
centralMemoryTest 87
cfgactvshow 95
cfgAdd 97
cfgClear 99
cfgCreate 101
cfgDelete 103
cfgDisable 105
cfgEnable 107
cfgRemove 109
cfgSave 111
cfgShow 113
cfgsize 117
cfgTransAbort 119
cfgtransshow 121
chassisName 123
chassisShow 125
chippropshow 128
chipregshow 130
cmemRetentionTest 132
cmiTest 135
configDefault 139
configDownload 141
configShow 144
configUpload 147
configure 150
conventions
document 17
text symbols 17
crossporttest 163
B
backplanetest 55
backport 58
backSpace 62
bannerset 63
bannershow 65
bcastShow 66
bladeBeacon 68
bladediag 70
bladediagshort 73
bladedisable 77
bladeenable 79
bladePropShow 81
broadcast zone 889
bsn 83
Fabric OS Version 3.1.x/4.1.x Reference Guide
Index
C
Index
A
977
Index
D
F
dataTypeShow 172
date 174
dbgshow 177
diagClearError 179
diagCommandShow 181
diagDisablePost 183
diagEnablePost 185
diagesdports 187
diagfaillimit 189
diagHelp 191
diagloopid 193
diagmodepr 195
diagpost 197
diagretry 199
diagsetburnin 201
diagsetcycle 203
diagshow 205
diagshowtime 208
diagsilkworm 210
diagskiptests 212
diagstopburnin 214
dlsReset 216
dlsSet 218
dlsShow 220
dnsconfig 221
document
conventions 17
prerequisites 16
related documentation 16
fabportshow 240
fabretryshow 243
fabricprincipal 245
fabricShow 247
fabstateclear 249
fabstateshow 250
fabStatsShow 252
fabswitchshow 254
fanDisable 256
fanEnable 257
fanShow 259
fashow 261
faStatsShow 264
fastboot 266
fazoneAdd 268
fazoneCreate 270
fazoneDelete 274
fazoneRemove 276
fazoneShow 278
fcpprobeshow 280
fcprlsshow 282
fdmicacheshow 284
fdmishow 286
firmwareCommit 291
firmwaredownload 293
firmwarerestore 298, 300, 302
fporttest 304
fspfShow 308
fwAlarmsFilterSet 311
fwAlarmsFilterShow 313
fwClassInit 314
fwConfigReload 316
fwConfigure 318
fwFruCfg 323
fwHelp 325
fwMailCfg 327
fwsamshow 330
fwSetToCustom 332
fwSetToDefault 333
fwShow 334
E
errClear 223
errDump 225
errNvLogSizeSet 227
errNvLogSizeShow 229
errSaveLvlSet 230
errSaveLvlShow 232
errShow 233
exit 239
978
Fabric OS Version 3.1.x/4.1.x Reference Guide
Index
G
L
gbicshow 338
getting help 19
ledtest 395
licenseAdd 396
licenseHelp 398
licenseIdShow 400
licenseRemove 402
licenseShow 404
linkCost 406
login 409
logout 410
loopPortTest 412
LSDbShow 418
H
h command 341
haDisable 343
hadump 344
haEnable 346
haFailover 347
haShow 349
hasyncstart 351
hasyncstop 352
help 353
help, obtaining 19
historyLastShow 355
historymode 357
historyShow 359
HP
authorized reseller 20
storage website 19
technical support 19
I
i command 361
ifModeSet 364
ifModeShow 367
ifShow 369
interfaceShow 371
iodReset 376
iodSet 378
iodShow 380
ipAddrSet 381
ipAddrShow 385
islshow 388
itemlist 389
M
mcastShow 422
memshow 424
mscapabilityshow 426
msConfigure 429
msPlatShow 432
msPlClearDB 434
msPlMgmtActivate 436
msPlMgmtDeactivate 438
msTdDisable 440
msTdEnable 442, 444
myid 445
N
nbrStateShow 449
nbrStatsClear 447
nodefind 451
nsaliasshow 453
nsAllShow 456
nscamshow 458
nsShow 460
nsstatshow 463
nszonemember 465
K
P
killtelnet 392
parityCheck 467
passwd 469
pdshow 473
Fabric OS Version 3.1.x/4.1.x Reference Guide
979
Index
perfAddEEMonitor 475
perfAddIPMonitor 478
perfAddReadMonitor 480
perfAddRWMonitor 482
perfAddSCSIMonitor 484
perfAddUserMonitor 486
perfAddWriteMonitor 490
perfCfgClear 492
perfCfgRestore 494
perfCfgSave 496
perfcleareemonitor 498
perfclearfiltermonitor 500
perfClrAlpaCrc 502
perfDelEEMonitor 504
perfDelFilterMonitor 506
perfHelp 508
perfSetPortEEMask 510
perfShowAlpaCrc 513
perfShowEEMonitor 515
perfShowFilterMonitor 519
perfShowPortEEMask 522
pkicreate 525
pkiremove 527
pkishow 529
portcamshow 530
portcfgdefault 533
portCfgEport 535
portCfgGport 537
portcfgislmode 539
portCfgLongDistance 541
portCfgLport 547
portcfgpersistentdisable 549, 551
portCfgShow 553
portCfgSpeed 556
portCfgTrunkport 558
portdebug 560
portDisable 561
portEnable 563
portErrShow 565
portflagsshow 567
portLEDTest 569
portLogClear 571
980
portLogDump 573
portLogDumpPort 576
portloginshow 579
portlogpdisc 581
portLogShow 582
portlogshowport 585
portLoopbackTest 587
portname 592
portPerfShow 594
portRegTest 596
portRouteShow 600
portShow 603
portstatsclear 607
portStatsShow 609
portswap 613
portswapdisable 615
portswapenable 616
portswapshow 618
porttest 620
porttestshow 624
powerofflistset 627
powerofflistshow 629
prerequisites 16
primary FCS, security feature 941
psShow 631
ptdatashow 633
ptphantomshow 635
ptpropshow 637, 639
ptstatsshow 641, 643
Q
qlDisable 645
qlEnable 647
qloopAdd 649
qloopCreate 651
qloopDelete 653
qloopRemove 655
qloopShow 657
qlpartner 659
qlPortDisable 661
qlPortEnable 663
qlPortShowAll 665
Fabric OS Version 3.1.x/4.1.x Reference Guide
Index
qlShow 667
qlStatsShow 670
quietMode 672
R
ramTest 674
reboot 677
related documentation 16
routeHelp 679
S
savecore 681
secfabricshow 683
secfcsfailover 685
sechelp 687
secmodedisable 689
secmodeenable 691
secmodeshow 695
secnonfcspasswd 697
secpolicyabort 699
secpolicyactivate 701
secpolicyadd 703
secpolicycreate 707
secpolicydelete 712
secpolicydump 715
secpolicyfcsmove 719
secpolicyremove 721
secpolicysave 725
secpolicyshow 727
secstatsreset 731
secstatsshow 734
sectemppasswdreset 737
sectemppasswdset 739
sectransabort 741
security commands 941
security feature for primary FCS 941
secversionreset 743
sensorShow 745
setdbg 747
setesdmode 748
setgbicmode 750
Fabric OS Version 3.1.x/4.1.x Reference Guide
setsfpmode 752
setSplbMode 754
setverbose 756
sfpShow 757
slotOff 760
slotOn 761
slotPowerOff 762
slotPowerOn 763
slotShow 764
snmpMibCapSet 766
spinFab 768
spinSilk 775
sramRetentionTest 784
ssn 787
statsTest 789
stopporttest 792
supportShow 794
switchBeacon 800
switchcfgpersistentdisable 802
switchcfgpersistentenable 804
switchCfgSpeed 806
switchCfgTrunk 808
switchDisable 810
switchEnable 812
switchName 814
switchShow 818
switchShutdown 824
switchStart 816, 826
switchStatusPolicySet 828
switchStatusPolicyShow 831
switchStatusShow 833
switchuptime 835
symbols in text 17
syslogdIpAdd 836
syslogdIpRemove 838
syslogdIpShow 840
systemtest 841
systemverification 843
T
technical support, HP 19
tempShow 846
981
Index
text symbols 17
timeout 848
topologyShow 850
trackchangeshelp 853
trackChangesSet 854
trackChangesShow 856
trunkDebug 857
trunkShow 859
tsclockserver 861
tshelp 863
tstimezone 864
turboRamTest 866
txdpathtest 870
U
uptime 873
uRouteConfig 875
uRouteRemove 877
uRouteShow 879
982
V
version 882
W
websites
Fibre Channel Association 16
HP storage 19
StorageWorks 16
wwn 884
Z
zoneAdd 886
zoneCreate 888
zoneDelete 891
zoneHelp 893
zoneRemove 895
zoneShow 897
Fabric OS Version 3.1.x/4.1.x Reference Guide