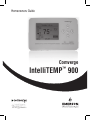
1
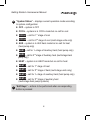
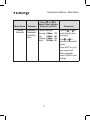
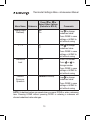
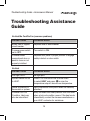
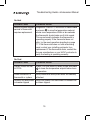
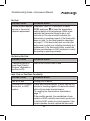
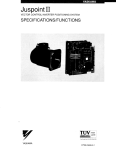
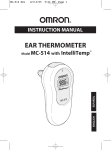
Homeowners Guide Comverge IntelliTEMP™ 900 Version Number: 2.0 Release Date: July 2012 Copyright © 2012 by Comverge, Inc. and Emerson, Inc. All rights reserved. IntelliTEMP™ is a registered trademark of Comverge, Inc. All other brand and product names are trademarks or registered trademarks of their respective companies. Document Change Record Version Date Comments 1.0 March 2011 1st release 2.0 July 2012 2nd release Table of Contents Introduction.................................................................. 2 Step 1: Getting started Guide...................................... 3 Step 2 : Homeowner Main Menu................................. 8 Step 3: Thermostat Settings Menu.............................. 11 Description of Homeowner Menu Options................... 13 Troubleshooting Assistance Guide.............................. 16 1 Introduction Congratulations, you are now in possession of the most advanced demand response thermostat available. About this Guide This guide describes how to set up and use the various features of the Comverge IntelliTEMP™ 900. Thermostat Models Covered by this Guide This guide covers the IntelliTEMP™ 900 thermostat, firmware version number starting with 0160 0263 07 or greater. 2 Getting Started • Homeowner Manual Step 1 Getting Started Guide Before using your thermostat, you should familiarize yourself with its features and user interface. Your thermostat consists of two parts: the thermostat chassis and the mounting base. To detach the two parts gently pull on the thermostat chassis until it releases from the mounting base. To attach the thermostat back onto the mounting base, align the retention tabs on the mounting base with the retention slots in the thermostat and gently press the two together until the retention tabs click. If the thermostat does not easily click onto the mounting base, be certain not to press with excessive force that may damage the thermostat and/or mounting base. Note: It is recommended to turn off the HVAC power before removing the thermostat from the mounting base when installed. 3 Getting Started • Homeowner Manual 1 A. The Thermostat Buttons and Indicators 2 1 3 4 5 6 9 8 7 1 “Left Arrow” – navigates menu items 2 “Up Arrow” – raises temperature setpoint/changes selected item 3 “Action Button” – selects action of selected menu item 4 “LED” – indicates occurrence of curtailment event 5 “Right Arrow” – navigates menu items “Down Arrow” – lowers temperature setpoint/changes selected item “SYSTEM Button” – changes system selection [OFF, COOL, HEAT, AUX (displayed on heat pump units only)] 6 7 8 “FAN Button” – change fan setting (Auto/On) 9 “Soft Keys” – perform action listed on display above the button 4 Getting Started • Homeowner Manual B.The Thermostat Display 1 3 2 4 5 6 7 1 “Messaging Area” – displays day/time, thermostat and utility related messages 2 “Temperature” – displays current room temperature 3 “Setpoint Temperature” – displays current desired temperature • Blank when system is in OFF mode • SET AT changes to HOLD AT when in temporary or permanent hold. SET AT not displayed during Utility control event “ ” – displays when keypad is locked. 4 5 “FAN status” – blank when in auto mode – displays “FAN ON” when fan is on continuously 5 Getting Started • Homeowner Manual 6 “System Status” – displays current operation mode according to system configuration OFF – system is OFF COOL – system is in COOL mode but no call for cool COOL1 – call for 1st stage of cool COOL2 – call for 2nd stage of cool (multi-stage units only) AUX – system is in AUX heat mode but no call for heat (heat pump only) AUX1 – call for 1st stage of Auxiliary heat (heat pump only) AUX2 – call for 2nd stage of Auxiliary heat (multi-stage heat pump only) HEAT – system is in HEAT mode but no call for heat HEAT1 – call for 1st stage of heat HEAT2 – call for 2nd stage of heat (multi-stage units only) HEAT3 – call for 1st stage of auxiliary heat (heat pump only) HEAT4 – call for 2nd stage of auxiliary heat (multi-stage heat pump systems) 7 “Soft Keys” – actions to be performed when corresponding button is pressed 6 Getting Started • Homeowner Manual C. Temporary versus Permanent Hold A temporary hold can be set when operating in any mode except for OFF. A temporary hold is set by pressing the or on the thermostat to adjust the desired temperature. The SET AT indication of the temperature setpoint will change to HOLD AT and a message will be cycled in the thermostat messaging display area to confirm that a temporary hold is set. A temporary hold setpoint will then be maintained until the start of the next programmed time period or the RUN softkey is pressed. A permanent hold can be set when operating in any mode except for OFF. To set a permanent hold, change the temperature just like setting a temporary hold. When the desired setpoint is entered, the user will have approximately 4 seconds to press the PERM HOLD softkey to convert the temporary hold into a permanent hold. The SET AT by the setpoint will change to HOLD AT and a message will be cycled in the thermostat messaging display area to confirm that a permanent hold is set. If the PERM HOLD softkey is not pressed within 4 seconds, the hold will remain a temporary hold. A permanent hold setpoint will override the programmed setpoints and time periods. A hold will end whenever the RUN softkey is pressed. 7 Main Menu • Homeowner Manual Step 2 Homeowner Main Menu The homeowner programming menu table summarizes the configuration items that the homeowner has access to set. For more details on each homeowner programming menu option, see “Description of Homeowner Menu Options” on page 13. To enter the Homeowner Programming menu: 1. Ensure the thermostat is at the idle screen (display with the room temperature displaying). 2. Press the MENU soft key. The display will show the first level of the Homeowner Programming Menu. 3. While in the Homeowner Programming Menu: The and scroll the cursor up and down respectively The softkey labeled HOME exits the programming menu back to the IDLE screen (NOTE: when the HOME softkey is pressed, any changes made on the current menu item are not saved) The button selects the highlighted menu item or switches value of underlined item When changes are made to a menu item, pressing the DONE softkey saves the changes and goes back one menu level 4. To exit the menu and return to the program operation, press HOME (when available). If no keys are pressed within two minutes, the thermostat will revert to normal operation and discards any changes not saved. 8 Main Menu • Homeowner Manual Menu Name Clock (Time Date) Set Clock Submenu Press or to Select Other Options (Defaults in BOLD) Comments NOTE: You should set Daylight Saving and Time Zone before setting the time on the clock Time am/pm Month Day Year or to Use the scroll through items to change or to Use change values When complete press DONE Select Time Zone Daylight Saving (On/Off) Hawaii Alaska Pacific Mountain Central Eastern Atlantic Newfoundland Use or to change values Off On to change Use values When complete press DONE When complete press DONE 9 Main Menu • Homeowner Manual Menu Name Submenu Press or to Select Other Options (Defaults in BOLD) Comments Programming Time-Based Programming: Off Cool Setpoint 78°F button to Use toggle between Off to On Heat Setpoint 68°F Highlight setpoint to or adjust using Adjust temperature setting using or When complete, press DONE to save settings Time-Based Progamming: On Heating Schedule Weekdays/ Weekends Individual days button to Use toggle between Off and On Defaults settings: Morning Day Evening Night 6:00am 8:00am 5:00pm 10:00pm 70° 62° 70° 62° or to Use the scroll through items to change Use or to increment/decrement values Press NEXT to go to next time period When complete, press DONE to save settings 10 Homeowner Manual • Main Menu Menu Name Submenu Cooling Schedule Weekdays/ Weekends Individual days Press or to Select Other Options (Defaults in BOLD) Defaults settings: Morning Day Evening Night 6:00am 8:00am 5:00pm 10:00pm 78° 85° 78° 82° Comments or to Use the scroll through items to change Use or to increment/decrement values Press NEXT to go to next time period When complete, press DONE to save settings 11 Thermostat Settings Menu • Homeowner Manual Step 3 Thermostat Settings Menu Menu Name Backlight: (Auto/On) Temperature Limits Submenu Press or to Select Other Options (Defaults in BOLD) Comments Auto On to change Use underlined value Min Cool Set Point: 45°F or Use the to select setpoint to change Max Heat Set Point: 99°F Use or to increment/decrement value When complete, press DONE to save settings or HOME to exit without saving Adjust Temp Display Current Room Temp (measured temp) Desired Offset 0° Use or to increment/decrement value When complete, press DONE to save settings or HOME to exit without saving 12 Thermostat Settings Menu • Homeowner Manual Menu Name Energy Mgmt Recovery Submenu Press or to Select Other Options (Defaults in BOLD) Off On Comments to change Use underlined value Press DONE to save settings or HOME to exit without saving °F / °C °F °C to change Use underlined value Press DONE to save settings or HOME to exit without saving Thermostat Lock 0000 Enter PIN number. Press or to change number Press DONE to save settings or HOME to exit without saving Comfort/ Economy Operation Comfort/Economy to change Use underlined value Press DONE to save settings or HOME to exit without saving NOTE: Underlined values are saved when you press DONE or enter a submenu item. Pressing HOME without pressing DONE or entering a submenu will discard underlined value changes. 13 Menu Options Description • Homeowner Manual Description of Homeowner Menu Options The following are detailed descriptions of your IntelliTEMP™ configuration menu options. 1. Clock – Set Clock/Select Time Zone/Daylight Savings You can set the clock on the thermostat from the user interface unless the utility has inhibited you from changing the clock. When setting the clock from the user interface, you should set the time zone and daylight saving before setting the clock, otherwise the clock will likely have to be set again to correct the time. NOTE: This thermostat is capable of having the clock set remotely by the utility. If the utility sets the clock, you may not be able to adjust the clock. If the clock on your thermostat is incorrect, please contact the utility at the number provided when the system was installed. 2. Programming – Heat/Cool Programming The IntelliTEMP™ 900 thermostat can be configured for Individual Days or Weekdays/Weekends programming or with a single heat/cool setpoint. With time-based Programming feature Off, single setpoint heat and single setpoint cool operation can be selected. With Time-based programming on, the Individual Days programming selection provides the most scheduling flexibility, allowing unique heat and cool profile for individual days. 14 Menu Options Description • Homeowner Manual The Weekdays/Weekends programming selection will provide a separate heat cool profile for the five consecutive weekdays and a different profile for the two weekend days. 3. Thermostat Settings – Backlight This menu item controls the display backlight, you can choose either: AUTO – (Default) Backlight comes on when you press any key. Backlight goes off after a short delay when there is no button pressed ON – Backlight is always On. 4. Thermostat Settings – Temperature Limits Temperature limits can be used to set limits on how high your heating temperature can be set and how low your cooling temperature can be set. The range for both values is from 45°F to 99°F. Cool Setpoint – 45°F (default) Heat Setpoint – 99°F (default) 5. Thermostat Settings – Adjust Temp Display This allows you to adjust the displayed temperature up to 5° higher or lower than the actual room temperature. Your thermostat was accurately calibrated at the factory, but you have the option to change the display temperature to match your previous thermostat. The current or adjusted room temperature will be displayed on the left side of the display while your desired offset will be displayed on the right side of the display. Options for this menu item include: +1° through +5° – Adjusts the displayed temperature the specified number of degrees higher than the measured room temperature. 15 Menu Options Description • Homeowner Manual 0 – (Default) Displays the measured room temperature. -1° through -5° – Adjusts the displayed temperature the specified number of degrees lower than the measured room temperature. 6. Thermostat Settings – Energy Mgmt Recovery Options for this menu item include: OFF – (Default) The system starts heating or cooling at the start time for the program period. ON – The system starts heating or cooling before the start time for the program period so that the room temperature reaches the program setpoint at the period start time. Example: You select EMR ON and have your heat (conventional heating system) programmed to 65° at night and 70° at 7:00 AM (a difference of 5°). Allowing 7 minutes per degree, the thermostat will start calling for heat prior to the 7:00 AM period start time in an attempt to reach the 70° setpoint by 7:00 AM. With EMR OFF, the thermostat will wait until the 7:00 AM period start time to begin heating the home. 7. Thermostat Settings - °F/°C You can display temperature in either: °F – (Default) Fahrenheit °C – Celsius (Centigrade) 16 Menu Options Description • Homeowner Manual 8. Thermostat Lock The IntelliTEMP™ 900 thermostat can be locked to prevent unwanted users from changing the thermostat settings. In the Thermostat Settings menu simply choose the thermostat lock option and enter your 4 digit combination that will be required to unlock the thermostat. Write down the code for safe keeping and press DONE. 9. Press menu to access unlock screen. Enter your 4 digit code and press Unlock. Thermostat will be unlocked for two minutes if no keypad activity. Press menu again and go to thermostat lock screen. Enter 0000 and press DONE to permanently turn off lock. Comfort / Economy This option is available when the IntelliTEMP™ 900 is connected to a multi-stage heating or cooling system or on most heat pump systems. In the Economy mode, the thermostat’s logic will analyze when secondary heating or cooling is needed to minimize the secondary heating or cooling energy usage. In Comfort (default) mode, a user interaction modifying the setpoint by three degrees or more will initiate secondary heating or cooling. Reset Operation If a voltage spike or static discharge blanks out the display or causes erratic thermostat operation, you can cycle the thermostat power by unplugging the thermostat from the baseplate for a few seconds then plugging the thermostat back onto the baseplate. If the thermostat power has been cycled and still does not function correctly, you can call the contact information provided on the back page of this manual. If no contact info is provided, call your local utility. 17 Troubleshooting Guide • Homeowner Manual Troubleshooting Assistance Guide No Heat/No Cool/No Fan (common problems) Possible Cause Corrective Action Blown fuse or tripped circuit breaker. Replace fuse or reset breaker. Furnace power switch set to OFF. Turn switch to ON. Furnace blower compartment door or panel is loose or not properly installed. Replace door panel in proper position to engage safety interlock or door switch. No Heat Possible Cause Corrective Action Pilot light not lit. Re-light pilot. System switch not set to HEAT. Press SYSTEM button one or more times to raise the to select HEAT and press temperature setpoint above room temperature. Loose connection to thermostat or system. Verify thermostat and system wires are securely attached. Furnace Lock-Out Condition. Heat may also be intermittent. Many furnaces have safety devices that shut down when a lock-out condition occurs. If the heat works intermittently, contact the furnace manufacturer or your HVAC contractor for assistance. 18 Troubleshooting Guide • Homeowner Manual No Heat Possible Cause Corrective Action Heating system requires Diagnostic: Press SYSTEM button to select HEAT service or thermostat to raise the temperature setpoint and press requires replacement. above room temperature. Within a few seconds the thermostat should make a soft click sound. This sound usually indicates the thermostat is operating properly. If the thermostat does not click, try the reset operation described on page 17. If the thermostat does not click after being reset, contact your installing contractor for a replacement. If the thermostat clicks, contact the furnace manufacturer or your HVAC contractor to verify the heating is operating correctly. No Cool Possible Cause Corrective Action System Switch not set to COOL. Press SYSTEM button to select COOL and press to lower the temperature setpoint below room temperature. Loose connection to thermostat or system. Verify thermostat and system wires are securely attached. Outdoor unit disconnect or breaker tripped Verify the outdoor unit disconnect or breaker has not been tripped. 19 Troubleshooting Guide • Homeowner Manual No Cool Possible Cause Corrective Action Cooling system requires Diagnostic: Press SYSTEM button to select to lower the temperature COOL and press service or thermostat setpoint below room temperature. Within a few requires replacement. seconds the thermostat should make a soft click sound. This sound usually indicates the thermostat is operating properly. If the thermostat does not click, try the reset operation described on page 17. If the thermostat does not click after being reset, contact your installing contractor for a replacement. If the thermostat clicks, contact the furnace manufacturer or HVAC contractor to verify the cooling is operating correctly. No Heat or No Cool Possible Cause Corrective Action Thermostat may be in Load Shed (“Event in Progress” displyaed on top line of LCD) Wait for the Control Event to end. Heat, Cool, or Fan Runs Constantly Possible Cause Corrective Action Fan set to ON. Change Fan to AUTO. Possible short in wiring, thermostat, or HVAC system. Check each wire connection to verify they are not shorted or touching together. No bare wire should stick out from under terminal screws. Try resetting the thermostat as described on page 17. If the condition persists, the manufacturer of your system or HVAC contractor can instruct you on how to test the HVAC system for correct operation. If the system operates correctly, replace the thermostat. 20 Troubleshooting Guide • Homeowner Manual Blank Display and/or Keypad Not Responding Possible Cause Corrective Action Voltage spike or static discharge. Use the Reset Operation described on page 17. Furnace (air conditioner) cycles too fast or too slow (narrow or wide temperature swing) Possible Cause Corrective Action The location of the thermostat and/or the size of the heating system may be influencing the cycle rate. Electronic thermostats normally provide precise temperature control and may cycle faster than some older mechanical models. A faster cycle rate means the unit turns on and off more frequently, but runs for a shorter time so there is no increase in energy use Contact your installing contractor to have the cycle rate adjusted and additional suggestions. Thermostat Setting and Thermometer Disagree Possible Cause Corrective Action Thermostat thermometer setting requires adjustment. The thermometer can be adjusted +/- 5 degrees. See Temperature Display Adjustment on page 15. 21 Troubleshooting Guide • Homeowner Manual Second, Third and/or Fourth Stage Won’t Come On Possible Cause Corrective Action Your thermostat is Wait for the second, third and/or fourth stage to designed to determine come on. the optimum time to activate the second stage. Simply raising the temperature in heating or lowering it in cooling will not always force the thermostat to bring the second stage on quickly. There is a time delay from 0-30 minutes depending on the performance of the first stage of the system. WR Part No. 37-7225B Replaces 37-7225A 1211