1
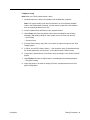
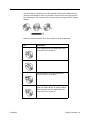
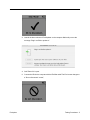
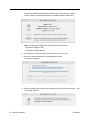
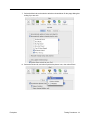
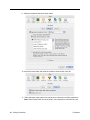
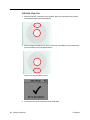
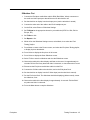
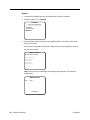
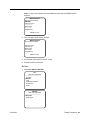
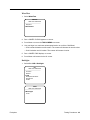
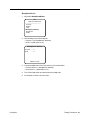
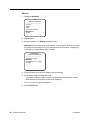
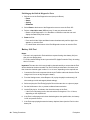
Service Source iPod Testing Procedures iPod photo 16 May 2005 © 2004 Apple Computer, Inc. All rights reserved. Testing Procedures Purpose These procedures are a tool to help identify an iPod hardware failure point before sending the iPod in for repair. The procedures include a list of tools, computer setup, Restoring procedures, various standard tests and checks, built-in iPod diagnostic tests, and the battery life test. Important: iPods without an identified hardware failure do not qualify to be sent to Apple for repair. If received by Apple, such units will be identified as NTF (No Trouble Found). How To Use These Procedures These “iPod Testing Procedures” are available for download in PDF format, along with a supporting audio test file at: http://service.info.apple.com/ipod-tp.html Normal troubleshooting is not covered in these procedures. Refer to the iPod Service & Support Page: http://www.apple.com/support/ipod/ Refer to the Preparation section, below, to determine other setup needs. The procedures are written in a beginning-to-end format, but it is not required to complete all the procedures. You may find that performing a test out of order may be helpful to quickly identify a likely hardware failure. Keep in mind, each test or procedure may not be self-contained, due to the beginning-to-end structure, an earlier procedure may set up the iPod or connections needed for a later procedure. Warning: These procedures reformat the iPod for the Mac, and erase all data. If all tests complete successfully, the iPod is returned to its original shipping condition, with the most current Mac version of its iPod software installed. iPod photo Testing Procedures - 1 Preparation Tools needed • Apple Macintosh computer with the following: – Mac OS X 10.3.5 or later – iTunes 4.7 or later – iPhoto 4.0.3 or later, Note: iPhoto 4.0 or later must be installed before updating to 4.0.3 or later. Version 4.0 is available via the iLife '04 install. – iPod Updater 2004-10-20 or later (download at http://www.apple.com/ipod/ download/) – “ipod_ChannelCheck.mp3” test file (download from http://service.info.apple.com/ ipod-tp.html) – A minimum of a CDs worth of MP3 or AAC music files in iTunes – Some photos, imported into iPhoto – A 40 MB file (at least) on the hard drive (for USB file transfer testing) (place it somewhere other than the desktop, to avoid deleting during procedures) – FireWire 400 port – USB 2.0 port • iPod 8 watt power adapter (p/n 661-3123) • iPod photo Dock (p/n 922-6574) • iPod Remote (p/n 922-5860) • Belkin Voice Recorder (Belkin p/n F8E462) • Audio headphones • iPod FireWire 30-pin to 6-pin cable (p/n 922-6312) • iPod USB 30-pin to 6-pin cable (p/n 922-6340) • iPod photo audio/video cable, 3.5mm to (3) RCA (p/n 922-6606) • S-Video cable (S-Video to S-Video) • Color television (NTSC or PAL) with stereo speakers, composite (RCA) audio and video input ports (Yellow, White, Red), and S-Video input port 2 - Testing Procedures iPod photo Computer setup Note: Refer to the Tools needed section, above. 1. Install the required, or latest, iPod Updater onto the Macintosh computer. Note: The system usually stores the iPod Updater in an “iPod Software Updater” folder in the Utilities folder (if desired, you may need to create this if iPod software was not originally installed from a CD). 2. Install or update iTunes and iPhoto to the required versions. 3. Open iTunes and create two playlists. Name them something like the following examples: (Tip: Adding a bullet or other symbol can sort the lists near the top) • iPod Testing • Channel Check 4. From the iTunes Library, drag a CD or more worth of imported songs into the “iPod Testing” playlist. 5. In iTunes, choose File > Add to Library...., then locate the “ipod_ChannelCheck.mp3” file, downloaded earlier, and Choose it, to load the file into the iTunes Library. 6. Locate “ipod_ChannelCheck” in the iTunes Library and drag it to the “Channel Check” playlist. 7. Open iPhoto and create an album. Name it something like the following example: • iPod photo Testing 8. Import the photos to be used for testing into iPhoto, and place them into the iPod photo Testing album. iPod photo Testing Procedures - 3 Initial Inspection Inspect the shipping box for damage that may have damaged the iPod. Apple will repair damage caused by shipping. Under warranty Damage NOT covered under warranty (unless caused by shipping): • visually broken • cracked • deformed • liquid seeped inside • iPod shows signs of being opened • customer acknowledged causing damage Out of warranty Apple will repair, for a fee, iPods that are out of warranty, unless they have “excessive” damage that requires too many internal parts to be replaced. Damage NOT repairable (unless caused by shipping): • severely damaged, crushed • iPod arrives in pieces Important Notes • Note the position of the Hold switch as it was received. Make sure the Hold switch is off (no orange showing) during operation. • Watch the iPod screen when turning it on, for a low-battery icon (shown below) that may display for approximately three seconds. If this happens connect the iPod to the power adapter for at least 5-15 minutes before operating it from the battery. • If a hardware failure is detected, the following icon will be shown. Fail the iPod. 4 - Testing Procedures iPod photo • If the iPod detects a hard drive error during startup, it will launch a diagnostic hard drive scan and attempt to repair any problems. You will see the icons and progress bar, shown below. This can take up to 15 to 20 minutes, so plug the iPod to a power adapter. When the scan has finished, one of four possible icons will be displayed: Icon Description Scan failed and will be repeated the next time the iPod is turned on. Scan found no problems. Some problems found, but was able to correct some or all of them. Scan was canceled by user (by holding down the Select button for approximately three seconds) and will repeat the next time the iPod is turned on. iPod photo Testing Procedures - 5 Verify Problem Reported by Customer • Attempt to duplicate and document the problem reported by the customer. • Use standard troubleshooting procedures to diagnosis and fix the problem, if possible. • If a problem is documented and cannot be resolved, there is no need to continue. The iPod and the documented problem information can be sent to Apple for repair. Restore iPod Software Warning: This procedure erases all data on the iPod, and formats it for Macintosh computers. Important: Make sure you have completed the earlier Computer setup procedures, before continuing. Note: The battery must have enough charge to operate the iPod on battery power at times during these procedures. Charge the iPod about 5 to 15 minutes if needed. 1. With the iPod NOT connected to the computer. Reset it by simultaneously pressing and holding the Menu and Select buttons. 2. When the Apple icon appears in on the iPod screen, immediately, and simultaneously, press and hold the Play and Select buttons, until you see the Disk Mode screen. 6 - Testing Procedures iPod photo 3. Launch the latest release of iPod Updater on the computer. Wait until you see the message “Plug in an iPod to update it.” 4. Quit iTunes if it is open. 5. Connect the iPod to the computer with the FireWire cable. The iPod screen changes to a “Do not disconnect” screen,” iPod photo Testing Procedures - 7 and the iPod Updater window displays the iPod name, serial number, software version, capacity, and the Restore button is available. Example shown here: Note: The approximate Capacity for the following iPods should be: • iPod photo (40 GB): 37 GB • iPod photo (60 GB): 55.8 GB 6. Click Restore. Click Restore again, when it asks you if you are sure. 7. Enter your name and password in the Authenticate screen. A progress bar appears. 8. When the progress bar completes, the message “Your iPod has been restored..., and is restarting.” appears. 8 - Testing Procedures iPod photo 9. The iPod screen will display the Apple and, in a moment, a progress bar will begin. 10. Wait until the iPod Updater window displays the iPod name and serial number screen. 11. Quit the iPod Updater. The iPod has been Restored. Do not disconnect it. iTunes Synchronization Test 1. Open iTunes if it didn’t launch automatically. Note: If iTunes was already open, quit and relaunch it. 2. The iPod Setup Assistant window will be displayed. 3. Deselect both check boxes for “Automatically update songs on my iPod” and “Automatically copy photos to my iPod.” Click Next. iPod photo Testing Procedures - 9 4. In the “Register Your iPod” screen, click Done. Note: iTunes may attempt to connect to the Apple Music Store. If it is unsuccessful, due to no internet connection for example, you will receive a message window. 5. In the iTunes playlist Source panel, select the iPod icon. 6. Select the “Display iPod options” button at the bottom right corner of the iTunes window to open the iPod Preferences. 10 - Testing Procedures iPod photo 7. Select the Music tab, and make the selections shown below. Ok the popup dialog box asking if you are sure. 8. Select the Photos tab, and select Synchronize photos from:, then select iPhoto. iPod photo Testing Procedures - 11 9. Make the additional selections shown below. 10. Select the General tab, and make the selections shown below. Click OK 11. iTunes will begin copying the music and photos as selected in the iPod preferences. Note: iTunes copies music first, then photos, until completed or until the iPod is full. 12 - Testing Procedures iPod photo FireWire Disk Mode Test 1. Make sure that the iPod icon is on the desktop. 2. If not, select the iPod icon in the iTunes Source panel, then select the “Display iPod options” button to open iPod Preferences (see above instructions), and make sure the “Enable disk use” check box is checked. Battery Charging Check 1. Make sure that the animated battery charging symbol appears at the top right corner of the iPod screen. 2. Select the iPod icon in the Source panel of iTunes, then either click the iPod Eject button at the bottom right corner of the iTunes window, or the eject symbol in the Source panel. This ejects the iPod from the Source panel and the desktop. 3. The “Do not disconnect.” screen will disappear, and the Language screen appears. 4. Disconnect the iPod from the computer. iPod photo Testing Procedures - 13 USB Disk Mode Test 1. With the iPod NOT connected to the computer. Reset it by simultaneously pressing and holding the Menu and Select buttons. 2. When the Apple icon appears in on the iPod screen, immediately, and simultaneously, press and hold the Play and Select buttons, until you see the Disk Mode screen. 3. Connect the iPod to the computer with the USB cable. 14 - Testing Procedures iPod photo 4. Make sure that the iPod icon is on the desktop. 5. Drag a test file (40 MB or more) to the iPod desktop icon. If the file copies to the iPod without error, drag the iPod icon to the trash to eject the iPod. Fail the iPod if it does not function as expected. 6. Quit iTunes and disconnect the USB cable. iPod Screen Check 1. With the iPod NOT connected to the computer. Reset it by simultaneously pressing and holding the Menu and Select buttons until the Apple screen appears. 2. In the Language screen, English should be highlighted. Click the Select button to select it. The iPod screen appears. 3. Use the Click Wheel and Select and Menu buttons to navigate through some screens. 4. Make sure that the backlight is on when navigating the menus 5. Make sure the screen displays properly with no pixels missing. 6. Check for “rainbow effect” by looking straight at the iPod display screen, without tilting. If a rainbow effect (Newton Ring effect) appears and is larger than 1 square cm, fail the iPod. 7. If the screen is too dark or too light, adjust the Contrast from the Settings menu to get a normal contrast. Note: If the adjusted contrast is less than 25% (less than a quarter of the contrast bar) or more than 75% (more than 3 quarters of the contrast bar) then reject the unit for “Contrast excessive adjustment.” iPod photo Testing Procedures - 15 Control Buttons & Audio Test 1. Use the Click Wheel to scroll up and down the menu. Make sure that you hear the clicker sound when rotating the Click Wheel. 2. Connect headphones to the iPod, and orient the left and right sides correctly. 3. Navigate to the “Channel Check” playlist (this contains the downloaded “ipod_ChannelCheck.mp3” file), and press Select. 4. Make sure the ipod_ChannelCheck audio file is selected, then press the Play button. 5. Listen for any distortion. Make sure the left and right channel messages are heard on the appropriate side. 6. Navigate to the “iPod Testing” playlist, and start playing the songs. 7. Use the Click Wheel to vary the volume to ensure it works properly. 8. Press the Next button to play the next song, and play it for about 5 seconds. 9. Press the Previous button twice to go back to the first song (the first press goes back to the beginning of the song). Play it for about 5 seconds. 10. Press the Play button to stop the playback. 11. Slide the Hold button on (to reveal the orange color). Scroll the Click Wheel and press all five buttons to make sure they are deactivated and nothing happens. 12. Slide the Hold button off (to cover the orange color) (all buttons will be active). 13. Press the Menu button several times to go back to the iPod menu screen. 14. Remove the headphones. Sleep/Wake up Test 1. Press and hold the Play button a few seconds to put the iPod into sleep mode. The iPod screen goes blank. 2. Press any button to wake up the iPod. 16 - Testing Procedures iPod photo Slideshow Test 1. Connect the iPod photo audio/video cable’s RCA (Red, White, Yellow) connectors to the audio and video input ports that will be used on the television set. 2. Set the television to display from these input ports (see the television’s manual) 3. Connect the other end of the cable to the iPod’s headphone port. 4. On the iPod, select Photos > Slideshow Settings 5. Set TV Signal to the appropriate format for your television (NTSC for USA, PAL for Europe, etc.). 6. Set TV Out to Ask. 7. Set Repeat to On. 8. While still on the Slideshow Settings screen, select Music, then select the “iPod Testing” playlist. 9. Press Menu to return to the Photos screen, and select the iPod photo Testing playlist, to display its photo thumbnails. 10. Press Select to display the first photo in full screen. 11. Press Select to display the Start Slideshow screen. 12. Select TV On to start the slideshow and view the Slideshow screen. 13. Observe the television’s video display, and listen to the sound, for approximately 20 seconds. Fail the iPod if any abnormal video is observed, or sound distortion is heard. 14. Disconnect the iPod photo audio/video cable from the iPod. 15. Connect the S-Video cable to the television, and to the iPod photo Dock. 16. Set the television to display from the S-Video input (see the television’s manual). 17. Put the iPod in the Dock. The slideshow should be displaying (without sound), restart the slideshow, if not. 18. Observe the television’s video display for approximately 10 seconds. Fail the iPod if any abnormal video is observed. 19. Press the Menu button to stop the slideshow. iPod photo Testing Procedures - 17 Built-in iPod Diagnostics Tests Important: If the iPod does not behave as indicated during any of the following built-in diagnostic tests, fail the iPod. Notes: • Navigate through the lists of tests by using the Click Wheel or Next and Previous buttons to move the selection pointer “>” up and down the list. • Start a test by pressing the Select button (sometimes referred to as ACTION button). • Press the Menu button to continue, or return to previous diagnostics menu screens. • The example diagnostic screens in these procedures are approximations, and bold text or text in parenthesis is used for emphasis, only. • To leave the diagnostics, Reset the iPod. 1. Make sure the iPod is NOT connected to the computer. 2. Reset the iPod by simultaneously pressing and holding the Menu and Select buttons. 3. When the Apple icon appears on the iPod screen, immediately, and simultaneously, press and hold the Previous and Select buttons. Release the buttons when the Apple icon disappears from the screen, you will hear some beeps, and an iPod Diagnostics screen, similar to the following, will appear. 18 - Testing Procedures iPod photo iPod Diagnostics Menu Screen: iPod Diagnostics SRV Oct 08 2004 ------------------------------> Memory IO Power Status SysCfg Diskmode Reset SDRAM: 1. With the selection pointer “>” on Memory, select Memory > SDRAM > SDRAMFullTest. 2. The SDRAMFullTest takes approximately 3 minutes. A progress percent readout displays at the bottom of the screen. 3. Pass = SDRAM OK Memory SRV Oct 08 2004 ------------------------------> SDRAM Flash (Skip) IRAM 4. Press Menu until returned to the Memory screen. IRAM: 1. Skip the Flash test. 2. Move the selection pointer “>” and select IRAM. 3. The IRAM Test screen appears, with Waiting..., on screen. 4. The test may take approximately 2 minutes. Note: Watch the screen at about 1-1/2 minutes, as it only briefly displays the test result message, before resetting. 5. Pass = IRAM PASS 6. Return to the iPod Diagnostics. iPod photo Testing Procedures - 19 USBTest: 1. Connect the iPod USB cable to the iPod and computer. 2. Select IO > Comms > USBTest. (Comms stands for Communication) iPod Diagnostics SRV Oct 08 2004 ------------------------------Memory > IO Power Status SysCfg Diskmode Reset IO SRV Oct 08 2004 ------------------------------> Comms Wheel LCD HeadphoneDetect HardDrive Audio Comms SRV Oct 08 2004 ------------------------------> USBTest FirewireTest Remote 3. Pass = the following display: USB Test ID = 0x22FA05 MENU to exit Note: If no USB cable is detected, “No Cable Conn” is displayed. 4. Press Menu to return to the Comms screen. 5. Disconnect the USB cable. 20 - Testing Procedures iPod photo FirewireTest: 1. Connect the iPod FireWire cable to the iPod and computer. 2. Select FirewireTest. Comms SRV Oct 08 2004 ------------------------------USBTest > FirewireTest Remote 3. Pass = the following display: Firewire Test Connection Rate=S400 OK FW Chip OK Firewire OK MENU to exit Note: If no FireWire cable is detected, “No Connection” is displayed. 4. Press Menu to return to the Comms screen. 5. Disconnect the FireWire cable. iPod photo Testing Procedures - 21 Remote: 1. Connect the iPod Remote to the iPod. Make sure its slider is unlocked. 2. Place the selector “>” on Remote. Comms SRV Oct 08 2004 ------------------------------USBTest FirewireTest > Remote 3. Select Remote and the following screen appears. Within 10 seconds, press all the keys on the remote. As the keys are pressed and detected, a beep sounds, and the greyed out name of the key turns to black. Remote Test Press Remote Keys Volume Down Volume Up Next Track Rev Track Play/Pause Note: If the remote is not detected, the following screen appears. (HP stands for headphones.) Remote Test HP NG Insert HP 22 - Testing Procedures iPod photo Note: If a key is not detected or pressed within the time limit, an ERROR screen appears. Remote Test Press Remote Keys ERROR Volume Down Volume Up Next Track Rev Track Play/Pause MENU to exit 4. Pass = display shows all keys in black. Remote Test Press Remote Keys Volume Down Volume Up Next Track Rev Track Play/Pause MENU to exit 5. Press Menu until returned to the IO screen. 6. Disconnect the iPod Remote. KeyTest: 1. Select IO > Wheel > KeyTest. IO SRV Oct 08 2004 ------------------------------Comms > Wheel LCD HeadphoneDetect HardDrive Audio Wheel SRV Oct 08 2004 ------------------------------> KeyTest WheelTest iPod photo Testing Procedures - 23 2. Select KeyTest and the following screen appears. Within 6 seconds, press all the buttons on the Click Wheel. As the buttons are pressed and detected, the greyed out name turns black. Key Test Press Keypad button Action Key (Select button) Menu Key Pause/Play Key Prev Key Next Key Note: If a button is not detected or pressed within the time limit, a Timeout Error appears. Key Test Press Keypad button Action Key Menu Key Pause/Play Key Prev Key Next Key Timeout Error MENU to exit 3. Pass = display shows all keys in black. Key Test Press Keypad button Action Key Menu Key Pause/Play Key Prev Key Next Key MENU to exit 4. Press Menu to return to the Wheel screen. 24 - Testing Procedures iPod photo WheelTest: 1. Select WheelTest. Wheel SRV Oct 08 2004 ------------------------------KeyTest > WheelTest 2. Pass = WHEEL ID PASS appears on screen. 3. Press Menu to move to the TOUCH MENU test screen. 4. Use your finger in a continuous uninterrupted motion to scroll the Click Wheel: • Scroll counterclockwise one full rotation. The counter will decrease in numeric value. • Scroll clockwise one full rotation. The counter will increase in value. 5. Pass = WHEEL PASS displays on screen. 6. Press Menu until returned to the IO screen. Backlight: 1. Select IO > LCD > Backlight. IO SRV Oct 08 2004 ------------------------------Comms Wheel > LCD HeadphoneDetect HardDrive Audio LCD SRV Oct 08 2004 ------------------------------> Backlight Color iPod photo Testing Procedures - 25 2. Use the Click Wheel to adjust the backlight brighter (clockwise) and darker (counterclockwise). 3. Press Menu to return to the LCD screen. Color: 1. Select Color. LCD SRV Oct 08 2004 ------------------------------Backlight > Color 2. Press the Select button to display (full screen), colors, gradients, and a pattern. Note: The following screen representations appear in right to left order. The colors are rough approximations only, and will vary. MENU to exit 3. Press Menu until returned to the IO screen. 26 - Testing Procedures iPod photo HeadphoneDetect: 1. Select IO > HeadphoneDetect. IO SRV Oct 08 2004 ------------------------------Comms Wheel LCD > HeadphoneDetect HardDrive Audio 2. The following screen should appear: • Present = 0 (no headphones detected) • Hold = 0 (Hold switch is off) Headphone Detect Present : Hold : 0 0 MENU to quit 3. Connect headphones to the iPod, and turn on the Hold switch. • Present should = 1 (headphones attached) • Hold should = 1 (Hold switch is on) 4. Turn off the Hold switch and disconnect the headphones. 5. Press Menu to return to the IO screen. iPod photo Testing Procedures - 27 HDScan: 1. Select IO > HardDrive. IO SRV Oct 08 2004 ------------------------------Comms Wheel LCD HeadphoneDetect > HardDrive Audio 2. Skip HDSpecs. 3. Move the selector “>” to HDScan (hard drive scan). Important: This test can take 30 to 50 minutes. You may want to save this test (and the battery life test) until the end, or for when the time can be allotted. If postponing, remember to complete this test later, if needed. HardDrive SRV Oct 08 2004 ------------------------------HDSpecs (Skip) > HDScan HDSMARTData (Skip) HDRW 4. Plug the iPod into an iPod power adapter, before continuing. 5. Press Select to begin the hard drive scan: • The screen will display START SCAN..., which indicates that the scan is running. • When finished, the Hard Drive screen will be displayed. Pass = no error message was displayed. 6. Skip HDSMARTData. 28 - Testing Procedures iPod photo HDRW: 1. Select HDRW. • Pass = HDD R/W PASS 2. Press Menu until returned to the IO screen. Mic 1. Skip the Playback test. 2. Select IO > Audio > Mic. IO SRV Oct 08 2004 ------------------------------Comms Wheel LCD HeadphoneDetect HardDrive > Audio Audio SRV Oct 08 2004 ------------------------------Playback (Skip) > Mic 3. Plug in the Belkin Voice Recorder (microphone) to the iPod. 4. Press Select to start recording and, from a few inches away, speak a short sentence into the microphone. The recording stops by itself after a moment. 5. Unplug the microphone and plug in headphones. 6. Press Select to listen to the recording. 7. Press Menu until returned to the iPod Diagnostics screen. iPod photo Testing Procedures - 29 Finishing-up the Built-in Diagnostics Tests: 1. Skip the rest of the iPod Diagnostics tests (except for Reset): • Power • Status • SysCfg • Diskmode 2. Select Reset at the bottom of the Diagnostics screen to reset the iPod, OR... 3. Perform a hard drive scan (HDScan) now, if it was not performed earlier. • Return to iPod Diagnostics > IO > HardDrive > HDScan to start the scan and display the Read Verify Scan screen. 4. Reset the iPod: • Press and hold the Select and Menu buttons simultaneously until the Apple icon appears, to reset the iPod. • Or, select Reset at the bottom of the iPod Diagnostics screen to reset the iPod. Battery Life Test Notes: • This test is only required for iPods which are reported having short battery life (less than 12 hours playing time). • For iPods returned during the 2nd year under APP (Apple Protection Plan), the testing time is 7.5 hours. Important: The start time of this test should be planned carefully to ensure that the iPod will be checked at the times needed. The iPod is initially checked after 15 minutes, and then it must be checked again in either 7.5 or 12 hours, depending on the required test. 1. Connect the iPod to the computer with the 6-pin FireWire cable and allow the iPod to charge for 4.5 hours to fully charge the battery. 2. From the Settings menu, select Repeat > All (to play the playlist continuously). All other settings are left unchanged (default settings). 3. Select and play the “iPod Testing” playlist. Record the start time on a piece of paper. 4. Set the Hold button to On, to prevent accidental button activation. 5. Let the iPod play for 15 minutes, then check the status of the iPod: • If the iPod is still playing music, then recheck the iPod again at 7.5 or 12 hours, depending on the required test. 6. If the iPod is still playing music when checked again at the specified time, the battery is OK, and passes the test. 7. If the iPod stops playing because the battery depleted, then reject the iPod for short battery life. 30 - Testing Procedures iPod photo Restore to Shipping Configuration This step removes all the music and data on the iPod and restores it to the manufacturing configuration. Refer to the Restore iPod Software procedures described earlier, to perform the following: 1. Launch the latest release of iPod Updater on the computer. Wait until you see the message “Plug in an iPod to update it.” Note: You do not need to Reset or put the iPod into Disk Mode. 2. Quit iTunes if it is open. 3. Connect the iPod to the computer with the FireWire cable. The iPod screen changes to a “Do not disconnect” screen,” and the iPod Updater window displays the iPod name, serial number, software version, capacity, and the Restore button is available. 4. Click Restore. Click Restore again, when it asks you if you are sure. 5. Enter your name and password in the Authenticate screen. A progress bar appears. 6. When the progress bar completes, the message “Your iPod has been restored..., and is restarting.” appears. 7. The iPod screen will display the Apple and, in a moment, a progress bar will begin. 8. Wait until the iPod Updater window displays the iPod name and serial number screen, then quit the iPod Updater. The iPod has been Restored. Do not disconnect the iPod. 9. Open iTunes if it didn’t launch automatically. Note: If iTunes was already open, quit and re-launch it. 10. The iPod Setup Assistant window will be displayed. This time, click Cancel. iPod photo Testing Procedures - 31 11. Drag the iPod icon on the desktop to the Trash to unmount it. 12. Disconnect the iPod. Charge the Battery (unattended operation) 1. If the tested iPod has passed all the tests so far, connect an iPod power adapter to the iPod and charge it for at least 1.5 hours. 2. Ensure that the battery has a good charge. After the charge, the battery symbol should indicate that the charge level is close to 100%. Fail the iPod if the battery is not charged. Note: It may take about five minutes after disconnecting the iPod from power for the battery charge symbol to indicate its full charge. 32 - Testing Procedures iPod photo