1
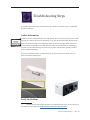
Service Source iPod Hi-Fi Updated: 17 Aug 2007 © 2006-2007 Apple Computer, Inc. All rights reserved. iPod Hi-Fi Contents Inspection Inspecting the Unit 2 Troubleshooting General Information 7 Troubleshooting Steps 8 Gather Information 8 Try Quick Fixes 9 Run Diagnostics 9 Try Systematic Fault Isolation 10 Research 10 Escalate 10 Repair or Replace 11 Verify the Repair 11 Inform the User 11 Complete Administrative Tasks 11 Quick Screening with Customer 12 Symptom Charts 14 When to Use the Symptom Charts 14 How to Use the Symptom Charts 14 Hear Buzz with Auxiliary Input and High Volume 15 Left/Right Sound Distortion 15 Left/Right Channel Issues 15 No Audio Amplification 16 You Cannot Switch the Audio Input Source from Analog to Digital 16 Audio In Does Not Work 16 Poor Sound Quality 17 No Sound 17 No/Incorrect Volume Control 18 Unit Will Not Run Off Batteries 18 Unit Will Not Run Off AC Adapter 18 Battery Life Too Short 19 iPod Connection Does Not Work 19 i LED Does Not Respond or Responds Incorrectly 20 You Cannot Control the Unit with the Remote 20 Apple Remote Does Not Work 21 Unit Unusually Hot 21 No Power or Response at All 22 ii Service Source Inspection iPod Hi-Fi © 2006-2007 Apple Computer, Inc. All rights reserved. Inspecting the Unit Before you open the unit, you must perform the visual and mechanical inspection and the verification screens. Overview 1. Perform the Visual and Mechanical Inspection (VMI). (AASPs, Retail, and Apple Repair Centers1) 2. Perform the Verification Screen 1—System Functional Screen Test (VS1), per document part number 070-2080. (Apple Repair Centers) 3. Perform the Verification Screen 2—Ramp Voltage (VS2), per document part number 0702080. (Apple Repair Centers) 4. Perform the Verification Screen 2—NTI (VS2), per document part number 070-2080. (Apple Repair Centers) 1 An Apple Repair Center is a location where iPod Hi-Fi’s are repaired, sometimes also known as a depot. Apple Authorized Service Providers (AASPs) and Retail are typically not Apple Repair Centers for the iPod HiFi. iPod Hi-Fi Inspection 2 Visual and Mechanical Inspection Technicians at AASPs, Retail, and Apple Repair Centers should perform this inspection before starting to troubleshoot. Procedure 1. Perform a visual inspection for damage resulting from accident, unauthorized service, or unauthorized modifications (see examples next to CompTIA code 915, below). 2. Check for mechanical defects. 3. Enter the appropriate CompTIA code(s) in the Service Instructions area. 4. If the unit passes the visual and mechanical inspections, proceed to the VS1 screen process to test for functionality (if you are at an Apple Repair Center), or to troubleshooting (if you are at an AASP or Retail store). If the unit fails the visual and mechanical inspections and the customer has not already agreed to any out-of-warranty charges, return the unit to the customer to gain agreement on charges. Notes CompTIA codes used for the iPod Hi-Fi are: CompTIA Code Failure Description iPod Hi-Fi Symptom 900 VMI - Visual Mechanical Inspection fail 909 iPod updater issue,. iPod restore issue 910 Cosmetic Defects 911 Case Separation; reseated in screening process 912 Power Socket Burnt 913 Battery LED not functioning normally LED not working before/during/after charge 914 Defective Speakers No Sound, Left/Right Speaker Distortion, Left/Right Channel Issues 915 Customer abuse Foreign materials, Detect faceplate, Cracked main housing, Cracked driver housing, Burnt AC socket, Battery leakage, Missing grille, Missing tube cup, Missing faceplate screw, Missing modules, Volume control damaged, Battery terminal damaged, Battery terminal missing, Battery terminal contaminated 916 Audio port broken or too loose Audio port cracked/broken/loose 917 FW port or Dock conn broken or too loose Dock connector loose/broken Faceplate separated from main housing or driver housing iPod Hi-Fi Inspection 3 CompTIA Code Failure Description iPod Hi-Fi Symptom 919 Unit LED defective Status LED does not illuminate when unit is in on position 922 Remote control function failure Remote control problem 930 Battery playing time too short After fully charged, battery playing time too short. (out of spec) 931 Battery does not hold charge After fully charged, battery playing time too short. (out of spec) 932 Dead battery 935 Sound quality issue. No sound in left/right/both channel, cracking noise, distortion 937 Loose Hardware Internal vibration due to loose screws and loose mounted modules. 938 Missing item (cover, lens, FireWire, etc.) Missing grille, dock adapters, etc. 957 No audio No sound, left/right speaker distortion, left/right channel issues 962 Defective woofer Defective woofer 963 M16 Defective Dock Connector Defective dock connector 964 Cannot be reset Cannot be reset 970 Dead unit (including no power) No sound, no power LED 976 iPod unusually HOT Unit abnormally hot. 977 Unusual noise Unusual noise 978 Service KGB DOA Service known-good Hi-Fi is dead on arrival 989 Remote inoperable Apple Remote inoperable 992 Dock connector bad Dock connector bad Note: For Apple Repair Centers only: Apple Repair Centers will be required to use a traveler, to accompany the unit through the process, identifying the customer complaint (converted to CompTIA code), and record the CompTIA code of the failure found in the screening process. The traveler will also be used to identify steps in the process that have been completed, and the unit passed. This traveler will be sent with the failing units back to the vendor for repair (see RMA SOP). This information will help the repair vendor identify and fix the problem. Also, if all tests pass, (NTF), the traveler will be used to verify that all tests were successfully run before the unit is returned to the customer. Battery Life Test Perform the Battery Life Test only if the customer complains of short battery life. The battery test takes 3 hours. 1. Load in new alkaline batteries and close the battery door. 2. Connect a known-good iPod. (If you do not have a known-good iPod, use a known-good iPod Hi-Fi Inspection 4 external audio input source; if you have neither you cannot perform this test.) 3. Press PLAY/PAUSE to play music from the iPod. 4. Adjust the volume control to 50% loudness. 5. Record the starting time. The battery life must be able to last 3 hours for new batteries. If the batteries do not last 3 hours dispatch the iPod Hi-Fi to the Apple Repair Center.. iPod Hi-Fi Inspection 5 Service Source Troubleshooting iPod Hi-Fi © 2006-2007 Apple Computer, Inc. All rights reserved. General Information The first task of the service provider will be to determine if there is a repairable problem with the iPod Hi-Fi and whether the repair is covered under warranty. The kinds of problems you might see include: • Hear Buzz with Auxiliary Input and High Volume 15 • Left/Right Sound Distortion 15 • Left/Right Channel Issues 15 • No Audio Amplification 16 • You Cannot Switch the Audio Input Source from Analog to Digital 16 • Audio In Does Not Work 16 • Poor Sound Quality 17 • No Sound 17 • No/Incorrect Volume Control 18 • Unit Will Not Run Off Batteries 18 • Unit Will Not Run Off AC Adapter 18 • Battery Life Too Short19 • iPod Connection Does Not Work 19 • LED Does Not Respond or Responds Incorrectly 20 • You Cannot Control the Unit with the Remote 20 • Apple Remote Does Not Work 21 • Unit Unusually Hot 21 • No Power or Response at All 22 In the next section we will discuss the individual troubleshooting steps as they apply to this product. As a reminder, the troubleshooting steps are: 1. Gather information 2. Verify the problem 3. Try quick fixes 4. Run diagnostics 5. Try systematic fault isolation 6. Research 7. Escalate 8. Repair or replace 9. Verify the repair 10. Inform the user 11. Complete administrative tasks Note: If you are not familiar with the Apple General Troubleshooting Flowchart, see the selfpaced course General Troubleshooting Theory. iPod Hi-Fi Troubleshooting — General Information 7 Troubleshooting Steps You perform the first few steps of troubleshooting1 regardless of whether there is a repairable problem or damage. Gather Information In addition to the normal information you might gather about a problem, with this product look especially for evidence of someone attempting to pry open the black faceplate, damage to the white case, and/or damage to the wide-range drivers or woofer. The image below left shows a pried faceplate and damage to the white case; the image on the right shows an undamaged faceplate. (See Accidental Damage in the Service Programs manual for the general procedure around accidental damage.) (If you are not familiar with the normal information to gather, or any of the other steps, see General Troubleshooting Theory.) Verify the Problem 1 Throughout the manual, when we refer to a troubleshooting process, we are referring to the process documented in the Apple General Troubleshooting Flowchart. iPod Hi-Fi Troubleshooting — Steps 8 Verify that the symptom exists as the customer reports it. In trying to recreate the symptom, look for any of the following: • Scratches on the white case or other evidence of trying to open the case • Torn or punctured wide-range drivers or woofer • The black faceplate not being flush with the white case Note: At this point in the troubleshooting you may have enough information to determine whether any repair will be covered by warranty or not. Try Quick Fixes Quick fixes that may apply to the symptom you are troubleshooting include: • Use a blower to clean any debris from the iPod connector. • Make sure the volume is not turned down all the way on either the iPod Hi-Fi or the sound source (iPod or audio in) • Check sound with a known-good iPod with known-good music • Try controlling the volume on the touch pad and/or using a known-good Apple Remote • Switch input sources from a known-good iPod to a known-good external (auxiliary) source, and back • Use a known-good power cord and/or set of fresh batteries • Try resetting the iPod Hi-Fi (remove the batteries and AC power, wait 10 seconds, reapply power) Also, because the iPod Hi-Fi is an acoustic device, its environment can impact the quality of sound. If the customer’s issue involves sound quality, be sure to ask questions about where the iPod Hi-Fi is set up. The guidelines to ensure the best performance include: • Place iPod Hi-Fi on a stable, hard surface, away from floor and ceiling. • Center iPod Hi-Fi between side walls for correct stereo imaging. • Give iPod Hi-Fi room to breathe on all sides. • Place iPod Hi-Fi at ear level. If the customer does not have the iPod Hi-Fi set up according to these guidelines, try having the customer correct the setup first. For more details, see the Symptom Charts section. Run Diagnostics AASPs have access to two diagnostic tools for the iPod Hi-Fi: • Diagnostic kit (with iPod nano) • Diagnostic kit (without iPod nano) For left/right channel issues, you can download the following sound files, load them onto an iPod or computer with iTunes, and test the iPod Hi-Fi: (These files are included with the diagnostic kits.) iPod Hi-Fi Troubleshooting — Steps 9 • • • • iPod_ChannelCheck.m4a For the Mind.mp3 LEFT - For the Mind.mp3 RIGHT - For the Mind.mp3 If you cannot duplicate the symptom with these sound files, or with known-good files, but you can with the customer’s sound file, include the specific name of the problem sound file in the Service Instructions. Apple Repair Centers have two additional diagnostic tools: • Functional screen test • NTI sound chamber Try Systematic Fault Isolation There are no applicable systematic fault isolation techniques that the service technician can try, other than those covered by the Verify Problem and Try Quick Fixes steps. Research If you have not located the trouble following the steps thus far, try researching the symptoms. Research resources include: • Symptom Charts section of this manual • GSX gsx.apple.com Enter serial number and click Coverage Check • Service Source service.info.apple.com Check Quick Links and/or Technical Resources Check options under appropriate Product Service pop-up menu • Product support page service.info.apple.com Choose iPod Hi-Fi Support Page from the appropriate Product Service pop-up menu • Knowledge Base search.info.apple.com keyword kipodhifi • Self-paced service training service.info.apple.com Choose Service Training from the Product Service pop-up menu Escalate Follow the practices and policies of your business or agency. iPod Hi-Fi Troubleshooting — Steps 10 Repair or Replace Once you locate the trouble you will most likely need to send the unit to the Apple Repair Center so they can replace a part. Be sure to follow the packing instructions. Also, be sure and include the CompTIA code, the troubleshooting steps you performed, and the results in the Service Instructions section of GCRM and/or GSX. Also be aware of the following parts that customers may replace themselves (known as Do-ItYourself parts): • Battery door • Apple Remote • Apple Remote battery tray • Dock inserts • Power cable • Grille Note: For the current list of Do-It-Yourself parts, see the product support website. Verify the Repair To verify the repair: 1. Try to recreate the original symptoms. You should not be able to. (If you can, return to the beginning of the troubleshooting flowchart.) 2. Complete the testing procedures (Apple Repair Center only). 3. There are no preventive maintenance tasks for this product, other than what is included in the testing procedures. Inform the User Include in the case notes all that you have done. The customer may like a copy of any diagnostic reports. Important: For any unit you send on to an Apple Repair Center, include the CompTIA code, symptoms, steps to reproduce, and troubleshooting steps you have completed thus far in the Service Instructions section of GCRM and/or GSX. (Service Instructions are also known as FAI notes.) Complete Administrative Tasks There are no particular administrative tasks for this product, other than those required by the internal policies of your business or agency. iPod Hi-Fi Troubleshooting — Steps 11 Quick Screening with Customer If you are with a customer, follow these steps: 1. Check for evidence of scratches on the white case or other evidence of trying to open the case, torn or punctured speaker cones, or the black faceplate not being flush with the white case. 2. Try a known-good iPod and known-good music files. 3. Try a known-good external audio input source. 4. Try playing the ipod_ChannelCheck.m4a. 5. Try known-good batteries and/or a known-good power cord. 6. Try resetting the iPod Hi-Fi (see Quick Fixes). 7. Try a known-good Apple Remote. You must screen the iPod Hi-Fi to verify the problem before sending the unit to an Apple Repair Center. If the iPod Hi-Fi passes these tests, do not send it to the Apple Repair Center. iPod Hi-Fi Troubleshooting — Steps 12 Symptom Charts The symptoms discussed in this section include: • Hear Buzz with Auxiliary Input and High Volume 15 • Left/Right Sound Distortion 15 • Left/Right Channel Issues 15 • No Audio Amplification 16 • You Cannot Switch the Audio Input Source from Analog to Digital 16 • Audio In Does Not Work 16 • Poor Sound Quality 17 • No Sound 17 • No/Incorrect Volume Control 18 • Unit Will Not Run Off Batteries 18 • Unit Will Not Run Off AC Adapter 18 • Battery Life Too Short19 • iPod Connection Does Not Work 19 • LED Does Not Respond or Responds Incorrectly 20 • You Cannot Control the Unit with the Remote 20 • Apple Remote Does Not Work 21 • Unit Unusually Hot 21 • No Power or Response at All 22 When to Use the Symptom Charts Before turning to the symptom charts, you should have completed the following steps on the Apple General Troubleshooting Flowchart: 1. Gather information 2. Verify the problem 3. Try quick fixes You consult the symptom charts as part of the Research troubleshooting step (and sometimes as part of the Try Quick Fixes step). How to Use the Symptom Charts The Symptom Charts included in this chapter will help you diagnose specific symptoms related to the product. Cures are listed on the charts in the order of most likely solution: try the cures in the order presented. iPod Hi-Fi Troubleshooting — Symptom Charts 14 Many steps ask you to test with a known-good iPod. If you do not have a known-good iPod, in many cases you can use a known-good external audio source. If you have neither, you will not be able to perform the step. Hear Buzz with Auxiliary Input and High Volume 1. Verify that the buzzing sound is present only when there is an appropriate plug in the audio input port and the volume is set high. 2. Is the buzzing present only under these two conditions? Yes: This is normal behavior. Proceed to the Inform Customer step on the flowchart; do not dispatch this unit to the Apple Repair Center. No: Locate the trouble by proceeding to the Verify Problem step on the flowchart. Begin by discovering precisely under what circumstances you can hear the buzzing. Left/Right Sound Distortion 1. Using a known-good iPod with diagnostic music files, verify that the sound is outside the sound quality specification, if you have not already done so. (You must use your best judgement.) 2. Does the sound quality fall within range? Yes: The unit is operating normally. Proceed to the Inform Customer step on the flowchart; do not dispatch this unit to the Apple Repair Center. When speaking with the customer, offer a copy of the diagnostics report and suggest ways the customer might check the quality of his or her music files. No: A speaker connection may be loose, or one of more of the speakers may need to be replaced. Add the CompTIA code, details of what tests you ran, and the test results to the Service Instructions section of GCRM and/or GSX. If you cannot duplicate the symptom with these sound files, or with known-good files, but you can with the customer’s sound file, include the specific name of the problem sound file in the Service Instructions. Dispatch to the Apple Repair Center. Left/Right Channel Issues 1. Using a known-good iPod with diagnostic music files, verify that the sound is outside the sound quality specification, if you have not already done so. 2. Does the sound quality fall within range? Yes: The unit is operating normally. Proceed to the Inform Customer step on the flowchart; do not dispatch this unit to the Apple Repair Center. When speaking with the customer, offer a copy of the diagnostics report and suggest ways the customer might check the quality of his or her music files. No: The MLB assembly may need to be replaced. Add the details of what tests you ran, the test results, and the CompTIA code to the Service Instructions section of GCRM and/or GSX. If you cannot duplicate the symptom with these sound files, or with known-good files, but you can with the customer’s sound file, include the specific name of the problem sound file in iPod Hi-Fi Troubleshooting — Symptom Charts 15 the Service Instructions. Dispatch to the Apple Repair Center. No Audio Amplification 1. Using a known-good iPod with diagnostic music files, verify that you cannot hear audio amplification. You may have already done this as part of the Gather Information or Verify Problem steps. 2. Is the audio amplification good? Yes: The unit is operating normally. Proceed to the Inform Customer step on the flowchart; do not dispatch this unit to the Apple Repair Center. When speaking with the customer, suggest ways the customer might check the quality of his or her music files. No: Continue with the next step. 3. Visually inspect the woofer (remove the grille). You may have already done this as part of Verify Problem. 4. Is the woofer damaged, for example, is the cone torn or punctured? Yes: Inform the customer that you can have the woofer replaced, but there will be a charge. If the customer agrees to the charge, update the Service Instructions section of GCRM and/ or GSX with the CompTIA code, troubleshooting steps you performed and the results, and dispatch the unit to the Apple Repair Center. No: The woofer connection may be loose, the woofer may be damaged or not working, the MLB assembly may be defective, or other connections may be loose. Update the Service Instructions section of GCRM and/or GSX with the CompTIA code, troubleshooting steps you performed and the results, and dispatch the unit to the Apple Repair Center. You Cannot Switch the Audio Input Source from Analog to Digital 1. If you have not already done so, verify the symptom with known-good analog and digital input sources. 2. Does the symptom persist? Yes: The digital/analog switch on the audio in assembly may have failed. Update the Service Instructions section of GCRM and/or GSX with the CompTIA code, troubleshooting steps you performed and the results, and dispatch the unit to the Apple Repair Center. No: Inform the customer that the trouble appears to be with his or her audio input source. Proceed to the Complete Administrative Tasks on the flowchart, including updating the Service Instructions section of GCRM and/or GSX. Do not dispatch this unit to the Apple Repair Center. Audio In Does Not Work 1. If you have not already done so, verify the symptom with a known-good auxiliary input device and plug, and known-good sound files. 2. Does the symptom persist? Yes: Continue with the next step. iPod Hi-Fi Troubleshooting — Symptom Charts 16 No: Continue with the next step. 3. Verify whether you can hear sound from a known-good iPod connected through the dock connector. 4. Can you hear sound from the iPod? Yes: If you can hear sound from the iPod, but not from the audio in source, the audio in assembly may have failed. Update the Service Instructions section of GCRM and/or GSX with the CompTIA code, troubleshooting steps you performed and the results, and dispatch the unit to the Apple Repair Center. No: If you cannot hear sound from either the audio in source or the iPod, the speaker connection(s) may be loose or the speaker(s) may be defective. Update the Service Instructions section of GCRM and/or GSX with the CompTIA code, troubleshooting steps you performed and the results, and dispatch the unit to the Apple Repair Center. Poor Sound Quality 1. Do you hear a buzzing sound? Yes: Follow the steps for Hear Buzz When Have Auxiliary Input and High Volume. No: Continue with the next step. 2. Using a known-good iPod with diagnostic music files, verify that the sound quality is poor, if you have not already done so. 3. Is the sound quality poor? Yes: The unit could have a leakage problem or it could have a defective rubber seal. Update the Service Instructions section of GCRM and/or GSX with the CompTIA code, troubleshooting steps you performed and the results. If you cannot duplicate the symptom with these sound files, or with known-good files, but you can with the customer’s sound file, include the specific name of the problem sound file in the Service Instructions. Dispatch the unit to the Apple Repair Center. No: The unit is operating normally. Proceed to the Inform Customer step on the flowchart; do not dispatch this unit to the Apple Repair Center. When speaking with the customer, suggest ways the customer might check the quality of his or her music files. No Sound 1. Using a known-good iPod with diagnostic music files, verify that you hear no sound, if you have not already done so. 2. Do you hear sound? Yes: If you hear sound and the quality is good, the unit is operating normally. Proceed to the Inform Customer step on the flowchart; do not dispatch this unit to the Apple Repair Center. When speaking with the customer, suggest ways the customer might check the quality of his or her music files. If you hear sound, but the quality is poor, continue troubleshooting using one of the other sound quality symptoms. No: If you have not already done so, try resetting the iPod Hi-Fi. Continue with the next step. 3. Do you hear sound after a reset? iPod Hi-Fi Troubleshooting — Symptom Charts 17 Yes: If you hear sound and the quality is good, the unit is operating normally. Proceed to the Inform Customer step on the flowchart; do not dispatch this unit to the Apple Repair Center. When speaking with the customer, suggest ways the customer might check the quality of his or her music files. If you hear sound, but the quality is poor, continue troubleshooting using one of the other sound quality symptoms. No: A speaker connection may be loose, or one of more of the speakers may need to be replaced. Add the details of what tests you ran and the test results to the Service Instructions section of GCRM and/or GSX. Dispatch to the Apple Repair Center. No/Incorrect Volume Control 1. Using a known-good Apple Remote, attempt to adjust the volume of the iPod Hi-Fi. Also make sure you are using a known-good iPod with diagnostic music files. You may have already done this as part of the Gather Information or Verify Problem steps. 2. Can you control the volume with the Apple Remote? Yes: The sound board appears to be working normally, but the distance between the control buttons and the board may exceed specifications. Update the Service Instructions section of GCRM and/or GSX with the CompTIA code, troubleshooting steps you performed and the results, and dispatch the unit to the Apple Repair Center. No: The sound board may be malfunctioning. Update the Service Instructions section of GCRM and/or GSX with the CompTIA code, troubleshooting steps you performed and the results, and dispatch the unit to the Apple Repair Center. Unit Will Not Run Off Batteries 1. Verify whether the unit will run off a known-good power outlet. You may have already done this as part of the Gather Information or Verify Problem steps. 2. Does the unit run properly when connected to a known-good power outlet? Yes: Continue with the next step. No: Troubleshoot as for No Power at All. 3. Run the DC supply test from the functional screen test (if you have the functional screen test). 4. Does the unit pass the DC supply test? Yes: Return to the customer as operating normally, or troubleshoot as for Battery Life Too Short. Update the Service Instructions section of GCRM and/or GSX accordingly. No: The battery terminals on the unit may be damaged, the battery connection may be loose, or the MLB assembly may be malfunctioning. Update the Service Instructions section of GCRM and/or GSX with the CompTIA code, troubleshooting steps you performed and the results, and dispatch the unit to the Apple Repair Center. Unit Will Not Run Off AC Adapter 1. Verify whether the unit will run off known-good batteries. You may have already done this as iPod Hi-Fi Troubleshooting — Symptom Charts 18 part of the Gather Information or Verify Problem steps. 2. Does the unit run properly when using known-good batteries? Yes: Continue with the next step. No: Troubleshoot as for No Power at All. 3. Run the AC supply test from the functional screen test (if you have it). 4. Does the unit pass the AC supply test? Yes: Make sure that all the products in the system besides the iPod Hi-Fi are known-good (for example, the iPod, the sound files, the batteries); make sure the volume is set to a level you would normally be able to hear. Continue from step 2. No: The MLB assembly may be malfunctioning or the unit may have a loose connection. Update the Service Instructions section of GCRM and/or GSX with the CompTIA code, troubleshooting steps you performed and the results, and dispatch the unit to the Apple Repair Center. Battery Life Too Short 1. Verify that the battery life is less than three hours given fresh, name-brand non-expired, unmixed batteries. Note any behavior of the LED indicator light. You may have already done this as part of the Gather Information or Verify Problem steps.” 2. Is the battery life too short, given fresh batteries and the usage pattern? Yes: The MLB assembly may be malfunctioning, the volume control may be malfunctioning, or the iPod connector may be defective. Update the Service Instructions section of GCRM and/or GSX with the CompTIA code, troubleshooting steps you performed and the results, and dispatch the unit to the Apple Repair Center. No: The unit is operating normally. Proceed to the Inform Customer step on the flowchart; do not dispatch this unit to the Apple Repair Center. When speaking with the customer, set expectations about battery life for the usage pattern. iPod Connection Does Not Work 1. Inspect the iPod connector for broken, bent, or missing pins, foreign materials in the well, or contamination left on your finger when you run it lightly over the connector. 2. Did you find any items listed in step 1? Yes: Add the specifics of what you found to the Service Instructions section of GCRM and/or GSX. If you found foreign material or contamination, try to remove it. Continue with the next step. No: Continue with the next step. 3. Verify the problem with a known-good iPod and known-good sound files. 4. Are you able to hear good sound from the iPod and iPod Hi-Fi? Yes: You may have resolved the problem sufficiently for the customer, especially given the cost of what would be an out-of-warranty repair. Proceed to the Inform Customer step on iPod Hi-Fi Troubleshooting — Symptom Charts 19 the flowchart; do not dispatch this unit to the Apple Repair Center. No: The iPod connector may need to be replaced. Inform the customer of the potential charge if you have found evidence of damage. Update the Service Instructions section of GCRM and/or GSX with the CompTIA code, troubleshooting steps you performed and the results, and dispatch the unit to the Apple Repair Center. LED Does Not Respond or Responds Incorrectly 1. Verify that the unit responds normally except for the indicator light. In other words, you can adjust volume using the touch pad and the remote, for example. 2. Is the problem restricted to the LED indicator light behavior only? Yes: The LED assembly and/or LED indicator light may have failed. Update the Service Instructions section of GCRM and/or GSX with the CompTIA code, troubleshooting steps you performed and the results, and dispatch the unit to the Apple Repair Center. No: Return to the beginning of the flowchart. Try to discover the true failure by doing things that would normally elicit LED signals, like inserting or running off batteries, controlling the iPod through the Apple Remote, and adjusting the iPod Hi-Fi volume. You Cannot Control the Unit with the Remote 1. Verify the behavior of the remote. Does the iPod Hi-Fi LED indicator light flash amber when you press the remote? Yes: Verify that you are asking the unit to do something it can. For example, if you press the increase volume button on the remote when the volume is already set to the maximum, the iPod Hi-Fi LED indicator light will flash amber: it cannot implement the command. No: Continue with the next step. 2. Does the iPod Hi-Fi LED indicator light flash green when you press the remote? Yes: Verify that the iPod Hi-Fi responds appropriately to the command from the remote. If it iPod Hi-Fi Troubleshooting — Symptom Charts 20 does not, troubleshoot as for No Power at All. No: Continue with the next step. 3. Does the iPod Hi-Fi LED indicator light flash any color when you press the remote? Yes: The color is either amber or green. Return to the previous step. No: The remote may have failed. Continue with the next step. 4. If you have not already, try using a known-good remote. 5. Does using the known-good remote remove the symptom? Yes: The original remote has failed. Replace it. Do not dispatch the unit to Apple Repair Center. No: As part of Gather Information, Verify Problem, and/or Try Quick Fixes, you may have already tried controlling the iPod Hi-Fi directly (not using a remote). If you have not, try that now. Continue with the next step. 6. Does the iPod Hi-Fi operate normally when you control it directly (not using a remote)? Yes: The IR sensor could be malfunctioning. Add the details about what troubleshooting steps you have taken and the results to the Service Instructions section of GCRM and/or GSX and dispatch the iPod Hi-Fi to the Apple Repair Center. No: Troubleshoot as for No Power at All. Apple Remote Does Not Work 1. If you have not already, verify that the iPod Hi-Fi works properly using a known-good remote. 2. Does the iPod Hi-Fi work properly using a known-good remote? Yes: The remote has failed. Replace the part and proceed to Verify Repair on the flowchart. Do not dispatch this unit to the Apple Repair Center. No: Verify that the iPod Hi-Fi works when you control it directly (not using a remote). Continue with the next step. 3. Does the iPod Hi-Fi operate normally when you control it directly (not using a remote)? Yes: The IR sensor could be bad. Add the details about what troubleshooting steps you have taken and the results to the Service Instructions section of GCRM and/or GSX and dispatch the iPod Hi-Fi to the Apple Repair Center. No: The sound board may be malfunctioning or the distance between the control buttons and the board may exceed specifications (if you cannot control the volume), or the MLB assembly may be malfunctioning. Add the details about what troubleshooting steps you have taken and the results to the Service Instructions section of GCRM and/or GSX and dispatch the iPod Hi-Fi to the Apple Repair Center. Unit Unusually Hot 1. Verify that the unit is hotter than other similar products running for the same amount of time, if you have not already done so. 2. Is the iPod Hi-Fi hotter than similar products and/or too hot to hold? Yes: The MLB assembly assembly may be malfunctioning. Update the Service Instructions iPod Hi-Fi Troubleshooting — Symptom Charts 21 section of GCRM and/or GSX with the CompTIA code, troubleshooting steps you performed and the results, and dispatch the unit to the Apple Repair Center. No: The unit is operating normally. Proceed to the Inform Customer step on the flowchart; do not dispatch this unit to the Apple Repair Center. No Power or Response at All 1. If you have not done so already, verify the problem with a known-good iPod and power cord. 2. Do you see or hear any response with battery power? Yes: Note any response in the case notes, including LED indicator light behavior, and continue with the next step. No: If you have not already done so, try resetting the iPod Hi-Fi. Continue with the next step. 3. Do you see or hear any response with battery power after resetting the iPod Hi-Fi? Yes: The reset resolved the issue. Proceed to the Verify Repair step on the flowchart; do not dispatch this unit to the Apple Repair Center. No: The battery connector may need to be replaced. Update the Service Instructions section of GCRM and/or GSX with the CompTIA code, troubleshooting steps you performed and the results. Continue with the next step. 4. Do you see or hear any response when connected to AC power? Yes: The battery connector may need to be replaced. Update the Service Instructions section of GCRM and/or GSX with the CompTIA code, troubleshooting steps you performed and the results, and dispatch the unit to the Apple Repair Center. No: The power supply (part of the MLB assembly assembly) may need to be replaced. Update the Service Instructions section of GCRM and/or GSX with the CompTIA code, troubleshooting steps you performed and the results, and dispatch the unit to the Apple Repair Center. iPod Hi-Fi Troubleshooting — Symptom Charts 22