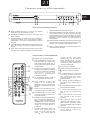
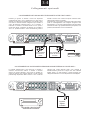
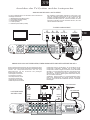
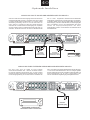
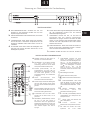
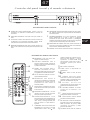
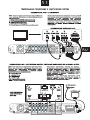
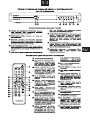
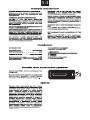
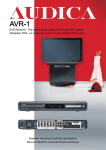
1
3
GB
Welcome
FR
Thank you for choosing AUDICA
Audica AV products have been designed and engineered to the highest standards, combining style with
functionality and ergonomics. To extract the best from your system, please refer closely to this manual. It
may also be necessary for you to refer to other components’ user guides to prevent any damage or loss in
performance which may occur from incorrect installation.
IT
Enjoy...
DE
Contents
Read this before you begin
-
-
-
-
4
Connecting a TV and speakers-
-
-
-
-
5
Optional connections-
-
-
-
-
6
Front panel and handset controls
-
-
-
-
7
Setting up the AVR-1
-
-
-
-
-
8
Playing a DVD
-
-
-
-
-
-
12
Playing a CD
-
-
-
-
-
-
12
Playing MP3 discs -
-
-
-
-
-
12
Viewing JPG photo discs
-
-
-
-
-
13
Playing the radio
-
-
-
-
-
13
Playing from an external source
-
-
-
-
13
On-screen toolbar -
-
-
-
-
-
14
Troubleshooting
-
-
-
-
-
-
15
Specifications
-
-
-
-
-
-
15
Remote Control
-
-
-
-
-
-
15
Guarantee
-
-
-
-
-
-
15
-
-
ESP
RU
SOURCE
4
Important Safety Information
1. GENERAL INFORMATION
The AUDICA AVR-1 DVD/Receiver includes four system
components in one box - a DVD player, FM/AM radio, surround
sound decoder and 6 channel amplifier. In addition to the AVR-1
you will need a TV and a speaker system with between two and
six channels. A full six channel speaker system is recommended
to deliver the most realistic surround-sound experience.
2. UNPACKING YOUR SYSTEM
Care must be taken whilst unpacking your system that no part is
damaged or lost. For an inventory of what should be supplied
with the system, please refer to system specifications on page
16. Retain packaging materials so the system can be re-packed
and shipped if necessary.
3. SERVICING
Do not attempt to service this product yourself as opening covers
or panels may expose you to dangerous voltages or other
hazards. Refer all servicing to qualified personnel.
Where replacement parts are required be sure the service
technician has used replacements supplied by the manufacturer
or have the same characteristics as the original part. Use of
unsuitable parts could cause fire, electrical shock or other
hazards and may void any warranty or guarantee.
The technician must perform any safety checks to test the
performance of any repairs.
CAUTION!
RISK OF ELECTRIC SHOCK
DO NOT OPEN
TO REDUCE THE RISK OF ELECTRIC SHOCK DO
NOT REMOVE COVER (OR BACK)
This symbol indicates that there are
important operating and maintenance
instructions in the literature
This symbol indicates that dangerous
voltage constituting a risk of electric
4. PRECAUTIONS
! Read these instructions.
! Keep these instructions.
! Heed all warnings.
! Follow all instructions.
! Do not use this apparatus near water.
! Clean only with a slightly damp cloth.
! Do not block any ventilation openings.
! Install in accordance with the manufacturer's instructions.
! Do not install or operate near any heat sources such as
radiators, stoves, or other apparatus that produce heat.
! Unplug this apparatus during lightning storms or when
unused for long periods of time.
! Refer all servicing to qualified service personnel. Servicing is
required when the apparatus has been damaged in any way,
such as the power-supply cord or plug is damaged, liquid
has been spilled or objects have fallen into the apparatus,
the apparatus has been exposed to rain or moisture, does
not operate normally, or has been dropped.
! Warning: To reduce the risk of fire or electrical shock, do not
expose this product to rain or moisture. The product must not
be exposed to dripping and splashing and no object filled
with liquids such as a vase of flowers should be placed on the
product.
! No naked flame sources such as candles should be placed
on the product.
Caution: Changes or modifications not expressly approved by
the manufacturer could void the user's authority to operate this
device.
Caution: Usage of controls or adjustments or performance of
procedures other than those specified herein may result in
hazardous exposure.
These labels tell you that the unit contains a Laser component.
Do not stare at the laser lens.
IMPORTANT
This equipment has been tested and found to comply with the
limits for a Class B digital device pursuant to part 15 of the FCC
rules. These limits are designed to provide reasonable protection
against harmful radiation in a residential installation. This
equipment generates, uses and can radiate radio frequency
energy and, if not installed and used in accordance with the
instructions, may cause harmful interference to radio
communication. However, this is no guarantee that interference
will not occur in a particular installation. If this equipment does
cause harmful interference to radio or television reception, which
can be determined by turning the equipment off and on, the user
is encouraged to try to correct the interference by one of the
following measures:
! Reorient or relocate the receiving antenna.
! Increase the separation between the equipment and
receiver.
! Connect the equipment into an outlet on a circuit different
from that to which the receiver is connected.
! Consult the dealer or an experienced radio/TV technician for
help.
ELECTRICAL INFORMATION
Mains Supply: The mains operating voltage of this unit is on the
rating plate on the rear. In the UK this is 230/240 V.
The AVR-1 is supplied with a power cord terminated with a UK
approved mains plug fitted with a 3A fuse. If the fuse needs to be
replaced, an ASTA or BSI approved BS1362 fuse rated at 3A
must be used. If you need to change
the mains plug, remove the fuse and
dispose of this plug safely
3A FUSE
immediately after cutting it from the
BS 1362
cord.
MAINS POWER SWITCH
BLUE
BROWN
(Live)
The AVR-1 does not have a power (Neutral)
Class II construction double insulated. This
product must not be connected to earth.
switch. If you need to switch off the mains power to the AVR-1,
remove the mains plug from the wall outlet. For this reason,
ensure that the mains plug remains easily accessible when
installing the AVR-1.
Dolby 5.1ch
Manufactured under license from Dolby Laboratories. “Dolby”,
“Pro-logic" and the double-D symbol are trademarks of Dolby
Laboratories.
DTS
Manufactured under license from Dolby Laboratories. Dolby,
and the double-D symbol are trademarks of Dolby Laboratories.
Additionally, software products running on a computer must also
be marked with: Confidential unpublished works. Copyright
1992-2002 Dolby Laboratories .All rights reserved.
copyright protection
This product incorporates copyright protection technology that is
protected by method claims of certain U.S. patents and other
intellectual property rights owned by Macrovision Corporation
and other rights owners. Use of this copyright protection
technology must be authorized by Macrovision Corporation, and
is intended for home and other limited viewing uses only unless
otherwise authorized by Macrovision Corporation. Reserve
engineering or disassembly is prohibited.
5
GB
Connecting a TV and speakers
CONNECTING THE AVR-1 TO A TV
The highest quality connection is at the top, the lowest at the
bottom. Your TV will probably have several connection options
for picture (video) input. For the best quality picture, check which
connections are available on your TV and use the one nearest
the top of the list.
There are 5 video output connections to take the picture to your
TV. These are 1. HDMI digital output (picture and sound)
2. PrPbY component (picture only)
3. SCART (picture and sound, 240V version only)
4. S-Video (picture only)
5. CVBS composite video (picture only)
TV VIDEO CONNECTIONS
d
e
a
S-VIDEO CVBS HDMI
b
c
PR PB Y
SCART
CONNECTING SPEAKERS, A SUBWOOFER AND AERIALS TO THE AVR-1
There are speaker connections for up to 6 speakers set up in a
surround sound configuration. The speaker connections are
labelled to match the position of each speaker as follows - FR is front right
- FL is front left
- RR is rear right
- RL is rear left
- CEN is front centre
- RCEN is rear centre
Position your speakers as instructed in the handbook for the
speakers. Connect the wires from each speaker to the correct
terminals at the rear of the AVR-1 for that speaker. Ensure that
the + speaker terminals (coloured red) connect to the top +
terminals of the AVR-1 by connecting the striped wire to the +
terminals.
CAUTION:- When connecting speaker wires make sure that no
loose wire strands can touch another terminal. This may
permanently damage the circuitry of the AVR-1.
FM AERIAL
Subwoofer
Front
left
SPEAKER
LOCATIONS
Centre
front
Front
right
Rear
right
Rear
left
Centre
rear
AM AERIAL
6
Optional connections
CONNECTING TV SOUND AND OTHER SOURCES TO THE AVR-1
Both TV Audio and AUX inputs are available on the AVR-1 for the
connection of other signal sources. If your TV is connected with a
SCART cable, then no further connection is necessary to listen
to TV sound through your AVR-1. If your TV is not using the
SCART connector and has a stereo audio output, we
recommend that you connect it to the TV AUDIO in connections
of the AVR-1. You can then play sound from your TV through the
TV AUDIO
OUTPUT
CONNECTIONS
multi-channel surround decoder built into the AVR-1 by selecting
the TV input of the AVR-1.
Similarly, you may have another stereo audio-visual source such
as a VCR that can be connected to the AUX input of the AVR-1.
The VCR sound can then be played through the AVR-1 on the
main system speakers and decoded into multi-channel sound if
preferred.
VCR/AUX
AUDIO OUTPUT
CONNECTIONS
CONNECTING AN EXTERNAL SURROUND-SOUND DECODER TO THE AVR-1
The AVR-1 may also be used as a source for an external
surround-sound decoder or receiver. An external decoder or
receiver may be used in a large room with large speakers to
achieve more output power than the internal amplifiers of the
AVR-1 can produce. All channels of the multi-channel signal from
the AVR-1 are connected to the Decoder/Receiver through a
single digital coaxial phono cable. NOTE:- FM/AM radio and Aux
input signals connected to the AVR-1 are not available through
the digital output.
Coaxial
digital input
EXTERNAL SURROUND
DECODER OR RECEIVER
7
GB
Front Panel and Handset Controls
SOURCE
ab
c d e f
g
h
FRONT PANEL KEYS
a
b
c
d
HEADPHONE SOCKET. Connect your headphones here.
The speakers will switch off when headphones are
connected.
e
f
DISC UNLOAD. Press this key to remove a disc.
Volume controls. These keys control the volume of speakers
or headphones connected to the AVR-1. NOTE:- these keys
will not change the TV volume.
PLAY/PAUSE. This key will play a DVD or CD disc. Press
again to pause disc play.
g
h
STOP. This key will stop play of a DVD or CD disc. It will
erase a FM/AM radio preset if pressed twice.
NEXT/PREVIOUS. Press briefly to fast search a disc or to
skip to the next radio preset. Press and hold these keys to
change to the previous or next chapter, track or to search
tune the band for another station.
SOURCE SELECT. This key selects the source you want to
play on the AVR-1 from DVD/CD disc - AUX - OPTICAL IN TV - SCART IN - FM - AM.
STANDBY. Switch the AVR-1 on or off. Set to Standby when
REMOTE CONTROL KEYS
a
b
a
c
b
c
e
g
h
1!
1#
1$
1^
1&
1*
d
d
f e
h
i f
1)
1@ g
1%
1(
h
i
POWER. Press to switch on or off.
NUMERIC KEYPAD. For direct access
selection of tracks, DVD chapters
(when used with the GOTO key) or
radio presets.
STORE. For programming discs or for
storing radio presets. Hold down this
button to start auto-programming for
the radio.
GO TO. Quick selection of a particular
DVD title or chapter.
tune the radio in steps, hold to search
tune.
1) OK. Confirms a selection.
1! SLEEP. Activates the sleep timer.
1@ MENU. Activates the disc menu.
1# SOURCE SELECT. This key
selects the source you want to play on
the AVR-1 from DVD-AUX1-OPTICAL
IN-TV- SCART IN-FM-AM.
1$
SELECT. Selects audio bass,
treble and channel balance settings.
STOP. Stop DVD/CD playback or FM
scanning. Clears radio presets when
held.
1%
MUTE. Instantly mutes the sound.
Press again to cancel.
1^
PLAY/PAUSE. Plays a disc. Press
again to pause.
1&
PREV/NEXT. Press briefly to fast
search a disc or select another radio
preset. Press and hold to change to the
previous or next chapter or track.
1* EQ. Selects an audio equaliser mode
CURSOR KEYS. Use these keys to
navigate menus. When playing a disc
use
to change the camera angle
(multi-angle discs only) and
to
playback in slow motion. Press
to
1( AV MODE. Switches between stereo
VOLUME. Sets the master volume
of speakers or headphones.
SETUP. Enter or exit the AVR-1
setup menu .
TOOLS. Activates the on-screen
menu for special features.
from FLAT - EQB+ (bass boost, EQM+
(midrange boost), EQM- (midrange
cut).
sound and multi-channel surroundsound modes.
8
AVR-1 General set-up
GENERAL PAGE
AUTO
PIC MODE
FILM
AUDIO OUT
GENERAL SETUP
Press the SETUP key on the handset. There
are 4 set-up options. Use the cursor key to
navigate the menu options and press OK to
select your chosen menu. The menus
available are shown at the right.
NOTE:- Video setup and Preferences menus
are not accessible when a disc is playing.
D.R.C.
VIDEO
ANGLE MARK
SMART
OSD LANGUAGE
SUPER SMART
SCREEN SAVER
PIC MODE optimises the video performance
of the AVR-1. Select AUTO and the AVR-1
will optimise automatically. FILM setting
optimises for films, VIDEO for best
resolution, SMART for additional vertical
processing when progressive and SUPER
SMART for motion adaptive processing.
MAIN PAGE
GENERAL PAGE
PIC MODE
AUDIO OUT
SPDIF/RAW
D.R.C.
SPDIF/PCM
AUDIO OUT sets the digital audio output
format. If you have an external surroundsound decoder, choose SPDIF/RAW. If you
have a stereo DAC, choose SPDIF/PCM.
ANGLE MARK
SETUP MENU MAIN PAGE
OSD LANGUAGE
SCREEN SAVER
GENERAL SETUP
SPEAKER SETUP
MAIN PAGE
VIDEO SETUP
PREFERENCES
EXIT SETUP
GENERAL PAGE
FULL
PIC MODE
AUDIO OUT
6/8
D.R.C.
ANGLE MARK
D.R.C. sets the audio dynamic range
compression. Set this FULL or to a high value
for small speakers. Set to OFF or to a low
value for large speakers.
4/8
OSD LANGUAGE
SCREEN SAVER
2/8
MAIN PAGE
OFF
Angle mark sets the ANGLE symbol to
appear automatically when a DVD includes
multi-angle information.
GENERAL PAGE
PIC MODE
AUDIO OUT
D.R.C.
ANGLE MARK
ON
OSD LANGUAGE
OFF
SCREEN SAVER
MAIN PAGE
OSD language sets the language for the onscreen menus. The choices are English,
French, German, Spanish, Italian. The
default is English.
GENERAL PAGE
PIC MODE
AUDIO OUT
D.R.C.
ANGLE MARK
OSD LANGUAGE
ENGLISH
SCREEN SAVER
GERMAN
FRENCH
MAIN PAGE
ITALIAN
SCREEN SAVER sets the screen saver on or
off. If the AVR-1 is left in STOP or PAUSE
mode for more than 5 minutes, the screensaver will start. We recommend that this is
set to ON.
GENERAL PAGE
PIC MODE
AUDIO OUT
D.R.C.
ANGLE MARK
OSD LANGUAGE
SCREEN SAVER
ON
OFF
MAIN PAGE
9
GB
AVR-1 Speaker Setup
SETUP MENU MAIN PAGE
GENERAL SETUP
SPEAKER SETUP
Select the SPEAKER SETUP menu to set
your AVR-1 to correctly match your system
speakers and your room.
VIDEO SETUP
PREFERENCES
EXIT SETUP
SPEAKER SETUP PAGE
SPEAKER TYPE
SPEAKER TYPE
FRONT SPEAKER
CS-C1
SPEAKER POSITION
CENTER SPEAKER
CS-LCR
SPEAKER DISTANCE
REAR SPEAKER
GENERIC
SPEAKER TEST TONE
REAR C SPEAKER
OFF
SUBWOOFER
MAIN PAGE
PREVIOUS PAGE
SPEAKER SETUP PAGE
SPEAKER POSITION
SPEAKER TYPE
FRONT SPEAKER
ON WALL
ON SHELF
SPEAKER POSITION
CENTER SPEAKER
SPEAKER TEST TONE
REAR SPEAKER
FREE 1
SPEAKER DISTANCE
REAR C SPEAKER
ON GEO STAND
SPEAKER TYPE enables you to select the
model of Audica speaker you are using for
each position in your system. If the speaker is
not an Audica, select GENERIC. If you do not
have a speaker in this position (centre and
rear speakers only), select OFF. If using an
Audica CS-LCR set the centre to LCR and
the front left and right will default to LCR also.
SPEAKER POSITION enables you to select
the placement of your speakers. Choose
from WALL-MOUNT, SHELF-MOUNT,
FREE 1 (floor standing) or ON GEO STAND
(front centre and LCR only).
MAIN PAGE
PREVIOUS PAGE
SPEAKER SETUP PAGE
SPEAKER DISTANCE
SPEAKER TYPE
CENTER DISTANCE
SPEAKER POSITION
FRONT DISTANCE
SPEAKER DISTANCE
REAR DISTANCE
SPEAKER TEST TONE
SUB DISTANCE
5 FT/1.5M
SPEAKER DISTANCE enables you to set
the distance that each speaker is from the
listener. The AVR-1 will automatically correct
for these distances when playing. use the
CURSOR key to scroll through distances.
MAIN PAGE
PREVIOUS PAGE
SPEAKER SETUP PAGE
SPEAKER TYPE
SPEAKER TEST TONE
TEST TONE
MANUAL
SPEAKER POSITION
SPEAKER DISTANCE
SPEAKER TEST-TONE
MAIN PAGE
AUTO
PREVIOUS PAGE
With TEST TONE and AUTO selected, you
can check that all speaker volumes are
equal. If you want to adjust the volume of a
particular speaker, select the 'MANUAL'
option and choose the speaker to adjust with
the
CURSOR key. Then you can set the
relative volume of that speaker with the
VOLUME keys.
10
AVR-1 Video Setup
SETUP MENU MAIN PAGE
GENERAL SETUP
SPEAKER SETUP
VIDEO SETUP
PREFERENCES
EXIT SETUP
Select the VIDEO SETUP
menu to set up your AVR-1 to
correctly match your TV.
NOTE:- This menu can only
be selected when the disc is
stopped.
VIDEO SETUP
TV DISPLAY
NORMAL/PS
TV TYPE
NORMAL/LB
RESOLUTION
WIDE/HDTV
VIDEO OUTPUT
MAIN PAGE
VIDEO SETUP
TV DISPLAY
TV TYPE
MULTI
RESOLUTION
NTSC
VIDEO OUTPUT
PAL
MAIN PAGE
VIDEO SETUP
TV DISPLAY
TV TYPE
SD INTERLACE
RESOLUTION
SD PROGRESSIVE
VIDEO OUTPUT
720P
1080I
MAIN PAGE
VIDEO SETUP
TV DISPLAY
TV TYPE
RESOLUTION
VIDEO OUTPUT
YPRPB
RGB
MAIN PAGE
TV DISPLAY enables you to choose the screen shape
of your TV. Choose NORMAL/PS (Pan & Scan) mode
to display a wide picture on a 4:3 size screen by cutting
the left and right sides of the picture. Choose
NORMAL/LB (Letterbox) to display the the full
widescreen picture on a 4:3 screen with bands at the
top and bottom. Choose WIDE/HDTV for a 16:9 widescreen TV.
TV TYPE enables you to select the video system
compatibility of your TV. Choose MULTI if your TV has
a dual PAL/NTSC video system. Choose NTSC if your
TV is a U.S. spec TV. Choose PAL to match TVs sold in
other markets. NOTE:- Do not change this setting
unless you are certain that the current setting is
incorrect, you may lose the TV picture.If you set the
incorrect setting and loose the picture press the stop
button for 5 seconds and the AVR-1 will reset and
return to standby. On power up the factory settings will
be restored.
RESOLUTION enables you to change the picture
quality to match your TV from Interlace - Progressive
720P - Interlace 1080. Set the highest quality
compatible with your TV. NOTE:- If you set the
incorrect setting and loose the picture press the stop
button for 5 seconds and the AVR-1 will reset and
return to standby. On power up the factory settings will
be restored. Depending on the way your screen's
internal scaling works the highest setting may not
necessatirly give the best results. Consult your
screen's manual to confirm the best setting.
Set the VIDEO OUTPUT to match the video
connection you made from the AVR-1 to your TV. If you
connected with a SCART cable, choose RGB. If you
connected with Component Video, choose YPRPB. If
you used a different video output connection, this
setting does not apply.
11
GB
AVR-1 Preferences
PREFERENCES
AUDIO
ENGLISH
SUBTITLE
GERMAN
DISC MENU
FRENCH
PARENTAL
SPANISH
PASSWORD
ITALIAN
AUDIO selects the preferred language for
dialogue.
DEFAULTS
SETUP MENU MAIN PAGE
MAIN PAGE
GENERAL SETUP
SPEAKER SETUP
VIDEO SETUP
PREFERENCES
EXIT SETUP
SUBTITLE selects the preferred language
for subtitles.
PREFERENCES
AUDIO
SUBTITLE
ENGLISH
DISC MENU
GERMAN
PARENTAL
FRENCH
PASSWORD
SPANISH
DEFAULTS
ITALIAN
OFF
MAIN PAGE
DISC MENU sets the preferred language for
disc menus.
PREFERENCES
AUDIO
SUBTITLE
DISC MENU
ENGLISH
PARENTAL
GERMAN
PASSWORD
FRENCH
DEFAULTS
SPANISH
ITALIAN
MAIN PAGE
1 G - Kids material
2 - General audience
3 PG - Parental guidance
4 PG13 - Over 13 years old
5/6 PG-R Under 17 with adult
7 NC-17 Over 17 only
8 ADULTAdults only
NO PARENTAL Plays all discs
PREFERENCES
2
AUDIO
SUBTITLE
3 PG
DISC MENU
4 PG13
5
PARENTAL
PASSWORD
PG-R
DEFAULTS
NC-17
MAIN PAGE
NO PARENTAL
PARENTAL sets the access level to
restricted access discs. The setting levels
are shown in the table on the left. The factory
setting is NO PARENTAL.
NOTE:- Not all DVD discs have parental
restriction.
ADULT
PREFERENCES
AUDIO
SUBTITLE
DISC MENU
PARENTAL
PASSWORD
CHANGE
PASSWORD protects the parental settings.
The factory setting is 1234. Use this menu
option to change the password. To clear the
password back to 1234, press STOP 4 times
when prompted for the old password.
DEFAULTS
MAIN PAGE
Select the RESET menu option to set all user
adjustable settings back to the factory
defaults.
PREFERENCES
AUDIO
SUBTITLE
DISC MENU
PARENTAL
PASSWORD
DEFAULTS
MAIN PAGE
RESET
12
Playing a DVD
PLAYING A DVD-VIDEO DISC
Switch on the AVR-1 and your TV. Select the correct AV input of
your TV (if you are using SCART connection the input may select
automatically). Load your DVD disc into the front panel loading
slot. The disc menu will appear on your TV screen. Use the
cursor keys to navigate the on-screen menu and play the movie
or press the key.
Press the GOTO key. Enter the title or chapter numbers with the
NUMBER keys. Use the
CURSOR keys to switch between
title/chapter selection. Press the key to go.
SETTING THE VOLUME
Use the VOLUME keys to set the volume level from the
speakers. NOTE:- The AVR-1 volume control will not control the
volume from the TV speakers.
SLOW MOTION
To view a section of the movie in slow motion, press the
CURSOR key repeatedly to set the slow motion speed and
direction. Continue pressing to return to play the movie.
FAST SEARCH
Press the
keys, fast search will begin in your chosen
direction. Press again to change the search speed x2, x4, x6, x8.
Press
to cancel. This function is only available from the
remote control.
DISC MENU
Press MENU at any time to return to the disc menu. You can
access disc options encoded in the disc by the publisher. This
may include direct title/chapter access, soundtrack settings,
special features etc.
STEPPING THROUGH CHAPTERS
Hold down the
keys to step through chapters.
AUDIO MODE SELECTION
When playing a DVD you can select different sound modes with
the AV MODE key. The sound modes available will depend on
the soundtracks available on the DVD.
GO DIRECTLY TO A NEW TITLE OR CHAPTER
STILL FRAME
To freeze the picture in still frame, press the
to cancel and return to play.
key. Press again
Playing a CD
PLAYING A CD AUDIO DISC
Switch on the AVR-1. Select DVD with the SOURCE key. Load
your CD disc into the front panel loading slot. The disc will play
automatically.
SETTING THE VOLUME
Use the VOLUME keys to set the volume level from the
speakers. NOTE:- The AVR-1 volume control will not control the
volume from the TV speakers.
FAST SEARCH
Press the
keys, fast search will begin in your chosen
direction. Press again to change the search speed x1, x2, x3, x4.
Press
to cancel. This function is only available from the
remote control.
JUMP DIRECTLY TO ATRACK
Enter the track number with the number pad. Press the
go.
PAUSE
To pause the music, press the
return to play.
key to
key. Press again to cancel and
STORING A PROGRAM SEQUENCE
To store a sequence of tracks, stop the disc and press the
STORE key. Now enter each track you want to program in turn
with the NUMBER keys, then OK to store it. Press
to play the
program. Press repeatedly to stop playback and clear the
program.
AUDIO MODE SELECTION
When playing a CD you can select different sound modes with
the AV MODE key. 2 channel stereo and Dolby Pro Logic II Music
modes are recommended for CD sound.
STEPPING THROUGH THE TRACKS
Hold down the
keys to select tracks.
Playing an MP3 Disc
PLAYING AN MP3 DISC
You can listen to a CD-R or DVD-R disc of your MP3 music files
with the AVR-1.
Switch on the AVR-1. Select DVD with the SOURCE key. Load
your MP3 disc into the front panel loading slot. Press
to play
the disc.
SETTING THE VOLUME
Use the volume keys to set the volume level from the speakers.
NOTE:- The AVR-1 volume control will not control the volume
from the TV speakers.
STEPPING THROUGH THE TRACKS
Hold down the
keys to select tracks.
JUMP TO ATRACK
Enter the track number with the NUMBER keys. The AVR-1 will
jump to this track.
FAST SEARCH
Press the
keys briefly, fast search will begin in your
chosen direction. Press again to change the search speed x2,
x4, x6, x8. Press to cancel.
PAUSE
To pause the music, press the
return to play.
key. Press again to cancel and
ON-SCREEN NAVIGATION
You can switch on the TV to navigate folders of tracks more
easily on-screen when the disc is stopped. You will see a folder
list on the left of the screen and a list of your music files on the
right. Navigate the folder list to find your music folder, with the
CURSOR keys, then press OK to select the folder. Press the
CURSOR key to move to the file list of MP3 tracks. Navigate the
list with the
CURSOR keys. Select file number 0 at the top of
the list to move back up the folder list.
13
Viewing JPG Digital Photos on a CD-R or DVD-R
VIEWING JPG DIGITAL PHOTOS
You can view a CD-R or DVD-R disc of your digital photos or
other JPG files with the AVR-1.
Switch on the AVR-1 and your TV. Select DVD with the SOURCE
key. Load your disc into the front panel loading slot.
FINDING YOUR PHOTOS ON THE DISC
You can navigate the disc on the TV screen. The screen will show
a map of the disc folders, Press OK to select a folder and display
sub-folders or files on the disc. Use the
CURSOR keys
to navigate the folder list. Selecting number 0 at the top of the list
will move back up the folder list.
When you find the folder you want, select a file in the folder and a
slide-show will begin. You can pause the slide-show with the
key. Press again to start the slide-show. You can also change
the picture displayed by holding down the
keys. When all
pictures in the folder have been shown, the AVR-1 will move to
the next folder (if available).
ROTATING THE PICTURES
Use the
CURSOR keys to rotate or mirror pictures when they
are on the screen.
RETURNING TO THE FOLDER LIST
To return to the folder list, press the STOP key.
SLIDESHOW
Playing The Radio
PLAYING THE RADIO
Switch on the AVR-1. Press the SOURCE key to select the FM or
AM band you require.
SETTING THE VOLUME
Use the volume keys to set the volume level from the speakers.
NOTE:- The AVR-1 volume control will not control the volume
from the TV speakers.
AUTO-TUNING
The AVR-1 radio will auto-tune all local stations automatically
and program them into preset locations. To auto-tune, press the
GOTO key. AUTOPROG will show in the display. Wait briefly
while the AVR-1 searches out all available stations and programs
them into memory. If the display shows FULL, then more than 40
stations were found.
MANUAL TUNING
The AVR-1 can also be tuned manually. Press the
CURSOR keys to tune manually in steps. Hold down these keys
to scan to the next station up or down the band.
STORING A PRESET STATION
There are 40 preset radio station memories available for FM or
AM stations. To STORE a station, first tune in to a station, then
press the STORE key, followed by one or two digits with the
NUMBER keys to set the preset number, then press STORE
again. This station will be stored in memory for future use.
PLAYING A PRESET STATION
Pressing a NUMBER key will recall a preset station. If the station
number has two digits, press the two numbers in sequence.
STEPPING THROUGH PRESET STATIONS
Use the
keys to step through each preset in turn.
or
Playing From an External Source
PLAYING AN EXTERNAL SOURCE
Three additional sources may be connected to the AVR-1 such
as TV sound (via SCART cable or TV input), a digital source (to
OPTICAL input) or another analogue source such as tape. See
page 6 for connection instructions.
SELECT THE CORRECT SOURCE
To select one of these external sources, press the SOURCE key.
This will change the source from DVD-AUX1-OPTICAL IN-TVSCART IN-FM-AM
SETTING THE VOLUME
Use the volume keys to set the volume level from the speakers.
NOTE:- The AVR-1 volume control will not control the volume
from the TV speakers.
GB
14
AVR-1 On-Screen Toolbar
The on-screen TOOLBAR gives quick access to certain
features while a movie is playing.
SWITCHING ON THE TOOLBAR
Press the TOOLS key to switch on the on-screen toolbar.
SWITCHING OFF THE TOOLBAR
Press the TOOLS key again to switch off the toolbar when you
are finished.
SELECTING ATOOLBAR SYMBOL
You can choose a Toolbar symbol with the
CURSOR keys.
CHANGING ATOOLBAR SETTING
The CURSOR key changes toolbar settings.
A-B
SUBTITLES
AUDIO
REPEAT
A-B LOOP
ZOOM
Choose this toolbar symbol to
switch the subtitles on or off or scroll
through the available languages
using the CURSOR key.
DISPLAY
RETURN
Press RETURN to go back to
main page when playing a disc.
Choose the DISPLAY symbol to switch on a
status display on the TV screen. You can
choose different display options by pressing
repeatedly the DOWN key.
Choose the AUDIO symbol to change the
audio language. This is only possible if the
disc includes multiple languages.
Choose the REPEAT symbol if you want to
set the whole disc to repeat, or to repeat
only a title, chapter or track on the disc.
When the symbol is selected, use the
CURSOR key to choose the repeat option
you want.
Choose the ZOOM symbol to zoom into the
centre of the picture. Press the CURSOR
key to set the zoom level you want.
Choose A-B LOOP if you want to repeat a
section of a movie. Press the
CURSOR
key once when you are ready to start the loop
(A point). Press the
CURSOR key again
when you want to end the loop. The AVR-1
will now play the loop between start and end
continually. Press the CURSOR key again
to cancel the A-B LOOP.
15
Troubleshooting
NO PICTURE ON THE TV
Make sure that you have selected the correct AV input channel
on your TV for the video connection that you have used.
DISTORTED, UNSTABLE TV PICTURE
The TV TYPE or RESOLUTION settings may be incorrect for
your TV. To reset resolution to factory settings, press
OPEN/CLOSE, then the NEXT key.
WRONG REGION MESSAGE ON THE TV SCREEN WHEN
PLAYING A DVD
The disc you are playing was purchased in another DVD region.
You can only play DVD discs purchased in the same region as
your player. The region setting for the AVR-1 is marked on the
rear panel and will appear as a number inside a globe. The disc
will also carry the same region marking.
GB
A disc may be playing. These menus are only accessible when
the disc is stopped.
NO SOUND FROM THE CENTRE OR REAR SPEAKERS
Check that the speaker has not been switched off in the
SPEAKER SETUP menu.
POOR QUALITY FM RADIO RECEPTION
The aerial is not connected or is not sensitive enough - an
outdoor aerial may be required in some areas. Check the aerial
connection or ask a local aerial fitter to recommend a better
aerial system for your AVR-1.
NO SOUND FROM AN EXTERNAL SURROUND SOUND
DECODER
Check that the digital audio output is switched on in the
GENERAL SETUP menu.
UNABLE TO ACCESS VIDEO OR PREFERENCES MENUS
Specifications
POWER SUPPLY
Voltage requirement . . . . . . . . . . . . . . . . . 220V-240V ~50Hz
Power consumption . . . . . . . . . . . . . . . . . . . . . . . . . . . 280W
Dimensions (mm) . . . . . . . . . . . . . . 430 (W) x 360 (D) x 62(H)
1 ....Power cable
2 ....Remote control with batteries
3 ....FM aerial
4 ....AM aerial
5 ....Auxiliary phono cable
6 ....This handbook
Amplifier power output. . . . . . . . . . . . . . . . . . . . . . . . 6 x 60W
Video outputs . . . . . . . HDMI, SCART, YCrCb, SVideo, CVBS
Audio decoding . . . . . . . . . . . . . . . . . . . . . Dolby digital, DTS
ITEMS SUPPLIED WITH THE AVR-1
Remote control battery
REPLACING THE REMOTE CONTROL BATTERY
+
+
If the remote control is not working, remove the battery
compartment and replace the battery with the same type 3V
CR2025 as shown in the diagram.
Guarantee
Your Audica product is warranted for a period of two years from
date of purchase. If during this period the system malfunctions, it
will be repaired or replaced at Audica's option.
The warranty excludes fare wear and tear and all damage due to
misuse, however caused. The warranty lies in the first instance
with the retailer from whom you purchased the equipment and to
whom equipment service should be sent, preferably in the
original packing, carriage paid. Please include your proof of
purchase. Goods in transit to Audica are at the risk of the sender.
If this is not possible, contact Audica at:
Audica UK
Armour Home electronics
Stortford Hall Industrial Park
Dunmow Road
Bishops Stortford
Hertfordshire
CM23 5GZ
UNITED KINGDOM
or e-mail [email protected]
17
Bienvenue
FR
Merci d'avoir choisi AUDICA
Les produits Audica AV ont été conçus et mis au point avec les normes les plus élevées pour conjuguer
style, fonctionnalité et ergonomie. Pour profiter au mieux de votre système, veuillez suivre attentivement
les conseils de ce manuel. Vous devrez peut-être consulter les guides d'utilisation des autres éléments
de votre système pour éviter tout dommage ou perte de performance qui pourraient résulter d'une
installation incorrecte.
Passez un bon moment...
Table des matières
À lire avant de commencer
-
-
-
-
17
Brancher un téléviseur et des enceintes -
-
-
-
18
Branchements facultatifs
-
-
-
-
19
Panneau avant et télécommande
-
-
-
-
20
Installation du AVR-1
-
-
-
-
-
21
Lire un DVD
-
-
-
-
-
-
26
Lire un CD
-
-
-
-
-
-
26
-
-
-
-
-
26
Lire un disque de photos JPG -
-
-
-
-
27
Écouter la radio
-
-
-
-
-
27
Lire une source externe
-
-
-
-
-
27
Barre d'outils à l'écran
-
-
-
-
-
28
Résolution des problèmes
-
-
-
-
-
29
Caractéristiques
-
-
-
-
-
-
29
Télécommande
-
-
-
-
-
-
29
Garantie -
-
-
-
-
-
-
29
Lire un disque de MP3
-
-
-
SOURCE
18
Informations importantes relatives à la sécurité
1. INFORMATIONS GÉNÉRALES
Le récepteur AUDICA AVR-1 DVD comprend quatre
composants en un seul appareil : un lecteur DVD, une radio
AM/FM, un décodeur de son surround et un amplificateur à 6
canaux. En plus de l'AVR-1 vous aurez besoin d'un téléviseur et
d'un système de haut-parleurs comprenant 2 à 6 canaux. Il est
recommandé d'utiliser un système à 6 canaux pour obtenir
l'expérience de son surround la plus réaliste.
2. DÉBALLAGE DU SYSTÈME
Déballez votre système avec précautions de façon à ne pas
endommager ni perdre de pièces. Pour une liste des éléments
fournis avec le système, voir les caractéristiques en page 16.
Conservez les emballages au cas où vous auriez besoin de
renvoyer l'appareil.
3. RÉPARATIONS
N'essayez pas de réparer ce produit vous-même car l'ouverture
du boîtier ou des panneaux peut vous exposer à des tensions
dangereuses ou d'autres risques. Confiez toutes les réparations
à du personnel qualifié.
Lorsqu'il est nécessaire de changer des pièces, assurez-vous
que le technicien utilise les pièces de rechange fournies par le
fabricant ou ayant les mêmes caractéristiques que les pièces
d'origine. L'utilisation de pièces inadaptées pourrait entraîner un
incendie, une électrocution ou d'autres risques, et pourrait
annuler toutes les garanties.
Le technicien doit effectuer toutes les vérifications de sécurité
pour tester les performances de chaque réparation.
ATTENTION !
RISQUE DE CHOC ÉLECTRIQUE
NE PAS OUVRIR
POUR RÉDUIRE LE RISQUE D'ÉLECTROCUTION,
NE PAS RETIRER LE COUVERCLE (OU L'ARRIÈRE)
Ce symbole indique des consignes
importantes pour l'utilisation et la
maintenance dans la documentation
Ce symbole indique la présence d'une
tension dangereuse représentant un
risque de choc électrique.
4. PRÉCAUTIONS
! Lisez ces instructions.
! Conservez ces instructions.
! Tenez compte de tous les avertissements.
! Suivez toutes les instructions.
! Ne pas utiliser cet appareil à proximité d'eau.
! Nettoyer uniquement avec un chiffon légèrement humide.
! Ne pas bloquer les ouvertures de ventilation.
! Installer conformément aux instructions du fabricant.
! Ne pas installer ni utiliser près d'une source de chaleur telle
qu'un radiateur, un four ou autre appareil produisant de la
chaleur.
! Débranchez cet appareil pendant les orages ou en cas de
période prolongée d'inutilisation.
! Confiez toutes les réparations à du personnel qualifié. Des
réparations sont nécessaires lorsque l'appareil a subi des
dommages de quelques façons que ce soit : cordon
d'alimentation ou prise abîmée, liquide répandu dans
l'appareil, introduction d'objets dans l'appareil, exposition à
la pluie ou à l'humidité, fonctionnement anormal, chute.
! Avertissement : pour réduire le risque d'incendie ou
d'électrocution, ne pas exposer ce produit à la pluie ou à
l'humidité. L'appareil ne doit pas être exposé à des
écoulements ou des éclaboussures et aucun objet rempli de
liquide tel qu'un vase ne doit être placé sur l'appareil.
! Aucune source de flamme nue telle qu'une bougie ne doit
être placée sur l'appareil.
Attention : toute altération ou modification qui ne soit pas
expressément approuvée par le fabricant peut ôter à l'utilisateur
son droit à utiliser l'appareil.
Attention : l'utilisation de contrôles, d'ajustement ou de
procédures autres que celles qui sont spécifiées ici peuvent
entraîner un risque pour l'utilisateur.
PRODUIT LASER
DE CLASSE 1
Ces étiquettes vous indiquent que l'appareil contient un
composant laser. Ne regardez pas la lentille laser.
IMPORTANT
Cet équipement a été testé et il est conforme aux limites
imposées pour un équipement numérique de classe B,
conformément à la section 15 des directives FCC. Ces limites
sont conçues pour offrir une protection raisonnable contre les
radiations nuisibles dans une installation résidentielle. Cet
équipement génère, utilise et peut émettre de l'énergie sous
forme de fréquences radio et, s'il n'est pas installé et utilisé
conformément aux instructions, il peut produire des
interférences nuisibles à la communication radio. Cependant, il
n'existe aucune garantie que ces interférences ne se produiront
pas dans une installation particulière. Si cet équipement produit
des interférences nuisibles à la réception d'émissions de radio ou
de télévision, ce qui peut être déterminé en allumant et en
éteignant l'appareil, l'utilisateur est invité à essayer de corriger
l'interférence par l'une des méthodes suivantes :
! Réorientez ou déplacez l'antenne de réception.
! Augmentez la distance séparant l'équipement du récepteur.
! Branchez l'équipement dans une prise appartenant à un
circuit différent de celui sur lequel est branché le récepteur.
! Consultez le revendeur ou un technicien radio/TV
expérimenté pour obtenir de l'aide.
INFORMATIONS RELATIVES À L'ÉLECTRICITÉ
Alimentation secteur : la tension de fonctionnement de cet
appareil est indiquée sur sa plaque nominale, à l'arrière. Au
Royaume-Uni, elle est de 230/240 V.
Le AVR-1 est fourni avec un cordon d'alimentation terminé par
une prise secteur anglaise certifiée dotée d'un fusible de 3A. S'il
devient nécessaire de remplacer le fusible, choisir un fusible
BS1362 de 3A, certifié ASTA ou BSI. Si vous avez besoin de
changer la prise secteur, retirez le
fusible et jetez la prise
FUSIBLE 3A
immédiatement après l'avoir coupée
BS 1362
du cordon, en respectant les
précautions de sécurité.
BLEU
BRUN
INTERRUPTEUR PRINCIPAL
(Neutre)
(Sous tension)
L e AV R - 1 n e p o s s è d e p a s
Construction de classe II à double isolation. Ce
produit ne doit pas être relié à la terre.
d'interrupteur d'alimentation. Si vous avez besoin de couper
l'alimentation de l'AVR-1, débranchez-le de la prise murale. Pour
cette raison, veillez à ce que la prise d'alimentation reste
facilement accessible lorsque vous installez le AVR-1.
Fabriqué sous licence de Dolby Laboratoires. "Dolby", "AC-3",
"Pro Logic" et le logo représentant un double D sont des
marques déposées de Dolby Laboratories.
19
Brancher un téléviseur et des enceintes
BRANCHER LE AVR-1 À UN TÉLÉVISEUR
La meilleure qualité de connexion est en haut de la liste, la moins
bonne est en bas. Votre téléviseur possède sans doute plusieurs
options de connexion pour l'entrée de l'image (vidéo). Pour la
meilleure qualité d'image, regardez quelles sont les connexions
de votre téléviseur, puis choisissez celle qui apparaît en premier
dans la liste.
Cinq connexions de sortie vidéo sont à votre disposition pour
transmettre l'image à votre téléviseur. Ces connexions sont :
1. Sortie numérique HDMI (image et son)
2. Composant PrPbY (image seulement)
3. SCART (image et son)
4. S-Video (image seulement)
5. Vidéo composite CVBS (image seulement)
CONNEXIONS VIDEO TV
d
e
a
S-VIDEO CVBS HDMI
b
c
PR PB Y
SCART
BRANCHER DES ENCEINTES, UN CAISSON DE BASSE ET DES ANTENNES À L'AVR-1
Vous pouvez brancher jusqu'à 6 haut-parleurs dans une
configuration de son surround. Les connexions des hautparleurs sont étiquetées en fonction de la position de chaque
enceinte, comme suit :
- FR : frontal droite
- FL : frontal gauche
- RR : arrière droite
- RL : arrière gauche
- CEN : frontal centre
- RCEN : arrière centre
Placez vos enceintes comme indiqué dans le manuel qui vous a
été fourni. Branchez les fils de chaque enceinte au terminal
correspondant à l'arrière de l'AVR-1. Vérifiez que le terminal + de
l'enceinte (de couleur rouge) est connecté au terminal + de
l'AVR-1 en branchant le fil rayé au terminal -.
ATTENTION : Lors du branchement des fils de l'enceinte,
vérifiez qu'aucun fil de cuivre ne touche un autre terminal. Ceci
pourrait endommager de façon permanente les circuit du AVR-1.
Caisson de basses
Avant
Gauche
ENCEINTE
EMPLACEMENTS
Centre
Avant
Avant
Droite
Arrière
Droite
Arrière
Gauche
Centre
Arrière
ANTENNE FM
ANTENNE AM
FR
20
Branchements facultatifs
BRANCHEMENT DU SON TV ET D'AUTRES SOURCES AU AVR-1
Des entrées TV audio et AUX sont à votre disposition sur l'AVR-1
pour permettre le branchement d'autres sources. Si votre
téléviseur est connecté avec un câble SCART, vous n'avez pas
besoin d'effectuer d'autres branchements pour écouter le son de
la télévision via votre AVR-1. Si votre téléviseur n'emploie pas le
connecteur SCART et possède une sortie audio stéréo, nous
vous recommandons d'y brancher les connexions TV AUDIO in
de l'AVR-1. Vous pourrez ensuite écouter le son de votre
TV AUDIO
SORTIE
CONNEXIONS
téléviseur via le décodeur surround multi-canal intégré à l'AVR-1
en sélectionnant l'entrée TV de l'AVR-1.
De même, vous pouvez utiliser une autre source audio-visuelle
telle qu'un magnétoscope en la branchant à l'entrée AUX de
l'AVR-1. Le son du magnétoscope pourra être transmis par
l'AVR-1 aux enceintes principales du système et décodé en son
multi-canal si vous le désirez.
VCR/AUX
CONNEXIONS
DÉ SORTIE AUDIO
BRANCHER UN DÉCODEUR DE SON SURROUND EXTERNE À L'AVR-1.
L'AVR-1 peut également être utilisé comme source pour un
récepteur ou un décodeur de son surround externe. On peut
utiliser un décodeur ou un récepteur externe dans une grande
pièce équipée de grandes enceintes pour obtenir une puissance
supérieure à celle offerte par les amplificateurs internes de
l'AVR-1. Tous les canaux du signal multi-canal de l'AVR-1 sont
connectés au décodeur/récepteur via un seul câble phono
coaxial numérique. REMARQUE : les signaux d'entrée radio
FM/AM et Aux connectés à l'AVR-1 ne sont pas disponibles via la
sortie numérique.
Entrée
coaxiale
numérique
DÉCODEUR/RÉCEPTEUR
SURROUND EXTERNE
21
Panneau avant et télécommande
FR
SOURCE
ab
c d e f
g
h
TOUCHES DU PANNEAU FRONTAL
a
b
c
d
e
PRISE CASQUE. Branchez-y un casque. Les enceintes
s'éteignent lorsqu'un casque est connecté.
présélectionnée si elle est pressée deux fois.
f
ÉJECTION DU DISQUE. Appuyez sur cette touche pour
retirer un disque.
CONTRÔLES DU VOLUME Ces touches contrôlent le
volume des enceintes ou du casque branché à l'AVR-1.
REMARQUE :- ces touches ne changent pas le volume du
téléviseur.
LECTURE/PAUSE. Cette touche lance la lecture d'un CD ou
d'un DVD. Appuyez à nouveau pour suspendre la lecture du
disque.
STOP. Cette touche interrompt la lecture d'un CD ou d'un
DVD. Elle permet également d'effacer une station FM/AM
g
h
SUIVANT/PRÉCÉDENT. Appuyez brièvement pour faire
une recherche rapide dans un disque ou passer à la station
de radio présélectionnée suivante. Maintenez ces touches
enfoncées pour passer au chapitre ou à la piste suivante ou
précédente, ou pour rechercher une autre fréquence de
station de radio.
SÉLECTION DE LA SOURCE. Cette touche vous permet de
choisir la source que vous souhaitez lire avec l'AVR-1 parmi
DVD/CD - AUX - OPTIQUE - SCARTAUDIO -FM- AM.
VEILLE. Allume ou éteint l'AVR-1. L'appareil doit être mis en
veille lorsqu'il n'est pas utilisé.
TOUCHES DE LA TÉLÉCOMMANDE
a
b
a
c
b
c
e
g
h
1!
1#
1$
1^
1&
1*
d d
f
h e
i
1)
1@ f
1%
g
1(
h
i
POWER. Allume ou éteint l'appareil
PAVÉ NUMÉRIQUE. Permet l'accès
direct aux pistes, aux chapitres des
DVD (lorsqu'elle est utilisée avec la
touche GOTO) et aux stations de radio
présélectionnées.
STORE. Pour programmer la lecture
d'un disque ou enregistrer des stations
de radio en présélections. Maintenez
cette touche enfoncée pour
commencer la programmation
automatique de la radio.
GO TO. Sélection rapide d'un titre ou
d'un chapitre particulier sur un DVD.
STOP. Interrompt la lecture d'un
DVD/CD ou la recherche FM.
Maintenez la touche enfoncée pour
supprimer une présélection de station
de radio.
caméra (disques multi-angles
seulement) et
pour une lecture au
ralenti. Appuyez sur
pour
rechercher une station par incréments,
maintenez la touche enfoncée pour
chercher une fréquence.
1) OK. Confirme une sélection;
1! SLEEP. Active le délai avant extinction.
1@ MENU. Active le menu du DVD
1# SOURCE SELECT. Cette touche
vous permet de choisir la source que
vous souhaitez lire avec l'AVR-1
parmiDVD-AUX1-OPTICAL IN-TVSCART IN-FM-AM.
1$
SELECT. Permet de sélectionner
des réglages audio : basses, aigus et
balance.
1%
VOLUME. Ajuste le volume maître
des enceintes ou du casque.
MUTE. Coupe instantanément le son.
Appuyez à nouveau pour rétablir le son
1^
LECTURE/PAUSE. Lance la lecture
d'un disque. Appuyez à nouveau pour
suspendre la lecture.
1&
PREC/SUIV. Appuyez brièvement pour
faire une recherche rapide dans un
disque ou passer à la station de radio
présélectionnée suivante. Maintenez
ces touches enfoncées pour passer au
chapitre ou à la piste suivante ou
précédente.
TOUCHES FLÉCHÉES. Utilisez ces
touches pour naviguer dans les
menus. Lors de la lecture d'un DVD
utilisez
pour changer l'angle de
SETUP. Permet d'entrer ou de
sortir du menu de configuration de
l'AVR-1.
TOOLS. Active le menu à l'écran
pour accéder à des fonctions
spéciales.
1* EQ.
Permet de choisir un mode
d'égaliseur audio parmi FLAT (plat) EQB+ (basses amplifiées), EQM+
(médiums amplifiés), EQM - (médiums
diminués).
1( AV MODE. Permet de passer du mode
de son stéréo au mode de son
surround multi-canal.
22
Configuration générale DE L'AVR-1
PAGE GÉNÉRALE
AUTO
MODE D'IMAGE
FILM
SORTIE AUDIO
Configuration générale DE L'
Appuyez sur la touche SETUP de la
télécommande. Vous avez 4 options de
configuration. Utilisez les touches fléchées
pour naviguer dans les options de menu et
appuyez sur OK pour sélectionner le menu
de votre choix Les menus disponibles sont
visibles à droite.
REMARQUE: les menus Configuration vidéo
et Préférences ne sont pas accessibles lors
de la lecture d'un disque.
D.R.C.
VIDÉO
MARQUE DE L'ANGLE
SMART
LANGUE DU MENU À L'ÉCRAN
SUPER SMART
ÉCONOMISEUR D'ÉCRAN
PAGE PRINCIPALE
PAGE GÉNÉRALE
MODE D'IMAGE
SORTIE AUDIO
SPDIF/RAW
D.R.C.
SPDIF/PCM
MARQUE DE L'ANGLE
PAGE PRINCIPALE DU MENU DE CONFIGURATION
MODE D'IMAGE optimise la performance
vidéo de l'AVR-1. Sélectionnez AUTO et le
AVR-1 procèdera automatiquement à
l'optimisation. Le réglage FILM optimise
l'image pour les films, VIDEO donne la
meilleur résolution, SMART applique un
traitement vertical supplémentaire dans le
balayage progressif et SUPER SMART
applique un traitement en fonction du
mouvement.
AUDIO OUT permet de régler le format audio
numérique. Si vous avez un décodeur de son
surround externe, choisissez SPDIF/RAW.
Si vous avez un DAC stéréo, choisissez
SPDIF/PCM.
LANGUE DU MENU À L'ÉCRAN
ÉCONOMISEUR D'ÉCRAN
CONFIGURATION GÉNÉRALE
CONFIGURATION DES ENCEINTES
PAGE PRINCIPALE
CONFIGURATION VIDÉO
PRÉFÉRENCES
QUITTER LA CONFIGURATION
CONFIGURATION GÉNÉRALE
PLEIN
MODE D'IMAGE
SORTIE AUDIO
6/8
D.R.C.
MARQUE DE L'ANGLE
4/8
D.R.C. ajuste la compression du spectre
dynamique. Réglez-le sur PLEIN ou à une
valeur élevée pour de petites enceintes.
Réglez le sur OFF ou à une valeur faible pour
de grandes enceintes.
LANGUE DU MENU À L'ÉCRAN
ÉCONOMISEUR D'ÉCRAN
2/8
PAGE PRINCIPALE
ARRÊT
PAGE GÉNÉRALE
MODE D'IMAGE
SORTIE AUDIO
D.R.C.
MARQUE DE L'ANGLE
ACTIVÉ
LANGUE DU MENU À L'ÉCRAN
ARRÊT
L'option Marque d'angle fait apparaître
le symbole ANGLE automatiquement
lorsqu'un DVD comprend des informations
multi-angles.
ÉCONOMISEUR D'ÉCRAN
PAGE PRINCIPALE
PAGE GÉNÉRALE
MODE D'IMAGE
SORTIE AUDIO
D.R.C.
Langue du menu à l'écran permet de choisir
la langue des menus à l'écran. Les options
sont Anglais, français, allemand, espagnol,
italien. La langue par défaut est l'anglais.
MARQUE DE L'ANGLE
LANGUE DU MENU À L'ÉCRAN
ANGLAIS
ÉCONOMISEUR D'ÉCRAN
ALLEMAND
FRANÇAIS
PAGE PRINCIPALE
ITALIEN
PAGE GÉNÉRALE
MODE D'IMAGE
SORTIE AUDIO
D.R.C.
MARQUE DE L'ANGLE
LANGUE DU MENU À L'ÉCRAN
ÉCONOMISEUR D'ÉCRAN
ACTIVÉ
ARRÊT
PAGE PRINCIPALE
ÉCONOMISEUR D'ÉCRAN permet d'activer
ou de désactiver l'économiseur d'écran.
Si l'AVR-1 reste en mode STOP ou PAUSE
pendant plus de 5 minutes, l'économiseur
d'écran$ se met en route. Nous vous
recommandons de le régler sur MARCHE.
23
Configuration des enceintes de l' AVR-1
PAGE PRINCIPALE DU MENU DE CONFIGURATION
CONFIGURATION GÉNÉRALE
CONFIGURATION DES ENCEINTES
CONFIGURATION VIDÉO
FR
Sélectionnez le menu CONFIGURATION
DES ENCEINTES pour que votre AVR-1
s'adapte correctement à votre système
d'enceintes et à votre pièce.
PRÉFÉRENCES
QUITTER LA CONFIGURATION
PAGE DE CONFIGURATION DES ENCEINTES
TYPE DES ENCEINTES
TYPE DES ENCEINTES
HAUT-PARLEUR AVANT
CS-C1
POSITION DES ENCEINTES
HAUT-PARLEUR CENTRAL
CS-LCR
DISTANCE DES ENCEINTES
HAUT-PARLEUR ARRIÈRE
GÉNÉRIQUE
SON DE TEST DES ENCEINTES
HAUT-PARLEUR ARRIÈRE C
ARRÊT
CAISSON DE BASSES
PAGE PRINCIPALE
PAGE PRÉCÉDENTE
PAGE DE CONFIGURATION DES ENCEINTES
TYPE DES ENCEINTES
POSITION DES ENCEINTES
HAUT-PARLEUR AVANT
MURAL
POSITION DES ENCEINTES
HAUT-PARLEUR CENTRAL
SUR ÉTAGÈRE
SON DE TEST DES ENCEINTES
HAUT-PARLEUR ARRIÈRE
AUTONOME
DISTANCE DES ENCEINTES
HAUT-PARLEUR ARRIÈRE C
SUR PIED
TYPE D'ENCEINTES vous permet de
sélectionner le modèle d'enceintes Audica
que vous utilisez pour chaque emplacement
de votre système. Si l'enceinte n'est pas une
Audica, sélectionnez GÉNÉRIQUE Si vous
n'avez pas d'enceinte pour cet emplacement
(centre et arrière seulement), sélectionnez
OFF. Si vous utilisez un Audica CS-LCR,
réglez le centre sur LCR et les enceintes
avant gauche et droite se règleront
automatiquement sur LCR.
POSITION D'ENCEINTES vous permet
de sélectionner l'emplacement de vos
enceintes. Choisissez parmi MURAL,
SUR ÉTAGÈRE AUTONOME 1 (au sol)
ou
SUR PIED (avant centre et LCR
seulement).
PAGE PRINCIPALE
PAGE PRÉCÉDENTE
PAGE DE CONFIGURATION DES ENCEINTES
DISTANCE DES ENCEINTES
TYPE DES ENCEINTES
DISTANCE AU CENTRE
POSITION DES ENCEINTES
DISTANCE À L'AVANT
DISTANCE DES ENCEINTES
DISTANCE À L'ARRIÈRE
SON DE TEST DES ENCEINTES
DISTANCE DU CAISSON
5PI/1,5M.
DISTANCE D'ENCEINTES vous permet de
sélectionner la distance qui sépare chaque
enceinte de l'auditeur. Le AVR-1 fera des
corrections automatiques pour ces distances
lors de la lecture. Utilisez les touches
FLÉCHÉES pour faire défiler les distances.
PAGE PRINCIPALE
PAGE PRÉCÉDENTE
PAGE DE CONFIGURATION DES ENCEINTES
TYPE DES ENCEINTES
SON DE TEST DES ENCEINTES
SON DE TEST
MANUEL
POSITION DES ENCEINTES
DISTANCE DES ENCEINTES
SON DE TEST DES ENCEINTES
PAGE PRINCIPALE
AUTO
PAGE PRÉCÉDENTE
En sélectionnant BRUIT DE TEST et AUTO,
vous pouvez vérifier que le volume de toutes
vos enceintes est homogène. Si vous
souhaitez ajuster le volume d'une enceinte
en particulier, sélectionnez l'option MANUEL
et choisissez l'enceinte à ajuster avec les
touches FLÉCHÉES. Vous pouvez ensuite
ajuster le volume relatif de cette enceinte
avec les touches de VOLUME.
24
AVR-1 Configuration vidéo
PAGE PRINCIPALE DU MENU DE CONFIGURATION
CONFIGURATION GÉNÉRALE
CONFIGURATION DES ENCEINTES
CONFIGURATION VIDÉO
PRÉFÉRENCES
QUITTER LA CONFIGURATION
Sélectionnez le menu
CONFIGURATION VIDÉO
p o u r q u e v o t r e AV R - 1
s'adapte correctement à votre
téléviseur.
REMARQUE : ce menu ne
peut être sélectionné que
lorsque le disque est arrêté.
CONFIGURATION VIDÉO
AFFICHAGE TV
NORMAL/PS
TYPE DE TÉLÉVISEUR
NORMAL/LB
RÉSOLUTION
LARGE/HDTV
SORTIE VIDÉO
PAGE PRINCIPALE
CONFIGURATION VIDÉO
AFFICHAGE TV
TYPE DE TÉLÉVISEUR
MULTI
RÉSOLUTION
NTSC
SORTIE VIDÉO
PAL
PAGE PRINCIPALE
CONFIGURATION VIDÉO
AFFICHAGE TV
TYPE DE TÉLÉVISEUR
SD INTERLACE
RÉSOLUTION
SD PROGRESSIF
SORTIE VIDÉO
720P
1080I
PAGE PRINCIPALE
CONFIGURATION VIDÉO
AFFICHAGE TV
TYPE DE TÉLÉVISEUR
RÉSOLUTION
SORTIE VIDÉO
YPRPB
RGB
PAGE PRINCIPALE
AFFICHAGE TV vous permet de choisir le format
d'écran de votre téléviseur. Choisissez le mode
NORMAL/PS (Pan & Scan) pour afficher une image
large sur un écran 4:3 en coupant les bords latéraux de
l'image. Choisissez NORMAL/LB (boîte aux lettres)
pour afficher une image large en entier sur un écran
4:3 avec des bandes noires en haut et en bas.
Choisissez LARGE/HDTV pour un téléviseur à écran
16:9.
TYPE DE TÉLÉVISEUR vous permet de sélectionner
la compatibilité système vidéo de votre téléviseur.
Choisissez MULTI si votre téléviseur est équipé du
double système PAL/NTSC. Choisissez NTSC si votre
téléviseur est aux normes américaines. Choisissez
PAL pour les téléviseurs vendus sur les autres
continents. REMARQUE : ne modifiez pas ce réglage
à moins que vous soyez certain que la valeur actuelle
est incorrecte, car vous pourriez perdre l'image de
votre téléviseur. Si vous appliquez le mauvais réglage
et que vous perdez, appuyez sur la touche STOP
pendant 5 secondes pour que l'AVR-1 se réinitialise et
passe en mode veille. Lorsque vous le rallumerez, les
réglages par défaut seront restaurés.
RÉSOLUTION vous permet de changer la qualité de
l'image pour l'adapter à votre téléviseur. Les options
sont Interlace – Progressif 720P - Interlace 1080.
Appliquez la plus grande qualité compatible avec votre
téléviseur. REMARQUE : Si vous appliquez le
mauvais réglage et que vous perdez, appuyez sur la
touche STOP pendant 5 secondes pour que l'AVR-1 se
réinitialise et passe en mode veille. Lorsque vous le
rallumerez, les réglages par défaut seront restaurés.
Selon la façon dont le format interne de votre écran
fonctionne, le réglage le plus élevé ne donnera pas
nécessairement le meilleur résultat. Consultez le
manuel de votre écran pour connaître le meilleur
réglage.
Réglez le paramètre SORTIE VIDÉO pour l'adapter à
la connexion vidéo que vous avez établie entre votre
AVR-1 et votre téléviseur. Si vous avez fait le
branchement avec un câble SCART, choisissez RGB.
Si vous avez fait le branchement avec un câble Vidéo
Composant, choisissez YPRPB. Si vous avez utilisé
une connexion de sortie vidéo différente, ce réglage ne
s'applique pas.
25
Préférences AVR-1
PRÉFÉRENCES
AUDIO
ANGLAIS
SOUS-TITRES
ALLEMAND
MENU DISQUE
FRANÇAIS
CONTRÔLE PARENTAL
ESPAGNOL
MOT DE PASSE
ITALIEN
VALEURS PAR DÉFAUT
FR
AUDIO permet de choisir la langue des
dialogues.
PAGE PRINCIPALE DU MENU DE CONFIGURATION
PAGE PRINCIPALE
CONFIGURATION GÉNÉRALE
CONFIGURATION DES ENCEINTES
CONFIGURATION VIDÉO
PRÉFÉRENCES
QUITTER LA CONFIGURATION
SOUS-TITRES permet de choisir la langue
des sous-titres.
PRÉFÉRENCES
AUDIO
SOUS-TITRES
ANGLAIS
MENU DISQUE
ALLEMAND
CONTRÔLE PARENTAL
FRANÇAIS
MOT DE PASSE
ESPAGNOL
VALEURS PAR DÉFAUT
ITALIEN
ARRÊT
PAGE PRINCIPALE
MENU DISQUE permet de choisir la langue
des menus des disques.
PRÉFÉRENCES
AUDIO
SOUS-TITRES
MENU DISQUE
ANGLAIS
CONTRÔLE PARENTAL
ALLEMAND
MOT DE PASSE
FRANÇAIS
VALEURS PAR DÉFAUT
ESPAGNOL
ITALIEN
PAGE PRINCIPALE
1 G - Kids material
2 - General audience
3 PG - Parental guidance
4 PG13 - Over 13 years old
5/6 PG-R Under 17 with adult
7 NC-17 Over 17 only
8 ADULTAdults only
NO PARENTAL Plays all discs
PRÉFÉRENCES
2
AUDIO
SOUS-TITRES
3 PG
MENU DISQUE
4 PG13
5
CONTRÔLE PARENTAL
MOT DE PASSE
PG-R
VALEURS PAR DÉFAUT
NC-17
PAGE PRINCIPALE
AUCUN CONTRÔLE
ADULTE
PRÉFÉRENCES
AUDIO
SOUS-TITRES
MENU DISQUE
CONTRÔLE PARENTAL
MOT DE PASSE
MODIFIER
VALEURS PAR DÉFAUT
CONTRÔLE PARENTAL définit le niveau
d'accès aux DVD à accès restreint. Les
niveaux des réglages sont visibles dans
le tableau de gauche/ Le réglage par
défaut est AUCUN CONTRÔLE
REMARQUE : les DVD n'ont pas
systématiquement de restriction.
MOT DE PASSE protège les réglages du
contrôle parental. Le mot de passe par
défaut est 1234. Utilisez cette option du
menu pour modifier le mot de passe. Pour
réinitialiser le mot de passe à 1234, appuyez
4 fois sur STOP lorsqu'on vous demande
l'ancien mot de passe.
PAGE PRINCIPALE
Sélectionnez l'option RÉINITIALISATION
pour rétablir tous les paramètres utilisateurs
à leurs valeurs par défaut.
PRÉFÉRENCES
AUDIO
SOUS-TITRES
MENU DISQUE
CONTRÔLE PARENTAL
MOT DE PASSE
VALEURS PAR DÉFAUT
PAGE PRINCIPALE
RESET
26
Lire un DVD
LIRE UN DVD
Allumez votre AVR-1 et votre téléviseur. Sélectionnez la bonne
entrée AV de votre téléviseur (si vous utilisez une connexion
SCART, l'entrée peut être sélectionnée automatiquement).
Insérez votre DVD dans la fente du panneau frontal. Le menu du
disque apparaît sur l'écran de votre téléviseur. Utilisez les
touches fléchées pour naviguer dans le menu et lancer la lecture
du film, ou appuyez sur la touche .
Appuyez sur la touche GOTO. Saisissez le numéro du titre ou du
chapitre à l'aide du pavé numérique. Utilisez les touches
fléchées
pour passer de la sélection d'un titre à celle d'un
chapitre. Appuyez sur la touche pour vous y rendre.
REGLAGE DU VOLUME
Utilisez les touches de VOLUME pour ajuster le volume sonore
des enceintes. REMARQUE : le contrôle du volume de l'AVR-1
ne contrôle pas le volume des haut-parleurs du téléviseur.
RALENTI
Pour voir une partie d'un film au ralenti, appuyez sur la touche
fléchée plusieurs fois pour ajuster la vitesse et la direction du
ralenti. Continuez d'appuyez sur la touche pour revenir en mode
normal de lecture.
RECHERCHE RAPIDE
Appuyez sur la touche
ou
pour commencer une
recherche rapide dans la direction voulue. Appuyez à nouveau
pour changer de vitesse de recherche (x2, x4, x6, x8). Appuyez
sur
pour annuler. Cette fonction n'est disponible que sur la
télécommande.
NAVIGUER ENTRE LES CHAPITRES
ou
Maintenez la touche
pour passer d'un chapitre à
l'autre
ARRET SUR IMAGE
Pour faire un arrêt sur image, appuyez sur la touche
à nouveau pour annuler et revenir à la lecture.
. Appuyez
MENU DU DVD
Appuyez sur la touche MENU à tout moment pour revenir au
menu du DVD. Vous pouvez accédez aux options encodées
dans le DVD par l'éditeur, telles qu'un accès direct aux titres et
aux chapitres, des options de sons, des contenus spéciaux, etc.
SELECTION DE MODE AUDIO
Lors de la lecture d'un DVD, vous pouvez sélectionnez différents
modes de son grâce à la touche AV MODE. Les modes de son
disponibles dépendent des bandes-son présentes sur le DVD.
ACCEDER DIRECTEMENT A UN AUTRE TITRE OU UN
AUTRE CHAPITRE
Lire un CD
LIRE UN CD AUDIO
Allumez l'AVR-1. Sélectionnez DVD avec la touche SOURCE.
Insérez votre Cd dans la fente du panneau frontal. La lecture
commence automatiquement.
REGLAGE DU VOLUME
Utilisez les touches de VOLUME pour ajuster le volume sonore
des enceintes. REMARQUE : le contrôle du volume de l'AVR-1
ne contrôle pas le volume des haut-parleurs du téléviseur.
RECHERCHE RAPIDE
Appuyez sur la touche
ou
pour commencer une
recherche rapide dans la direction voulue. Appuyez à nouveau
pour changer de vitesse de recherche (x1, x2, x2, x4). Appuyez
sur | pour annuler. Cette fonction n'est disponible que sur la
télécommande.
NAVIGUER ENTRE LES PISTES
Maintenez la touche
enfoncée pour sélectionner des
ou
pistes.
ACCEDER DIRECTEMENTA UNE PISTE
Saisissez le numéro de la piste à l'aide du pavé numérique.
Appuyez sur la touche
pour commencer la lecture.
PAUSE
Pour suspendre la lecture, appuyez sur la touche
nouveau pour annuler et reprendre la lecture.
. Appuyez à
PROGRAMMER UNE SEQUENCE DE LECTURE.
Pour enregistrer une suite de piste, arrêtez le disque et appuyez
sur la touche STORE. Saisissez maintenant successivement le
numéro de chaque piste à l'aide du pavé numérique en validant
chaque fois avec la touche OK. Appuyez sur la touche | pour
lire le programme. Appuyez plusieurs fois sur la touche pour
arrêter la lecture et effacer le programme.
SELECTION DU MODE AUDIO
Lors de la lecture d'un CD, vous pouvez sélectionnez différents
modes de son à l'aide de la touche MODE AV. Pour le son CD,
nous recommandons le mode stéréo à 2 canaux et le mode
Dolby Pro Logic II Music.
Lire un disque de MP3
Lire un disque de MP3
Vous pouvez écouter des fichiers de musique MP3 enregistrés
sur un CD-R ou un DVD-R avec votre AVR-1.
Allumez l'AVR-1. Sélectionnez DVD à l'aide de la touche
SOURCE. Insérez votre disque de MP3 dans la fente du
panneau avant. Appuyez sur pour commencer la lecture.
RECHERCHE RAPIDE
Appuyez sur la touche
pour commencer une
ou
recherche rapide dans la direction voulue. Appuyez à nouveau
pour changer de vitesse de recherche (x2, x4, x6, x8). Appuyez
sur pour annuler.
REGLAGE DU VOLUME
Utilisez les touches de VOLUME pour ajuster le volume sonore
des enceintes. REMARQUE : le contrôle du volume de l'AVR-1
ne contrôle pas le volume des haut-parleurs du téléviseur.
. Appuyez à
NAVIGUER ENTRE LES PISTES
Maintenez la touche
enfoncée pour sélectionner des
ou
pistes.
ACCEDER DIRECTEMENTA UNE PISTE
Saisissez le numéro de la piste à l'aide du pavé numérique.
L'AVR-1 commencera directement la lecture.
PAUSE
Pour suspendre la lecture, appuyez sur la touche
nouveau pour annuler et reprendre la lecture.
NAVIGATION A L'ECRAN
Vous pouvez allumer votre téléviseur pour parcourir vos
dossiers plus facilement lorsque le disque est arrêté. Vous
verrez une liste de dossiers sur la gauche de l'écran, et une liste
des fichiers musicaux sur la gauche. Naviguez dans la liste des
dossiers à l'aide des touches fléchées
et
pour trouver le
dossier de musique de votre choix, puis sélectionnez-le en
appuyant sur la touche OK. Appuyez sur la touche fléchée
pour passer à la liste des fichiers, puis parcourez la liste à l'aide
des touches fléchées et . Sélectionnez le fichier numéro 0 en
haut de la liste pour revenir à la liste des dossiers.
27
Regarder des photos numériques JPG sur CD-R ou DVD-R
REGARDER DES PHOTOS NUMERIQUES
Vous pouvez regarder des photos numériques ou d'autres
images au format JPG enregistrées sur un CD-R ou un DVD-R
grâce à votre AVR-1.
Allumez l'AVR-1 et votre téléviseur. Sélectionnez DVD à l'aide de
la touche SOURCE. Insérez votre disque dans la fente du
panneau avant.
TROUVER VOS PHOTOS SUR LE DISQUE
Vous pouvez parcourir le disque depuis l'écran de votre
téléviseur. Vous verrez s'afficher un plan des dossiers du disque.
Appuyez sur OK pour sélectionner un dossier et afficher les
sous-dossiers ou les fichiers présents. Utilisez les touches
fléchées
et pour naviguer dans la liste des dossiers.
Vous pouvez remonter d'un niveau dans la liste de dossiers en
choisissant le numéro 0 en haut de la liste.
DIAPORAMA
Une fois que vous avez trouvé le dossier que vous voulez,
sélectionnez un fichier de ce dossier pour commencer le
défilement du diaporama. Vous pouvez suspendre le diaporama
à l'aide de la touche . Appuyez à nouveau sur la touche pour
reprendre le diaporama. Vous pouvez également passer l'image
affichée en maintenant la touche
enfoncée. Lorsque
ou
toutes les images du dossier ont été affichées, l'AVR-1 passe au
dossier suivant (s'il existe).
CHANGER L'ORIENTATION DES IMAGES
À l'aide des touches fléchées
et , vous pouvez faire tourner
ou inverser les images qui sont affichées à l'écran.
REVENIR à LA LISTE DES DOSSIERS
Pour revenir à la liste des dossiers, appuyez sur la touche STOP.
Écouter la radio
ÉCOUTER LA RADIO
Allumez l'AVR-1. Appuyez sur la touche SOURCE pour
sélectionner la bande de fréquence FM ou AM.
REGLAGE DU VOLUME
Utilisez les touches de VOLUME pour ajuster le volume sonore
des enceintes. REMARQUE : le contrôle du volume de l'AVR-1
ne contrôle pas le volume des haut-parleurs du téléviseur.
AJUSTEMENTAUTOMATIQUE
La radio de l'AVR-1 peut se régler automatiquement sur toutes
les stations locales et les enregistrer sous forme de
présélections. Pour procéder à l'ajustement automatique,
appuyez sur la touche GOTO. PROG AUTO s'affiche. Patientez
quelques instants pendant que l'AVR-1 recherche toutes les
stations disponibles et les enregistre dans la mémoire. PLEIN
s'affiche lorsque plus de 40 stations ont été découvertes.
ENREGISTRER UNE STATION EN PRESELECTION.
Vous pouvez enregistrer jusqu'à 40 stations de radio AM ou FM
en présélection. Pour enregistrer une station, commencez par
régler le tuner sur cette station puis : appuyez sur la touche
STORE, saisissez le numéro de présélection à un ou deux
chiffres à l'aide du pavé numérique et appuyez à nouveau sur la
touche STORE. Cette station sera enregistrée dans la mémoire
et vous pourrez la retrouver ultérieurement.
ÉCOUTER UNE STATION PRESELECTIONNEE
Vous pouvez écouter une station présélectionnée en appuyant
simplement sur une touche numérotée. Si le numéro de la
station est à deux chiffres, appuyez successivement sur les
touches correspondantes.
NAVIGUER ENTRE LES STATIONS PRESELECTIONNEES
Utilisez les touches
et
pour passer d'une présélection à
l'autre.
AJUSTEMENT MANUEL
L'AVR-1 peut également être ajusté manuellement. Appuyez sur
les touches et pour procéder à un ajustement manuel par
incréments. Maintenez ces touches enfoncées pour chercher la
station précédente ou suivante sur la bande.
Lire une source externe
LIRE UNE SOURCE EXTERNE
Trois sources supplémentaires peuvent être connectées à
l'AVR-1 : le son du téléviseur (via un câble SCART ou l'entrée
TV), une source numérique (vers l'entrée OPTIQUE) ou une
source analogique (magnétophone, etc.). Voir page 6 pour les
instructions concernant les branchements.
SELECTIONNER LA BONNE SOURCE
Pour sélectionner l'une de ces sources externes, appuyez sur la
touche SOURCE. Vous naviguerez entre les sources DVDAUX1-OPTICAL IN-TV- SCART IN-FM-AM.
REGLAGE DU VOLUME
Utilisez les touches de VOLUME pour ajuster le volume sonore
des enceintes. REMARQUE : le contrôle du volume de l'AVR-1
ne contrôle pas le volume des haut-parleurs du téléviseur.
FR
28
Outils à l'écran de l'AVR-1
La barre d'outils (TOOLBAR) à l'écran offre un accès rapide à
certaines fonctions pendant la lecture d'un film.
ACTIVER LA BARRE D'OUTILS
Appuyez sur la touche TOOLS pour afficher la barre d'outils à
l'écran.
DESACTIVER LA BARRE D'OUTILS
Appuyez à nouveau sur la touche TOOLS pour masquer la
barre d'outils lorsque vous avez terminé.
SELECTIONNER UNE ICONE DE LA BARRE D'OUTILS
Vous pouvez sélectionner une icône de la barre d'outils à l'aide
des touches fléchées et .
MODIFIER UN PARAMETRE DANS LA BARRE D'OUTILS
La touche fléchée permet de modifier les paramètres dans la
barre d'outils.
A-B
SOUS-TITRES
AUDIO
REPETITION BOUCLE A-B
AFFICHAGE
ZOOM
RETOUR
Choisissez cette icône pour activer
ou désactiver les sous-titres, ou
faire défiler les langues disponibles
avec la touche fléchée .
Choisissez l'icône AFFICHAGE pour activer
l'affichage du statut sur l'écran de votre
téléviseur. Vous pouvez choisir différentes
options d'affichage en appuyant plusieurs
fois sur la touche fléchée v.
Choisissez l'icône AUDIO pour changer la
langue audio. Ce n'est possible que si le
DVD comprend plusieurs langues.
Choisissez l'icône REPETITION sur vous
souhaitez lire le disque en boucle, ou lire
seulement un titre, un chapitre ou une
piste du disque en boucle. Une fois l'icône
sélectionne, utilisez la touche fléchée
pour choisir le mode de répétition que vous
voulez.
Choisissez l'icône ZOOM pour zoomer au
centre de l'image. Appuyez sur la touche
fléchée pour ajuster le niveau du zoom.
Choisissez BOUCLE A-B si vous souhaitez
répéter une section de film. Appuyez sur la
touche fléchée une fois que vous êtes prêt
pour marquer le début de la boucle (point A).
Appuyez à nouveau sur la touche fléchée
au moment où vous souhaitez que la section
s'achève (point B). L'AVR-1 va maintenant
lire la section A-B en boucle continuellement.
Appuyez à nouveau sur la touche fléchée
pour annuler la fonction BOUCLE A-B.
29
Résolution des problèmes
PAS D'IMAGE SUR LE TÉLÉVISEUR.
Vérifiez que vous avez sélectionné le bon canal d'entrée AV sur
votre téléviseur pour la connexion vidéo que vous utilisez.
Un disque est peut-être en cours de lecture. Ces menus ne sont
accessibles que si le disque est arrêté complètement (et non
suspendu).
IMAGE DISTORDUE OU INSTABLE
Le TYPE DE TÉLÉVISEUR et/ou la RÉSOLUTION que vous
avez indiqués ne correspondent peut-être pas à votre
téléviseur. Pour rétablir les réglages par défaut, appuyez sur
OPEN/CLOSE, puis sur la touche NEXT.
AUCUN SON ÉMIS PAR LES ENCEINTES CENTRALES OU
ARRIÈRE
Vérifiez que l'enceinte n'a pas été désactivée dans le menu
CONFIGURATION DES ENCEINTES.
MESSAGE DE ZONE INCORRECTE SUR L'ÉCRAN DU
TÉLÉVISEUR LORS DE LA LECTURE D'UN DVD
Le disque que vous lisez a été acheté dans une autre zone
DVD. Vous ne pouvez lire que des DVD achetés dans la même
région que votre lecteur. La zone de votre AVR-1 est inscrite sur
le panneau arrière et apparaît sous la forme d'un numéro dans
un globe terrestre. Le disque porte également le même label de
zone.
IMPOSSIBLE D'ACCÉDER AUX MENUS VIDÉO OU
PRÉFÉRENCES
RÉCEPTION DE LA RADIO FM DE MAUVAISE QUALITÉ.
L'antenne n'est pas branchée ou n'est pas assez sensible - une
antenne extérieure peut parfois être nécessaire dans certaines
régions. Vérifiez le branchement de l'antenne ou demandez à
un installeur d'antenne local de vous recommander un meilleur
système d'antenne pour votre AVR-1.
AUCUN SON REÇU D'UN DÉCODEUR DE SON SURROUND
EXTERNE
Vérifiez que la sortie audio numérique est activée dans le menu
CONFIGURATION GÉNÉRALE.
Caractéristiques
ALIMENTATION
Tension requise . . . . . . . . . . . . . . . . . . . . 220V-240V ~50Hz
Consommation. . . . . . . . . . . . . . . . . . . . . . . . . . . . . . . 280W
Dimensions (mm) . . . . . . . . . . . . . . 430 (W) x 360 (D) x 62(H)
1 ....Cordon d'alimentation
2 ....Télécommande avec piles
3 ....Antenne FM
4 ....Antenne AM
5 ....Câble phono auxiliaire
6 ....Ce manuel
Puissance de sortie de l'amplificateur . . . . . . . . . . . . 6 x 60W
Sorties vidéo . . . . . . . HDMI, SCART, YCrCb, SVideo, CVBS
Décodage Audio . . . . . . . . . . . . . . . . . . . . Dolby digital, DTS
ACCESSOIRES FOURNIS AVEC L' AVR-1
Pile de la télécommande
Garantie
Votre produit Audica est garanti pour une période de deux ans à
compter de la date d'achat. Si, au cours de cette période, le
système présente un dysfonctionnement, il sera réparé ou
remplacé, ce choix étant à la discrétion d'Audica.
La garantie exclut l'usure normale, ainsi que tous les
dommages dus à une mauvaise utilisation, quelle qu'en soit la
cause. La garantie incombe en premier lieu au revendeur
auprès de qui vous avez acheté l'équipement et à qui vous
devrez envoyer l'appareil pour réparation, de préférence dans
son emballage d'origine, port payé. Veuillez joindre votre
preuve d'achat. Pendant leur transport vers Audica, les produits
sont sous la responsabilité de l'expéditeur. En cas
d'impossibilité, contactez Audica à l'adresse :
[email protected]
+
Si la télécommande ne fonctionne pas, retirez le compartiment
à pile et remplacez la pile avec le même modèle (3V, CR2025)
comme indiqué sur le schéma.
+
REMPLACER LA PILE DE LATÉLÉCOMMANDE
FR
31
Benvenuti
Grazie per aver scelto AUDICA
I prodotti AV Audica sono stati studiati e progettati per soddisfare gli standard più elevati e uniscono stile a
funzionalità ed ergonomicità. Per ottenere il meglio dal sistema, consultare attentamente il presente
manuale. Per evitare danni o una diminuzione delle prestazioni del sistema a causa di un'installazione
incorretta, è necessario consultare i manuali dell'utente per tutti gli altri componenti.
IT
Divertitevi...
Indice
Prima di iniziare leggere quanto segue -
-
-
-
32
Collegamento della TV e degli speaker -
-
-
-
33
Collegamenti opzionali
-
-
-
-
34
Pannello anteriore e controlli del ricevitore
-
-
-
35
Risoluzione dei problemi
-
-
-
-
-
36
Dati tecnici
-
-
-
-
-
-
36
Telecomando
-
-
-
-
-
-
36
Garanzia
-
-
-
-
-
-
36
-
SOURCE
32
Importanti informazioni di sicurezza
1. INFORMAZIONI GENERALI
Il ricevitore DVD AUDICA AVR-1 racchiude in un unico sistema
quattro componenti: lettore DVD, radio FM/AM, decodificatore
surround sound ed amplificatore a 6 canali. In aggiunta a AVR-1
è necessario disporre di un televisore e di un sistema di speaker
compresi tra due e sei canali. Si consiglia un sistema di speaker
a sei canali per avere un'esperienza surround sound più vicina
alla realtà.
2. DISIMBALLAGGIO DELL'APPARECCHIO
Per non danneggiare o perdere componenti dell'unità, occorre
rimuovere con particolare cautela l'imballaggio. Per un
inventario delle parti in dotazione con l'apparecchio, consultare i
dati tecnici dell'apparecchio a pagina 16. Conservare il materiale
d'imballaggio perché, se necessario, l'apparecchio può essere
reimballato e riconsegnato.
3. MANUTENZIONE
Non tentare di eseguire la manutenzione di questo prodotto
aprendo vani o pannelli che potrebbero esporre a tensioni
elettriche pericolose o ad altri pericoli. Per tutti i lavori di
manutenzione rivolgersi a personale qualificato.
Per parti da sostituire, assicurarsi che il tecnico abbia utilizzato
componenti fornite dal produttore o aventi le stesse
caratteristiche dell'originale. Se si utilizzano parti non conformi,
queste potrebbero causare incendi, scosse elettriche o altri
pericoli o la garanzia potrebbe essere annullata.
Il tecnico deve eseguire controlli di sicurezza per testare il
rendimento di qualsiasi riparazione.
ATTENZIONE!
PERICOLO DI SCOSSA ELETTRICA
NON APRIRE
PER RIDURRE IL PERICOLO DI SCOSSA ELETTRICA
NON RIMUOVERE IL COPERCHIO (O IL RETRO)
Questo simbolo indica che il manuale
include importanti istruzioni di
funzionamento e manutenzione
Questo simbolo indica che una tensione
di corrente pericolosa può causare
scosse elettriche
4. PRECAUZIONI
! Leggere le seguenti istruzioni.
! Conservare le istruzioni.
! Prestare attenzione a tutte le avvertenze.
! Seguire tutte le istruzioni.
! Non utilizzare l'apparecchio nelle vicinanze d'acqua.
! Pulire solo con un panno leggermente umido.
! Non bloccare le aperture di ventilazione.
! Installare seguendo le istruzioni del produttore.
! Non installare o far funzionare nelle vicinanze di fonti di
calore quali radiatori, fornelli o altri generatori di calore.
! Scollegare la spina dell'apparecchio durante temporali o se
inutilizzato per lunghi periodi di tempo.
! Per tutti i lavori di manutenzione rivolgersi a personale
qualificato. La manutenzione diventa necessaria se
l'apparecchio è stato danneggiato in qualche modo, se il
cavo d'alimentazione o la spina hanno subito danni, se
liquidi o oggetti sono caduti sull'apparecchio, se è stato
esposto alla pioggia o all'umidità, se non funziona
normalmente o è caduto.
! Avvertenza: Per ridurre il rischio di incendio o scossa
elettrica, non esporre il prodotto alla pioggia o all'umidità.
Non collocare sull'apparecchio oggetti contenenti liquidi
come vasi di fiori o oggetti bagnati o impregnati d'acqua.
! Non collocare sull'apparecchio fiamme vive quali candele.
Attenzione: Modifiche o cambiamenti non approvati dal
produttore potrebbero annullare l'autorità dell'utente ad operare
l'apparecchio.
Attenzione: Se i controlli, la messa a punto e il rendimento delle
procedure sono diversi da quelli specificati si espone
l'apparecchio a rischi pericolosi.
Questi simboli indicano che l'unità contiene un componente
Laser. Non fissare l'obiettivo laser.
IMPORTANTE
Questo apparecchio è stato sottoposto a test ed è conforme ai
limiti per i dispositivi digitali di classe B in conformità alla sezione
15 delle norme FCC. Questi limiti sono stati studiati per offrire
una ragionevole protezione contro radiazioni dannose in
installazioni residenziali. Questo apparecchio genera, utilizza e
può emettere radiazioni di radiofrequenza e, se non installato e
utilizzato in conformità alle istruzioni, può causare interferenze
dannose alla comunicazione radiofonica. Tuttavia, non esiste
alcuna garanzia che non si verifichino interferenze in particolari
installazioni. Se l'apparecchio causa interferenze dannose alla
ricezione televisiva o radiofonica che possono essere
determinate dall'accensione o dallo spegnimento
dell'apparecchio, l'utente è incoraggiato a correggere
l'interferenza mettendo in atto una delle seguenti operazioni:
! Riorientare o riposizionare l'antenna di ricezione
! Allontanare l'apparecchio dal ricevitore.
! Collegare l'apparecchio ad una presa differente da quella
del ricevitore.
! Per ricevere assistenza, contattare il rivenditore o un tecnico
radio/TV qualificato.
INFORMAZIONI SULLA TENSIONE ELETTRICA
Alimentazione: La tensione d'alimentazione dell'unità è indicata
sul pannello posteriore. La tensione del Regno Unito è 230/240
V.
L'apparecchio AVR-1 è dotato di un cavo di alimentazione
terminante con una presa d'alimentazione approvata per il
Regno Unito dotata di un fusibile 3A. In caso di sostituzione del
fusibile, occorre utilizzare un fusibile ASTA o BSI approvato
BS1362 di 3A. Se occorre sostituire
la spina d'alimentazione, rimuovere
FUSIBILE 3A
il fusibile ed eliminare la spina subito
BS 1362
dopo averla tagliata dal cavo.
INTERRUTTORE
BLU
MARRONE
D'ALIMENTAZIONE
(neutro)
(sotto tensione)
L'apparecchio AVR-1 non ha un
Classe II costruzione doppio isolamento. Non
occorre collegare a terra il prodotto.
interruttore di corrente. Se si deve spegnere la corrente
d'alimentazione dell'apparecchio AVR-1, togliere la spina dalla
presa. Per questo motivo, assicurarsi che la spina sia facilmente
accessibile durante l'installazione di AVR-1.
Prodotto con licenza di Dolby Laboratories. "Dolby", "AC-3",
"Pro Logic" e il simbolo double-D sono marchi registrati di Dolby
Laboratories.
33
Collegamento del televisore e degli speaker
COLLEGAMENTO DI AVR-1 AL TELEVISORE
Esistono 5 connessioni in uscita per trasmettere l'immagine sul
televisore. E sono le seguenti:
1. uscita digitale HDMI (immagine e suono)
2. componente PrPbY (solo immagine)
3. SCART(immagine e suono)
4. S-Video (solo immagine)
5. video composito CVBS (solo immagine)
Il collegamento di ottima qualità si trova in alto mentre quello di
bassa qualità più in basso. Il televisore ha probabilmente diverse
opzioni di collegamento per l'ingresso di immagini o (video).
Per un'immagine della migliore qualità, controllare quali
connessioni sono disponibili sul televisore e utilizzare solamente
la più in alto nell'elenco.
IT
COLLEGAMENTI VIDEO AL TELEVISORE
d
e
a
S-VIDEO CVBS HDMI
b
c
PR PB Y
SCART
COLLEGAMENTO DI SPEAKER, DI SUBWOOFER E ANTENNE ALL'APPARECCHIO AVR-1
In un sistema di surround sound si possono collegare fino a 6
speaker. I collegamenti per speaker sono indicati in
corrispondenza a ciascun speaker come segue:
- FR indica davanti a destra
- FL indica davanti a sinistra
- RR indica dietro a destra
- RL indica dietro a sinistra
- CEN indica centrale sul davanti
- RCEN indica centrale sul dietro
Posizionare gli speaker come indicati nel manuale delle
istruzioni. Collegare i cavi di ogni speaker al corretto terminale
nella parte posteriore di AVR-1 per quel determinato speaker.
Assicurarsi che i terminali di segno + dello speaker (rossi) siano
collegati al segno + in cima ai terminali dell'apparecchio AVR-1
unendo il cavo a strisce al segno + dei terminali.
ATTENZIONE:- Durante il collegamento dei cavi dello speaker
assicurarsi che nessun cavo sfilacciato tocchi un altro terminale.
Questo potrebbe danneggiare permanentemente il circuito di
AVR-1.
Subwoofer
Davanti a
sinistra
COLLOCAMENTO
SPEAKER
Centrale sul
davanti
Davanti a
destra
Dietro a
destra
Dietro a
sinistra
Centrale sul
dietro
ANTENNA FM
ANTENNA AM
34
Collegamenti opzionali
COLLEGAMENTO DEL SUONO DEL TELEVISORE E ALTRE FONTI A AVR-1
Entrambi gli ingressi TV AUDIO e AUX sono disponibili
sull'apparecchio AVR-1 per il collegamento con altre fonti di
segnale. Se il televisore è collegato ad un cavo SCART, allora
non saranno necessari ulteriori collegamenti per ascoltare il
suono del televisore attraverso AVR-1. Se, al contrario, il
televisore non utilizza il connettore SCART e ha un punto in
uscita audio stereo, consigliamo di collegarlo al TV AUDIO di
AVR-1. E' possibile sentire il suono del televisore grazie al
COLLEGAMENTI
IN USCITA TV
AUDIO
decoder surround multi canale incorporato nell'unità AVR-1
selezionando l'ingresso TV di AVR-1.
Analogamente, ci può essere un'altra fonte audio visiva stereo
quale un videoregistratore VCR collegato all'ingresso AUX
dell'unità AVR-1. Il suono del videoregistratore VCR può essere
trasmesso da AVR-1 agli speaker del sistema principale e, se si
preferisce, decodificato in un suono multicanale.
COLLEGAMENTI
AUDIO IN USCITA
VCR/AUX
COLLEGAMENTO DI UN DECODER SURROUND-SOUND ESTERNO ALL'UNITÀ AVR-1
E' possibile utilizzare AVR-1 come fonte per un decoder o
ricevitore surround-sound esterno. Il decoder o ricevitore
esterno può essere utilizzato in ampi locali con speaker più
grandi per ottenere una maggiore potenza in uscita di quella
prodotta dagli amplificatori interni di AVR-1. Tutti i canali del
segnale multi canale dell'unità AVR-1 sono collegati al
decoder/ricevitore grazie ad un singolo cavo fono coassiale
digitale. NOTA:- La radio FM/AM e i segnali d'ingresso Aux
collegati all'unità AVR-1 non sono disponibili con uscita digitale.
Ingresso
digitale
coassiale
DECODER O RICEVITORE
SURROUND ESTERNO
35
Pannello anteriore e controlli del ricevitore
SOURCE
ab
c d e f
g
h
TASTI PANNELLO ANTERIORE
a
b
c
d
e
PRESA CUFFIA. Collegare le cuffie nella presa. Gli speaker
si spengono quando le cuffie sono collegate.
FM/AM.
f
ESTRAZIONE DISCO. Premere il tasto per estrarre il disco.
Controllo volume. I tasti controllano il volume degli speaker o
delle cuffie collegate a AVR-1. NOTA:- i tasti non modificano
il volume del televisore.
PLAY/PAUSE. Il tasto avvia il DVD o il CD. Ripremere per
interrompere la lettura del disco.
STOP. Il tasto ferma la lettura del DVD o del CD. Cancella, se
premuto per due volte, la programmazione della radio
g
h
SUCCESSIVO/PRECEDENTE. Premere brevemente per
eseguire una ricerca veloce sul disco o passare alla
programmazione successiva della radio. Tenere premuti i
tasti per passare al capitolo o track precedente o successivo
o sintonizzare la banda di frequenza per un'altra stazione.
SELEZIONE FONTE. Il tasto seleziona la fonte che si
desidera attivare su AVR-1 dal DVD/CD - AUX - OPTICAL SCARTAUDIO -FM- AM.
STANDBY. Accendere o spegnere AVR-1.
Standby quando non in uso.
Selezionare
TASTI TELECOMANDO
a
b
a
b
c
e
g
h
1!
1#
1$
1^
1&
1*
c
d
f d
h
i
1) e
1@
1%
1(
f
g
h
i
ALIMENTAZIONE. Premere per
accendere o spegnere.
TA S T I E R A N U M E R I C A .
Per
selezionare direttamente i track, i
capitoli del DVD (se usato assieme al
tasto GO TO) o le programmazioni
radio.
STORE (MEMORIA). Per
programmare dischi o per
memorizzare le programmazioni della
radio. Premere il tasto per avviare la
programmazione automatica della
radio.
G O T O ( VA I A ) . S e l e z i o n a
velocemente un titolo o capitolo
particolare del DVD.
STOP. Interrompe il playback del
DVD/CD o la scansione FM. Se
premuto, cancella le programmazioni
radiofoniche.
MUTE. Cancella immediatamente il
suono. Ripremere per annullare.
PLAY/PAUSE. Lettura del disco.
Ripremere per interrompere.
PREV/NEXT . Premere brevemente
per eseguire una ricerca veloce del
disco o selezionare un'altra
programmazione radiofonica.
Premere il tasto per passare al capitolo
o track precedente o successivo.
TASTI CURSORI. Usare questi tasti
per navigare nel menu. Quando si
inserisce il disco, usare
per
modificare l'angolo della videocamera
(solo per dischi multiangolo) e
per
eseguire il playback al rallentatore.
Premere
per sintonizzare la radio,
tenere premuto il tasto per ricercare la
stazione su cui sintonizzarsi.
1) OK. Conferma la selezione.
1! SLEEP. Avvia lo sleep timer.
1@ MENU. Attiva il menu del DVD.
1# SOURCE SELECT (SELEZIONA
FONTE). Il tasto seleziona la fonte che
si desidera attivare su AVR-1 dal
DVD/CD - AUX - OPTICAL SCARTAUDIO -FM- AM.
1$
SELECT (SELEZIONA).
Seleziona i controlli toni (bass, treble) e
le impostazioni balance del canale.
1%
VOLUME. Imposta il volume
principale degli speaker o delle cuffie.
1^
S E T U P ( I M P O S TA Z I O N I ) .
Accedere o uscire dal menu
d'impostazione di AVR-1.
1&
TOOLS (STRUMENTI). Attiva il
menu su schermo per opzioni speciali.
1* EQ.
Seleziona una modalità per
equalizzatore audio da FLAT - EQB+
(bass boost, EQM+ (midrange boost),
EQM - (midrange cut).
1( AV MODE (MODALITÀ AV). Passa tra
IT
36
Risoluzione dei problemi
NESSUNA IMMAGINE SUL TELEVISORE
Assicurarsi di aver selezionato il corretto canale d'ingresso AV
sul televisore per la connessione video utilizzata.
IMMAGINE DISTORTA O MOSSA
Le impostazioni TV TYPE o RESOLUTION (TIPO TV o
RISOLUZIONE) possono non essere corrette per il televisore.
Per reimpostare le impostazioni di fabbrica, premere
OPEN/CLOSE (APRI/CHIUDI), poi il tasto NEXT
(SUCCESSIVO).
MESSAGGIO DI ERRATO PAESE SULLO SCHERMO
TELEVISIVO
Il DVD non viene letto perché acquistato in un altro paese.
E' possibile utilizzare DVD acquistati nello stesso paese del
lettore. L'impostazione del paese per l'unità AVR-1 è
contrassegnata sul pannello posteriore e appare come numero
all'interno di un globo. Il disco riporta inoltre lo stesso simbolo
del paese.
IMPOSSIBILE ACCEDERE AL MENU VIDEO O
PREFERENZE
Il disco è già stato inserito. Questi menu sono solamente
accessibili quando il disco è stato fermato due volte (non messo
in pausa).
NESSUN SUONO DAGLI SPEAKER CENTRALI O
POSTERIORI
Controllare che lo speaker non sia stato spento nel menu
SPEAKER SET UP (IMPOSTAZIONE SPEAKER).
RICEZIONE DI SCARSA QUALITÀ DELLA RADIO FM
L'antenna non è collegata o non è abbastanza sensibile,
potrebbe essere necessario in alcune aree installare
un'antenna esterna. Controllare il collegamento dell'antenna o
chiedere all'antennista di consigliare un sistema migliore per
AVR-1.
NESSUN SUONO DAL DECODER SURROUND SOUND
ESTERNO
Controllare che l'uscita audio digitale sia accesa nel menu
GENERAL SET UP (IMPOSTAZIONE GENERALE).
PER REIMPOSTARE AVR-1 ALLE IMPOSTAZIONI
PREDEFINITE DI FABBRICA.
Premere il tasto '”STOP” sul telecomando per 5 secondi.
AVR-1 ritorna in modalità standby. Quando acceso, AVR-1 si
sarà reimpostato sulle sue impostazioni predefinite.
Dati tecnici
ALIMENTAZIONE
Tensione richiesta. . . . . . . . . . . . . . . . . . . 220V-240V ~50Hz
Consumo . . . . . . . . . . . . . . . . . . . . . . . . . . . . . . . . . . . 280W
Dimensioni (mm) . . . . . . . . . . . . . . . 430 (L) x 360 (P) x 62(A)
1 ....Cavo d'alimentazione
2 ....Telecomando con batterie incluse
3 ....Antenna FM
4 ....Antenna AM
5 ....Cavo fono ausiliare
6 ....Il presente manuale
Uscita corrente amplificatore . . . . . . . . . . . . . . . . . . 6 x 60W
Uscite Video . . . . . . . . HDMI, SCART, YCrCb, SVideo, CVBS
Decodificazione audio . . . . . . . . . . . . . . . . Dolby digital, DTS
PARTI IN DOTAZIONE CON AVR-1
Batteria del telecomando
Garanzia
Il prodotto Audica è garantito per un periodo di due anni dalla
data d'acquisto. Se durante questo periodo il sistema non
funzionasse bene, l'unità verrà riparata o sostituita a
discrezione di Audica.
La garanzia non copre il logorio e i danni causati da un uso
improprio, qualunque ne sia la causa. La garanzia rientra, in
prima istanza, sotto la responsabilità del rivenditore dal quale si
è acquistato l'apparecchio e al quale si deve inviare per
riparazione o sostituzione il sistema, preferibilmente
nell'imballaggio originale e dopo aver pagato le spese di
trasporto. Includere sempre lo scontrino fiscale. Le merci
inviate a Audica sono a rischio del mittente. Se non fosse
possibile inviare l'unità, contattare Audica al seguente indirizzo:
[email protected]
+
Se il telecomando non funziona, rimuovere il vano batterie e
sostituire la batteria con uno stesso tipo 3V CR2025 come
indicato nella figura.
+
SOSTITUZIONE DELLA BATTERIA DEL TELECOMANDO
37
Willkommen
Vielen Dank, dass Sie sich für AUDICA entschieden haben!
Die Audica AV-Produkte werden nach den höchsten Standards entwickelt und produziert und
kombinieren Stil mit hoher Funktionalität und Ergonomie. Um Ihr System optimal nutzen zu können,
lesen Sie diese Anleitung bitte sorgfältig. Möglicherweise müssen Sie auch auf Benutzerhandbücher
anderer Komponenten zurückgreifen, um Beschädigungen oder Leistungsverluste zu verhindern.
Viel Spaß!
DE
Inhalt
Vor der Installation
-
-
-
-
38
Anschluss des TV-Gerätes und der Lautsprecher -
-
-
39
Optionale Anschlüsse-
-
-
-
40
Steuerung am Gerät und mit der Fernbedienung
-
-
-
41
Problemlösung
-
-
-
-
-
-
42
Spezifikationen
-
-
-
-
-
-
42
Fernbedienung
-
-
-
-
-
-
42
Garantie -
-
-
-
-
-
-
42
-
-
-
SOURCE
38
Wichtige Sicherheitsinformationen
1. ALLGEMEINE INFORMATIONEN
Der AUDICA AVR-1 DVD Receiver umfasst vier
Systemkomponenten in einem Gerät - einen DVD Player,
ein UKW/MW Radio, einen Surroundsound-Decoder und einen
6-Kanal Verstärker. Zusätzlich zum AVR-1 benötigen Sie ein
TV-Gerät und ein Lautsprechersystem mit 2 bis 6 Kanälen. Ein
vollständiges 6-Kanal Lautsprechersystem wird empfohlen, um
das bestmögliche realistischste Surroundsound-Erlebnis bieten
zu können.
2. AUSPACKEN IHRES SYSTEMS
Sie müssen beim Auspacken Ihres Systems sorgfältig vorgehen,
damit keine Teile beschädigt werden oder verloren gehen. Für
ein Verzeichnis der Teile, die mit Ihrem System geliefert worden
sein sollten, sehen Sie bitte in die Systemspezifikationen auf
Seite 16. Verwahren Sie die Verpackungsmaterialien auf, damit
das System erneut verpackt und sicher verschickt werden kann,
falls eine Rücksendung erforderlich wird.
3. WARTUNG
Versuchen Sie nicht, das Produkt selbst zu warten, da das
Öffnen von Abdeckungen oder Platten gefährliche Spannung
oder anderen Gefahren für Sie bedeuten kann. Überlassen Sie
Wartungsdienste qualifiziertem Personal.
Wenn Ersatzteile benötigt werden, achten Sie darauf, dass der
Techniker Ersatzteile verwendet, die vom Hersteller geliefert
wurden oder die dieselben Eigenschaften haben wie die
Originalteile. Die Verwendung nicht passender Teile kann zu
Bränden, elektrischen Schlägen oder anderen Gefahren führen
und macht die Garantie oder Gewährleistung ungültig.
Der Techniker muss alle Sicherheitsprüfungen durchführen, um
die Funktionsfähigkeit nach Reparaturen sicher zu stellen.
ACHTUNG!
RISIKO EINES ELEKTRISCHEN
SCHLAGS NICHT ÖFFNEN
UM DAS RISIKO EINES ELEKTRISCHEN SCHLAGS ZU
VERRINGERN, ENTFERNEN SIE NIEMALS DIE
ABDECKUNG (ODER DIE RÜCKSEITE)
Dieses Symbol zeigt an, dass die beiliegende
Dokumentation wichtige Bedienungs- und
Wartungsanweisungen enthält.
Dieses Symbol zeigt an, dass Gefahren eines
elektrischen Schlages durch gefährliche
Spannung vorliegen.
4. VORSICHTSMASSNAHMEN
! Lesen Sie diese Anweisungen sorgfältig durch.
! Bewahren Sie diese Anweisungen auf.
! Beachten Sie alle Warnungen.
! Befolgen Sie alle Anweisungen.
! Verwenden Sie das Gerät nicht in der Nähe von Wasser.
! Reinigen Sie es nur mit einem leicht angefeuchteten Tuch.
! Blockieren Sie keine Belüftungsschlitze.
! Installieren Sie es nur nach den Anweisungen des
Herstellers.
! Stellen Sie es nicht in der Nähe von Wärmequellen auf, z.B.
Heizungen, Heizkörpern, Öfen oder anderen Geräten
(einschließlich Verstärkern), die Hitze erzeugen.
! Ziehen Sie den Apparat bei Gewitter oder wenn er für
längere Zeit nicht verwendet wird aus der Steckdose.
! Überlassen Sie alle Wartungsarbeiten qualifiziertem
Servicepersonal. Eine Wartung ist erforderlich, wenn der
Apparat in irgendeiner Weise beschädigt wurde, z.B. wenn
das Stromkabel oder der Stecker beschädigt ist,
Flüssigkeiten über dem Gerät verschüttet wurden oder
Fremdkörper in das Gerät gefallen sind sowie wenn das
Gerät Regen oder Feuchtigkeit ausgesetzt war, nicht normal
funktioniert oder fallen gelassen wurde.
! Warnung: Um das Risiko eines Feuers oder elektrischen
Schlags zu verringern, setzen Sie das Produkt keinem
Regen oder Feuchtigkeit aus. Das Produkt darf keinen
Tropfen oder Spritzwasser ausgesetzt werden und es darf
kein mit Flüssigkeit gefülltes Objekt wie z.B. eine
Blumenvase auf dem Gerät abgestellt werden.
! Keine offenen Flammenquellen wie z.B. Kerzen sollten auf
das Produkt gestellt werden.
Vorsicht: Änderungen oder Modifikationen, die nicht
ausdrücklich vom Hersteller zugelassen sind, könnten die
Berechtigung zur Benutzung dieses Gerätes ungültig machen.
Vorsicht: Die Verwendung von Bedienelementen oder
Leistungsanpassungen, die nicht hierin beschrieben sind, kann
zu hohen Gefährdungen führen.
Diese Zeichen besagen, dass dieses Gerät ein Laser-Bauteil
enthält. Blicken Sie nicht direkt in den Laser.
WICHTIG
Dieses Gerät wurde getestet und für übereinstimmend mit den
Beschränkungen für ein Klasse B Digitalgerät nach Part 15 der
FCC befunden. Diese Einschränkungen wurden aufgelegt, um
einen angemessenen Schutz vor schädlicher Strahlung von
Geräteinstallationen in Haushalten zu gewährleisten. Dieses
Gerät erzeugt, nutzt und kann Funkfrequenzenergie
ausstrahlen. Wenn es nicht in Übereinstimmung mit diesen
Anweisungen aufgestellt wird, kann eine schädliche Störung mit
Funkübertragungen auftreten. Es gibt jedoch keine Garantie,
dass bei einer bestimmten Installation keine Störungen
auftreten. Falls das Gerät doch schädliche Störungen bei Radiooder Fernsehempfang verursacht, was überprüft werden kann,
indem das Gerät ein- und ausgestellt wird, sollte der Anwender
versuchen, die Störungen durch Durchführung einer oder
mehrerer der folgenden Maßnahmen zu korrigieren:
! Neuausrichtung oder Umsetzen der Empfangsantenne.
! Erhöhung des Abstands zwischen dem Gerät und dem
Empfänger.
! Anschluss des Gerätes an einer Steckdose, die an einem
anderen Stromkreis als der Empfänger angeschlossen ist.
! Befragen Sie den Händler oder einen erfahrenen Radio/Fernsehtechniker zu weiteren Maßnahmen.
ELEKTRISCHE INFORMATIONEN
Stromversorgung: Die Spannung dieser Einheit ist auf dem
Typenschild auf der Rückseite vermerkt. In Großbritannien sind
das 230/240V.
Der AVR-1 wird mit einem Stromkabel geliefert, das mit einem für
Großbritannien geeigneten Stecker mit einer 3A Sicherung
ausgestattet ist. Wenn die Sicherung ausgetauscht werden
muss, muss eine nach ASTA oder BSI zugelassene BS1362
Sicherung mit 3A verwendet werden. Wenn Sie den Netzstecker
austauschen müssen, entfernen Sie
die Sicherung und entsorgen Sie
3A
SICHERUNG
den alten Stecker direkt nachdem
BS 1362
Sie ihn vom Kabel abgeschnitten
haben.
BLAU
BRAUN
HAUPTSTROMSCHALTER
(Neutral)
(Masse)
D e r AV R - 1 b e s i t z t k e i n e n
Klasse II Konstruktion doppelt isoliert. Dieses Produkt
muss nicht geerdet werden.
Stromschalter. Wenn Sie den Strom des AVR-1 ausschalten
müssen, ziehen Sie den Stecker aus der Steckdose. Achten Sie
bei der Installation darauf, dass der Netzstecker des AVR-1
immer leicht zugänglich ist.
Hergestellt mit Lizenz der Dolby Laboratories. "Dolby", "AC-3",
"Pro Logic" und das Doppel-D Symbol sind Warenzeichen der
Dolby Laboratories.
39
Anschluss des TV-Gerätes und der Lautsprecher
ANSCHLUSS DES AVR-1 AM TV-GERÄT
Die qualitative hochwertigste Verbindung ist die erste in der
Liste, die niedrigste ist die unterste Ihr TV hat wahrscheinlich
mehrere Anschlussmöglichkeiten für Bild (Video). Für das
qualitativ beste Bild prüfen Sie, welche Anschlüsse an Ihrem
Fernseher vorhanden sind und verwenden Sie den, der in der
Liste am weitesten oben steht.
Es gibt 5 Videoausgänge, um das Bild an Ihren Fernseher zu
übertragen. Diese sind:
1. HDMI Digitalausgang (Bild und Ton)
2. PrPbY Komponenten (nur Bild)
3. SCART (Bild und Ton)
4. S-Video (nur Bild)
5. CVBS Composite Video (nur Bild)
TV VIDEO ANSCHLÜSSE
d
e
a
S-VIDEO CVBS HDMI
b
c
PR PB Y
SCART
ANSCHLUSS VON LAUTSPRECHERN, EINEM SUBWOOFER UND DER ANTENNE AM AVR-1
Es gibt Lautsprecheranschlüsse für bis zu 6 Lautsprecher, die für
Surroundsound in der richtigen Konfiguration aufgestellt werden
müssen. Die Lautsprecheranschlüsse sind wie folgt
gekennzeichnet, um die Positionen des jeweiligen
Lautsprechers anzugeben
- FR entspricht vorne rechts
- FL entspricht vorne links
- RR entspricht hinten rechts
- RL entspricht hinten links
- CEN entspricht vorne Mitte
- RCEN entspricht hinten Mitte
Positionieren Sie Ihre Lautsprecher, wie im Handbuch für die
Lautsprecher angegeben. Schließen Sie die Kabel jedes
Lautsprechers an den richtigen Anschlüssen auf der Rückseite
des AVR-1 an. Achten Sie darauf, dass die + Anschlüsse (rot) mit
den oberen + Anschlüssen des AVR-1 angeschlossen sind,
indem Sie den mit einem Streifen gekennzeichneten Draht für
die + Anschlüsse verwenden.
VORSICHT: Beim Anschluss von Lautsprecherkabeln dürfen
keine losen Kabelstränge die jeweils anderen Anschlüsse
berühren. Dies könnte die Schaltkreise des AVR-1 dauerhaft
beschädigen.
UKW-ANTENNE
Subwoofer
Vorne
Links
Mitte
Vorne
Vorne
Rechts
LAUTSPRECHER
AUFSTELLUNG
Hinten
Links
Hinten
Rechts
Mitte
Hinten
LW-ANTENNE
DE
40
Optionale Anschlüsse
ANSCHLUSS VON TV SOUND UND ANDEREN QUELLEN AM AVR-1
Sowohl TV Audio als auch AUX-Eingänge sind für den Anschluss
anderer Signalquellen am AVR-1 vorhanden. Wenn Ihr TV-Gerät
mit einem SCART Kabel angeschlossen ist, ist keine weitere
Verkabelung notwendig, um den TV Ton mit Ihrem AVR-1 zu
hören. Wenn Ihr TV-Gerät nicht über den SCART Anschluss
verbunden ist und einen Stereo Audioausgang hat, empfehlen
wir Ihnen, diesen mit den TV AUDIO Anschlüssen des AVR-1 zu
verbinden. Sie können dann den Ton Ihres TV-Gerätes mithilfe
TV AUDIO
AUSGANGSANSCHLÜSSE
des im AVR-1 eingebauten Multikanal-Surrounddekoders
wiedergeben, indem Sie den TV Eingang des AVR-1 auswählen.
In ähnlicher Weise können Sie eine weitere Bild-/Tonquelle mit
Stereoausgang, wie einen Videorekorder, am AUX Eingang des
AVR-1 anschließen. Der Ton des Videorekorders kann dann
mithilfe der Hauptsystemlautsprecher des AVR-1
wiedergegeben werden und bei Bedarf als Multikanal-Sound
decodiert werden.
VCR/AUX
AUDIOAUSGANGSANSCHLÜSSE
ANSCHLUSS EINES EXTERNEN SURROUNDSOUND-DEKODERS AM AVR-1
Der AVR-1 kann auch als Quelle für einen externen
Surroundsound-Dekoder oder - Receiver verwendet werden.
Ein externer Dekoder oder Receiver kann in einem großem
Zimmer mit großen Lautsprechern eingesetzt werden, um eine
höhere Ausgangsleistung als mit dem internen Verstärker des
AVR-1 zu erzielen. Alle Kanäle des Multikanal-Signals des AVR1 sind mit dem Dekoder/Receiver über ein einziges digitales
Koaxial-Audiokabel verbunden. HINWEIS: UKW/LW Radio und
AUX Eingangssignale, die am AVR-1 angeschlossen sind,
können nicht über den Digitalausgang weitergeleitet werden.
Koaxial
Digitaleingang
EXTERNER SURROUNDDEKODER ODER -RECEIVER
41
Steuerung am Gerät und mit der Fernbedienung
SOURCE
ab
c d e f
g
h
TASTEN AM GERÄT
a
b
c
d
KOPFHÖRERANSCHLUSS. Schließen Sie hier Ihre
Kopfhörer an. Die Lautsprecher schalten sich aus, wenn
Kopfhörer angeschlossen sind.
DISC AUSWERFEN. Drücken Sie diese Taste, um eine Disc
zu entfernen.
Lautstärkekontrolle. Diese Tasten steuern die Lautstärke,
der mit dem AVR-1 verbundenen Lautsprecher bzw. des
Kopfhörers. HINWEIS: Diese Tasten ändern nicht die TV
Lautstärke.
PLAY/PAUSE. Diese Taste startet die Wiedergabe einer
DVD oder CD. Drücken Sie diese Taste erneut, um die
Wiedergabe zu pausieren.
e
f
g
h
STOPP. Diese Taste stoppt die Wiedergabe einer DVD oder
CD. Bei zweimaligem Drücken wird der UKW/LW
Radiosenderspeicher gelöscht.
VOR/ZURÜCK. Drücken Sie kurz, um eine Disc zu
durchsuchen oder zum nächsten gespeicherten
Radiosender zu springen. Drücken und halten Sie diese
Tasten, um zum vorherigen oder nächsten Kapitel, Titel zu
wechseln oder das Frequenzband nach einem anderen
Sender zu durchsuchen.
QUELLENAUSWAHL. Diese Taste wähle die Quelle aus,
die Sie mit dem AVR-1 wiedergeben möchten: DVD/CDAUX- OPTISCH- SCARTAUDIO - UKW - LW.
STANDBY. Schaltet den AVR-1 ein oder aus. Schaltet in
TASTEN AN DER FERNBEDIENUNG
a
b
a
c
b
c
e
g
h
1!
1#
1$
1^
1&
1*
d d
f
h e
i
1)
1@ f
1%
1(
g
h
POWER. Drücken Sie diese Taste, um
den AVR-1 ein- oder auszuschalten.
ZIFFERNFELD. Für die direkte Auswahl
v o n Ti t e l n , D V D K a p i t e l n ( b e i
Verwendung zusammen mit der GOTO
Taste) oder der Radiosenderspeicher.
S TO R E ( S P E I C H E R N ) . F ü r d i e
Programmierung von Discs oder zur
Speicherung von Radiosendern. Halten
Sie diese Taste gedrückt, um die
Autoprogrammierung der Radiosender
zu beginnen.
GOTO.
Schnellauswahl
eines
bestimmten DVD Titels oder Kapitels.
STOPP. Stoppt die DVD/CD Wiedergabe
oder den UKW Suchlauf. Durch Halten
der Taste wird der Radiosenderspeicher
gelöscht.
MUTE (STUMM). Schaltet den Ton sofort
stumm. Drücken Sie die Taste erneut, um
die Stummschaltung abzubrechen.
PLAY/PAUSE. Gibt eine Disc wieder.
Drücken Sie die Taste erneut, um zu
pausieren.
PREV/NEXT (ZURÜCK/VOR). Drücken
Sie kurz, um eine Disc schnell zu
durchsuchen oder einen gespeicherten
Radiosender auszuwählen. Drücken und
halten Sie die Taste, um zum vorherigen
oder nächsten Kapitel oder Titel zu
springen.
i
PFEILTASTEN. Benutzen Sie diese
Tasten zur Navigation in Menüs.
Verwenden Sie bei der Wiedergabe einer
Disc
, um den Kamerawinkel zu
wechseln (nur bei entsprechenden Discs)
und
zur Wiedergabe in Zeitlupe.
Drücken Sie
, um das
Radioprogramm schrittweise
einzustellen, halten Sie die Taste für den
Suchlauf.
1) OK. Bestätigt eine Auswahl.
1! SLEEP. Aktiviert den Sleep-Timer.
1@ MENU. Aktiviert das DVD Disc Menü.
1# QUELLENAUSWAHL. Diese Taste
wähle die Quelle aus, die Sie mit dem
AVR-1 wiedergeben möchten: DVD/CDAUX-OPTISCH-SCARTAUDIO - UKW LW.
1$
SELECT
(AUSWAHL).
Audio-Bass,
-Höhen
Kanalbalanceeinstellungen aus.
Wählt
und
1%
VOLUME (LAUTSTÄRKE). Stellt die
Hauptlautstärke der Lautsprecher oder
des Kopfhörers ein.
1^
SETUP. Aufruf oder Beenden des
AVR-1 Setup Menüs.
1&
TO O L S .
Aktiviert
das
Bildschirmmenü für spezielle Funktionen.
1* EQ.
Wählt den Modus des AudioEqualizers
aus:
FLAT - EQB+
DE
42
Problemlösung
KEIN BILD AM TV-GERÄT
Achten Sie darauf, dass Sie den korrekten AV Eingang an Ihrem TV
gewählt haben, entsprechend der Videoverbindung, die Sie
verwenden.
KEIN TON AUS DEM MITTLEREN ODER DEN RÜCKWÄRTIGEN
LAUTSPRECHERN
Prüfen Sie, ob die Lautsprecher nicht im SPEAKER SETUP Menü
ausgeschaltet wurden.
GESTÖRTES, INSTABILES TV BILD
Die Einstellungen TV TYPE (TV TYP) oder AUFLÖSUNG
(RESOLUTION) können für Ihr TV-Gerät nicht geeignet sein. Um die
Auflösung auf die Werkseinstellungen zurückzusetzen, drücken Sie
OPEN/CLOSE und dann die Taste NEXT.
UKW RADIO-EMPFANG MIT SCHLECHTER QUALITÄT
Die Antenne ist nicht angeschlossen oder nicht empfindlich
genug - eine Außenantenne kann in bestimmten Gebieten
erforderlich sein. Überprüfen Sie den Antennenanschluss oder
fragen Sie einen lokalen Händler nach Tipps für ein besseres
Antennensystem für Ihr AVR-1.
NACHRICHT ZUR FALSCHEN REGION AUF DEM TV
BILDSCHIRM BEI WIEDERGABE EINER DVD
Die Disc, die Sie gerade wiedergeben, wurde in einer anderen DVD
Region gekauft. Sie können nur DVD Discs wiedergeben, die in
derselben Region gekauft wurden, wie Ihr DVD Player. Die
Regionseinstellung für den AVR-1 ist auf der Rückseite vermerkt
und wird durch eine Zahl innerhalb eines Globus dargestellt. Auf der
Disc finden Sie eine gleiche Kennzeichnung für die Region.
KEIN ZUGRIFF AUF VIDEO ODER FAVORITENMENÜS
Eine Disc wird gerade wiedergegeben. Auf diese Menüs kann nur
zugegriffen werden, wenn die Disc-Wiedergabe mit einem
doppelten Stopp (nicht der Pause-Funktion) angehalten wird.
KEIN TON VOM EXTERNEN SURROUNDSOUND-DEKODER
Überprüfen Sie, ob der Digitalausgang im Menü GENERAL SETUP
(ALLGEMEINES SETUP) eingeschaltet ist.
ZURÜCKSETZEN
DES
AV R - 1
AUF
DIE
WERKSEINSTELLUNGEN
Drücken Sie die Taste 'STOP' auf der Fernbedienung mindestens 5
Sekunden. Der AVR-1 schaltet in den Standby-Modus. Beim
erneuten Einschalten ist der AVR-1 auf die Werkseinstellungen
zurückgesetzt.
Spezifikationen
STROMVERSORGUNG
Netzspannung . . . . . . . . . . . . . . . . . . . . . 220V-240V ~50Hz
Stromverbrauch . . . . . . . . . . . . . . . . . . . . . . . . . . . . . . 280W
Abmessungen (mm) . . . . . . . . . . . . 430 (B) x 360 (T) x 62 (H)
1 ....Stromkabel
2 ....Fernbedienung mit Batterien
3 ....UKW Antenne
4 ....LW Antenne
5 ....Zusätzliches Phono-Kabel
6 ....Dieses Handbuch
Verstärker-Leistungsausgang . . . . . . . . . . . . . . . . . . 6 x 60W
Videoausgänge . . . . . HDMI, SCART, YCrCb, SVideo, CVBS
Audiodekonierung . . . . . . . . . . . . . . . . . . . Dolby digital, DTS
LIEFERUMFANG DES AVR-1
Fernbedienungsbatterie
Garantie
Ihr Audica Product hat eine Garantie von zwei Jahren ab
Kaufdatum. Falls während dieses Zeitraums Fehlfunktionen im
System auftreten, wird es nach Ermessen von Audica repariert
oder ersetzt.
Die Garantie erstreckt sich nicht auf natürliche Abnutzung oder
alle Schäden durch Missbrauch, wie auch immer verursacht.
Die Garantie wird in erster Linie durch den Händler geleistet,
von dem Sie das Gerät erworben haben, und an den das Gerät
zur Wartung frei gemacht eingesandt werden sollte,
vorzugsweise in der Originalverpackung. Bitte legen Sie Ihren
Kaufbeleg bei. Waren, die sich im Versand an Audica befinden,
unterliegen dem Risiko des Käufers.
Wenn dies nicht möglich ist, kontaktieren Sie Audica unter:
[email protected]
+
Wenn die Fernbedienung nicht mehr funktioniert, entfernen Sie
die Batteriefachabdeckung und ersetzen Sie die Batterien
durch neue desselben Typs 3V CR2025, wie in dem Diagramm
gezeigt.
+
WECHSEL DER BATTERIE DER FERNBEDIENUNG
43
Bienvenidos
Gracias por elegir AUDICA.
Los productos audiovisuales Audica han sido diseñados y fabricados en función de los más altos niveles
de calidad y presentan una combinación perfecta de estilo, prestaciones y ergonomía. Para sacar el
máximo partido del sistema, lea detenidamente el presente manual. También puede que necesite
consultar las guías del usuario de otros componentes a fin de evitar daños o pérdidas de rendimiento
debido a una instalación incorrecta.
Disfrute…
Contenido
Antes de empezar -
-
-
-
-
44
Conexión del televisor y los altavoces
-
-
-
-
45
Conexiones optativas
-
-
-
-
46
Controles del panel frontal y el mando a distancia -
-
-
47
Solución de problemas
-
-
-
-
-
48
Especificaciones
-
-
-
-
-
-
48
Mando a distancia -
-
-
-
-
-
48
Garantía -
-
-
-
-
-
48
-
-
-
ESP
SOURCE
44
Información importante de seguridad
1. INFORMACIÓN GENERAL
El DVD/receptor AVR-1 de AUDICA incluye cuatro componentes
del sistema: un reproductor de DVD, una radio FM/AM, un
descodificador de sonido envolvente y un amplificador de 6
canales. Además del AVR-1, necesitará un receptor de
televisión y un sistema de altavoces de entre 2 y 6 canales. Se
recomienda un sistema de altavoces completo de 6 canales a fin
de obtener una experiencia de sonido envolvente lo más realista
posible.
2. DESEMBALAJE DEL SISTEMA
Al desembalar el sistema, se debe tener cuidado de no dañar ni
perder ningún elemento. Si desea ver una lista de los elementos
que debe incluir el sistema, consulte el apartado de
especificaciones en la página 8. Conserve el material de
embalaje para poder volver a empaquetar el sistema y enviarlo
en caso de ser necesario.
3. REPARACIÓN
No intente reparar este producto por su cuenta, ya que la
apertura de cubiertas o paneles podría provocar la exposición a
voltajes peligrosos u otros riesgos. Sólo el personal cualificado
debe realizar reparaciones.
En caso de necesitar piezas de recambio, asegúrese de que el
técnico emplee repuestos proporcionados por el fabricante o
con las mismas características que las piezas originales. El uso
de piezas inadecuadas podría provocar fuego, descargas
eléctricas u otros peligros, así como invalidar la garantía.
El técnico debe realizar las comprobaciones de seguridad
necesarias para verificar el funcionamiento tras las
reparaciones.
¡PRECAUCIÓN!
RIESGO DE DESCARGA
ELÉCTRICA NO ABRIR
PARA REDUCIR EL RIESGO DE DESCARGA ELÉCTRICA
NO RETIRAR LA CUBIERTA NI LA PARTE POSTERIOR
Este símbolo indica que la
documentación incluye instrucciones
importantes de uso y mantenimiento.
Este símbolo indica que existe voltaje
peligroso, el cual implica riesgos de sufrir
descargas eléctricas.
4. PRECAUCIONES
! Lea estas instrucciones.
! Conserve estas instrucciones.
! Preste atención a todas las advertencias.
! Siga todas las instrucciones.
! No utilice este aparato cerca del agua.
! Utilice para limpiarlo únicamente un paño ligeramente
humedecido.
! No bloquee las aberturas de ventilación.
! Realice la instalación de acuerdo con las instrucciones del
fabricante.
! No lo instale ni lo utilice cerca de fuentes de calor como
radiadores, estufas u otros aparatos que generen calor.
! Desenchufe el aparato durante tormentas eléctricas o
cuando no se vaya a utilizar por un periodo prolongado.
! Sólo el personal cualificado debe realizar reparaciones. Es
necesario recurrir al servicio técnico cuando el aparato ha
resultado dañado de cualquier forma, como por ejemplo si
se estropean el cable de alimentación o el enchufe, si se
derrama líquido sobre él o caen dentro objetos, si ha estado
expuesto a lluvia o humedad, si el funcionamiento no es
correcto o si se ha caído.
! Advertencia: para reducir el riesgo de que se produzcan
fuego o descargas eléctricas, no exponga el producto a la
lluvia ni la humedad. Este producto no debe exponerse a
goteos ni salpicaduras, por lo que no deberá colocarse
sobre él ningún objeto lleno de líquido, como pueden ser
jarrones con flores.
! No se deben colocar sobre el producto fuentes
incandescentes como velas.
Precaución: los cambios o las modificaciones no aprobados
expresamente por el fabricante podrían anular la autoridad del
usuario para utilizar este dispositivo.
Precaución: el uso de controles, ajustes o procedimientos de
uso distintos de los especificados en el presente documento
podrían provocar la exposición a peligros.
PRODUCTO LÁSER
DE CLASE 1
Estas etiquetas indican que la unidad contiene un componente
láser. No mire fijamente la lente del láser.
IMPORTANTE
Tras someterlo a las pruebas correspondientes, se ha
determinado que este equipo cumple los límites establecidos
para dispositivos digitales de clase B de conformidad con la parte
15 de la normativa de la FCC. Estos límites se han establecido
con el objetivo de aportar una protección razonable contra
radiaciones perjudiciales cuando el equipo se utiliza en el hogar.
Este equipo genera, utiliza y puede emitir energía de
radiofrecuencia y, a menos que se instale y se utilice de acuerdo
con el manual de instrucciones, puede provocar interferencias
perjudiciales en las comunicaciones de radio. Sin embargo, no
existe garantía de que éstas no se produzcan en determinadas
instalaciones. Si el equipo produce interferencias perjudiciales
en la recepción de radio o televisión, lo cual puede probarse
encendiendo y apagando el equipo, se recomienda al usuario
corregir dichas interferencias tomando una o varias de las
siguientes medidas:
! reorientar o reubicar la antena de recepción;
! aumentar la separación entre el equipo y el receptor;
! conectar el equipo a una toma de corriente o un circuito
diferentes a los del receptor;
! solicitar ayuda al proveedor o a un técnico experimentado
de radio y televisión.
INFORMACIÓN ELÉCTRICA
Alimentación: el voltaje de funcionamiento de esta unidad se
indica en la placa de datos situada en la parte trasera. Para el
Reino Unido, es de 230/240 V.
El AVR-1 se suministra con un cable de alimentación terminado
en un enchufe equipado con un fusible de 3 A aprobado para el
Reino Unido. En caso de sustituir el
fusible, se debe emplear un fusible
FUSIBLE
BS1362 aprobado por ASTA o BSI
DE 3 A
de 3 A. Si necesita cambiar el
BS 1362
enchufe, retire el fusible y
deshágase del enchufe de forma
MARRÓN
segura inmediatamente después de AZUL
(vivo)
(neutro)
cortarlo del cable.
Equipo de clase II con aislamiento doble. Este
producto no se debe conectar a tierra.
INTERRUPTOR DE ALIMENTACIÓN
El AVR-1 no dispone de interruptor de alimentación. Si necesita
interrumpir la alimentación del AVR-1, desenchúfelo de la toma
de corriente. Por este motivo, hay que asegurarse de que se
pueda acceder con facilidad al enchufe a la hora de instalar el
AVR-1.
Fabricado con licencia de Dolby Laboratories. "Dolby", "AC-3",
"Pro Logic" y el símbolo de la D doble son marcas comerciales
de Dolby Laboratories.
45
Conexión del televisor y los altavoces
CONEXIÓN DEL AVR-1 A UN RECEPTOR DE TELEVISIÓN
La conexión de mayor calidad está en la parte superior y, la de
menor calidad, en la parte inferior. El receptor de televisión
contará probablemente con diversas opciones de conexión para
la entrada de imágenes (vídeo). A fin de obtener imágenes de la
mejor calidad, compruebe de qué conexiones dispone el
receptor de televisión y utilice la situada más cerca del principio
de la lista.
Existen 5 conexiones de salida de vídeo que transfieren la
imagen al televisor. Son las siguientes:
1. Salida digital HDMI (imagen y sonido)
2. Componente PrPbY (sólo imagen)
3. SCART (imagen y sonido)
4. S-Video (sólo imagen)
5. Vídeo compuesto CVBS (sólo imagen)
CONEXIONES DE VÍDEO DEL TELEVISOR
d
e
a
S-VIDEO CVBS HDMI
b
c
PR PB Y
SCART
ESP
CONEXIÓN DE ALTAVOCES, SUBWOOFER (ALTAVOZ DE GRAVES) Y ANTENAS AL AVR-1
Existen conexiones para un máximo de 6 altavoces con una
configuración de sonido envolvente. Estas conexiones tienen
etiquetas que permiten determinar la posición de cada uno de
los altavoces, tal y como sigue:
- FR corresponde al delantero derecho
- FL corresponde al delantero izquierdo
- RR corresponde al trasero derecho
- RL corresponde al trasero izquierdo
- CEN corresponde al delantero central
- RCEN corresponde al trasero central
Coloque los altavoces tal y como se indica en el manual de los
altavoces. Conecte los cables de cada uno de los altavoces a los
terminales correspondientes situados en la parte posterior del
AVR-1. Asegúrese de que los terminales positivos de los
altavoces (de color rojo) estén conectados a los terminales
positivos superiores del AVR-1 mediante la conexión de los
cables rayados a los terminales positivos.
PRECAUCIÓN: al conectar los cables de los altavoces,
asegúrese de que ningún hilo suelto pueda tocar otro terminal.
Esto podría dañar permanentemente el sistema de circuitos del
AVR-1.
Subwoofer
Delantero
izquierdo
UBICACIONES DE
LOS ALTAVOCES
Central
delantero
Delantero
derecho
Trasero
derecho
Trasero
izquierdo
Central
trasero
ANTENA FM
ANTENA AM
46
Conexiones optativas
CONEXIÓN DEL SONIDO DEL TELEVISOR Y OTRAS FUENTES AL AVR-1
El AVR-1 dispone de las entradas de sonido TV y AUX para la
conexión de otras fuentes de señales. Si su televisor está conectado
mediante un cable SCART, no es necesario realizar otras
conexiones para escuchar el sonido de la televisión a través del
AVR-1. En caso de que el televisor no utilice el conector SCART y
disponga de salida de sonido estéreo, se recomienda conectarlo a
las conexiones de entrada de sonido TV del AVR-1. Esto le permitirá
escuchar el sonido del televisor a través del descodificador de
CONEXIONES
DE SALIDA DE
SONIDO TV
sonido envolvente multicanal integrado en el AVR-1 mediante la
selección de la entrada TV del AVR-1.
De igual forma, puede disponer de otra fuente audiovisual estéreo,
como un reproductor de vídeo, que se puede conectar a la entrada
AUX del AVR-1. El sonido del vídeo se puede reproducir a través del
AVR-1 en los altavoces del sistema principal y descodificarse para
obtener sonido multicanal si se prefiere.
CONEXIONES
DE SALIDA DE
SONIDO AUX
CONEXIÓN DE UN DESCODIFICADOR DE SONIDO ENVOLVENTE EXTERNO AL AVR-1
El AVR-1 también se puede utilizar como fuente para un receptor
o descodificador de sonido envolvente externo. Es posible
emplear un receptor o descodificador externo en una estancia
amplia con grandes altavoces para conseguir una potencia de
salida superior a la que pueden ofrecer los amplificadores
internos del AVR-1. Todos los canales de la señal multicanal del
AVR-1 se conectan al receptor/descodificador mediante un
único cable de sonido digital coaxial. NOTA: las señales de
entrada de radio FM/AM y AUX conectadas al AVR-1 no están
disponibles a través de la salida digital.
Entrada digital
Coaxial
RECEPTOR O DESCODIFICADOR
DE SONIDO ENVOLVENTE EXTERNO
47
Controles del panel frontal y el mando a distancia
SOURCE
ab
c d e f
g
h
BOTONES DEL PANEL FRONTAL
a
b
c
d
CONECTOR PARA AURICULARES. Conecte aquí sus
auriculares. Los altavoces se desactivarán al conectar los
auriculares.
EXPULSIÓN DE DISCO. Pulse este botón para extraer un
disco.
Controles de volumen. Estos botones controlan el volumen de
los altavoces o los auriculares conectados al AVR-1. NOTA:
estos botones no actúan sobre el volumen del televisor.
REPRODUCCIÓN/PAUSA. Este botón permite reproducir un
DVD o un CD. Púlselo de nuevo para pausar la reproducción del
disco.
e
f
g
h
DETENCIÓN. Este botón detendrá la reproducción de un DVD o
CD. También permite borrar una presintonía de radio FM/AM si
se pulsa dos veces.
SIGUIENTE/ANTERIOR. Si se pulsa brevemente, permite
buscar rápidamente en un disco o pasar a la siguiente
presintonía de radio. Pulse estos botones y manténgalos
pulsados para cambiar al capítulo o la pista anterior o siguiente,
o bien para sintonizar la banda y buscar otra estación.
SELECCIÓN DE FUENTE. Este botón permite seleccionar la
fuente de la reproducción mediante el AVR-1 entre DVD/CD,
AUX, OPTICAL, SCARTAUDIO, FM y AM.
ESPERA. Permite activar o desactivar el AVR-1. Colóquelo en
BOTONES DEL MANDO A DISTANCIA
a
b
a
c
b
d
c
e
g
h
1!
1#
1$
1^
1&
1*
d
f e
h
i
1) f
1@
1%
g
1(
h
i
ENCENDIDO. Pulse este botón para
apagar o encender el equipo.
TECLADO NUMÉRICO. Para la
selección directa de pistas, capítulos de
DVD (en conjunción con el botón GO TO)
o presintonías de radio.
STORE. Para programar discos o
almacenar presintonías de radio.
Mantenga pulsado este botón para iniciar
la programación automática de la radio.
GO TO. Selección rápida de un título o
capítulo de DVD particular.
DETENCIÓN. Para detener la
reproducción de DVD/CD o la búsqueda
de estaciones FM. Permite borrar las
presintonías de radio cuando se
mantiene pulsado.
cambiar el ángulo de la cámara (sólo en
discos con varios ángulos) y
para la
reproducción a cámara lenta. Pulse
para sintonizar la radio paso a paso y
manténgalo pulsado para buscar
sintonías.
1) OK. Confirma una selección.
1! SLEEP. Activa el temporizador
1@
MENU. Activa el menú del disco
DVD.
1#
SOURCE. Este botón permite
seleccionar la fuente de la reproducción
mediante el AVR-1 entre DVD/CD, AUX,
OPTICAL, SCARTAUDIO, FM y AM.
1$
S E L E C T. S e l e c c i o n a
configuraciones de graves, agudos y de
equilibrio de canales para el sonido.
MUTE. Bloqueo instantáneo del sonido.
Pulse de nuevo este botón para cancelar
la acción anterior.
1%
REPRODUCCIÓN/PAUSA. Permite
reproducir un disco. Pulse de nuevo este
botón para pausar la reproducción.
1^
ANTERIOR/SIGUIENTE. Pulse
brevemente para buscar rápidamente en
un disco o seleccionar otra presintonía de
radio. Pulse y mantenga pulsado para
pasar al capítulo o la pista anterior o
siguiente.
CURSORES. Utilice estos botones para
desplazarse por los menús. Si se está
reproduciendo un disco, utilice
para
de
desactivación.
VOLUMEN. Establece el volumen
principal de los altavoces o los
auriculares.
SETUP. Permite entrar en el menú de
configuración del AVR-1 o salir de él.
1&
TOOLS. Activa el menú en pantalla
para las funciones especiales.
1* EQ. Selecciona un modo de ecualización
de sonido entre FLAT (sin ecualización),
EQB+ (incremento de graves), EQM+
(incremento de medios) y EQM(reducción de medios).
1( AV MODE. Alterna entre los modos de
ESP
48
Solución de problemas
NO APARECEN IMÁGENES EN EL TELEVISOR
Asegúrese de haber seleccionado el canal de entrada AV correcto
en el televisor para la conexión de vídeo utilizada.
IMÁGENES DISTORSIONADAS O INESTABLES EN EL TELEVISOR
Puede que la configuración de tipo de televisión o resolución no sea
correcta para el receptor de televisión. A fin de restablecer la
resolución a los valores de fábrica, pulse el botón de apertura/cierre
y, a continuación, el botón SIGUIENTE.
MENSAJE DE REGIÓN INCORRECTA EN LA PANTALLA DEL
TELEVISOR AL REPRODUCIR UN DVD
El disco que está intentando reproducir pertenece a otra región de
DVD. Sólo se pueden reproducir discos DVD adquiridos en la
misma región que el reproductor. La configuración de región del
AVR-1 está indicada en el panel trasero y aparece en forma de
número dentro de un globo. El disco también presenta este mismo
tipo de marca de región.
NO ES POSIBLE ACCEDER A LOS MENÚS DE VÍDEO O
PREFERENCIAS
Puede que se esté reproduciendo un disco. Sólo se puede acceder
a estos menús cuando el disco se detiene completamente (no
mediante la pausa).
LOS ALTAVOCES CENTRALES O POSTERIORES NO EMITEN
SONIDO
Compruebe que no se hayan desactivado los altavoces en el menú
SPEAKER SET UP.
RECEPCIÓN DE RADIO FM DE MALA CALIDAD
La antena no está conectada o no es suficientemente potente.
Puede que se requiera una antena exterior en algunas áreas.
Compruebe la conexión de la antena o solicite a un técnico de
antenas local que le recomiende un sistema de antenas mejor para
el AVR-1.
EL DESCODIFICADOR DE SONIDO ENVOLVENTE EXTERNO
NO EMITE SONIDO
Compruebe que la salida de sonido digital esté activada en el menú
GENERAL SET UP.
PARA DEVOLVER EL AVR-1 A LA CONFIGURACIÓN
PREDETERMINADA DE FÁBRICA
Pulse el botón de detención en el mando a distancia durante 5
segundos. El AVR-1 pasará al modo de espera. Al activar de nuevo
el AVR-1, se habrán restablecido los valores predeterminados.
Especificaciones
ALIMENTACIÓN
Requisitos de voltaje . . . . . . . . . . . . . . . . . . . . 220V-240V ~50Hz
Consumo eléctrico . . . . . . . . . . . . . . . . . . . . . . . . . . . . . . . 280W
Dimensiones (mm) . . . 430 (ancho) x 360 (profundidad) x 62 (alto)
1 ....Cable de alimentación
2 ....Mando a distancia con pilas
3 ....Antena de FM
4 ....Antena de AM
5 ....Cable de sonido auxiliar
6 ....Este manual
Potencia de salida del amplificador . . . . . . . . . . . . . . . . . 6 x 60W
Salidas de vídeo . . . . . . . . HDMI, SCART, YCrCb, SVideo, CVBS
Descodificación de sonido . . . . . . . . . . . . . . . . Dolby digital, DTS
ELEMENTOS SUMINISTRADOS CON EL AVR-1
Pila del mando a distancia
Garantía
Este producto Audica está garantizado por un período de dos años a
partir de la fecha de adquisición. Si durante este periodo se produce
algún fallo de funcionamiento en el sistema, será reparado o
reemplazado, según estime Audica.
La garantía excluye el desgaste lógico y normal, así como cualquier
daño debido al uso incorrecto por cualquier motivo. La garantía es
responsabilidad en primera instancia del establecimiento en el que
se adquirió el equipo, donde deberá enviarse, preferiblemente en su
embalaje original, con los gastos pagados. Se debe incluir una
prueba de compra. El remitente será responsable de los artículos en
tránsito hacia Audica.
En caso de no ser esto posible, póngase en contacto con Audica en:
[email protected].
+
Si el mando a distancia no funciona, retire la tapa del
compartimento de la pila y sustituya la pila por otra del mismo
tipo (CR2025 3 V), tal y como se muestra en la ilustración.
+
SUSTITUCIÓN DE LA PILA DEL MANDO A DISTANCIA
49
50
51
52
53
54
[email protected]
www.audica.co.uk