1
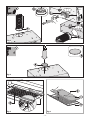
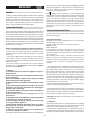
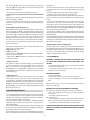
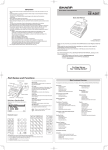
Chmney Hood - Model:
HBV60X
GB
COOKER HOOD - User instructions
-2-
Fig.1
Fig.2
-3-
Fig.3
Fig.4
Fig.6
Fig.5
-4-
Fig.7
-5-
ENGLISH
Waste Electrical and Electronic Equipment (WEEE). By making
sure that this appliance is disposed of in a suitable manner,
the user is helping to prevent potential damage to the
environment or to public health.
GB
GENERAL
The
symbol on the product or on the accompanying
paperwork indicates that the appliance should not be treated
as domestic waste, but should be delivered to a suitable
electric and electronic appliance recycling collection point.
Follow local guidelines when disposing of waste. For more
information on the treatment, re-use and recycling of this
product, please contact your local authority, domestic waste
collection service or the shop where the appliance was
purchased.
Carefully read the following important information regarding
installation safety and maintenance. Keep this information
booklet accessible for further reference. The appliance has
been designed for use in the ducting version (air exhaust to
the outside – Fig.1B), filtering version (air circulation on the
inside – Fig.1A) or with external motor (Fig.1C).
SAFETY PRECAUTION
INSTALLATION INSTRUCTIONS
1. Take care when the cooker hood is operating simultaneously
with an open fireplace or burner that depend on the air in the
environment and use a fuel source other than electrical energy,
as the cooker hood removes the air from the environment
which a burner or fireplace need for combustion. The negative
pressure in the environment must not exceed 4Pa (4x10⁻⁵ bar).
Provide adequate ventilation in the environment for a safe
operation of the cooker hood.Follow the local laws applicable
for external air evacuation.
Assembly and electrical connections must be carried out by
specialised personnel.
• Electrical Connection
The appliance has been manufactured as a class II, therefore
no earth cable is necessary.
The connection to the mains is carried out as follows:
BROWN = L line
BLUE = N neutral
If not provided, connect a plug for the electrical load
indicated on the description label. Where a plug is provided,
the cooker hood must be installed in order that the plug is
easily accessible.
An omnipolar switch with a minimum opening of 3mm
between contacts, in line with the electrical load and local
standards, must be placed between the appliance and the
network in the case of direct connection to the electrical
network.
Before connecting the model to the electricity network:
- check the data plate (positioned inside the appliance) to
ascertain that the voltage and power correspond to the
network and the socket is suitable. If in doubt ask a qualified
electrician.
- If the power supply cable is damaged, it must be replaced
with another cable or a special assembly, which may be
obtained direct from the manufacturer or from the Technical
Assistance Centre.
- This device must be connected to the supply network
through either a plug fused 3A or hardwired to a 2 phase
spur protected by 3A fuse.
• The minimum distance between the support surfaces of
the cooking pots on the cooker top and the lowest part of
the cooker hood must be at least 65 cm. If a connection
tube composed of two parts is used, the upper part must be
placed outside the lower part. Do not connect the cooker
hood exhaust to the same conductor used to circulate hot air
or for evacuating fumes from other appliances generated by
other than an electrical source. Before proceeding with the
assembly operations, remove the anti-grease filter(s) (Fig.6)
so that the unit is easier to handle.
- In the case of assembly of the appliance in the suction version
prepare the hole for evacuation of the air.
2. Warning !
In certain circumstances electrical appliances may be a
danger hazard.
A) Do not check the status of the filters while the cooker
hood is operating
B) Do not touch bulbs or adjacent areas, during or straight
after prolonged use of the appliance.
C) Flambè cooking is prohibited underneath the cooker
hood
D) Avoid leaving exposed flames and always ensure that
the burners are covered as open flames are damaging for
the filters and a fire hazard
E) Constantly check food frying to avoid overheated oil
becoming a fire hazard
F) Disconnect the electrical plug prior to any
maintenance.
G) This appliance is not intended for use by young children
or infirm persons without supervision
H) Young children should be supervised to ensure they
do not play with the appliance
I) There shall be adequate ventilation of the room when
the rangehood is used at the same time as appliances
burning gas or other fuels
L) There is a risk of fire if cleaning is not carried out in
accordance with the instructions
This appliance conforms to the European Directive EC/2002/96,
• We recommend the use of an air exhaust tube which has the
same diameter as the air exhaust outlet hole. If a pipe with a
smaller diameter is used, the efficiency of the product may be
reduced and its operation may become noisier.
• Warning: if the bulbs are not working, ensure that they are
screwed in fully.
• Installation
Prior to proceeding with the assembly operations (according
to the model that you have purchased), to facilitate handling
of the device, remove the grille as indicated in Fig. 5.
• The appliance is equipped with 2 air outlets, to be used in
accordance with your specific requirements: one is located on
the upper part of the appliance and the other at the rear (Fig.
-6-
1A). The flange D, to which the air exhaust pipe is connected,
and a plug B, used to shut off the unused air outlet, are both
supplied with the product.
instructions:
- Remove the filters from the cooker hood and wash them
in a solution of water and neutral liquid detergent, leaving
to soak.
- Rinse thoroughly with warm water and leave to dry.
- The filters may also be washed in the dishwasher.
The aluminium panels may alter in colour after several washes.
This is not cause for customer complaint nor replacement of
panels.
• The active carbon filters purify the air that is replaced in the
environment. The filters are not washable nor re-useable
and must be replaced at maximum every four months. The
saturation of the active carbon filter depends on the frequency
of use of the appliance, by the type of cooking and the regularity
of cleaning the anti-grease filters.
• Clean the fan and other surfaces of the cooker hood regularly
using a cloth moistened with denatured alcohol or non abrasive
liquid detergent.
• The illumination installation is designed for use during cooking
and not for prolonged general illumination of the environment.
Prolonged use of the illumination installation notably reduces
the duration of the bulb.
• This device may be installed in two different ways:
1. Fixing the hood to the lower part of the wall cabinet
(Fig.2)
- Make 4 holes in the wall cabinet respecting the measurements
indicated in figures 2 A-2 C.
- Position the hood underneath the wall cabinet and fix it
into place using 4 screws (not supplied) suitable for the type
of cabinet.
2. Fixing the hood to the wall (Fig.2).
- Make 4 holes in the wall cabinet referring to the measurements
indicated in figures 2 A-2 B. - Hang the hood on the wall, using
the 2 holes H, align it in a horizontal position and fix it definitively
to the wall using the two lower safety holes I (Fig. 2B). For the
various installations use screws and screw anchors suited to
the type of wall (e.g. reinforced concrete, plasterboard, etc.). If
the screws and screw anchors are provided with the product,
check that they are suitable for the type of wall on which the
hood is to be fixed.
• Replacing the acrylic or metal panels
To replace the acrylic or metal panels you need to first remove
the grille D by pushing the two side buttons B inwards as
indicated in figure 5. Remove the two filter clips B (fig. 6) and
the acrylic or metal panel C. To reassemble the part, simply
perform the procedure in reverse.
The hood is already prepared for the version with which it was
ordered. The versions may be:
- Extraction (Fig. 1A-3)
- Filter (Fig. 1B-4-7).
- If the hood is an extractor model, the lever C must be positioned as indicated in Fig. 3.
- If the hood is a filter model, the lever C must be positioned
as indicated in Fig. 4.
• FILTER REMOVAL
WARNING - ENSURE THE APPLIANCE IS SWITCHED OFF
AT THE MAINS BEFORE REPLACING THE BULBS AND
FILTERS.
1. remove the filters by lifting the recessed handle and lift
free from the hood frame.
2. To reinstall the filters position in the recess at the rear
and press to lock in position.
• Extractor version
The appliance expels the fumes through an outside wall or
a duct. It is necessary to buy a telescopic pipe in accordance
with the standards in use (inflammable) and connect it to
flange D (Fig 1A). The flange D is supplied with the product
and should be fixed above the air outlet hole of the hood as
indicated in Fig. 3.
BULB REPALCEMENT
1. Remove the filters
2. Unscrew the bulb in an anti-clock wise direction.
3. After installing the correct replacement bulb, refit the
filter.
• Filtering version
To transform an extractor hood version into a filter hood
version, please inquire with your retailer about purchasing
charcoal filters. The filters should be fitted to the extraction
assembly inside the hood, by centring them and rotating them
90 degrees, until they click into place (Fig. 7). To do this, remove
the grille D (Fig. 5). Close the air outlet opening with the plug
B, as indicated in Fig. 4.
Replacement bulbs can be easily obtained from a good
electrical or DIY store.
BEFORE CALLING SERVICE/TROUBLE SHOOTING
The hood was switched on but the unit does not operate.
• Have you plugged in/switched on the power supply at
the socket?
• Check for a blown fuse/or trip.
Extraction is poor
• Check and clean the filters if required, if required, if active
filters are present replacement filters maybe required.
• Check that the exhaust ducting is not obstructed.
USE AND MAINTENANCE
• It is recommended to operate the appliance prior to cooking.
It is recommended to leave the appliance in operation for 15
minutes after cooking is terminated in order to completely
eliminate cooking vapours and odours.
The proper function of the cooker hood is conditioned by the
regularity of the maintenance operations, in particular, the
active carbon filter.
• The anti-grease filters capture the grease particles suspended
in the air, and are therefore subject to clogging according to
the frequency of the use of the appliance.
In order to prevent fire hazard, it is recommendable to clean the
filter at a maximum of 2 months by carrying out the following
THE MANUFACTURER DECLINES ALL RESPONSIBILITY FOR
EVENTUAL DAMAGES CAUSED BY BREACHING THE ABOVE
WARNINGS.
-7-
Guarantee and Service
Your Beko product is guaranteed against the cost of breackdown repairs for twelve months from the date of
the original purchase.
What is covered?
• All repairs necessary as a result of faulty materials, defective components or manufacturing defect.
• The cost of all functional replacement parts.
• The labour costs of a Beko approved repairer to carry out the repair
What is not covered?
• Transit or delivery damage
• Accidental damage
• Misuse, or abuse.
• Cabinet or appearance parts, including knobs and flaps
• Accessory items, including ice trays, scrapers, cutlery baskets
• Repairs required as a result of unauthorised repairs or inexpert installation that fails to meet the requirements
contained in the user instruction book.
• Repairs to products used on commercial or non-residential household premises
Important notes.
• The product is guaranteed for domestic household use only.
• The guarantee will be void if the product is installed or used in commercial or non-residential household
premises.
• The product must be correctly installed, located and operated in accordance with the instructions contained
in the User Instructuion Booklet provided.
• Professional Istrallation by a qualified plumber/electrical appliance installer is recommended for all Washing
& Dishwashing Machines and Electric Cookers
• Gas appliances must only be installed by a Gas Safe ( or BORD GAIS) registered Gas Installer.
• The guarantee is given only within the boundaries of the United Kingdom.
• The guarantee is not transferable if the product is resold.
• Beko plc disclaims any liability for incidental or consequential damages
• The guarantee does not in anyway diminish your statutory or legal rights.
HOW TO OBTAIN SERVICE UNDER THE MANUFACTURERS WARRANTY
Please keep your purchase receipt or other proof of purchase in a safe place; you will need to have it should the
product require attention in the guarantee period
You should also complete the details below; it will help us assist you quicker when requesting service. ( The
model number is printed on the Instruction Booklet)
Model Number:
Purchased From:
---------------------------
-----------------------------
Date of Purchase:
---------------------------
For service under guarantee simply telephone the appropriate number below
UK Mainland & Northern Ireland
Fridges & Freezers
Electric Cookers
Gas & Dual Fuel Cookers
Washing Machines & Dishwashers
-8-
0845 600 4903
0845 600 4902
0845 600 4905
0845 600 4906
Republic of Ireland
All Refrigeration, Cooking, Washing & Dishwashing Machines
01 862 3411
Before requesting service please check the trouble-shooting guide in the Operating Instructions as a charge
may be levied where no faults is found even though your product may still be under guarantee.
Service once the manufacturers guarantee has expired:
If you have purchased an extended guarantee please refer to the instructions contained within the extended
guarantee agreement document. Otherwise please call the above numbers where service can be obtained at
a charge.
Should you experience any difficulty in obtaining service please call the
Beko Customer Help-Line on 0845 600 4911
Beko House, Caxton Way, Watford, Herts, WD18 8UF, Tel: 0845 600 4911
-9-
- 10 -
- 11 -
3LIK06--