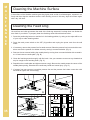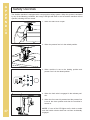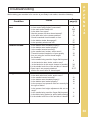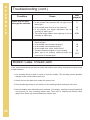
1
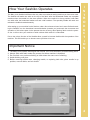
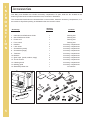
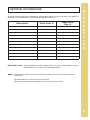
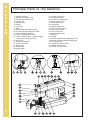
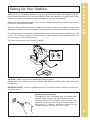
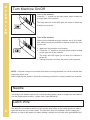
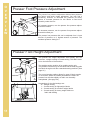
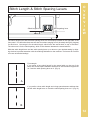
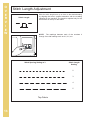
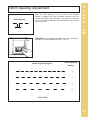
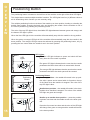
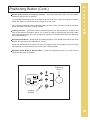
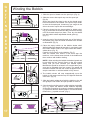
I
N
T
R
O
D
U
C
T
I
O
N
1
"IMPORTANT SAFETY INSTRUCTIONS"
When using sashiko machine, basic safety precautions should always be followed,
including the following.
"Read all instructions before using this sashiko machine."
DANGER-
To reduce the risk of electric shock.
1. The sashiko machine should never be left unattended when plugged in. Always unplug this sashiko
machine from the electrical outlet immediately after using and before cleaning.
WARNING-
To reduce the risk of burns, fire, electric shock, or injury to persons.
1. Do not allow to be used as a toy. Close attention is necessary when the sashiko machine is used
by or near children.
2. Use this sashiko machine only for its intended use as described in this manual. Use only attachments recommended by the manufacturer as contained in this manual.
3. Never operate this sashiko machine if it has a damaged cord or plug, if it is not working properly,
if it has been dropped or damaged, or dropped into water. Return the sashiko machine to the nearest authorized retailer or service center for examination, repair, electrical or mechanical adjustment.
4. Never operate the sashiko machine with any air openings blocked. Keep ventilation openings of
the sashiko machine and foot control free from the accumulation of lint, dust, and loose cloth.
5. Never drop or insert any object into any opening.
6. Do not use outdoors.
7. Do not operate where aerosol (spray) products are being used or where oxygen is being administered.
8. To disconnect, turn the main switch to the symbol "O" position which represents off, then remove
plug from outlet.
9. Do not unplug by pulling on cord. To unplug, grasp the plug, not the cord.
10. Keep fingers away from all moving parts. Special care is required around the sashiko machine
needle.
11. Always use the proper needle plate. The wrong needle plate can cause the needle to break.
12. Do not use bent needle and latch wire.
13. Do not pull or push fabric while stitching. It may deflect the needle causing it to break.
14. Switch the sashiko machine to the symbol "O" position when making any adjustments in the needle area, such as threading bobbin, changing needle, changing latch wire, or changing presser
foot, and the like.
15. Always unplug the sashiko machine from the electrical outlet when removing covers, lubricating,
or when making any of the user servicing adjustments mentioned in the instruction manual.
16. Keep fingers away from moving parts.
17. The appliance is not intended for use by young children or infirm persons without supervision.
18. Young children should be supervised to ensure that they do not play with the appliance.
"SAVE THESE INSTRUCTIONS"
"This sashiko machine is intended for household use."
PLEASE READ BEFORE USING THIS MACHINE
For safe operation
1. Be sure to keep your eye on the needle while sewing. Do not touch the handwheel, latch wire,
needle or other moving parts.
2. Remember to turn OFF the power switch and unplug the cord when:
Operation is completed.
Replacing or removing the needle or any other parts.
A power failure occurs during use.
Maintaining the machine.
Leaving the machine unattended.
3. Do not store anything on the foot controller.
4. Plug the machine directly into the wall. Do not use extension cords.
For a longer service life
1. When storing this machine, avoid direct sunlight and high humidity locations. Do not use or store
the machine near a space heater, iron, halogen lamp, or other hot objects.
2. Use only neutral soaps or detergents to clean the machine. Benzene, thinner, and scouring powder can damage the machine, and should never be used.
3. Do not drop or hit the machine.
4. Always consult this operation manual when replacing or installing any assemblies, the latch wire,
needle or other parts to assure correct installation.
I
N
T
R
O
D
U
C
T
I
O
N
For repair or adjustment
In the event a malfunction occurs or adjustment is required, first follow the troubleshooting guide in
the back of this operation manual to inspect and adjust the machine yourself. If the problem persists,
please consult your local authorized Baby Lock retailer.
For additional product information and updates, visit our website at www.babylock.com
The contents of this manual and specifications of this product are subject to change without
notice.
Do not dispose of electrical appliances as unsorted municipal waste, use separate collection facilities. Contact your local government for information regarding the collection systems available. If electrical appliances are disposed of in
landfills or dumps, hazardous substances can leak into the groundwater and get
in the food claim, damaging your health and well-being. When replacing old
appliances with new ones, the retailer is legally obligated to take back your old
appliance for disposal for free of charge.
2
I
N
T
R
O
D
U
C
T
I
O
N
Table of Contents
INTRODUCTION
Safety Instructions ..................................................................................................... 1-2
Table of Contents .......................................................................................................... 3
How Your Sashiko Operates ......................................................................................... 4
Important Notice ............................................................................................................ 4
Accessories................................................................................................................... 5
Optional Accessories..................................................................................................... 6
OVERVIEW
Principal Parts of the Machine....................................................................................... 7
Setting Up Your Sashiko ............................................................................................... 8
Turn Machine On/Off..................................................................................................... 9
Needle........................................................................................................................... 9
Latch Wire ..................................................................................................................... 9
Thread......................................................................................................................... 10
Fabric .......................................................................................................................... 10
Side Cover .................................................................................................................. 10
Presser Foot Pressure Adjustment.............................................................................. 11
Presser Foot Height Adjustment.................................................................................. 11
Stitch Length & Stitch Spacing Levers......................................................................... 12
Stitch Length Adjustment............................................................................................. 13
Stitch Spacing Adjustment........................................................................................... 14
Positioning Button ................................................................................................. 15-16
GETTING READY
Winding the Bobbin ..................................................................................................... 17
Loading Position.......................................................................................................... 18
Inserting the Bobbin .................................................................................................... 18
Bobbin Tension Adjustment ........................................................................................ 19
Removing the Bobbin.................................................................................................. 20
Pulling Up the Bobbin Thread ..................................................................................... 21
Beginning a Stitch ....................................................................................................... 22
Ending a Stitch ............................................................................................................ 23
BASIC SASHIKO TECHNIQUES
Securing Stitches ........................................................................................................ 24
Straight Sewing .......................................................................................................... 25
Curved Sewing............................................................................................................ 26
Pivot Sewing .......................................................................................................... 27-28
Sewing Bulky Seams .................................................................................................. 29
Moving Within Designs................................................................................................ 29
Traditional Sashiko Designs................................................................................... 30-31
USEFUL SEWING INFORMATION
Specialty Stitch Mode .................................................................................................. 32
Quilting Guide ............................................................................................................. 32
Needle Plate Scale ...................................................................................................... 32
MAINTENANCE
Replacing Needle ........................................................................................................ 33
Replacing Latch Wire .................................................................................................. 34
Cleaning the Machine Surface ..................................................................................... 35
Cleaning the Feed Dog ................................................................................................ 35
Cleaning the Shuttle Hook............................................................................................ 36
3
APPENDIX
Safety Devices ............................................................................................................ 37
Troubleshooting ..................................................................................................... 38-39
Bobbin Case Thread Jam ........................................................................................... 39
Thread/Fabric Reference Chart ............................................................................. 40-41
How Your Sashiko Operates
The Baby Lock Sashiko is different than any other conventional sewing machine you have ever used.
The Sashiko will make one stitch on the top of the fabric after the handwheel makes two complete
rotations when the needle is in the down position. When the needle is in the up position it will make
one stitch after the handwheel makes one and a half rotations. The specialty needle will catch and
release the bobbin thread alternately.
After setting up your machine for the first time, take a few minutes to learn how it sews. Before threading the Sashiko, turn the handwheel counterclockwise (towards you) and watch the movement and
operation of the various parts. At the present time do not worry about placing fabric under the presser foot. It will not hurt your machine to stitch without fabric while it is unthreaded.
Due to the unique function of the Sashiko allow yourself to become familiar with the operation of the
machine. This will enable you to become more proficient in its use.
Important Notice
1.
2.
3.
4.
5.
I
N
T
R
O
D
U
C
T
I
O
N
The Baby Lock Sashiko stitching will not unravel, so it is not necessary to make tacking stitch.
Always stitch with fabric under the presser foot when machine is threaded.
Do not stitch over previous stitching or stitch down the same row of stitching.
Avoid stitching over pins.
Before removing bobbin case, changing needle, or replacing latch wire; place needle in up
position, remove fabric, and cut thread.
4
I
N
T
R
O
D
U
C
T
I
O
N
Accessories
Your Baby Lock Sashiko has a built-in accessory compartment. To open, slide the “bin” located on the
bottom right side of the machine toward the front, as shown in illustration.
The accessories listed below are located either on the machine, inside the accessory compartment, or in
the machine’s Styrofoam packing as indicated under the Location column.
Quantity
Included
Location
1. Instruction and Reference Guide
1
Packing box
2. Quick Reference Guide
1
Packing box
3. Power cord
1
Packing box
4. Foot control
1
Packing box
5. Needles
3
Accessory compartment
6. Latch wires
3
Accessory compartment
7. Screwdriver (small)
1
Accessory compartment
8. Screwdriver (large)
1
Accessory compartment
Accessory
9. Tweezers
1
Accessory compartment
10. Bobbins
3
Accessory compartment
11. Spool caps (small, medium, large)
3
Accessory compartment
12. Thumb screws
2
Accessory compartment
13. Cleaning brush
1
Accessory compartment
14. Quilting guide
1
Accessory compartment
15. Standard presser foot
1
On machine
1
5
10
5
3
2
6
7
11
4
8
12
9
13
15
14
Optional Accessories
There are optional accessories available for the Sashiko machine. Contact your Baby Lock retailer for
information on purchasing any of the following optional accessories:
Description
Parts Code #
Baby Lock
Item #
Organ QKx1 Size 18 Needles (2)
Q0-84007A-DD
BLQK-N
Latch Wire
Q0-84008A-DD
BLQK-LW
Double Fold Bias Binder (1-1/8", 28mm) B0421S03A-E
BLE8-S3
Double Fold Bias Binder (1-3/8), 36mm) B0421S02A-E
BLE8-S2
Plain Hemmer (1/4", 7.5mm)
B0421S07A-E
BLE8-S7
Plain Hemmer (1/2", 13mm)
B0421S06A-E
BLE8-S6
Single Downturn Feller (1/4", 7.5mm)
B0421S10A-E
BLE8-S10
Single Downturn Feller (5/8", 16mm)
B0421S08A-E
BLE8-S8
Single Downturn Feller (1", 25mm)
B0421S09A-E
BLE8-S9
Single Fold Bias Binder (1-1/8", 28mm)
B0421S04A-E
BLE8-S4
Single Fold Bias Binder (1-1/2", 40mm)
B0421S05A-E
BLE8-S5
I
N
T
R
O
D
U
C
T
I
O
N
IMPORTANT NOTE: Use lightweight to medium weight fabric only. Not recommended for heavy
weight fabrics. Do not use knit or stretchable fabrics.
MEMO: The two thumb screws, which come with the machine, are to be used with the optional
accessories.
All specifications are correct at the time of printing.
Please be aware that some specifications may change without notice.
6
O
V
E
R
V
I
E
W
7
Principal Parts of The Machine
1. Presser foot lever
2. Quilting guide fixing screw
3. Presser foot holder screw
4. Presser foot
5. Needle guard
6. Needle
7. Latch wire
8. Wiper
9. Thread guide for bobbin winding
10. Presser foot height adjustment dial
11. LED for needle up position
12. LED for needle down position
13. LED for bobbin loading, needle changing,
or latch wire changing position
14. Side cover
15. Thread cutter/holder
16. Shuttle race clasp
17. Shuttle race
18. Bobbin case
19. Needle plate
20. Thumb screw holes
21. Positioning button
22. Accessory compartment
23. Stitch spacing lever
24. Stitch length lever
25. Handwheel
26. Bobbin winder lever
27. Power cord receptacle
28. Main power switch
29. Foot control jack
30. Bobbin winder shaft
31. Spool pin
32. Handle
33. Bobbin winder balance adjusting screw
34. Bobbin winder adjustable thread guide
35. Pre-tension disk
36. Presser foot pressure dial
37. Needle clamp screw
38. Presser foot lock button
Setting Up Your Sashiko
After removing the packing materials from the box, gently lift your Baby Lock Sashiko by grasping the handle provided on the top of the machine. Place the machine on a sewing table or any
sturdy level surface that provides ample work space to the left of the machine.
Before connecting the power supply, make sure the voltage and frequency shown on the machine
conforms to your electrical power.
With the sewing machine turned off, insert the foot control plug and the power cord into their
appointed connectors as illustrated below. Then plug the power cord into an electrical wall outlet.
The sewing speed of the machine is determined by the amount of the pressure applied to the foot
control. Do not place anything on the foot control, or the machine could inadvertently start and
the foot control or motor could burn out.
O
V
E
R
V
I
E
W
This machine uses foot control model YC-485EC.
CAUTION: Never leave machine unattended when plugged in.
Always unplug this machine from the electrical wall outlet immediately after using and before
maintenance.
IMPORTANT NOTE: Consult a qualified electrician if in doubt as how to connect the machine to
the power source.
Polarized plug information
This appliance has a polarized plug (one blade wider
than the other) to reduce the risk of electrical shock;
this plug will only fit in a polarized outlet one way. If the
plug does not fit fully in the outlet, reverse the plug. If it
still does not fit, contact a qualified electrician. Do not
modify the plug in any way. (For U.S.A. only)
8
O
V
E
R
V
I
E
W
Turn Machine On/Off
Turn on the machine
Press the “ l ” symbol on the main power switch located on
the right side of the machine.
The lamp and one of the LED lights will come on when the
machine is turned on.
Turn off the machine
When you are finished using the machine, turn it off. In addition, before moving the machine to another location, be sure
to turn it off.
1. Make sure the machine is not sewing.
2. Press the “ O” symbol on the main power switch located
on the right side of the machine.
The lamp and LED lights go off when the machine is
turned off.
3. Unplug the power cord from the power cord receptacle.
NOTE: If a power outage occurs while the machine is being operated, turn off the machine and
unplug the power cord.
When restarting the machine, follow the necessary procedure to correctly operate the machine.
Needle
Your Baby Lock Sashiko uses a size 110/18 specialty needle, which is suitable for most fabrics.
Use the Organ brand needles – system QKx1 (part #BLQK-N).
Latch Wire
9
The latch wire is located in the front of the needle which slides in the needle groove in order to
open and close the eye of the needle. The latch wire plays an important role for creating the
stitches. In case of skip stitches or fabric damage, change to a new latch wire (part #BLQK-LW).
Thread
Most threads used on an ordinary sewing machine (cotton, silk, long-staple polyester, etc.) may be
used on your Baby Lock Sashiko, but 100% long-staple polyester thread, cross wound on a cone,
consistently provides the best stitching performance. Because of the thread movement through the
bobbin system the thread must be of uniform thickness and high strength with a minimum amount of
lint being produced.
Good quality cotton or cotton covered polyester threads sew well, though they produce more lint,
creating the need to clean the machine more frequently. Threads of poor grade can result in frequent
fraying, breaking and unbalanced stitches.
O
V
E
R
V
I
E
W
IMPORTANT NOTE: For maximum performance of the Baby Lock Sashiko, it is recommended to
use 100% long staple polyester thread within the range of 30 to 100 weight. Wooly nylon, monofilament, or threads that can be easily snagged are not recommended for this machine.
Fabric
Stretchable fabrics, including knit fabrics, are not recommended for the Baby Lock Sashiko
machine.
Depending on the weight of the fabric we do not recommend stitching on more than 4 layers.
Side Cover
To open for threading grasp the side cover located on the
left side of the machine and pull as illustrated.
NOTE: When the side door is open the orange LED light
will flash off and on and the machine will not operate.
CAUTION: To reduce the risk of injury, close the side
cover before beginning to sew.
10
O
V
E
R
V
I
E
W
Presser Foot Pressure Adjustment
The presser foot pressure adjustment dial has been preset at
the factory and rarely needs adjustment. You may find it
necessary, however, to decrease the pressure for heavy
fabrics or increase pressure for thin fabrics to feed more
smoothly under the foot.
To increase pressure, turn the presser foot pressure adjustment dial forward.
To decrease pressure, turn the presser foot pressure adjustment dial toward you.
The presser foot pressure dial can be adjusted from 0, least
amount of pressure, to 9, highest amount of pressure. The
standard pressure setting is 5.
Presser Foot Height Adjustment
The presser foot height adjustment dial actually has two
functions - straight sewing or curved sewing. This dial is located on the left side of the machine.
The straight sewing position is for straight sewing only.
The presser foot lies on top of the fabric and the feed dog pulls
the fabric through much like a standard sewing machine. (See
page 25 )
A
The curved sewing position allows for ease of fabric rotation
or movement. When the needle penetrates the fabric the
presser foot will raise slightly so fabric can be easily
manipulated. (See page 26 )
Suggestions for the dial settings are:
0 – Straight sewing
1 – Curved sewing for lightweight fabrics
2 – Curved sewing for medium weight fabrics
3 – Curved sewing for heavy weight fabrics or
fabric with batting
11
Stitch Length & Stitch Spacing Levers
Stitch length lever
2
2
3
3
4
4
5
5
Stitch spacing lever
O
V
E
R
V
I
E
W
The stitch length lever and the stitch spacing lever are conveniently located on the right side of the
front panel. You will notice there are two sets of numbers ranging from 2 (shortest) through 5 (longest)
for each lever. One range is for the stitch length, which forms the actual stitch on top of the fabric.
The other one is for the stitch spacing, which is the distance between the actual stitches.
Slide the stitch length lever and the stitch spacing lever up or down to your desired setting by aligning the lever’s pointed extension with the markings indicated on the machine. The levers do not have
to be set at identical settings.
For example:
If you prefer a long stitch length for the actual stitch on the top of the
fabric and a short space between stitches then set the stitch length lever
on 5 and the stitch spacing lever on 2. (Fig. A)
A
If you prefer a short stitch length and a long space between stitches then
set the stitch length lever on 2 and the stitch spacing lever on 5. (Fig. B)
B
12
O
V
E
R
V
I
E
W
Stitch Length Adjustment
Slide the stitch length lever up or down to the desired setting
by aligning the lever’s pointed extension with the marking
indicated on the machine. The length is adjusted only for the
stitch sewn on the top of the fabric.
Stitch Length
NOTE: The markings between each of the numbers 2
through 5 are half settings such as 2.5, 3.5, etc.
2
3
2
3
4
5
Stitch Spacing Setting at 3
Stitch Length
Setting
2
3
4
5
Top Fabric
13
Stitch Spacing Adjustment
Stitch Spacing
Slide the stitch spacing lever up or down to the desired
setting by aligning the lever’s pointed extension with the
marking indicated on the machine. The spacing is adjusted
only for the distance between the actual stitches sewn on the
top of the fabric.
O
V
E
R
V
I
E
W
REMINDER: The markings between each of the numbers 2
through 5 are half settings such as 2.5, 3.5, etc.
2
2
3
3
4
5
Stitch Length Setting at 3
Stitch Spacing
Setting
2
3
4
5
Top Fabric
14
O
V
E
R
V
I
E
W
Positioning Button
The positioning button is located on the left front of the machine to the right of the three LED lights.
This single button controls multiple machine functions. The LED lights have four (4) different colors to
aid in determining which function you are currently using.
The multiple positioning functions consists of the needle up or down position, loading or unloading the
bobbin case position, changing the latch wire, and changing the needle. Set the machine to one of
the various positions by pressing the positioning button.
The color of the top LED light is blue, the middle LED light alternates between green and orange, and
the bottom LED light is yellow.
When the blue LED light is lit the machine will automatically stop with the needle in the up position.
When the green or orange LED light is lit the machine will automatically stop with the needle in the
down position. The orange LED light cannot be selected by pressing the positioning button; only by
pressing the foot control when the needle is set in the down position.
LED
Lights
LED Lights:
The blue LED light indicates a space and stitch will form
every time the foot control is pressed.
The green LED light indicates that the next time the needle
penetrates the fabric there will be an actual stitch formed.
The orange LED light indicates that the next time the needle
penetrates the fabric the stitch space will be created.
Positioning
Button
Positioning Button:
Needle up position – the needle will remain in the up position after a space and an actual stitch is formed on the top
of the fabric when the machine is stopped. The color of the
top LED light is blue.
Needle down position – the needle will remain in the down
position when machine is stopped. The colors of the middle
LED light are green and orange.
Needle up to needle down position – press the positioning button one time and the needle moves to the down position.
15
Press the foot control one time and the color of the LED light
will change from green to orange and the needle will remain
in the down position
Positioning Button (Cont.)
Needle down position to needle up position – press the positioning button one time and the
needle will move to the up position.
If the needle positioning button is pressed while the color of the LED light is green the handwheel will rotate one and a half turns creating an actual stitch.
If the needle positioning button is pressed when the color of the LED light is orange the handwheel will rotate a half turn creating a space.
Loading Position – press and hold the positioning button for approximately 2 seconds. The
color of the bottom LED light is yellow. This function is used for inserting and removing bobbin
case, changing the latch wire, and changing the needle. For detailed instructions see appropriate subject headings.
O
V
E
R
V
I
E
W
Specialty Stitch Mode – double click the positioning button. The needle will remain in the down
position and the green LED will flash on and off.
Press and release the foot control one time, the needle moves one complete cycle (one stitch
and spacing) and then will stop at the next green LED lit position.
Specialty Stitch Mode to Normal Mode – press the positioning button one time and the
needle moves to the up position.
Positioning
Button
Loading
Position
16
G
E
T
T
I
N
G
Winding the Bobbin
1. Slide the spool of thread onto the spool pin. (Fig. A)
A
2. Slide the correct size spool cap onto the spool pin.
(Fig. B)
Spool cap should be close in size to the thread spool,
however should not be smaller. If the spool cap is smaller than the thread spool, thread may get caught in the
slit on the end of spool and cause damage.
3. Place the thread into the thread guide for bobbin winding (a), and insert the thread into the pre-tension disk (b)
until the thread snaps into place. Then lay the thread
into the bobbin winder adjustable thread guide (c).
(Fig. C)
R
E
A
D
Y
B
a
c
b
C
4. Insert the end of the thread through one of the holes in
the bobbin going from the inside of bobbin to the outside
as illustrated. (Fig. D)
5. Place the empty bobbin on the bobbin winder shaft.
While holding the thread tail securely in one hand, push
the bobbin winder shaft to the right toward the bobbinwinder lever. (Fig. E)
Press the foot control to wind bobbin. (Fig. F)
After the bobbin has wound a few turns stop the
machine, cut the thread near the hole of the bobbin and
then continue with bobbin winding.
NOTE: When winding the bobbin the desired speed can
be set with the foot control. Press on the foot control
slowly until you have reached your desired speed.
Maintain the speed for at least 3 to 4 seconds then pressure can be released from foot control. The speed will
maintain constant until the foot control is tapped once to
stop the machine or until the bobbin is fully wound.
E
D
6. The bobbin winder will stop automatically once the
bobbin is fully wound and the top LED light will flash the
color blue. (Fig. G)
7. Slide the bobbin winder shaft with the bobbin to the left
and grasp the full bobbin and pull upward to remove.
F
8. If the thread is winding uneven while winding the bobbin
(Fig. H); adjust the bobbin winder balance adjusting
screw with screwdriver by turning it clockwise toward the
(+) symbol to raise the thread guide or counterclockwise
toward the (–) symbol to lower. (Fig. I)
G
17
H
I
Loading Position
Press and hold the positioning button for approximately 2 seconds and the machine will automatically move to the loading
position. The yellow LED light will now be lit.
The loading position will adjust the machine to enable one of the
following procedures:
1. Insert or remove the bobbin case
2. Replace the latch wire
3. Replace the needle
IMPORTANT: The needle should be in the UP position, the thread cut, and the fabric removed before
setting machine to the loading position.
NOTE: The blue or green LED light will also be lit, depending on which needle position was selected prior to pressing the positioning button for the loading position. If the presser foot is in the up
position or if the side door is open then the orange LED light will flash while the yellow LED is lit.
Inserting the Bobbin
1. Hold the bobbin case with one hand. Insert the fully wound bobbin
into the bobbin case so that the bobbin turns in a clockwise direction. (Fig. A)
A
G
E
T
T
I
N
G
R
E
A
D
Y
2. Pull the thread through the slot of the bobbin case. (Fig. B)
3. Slide the bobbin thread toward the left so the thread enters under
the tension spring and through the cut out area directly above the
bobbin case double-eye thread guides. (Fig. C)
4. Insert the end of the bobbin thread from right to left through the
bobbin case double eye thread guides. (Fig. D)
B
C
5. Pull out approximately 10” (25cm) of bobbin thread.
6. Press and hold the positioning button for approximately 2 seconds
to set the machine to the bobbin loading position.
7. Hold the bobbin case by the hinged latch. Align the double eye
thread guides of the bobbin case at a seven o'clock position.
(Fig. E)
m)
10
c
25
"(
D
8. Insert the bobbin case and rotate the bobbin case counterclockwise
so the double eye thread guide is in alignment with the groove
(yellow dot marking) of the shuttle race. Insert the bobbin case fully
into the shuttle race and release the latch. (Fig. F)
E
Yellow Mark
18
F
G
E
T
T
I
N
G
R
E
A
D
Y
Bobbin Tension Adjustment
Balanced tension
Underside
of fabric
The Sashiko stitch has the correct thread tension when the
actual stitch sewn on the topside of the fabric lays straight
and shows no fabric puckering around the stitch.
Topside
of fabric
Bobbin thread is too loose
Underside
of fabric
The bobbin thread is too loose when thread loops form on
the underside of the fabric. On the topside of the fabric,
where the actual stitch is formed, the two threads may separate.
NOTE: The Sashiko stitch consists of two stitches when
formed on the topside of the fabric; one on top of the other.
Topside
of fabric
Bobbin thread is too tight
Underside
of fabric
The bobbin thread is too tight when the stitches pull the
fabric and create puckers on the underside or topside of
the fabric.
Topside
of fabric
Turn the bobbin tension adjusting screw of the bobbin case
counterclockwise to loosen the bobbin thread or turn the
screw clockwise to tighten.
Bobbin Tension Adjusting Screw
Slightly turn the bobbin tension adjusting screw and then
test sew a stitch sample to check the stitches. Make sure
to use the same type of thread and fabric as the actual item
being sewn.
If not satisfied then adjust the bobbin tension adjusting
screw a little more and sew another sample. This will
prevent the bobbin tension adjusting screw from getting
too far out of adjustment.
19
Removing the Bobbin
Before removing the bobbin case from the machine the needle should be placed in the up position by
pressing the positioning button, the thread cut, and the fabric removed.
1. Press and hold the positioning button for approximately 2
seconds to set the machine to the bobbin loading position. (Fig. A)
A
2. Open the side cover of the machine.
3. Grasp the bobbin case by the hinged latch. (Fig. B)
G
E
T
T
I
N
G
R
E
A
D
Y
B
4. Remove the bobbin case with the bobbin from the machine.
(Fig. C)
C
5. To remove the bobbin from the bobbin case release the hinged
latch of the bobbin case. (Fig. D)
D
REMINDER: Stitching will not unravel when the thread is cut because
each stitch is locked in place when sewn.
20
G
E
T
T
I
N
G
Pulling Up the Bobbin Thread
1. After inserting the bobbin into the machine, turn the
handwheel towards you (counterclockwise) several
times until the eye of the needle catches and lifts up
the thread. (Fig. A)
2. Raise the presser foot.
3. Slide tweezers between the bottom of the presser
foot and needle plate from back to front to pull the
thread to the surface. (Fig. B)
A
R
E
A
D
Y
4. Pull the thread to the left side of the needle plate.
(Fig. C)
5. Grasp and hold the thread tautly with the left hand,
turn the handwheel towards you (counterclockwise)
until the lower thread take-up lever catches the
thread. (Fig. D)
6. While still holding the thread taut use the right hand
to close the side cover. Draw the thread into the slot
of the thread cutter/holder located on the side
cover. If necessary, cut excess thread. (Fig. E)
B
NOTE: Bobbin thread will remain in only one of the
double eye thread guides of the bobbin case once the
bobbin thread has been pulled to the surface of the
machine.
ATTENTION: Do not sew without fabric under the
presser foot once the machine has been threaded.
C
D
21
E
Beginning a Stitch
1. After loading bobbin into machine place fabric under the presser foot and lower the presser foot
lever. (Fig. A)
2. Check to make sure the thread is still held in place by the thread cutter/holder. If thread was pulled
out of holder upon placing fabric in position then grasp and gently pull thread back into holder.
(Fig. B)
3. Begin sewing at a low speed for the first few stitches by slowly pressing on the foot control.
The Sashiko will sew one stitch on the top of the fabric after pressing the foot control twice when
the needle is set in the down position.
When the needle is set in the up position a space and actual stitch will be made when the foot
control is pressed once.
ATTENTION: Thread needs to be held in place by the thread cutter/holder at the beginning stitch to
prevent thread from jamming machine.
REMINDER: Do not sew without fabric under the presser foot once the machine has been threaded
or stitch back over previous stitching.
A
G
E
T
T
I
N
G
R
E
A
D
Y
B
22
G
E
T
T
I
N
G
R
E
A
D
Y
Ending a Stitch
1. When ready to end stitching stop the machine. (Fig. A)
2. Raise the needle to the up position by pressing the positioning button.
3. Raise the presser foot and pull the fabric and threadstraight back behind the needle bar. (Fig. B)
A
NOTE: When the machine is stopped and the green LED
light is lit the machine will complete the cycle by taking a
stitch when the positioning button is pressed to raise the
needle.
B
C
23
4. Guide the thread into the thread cutter/holder and then
gently pull the thread to cut. The end of thread will
remain in the thread cutter/holder. (Fig. C)
Securing Stitches
The Sashiko stitching will not unravel when the thread is cut
but the stitching can be pulled apart if the fabric pieces are
pulled. To prevent this you will want to secure the stitches by
leaving a long enough thread tail to be anchored.
It is really a matter of preference as to how you would like to
secure your stitches. The following are several recommended techniques:
Backside of fabric
A
1. Use of a hand sewing needle – thread needle with end of
thread to be secured, insert needle into fabric and pull to
the fabric backside, make several small stitches and cut.
(Fig. A)
2. Pull end of thread to fabric backside, make loop to form
a knot and cut. (Fig. B)
Backside
of fabric
3. Using fabric adhesive on the fabric backside place a drop
on the stitch to be secured and let dry. (Fig. C)
B
NOTE: Do not stitch back over previous stitching or stitch
down the same row of stitching as this could jam the
machine or cause machine damage.
C
B
A
S
I
C
S
A
S
H
I
K
O
T
E
C
H
N
I
Q
U
E
S
24
B
A
S
I
C
Straight Sewing
Align the presser foot height adjustment dial with the notch
on the machine to “0” for the straight sewing position.
Place the fabric under the presser foot and lower the presser foot lever. Be careful when positioning the fabric so the
thread is not pulled out of the thread cutter/holder.
0
S
A
S
H
I
K
O
T
E
C
H
N
I
Q
U
E
S
25
1
Press the foot control slightly for the first few stitches, then
gradually increase the sewing speed, if preferred.
REMINDER: While the needle is set in the up position a
space and actual stitch can be made by pressing the foot
control one time. The foot control will need to be pressed
twice when the needle is set in the down position.
0
1
Curved Sewing
0
Align the presser foot height adjustment dial with the notch
on the machine to one of the numbers ranging from 1
through 3 for the curved sewing position.
1
Place the fabric under the presser foot and lower the presser foot lever. Be careful when positioning the fabric so the
thread is not pulled out of the thread cutter/holder.
2
3
Press the foot control slightly for the first few stitches then
gradually increase the sewing speed, if preferred.
The number range of your setting will depend on the thickness of your fabric. You will want to set your machine so
your fabric can be easily maneuvered.
B
A
S
I
C
S
A
S
H
I
K
O
0
1
2
3
T
E
C
H
N
I
Q
U
E
S
26
B
A
S
I
C
S
A
S
H
I
K
O
T
E
C
H
N
I
Q
U
E
S
Pivot Sewing
When the presser foot height adjustment dial is set at “0”
to “1” the fabric cannot be pivoted without raising the
presser foot.
Follow the steps below for pivoting your fabric properly
when straight sewing.
A
2. Stop the machine when you reach a corner or a section
of your design where you would like to pivot the fabric.
(Fig. B)
B
3. Raise the presser foot and carefully pivot the fabric.
(Fig. C)
NOTE: When necessary, use the needle plate markings,
quilting guide, or presser foot as your guide for aligning
fabric.
C
4. Lower the presser foot and continue straight sewing.
(Fig. D)
D
27
1. Press the positioning button to set the needle in the
down position. (Fig. A)
Pivot Sewing (cont.)
When the presser foot height adjustment dial is set at 1-1/2
to 3 the fabric can be pivoted without the need to raise the
presser foot. Follow the steps below for pivoting your fabric
properly when curved sewing.
1. Press the positioning button to set the needle in the down
position. (Fig. A)
A
2. Adjust the presser foot height adjustment dial for the
thickness of the fabric. (Fig. B)
3. When the needle penetrates the fabric the presser foot
will be slightly raised. (Fig. C)
0
4. Stop the machine when you reach a corner or a section
of your design where you would like to pivot the fabric.
(Fig. D)
1
2
3
5. Pivot the fabric and continue curved sewing. (Fig. E)
B
NOTE:
The needle will always stop in the down position when the
green or orange LED light is lit.
REMINDER:
When the green LED light is lit the next time the needle penetrates the fabric an actual stitch will be made on the top of
the fabric.
When the orange LED light is lit the next time the needle
penetrates the fabric there will be a space. (See page 15)
C
D
B
A
S
I
C
S
A
S
H
I
K
O
T
E
C
H
N
I
Q
U
E
S
E
28
B
A
S
I
C
S
A
S
H
I
K
O
T
E
C
H
N
I
Q
U
E
S
Sewing Bulky Seams
A
When sewing heavy fabrics, the toe of the presser foot
can lift up and may cause the stitch length or stitch
spacing to be inconsistent. (Fig. A)
The black button on the left side of the presser foot will
lock the presser foot in a horizontal position if you push
it in before lowering the presser foot.
B
This ensures even feeding at the beginning of a seam
and helps when sewing multiple layers of fabric such
as sewing over seams which have been joined together.
C
When you reach the point of an increased thickness,
lower the needle and raise the presser foot. (Fig. B)
Lift the toe of the presser foot so it is in a level position.
Push in the black button and hold while lowering the
presser foot. Continue sewing. (Fig. C, D)
D
The black button releases automatically after sewing a
few stitches.
Moving Within Designs
Moving from one stitch location to another within a
design pattern is a simple process. In some cases,
may be completed without cutting the thread.
1. Press the positioning button and set the needle in
the up position.
2. Raise the presser foot.
3. Position the fabric with thread still attached at the
beginning of your next stitch. (Example: B to C)
4. Place the index finger of your left hand behind the
presser foot and apply slight pressure on top of the
fabric to help hold the thread taut.
5. Lower the presser foot and continue sewing.
29
NOTE: Thread is not pulled to the fabric surface when
using the needle up position. This will help by saving
valuable sewing time.
Traditional Sashiko Designs
B
A
S
I
C
S
A
S
H
I
K
O
T
E
C
H
N
I
Q
U
E
S
30
B
A
S
I
C
S
A
S
H
I
K
O
T
E
C
H
N
I
Q
U
E
S
31
Traditional Sashiko Designs
Specialty Stitch Mode
Double click the positioning button. The needle will remain in the down
position and the green LED will flash on and off.
Press and release the foot control one time, the needle moves one
complete cycle (one stitch and spacing) and then will stop at the next
green LED lit position.
The specialty stitch mode is useful for attaching braid and one stitch
sewing where a complete cycle (one stitch and spacing) is required.
Specialty Stitch Mode to Normal Mode – press the positioning button
one time and the needle will move to the up position and the normal
mode will resume.
Quilting Guide
To use the quilting guide, loosen the quilt guide
fixing screw located on the back of the presser
foot holder. Insert the straight end of the guide into
the right side of the hole opening.
Adjust the quilt guide to the width from the needle
that you desire and then finger tighten the screw.
Needle Plate Scale
Using the needle plate scale will allow ease of
maintaining an equal sewing distance from the
needle to the fabric edge.
Millimeters
The front section of the needle plate indicates the
distance in inches and the rear section is in
millimeters.
U
S
E
F
U
L
S
E
W
I
N
G
I
N
F
O
R
M
T
I
O
N
Inches
32
M
A
I
N
T
E
N
A
N
C
E
Replacing Needle
Positioning
Button
1. Press and hold the positioning button for approximately 2 seconds to set the machine to the loading
position. (Fig. A)
REMINDER: Remove fabric and cut thread before
putting machine into the loading position.
2. Lower the presser foot. (Fig. B)
Loading
Position
A
3. To move the latch wire from in front of the needle
grasp the latch wire lever and pull straight down, turn
the lever 90 degrees towards you and release. Lever
will remain in the down position. (Fig. C)
4. While holding needle with tweezers loosen the needle clamp screw and remove needle. (Fig. D)
B
5. With the flat side of the new needle facing the right
side of needle clamp insert the needle into the opening as far up as it will go. Securely tighten the needle clamp screw. (Fig. E)
6. Restore the latch wire to its original position. (Fig. F)
7. After restoring the latch wire, make sure the latch
wire is in the center channel of needle. (Fig. G)
C
D
E
33
F
G
Replacing Latch Wire
Positioning
Button
1. Press and hold the positioning button for approximately 2 seconds to set the machine to the loading
position. (Fig. A)
REMINDER: Remove fabric and cut thread before
putting machine into the loading position.
2. Lower the presser foot. (Fig. B)
Loading
Position
A
B
3. To move the latch wire from in front of the needle,
grasp the latch wire lever and pull straight down,
turn the lever 90 degrees towards you and release.
Lever will remain in the down position. (Fig. C)
4. With screwdriver, loosen the latch wire screw by
turning it counterclockwise, then slide the latch wire
toward the left to remove. (Fig. D)
5. Slide the new latch wire onto latch wire screw until
the opening is completely against the screw.
Securely tighten the latch wire screw. (Fig. E)
M
A
I
N
T
E
N
A
N
C
E
6. Restore the latch wire to its original position. (Fig. F)
C
7. After restoring the latch wire, make sure it is in the
center channel of needle. (Fig. G)
D
E
34
F
G
M
A
I
N
T
E
N
A
N
C
E
Cleaning the Machine Surface
If the surface of the Sashiko machine gets dirty, lightly soak a cloth in mild detergent, squeeze it out
firmly and then wipe the machine surface. After cleaning it once in this way, wipe the surface again
with a dry soft cloth.
Cleaning the Feed Dog
Lint and fuzz can build up between the teeth of the feed dog area and if not kept clean can hinder the
even feed of your fabric. To properly clean the feed dog areas follow directions below:
1. Press the positioning button so machine is in the loading position; by doing so the wiper will be out
of your way to make cleaning easier.
2. Press the main power switch to the OFF (O) position and unplug the power cord from the wall
outlet.
3. If necessary, remove the presser foot for easier access. Raise the presser foot lever and with screwdriver remove the presser foot holder screw by turning it counterclockwise. (Fig. A)
4. Remove the two screws holding the needle plate by turning them counterclockwise with screwdriver. Lift and remove needle plate. (Fig. B)
5. Clean the feed dog area thoroughly with lint brush. Use your tweezers to remove any threads that
may be caught in the feed dog teeth. (Fig. C)
6. Reposition the needle plate and tighten screws snugly. Be sure the needle enters the center of the
needle plate opening; otherwise the needle may break and cause injury. (Fig. D)
7. If presser foot was removed, reposition presser foot and the presser foot holder screw then with
screwdriver tighten the screw snugly.
B
A
Needle
hole
35
C
D
Cleaning the Shuttle Hook
If lint and bits of thread accumulate in the hook, this will interfere with the smooth operation of
the machine. Check and clean regularly. We recommend using the cleaning brush often in order
to keep lint off the needle bar, the feed dog mechanism and foot.
The major moving parts of your Baby Lock machine are well protected and will only require a
small amount of good quality sewing machine oil as outlined in the steps below.
Shuttle
Race Ring
Shuttle Race
Clasps
1. Remove the bobbin case from the shuttle race pin
and push the shuttle race clasps toward the outside
edges of the shuttle race ring. (Fig. A)
A
M
A
I
N
T
E
N
A
N
C
E
2. Remove the shuttle race ring and shuttle hook.
(Fig. B)
Shuttle Hook
Shuttle Race Ring
B
C
3. Using the lint brush thoroughly clean around the
inside of the shuttle driver and especially the
grooved area of driver. (Fig. C)
Place a few drops of a good quality sewing machine
oil on the tip of a cotton swab and gently wipe
around the inside of the shuttle driver being careful
not to catch cotton fibers on the driver. It may be
necessary to turn handwheel counterclockwise in
order to reach all areas. Remove any caught cotton
fibers with tweezers.
NOTE: Frequency of oiling will depend on machine
usage along with the types of fabrics used. Fabrics
producing a large amount of lint will absorb oil quickly. An easy way to remember would be to clean and
oil machine before using.
D
4. Replace shuttle hook, then the shuttle race ring, and
last push the shuttle race clasps toward the inside of
the shuttle race until they click back into place.
(Fig. D)
36
A
P
P
E
N
D
I
X
Safety Devices
The Sashiko machine is equipped with a stop machine safety system. When the system is activated
by any of the following conditions; the orange LED light will flash on and off and the machine will not
operate, including the foot control.
1. When the side cover is open.
2. When the presser foot is in the raised position.
3. When machine is set to the loading position and
presser foot is in the raised position.
4. When the latch wire is engaged in the release position.
5. When the foot control is pressed and the presser foot
is set in the down position and then the machine is
turned on.
37
NOTE: If none of the LED lights are lit, check to make
sure the bobbin winder shaft has not been accidentally
engaged.
Troubleshooting
Before taking your machine in for service at your Baby Lock retailer, check the following:
Cause
Condition
The machine fails to 1. Are electrical plugs properly connected?
2. Is foot control plug properly connected?
start:
3.
4.
5.
6.
7.
8.
9.
Thread breaks:
Skipped stitches:
Is the main power switch on?
Is the side cover open?
Has the presser foot lever been lowered?
Is the latch wire in the release position?
Check household circuit breaker or fuse.
Is the bobbin winder disengaged?
Is the specialty stitch mode off?
1.
2.
3.
4.
5.
6.
Is the bobbin case threaded properly?
Is the bobbin case loaded properly?
Is the needle inserted correctly?
Is the needle bent, broken, and/or worn?
Thread is knotted, tangled or of poor quality.
Are you using the correct thread weight
for machine?
7. Is the needle being used the Organ QKx1system?
8. Is the latch wire bent, broke, and/or worn?
9. Is the latch wire in the center channel of needle?
10. Is the shuttle hook free of lint and bits of thread?
11. Spool cap is not properly attached
and/or the correct size for thread spool.
1.
2.
3.
4.
5.
6.
Is the needle bent, broke, and/or worn?
Is the latch wire bent, broke, and/or worn?
Is the needle inserted correctly?
Is the bobbin case threaded properly?
Is the bobbin case loaded properly?
Is the presser foot pressure dial set correctly for
the type of fabric?
7. ls the presser foot height adjustment dial set correctly?
8. Is the needle being used the Organ QKx1system?
9. Is the fabric being pushed or pulled while sewing?
10. Is the shuttle hook free of lint and bits of thread?
See
page(s)
8
8
8/9
10
7
34
17
32
A
P
P
E
N
D
I
X
18
18
33
10
10
9
34
37
11/17
33
18
18
11
11
9
37
38
A
P
P
E
N
D
I
X
Troubleshooting (cont.)
Condition
Fabric will not feed
through the machine:
Stitch is unbalanced:
Cause
1. Is the feed dog free of lint?
2. Is the presser foot pressure dial set right for the
fabric type?
3. Is the needle plate secure on the machine?
4. Is the presser foot height adjustment dial set
correctly for fabric type?
5. The stitch length and/or stitch spacing is not set
correctly for fabric type.
1. Is the bobbin thread tension adjusted properly for
thread weight?
2. Is the bobbin case threaded properly?
3. Is the bobbin case loaded properly?
4. Is the needle bent, broke, and/or worn?
5. Thread is knotted, tangled or of poor quality.
6. Spool cap is not properly attached and/or the
correct size for thread spool.
See
page(s)
36
11
36
11
40/41
19
18
18
10
11/17
Bobbin Case Thread Jam
In the event thread would get jammed inside the bobbin case during sewing follow steps below
to clear machine:
1. Cut thread(s) close to fabric in order to clear the needle. This will help prevent possible
damage to the needle and/or latch wire.
2. Gently remove the fabric from under the presser foot.
3. Press positioning button to set machine to the loading position and open side cover.
4. Remove bobbin case with bobbin from machine. If necessary, carefully cut any threads that
may prevent you from removing bobbin case. Then refer to Cleaning the Shuttle Hook
(page 36) to clean any loose threads from shuttle area.
39
X
X
X
X
X
X
X
X
X
X
Silk
Cotton Linen Flannel
X
X
X
X
Synthetics Wool
Lightweight, Medium Weight, &
Heavy Weight
Fabrics
High Loft
Low Loft
Low Loft
Low Loft
Batting
Filler
Poly-mesh
Tear-away
Poly-mesh
Tear-away
Poly-mesh
Tear-away
Stabilizer
Backing
30/40/50/
60/70
40
30/40/50/
60/70
40
30/40/50/
60/70
40
30/40/50/
60/70
40
30/40/50/
60/70
40
30/40/50/
60/70
40
30/40/50/
60/70
40
100% Cotton &
100% Polyester
100% Cotton &
100% Polyester
100% Cotton &
100% Polyester
100% Cotton &
100% Polyester
100% Cotton &
100% Polyester
100% Rayon
100% Rayon
100% Rayon
100% Cotton &
100% Polyester
100% Rayon
100% Cotton &
100% Polyester
100% Rayon
100% Rayon
100% Rayon
WT
Type
Thread
THREAD / FABRIC REFERENCE CHART
3.5-5.0
3.0-5.0
2.5-5.0
2.0-5.0
3.0-5.0
2.5-5.0
2.0-5.0
3.0-5.0
2.0-5.0
2.0-5.0
2.0-5.0
2.0-5.0
2.0-5.0
2.0-5.0
0-3
0-3
0-3
0-3
0-3
0-3
0-3
Presser
Stitch
Stitch
Foot
Length Spacing Height
Recommended
Machine
Settings
A
P
P
E
N
D
I
X
40
X
X
X
X
X
X
X
X
X
X
X
X
X
Silk
X
X
X
X
X
X
X
X
Synthetics Wool
Lightweight, Medium Weight, &
Heavy Weight
Fabrics
Cotton Linen Flannel
41
High Loft
High Loft
Low Loft
Low Loft
Low Loft
High Loft
Batting
Filler
100% Silk
100
100
100
100% Silk
100% Silk
100
3.5-5.0
3.0-5.0
3.0-5.0
2.5-5.0
2.0-5.0
100
100% Silk
100% Silk
3.0-5.0
100
100% Silk
2.0-5.0
4.0-5.0
Poly-mesh
Tear-away
40
100% Rayon
100
30/40/50/
60/70
100% Cotton &
100% Polyester
3.0-5.0
3.0-5.0
2.0-5.0
2.0-5.0
2.0-5.0
2.0-5.0
2.0-5.0
3.0-5.0
Stitch
Stitch
Length Spacing
100% Silk
WT
Type
0-3
0-3
0-3
0-3
0-3
0-3
0-3
0-3
Presser
Foot
Height
Recommended
Machine
Settings
Poly-mesh
Tear-away
Stabilizer
Backing
Thread
THREAD / FABRIC REFERENCE CHART
A
P
P
E
N
D
I
X