1
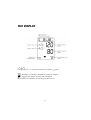
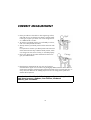
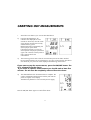
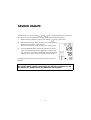
Table of contents
INTRODUCTION . . . . . . . . . . . . . . . . . . . . .
SAFETY INSTRUCTIONS . . . . . . . . . . . . . . .
ABOUT THIS DEVICE . . . . . . . . . . . . . . . . .
FIRST OPERATION . . . . . . . . . . . . . . . . . . .
THE DISPLAY . . . . . . . . . . . . . . . . . . . . . . .
ATTACHING THE WRIST SLEEVE . . . . . . . . .
CORRECT MEASUREMENT . . . . . . . . . . . . . .
CARRYING OUT MEASUREMENTS . . . . . . . .
SAVING VALUES . . . . . . . . . . . . . . . . . . . .
CLEANING AND MAINTENANCE . . . . . . . . .
ENVIRONMENTAL PROTECTION . . . . . . . . .
ERROR MESSAGES . . . . . . . . . . . . . . . . . . .
Guidelines and manufacturer's declaration
regarding EMC . . . . . . . . . . . . . . . . . . . . .
3
.
.
.
.
.
.
.
.
.
.
.
.
.
.
.
.
.
.
.
.
.
.
.
.
.
.
.
.
.
.
.
.
.
.
.
.
.
.
.
.
.
.
.
.
.
.
.
.
.
.
.
.
.
.
.
.
.
.
.
.
.
.
.
.
.
.
.
.
.
.
.
.
.
.
.
.
.
.
.
.
.
.
.
.
.
.
.
.
.
.
.
.
.
.
.
.
. 4
. 5
. 6
. 7
. 8
. 9
10
11
12
13
14
15
. . . . . . . . 16
INTRODUCTION
Thank you for the trust you have placed in us!
We congratulate you on the purchase of your new blood pressure device and are convinced
that you will be delighted with this modern piece of equipment.
In order to guarantee the optimum operation and performance of your blood pressure
measuring device at all times and in order to protect your personal safety, we would make the
following request:
• Please read these operating instructions thoroughly and follow them and the safety notes
in particular before using the appliance for the first time!
• Anything done to or with this appliance may only be undertaken as described in the
operating instructions.
• If you pass on your device to someone else, always include the operating instructions.
Packaging
Your blood pressure measuring device is wrapped in packaging to protect it against
transportation damage. Packaging is raw material and can be re-used or added to the
recycling system.
4
SAFETY INSTRUCTIONS
• The device is suitable for healthy adults. Use the unit for comparative measurements,
particularly during sporting activities. Do NOT use the unit for medical diagnosis. It can
not replace medical intervention.
• The unit is battery-operated. Batteries may endanger life if swallowed. For these reasons,
keep the unit out of reach of children. If a battery is swallowed, please obtain immediate
medical assistance.
• Do not use rechargeable batteries, as this could lead to incorrect measurements due to the
lower power of these batteries.
• Only start the air supply (ON/OFF button) once the unit is attached correctly to the arm.
• Do not drop the unit and do not place objects on top of it.
• Never immerse the unit in water. Do not expose it to water or moisture!
• Do not use the device under extreme temperature conditions!
• Do not bend the fixed part of the sleeve!
• Never try to open and/or repair the unit yourself. Repairs may only be undertaken by our
Service Centre or other appropriate specialist workshop.
This symbol means:
Caution: Please take note of the accompanying documents (operating instructions).
5
ABOUT THIS DEVICE
The device is used to measure blood pressure at the wrist. It is suitable for healthy people above
12 years of age and can be use to make comparative measurements – especially during
sporting activities.
If the values obtained give you cause to be concerned about your
health, take medical advice. Do not change your treatment/dosage of
medication as a result of the values unless you have discussed this
with your doctor!
When interpreting the values measured, please note that there can be differences in the values
measured at the wrist and arm. However, because the values measured at the upper arm and
wrist undergo the same changes the values measured at the wrist can be used for comparative
measurements.
The blood pressure measurement device displays blood pressure (systolic and diastolic values),
pulse, date and time. The following summary can help you to assess the values you measure:
The classification of blood pressure values is based on a definition and classification by the
WORLD HEALTH ORGANISATION from 1999. The WHO defines high blood pressure as
values above 140 mmHg (systolic value) and 90 mmHg (diastolic value).
6
FIRST OPERATION
1.
Remove the cover of the battery compartment in the direction of the arrow.
2)
Insert two 1.5V batteries, AAA, LR03 (alkaline). Pay attention to the polarity (the
negative terminal faces the spring).
3)
Close the battery compartment.
Replace the batteries
– if the battery icon appears on the display,
– if the display remains blank after pressing the ON/OFF button.
Setting the date and time
Make the settings within 10 seconds; then the display moves to the next setting.
1.
Press the
button. The current month flashes.
2)
Press the
button repeatedly to set the current month.
3)
Press the
button. The day flashes.
4)
Press the
button repeatedly to set the current day.
5)
Press the
button. The hour flashes along with the "AM" (for the hours between
00:00 and 11:59) or "PM" (for the hours between 12:00 and 23:59).
6)
Press the
button repeatedly to set the current hour.
7)
Press the
button. The minutes flash.
8)
Press the
button repeatedly to set the current minutes. Date and time have been set.
The flashing bar disappears after 10 seconds.
7
THE DISPLAY
Memory area icon 1 or 2; select the memory area with the
button.
.
The battery icon appears if the batteries need to be changed.
The pulse sign appears when the pulse is displayed.
EE (E1, E2) Error notifications for operating and device errors.
8
ATTACHING THE WRIST SLEEVE
1.
Attach the wrist sleeve in such a way that it is
approx. 5 - 10mm away from the palm of your left
hand (see fig. B). Ensure that no articles of clothing
are trapped in the sleeve.
2)
Hold the lower part of the sleeve as shown in fig.
C. Pull down and wrap it around and upwards, so
that there is no gap between the sleeve and your
wrist.
3)
Use your thumb to hold the sleeve cover while you
wrap it upwards.
4)
Wrap the sleeve according to the shape of your
wrist. If the sleeve is not firmly attached the
pressure will increase and the wrist will become
numb. Correct measurement is then no longer
possible.
If the sleeve cannot be attached to your left arm and if it
is not possible to measure your left arm, use your right
one. Attach the sleeve as shown in fig. D.
9
CORRECT MEASUREMENT
• Place your elbow on the table or other supporting surface,
and hold your arm so that the wrist sleeve is at heart height.
In doing so, support your lower arm on the storage box or
on a folded towel or similar.
• To measure your blood pressure, sit comfortably on a chair,
take 5 or 6 deep breaths and relax.
• Always measure your blood pressure at the same time each
day!
It is important to measure your blood pressure at home and
at the same time each day so that the blood pressure, which
can change over the course of a day, is recorded properly.
• Inform your doctor of the values measured so that he can
give you medical advice.
• Blood pressure measured at the wrist can vary from that
measured at the upper arm. The values may be slightly different because of the different
measurement positions and the strength of the blood vessels in the wrist and upper arm. In
many cases, the difference for healthy people can be ±10 mmHg of the systolic and
diastolic blood pressure.
Attention is advised for the following types of person: People with
high blood pressure, diabetes, liver disease, hardened
arteries, poor circulation.
10
CARRYING OUT MEASUREMENTS
1.
Attach the wrist sleeve to your wrist as described above.
2)
Press the ON/OFF button. All
indicators are displayed for a few
seconds on the screen; then the screen
shows the time and the most recently
selected memory space.
Measurement starts automatically; the
device pumps up the sleeve.
If the sleeve pressure is too low the
device pauses and pumps up the sleeve
again until it reaches a sleeve pressure
that is appropriate for the
measurement.
3)
The measuring process starts when the correct sleeve pressure has been reached.
During measurement do not move the sleeve or your arm or hand muscles. The device
also measures your pulse. The value displayed will fall during measurement.
If you want to stop the measurement, press the ON/OFF button. The
air is released from the sleeve.
If you want to repeat a measurement you should wait at least five
minutes. The air must be completely removed from the sleeve.
4)
The sleeve deflates when the measurement is complete. The
systolic and diastolic blood pressure and the pulse with the
pulse icon appear in the display.
The MEM entry flashes for a few seconds (see next page).
Press the ON/OFF button again to switch off the device.
11
SAVING VALUES
The device has two memory areas
and
. Up to 50 measurements can be saved in
each area. You can also display the average values of the saved measurements.
1.
Before measuring select the memory area with the
memory area button.
2)
Take the measurement. When the values are displayed MEM
flashes on the screen for a few seconds.
The measured value is saved into the chosen memory space.
3)
Press the MEMORY button repeatedly to display the saved
values. The measured values are displayed in reverse order
with each press of the button. The A entry shows the average
value (for this to occur at least two values must be saved).
The date and time are shown successively with a few seconds in
between.
Note:
The saved values remain saved when the device is switched on/off.
The values are deleted when the batteries are changed.
12
CLEANING AND MAINTENANCE
Notes on maintenance
It is recommended that you check the usability of the unit every three years or after repairs.
According to the "Operating Regulations for Medical Products" a technical measurement check
must take place every 2 years if the device is used for commercial purposes.
Cleaning/storage
Do not clean the device with solvents that contain alcohol. Only use a soft cloth, which may be
moistened, and a mild cleaning agent. Then dry the device carefully.
Store and transport the device in the storage box supplied.
Do not bend the preshaped sleeve outwards. The sleeve should neither be washed nor dry
cleaned.
If the appliance is not going to be used for long periods, remove the batteries.
13
ENVIRONMENTAL PROTECTION/
DISPOSAL
The unit is battery-operated. Do not dispose of dead batteries in the household
rubbish.
After the end of its life, ensure to dispose the product beneficial to the environment.
Do not dispose the product in the household rubbish.
14
ERROR MESSAGES
Defect
Possible cause and solution
EE / E1 / E2
The sleeve is not attached correctly. Please refer to the notes in these
instructions.
Movement during measurement. Do not move or speak during
measurement
The device is not able to measure the values appropriately. Take the
measurement again after a 5 minute break.
Contact the service centre if the error is indicated repeatedly over a
long period of time.
The batteries are dead. Replace both batteries with 2 new 1.5V, LR03
(alkaline) AAA batteries.
Notice:
If you detect failures on the display or wrong measurements, remove the
batteries and replace them after 1 minute. Wait for 10 minutes and then
turn the unit on again to start measurement.
Be informed, that all memory values will be deleted after a battery
changing!
15
Guidelines and manufacturer's
declaration regarding EMC
Guidelines and manufacturer's declaration – electromagnetic emissions
Model MD 10544 is designed for operation in an environment as described below: The customer or
user of Model MD 10544 should ensure that it is operated in such an environment.
Interference emission
measurements
In line with
Electromagnetic environment guidelines
RF emissions
according to CISPR 11
Group 1
Model MD 10544 uses RF energy
for its internal operation. Therefore
its RF emission is very low and it is
unlikely that nearby electronic
devices should suffer interference.
RF emissions
according to CISPR 11
Class B
Emission of
harmonics
according to IEC 61000-3-2
Class A
The MD 10544 is suitable for use in all establishments,
including domestic establishments and those directly
connected to the public low-voltage power supply
network that supplies buildings used for domestic
purposes.
Emission of
voltage fluctuations/flicker
according to IEC 61000-3-3
Complies
Guidelines and manufacturer's declaration – electromagnetic interference immunity
Model MD 10544 is intended for operation in an electromagnetic environment as described below: The customer
or user of Model MD 10544 should ensure that it is operated in such an environment.
Interference immunity tests
IEC 60601
test level
Electrostatic discharge (ESD) ± 6 kV
according to IEC 61000-4-2
contact discharge
Pass level
± 6 kV contact
± 8 kV
Air discharge
± 8 kV
air discharge
Fast, transient
electrical interference/
bursts
according to IEC 61000-4-4
± 2 kV for power
supply lines
± 2 kV for power supply
lines
± 1 kV for input and
output lines
Not applicable
Voltage surges
according to IEC 61000-4-5
± 1 kV
differential mode
Not applicable
± 2 kV
common mode
Electromagnetic environment – guidelines
Floors should be of wood or concrete
or laid with ceramic tiles.
If the floor is covered with synthetic
material, the relative
humidity should be at least 30%.
The quality of the power supply should
match that of a typical business or
hospital environment.
The quality of the power supply should
match that of a typical business or
hospital environment.
Not applicable
Voltage drop-outs,
short-term breaks and drops
in supply voltage
according to IEC 61000-4-11
< 5 % VT
(> 95 % drop in VT)
for ½ period
Not applicable
40 % VT
(60 % drop in VT)
for 5 periods
70 % VT
(30 % drop in VT)
for 25 periods
< 5 % VT
(> 95 % drop in VT)
for 5 s
16
The quality of the power supply should
match that of a typical business or
hospital environment. If
the user of Model MD 10544
requires continued operation even if
power supply drop-outs occur,
we recommend supplying Model MD 10544
from an uninterruptible
power supply or a battery
.
Magnetic field at the
power frequency
(50/60 Hz)
according to IEC 61000-4-8
NOTE
3 A/m
Not applicable
The MD 10544 contains no devices
susceptible to magnetic fields.
.
UT is the mains AC voltage prior application of the test level.
Guidelines and manufacturer's declaration – electromagnetic stability
Model MD 10544 is designed for operation in an electromagnetic environment as described below: The customer
or user of Model MD 10544 should ensure that it is operated in such an environment.
Interference immunity
tests
IEC 60601
test level
Pass level
Electromagnetic environment – guidelines
Portable and mobile should not be used closer to
the model MD 10544 than the protection distance
calculated using the equation applicable for the
emission frequency.
Recommended protection distance:
Conducted RF
interference
according to IEC 61000-46
3 Vrms
150 kHz to 80 MHz
3 V/m
Radiated
RF interference
according to IEC 61000-43
3 V/m
80 MHz to 2.5 GHz
3 V/m
d = 1,17 1/V *
d = 1,17 m/V *
*80 MHz to 800 MHz
d = 2,33 m/V * 800 MHz to 2.5 GHz
Where P is the maximum output power rating of
the transmitter in watts (W) according to the
transmitter manufacturer and d is the
recommended separation distance in metres (m).
Field strengths from fixed RF transmitters, as
determined by an electromagnetic site survey, a
should be less than the compliance level in each
frequency range. b
Interference may occur in the vicinity of equipment
marked with the following symbol:
NOTE 1 The higher value applies at 80 MHz and 800 MHz.
NOTE 2 These guidelines may not apply to all situations. Electromagnetic propagation is affected by absorption and
reflection from structures, objects and people.
a
Field strengths from fixed transmitters, such as base stations for radio (cellular/cordless) telephones and land mobile
radios, amateur radio, AM and FM radio broadcast and TV broadcast cannot be predicted theoretically with accuracy. To
assess the electromagnetic environment due to fixed RF transmitters, an electromagnetic site survey should be
considered. If the measured field strength in the location in which the MD 10544 should be observed to verify normal
operation. If abnormal performance is observed, additional measures may be necessary, such as re-orienting or
relocating the MD 10544.
b
Over the frequency range 150 kHz to 80 MHz, field strengths should be less than 3 V/m.
17
Recommended protective distances between
portable and mobile RF telecommunication devices and the MD 10544
Model MD 10544 is intended for operation in an electromagnetic environment in which the RF interference is controlled
. The customer or user of Model MD 10544 can help to avoid electromagnetic interference
by adhering to the minimum distance between portable and mobile RF telecommunication devices (transmitters) and the
Model MD 10544 – depending on the output of the communication device as shown below.
Separation distance according to frequency of transmitter
Rated maximum output
power of transmitter
W
150 kHz to 80 MHz
80 MHz to 800 MHz
800 MHz to 2,5 GHz
d = 1,17 1/V *
d = 1,17 m/V *
d = 2,33 m/V *
0.01
0,12
0,12
0,23
0.1
0,37
0,37
0,74
1
1,17
117
2,33
10
3,7
3,7
7,37
100
11,7
11,7
23,3
For transmitters rated at a maximum output power not listed above, the recommended separation distance d in metres (m) can
be estimated using the equation applicable to the frequency of the transmitter, where P is the maximum output power rating of
the transmitter in watts (W) according to the transmitter manufacturer.
NOTE 1 The higher frequency range applies at 80 MHz and 800 MHz.
NOTE 2These guidelines may not apply to all situations. The radiation of electromagnetic waves is influenced
by absorption and reflection from buildings, objects and people.
18