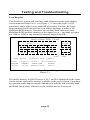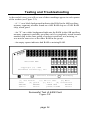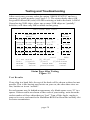
1
Checkmate Technology, Inc.
MultiRam™ RGB Card
Colorful Memory for the Apple™ //e
Owner’s
Installation
Manual
Owner’s Installation Manual
for the
MuItiRam™ RGB Card
Checkmate Technology, Inc.
509 South Rockford Drive
Tempe, Arizona 85281
(602) 966-5802 or (800) 325-7347
(c) Copyright 1986 by Checkmate Technology, Inc.
All rights reserved
Part #MRRGB -2
Manual Revised by Quentin Smith
Edited by Christine Cecala
Accelerator II is a trademark of Titan Technologies. Inc.
Apple and the Apple Logo are registered trademarks of Apple Computer, Inc.
Apple Pascal. AppleWorks. AppleWriter //e, DOS 3.3. ProDOS, Filer and ProFile are trademarks of
Apple Computer, Inc.
Cat Doctor is a trademark of Glen Bredon
Copy II Plus is a trademark of Central Point Publishing
CP/M is a registered trademark of Digital Research, Inc.
FlashCalc is a trademark of VisiCorp/Paladin
IBM is a trademark of International Business Machines Corp.
Jeeves is a trademark of PBI Software
Locksmith is a trademark of Applied Business Systems
MagiCalc and Magic Office are trademarks of Artsci, Inc.
MultiRam is a trademark of Checkmate Technology, Inc.
PinPoint is a trademark of PinPoint Publishing
ProTERM is a trademark of ProTech Software, Inc.
Quick Spell and MacroWorks are trademarks of Beagle Brothers
Side, is a trademark of First Class Peripherals. Inc.
SpeeDemon is a trademark of Micro Computer Technologies, Inc.
SuperCalc 3. is a trademark of Computer Associates
TimeOut is a trademark of Turning Point Software
Word Perfect is a trademark of Word Perfect Corp.
Wordstar is a trademark of MicroPro International
APPLE COMPUTER, INC. MAKES NO WARRANTIES. EITHER EXPRESS OR
IMPLIED. REGARDING THE ENCLOSED SOFTWARE PACKAGE. ITS MERCHANTABILITY OR ITS FITNESS FOR ANY PARTICULAR PURPOSE. THE
EXCLUSION OF IMPLIED WARRANTIES IS NOT PERMITTED BY SOME
STATES. THE ABOVE EXCLUSION MAY NOT APPLY TO YOU. THIS WARRANTY PROVIDES YOU WITH SPECIAL LEGAL RIGHTS. THERE MAYBE
OTHER RIGHTS THAT YOU MAY HAVE WHICH VARY FROM STATE TO
STATE.
TABLE OF CONTENTS
Preface - HOW TO USE THIS MANUAL ............... i
Chapter 1 - INTRODUCTION ................................. 1
FEATURES ........................................................ 3
Standard Features ........................................... 3
Optional Features .......................................... 5
HARDWARE REQUIREMENTS ........................... 5
Chapter 2 - INSTALLATION .................................. 7
UNPACKING THE MULTIRAM RGB CARD ......... 7
CARD CARE ..................................................... 8
PHYSICAL DESCRIPTION .................................. 8
Ram Groups .................................................. 8
Memory Card Connector .................................. 9
RGB Video Connector ..................................... 10
CPU Port and CPU Memory Port ......................10
Jumper Block .................................................11
LED’s .......................................................... 11
ADDING MEMORY ............................................ 11
original Ram ................................................ 12
User Installed Ram ......................................... 13
RAM Removal ..............................................13
Installation Order ........................................... 14
Installation Procedure ..................................... 14
Dealer Installed RAM ..................................... 15
Factory Installed RAM ................................... 15
ADDING OPTIONS ............................................. 16
RGB Video .................................................. 16
MultiRam Memory Cards .............................. 17
MultiRam EX Card ....................................... 18
INSTALLING THE MULTIRAM RGB CARD ........ 18
Preparation ................................................... 19
Inserting The Card ......................................... 20
Chapter 3 - TESTING & TROUBLESHOOTING ...
Memory Bank versus RAM Bank .....................
RAM TEST PROGRAMS....................................
Test Display ..............................................
Test Selection ............................................
Running A Test .........................................
Test Results ..............................................
NON-RAM PROBLEMS ....................................
23
23
24
25
26
27
29
30
Chapter 4 - APPLEWORKS EXPANSION .................
PURPOSE ..............................................................
EXPANDING APPLEWORKS ...............................
INSTRUCTIONS ...................................................
Floppy Disk Expansion ..................................
Hard Drive and 3.5 Disk Drive Expansion ......
Adding Other Patches or Features ...................
PATCH.PATCH ....................................................
EXPANSION PROBLEMS ....................................
HELP ....................................................................
33
33
33
34
34
34
35
35
35
36
Chapter 5 - RAM DISKS ..............................................
CREATING THE RAM DISK ...............................
DOS RAM Disk .............................................
ProDOS RAM Disk ........................................
OPTIONS .............................................................
37
37
38
38
40
Chapter 6 - COMPATIBILITY .....................................
HARDWARE ........................................................
RGB Monitors ..............................................
Disk Drives ...................................................
Co-Processor Cards .......................................
Non-interruptible Power Supplies .................
SOFTWARE .........................................................
41
41
41
44
45
45
46
Chapter 7 - WARRANTY & SERVICE .......................
WARRANTY ........................................................
SERVICE POLICIES ...........................................
How to Get Help ..........................................
How to Return a Card ...................................
Returning Your Repaired Card .....................
RAM Installation and Replacement Policy ....
Replacing Damaged Diskettes .......................
Software Updates ..........................................
Newsletters ....................................................
Independent Software Developers .................
Suggestions ..................................................
47
47
48
48
49
50
50
50
51
51
51
51
Preface
HOW TO USE THIS MANUAL
The manual is divided into four parts.
Part 1, GETTING STARTED, should be read first by everyone. Chapter 1
summarizes MultiRam RGB’s features and minimum hardware requirements.
Chapter 2 gives step-by-step instructions for installing MultiRam RGB and
adding memory to the card. Chapter 2 is required reading for those of you who
intend to install your own RAM. Chapter 3 covers testing and troubleshooting
procedures.
Part 2, USING THE MULTIRAM RGB CARD, shows how to use the software
included with your MultiRam RGB Card. Chapter 4 explains how to use
MultiRam RGB’s large memory with AppleWorks. Chapter 5 shows how to
use the MultiRam RGB card as a fast RAM disk drive for ProDOS and DOS
3.3. Chapter 6 covers software and hardware compatibility questions.
Part 3, THE MULTIRAM RGB SERVICE GUIDE, should be read by everyone.
Chapter 7 describes the MultiRam RGB warranty and how you can get service if
you have a problem and explains RAM replacement and software update policies.
This manual assumes you know how to operate your Apple //e. If you are a
new Apple lie owner or if any terms or procedures in this manual are unfamiliar
to you, please refer to your Apple lie owner’s manual for help. Computer
magazines, computer books, Apple user groups, your local Apple dealer and
Checkmate Technology, Inc. are all sources of additional help. Finding local
Apple dealers and user groups has been made easier by Apple Computer, Inc.
since they provide a toll free phone number, 800-538-9696 extension 500, for
this information. Apple’s own software publisher is Claris Corp. To reach
their Technical Support call (415) 962-0371, and for Customer Service call
(415) 962-8946.
page i
Chapter 1
INTRODUCTION
This section highlights features of the MultiRam™ RGB card that are explored
at length later in the manual.
The MultiRam RGB card is an expandable, extended 80-column memory card
for the Apple //e with Apple or IBM compatible RGB video output.
MultiRam RGB’s memory is expandable on the card from 64K to 1 megabyte.
You may easily expand the card by adding 64K or 256K RAM chips as your
memory needs grow.
There are currently two optional piggyback memory cards that fit onto the
MultiRam RGB. The first is the MultiRam //e card, expandable to 768K,
giving a total memory of 1.75 megabytes in one slot. The second is the
MultiRam Plus card, which is expandable up to 4 megabytes. giving a total of
5 megabytes of memory in one slot. Either one of these cards can be added
without interfering with: any card in slot one.
At the time this card was designed there was an optional feature built in for a
Static RAM pack. The Static RAM port exists on the MultiRam ROB card,
however this feature was never put into production.
The MultiRam RGB card’s video signals can be Sent to a monochrome
monitor or composite color monitor (an NTSC monitor) through the Apple
//e’s own video connector. The RGB card can also be connected to any Apple
compatible TTL RGB monitor (Red, Green, Blue) through MultiRam’s RGB
connector. Both a standard NTSC monitor and an RGB monitor can be
connected at the same time. IBM compatible monitors can also be used with
an optional Apple RGB to IBM RGB converter cable which is available from
Checkmate.
RGB video produces sharper displays by removing the extraneous colors that
occur during color transitions in high resolution graphics screens and mixed
mode screens showing both graphics and text. Further, using an RGB
monitor, not only are double hi-res displays of 560x192 pixels in
page 1
Introduction
monochrome and 140x192 pixels in 16 colors possible, but both these modes
can be mixed on one screen, something not possible without an RGB
monitor. RGB monitor types are discussed more in Chapter 6 - Hardware and
Software Compatibility.
The MultiRam RGB has a CPU connector to allow a 16-bit processor to
directly address all of its memory without bank-switching. A cable from this
connector to the MultiRam EX card, which uses the 65C816 processor, allows
your Apple //e to directly address up to 5 megabytes of memory. These cards
were designed prior to the release of the Apple IIGS. The MultiRam EX card
will run some 16 bit software however, most Apple IIGS software is NOT
compatible with the MultiRam EX card.
With all MultiRam RGBs unique features. MultiRam RGB still fits into the
//e auxiliary slot and functions like a a standard Apple extended 80-column card.
It is 100% compatible with all programs designed to show the //e 80-column
display or double hi-resolution graphics and those programs using an
additional 64K of auxiliary memory.
Memory can be added to the RGB card in either 64K or 256K increments. The
MultiRam RGB is shipped with a minimum of 64K memory installed.
MultiRam’s unique hi-res RAM test display allows you to confidently add
your own RAM to the card and then easily test the RAM for correct
functioning.
With more than 64K installed, MultiRam RGB brings greater power and
versatility to your Apple. There are two ways to take advantage of this
expanded memory. First, the program may already be written to see the
additional memory, or there may be a patch that will allow the program to see
and use the extra memory. The expansion disk included with this card patches,
that is “teaches”, AppleWorks to use the extra memory. Chapter 4 explains
how to patch AppleWorks and how other enhancements may be added. The
second way to use the extra memory is to make a RAM disk and load
application programs into it. The RAM disk improves execution speed of
disk intensive programs and allows multiple diskette application programs to
be loaded on one “disk drive”. The software to create the RAM disk is
included on the MultiRam Software Disk with basic instructions included in
Chapter 5 - RAM Disks. Refer to the MultiRam Software Manual for details.
The best selling program for the Apple//computers, AppleWorks, can now
use all of the RGB’s memory. MultiRam RGB and its AppleWorks memory
expansion software eliminate the 55K memory Desktop limit that is normal
page 2
Introduction
for AppleWorks with an ordinary 64K memory card. A one megabyte
MultiRam RGB card, for example, offers usable AppleWorks Desktop space
of 758K. By removing AppleWorks memory limitations, MultiRam RGB
truly turns AppleWorks into one of the best integrated packages available for
any microcomputer. The MultiRam RGB card, AppleWorks, and a hard disk
drive used together turn the Apple//c into a serious business machine capable
of the most demanding tasks.
With the RAM drive software included with the MultiRam RGB, programs
can be accessed over twenty times faster than is normal with standard Apple
disk drives. With 1 megabyte installed, MultiRam RGB can take the place of
eight standard 5-1/4 inch Apple disk drives. Larger RAM disks can be created
if a piggyback card is added to the MultiRam RGB card. Put your favorite
unprotected programs onto a RAM drive and discover the speed and power of
the electronic RAM disk. SQUIRT, an alternate program selector from Synesis
Systems, also included, makes it easy to use this “electronic hard disk”.
FEATURES
MultiRam RGB offers mom standard and optional features than any other
extended memory card for the Apple //e. MultiRam RGB is also easily
expandable so that you can purchase the card with as little memory as you
need today and grow into more memory as your needs and budget allow.
MultiRam RGB’s flexibility insures your Apple //e a long, productive life.
Standard Features
The MultiRam RGB package comes with a large number of standard features:
- Adds from 64K to 1 megabyte to the Apple //e
- Uses standard 150 nanosecond 64K or 256K RAM chips in any
combination (you can even add the 64K chips from your old extended 64K
card to MultiRam RGB)
page 3
Introduction
- Easily user upgradeable at any time with 13 memory configurations possible:
64K
320K
576K 1024K
128K
384K
640K
192K
448K
768K
256K
512K
832K
- Has five LED card/64K bank display indicators for programming
convenience and operational verification
- Expansion connector to allow an optional memory card to be added to the
back of the RGB card
- 16 bit CPU port to allow direct linear memory addressing by 16 bit
microprocessors and an optional MultiRam EX 65C816 processor board
- Software included to:
**
**
**
**
**
Configure AppleWorks to use all of MultiRam RGB’s memory
Use MultiRam RGB as a ProDOS RAM disk emulator
Use MultiRam RGB as a DOS 3.3 RAM disk emulator
Test MultiRam RGB memory for defective RAM
SQUIRT, An easy to use ProDOS program selector
- RGB video output supporting 80-column text (green), 16 color LORES
graphics, 8 color HIRES graphics, and 16 color Double HIRES graphics
(140 x 192 pixels with 16 colors, 560 x 192 pixels with monochrome only,
and mixed 140 x 192 and 560 x 192 anywhere on screen).
- Optional cables for either Apple TTL RGB monitors or the IBM TTL
RGB monitors
- 80-column standard video
- Supports double hi-resolution graphics
- Jumper allows card to work in older, lion-enhanced Apple //e “A”
motherboards
- Compatible with both the enhanced and non-enhanced Apple //e
- Software updates available from Checkmate
page 4
Introduction
- Exclusive memory management addressing modifiable through a factory
PAL update
- Full 7 year warranty on the card and all Checkmate Technology supplied
components purchased after January 1, 1988(5 yrs x products prior t that).
Optional Features
MultiRam RGB offers a number of options for those who demand more out of
their Apple //e:
- 64K or 256K RAM kits to expand the memory of MultiRam RGB with
tested, seven year warranted RAM chips
- Two “piggyback” memory expansion cards:
** Add the MultiRam //e card for up to 768K of additional memory for a
1.75 megabyte total
** Add the MultiRam Plus card for up to 4 megabytes of additional
memory for a 5 megabyte total
** Neither piggybacked memory card will interfere with any slot Both
are attached to the back of the MultiRam RGB card
- Pascal RAM disk emulator
- CP/M RAM disk emulator
- 16 bit MultiRam EX 65816 processor card that can directly address all
MultiRam RGB memory without bank switching to give the Apple RGB
super-micro capabilities.
HARDWARE REQUIREMENTS
The minimum equipment requirements to use the MultiRam RGB are:
- An Apple //e computer (enhanced or non-enhanced). MultiRam RGB will
not work in an Apple //c or in the Apple II. II+ or Apple II+ compatible
computers.
- A 5.25 inch disk drive to use MultiRam RGB software.
- A monitor suitable for 80-column display.
page 5
Introduction
page 6
Chapter 2
INSTALLATION
This chapter contains all the information you will need to install your
MultiRam RGB card. Package contents, card care instructions, a physical
description, and instructions for RAM additions and card installation are
covered.
UNPACKING THE MULTIRAM RGB CARD
Check the contents of your MultiRam RGB package to be sure you have the
following:
-
This owner’s manual
MultiRam Software Manual
MultiRam RGB Card
A 5.25 inch floppy disk, containing:
Side 1 - AppleWorks Memory Expansion program, a listing of the recent
changes to the disk
Side 2 - Utilities which include ProDOS and DOS 3.3 RAM disk drive
emulator programs, and a RAM test program
- A warranty card
Contact your dealer or Checkmate Technology if anything is missing.
You should fill Out and return your warranty registration card as soon as
possible. Only registered owners will be notified of updates to the software
packaged with the MultiRam RGB Card.
page 7
Installation
CARD CARE
Always ground yourself before handling or touching the MultiRam RGB Card.
Touch any metal object to discharge static electricity from your body. Static
electricity, which can build up on your body, can damage RAM chips.
Handle the MultiRam RGB Card carefully by the edges. Do not flex your card
when handling it as this can lead to weakening of connections.
Avoid touching the gold-plated fingers at the bottom of the card. These
contacts must be clean because they connect the MultiRam RGB to the Apple.
Clean these contacts if needed with isopropyl alcohol and a cotton swab.
Never insert your card into or remove it from the computer while the Apple’s
power is on. You can damage the card, the Apple, and other cards in the
Apple’s slots. This will void your MultiRam RGB warranty.
When installing additional RAM, as discussed later, try to minimize the
number of times RAM is inserted into and removed from the MultiRam
RGB’s sockets. Even our quality sockets will be degraded by excessive
insertion and removal of RAM chips.
PHYSICAL DESCRIPTION
After unpacking die MultiRam RGB card, carefully set it down flat on a clean,
dry surface, with the sockets and other components facing up. Place the card
so that the gold-fingered connector at the bottom of the card is facing toward
you. Compare your card with Figure 21 and locate the following components.
Ram Groups
There are four groups of sockets on the card into which RAM chips can be
inserted: RAM Group A, RAM Group B, RAM Group C. and RAM Group D.
RAM Group A is the most important of the four groups. Either 64K or 256K
RAM chips MUST be present in this bank for 80-column video to operate and
for all programs requiring auxiliary memory to work. RAM Group A is
located across the top center of the card. RAM Group A consists of eight
sockets, labeled Al to A8.
page 8
InstallatIon
Card
LED
Bank
LEDs
RAM Group A
RAM Group B
RAM Group C
RGB Video
Connector
CPU Port
CPU Memory Port
Jumper
Block
RAM Group D
Static RAM
Connector
Memory Card
Connector Pins (backside)
MultiRam RGB Card
Figure 2.1
RAM Group B is located at the top right of the card. RAM Group B sockets
are labeled B1 to B8.
RAM Group C is located at the center right of the card. RAM Group C
sockets are labeled C1 to C8.
RAM Group D is located at the lower right of (lie card. RAM Group D
sockets are labeled D1 to D8.
The ADDING MEMORY section of this chapter explains RAMchips and how
to install them on the MultiRam RGB card. Chapter 3 - Testing and Troubleshooting explains how to use Checkmate Technology’s diagnostic tests.
Memory Card Connector
Directly above the gold-fingered motherboard connector, on the back of the
RGB card, is a memory card expansion connector. Additional memory cards
can be attached to the RGB card with this connector.
page 9
Installation
One of two companion expansion cards can be added to the MultiRam RGB to
increase the memory beyond 1 megabyte. The first card is the MultiRam //e
which can add 768K. When these two cards am combined there is a total of
1.75 megabytes of memory. The second card, the MultiRam Plus, can add up
to 4 megabytes for a combined total of 5 megabytes when piggybacked to the
MultiRam RGB.
Because the memory connector is on the back of the MultiRam RGB card,
neither piggybacked companion card will interfere with a card that is plugged
into slot one of the Apple //e.
RGB Video Connector
The RGB connector is a double row of male pins located near the top and front
of the card, just under the LED lights. The RGB Video Connector is used to
output ‘lit RGB video signals to an RGB monitor. Checkmate Technology
does not include an RGB cable because it is an unnecessary expense for those
not using an RGB monitor, nor do we know which RGB cable to include.
Checkmate Technology manufactures two different RGB cables for the
MultiRam RGB. For Apple type TTL RGB monitors the cable ends in a DB15 connector that is secured to the back of the Apple //e. For IBM type TTL
RGB monitors the cable ends in a DB-9 connector that is secured to the back
of the Apple //e. The DB-9 cable not only has a different connector, but it
must also take the Apple format RGB video signals and turn them into the
IBM format RGB video signals. Chapter 6 - Hardware and Software
Compatibility explains the differences between the Apple RGB and IBM RGB
video formats.
CPU Port and CPU Memory Port
For the MultiRam EX card to linearly address the memory on the MultiRam
RGB card a cable must be run from it to the CPU Port. The 74HC273 chip is
removed from the MultiRam RGB and the cable plugged into the socket. If
the MultiRam //e or the MultiRam Plus card are piggybacked, a cable must be
run from the MultiRam RGB CPU memory port to the piggybacked card to
allow the MultiRam EX to linearly address this memory.
page 10
Installation
Jumper Block
Near the bottom edge of the card, about 1/3 of the length of the card from the
left end, is a small plastic block mounted on two pins. This jumper block
must be removed if you have an early model of the Apple //e (Revision A
motherboard) in order for the RGB card to operate properly. Owners of more
recent models should leave the block on the card, since this jumper block
allows double hi-ms on these later motherboards. The Revision A
motherboards are not able to produce double hi-res displays. The Preparation
section of this chapter describes how to find out which motherboard Revision
you have.
LED’s
At the extreme top left end of the MultiRam is a row of five small, red Light
Emitting Diodes (LED). The group of four identified as Bank LED’s in Figure
2.1 are labeled 1,2,4, and 8. These LED’s provide a visual indication of the
exact 64K memory bank on the RGB card currently read from or written to.
Provided primarily for programmers’ use, the LED’s allow anyone to
determine if a program is using the card’s memory beyond the ordinary first
64K auxiliary bank. The Card LED, when on, indicates that the RGB card’s.
memory is being used; when off, it means that the piggyback memory card
attached to it is being used.
ADDING MEMORY
Your MultiRam RGB Card has four groups of eight sockets labeled “A”, ‘B”,
“C”, and “D.” Either a 64K or a 256K dynamic RAM set of eight chips may
be installed in each group. The four groups are clearly defined on the card (see
Figure 2.1).
With the four groups, there are fourteen RAM combinations possible as Table
2.1 shows.
page 11
Installation
Table 2.1 Ram flanks And Size Combinations
1
2
3
4
64K
64K
64K
64K
64K
64K
GROUP A
GROUP B
GROUP C
GROUP D
64K 64K
64K
Total
64K 128K`192k 256K
5
6
7
8
9
10
256K
256K
64K
256K
64K
64K
256K
64K
64K
256K
256K
256K 256K 256K
256K 256K 256K
64K 64K 256K
64K
64K
256K
320K
384K
448K
11
64K
512K
12
13
14
256K 256K
256K 256K
256K 256K
64K
256K
376K 640K 768K
832K
1024K
Table 2.1
If your card only has 64K of RAM installed, you may wish to add RAM to it
at a future date to increase its memory. RAM may be installed by you, the
dealer, or Checkmate Technology. See the User Installed RAM section of this
chapter for details.
Original Ram
Each MultiRam RGB card is shipped with a minimum of 64K in RAM Group
A, which means RAM Group A will have a full set of eight RAM chips.
RAM Group A must be populated with at least 64K chips in order to provide
80-column video and to work with those programs requiring a 128K Apple //e
configuration. Your MultiRam RGB card may contain RAM in other banks
or 256K RAM in RAM Group A as your dealer may have ordered the card
with more memory or may have installed his own RAM chips.
It is normal for dealers to install their own RAM in order to limit the different
RAM sizes they stock. Dealer-installed RAM does not void (//e card’s
warranty. Checkmate Technology guarantees for seven years only those RAM
chips that are installed and tested at the factory or RAM chips sold in kits by
Checkmate Technology, Inc.
We cannot guarantee non-Checkmate Technology RAM chips which are added
by you or a dealer. Refer to Chapter 7, which explains the terms of
Checkmate Technology’s seven-year warranty on the card and its components.
page 12
Installation
User Installed Ram
To install your own RAM, you need to purchase one or more sets of 64K or
256K dynamic RAM chips. Each set will have eight matching chips. That is,
they will be the same size, 64K or 256K, will be the same speed rating and
will be made by the same manufacturer. RAM on the RGB must always be
installed in -sets of eight in order to generate the additional 64K or 256K of
memory.
Chips installed in a group of sockets must g be the same type -- eight 64K
chips or eight 256K chips. Although mixing chips will not harm the RAM
or the card, you will lose the use of 192K of a bank of 256K chips if even one
64K chip is accidentally installed into the bank. Similarly, only 64K of a
256K chip installed into a bank of 64K chips is usable.
The dynamic RAM set should be eight 64K by one bit chips, or eight 256K
by one bit chips with a speed rating of 150 nanoseconds or faster. Although
200 nanosecond 64K or 256K DRAM chips may work in the computer, this
speed rating is not recommended. You should try to purchase a set of eight
RAMS that are the same speed and made by the same manufacturer to
minimize potential compatibility problems.
If you are unfamiliar with purchasing RAM, ask your dealer for Checkmate
Technology’s RAM Kit. The RAM in each kit is guaranteed to work with
MultiRam RGB when correctly installed, and are warranted for seven years by
Checkmate Technology.
RAM Removal
If you are replacing an existing extended 80-column card, you may want to
move the 64K RAM chips from it to the MultiRam RGB card. There are
several conditions that must be met in order to do this. Are the RAM chips in
sockets? If they are not you will be unable to remove them. Are the RAM
chips on the old card a bank of eight matching 64K chips? If they are not the
RAM on this card is incompatible with the MultiRam RGB card. Check the
speed rating for these RAM chips, 200 nanoseconds should be OK, but
Checkmate Technology recommends 150 nanoseconds or faster.
To remove chips from any card, you should use an “IC-puller” (an
inexpensive tool designed for removing integrated circuits, and widely
available at electronic supply stores). Lacking an IC-puller, an ordinary
page 13
Installation
flatware spoon can be inserted between the chip and the socket and the bowl
portion can be used to rock each end of the chip lose. A small flat blade
screwdriver may be used for the same purpose.
Carefully remove each chip from its socket by gently prying the ends of the
chip upward, a little at one end and then the other, being careful not to damage
or bend the pins. He sure you are prying only the chip and not the entire
socket; very little pressure is necessary. When the chip has been removed,
inspect it for bent pins. If a bent pin is found, carefully straighten it. These
pins break easily. A broken pin means the RAM chip is no good, and a bent
pin makes it very difficult to install the RAM chip. Take your time when
removing RAM chips to avoid this conflict.
Installation Order
If you are installing one or more banks of 256K RAM, we recommend you
follow the placement order shown in Table 2.1: first install a set of 256K
RAM in RAM Group A, second in RAM Group B, third in RAM Group C,
last in RAM Bank D. All 64K RAM should be installed to the right of or under
256K banks. In other words, install RAM clockwise, use sets of 256K RAM
before 64K and do not leave groups of sockets empty between filled groups.
Although the only essential RAM placement requirement for existing software
is that RAM Group A must always be populated with either 64K or 256K
chips for 80-column displays and programs requiring 128K to work, the
placement of RAM suggested in the preceding paragraph should insure that
future software developed for the MultiRam RGB by third party software
developers will work with the card. All software developed by Checkmate
Technology does not and will not require 256K RAM to be placed in any
specific location.
Installation Procedure
To install a set of RAM chips, lay the MultiRam RGB down flat on a table,
with the socket side up arid the bottom (with the row of gold fingers) towards
you. The eight sockets of RAM Group A will be at the top middle of the card
(see Figure 2.1); there should already be a set of RAM installed in that group.
If RAM Group B is empty, the next set of RAM should be plugged into those
sockets. If two sets are already installed, you may plug your RAM into Group
C. If RAM Group A contains 64K RAM, and you are adding 256K chips, you
should remove the chips from RAM Group A and substitute the 256K chips.
page 14
Installation
Most RAM chips have a notch or dot at one end to designate pin one. The
chip notch should match the notch on the chip drawing under the socket.
The notch or dot of all RAM chips should point up to the top of the card.
WARNING! IF A RAM CHIP IS INSTALLED BACKWARDS, IT
MAY BE DESTROYED WHEN POWER IS TURNED ON. THE
MULTIRAM RGB CARD WILL NOT BE DAMAGED.
Carefully line up both rows of pins with the holes in a socket, with all the
pins started into the socket. STOP. Check that none of the pins are bent Out
or bent under the chip. Now press the chip into the socket, pressing firmly to
seat the chip. Repeat the process with each chip until the bank is filled.
When you have finished installing any additional memory, you are ready to
install the MultiRam RGB card into your computer with the power TURNED
OFF. With the MultiRam RGB card installed in the Apple //e run Checkmate
Technology’s memory test to verify correct installation and goad RAM chips.
See Chapter 3 - Testing and Troubleshooting for a complete description of
how to test the newly installed memory.
If you have any doubts about removing or installing the chips, have a serviceperson do it for you.
Dealer Installed RAM
You may have your dealer install RAM at the time you purchase your card or
at a later date: Be certain that the installed RAM passes the test program
supplied with the MultiRam RGB Card (described in Chapter 3).
Refer to Chapter 7 if your card containing dealer-installed RAM is in need of
service.
Factory Installed RAM
You may return your card to Checkmate Technology to have additional RAM
installed on the card. All factory RAM is thoroughly tested on the card at the
factory and is warranted for seven years.
page 15
Installation
ADDING OPTIONS
A number of options can be added to your MultiRam RGB card. An RGB
monitor can be used by the card, additional memory cards can be added to the
back of (//e RGB card, and a 16-bit 65C816 processor can be attached to
address all memory on (//e card. Following are instructions for attaching these
options to the card.
RGB Video
With the MultiRam RGB card in the Apple //e, you may display video
through a National Television Standards Committee (NTSC) composite color
or monochrome monitor or a Red, Green, Blue (RGB) monitor, or to both at
the same time. The RGB output of MultiRam improves the quality of both
color and text displays by removing the extraneous colors that occur during
color transitions in the Apple’s hi-res graphics and mixed modes.
To display video on a monochrome or color composite monitor, simply attach
the monitor to the video connector on the back of the Apple //e as you
normally would. To display video on an RGB monitor, you will need to
attach a cable to the MultiRam RGB card to connect the card to the monitor.
Figure 2.2 shows the signals that are present on each pin.
You may purchase an RGB connector cable from your dealer or from
Checkmate Technology. The RGB cable was not packaged with the
MultiRam card as it would have been an unnecessary added expense for those
without an RGB monitor. Also there are two different cables for the
MultiRam RGB, one supports the Apple type TTL, RGB monitor and the
other supports the IBM TTL RGB type monitor. Read Chapter 6 - Hardware
and Software Compatibility to decide which cable is needed for your monitor.
page 16
Installation
Ground
Green
Synch*
RGB Cable Connector
Blue
Intensity
N/C
N/C
Red
*Composite
(horizontal & vertical)
negative Sync
N/C
Ground
Ground
N/C
+5 Volts
N/C
N/C
N/C
J4
RGB Connector Pinout
Figure 2.2
MultiRam Memory Cards
You may add either the MultiRam //e card or the MultiRam Plus card to the
back of the RGB card for mare memory. The MultiRam //e card adds up to
768K while the MultiRam Plus card adds up to 4 megabytes and also has the
battery-backed RAM disk.
Ta add either card to the MultiRam RGB card, you must remove the RGB
from the computer.
page 17
Installation
To add the MultiRam //e card to the RGB card, hold the RGB card in one hand
and hold the MultiRam //e card in the other hand. Hold the RGB card so that
the memory card connector pins on the back of the RGB card (just above the
gold fingered connectors on the bottom of the card) face the RGB connector
socket on the front of the MultiRam //e card (just above the gold fingered
connectors). The slanted part of each card should be facing in the same
direction.
Align the two connectors. The top pins of the RGB connector should fit into
the top holes of the MultiRam //e socket and the bottom pins into the bottom
holes. Make sure that the pins of the RGB card are not off one or more holes
along the length of the female connector.
WARNING: Be careful! If the cards are incorrectly connected, you may
damage the RAM on the MultiRam cards or other MultiRam
components. Double check the connection for good alignment
before inserting the two cards back into the Apple //e.
Push the two cards together until a firm connection is made.
To remove the MultiRam //e card to add more memory to it or for any other
reason, after turning off the //e, first remove the combined cards from the
auxiliary slot.
Next, with both hands use a back-and-forth rocking motion along the width of
the cards. Continue rocking until the two cards separate from one another.
Instructions for attaching the MultiRam Plus card to the MultiRam RGB are
the same as for the MultiRam //e card.
MultiRam EX Card
The 65C816 on the EX card can directly address all memory on the MultiRam
RGB card when the EX card is connected to the RGB card by a cable.
Assembly instructions are in the MultiRam EX manual.
INSTALLING THE MULTIRAM RGB CARD
The MultiRam RGB Card must first be configured for the type of lie it is to
be used in.
page 18
Installation
Preparation
The MultiRam RGB card comes ready to use on current Apple //e enhanced
motherboards.
Current Apple //e computers are “Enhanced,” with a revision of components
on the motherboard so the //e more closely resembles the //c. These machines
can be recognized by the won! “Enhanced” that appears on the power indicator
light on the lower left of the keyboard, and also by a large letter “E” on the
left rear of the motherboard. If you are unsure what your Apple is, continue
reading. If your computer is enhanced, skip to the next section, “Inserting the
Can!”.
To see if you have a Revision A motherboard remove the cover from your
Apple //e and look at the back edge of the motherboard, just behind the row of
seven peripheral slots, near the middle. You should see the words “APPLE
COMPUTER” and below them the serial number (see Figure 2.3). The last
character of the serial number is a letter-- A, B, or C. If the letter is an “A”,
yours is the Rev. A motherboard. (Note: if the copyright date to the left of the
serial number is 1984 or newer, you have an enhanced //e and no modification
is necessary for the installation procedure.)
For owners of earlier, non-enhanced Apple //e computers, there are three
versions of the motherboard -- Revisions A, B, and C. For the Revision A
motherboards, the earliest Apple //e, double hi-res is not available and a
simple modification is necessary to prepare the MultiRam RGB for use with
this motherboard. Refer to Figure 2.l,and locate the Jumper Block along the
bottom center of the card. Remove this block by simply pulling it outward
from the card. You might wish to place it back on just one of the exposed
pins for storage. If your motherboard is a Rev. B or C, leave the block in
place covering the two pins. To get the double high resolution you must
swap your Revision A motherboard for a later revision. Your local Apple
dealer can do the swap and installation.
page 19
Installation
Copyright
Date
Computer, Inc.
Serial Number
Apple //e Motherboard
Figure 2.3
Inserting The Card
The MultiRam RGB must be inserted into the auxiliary Apple //e
motherboard.
connector slot on the
Be sure the power to the //e is turned off. It is best to be completely sure by
unplugging the power cord.
WARNING: YOU SHOULD NEVER INSERT OR REMOVE A
PERIPHERAL CARD WITH THE POWER ON BECAUSE IT WILL
ALMOST CERTAINLY DAMAGE COMPONENTS ON THE
MOTHERBOARD AS WELL AS THE PERIPHERAL CARD. YOU WILL
VOID TIlE MULTIRAM RGB WARRANTY IF THE CARD IS REMOVED
OR INSERTED WITH THE POWER ON.
page 20
Installation
If you have not already removed the cover from the //e, do so now. Next
locate tile power supply. It is the large metal box sitting on the left side of
the motherboard. Before touching a peripheral card or other sensitive
components, it is a good idea to ground static electricity by touching, with
your fingers, the top of the power supply case.
Now locate the auxiliary connector slot. It is about an inch to the right of the
front (toward the keyboard) of the power supply, and is identified by the words
“AUX. CONNECTOR” printed on the motherboard alongside it (see Figure
2.3). The MultiRam RGB Card is to be installed in this slot.
If there is another 80-column card in the auxiliary slot, remove it before
continuing. With the power off, pull up on the card while rocking it back and
forth until it pulls free of the slot. If it is a 64K auxiliary memory card, you
may want to remove the RAM chips and install them on the MultiRam RGB
before proceeding (see “Installing Additional Memory” in this chapter).
Hold the RGB Card with the sockets and components facing to the right. The
front of tile card slopes downward from the top and should face toward the
keyboard. Due to the design of the card, it cannot be inserted any other way.
Insert the foot of the card, the gold-fingered connector, into the auxiliary
connector slot. Use a gentle back-and-forth rocking motion along the length
of tile card to seat it.
Check the MultiRam card to be certain it is seated firmly into the slot and is
not loose. Replace the cover of the Apple.
Now turn to Chapter 3 to test your new card for proper functioning.
page 21
Installation
page 22
Chapter 3
TESTING AND TROUBLESHOOTING
This chapter covers the testing procedures you may use to check the RAM on
your MultiRam RGB card.
All those who just installed a MultiRam RGB card or added memory to it
should read this chapter. Refer back to this chapter and the diagnostic memory
test, which is on the back side of the MultiRam disk, whenever you doubt the
RAM on the MultiRam RGB card.
Memory Bank versus RAM Bank
Just to keep everyone together let’s define two similar sounding but very
different terms that are used when talking about memory cards.
Memory banks refer to the addressing of the Random Access Memory (RAM)
chip. A memory bank has an address range of 0 to 65535 (decimal), referred to
as 64K, and a bank of RAM chips may have one or four memory banks in it.
The microprocessor used in the Apple //e is the 6502 (non-enhanced) or the
65C02 (enhanced) and is able to address only 64K of memory at a time. By
electrical slight of hand, Apple has the microprocessor find and use 64K of
motherboard memory. 12K of ROM memory, 4K of input/output, and 64K of
memory on the AUX 80 column card. That’s 144K total. This slight of hand
is called bank switching which enables the 6502 in find and use far more
‘memory’ than what the microprocessor’s designers intended it to. Checkmate
Technology extends this slight of hand and has the microprocessor find sixteen
memory banks on the MultiRam card instead of the standard one bank. These
sixteen memory banks are contained in four RAM banks, using 256K chips.
A complete RAM bank is a set of eight RAM chips that may be either 64K or
256K in size. The MultiRam RGB card has sockets to accommodate up to
four RAM banks. Mixing 64K and 256K chips in a single bank will result in
only 64K of useable test memory and will crash application programs.
page 23
Testing and Troubleshooting
RAM TEST PROGRAMS
The back of the disk included with the MultiRam RGB card has several
utilities. Before using this disk, make a backup of both sides. Apple’s Filer is
include in ibis menu for making backup copies of Checkmate Technology’s
disk. To run the Filer press the number key that matches the name on the
Main Menu. When the Filer is up, make a backup disk. When you exit from
the Filer, the program selector SQUIRT will take over and list the volume
names for alt volumes that are on line. Choose the letter that matches the
Checkmate disk, “MULTIRAM.UTIL’. SQUIRT will now list all of the
subdirectories and system files on this volume. Choosing the
‘LOGO.SYSTEM”, i.e. press the key that matches the letter that goes with
the system file, SQUIRT will display the Checkmate Technology logo and
then display the Main Menu. From here choose the number that matches the
MultiRam diagnostic test program, it contains the test programs for all of
Checkmate Technology’s memory cards.
A second menu will be presented. From this choose the memory card test that
corresponds to the MultiRam RGB card. If either the MultiRam //e or the
MultiRam Plus card are piggybacked to the MultiRam RGB they may be
tested while piggybacked using a separate test. These tests will overwrite
everything that is on the RAM card. This means that all data and programs on
the RAM disk will be destroyed when you run any of these tests. Be sure to
back up all data from your RAM disk before running a test.
Each memory card has its own video picture that matches the physical card and
has a graphic representation of each RAM chip on the card. Although each
memory card has its own unique hi-res picture, they all share the same test
options. Later in this chapter, under the heading Running A Test, the graphic
representation for the RAM chips and RAM banks will be explained. Choose
only the RAM test for the Checkmate memory card(s) that is(are) in your
Apple //e.
page 24
Testing and Troubleshooting
Test Display
You should see sixteen 64K auxiliary bank indicators on the status display
screen numbered from 0 to 15 (see Figure 3.1). Since the Apple’s 6502
processor Cannot address more than 64K of memory at a time, the Apple
swaps memory banks into and out of its addressing range in order to use
MultiRam RGB memory. Therefore, the auxiliary bank indicators show
MultiRam RGB auxiliary memory as the Apple sees it -- one bank at a time,
not 128K or 512K or any amount of memory larger than 64K.
MultiRam RGB Card
Individual
Bank
0=64K
4=64K
1=64K
7=64K
2=64K
10=0K
3=64K
13=0K
5=64K
8=64K
11=0K
14=0K
6=64K
9=64
12=0K
15=0K
=
=
=
=
Total
[1]See Status [2]80-col test [3]Menu
Test: [4]Quick [5]Full [6lContinuous
RETURN
ARROWS
SPACE BAR
ESCAPE
starts
select pause/resume
cancel
Bank
Groups
A 256K
B 256K
C 64K
D 64K
640K
Status Page Before Testing
Figure 3.1
The usable memory in RAM Groups A, B, C and D is identified on the status
screen and the total usable memory available on the card is shown. Upon bootup, question marks appear instead of numbers in both the 64K auxiliary bank
and RAM Group status indicators as the card has not yet been tested.
page 25
Testing and Troubleshooting
The bottom two lines of the screen show the keys used to run the tests:
- Pressing the Arrow keys position a flashing, solid cursor in a box to the
left of the six applications shown. You may use the number keys as well
as the arrow keys to select the desired test.
- Pressing Return runs the application marked by the flashing cursor.
- Pressing the Esc key aborts “full” or “continuous” tests.
- Pressing the Space Bar once pauses “full” or “continuous” tests: pressing
it again resumes the tests.
After you have finished the RGB test, you may return to the main diagnostic
menu to test a memory expansion card attached to the back of the MultiRam
RGB card by selecting the option “MENU” shown on the screen.
Test Selection
Four tests are shown on the menu: a "quick” test, a “full” test, a “continuous”
test, and an “80-column” test.
The “quick” test checks a very small percentage of the memory in a RAM chip
in a short time. The test will run in three seconds. Use this test to quickly
find major RAM failures. If RAM is bad in an area other than the few places
the test checks, a bad chip may be undetected by this test.
The “full” test runs the “quick” test and then exhaustively checks all banks
found by the “quick” lest. Each bank is tested as long as a single RAM chip
is found useable. The test runs approximately three seconds per 64K. You
should always run the full test after adding or changing RAM on the card or
when first installing the card.
The “continuous” test runs the full test over and over for added error checking,
until you press the Escape key. Use the continuous test if a problem develops
with the card after it has been in use. Many problems with RAM show up as
intermittent problems. One run of the “full” test might not disclose such a
problem whereas the continuous running would. Letting this test run for
extended periods will often find intermittent problems the other tests miss.
The “80-Column” test allows a visual check of the part of auxiliary memory
dedicated to displaying 80-columns.
page 26
Testing and Troubleshooting
If RAM in the text video page is bad or incomplete, you will see the message
“NO 80 COLUMN VIDEO AVAILABLE DUE TO INCOMPLETE
AUXILIARY MEMORY BANK 0” on the 40 column screen.
If there is no RAM failure, you will see eight repeated printings of the ASCII
character set in ascending numeric order on the 80-column screen. The inverse
ASCII character set is printed first, followed by the normal Set, each Set
repeated eight times. Check to see if there are any breaks in the character
pattern. Any breaks will indicate RAM failure. If a failure is suspected, run
the continuous RAM test to locate the bad chip.
Running A Test
Running the “quick”, “full”, or “continuous” tests shows a high resolution
picture of the MultiRam RGB Card. Each RAM socket is shown exactly as
laid out on the card.
Each socket is divided into four squares. Each socket is shown as four squares
because MultiRam RGB can contain Sixteen 64K auxiliary banks in its four
RAM groups. The Apple, through MultiRam RGB circuitry, addresses these
sixteen 64K banks as follows:
BANK A
0
4
5
6
BANK B
1
7
8
9
BANK C
2
A
B
C
BANK D
3
D
E
F
fly running any of these tests, you will see a spinning cursor appear in place
of the flashing cursor in the bottom four lines of the screen. The cursor will
spin until the test is completed.
You will also see four flashing lights blink off and on the left side of the
picture. These lights correspond to the flashing LED’s on the card and show
which of the sixteen banks of auxiliary 64K is being currently tested. Add
together the numbers that arc to the left of the lit LED’s to see which bank is
being tested. Auxiliary banks are tested from 15 to 0 in descending order.
page 27
Testing and Troubleshooting
At the end of a test, you will see one of three markings appear in each quarter
of the sockets (see Figure 3.2):
- A “+“ on a black background indicates the RAM in the 64K auxiliary
memory segment, whether found on a 64K RAM chip or a 256K RAM
chip, tested good.
- An “X” on a white background indicates the RAM in the 64K auxiliary
memory segment is probably good but can’t be completely tested because
another chip in the same group of sockets tested bad, was missing, or
was not the same size as the other RAM in the group.
- An empty square indicates bad RAM or missing RAM.
a8
a7 a6
a5 a4
a3 a2 al
b8 b7
b6 b5
b4
b3 b2
b1
MultiRam RGB
c8
c7 c6
d8
d7
c5 c4
c3
c2 c1
copyright (c) 1986
Checkmate Technology, Inc.
= Good
= Good but Unusable
d6 d5 d4
d3 d2
= Bad/Empty
[1] See Status
(2] 8O—col test
(3] Menu
Test:
[4] QuIck
[5] Full
[6] Continuous
RETURN
ARROWS
SPACE BAR
ESCAPE
starts
select
pause/resume
cancel
Successful Test of 640K Card
Figure 3.2
page 28
dl
Testing and Troubleshooting
After a est is run, you may select the option “SHOW STATUS” and see a
summary of usable memory (see Figure 3.3). The sixteen banks show 64K
for good RAM and 0K (zero) if RAM is missing or bad in the bank. A RAM
Group having 256K chips, where one or more 256K chips are “partially”
defective, will show only 64K available in that group.
MultiRam RGB Card
Individual
Banks
Bank
Groups
0=64K
4=64K
5=64K
6=64K
=
A 256K
1=64K
7=64K
8=64K
9=64K
=
B 256K
2=64K
10=0K
11=0K
12=0K
=
C
64K
3=64K
13=0K
14=0K
15=0K
=
D
64K
[1] See Status
Test:
[4]Quick
RETURN
ARROWS
starts
select
Total
640K
[2] 80—col
[3]Menu
[5]Full
[6]Continuous
SPACE BAR
ESCAPE
pause/resume
cancel
Status Page After Testing
Figure 3.3
Test Results
If one chip in a bank fails, the rest of the bank will be shown as there but not
useable. This is like having one flat tire on your car, the other three tires are
fine, but the car in not “useable”.
Several reasons may lie behind an appearance of a blank square or an “X” in a
square. If these results are shown as the result of your testing, write down the
socket number of those chips that test “bad.” Turn off the Apple, unplug it,
remove its cover, and remove the MultiRam RGB Card from the auxiliary slot
for better examination.
page 29
Testing and Troubleshooting
If an entire bank shows “bad”, there is probably no RAM in that bank or the
RAM chips are upside down. If there is RAM in the bank, check the polarity
notch to see that it matches the white markings on the board. If one chip in a
bank shows bad, it is also easy to check if that chip is missing. It will be
shown blank on the test results with no “X” and no “--“ drawn on the chip.
If there is a chip in the socket marked “bad”, first inspect the chip. Make
certain it matches the memory size of the other chips in its bank. If it does,
check to see that all of its pins are firmly inserted into the socket. A chip
may read “bad” if one of its legs is bent under the chip or if a pin is sticking
outside the socket.
If none of the preceding are true, then the RAM identified as “bad” is probably
defective. You may try swapping the chip with another RAM chip that tests
good. Reinsert the card and rerun the test to confirm the first test results. If
the “bad” RAM chip moved to the new location shows bad, then it is indeed
defective. If the failure stays in the same spat, there is a fault in the card.
If the defective RAM was originally shipped with the card or is from a
Checkmate RAM Kit, turn to Chapter 1 for warranty service information.
If the RAM is not from Checkmate Technology, check with the store that sold
you the RAM regarding replacement. Checkmate Technology will replace
another company’s bad RAM for a service fee.
NON-RAM PROBLEMS
Bad components on the MultiRam card may be another source of problems
when a program won’t run properly, or if 80-column video is not seen.
One problem, not related to the MultiRam RGB Card, which can sometimes
appear as a RAM problem, is an overloaded power supply.
If you are running a full Apple with a peripheral card in every slot, you are
probably overloading your Apple’s power supply. If a memory related
problem occurs in this situation, try removing some of the cards from the
Apple to see if the problem disappears.
page 30
Testing and Troubleshooting
To insure longer life for your computer, remove all cards that are only used
occasionally. A modem, speech synthesizer, CP/M card, etc. can draw up to
80% of their operating current even when they are not being used. If you need
IlIC use of all your cards in your Apple at one time, other remedies are
possible. The enhanced //e kit, available from your Apple Dealer, includes a
65C02 that can reduce power consumption by 180 milliampcrcs. Larger
power supplies are available that double the power rating of the standard power
supply. Even if your computer is working fine, add a fan to give it a helping
hand.
page 31
Testing and Troubleshooting
page 32
Chapter 4
APPLEWORKS EXPANSION
PURPOSE
This chapter is written for individuals who are familiar with their Apple //e,
AppleWorks, and ProDOS. If after reading this chapter things are not clear,
please read the "MultiRam Software Manual”. Chapter 2 explains the
expansion of AppleWorks. Chapter 3 details how to use the expanded
AppleWorks. Chapter 4 explains in detail, adding other enhancements such as
PinPoint, TimeOut and more.
Checkmate Technology, Inc. updates software for two reasons. The first is to
add new features and collect known bugs in existing releases. Second, updates
are released to make Checkmate Technology hardware compatible with new
releases of AppleWorks or to add new features. Updates of Checkmate
Technology’s disks arc available from your local dealer or from Checkmate.
Technology at a nominal fee.
The “RECENT.CHANGES’ file on the MultiRam disk details changes from
previous releases.
EXPANDING APPLEWORKS
Checkmate’s MultiRam disk adds new features and expands existing features
for the AppleWorks program. Expanded features include a larger desktop, an
increase of the number of lines for the word processor, an increase in the
number of data base records and more. Some enhancements include the ability
to load the entire program into RAM, saving large files over several data disks
if necessary, and displaying the time on screen. The “MultiRam Software
Manual” details all of the enhanced features as well as the expanded features.
The MultiRam disk supports several versions of AppleWorks, presently
versions 1.2, 1.3 and 2.0 are supported. Older releases of AppleWorks are no
longer supported by Checkmate Technology.
page 33
AppleWorks Expansion
INSTRUCTIONS
There is a specific sequence for expanding AppleWorks. Failure to follow this
sequence will create problems. Briefly the sequence is:
1. Make a copy of an UNMODIFIED AppleWorks.
2. Boot the MultiRam disk and follow the on screen instructions.
3. Add any other enhancements, i.e. TimeOut, PinPoint, Jeeves,
Fingertips, etc. following their instructions.
4. Use this improved AppleWorks.
ALWAYS work with a copy of AppleWorks. ALWAYS make all
modifications and patches to a working copy of AppleWorks. NOT to the
original disk. Do not copy an AppleWorks disk previously modified with
enhancements. This includes previously expanded MultiRam AppleWorks.
PinPoint, MacroWorks, TimeOut, Fingertips and the time display within
AppleWorks for clock cards. Exceptions to this are AppleWorks with custom
printers, custom data disk drives or pathnames, ProDOS modified for clock
drivers and modified help files (from MacroWorks). The MultiRam disk will
not recognize a previously modified AppleWorks disk and will not expand it.
The “MultiRam Software Manual” chapter 2 explains in more detail what can
and can not be left on AppleWorks.
Copy the unmodified AppleWorks to two 5.25 floppy disks, or one 3.5
diskette, or to a 200K subdirectory on your hard disk. AppleWorks copied to
the 3.5 diskette or a hard disk must have the original Startup and Program files
in the same subdirectory.
Floppy Disk Expansion
After copying AppleWorks, boot the MultiRam disk. From the main menu
choose the version of AppleWorks to be expanded. Follow the MultiRam
disk’s on-screen instructions to complete the expansion of AppleWorks.
Hard Drive and 3.5 Disk Drive Expansion
After copying AppleWorks to a 3.5 diskette or the hard drive, boot the
MultiRam disk. From the Main Menu chose the version of AppleWorks to
be expanded and follow the on screen instructions. When asked for the
PREFIX OR PATH’, type in the pathname where AppleWorks can be found.
page 34
AppleWorks Expansion
NOTE: You may wish to refer to your copy of PRODOS SUPPLEMENT
TO THE APPLE //E OWNER’S MANUAL (for the old //e) or the PRODOS
TECHNICAL REFERENCE MANUAL in order to review pathnames.
Adding Other Patches or Features
Once the MultiRam disk has finished expanding AppleWorks, start the new
disk to make sure that it works BEFORE adding other enhancements.
PATCH.PATCH
This is a BASIC program that allows customization of the AppleWorks
program. These include skipping the initial AppleWorks title screen,
skipping the date screen, turning off/on the memory in use indicator, and
more.
To run PATCH.PATCH boot the MultiRam disk with the AppleWorks
Expander side up. At the main menu choose the option exit to BASIC. Make
sure the [caps lock] key is on and type:
RUN PATCH.PATCH [RETURN]
PATCH.PATCH clears the screen and prompts you for the AppleWorks disk
or the pathname on which it is found. When the AppleWorks startup disk is
placed in the disk drive, PATCH.PATCH will ask questions about
customizing your AppleWorks program.
EXPANSION PROBLEMS
The following are some error messages that you might receive while
expanding your AppleWorks:
Can’t Follow the Path
The volume or subdirectories are not the same as what actually exists. Use
the Filer or some other disk utility like Copy II Plus or Cat Doctor to
check the volume and subdirectory pathnames. Copy II Plus has a tree
display of the ProDOS pathnames.
page 35
AppleWorks Expansion
Cant Recognize this Version of AppleWorks
Is this version of AppleWorks a supported version? Checkmate
Technology has quit supporting earlier versions of AppleWorks 1.0 and
1.1. You might have a new release of AppleWorks that Checkmate does
not yet support, or that is not supported by the software version you
have. Other possibilities are that the AppleWorks has already been
patched for MultiRam memory cards, or has enhancements like TimeOut.
Recopy the startup and program disk for AppleWorks from the
ORIGINAL, unmodified AppleWorks disk.
Can’t Find: APPLEWORKS.SYSTEM
Check the volume/subdirectory/file pathname using your favorite disk
utility. Example pathname could be:
/ROM/APPLEWORKS .FOLDR/APLWORKS.SYSTEM
/APPLEWORKS/APLWORKS.SYSTEM
/HARD.DRIVE.ONE/SUB.APPLEWORKS/APLWORKS.SYSTEM
Enter the correct pathname when the MultiRam disk asks for it.
Can’t Find: SEG.00
Check the pathname or prefix. This is similar to the previous problem:
Can’t Find APPLEWORKS.SYSTEM. Use a disk utility to check the
pathname.
Disk is Write Protected
Check the write protect notch on the diskette. For a floppy disk the notch
is uncovered. For the 3.5 disk the window should be closed.
HELP
If you still have problems, see the “MultiRam Software Manual”, take a
coffee break and do it again, call your Apple dealer, call a friend from your
Apple User Group or call or write Checkmate Technology.
page 36
Chapter 5
RAM DISKS
A RAM disk is perhaps one of the best ways to utilize the extra memory on
the MultiRam RGB card. With Checkmate’s software you may take part or
all of the memory and make it into an 'electronic disk drive’. That is, the
Apple //e will see the RAM as a large disk drive and most of the standard disk
drive commands will work with it There are a few exceptions; a drive speed
test will fail, volume copies to or from the RAM disk are not allowed, you
can not boot the RAM disk, and copy protected programs can not be put on it
Most other functions of the disk utilities work just fine. Chapter Sin the
“MultiRam software Manual” explains the limitations and advantages.
Chapter 6 goes into the ProDOS RAM disk and chapter 7 explains the DOS
3.3 RAM disk.
Advantages of using a RAM disk include the ability to use multiple-disk
applications without doing any disk swapping. Also, since the information,
resides in high speed RAM, the programs execute much faster than they do
from the slower mechanical disk drives. An example is having Beagle
Brother’s QuickSpell™ and AppleWorks loaded into the RAM disk, (408K of
programs) and still having a desktop of several hundred K. Spell checking a
20K file takes about ten seconds with no disk swapping! SQUIRT, the
program selector, allows you to switch easily between several non-related
programs on the RAM disk.
The instructions provided here are intended for individuals who are using their
own systems, copy utilities and application programs. The “MultiRam
Software Manual” explains RAM disks in depth as well as how to use them.
CREATING THE RAM DISK
The MultiRam disk that came with the MultiRam RGB has several utilities
on the back side. If you have not booted up this side, now would be a good
time. You may try the options while they are being explained.
page 37
RAM Disks
There are three steps to sec up and use a RAM disk:
1. Use the MultiRam disk utility in create the RAM disk.
2. Copy the desired programs and files to it.
3. Choose and run a program on the RAM disk.
The DOS 3.3 and ProDOS RAM disk creations are the only choices from the
Main Menu to be discussed in this chapter.
DOS RAM Disk
When using the DOS 3.3 RAM disk you must have the DOS system master
and two DOS formatted disks ready. Using DOS 3.3 RAM disks is not
encouraged due to the many limiting factors of DOS 3.3.
Without going into too much detail, let’s look at some of the limiting factors
of DOS 3.3. Each DOS RAM disk is limited i n a 384K size and no more
than nine disks can be made. A MultiRam ROB with 1 megabyte may be
setup with three DOS RAM disk. These RAM disks will, by default, be put
into slot 3 as drives 1.2 and 3. Another limit of DOS is that no more than
105 files may reside on a disk, even if all the memory of that disk has not
been used. DOS 3.3 does not have an effective way of handling a large
number of files. ProDOS’s structured directories and subdirectories make the
managing on hundreds or thousands of files easy.
Setting up a ProDOS RAM disk requires the three major steps mentioned
above. However, creating the DOS RAM disk will take approximately twenty
steps. Chapter 7 in the “MultiRam Software Manual” outlines the procedure
for making and using the DOS 3.3 RAM disk. Please use the ‘MultiRam
Software Manual” when using DOS 3.3 RAM disks.
ProDOS RAM Disk
The submenu that appears from the Main Menu shows several ways to
customize the RAM disk.
1. Install the RAM disk using the preset slot and size.
2. Change the slot and the memory size of the RAM disk.
3. Go back to the Main Menu.
page 38
RAM Disks
Choosing the preset default options creates a RAM disk that is addressed in
slot 3 as drive I with the volume name of /MRAM. Although the MultiRam
RGB card is physically in the AUX slot, the RAM disk is made to appear in
slot 3 for programming convenience. Slot 3 was chosen because it is the
video slot which rarely contains a card. If this presents a problem, the RAM
disk can be moved to another slot by choosing the second option.
The second option permits the changing of the RAM disk parameters to Suit
your system. There are four choices offered:
1.
2.
3.
4.
What slot the RAM disk is put into.
How much memory is to be given to it.
Save these custom settings to the floppy disk.
Create this custom RAM disk without saving these values to the
floppy disk.
Selection 1, lets you move the RAM disk to another slot. Slots 1 to 7 are fair
game, however slots 7 or 5 are the most likely alternate places to have the
RAM disk. Slots 7 or 5 are good choices as they are usually the last slots to
have cards installed. Remember the slot chosen must not have a card in it.
Selection 2, changes the memory allocated to the RAM disk. Additional
information is displayed on the screen showing how much memory is on the
MultiRam RGB card, how much of the memory the RAM disk holds, and
how large the AppleWorks desktop will be with this setting. The right and
left arrow keys decrease and increase the RAM disk size.
Selection 3, saves these settings to the MultiRam disk and creates the RAM
disk. This completes step one and you are ready for step two which is the
copying of programs/files to the RAM disk. The MultiRam disk will offer
the option to run Apples Filer or not. If you have a preferred copy utility
that allows for file copying, use it. Remember volume copying does not
work with a RAM disk.
Selection 4, is very similar to selection 3 except it does not save the present
RAM disk size and slot settings to the MultiRam disk. Copy the desired files
to the RAM disk and run the programs, step 3. SQUIRT is a handy
enhancement to ProDOS at this point as it will poll all logical devices that are
on line and present a menu list of the ProDOS volumes that are available.
Pressing a single key instructs SQUIRT which device to go to. SQUIRT
again presents a menu listing all of the subdirectories and system files on this
volume. Another single key stroke chooses which subdirectory or application
to go to next.
page 39
RAM Disks
OPTIONS
Checkmate Technology offers a simpler way of running your programs from
the ProDOS RAM disk. This is the AUTORAM disk, which upon booting
creates the RAM disk and then copies any diskettes given to it to the RAM
disk. Like the MultiRam disk, AUTORAM can have the RAM disk slot and
size changed to match your system needs. Once the RAM disk is loaded,
SQUIRT takes over to launch the chosen application.
Chapter six of the “MultiRam Software Manual" goes into detail about setting
up and using the ProDOS RAM disk.
page 40
Chapter 6
HARDWARE & SOFTWARE
COMPATIBILITY
The MultiRam RGB Card’s operation can be enhanced by using other
manufacturer’s hardware and software products along with it. Some of the
more useful products are described in this chapter.
HARDWARE
All hardware products tested with the MultiRam RGB card have been
compatible: modems, mouseR, printer cards and printers, co-processor cards,
hard drives, etc.
The four most useful hardware additions that could be made to increase
MultiRam RGB’s usefulness are an RGB monitor, a large capacity disk drive,
co-processor, and a non-interruptible power supply.
RGB Monitors
To get everyone to the same place, lets cover background so that we agree on
terms.
There are two ways to get color from your Apple //e. The first method is to
use the video jack on the Apple //e motherboard to drive a composite color
monitor. However, this method requires all color and video signals to be sent
over a single wire, which produces OK graphics and poor text display. The
text display tends to bleed colors giving the letters a fuzzy appearance and
making them difficult to read. The second is to use an RGB monitor which
has multiple wires to carry the color and video signals to the RGB monitor.
By using multiple wires~ one for red, one for blue, one for green, one or two
for synchronization and perhaps one for intensity, the video display is much
clearer.
page 41
Hardware & Software Compatibility
The RGB monitor has two implementations that should be of interest to the
Apple //e owner. The Apple type RGB differs from the IBM RGB in two
ways. The major difference is that Apple uses a composite synchronization
signal. This signal has bath the horizontal and vertical pulse information in
it. IBM type monitor uses two separate synchronization signals, one for the
horizontal sweep and another for the vertical sweep. Feeding the Apple type
synchronization to an IBM produces a picture that both rolls and tears left to
right. The second difference is not as critical, as it does not effect the stability
of the display, but it is noticeable. Since there are four color signals to work
with (red, green, blue and intensity) there are sixteen unique colors that can be
generated. Apple and IBM do not use the same combination of RGB signals to
define these sixteen colors, five of the color patterns do not match. For
example, Apple gray comes Out as brown on the IBM RGB monitor. If you
have an IBM type monitor, don’t panic.
Checkmate Technology has two different RGB cables, one with a DB-15
connector for TTL Apple RGB video, and one with a DB-9 connector for TTL
IBM RGB video. The DB-15 cable is intended to connect to Apple TTL RGB
monitors. The DB-9 cable turns the Apple RGB color and video signals into
the IBM TTL RGB format. Each of these cables comes with an instruction
manual and the necessary hardware for installation. Figure 2.2 on page 17
shows the connection for the RGB cable.
There is one more subcategory of RGB monitors. TTL and analog. The TTL
RGB monitor expects each color to be either on or off and the analog, actually
digital, expects each color to be one of sixteen voltages. The difference is that
the TTL can generate sixteen unique colors and the analog can generate 4096
unique colors. The Apple IIGS uses the analog RGB type monitor.
Now that the background has been covered we can talk about monitor options.
These options include:
- switch selectable between Apple TTL and IBM ‘TTL
- switch selectable between TTL and analog RGB
- switch selectable composite color and RGB
- switch selectable monochrome text display
- switchable from color television to RGB monitor
- may have a sound output
page 42
Hardware & Software Compatibility
The monitor may not have any of these options, that is it only works with an
Apple TTL RGB output, or it may have several of these options. The newer
monitors often have several of these options and you must set the switches
correctly to get a stable video display.
Choosing a new, more expensive monitor may be good decision if you are
planning to purchase a computer with better graphics that works with the
chosen monitor. Thompson makes monitors that work with TTL and analog.
so they will work with your present Apple //e and with the Apple IIGS. The
best video graphics that the Apple //e is capable of is 560 by 192 in
MONOCHROME. In sixteen colors the best it can do is 140 by 192. Don't
buy a high resolution monitor because the Apple //e can not make use of iL
If you have not purchased an RGB monitor, the following is a partial list of
Apple compatible RGB monitors you may wish to investigate:
Amdek models 500, 600, 700 -- the 700 model has a text switch to allow
you to choose between green or amber text characters
Apple Color Monitor 100
Comrex 6550
Princeton Graphics Systems
Models HX-12 & HX-9E -- both models have a text switch to allow you to
chose between green or amber text characters
SONY
Texan 610, 620
Thompson 4120
Zenith ZVM-130, 133
Other than the Apple RGB monitor, most of these models use a DB-9
connector.
Some manufacturers, as two of the above show, offer a text color switch that
allows you to switch between two or more colors for text display. The
MultiRam RGB card does not have a switch on the card to switch text colors,
but an optional IC can be purchased from Checkmate Technology that will
display the text in a different color. Green text is the color shipped with the
unit, the optional colors are red, blue, white and amber. This text color chip
is the 16R8A-2 PAL located just to the right of the RGB video connector.
This optional chip will only change the text color of a monitor connected to
the RGB video connector on the MultiRam RGB card.
page 43
Hardware & Software Compatibility
Disk Drives
MultiRam RGB’s large on-board memory, especially if expanded to a full!
megabyte, is far larger than the standard Apple II floppy disk drives
unformatted capacity of approximately 144K. The MultiRam RGB can host
one of two other memory cards to increase the memory to as much as 5
megabytes! The first card is the MultiRam lie which can use either 64K or
256K DRAM chips and is expandable to 768K. So a fully loaded MultiRam
RGB and MultiRam //e gives a total of 1792K. The second card is the
MultiRam Plus which can increase the memory from 256K to 4 megabytes,
using 18 pin DRAM chips. A fully loaded MultiRam RGB and MultiRam
Plus gives a total of 5120K. The MultiRam Plus has one other unique option.
With an optional external power supply the information on this card’s RAM
disk will not be lost when the //e is turned off.
To take better advantage of software that can use MultiRam RGB’s large
memory, you may want to consider purchasing larger capacity disk drives.
Using larger capacity drives, you may more easily save and load large data files
as well as keep many more programs on one disk.
Large capacity floppy disk drives are currently available for the Apple //e.
Larger floppy disk drive capacities range from 160K to over a megabyte and
come in 5 1/4 inch, and 3 1/2 inch sizes.
Hard disk drives have greater storage space available and faster access to
information stored on them than on floppy disk drives. Hard disk drives for the
Apple range from 5 megabytes to 60 megabytes. Most support all the major
operating systems used on the Apple.
Whether used in a single-user setting or networked for multiple users, a hard
disk drive makes a very effective companion to the MultiRam RGB Card.
ProDOS’s ability to use the extra RAM on the MultiRam cards turns the
Apple //e into a powerful productivity tool.
Hard drives available for the Apple should work well with MultiRam RGB. A
number of hard disk drives have been tested with the MultiRam RGB Card.
The Sider, an increasingly popular, inexpensive hard disk drive manufactured
by First Class Peripherals, Apple Computer’s Profile or HD2OSC or
HD4OSC, CMS drives SC2O and SC4O, and 5 to 42 megabyte hard drives
with networking ability manufactured by Space Coast Systems, Inc. have been
satisfactorily tested with the MultiRam RGB Card and the AppleWorks
program modified for MultiRam RGB use.
page 44
Hardware & Software Compatibility
Before buying a large floppy drive or hard disk drive, check to see that all the
operating systems you would like to use on your Apple (ProDOS, DOS 3.3,
Pascal, and CP/M) work on the drive. Further, if you use copy protected
commercial software, be certain that the drive will run the software you now
use or check with the software publishers to see if they have a version that
will vim on the drive in question.
Co-Processor Cards
The speed of the Apple’s motherboard 6502 or 65C02 processor is acceptable
for use with 64K or 128K of memory. You may discover, however, if you
work with large AppleWorks/MultiRam files that same operations, noticeably
those dealing with large spreadsheet files, take a relatively long time.
Co-processor boards using faster 65C02 processor can be added to the Apple
//e to speed up its operations. In testing, boards such as the Accelerator by
Titan Industries and The SpeeDEMON by Micro Computer Technologies,
speed up the operation of many AppleWorks functions threefold. Zip
Technology has successfully created a 40 pin IC that replaces the present
65C02 and that is completely compatible with all MultiRam cards. A coprocessor card used in conjunction with a hard disk drive and the MultiRam
RGB Card makes AppleWorks a superlative integrated program. Power
consumption of these speed-up cards is high. See Chapter 3 for additional
information about problems with power consumption.
Most CP/M cards may be used in conjunction with MultiRam RGB with
MulliRam’s optional CP/M disk emulation software. Any disk intensive
CP/M program, like Wordstar, shows increased speed from having a RAM
quick, large disk drive to load and save files to. MultiRam RGB and its
optional CP/M disk emulator software should work with any CP/M card that
works in slots 1 through 7 of the Apple.
Non-interruptible Power Supplies
In a business environment, a power failure that occurs while you are working
with a large data file, stored all in memory, could be disastrous. At best, data
must be re-entered resulting in lost time and aggravation. At worst, if a power
failure occurs while information is being written to disk, a power surge or
other disruption accompanying the power failure could cause damage to the file
being saved so that the file is unusable.
page 45
Hardware & Software Compatibility
A non-interruptible power supply offering quick response time to a loss of
power as well as having sufficient power to operate the computer long enough
to allow information stored in MultiRam RGB’s memory to be saved to hard
or floppy drives would be ideal if you are using MultiRam in a business
setting. Non-interruptible power supplies range in price from approximately
$300-$600.
SOFTWARE
Checkmate Technology includes software utilities that enhance the
performance of existing software. AppleWorks is taught to use the additional
memory for larger desktop, and many disk intensive programs run faster from
the RAM drive.
Some programs currently on the market will use more than 64K of
MultiRam’s memory, though not all of the memory on a card may be
recognized. ProTERM, WordPerfect, SuperCalc3a, FlashCalc, Locksmith
6.0, MagiCalc, and Magic Office are examples of programs which will
recognize large portions of MultiRam memory.
Unprotected programs that return to a program or data disk frequently can
benefit now from MultiRam RAM disk emulation software. Most popular,
unprotected programs can run out of a RAM drive and use the same RAM
drive to store their data, thus greatly speeding up these programs.
For example, with a large enough MultiRam RGB card, you could easily store
the ProDOS version of Apple Writer //e, the ProDOS Users Disk, and Apple’s
ProDOS ED/ASM assembler on the MultiRam RGB ProDOS RAM disk.
When running them, their disk access time would be almost unnoticeable.
RAM fast disk speed would also allow you to very quickly and easily switch
between programs as needed.
The ProTERM telecommunication package and the MultiRam ROB make an
excellent combination. ProTERM will provide a 700K scrollback buffer and a
46K copy buffer from a 1 megabyte MultiRam RGB. The scrollback buffer
captures everything that scrolls across your screen for later review. An
effective way to use this feature is to go on line at a high baud rate, 1200 or
more, and skim read while on line. Once off line you can take your time to
read, save to disk, or print the items of interest in the scrollback buffer
without paying for the Connect charges.
page 46
Chapter 7
WARRANTY & SERVICE
WARRANTY
The MultiRam RGB Card, like all of Checkmate Technology’s peripheral
cards, carries a FIVE YEAR LIMITED WARRANTY
CHECKMATE TECHNOLOGY. INC. warrants products against defects in.
material and workmanship for a period of 5 years (90 days for software) after
purchase. During the warranty period, CHECKMATE TECHNOLOGY, INC.
will repair or replace defective products at no charge, or at its option refund the
purchase price to the purchaser, provided that the CHECKMATE
TECHNOLOGY product is returned, shipping prepaid, to CHECKMATE
TECHNOLOGY, INC. For products returned by other than U.P.S., the sender
assumes greater risk of loss and delays.
Your sales receipt is your warranty validation. The receipt must be provided
when requesting warranty work to be performed unless a valid product
registration card is on file at the company headquarters. This warranty does
not apply if, in the sole opinion of CHECKMATE TECHNOLOGY, INC.,
the product has been damaged due to abuse, misuse, misapplication, accident
or as a result of service or modification by other than an authorized
CHECKMATE TECHNOLOGY. INC. service center.
THIS WARRANTY IS EXPRESSLY IN LIEU OF ANY AND ALL
WARRANTIES EXPRESSED OR IMPLIED. CHECKMATE
TECHNOLOGY DOES NOT WARRANT THAT GOODS ARE
MERCHANTABLE OR FIT FOR ANY PARTICULAR PURPOSE.
CHECKMATE TECHNOLOGY SHALL NOT BE HELD RESPONSIBLE
FOR ANY CONSEQUENTIAL DAMAGES OR LOSSES ARISING FROM
THE USE OF THIS PRODUCT.
This warranty applies to CHECKMATE TECHNOLOGY products purchased
in the United States. The warranty may vary for products purchased outside
the continental United States. Contact CHECKMATE TECHNOLOGY.
INC. for warranty service information.
page 47