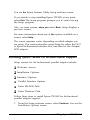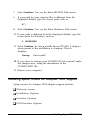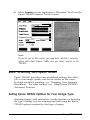
1
Scanner Utility
for Epson TWAIN
User’s Guide
Scanner Utility
for Epson TWAIN
User’s Guide
@
This manual is printed on recycled paper and is 100% recyclable.
IMPORTANT NOTICE
DISCLAIMER OF WARRANTY
Epson America makes no representations or warranties, either express or implied, by or
with respect to anything in this manual, and shall not be liable for any implied warranties
of merchantability and fitness for a particular purpose or for any indirect, special, or
consequential damages. Some states do not allow the exclusion of incidental or
consequential damages, so this exclusion may not apply to you.
COPYRIGHT NOTICE
All rights reserved. No part of this publication may be reproduced, stored in a retrieval
system, or transmitted, in any form or by any means, electronic, mechanical,
photocopying, recording, or otherwise, without the prior written permission of Epson
America, Inc. No patent liability is assumed with respect to the use of information
contained herein. Nor is any liability assumed for damages resulting from the use of the
information contained herein Further, this publication and the features described herein
are subject to change without notice.
TRADEMARKS
Epson is a registered trademark of Seiko Epson Corporation.
General notice: Other product names used herein are for identification purposes only and
may be trademarks of their respective companies.
Copyright 0 1992 by Epson America, Inc.
Torrance, California
ii
IMPORTANT
0 For SCSI interface users: if you are using other
SCSI devices besides the scanner, see page 2-6
and 2-7 in the TWAIN manual and also see the
SCSI information in the README file on the disk.
0 The colors in scan previews are not accurate if
your computer supports 256 or fewer colors. This
does not affect the final scan. For optimum
viewing choose True Color as the SCAN MODE on
the Scanner Control screen. For the best
scanning and viewing, Epson recommends using
a True Color (24-bit) video board.
0 Both the horizontal and vertical dimensions of
the largest scan possible are reduced by 1/2 inch
in the current version of the Epson TWAIN.
0 Picture Publisher must be set up the first time
you use it. Use the SETUP command in the FILE
pull-down menu. Select ACQUIRE DEVICE and
then select EPSON SCANNERS. To scan a
document, use the ACQUIRE command also
located in the FILE pull-down menu. Do not use
the SCAN command in the FILE pull-down menu
because it does not use Epson TWAIN and it may
lock up your system.
cl The current version of Picture Publisher (version
3.1) produces a reversed or negative image when
you use the black & white line art setting within
the SCAN MODE. Correct this within Picture
Publisher by selecting the INVERT command
from within the EFFECTS pull-down menu. This
problem will be corrected in later releases of
Picture Publisher.
0 The current version of Epson TWAIN does not
support all OS/2 version 2.0 applications.
Copyright 0 1992 Epson America, Inc.
Contents
Introduction
What is on Your Epson Scanner Utility Diskette . . . . . . . . .
What You Need to Use Epson TWAIN . . . . . . . . . . . . . .
Computer . . . . . . . . . . . . . . . . . . . . . . . . . . . .
Scanner . . . . . . . . . . . . . . . . . . . . . . . . . . . . .
Interface. . . . . . . . . . . . . . . . . . . . . . . . . . . . .
How to Use This Manual . . . . . . . . . . . . . . . . . . . . . .
Warnings, Cautions, and Notes . . . . . . . . . . . . . . . . . .
Where to Get Help . . . . . . . . . . . . . . . . . . . . . . . . . .
Chapter 1
Installing the Interface Card
Removing the Cover . . . . . . . . . . . . . . . . . . . . . . . . .
Checking the Jumper Setting . . . . . . . . . . . . . . . . . . . .
Installing the Card . . . . . . . . . . . . . . . . . . . . . . . . . .
Replacing the Cover . . . . . . . . . . . . . . . . . . . . . . . . .
Connecting the Cable . . . . . . . . . . . . . . . . . . . . . . . .
Connecting the Bi-directional Parallel Cable . . . . . . . .
Connecting the SCSI Cable . . . . . . . . . . . . . . . . . .
Checking Your SCSI Device Settings . . . . . . . . . . . . . . .
Chapter 2
1
2
2
3
3
4
4
5
1-3
1-3
1-6
1-6
1-7
1-7
1-7
1-8
Installing Epson TWAIN
Starting the Epson TWAIN Setup Program . . . . . .
Installing Epson TWAIN for Bidirectional Support.
Installing EpsonTWAIN for Adaptec SCSI Support
Running SCANTEST . . . . . . . . . . . . . . . . . .
. . . . . .
. . . . . .
. . . . . .
. . . . . .
2-2
2-3
2-5
2-8
iii
Chapter 3
Using TWAIN
Starting Epson TWAIN . . . . . . . . . . . . . . . . . . . . . . . . 3-2
Basic Scanning With Epson TWAIN . . . . . . . . . . . . . . . . 3-3
Setting Epson TWAIN Options for Your Image Type . . . 3-3
Previewing Your Image . . . . . . . . . . . . . . . . . . . .3-3
Selecting the Scanning Area . . . . . . . . . . . . . . . . . .3-5
Adjusting the Brightness . . . . . . . . . . . . . . . . . . . . 3-6
Adjusting the Magnification . . . . . . . . . . . . . . . . . . 3-6
Checking the Size . . . . . . . . . . . . . . . . . . . . . . . .3-7
Scanning Your Image . . . . . . . . . . . . . . . . . . . . . .3-7
Changing Your Scanning Resolutions . . . . . . . . . . . . . . . 3-7
Using Epson TWAIN’s Advanced Features . . . . . . . . . . . . 3-10
Modifying Settings on the Scanner Control Screen . . . . . 3-10
Editing the Scan Mode Settings . . . . . . . . . . . . . . . . 3-11
Editing the Target Device Settings . . . . . . . . . . . . . . 3-14
Chapter 4
Troubleshooting
When you select an Acquire device, Epson Scanners
is not listed . . . . . . . . . . . . . . . . . . . . . . . . . . . . .4-2
Nothing happens when you select Acquire . . . . . . . . . . . .4-2
Target Device or Scan Mode names or settings are different
or incorrect . . . . . . . . . . . . . . . . . . . . . . . . . . . . 4-3
The scan is not the full width you selected in the
Preview area . . . . . . . . . . . . . . . . . . . . . . . . . . . .4-3
Numbers you type in the width or height box
are not accepted . . . . . . . . . . . . . . . . . . . . . . . . .4-3
An error in the scanner or a paper jam in the Automatic
Document Feeder caused an error message . . . . . . . . . . . 4-4
The Sharpness setting is “grayed out” in the Epson TWAIN
Scanner Control dialog . . . . . . . . . . . . . . . . . . . . . .4-4
The Document Source setting is “grayed out” in the
Epson TWAIN Scanner Control dialog . . . . . . . . . . . . .4-4
The Preview button is “grayed out” when the Automatic
Document Feeder is selected under Document Source . . . . 4-4
iv
When you scan Black and White Line Art, Black and
White Halftone, or other monochrome image, the
scanned image is reversed like a negative image . . . . . . . 4-4
The predefined Scan Mode and Target Device settings
don’t meet your specific scanning requirements . . . . . . . 4-5
Sometimes the halftone or dither settings you select in
Scan Mode seem to be ignored . . . . . . . . . . . . . . . . . 4-5
Glossary
Index
V
TWAIN is an open industry interface that allows you to acquire
image data from a variety of external sources without leaving
the application you are currently using. For instance, suppose
you are using Picture Published and want to include a scanned
photograph. Without leaving Picture Publisher, you can use
TWAIN to scan the image and place it in your document.
Epson” TWAIN is a set of drivers designed to take advantage of
your Epson scanner’s advanced features with any software
application that supports TWAIN, providing you with a
sophisticated, high-speed scanning solution.
What is on Your Epson Scanner Utility Diskette
Your Epson TWAIN package contains a single diskette, the
Epson Scanner Utility Diskette. This diskette provides scanner
support, including Epson TWAIN, for devices using either the
bi-directional parallel interface or the Adapte® AHA- SCSI
host adapter, referred to here as the Adaptec SCSI adapter.
This diskette contains the following:
0
SETUP program for Microsoft® Windows™ 3.0 or 3.1
0 Epson TWAIN
Q
Epson Scanner DOS Device Driver for MS-DOS®
0 INSTALL program
CI SCANTEST
0 README file.
Introduction 1
If you are using Windows 3.0 or 3.1 with applications that
support TWAIN, the Epson Scanner Utility Setup program for
Windows installs everything you need. Just follow the
instructions in Chapter 3 for installing Epson TWAIN.
If you do not have Windows, you can still install the Epson
Scanner Utility to support the bidirectional parallel or Adaptec
SCSI adapters using the INSTALL program from the DOS
prompt. Read the README file supplied on the Epson Scanner
Utility diskette for more information about installing the Epson
Scanner Utility from DOS
Note
If you are using the Adaptec SCSI adapter, you also received an
Adaptec ASPI™ DOS Manager diskette. You will need this
diskette to install SCSI support for either Epson TWAIN or the
Epson Scanner Utility for DOS.
What You Need to Use Epson TWAIN
Epson TWAIN supports any TWAIN-compliant application
using Windows 3.0 or higher. Before you can use Epson
TWAIN, you’ll need the components described here.
Computer
Your computer needs the following configuration to support
Epson TWAIN:
0
80286,80386, or 80486 based computer with an IBM® AT™
(ISA) bus, or an IBM PS/2™ or compatible computer
a
At least 1MB of RAM
Cl
MS-DOS version 3.3 or higher
Cl
Microsoft Windows version 3.0 or higher
2 Introduction
Q
At least a 40MB hard disk with 150KB available space,
although you’ll want as much space as possible to store
your scanned images
Cl
TWAIN-compliant software; check with your software
publisher to see if your application supports TWAIN.
Scanner
Epson TWAIN supports the following Epson scanners:
0 ES-800C
tl ES-600C
0 ES-300C.
Interface
Epson TWAIN supports the following interface options:
Cl
Epson bidirectional parallel interface (B808011) for IBM AT
or compatible computers (ISA bus)
0
Adaptec AHA-1510 SCSI host adapter
D
PS/2 built-in bidirectional parallel interface.
Introduction 3
How to Use This Manual
This User’s Guide contains information you need to install and
use Epson TWAIN with your Epson scanner and your
applications that support the open industry TWAIN interface.
Chapter 1 explains how to install either your bidirectional
parallel interface or SCSI adapter card.
Chapter 2 provides procedures for installing Epson TWAIN on
your computer and testing the connection between your
scanner and computer.
Chapter 3 describes how to use Epson TWAIN.
Chapter 4 contains troubleshooting tips.
At the end of this guide, you’ll find a glossary and an index.
Warnings, Cautions, and Notes
Warnings
Q must be followed carefully to avoid damage to your scanner
and computer.
Cautions
should be followed carefully to ensure correct operation.
Notes
contain important information and useful tips on the operation
of your scanner.
4 Introduction
Where to Get Help
Epson America provides local customer support and service
through a nationwide network of authorized Epson dealers and
Service Centers.
Epson also provides the following support services through the
Epson Consumer Resource Center at (800) 922-8911:
Assistance in locating your nearest Authorized Epson
Reseller or Service Center
Technical assistance with the installation, configuration,
and operation of Epson products
Epson technical information library fax service-also
available by calling the toll number (310) 782-4214 directly
Product literature with technical specifications on current
and new products
Sales of ribbons, supplies, parts, documentation, and
accessories for your Epson product
Customer Relations
User group locations.
Introduction 5
Chapter 1
Installing the Interface Card
Removing the Cover . . . . . . . . . . . . .
Checking the Jumper Setting . . . . . . . .
Installing the Card . . . . . . . . . . . . . .
Replacing the Cover . . . . . . . . . . . . .
Connecting the Cable . . . . . . . . . . . .
Connecting the Bidirectional Parallel
Connecting the SCSI Cable . . . . . .
Checking Your SCSI Device Settings . . .
. . . . . . . . . . . .
. . . . . . . . . . . .
. . . . . . . . . . . .
. . . . . . . . . . . .
. . . . . . . . . . . .
Cable . . . . . . . .
. . . . . . . . . . . .
. . . . . . . . . . . .
Installing the interface Card
1-3
1-3
1-6
1-6
1-7
1-7
1-7
1-8
1-1
You can install one of two different interface cards to connect
your Epson scanner to your computer:
Ll
Epson b&directional parallel adapter @3808011), or
3
Adaptec AHA-1510 AT-to-SCSI host adapter.
Note
Epson TWAIN supports the built-in bidirectional parallel
interface on the IBM PS/2. If you have a PS/2, you don’t need
to install an additional interface card. Turn to Chapter 2 for
instructions on installing Epson TWAIN. You must install
either the bidirectional parallel interface or the Adaptec SCSI
adapter for all other computers.
Procedures for installing the bidirectional parallel or the
Adaptec SCSI adapter cards differ slightly. You may want to
refer to your computer’s documentation for more complete
instructions on installing option cards.
This chapter contains the following sections. The checkmarks
indicate which sections apply to installing a bidirectional
parallel adapter, an Adaptec SCSI adapter, or both.
Section
Removing the cover
J
Checking the jumper settings
/
Installing the card
/
Connecting the cable
Bi-directional
SCSI
/
Checking your SCSI device ID
1-2
Parallel
Installing the Interface Card
Adaptec
SCSI
/
J
J
/
Removing the Cover
Follow these steps to remove your computer’s cover:
1.
Turn off the computer and any peripheral devices.
2. Disconnect the computer’s power cable from the electrical
outlet and from the back panel. Also disconnect any cables
that are connected to the computer, including the keyboard
cable.
3.
Remove the cover. (If you need instructions, see your
computer manual.)
4.
Before you touch any of the components, touch an unpainted
metal surface inside the computer’s case to ground yourself
and avoid an electric shock.
Q
Warning
Be sure to ground yourself to an unpainted metal surface in
the computer every time you remove the cover. If you are not
properly grounded, you could generate an electric shock which
could damage a component.
If you are installing an Adaptec SCSI adapter card, skip the
section on checking jumper setting.
Checking the Jumper Setting
One of the jumpers on your Epson bidirectional parallel
adapter card identifies the port address for your bidirectional
parallel port. Follow these steps to unpack the option card and
check the jumper setting:
1.
Unpack the option card. When you handle it, be careful not to
touch any of the components on the circuit board or the
gold-edged connector.
Installing the interface Card
1-3
2.
Locate jumper J1 on the card. (Ignore the J2 jumper.)
J1
A jumper’s setting is determined by where the jumper is placed
on the pins. It connects either the left pin and the middle
pin or the right pin and the middle pin, as shown below.
LPT1
1-4
Installing the interface Card
LPT2
Refer to the table below to see which setting is appropriate for
your system.
J1 Jumper settings
Position
Function
LPT2’
Identifies the port address as LPT2
LPT1
Identifies the port address as LPT1
‘Factory setting
Most people use LPT1 to connect a printer, so you probably
want to leave the jumper at the factory setting so that it
supports the LPT2 address for your scanner.
Note
The TWAIN installation program requires that you identify your
J1 jumper setting on the Epson bidirectional parallel adapter
card as part of the installation process. Make sure you note the
jumper setting before you install the card.
3.
If necessary, move the jumper from one position to the other,
using needle-nose pliers or tweezers to pull it off its pins
and gently move it to the desired position.
Caution
Be careful not to bend the jumper pins or damage any
surrounding components on the card.
4.
Place the interface card gently on top of its original packing
material with the component side facing up. Keep the
packing materials in case you remove the card later.
Installing the Interface Card
1-5
installing the Card
Your computer has several standard option slots that can
accommodate either the Adaptec SCSI or the bidirectional
parallel adapter card. You can install the interface card in any
available slot. See your computer manual for detailed
installation instructions or follow these general steps:
1.
Remove any retaining screws from the metal option slot cover
and remove the slot cover. Keep the screw(s) to secure the
option card to the computer. Store the slot cover in a safe
place in case you remove the interface card later.
2.
Grip the interface card firmly by the top corners and make
sure the connector points down.
3.
Insert the card into the slot, guiding it straight down. Once
the connector reaches the slot, push the card down firmly
(but carefully) to insert it fully. You should feel the card fit
into place.
4. Secure the end of the card to the back of the computer with
the retaining screw(s).
Replacing the Cover
Follow these steps to replace your computer’s cover:
1-6
1.
Replace the cover. (If you need instructions, see your
computer manual.)
2.
Reconnect the computer’s power cable to the back panel and
then to an electrical outlet. Also reconnect any cables you
disconnected, including the keyboard cable.
Installing the Interface Card
Connecting the Cable
These procedures describe connecting the bidirectional parallel
adapter cable, then the SCSI adapter cable.
Connecting the Bi-directional Parallel Cable
Follow these steps to connect the cable to your bidirectional
adapter card. This cable came in your Epson Scanner Interface
kit.
1.
Make sure both the scanner and computer are turned off.
2. Connect the 25-pin end of the cable to the computer, then
tighten the screws on the sides of the connector.
3. Connect the 36-pin end of the cable to the scanner; then fasten
the connector with the clamps on the sides of the connector.
4. Turn on your computer and scanner.
You are now ready to install Epson TWAIN.
Connecting the SCSl Cable
The SCSI interface on your computer allows you to connect up
to eight devices, including the computer, in a daisy-chain
arrangement. Only the first SCSI device is connected to the
computer; each of the other devices is connected to the
previous device.
1.
Make sure both the scanner and computer are turned off.
2. If the Epson scanner is your only SCSI device, attach the
50-pin connectors to the scanner and your computer.
Fasten the connectors with the clamps on the sides of the
connector.
installing the Interface Card
1-7
You must also set the terminator switch to on or install an
external terminator on one of the two SCSI connectors on
your scanner if the scanner is the last device in the chain.
See your scanner documentation for more information on
terminators.
If you have additional SCSI devices, make sure only the last
device in the daisy chain is terminated. Use cables with
50-pin connectors at both ends, then fasten the connectors
to the scanner and the next device with the clamps on the
sides of the connector.
3.
With a SCSI adapter, always turn on the scanner first; then
start the computer.
Warning
Do not connect a parallel and a SCSI interface cable to the
scanner at the same time. Always use shielded cables.
Checking Your SCSI Device Settings
The factory-set SCSI ID of the scanner is 2. The SCSI host
adapter in the computer is normally preset to ID number 7. If
you are going to add the scanner to a system in which one of
your SCSI devices already has a SCSI ID of 2, change the ID
number of the scanner to an unused number as described next:
1.
1-8
Locate the SCSI ID switch next to the SCSI connectors on the
rear panel of the scanner.
Installing the Interface Card
ES-800C
2.
Set the switch to the desired number.
e
Caution
Do not set the SCSI ID to 8 or 9, and do not set the ID number
to an ID already assigned to another device. The computer,
scanner, and other devices will notfunction properly.
You are now ready to install Epson TWAIN.
Installing the Interface Card
1-9
Chapter 2
Installing Epson TWAIN
Starting the Epson TWAIN Setup Program . . . . . .
Installing Epson TWAIN for Bi-directional Support.
Installing Epson TWAIN for Adaptec SCSI Support
Running SCANTEST . . . . . . . . . . . . . . . . . .
. . . . . .
. . . . . .
. . . . . .
. . . . . .
2-2
2-3
2-5
2-8
Installing Epson TWAIN 2-1
The Epson Scanner Utility Setup program collects information
about your system and installs everything you need to use
Epson TWAIN with TWAIN-compliant applications, including:
U Epson TWAIN
0
Epson Scanner DOS Device Driver.
If you are using an Adaptec SCSI adapter, the Setup program
also prompts you to insert the Adaptec ASPI DOS Manager
diskette and installs the SCSI support software from that
diskette.
If you change interfaces, for instance, from an Adaptec SCSI to
a bi-directional parallel interface, you need to run the Setup
program again.
Starting the Epson TWA/N Setup Program
Follow these steps to start the Epson TWAIN Setup program
using Windows:
1.
If you are not already in Windows, start Windows.
2.
Insert the Epson Scanner Utility diskette in your diskette
drive.
3.
From the File menu in the Program Manager or File Manager,
select Run. The Run dialog box appears.
4.
Type the letter of the drive containing the diskette, followed
by SETUP. For example:
A:SETUP
5.
Select OK or press Enter. The screen displays this message:
Initializing Epson TWAIN Setup . . .
2-2
Installing Epson TWAIN
You see the Epson Scanner Utility Setup welcome screen.
If you decide to stop installing Epson TWAIN at any point,
select Exit. The Setup program prompts you to verify leaving
the Setup program.
Also, on some screens, when you select Back, Setup displays a
previous screen.
For more information about any of the options available on a
screen, select Help.
The screen sequence varies depending on which adapter you
are using. This section describes using Setup for either the PS/2
or Epson bi-directional interface first, and then for the Adaptec
SCSI adapter.
Installing Epson TWAIN for Bi-directional Support
Setup screens for the bidirectional parallel adapter include:
Cl Welcome screen
0 Installation Options
Q Interface Options
0
Parallel Interface Options
0
Enter MS-DOS Path
Ll Enter Windows Path.
Follow these steps to install Epson TWAIN for bi-directional
parallel adapter support:
1.
From the Setup welcome screen, select Continue. You see the
Installation Options screen.
installing Epson TWAIN 2-3
2.
Select your preferred option:
Make changes to CONFIG.SYS
Write changes to file - CONFIG.ADD
If you select the first option, Setup copies your existing
CONFIG.SYS file to CONFIG.BAK before it modifies the
file.
If you select the second option, Setup copies the changes to a
file called CONFIG.ADD. You can refer to this file later to
modify your CONFIG.SYS file.
3.
Select Continue. You see the Interface Options screen.
4.
Select the bidirectional parallel option:
Bi-directional Parallel Adapter Support
5.
Select Continue. You see the Parallel Interface Options screen.
6.
Refer to the table below to select one of the options.
Epson Adapter J1-LPT1: - Address 03F8h
Epson Adapter J1-LPT2: - Address 02F8h
Most PS/2 Models - Address 038Ch
Select
If
J1-LPT1
The jumper on your bidirectional card is set to LPT1
and you want to use LPT1 as your scanner port
J1-LPT2
The jumper on your bi-directional card is set to LPT2
(factory default) and you want to use LPT2 as your
scanner port
PS/2
You are using the built-in bi-directional port on an
IBM PS/2
*default option
2-4
Installing Epson TWAIN
7. Select Continue. You see the Enter MS-DOS Path screen.
8.
If your path for your start-up files is different from the
displayed default, type the correct path, such as:
c:\
9.
Select Continue. You see the Enter Windows Path screen.
10. If your path is different from the displayed default, type the
correct path for Windows, such as:
C:\WINDOWS\
11. Select Continue. As Setup installs Epson TWAIN, it displays
what percent of the installation is complete. Then it
displays:
Setup
Successful!
12. If you chose to change your CONFIG.SYS file yourself, make
the changes now, using the information in the
CONFIG.ADD file.
13. Reboot your computer.
Installing Epson TWAIN for Adaptec SCSI Support
Setup screens for Adaptec SCSI adapter support include:
0 Welcome screen
0 Installation Options
0 Interface Options
0 SCSI Interface Options
Installing Epson TWAIN 2-5
c3
Enter Scanner SCSI ID
3
Enter MS-DOS Path
D Enter Windows Path
0 Enter ASPI Path.
Follow these steps to install Epson TWAIN for Adaptec SCSI
adapter support:
1.
From the welcome screen, select Continue. The Installation
Options screen appears.
2.
Select your preferred option:
Make changes to CONFIG.SYS
Write changes to file - CONFIG.ADD
If you select the first option, Setup copies your existing
CONFIG.SYS file to CONFIG.BAK before it modifies the
file.
If you select the second option, Setup copies changes to a file
called CONFIG.ADD. You can refer to this file later to
modify your CONFIG.SYS file.
3.
Select Continue. You see the Interface Options screen.
4.
Select the SCSI support option:
ASPI Manager SCSI Support
5.
Select Continue. You see the SCSI Interface Options screen.
Epson SCSI Support Software
Use Existing SCSI Support Software
If you are installing your first Adaptec SCSI adapter, select the
first option.
2-6
Installing Epson TWAIN
If you already have an Adaptec SCSI device, select the second
option to use your existing SCSI support software.
6.
Select Continue. You see the Enter Scanner SCSI ID screen.
7.
Check the back of the scanner for the Scanner SCSI ID
number. If it is not 2, type the new value in the Scanner
SCSI ID field.
8.
Select Continue. You see the Enter MS-DOS Path screen.
9.
If your path for your start-up files is different from the
displayed default, type the correct path, such as:
c:\
10. Select Continue. You see the Enter Windows Path screen.
11. If your path is different from the displayed default, type the
correct path for Windows, such as:
c:\w1ND0ws\
12. Select Continue. The Setup program displays the Enter ASPI
Path screen with this path:
Path A:\
13. Change the path for the ASPI diskette, if necessary.
14. Insert the Adaptec ASPI DOS Manager diskette in your
diskette drive.
15. Select Continue. After installing the ASPI files, the Setup
program prompts you to insert the Epson TWAIN diskette
in your diskette drive.
Installing Epson TWAIN 2-7
16. Insert the Epson Scanner Utility diskette in your diskette
drive. As Setup installs Epson TWAIN, it displays what
percent of the installation is complete. Then it displays:
Setup Successful!
17. If you chose to change your CONFlG.SYS file yourself, make
the changes now, using the information in the
CONFIG.ADD file.
18. Reboot your computer.
Running SCAN TEST
SCANTEST is a utility that bypasses any other software
program to test just the physical connection to the scanner. You
can run SCANTEST from within Windows or at the DOS
prompt.
1.
Make sure both your scanner and your printer are turned on.
2.
Place
3.
To start SCANTEST from the Run option on the Program
Manager’s File menu, type the following:
an
image
on
the
scanner.
C:\WINDOWS\TWAIN\SCANTEST
To run SCANTEST from the DOS prompt, change to the
TWAIN subdirectory in your Windows directory and type
SCANTEST.
4.
Press Enter (or select OK in Windows). If your scanner,
interface, and drivers are working properly, the scanner
scans the image and displays it on your screen.
5. Press any key to quit SCANTEST.
2-8
installing Epson TWAIN
If you have problems scanning an image using SCANTEST,
check that the scanner is turned on and connected with the
correct cable. See your scanner manual for troubleshooting
information.
Now you are ready to use Epson TWAIN.
Installing Epson TWAIN 2-9
Chapter 3
Using TWAIN
Starting Epson TWAIN . . . . . . . . . . . . . . . . . . . . . . .
Basic Scanning With Epson TWAIN . . . . . . . . . . . . . . . .
Setting Epson TWAIN Options for Your Image Type . . .
Previewing Your Image . . . . . . . . . . . . . . . . . . . .
Selecting the Scanning Area . . . . . . . . . . . . . . . . .
Adjusting the Brightness . . . . . . . . . . . . . . . . . . .
Adjusting the Magnification . . . . . . . . . . . . . . . . .
Checking the Size . . . . . . . . . . . . . . . . . . . . . . .
Scanning Your Image . . . . . . . . . . . . . . . . . . . . .
Changing Your Scanning Resolutions . . . . . . . . . . . . . . .
Using Epson TWAIN’s Advanced Features . . . . . . . . . . .
Modifying Settings on the Scanner Control Screen . . . .
Editing the Scan Mode Settings . . . . . . . . . . . . . . .
Editing the Target Device Settings . . . . . . . . . . . . . .
3-2
3-3
3-3
3-5
3-5
3-6
3-6
3-7
3-7
3-7
3-10
3-10
3-11
3-14
Using TWAIN 3-1
This section describes using Epson TWAIN to scan an image
into your TWAIN-compliant application.
Starting Epson TWAIN
Follow these steps to select your Epson scanner as the TWAIN
acquire device and to start Epson TWAIN:
1.
Make sure both your scanner and your computer are turned
on.
2.
Start your TWAIN-compliant application as you normally
would.
3.
Make sure Epson Scanners is selected as your TWAIN acquire
device.
Different applications provide different options for selecting
the TWAIN acquire device. Check your application
software for how to select the TWAIN acquire device.
Note
You may have already installed application device drivers for
other scanners. To use TWAIN, make sure you use Epson
Scanners in the Acquire device setting instead.
3-2 Using TWAIN
4.
Select Acquire in your application’s File menu. You’ll see the
Epson TWAIN Scanner Control screen.
Note
If you do not see this screen, you may have selected a scanning
option other than Acquire. Make sure you select Acquire to use
TWAIN.
Basic Scanning With Epson TWAIN
Epson TWAIN provides some predefined settings that allow
you to scan images quickly and see the results on the screen.
For high-resolution scanning, see “Changing Your Scanning
Resolutions.” For other features, see “Using Epson TWAIN’s
Advanced Features.”
Setting Epson TWAIN Options for Your Image Type
Scanning images with satisfactory results depends on knowing
the type of image you are scanning and then using the Epson
TWAIN options required by that type of image.
Using TWAIN 3-3
Epson TWAIN provides two important selections, Scan Mode
and Target Device, that work together to determine how your
image is scanned. When you are using Epson TWAIN, make
sure you pay particular attention to the settings for these two
options.
If you are scanning color images, you may want to install a true
color or 24-bit video card in your computer for the best results.
Follow these steps to select the Epson TWAIN options that are
best for the type of image you are scanning.
1.
Determine whether your image is color, a black and white
photograph (also called gray scale), or black and white line
art. If you need more information on these image types, see
your scanner manual.
2.
Use the chart below to identify the scan mode for your image
type.
If Image Type is
Choose Scan Mode
Color
True Color
Black and white photograph
Black &White Photograph
Black and white line art
Black & White Line Art
3.
Use the pull-down menu for Scan Mode to select the scan
mode you want.
4.
If the Target Device setting on the Scanner Control screen is
not VGA Screen, use the pull-down menu for Target Device
to select VGA Screen.
Previewing Your Image
Epson TWAIN displays a preview of the image you want to
scan. Follow these steps to preview your image.
3-4 Using TWAIN
1.
Place the image you want to scan face down on the scanner.
2.
Select Preview. After several seconds, the rectangle on the
right of the Scanner Control screen shows the image. Note
that the preview colors may not be accurate unless you
have a true color (24-bit) video card. Wait until you have
scanned the image to judge the colors.
q1 :: I::::::::$*
_,.,: ., : ::,i
0
Tmyd Da.krr
:: ‘.:.,, _.:..:_: _..:i.-:.”/ :, F< j ! -,::;
wi
Heght
[1.761
50 KB
Selecting the Scanning Area
If you want to scan only a portion of the image, follow these
steps:
1.
Move the cursor into the preview box.
2.
Hold down the mouse button and drag the cursor until the
box encloses the area you want to scan.
3.
Release the mouse button.
Once you have defined the scanning area, you can redefine it,
move it, or reselect the default.
Using TWAIN 3-5
To define a new scanning area, move the cursor to the edge of
the box until you see a double arrow; then hold the mouse
button down while you drag the edge of the box to a different
position. To reselect the default, click outside the selected
scanning area but within the image.
To move the scanning area, move the cursor to the center of the
scanning area. The cursor becomes a hand icon. Hold the
mouse button down and drag the box to a different position.
When the image is what you want, you can then scan or select
Preview again to see the new scan area.
Adjusting the Brightness
If the preview of your image appears too dark or too light, you
can adjust the Brightness scroll bar on the Epson TWAIN
Scanner Control screen to make your image lighter or darker.
Brightness values range from -3 to +3. To lighten a dark
original, use -1 to -3. To darken a light original, use +1 to +3.
Adjusting the Magnification
If you want to increase or decrease the size or scale of your
image, you can use the Magnification scroll bar on the Epson
TWAIN Scanner Control screen to select sizes from 50% to
200% of the original.
The size you select is not reflected in the preview scan but is
reflected in the final scan. Also, the size of the image on the
monitor is only an approximation of the actual size of the
image when printed. The Width and Height settings on the
Scanner Control screen show the exact size of the image.
3-6 Using TWAIN
Checking the Size
Three options on the Scanner Control screen allow you to see
the size of the image you are scanning. The Width and Height
options allow you to see the size of the selected image while the
Units setting allows you to select inches, centimeters, or pixels
as your units. The Memory setting allows you to see the
memory requirements for the selected scan.
Scanning Your Image
Once you have adjusted the Epson TWAIN settings to suit your
needs, you can scan the image by selecting Scan. After several
seconds, Epson TWAIN places the scanned image in your
application.
Changing Your Scanning Resolutions
You may want to change your scanning resolutions to provide
the best results possible for the printer or other output device
you are using. The following table provides some resolution
guidelines for you to consider. Your scanner manual also
provides detailed information on resolutions.
Resolution guidelines
Line art
Black and
White
Photograph
Color
Black and
white printer
300-400
75
75
Electronic
color printer
300-400
150-200
150-200
Printing press/
Imagesetter
400-800
150-200
150-200
Using TWAIN 3-7
If you need to scan images at resolutions above 72 DPI, follow
these steps to modify your resolution settings.
1. From the Epson TWAIN Scanner Control screen, select Target
Device from the Edit pull-down menu. You see the Edit
Target Device screen.
larget Device
Target Device Setting Name
VGA with 200 DPI
Gamma Correction
Analog Monitor
Color Correction
CR T D itplay
Resolution
200 DPI
2.
Select VGA Screen from the Target Device list.
3.
Move the cursor to the Target Device Setting Name field and
type the name of the new target device over the old name.
For example, to create a target device with a resolution of
200, you would type:
VGA with 200 DPI
4.
From the pull-down Resolution menu, select the resolution
that matches the resolution you used to name your target
device.
5.
Select Add. You see the target device you created in the list of
target devices.
3-8 Using TWAIN
Note
Make sure you select Add and not Modify or OK or Epson
TWAIN modifies the existing target device rather than creating a
new one.
6.
Select OK to return to the Epson TWAIN Scanner Control
screen.
To scan an image at the resolution you have just identified,
follow the procedures in the section “Basic Scanning with
Epson TWAIN.” Instead of selecting VGA Screen as your
target device, however, make sure you select the target device
you created, for example, “VGA with 200 DPI.”
Using TWAIN 3-9
Using Epson TWAIN’s Advanced Features
You may want to use Epson TWAIN’s advanced features to
meet your scanning needs.
Modifying Settings on the Scanner Control Screen
The following table summarizes the options available to you on
the Epson TWAIN Scanner Control screen. Use these options to
modify the settings used to scan your image.
Scanner Control Screen Options
To
Select from a list of scan modes.
Increase or decrease the brightness of the image from
-3 to +3.
Sharpness
Correct the sharpness of an image on scanners that
support this feature. Values range from -2 to +2.
Magnification
Scale the image from 50% to 200%.
Select from a list of target devices.
Source
Select the type of document feed on scanners that
support this feature, such as manual feed, the optional
automatic document feed, and the optional
transparency unit. This selection is available only if an
option is installed.
See the size of the selected scan or enter a new size.
Select the measurement units, from inches,
centimeters, or pixels.
See the memory requirements for the selected scan.
3-10
Using TWAIN
Editing the Scan Mode Settings
The scan mode definitions provide pixel depth and halftone
values used to scan your image. Epson TWAIN allows you to
modify or delete existing definitions or create your own
definitions to suit your needs.
Select Scan Mode from the Edit pull down menu. You see the
Scan Mode screen:
Scan Mode
Scan Mode Hame
Black & White Line Art
scan mode 3
Black &White Halftone
Black L White Photograph
&el Depth
Color Chart
Color Halftone
True Color
Color Photograph
True Cdor
iI.
.
m Halftone
To Add a Scan Mode
Rather than modifying the Epson-supplied scan modes, you
will probably want to create your own definitions. Follow these
steps to add a scan mode:
1. Select a scan mode similar to the mode you want to define.
2.
Type the name you want to assign to your scan mode over the
name displayed in the Scan Mode Name dialog box.
Using TWAIN 3-11
3.
Select Pixel Depth and Halftone values, using the information
in the following table. These options are described in detail
in your scanner manual.
USe
To
Pixel Depth
Select the form of the image data. Each option
below identifies a data format that specifies the
number of bits used to represent the tone of a pixel.
The more bits per pixel, the more tones and colors
you can capture in the scanned image. The
highest number of bits possible is 24 bit color (or
True Color), which can represent over 16 million
colors.
Note, however, that the output devices you use
should be capable of producing the same tones.
Also, the larger the bits per pixel value chosen, the
larger the size of the Image data.
Possible values are:
Black and White
16 Gray Scale
255 Gray Scale
Halftone
8 Colors
16 Colors
64 Colors
256 Colors
True Color
Define the halftone processing applied to the
scanned image. You will generally want to select
None and let your image editing software or the
output device perform the halftoning.
The selections you see vary depending on the
scanner you are using. Possible values are:
None
Hard Tone
Soft Tone
Net Screen
Bayer dither
Spiral dither
Net dither 4
Net dither 8
4. Select Add.
5. Select OK to accept your changes or Cancel to discard them.
3-12
Using TWAlN
To Modify a Scan Mode
You can modify any of the scan modes. Follow these steps:
1.
Select the name of the scan mode you want to modify.
2.
Change the Pixel Depth and Halftone values, as needed.
3. Select Modify.
4. Select OK to accept your changes or Cancel to discard them.
Use the following table if you need to reset the defaults of your
Epson-supplied scan modes once you have modified them.
Epson-supplied Scan Mode Defaults
Scan Mode
Pixel Depth
Halftone
Black & White Line Art
Black and White
None
Black &White Halftone
Black and White
Hard Tone
Black &White Photograph 256 Gray
None
Color Chart
16 Colors
None
Color Halftone
16 Colors
Hard Tone
Color Photograph
256 Colors
None
True Color
True Color
None
To Delete a Scan Mode
Follow these steps to delete a scan mode:
1.
Select the name of the scan mode you want to delete. You see
the Pixel Depth and Halftone values for the selected scan
mode.
2. Select Delete.
3.
Select OK to accept your changes or Cancel to discard them.
Using TWAIN 3-13
Editing the Target Device Settings
Epson TWAIN provides several target device definitions you
can use or edit to suit your needs. In addition to Gamma
Correction and Color Correction settings, the Target Device
screen allows you to edit Resolution settings.
You may want to use only the VGA Screen target device or the
target devices you defined to change resolutions, for example,
“VGA with 200 DPI.”
When you scan an image using the VGA target device option,
you get the best quality scan. Your image editing software can
then provide the output settings appropriate for your output
device.
If you are scanning a color image and you select a target device
other than a VGA option, the colors displayed may not match
the colors in the original.
If you get poor color quality from a dot matrix or ink jet printer,
try re-scanning the image using a different target device, such
as LQ printer or Thermal printer. The colors on the screen will
be inaccurate, but your color printout will be better.
3-14 Using TWAIN
Select Target Device from the Edit pull down menu. You see
the Target Device screen:
larget Device
Target Device Setting Name
1 taraet device 3
p&Y
Gamma Correction
Analog Monitor
Cglor Correction
CRT D isplay
Resolution
72 DPI
To Add a Target Device
Rather than modifying the Epson-supplied target devices, you
will probably want to create your own definitions. Follow these
steps to add a target device:
1.
Select a predefined target device similar to the device you
want to define.
2.
Type the name you want to assign to your target device over
the name displayed in the Target Device Setting Name
dialog box.
3. Select the values you want to assign to the target device,
using the information in the following table. These options
are described in more detail in your scanner manual.
Using TWAIN
3-15
use
To
Gamma
Correction
Adjust the gamma curve so that the reproduction
results on different types of output devices have
gradations similar to the original image. Possible
values include:
Digital Monitor
Analog Monitor
High Density Printer
Low Density Printer
High Contrast
Color
Correction
Adjust the color image data for a particular type of
device so that the reproduction results are close to
the original colors. Values include:
CRT Display
Impact Dot
Thermal Transfer
Ink Jet
Resolution
Select minimum to maximum dots per inch (DPI)
defined by the scanner. Values are:
50 DPI
60 DPI’
72 DPI
75 DPI
80 DPI
90 DPI
100 DPI
120 DPI
133 DPI’
144 DPI
150 DPI
160 DPI
‘Not available on some scanners,
4. Select Add.
3-16 Using TWAIN
175 DPI’
180 DPI
200 DPI
216 DPI’
240 DPI
300 DPI
320 DPI
360 DPI
400 DPI
480 DPI
600 DPI
800 DPI’
Note
Make sure you select Add and not Modify or OK or Epson
TWAIN modifies the existing target device rather than creating a
new one.
5.
Select OK to accept your changes or Cancel to discard them.
To Modify a Target Device
You can modify any of the existing target devices. Follow these
steps:
1.
Select the name of the target device you want to modify.
2.
Change the settings as needed.
3. Select Modify.
4.
Select OK to accept your changes or Cancel to discard them.
Using TWAIN 3-17
Use the following table if you need to reset the defaults of your
Epson-supplied target devices once you have modified them.
Epson-supplied Target Device Defaults
Gamma
Correction
Color
Correction
Resolution
FX Printer
Low Density
Printer
Impact Dot
72 DPI
LQ Printer
High Density
Printer
Impact Dot
90 DPI
SQ Printer
High Density
Printer
Ink Jet
90 DPI
Thermal Printer
High Contrast
Thermal Transfer
100 DPI
Laser Printer
High Contrast
Thermal Transfer
l00 DPI
VGA Screen
Analog Monitor
CRT Display
72 DPI
EGA Screen
Digital Monitor
CRT Display
72 DPI
Target Device
To Delete a Target Device
Follow these steps to delete a target device:
1. Select the name of the target device you want to delete. You
see the values associated with the selected target device.
2. Select Delete.
3.
Select OK to accept your changes or Cancel to discard them.
3-18 Using TWAIN
Chapter 4
Troubleshooting
When you select an Acquire device, Epson Scanners
is not listed . . . . . . . . . . . . . . . . . . . . . . . . . . . . 4-2
Nothing happens when you select Acquire. . . . . . . . . . . . 4-2
Target Device or Scan Mode names or settings are
different or incorrect . . . . . . . . . . . . . . . . . . . . . . . 4-3
The scan is not the full width you selected in the
Preview area . . . . . . . . . . . . . . . . . . . . . . . . . . . . 4-3
Numbers you type in the width or height box
are not accepted . . . . . . . . . . . . . . . . . . . . . . . . . . 4-3
An error in the scanner or a paper jam in the Automatic
Document Feeder caused an error message . . . . . . . . . . 4-4
The Sharpness setting is “grayed out” in the Epson TWAIN
Scanner Control dialog . . . . . . . . . . . . . . . . . . . . . . 4-4
The Document Source setting is “grayed out” in the
Epson TWAIN Scanner Control dialog . . . . . . . . . . . . . 4-4
The Preview button is “grayed out” when the Automatic
Document Feeder is selected under Document Source . . . . 4-4
When you scan Black and White Line Art, Black and
White Halftone, or other monochrome image, the
scanned image is reversed like a negativeimage . . . . . . . 4-4
The predefined Scan Mode and Target Device settings
don’t meet your specific scanning requirements . . . . . . . 4-5
Sometimes the halftone or dither settings you select
in Scan Mode seem to beignored . . . . . . . . . . . . . . . . 4-5
Troubleshooting 4-1
If you have problems using Epson TWAIN, check this section.
It describes potential problems and provides possible solutions.
When you select an Acquire device, Epson Scanners is not listed.
Either Epson TWAIN was not installed or was not installed
correctly. Reinstall Epson TWAIN using the Setup program
from within Windows.
Nothing happens when you select Acquire.
Make sure your scanner is turned on and the cables are
connected properly.
Epson Scanners may not be selected as the “Acquire” device.
From within your application, select Epson Scanners as the
TWAIN device. You’ll usually find this option under Select in
your application.
You may not have rebooted your computer after you installed
Epson TWAIN. Reboot your computer and try again.
The Epson Scanner DOS Device Driver, the Epson TWAIN
Data Source (ESTWAIN.DS) file, or the SCSI support software
may not be installed correctly. Reinstall Epson TWAIN using
the Setup program within Windows.
You may have selected the wrong port number or SCSI ID
during setup. Check your interface adapter and scanner
settings. Reinstall Epson TWAIN using the Setup program
from within Windows, making sure the settings you select
match the settings on the adapter and scanner.
You may have changed the interface from parallel to SCSI or
from SCSI to parallel without reinstalling Epson TWAIN.
Reinstall Epson TWAIN for the correct interface using the
Epson TWAIN Setup utility that came with your interface
solution.
4-2 Troubleshooting
You may have tried to install Epson TWAIN using the Setup
utility for the Adaptec AHA-1510 SCSI Host Adapter when you
were using another Adaptec host adapter. The Epson TWAIN
SCSI installer installs SCSI support only for the Adaptec
AHA-1510 SCSI Host Adapter. If you are using a different
adapter, follow the software installation instructions in the
adapter user manual. Then run the Epson TWAIN Setup
program and select Use Existing SCSI Support
Software at the SCSI Interface Options screen.
An error condition may have caused your application or the
TWAIN Source Manager to stop working correctly. Save any
documents in process, close any open applications, and exit
Windows. Restart Windows to restore the TWAIN Source
Manager, then start your application and try again.
Target Device or Scan Mode names or settings are different or
incorrect.
You may have connected a different model scanner than you
were using when you defined the Target Device or Scan Mode.
Delete or modify the settings to match your new scanner’s
capabilities.
The scan is not the full width you selected in the Preview area.
The Epson ES-300C scanner restricts the scan width to 4096
pixels at high resolutions. Choose a lower resolution for a
wider scan.
Numbers you type in the width or height box are not accepted.
Check that the value you entered is not greater than 8 inches
wide and 11 inches high (14 inches if the Automatic Document
Feeder option is installed).
If you are using the optional Transparency unit, values greater
than 4.5 inches high and 4.5 inches wide are not allowed.
Troubleshooting 4-3
When you type a value that exceeds the right edge of the
scanning area, the value is not accepted. Move the selection
rectangle to the left edge and retype the value.
An error in the scanner or a paper jam in the Automatic Document
Feeder caused an error message.
Reset the scanner to clear the error condition, then try scanning
again.
The Sharpness setting is “grayed out” in the Epson TWAIN
Scanner Control dialog.
You are using a scanner that does not support the Sharpness
feature.
The Document Source setting is “grayed out” in the Epson
TWAIN Scanner Control dialog.
This feature requires an optional Automatic Document Feeder
or a Transparency Unit.
The Preview button is “grayed out” when the Automatic
Document Feeder is selected under Document Source.
The preview feature is disabled when the Automatic Document
Feeder is selected because the document would have to be fed
through the feeder for the preview scan and then reinserted
into the feeder for the final scan. If necessary, use the flatbed for
previewing your document.
When you scan Black and White Line Art, Black and White
Halftone, or other monochrome image, the scanned image is
reversed like a negative image.
Some TWAIN-compliant applications incorrectly interpret the
scanner data. Check with your software application publisher
for an updated version of the software.
4-4 Troubleshooting
If your application has an INVERT function, use it to reverse
the image.
The predefined Scan Mode and Target Device settings don’t meet
your specific scanning requirements.
You can define your own settings using the instructions in
Chapter 3 of this manual.
Sometimes the halftone or dither settings you select in Scan Mode
seem to be ignored.
Halftone and dither settings on most Epson scanners are only
available when the Pixel Depth setting is set to Black and White
or 8 colors (1 or 2 bits per pixel per color). With other Pixel
Depth settings, the halftone or dither settings may be ignored.
Choose Black and White or 8 colors for scanning with halftone
or dither settings.
Troubleshooting 4-5
Glossary
A software program designed to perform a specific task, such
as a word processing, image editing, or spreadsheet program.
bi-directional parallel interface
An interface Epson TWAIN uses to communicate between the
computer and the scanner.
A scanner function to lighten or darken the output image data.
color correction
A method of adjusting the color image data for a particular
type of device so that the reproduction results become close to
the original colors.
cursor
The highlighted marker that shows your position on the screen.
device
A piece of equipment that is part of a computer system and
performs a specific task, such as a disk drive, a monitor, a
printer, or a scanner. Also called a peripheral.
device driver
A file containing instructions that allow your computer to
recognize and control a device.
Glossary 1
dithering
A process in which software or an output device simulates
continuous tones with groups of dots.
dpi
Short for dots per inch. A unit of measurement for resolution.
The higher the value, the higher the resolution.
gamma correction
A method of adjusting the transfer curve so that the
reproduction results on different types of output devices have
gradations similar to the original image.
A data processing method of converting continuous tones into
digital data so that the output data simulates the tones.
interface
A piece of hardware, a method, or a standard used for
connection between or among computer devices.
jumper
A small device that connects two pins on an option card used to
activate a particular function.
path
The directory name(s) you specify to locate a file. For example,
the path for the TWAIN directory in Windows may be
C:\WINDOWS\TWAIN or D:\WINDOWS\TWAIN.
2 Glossary
pixel
Short for picture element. Each image is composed of a number
of pixels. Pixels are also counted in units of dots.
An interface channel through which data is transmitted
between devices.
resolution
Indication of how finely an image is resolved into pixels.
Measured in dots per inch (dpi) or pixels per inch (ppi).
scan
An operation performed by the sensor and the carriage. The
image is divided into pixels by scanning.
scan mode
A selection of pixel depths and halftoning methods. Epson
TWAIN provides several scan mode settings to adjust the
scanned image you are creating. You can also define your own
scan mode settings.
scanning area
The physical size of the image that can be scanned by the
scanner.
Short for small computer system interface. Epson TWAIN can
use the Adaptec AHA-1510 SCSI host adapter or any other
ASPI compliant host adapter to communicate between the
computer and the scanner.
Glossary 3
target device
A set of gamma correction, color correction, and resolution
settings that match the characteristics of the scan to the final
output device. Epson TWAIN provides several target device
settings to adjust your scanned image to suit the target device
you intend to use. You can also define your own target device
settings.
TWAIN
An open industry interface allowing you to acquire image data
directly from external sources without leaving your current
application.
4 Glossary
Index
A
E
Acquire, 3-2
problems, 4-2
device, 3-2, 4-2
Adaptec SCSI adapter, Intro-3
Bayer dither, 3-12
Bi-directional parallel
interface, Intro-3
Black and white
photograph, 3-4
line art, 3-4
Brightness, 3-6, 3-10
Electric shock, 1-3
Enter path, 2-5, 2-7
Epson bi-directional parallel
interface, Intro-3
Epson Scanner Utility
DOS Device Driver, 2-2
DOS installation, Intro-2
README, Intro-2
Epson TWAIN
installation, Intro-2, 2-2 -9
setup program, 2-2
starting, 3-2
Errors, 4-4
C
G
Cable
bi-directional parallel, 1-7
connection, 1-7
SCSI, 1-7
warning, 1-8
Card interface, 1-6
Color, 3-4, 3-5
Color correction, 3-16
CONFIG.SYS, 2-4, 2-6
Cover
removing, 1-3
replacing, 1-6
Customer service, Intro-5
Gamma correction, 3-16
Gray scale, 3-12
B
D
Default settings
scan mode, 3-13
target device, 3-18
Diskette contents, Intro-1
Dither, 3-12
Document source, 3-10, 4-4
DPI, 3-8, 3-16
H
Halftone, 3-12
Hard tone, 3-12
Height, 3-7, 3-10, 4-3
Help, where to get, Intro-5
I
IBM PS/2 bi-directional
parallel interface, Intro-3
Image type, 3-4
Interface, Intro-3
Interface card, 1-6
J
Jumper setting, 1-4 -5
L
Line art, 3-4
LPT address settings, 1-4 -5, 2-4
Index 1
M
Option slot, 1-6
Scanners, supported, Intro-3
SCANTEST, 2-8
SCSI ID, 1-8
caution, 1-9
scanner, 2-7
Setup, starting, 2-2
Sharpness, 3-10, 4-4
Size, 3-7
Soft tone, 3-12
Spiral dither, 3-12
System requirements, Intro-2 -3
P
T
Magnification, 3-6, 3-10
Memory, 3-7, 3-10
N
Net dither, 3-12
Net screen, 3-12
0
Path, 2-5, 2-7
Photography, 3-4
Pixel depth, 3-12
Port address, 2-4
Preview, 3-4 -5
Preview problems, 4-4
R
README file, Intro-2
Rebooting, 2-5, 2-8
Resolution, 3-16
changing, 3-7
guidelines, 3-7
Reversed image problems, 4-4 -5
S
Scan problems, 4-3
Scan area, 3-5
Scan mode, 3-11-14
add, 3-11
defaults, 3-13
delete, 3-13
edit, 3-11
modify, 3-13
problems, 4-3, 4-5
2 Index
Target device
add, 3-8, 3-14 -18
defaults, 3-18
delete, 3-18
modify, 3-17
problems, 4-3, 4-5
settings, 3-16
Technical help, Intro-5
Testing scanner connection, 2-8 -9
True color, 3-4
TWAIN acquire
device, 3-2
U
units, 3-7, 3-10
V
VGA screen, 3-8
Video card, 3-4, 3-5
W
Width, 3-7, 3-10, 4-3
Epson Latin America Subsidiaries
Epson America, Inc.
20770 Madrona Avenue
Torrance, CA 90503
Phone: (800) 289-3776
Phone: (310) 782-5046
Fax: (310) 7825051
Epson Chile S.A.
Avenida Costanera Andres Be110
2287 Providencia,
Santiago, Chile
Phone: (562) 232-4661
Fax: (562) 233-3197
Epson Canada, Ltd.
95 Mural Street
Richmond Hill, Ontario L4B 3G3
Phone: (800) GO-EPSON
Fax: (416) 881-5765
Epson Costa Rica
Apartado 1076-2050
San Jose, Costa Rica
Phone: (506) 34-6666
Fax: (506) 25-5709
Epson Latin America Trading, Inc.
9002 N.W. 105 Way
Medley, Florida 33178
Phone: (305) 888-1078
Fax: (305) 888-1079
Epson Mexico, S.A.
De C.V. Av. Ejercito National
No. 904 6 Piso Col. Palamas Polanco
Condigo Postal 11510,
Mexico, D.F.
Phone: (525) 395-9944
Fax: (525) 395-9499
Epson Argentina S.A.
Avenida Del Libertad or 498,
Piso 12
1001 Buenos Aires
Phone: (541) 394-2439
Fax: (541) 322-9725
Epson Do Brazil
Av. Pedroso De Morais
631,5th Floor Pinheiros,
Sao Paulo-P/05419 Brazil
Phone: (55) (11) 813-3044
Fax: (55) (11) 210-9290
Epson Venezuela, S.A.
Edif. Epson - La Urbina Caracas,
Venezuela
Phone: (582) 241-0433
Fax: (582) 2414561
Epson America, Inc.
20770 Madrona Avenue
Torrance, California 90503