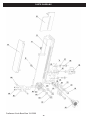
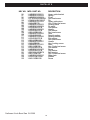
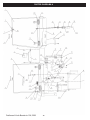
1
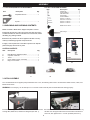
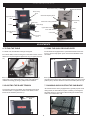
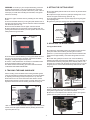
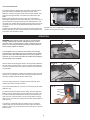
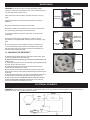
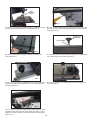
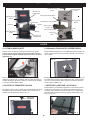
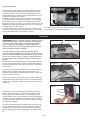
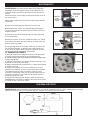
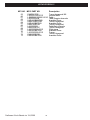
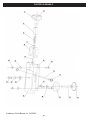
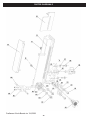
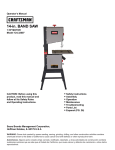
Operator’s Manual
9-in. BENCH TOP
BAND SAW
1/4 HP MOTOR
Model 124.3299
CAUTION: Before using this
product, read this manual and
follow all its Safety Rules
and Operating Instructions.
Safety Instructions
Assembly
Operation
Maintenance
Troubleshooting
Parts List
Espanol (PG. 22)
Sears Brands Management Corporation,
Hoffman Estates, IL 60179 U.S.A
WARNING: Some dust created by power sanding, sawing, grinding, drilling, and other construction activities contains
chemicals known to the State of California to cause cancer and birth defects or other reproductive harm.
Advertencia: Algunos polvo creado al lijar, serrado, rectificado, taladrado, y otras actividades de construcción contiene
sustancias químicas que se sabe que el Estado de California, que causa cáncer y defectos de nacimiento u otros daños
reproductivos.
TABLE OF CONTENTS
Warranty..........................................................................................................................................................................................2
Safety Instructions.....................................................................................................................................................................................2-3
Specifications......................................................................................................................................................3
Assembly...................................................................................................................................................................................................4-5
Know Your Band Saw....................................................................................................................................................................6
Adjustments.............................................................................................................................................................................................6-8
Operation...................................................................................................................................................................................................8
Maintenance...............................................................................................................................................................................................9
Electrical Schematic..................................................................................................................................................................................9
Troubleshooting.........................................................................................................................................................................................10
Repair Protection Agreements....................................................................................................................................................................10
Notes.....................................................................................................................................................................................................11
Parts Diagrams..............................................................................................................................................................12-21
FULL ONE YEAR WARRANTY
ONE-YEAR FULL WARRANTY ON CRAFTMAN PROFESSIONAL TOOL
FOR ONE YEAR from the date of purchase, this product is warranted against any defects in material or workmanship. A defective
product will receive free repair or replacement if repair is unavailable.
For warranty coverage details to obtain free repair or replacement, visit the web site: www. craftsman. com
This warranty does not cover the blade, which is an expendable part that can wear out from normal use within the warranty period.
This warranty is void if this product is ever used while providing commercial services or if rented to another person.
This warranty gives you specific legal rights, and you may also have other rights which vary from state to state.
Sears Brands Management Corporation, Hoffman Estates, IL 60179
For Questions/Comments or Technical Assistance - Please Call Customer Service at: 1-877-866-8392 (M-F 8:30AM-5PM EST.)
SAFETY INSTRUCTIONS
GENERAL SAFETY WARNINGS
KNOW YOUR POWER TOOL. Read the owner’s manual carefully. Learn the tool’s applications, work capabilities, and its specific
potential hazards.
Always Ground All Tools.
If your tool is equipped with a three-pronged plug, you must plug it into a three-hole electric receptacle. If you use
an adapter to accommodate a two-pronged receptacle, you must attach the adapter plug to a known ground. Never
remove the third prong of the plug.
Always Avoid Dangerous Environments.
Never use power tools in damp or wet locations. Keep your work area well lighted and clear of clutter.
Always Remove the Adjusting Keys and Wrenches from Tools after Use.
Form the habit of checking to see that keys and adjusting wrenches are removed from the tool before turning it on.
Always Keep Your Work Area Clean. Cluttered areas and benches invite accidents.
Always Keep Visitors Away from Running Machines.
All visitors should be kept a safe distance from the work area.
Always make the Workshop Childproof.
Childproof with padlocks, master switches, or by removing starter keys.
Never operate a tool while under the influence of drugs, medication, or alcohol.
2
Always Wear Proper Apparel.
Never wear loose clothing or jewelry that might get caught in moving parts. Rubber-soled footwear is recommended
for the best footing.
Always Use Safety Glasses and Wear Hearing Protection.
Also use a face or dust mask if the cutting operation is dusty.
Never Overreach.
Keep your proper footing and balance at all times.
Never Stand on Tools.
Serious injury could occur if the tool is tipped or if the cutting tool is accidentally contacted.
Always Disconnect Tools.
Disconnect tools before servicing and when changing accessories such as blades, bits, and cutters.
Always Avoid Accidental Starting.
Make sure switch is in “OFF” position before plugging in cord.
Never Leave Tools Running Unattended.
Always Check for Damaged Parts.
Before initial or continual use of the tool, a guard or other part that is damaged should be checked to assure that it
will operate properly and perform its intended function. Check for alignment of moving parts, binding of moving parts,
breakage of parts, mounting, and any other conditions that may affect its operation. A guard or other damaged parts
should immediately be properly repaired or replaced.
SPECIAL SAFETY RULES FOR BAND SAWS
1. Always stop the band saw before removing scrap pieces from table.
2. Always keep hands and fingers away from the blade.
3. Never attempt to saw stock that does not have a flat surface, unless a suitable support is used.
4. Always hold material firmly and feed it into the blade at a moderate speed.
5. Always turn off the machine if the material is to be backed out of an uncompleted cut.
6. Check for proper blade size and type for thickness and type of material being cut.
7. Make sure that the blade tension and blade tracking are properly adjusted.
8. Make “relief” cuts before cutting long curves.
9. Release blade tension when the saw will not be used for a long period of time.
10. Note and follow the safety warnings and instructions that appear on the lower door of this saw.
SPECIFICATIONS
Blade Length......................................................62"
Blade Width............................................1/8" to 3/8"
Throat Width...................................................8-3/4"
Cutting Depth.................................................3-1/2"
Blade Speeds.............................................1 Speed
Dust Port(1)..........................................................2"
Table Size......................................11-1/2" x 11-1/2"
Table Tilt.............................................0-45 Degrees
Motor.............................................................1/4 HP
Motor Voltage..................................................120V
Motor Amperage..............................................2.5 A
Net Weight....................................................44 LBS
SAVE THESE INSTRUCTIONS.
Refer to them often.
3
ASSEMBLY
1. TOOLS REQUIRED FOR ASSEMBLY
Description
LIST OF LOOSE PARTS IN BAG
Item
Item
Adjustable Wrench................................1
Square...................................................1
Description
Qty.
Washer M6.......................................4
Hex Bolt M6x12................................4
Flat Washer M6................................1
Hex Nut M6 ......................................1
Hex Bolt M6x20................................1
M2 Hex "L" Wrench..........................1
M2.5 Hex "L" Wrench.......................1
M4 Hex "L" Wrench..........................1
M5 Hex "L" Wrench..........................1
Qty.
.
2. UNPACKING AND CHECKING CONTENTS
Blade Tension Knob.........................1
Model 124.3299 9” Band Saw is shipped complete in one box.
Miter Gauge.....................................1
A. Separate all parts from carton and check each item with Carton
Contents list below to make sure all items are accounted for, before
discarding any packing material.
B. Remove the protective oil that is applied to the table. Use any
ordinary household type grease and spot remover.
C. Apply a coat of paste wax to the table to prevent rust. Wipe all
parts thoroughly with a clean dry cloth.
CARTON CONTENTS
Item
Description
Qty.
A
B
C
D
E
Main Machine w/Blade Installed................................1
Operator’s Manual...............................................1
Table.........................................................1
Upper Table Trunnion Assembly...............................1
Bag of Loose Parts....................................................1
B
A
C
D
E
3. INITIAL ASSEMBLY
The 124.3299 band saw is supplied partly assembled. Prior to use, the following items have to be assembled: Table Trunnion, Table, and
Blade Tension Knob.
WARNING: To avoid injury, do not attempt to run or use this machine until all parts are assembled and working properly.
FIG. 1
Table Bolts
(x4)
FIG. 2
B. Locate four bolts and four washers used to mount the table. Lay
the table onto the upper table trunnion and install a bolt washer in
each hole, then tighten with “ L” wrench provided (See FIG. 2).
A. Assemble the upper table trunnion to the lower table trunnion with
Carriage Bolt, Glide Piece, Washer and Wing Nut (See FIG. 1).
4
Square Table
to Blade
FIG. 3
FIG. 4
C. After the table is installed use a square to make sure that is 90
degrees to the blade (See FIG. 3).
D. Next, set the degree pointer until it reads zero degrees. Using a
Phillips screw driver loosen the pointer and set pointer to zero (See
FIG. 4).
FIG. 6
Blade Tension
Handle
Metal Receiver
FIG. 5
E. Install the table leveling hex socket screw, washer and nut (See
FIG. 5).
F. Insert the blade tension handle into the metal receiver protruding
from the top of the saw (See FIG. 6).
FIG. 8
FIG. 7
Miter Gauge Slot
G. To ensure upright stability, four holes are provided in the base to
allow the saw to be bolted to a bench (See FIG. 7).
Table Bolts
(x4)
Miter Gauge
H. Slide the miter gauge into the miter gauge slot in the aluminum
table (See FIG. 8).
FIG. 9
I. To center the blade in the table, locate four bolts and four washers
used to mount the table. Loosen the bolts and center the table by
hand. Tighten the four bolts to retain adjustment (See FIG. 9.)
5
KNOW YOUR BAND SAW
Blade Tension Knob
Blade Quick Release
Door Locking
Knob
Guide Post Adjusting Knob
Upper Bandwheel
Door
Switch
Table Insert
Blade Guides
Blade Tracking
Knob
Guide Post Locking Knob
Miter Gauge
Upper Table Trunnion
Motor
Lower Table Trunnion
Lower Bandwheel
Door
Table
2” Dust Port
Door Locking
Knob
ADJUSTMENTS
4. TILTING THE TABLE
6. USING THE QUICK RELEASE LEVER
For bevel cuts, the table tilts 0 through 45 degrees.
A. This band saw equipped with a quick release blade tension feature. It is used to help speed up the removal and installation of the
saw blade.
A. To tilt the table, loosen the wing nut on the table trunnion, set the
table to the required angle and tighten the wing nut again (See FIG.
10).
FIG. 12
OFF
FIG. 10
ON
Wing Nut
B. It is recommended to verify the correct angle setting using an
angle guide, or by making trial cuts in scrap wood. Adjust the
indicator accordingly by using a phillips head screwdriver.
B. To operate the quick release and remove tension from the blade,
move the lever from the three o’clock position (ON) to the nine o’clock
position (OFF). Reverse direction to tension the blade (See FIG 12).
5. ADJUSTING THE BLADE TENSION
7. CHANGING AND ADJUSTING THE SAW BLADE
To loosen the tension of the blade, turn the blade tension knob
counterclockwise. To tighten the tension of the blade, turn the
tension knob clockwise (See FIG. 11).
A. This band saw is factory-equipped with a general-purpose wood
cutting blade, the saw blade is set prior to delivery. To change the
saw blade, begin by removing the table leveling hex socket screw,
washer and nut (See FIG. 13).
FIG. 11
Blade Tension
Knob
FIG. 13
6
WARNING: To avoid injury from unexpected starting, whenever
8. SETTING THE CUTTING HEIGHT
changing the saw blade or carrying out adjustments, switch the
band saw off and remove the power cord from the power outlet. To
avoid injury to hands when handling the saw blade, wear gloves
whenever necessary.
A. The upper blade guide should be set as close as practical above
the work piece.
B. To adjust this height, loosen the guide post locking knob on the
back of the upper wheel housing. (See FIG. 16)
C. Set the blade guides to the required height by turning the guide
post adjusting knob.
D. Tighten the guide post locking knob after setting proper height.
B. Open the upper and lower doors by releasing the door locking
knobs.
C. Remove the blade tension by moving the quick release lever on
the upper rear wheel housing counter-clockwise until the saw blade
has slackened (See FIG. 12).
D. Remove the saw blade from the upper and lower wheels.
E. When installing the new saw blade ensure the blade teeth are
pointing downwards and towards you at the position where the saw
blade passes through the table.
FIG. 14
FIG. 16
Guide Post
Adjusting Knob
Blade Tension
Knob
Guide Post
Locking Knob
9. ADJUSTING THE BLADE GUIDES
The Upper Blade Guide
A. To adjust the upper blade guides, first position the right and left
guide pins relative to the blade by loosening the lock screw
(SEE FIG. 17) and moving the guide carrier forward until both side
guide pins are approximately 1/16” behind the gullets of the saw
blade.
B. Set both side guide pins to within 1/32” of the saw blade by
releasing the guide pin locking screw (SEE FIG. 17) on each side of
the saw blade and moving the guide pins to desired position. Lock
the guide pin in position with the guide pin locking screw. Do not set
the guide pins too close as this will adversely affect the life of the
saw blade.
F. Re-tension the new saw blade by turning quick release lever on
the upper rear wheel housing clockwise. Check the saw blade
tracking by turning the upper wheel by hand.
G. If more or less blade tension is needed, turn the blade tension
knob until desired tracking is made (See FIG. 14).
H. If blade needs further tracking; proceed as mentioned below
“TRACKING THE BAND SAW BLADE”
Blade Gullet
8. TRACKING THE BAND SAW BLADE
Set the tracking of the saw blade before setting the blade guides.
Once the saw blade is installed and tensioned, track the saw blade
by adjusting the tracking knob by hand (See FIG. 15). The saw
blade should run in the center of the band saw wheels. Use the
blade tracking window to check position on wheel. When the correct
adjustment is achieved lock the tracking knob with the wing nut.
1/16”
FIG. 15
Blade
Tracking
Window
Lock Screw
Guide Pin (x2)
FIG. 17
C. Adjust the rear roller guide to be just clear of the back of the saw
blade by releasing the lock screw (SEE FIG. 18) and moving the
roller guide to approximately 1/32” behind the blade.
D. When the correct adjustment is reached, lock the roller guide in
position with the guide lock screw (SEE FIG. 18).
Wing Nut
Door
Locking
Knob
Guide Pin
Locking
Screws
Rear Roller Guide
Tracking Knob
Lock Screw
After it is determined that the blade is tracking in the center of both
wheels, close the upper and lower doors by latching the door locking knobs (See FIG. 15).
FIG. 18
7
The Lower Blade Guide
FIG. 19
A. To adjust the upper blade guides, first position the right and left
guide pins relative to the blade by loosening the lock screw
(SEE FIG. 19) and moving the guide carrier forward until both side
guide pins are approximately 1/16” behind the gullets of the saw
blade.
B. Set both side guide pins to within 1/32” of the saw blade by
releasing the guide pin locking screw (SEE FIG. 19) on each side of
the saw blade and moving the guide pins to desired position. Lock
the guide pin in position with the guide pin locking screw. Do not set
the guide pins too close as this will adversely affect the life of the
saw blade.
C. Adjust the rear roller guide to be just clear of the back of the saw
blade by releasing the lock screw and moving the roller guide to approximately 1/32” behind the blade.
Blade Gullet
Guide Pin
Locking
Screws
1/16”
Rear Roller Guide
D. When the correct adjustment is reached, lock the roller guide in
position with the guide lock screw.
OPERATION
WARNING: Before starting check if any part of your band saw is
missing, malfunctioning, has been damaged or broken, such as
the motor, switch, or other operation control, a safety device or the
power cord, turn the band saw off and unplug it until the particular
part is properly repaired or replaced.
FIG. 20
Blade
Correct
The saw blade cuts on a continuous downstroke. To avoid injury
when hands are unavoidably near to the saw blade, they should be
placed on either side of the blade (See FIG. 20), not in line with it
(See FIG. 21). Use a push stick whenever possible when working in
close proximity to the saw blade.
FIG. 21
Start the band saw by lifting the switch to the ON position (See FIG.
22) and wait for the band saw to come to full speed before starting
to cut. Never start the band saw with the work piece in contact with
the saw blade.
Blade
Slowly feed the work piece towards the saw blade, putting only light
pressure on it. With both hands, firmly hold the work piece down on
the table, and feed it towards the saw blade slowly.
Incorrect
Once the cutting operation is complete turn the band saw off by
lowering the switch to the OFF position.
FIG. 22
To prevent unauthorized use, remove the center key from the switch
(SEE FIG. 22).
ON
For best results the saw blade must be sharp. Select the right saw
blade for the job, depending on the thickness of the wood the cut to
be made. The thinner and harder the wood, the finer the teeth (14
teeth per inch) of the saw blade. Use a fine tooth blade for cutting
sharp curves. For thick wood cutting use less teeth, approximately 4
teeth per inch.
OFF
KEY
The machine is especially suited for cutting curves, but will also
make straight cuts. Do not attempt to turn the work piece without
pushing it, as this may cause the work piece to get stuck, or the saw
blade to bend.
8
MAINTENANCE
WARNING: To avoid injury due to unexpected starting, before
FIG. 23
cleaning or carrying out maintenance work, switch off and disconnect
the band saw from the power source.
Never use water or other liquids to clean the band saw. Use a dry
brush.
Keep Inside
Areas Clean
Use Brush to
Clean Guides
Regular maintenance of the band saw will prevent unnecessary
problems.
A. Keep the table clean to ensure accurate cutting.
B. Keep the outside of the machine clean to ensure accurate operation of all moving parts and prevent excessive wear.
FIG. 24
C. Keep the ventilation slots of the motor clean to prevent it from
overheating.
Blade Quick
Release Lever
D. Keep the inside (near the saw blade, etc.) clean to prevent
accumulation of dust (See FIGS. 23 & 24). Use dust collection if possible.
Keep Areas
Clean
E. To prolong the life of the saw blade, when the band saw is not
in use for extended periods, release the saw blade tension (See
FIG. 24). Before reusing the band saw ensure that the blade is retensioned and tracking is checked.
Motor Belt
Tension Bolt
14. CHANGING THE DRIVE BELT
A. Release the saw blade tension by turning the blade tension knob
on the top of band saw counterclockwise.
B. Release the drive belt tension by loosening motor belt tension bolt
(See FIG. 24).
C. Using snap-ring pliers remove the installed snap-ring (See FIG. 25)
from the center of the lower wheel.
D. Carefully slide the lower wheel forward and at the same time
release the saw blade from the wheel.
E. Remove the old drive belt and install the new belt (ensure ribs in
drive belt are seated correctly before reassembling and tensioning the
drive belt).
F. Slide the lower wheel back onto the lower wheel shaft making sure
the belt is placed around the motor pulley. Install the snap-ring.
G. Follow procedures for CHANGING AND ADJUSTING THE SAW
BLADE & TRACKING THE BAND SAW BLADE, before restoring
power to the band saw and setting up for use.
Snap-Ring
FIG. 25
ELECTRICAL SCHEMATIC
WARNING: This machine must be grounded. To avoid electrocution or fire, any repairs to electrical system should be done only by a
qualified electrician, using genuine replacement parts.
9
TROUBLESHOOTING
Problem
Diagnosis
Remedy
The machine does not work when switched
on.
1. No power supply.
2. Defective switch.
3 Defective motor.
1. Check the cable for breakage.
2. Replace the lock switch.
3. Defective motor.
The saw blade does not move with the
motor running.
1. The blade tension knob has not been
tightened.
2. The blade has come off one of the
wheels.
3. The saw blade has broken.
4. The drive belt has snapped.
1. Switch off the motor, tighten the blade
tension knob.
2. Open the doors and check.
1. Rip fence for cutting not used.
2. Feed rate too fast.
1. Use a rip fence.
2. Put light pressure on the work piece.
Make sure the saw blade does not bend.
3. Try a new saw blade.
4. Adjust the blade guides (see ADJUSTMENT instructions).
The saw blade does not cut in a straight
line.
3. The blade teeth are dull or damaged.
4. Blade guides not suitably adjusted.
The saw blade does not cut, or cuts very
slowly.
Sawdust builds up inside the machine.
1. The teeth are dull, caused by cutting
hard material or long use.
3. Replace the blade.
4. Replace the belt.
2. The saw blade was fitted the wrong way
on the band saw.
1. Replace the saw blade, use a 6 T.P.I.
(Teeth Per Inch) saw blade for wood and
soft material. Use a 14 T.P.I. saw blade
for harder materials. A 14 T.P.I. saw blade
always cuts slower due to the finer teeth
and the slower cutting performance.
2. Fit the saw blade correctly.
This is normal
Clean the machine regularly. Open the
Repair Protection doors
Agreements
and remove the sawdust with a
Congratulations on making
a cleaner.
smart purchase. Your new
vacuum
Craftsman® product is designed and manufactured for years of
dependable operation.
But like
all products,
it may
Clean
the ventilating
slots
of therequire
motor repair
with
from time to time. That’s
when having
Repair
Protection
a vacuum
cleaner.aFrom
time
to time reAgreement can save move
you money
and aggravation.
the sawdust
to prevent it from being
drawn
into the housing.
Here’s what the Repair
Protection
Agreement* includes:
Sawdust inside the motor housing.
This is normal
The machine does not cut at 45 or 90 degrees.
;angles
Expert
service by
10,000
professional repair specialists
1. The table is not at right
to the
1. our
Adjust
the table.
;
Unlimited
service
and
no
charge
for parts and labor on all
blade.
covered repairs
2. The saw blade is dull or too much pres2. Replace the saw blade or put less
; Product replacement up to $1500 if your covered product
sure was put on the work piece.
pressure on the work piece.
can’t be fixed
; Discount of 25% from regular price of service and related
Replaceby
bearing.
1. The wheels are not in alignment
or deinstalled
parts not1.covered
the agreement; also, 25% off
fective bearing.
regular price of preventive maintenance check
2. Adjust
tracking
knob (See
2. The blade tracking knob
; hasn’t
Fast been
help by phone
– wethe
callblade
it Rapid
Resolution
–
ADJUSTMENT
instructions).Think of us
properly adjusted.
phone support from
a Sears representative.
3. Replace
the saw blade.
3. Inferior saw blade.
as a “talking owner’s
manual.”
The saw blade can not be properly positioned on the wheels.
Repair Protection Agreements
Congratulations on making a smart purchase. Your new
Craftsman® product is designed and manufactured for years of
dependable operation. But like all products, it may require repair
from time to time. That’s when having a Repair Protection
Agreement can save you money and aggravation.
Here’s what the Repair Protection Agreement* includes:
; Expert service by our 10,000 professional repair specialists
; Unlimited service and no charge for parts and labor on all
covered repairs
; Product replacement up to $1500 if your covered product
can’t be fixed
; Discount of 25% from regular price of service and related
installed parts not covered by the agreement; also, 25% off
regular price of preventive maintenance check
; Fast help by phone – we call it Rapid Resolution –
phone support from a Sears representative. Think of us
as a “talking owner’s manual.”
10
Once you purchase the Repair Protection Agreement, a
simple phone call is all that it takes for you to schedule service.
Once you purchase the Repair Protection Agreement, a
simple phone call is all that it takes for you to schedule service.
You can call anytime day or night, or schedule a service
appointment online.
The Repair Protection Agreement is a risk-free purchase. If
you cancel for any reason during the product warranty period,
we will provide a full refund. Or, a prorated refund anytime after
the product warranty period expires. Purchase your Repair
Protection Agreement today!
Some limitations and exclusions apply. For prices and
additional information in the U.S.A. call 1-800-827-6655.
*Coverage in Canada varies on some items. For full details
call Sears Canada at 1-800-361-6665.
Sears Installation Service
For Sears professional installation of home appliances, garage
door openers, water heaters, and other major home items, in the
U.S.A. or Canada call 1-800-4-MY-HOME®.
NOTES
Craftsman 9-inch Band Saw 124.3299
11
PARTS DIAGRAM A
Craftsman 9-inch Band Saw 124.3299
12
PARTS LIST A
KEY NO.
1
2
3
4
5
6
7
8
9
10
11
12
13
14
15
16
17
18
19
20
21
22
23
24
25
26
27
28
29
30
31
32
33
34
35
36
37
38
39
40
41
42
43
44
45
46
47
48
49
50
51
MFG. PART NO.
DESCRIPTION
1-JMBS0901010001-001S
1-JMBS0901010009
1-ST3D5X9D5GB845B
1-JMBS0901010008
1-M5X8GB818B
1-HY7A
1-JMBS0901010005
1-JMBS0901010002-001S
1-JL22020003
1-WSH8GB97D1B
1-M8X25GB70B
1-JMBS0901020002
1-M5X8GB80B
1-M4X10GB819B
1-JMBS0901010007
1-M6X16GB70B
1-JMBS0901040003
1-JMBS0901040006
1-JMBS0901040004
1-JMBS0901040005
1-M5X6GB77B
1-JMBS0901011000-081Z
1-M5X8GB70D1B
1-JMBS0901050001
1-M5X10GB818B
1-M8X70GB14B
1-JL22010006
1-M8GB6177B
1-6N3-4
1-M6X10GB70B
1-WSH6GB97D1B
1-M6X16GB5783B
1-M6GB6170B
1-M4X6GB77B
1-PIN5X14GB119D1Z
1-BRG606-2ZGB276
1-WSH5GB97D1B
1-JMBS0901031003
1-M5X12GB70B
1-M12GB6170B
1-WSH12GB93B
1-CLP10GB894D1B
1-JMBS0901020004
2-YYG808024
1-JMBS0901010004
1-M5X10GB818B
1-JMBS0901031004
1-WSH4GB97D1B
1-WSH8GB93B
1-JMBS0901031002
1-JMBS0901031001
Upper door
Clear window
Tapping screw 3.5x9.5
Handle
Pan head screw
Switch
Switch plate
Lower door
Drive belt
Flat washer
Hex bolt
Motor pulley
Hex. Bolt
Screw
Hinge
Hex. Socket set screw M6X16
Shaft tube
Fixing tube
Shaft
Lever
Hex. set screw M5X6
Frame
Hex. Socket set screw M5X8
Baffle
Pan head screw
Carriage bolt M8x70
Brush
Flange nut M8
Loop
Hex. Socket set screw
Flat washer
Hex. Socket set screw
Hex nut
Hex. set screw M4X6
Pin
Ball bearing
Flat washer
Screw
Hex. Socket set screw
Hex nut
Spring washer
Retaining ring
Lower bearing bolt
Motor
Dust port
Pan head screw
Glide piece
Flat washer
Spring washer
Shaft
Support piece
Craftsman 9-inch Band Saw 124.3299
13
PARTS DIAGRAM B
53
58
52
52
57
57
54
53
55A
55
57
57
52
52
56
54
Craftsman 9-inch Band Saw 124.3299
14
PARTS LIST B
KEY NO. MFG. PART NO.
52
53
54
55
55A
56
57
58
DESCRIPTION
Ball bearing
Wheel
Tire
Bolt
Hex nut
Drive pulley
Retaining ring
Blade
1-BRG6000-2ZGB276
1-JMBS0901022002
1-JMBS0901021002
1-M4X12GB70Z
1-M4GB6170Z
1-JMBS0901022001
1-CLP26GB893D1B
1-JMBS0901020001
Craftsman 9-inch Band Saw 124.3299
15
PARTS DIAGRAM C
Craftsman 9-inch Band Saw 124.3299
16
PARTS LIST C
KEY NO. MFG. PART NO.
59
60
61
62
63
64
65
66
67
68
69
70
71
72
73
DESCRIPTION
1-M6GB6170B
1-JL22031002-001S
1-JMBS0901030001-001G
1-JL22032001B
1-WSH6GB862D2B
1-M6X12GB5783B
1-WSH6GB97D1B
1-M6X16GB70B
1-JL22030001
1-M6X35GB12Z
1-JL22030002-001S
1-WSH6GB97D1B
1-JL22020002-001S
1-M6X20GB70B
1-WSH6GB97D1B
Craftsman 9-inch Band Saw 124.3299
17
Hex. Nut M6
Table insert
Table
Upper table trunnion
Flat washer
Hex bolt
Flat washer
Hex bolt
Lower table trunion
Hex bolt
Glide piece
Flat washer
Wing nut
Hex. Socket set screw
Flat washer
PARTS DIAGRAM D
Craftsman 9-inch Band Saw 124.3299
18
PARTS LIST D
KEY NO. MFG. PART NO.
74
75
76
77
78
79
80
81
82
83
84
85
86
87
88
89
90
91
92
93
94
95
DESCRIPTION
1-JL22024001-001S
1-JL22021003
1-JMBS0901040002
1-WSH8GB97D1B
1-JMBS0901040007-081Z
1-M8X70GB14B
1-M6GB6177B
1-WSH6GB97D1B
1-M6X12GB5783B
1-JMBS0901041000-081Z
1-CLP10GB894D1B
1-JMBS0901040001
1-M10GB6170B
1-JL20010016-001S
1-M8GB6172Z
1-JL20024002-001S
1-M8X60GB5783Z
1-JL20024001-001S
1-JMBS0901040009
1-CLP6GB896B
1-JL22024002-001S
1-JMBS0901040008
Craftsman 9-inch Band Saw 124.3299
19
Tension handle
Tension screw
Spring
Flat washer
Blade tensioner
Bolt M8X70
Hex. Bolt M6
Flat washer
Hex.bolt M6X12
Tension bracket
Retaining ring
Upper bearing bolt
Hex nut M10
Wing nut
Hex nut
Adjusting handle bracket
Hex bolt
Adjusting knob cap
Mount shaft
Star lock
Tension knob cap
Wheel carrier bracket
PARTS DIAGRAM E
Craftsman 9-inch Band Saw 124.3299
20
PARTS LIST E
KEY NO. MFG. PART NO.
96
97
98
99
100
101
102
103
104
105
106
107
108
109
110
111
112
113
114
115
116
117
118
119
120
121
122
123
124
125
DESCRIPTION
1-JMBS0901050011
1-JMBS0901050009
1-JMBS0901050008
1-ST3D5X9D5GB845B
1-PIN5X14GB119D1Z
1-JMBS0901051002
1-M4X6GB77B
1-JMBS0901050003
1-JMBS0901050004
1-WSH8GB97D1B
1-JMBS0901050002
1-WSH5GB97D1B
1-M5X10GB818B
1-JMBS0901050005
1-WSH6GB955B
1-JMBS0901050006
1-WSH5GB97D1B
1-M5X10GB818B
1-JMBS0901050007
1-M4X5GB80B
1-JMBS0901051001
1-M5X12GB70B
1-WSH5GB97D1B
1-JMBS0901031003
1-WSH5GB97D1B
1-BRG606-2ZGB276
1-M5X12GB70B
1-JMBS0901050010
1-WSH12JB7590B
1-M4X12GB819B
Craftsman 9-inch Band Saw 124.3299
21
Upper guide bracket
Spring
Cover
Pan head screw
Pin
Upper guide piece
Hex. Socket set screw
Locking piece
Fix piece
Flat washer
Handle
Flat washer
Pan head screw
Gear
Special washer
Locking bracket
Flat washer
Pan head screw
Handle
Hex. Locking screw
Shaft
Hex. Socket set screw
Flat washer
Screw
Flat washer
Ball bearing
Hex. Socket set screw
Slide plate
Washer
Screw
Lista de Contenido
Garantía..........................................................................................................................................................................................22
Las instrucciones de seguridad..............................................................................................................................................................22-23
Especificación......................................................................................................................................................23
Asamblea...............................................................................................................................................................................................24-25
Saber tu Band Saw....................................................................................................................................................................26
Ajuste.............................................................................................................................................................................................26-28
Operación...................................................................................................................................................................................................28
Mantenimiento............................................................................................................................................................................................29
Diagrama Eléctrico..................................................................................................................................................................................29
Localizador de averías................................................................................................................................................................................30
Reparar Protección Contrato....................................................................................................................................................................30
Nota.....................................................................................................................................................................................................31
Parte Diagrama..............................................................................................................................................................32-41
Plena GARANTÍA DE UN AÑO
UN AÑO DE GARANTÍA COMPLETA SOBRE CRAFTMAN HERRAMIENTA PROFESIONAL
Durante un año a partir de la fecha de compra, este producto está garantizado contra defectos en los materiales o la mano. Un
producto defectuoso se reciben reparación gratuita o reemplazo si la reparación no esté disponible. Para la cobertura de garantía
los detalles para conseguir reparación gratuita o reemplazo, visite el sitio web: www. artesano. com Esta garantía no cubre la
cuchilla, que es parte consumible que pueden desgastarse debido al uso normal dentro del período de garantía. Esta garantía es
válida si el producto es utilizado alguna vez proporcionando al mismo tiempo
Sears Brands Management Corporation, Hoffman Estates, IL 60179
Para Preguntas/Comentarios o Asistencia técnica - Por favor Llame el Servicio de atención al cliente en:
1-877-866-8392 (8:30 de M-F - 17:00 EST.)
LAS INSTRUCCIONES DE SEGURIDAD
PRECAUCIONES DE SEGURIDAD GENERAL
Conoce su herramienta ELÉCTRICA. Lea el manual de instrucciones cuidadosamente. Aprender las aplicaciones de la herramienta,
capacidades para el trabajo, y sus posibles peligros específicos.
Siempre Suelo Todas las herramientas.
Si el instrumento está equipado con un triple plug, debe conectar en una de tres hoyos recipiente eléctrico. Si utiliza
un adaptador para acomodar un doble recipiente, debe adjuntar el adaptador a un terreno conocido. Nunca elimine la
tercera clavija del enchufe.
Siempre evitar situaciones peligrosas.
Nunca utilice herramientas eléctricas en lugares húmedos o mojados. Mantener su área de trabajo bien iluminado y
claro de desorden.
Siempre retire la adaptación llaves y llaves de herramientas después de Uso.
Constituyen la costumbre de comprobar que las claves y el ajuste llaves se quitan de la herramienta antes de
encenderlo.
Siempre mantenga su área de trabajo limpia. Amontonado ámbitos y bancos invitamos a accidentes.
Siempre mantenga los visitantes Lejos de máquinas para correr.
Todos los visitantes deben mantenerse una distancia segura de la zona de trabajo.
Siempre hacer el Taller Picaportes.
Picaportes con candados e interruptores maestros, o eliminando starter claves.
Nunca opere una herramienta mientras que bajo la influencia de las drogas,
medicamentos o alcohol.
22
Siempre se debe usar vestimenta adecuada.
Nunca use ropa suelta o las joyas que puedan quedar atrapados en las piezas móviles. Puestas unas chanclas de
goma es recomendado para la mejor base.
Siempre utilice gafas de seguridad y Use protección para los Oídos.
También usa una cara o mascarilla si la operación de corte es polvorienta.
Extralimitación Nunca.
Mantenga su calzado apropiado y en equilibrio en todo momento.
Nunca se pare sobre herramientas.
Lesiones graves pueden ocurrir si la herramienta se inclina o si la herramienta de corte es contacto.
Siempre desconecte herramientas.
Desconecte herramientas antes del servicio y al cambiar los accesorios tales como las cuchillas, brocas y cuchillas.
Evite siempre arranque accidental.
Asegúrese de interruptor se encuentra en la posición OFF antes de conectar cable.
Nunca deje Desatendida ejecutar Herramientas.
Siempre revise las partes dañadas.
Antes de la primera o la continua utilización de la herramienta, un guardia o en alguna otra parte que está dañada
debe verificarse para asegurar que funcione correctamente y realizar su función prevista. Revise la alineación de
los elementos móviles, obligatorio de piezas móviles, rotura de las partes, el montaje, así como cualesquiera otras
condiciones que puedan afectar a su funcionamiento. Un guardia u otras partes dañadas debe inmediatamente ser
correctamente reparado o reemplazado.
NORMAS ESPECIALES EN MATERIA DE SEGURIDAD DE SIERRAS
1. Siempre se detienen las sierras de cinta antes de quitar piezas de chatarra tabla.
2. Siempre mantenga las manos y los dedos lejos de la cuchilla.
3. Nunca había intentado stock que no tienen una superficie plana, a menos que un soporte adecuado se usa.
4. Siempre mantenga material con firmeza y alimentarla en la cuchilla a un ritmo moderado.
5. Siempre apague la máquina si el material se ha retirado de un recorte Convertrán.
6. Verifique las pala tamaño y tipo de espesor y el tipo de material cortado.
7. Asegúrese de que la tensión de la hoja y la cuchilla de seguimiento están correctamente ajustado.
8. Hacer “alivio” cortes antes de cortar largas curvas.
9. Liberar la tensión de la hoja cuando vio no será utilizado por un largo período de tiempo.
10. Nota y siga las instrucciones y advertencias de seguridad que aparecen en la parte baja de esta puerta vio.
SPECIFICATIONS
Cuchilla de longitud............................................62"
Cuchilla Ancho.......................................1/8" to 3/8"
Garganta Ancho.............................................8-3/4"
Profundidad de corte......................................3-1/2"
Cuchilla velocidades...................................1 Speed
Puerto de Polvo(1)................................................2"
Tamaño de la Tabla.......................11-1/2" x 11-1/2"
Tabla Basculante................................0-45 Degrees
Motor.............................................................1/4 HP
Voltaje de Motor..............................................120V
Motor Amperaje..............................................2.5 A
Peso Neto....................................................44 LBS
GUARDAR estas INSTRUCCIONES.
Vaya a ellos a menudo.
23
Asamblea
1. HERRAMIENTAS NECESARIAS PARA EL MONTAJE
Artículo
Descripción
llave ajustable.......................................1
Cuadrar.................................................1
LISTA DE PARTES SUELTAS en bolsa
Artículo
Descripción
Cantidad
Arandela M6.....................................4
Hex Bolt M6x12................................4
Plano arandela M6...........................1
Hex Nut M6 ......................................1
Hex Bolt M6x20................................1
M2 Hex "L" Torcer.............................1
M2.5 Hex "L" Torcer..........................1
M4 Hex "L" Torcer.............................1
M5 Hex "L" Torcer.............................1
Cantidad
.
2. DESEMBALAJE y comprobación CONTENIDO
Tensión de la Hoja Mando................1
124,3299 Modelo 9” sierra de cinta se envía completa en una sola
caja.
A. Todas las partes separadas del cartón y compruebe cada tema
con los envases de cartón contenidos lista a continuación para
asegurarse de que todos los temas se contabilizan, antes de
desechar cualquier material de empaque.
B. Retire la cubierta protectora del petróleo que se aplican a la
tabla. Cualquier uso doméstico corriente tipo grasa y spot remove.
Cartabón..........................................1
C. Aplique una capa de cera para la tabla y evitar la herrumbre.
Limpie todas las partes cuidadosamente con un paño seco y limpio.
EL CARTÓN CONTENIDO
Artículo Descripción
A
B
C
D
E
Cantidad
Maquina Principal w/Blade Instalados......................1
Manual del Operador................................................1
Tabla.........................................................1
Tabla Superior charnela Asamblea............................1
Bolsa de piezas sueltas.............................................1
B
A
C
D
E
3. ASAMBLEA INICIAL
124,3299 La banda se vio facilitada parcialmente montado. Antes de su utilización, los siguientes elementos han de ser montados: Tabla
charnela, Tabla, mando y tensión de la hoja.
ADVERTENCIA: Para evitar lesiones, no intente ejecutar o utilizar esta máquina hasta que todos se arman y funciona correctamente.
FIG. 1
Tabla Pernos
(x4)
A. Montar la parte superior de la tabla charnela inferior tabla charnela con transporte perno, Glide pieza, lavadora y tuerca (See FIG. 1).
24
FIG. 2
B. Busque cuatro pernos y cuatro arandelas usada para montar el
cuadro. Poner la mesa en la tabla superior charnela e instalar un
perno lavadora en cada hoyo, luego apriete con “L” prefijado siempre (See FIG. 2).
Mesa
Cuadrada a
Blade
FIG. 3
FIG. 4
C. Una vez que la tabla está instalado utilizar un cuadrado para asegurarse de que es de 90 grados a la cuchilla (See FIG. 3).
D. Luego, configure el grado puntero hasta que lee cero grados. Mediante el uso de un destornillador Phillips afloje el puntero y puntero
a cero (See FIG. 4).
FIG. 6
Tensión de la
Hoja Manejar
Receptor Metal
FIG. 5
E. Instalar la mesa tornillo hexagonal nivelado, arandela y una
tuerca (See FIG. 5).
F. Inserte la tensión de la hoja manejar receptor en el metal saliendo
por la parte superior de la sierra (See FIG. 6).
FIG. 8
FIG. 7
Cartabón de ranura
G. Con el fin de garantizar la estabilidad vertical, cuatro pozos están
siempre en la base, para permitir que los vio a ser atornillados a la
banqueta (See FIG. 7).
Tabla Pernos
(x4)
H. Deslice el cartabón en el cartabón de ranura en la mesa de aluminio (See FIG. 8).
FIG. 9
I. En el centro, la cuchilla en la tabla, busque cuatro pernos y cuatro
arandelas usada para montar el cuadro. Afloje los tornillos y centro
la tabla con la mano. Ajuste los cuatro pernos para mantener ajuste
(See FIG. 9.)
Cartabón
25
Sé tu banda VIO
Tensión de la Hoja
Mando
Bloqueo de la
Puerta Mando
Guía ajuste posterior Mando
Bandwheel Puerta
Superior
Interruptor
Liberación Rápida
cuchilla
Guías cuchilla
Insertar tabla
Lámina perilla de
Rastreo
Guía Bloquea puesto Mando
Cartabón
Tabla Superior
charnela
Motor
Charnela inferior Tabla
Menor Bandwheel
Puerta
Tabla
2” Puerto de
Polvo
Bloqueo de la
Puerta Mando
AJUSTE
4. LA TABLA BASCULANTE
6. Utilizando la PALANCA DEL CIERRE RÁPIDO
Bisel de cortes, la tabla se inclina hacia 0 hasta los 45 grados.
A. Para inclinar la mesa, afloje la tuerca de la tabla charnela,
puso la mesa al ángulo requerido y apriete la tuerca de nuevo
(Véase fig. 10).
A. Esta banda vió equipado con una rápida liberación de tensión de
la hoja. Se utiliza para ayudar a acelerar el traslado y la instalación
de la cuchilla.
FIG. 12
OFF
FIG. 10
ON
Tuerca
B. Es recomendado para verificar el correcto ajuste del ángulo
utilizando un ángulo guía, o haciendo que los cortes de prueba en
madera de desecho. Ajuste el indicador en consecuencia mediante
el uso de un destornillador Phillips.
B. Para hacer funcionar el mecanismo de desenganche rápido y quitar tensión de la cuchilla, mueva la palanca de la 3 o’clock posición
(A) a los 9 o’clock posición (OFF). Direcciã³n contraria a tensión la
cuchilla (véase el gráfico 12).
5. AJUSTAR LA TENSIÓN DE LA HOJA
7. MODIFICAR y ADECUAR LA CUCHILLA
A. Esta banda se vio de fábrica equipada con un propósito general
cuchilla para cortar madera, la cuchilla está establecido antes de
la entrega. Para cambiar la hoja de la sierra, hay que empezar por
eliminar la tabla nivelación tornillo hexagonal, una lavadora y una
tuerca (ver fig. 13).
Para aflojar la tensión de la cuchilla, gire la perilla tensión de la hoja
las agujas del reloj. Para ajustar la tensión de la cuchilla, gire la
perilla tensión las agujas del reloj (ver fig. 11).
FIG. 11
Tensión de la
Hoja Mando
FIG. 13
26
ADVERTENCIA: Para evitar daños en caso de partida ines-
perada, cada vez que cambia la cuchilla o llevar a cabo ajustes,
cambie la banda vio apagado y desconecte el cable de alimentación
de la toma de corriente. Para evitar lesiones en las manos para la
manipulación de la cuchilla de la sierra, use guantes cuando sea
necesario.
B. Abra la puerta superior e inferior al liberar el bloqueo de la puerta
los mandos.
C. Quitar la tensión de la hoja moviendo la palanca del cierre rápido
sobre la rueda trasera vivienda superior contrario a las agujas hasta
que la cuchilla se ha atenuado (ver fig. 12).
D. Retire la cuchilla de la parte superior e inferior ruedas.
E. Cuando se instala la cuchilla garantizar los dientes de la cuchilla
están apuntando hacia abajo y hacia usted en la posición donde la
cuchilla pasa a través de la tabla.
FIG. 14
8. AJUSTE DE LA altura de corte
A. La hoya superior guía debería establecerse lo más próxima posible por encima de la pieza de trabajo.
B. Para ajustar la altura, afloje la guía puesto mando de bloqueo en
la parte posterior de la rueda superior la vivienda. (Ver Fig. 16)
C. Ajuste la cuchilla guías a la altura requerida girando el mando
guía ajuste posterior.
D. Apriete la guía bloqueo puesto mando después de ajustar altura
correcta.
FIG. 16
Guía ajuste
posterior Mando
Tensión de la
Hoja Mando
Guía Bloquea
puesto Mando
9. AJUSTE LA CUCHILLA guías
La Hoya Superior Guía
F. Ténselo de la nueva cuchilla girando palanca en la parte superior trasera vivienda las manecillas del reloj. Compruebe la cuchilla
seguir girando la rueda superior a mano.
G. Si más o menos tensión de la hoja es necesaria, gire el mando
hasta tensión de la hoja de seguimiento deseado (ver fig. 14).
H. Si necesita un mayor seguimiento de cuchilla; proceder como
se ha mencionado a continuación “RASTREO DE LA HOJA DE LA
SIERRA”
A. Para ajustar la hoya superior guías, primera posición derecha
e izquierda clavijas guía relativa a la cuchilla aflojando el tornillo
de bloqueo (véase fig. 17) Y moviendo la guía transportista hacia
adelante hasta tanto guía lateral pines son aproximadamente 1/16”
detrás de las gargantas de la cuchilla.
B.Establezca las dos clavijas guía al lado de 1/32” de la cuchilla
por liberar la guía pin tornillo de cierre (véase fig. 17) De cada lado
de la cuchilla y mover las clavijas guía hasta la posición deseada.
Bloquear la guía pin en posición con la guía pin tornillo de cierre. No
establecen las clavijas guía demasiado cerca ya que esto afectaría
adversamente la vida de la cuchilla.
Cuchilla Gullet
8. SEGUIMIENTO DE LA HOJA DE LA SIERRA
Ajustar el seguimiento de la cuchilla antes de establecer la cuchilla
guías. Una vez que la cuchilla esté instalado y tensados, vía la
cuchilla ajustando el potenciómetro de rastreo a mano (ver fig. 15).
La cuchilla debe ejecutar en el centro de la banda vio las ruedas.
Utilice la ventana hoja de seguimiento para comprobar la posición
de rueda. Cuando el ajuste correcto se logra bloquear el rastreo de
mando con la tuerca.
FIG. 15
Seguimiento
de cuchilla
Ventana
Tuerca
Bloqueo de
la Puerta
Mando
1/16”
G u í a P i n
tornillos de
bloqueo
To r n i l l o d e
bloqueo
Guía Pin (x2)
FIG. 17
C.Ajustar el rodillo trasero de ser una guía clara de la parte posterior
de la cuchilla por liberar el tornillo de bloqueo (véase fig. 18) Y mover el rodillo guía de aproximadamente 1/32” detrás de la cuchilla.
D. Cuando el ajuste correcto es alcanzado, bloquear el rodillo guía
en posición con el tornillo de bloqueo guía (ver fig. 18).
Rodillo trasero
Guía
Mando de
Rastreo
Después de que se determine que la cuchilla está rastreando en
el centro de ambas ruedas, cerrar la parte superior e inferior de las
puertas bloguenadores el bloqueo de la puerta los mandos (ver fig.
15).
To r n i l l o d e
bloqueo
FIG. 18
27
La hoya inferior Guía
FIG. 19
A. Para ajustar la hoya superior guías, primera posición derecha
e izquierda clavijas guía relativa a la cuchilla aflojando el tornillo
de bloqueo (véase fig. 19) Y moviendo la guía transportista hacia
adelante hasta tanto guía lateral pines son aproximadamente 1/16”
detrás de las gargantas de la cuchilla.
B. Establezca las dos clavijas guía al lado de 1/32” de la cuchilla
por liberar la guía pin tornillo de cierre (véase fig. 19) De cada lado
de la cuchilla y mover las clavijas guía hasta la posición deseada.
Bloquear la guía pin en posición con la guía pin tornillo de cierre. No
establecen las clavijas guía demasiado cerca ya que esto afectaría
adversamente la vida de la cuchilla.
C. Ajustar el rodillo trasero de ser una guía clara de la parte posterior de la cuchilla por liberar el tornillo de bloqueo y mover el rodillo
guía de aproximadamente 1/32” detrás de la cuchilla.
Cuchilla
Gullet
G u í a P i n
tornillos de
bloqueo
1/16”
Rodillo trasero Guía
D. Cuando el ajuste correcto es alcanzado, bloquear el rodillo guía
en posición con la guía tornillo de bloqueo.
Operación
ADVERTENCIA: Antes de comenzar verifiquen si alguna parte de tu
banda sierra está ausente, el mal funcionamiento, ha sido dañado
o roto, tales como el motor, switch, o de cualquier otra operación
control, un dispositivo de seguridad o el cable de alimentación,
apague la banda vio off y desconectelo hasta la parte en concreto
está correctamente reparado o sustituido.
FIG. 20
Cuchilla
Correcto
La cuchilla corta en un continuo palotes. Para evitar lesiones
cuando manos son inevitablemente cerca de la cuchilla de la Sierra,
deben ser colocados a ambos lados de la pala (ver fig. 20), no está
en línea con el mismo (ver fig. 21). Utilice un empuje stick siempre
que sea posible cuando se trabaja en estrecha proximidad con la
cuchilla.
Start the band saw by lifting the switch to the ON position (See FIG.
22) and wait for the band saw to come to full speed before starting
to cut. Never start the band saw with the work piece in contact with
the saw blade.
FIG. 21
Cuchilla
Comer lentamente la pieza de trabajo hacia la cuchilla de la Sierra,
dejando sólo la luz presión sobre ella. Con ambas manos, con
firmeza la pieza de trabajo hacia abajo sobre la mesa, y pienso que
hacia la cuchilla con lentitud.
Una vez que la operación de corte es vuelta completa la banda vio
apagado por disminuir el interruptor a la posición de apagado. Para
impedir el uso no autorizado, quitar el centro clave en el interruptor
(ver fig. 22).
Incorrecto
FIG. 22
ON
Para obtener los mejores resultados la cuchilla deben estar bien
afilados. Seleccione el derecho cuchilla para el trabajo, dependiendo del grosor de la madera el corte. Los más delgados y más
difícil la madera, el más fino los dientes (14 dientes por pulgada) de
la cuchilla. Utilice una multa diente cuchilla para cortar curvas muy
cerradas. Para cortar madera gruesa uso menos dientes, alrededor
de 4 dientes por pulgada.
OFF
KEY
La máquina está especialmente capacitada para cortar las curvas,
sino que también hará cortes rectos. No intente poner la pieza de
trabajo sin que se pierda nada, ya que esto puede causar que la
pieza de trabajo que se ha quedado atascado o la cuchilla de doblar.
28
MANTENIMIENTO
ADVERTENCIA: Para evitar lesiones debido a las inesperadas
empezando, antes de la limpieza o llevar a cabo trabajos de mantenimiento, apague y desconecte la sierra de cinta de la fuente de
energía.
Nunca utilice agua u otros líquidos para limpiar la sierra de cinta. Utilizar un pincel seco.
Mantenimiento regular de las sierras de cinta para evitar problemas
innecesarios.
FIG. 23
Mantener
dentro
de zonas
limpias
Utilizar cepillo
para limpiar
guías
A. Mantener la mesa limpia para asegurar el correcto cortar.
B. Mantenga la parte exterior de la máquina limpia para asegurar
el correcto funcionamiento de todas las piezas móviles y prevenir el
desgaste excesivo.
FIG. 24
C. Mantener las ranuras de ventilación del motor limpio para evitar
que se sobrecaliente.
Palanca de
liberación
rápida cuchilla
D. Mantener el interior (cerca de la cuchilla de la Sierra, etc. ) limpia
para evitar la acumulación de polvo (Véase fig. 23 & 24). Utilice captación de polvo si es posible.
Mantiene
las áreas
limpias
E. Para prolongar la vida de la cuchilla, cuando ésta no está en uso
por períodos prolongados, el despacho de la cuchilla tensión (ver
fig. 24). Antes de volver a utilizar la banda vio asegúrese de que la
cuchilla es re-tensada y seguimiento está activada.
Tensión de la
correa motriz
Perno
14. CAMBIAR LA CORREA
A. Suelte la cuchilla tensión apagando la tensión de la hoja situado
en la parte superior de la banda vio las manecillas del reloj.
B. Liberar la tensión de la correa aflojando motor perno tensión de la
correa (Véase fig. 24).
C. Utilizando complemento unos alicates eliminarlo snap-ring (ver fig.
25) Desde el centro de la rueda inferior.
D. Deslice cuidadosamente la rueda inferior y, al mismo tiempo liberar
la cuchilla de la rueda.
E. Quitar el casco antiguo de la correa e instale la nueva correa
(garantizar las costillas en la correa de transmisión están colocados
correctamente antes de volver a ensamblar y tensar la correa).
F. Deslice la rueda inferior hacia el eje de la rueda inferior para asegurarse que el cinturón se coloca alrededor de la polea del motor.
Instalar el complemento anillo.
G. Siga los procedimientos para cambiar y ajustar la CUCHILLA Y
SEGUIMIENTO LA HOJA DE LA SIERRA, antes de devolver el poder
a la sierra de cinta y creación de empleo.
Snap-Ring
FIG. 25
ESQUEMA ELÉCTRICO
ADVERTENCIA: Esta máquina debe estar fundamentada. Con el fin de evitar electrocuciones o fuego, toda reparación de sistema
eléctrico sólo debe hacerse por un electricista calificado, utilizando una verdadera pieza de recambio.
29
Eliminación de Problemas
Problema
Diagnóstico
Remedio
La máquina no funciona cuando son activados.
1. Ninguna fuente de alimentación.
2. Interruptor Defectuoso.
3. Motor Defectuoso.
1. Compruebe el cable de rotura.
2. Reemplazar el interruptor de bloqueo.
3. Motor Defectuoso
La cuchilla no se mueve con el motor en
marcha.
1. La tensión de la hoja mando no se ha
endurecido.
2. La cuchilla se salió una de las ruedas.
3. La cuchilla ha roto.
4. La correa ha encajado.
1. Apague el motor, apriete el botón de
tensión cuchilla.
2. Abrir puertas y salir.
3. Reemplace la cuchilla.
4. Reemplazar el cinturón.
La cuchilla no cortar en línea recta.
1. Tope para cortar no utilizados.
2. Velocidad de alimentación demasiado rápido.
3. Los dientes de la cuchilla son aburridos o
dañado.
4. Guías cuchilla no convenientemente ajustada.
1. Utilice un tope.
2. Poner luz presión sobre la pieza de trabajo.
Asegúrese de que la cuchilla no doblar.
3. Intente una nueva cuchilla.
4. Ajuste la cuchilla guías (ver instrucciones
ajuste).
La cuchilla no cortar, o cortes muy lentamente.
1. Los dientes son aburridos, causados por
cortar materiales duros o utilización a largo
plazo.
1. Reemplace la cuchilla, utilice un 6 T. P. I.
(Dientes por pulgada) cuchilla de la sierra para
madera y materiales blandos. Utilice un 14 T. P.
I. cuchilla materiales más arduamente. 14 T. P.
I. cuchilla corta siempre más lento debido a la
más fina los dientes y el rendimiento de corte
más lento.
2. Ajuste la cuchilla correctamente.
2. La hoja de la sierra se colocó al revés
en la sierra de cinta.
Aserrín se acumula dentro de la máquina.
Esto es normal
Limpie la máquina con regularidad. Abrir
puertas y quitar el aserrín con una aspiradora.
Serrín dentro de la carcasa del motor.
Esto es normal
Limpie las ranuras de ventilación del motor
con una aspiradora. De vez en cuando
quitar el aserrín para evitar que se vieran
arrastradas a la vivienda.
La máquina no puede cortar a una temperatura de 45 o 90 grados.
1. El cuadro no está formando ángulos rectos
con la cuchilla.
2. La cuchilla es aburrida o demasiado se ejercieron presiones sobre la pieza de trabajo.
1. Ajustar la tabla.
2. Reemplace la cuchilla o realizar menos
presión sobre la pieza de trabajo.
La cuchilla no pueden ser debidamente
ubicadas en las ruedas.
1. Las ruedas no están armonizadas o
defectuoso teniendo.
2. El rastreo de cuchilla mando no ha sido
debidamente ajustado.
3. Less Than cuchilla.
1. Reemplazar teniendo.
2. Ajuste la cuchilla seguimiento de mando
(vea AJUSTE instrucciones).
3. Reemplace la cuchilla.
Reparar Protección Acuerdo
Una vez que usted compra la reparación Protección Acuerdo. una
Felicitaciones por hacer una compra inteligente. Su nuevo
simple llamada telefónica es todo lo que se necesita para programar
producto artesanal está diseñado y fabricado por años de
servicio. La reparación es un acuerdo de protección riesgo compra
funcionamiento confiable. Pero al igual que todos los productos, libre. Si usted cancela por cualquier motivo durante el período de
puede requerir recono- cimiento de vez en cuando. Es entonces garantía, que nos proporcionará un reembolso completo. O una
cuando habiendo una reparación acuerdo de protección le puede devolución prorrateada anytime tras el período de garantía caduca.
ahorrar dinero y a la agravación.
Esto es lo que la reparación acuerdo de protección incluye: Algunas limitaciones y exclusiones se aplican. Para precios e
-servicio de Expertos por nuestros 10.000 reparación
información adicional en los U.S.A. llame al 1-800 -827-6655.
profesionales especialistas
Cobertura en Canadá varía sobre algunos temas. Para conocer los
-servicio ilimitado y no te cobran por piezas y mano de obra en
detalles completos en Sears Canadá al 1-800-525-3243 (1-800-361todas las reparaciones cubiertas.
6665.
-Producto de sustitución hasta un total de 1500 si su producto
amparado no pueden repararse.
Sears Instalación profesional servicio de instalación de aparatos
-Descuento del 25% del precio de los servicios relacionados con de uso doméstico, garaje garajes, calentadores de agua, y otros
componentes instalados y no cubiertos por el acuerdo; asimismo, importantes temas domésticos, en los U.S.A. o Canadá llame al
25% descuento precio regular de mantenimiento preventivo.
1-800-4-MY-HOME.
-Ayuda rápida por teléfono de lo llamamos una rápida resolución
de soporte telefónico de Sears representante. piense en nosotros
30
como hablando manual del propietario.
NOTAS
Craftsman 9-Inch Banda vio 124,3299
31
PARTES DIAGRAMA A
Craftsman 9-Inch Banda vio 124,3299
32
LISTA DE PIEZAS A
KEY NO.
1
2
3
4
5
6
7
8
9
10
11
12
13
14
15
16
17
18
19
20
21
22
23
24
25
26
27
28
29
30
31
32
33
34
35
36
37
38
39
40
41
42
43
44
45
46
47
48
49
50
51
MFG. PART NO.
Descripción
1-JMBS0901010001-001S
1-JMBS0901010009
1-ST3D5X9D5GB845B
1-JMBS0901010008
1-M5X8GB818B
1-HY7A
1-JMBS0901010005
1-JMBS0901010002-001S
1-JL22020003
1-WSH8GB97D1B
1-M8X25GB70B
1-JMBS0901020002
1-M5X8GB80B
1-M4X10GB819B
1-JMBS0901010007
1-M6X16GB70B
1-JMBS0901040003
1-JMBS0901040006
1-JMBS0901040004
1-JMBS0901040005
1-M5X6GB77B
1-JMBS0901011000-081Z
1-M5X8GB70D1B
1-JMBS0901050001
1-M5X10GB818B
1-M8X70GB14B
1-JL22010006
1-M8GB6177B
1-6N3-4
1-M6X10GB70B
1-WSH6GB97D1B
1-M6X16GB5783B
1-M6GB6170B
1-M4X6GB77B
1-PIN5X14GB119D1Z
1-BRG606-2ZGB276
1-WSH5GB97D1B
1-JMBS0901031003
1-M5X12GB70B
1-M12GB6170B
1-WSH12GB93B
1-CLP10GB894D1B
1-JMBS0901020004
2-YYG808024
1-JMBS0901010004
1-M5X10GB818B
1-JMBS0901031004
1-WSH4GB97D1B
1-WSH8GB93B
1-JMBS0901031002
1-JMBS0901031001
Puerta Superior
Ventana Transparente
Tornillos 3,5 x9,5
Agarradera
Tornillo Pan
Interruptor
Interruptor la placa
Portezuela Inferior
La correa
Arandela Plana
Tornillo Hexagonal
Polea del motor
Perno Hexadecimal
Tornillo
Bisagra
Hex. Socket tornillo M6X16
Tubo Hueco
Tubo Fijación
Eje
Palanca
Hex. tornillo M5X6
Enmarca
Hex. Socket tornillo M5X8
Desconcerta
Tornillo Pan
Transporte perno M8x70
Pincel
Brida tuerca M8
Lazo
Hex. Socket tornillo de ajuste
Arandela Plana
Hex. Socket tornillo de ajuste
Tuerca Hexagonal
Tornillo hexagonal M4X6
Alfilerar
Cojinete a bolas
Arandela Plana
Tornillo
Tornillo Hexagonal
Tuerca Hexagonal
Arandela de tipo resorte
Anillo de retención
Baja teniendo perno
Motor Eléctrico
Puerto de Polvo
Tornillo Pan
Glide pieza
Arandela Plana
Arandela de tipo resorte
Eje
Pieza de Apoyo
Craftsman 9-Inch Banda vio 124,3299
33
PARTES DIAGRAMA B
53
58
52
52
57
57
54
53
55A
55
57
57
52
52
56
54
Craftsman 9-Inch Banda vio 124,3299
34
LISTA DE PIEZAS B
KEY NO. MFG. PART NO.
52
53
54
55
55A
56
57
58
Descripción
Cojinete a bolas
Rotar
Cansar
Tornillo
Tuerca Hexagonal
Polea Unidad
Anillo de retención
Cuchilla
1-BRG6000-2ZGB276
1-JMBS0901022002
1-JMBS0901021002
1-M4X12GB70Z
1-M4GB6170Z
1-JMBS0901022001
1-CLP26GB893D1B
1-JMBS0901020001
Craftsman 9-Inch Banda vio 124,3299
35
PARTES DIAGRAMA C
Craftsman 9-Inch Banda vio 124,3299
36
LISTA DE PIEZAS C
KEY NO. MFG. PART NO.
59
60
61
62
63
64
65
66
67
68
69
70
71
72
73
Descripción
1-M6GB6170B
1-JL22031002-001S
1-JMBS0901030001-001G
1-JL22032001B
1-WSH6GB862D2B
1-M6X12GB5783B
1-WSH6GB97D1B
1-M6X16GB70B
1-JL22030001
1-M6X35GB12Z
1-JL22030002-001S
1-WSH6GB97D1B
1-JL22020002-001S
1-M6X20GB70B
1-WSH6GB97D1B
Craftsman 9-Inch Banda vio 124,3299
37
Tuerca hexagonal M6
Insertar tabla
Tabla
Tabla Superior charnela
Arandela Plana
Tornillo Hexagonal
Arandela Plana
Tornillo Hexagonal
Tabla Bajo charnela
Tornillo Hexagonal
Glide pieza
Arandela Plana
Tuerca
Tornillo Hexagonal
Arandela Plana
PARTES DIAGRAMA D
Craftsman 9-Inch Banda vio 124,3299
38
LISTA DE PIEZAS D
KEY NO. MFG. PART NO.
74
75
76
77
78
79
80
81
82
83
84
85
86
87
88
89
90
91
92
93
94
95
Descripción
1-JL22024001-001S
1-JL22021003
1-JMBS0901040002
1-WSH8GB97D1B
1-JMBS0901040007-081Z
1-M8X70GB14B
1-M6GB6177B
1-WSH6GB97D1B
1-M6X12GB5783B
1-JMBS0901041000-081Z
1-CLP10GB894D1B
1-JMBS0901040001
1-M10GB6170B
1-JL20010016-001S
1-M8GB6172Z
1-JL20024002-001S
1-M8X60GB5783Z
1-JL20024001-001S
1-JMBS0901040009
1-CLP6GB896B
1-JL22024002-001S
1-JMBS0901040008
Craftsman 9-Inch Banda vio 124,3299
39
Tensión manejar
Tensión tornillo
Brotar
Arandela Plana
Cuchilla tensor
Perno M8X70
Tornillo hexagonal M6
Arandela Plana
Tornillo hexagonal M6X12
Tensión soporte
Anillo de retención
Cojinete superior perno
Tuerca hexagonal M10
Tuerca
Tuerca Hexagonal
Intentar Ajustar soporte
Tornillo Hexagonal
Ajuste mando pac
Montar el eje
Star cerradura
Botón de tensión pac
Rueda carro
PARTES DIAGRAMA E
Craftsman 9-Inch Banda vio 124,3299
40
LISTA DE PIEZAS E
KEY NO. MFG. PART NO.
96
97
98
99
100
101
102
103
104
105
106
107
108
109
110
111
112
113
114
115
116
117
118
119
120
121
122
123
124
125
Descripción
1-JMBS0901050011
1-JMBS0901050009
1-JMBS0901050008
1-ST3D5X9D5GB845B
1-PIN5X14GB119D1Z
1-JMBS0901051002
1-M4X6GB77B
1-JMBS0901050003
1-JMBS0901050004
1-WSH8GB97D1B
1-JMBS0901050002
1-WSH5GB97D1B
1-M5X10GB818B
1-JMBS0901050005
1-WSH6GB955B
1-JMBS0901050006
1-WSH5GB97D1B
1-M5X10GB818B
1-JMBS0901050007
1-M4X5GB80B
1-JMBS0901051001
1-M5X12GB70B
1-WSH5GB97D1B
1-JMBS0901031003
1-WSH5GB97D1B
1-BRG606-2ZGB276
1-M5X12GB70B
1-JMBS0901050010
1-WSH12JB7590B
1-M4X12GB819B
Craftsman 9-Inch Banda vio 124,3299
41
Guía Superior soporte
Brotar
Cubrir
Tornillo Pan
Alfiler
Guía Superior pieza
Tornillo Hexagonal
Bloqueo pieza
Revisión pieza
Arandela Plana
Palanca
Arandela Plana
Tornillo Pan
Engranar
Arandela Especial
Soporte de bloqueo
Arandela Plana
Tornillo Pan
Agarradera
Tornillo Hexagonal
Eje
Tornillo Hexagonal
Arandela Plana
Tornillo
Arandela Plana
Cojinete a bolas
Tornillo Hexagonal
Deslice placa
Arandela
Tornillo