1
Siluro GF4 MX Series
Graphics Accelerator
(MX-8X, MX-8X LP, MX-SE, MX-SE T)
User’s Manual
4200-0368-11
Rev. 1.02
Copyright and Warranty Notice
The information in this document is subject to change without notice and does
not represent a commitment on part of the vendor, who assumes no liability or
responsibility for any errors that may appear in this manual.
No warranty or representation, either expressed or implied, is made with
respect to the quality, accuracy or fitness for any particular part of this
document. In no event shall the manufacturer be liable for direct, indirect,
special, incidental or consequential damages arising from any defect or error
in this manual or product.
Product names appearing in this manual are for identification purpose only
and trademarks and product names or brand names appearing in this document
are property of their respective owners.
This document contains materials protected under International Copyright
Laws. All rights reserved. No part of this manual may be reproduced,
transmitted or transcribed without the expressed written permission of the
manufacturer and authors of this manual.
If you do not properly set the Graphics Accelerator settings causing the
motherboard to malfunction or fail, we cannot guarantee any responsibility.
Siluro GF4 MX Series
Graphics Accelerator
Index
Schnellinstallationsanleitung................................................................... 1
Guide d’Installation Rapide .................................................................... 3
Guida all’installazione rapida ................................................................. 5
Краткое руководство по установке ..................................................... 7
快速安裝指引 ............................................................................................ 9
クイックインストールガイド.............................................................. 11
빠른 설치 설명서 .................................................................................. 13
CHAPTER 1.
1-1.
1-2.
CHAPTER 2.
2-1.
2-2.
3-2.
3-3.
DRIVER INSTALLATION ...............................3-1
WINDOWS 98/ME ......................................................................... 3-1
Auto Setup:.............................................................................3-1
WINDOWS 2000 ............................................................................ 3-2
Plug and Play Setup:...............................................................3-2
Auto Setup:.............................................................................3-4
WINDOWS XP ............................................................................... 3-5
Plug and Play Setup:...............................................................3-5
Auto Setup:.............................................................................3-6
CHAPTER 4.
4-1.
HARDWARE SETUP ........................................2-1
CARD INSTALLATION .................................................................... 2-1
New Systems: .........................................................................2-1
Systems with Existing VGA Card:.........................................2-1
DEVICES CONNECTION ................................................................. 2-2
Siluro GF4 MX-SE:................................................................2-2
Siluro GF4 MX-8X: ...............................................................2-3
Siluro GF4 MX-8X LP:..........................................................2-4
Siluro GF4 MX-SE T: ............................................................2-5
CHAPTER 3.
3-1.
INTRODUCTION ..............................................1-1
FEATURES ..................................................................................... 1-1
SPECIFICATION.............................................................................. 1-2
Siluro GF4 MX-8X: ...............................................................1-2
Siluro GF4 MX-8X LP:..........................................................1-3
Siluro GF4 MX-SE/MX-SE T:...............................................1-4
DISPLAY PROPERTIES ..................................4-1
SETTINGS ...................................................................................... 4-1
4200-0368-11
Rev. 1.02
4-2.
4-3.
4-4.
4-5.
4-6.
4-7.
4-8.
4-9.
GENERAL ...................................................................................... 4-2
ADAPTER ...................................................................................... 4-3
MONITOR ...................................................................................... 4-3
TROUBLESHOOT ............................................................................ 4-4
COLOR MANAGEMENT .................................................................. 4-4
GEFORCE4 MX 440 (WITH AGP 8X) ........................................... 4-5
Performance and Quality Settings:.........................................4-5
Direct3D Settings: ..................................................................4-7
More Direct3D: ......................................................................4-8
Refresh Rate Override:...........................................................4-8
OpenGL Settings: ...................................................................4-9
Overlay Controls: ................................................................. 4-11
NVRotate:.............................................................................4-12
nView Display Mode:...........................................................4-12
Desktop Utilities:..................................................................4-15
NVIEW DESKTOP MANAGER ....................................................... 4-16
Info: ......................................................................................4-16
Profiles:.................................................................................4-17
Windows:..............................................................................4-18
Effects:..................................................................................4-19
Zoom: ...................................................................................4-20
Hot Keys:..............................................................................4-21
DEVICE SETTINGS ....................................................................... 4-21
Device Selection:..................................................................4-21
Select TV Output:.................................................................4-22
Select NTSC/PAL Format: ...................................................4-23
TV Output:............................................................................4-24
Color Correction:..................................................................4-25
Screen Adjustment:...............................................................4-26
Display Timing:....................................................................4-26
CHAPTER 5.
UTILITY SETUP................................................5-1
5-1.
5-2.
5-3.
5-4.
5-5.
NVIEW DESKTOP MANAGER SETUP WIZARD ............................... 5-1
SILURODVD ................................................................................. 5-5
DIRECTX....................................................................................... 5-7
GRAPHIC MAX .............................................................................. 5-9
DISPLAY TRAY ICON ................................................................... 5-11
5-6.
Display Modes Table............................................................5-13
BIOS FLASHING UTILITY ........................................................... 5-14
APPENDIX A. HOW TO GET TECHNICAL SUPPORT ......... A-1
Siluro GF4 MX Series
Schnellinstallationsanleitung
1
Schnellinstallationsanleitung
Installation der Karte
Diese Grafikkarte kann nur auf Motherboards mit AGP-Steckplatz installiert werden.
Bitte behandeln Sie diese Karte vorsichtig und vergewissern Sie sich, die
Netzversorgung Ihres Systems vor der Installation abzutrennen.
Neue Systeme:
1.
Trennen Sie alle Netzkabel von
Ihrem Computer.
2.
Nehmen
Sie
den
Computergehäusedeckel ab.
3.
Finden Sie den AGP-Steckplatz
auf Ihrem Motherboard.
4.
Entfernen
Sie
die
Metallklammer
des
AGP-Steckplatzes.
Bewahren
Sie die Schraube gut auf.
5.
Richten Sie die Karte mit dem
AGP-Steckplatz aus. Halten Sie
ihn an seinen Rändern fest und
stecken die Karte in den
Steckplatz,
ohne
Gewalt
anzuwenden oder Druck auf
Komponenten der Videokarte
auszuüben. Achten Sie darauf,
dass der Anschluss der Karte
fest und ganz im Steckplatz
sitzt.
6.
Sichern Sie die Halteklammer der Karte mit der anfangs von der
Metallklammer entfernten Schraube an der Rückwand des Computergehäuses.
7.
Setzen Sie den Gehäusedeckel wieder auf.
Handbuch
2
Schnellinstallationsanleitung
Systeme mit vorhandener VGA-Karte:
1.
Ändern Sie den Anzeigetreiber zu “Standard VGA”.
2.
Schalten Sie Ihren Computer aus und trennen alle Netzkabel ab.
3.
Ersetzen Sie die bestehende VGA-Karte mit dieser neuen Karte.
Die Installation Ihrer Grafikkarte ist nun vervollständigt. Verbinden Sie einen
PC-Monitor oder ein anderes Anzeigegerät mit dieser Karte, bevor Sie den Computer
neu starten (siehe Kapitel 2-2 “Geräteverbindung”).
Treiberinstallation
Starten Sie nach der Verbindung Ihren
Computer neu und installieren dann die
Treiber und Utility-Software. Klicken
Sie auf “Driver”, um die Einstellung des
Treibers für diese Karte zu starten.
(Detaillierte
Installationsvorgänge
finden
Sie
im
Kaptitel
3
“Treiberinstallation”.)
Siluro GF4 MX Series
Guide d’Installation Rapide
3
Guide d’Installation Rapide
Installation de la Carte
Cette carte graphique ne peut être installée que sur une carte disposant d’un slot AGP.
Veuillez manipuler cette carte avec précautions et assurez-vous de débrancher la
source d’alimentation de votre système avant l’installation.
Nouveaux Systèmes:
1.
Débranchez tous les cordons d’alimentation de votre ordinateur.
2.
Enlevez le couvercle de votre
boîtier.
3.
Localisez le slot AGP de votre
carte mère.
4.
Enlevez le cache en métal
correspondant au slot AGP.
Gardez la vis.
5.
Alignez la carte sur le slot AGP.
Tenez la carte par ses extrémités
et insérez la dans le slot AGP
sans force excessive ou pression
sur
ses
composants.
Assurez-vous
qu’elle
soit
fermement et complètement
fixée dans le slot.
6.
Vissez ensuite la carte sur le
panneau arrière du boîtier avec
la vis que vous aviez auparavant
mis de côté.
7.
Le schéma de la carte VGA peut varier
en fonction des modèles
Remettez en place le couvercle du boîtier.
Manuel de l’Utilisateur
4
Guide d’Installation Rapide
Systèmes avec déjà une carte VGA:
1.
Changez le pilote d’affichage en VGA Standard.
2.
Eteignez votre ordinateur et débranchez tous les câbles d’alimentation.
3.
Remplacez la carte VGA actuelle avec la nouvelle.
Votre carte graphique est maintenant installée. Avant de relancer votre ordinateur,
connectez le moniteur PC ou tout autre périphérique d’affichage à cette carte (voir
Chapitre 2-2 “Connexion des Périphériques”).
Installation du Pilote
Après la connexion, relancez votre
ordinateur et installez les drivers du
logiciel ainsi que les utilitaires. Cliquez
sur “Driver” pour commencer la
définition du driver pour cette carte.
(Pour
connaître
la
procédure
d’installation détaillée, veuillez vous
référer au Chapitre 3 “Installation du
pilote”.)
Siluro GF4 MX Series
Guida all’installazione rapida
5
Guida all’installazione rapida
Installazione della scheda
Questa scheda grafica può essere installata solamente su schede madri che abbiano
uno slot AGP. Maneggiare la scheda con cura ed assicurarsi di scollegare
l’alimentazione del sistema prima dell’installazione.
Sistemi nuovi:
1.
Scollegare tutti i cavi d’alimentazione del computer.
2.
Rimuovere
telaio.
3.
Localizzare lo slot AGP sulla
scheda madre.
4.
Rimuovere i supporti in metallo
che corrispondono allo slot AGP.
Conservare le viti.
5.
Allineare la scheda nello slot
AGP. Tenere la scheda per i lati
ed inserirla nello slot senza
utilizzare una forza eccessiva, o
premendo qualsiasi componente
sulla scheda. Assicurarsi che la
scheda
sia
inserita
completamente e con sicurezza
nello slot.
6.
Assicurare i supporti della
scheda al pannello posteriore
La disposizione della scheda VGA può
del telaio del computer, utilizzando
variare secondo i modelli
le viti rimosse dal supporto di metallo.
7.
Rimettere la copertura al telaio.
la
copertura
del
Manuale Utente
6
Guida all’installazione rapida
Sistemi con una scheda VGA esistente:
1.
Cambiare il driver schermo su Standard VGA.
2.
Spegnere il computer e scollegare tutti i cavi d’alimentazione.
3.
Sostituire la scheda VGA esistente con la scheda nuova.
La scheda grafica è installata. Prima di riavviare il computer, collegare il monitor PC
o altri dispositivi di visualizzazione, a questa scheda (vedi capitolo 2-2, “Connessione
periferiche”).
Installazione del driver
Dopo avere effettuato il collegamento,
riavviare il computer ed installare i
driver software e le utilità. Fare clic su
“Driver” per iniziare ad impostare il
driver della scheda. (Per la descrizione
dettagliata
della
procedura
di
installazione, si rimanda al Capitolo 3,
“Installazione del driver”.)
Siluro GF4 MX Series
Краткое руководство по установке
7
Краткое руководство по установке
Установка Платы
Данную графическую плату можно установить только в систему с AGP слотом.
Пожалуйста, аккуратно обращайтесь с платой и, прежде чем ее устанавливать,
убедитесь в том, что питание компьютера выключено.
Новые Системы:
1.
Отсоедините все провода питания компьютера.
2.
Откройте корпус компьютера.
3.
Найдите на материнской плате
AGP слот.
4.
Удалите
металлическую
заглушку, относящуюся к AGP
слоту. Сохраните винт.
5.
Примерьте плату к слоту AGP.
Держа плату за края, вставьте
ее в слот, не прилагая
особенных усилий и не
нажимая ни на какие ее
элементы. Убедитесь, что она
плотно вошла в слот.
6.
Закрепите плату в задней
части корпуса винтом от ранее
удаленной
металлической
заглушки.
7.
Закройте корпус компьютера.
Схема расположения элементов на плате VGA
может изменяться в зависимости от модели
Руководство Пользователя
8
Краткое руководство по установке
Системы с установленной VGA Платой:
1.
Замените драйвер монитора на Standard VGA.
2.
Выключите компьютер и отсоедините все шнуры питания.
3.
Замените старую плату VGA на новую.
Ваш графический адаптер теперь установлен. Перед перезагрузкой компьютера
не забудьте подключить монитор, или какое-либо другое устройство вывода
изображения (см. Часть 2-2 “Подключение Устройств”).
Установка Драйвера
После завершения подключения
перезагрузите
компьютер
и
установите драйверы и программные
утилиты.
Нажмите
“Driver”
(“Драйвер”) для запуска настройки
драйвера этой платы. (За подробную
процедуру установки обращайтесь к
Части 3 “Установка Драйвера”.)
Siluro GF4 MX Series
快速安裝指引
9
快速安裝指引
卡片安裝
這張顯示卡只能安裝到具有 AGP 插槽設計的主機板上面,請您小心地拿取這張
顯示卡,並且在安裝顯示卡到主機板上之前,先確認電腦的電源線已經拔掉。
全新系統:
1.
拔下電腦的所有電源線。
2.
拆下電腦機蓋。
3.
找出主機板上的 AGP 插槽。
4.
移除該 AGP 插槽之對應金屬
蓋條。請保留好螺絲。
5.
將本顯示卡與 AGP 插槽對齊
好。握住卡片邊緣,將其插到
插槽中,切忌用力過度,也不
要按到卡片上的任何組件。請
確定其已牢固並完全插入插槽
當中。
6.
用原來從固定槽上取下的螺絲
將顯示卡鎖到固定槽上。
7.
蓋回電腦機蓋。
現有顯示卡之系統:
1.
將顯示驅動程式變更為「標準 VGA」。
2.
關閉電腦電源,並拔下所有電源線。
3.
用新的顯示卡換掉現有的顯示卡。
您的顯示卡現已安裝好。在重新啟動電腦前,將 PC 監視器或其他顯示裝置接回
到本卡片上。(請參考 2-2 章 “輸出裝置連接圖”)
使用手冊
10
安裝驅動程式
在連接好顯示裝置後,重新啟動您的
電腦,並安裝驅動及公用程式。點選
“Driver”,即可開始顯示卡的驅動程式
安裝。(關於詳細的安裝程序,請參
考第 3 章 “安裝驅動程式”。)
Siluro GF4 MX Series
快速安裝指引
クイックインストールガイド
11
クイックインストールガイド
カードの取り付け
このグラフィックスカードは、AGP スロットを搭載するマザーボードにだけ
取り付けることができます。このカードは細心の注意を払って取り扱い、取り
付ける前にシステムの電源装置からプラブを抜いてあることを確認してくだ
さい。
新しいシステム:
1.
コンピュータの電源コードをす
べて抜く。
2.
コンピュータのシャーシカバー
を取り外す。
3.
マザーボードに AGP スロットを
配置する。
4.
AGP スロットに対応する金属製
ブラケットを取り除く。ネジは保
管しておいてください。
5.
このカードを AGP スロットの位
置に合わせます。カードの端をつ
かみ、不要な力を入れずに、また
カードの他のコンポーネントを
押すことなく、スロットに差し込
VGA カードの配置は型式によって異なります
む。スロットにしっかりと完全
に固定されているか、確認してください。
6.
このカードの取り付けブラケットを、金属製ブラケットから取り外した
ネジで、コンピュータのシャーシの背面パネルにしっかり固定する。
7.
シャーシカバーを元に戻す。
ユーザーマニュアル
クイックインストールガイド
12
既存の VGA カードを搭載するシステム:
1.
ディスプレイドライバを標準の VGA に変更する。
2.
コンピュータの電源をオフにして、すべての電源コードを抜く。
3.
既存の VGA カードをこの新しいカードに取り替える。
グラフィックスカードの取り付けがこれで完了しました。コンピュータを再起
動する前に、PC モニタまたはその他の表示デバイスをこのカードに接続して
ください(第 2-2 章「デバイス接続」をご覧ください)。
ドライバのインストール
接続が済んだら、コンピュータを再
起動し、ソフトウェアドライバとユ
ーティリティをインストールします。
“Driver” をクリックして、このカー
ド用のドライバの設定を開始します。
(詳細なインストール手順について
は、第 3 章「ドライバのインストー
ル」を参照してください。)
Siluro GF4 MX Series
빠른 설치 설명서
13
빠른 설치 설명서
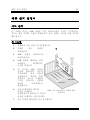
카드 설치
이 그래픽 카드는 AGP 슬롯을 가진 마더보드에만 설치가 가능합니다.
카드는 항상 주의를 기울여 취급하시고 설치 전에는 시스템 전원 코드를
뽑으십시오.
새 시스템:
1.
컴퓨터의 모든 전원 코드를 뽑습니다.
2.
컴퓨터
새시
제거합니다.
3.
AGP
슬롯을
위치시킵니다.
4.
AGP 슬롯에 해당하는 금속
브래킷을
제거합니다.
나사를 조입니다.
5.
이 카드를 AGP 슬롯의
중심에 맞춥니다. 카드의
가장자리를
잡고
슬롯에
삽입합니다. 무리한 힘을
가하거나 카드의 구성품을
누르면 안됩니다. 슬롯에
단단히
고정되었는지
확인합니다.
6.
금속 브래킷에서 제거한
나사를 사용하여
컴퓨터새시의 뒷면에 이 카드의
마운팅 브래킷을 고정시킵니다.
7.
새시 커버를 제자리에 다시 설치합니다.
커버를
마더보드에
VGA 카드 레이아웃은 모델에 따라
다릅니다.
사용 설명서
빠른 설치 설명서
14
기존 VGA 카드를 가진 시스템:
1.
디스플레이 드라이버를 표준 VGA 로 교체합니다.
2.
컴퓨터를 끄고 모든 전원 코드를 뽑습니다.
3.
기존의 VGA 카드를 새 카드로 교체합니다.
이제 그래픽 카드가 설치되었습니다. 컴퓨터를 다시 시작하기 전에, PC
모니터나 기타 디스플레이 장치를 이 카드에 연결하십시오 (2-2 장 "장치
연결"을 참조하십시오).
드라이버 설치
연결
후에는,
컴퓨터를
다시
시작하고 소프트웨어 드라이버 및
유틸리티를 설치합니다. “Driver” 를
클릭하여 이 카드의 드라이버
설치를 시작합니다. (자세한 설치
순서는 3 장 "드라이버 설치"를
참조하십시오.)
Siluro GF4 MX Series
Introduction
Chapter 1.
1-1
Introduction
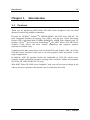
1-1. Features
Thank you for purchasing ABIT Siluro GF4 MX Series Graphics Cards, the most
advanced solution for graphics enthusiasts.
Powered by NVIDIA® GeForceTM4 MX440-SE/MX 440 GPU with AGP 8X, the
most integrated Graphics Processing Unit (GPU), and the new Video Processing
Engine (VPE), integrated Dual 350MHz RAMDACs, 64MB Video Memory and TV
encoder, nViewTM and Accuview AntialiasingTM, the ABIT Siluro GF4 MX Series
Graphics Cards deliver the most visually compelling and complete graphics
experience available today.
Combined with other innovations such as SiluroDVD and Graphic Max, the Siluro
GF4 MX Series Graphics Cards cater to all your graphics needs and enable a wide
range of application.
In addition, AGP 8X provides double the bandwidth of AGP 4X, enables more
complex models and detailed textures creating richer and more lifelike environments
(for Siluro GF4 MX-8X/MX-8X LP only).
With ABIT Siluro GF4 MX Series Graphics Cards, you will not just see things in the
old way but also experience the dynamic and vivid modern 3D world.
User’s Manual
1-2
Chapter 1
1-2. Specification
Siluro GF4 MX-8X:
Powered by NVIDIA® GeForceTM4 MX 440 GPU with AGP 8X working on
275MHz with 256-bit Graphics Core
On board 64MB Video Memory
Integrated dual 350MHz RAMDACs supporting twin-view at 2048 x 1536 @
75Hz
1.1 billion texels/sec fill rate
NVIDIA® Video Processing Engine (VPE) delivers the highest-quality DVD,
video and display output
NVIDIA® Shading Rasterizer technology creates real-time dramatic visual
effect
NVIDIA® nViewTM technology for using multiple displays
NVIDIA® Accuview AntialiasingTM delivers unbeatable visual quality and
frame rates
AGP 8X/4X/2X/1X support and AGP texturing support
Complete OpenGL® and DirectX® support
High-quality HDTV/DVD playback support
TV-Out supports S-Video/RCA output up to 1024x768
DVI-I interface for LCD Monitor
Siluro GF4 MX Series
Introduction
1-3
Siluro GF4 MX-8X LP:
Powered by NVIDIA® GeForceTM4 MX 440 GPU with AGP 8X working on
250MHz with 256-bit Graphics Core
On board 64MB Video Memory
Integrated dual 350MHz RAMDACs supporting twin-view at 2048 x 1536 @
75Hz
1.1 billion texels/sec fill rate
NVIDIA® Video Processing Engine (VPE) delivers the highest-quality DVD,
video and display output
NVIDIA® Shading Rasterizer technology creates real-time dramatic visual
effect
NVIDIA® nViewTM technology for using multiple displays
NVIDIA® Accuview AntialiasingTM delivers unbeatable visual quality and
frame rates
AGP 8X/4X/2X/1X support and AGP texturing support
Complete OpenGL® and DirectX® support
High-quality HDTV/DVD playback support
TV-Out supports S-Video/RCA output up to 1024x768
DVI-I interface for LCD Monitor
User’s Manual
1-4
Chapter 1
Siluro GF4 MX-SE/MX-SE T:
Powered by NVIDIA® GeForceTM4 MX440-SE GPU working at 256-bit
Graphics Core
On-board 64MB Video Memory
Integrated dual 350MHz RAMDACs supporting twin-view at 2048 x 1536 @
75Hz
1 billion pixels/sec fill rate
NVIDIA® Video Processing Engine (VPE) delivers the highest-quality DVD,
video and display output
NVIDIA® Lightspeed Memory Architecture II (LMA) Technology
NVIDIA® nView™ technology for using multiple displays
NVIDIA® Accuview AntialiasingTM delivers unbeatable visual quality and
frame rates
Integrated TV encoder provides TV-out functionality supporting 1024x768
resolution
AGP 4X/2X support and AGP texturing support
Complete support for DirectX® 8.1 and OpenGL®1.3
High-quality HDTV/DVD playback support
TV-Out supports S-Video/RCA output
Siluro GF4 MX Series
Hardware Setup
Chapter 2.
2-1
Hardware Setup
2-1. Card Installation
This graphics card can only be installed in a motherboard with AGP slot. Please
handle this card with care and make sure to unplug the power supply of your system
before installation.
New Systems:
1.
Unplug all power cords of your computer.
2.
Remove computer chassis cover.
3.
Locate the AGP slot on your
motherboard.
4.
Remove the metal bracket
corresponding to the AGP slot.
Keep the screw.
5.
Align this card to the AGP slot.
Hold the card’s edges and insert
it into the slot without using
excessive force or pressing any
components on the card. Make
sure it is firmly and completely
fixed into the slot.
6.
Secure this card’s mounting
bracket to the back panel of
computer chassis with the screw
removed from the metal bracket.
7.
Replace the chassis cover.
Systems with Existing VGA Card:
1.
2.
3.
Change the display driver to Standard VGA.
Shut down your computer and unplug all power cords.
Replace the existing VGA card with this new card.
Your graphics card is now installed. Before restarting your computer, connect PC
monitor or other display devices to this card (see “Devices Connection”).
User’s Manual
2-2
Chapter 2
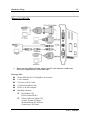
2-2. Devices Connection
This section shows you how to connect the display devices to your graphics card. The
layout of the VGA card may not be exactly the same as the one you have.
Siluro GF4 MX-SE:
Package List:
Siluro GF4 MX-SE 3D Graphics Accelerator
User's Manual
S-Video to RCA Cable
S-Video Extended Cable
Installation CD:
Driver/SiluroDVD 4
Siluro GF4 MX Series
Hardware Setup
2-3
Siluro GF4 MX-8X:
Please note that DVI-I to D-Sub Adapter and TV-Out connector could not be
selected as output interface at the same time.
Package List:
Siluro GF4 MX-8X 3D Graphics Accelerator
User's Manual
S-Video to RCA Cable
S-Video Extended Cable
DVI-I to D-Sub Adapter
Bundled Software
Installation CD:
Driver/SiluroDVD 4
Siluro Software Album CD:
Soldier Fortune II Demo/
WindowBlinds NV Edition/
Earthviewer 3D Demo
User’s Manual
2-4
Chapter 2
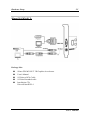
Siluro GF4 MX-8X LP:
Package List:
Siluro GF4 MX-8X LP 3D Graphics Accelerator
User's Manual
S-Video to RCA Cable
S-Video Extended cable
DVI-I to D-Sub Adapter
Bundled Software
Installation CD:
Driver/SiluroDVD 4
Siluro Software Album CD:
Soldier Fortune II Demo/
WindowBlinds NV Edition/
Earthviewer 3D Demo
Siluro GF4 MX Series
Hardware Setup
2-5
Siluro GF4 MX-SE T:
Package List:
Siluro GF4 MX-SE T 3D Graphics Accelerator
User's Manual
S-Video to RCA Cable
S-Video Extended cable
Installation CD:
Driver/SiluroDVD 4
User’s Manual
2-6
Siluro GF4 MX Series
Chapter 2
Driver Installation
Chapter 3.
3-1
Driver Installation
The screen displays in this manual may not exactly reflect the screenshots on your
screen (for example, the model name would vary according to different video adapter).
The contents of the Installation CD that came with this card are subject to change at
any time without notice. The latest driver for this board is also downloadable from our
Web site at http://www.abit.com.tw.
3-1. Windows 98/ME
Auto Setup:
1. Start Windows.
Insert the Installation CD into
CD-ROM drive, it should execute the
installation program automatically. If
not, double-click the execution file at
the main directory of this Installation
CD to enter the installation menu.
3. Click “Next>” to install display
driver.
Click “Driver”.
4. Click “Yes, I want to restart my
computer now”, and then click “Finish”.
2. Click “VGA Driver”.
User’s Manual
3-2
Chapter 3
3-2. Windows 2000
Plug and Play Setup:
1. Start Windows.
When Windows detects your graphics
card, the Found New Hardware Wizard
dialog box appears.
3. Select “Specify a location”, and
then click “Next>”.
Click “Next>”.
4. Insert the Installation CD into
CD-ROM drive. Use the “Browse...”
button to locate the driver, or type
“E:\Driver\Win2KXP” to specify the
path. E: is the CD-ROM drive. Click
“OK” to continue.
2. Select “Search for a suitable driver
for my device [recommended]”, and
then click “Next>”.
Siluro GF4 MX Series
Driver Installation
3-3
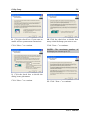
5. The wizard has found the driver for
this device. Click “Next>” to continue.
6. Click “Yes” to continue.
7. Windows has finished installing the
software for this device. Click “Finish”
to close the wizard.
User’s Manual
3-4
Chapter 3
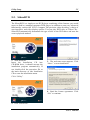
Auto Setup:
1. Start Windows.
Insert the Installation CD into
CD-ROM drive, it should execute the
installation program automatically. If
not, double-click the execution file at
the main directory of this Installation
CD to enter the installation menu.
3. The welcome screen appears, click
“Next>” to start installation.
Click “Driver”.
4. Click “Yes” to continue.
2. Click “VGA Driver”.
5. Click “Yes, I want to restart my
computer now”, and then click “Finish”.
Siluro GF4 MX Series
Driver Installation
3-5
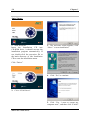
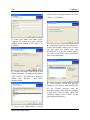
3-3. Windows XP
Plug and Play Setup:
1. Start Windows.
When Windows detects your graphics
card, the Found New Hardware Wizard
dialog box appears.
3. Click “Continue Anyway”.
Click “Next>”.
4. Click “Finish” to complete the
Found New Hardware Wizard.
2. Select “Search for the best driver in
these locations”, use the “Browse”
button to locate the driver, or type
“E:\Driver\Win2KXP” to specify the
path. E is the CD-ROM drive. Click
“Next>”.
User’s Manual
3-6
Chapter 3
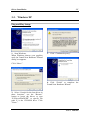
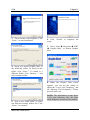
Auto Setup:
1. Start Windows.
Insert the Installation CD into
CD-ROM drive, it should execute the
installation program automatically. If
not, execute the execution file at the
main directory of this Installation Disk.
After it has been executed, the setup
screen appears.
3. The welcome screen appears, click
“Next>” to start installation.
Click “Driver”.
4. Click “Continue Anyway”.
2. Click “VGA Driver”.
5. Click “Yes, I want to restart my
computer now”, and then click
“Finish”.
Siluro GF4 MX Series
Display Properties
Chapter 4.
4-1
Display Properties
The Display Properties is a control panel that helps you to make adjustments on
Adapter, Monitor, Performance, Color Management, Display Position, and nView
functions.
To use the Display Properties, right-click the ABIT Display Tray Icon on the
taskbar’s status area and then click Display Properties to enter, or you may right-click
the Windows 98/ME/2000/XP desktop, click “Properties” “Settings” “Advanced” to enter.
NOTE: The screenshots in this chapter are based on the Windows XP operating
system and for your reference only, may not completely match what you see on your
screen.
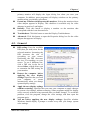
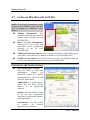
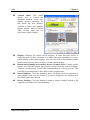
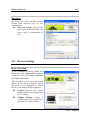
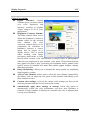
4-1. Settings
This tab displays icons that represent
your monitors. If more than one icon is
displayed, click each one to see the large
number in the corresponding monitor.
The settings for that monitor appear in
Display, Screen resolution, and Color
quality.
Display: Displays all installed
PCI and AGP video adapters.
The adapter for your primary
monitor is in position 1.
Screen resolution: Displays the
current
screen
resolution
settings for the monitor whose
video adapter appears in Display.
Drag the slider to specify the
screen resolution you want. The
higher the number of pixels, the more information you can display on your
screen.
Color quality: Displays the current color settings for the monitor whose
video adapter appears in Display. To use a different color setting, click the
arrow, and then click the setting you want.
Use this device as the primary monitor: Specifies that the monitor
corresponding to the icon you selected above is the primary monitor. The
User’s Manual
4-2
Chapter 4
primary monitor will display the logon dialog box when you start your
computer. In addition, most programs will display windows on the primary
monitor when you initially open them.
Extend my Windows desktop onto this monitor: Selects the monitor whose
video adapter appears in Display. This checkbox is available only for video
adapters in position 2 and higher.
Identify: Click this button to display a number on the monitors that
correspond with the icons shown above.
Troubleshoot: Click this button to start the Display Troubleshooter.
Advanced: Click this button to open the Properties dialog box for the video
adapter that appears in Display.
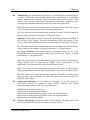
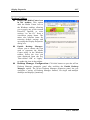
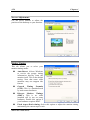
4-2. General
DPI setting: Lists the available
DPI (dots per inch) sizes for the
selected monitor. Increasing the
DPI increases the size of
everything on your screen.
Decreasing the DPI decreases
the size of everything on your
screen. To use a different size,
click a DPI size in the list or
choose Other, which allows you
to customize the DPI setting for
your monitor.
Restart the computer before
applying the new display
settings: Specifies that you want
your computer to restart
automatically when you change
system display settings.
Apply the new display settings
without restarting: Specifies that you want your computer to apply changes
to system color settings without restarting. Some programs might not display
colors correctly without being restarted after you make changes. To avoid this
problem, close the program, change the color settings, and then open the
program again.
Ask me before applying the new display settings: Specifies whether
Windows should display a prompt to restart every time you change system
color settings.
Siluro GF4 MX Series
Display Properties
4-3
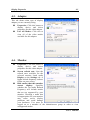
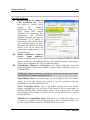
4-3. Adapter
This tab shows what type of display
adapter you are currently using.
Properties: Click this button to
display device and driver
properties for this video adapter.
List All Modes: Click this to
view all of the video modes
available for this adapter.
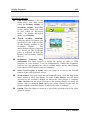
4-4. Monitor
Properties: Click this button to
display device and driver
properties for this video adapter.
Screen refresh rate: Lists the
refresh rates available for the
selected monitor listed under
Display on the Settings tab. A
higher refresh frequency reduces
flicker on your screen.
Hide modes that this monitor
cannot
display:
Specifies
whether the list under Refresh
Frequency will include modes
that are not supported by your
monitor. Choosing a mode that
is inappropriate for your monitor
may cause severe display
problems and could damage
your hardware. You must be
logged on as a member of the Administrator group in order to view
unsupported modes.
User’s Manual
4-4
Chapter 4
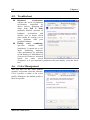
4-5. Troubleshoot
Hardware
acceleration:
Adjusts the levels of hardware
acceleration
controlled
by
device drivers. Dragging the
slider from Full to None
gradually disables portions of
hardware
acceleration
and
enables you to detect which
areas might be causing you to
have problems with your
graphics hardware.
Enable
write
combining:
Specifies
whether
"write
combining" is turned on or off.
Write combining improves
video performance by speeding
up the display of information to
your screen. However, increased
speed
can
cause
screen
corruption, so if you experience problems with your display, clear the check
box.
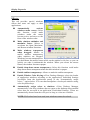
4-6. Color Management
This tab lists all the color profiles
currently associated with this monitor.
Click a profile to make it the active
profile. Otherwise, the default profile is
the active profile.
Siluro GF4 MX Series
Display Properties
4-5
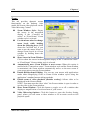
4-7. GeForce4 MX 440 (with AGP 8X)
NOTE: The display information in this
section is for reference only, and will
vary according to different video
adapter.
Adapter Information: This
information details the hardware
aspects of the currently selected
NVIDIA GPU.
Driver Version Information:
This table is a list of files and
associated version information
currently in use by your
NVIDIA GPU.
Additional Properties button: After clicking this button, a menu will pop up,
from which you could access additional features of your NVIDIA GPU.
NVIDIA on the Internet: Click this button to access the NVIDIA Web site
for the latest information and drivers for your NVIDIA GPU.
Performance and Quality Settings:
Intellisample[tm] Settings:
Drag the slider to select the
performance
setting
(as
described below) for quality
enhancements in Direct3D and
OpenGL applications.
Application: Use this setting to
ensure that the driver strictly
adheres to all application
requests.
Quality: Use this default setting
to get the best compromise
between the application requests
and performance.
Performance: Use this setting
to
achieve
the
highest
application performance.
User’s Manual
4-6
Chapter 4
Antialiasing: Use this slider by dragging it to set the degree of antialiasing to
be used in Direct3D and OpenGL applications. Antialiasing is a technique
used to minimize the "stairstep" effect sometimes seen along the edges of 3D
objects. Your selection can range from turning antialiasing completely off to
selecting the maximum amount possible for a particular application.
Off: This option will disable antialiasing in 3D applications. Select this option
if you require maximum performance in your applications.
2x: This option will enable antialiasing using the 2x mode. It offers improved
image quality and high performance in 3D applications.
Quincunx: This option enables a patented antialiasing technique available in
the GeForce GPU family. Quincunx antialiasing offers the quality of the
slower, 4x antialiasing mode at nearly the performance of the faster, 2x mode.
4x: This option will enable antialiasing using the 4x mode. It offers the higher
image quality at the expense of some performance in 3D applications.
4x, 9-tap Gaussian: This option enables antialiasing using the 4x, 9-tap
(Gaussian) mode. It offers higher image quality but at the expense of some
performance in 3D applications.
4xS: This option will enable antialiasing using the 4xS mode. It offers higher
image quality than 4x mode but at slightly lower performance in 3D
application. This setting affects only Direct3D applications.
6xS: This option enables antialiasing using the 6xS mode. It offers higher
image quality than 4xS mode. This setting affects only Direct3D applications.
8x: This option will enable antialiasing using the 8x mode. It offers higher
image quality than 6xS mode for Direct3D applications and 4x mode for
OpenGL applications.
Anisotropic Filtering: Use this slider by dragging it to set the degree of
anisotropic filtering for improved image quality. Enabling this option
improves image quality at the cost of performance.
Off: Disables anisotropic filtering.
1x: Results in maximum performance.
2x: Results in improved image quality at the cost of performance.
4x: Results in improved image quality at the cost of performance.
8x: Results in best image quality.
Texture Sharpening: Sharpens textures when running 3D applications with
antialiasing enabled. This can help improve image quality.
Siluro GF4 MX Series
Display Properties
4-7
Direct3D Settings:
Enable fog table emulation:
This option is used to turn fog
table emulation on or off.
Direct3D specifies that a display
adapter capable of D3D
hardware acceleration should be
able to implement either vertex
fog or table fog. Some games
do not correctly query the D3D
hardware capabilities and expect
table fog support. Choosing this
option will ensure that such
games will run properly on your
NVIDIA graphics processor.
Display logo when running
Direct3D application: Enables
the NVIDIA logo in Direct3D.
Enabling this setting will display
the NVIDIA logo in the lower
corner of the screen while running Direct3D applications.
Mipmap detail level: Allows you to adjust the LOD (Level of Detail) bias for
mipmaps. A lower bias will provide better image quality, while a higher bias
will increase application performance. You can choose from five preset bias
values, varying from “Best Image Quality” to “Best Performance”.
PCI Texture Memory Size: This allows the graphics processor to utilize up
to the specified amount of system memory for texture storage (in addition to
the memory installed on the display adapter itself).
NOTE: The maximum amount of system memory that can be reserved for
texture storage is calculated based on the amount of physical RAM installed in
your computer. The more system RAM, the higher the value you will be able
to set. This setting applies only to PCI display adapters (or AGP display
adapters running in PCI compatibility mode).
Custom Direct3D settings: A list of the custom settings (or “tweaks”) you
have saved. Selecting an item from the list will activate the setting. To apply
the setting, choose the “OK” or “Apply” button.
User’s Manual
4-8
Chapter 4
More Direct3D:
Limits the number of frames the CPU
can prepare before the frames are
processed by the graphics processor
when Vertical Sync is disabled.
NOTE: In some cases, the greater the
number of pre-rendered frames allowed,
the greater the “input lag” may be in
response to devices such as joysticks,
gamepads, or keyboards. Reduce this
value if you experience a noticeable
delay in response to the input devices
connected to your computer while
playing games.
Refresh Rate Override:
Applications control refresh
rate: Allows the Direct3D
application to select its own
refresh rate. The list box below
is disabled when this option is
enabled.
Override refresh rates: Allows
the driver to override the refresh
rate for Direct3D applications.
The list box below is enabled
when this option is enabled.
Siluro GF4 MX Series
Display Properties
4-9
OpenGL Settings:
Disable support for enhanced
CPU instruction sets: Select
this option to disable driver
support
for
enhanced
instructions used by certain
CPUs. Some CPUs support
additional 3D instructions that
complement your NVIDIA
graphics processor and improve
performance in 3D games or
applications. This option allows
you to disable support for these
additional 3D instructions in the
drivers. This can be useful for
performance comparisons or for
troubleshooting.
Enable conformant OpenGL
texture
clamp
behavior:
Texture clamping refers to how
texture coordinates are handled when they fall outside the body of the texture.
These can be clamped to the edge or within the image.
Multi-Display Hardware Acceleration: This option determines advanced
rendering options when using multiple displays and/or different classes of
NVIDIA GPUs.
NOTE: Multi-display hardware acceleration options do not apply when using
nView Multiview mode in Windows NT 4.0.
Single-Display Mode: If you have only one active display, this is the default
setting. You can also specify this setting if you have problems with the
"Multi-Device" modes explained below.
nView Clone/Span Mode: This is the default setting when your nView
display configuration is set to nView Clone mode or nView Span mode. If
multiple NVIDIA-GPU based graphics cards in your system are in use with
active displays, this setting is replaced by one of the "Multi-Device" modes
described below.
Multi-Device Compatibility Mode: This mode is available if you have two
or more active display devices when running in nView Dualview mode or if
you are using different classes of NVIDIA GPU-based cards.
User’s Manual
4-10
Chapter 4
NOTE: When Multi-Device Compatibility Mode is in effect, OpenGL renders
in "compatibility" mode for all displays. In this mode, when different classes
of GPUs are in use, the lowest common feature set of all active GPUs is
exposed to OpenGL applications. The OpenGL rendering performance is
slightly slower than in Single-Display mode.
Multi-Device Performance Mode: This mode is available if you have two or
more active display devices when running in nView Dualview mode or if you
are using different classes of NVIDIA GPU-based cards.
NOTE: When Multi-Device Performance Mode is in effect, OpenGL renders
in "performance" mode for all displays. As in "Compatibility Mode", when
different classes of GPUs are in use, the lowest common feature set of all
active GPUs is exposed to OpenGL applications. However, the rendering
performance is "faster" than in Compatibility Mode, although switching or
spanning display devices may result in minor transient rendering artifacts.
Default color depth for texture: This option determines whether textures of
a specific color depth should be used by default in OpenGL applications. Use
desktop color depth will always use textures of the color depth at which your
Windows desktop is currently running. The Always use 16 bpp and Always
use 32 bpp options will force the use of textures of the specified color depth,
regardless of your desktop settings.
Buffer flipping mode: This option determines the buffer flipping mode for
full-screen OpenGL applications. You can select from the block transfer
method, the page flip method or auto-select. Auto-select allows the driver to
determine the best method based on your hardware configuration.
Vertical sync: This option lets you specify how vertical sync is handled in
OpenGL. Always off will always disable vertical sync in all OpenGL
applications. Off by default will keep vertical sync disabled, unless an
application specifically requests that it be enabled. On by default will keep
vertical sync enabled, unless an application specifically requests that it be
disabled.
Use up to “xx” MB of system memory for textures in PCI mode: This
allows the graphics processor to utilize up to the specified amount of system
memory for texture storage (in addition to the memory installed on the display
adapter itself).
NOTE: The maximum amount of system memory that can be reserved for
texture storage is calculated based on the amount of physical RAM installed in
your computer. The more system RAM, the higher the value you will be able
to set. This setting applies only to PCI display adapters (or AGP display
adapters running in PCI compatibility mode).
Custom OpenGL settings: A list of the custom settings (or “tweaks”) you
have saved. Selecting an item from the list will activate the setting. To apply
the setting, choose the “OK” or “Apply” button.
Siluro GF4 MX Series
Display Properties
4-11
Overlay Controls:
Full Screen Device: Click the
down arrow and then select
either the Primary display or
Secondary display, depending
on the display where you want
to play video in full-screen
mode. To disable full-screen
mode, select Disable.
Track
overlay
rotation:
Links the degree of rotation you
specified for the video overlay
on the Primary display to the
Secondary display.
This
means that the degree of rotation
you choose on the NVRotate
panel is reflected on both the
Primary and Secondary display
devices.
Brightness, Contrast, Hue,
Saturation: Use these controls to adjust the quality of video or DVD
playback on your monitor. You can independently control the brightness,
contrast, hue and saturation to achieve optimal image quality when playing
back videos or DVD movies on your computer.
Select screen region to zoom: Lets you zoom in or out on the selected
portion of the video playback screen.
Zoom control: Lets you zoom into the rendered video. Click the drop-down
menu button to select the display to zoom. Video Mirror sets the zoom
selection to the secondary display on which the video mirror is rendered.
Video Overlay sets the zoom selection to the primary display on which the
overlay video is rendered. Both applies the zoom selection to the both the
primary and the secondary display on which the video is rendered.
Out-In: Drag the slider to zoom in or out of the selected area of the video
playback screen.
User’s Manual
4-12
Chapter 4
NVRotate:
: You can use the
left/right arrow button to
perform the rotation options
below. Or you can click circular
arrow on the right top and drag
it in the direction of the rotation.
Landscape: Landscape is the
“default” desktop mode.
Portrait: Portrait results in a
90-degree rotation.
Inverted Landscape: Inverted
Landscape
results
in
a
180-degree rotation.
Inverted Portrait: Inverted
Portrait results in a 270-degree
rotation.
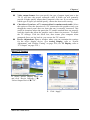
nView Display Mode:
The nView functions allow you to connect two separate output devices (analog
monitor, digital flat panel or TV) to a single graphics card.
Standard Mode (DualView):
Use this mode if you have only
one display device attached to
your
NVIDIA
GPU-based
graphics card.
Siluro GF4 MX Series
Display Properties
4-13
Clone Mode: This mode
outputs an exact copy of the
primary
display
on
the
secondary device.
To enable Clone Mode, select
Clone Mode and click OK or
Apply. Both display monitors
now display the same image.
To disable Clone Mode, select
Standard Mode and click OK or
Apply.
Horizontal Span: This mode
allows you to extend the
Windows desktop across two
display devices horizontally. In
this mode the two displays
combine to form a wide,
spanned display surface, which
is useful when viewing items
that are wider than a single
display.
User’s Manual
4-14
Chapter 4
Vertical Span: This mode
allows you to extend the
Windows desktop across two
display devices vertically. In
this mode the two displays
combine to form a tall, spanned
display surface, which is useful
when viewing items that are
taller than a single display.
Display: Displays all current nView displays. If more than one device is
connected and you have switched to a mode other than Standard, you select
which display is the current display. You can also click on the monitor graphic
in the control directly above to select it as the current display.
Disable auto-panning on secondary device (viewport lock): Turning on this
feature will lock the current pan position on the currently selected display.
This lets you effectively “freeze” the virtual desktop at a certain position. This
is useful for presentations or fine detail work in applications.
Detect Displays: Click this button to detect all display devices connected to
your graphics card. Use this feature if you have plugged in any displays after
the control panel was opened.
Device Settings: Click this button to setup or change settings related to the
output device used for the current display.
Siluro GF4 MX Series
Display Properties
4-15
Desktop Utilities:
Display the Media Center icon
in the taskbar: This option
adds the Media Center icon to
the Windows taskbar, allowing
you to apply any of the custom
Direct3D, OpenGL or color
settings “on the fly” from a
convenient popup menu. The
menu also contains items for
restoring default settings and
accessing the Display Properties
dialog box.
Enable Desktop Manager:
Allows you to choose the icon
used to represent the Media
Center utility in the Windows
taskbar. Select the icon you
want displayed from the list.
Then choose “OK” or “Apply”
to update the icon in the taskbar.
Desktop Manager Configuration: Click this button to open the nView
Desktop Manager properties panel after enabling the Enable Desktop
Manager option. The nView Desktop Manager properties panel lets you
configure a variety of Desktop Manager features, for single and multiple
desktops and displays [monitors].
User’s Manual
4-16
Chapter 4
4-8. nView Desktop Manager
This tab contains information about the nView Desktop Manager. The Setup Wizard
can also be accessed from this tab.
Info:
Enable
nView
Desktop
Manager: Loads or unloads
nView
Desktop
Manager
desktop management.
Also
controls if nView Desktop
Manager automatically starts at
boot or not.
Show
Advanced
nView
controls: Shows or hides
advanced
nView
Desktop
Manager settings [in the form of
additional tabs] for multiple
desktops,
application
management, and user interface
features.
Wizard: Click this button to run
the NVIDIA nView Desktop
Manager Setup Wizard. The
Wizard helps set up the most commonly used nView Desktop Manager
display settings, including window management, desktop management and
“transparency” effects. Using this Wizard, you can enable or disable the
automatic startup of nView Desktop Manager when loading Windows.
(For detailed setup procedure, please refer to Chapter 5-1 “nView Desktop
Manager Setup Wizard”.)
Display Settings: Click to access the Windows Display Properties Settings
panel where you can turn on or off [attach or detach] your connected displays.
Siluro GF4 MX Series
Display Properties
4-17
Profiles:
This tab displays a list of all currently
available profiles.
A profile contains a record of all nView
display settings for easy software setup.
You can load a profile after selecting it
from the list.
Using nView, an administrator can save
a record of all of its display settings in a
single file called a Profile and continue
to add new profiles that are specific to a
company, workgroup, or user. An
administrator can create, save, or delete
profiles.
NOTE: nView includes several generic
profiles for different industries.
Include Display Settings in
Profile Loads and Saves: Allows you to control whether display mode
information [resolution, display arrangement, etc] is saved to and/or restored
from profiles.
Load Profile: Allows you to load a selected profile into nView Desktop
Manager. Once you load a profile, all current Desktop Manager settings are
replaced with those of the profile that is loaded.
New Profile: Allows you to create and add a new profile that contains all of
the current nView Desktop Manager settings. Once saved, you can reload this
profile at any time.
Save Profile: Allows you to save current nView Desktop Manager settings to
the selected profile. Once saved, you can reload this profile at any time.
Delete Profile: Allows you to delete the selected profile.
User’s Manual
4-18
Chapter 4
Windows:
This tab allows control of window and
dialog box placement when using
multiple monitors.
Enable window spanning
across
monitors:
Allows
windows to span [appear across]
displays.
If this option is
disabled, windows will not span
displays.
Enable child window spanning
across monitors: Allows child
windows within an application
to span [appear across] displays.
If this option is not checked,
child windows will not span
displays, even if the parent
window does.
NOTE: To access this option, you must first enable the “Enable window
spanning across displays” option.
Show full-desktop maximize button on title bar: Allows you to add the
nView Desktop Manager window maximize button to title bars on all
application windows. Use this title bar button to toggle between maximized
and restored states in multiple-display configurations.
Allow taskbar to span multiple monitors: Allows you to control whether
the taskbar is limited to a single display or stretched across multiple displays.
Enable dialog box repositioning: This option lets you specify the location of
dialog boxes.
Center on monitor XX: Allows you to display dialog boxes on the specified
display.
Center on cursor’s monitor: Allows you to reposition dialog boxes to the
display where the cursor is located.
Locate on application’s monitor: Allows you to display dialog boxes on the
parent application’s display.
Siluro GF4 MX Series
Display Properties
4-19
Effects:
This tab provides special windows
effects that users can apply to their
applications.
Automatically
activate
windows under cursor: Select
this function could make
windows under the cursor
become active and move to the
front of the window order.
Make windows minimize and
maximize faster: Allows to
accelerate the Open, Maximize,
and Restore window functions.
Make windows transparent
when dragged: Allows to
enable window transparency
when windows are dragged.
Windows become transparent as
you hold down the mouse button while on the window’s title bar, so you can
quickly see what is underneath the window. When you release the mouse
button, the window becomes opaque.
Enable drop-down menu transparency: Select this function could make
drop-down menus transparent when the main window is opaque.
Enable taskbar transparency: Allows to make the taskbar transparent.
Enable Window Color Keying: nView Desktop Manager colors the border
of application windows according to the application’s Individual Settings
[accessible from the Applications panel] or the “Automatically assign
colors..” option below. You can then manipulate color-keyed windows using
color-keyed hot keys.
Automatically assign colors to windows: nView Desktop Manager
automatically color keys windows that are open on the desktop using enabled
colors that are not used in an application’s Individual Settings. Colors are
automatically chosen from the color pool as long as colors are available.
NOTE: If all colors have been used, new windows cannot be colored.
User’s Manual
4-20
Chapter 4
Zoom:
This tab provides dynamic zooms
functionality on the desktop. Also
enable full screen video playback via the
Video Mirroring Control.
Zoom Window Style: Shows
the cursor in the magnified
display if the “Centered on
cursor” or “Fixed frame” Zoom
window style is selected.
Use the mouse wheel to change
zoom levels while holding
down the following keys: Hold
down the Ctrl/Shift key, if you
want to use the mouse wheel to
change Zoom Levels in a Zoom
window by holding down the
Ctrl key.
Show cursor in Zoom Window:
Click to show the cursor in the magnified display if the “Centered on cursor”
or “Fixed frame” Zoom window style is selected.
Automatically move Zoom Window to next screen: When this option is
enabled with “Centered on cursor” Zoom window style and the Zoom window
is maximized, the Zoom window automatically moves to the next screen if
your cursor moves onto the Zoom window.
Enable Bi-Directional Editing: You can use your mouse with applications
under either Magnifying Glass or Frame Zoom window styles using the
application’s standard mouse editing methods.
Enable zoom of video playback [disables overlay]: Allows video to be
displayed in the Zoom window:
NOTE: You must start the video “after” the Zoom window is open in order to
see the video in the Zoom window.
Show Zoom Window: Click this button to toggle on or off a window that
displays a magnification of a selected area of your screen.
Video Mirroring Options: Click this button to open the Overlay Setting
panel, where you can zoom a video window to fit an entire screen at full
playback speed.
Siluro GF4 MX Series
Display Properties
4-21
Hot Keys:
Hot Keys lets users perform various
actions with shortcut keys or key
combinations.
Select an Action: Lists actions
that can be performed when you
press a key or combination of
keys.
4-9. Device Settings
Device Selection:
In the Extended Desktop Mode, the
nView tab in the Advanced tab menu is
replaced by two tabs: Device Selection
and Color Correction.
This tab allows you to select the output
display device (analog monitor, digital
flat panel or TV, depending on which
devices your display adapter supports).
Format: Indicates the current
format and country settings used
for TV output.
Change Format: Opens a
window where you can specify a
particular TV output format.
User’s Manual
4-22
Chapter 4
Video output format: Lets you specify the type of output signal sent to the
TV. If you have the proper connector cable, S-Video out will generally
provide a higher quality output than Composite video out. If you are not sure
which type of signal you should specify, choose the Auto-select setting.
Check here if you have a TV connected but it remains unselectable: Select
this option to force the detection of a TV connected to the graphics card, even
though the control panel does not show that one is currently connected. This
useful in situations where the particular TV model attached does not properly
load the signals that allow the graphics card to detect its presence. To enable
the TV settings: Click the check box, then restart your computer when
prompted. Once you log back in, you can use the TV controls.
Device Adjustment: Opens a window where you can customize the settings
for the active display device. (For Analog Display, refer to “Screen
Adjustment” and “Display Timing” on page 4-26; for TV Display, refer to
“TV Output” on page 4-24.)
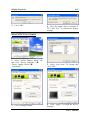
Select TV Output:
1. Select “nView Display Mode” tab
and click “Device Settings>>”
“Select Output Device”“TV”.
2. Click “Apply”.
Siluro GF4 MX Series
Display Properties
3. Click “OK”.
4-23
4. Now the output device switches to
TV. Click “Yes” to confirm the display
settings.
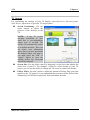
Select NTSC/PAL Format:
1. Select “nView Display Mode” tab
and click “Device Settings>>”
“Select Output Device”
“Advanced...”.
3. Select your local TV format and
click “OK”.
2. Click “Change Format...”.
4. Click “Apply” to finish the Device
Settings.
User’s Manual
4-24
Chapter 4
TV Output:
For customizing the settings of your TV display, enter the Device Selection panel,
click Device Adjustment to open the TV Output panel.
Screen Positioning: Use the
arrow buttons to adjust the
position of the desktop on the
TV.
NOTE:
If the TV picture
becomes scrambled or goes
blank due to over-adjustment,
simply wait 10 seconds. The
picture will automatically return
to its default position. Then you
can begin your adjustments
again. Once you have positioned
the desktop where you want it,
you must press the “OK” or
“Apply” button to save the
settings before the 10-second
interval has elapsed.
Screen Size: Use the slider control by dragging it to the level that adjusts the
screen size of your TV. For example, if you see a black border on your TV
screen, you can use the slider to enlarge the TV screen to remove the border.
Flicker Filter: Use this control to adjust the amount of flicker filter you want
applied to the TV signal. It is recommended that you turn off the flicker filter
completely for DVD movie playback from a hardware decoder.
Siluro GF4 MX Series
Display Properties
4-25
Color Correction:
Digital
Vibrance:
Digital
Vibrance gives you more control
over color separation and
intensity, resulting in brighter
cleaner images in all of your
applications.
Brightness, Contrast, Gamma:
The slider controls allow you to
adjust the brightness, contrast or
gamma values for the selected
color channel. The color
correction controls help you to
compensate for variations in
luminance between a source
image and its output on a
display device. This is useful
when working with image
processing applications to help
provide more accurate color reproduction of images (such as photographs)
when they are displayed on your monitor. Also, many 3D-accelerated games
may appear too dark to play. Increasing the brightness and/or gamma value
equally across all channels will make these games appear brighter, making
them more playable.
Image Sharpening: Allows you to sharpen the image quality by amplifying
high frequency content.
Active Color Channel: Allows you to select the color channel controlled by
the sliders. You can adjust the red, green or blue channels individually or all
three channels at once.
Custom color settings: A list of the custom color settings you have saved.
Selecting an item from the list will activate the setting.
Automatically apply these settings at startup: Select this option to
automatically restore the color adjustments you have after Windows is
restarted. If your computer is running on a network, the color is adjusted after
you log on to Windows.
User’s Manual
4-26
Chapter 4
Screen Adjustment:
Use the arrow buttons to adjust the
position of the desktop on your monitor.
Display Timing:
This tab allows you to select your
monitor timing mode:
Auto-Detect: Allows Windows
to receive the proper timing
information directly from the
monitor itself. This is the default
setting. Note that some older
monitors may not support this
feature.
General Timing Formula
(GTF): This is a standard used
by most newer hardware.
Discrete Monitor Timings
(DMT): This is an older
standard still in use on some
hardware. Enable this option if
your hardware requires DMT.
Fixed Aspect Ratio timing: Select this option to adjust the monitor timing
maintaining the current aspect ratio.
Siluro GF4 MX Series
Utility Setup
Chapter 5.
5-1
Utility Setup
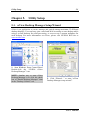
5-1. nView Desktop Manager Setup Wizard
nView is an application to create, manage and switch among maximum 32 different
desktop displays. You can keep your e-mail and Web browsing on one desktop while
using a second desktop for word processing, or even set up a custom wallpaper for
each desktop. For more information on nView, please visit NVIDIA Web site at
www.nvidia.com.
1. Start Windows. Enter Control Panel.
Double-click the “NVIDA nView
Desktop Manager” icon.
NOTE: Another way to enter nView
Desktop Manager is to click the check
box of “Enable Desktop Manager” item
in the “Desktop Utilities” tab.
2. Click “Wizard…” to enter “nView
Desktop Manager setup wizard”.
User’s Manual
5-2
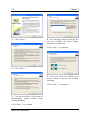
3. Click “Next >”.
Chapter 5
6. By selecting a profile from the list
you can configure all nView display
settings in a single step.
Click “Next >” to continue.
4. Click “Next >”.
7. Click the check box whether you
want to allow or prevent the window
spanning.
Click “Next >” to continue.
5. Click the check box if you want to
automatically enable nView when
starting Windows.
Click “Next >” to continue.
Siluro GF4 MX Series
Utility Setup
5-3
8. Click the check box if you want to
enable nView system menu extensions.
10. Click the check box to decide how
many initial desktops you want to use.
Click “Next >” to continue.
Click “Next >” to continue.
NOTE: The maximum number of
desktops you can set up is 32.
9. Click the check box to decide the
dialog boxes placement.
Click “Next >” to continue.
11. Click “Next >” to continue.
User’s Manual
5-4
Chapter 5
12. Click the check box if you want to
use the Explorer to navigate desktops.
14. Click the check box if you want to
make windows maximize faster.
Click “Next >” to continue.
Click “Next >” to continue.
13. Click the check box if you want to
make the windows transparent when
dragged.
Click “Next >” to continue.
Siluro GF4 MX Series
15. Click “Finish” to complete the
setup.
Utility Setup
5-5
5-2. SiluroDVD
The SiluroDVD is a simple-to-use DVD player combining all the features you would
expect to find in a standard consumer DVD player, in addition to some very advanced
functionality, such as full VCD 2.0 support, full precision video decoding, a choice of
user interfaces, and video display options. You can play DVD titles or Video CDs SiluroDVD automatically determines the type of disc in the DVD drive and uses the
correct playback method.
1. Start Windows.
Insert the Installation CD into
CD-ROM drive, it should execute the
installation program automatically. If
not, double-click the execution file at
the main directory of this Installation
CD to enter the installation menu.
3. The welcome screen appears. Click
“Next>” to start installation.
Click “Utility”.
4. Read the license agreement. Click
“Yes” to continue.
2. Click “SiluroDVD”.
User’s Manual
5-6
Chapter 5
one from the existing folders list. Click
“Next>” to continue.
5. Enter your name, the name of the
company for whom you work, and the
product serial number. Click “Next>” to
continue.
8. When the installation has finished, a
screen will appear, asking you to select
the file types for which you want
SiluroDVD 4 to be the default player.
To select both DVD video and Movie
File is recommended.
6. Setup will install SiluroDVD in the
following folder. To install to this folder,
click “Next>”. To install to a different
folder, click “Browse…” and select
another folder.
9. Then another screen will pop up,
asking if you want to install Help files
or not. Please proceed with the
necessary steps if you want to continue.
If you don’t want to have Help files
installed, simply click “Cancel” to end
the installation process.
7. Type a new folder name, or select
Siluro GF4 MX Series
Utility Setup
5-7
5-3. DirectX
For the best gaming capability, we suggest that you install the latest DirectX driver.
Some newer games will also ask you to install the DirectX driver before you start
them.
1. Start Windows.
Insert the Installation CD into
CD-ROM drive, it should execute the
installation program automatically. If
not, double-click the execution file at
the main directory of this Installation
CD to enter the installation menu.
3. The welcome screen appears. Read
the license agreement carefully. Select
“I accept the agreement”, then click
“Next>” to continue.
Click “Utility”.
4. Click “Next>” to start installation.
2. Click “DirectX”.
User’s Manual
5-8
Chapter 5
5. Click “Finish”
installation.
to
end
the
NOTE: Some games written for older DirectX versions may not work properly under
DirectX 9. Please make sure your application support DirectX 9 before installation.
Also note that the DirectX 9 cannot be uninstalled in the normal way.
Siluro GF4 MX Series
Utility Setup
5-9
5-4. Graphic Max
We have provided you with a tool for adjusting both the graphic processors working
speed and the graphic memory speed. Please be reminded that it may cause damage to
both the graphic processor and graphic memory if you use incorrect settings. Please
read the following description carefully before running Graphic Max!
Important Warning Message: ABIT does not provide any warranty or support for
this utility. The usage of this utility is at your own risk. This risk includes all damages
caused by this utility. If you don't accept this warning, don’t use this utility. ABIT
does not recommend any over-clocking settings for your hardware. Over-clocking can
cause overheating which will damage your chip. If you are not acquainted with the
display card hardware, we strongly recommend that you not to use this utility.
Improper settings can cause unrecoverable damages to your graphics chip, your
display card, and other components!
1. Start Windows.
Insert the Installation CD into
CD-ROM drive, it should execute the
installation program automatically. If
not, double-click the execution file at
the main directory of this Installation
CD to enter the installation menu.
2. Click “Graphic Max”.
Click “Utility”.
User’s Manual
5-10
3. The welcome screen appears. Click
“Next>” to start installation.
Chapter 5
6. Click “Finish” to complete the
setup.
7. Select “Start Programs ABIT
Graphic Max” to launch Graphic
Max.
4. Setup will install Graphic Max in
the following folder. To install to this
folder, click “Next>”. To install to a
different folder, click “Browse…” and
select another folder.
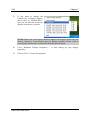
8. When the Graphic Max screen
appears, you can use the sliders to
adjust the “Core Clock Frequency” and
the “Memory Clock Frequency”. Please
proceed with care.
NOTE: The information on this figure
is for your reference only; the exact
clock frequency would vary by models.
5. Type a new folder name, or select
one from the existing folders list. Click
“Next>” to continue.
Siluro GF4 MX Series
Utility Setup
5-11
5-5. Display Tray Icon
After installation of display drivers, you will find a display tray icon on the taskbar’s
status area. Clicking this icon opens this Display Tray, showing a menu composed of
shortcuts of the graphics board’s enhanced and other functions.
NOTE: Besides clicking this display tray icon to control the display properties,
another way to do this is to right-click the Windows desktop area, click Properties
Settings Advanced, and then click the appropriate tab to change your display
settings.
1.
Right-click this display tray icon
on the taskbar’s status area.
2.
A menu pops up. Move the
cursor to “More Resolution”
item to see the entire resolution
table. Here you can directly
choose the display resolution
you want.
User’s Manual
5-12
3.
Chapter 5
If you want to change the
refresh rate of display adapter,
move cursor to “Refresh Rate”,
here you can directly choose the
display refresh rate you want.
NOTE: Make sure your display monitor supports the higher refresh rate you
choose; otherwise, your monitor may not display normally. Please refer to
your display monitor user’s manual for detailed specifications.
4.
Click “Windows Display Properties…” to start setting up your display
properties.
5.
Choose “Exit” to leave this program.
Siluro GF4 MX Series
Utility Setup
5-13
Display Modes Table
This display mode table is for your reference only. The display mode will differ
depending on your specific monitor, and so the resulting display may not be identical
to this table.
Resolution
Colors
Vertical Refresh Rate
640 x 480
8/16/32 bits
60Hz to 240Hz
800 x 600
8/16/32 bits
60Hz to 240Hz
1024 x 768
8/16 bits
60Hz to 240Hz
1024 x 768
32 bits
60Hz to 200Hz
1152 x 864
8/16 bits
60Hz to 200Hz
1152 x 864
32 bits
60Hz to 170Hz
1280 x 960
8/16 bits
60Hz to 170Hz
1280 x 960
32 bits
60Hz to 150Hz
1280 x 1024
8/16 bits
60Hz to 170Hz
1280 x 1024
32 bits
60Hz to 150Hz
1600 x 900
8/16 bits
60Hz to 150Hz
1600 x 900
32 bits
60Hz to 120Hz
1600 x 1200
8/16 bits
60Hz to 120Hz
1600 x 1200
32 bits
60Hz to 100Hz
1920 x 1080
8/16 bits
60Hz to 100Hz
1920 x 1080
32 bits
60Hz to 85Hz
1920 x 1200
8/16 bits
60Hz to 100Hz
1920 x 1200
32 bits
60Hz to 85Hz
1920 x 1440
8/16 bits
60Hz to 85Hz
1920 x 1440
32 bits
60Hz to 75Hz
2048 x 1536
8/16 bits
60Hz to 75Hz
2048 x 1536
32 bits
60Hz
User’s Manual
5-14
Chapter 5
5-6. BIOS Flashing Utility
You may update the newest drivers or BIOS files from your dealer or directly
download from our WEB site at http://www.abit.com.tw.
NOTE: When you use the flash utility to flash the BIOS, the screen will be blank for
about 10 seconds. This is a normal situation, not a malfunction. Do not reboot your
computer during this period, or you may cause the flash to fail.
1.
Reboot your computer into DOS environment, or open a Windows® 95/98
window to the DOS prompt.
Insert the Installation CD into your CD-ROM drive.
2.
Copy CWSDPMI.EXE and NVFLASH.EXE to a new directory from path
D:\NVFLASH. (D: refers to the CD-ROM drive letter)
3.
Copy the new BIOS binary file to the new directory.
4.
Change to the new directory and type the following command:
NVFLASH –F [Filename]. ([Filename] refers to the name of BIOS binary file.)
Then press the “Enter” key. The program will begin flashing your display card
BIOS.
5.
When the flash is complete (the screen will display images again), you must
reboot your computer system to make flash take effect.
Siluro GF4 MX Series
Utility Setup
5-15
The following commands are for the NVIDIA Flash ROM programming utility V4.38,
for your reference only.
NVIDIA Flash ROM utility v4.38 Command List:
Usage:
nvflash [commands] [rom filename]
file
f <filename>
save
b <filename>
compare
k <filename>
tv
x <filename>
version
v <filename>
erase
e
display
d [bytes]
check
c
nolight
l
overridetype p
overridesub u
reboot
y
protecton
w
protectoff
r
straps
m<straps>
format is:
keepstraps
g
romstrap
j
guid
q<guid>
guidsource
1<location>
list
index
help
silence
a
i <index>
?
s <level>
default
#=4 (or 2)
#=5 (or 1)
Flash the ROM using <filename> (no confirmation), then do
compare and ~CRC32.
Read ROM and save to <filename>.
Read ROM and compare with <filename>.
Transfer TV data from file to EEPROM.
Display file version and ~CRC32 (if no filename, acts on ROM).
Erase the ROM.
Display 256 the first bytes of the EEPROM (default is 256 bytes)
Check for supported EEPROM.
Don't light keyboard LEDs.
Don't pause if file & chip PCI VenID/DevID mismatch.
Don't pause if file & chip PCI subsystem ID mismatch.
Reboot the PC after other tasks completed.
Write protect ROM (only works on some ROMs).
Remove ROM Write protect. (only works on some ROMs).
Change soft straps
AND Mask 0, OR Mask 0, AND Mask 1, OR Mask 1
Keep the soft straps already present in the EEPROM after
flashing the new image.
Override the ROM strap setting to allow flashing an image when
grounding the STRAP_SUB_VENDOR pin. This allows flashing
a corrupted or erased EEPROM.
Note: Make sure there is a physical EEPROM present when using
this option
Set the IEEE 1394 GUID in the ROM image (GUID is in the form
of 16 hex digits).
Set the source of the IEEE 1394 GUID.
main
- main EEPROM image
dedicated
- separate serial EEPROM part
List all NVIDIA display adapters found in the system.
Force a specific device index.
Display this screen.
Silence level:
All beeps.
No progress beeps.
No beeps.
User’s Manual
5-16
override
o <level>
default
level=1
level=2
level=3
directpci
n
Chapter 5
Override safety check level:
unknown EEPROM | NV chip aborts application.
unknown EEPROM acceptable for read operations.
unknown NV chip acceptable for read/write operations.
Combined effect of 1,2 (cannot write to unknown EEPROM).
Bypass the PCI BIOS.
Use a single dash ("-") to use the single letter version of a command.
Use a double dash ("--") to use the longer descriptive version of a command.
Use equals ("=") to specify parameters, with separating commas (",").
Sample usage:
nvflash --index=1 nv30nz.rom
Siluro GF4 MX Series
How to Get Technical Support
A-1
Appendix A. How to Get Technical Support
(From our website) http://www.abit.com.tw
(In North America) http://www.abit-usa.com
(In Europe) http://www.abit.nl
Thank you for choosing ABIT products. ABIT sells all our products through
distributors, resellers and system integrators; we have no direct sales to end-users.
Before sending email for tech support please check with your resellers or integrators if
you need any services, they are the ones who sold you your system and they should
know best as to what can be done, how they serve you is a good reference for future
purchases.
We appreciate every customer and would like to provide the best service to you.
Providing fast service to our customers is our top priority. However we receive many
phone calls and a huge amount of email from all over the world. At the present time it
is impossible for us to respond to every single inquiry. Therefore it is quite possible
that if you send an email to us that you may not receive a response.
We have done many compatibility tests and reliability tests to make sure our products
have the best quality and compatibility. In case you need service or technical support,
please understand the constraint we have and always check with the reseller who
sold the product to you first.
To expedite service, we recommend that you follow the procedures outlined below
before contacting us. With your help, we can meet our commitment to provide the
best service to the greatest number of ABIT customers:
1. Check the Manual. It sounds simple but we have taken a lot of care in making a
well-written and thorough manual. It is full of information that doesn't only
pertain to motherboards. The CD-ROM included with your board will have the
manual as well as drivers. If you don't have either one, go to our Program
Download Area of the Website or FTP server.
2. Download latest BIOS, software or drivers. Please go to our Program
Download area on our Website to check to see if you have the latest BIOS. They
are developed over periods of time to fixes bugs or incompatibilities. Also please
make sure you have the latest drivers from your peripheral cards makers!
3. Check the ABIT Technical Terms Guide and FAQ on our Website. We are
trying to expand and make the FAQs more helpful and information rich. Let us
know if you have any suggestions. For hot topics check out our HOT FAQ!
User’s Manual
A-2
Appendix A
4. Internet Newsgroups. They are a great source of information and many people
there
can
offer
help.
ABIT's
Internet
News
group,
alt.comp.periphs.mainboard.abit, is an ideal forum for the public to exchange
information and discuss experiences they have had with ABIT products. Many
times you will see that your question has already been asked before. This is a
public Internet news group and it is reserved for free discussions. Here is a list of
some of the more popular ones:
alt.comp.periphs.mainboard.abit
comp.sys.ibm.pc.hardware.chips
alt.comp.hardware.overclocking
alt.comp.hardware.homebuilt
alt.comp.hardware.pc-homebuilt
5. Ask your reseller. Your ABIT authorized distributor should be able to provide
the fastest solution to your technical problem. We sell our products through
distributors who sell to resellers and stores. Your reseller should be very familiar
with your system configuration and should be able to solve your problem much
more efficiently than we could. After all, your reseller regards you as an important
customer who may purchase more products and who can urge your friends to buy
from him or her as well. They integrated and sold the system to you. They should
know best what your system configuration is and your problem. They should have
reasonable return or refund policies. How they serve you is also a good reference
for your next purchase.
6. Contacting ABIT. If you feel that you need to contact ABIT directly you can
send email to the ABIT technical support department. First, please contact the
support team for the branch office closest to you. They will be more familiar with
local conditions and problems and will have better insight as to which resellers
offer what products and services. Due to the huge number of emails coming in
every day and other reasons, such as the time required for problem reproduction,
we will not be able to reply to every email. Please understand that we are selling
through distribution channels and don't have the resources to serve every end-user.
However, we will try to do our best to help every customer. Please also remember
that for many of our technical support team English is a second language, you will
have a better chance of getting a helpful answer if your question can be
understood in the first place. Be sure to use very, simple, concise language that
clearly states the problem, avoid rambling or flowery language and always list
your system components. Here is the contact information for our branch offices:
Siluro GF4 MX Series
How to Get Technical Support
A-3
North America and South America:
ABIT Computer (U.S.A.) Corporation
45531 Northport Loop West,
Fremont, California 94538, U.S.A.
Tel: 1-510-623-0500
Fax: 1-510-623-1092
[email protected]
[email protected]
http://www.abit-usa.com
U.K. and Ireland:
ABIT Computer (U.K.) Corporation Ltd.
Unit 3, 24-26 Boulton Road,
Stevenage, Herts SG1 4QX, U.K.
Tel: 44-1438-228888
Fax: 44-1438-226333
[email protected]
[email protected]
Germany, Benelux (Belgium, Netherlands, Luxembourg),
Denmark, Norway, Sweden, Finland, and Switzerland:
AMOR Computer B.V. (ABIT's European Office)
Van Coehoornstraat 7,
5916 PH Venlo, The Netherlands
Tel: 31-77-3204428
Fax: 31-77-3204420
[email protected]
[email protected]
http://www.abit.nl
Austria, Czech, Romania, Bulgaria, Yugoslavia, Slovakia,
Slovenia, Croatia, Bosnia, Serbia, and Macedonia:
Asguard Computer Ges.m.b.H
Schmalbachstrasse 5,
A-2201 Gerasdorf/Wien, Austria
Tel: 43-1-7346709
Fax: 43-1-7346713
[email protected]
User’s Manual
A-4
Appendix A
Japan:
ABIT Computer (Japan) Co. Ltd.
Fax: 81-3-5396-5110
http://www.abit4u.jp
Shanghai:
ABIT Computer (Shanghai) Co. Ltd.
Tel: 86-21-6235-1829
Fax: 86-21-6235-1832
http://www.abit.com.cn
Russia:
ABIT Computer (Russia) Co. Ltd.
Fax: 7-095-937-2837
[email protected]
http://www.abit.ru
France, Italy, Spain, Portugal, and Greece:
ABIT Computer France SARL
Tel: 33-1-5858-0043
Fax: 33-1-5858-0047
http://www.abit.fr
All other territories not covered above please contact Taiwan Head Office:
When contacting our headquarters please note we are located in Taiwan and we
are 8+ GMT time. In addition, we have holidays that may be different from those
in your country.
ABIT Computer Corporation
No.323, Yang Guang St., Neihu, Taipei, 114, Taiwan
Tel: 886-2-8751-8888
Fax: 886-2-8751-3382
[email protected]
[email protected]
[email protected]
http://www.abit.com.tw
Siluro GF4 MX Series
How to Get Technical Support
A-5
7. RMA Service. If your system has been working but it just stopped, but you have
not installed any new software or hardware recently, it is likely that you have a
defective component. Please contact the reseller from whom you bought the
product. You should be able to get RMA service there.
8. Reporting Compatibility Problems to ABIT. Because of tremendous number of
email messages we receive every day, we are forced to give greater weight to
certain types of messages than to others. For this reason, any compatibility
problem that is reported to us, giving detailed system configuration information
and error symptoms will receive the highest priority. For the other questions, we
regret that we may not be able to reply directly. But your questions may be posted
to the Internet news group in order that a larger number of users can have the
benefit of the information. Please check the news group from time to time.
9. How to Get Technical Support: If you encounter any problems and need help
from our technical staff, please take the time to fill out the Technical Support
Form and send it to your dealer or our technical support mailbox. The mailbox
address is: [email protected]. We will try to solve your problem as soon as
possible. You must provide specific information on your equipment. Also please
describe in detail the problems you encountered. It’s helpful and enables our
technicians to analyze your problems more quickly.
Information on items marked with an asterisk “*” on the Technical Support Form
are required.
Thank you
ABIT Computer Corporation
http://www.abit.com.tw
User’s Manual
A-6
Appendix A
Technical Support Form
Company Name:
Phone Number:
Contact Person:
Fax Number:
E-mail Address:
VGA Card Product Name
GPU
Memory
*
*
*
*
O/S
□TV-Out □DVI □VIO
M/B maker/model
*
BIOS
*
Driver
*
CPU Type
Intel: □PII □PIII □P4
AMD: □Socket A Other: _________________________
Chipset
□Intel □VIA □SiS □ALi
Chipset code name description: _________________________
Hardware name
IDE1
HDD
IDE2
CD-ROM IDE1
Drive
IDE2
System Memory Size
(SDRAM)
Monitor maker/model
Problem Description:
Siluro GF4 MX Series
Type
Specifications
*
*
*
*