1
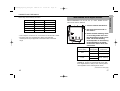
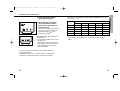
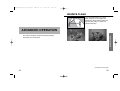
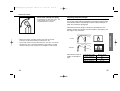
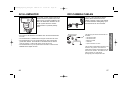
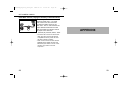
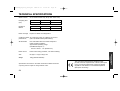
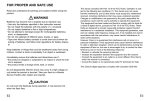
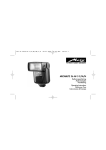
PF2500D_English_C404.qxd
2004.05.12
03:33 PM
Page 1
PROGRAM FLASH
MAXXUM FLASH
2500 (D)
E
INSTRUCTION MANUAL
PF2500D_English_C404.qxd
2004.05.12
03:33 PM
Page 2
FOR PROPER AND SAFE USE
Read and understand all warnings and cautions before using this
product.
WARNING
Using batteries improperly can cause them to leak harmful
solutions, overheat, or explode which may damage property or
cause personal injury. Do not ignore the following warnings.
• Only use the batteries specified in this instruction manual.
• Do not install the batteries with the polarity (+/–) reversed.
• Do not use batteries which show wear or damage.
• Do not expose batteries to fire, high temperatures, water, or
moisture.
• Do not attempt to recharge, short, or disassemble batteries.
• Do not store batteries near or in metallic products.
• Do not mix batteries of different types, brands, ages, or charge
levels.
• Do not charge alkaline or lithium batteries.
• When recharging rechargeable batteries, only use the
recommended charger.
• Do not use leaking batteries. If fluid from the batteries enters your
eye, immediately rinse the eye with plenty of fresh water and
contact a doctor. If fluid from the batteries makes contact with
your skin or clothing, wash the area thoroughly with water.
• Tape over battery contacts to avoid short-circuiting during
disposal; always follow local regulations for battery disposal.
2
• Do not disassemble this product. Electric shock may cause injury
if a high voltage circuit inside the product is touched.
• Immediately remove the batteries and discontinue use if the
camera is dropped or subjected to an impact in which the interior,
especially the flash unit, is exposed. The flash has a high voltage
circuit which may cause an electric shock resulting in injury. The
continued use of a damaged product or part may cause injuries.
• Store this product out of reach of children. Be careful when
around children not to harm them with the product or parts.
• Do not fire the flash directly into the eyes. It may damage
eyesight.
• Do not fire the flash at vehicle operators. It may cause a
distraction or temporary blindness which may lead to an accident.
• Do not expose this product to liquids or operate this product with
wet hands. If liquid enters the product, immediately remove the
batteries and discontinue use. The continued use of a product
exposed to liquids may cause damage or injury through fire or
electric shock.
• Do not use the product near inflammable gases or liquids such as
gasoline, benzine, or paint thinner. Do not use inflammable
products such as alcohol, benzine, or paint thinner to clean the
product. The use of inflammable cleaners and solvents may
cause an explosion or fire.
• If the product emits a strange odor, heat, or smoke, discontinue
use. Immediately remove the batteries taking care not to burn
yourself, as batteries become hot with use. The continued use of
a damaged product or part may cause injuries.
• Take the product to a Konica Minolta Service Facility when repairs
are required.
3
PF2500D_English_C404.qxd
2004.05.12
03:33 PM
Page 4
FOR PROPER AND SAFE USE
CAUTION
• Do not use or store the product in a hot or humid environment
such as the glove compartment or trunk of a car. It may damage
the product and batteries which may result in burns or injuries
caused by heat, fire, explosion, or leaking battery fluid.
• If batteries are leaking, discontinue use of the product.
• Do not fire the flash while it is in contact with people or objects.
The flash unit discharges a large amount of energy which may
cause burns.
• Burns may result if the batteries are removed immediately after
prolonged or heavy flash use. Wait for the batteries to cool.
This device complies with Part 15 of the FCC Rules. Operation is
subject to the following two conditions: (1) This device may not cause
harmful interference, and (2) this device must accept any interference
received, including interference that may cause undesired operation.
Changes or modifications not approved by the party responsible for
compliance could void the user's authority to operate the equipment.
This equipment has been tested and found to comply with the limits
for a Class B digital device, pursuant to Part 15 of the FCC Rules.
These limits are designed to provide reasonable protection against
harmful interference in a residential installation. This equipment
generates, uses and can radiate radio frequency energy and, if not
installed and used in accordance with the instructions, may cause
harmful interference to radio communications.
However, there is no guarantee that interference will not occur in a
particular installation. If this equipment does cause harmful
interference to radio or television reception, which can be determined
by turning the equipment off and on, the user is encouraged to try to
correct the interference by one or more of the following measures:
• Reorient or relocate the receiving antenna.
• Increase the separation between the equipment and the receiver.
• Connect the equipment to an outlet on a circuit different from that to
which the receiver is connected.
• Consult the dealer or an experienced radio/TV technician for help.
This Class B digital apparatus complies with Canadian ICES-003.
4
5
PF2500D_English_C404.qxd
2004.05.12
03:33 PM
Page 6
CONTENTS
NAMES OF PARTS .................................................................................6
BASIC OPERATION
INSTALLING BATTERIES .....................................................................10
GETTING STARTED .............................................................................12
Mounting the flash........................................................................12
Removing the flash ......................................................................12
Turning the flash on .....................................................................12
Auto Power Off.............................................................................12
Metering-mode switch..................................................................13
About film use (Maxxum/Dynax cameras) ...................................13
P MODE FLASH: THE BASICS ............................................................14
With Maxxum/Dynax series cameras ..........................................14
With DiMAGE series digital cameras...........................................17
EXPOSURE MODES ............................................................................20
A Mode Flash ..............................................................................20
S Mode Flash ..............................................................................20
M Mode Flash .............................................................................21
Flash Sync Speed........................................................................21
ADVANCED OPERATION
BOUNCE FLASH...................................................................................23
AF ILLUMINATOR .................................................................................26
OFF-CAMERA CABLES........................................................................27
Flash-Ratio Control (Varying the intensity of individual flash) .....28
APPENDIX
COMPATIBILITY WITH OTHER PRODUCTS.......................................30
CAUTIONS WHILE HANDLING ............................................................32
TECHNICAL SPECIFICATIONS............................................................34
6
Thank you for purchasing this Konica Minolta product. Please take
time to read through the instruction manual so you may enjoy all
the features of your new flash unit.
This manual covers the operation of PROGRAM/MAXXUM FLASH
2500HS(D) with the following cameras:
Maxxum
9, 7, 800si, 700si, 600si, 400si, 300si, XTsi, HTsi, STsi, QTsi, 3,
4, 5
Dynax
9, 7, 800si, 700si, 600si, 505si, 505si Super, 500si, 500si Super,
404si, 303si, 300si, 3L, 3, 5
DiMAGE
A1, A2, Z1, Z2, 7Hi, 7i, 7, 5
When using another Maxxum, Dynax series 35mm camera, a Vectis
series APS camera, or a Dimâge series digital camera, refer to
“Compatibility with Other Products” section on page 30 while read
the main section of this manual.
This flash unit is designed and manufactured solely for use with
the Konica Minolta Maxxum/Dynax series cameras and DiMAGE
series digital cameras. It cannot be attached to other Konica
Minolta cameras. Performance when used with cameras from
other manufacturers cannot be guaranteed. Konica Minolta takes
no responsibility for accidents or malfunctions due to use with
those cameras.
7
PF2500D_English_C404.qxd
2004.05.12
03:33 PM
Page 8
NAMES OF PARTS
Figures in parenthesis refer to the page number of relevant sections.
Flashtube
BASIC OPERATION
Mounting-foot-release
button (12)
AF illuminator (26)
Mounting foot
(12)
Metering-mode switch
(13, 14, 17)
Switch up - ADI
flash metering
Switch down - TTL
flash metering
The section covers how to prepare the flash for use as
well as the basic flash operation.
Ready lamp (11, 15, 18)
Glows steadily when
the flash is ready to
fire.
Blinks when the
correct flash exposure
was made.
Turns off when the
flash is charging.
Battery-chamber door
(10)
Main switch (12)
Autoflash lamp (14)
Glows to indicate autoflash is
active.
Turns off when using fillflash.
8
9
PF2500D_English_C404.qxd
2004.05.12
03:33 PM
Page 10
The 2500 (D) may be powered by :
• Four AA-size alkaline batteries
• Four AA-size lithium batteries
• Four AA-size rechargeable nickel-metal hydride (Ni-MH) batteries
Only charge nickel-metal hydride batteries in an appropriate
charger unit.
When the flash is charged and ready,
the ready lamp at the rear of the unit
glows.
When the flash charging time exceeds
30 seconds, replace the batteries.
1. Open the battery-chamber door as shown.
2. Insert the batteries as shown
in the diagram in the battery
chamber.
3. Close the battery-chamber
door.
10
11
BATTERIES
INSTALLING BATTERIES
PF2500D_English_C404.qxd
2004.05.12
03:33 PM
Page 12
Mounting the flash
Metering-mode switch
Slide the flash mounting foot
firmly into the camera’s
accessory shoe until it stops.
• The flash locks into place
automatically.
• If the camera’s built-in flash is up,
lower it before mounting the flash unit.
Removing the flash
While pressing the mounting-foot
release button (1), slide the flash
(2) from the accessory shoe.
Select the flash metering-mode.
• For the Maxxum/Dynax series cameras,
ADI flash metering is available with the
ADI compatible cameras and D series
lenses. Refer to the camera’s instruction
manual for details.
• For the DiMAGE series digital cameras,
ADI flash metering is available with the
ADI compatible digital cameras when the
ADI flash metering-mode is set with the
recording mode menu. Refer to the
camera’s instruction manual for details.
• When using a close-up diffuser, a filter
that increases exposure (red 25, neutral
density), or bounce flash, set the
metering mode to TTL. ADI metering will
result in incorrect exposures.
About film use (Maxxum/Dynax cameras)
Turning the flash on
Slide the main switch to turn the
flash on and off.
Do not use films with a speed in excess of ISO 1000. Exposure
errors may result.
• The low-speed film limit is the same as specified in the camera’s
instruction manual. Refer to the instruction manual for details.
Auto Power Off
The flash is turned off automatically to save battery power if the
flash is not used for 15 minutes. To restore power, slide the main
switch off and on.
12
13
GETTING STARTED
GETTING STARTED
PF2500D_English_C404.qxd
2004.05.12
03:33 PM
Page 14
With Maxxum/Dynax series cameras
1. Turn the camera and flash on.
2. Set the P exposure mode on
the camera.
3. Select the flash metering mode
on the flash. The active
metering mode depends on the
metering mode selected and
the camera in use, see chart
below.
ADI flash compatible cameras with
a D series lens
• With the Maxxum/Dynax 7, autoflash is used with full-auto, and fillflash with the P mode.
• With the Maxxum/Dynax 9 and 800si, fill-flash is used when the P
mode is selected (autoflash may also be selected as a custom setting
with the 800si).
• With other cameras, autoflash is used with the P mode. Fill-flash can
be selected in the same way as the flash mode of the built-in flash on
the camera.
5. When the flash is charged,
press the shutter-release
button all the way down to
take the picture.
• The flash is charged when the ready
lamp on the rear of the unit and the
flash-ready lamp
in the camera
viewfinder are both lit.
Metering-mode
switch position
Flash metering
mode used
ADI
ADI metering
TTL
TTL metering
If the flash output was sufficient for
the exposure:
TTL metering
• The ready lamp blinks on the rear of
the flash unit.
• The indicator
blinks in the camera
viewfinder.
ADI flash compatible cameras with
TTL metering selected with a
custom function
ADI
Cameras incompatible with ADI
flash metering
TTL
4. Press the shutter-release
button partway down.
• The photo will be under-exposed if taken before the flash is
completely charged.
• When using the self-timer, confirm the flash is charged before
pressing the shutter-release button to start the countdown.
• The autoflash lamp glows to indicate
autoflash is active.
• The autoflash lamp does not glow
when using fill-flash.
14
15
P MODE FLASH
P MODE FLASH: THE BASICS
PF2500D_English_C404.qxd
2004.05.12
03:33 PM
Page 16
Flash range of the 2500 (D) in meters
With DiMAGE series digital cameras
Aperture
ISO 100
ISO 400
2.8
1-9
1 - 18
4
1-6
1 - 12
5.6
1 - 4.5
1-9
8
1-3
1-6
11
1 - 2.2
1 - 4.5
With the DiMAGE A1, A2, Z1, Z2, 7Hi, 7i, 7 and 5, fill-flash is used
when the P mode is selected.
1. Turn the camera and flash on.
2. Set the P exposure mode on
the camera.
3. Select the flash-metering mode
on recording-mode menu and
the flash metering mode on the
flash. The active metering
mode depends on the metering
mode selected on recordingmode menu and the flash, see
chart below.
• If the subject is closer than 1m, use the flash off-camera with a cable.
• The flash range is for negative films. When using slide film,
underexposure may be apparent at the farther limits of the flash
range.
Recordring-mode
menu setting
Metering-mode
switch position
Flash metering
mode used
ADI
ADI metering
TTL
P-TTL metering
ADI
ADI
P-TTL
P-TTL metering
TTL
• The flash-metering mode can not be selected with the
DiMAGE Z1, and Z2 on recording-mode menu. With
these digital cameras, always P-TTL metering will be
used regardless of the metering-mode switch.
(Continued on next page)
16
17
P MODE FLASH
P MODE FLASH: THE BASICS
PF2500D_English_C404.qxd
2004.05.12
03:33 PM
Page 18
4. Press the shutter-release
button partway down.
5. When the flash is charged,
press the shutter-release
button all the way down to
take the picture.
• The flash is charged when the ready
lamp on the rear of the unit glows
and the flash signal
on the
monitors turns white.
If the flash output was sufficient for
the exposure:
• The ready lamp blinks on the rear of
the flash unit.
• The indicator used with the built-in
flash appears on the monitors. Refer
to the digital camera’s instruction
manual for details.
Flash range of the 2500 (D) in meters with the DiMAGE A1 / A2 / Z1 /
Z2 / 7Hi / 7i / 7 / 5.
Camera sensitivity (ISO)
Aperture
(F)
AUTO
ISO 100
ISO 200
ISO 400
ISO 800
2.8
0.5 - 12
0.5 - 9
0.5 - 12
0.5 - 18
0.5 - 25
4
0.5 - 9
0.5 - 6
0.5 - 9
0.5 - 12
0.5 - 18
5.6
0.5 - 6
0.5 - 4.5
0.5 - 6
0.5 - 9
0.5 - 12
8
0.5 - 4.5
0.5 - 3
0.5 - 4.5
0.5 - 6
0.5 - 9
11
0.5 - 3
0.5 - 2.2
0.5 - 3
0.5 - 4.5
0.5 - 6
• If the subject is closer than 0.5m, use the flash off-camera with a
cable.
• The photo will be under-exposed if taken before the flash is
completely charged.
• When using the self-timer, confirm the flash is charged before
pressing the shutter-release button to start the countdown.
18
19
P MODE FLASH
P MODE FLASH: THE BASICS
PF2500D_English_C404.qxd
2004.05.12
03:33 PM
Page 20
The following descriptions are for camera models with A, S and M
exposure modes.
A Mode Flash
1. Turn the camera and flash on.
2. Set the A exposure mode on
the camera.
• Fill-flash is the active flash mode.
3. Set the aperture and focus on the subject.
• The aperture will affect the flash range. The larger the aperture (the
smaller the f number), the greater the range.
• The shutter speed is automatically set by the camera.
4. When the flash is charged, press the shutter-release
button all the way down to take the picture.
S Mode Flash
1. Turn the camera on.
2. Set the S exposure mode on the camera.
• Fill-flash is the active flash mode.
3. Set the shutter speed, and focus on the subject.
• When using an SLR film camera, the shutter speed should be set to
the flash sync speed or slower.
• The shutter speed is set automatically with the Dynax 500si,
500siSuper, and Maxxum 400si.
4. When the flash is charged, press the shutter-release
button all the way down to take the picture.
20
M Mode Flash
1. Turn the camera on.
2. Set the M exposure mode on the camera.
• Fill-flash is the active flash mode.
3. Set the aperture and shutter speed, and focus on the
subject.
• When using an SLR film camera, the shutter speed should be set to
the flash sync speed or slower.
• The aperture will affect the flash range. The larger the aperture (the
smaller the f number), the greater the range.
4. When the flash is charged, press the shutter-release
button all the way down to take the picture.
FLASH SYNC SPEED
Because of flash duration and focal-plane shutters, there is a
limit to the maximum shutter speed that can be used. This
maximum speed is known as the flash sync. speed.
Sync speeds for specific camera models:
•
•
•
•
•
•
•
Maxxum/Dynax 9
:
Maxxum/Dynax 7, 800si, 700si, 600si
:
Maxxum XTsi, HTsi, 5
:
Dynax 505si, 505si Super, 5
:
Maxxum STsi, QTsi, 400si, 300si, 3, 4
:
Dynax 500si, 500si Super, 404si, 303si, 300si :
Dynax 3L, 3
:
1/300 sec.
1/200 sec.
1/125 sec.
1/125 sec.
1/90 sec.
1/90 sec.
1/90 sec.
• All shutter speeds can be set with DiMAGE series digital
cameras.
21
EXPOSURE MODES
EXPOSURE MODES
PF2500D_English_C404.qxd
2004.05.12
03:33 PM
Page 22
BOUNCE FLASH
Direct flash illumination can cause
harsh shadows on the subject and
background. Bounce flash reflects the
light from the ceiling to create soft
diffuse illumination.
ADVANCED OPERATION
Bounce flash
BOUNCE FLASH
The section describes advanced flash photography
techniques and accessories..
Normal flash
(Continued on next page)
22
23
PF2500D_English_C404.qxd
2004.05.12
03:33 PM
Page 24
BOUNCE FLASH
Tilt the flash towards the ceiling.
• The flash has a click stop at 60°. The
bounce head can be set in any
position between 0° and 90°.
Adjusting the Bounce Angle
The angle of the bounce head is important. If the bounce angle is
too low, the subject will be illuminated by both directly with the flash
and indirectly with the reflected light from the ceiling resulting in a
harsh and unevenly lit photograph.
• With bounce flash, using ADI metering can result in incorrect
exposure. Set the flash metering-mode switch to TTL.
• Use a white ceiling or wall to reflect the flash. The color of a surface
will affect the color of the flash illumination. High ceilings or highly
reflective surfaces such as glass are not suitable for bounce flash.
BOUNCE FLASH
Determine the bounce angle in reference to the distance to the
reflective surface, the distance from the camera to the subject, and
the angle of view of the lens.
Correct
Incorrect
Determine the angle in
relation to the table at
right.
24
Focal length of lens
Bounce angle
70mm minimum
45°
28~70mm
60°
28mm maximum
75°, 90°
25
2004.05.12
03:33 PM
Page 26
AF ILLUMINATOR
In low-light or when subject contrast is
low, the autofocus system may not be
able to focus. In these conditions, the
flash’s AF illuminator will active to aid
the AF system when the shutterrelease button is pressed partway
down.
• The camera’s AF illuminator is disabled when the flash AF illuminator
is in use.
• The AF illuminator is disabled when using the continuous AF mode.
• The AF illuminator may not operate with lenses with focal lengths
greater than 300mm. The illuminator is disabled when the flash is
used off-camera, or with the AF macro-zoom 3X-1X lens.
• The AF illuminator may not operate when the flash is used with the
DiMAGE series digital cameras.
26
OFF-CAMERA CABLES
The use of the optional off-camera
cables allows the flash unit to be
placed to the left or right of the subject
to create attractive side lighting. Up to
four flash units can be connected.
The following off-camera accessories are
available:
• Off-camera cable
• Off-camera shoe
• Extension cable
• Cable CD
• Triple connector TC-1000
The off-camera cable allows the flash to be
used from any position. The extension
cable further extends of the distance of the
flash from the camera. The cable CD and
triple connector TC-1000 allows
photography with multiple flash units.
27
AF ILLUMINATOR
OFF-CAMERA CABLES
PF2500D_English_C404.qxd
PF2500D_English_C404.qxd
2004.05.12
03:33 PM
Page 28
OFF-CAMERA CABLES
Flash-Ratio Control (varying the intensity of individual flash)
When using this flash with other
accessory flash units*, a 2:1 flash
ratio can be used. The flash ratio
controls the relative power of two
flash units. The 2:1 ratio indicates the
output difference between the main
light and fill light; the fill light controls
the depth of the shadows.
*5600HS (D), 5400HS, 5400xi, 5200i
APPENDIX
• The flash ratio cannot be set with this
flash. The ratio must be set with the
compatible accessory flash unit. See
the flash manual for details.
• Ratio control cannot be used with the
DiMAGE series digital cameras and
Maxxum/Dynax 300si. The use of this
function may result in incorrect
exposures.
28
29
PF2500D_English_C404.qxd
2004.05.12
03:33 PM
Page 30
COMPATIBILITY WITH OTHER PRODUCTS
Have your camera manual as reference when reading this flash
manual.
Using xi Series SLR Cameras
(Maxxum/Dynax 9xi, 7xi, 5xi, 3xi, SPxi, 2xi)
• Flash is set to autoflash in the P exposure mode with the 9xi, 7xi, 5xi
and 3xi. Fill flash can be selected. See the camera manual for details.
• Flash is set to autoflash in the P exposure mode with the SPxi and
2xi. Fill flash cannot be selected.
• The shutter speed is set automatically in the S exposure mode with
the 7xi, 5xi, 3xi, SPxi, and 2xi.
Using i Series SLR Cameras
Using APS SLR Cameras
(Vectis S-1)
• Flash is set to autoflash in the P exposure mode. Fill flash can be
selected with the flash-mode button on the camera.
• The shutter speed is set automatically in the S exposure mode.
• The flash coverage with APS cameras is sufficient for lenses with a
focal length of 22mm or longer.
Using Dimâge RD3000 and RD-175 Digital Cameras
• Flash is set to autoflash in the P exposure mode. Fill flash is used
when a photo is taken while the manual fill-flash button on the camera
is pressed.
• The shutter speed is set automatically in the S exposure mode.
(Maxxum/Dynax 8000i, 7000i, 5000i, 3000i)
• Flash is set to autoflash in the P exposure mode. Fill flash can be
selected with the 8000i. See the camera manual for details.
• Flash is set to autoflash in the S exposure mode, and the shutter
speed is set automatically.
• The use of ratio flash control will result in incorrect exposures when
used with the 5000i and 3000i.
Using Early AF Series SLR Cameras
COMPATIBILITY
(Maxxum/Minolta 9000, 7000, 5000)
• The optional flash shoe adapter FS-1200 is required. See the FS1200 manual for details.
30
31
PF2500D_English_C404.qxd
2004.05.12
03:33 PM
Page 32
CAUTIONS WHILE HANDLING
During Photography
• This flash unit has an intense light output and should not be fired
directly in front of anyone's eyes.
Batteries
• Do not store the flash unit with the alkaline batteries inside.
Leakage from the batteries may damage the battery chamber.
• When using alkaline batteries, temperature and storage conditions
can affect performance and may require more than 30 seconds for
the flash to charge. Battery performance can be restored by using
the flash a few times or turning the flash unit on and off several
times. Replace the battery if performance does not improve.
• If lithium batteries become hot due to high temperatures or
repeated use, an internal safety circuit shuts them down. Wait until
the batteries cool before using the flash again.
• Nickel-metal hydride batteries can lose power suddenly. If battery
performance drops while using the batteries, recharge them.
• Depending on the time elapsed since the battery was
manufactured, the flash performance for new batteries may differ
from the values shown in the technical specification section.
• To prevent condensation from forming, place the flash in a sealed
plastic bag when bringing it from a cold environment to a warm
one. Allow it to come to room temperature before removing it from
the bag.
• Battery capacity decreases at colder temperatures. Keep your
flash and spare batteries in a warm inside pocket when shooting
in cold weather. Batteries will regain some of their capacity when
warmed to normal operating temperatures.
• This flash unit is not waterproof. Care should be taken not to
expose the unit to water.
• Care should be taken when used on a beach or near water.
Exposure to water, sand, dust, or salt may damage the product.
Maintenance
• Clean by wiping with a soft, clean cloth. If the flash has been in
contact with sand, wiping will cause surface damage. Gently
remove sand particles using a blower before wiping.
• Do not use organic solvents (paint thinners or benzene) to clean
the product.
Questions and Service
• Flash unit operating temperature: –20°C to 50°C, –4°F to 122°F.
• Do not leave the flash unit exposed extremely high temperatures
(eg. direct sunlight inside motor vehicles), or in conditions of high
humidity.
32
• If you have questions about your flash, contact your local camera
dealer or write to the Konica Minolta distributor in your area.
• Before shipping your flash for repair, please contact an authorized
Konica Minolta Service Facility for instructions.
CAUTIONS
Temperature
33
PF2500D_English_C404.qxd
2004.05.12
03:33 PM
Page 34
TECHNICAL SPECIFICATIONS
Guide number
Recycling time
(sec.)
Number of
flashes
25 (in meters at ISO 100), 82 (in feet at ISO 100)
Alkaline
Ni-MH
Lithium
0.2 - 6
0.2 - 5
0.2 - 6
Alkaline
Ni-MH
Lithium
200 - 4000
200 - 4000
500 - 10000
• For every new battery set.
Flash coverage
Equal to a 28mm focal length lens
AF illuminator
LED. Automatic with low-contrast subjects or
under low-light conditions
Approximate operating range
(with Maxxum/Dynax 7)
AF mid 1 area: 1 - 5m (50mm lens)
Flash control
Flash control using pre-flash, TTL direct metering
Size
65 (W) x 115 (H) x 69 (D) mm
Weight
190g (without batteries)
Specifications are based on the latest information available at the time
of printing and are subject to change without notice.
34
This mark below the flashtube certifies that this
product meets the requirements of the EU (European
Union) concerning interference causing equipment
regulations. CE stands for conformité Européenne
(European conformity).
35
TECHNICAL
SPESIFICATIONS
Continuous flash 30 continuous cycles of 3 flashes per second
(GN 2.8, Nickel-metal hydride battery)
performance
PF2500D_English_C404.qxd
2004.05.12
03:33 PM
Page 36
© 2004 Konica Minolta Photo Imaging, Inc. under the
Berne Convention and universal Copyright Convention
9222-8845-11
P-C404