1
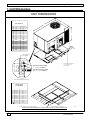
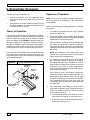
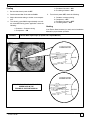
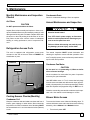
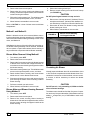
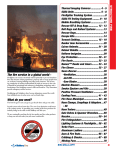
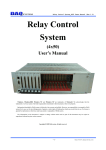
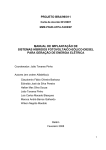
Contents
1. Unit Dimensions . . . . . . . . . . . . . . . . . . . 2
1. Safety Labeling And Signal Words . . 3
2. Safe Installation Requirements . . . . . 3
3. Locating the Unit . . . . . . . . . . . . . . . . . . 4
4. Electrical Wiring . . . . . . . . . . . . . . . . . . . 7
5. Air Distribution System . . . . . . . . . . . . . 9
6. Economizer Accessory . . . . . . . . . . . 10
7. Start--up Procedures . . . . . . . . . . . . . . 11
8. Operation . . . . . . . . . . . . . . . . . . . . . . . 13
9. Maintenance . . . . . . . . . . . . . . . . . . . . . 14
10. Rigging Instructions . . . . . . . . . . . . 16
Rated in accordance
with ARI Standard 210.
PAE 3 TO 5 TON PACKAGE AIR
Printed in U.S.A.
513 01 1701 00
513 01 1702 00
4--01
10/23/01
Installation Instructions
Single Package Air Conditioners
1. Unit Dimensions
UNIT DIMENSIONS
"B"
MODELS:
ALL MODELS
"C"
PAAA47 - PAAA60
DIM.
INCHES
A
36"
B
47-3/8"
1203
1854
MILLIMETERS
C
73"
D
4-5/8"
117
E
15"
381
F
12"
307
476
G
18-3/4"
H
18-3/4"
476
I
12"
305
J
4"
K
"T"
914
"A"
"I"
"E"
102
N/A
1 & 1-1/4"
25N/A
& 31
L
4-1/4"
108
M
5-1/4"
133
N
12-1/4"
311
P
19"
483
Q
15"
381
R
483
S
19"
12-1/4"
311
T
16-7/8"
429
"G"
"H"
"D"
"M"
"R"
"F"
RETURN
"J"
LOW VOLTAGE
1/2" CONDUIT
"S"
"N"
"Q"
SUPPLY
"L"
"P"
UNIT BASE SHOWN SEPARATELY
TO ILLUSTRATE BOTTOM
DUCT OPENINGS
ELECTRIC
HEAT
POWER
ELECTRIC HEAT
POWER
1-1/2" , 2"2²
CONDUIT
1²,1’ ,1--1/2²,
CONDUIT
9-1/8
6
5-5/8
UNIT ELECTRICAL
ELECTRICAL POWER
UNIT
POWER
3/4" , 1" , 1-1/4" CONDUIT
3/4²,
1², 1--1/4² CONDUIT
1-3/4
3-1/2
4-5/8
Note: Above dimensions are in inches.
ROOF
CURB
ROOF CURB
ALLMODELS:
MODELS
PAAA47 - PAAA60
MILLIMETERS
DIM.
INCHES
A
67-3/4"
1721
B
64-3/4"
1645
C
23"
584
D
23"
584
E
2-1/2"
64
F
42-3/4"
1086
G
39-3/4"
1010
H
23"
"J"
"I"
584
I
12"
305
J
12"
305
K
14"
356
"E"
"C"
"A"
"B"
"G"
"F"
"H"
’D"
"K"
ROOF CURBS ARE ALSO AVAILABLE IN 8"(203)
AND 24"(610) HEIGHTS (K DIMENSION).
* Roof curbs are also available in 8² (203mm) and 24² (610mm) heights (K dimension).
2
513 01 1702 00
80-10-14
Single Package Air Conditioners
Installation Instructions
1. Safety Labeling And Signal Words
DANGER, WARNING AND CAUTION
The signal words DANGER, WARNING and CAUTION are
used to identify levels of hazard seriousness. The signal
word DANGER is only used on product labels to signify an
immediate hazard. The signal words WARNING and CAUTION will be used on product labels and throughout this
manual and other manuals that may apply to the product.
CAUTION -- Hazards or unsafe practices which COULD
result in minor personal injury or product or property damage.
Signal Words in Manuals
The signal word WARNING is used throughout this manual
in the following manner:
SIGNAL WORDS
DANGER -- Immediate hazards which WILL result in severe personal injury or death.
WARNING -- Hazards or unsafe practices which COULD
result in severe personal injury or death.
WARNING
The signal word CAUTION is used throughout this manual
in the following manner:
CAUTION
2. Safe Installation Requirements
· Seal supply and return air ducts.
Installation or repairs made by unqualified persons can result in hazards to you and others.
Installation MUST conform with local building
codes or, in the absence of local codes, with the
National Electrical Code NFPA70--1990 or current
edition or in Canada CSA C22.1 -- Canadian Electrical Code Part 1 or current edition.
· Check to see that filters are installed correctly and
are the proper type and size.
NOTE: It is the personal responsibility and obligation of the
customer to contact a qualified installer to ensure that the
installation is adequate and conforms to governing codes
and ordinances.
The information contained in this manual is intended for use by a qualified service technician
familiar with safety procedures and equipped
with the proper tools and test instruments.
Failure to carefully read and follow all instructions in this manual can result in unit malfunction,
property damage, personal injury and/or death.
513 01 1702 00
3
Installation Instructions
Single Package Air Conditioners
3. Locating the Unit
The unit is designed for outdoor installation only. The unit
may be installed on a concrete slab (or other adequate platform) at ground level, or on a rooftop with an adequate platform or a roof curb. Typical installations are shown in
NO TAG through NO TAG.
FIGURE 1
Minimum Clearances
CAUTION
Do NOT operate unit in a corrosive atmosphere containing chlorine, fluorine, or any other corrosive chemicals.
Minimum Clearances to Combustible
Construction
Supply and Return Air Ducts . . . . . . . . . . . . . . . . . . . . . . 0²
Duct Connection Side (no economizer)
Duct Connection Side (with economizer) . 48² (1220mm)
48”
Condenser Access Panel Side . . . . . . . . . . 30² (762mm)
Blower Access Panel Side . . . . . . . . . . . . . . 30² (762mm)
Electrical Access Panel Side . . . . . . . . . . . . 30² (762mm)
Clearance between 3 Ft. Overhang
and Top of Unit
. . . . . . . . . . . . 30² (762mm)
Combustible Base
(Wood or Class A, B or C
roof covering material) . . . . . . . . . . . . . . . . . 0²
Access Panels
CAUTION
Clearances
The location MUST allow for minimum clearances and
should not be adjacent to a patio or other area where the
unit’s operating sound level might be objectionable. Local
codes MUST be observed.
Minimum clearances, as specified below and in FIGURE 1,
MUST be maintained from adjacent structures to provide
adequate air circulation and room for service personnel.
Unit will NOT operate properly without all access panels in place.
See FIGURE 2 below for a general view of unit and location
of access panels.
FIGURE 2
Compressor Access
Panel
Blower Access Panel
While minimum clearances are acceptable for safety reasons, they may not allow adequate air circulation around
the unit for proper operation in the cooling mode. Whenever possible, it is desirable to allow additional clearance, especially around the condenser inlet and discharge
openings.
Do NOT install the unit in a location that will permit discharged air from the condenser to recirculate to the condenser inlet.
4
Access Panels
Electrical Access
Panel
513 01 1702 00
Single Package Air Conditioners
Installation Instructions
Installation
Rooftop Installation
CAUTION
Rooftop platform requirements:
Unit will NOT operate properly unless it is installed level front to rear and side to side.
1/ ²
8
The slope MUST NOT be greater than
per foot
(10mm per meter). For side to side leveling, the control
box side MUST always be lower.
--
The unit MUST be situated to provide safe access for
servicing.
--
The existing roof structure MUST be adequate to
support the weight of the unit or the roof MUST be reinforced.
Check the weight of the unit in relation to the roof
structure and local building codes or ordinances and
reinforce roof structure if necessary. See NO TAG on
the back cover of this manual for unit weights and
corner weights.
Ground Level Installation
Ground level platform requirements:
--
The unit MUST be situated to provide safe access for
servicing.
--
Platform may be made of either concrete or pressure
treated wood and MUST be level and strong enough
to support unit weight.
--
Position platform separate from building foundation.
--
Install in well--drained area, with top surface of platform above grade level.
--
Platform MUST be high enough to allow for proper
condensate trap installation and drainage. See
FIGURE 4 and associated text for more information
about condensate drainage.
--
Support for the unit MUST be level and strong
enough to carry unit weight. The support may consist
of a platform or a combination of platform and roof
beams or curb.
The platform may be constructed of pressure treated
wood and may be covered with Class A, B or C roof
covering.
--
Platform MUST allow for proper condensate trap
installation and drainage. See FIGURE 4 and
associated text for more information about condensate drainage.
--
See Hoisting section below for hoisting instructions.
NOTE: Cardboard covers on horizontal supply and return duct openings MUST be removed before starting
unit.
Hoisting
NOTE: All access panels MUST be secured in place before
hoisting.
The unit should be hoisted with two lifting slings. Attach the
slings to rigging shackles that have been hooked through
holes in the base rail.
513 01 1702 00
Two spreader bars MUST be placed on top of the unit to
protect the unit from damage from the pressure exerted by
the slings. Make sure that all equipment is adequate to
handle the weight of the unit and that the slings will not allow the unit to shift.
Refer to NO TAG on the back cover of this manual for
illustrated rigging instructions and weight chart.
5
Installation Instructions
Single Package Air Conditioners
Downflow Conversion
Condensate Drain
These units are shipped ready for horizontal operation but
are adaptable to downflow use. To convert to downflow
use, follow these steps:
The condensate drain outlet is a 3/4² (19.1mm) threaded
female PVC connection located at the bottom of the unit to
the left of the electrical access panel (see FIGURE 4). Condensate drain outlet MUST be held with wrench when
installing trap and drain line.
1. Remove the blockoff plates found in the return air
compartment and the supply air compartment (see
FIGURE 3.
NOTE: Blockoff plate in the supply air compartment only
contains one screw. If reinstalling plate, back part of plate
MUST fit into mating dimples on flange. To reinstall, slant
plate into dimples, then put plate into position and fasten
with screw.
2. Install the removed plates on the horizontal return
and supply air openings.
NOTE: It is the installer’s personal responsibility to follow
all local codes and ordinances and instructions contained
herein, as well as instructions included with accessory
items when installing unit. It is the installer’s personal responsibility to locate directions for installation of this unit
and any or all accessories. Manufacturer is NOT responsible for improper installation practices.
3. Install unit on the appropriate roof curb.
FIGURE 3
The circulating blower and the condenser fan create a negative pressure on the condensate drain line that will prevent the condensate from draining properly without a trap.
To combat this negative pressure, a field supplied condensate trap that will allow a standing column of water of at
least 2² (50.8mm) MUST be installed. Top of outlet from
trap MUST be at least 1² (25.4mm) below top of outlet from
unit. Install the trap as near to the unit as possible for
proper drainage.
A 3/4² (19.1mm) drain line MUST be installed if required by
local codes or if location of unit requires it. Run the drain
line to an open drain or other suitable disposal point.
Condensate Drain Information*
FIGURE 4
Blockoff Plate
(Return Air Compartment)
Electrical Access Panel
Screw
3/
4² (19.1mm)
Threaded Female
PVC Fitting
1² (25.4mm)
2² (50.8mm)
Blockoff
Plate
3/
4² (19.1mm)
Drain Line
* Condensate trap MUST be installed.
6
513 01 1702 00
Single Package Air Conditioners
Installation Instructions
4. Electrical Wiring
connections. If an economizer is installed, see the following section, Low Voltage Wiring With Economizer Option.
Electrical shock hazard.
Disconnect power at fuse box or service panel
before making any electrical connections.
Unit MUST be grounded to electrical service panel.
Failure to follow this warning can result in property damage, personal injury, and/or death.
NOTE: All electrical work MUST conform with the requirements of local codes and ordinances and in the United
States with National Electrical Code ANSl/NFPA 70--1990
(or current edition) and in Canada with CSA C22.1 -- Canadian Electrical Code Part 1 (or current edition). Provide line
voltage power supply from a separate fused circuit with a
disconnect switch (when required) located within sight of
the unit. Supply voltage, amperage, wire, fuse and disconnect switch sizes MUST conform with specifications in the
Technical Support Manual and on the unit rating plate.
Wiring MUST be protected from possible mechanical damage and MUST NOT interfere with removal of access panels, filters, etc.
All exposed wiring and connections MUST be made with
weatherproof cable or wire unless installed in conduit.
Low Voltage Wiring
Low voltage connections are made on the low voltage terminal board inside the electrical compartment (see
FIGURE 5). For access, remove the electrical access panel (see FIGURE 2).
Low Voltage Wiring With Economizer
Option
Same as the above Low Voltage Wiring section except refer to the connection wiring diagram supplied with the
economizer. Also, a pre--wired plug for the economizer is
located just inside the return air opening.
Thermostat
The location of the thermostat has an important effect on
the operation of the unit. FOLLOW THE INSTRUCTIONS
INCLUDED WITH THE THERMOSTAT FOR CORRECT
LOCATION, MOUNTING AND WIRING.
Unit Without Economizer
A field supplied single stage thermostat is required.
Unit With Economizer
A field supplied two stage thermostat is recommended for
use with an economizer. If a single stage thermostat is
used, the compressor will not start if the economizer can
not satisfy the demand for cooling.
Ground Connections
A ground lug is installed on the electrical control plate for
the ground connection (see FIGURE 5). Use a copper conductor of the appropriate size from the unit to a grounded
connection in the electrical service panel or to a properly
driven and electrically grounded ground rod. See WARNING above.
Line Voltage Wiring
Refer to the Technical Support Manual for the connection
wiring diagram for the applicable model and to the instructions included with the thermostat.
Do NOT complete line voltage connections until unit is permanently grounded. All line voltage connections and the
ground connection MUST be made with copper wire.
Route low voltage wires through the port located at the bottom left corner of the blower access panel side of the unit.
Route low voltage wires behind unit cornerpost, through
the wire clip provided, and up to the low voltage terminal
board.
Connections for line voltage are made on the unit electrical
control plate (see FIGURE 5). For access, remove the
electrical access panel (see FIGURE 2).
NOTE: If an Electric Heat Accessory is installed, see the
Electric Heat Accessory Installation Manual for low voltage
513 01 1702 00
Refer to applicable wiring diagram in the Technical Support
Manual. Complete the line service connections to the con-
7
Installation Instructions
Single Package Air Conditioners
tactor ‘L’ terminals on the unit electrical control plate.
Check all screw terminals to ensure they are tight.
NOTE: If an Electric Heat Accessory is installed, refer to
the Electric Heat Accessory Installation Manual to determine line voltage connections. The Electric Heat Accessory mounts inside the unit. Field supplied line voltage wires
for the Electric Heat Accessory (separate from the field
supplied line voltage wires to the unit) connect to the circuit
breaker(s) in the Electric Heat Accessory.
Converting 230V Units to 208V
5. Replace the electrical access panel.
Field Installed Equipment
Wiring to be done in the field between the unit and other devices, or between separate devices which are field
installed and located, MUST NOT exceed the temperature
limitations for type T wire and MUST be installed according
to the manufacturer’s instructions for the devices.
Final Electrical Check
Make a final wiring check to be sure system is correctly
wired. Inspect field installed wiring and the routing to ensure that rubbing or chafing due to vibration will not occur.
To convert 230V units to 208V:
1. Turn electric power OFF.
2. Remove the electrical access panel.
NOTE: Wiring MUST be installed so it is protected from
possible mechanical damage.
3. Locate the 24V control transformer.
4. Remove wires from the terminal labeled “240V” on
the 24V control transformer and reconnect them to
the 208V terminal of the 24V control transformer.
FIGURE 5
Typical Wiring Installation
Electrical Control
Plate
Low Voltage Terminal Board
Contactor ‘L’ Terminals
Ground lug
Carefully route low
voltage wires behind
unit cornerpost
through wire clip
Field supplied line
voltage wires
Knockout for Electric Heat Accessory
field supplied line
voltage wires
80-30-53
8
513 01 1702 00
Single Package Air Conditioners
Installation Instructions
5. Air Distribution System
For airflow data (blower performance data, blower speed
tap settings, filter sizes, etc.) see the Technical Support
Manual.
Ductwork
NOTE: The total heat gain from the structure as expressed
in total Btu/hr MUST be calculated by manufacturer’s
method or in accordance with “A.S.H.R.A.E. Guide” or
“Manual J -- Load Calculations” published by the Air Conditioning Contractors of America or in Canada “H.R.A.I. Residential Heating and Cooling Load Calculation Manual.”
The total heat gain calculated should be equal to or less
than the cooling capacity. Output based on D.O.E. test procedures, steady state efficiency times input.
Ductwork, supply registers, and return air grilles MUST be
designed and sized to handle the unit’s cooling air volume
requirements. If the unit is connected to an existing system,
the ductwork MUST be checked to make sure it is adequate. Extra runs or larger duct sizes may have to be
installed.
Maximum recommended velocity in trunk ducts is 1000
feet per minute (5.08m/s). Velocity in branches should not
exceed 800 feet per minute (4.06m/s). Refer to the Technical Support Manual for unit air volume requirements and
system sizing recommendations.
NOTE: Ductwork sizing affects temperature rise and cooling temperature differential. Be sure to properly size ductwork to the capacity and airflow characteristics of your unit.
Failure to do so can affect limit controls, compressors, motors, and other components and will lead to premature failure of components. This will also adversely affect day to
day unit performance.
Ductwork Insulation
It is recommended that ductwork installed outdoors have a
minimum of 2² (51mm) of fiberglass insulation and be covered by a weatherproof vapor barrier that is protected
against damage. Caulking and flashings, or other means
adequate to provide a permanent weather seal, must be
used.
It is recommended that ductwork installed in attics or other
areas exposed to outdoor temperatures be installed with a
minimum of 2² (51mm) fiberglass insulation and have an
indoor type vapor barrier.
Ductwork Connections
The use of flexible, non--combustible connectors between main trunk ducts and supply and return air plenums
is recommended to minimize vibration transmission .
NOTE: Connect supply and return air plenums to unit in a
manner that will allow the top of the unit to be removed without removing plenums. Plenums MUST be individually
sealed to unit casing. Ducts MUST be terminated inside
structure.
Filters
All return air MUST pass through a filter before entering the
unit. An electronic air cleaner, optional filter racks or other
accessible filter arrangements MUST be installed in the return air ductwork. Minimum recommended filter areas are
listed in the Technical Support Manual and are based on a
velocity of 300 ft./min. (1.2m/s) for disposable filters and
500 ft./min. (2.54m/s) for washable high velocity filters.
CAUTION
Do NOT operate the unit without all filters in place.
Refer to unit rating plate for proper Electric Heat Accessory
sizing and see the Temperature Rise Check section in the
Electric Heat Accessory Installation Instructions.
513 01 1702 00
9
Installation Instructions
Single Package Air Conditioners
6. Economizer Accessory
Sequence of Operation
The purpose of an economizer is to:
·
Provide cool outdoor air to the conditioned space
during the cooling cycle to minimize the use of compressors.
·
Bring outdoor air into the conditioned space to meet
minimum ventilation air requirements whenever the
circulation blower is running.
Theory of Operation
When a field supplied two stage thermostat is in the FAN
ON position:
1. The outdoor air dampers will open to the minimum
position for outdoor air.
The economizer has two sets of dampers that are mechanically linked together. The outdoor air dampers regulate the
intake of outdoor air and the return air dampers regulate
the flow of return air (see FIGURE 6). When the outdoor air
dampers modulate open, the linkage causes the return air
dampers to modulate closed. A barometric relief damper is
installed in the return air side of the system. It relieves any
positive pressure in the unit created by the economizer.
The economizer is controlled by a logic module which field
connects to the unit controls through a harness plug. The
logic module also controls the compressor staging based
on the thermostat input.
FIGURE 6
NOTE: For correct wiring to the low voltage terminal board,
see the connection wiring diagram in the economizer’s
documentation.
Typical Downflow Economizer
Outdoor Air
Dampers
Mixed Air
Sensor
2. On the thermostat’s call for cooling, the thermostat
completes Circuit 1 between thermostat terminals R
and G and Y1 for first stage cooling.
If the economizer’s enthalpy sensor determines that
the outdoor air conditions are below the setting for
economizer operation, the outdoor air dampers will
modulate open and the return air dampers will modulate closed.
NOTE: All circuits have a low voltage safety circuit
consisting of a high pressure switch, a low pressure
switch and an anti--cycle delay timer.
3. The mixed air sensor at the blower inlet modulates
the economizer dampers to prevent the mixed air
from falling below 56°F (13.3°C). (Mixed air refers to
return air after it combines with outdoor air from the
economizer.) The mixed air sensor modulates the
outdoor air dampers between the full open and minimum outdoor air positions.
If the mixed air is not cold enough to maintain the
conditioned space at the selected temperature, the
thermostat will make Y2 and call for second stage
cooling by energizing the economizer logic module.
This energizes the Y1 anti--cycle delay timer and
contactor C1 which energizes the condenser fan and
the compressor.
Actuator Motor and
Logic Module
80-50-28b
Return Air
Dampers
4. If the thermostat is still calling for cooling and the
economizer’s enthalpy sensor determines that the
outdoor air conditions have risen above the setting
for economizer operation:
a. The economizer dampers will close to the minimum position for outdoor air and remain there.
b. Contactor C1 will remain energized and the compressor will continue to run.
10
513 01 1702 00
Single Package Air Conditioners
Installation Instructions
7. Start--up Procedures
cess panel and is also published in the Technical Support
Manual. Wire the speed tap as required.
Electrical shock hazard.
Cooling and Heating
Use extreme care during all of the following
checks and procedures.
If an Electric Heat Accessory is used, see its Installation
Manual for proper heating speed tap settings. If it has been
determined that cooling and heating speeds are needed on
the same speed tap, remove the red heating lead from the
speed tap block and connect it to the insulated male terminal on the black cooling lead. Then place the insulated
black female quick connect to the required speed tap.
Make sure electric power is turned OFF as
instructed in appropriate steps.
Failure to follow this warning can result in property damage, personal injury, and/or death.
Circulating Air Blower
Determining Blower Speed
1. Turn electric power OFF.
2. From the system design, determine the external static pressure (ESP) for the supply ducts, return ducts
and registers, diffusers, grilles, dampers, heaters
and special filters (if any).
3. To your system ESP determined in Step 2, add 0.05
inches of Water Column for a wet coil and 0.08 inches
of Water Column for the unit filter.
4 . From the system design, determine the desired cooling airflow in cubic feet per minute (CFM).
5. Locate the unit’s Blower Performance Data table in
the tech data sheet for the unit’s voltage. (The tech
data sheet is attached to the inside of the electrical
access panel and is also published in the Technical
Support Manual.) From the table, determine the
speed tap the desired airflow requires.
6 . See next section, Speed Taps, to set the blower motor speed terminal block (speed taps) to the cooling
speed determined in the previous steps.
Speed Taps
After determining the required CFM and speed tap data
from the tech data sheet, follow the steps below to change
speeds if necessary.
NOTE: The yellow lead MUST always be connected to the
speed tap block at the common quick connect terminal.
The terminal is identified as COM. Also, this is the only lead
which is 3/16² wide. All other quick connects are 1/4² wide.
Cooling Only
Check Before Starting
1. Check that the blower motor speed terminal block is
set to the proper cooling speed. Refer to the unit wiring diagram and the various airflow tables in the
Technical Support Manual.
2. Check to see that clean, properly sized field supplied
air filters are installed in the return air duct.
3. Inspect the inside of the unit to be sure that all wires
are in place and all tools, etc. are removed.
4. Replace all service access panels.
Check the unit’s operation as outlined in the following
instructions. If any unusual sparking, odors or noises are
encountered, shut OFF electric power immediately. Recheck for wiring errors or obstructions in or near blower motors.
Reverse Rotation (Scroll Compressors
Only)
Three phase scroll compressors CAN run in reverse if improperly wired. If the compressor makes an unusually loud
noise, or if high and low side pressures are nearly identical,
this indicates reverse rotation. To correct, reverse any two
wires at line voltage connections ONLY. Do NOT rewire
any circuits inside the unit to attempt correction of reverse
rotation.
Circulating Air Blower
1. Be sure electric power is OFF.
2. Set thermostat Heat--Cool selector to OFF.
3. Set thermostat fan switch to AUTO.
Refer to FIGURE 7 on Page13 and the unit’s wiring diagram, which is attached to the inside of the electrical ac-
513 01 1702 00
11
Installation Instructions
4. Turn electric power ON. Nothing should start running.
5. Set thermostat fan switch to ON. The circulating air
blower should come ON.
12
Single Package Air Conditioners
6. Resset thermostat fan switch to AUTO. The circulating air blower should go OFF. Nothing should be running.
513 01 1702 00
Single Package Air Conditioners
Installation Instructions
Cooling
c. Condenser fan motor -- ON
d. Circulating air blower -- ON
1. Be sure that electric power is OFF
2. Set thermostat Heat--Cool select to COOL.
5. Turn electric power OFF, check the following:
a. Contactor contacts opening.
b. Compressor -- OFF
c. Condenser fan motor -- OFF
d. Circulating blower -- OFF
3. Adjust thermostat setting to below room temperature.
4. Turn electric power ON for approximately one minute, then OFF. During power application check the
following:
a. Contactor -- Contacts closing
b. Compressor -- ON
FIGURE 7
Heating
If an Electric Heat Accessory is used, see its Installation
Manual for proper heater operation.
Blower Motor Speed Taps (3--Speed and 4--Speed Motors)
3-SPEED MOTOR
YELLOW
COM
BLACK
HI
MOTOR
BLACK
MED
LO
RED
4-SPEED MOTOR
BE SURE TO CHECK BLOWER MOTOR
SPEED DATA IN THE
TECHNICAL SUPPORT MANUAL.
YELLOW
COM
BLACK
HI
BLACK
MEDHI
MOTOR
MEDLO
RED
513 01 1702 00
LO
13
Installation Instructions
Single Package Air Conditioners
8. Operation
Starting Unit After Shutdown
Thermostat Fan Switch Operation
Cooling
With the thermostat fan switch in the ON position, the circulating air blower will run continuously at the speed used for
cooling.
Adjust thermostat setting to desired temperature and set
Heat--Cool selector switch to COOL. The unit will come on
and operate automatically under control of the thermostat.
Close all doors and windows. The unit may run continuously for several hours or longer on the initial run because of
residual heat and moisture in the house. This is normal for
any air conditioning system.
CAUTION
Do NOT operate unit on cooling when the outdoor temperature is below 40°F (4.4°C) unless an optional low
ambient kit is used. This is necessary to prevent possible damage to the compressor.
Heating
If the unit has an Electric Heat Accessory installed, see the
Electric Heat Accessory Installation Instructions for starting procedure.
With the thermostat fan switch in the AUTO position, the
circulating air blower will only run during each cooling cycle
(or heating cycle if Electric Heat Accessory is installed).
Adjusting Room Temperatures
If the temperature in individual rooms is not as desired, balance the system by adjusting the dampers in the branch
ducts. Adjust a little at a time and wait a day after each
change to judge the effect. Once the dampers are adjusted
for normal weather conditions, it is best to leave them that
way. Compensate for temporary weather changes by adjusting the thermostat setting .
FIGURE 8
Typical Branch Duct Dampers
Turning The Unit Off
1. Set the thermostat selector switch to OFF and set the
thermostat fan switch to AUTO. To restart in cooling
mode, adjust the thermostat to the desired temperature and set the thermostat Heat--Cool selector
switch to COOL. To restart in heating mode if Electric
Heat Accessory is installed, adjust the thermostat to
the desired temperature and set the thermostat
Heat--Cool selector switch to HEAT.
2. To shut the unit down completely, turn electric power
OFF.
14
513 01 1702 00
Single Package Air Conditioners
Installation Instructions
9. Maintenance
Monthly Maintenance and Inspection
Checks
Condensate Drain
Air Filters
Annual Maintenance and Inspection
CAUTION
Check for condensate drainage. Clean as required.
Do NOT operate unit without air filters.
Inspect filters at least monthly and replace or clean as required. Washable filters may be cleaned by soaking in mild
detergent and rinsing with cold water. Replace filters with
the arrows on the side pointing in the direction of air flow.
Dirty filters are the most common cause of inadequate
heating or cooling performance, and of compressor failures.
Refrigeration Access Ports
This unit is equipped with refrigeration access ports
mounted on the side of the unit. Refer to FIGURE 9 for
identification of ports.
FIGURE 9
Electrical shock hazard.
Turn OFF electric power supply at disconnect
switch or service panel before removing any access or service panel from unit.
Failure to follow this warning can result in property damage, personal injury, and/or death.
The annual inspection MUST include lubrication and
cleaning as required to ensure efficient operation of the
unit. To simplify access, remove all access panels and the
top from the unit if possible.
Typical Access Ports
Condenser Fan Motor
CAUTION
Do not use 3 in 1 oil, penetrating oil, WD40 or similar
oils to oil motor bearings.
High Side
Oil the condenser fan motor after five years of operation
and every five years thereafter.
Low Side
Use SAE l0W30 motor oil. To oil, remove the hole plugs
from the motor end bells and add several drops (approximately 1/2 teaspoonful) of oil with a squeeze type, flexible
tube oiler. Replace hole plugs after oiling. Do NOT over oil.
Clean the surrounding area and the condenser and evaporator coils. Use caution to avoid damage to coil fins.
Cooling Season Checks (Monthly)
Condenser Coil
Keep the condenser inlet and outlet area clean and free of
leaves, grass clippings or other debris. Grass should be
kept short in front of the condenser inlet. Shrubbery MUST
be trimmed back so it is no closer than 30 inches (762mm)
to unit.
513 01 1702 00
Blower Motor Access
To access the blower motor follow the following steps. To
remove the blower motor and/or the blower motor housing
assembly, refer to Method 1 and Method 2 below.
1. Turn electric power OFF.
15
Installation Instructions
Single Package Air Conditioners
2. Remove the blower access panel.
4. Slide entire housing toward you.
3. Remove the four screws securing the blower motor
housing. If unit has a support bracket, remove the two
screws securing the bracket.
5. Remove screws securing corner and front of unit top
(see FIGURE 10).
4. Slide entire housing toward you. This will allow easier
access to the speed tap block, motor, and wires.
5. When finished, reassemble in reverse order.
Refer to NO TAG for a view of blower motor and blower
compartment.
Method 1 and Method 2
Method 1 allows the motor to be removed without removing the entire blower housing assembly. If it is desirable to
remove the entire blower housing assembly to work on the
motor, use Method 2.
CAUTION
Do NOT place fingers between unit top and unit.
6. Raise corner of unit top at least 2² (50.8mm). Place a
sturdy brace at least 2² (50.8mm) thick between corner and unit top. A 2X4 piece of wood is ideal for this.
7. Disconnect all wires from blower housing and slide
blower housing out of unit.
8. When finished, reassemble in reverse order.
FIGURE 10
Blower Access Showing
Lid Propped with 2X4
With Method 2, the top of the unit is lifted up so that the entire blower housing assembly can be removed. Use Method 2 to replace or repair blower wheel, blower housing, or
any unreachable components behind blower assembly.
Blower Motor Removal Using Method 1
1. Turn electric power OFF.
2. Remove the blower access panel.
3. Remove the four screws securing the blower housing
to blower deck. If the unit has a support bracket, remove the two screws securing the support bracket to
the blower housing.
4. Slide entire housing toward you. This will allow easier
access to the speed tap block, motor, and wires.
5. Reach behind blower housing and locate blower
wheel set nut. Loosen blower wheel set nut.
6. Disconnect all wires from motor and remove the four
pins securing the blower motor mounting cradle to
blower housing.
7. Pull motor towards you and remove.
8. When finished, reassemble in reverse order.
Blower Motor and Blower Housing Removal
Using Method 2
1. Turn electric power OFF.
2. Remove the blower access panel.
3. Remove four screws securing blower housing to
blower deck. If the unit has a support bracket, remove
the two screws securing the support bracket to the
blower housing.
16
Circulating Air Blower
Visually inspect the blower wheel for accumulations of dirt
or lint. Clean the compartment and the blower wheel. If accumulation is excessive on blower wheel, or does not easily remove, it will be necessary to remove the blower
assembly.
CAUTION
Do NOT use 3 in 1 oil, penetrating oil, WD40 or similar
oils to oil motor bearings.
The blower motor should be oiled after five years of operation and every five years thereafter. Oil the blower motor by
adding 1/2 teaspoonful (1cc) of SAE l0W30 to each motor
bearing.
513 01 1702 00
Single Package Air Conditioners
Installation Instructions
10. Rigging Instructions
FIGURE 11
Rigging Instructions “B” Chassis
FAILURE TO FOLLOW THESE WARNINGS CAN RESULT IN
PROPERTY DAMAGE, PERSONAL INJURY AND/OR DEATH.
-- All panels MUST be in place when rigging and lifting.
-- Hook rigging shackles through holes in base rail, as shown in Detail--A.
-- Use spreader bars, when rigging, to prevent unit damage.
-- Be sure rigging and shackles are sufficient to handle weight listed below.
B
C
A
D
CABINET
COOLING
CAPACITY
RANGE
LENGTH
WIDTH
HEIGHT
MAX. WEIGHT
IN
IN
IN
LB
B
3 -- 5 TONS
48.00
48.00
32.50
435
CORNER WEIGHTS in LBS.
MODEL NUMBER
OPERATING WEIGHT
3 TON
392
4 TON
5TON
513 01 1702 00
A
B
CORNER WEIGHTS
C
D
84
104
120
95
412
87
109
126
98
435
91
124
131
103
17
Installation Instructions
Single Package Air Conditioners
11. Rigging Instructions
FIGURE 12
Rigging Instructions “C” Chassis
FAILURE TO FOLLOW THESE WARNINGS CAN RESULT IN
PROPERTY DAMAGE, PERSONAL INJURY AND/OR DEATH.
-- All panels MUST be in place when rigging and lifting.
-- Hook rigging shackles through holes in base rail, as shown in Detail--A.
-- Use spreader bars, when rigging, to prevent unit damage.
-- Be sure rigging and shackles are sufficient to handle weight listed below.
B
C
A
D
CABINET
COOLING
CAPACITY
RANGE
LENGTH
WIDTH
HEIGHT
MAX. WEIGHT
IN
IN
IN
LB
C
3 -- 5 TONS
73.00
48.00
36.50
515
CORNER WEIGHTS in LBS.
MODEL NUMBER
18
OPERATING WEIGHT
3 TON
472
4 TON
5TON
A
B
CORNER WEIGHTS
C
D
98
122
141
111
492
102
128
148
115
515
107
134
154
121
513 01 1702 00
INTERNATIONAL COMFORT PRODUCTS
LIMITED WARRANTY CERTIFICATE
For Cooling & Heating Products
SAVE THIS CERTIFICATE. It gives you specific legal rights, and you may also have other rights which may vary from state to state and
province to province.
If your unit needs servicing, contact a qualified dealer or qualified service technician of your choice. When requesting service, please have the model
and serial number from each unit in your heating and/or cooling system readily available. If your dealer needs assistance, the distributor is available to
provide support and we, in turn, support its efforts.
Fill in the installation date and model and serial numbers of the unit in the space provided below and retain this Limited Warranty for your files.
GENERAL TERMS
Subject to the conditions and limitations stated herein, during the term of this Limited Warranty, we will provide a replacement for any functional
component part (as defined below) of your unit found to be defective in materials or workmanship. The term of this Limited Warranty is five years from
installation on Residential Products and one year from installation on Commercial Products. Except as otherwise stated in the ‘‘Additional Terms’’
section, this Limited Warranty covers only the original purchaser and subsequent transferees, and only while the unit remains at the site of the original
installation (except for mobile home installations), and only if the unit is installed inside the continental United States, Puerto Rico, Alaska, Hawaii or
Canada. In addition, the Limited Warranty applies only if the unit is installed and operated in accordance with the printed instructions accompanying the
unit, and in compliance with all applicable installation and building codes and good trade practices. As used in this Limited Warranty, ‘‘installation”
means the original installation of the unit.
THERE ARE EXCEPTIONS to this Limited Warranty as described on the reverse side of this page. All replacement parts will be warranted for the
unused portion of the warranty coverage period on the unit. The part to be replaced must be returned by the dealer to a distributor that sells products for
International Comfort Products, in exchange for the replacement part. In lieu of providing a replacement part, we may, at our sole option, refund to you
an amount equal to the distributor’s component purchase price from us, or provide to you a credit equal to that amount to be applied toward the purchase
of any new unit that we distribute. If a credit for a new unit is given in lieu of a replacement part, the rating plate from the unit being replaced must be
submitted on a warranty claim, and your dealer must make the unit being replaced available to our distributor for disposition. As a condition to warranty
coverage, the unit must receive yearly maintenance, as described in the owner’s manual, by a dealer. Satisfactory proof of yearly service by a dealer
may be required.
‘‘Functional component parts” include only the following: blower motor, unit--mounted sensors & timers, condenser motor, evaporator coil, condenser
coil, condenser fan, capacitor, transformer, single--phase strip heat elements, expansion device, reversing valve, solenoid valve, service valve,
electronic and electro--mechanical control board, ignitor, ignition module, draft inducer assembly, burner pilot, gas valve, limit control, pressure switch,
relays and contactors, blower wheel, interlock switch, crosslighter, pilot shield, gas & oil burners, oil pump assembly, accumulators and factory installed
driers and strainers.
This Limited Warranty DOES NOT COVER any labor, material, refractory chambers, oil nozzles, refrigerant, refrigerant inspection and refrigerant
reclaiming, freight and/or handling charges associated with any repair or replacement and such charges will be your responsibility.
To establish the installation date for any purpose under this Limited Warranty, you must retain the original records that can establish the installation date
of your unit. If you do not provide such documents the start date of the term of this Limited Warranty will be based upon the date of unit manufacture, plus
thirty (30) days. In establishing that the required yearly service has occurred, you must furnish proof of yearly service by a qualified service technician.
This Limited Warranty does not cover: (a) failure or damages caused by accident, abuse, negligence, misuse, riot, fire, flood, or Acts of God (b)
damages caused by operating the unit where there is a corrosive atmosphere containing chlorine, fluorine, or any other damaging chemicals (other
than those found in a normal residential environment) (c) damages caused by an unauthorized alteration or repair of the unit affecting its stability or
performance (d) damages caused by improper matching or application of the unit or the unit’s components (e) damages caused by failing to provide
proper maintenance and service to the unit in accordance with this Limited Warranty Certificate and the printed instructions originally provided with the
unit (f) any expenses incurred for erecting, disconnecting, or dismantling the unit (g) parts or supplies used in connection with service or maintenance,
such as refrigerant, refractory chambers, oil nozzles, filters, or belts (h) damage, repairs, inoperation or inefficiency resulting from faulty installation or
application (i) electricity or fuel costs or any increase in electricity or fuel cost whatsoever including additional or unusual use of supplemental electric
heat (j) units which have not had the required yearly maintenance described elsewhere in this limited warranty.
In no event shall we be liable for any incidental, consequential, or special damages or expenses in connection with any use or failure of this unit.
We have not made, do not make, and hereby disclaim any implied condition or implied warranty of fitness for a particular use or purpose, and
any implied condition or implied warranty of merchantability, to the fullest extent allowed by law. We make no express or implied warranties
except as stated in this Limited Warranty certificate.
No one is authorized to change this Limited Warranty or to create for us any other obligation or liability in connection with this unit. Any implied
warranties shall last for the term of the expressed warranty contained herein. Some states and provinces do not allow the exclusion or limitation of
incidental or consequential damages or do not allow limitations on how long an implied warranty or condition lasts, so the above limitations or exclusions
may not apply to you. The provisions of this Limited Warranty are in addition to and not a modification of or subtraction from any statutory warranties and
other rights and remedies provided by law.
Please refer to reverse side of this page for additional terms.
Model No. _________________________________
Serial No. __________________________________
Date Installed _______________________________
Effective on units installed After July 1, 2002.
USA: International Comfort Products Corporation (USA) · 650 Heil--Quaker Avenue · P.O. Box 128 · Lewisburg, Tennessee 37091 · (931--270--4100)
CANADA: International Comfort Products division of UTC Canada Corporation · 6060 Burnside Court, Unit 1, Mississauga, Ontario L5T 2T5
(905--795--8113).
Manufacturers of Airquest, Arcoaire, Clare, Comfortmaker, Dettson, Heil, Keeprite, Lincoln, Tempstar and other quality brand name private label
products.
Part No. 401 06 1010 18 (Orig. 8/9/2002)
ADDITIONAL TERMS FOR RESIDENTIAL APPLICATIONS ONLY
The Additional Terms for the components listed below are in addition to, and subject to, the General Terms on the reverse side of this page.
Warranty coverage is limited to parts that fail due to defect in materials or workmanship during the specified term.
CENTRAL GAS & OIL FURNACE HEAT EXCHANGERS*
Gas Model Series: C9MPV, H9MPV, T9MPV, C9MPT, H9MPT, T9MPT, C9MPD, H9MPD, T9MPD: Limited Lifetime Warranty on heat exchangers. If
a heat exchanger on one of these furnaces fails due to defect in the part, we will provide a replacement part or, at our option, credit toward the purchase
of a new furnace manufactured by us. This additional Limited Warranty runs only to the original purchaser, and lasts only for as long as the original
purchaser lives in the home where the furnace is initially installed.** It is not transferable to any subsequent owner. If the furnace was not installed in the
home owned by the original purchaser, if the original purchaser sells the home to a subsequent owner, or if proof of original purchase cannot be
provided, then the limited warranty is only for 20 years from the date of original installation.
Gas Model Series: GDL, GNL, TNE, TDE, NTC7, NDC7, NTP6, NDP6, TDE, NTV6, VNE: A replacement heat exchanger will be provided for any
heat exchanger that fails in one of these furnaces due to defect for 25 years from the original date of installation.
Gas Model Series: NTC6, GNE, GDE, NDN6, NTG3, NDN3, FBF, NBF, NDF, NTN3, NTN6, NNE, N9MP1, N9MP2, FUH: A replacement heat
exchanger will be provided for any heat exchanger that fails in one of these furnaces due to defect for 20 years from original date of installation.
Oil Model Series: OLR(105, 160, 182), OCF, OLF, OUF, NOLF, NOUF, OLB, OHB, ODH, FLO, MBO, LBO, NOMF: Limited Lifetime Warranty on
heat exchangers. If a heat exchanger on one of these furnaces fails due to defect in the part, we will provide a replacement part or, at our option, credit
toward the purchase of a new furnace manufactured by us. This additional Limited Warranty runs only to the original purchaser, and lasts only for as
long as the original purchaser lives in the home where the furnace is initially installed.** It is not transferable to any subsequent owner. If the furnace
was not installed in the home of the original purchaser, if the original purchaser sells the home to a subsequent owner, or if proof of original purchase
cannot be provided, then the limited warranty is only for 20 years from the date of original installation.
Oil Fired Floor Furnace: NFO: A replacement heat exchanger will be provided for any heat exchanger that fails due to defect for 10 years from
installation with the following limitation: during the sixth through tenth year, any credit toward your purchase of a component or toward the purchase of
any new unit will be in an amount equal to the distributor’s purchase price reduced by 20 percent for each year after the fifth year.
ADDITIONAL TERMS FOR OIL FURNACE APPLICATIONS ONLY
1) OIL BURNERS - A replacement for 5 years from date of original installation for Oil Burner Parts.
2) OPTIONAL ACCESSORIES AND FUNCTIONAL PARTS: A replacement for 5 years from date of original installation. (Refractory and
oil nozzles not included)
GAS/ELECTRIC PACKAGED UNITS HEAT EXCHANGERS
Model series: PGAD, PGAA, PGMD, PGME, PGF, GPFM, PGC, GPCM: A replacement for 10 years from original date of installation.
COMPRESSORS:*
1) Premium Model Units: HAC0, HAC2, HAC4, CAC0, CAC2, CAC4, KAC0, TCA0, TCA2, TCA4, HHP0, HHP2, HHP4, CHP0, CHP2, CHP4,
TCH0, TCH2, TCH4, PGME, PYMC, PHAD, PGAD, PA95, PAPC, PAK, APK: To the original purchaser a replacement for 10 years from original date
of installation, only if the unit is installed with factory matched coils, except air conditioner condensing units with a nominal SEER of 10 may be matched
with evaporator coils of the same nominal tonnage regardless of manufacturer and in accordance to factory recommendations. This limited 10--year
warranty is not transferable to any subsequent owner. HOWEVER, if the unit was not installed in the home owned by the original purchaser, if the
purchaser sells the home to a subsequent owner, or if proof of original purchase cannot be provided, then the limited warranty is only for 5 years from the
original date of installation.**
2) All Other Models: Air Conditioners, Heat Pumps, & Combination Gas/Electric Units: NAC0, NAC2, NHP0, NHP2, AO, A2, HO, H2, PGF,
PGC, GPFM, GPCM, PAF, APFM, PHF, HPFM, PGAA, PGMD, PA55, PH55, PAPA, PYPA: A replacement for 5 years from date of original
installation, only if: (a) air conditioner condensing units with SEER rating in the range of 10 to 11 SEER are matched with evaporator coils of the same
nominal tonnage regardless of manufacturer and in accordance to factory recommendations, or (b) heat pump condensing units are used with factory
matched coils, unless written approval to do otherwise is obtained from manufacturer.
ADDITIONAL TERMS FOR COMMERCIAL APPLICATIONS ONLY
For purposes of this warranty a commercial application is one in which: the product has over 5 tons nominal cooling capacity, or is designed
for operation with 3 phase electrical power, or is installed in a commercial establishment such as a beauty or hair salon, hospital, school,
restaurant, church, hotel etc..
3-- Phase Models: PGF, GPFM, GPF, PGAD, PGME, PGB, PGMG, PGMF, PGS, PGE, APE, PAE, PAB, PAMD, PAS, PAF, APFM, APF, PHB, PHE,
PYMD, HPB, PHS, CAC, ACC, CAE, ACE, CHC, HCC, CHE, HCE:
The additional Terms of the components listed below are in addition to and subject to the General Terms on the reverse side of this page.
1) GAS FIRED HEAT EXCHANGERS (ALL MODELS):* A replacement for 10 years from date of original installation.
2) COMPRESSORS (ALL MODELS):* A replacement for 5 years from date of original installation.
3) OPTIONAL ACCESSORIES AND FUNCTIONAL COMPONENT PARTS (ALL MODELS):*
A replacement for 1 year from date of original installation.
4) COMMERCIAL OIL MODELS: OLR210, OLR350, OTF210, AMT3, AMT4, AMP3: Ten(10) Year Limited Warranty on heat exchangers.
*To receive advantage of your limited warranty, you must provide proof of yearly service by a qualified service technician.
**To receive advantage of your warranty, you must retain the original records that can establish the installation date and proof of purchase of the unit.
MINI SPLITS:
Summary - Mini Splits Warranted for one (1) year on all replacement parts.
Additional terms for Mini Splits:
The additional Terms of the components listed below are in addition to, and subject to, the General Terms on the reverse side of this page.
1) Compressors (All Models): A replacement compressor will be provided for all compressors that fail due to defect for 5 years from date of original
installation.
2) Optional Accessories and Functional Components Parts (All Models):
A replacement part will be provided for all parts that fail due to defect for one (1) year from date of original installation.
Failure to maintain the equipment through annual maintenance by a qualified service technician shall void the warranty. Proof of service will be required
with all warranty claims. Proof of purchase and installation date must be submitted with all claims.