1
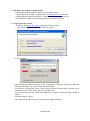
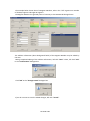
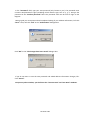
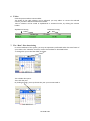
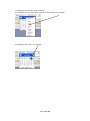
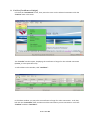
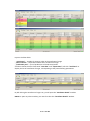
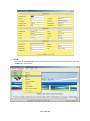
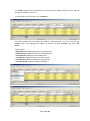
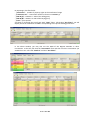
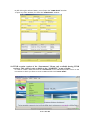
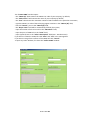
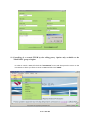
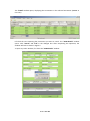
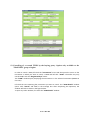
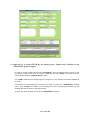
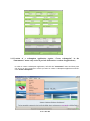
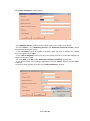
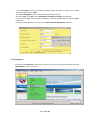
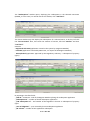
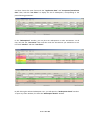
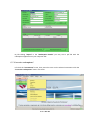
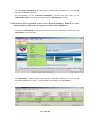
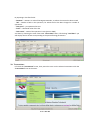
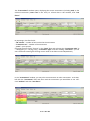
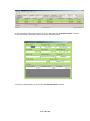
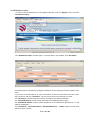
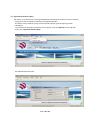
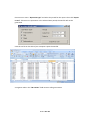
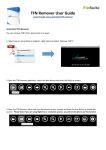
User Manual for the Certificate of Origin
Register computer system
Strona 1 z 44
Index of contents
1.
Hardware and software requirements: ........................................................................................... 3
2.
Logging into the system: ................................................................................................................. 3
3.
The “Settings” Menu ....................................................................................................................... 4
4.
System messages: ............................................................................................................................ 8
5.
Exporting tables to xlsx and csv files. .............................................................................................. 8
6.
Tables............................................................................................................................................... 9
7.
The “Date” filter functioning ........................................................................................................... 9
8.
CoO list [Certificates of Origin] ...................................................................................................... 11
9.
TPNR .............................................................................................................................................. 13
10.
TPNR creation (option of the “Instruments" Menu, only available during TPNR sessions). This
option is only available to the “MAKLER” group of rights. ................................................................... 16
11.
Cancelling of a created TPNR by the selling party. Option only available to the "MAKLER"
group of rights. ...................................................................................................................................... 18
12.
Cancelling of a created TPNR by the buying party. Option only available to the "MAKLER"
group of rights. ...................................................................................................................................... 20
13.
Approval of a created TPNR by the buying party. Option only available to the "MAKLER" group
of rights. ................................................................................................................................................ 21
14.
Creation of a redemption application (option “Create redemption” in the “Instruments” menu
only active in periods dedicated to creation of applications). .............................................................. 22
15.
Creation of a corrective redemption application (option “Create corrective redemption” in the
“Instruments” menu only active in periods dedicated to creation of applications) ............................. 24
16.
Redemptions ............................................................................................................................. 25
17.
"Corrective redemptions" ......................................................................................................... 28
18.
Relocations PR (on justified request of two Register Members, POLPX S.A. may relocate
property rights between register accounts of those Members): .......................................................... 29
19.
Fee report .................................................................................................................................. 31
20.
Transactions: ............................................................................................................................. 34
21.
PR balances report .................................................................................................................... 37
22.
Operations ................................................................................................................................. 38
23.
Viewing PR balance on a date earlier than the current day. ..................................................... 41
24.
Operations details report. ......................................................................................................... 43
Strona 2 z 44
1. Hardware and software requirements:
- installed Microsoft Windows Vista SP2 to 8.1 operating system
- Installed Windows Installer 3.1 (download from www.microsoft.com website)
- Installed Microsoft NET Framework 4.5. (download from www.microsoft.com)
- the application requires use of the Microsoft Internet Explorer browser
2. Logging into the system:
a) connect with www.rejestr.tge.pl (using your Internet browser).
The window below shall open. Click “Uruchom” [Start].
b) in the window:
Type the login provided by POLPX S.A. in the “Użytkownik” [User] field, and then the password
obtained from POLPX. S.A. in the “Hasło” [Password] field.
If you wish to use the Polish version of the system, left-click the Polish flag. If you wish to use
the English version of the system, left-click the English flag.
If you use the Polish version of Microsoft Windows, the system will open the Polish version by
default.
Left-click “Zaloguj” [Log in].
If the login and password are correct, the following window will open:
Strona 3 z 44
Menu Settings
Your Login
Your TGE ID
3. The “Settings” Menu
Left-click the “Settings” menu and then "Your Profile".
The “Account data” window opens (see below), which is specific to your company:
Strona 4 z 44
The example below shows data of a Register Member, who in the “old” register was member
of the RES, Kogen-A and Kogen-B registers.
The Register Member has granted power of attorney to the DOTDOT brokerage house.
The address information (white background fields) of the Register Member may be edited by
the User.
Having completed editing of the address information, left-click "Save". Them, left-click “Tak”
in the “Confirmation” dialogue box.
Click “OK” in the “Changes saved” dialogue box.
If you do not want to save the edited changes, left-click "Cancel".
Strona 5 z 44
Left-click your login:
The “User data” window opens, displaying your data:
type your New password here
Your group of rights
The address information (white background fields) of the Register Member may be edited
by the User.
Strona 6 z 44
In the “Password” field, type your new password (only known to you). The password must
contain 6-8 alphanumeric signs (excluding Polish diacritic signs such as ą, ę, ć). Re-type the
password in the “Confirm password” field. This password shall now be used to login to the
Register.
Having typed your new password and completed editing of your address information, left-click
“Save”. Then, left-click “Tak” in the “Confirmation” dialogue box.
Click “OK” in the “The changes have been saved” dialogue box.
If you do not want to save the new password and edited address information changes, leftclick "Cancel".
To open any other window, you shall close the “Account Data” and “User Data” windows.
Strona 7 z 44
4. System messages:
In many of the Register windows, some fields are mandatory (must contain correct input). If
there is missing input or if the input is not correct, an exclamation mark is displayed next to
the field. Point the cursor on the exclamation mark to display the system message.
5. Exporting tables to xlsx and csv files.
Tables in windows:
"Fee report"
"PR balances report"
"Operations"
"Transactions"
"TPNR"
"CoO list"
"Redemptions”
"Corrective redemptions"
"Relocations"
"Redemption details”
can be exported to xlsx and csv files.
In order to do it, click the right icon in the top menu of the window.
xlsx file
csv file
Strona 8 z 44
6. Tables
Several system windows contain tables.
The width of the table columns can be adjusted, you may widen or narrow the selected
column, just like in Microsoft Office Excel tables.
Data in columns can be sorted in alphabetical or numerical order, by clicking the column
header.
Alphabetical sorting
Numerical sorting
7. The “Date” filter functioning
In several windows of the system, you may see operations performed within the time-frame of
your choice. The "Calendar" function, used to choose dates is described below.
To change the year in the filter field, click here.
The calendar box opens.
Then click the year.
By clicking through, you may choose the year you are interested in.
Strona 9 z 44
To change the month input, click the month.
A scroll-down list of months opens, click the selected month, for example:
To change the day, click it, for example.
Strona 10 z 44
8. CoO list [Certificates of Origin]
Left-click the “Instruments” menu, then point the cursor on the selected instrument. Click the
“CoO list” item in the menu.
The “CoO list” window opens, displaying the certificates of origin for the selected instrument
(PMOZE_A in this particular case).
To refresh data in this window, click "Use filters".
In the above window, you may also see certificates of origin for other instruments. To do that,
left-click the “Instrument” filter and then mark the instruments you are interested in. Left-click
“Confirm” and then “Use filters”.
Strona 11 z 44
Input in the filter fields:
- „PR volume” – number of property rights in the certificate of origin
- „Short number” – sequential number of the certificate of origin
- „Production year” – year of production of the electrical power
and then choose the time frame with "Issue date" and "Import date", left-click "Use filters" to
display the list of certificates of origin, corresponding to the preset filtering parameters.
By left-clicking the certificate of origin row, you will open the "Certificate details" window.
NOTE: To open any other window, you must first close the “Certificate details” window.
Strona 12 z 44
9. TPNR
Left-click the “Instruments” menu, then point the cursor on the selected instrument. Click the
“TPNR” item in the menu.
Strona 13 z 44
The “TPNR” window opens, displaying the transactions of a register member on the selected
instrument (PMGM in this case).
To refresh data in this window, click "Use filters".
The above window may also display the TPNR of a selected status. To do this, left-click the
“Status” filter, then highlight the statuses of interest, left-click "Confirm" and then "Use
filters".
TPNR statuses:
- Registered by S (TPNR registered by the selling party)
- Confirmed by B (TPNR confirmed by the buying party)
- Accomplished (TPNR approved by POLPX S.A.)
- Canceled by S (TPNR canceled by the selling party)
- Canceled by B (TPNR rejected by the buying party)
- Canceled by TGE (TPNR canceled by POLPX S.A.)
Strona 14 z 44
By inputting in the filter fields:
- „PR volume” – number of property rights in the certificate of origin
- „Transaction no” – transaction number in format: YYYYMMDD_X
- „TGE ID (S)” – POLPX S.A. code of the selling party
- „TGE ID (B)” – POLPX S.A. code of the buying party
- „Price” – price spread
and then by choosing the time frame with "Date" filters, left-clicking "Use filters" you will
display the list of certificates of TPNR’s corresponding to the preset filtering parameters.
In the above window, you may also see the TPNR of the Register Member in other
instruments. To do that, left-click the “Instrument” filter and then mark the instruments you
would like to see. Left-click “Confirm” and then “Use filters”.
Strona 15 z 44
By left-clicking the selected TPNR , you will open the "TPNR details" window.
To open any other window, first close the “TPNR details” window.
10. TPNR creation (option of the “Instruments" Menu, only available during TPNR
sessions). This option is only available to the “MAKLER” group of rights.
In order to create a TPNR, left-click the "Instruments" menu and then point the cursor on the
instrument in which you want to create a TPNR and left-click “Create TPNR”.
Strona 16 z 44
The “Create TPNR" window opens.
- the “TGE ID (S)” field contains the POLPX S.A. code of your company, by default,
- the “Seller name" field contains the name of your company by default,
- the “max” value shows the maximum number of PR’s available in the particular instrument,
- type the POLPX S.A. code of the PR buying register member in the “TGE ID (B)” field,
- left-click "Search”, next to the “TGE ID (B)" field,
- the “Buyer name” field will be automatically filled by the system,
- input the number of PR's to be sold in the "PR volume" field,
- input the price of 1000 PR’s in the “Price” field,
- input (optional) text in the "Seller's description" field (max. 200 characters).
If you want to create the TPNR, left-click “Save” and "Yes" in the message box.
If you want to resign from creation of the TPNR, left-click "Cancel".
To open any other window, first close the “Create TPNR” window.
Strona 17 z 44
11. Cancelling of a created TPNR by the selling party. Option only available to the
"MAKLER" group of rights.
In order to cancel a TPNR, left-click the "Instruments" menu and then point the cursor on the
instrument in which you want to cancel a TPNR and left-click “TPNR”.
Strona 18 z 44
The “TPNR” window opens, displaying the transactions in the selected instrument (PMOZE in
this case).
Left-click the row containing the transaction you want to cancel. The “TPNR details" window
opens. Click “Cancel” and “Tak” in the dialogue box. After completing this operation, the
window will look as shown in Figure 2.
To open any other window, first close the “TPNR details” window.
Strona 19 z 44
12. Cancelling of a created TPNR by the buying party. Option only available to the
"MAKLER" group of rights.
In order to cancel a TPNR, left-click the "Instruments" menu and then point the cursor on the
instrument in which you want to cancel a TPNR and left-click “TPNR”. The Seller may only
cancel TPNR’s with the “Registered by S” status.
The “TPNR” window opens, displaying the transactions in the selected instrument (PMOZE in
this case).
Left-click the row containing the transaction you want to cancel. The “TPNR details" window
opens. Click “Cancel” and “Yes” in the message box. After completing this operation, the
window will look as shown in the figure below.
To open any other window, first close the “TPNR details” window.
Strona 20 z 44
13. Approval of a created TPNR by the buying party. Option only available to the
"MAKLER" group of rights.
In order to accept a TPNR, left-click the "Instruments" menu and then point the cursor on the
instrument in which you want to accept a TPNR and left-click “TPNR”. The Seller may only
accept TPNR’s with the “Registered by S” status.
The “TPNR” window opens, displaying the transactions in the selected instrument (PMOZE in
this case).
Left-click the row containing the transaction you want to accept. The “TPNR details" window
opens. Click “Accept” and “Yes” in the message box. After completing this operation, the
window will look as shown in the figure below.
To open any other window, first close the “TPNR details” window.
Strona 21 z 44
14. Creation of a redemption application (option “Create redemption” in the
“Instruments” menu only active in periods dedicated to creation of applications)
In order to create a redemption application, left-click the "Instruments" menu and then point
the cursor on the instrument in which you want to create a redemption application and leftclick “Create redemption”.
Strona 22 z 44
The “Create redemption" window opens.
- the “Redeemer TGE ID" is filled with the POLPX code of your company, by default
- left click “Search” – the “Redeeming account” and “Redeemer name and surname" will be
automatically filled by the system
- in the “PR volume” input the number of property rights you want to redeem, this number
may not be greater than "Max"
- in the “Year of obligation” filed, input the year in which you want to realize the obligation to
redeem the property rights
- left-click “Save” and “OK” in the “Redemption created successfully” message box.
- if you want to resign from creating a redemption, left-click "Cancel" before using the "Save"
command.
To open any other window, first close the “Create redemption” window.
Strona 23 z 44
15. Creation of a corrective redemption application (option “Create corrective
redemption” in the “Instruments” menu only active in periods dedicated to creation
of applications)
In order to create a redemption application, left-click the "Instruments" menu and then point
the cursor on the instrument in which you want to create a redemption application and leftclick “Create corrective redemption”.
The “Create corrective redemption" window opens.
- the “Redeemer TGE ID" is filled with the POLPX code of your company, by default
- left click “Search” – the “Redeeming account” and “Redeemer name and surname" will be
automatically filled by the system
Strona 24 z 44
- in the “PR volume” input the number of property rights you want to redeem, this number
may not be greater than "Max"
- the “Year of obligation" field is automatically filled by the system
- left-click “Save” and “OK” in the “Redemption created successfully” message box
- if you want to resign from creating a redemption, left-click "Cancel" before using the "Save"
command.
To open any other window, first close the “Create corrective redemption” window.
16. Redemptions
Left-click the “Instruments” menu, then point the cursor on the selected instrument. Click the
“Redemptions” item in the menu.
Strona 25 z 44
The “Redemptions” window opens, displaying the redemptions in the selected instrument
(PMOZE_A in this case). To refresh data in this window, click "Use filters".
The above window may also display the redemptions of a selected status. To do this, left-click
the “Current Status” filter, then mark the statuses of interest, left-click "Confirm" and then
"Use filters".
Statuses:
- Registered with TGE (application created in the system by a Register Member)
- Canceled (application canceled by POLPX S.A., on request of the Register Member)
- Accomplished (application approved by the Regulatory Authority = redemption of property
rights).
By inputting in the filter fields:
- „TGE ID” – POLPX S.A. code of the Register Member placing the redemption application
- „Redemption ID” – number of the PR redemption application
- „URE redemption no” – Ref number of the Regulator’s decision on redemption of property
rights
- „Year of obligation” – year covered by the PR redemption application
- „PR volume” – number of PR’s applied for redemption
Strona 26 z 44
and then choose the time frame with the "Application date" and "Acceptance/Cancelation
date" filter, left-click "Use filters" to display the list of redemptions, corresponding to the
preset filtering parameters.
In the “Redemptions” window, you may also see redemptions in other instruments. To do
that, left-click the “Instrument” filter and then mark the instruments you would like to see.
Left-click “Confirm” and then “Use filters”.
By left-clicking the selected redemption row , you will open the "Redemption details" window.
To open any other window, first close the “Redemption details” window.
Strona 27 z 44
By left-clicking “Export” in the “Redemption details” you may save a pdf file with the
redemption application on your computer disk.
17. "Corrective redemptions"
Left-click the “Instruments” menu, then point the cursor on the selected instrument. Click the
“Corrective redemptions” item in the menu.
Strona 28 z 44
The “Corrective redemptions” window opens, displaying the redemptions in the selected
instrument (PMGM in this case).
The functionalities of the “Corrective redemptions" window filters and access to the
"Redemption details" window are the same as in the "Redemptions" window.
18. Relocations PR (on justified request of two Register Members, POLPX S.A. may
relocate property rights between register accounts of those Members):
Left-click the “Instruments” menu, then point the cursor on the selected instrument. Click the
“Relocations” item in the menu.
The “Relocations” window opens, displaying the relocated transactions in the selected
instrument (PMOZE in this case). To refresh data in this window, click "Use filters".
Strona 29 z 44
By inputting in the filter fields:
- “TGE ID (debt side)” – the POLPX S.A. code of the Register Member from whose account the
PR’s are being relocated
- “TGE ID (credit side)” – the POLPX S.A. code of the Register Member to whose account the
PR’s are being relocated
- "Transaction” – number of the PR relocation
- „PR volume” – number of relocated property rights (PR’s)
and then choose the time frame with the "Date from" and "Date to" filter, left-click "Use
filters" to display the list of relocations, corresponding to the preset filtering parameters.
In the “Relocations” window, you may also see relocations in other instruments. To do that,
left-click the “Instrument” filter and then highlight the instruments you would like to see. Leftclick “Confirm” and then “Use filters”.
Strona 30 z 44
By left-clicking the selected relocation row , you will open the "Relocation details" window.
To open any other window, first close the “Relocation details” window.
19. Fee report
In the “Fee report” window you can see the list of fees charged by the Register for the
performed operations. Your company will be the payer of the above fees.
Left-click the "Reports” menu, then “Fee report”.
Strona 31 z 44
The “Fee report" window opens.
To see the list of fees on one or more instruments, click the “Instrument” filter, select the
required instruments, click "Confirm” and then "Use filters".
To refresh data in this window, click "Use filters".
The window will display the list of all fees on the selected instruments.
Strona 32 z 44
To see the list of selected fees, click the “Select” filter, choose the fees and click "Confirm" and
then "Use filters".
The window will display the list of selected fees on the selected instruments.
Strona 33 z 44
By inputting in the filter fields:
- “Receiver” – POLPX S.A. code of the Register Member, to whom the invoice has been issued
- “PR” – number of PR's in the operation, for which the fee has been charged or number of
operations
- “Unit price” – per operation fee rate
- “Price” – calculated value of the fee
- “Unit name” – name of the operation’s unit (piece or kWh)
and then by choosing the time frame with "Count date" filters, left-clicking "Use filters" you
will display the list of fees corresponding to the preset filtering parameters.
20. Transactions:
Left-click the “Instruments” menu, then point the cursor on the selected instrument. Click the
“Transactions” item in the menu.
Strona 34 z 44
The “Transactions” window opens, displaying the session transactions (including TPR) on the
selected instrument (PMEC-2009 in this case). To refresh data in this window, click "Use
filters".
By inputting in the filter fields:
- “PR volume” – number of PR’s involved in the transaction
- “Transaction no” – number of the transaction
- „Price” – price spread
Choosing the time frame "from-to” in the “Date” filter and selecting the “Transaction side” (S
– selling party, B – buying party), “Transaction type” and then clicking "Use filters" you can
see transactions meeting the filtering criteria. Each of the filters works independently.
In the “Transactions” window, you may also see transactions in other instruments. To do that,
left-click the “Instrument” filter and then mark the instruments you would like to see. Leftclick “Confirm” and then “Use filters”.
Strona 35 z 44
By left-clicking the selected transaction row, you will open the "Transaction details" window.
In the case of TPR’s, both sides of the transaction will be displayed.
To open any other window, first close the “Transaction details” window.
Strona 36 z 44
21. PR balances report
In order to see the PR balances of the Register Member, click the “Reports“ menu and then
“PR balances report”.
The “PR balances report" window opens. To refresh data in this window, click "Use filters".
The table shows the PR balances of Register Members in the selected instrument (PMEC in this
case).
If you want to see PR balances in other instruments, choose the instrument from the scrolldown menu list and click “Use filters”. You can only choose one instrument at a time.
The “PR balance” column shows the balance of all PR’s of the Register Member.
The “Active PR balance” column shows the balance of available property rights.
The “Blocked PR balance” column shows the balance of PR’s blocked in operations (i.e. in the
TPNR or redemption).
The “PR balance”, “Active PR balance”, “Blocked PR balance" - "TOTAL" fields show the total
values from the columns.
Strona 37 z 44
22. Operations
In order to see the operations performed in a register, click the "Instruments" menu and then
point the cursor on the selected instrument. Click the “Operations” item in the menu.
The “Operations” window opens, displaying the operations performed over the last 7 days in
the selected instrument (PMOZE in this case).
To refresh data in this window, click "Use filters".
Strona 38 z 44
We can see the selected type of operation, i.e. TPNR buying. To do that, click the “Transaction
type” filter and choose “TPNR (B)” then click “Accept” and “Use filters”.
We can see the selected status of operation, i.e. “Accomplished”. To do that, click the “Status”
filter and choose “Accomplished” then click “Accept” and “Use filters”.
Strona 39 z 44
By inputting in the filter fields:
- “Transaction no” – number of the transaction.
Choosing a time frame from - to in the "Date" filter and then clicking "Use filters", you may
see the operations meeting the filtering criteria. Each of the filters works independently.
In the “Operations” window, you may also see operations in other instruments. To do that,
left-click the “Instrument” filter and then mark the instruments you would like to see. Leftclick “Accept" and then “Use filters”.
Strona 40 z 44
23. Viewing PR balance on a date earlier than the current day.
In order to determine the balance of property rights in the instrument, on a date earlier than the
current day, choose an instrument in the "Instruments" menu (i.e. PGMG) and select the
“Operations” option.
Strona 41 z 44
The “Operations" window opens. In the “Pokaż saldo Praw Majątkowych na dzień" field, choose
the desired date. Then click “Pokaż saldo Praw Majątkowych na dzień".
The number of PR’s will be displayed in the “Saldo Praw Majątkowych” field.
Strona 42 z 44
24. Operations details report.
The report, in csv file format is a listing of PR batches matched with numbers of CoO certificates,
buying price and transactions realized by the Register Member.
This report may be used for pricing of the acquired property rights and pricing of their
redemption.
To see details of operations carried out in the register, click the “Reports” menu and then
choose the “Operation details report”.
The window below will open.
Strona 43 z 44
Choose one or more “Operation type” and select the period for the report. Then click “Export
to CSV”. If there are no operations in the selected time period, the CSV file will not be
generated.
Save the csv file on the disk of your computer. Open the CSV file.
A negative value in the "PR number" field means a selling transaction.
Strona 44 z 44