1
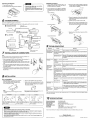
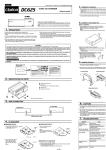
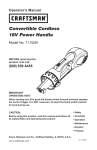
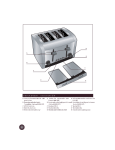
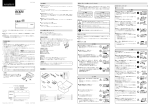
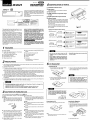
280-7715-00
clarion' DCZ6ZS
mm
6 DISC CD CHANGER WITH
CD TEXT Owner's manual
4 IDENTIFICATION OF PARTS
[I] Installation selector levers
[l] Eject button
~NET
Thank you for purchasing the DCZ625 system. The
DCZ625 is designed incorporating the latest digital
technologies, while featuring a newly developed CD
mechanism to achieve excellent performance and
good reliability.
EXT
DU6Z5 ..............._
clarion
""""a>""""""'~
''''''''''''''''''''''0UII"Jl
Please read this owner's manual entirely before proceeding with installation.
Press the eject button for ejecting the magazine.
[]] Flip down door
@] CeNET terminal for input and output
(13-pin)
[§] Digital optical fiber output terminal
[§] Address switch
-
1 BeSUlelooselheSCI8Ws.elo"include<lioltiepadcagefo,joslaila
l;onUs",gOltl$fsc",mcould(lan\llgetheset
2SetlMeselecto,sonbothsldepanelstotho"H"PosiMnwhen
inslallngtl>esalMnz(Mllally.lotheVpositiOnwheninstamnglhe
se1v&rbcatty,Wh!ln ..stallingal'h<!an!l'eol45-S\lIlh....10<''''.1O
t~eC<lnterclic~
position
TMselm'ybe<lamagedllll1ese1eclorsa,enol ...tlotheprope,
(>M'hons
~".
~'
When connecting an CD changer and MD changer
by CeNET, no more than 2 units can be connected.
When both of them are CD, the address switch needs
to be reset so that the address switch number is not
the same for each.
<How to change the address switch>
1
Switch the address by using a plastic stick with a sharp
tip or equivalent.
This equipment has been tested and found to comply with the limits for a Class B digital device, pursuant to Part 15 of the FCC Rules.
USE OF CONTROLS, ADJUSTMENTS, OR PERFORMANCE OF PROCEDURES OTHER THAN
THOSE SPECIFIED HEREIN, MAY RESULT IN
HAZARDOUS RADIATION EXPOSURE.
These limits are designed to provide reasonable protection against harmful interference in a residential
installation. This equipment generates, uses, and can
radiate radio frequency energy and, if not installed
and used in accordance with the instructions, may
cause harmful interference to radio communications.
However, there is no guarantee that interference will
not occur in a particular installation. If this equipment
does cause harmful interference to radio or television reception, which can be determined by turning
the equipment off and on, the user is encouraged to
consult the dealer or an experienced radiorrV technician for help.
2
< Example of address switch setting>
• Setting example 1
THE COMPACT DISC PLAYER SHOULD NOT BE
ADJUSTED OR REPAIRED BY ANYONE EXCEPT
PROPERLY QUALIFIED SERVICE PERSONNEL.
Source unit
CHANGES OR MODIFICATIONS NOT EXPRESSLY APPROVED BYTHE MANUFACTURER
FOR COMPLIANCE COULD VOID THE USER'S
AUTHORITY TO OPERATE THE EQUIPMENT.
• Setting example 2
INFORMATION FOR USERS:
CHANGES OR MODIFICATIONS TO THIS PRODUCT NOT APPROVED BYTHE MANUFACTURER
WILLVOIDTHEWARRANTY AND WILL VIOLATE
FCC APPROVAL.
Address switch
number 1
1 FEATURES
•
6-Disc Capability
•
•
CeNET with Balanced Audio Line Transmission
and Dynamic Noise Canceling
•
Eject Capability While Ignition-Off
•
8-Times Oversampling Digital Filter
•
120' Mounting Capability
•
Dual1-Bit D/A Converters
•
Optical Digital Output
•
Zero-Bit Detector'" Mute Circuit
•
3-Beam Laser System
•
•
CDTEXT
Dimensions:
8-7/8"(225mm)W x 2-11"2(63mm)H
x 6-9/16"(167mm)D
2 PRECAUTIONS
Spring-Loaded Silicon Oil-Dampened Suspension
System
1. This unit does not operate independently. The unit must be used with a source unit that has a cable connection for CeNET wire bound (sold separately).
• The unit may not operate when both CD
changers are set to the same address switch
number.
• Never change the address switch during operation. Doing so can cause malfunction or
breakdown. Do not change the address switch
forcibly, because this may also cause
malfunciton.
• The CeNET cable wiring must be less than 65.62
ft (20m) in length.
5 CD MAGAZINE
Inserting the CD
2. CD singles cannot be used.
3. • The pickup, the heart of a player, is built in deep behind the door. Do not leave this door open for extended
periods to prevent dust adhering to the pickup.
1. Put your finger on the disc holder release
knob and draw out the disc holder.
3. Press in on the disc holder until it locks securely
into the magazine. After loading a CD, make sure
that it is correctly loaded.
2. Insert a CD into the concave portion of the
disc holder with its label side (printed side
with a title, etc.) facing up.
• Look through the magazine opening and
check whether or not the CD is tilted.
If the disc holder does not slide in fully, or
slides with difficulty, it is possible that the CD
is not correctly loaded. Reload in such cases.
• When the inside of the car is very cold and the player is used soon after switching on the heater, dew may
form on the disc or optical parts of the player and proper playback may not be possible. If dew forms on the
disc, wipe it with a soft cloth. If dew forms on the optical parts of the player do not use the player for about
one hour and the condensation will disappear naturally to allow normal operation.
4. While the system is in play, do not plug or unplug the cables as this will cause damage.
5. This unit is compatible with CD TEXT. When it is connected to a center unit suitable for CD TEXT display, CD
TEXT can be displayed. (When it is connected to a center unit without CD TEXT function, CD TEXT can not
be displayed.)
6. Do not expose the magazine to direct sunlight, the car heater or other sources of strong heat. Replace the
CD magazine (CAA-397) with a new one if bent or otherwise damaged.
• The following magazines cannot be used for this unit. Using them will result in a damage to the
mechanism and cause the magazine not to eject.
• magazine (CAA-122) for the 12-disc CD changer (CDR1255z, CDR1240Z, CDC1235, etc.)
• magazine (CAA-355) for the 6-disc CD changer (CDR655Tz, CDR655z, CDR640Z, etc.)
3 CAUTIONS ON HANDLING CDs
g
Use only compact discs bearing the \I.ID.~ mark and the
mark.
Do not play heart-shaped, octagonal, or other specially shaped compact discs.
Handling
• New discs may have some roughness around the
edge. The set may not work or the sound may
skip if such discs are used. Use a ball-point pen,
etc., to remove roughness from the edge of the
disc.
Ball-point pen ~
Roughness
•
Never stick labels on the surface of the compact
disc or mark the surface with a pencil or pen.
•
Never playa compact disc with any cellophane
tape or other glue on it or with peeling off marks.
If you try to play such a compact disc, you may
not be able to get it back out of the CD player or it
may damage the CD player.
•
Always handle the compact disc by the edges.
Never touch the surface.
•
• Pulling strongly on the disc holder may cause it
to come out of the magazine. In such cases,
press in on the disc holder tabs and re-insert
into the magazine. Be sure that the disc holder
is correctly inserted.
Do not use commercially available CD protection
sheets or discs equipped with stabilizers, etc.
These may get caught in the internal mechanism
and damage the disc.
Storage
• Do not expose compact discs to direct sunlight or
any heat source.
•
Do not expose compact discs to excess humidity
or dust.
•
Do not expose compact discs to direct heat from
heaters.
Extracting the CD
Take out the CD after pulling out the disc holder.
Inserting the Magazine
1. Open the flip down door.
2. Insert the magazine (facing up as shown below)
into the unit with the CD load/unload side on the
right. Press the magazine into the unit until it locks
securely.
Cleaning
• To remove fingermarks and dust, use a soft cloth
and wipe in a straight line from the center of the
compact disc to the circumference.
•
•
Do not use any solvents, such as commercially
available cleaners, anti-static spray or thinner to
clean compact discs.
After using special compact disc cleaner, let the
compact disc dry off well before playing it.
Note:
• When taking out the CD do not let your fingers touch
the signal side of the CD.
3. Close the flip down door.
Installation Procedure
Extracting the Magazine
1. Open the flip down door.
• Dust and other objects may cause malfunctions if they get into the unit.
2. Press the eject button and take out the magazine.
Always be sure to shut the flip down door once
finished with loading or unloading the magazine.
3. Remove the floor carpet and decide on the place
to install. Adjust the installation bracket with bolts
to suit the place of installation.
1. Use the double seamed hexagonal bolts to fix
installation bracket to the unit (on both sides) in
the desired direction of installation.
2. Use the wing nut to hold in place the installation
bracket with bolt to the installation bracket, which
is attached to the unit. Then affix the cushion rubber.
<Vertical Position>
4. Remove the separator of the cushion rubber that
is attached to the installation bracket with bolt and
install accordingly.
Eject button
6 SYSTEM EXAMPLE
5. Unfasten the wing nut and remove the unit.
"II
"II
6. Return the floor carpet to its original place. Use a
knife to cut into the carpet where the bolt can be
felt, and allow the bolt to protrude from the carpet.
This unit is available for upgrade in various ways.
When you want to upgrade the system, make sure that the upgrade unit fits and wire it correctly.
• STANDARD SYSTEM
I
Souce
.....,.....,,.....,,.....,,.....,...,+,.....,...
j
<Horizontal Position>
OCZ6Z5
~~/=:::::::J===l
CeNET cable
(Included the Clarion expanded digital
sound processor / equalizer DSP/EQ)
I
• FULL SYSTEM
/
"
CeNETcable
(Included the DCZ625)
7. Align the unit with the bolts and secure it with the
wing nuts.
V-adapter
(CCA-519: Sold separately)
OCZ6Z5
/
"
I
CD deck or MD deck
I
G~
'\
<Suspending Position>
Digital optical fiber cable
(Sold separately)
Ferrite clamp
(Included the MD changer)
-[
MD changer
J
I
9 TROUBLESHOOTING
Symptom
'\
CeNETcable
(Included the DCZ625)
"II
Remedy
Cause
INSTALLATION OF CONNECTORS
Check connections. Connect the cable again.
Bad connection.
Loss of power
Connection with
the source unit is The length of the CeNET Rewire the connection so that the length of cable is less than 65.62 It
cable wiring is more than (20m).
not recognized.
65.62 It (20m).
Only the provided screws and brackets should be used during installation. Using screws other than those specified will cause damage.
Address switch num- When the 2 CD changers are connected, set the address switch so
that they do not have the same address number. Refer to the "Exambers are the same.
ple of address switch setting" in the section titled "IDENTIFICATION
OF PARTS".
7
Digital optical fiber cable
(Sold separately)
Note:
~
• When connecting the CeNET cable, fully insert it. Alter connection, fix
the connector with a c1amper as shown in the figure.
Magazine cannot Magazine inserted
wrongly.
be loaded.
• When removing the digital optical fiber cable, rotate it to loosen it and
pull it gently while holding the slide cap (a gray color part on the source
unit).
• Do not coil up the digital optical fiber cable with a radius of less than 1"
(3 cm). With a radius of less than 1", the performance of the cable will
be greatly impaired.
• When installed in a glove box or console box, make sure that the source
unit cables or cords do not interfere with the opening or closing of the
flip down door.
The installation selec- Set the installation selector levers to the same position on both sides.
tor levers are set to different positions on both
sides.
Moisture or dirt on disc.
Wipe disc free of moisture and dirt.
Set the unit installation direction and the installation selector lever
positions to match each other. When installed at an angle, change the
installation selector lever to a position (H, 45", V) not prone to noise or
sound loss.
Disc bent or badly Compare with another disc. If bad, discard the damaged disc.
damaged.
Note:
• Reinstall these lock pins when shipping the unit back
for repair.
H: Horizontal
Align the installation selector levers on both sides of the unit with
the "H" position.
Buy New Magazine CAA-397.
Noise, skipping
Disc is very dirty.
2. Decide on the installation place and direction.
3. Insert an item such as a screwdriver with a fine
point or the tip of a ballpoint pen into the round
hole of the installation selector lever to switch to
the position you need.
Mechanism does Mechanical error.
not function.
"
Disc holder is not correctly inserted into the
magazine.
Read the section on "Inserting the CD" carefully and reinsert the disc
holder correctly.
If the same phenomenon still occurs after checking the above, or it is impossible to remove the magazine, please
consult your local dealer.
V: Vertical
~~ ~ ~
~
1. Referring to section "INSTALLATION", check the three angle of installation selector levers are properly set. If not, set them at the
proper position for the angle of installation.
- Before shipment from the factory, the levers are normally placed in the horizontal position .
45": Slope
~
Clean the disc.
2. Check whether The CD magazine can be ejected by pressing the
CD magazine eject button, then insert a new CD magazine.
Magazine is
ejected evenwhen
inserted into the
unit.
u:
Distorted magazine.
Disc inserted upside- Read the section on "Inserting The CD" carefully and reinsert the CD
correctly.
down.
Prior to Installation
...-
Eject the magazine and insert the other.
The unit installation direction and the installation selector lever positions do not match.
1. Before attempting to use this unit you must first
remove the packing safety lock pins (3 positions). Store these lock pins carefully so they
can be used again if needed.
~
A magazine is already
in the player.
"No Disc" sign
appears when
searching for
discs.
8 INSTALLATION
~
Insert correctly.
y
45°
Align the installation selector levers on both sides of the unit with
the "45°" position.
10 SPECIFICATIONS
@y
Align the installation selector levers on both sides of the unit with
the "V" position.
•
Set the installation selector lever to the same position on both sides.
•
When the unit is installed below the horizontal position (up to 15 degrees) the ejected magazine,
when left in that position, will drop due to vibrations from the car.
•
Adjust the installation selector levers into the correct locations. Setting the locations incorrectly or
in varied positions will cause skipping.
•
Do not move the installation selector levers while the unit is in use. This will cause damage to the
mechanism and the disc.
Frequency Response
Signal-to-Noise Ratio
Wow and Flutter
Power Supply
Current Consumption
Unit Weight
Dimensions
: 5Hz-20kHz(±ldB)
: 105dB(1 kHz)IHF'A
: Below measurement limits
: DC14.4V (1 O.8-15.6V) negative ground
: Less than 1A
: 3.6Ib. (1.65kg)
: 8-7/8"(Width) x 2-1/2" (Height) x 6-9/16"(Depth)
[225mm(W) x 63mm(H) x 167mm(D)]
-Due to improvements, the design and these specifications may be modified without prior notice.
Clarion Co.,ltd.
All right Reserved. Copyright © 2001 :Clarion Co., Ltd.
Printed in China 2001/6 (T.C)
PE-24338 280-7715-00
Clarion
CAR AUDIO «;} BEYOND
Product Registration
for USA and Canada only
IMPORTANT:
1. Detach this section of the card and keep it with your records.
2. Retain your sales receipt to validate warranty service.
3. If you purchased a Clarion ADX Series, Pro Video or Pro Audio
product, be sure to complete the box on the last page of this form.
Information on Clarion authorized Warranty Centers
may be obtained by writing Clarion Corporation at the address below
or by calling
1-800-GO-CLARION.
In USA:
Clarion Sales Corporation
Warranty Service Center
661 West Redondo Beach Blvd.
Gardena, CA 90247
(310) 327-9100
In Canada
Clarion Canada, Inc.
Warranty Service Center
2239 Winston Park Drive
Oakville, Ontario L6H 5R1
(905) 829-4600
www.clarionmultimedia.com
clarion
PLEAS!: PLACE
FIRST-CLASS STAMP
CAR AUDIO (} BEYOND
HERE
(Post Office will not deliver
without proper postage.)
CLARION SALES CORPORATION
PO BOX 863
BREA CA 92822-0863
11111111111111111111111111111111111111111111111111111111111111
clarion
WAR RAN T YIN FOR MAT ION
TEAR THIS PAGE OFF AND KEEP IT WITH YOUR RECEIPT!
This product is warranted against all defects in material workmanship for a period of
one year from the date of original purchase. The conditions of this warranty and the
extent of the responsibility of Clarion Corporation under this warranty are as follows:
1. PROOF OF DATE OF PURCHASE WilL BE REQUIRED FOR WARRANTY SERVICE OF THIS
PRODUCT. INFORMATION ABOUT CLARION AUTHORIZED WARRANTY SERVICE CENTERS MAY
ALSO BE OBTAINED BY CONTACTING OR WRITING CLARION CORPORATION AT THE ADDRESS
LISTED ON THE FRONT OF THIS CARD.
2. This warranty will become void if service performed by anyone other than an approved Clarion
Warranty Service Center results in damage to product.
3. This warranty does not apply to any product which has been subject to misuse, neglect or
accident, or which has had the serial number altered, defaced or removed, or which has been
connected, installed, adjusted or repaired, other than in accordance with the instructions
furnished by Clarion Corporation.
4. This warranty does not cover car static or other electrical interferences, tape head cleaning or
adjustments, or labor costs for the removal or reinstallation of the unit for repair.
5. The sale responsibility of Clarion Corporation under this Warranty shall be limited to the repair or
replacement thereof, at the sole discretion of Clarion Corporation.
6. If it becomes necessary to send the product or any defective part to Clarion Corporation or an
authorized warranty service station, the product must be shipped in its original carton or
equivalent carton, fully insured, with shipping charges prepaid. Clarion Corporation will not
assume any responsibility for any loss or damage incurred in shipping.
7. ALL IMPLIED WARRANTIES EXCEPT TO THE EXTENT PROHIBITED BY APPLICABLE LAW SHALL
HAVE NO GREATER DURATION THAN THE WARRANTY PERIOD SET FORTH ABOVE. UNDER NO
CIRCUMSTANCES SHALL CLARION CORPORATION BE LIABLE FOR ANY LOSS OR DAMAGE, DIRECT
OR CONSEQUENTIAL, ARISING OUT OF THE USE OR INABILITY TO USE THE PRODUCT. BECAUSE
SOME STATES DO NOT ALLOW LIMITATIONS ON HOW LONG AN IMPLIED WARRANTY LASTS OR
EXCLUSIONS OR LIMITATIONS OF INCIDENTAL OR CONSEQUENTIAL DAMAGES, THE ABOVE
LIMITATIONS OR EXCLUSIONS MAY NOT APPLY TO YOU.
8. THIS WARRANTY GIVES YOU SPECIFIC LEGAL RIGHTS, AND YOU MAY ALSO HAVE OTHER RIGHTS
WHICH VARY FROM STATE TO STATE.
9. Should you have any difficulties with the periormance of this product during warranty, or with any
Clarion authorized service centers, you may contact the Clarion National Service Managers at the
address listed on the front of this card or call1-800-GO-CLARION for a listing of Authorized
Warranty Service Centers in your area.
281-0607-00
....
Q
-
:r
,..
:r
'<
Q
c:
...
Ctl
CO)
Ctl
mmm!lPRODUCT
REGISTRATION
CAR 0
Thank you for selecting a high-quality product from Clarion. We hope you are completely satisfied
with your purchase. We'd like to help serve you better by finding out more about your reasons for
choosing Clarion. Please take a few moments to fill out the registration information on this card and
answer a few questions about yourself and your product. Then, return the card to Clarion wjthin 10
days of purchase. Your answers will be kept strictly confidential. We appreciate your response!
In Canada, place the card in an envelope and mail to:
Clarion Canada, Inc., Warranty Service Center, 2239 Winston Park Drive, Oakville, Ontario L6H 5R1.
II
0 Mr. 0 Ms. 0 Mrs. 0 Miss
o
c:
o
I.'
II
What Clarion product did you purchase?
Multimedia
1
0
Color LCD Display/Control Unit
20 Color LCD Display
D Cellular Telephone
4 0 Voice-Activated Navigation System
3
Co
E
I'
50 Video Cassette Player
6DTVTuner
7
D Rear Vision Camera
Car Audio
8
D AM/FM Cassette
90
10
0
AM/FM CD Player
AM/FM Cassette/CD Player
D CD Changer
12 D Equalizer/DSP Processor Module
13 D Amplifier
14 D Speakers
11
II What is the name of the store where you purchased this product?
II
What is your age? (Optional)
1
ITJ
M_a_ri_ta_I_S_ta_tu_s_?_(,_O_p_tio_n_al_~__2 _D_M_ar_rie_d_ _3_0_Si_ng_le
II Are there any children in your household?
If yes, please specify age range:
3
D
10
1 - 12
Yes
20 No
5017 & up
4013 -16
II What is the highest level of education you have completed?
D Some High School
2 Q High School Graduate
40 Completed College
1
0 Some College
3
7
5
0
6
0 Completed Graduate School
0
VocationfTechnical School
Some Graduate School
What best describes your primary occupation?
1
D ProfessionalfTechnical
50 Clerical/Service Worker
2
0
Upper Management/Executive
60 Tradesman/Machine Operator/Laborer
10
D
Student
Middle Management
70 Self-Employed/Business Owner
11
D
Retired
12
D
Other
30
4
0 Sales/Marketing
8
9
0 Food Service
D Homemaker
II What is your annual household income? (Optional)
D
2D
3D
$10,000 - $19,999
40 $30,000 - 539,999
50 $40,000 - $49,999
$20,000 - $29,999
6
Under $10,000
1
70 $60,000 - 569,999
8 D $70,000 - $79,999
9 D $80,000 - $89,999
D $50,000 - $59,999
D
11 D
10
$90,000 - $99,999
$100,000 and over
II Which factors influenced you the MOST in choosing this Clarion Product?
Group A (Please check two)
1
0
Newspaper Advertisement
7
D TV Commercia!
3 D Radio Commercial
4 D Magazine Advertisement
5 D Recommended by Friend/Family
6 D Clarion Name/Reputation
8
2
D
D
D
10 D
11 D
12 D
9
Recommended by Store Salesperson
On-line Information
Clarion Web Site
Store Display
Special Promotion
Other
Group B (Please check two)
13
D
Warranty
15
D
14
D
Price
160
Quality/Reliability
17
D
Appearance/Design
Features
18
D
Ease of Operation
190
Other
II What type of music do you listen to most often? (Please check one)
D
10
D
Rhythm & Blues
11
0 Easy Listening
Reggae
12
0
40 Pop
70 Rap
20 Jazz
50 Country
8
0
3D Blues
6
9
D
1
Rock
0 Classical
New Age
Alternative
Which of the following products/services do you own or intend to buy within the next 18 months?
Own
Intend to buy
laptop Computer
10
20
Color Monitor
3D
CO-ROM
40
50
60
70
80
90
100
110
120
130
140
150
160
Home Desktop PC
Computer Speakers
Color Printer
Modem
large Screen 1V (35" or larger}
Is this your first Clarion purchase?
Satellite System/Service
Cellular Telephone
Pager
Call Waiting
Karaoke
Vehicle Navigation System
Vehicle Security System
10 1st purchase
2
0 2nd purchase
3
Own
Intend 10 buy
170
180
190
200
210
220
230
240
250
260
270
280
290
300
0 3rd or more
:- II What type of computer do you own?
"'1:1
en
CD
1
0 IBM PC or Clone
2
0 Macintosh or Clone
3000 Not Own
~
~
o
en
'Which on-line service/network do you subscribe to?
1
0 America Online
40MSN
70 Other
2
0 CompuServe
50 Internet
8
CD
c.
3D GEnie
0 00 not have service/access
60 Prodigy
ADX SERIES, PRO VIDEO & PRO AUDIO WARRANTY INFORMATION
CD
C.
(l:I
CD
c
c
z
o
-l
en
-l
;roo
"'1:1
rm
Clarion offers two-year warranty coverage on ADX Series, Pro Video, and Pro Audio products (excluding
speakers) ONLY jf the product is installed at the same location where purchased. If not installed by the
authorized dealer. one-year warrantv coverage is provided.
To obtain two-year warranty coverage on your Clarion ADX Series, Pro Video, or Pro Audio product,
excluding speakers, complete this section in full and return it along with a copy of your receipt and
the attached product registration information in an envelope addressed to:
Clarion Sales Corporation
P.O. Box 863
Brea, CA 92822-0863