1
SIRIUS SATELUTE RADIO
RECEIVER CONTROLLER
CONTROLADOR DEL
SINTONIZADOR SIRIUS DE
RECEPCION RADIO VIA
SATEUTE
\/
~\
SIRIUS
Satellite Radio
Thank you
you for
for purchasing
purchasing this
this Clarion DSC920S.
Thank
Please read
read this
this owner’s
owner's manual
manual in
in its
its entirety
entirety before
before operating
operating this
this equipment.
equipment.
** Please
After reading
reading this
this manual,
manual, be
be sure
sure to
to keep
keep itit in
in aa handy
handy place
place (e.g.,
(e.g., glove
glove compartment).
compartment).
+*After
Check the
the contents
contents of
of the
the enclosed
enclosed warranty
warranty card
card and
and keep
keep itit carefully
carefully with
with this
this manual.
manual.
**Check
Contents
1.
PRECAUTIONS
2.
SUMMARY OFTHE DSC920S
........................................................................................................
.......................................................................................................
2
22
2
3. CONTROLS ....................................................................................................................................
Names of the Buttons
Buttons and
and their
their Functions
Functions ......................................................................................
Display Items ..................................................................................................................................
33
33
44
4. OPERATIONS .................................................................................................................................
....................................................................................................................
5. INSTALLATION
55
88
1. The
The DSC920S
DSC920S can
can easily
easily be damaged
damaged by
by
or high
high humidity.
humidity.
moisture,
high temperatures
temperatures or
moisture, high
Keep the
inside of the
Keep
the inside
the car
car clean
clean and
and well
well
ventilated.
ventilated.
Never subject
DSC92OS to strong
2. Never
subject the
the DSC920S
strong shocks
shocks
or
Doing so may
may result
result in damor open
open its case.
case. Doing
damage.
age.
Use a soft,
soft, dry
cloth to wipe
wipe dirt
off the
3. Use
dry cloth
dirt off
the
DSC920S. Never
Never use
use a hard
hard cloth
cloth or thinner,
thinner,
DSC920S.
alcohol, etc.
etc. For tough
tough dirt,
dirt, apply
apply some
some cold
cold
alcohol,
or lukewarm
lukewarm water
water to a soft
soft cloth
cloth and
and wipe
wipe off
or
the dirt
dirt gently.
gently.
the
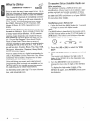
The DSC920S
DSC920S has been
been designed
designed to activate
activate
The
Clarion Sirius
Sirius Satellite
Satellite Radio
Radio Receiver
Receiver in the
the Clarion
Stand alone
alone mode.
mode.
Stand
tvloreover, even ifif the unit was connected
connected with
Moreover,
compatible with the CeNET
CeNET conthe main unit compatible
nection (Sirius-ready
(Sirius-ready unit built-in),
built-in), the SIRIUS
SIRIUS
nection
Satellite Receiver
Receiver can be controlled
controlled from the
the
Satellite
DSC920S or the main unit.
DSC920S
2
DSC920S
CHANGES OR MODIFICATIONS NOT EX·
PRESSLY APPROVED BYTHE MANUFAC·
TURER FOR COMPLIANCE COULD VOID THE
USER'S AUTHOR lTV TO OPERATE THE
EQUIPMENT.
'li'iOJ;IJftlUlSJatit°hBW;fil
CHANGES OR MODIFICATIONS TO THIS
PRODUCT NOT APPROVED BY THE MANU·
FACTURER Will VOID THE WARRANTY.
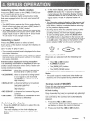
III To receive Sirius Satellite Radio
The Sirius Satellite Radio Receiver that is connected with the DSC920S holds a "SIRIUS 10"
for user identification. All you have to do to obtain a subscriber
subscriber contract
contract and enable
enable reception
reception
Sirius Satellite
Satellite Radio
Radio is to call the Sirius
Sirius Serof Sirius
vice Center
Center (88S-S39-SIRI)
(888”539-SIAI) and inform
inform us of
vice
your Sirius
Sirius ID
ID and a few other
other details.
details.
your
refer to
to the
the subsection
subsection
For your "SIRIUS 10",“, refer
"Verifying your SIRIUS 10" in the section "OPERATIONS".
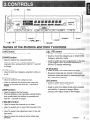
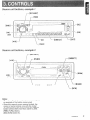
Names of the Buttons and their Func
[SAT]
e buttonn
Used to turn
turn the
the power
power on or
or off.
•* Used
[BAND] button
• Used to switch the reception band.
0 Used
Used to switch
switch the
the Tuning
Tuning mode
mode (seek!
(seek/
manual) when
pressed and
and held
held for
for 1 second
second
manual)
when pressed
longer.
or longer.
@
[CAT]
button
i
he Category
Category selection
selection mode
mode on
•@Used to turn the
or off.
[SCAN] outton
o
oe
Used to perform the category scan.
Used to perform
perform the preset
preset scan
scan when
when the
Used
button is pressed
pressed and held
held for 1 second
second or
button
longer.
longer.
[DISP] buttonn
switch the Text mode.
mode.
• Used to switch
e
The
text
display
in
the
operation
status indicaindicaoperation status
• The text display
tion scrolls
scrolls when
when the
the button
button is
is pressed
pressed and
and
tion
held for 1‘1second
second or longer.
longer.
held
[,&], [T] Dutton
Used to
to move
move the
the preset
preset channel
channel up
up or down,
• Used
Used to move
move the
the category
category up.
up or
or d
down in the
• Used
Category selection
selection mode.
mode.
Category
Used
to
switch
the
item
adjustment or the item
• Used switch. the item adjustment
the Adjust
mode. (Contq3stadjust
(Contrast adjustment,
in the
Adjust mode.
SIRIUS 10
ID display
display sWitching)
switching)
SIRIUS
n
[P-M]
button
I
Used to
to enter
enter the
the Preset memory mode.
•* Used
Received channels
channels are
are stored
stored in
in the
the preset
preset
•* Received
channels when
when lhe
the bUtton.
button is
is pres
pressed and held
channels
for 2 seconds
seconds Or
or longer.
longer.
for
[55] button
• Used to switch the screen saver.
OFF
SS1
SS2
OFF
.
Used to
to enter
enter the
the Adjust
Adjust mode
mode when
when pressed
pressed
•e Used
and held
held for
for 11 second
second or
or longer.
longer. When
When
and
pressed, the
the Adjust
Adjust mode
mode is
is terminated.
terminated.
pressed,
[<<III], [~>] button
Used to
to move
move the
the channel
channel up
up or
or down.
down.
•Q Used
Used to
to search
search up
up or
or down
down the
the channel
channel in
in the
the
•*J Used
Category selection
selection mode.
mode.
Category
Used to switch
switch the adjustment
adjustment item in the Ad~* Used
just mode.
mode.
just
Used to
to move
move the
the channel
channel faster
faster when
when kept
kept
•e Used
pressed.
pressed.
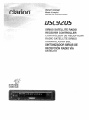
osc92os
DSC920S
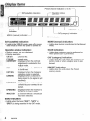
Preset
_.•.•
Preset channel
channel indication
indication (1
(1 to 6) x.-.-
---
----.--- SAT(satellite)
SAT(satellite) indication
indication
Operation status
__ PRESET indication
indication
MANU (manual)
(manual) indication
indication ”
MANU
I
__ CAT(category)
CAT(category) indication
indication
‘%-SCAN
indication
"
- SCAN indication
SAl" (satellite) indication:
MANU (manual) indication:
a Lightsirl
Lights in the
SIRIUS mode,
mode, goes
goes off
off in some
some
••
the SIRIUS
other mode or when
power is turned
turned off.
othl'1fmOde
when the power
Lights when
tuning is performed
performed in the
the Manual
tvlanual
•* Lights
when tuning
mode.
mode.
Operation status indication:
SCAN indication:
•• Station names, etc. are displayed.
Lights when
category scan
scan is performed
performed or
or
•* Lights
when category
when
preset scan
scan is performed.
performed.
when preset
•
examples
channel No.
: channel
P SCAN
: preset scan
AST : displayed
displayed when
contrast
c;PNTRAST:
when the
the contrast
adjustment is selected
selected in the
adjustment
the
Adjust
mode.
Adjust mode.
>>
ESN»
displayed when
SlRllJS ID
: displayed
when the
the SIRIUS
confirmed.
is confirmed.
displayed when
the Category
Category
: displayed
when the
selection mode
mode is selected.
selected.
selection
: displayed
displayed when
channel is
LINKING
when a channel
being tuned
tuned in (no
(no signal
signal is yet
yet
being
received).
received).
~~~ :.: displayed
displayed when
channel not
not
NOSIGNUP
when a channel
covered by your
contract is sesecovered
your contract
lected.
lected.
displayed when
receiver .is
is
: displayed
when the
the receiver
turned
or after
after a reset.
reset.
turned on or
channel without
broadcast
: a channel
without a broadcast
has been
been selected.
selected.
has
Dindication:
2” or
or
t~when the band ("SATi", "SAT2"
mode.
13")is being received in the SAT mode.
...
DSC92OS
DSC920S
n:
in
CAT (category) indication:
3
un enters the
the Category
Category seseLights when the unit
lection mode
mode or when
category scan
scan is perperlection
when category
formed.
formed.
PRESET indication:
Lights when
the unit
unit enters
enters the
the Preset
Preset
•0 Lights
when the
memory mode.
mode.
memory
Turning the power on/off
3. Press
or[I»]for 1$
Press and
and hold
hold the
the [<<ill]
[
or longer.
1. Press the [SAT] button to turn the power on/
off.
en the
the power
power is turned
turned on, "SAT" is disWhen
played in the Operation status indication and
then the
the display
display is changed
changed to the
the channel
channel
then
being received.
received.
being
Verifying your Sirius lD
on for
for 1 second
second
1. Press and hold the [58] button
longer to enter
enter the
t Adjust mode.
or longer
2. Press the [<4iI] or [1»] to select the "ESN
»11.
Z-2”.
enters the SIRIUS
SIRIUS 10
ID display
display
'":I;When the unit enters
“ESN>>” is displayed
displayed and then the dismode, "E8N»"
The receiver
receiver moves
moves to seek
seek channe.lsbeloIN
channels below
The
above the
the current
current channel
channel ariel
and the
chanor above
m~ph3r1
found when
either button
button is released
released is
nel found
when either
received.
received.
~
1. Press the [<~] or [1»] button.
The receiver seeks the next availa.blechannel below
below or
or above
above the
the Gyrr~pt
current channel.
?~anprl.
nel
Press and
and hold
hold the
the [<4iI]
[
button.
2. Press
or [1»]] button.
play is changed to the high-order 6 digits of
the SIRIUS 10 ("012345 'V") in the Operation
status indication.
The receiver
receiver moves
moves to seek chcmnels
annels below
The
above the
the current
current t;IIi:llllH:il.
channel. If the channel
or above
found when
either button
button is released
found
when either
reIEJ,a§E~d is available that
that channel
channel is received.
Otherwise,
able
let;elveu. OUlenNise,
seeking continues
continues until an available channel
seeking
found.
is found.
3. Press the ['V] button to change the low-order 6 digits of the SIRIUS 10 ("678901 A").
" To display the high-order 6 digits of the
SIRIUS ID again, press the [AJ button.
4. Press the [<4iI] or [1»] button to return the
previous mode.
mode.
previous
Selecting a band
utton to select
select a band.
band.
1. Press the [BAND] button
2” or
or "SAT3")
”
3”)
BAND indication ("SATi", "SA.2"
light in the
the display.
display.
is light
Preset memory
3 bands are av'3.i1a.ble l(vnr",,,,,,1
for preset memory and 6
channels for each band, a total of 18 channels
channels
can be stored
stored in memory.
memory.
can
The indication
indication concerning
The
cOlnc~lmirlg the preset memory is
displayed both
both in the BAND indication for the
displayed
band being
being received (’
2”, or
band
"SAT3") and in
the preset number.
Tuningmode
There are
are two
two channel
channel selection
selection modes:
modes: seek
seek
There
mode and
and manual
manual mode.
mode.
mode
~
Seek tuning
Only channels
channels that
that can
can be receivedareselepted
received are selected
Only
while
channels without
broadcasts and
and channels
channels
while channels
without broadcasts
not covered
covered by the
the contract
contract are
are automatically
automatically
not
skipped.
Manual tuning
ding channels
channels without
broadAny channel including
without broadcasts and
and channels
channels not
not covered
covered by
by the
the contract
contract
casts
can be
be selected
selected during
during manual
manual tuning.
tuning.
can
Press and
and hold
hold the
the [BAND]
[
] (BND)
(BMD) button
button for
for
1. Press
second or
or longer.
longer.
1 second
seek mode
mode to
to manual
manual mode
mode
* This changes thee seek
indicator on
on the
the display
display lights.
lights.
and the "MANU"’ indicator
When this
this operation
operation is
is performed
performed in
in manual
manual
When
mode, the
the seek
seek mode
mode is
is engaged
engaged and
and the
the
mode,
I&
indicator on
on the
the display
display goes
goes off.
off.
"MANU"” indicator
notes:
Notes:
tfJe seek
seek
The receiver
receiver automatically
automatic
verts to
to the
•81The
reverts
button is
is not
not used
used for
for
mode when the r<~] or
button
7 seconds
seconds in
in the
the manuai
m
7
mode.
2. Press the [<4iI] or [1»] button. The receiver
moves to
to channels
channels above
above or
or below
below the
the curcurmoves
rent channel
channel one
one by
by one.
one.
rent
~
Recailinga
1. Press the
set station. Each time the
preset stations
stations are
are recalled
recalled in a sequential
preset
order.
order.
* When the [P-M]] button is pressed and the Preset memory
memory mode
mode is engaged, preset stations
set
cannot be
be recalled.
recalled.
cannot
the button is pressed, the sound is
** When
muted and reception channel data are dis-
and recE,pti()n
olaved in
in the Ooeration status indication in the
played
following order.
order.’
following
Channel number
number 11m'
(for "'''Am'....
example
Channel
I'' “CH 0%“) -)
abbreviated R-rllinit
8-digit channel
abbreviated
"h;~nrIAI name + returned
to the
the original
original display mode
to
r»->]
DSC920S
DSG920S
Operations
~
Manual
casual memory
memory
1. Select
to be
be memorized.
memorized.
Select a channel
channel to
Receiving statkms selected by
category
2. Press the [P-M] button to enter the Preset
memory mode.
1. Press the [CAT]] button
button to
to enter
enter the
the category
category
selection mode. CAT
CAT indication
indication is
is light
light in
in the
the
*x:The
channel number
number (“CH
("CI-! WI”)
051") in
The reception
reception channel
the Operation
status indication
indication blinks
blinks and
and the
Operation status
PRESET
PRESET indication
indication light.
3. Press
button to
to select
select a preprePress the [.6.] or [V]] button
set
to be memorized.
morized.
set number
nu
"+ The selected
displayed in
selected preset
preset number
number is displayed
the Preset channel indication.
indication.
4. Press
button for 2 secPress and
and hold
hold the
the [P-M]
[
onds
being reonds or longer
longer to store
store the
the channel
channel being
ceived
ceived in memory.
memory.
* If the [P-M]
less than
-&Ii] button is released
released within less
2 seconds,
ds, preset
preset memory
memory is cancelled
cancelled and
the Preset memory
terminated.
memory mode is terminated.
Scan function
There
scan
There are two
two scan
scan modes:
modes: a category
category scan
mode and
and a preset
preset scan
scan mode.
mode.
mode
During scanning
scanning channels
channels are displayed
displayed in ababDuring
breviated form
form and the display
display mode
mode cannot
cannot be
breviated
switched.
~
Category scanning
In a category
category scan,
scan, broadcast
broadcast channels
channels in the
the
same category
category as the current
current channel
channel are
are sesesame
lected about every 10 seconds.
N] button
button to
to start
start aa category
category
1. Press the [SCAN]
scan.
button to cancel
cancel a catcat2. Press the [SCAN]] button
egory scan.
scan.
egory
got@:
Note:
Category scanning
scanning is not
not available
available when
when no
no catcat•8 Category
ory is
is defined
defined for
for the
the current
current channel.
channel.
egory
@
eset scan
scan
Preset
A preset
preset scan
scan scans
scans the
the channels
channels (up
(up to
to 18
18
A
channels) stored
stored in
in the
the preset
preset memory
memory about
about
channels)
every 10
10 seconds.
seconds.
every
1. Press
Press and
and hold
hold the
the [SCAN]
[ ~A~] button
button for
for 11 secsec1.
ond or
or longer
longer to
to start
start aa preset
preset scan.
scan.
ond
N] button
button to
to cancel
cancel aa preset
preset
2. Press the [SCAN]
scan.
scan.
()
DSC92OS
OSC920S
display.
2. Press the [.6.] or [V]] button
but10n to
to select
select aa catcategory.
3. Press the [<411] or [~>] button to tune in a station.
lion.
Notes:
e• When the category
categoly selection
selection mode
mode is entered,
entered, the
the
of the last
last received
received channel
channel is
is dispiayed
displayed
category of
category
first.
4• The category
is canceled
canceled when
when
category selection
selection mode
mode is
no channel
channel with the selected
selected category
category can
can be
be
found.
e• Press
button withit?
within 7 seconds
seconds afafPress the [[<<4] or [fi»] button
ter
channel has been
been set
set to continue
continue seeking
seeking
ter a channel
channels
channels up or
or down. The category
category selection
selection
mode
canceled and
and normal
normal reception
reception is
is reremode is canceled
sumed
operation is performed
performed for
for 7 seconds.
seconds.
sumed ifif no operation
Switching the text display
1. Press the [DISP] button. Each time the
[DISP] button is pressed, the item changes in
the follOWing order:
channel
channel number
number ~ channel
channel name
name (long)
(long) ~
title ~ artist ~ category ~ R-TEXT
" When the [01131'] button is pressed while the
Screen saver
saver mode
mode is engaged,
engaged, the
the displayed
displayed
text
text cannot
cannot be
be switched.
switched. If
If this
this happens,
happens, rerelease the Screen
Screen saver
saver mode
mode and
and scroll
scroll the
the
displayed
displayed text again.
again.
:k
* IfIf the reception
reception channel
channel is changed,
changed, the
the disdischanges in the order
order of channel
channel number
number
playy changes
channel name
name (short)
(short) and
-+ channel
and then
then the
the original
original
display mode
mode is
is resumed.
resumed.
display
When there
there is
is no
no text
** When
text information,
information, the
the indicaindication "--------,,
“--------‘I
will
will appear
appear on
on the
the display.
display.
tion
About the scrolling of the displayed textt
Scrolling is
is performed
performed once
Scrolling
once when
when the
the title
title bemg
being
selected is
is changed
changed or
selected
or when
when the
the [[DlSP]] button
button
is pressed
pressed and
and held
held for
1 second
is
for 1
second or
or longer.
longer.
Scrolling is
is not
not performed
performed when
** Scrolling
when a
a channel
channel number,
number,
abbreviated channel
channel name
name or
abbreviated
or category
category is
is displayed.
displayed.
Switching the screen saver
i. Press the [88]
button to
to switch
switch the
the screen
screen
$1 button
saver. Each
Each time
time the
the button
button is pressed,
pressed, the
the
saver.
screen saver
saver is
is switched
switched in the
the order
order of
of OFF
screen
... SS1 ... S82 ... OFF.
'" If the
the screen
screen saver
saver is turned
turned on and the button
button
:I:
operation is performed,
performed, the
the screen
screen saver
saver
operation
mode
mode is released.
released.
After
After information
information corresponding
corresponding to the
the button
button
operation
operation is displayed
displayed for 30 seconds,
seconds, the
the
screen
screen saver displayed
displayed is returned.
returned.
When “c)FF”
"OFF" is selected,
selected, the display
display is not lit.
backlight)
(only with backlight)
*'" If some
some other
other mode than SIRIUS
SIRIUS mode
mode is selected with the system
system wire bound using
CeNET, the
Hle set screen
screen saver works.
works.
Adjusting the display contrastt
atch the
You can adjust the display contrast to match
the
angle
angle of
of installation
installation of the
the unit.
unit.
*z
'" The factory
factory default
default setting
setting is “4”.
"4". (Adjustment
(Adjustment level
level::
1ito
to 7)
1. Press
Press and
and hold
hold the [88]
[S ] button
button for i1 second
second
i.
longer to
ta enter
enter the
the Adjust
Adjust mode.
mode.
or longer
to adjust
adjust the
the contrast.
contrast.
2. Press the ("-J or [. .] to
return to the
the previprevi3. Press the [88] button to return
ous mode.
mode.
ous
080920S
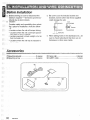
Before Installation
This set
set is
is exclusively
exclusively for
for use
use in
in cars
cars with
with aa
1. This
negative ground,
ground, 12
12 VV power
power supply.
supply.
negative
2. Read
Read these
these instructions
instructions carefully.
carefully.
2.
Be sure
sure to
to disconnect
disconnect the
the battery
battery IL”
"-" terminal
terminal
3. Be
before starting.
starting. This
This is
is to
to prevent
prevent short
short circirbefore
cuits during
during installation.
installation. (Figure
(Figure 1)
cuits
Car battery
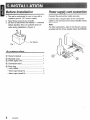
Accessories
@
CD
@
@
@
®
@
@
®
Owner’s manual
manual ..........................................
Owner's
Warranty
card ..............................................
Warranty card
1
1
Power suply
suply cord.........................................
cord.. .......................................
Power
1
Connection cord
cord ..........................................
Connection
1
e*
Parts bag
bag .......................................................
Parts
Cord holder
holder ................................................
Cord
Velcro
ee Velcro
tape
tape
e
Velcro
tape
e Velcro tape
8
DSC92os
DSC920S
(large A) ..................................
(large
(small B) ..................................
(small
.
2
2
2
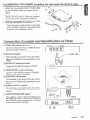
Connect
Connect the
the connection
connection cable
cable securely.
securely.
Connect
Connect the
the L-shaped
L-shaped side
side of
of the
the connection
connection
cable
cable to
to the
the terminal
terminal of
of the
the Sirius
Sirius Satellite
Satellite Radio
Radio
(DSl-l920S).
(DSH920S).
~fffe:
Note:
For
For other
other connections,
connections, refer
refer to the Owner’s
Owner's manual
manual
provided
provided with the Sirius
Sirius Safe/life
Satellite Radio
Radio (L?S1392OS).
(08N9208).
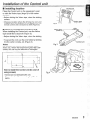
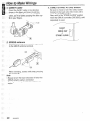
Installation of the Control unit
II Installing location
Dashboard
--,'rr~/t.
'(
Place the Control unit on the
passenger's seat
seat
e passenger’s
or
to the
the center
center
or stick
stick the
the Velcro
Velcro tape
tape (large
(large A) to
console.
console.
"'(: Before sticking
tape, clean
clean the sticking
sticking
sticking the Velcro tape.
surface.
surface.
••,‘- Choose
where the driving
driving of a car
car is not
Choose a location
location where
hindered
signals from the
hindered and the reception
reception of the signals
remote control unit is ensured
(Figure 2).
ensured as well (Figure
Fig 2
I~ _
II.
Velcrotape
(large A)
II How to instail the Control unit
When installing the Control unit, use the Velcro
cro
tape
tape (small
(small B) to secure
secure it (Figure
(Figure 3).
":::Before sticking the Velcro tape, clean the sticking
sticking
surface.
,.1’To
To secure the cord, use the cord holder
holder by sticking
sticking
it to the center
center console, etc. (Figure 4).
Notes:
ofes:
Control unit at
at a location
location (dashDo not leave the Control
temperature goes
goes high. Othboard, etc.) where the temperature
deformed or damaged.
damaged
erwise, the unit may be deformed
,
UP
-:+-r
____'60
---- 3·-'-H
"'
\
_ _-+117
---
1fp<J'
How to install the Control unit (in case of
using screws)
Screws are
are not
not enclosed
enclosed with
with unit.
unit.
"2%
Screws
Be sure
sure to
to check
check the
the screw
screw length.
length. (M3
(M3 xx 6mm
6mm
* Be
MAX)
MAX)
Fig 4
DSC920S
9
Product Registration
for USA and Canada only
IMPORTAN1\
etachthis
this section
sectionof the
the card
cardand
keepit with
i. Detach
and keep
with your
your records.
records.
retain your
yoursales
salesreceipt
receiptto
to validate
validatewarranty
warrantyservice.
service.
2., Retain
3, IfIf you
youpurchased
purchasesa Clarion
ClarionADX
ADXSeries,
Series,Pro
ProVideo
or Pro
ProAudio
3.
Video or
Audio
~r~~u~t,
be
sure
to
complete
the
box
on
the
last
page
product, be sure to complete the box on the last page of this
this form.
form.
informationon
on Clarion
Clarionauthorized
authorizesWarranty
WarrantyCenters
Centers
Information
maybe
beobtained
obtainerby
bywriting
writingClarion
ClarionCorporation
Corporation
at the
the address
aggressbelow
below
may
at
or by
by calling
falling
or
1-800-GO-ClARION.
In USA::
ClarionSales
SalesCorporation
Corporation
Clarion
WarrantyService
ServiceCenter
Center
Warranty
661 West
West Redondo
RedondoBeach
Beach Blvd.
Blvd.
661
Gardena,CA
CL!90247
90247
Gardena,
(310)327-9100
327-9100
(310)
In Canada
ClarionCanada,
Canada,Inc.
Inc.
Clarion
Warrant Service
Service Center
Center
Warranty
2239
Winston
Park
Drive
2239 Winston Park Drive
Oakville,
Ontario
L6l-l
331
Oakville, Ontario L6H 5R1
(905)829-4600
(905)829-4600
www.clarionmultimedia.com
II
PLEASEPLACE
I
FIRST-CLiISS
HERE
(Post OffiCf: will not denver
without proper postage,)
CLARION SALES CORPORATION
PO BOX 863
BREA CA 92822-0863
!
'
1,
I~
i
i!
i
i;
1
iIi
i
ii
i
i;
i
i!i
i
I3
I
I1
u
ia
HilS PAGE
AND KEEP IT WITH YOUR REGEl
This productis warranted
warrantedagainst
againstall
all defects
defectsin
in material
materialworkmanship
~~~k~at~shi~for a period
periodof
one yearfrom
the date
date of original
original purchase.
purchase.The
The conditions
conditionsof
af this
this warranty
warrantyand
and the
the
lTl the
extentof the
the responsibility
res~onsi~ili~of Clarion
ClarionCorporation
corporationunder
underthis
this warranty
~ar~ai~t~are
are as
as follows:
follavvs:
extent
F PATE OF PURCHASE Will BE REQUIRED fOR WARRANTY SERVICE Of TI'lIS
INFORMATION ABOUT CLARION AUTHORIZED WARRANTY SERVICE CENTERS MAY
)~TjI%II\U:D BY CONTACTING OR WRITING CLARION CORPORATION AT THE ADDRESS
LISTED ON THE fRONT Of nils CAm).
rranty will become void if service performed by anyone other than an approved Clarion
Warranty
ServiceCenter
Centerresults
resultsin
in darnageto
damageto product.
product.
ty Service
3. Thiswarranty
doesnot
not apply
applyto
to any
anyproduct
productwhich
whichhas
hasbeen
beenSUbject
subjectto
to misuse,
misuse,neglect
neglector
or
rranty does
accident,or
or which
whichhas
hashad
hadthe
the serial
serialnumber
numberaltered,
altered,defaced
defacedor
or removed,
removed,or
or which
whichhas
hasbeen
been
accident,
connected,.installed,
adjustedor
or repaired,
repaired,oth()r
otherthan
thanin
in accordance
accordance
with the
the instructions
instructions
, adjusted
with
furnishedby ClarionCorporation.
Corporation.
4. Thiswarranty
doesnot
not cover
covercar
car static
staticor
or other
otherelectrical
electricalinterferences,
interferences!
tapehead
headcleaning
cleaningor
or
arranty does
tape
adjustments,
or labor
laborcosts
costsfor
for the
the removal
removalor
or reinstallation
reinstallatioti
of the
the unit
unitfor
for repair.
repair,
adjustments,
or
of
5. The$olerespoO$ibility
Thesoleresponsibility
of Clarion
ClarionCorporation
Corporation
underthis
this Warranty
Warrarltyshall
shallbe
be limited
limitedto
to the
the repair
repairor
or
5.
of
under
thereof,
at the
the sole
solediscretion
discretionof Clarion
ClarionCorporation.
Corporation.
rreplacement
reof, at
6. IfIf it becomesnecessary
necessaryto
to send
sendthe
the prOduct
productor
or any
anydefective
defectivepart
partto
to Clarion
ClarionCorporation
Corporation
or an
an
6.
or
authorizedwarranty
warrantyservice
servicestation,
station,the
the product
productmust
mustbe
be shipped
shippedin
in its
its original
originalcarton
cartonor
or
authorized
equivalentcation,
carton,fUlly
fully insured,
insured,with
with shippiogcharges
shippingchargesprepaicl.
prepaid.Clarion
ClarionCorporation
Corporation
will not
not
will
assumeanyresponsibility
for any
anyloss
lossor
or damage
damageincurred
incurredin
in shipping.
shipping.
nsibility for
7. ALLIMPLIED
WARRANTIES
EXCEPT
TOTHEEXTENT
THEEXTENT
PROHIBITED
BYAPPI-ICABLE
LAWSHALL
SHALL
WARRANTIES
EXCEPT
TO
PROHIBITED
BY
APPLICABLE LAW
HAVENO
NOGREATER
GREATER
DURATION
THANTHE
THEWARRANTY
WARRANTPERIOD
PERIOD
SETFORTH
FORTH
ABOVE.
UNDER
NO
HAVE
DURATION
THAN
SET
ABOVE. UNDER
NO
CIRCUMSTANCES
SHALLCLARION
CLARION
~DRPORATION
BELIABLE
LIABLE
FORANY
LOSSOR
ORDAMAGE,
DAMAGE,
DIRECT
CIRCUMSTANCES
SHALL
CORPORATION
BE
FOR
ANY LOSS
DIRECT
ORCONSEQUENTIAL,
OUTOF
OFTHE
THEUSE
USEORINABILITY
ORlNA3lLl~TO
TOUSE
USETHE
THEPRODUCT.
PRODUCT.
BECAUSE
IAL, ARISING
ARISING OUT
BECAUSE
SOMESTATES
DONOT
NOTALLOW
LIMITATIONS
ONHOW
HOWLONG
LONG
AN
IMPLIED
WARRANTY
LASTSOR
OR
DO
ALLOW LIMITATIONS
ON
AN IMPLIED
WARRANTY
LASTS
EXCLUSIONS
ORLIMITATIONS
LIMITATIONS
OFINCIDENTAL
INCIDENTAL
ORCONSEQUENTIAL
CONSEQUENTIAL
DAMAGES,
THEABOVE
EXCLUSIONS.
OR
OF
OR
DAMAGES,
THE
ABOVE
LIMITATIONS
OREXCLUSIONS
EXCLUSIONS
MAYNOT
NOTAPPLY
TOYOU.
LIMITATIONS
OR
MAY
APPLY TO
YOU.
8. THISWARRANTY
GIVES
YOUSPECIFIC
SPECIFIC
LEGALRIGHTS,
RIGHTS,
AND
MAYALSO
HAVEOTHER
OTHER
RIGHTS
TY GIVES
YOU
LEGAL
AND YOU
YOU MAY
ALSO HAVE
RIGHTS
WHICH
VARY
FROMSTATE
STATE
TOSTATE.
STATE.
YFROM
TO
9. Should
Shouldyou
youhave
haveany
anydifficulties
difficultieswith
with the
the performance
pe~ormance
of this
this product
productduring
duringwarranty,
or with
any
9.
of
warranty, or
with any
Clarionauthorized
authorizedservice
servicecenters,
centers,you
youmay
maycontact
contactthe
the Clarion
ClarionNational
NationalService
ServiceManagers
tanagers at
at the
the
Clarion
addresslisted
listedon
on the
the front
front of
of this
this card
cardor
or call
call 1I-600-GO-CLARION
for aa listing
listingof
of Authorized
~800-GO-CLARION for
Authorized
Warranty
ServiceCenters
Centersin
in your
yourarea.
area.
281-0607-00
tyService
281-0607-00
~'1 I
:g I
~ I
~, I
KS
*ii
~ I
z~ ii!
.,
-* iI
"'" i
~ i
'" il
:: i
'" i
:oJ
il
'" il
'"
U
il
il
I
m I
,~
m
aa inl
',"
‘a In
-I
~ I
:;T I
“tr
;;;u) iI
.,,1
'" il
"" n
ill
i
"" n
::. n
;: I
..,.
::r I
""
2 I
'"t:: In
n
;; I
* nI
'"
;;'" n
~. I
~ n
Y-1
n
-
I
Is
II
n
I
I
Ie
I
I!i
il
ill
il
n
il
i
I
iB
l
nti
od
m
User Guide and Product Data Sheet
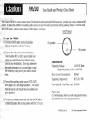
The Clarion FM200 is a two-channel stereo FM modulator with selectable FM frequencies, variable gain, and a remote on/off
on/off
switch. It~I!.?Wstheaddjtion
It allows the addition of auxiliary audio sources to any FM
FM radio (even those lacking auxiliary inputs). It can be used
more.
VD players, videocassette
with DVD
videocassette players, MP3 players, and more.
leJn/Off
On/Off Switch
M200:
1) Turn the On/Off
switch to the On position
Offswitch
(This is the poslt!cm
position with the "I"
“I” icon).
On position -_._--J'AL-
.- - Off
ff position
'
2) Turn on the radio and select the FM
FM band.
Tune in either 88.7 or 89.1
89.1 (your installer can
advise ypuwhiCh
you which frequency setting is being
being
used in your installation). Once you determine
the correct
frequency, it is a good idea to store
(;'1ytfreqllency,
the frequency
radio’s preset
qUency using one of your radio's
keys.
3) Turrlon
Turn on the
the auxiliary audio source (VCR, DVD,
DVD,
$)
PAP3player, etc.) and begin playback. The sound
MP3
the source
source unit should now be audible over
from the
your speakers.
speakers.
4) To return to standard radio use, turn the On/Off
OnlQff switch
to the Off po:;iti<m
position (this is the position with the "0"
“0” icon).
Specifications:
14.4V DC
DC Nom.
Nom.
Operating Voltage:
14.4V
(~~erat.i~g I~ange
Range 10.8
10.8 to
to 15.6V
15,W DC)
DC)
(Operating
2OOmA
Co~~su~~~~io~i: 200mA
Max. Current Consumption:
Operating Frequencies:
88.7, 89.1 FM
FM
88.7,89.1
Fuse rating (in
(in Fuse/Filter box): 2A P\GC
AGC
Part$ list
(1) FM
FM Modulator Main Unit with integrated harness.
(1)
(‘1)
On/Dff
Switch with
with integrated
integrated harness.
harness.
(1) On/Off Switch
IO-FMZOO-00 (Rev.
(Rev. A)
A)
10-FM200-00
2001 Clarion
Clarion Corporation
Corporalion of
of America
America
2001
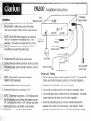
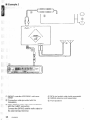
Installation Instructions
Frequency
-Selector Switch
Level
Matching Control ~'~'~:7'e;,.",~_•.•..•• -.I'6!'il:~)
f"/::.:...---------..-"'w.,,-~--__r.:;./·
1. Find a suitable location
location for the
the On I/ Off
Off switch
switc
Installation
Be sure that it issVllithin
within easy
easy reach
reach of
of the
the driver
driver
and
from the
and can
can be operated
operated safely
safely from
the seated
seated position.
position.
[][]
88.7MHz
;To)
NOTE: The (In/Off
O&Off swit9g
switch reg!Jires
requires a flat surface at
af
least 3/4"
3/4” in diameter for mounting,
mounting, with
with 1"
1Iirear
,.The
provided with 36"
clearamx?.
The swi(gh
switch is provided
36” of
of wire nto accou(]t
take this into
account when
when selecting a location,
location, or
ave to extend the switch wires.
you will have
wires.
89.1MHz
On/Off Switch
Plug-in Port
nhecnhe
2. Connect
the RCA
RCA inputs
inputs to the
the audio
audio source.
source.
to~he
le.antennaconnector
3. Connect the male
antenna connector to
the car
car radio's
radio’s
female connector
FM antenna input,tand
and the
the female
connector to the car
car
antenna.
NOTE: §prr;.evehicles
Some vehicles may require antenna
's (sold separately).
adapters
separately),
To Car
Antenna
,
On/Off Switch
l~
Chassis Ground
Ground
Chassis
...
.-l.~,CkWir~~'<F.'i. l:;~.< ;.· -'1-::::::-:::::::::::/
.
..
r~--""~' FBl~:._
l"Ied Wire
To Accessory -11 2V
F?CA Input
Input from
from
RCA
Audio
Source
Audio Source
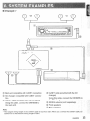
Setmup and Testing
1. Set
Set the Frequency
Frequency Select
Select switch
switch to either
either 88,7
88,7 or 89.1.
89.1~ If a local
local radio
radio
1,
station uses
uses the
the first
selected, use
LISQ?
the other
other frequency.
station
first frequency
frequency selected,
the
frequency.
nnect the
wire to chassis
4. Connect
the Black
Black wire
chassis ground.
ground
2. Switch
Switch the
the On I/ Off
Off switc!l
switch to On (the
( the "I"
“I” position),
position).
2,
5. Connect
the Red
Red wire
accessory +
+I12V.
2V,
onnect the
wire to accessory
3. Turn
Turn on the
the car
car radio
radio and
and tune
tune to the
the frequency
selected in Step
Step 1.
frequency selected
NOTE: Connecting
to accessory ++7’2V
will ensure thaI
that
nne<;tifJtj10
12V wJ1!
the FM moduiaror
off when the ignition is turned
or turns off
off. Connecting this wire to
lo +-f12V Constant may cause
off
battery drain
issues, and is not recommended.
recommended,
in issues,
IO-FM200-00
(Rev.. A)
Clarion Corporation
Corporation of
of America
2001 Clarion
America
4. Turn
Turn on the
the audio
audio source
source connected
connected to the
the FM Modulator.
Modulator. This
This audio
audio
4,
source should
should now
now be heard
heard over
over the
tile vehicle
vehicle speakers.
speakers.
source
5. Set
Set the level
level matching
control so
%o that
that the
the volume
volune level
level over
over the
the
5,
rnatchin~J control
loud
speakers is the
the same
same as
as when
listening to radio
radio stations.
stations. If loud
speakers
when listening
passages sound
sound (listorted,
distorted, lower
lower the
the Level
l-eve1 Matching
Matching Control
Control setting.
setting.
passages
Owner's manual
Mode #1'""->"<>f,,,,,;
Manual de Instrucclcmes
SIRIUS SATELLITE RADIO RECEIVER
SINTONIZADOR SIRIUS DE RECEPCION
RADIO
SATELITE
9!2,
\
SIRIUS
Satellite Radio
Clarion product.
product.
you for
forpurchasing
purchasing this
this ~~ar~~~
Thank you
read this
this owner’s
owner's manual
manual inin its
its entirety
entirety before
before operating
operating this
this equipment.
equipment.
:I:Please read
* After reading
reading this
this manual,
manual, be
be sure
sure to
to keep
keep itit inin aa handy
handy place
place (e.g.,
(e.g., glove
glove compartment).
compartment).
*After
Check the
the contents
contents of
of the
the enclosed
enClosed warranty
warranty card
card and
and keep
keep itit carefully
carefully with
with this
this manual.
manual.
:LCheck
l:l::jIl.Tlli&:.l~·~
s .
22
PRI:CJ\UTIOi\IS
,
MS .... ... ......_......................,.................,,.......................
‘ .. ... .. .. .... .. .... ..... .....‘..............
‘.. 33
55
co~rrFl(JlS ..,., ‘ .,..,_.,._._...,_.,,,.,~.,,.......,.,,.,.... ‘ .. ... .. ...._......................................................................
4. SIRIUS OPERATION
N ,..__,,.,__....,,.,,.,,......,.~.....,.,,....,......., ~.._.,,.,.,........_.......,.....................................
77
~.. ... ... ..... ... ... .. ... .. ....” 10
AND WIRE CONNECTION·‘ ,.,......,,,.........,,.,.,,.............,.,....
10
... . .. ... .... 13
MPlES . . . ... .
13
. .
..
.
.
SPE~CII:ICA'nO!IjS .. ,. . .
15
,
. .
. . I
. . .. . . ... .. .~. ... 15
. . .
.
,
. .
. .
.
.
.
.
CAPlJtput
witching between Slave, Stand-alone Provided
f DSC920S (EXClusive Commander) Supporting the other
'sCenter Units
~nt~mrlC.l '"enniil!C.lls for Satellite and Terrestrial Waves (SMB)
Channels each, a Total of 18 Channels for Memorization
Enabled
DSH920S
f
1. The
when starting
The first
first time
time or when
starting after
after turning
turning
off
off the
lhe backup
backup power
power supply,
supply, the
the receiver
receiver
does
does not
not operate
operate normally
normally until
until reception.
reception.
The
The sound
sound is not heard
heard until
until 20 or 30 secseconds
onds after
after reception.
reception.
2. Text data
data regarding
regarding the names
names of received
received
channels
written to the receiver
channels is written
receiver 30 to 60
seconds
seconds after
after start
start of normal
normal operation.
operation. If the
power
power is turned
turned off before
before the
the text
text data
data is
written,
written, it may
may not
not be correctly
correctly displayed
displayed next
next
time.
time. Perform
Perform a reset
reset operation
operation if no text
text data
data
is displayed.
displayed.
3. If the
the receiver
receiver freezes,
freezes, reset
reset it.
Resetting
ing
Disconnect
ct the
the SIRIUS
SIRIUS Receiver
Receiver power
power
cable
cable (the
(the CeNET
CeNET cable
cable if connected
connected to the
CeNET
CeNET and
and the 4-pin
4-pi11 power
power cable
cable during
during
standalone
wait about
standalone operation),
operation), wait
about 10 secseconds
onds and
and connect
connect it again.
again.
The
The last
last channel,
chnnnel, preset
preset memory
memory and
and other
other
data
data stored
stored in the
the receiver
receiver are deleted
deleted returning
turning it to its default
default settings.
settings.
4. A CeNET
CeNET and
and standalone
standalone operation
operation switch
switch is
provided
provided on the rear
rear of the
the receiver.
receiver. The
The
switch
switch is set
set to CeNET
CeNET position
position a1
at the time
time of
shipment.
shipment.
Do not
not set
set this
this switch
switch to the
the standalone
standalone posiposition
when using
tion when
using the
the CeNET.
CeNET.
@
5. The
warm
The tuner
tuner inside
inside the
the receiver
receiver becomes
becomes warm
during
during operation;
operation; this
this is only
only normal
normal and
and not
not
a cause
cause for concern.
concern.
6. Do not
not touch
touch the
the connector
connector pins
pins on the
the receiver
ceiver as
as this may
may damage
damage the
the ICs inside
inside the
the
unit.
unit.
7. No station
when the
station is selected
selected when
the [[<~] or [~>]1
button is moved
moved quickly.
quickly. This
‘This is because
because butbutbutton
operations are
are not
not accepted
accepted until
until the
the
ton operations
channel is confirmed.
confirmed. It takes
takes between
between 1.5 to
channel
seconds to change
change channels.
channels.
5 seconds
This
found to
This equipment
equipment has
has been
been tested
tested and
and found
comply
with the
the limits
comply with
limits for a Class
Class 8
B digital
digital device, pursuant
vice,
pursuant to Part
Part 15 of the
the FC
FCC Rules.
These
These limits
limits are
are designed
designed to prov'
provide reasonable
protection
protection against
against harmful
harmful interferen
interference in a residential
dential installation.
installation.
This
This equipment
equipment generates,
generates, uses, and can radiate
ate radio
radio frequency
frequency energy
energy and, if not installed
with the
and
and used
used in accordance
accordance with
the instruCtic
instructions,
may
may cause
cause harmful
harmful interference
interference to radio
radio comcommunications.
munications However,
However, there
there is no guarantee
guarantee
that interference
interference will not
not occur
occur in a particularinparticular inthat
stallation.
stallation.
If this
this equipment
equipment does
does cause
cause harmful
harmful interferinterference
which can
ence to radio
radio or television
television reception,
reception, which
can
determined by
bv turning
turnina the
the equipment
eauioment off
off and
and
be determined
the user
user is encouraged
encouraged to con
con&t the dealer
on, the
experienced radiolTV
radio/TV technician
for help.
or an experienced
t
USE OF CONTROLS
FORMANCE OFPR
THOSE SPECIFIED HERE
HAZARDOUS RADIATION EXPOSURE.
THE COMPACT DISC PLAYER and MINI DISC
PLAYER SHOULD NOT BE ADJUSTED ORREPAIRED BY ANYONE EXCEPT PROPERLY
QUALIFIED SERVICE PERSONNEL
CHANGES OR MODiFICATIONS NOT
PRESSLY APPROVED ElY
TURER FOR COMPLIANCE
USER'S AUTHORITYTO OPERATET
MENT.
IUli-Unrnfil.hj#_lilY-1i;tt
CHANGES OR MODIFICATI
PRODUCT NOT APPROVE
FACTURER WILL VOID THE WARRANTY AND
WILL VIOLATE FCC APPROVAl.
.,
clarion
12V
8
GROUND
ii SIRIUS SATELLITE RADIO . 2320~
r;!iS ~EVICT C0MPLIH. 1'111,1 PM" \5.01' ·IHS
Bottom View of Unit
ElSH920S
OSH920S
3
What is Sirius
Satellite Radio?
\/
~,
SIRIUS
Satellite Radio
Sirius is
is radio
radio the
the way
way itit was
was meant
meant to
to be:
be: Up
Up to
to
Sirius
of digital
digital quality
quality programming
programming
100 new
new channels
channels of
100
delivered to
to listeners
listeners coast
coast to
to coast
coast via
via satellite.
satellite.
delivered
That means
means 50
50 channels
channels of
of completely
completely commercommerThat
cial-free music.
music. Plus
Plus up
up to
to 50
50 more
more channels
channels of
of
cial-free
news, sports,
sports, and
and entertainment
entertainment from
from names
names
news,
like CNBC,
CNBC, Discovery,
Discovery, SCI-FI
SCI-FI Channel,
Channel, A&E,
A&E,
like
House of
of Blues,
Blues, E!,
E!, NPR,
NPR, Speedvision
Speedvision and
and
tlouse
ESPN.
ESPN.
Sirius is
is live,
live, dynamic
dynamic entertainment,
entertainment, completely
completely
Sirius
focused on
on listeners.
listeners. Every
Every minute
minute of
of every
every day
day
focused
of every
every week
week will
will be
be different.
different. All
All 50
50 commercommerof
cial-free music
music channels
channels are
are created
created in-house
in-house
cial-free
and hosted
hosted by
by DJs
DJs who
who know
Imow and
and love
love the
the mumuand
sic. Do
Do you
you like
like Reggae?
Reggae? How
How about
about Classic
Classic
sic.
Rock or
or New
New Rock?
Rock? Sirius
Sirius has
has an
an array
array of
of
Rock
choices spanning
spanning a vast
vast range
range of
of musical
musical tastes
tastes
choices
including the
the hits
hits of
of the
the 50’s,
50's, 60’s,
60's, 70’s.
70's, & 80’s
80's
including
as well
well as
as Jazz,
Jazz, Country,
Country, Blues,
Blues, Pop, Rap,
Rap, R&B,
R&B,
as
Bluegrass, Alternative,
Alternative, Classical,
Classical, Heavy
Heavy Metal,
Metal,
Bluegrass,
Dance and
and many
many others...
others...
Dance
From
its
state-of-the-art,
digital broadcasting
broadcasting fafaFrom its state-of-the-art, digital
cility in Rockefeller
Rockefeller Center,
Center, New
New York
York City, Sirius
Sirius
cility
deliver the
the broadest,
broadest, deepest
deepest mix
mix of radio
radio
will deliver
entertainment
from coast
entertainment from
coast to coast.
coast.
Sirius
you music
Sirius will bring
bring you
music and
and entertainment
entertainment
programming
that is simply
programming that
simply not available
available on traditional
the country.
ditional radio
radio in any
any market
market across
across the
country.
It's
It’s radio
radio like you've
you’ve never
never heard
heard before.
before.
So Get
Get Sirius
Sirius and
and Listen
Listen Up! For
For more
more informainformation, visit
visit siriusradio.com.
siriusradio.com.
4
OSH920S
OSH920S
To receive Sirius Sat@Uite Radio on
this receiver
This receiver
receiver contains
contains aa SIRIUS
SIRIUS ID
ID for
for user
user
This
identification. All
All you
you have
have to
to do
do to
to obtain
obtain aa subsubidentification,
scriber contract
contract and
and enable
enable reception
reception of
of Sirius
Sirius
scriber
Satellite Radio
Radio isis to
to call
call the
the Sirius
Sirius Service
Service CenCenSatellite
ter (@X3-539SlRl)
(888-539-SIRI) and
and inform
inform us
us of
of your
your SIRIUS
SIRIUS
ter
ID and
and aa few
few other
other details.
details.
ID
Verifying your Sirius ID
i. Press and hold the [ADJ] button for 1 second
or longer
longer to
to enter
enter the
the Adjust
Adjust mode.
mode.
or
Note:
note:
[ADJ] button
button is
is described
described in
in fhe
the source
source unit
unit ininThe regal
as iho
the [“!“I
[T] (TITLE)
(TITLE) bofion
button or
or
struction manual
manual either
either es
s&.&ion
[A-M] button.
button. This refers
refers to fhe
the function
function of
of tba
the bufbut[A-M]
labeled I’~~~~
"ADJ" on the
the source
source unit
unit panel.
panel.
ton labeled
ADJ
etc.
or
or
mADJ
2. Press the [<~] or [1»]
DlSP".
[a
select the "ESN
3. Press the [l>-mIl]] button
button to display
display lhe
tim SIRIUS
SIRIUS
ID.
The source
The
source unit
unit displays
displays the
the high-order
high-order 6
digits
of the
the SIRIUS
SIRIUS ID in the
the Qperation
Operation stastadigits of
tus indication.
Y] knob
knob clockwise
clockwise to
4. Turn the [ROTARY]
ow-order 6 digits
digits of the
the SIRIUS
SIRIUS
change the low-order
10.
display the
the high-order
high-order 6 digits
digits of the
the
To display
RY] knob
knob councounSIRIUS ID again,
again, turn
turn [ROTARY]
[
SIRIUS
terclockwise.
terclockwise.
Source unit buttcms, example 1
[ROTARY]
[SC]
[RD]
Source unit butto.ns, example 2
Notes:
The above
above illustrations
ilk&rations show
show two
two source
source units
units as
as
•@The
an exampte
example of
of the
the button
button names
names used.
used.
an
Since this
MS manual
manual coven;
cove/s several
several models,
models, the
the
•* Since
names of
of some
some buttons
buffoonsvary
vary with
withtlJe
fine model.
/770&i.
names
As shown
shown below,
below, this
this manual
manual gives
gives the
fhe different
different
As
buttoon names
names when
when more
more than
than name
name is
is used.
used.
button
~~~~1 (FUNC)
(FUINC)button,
buffon,
[FNC]
[SC] (SCN)
(SC/v) button
bufto,, etc.
6&c.
[SCi
DSH920S
5
'\-- Operation status indication
"'- fu-?ej : SIRIUS indication
'"
~T
channel indication
Function mode indication
indication
Sot.m;~e
unit display, example 2
OSH920S
Selecting Sirius Radio modes
Press the [SAT] button or the [FNC] (FUNC) button to select the Sirius mode.
The Sirius
Sirius indication
indication lights
lights entering
entering the
the mode
mode
The
that was
was engaged
engaged when
when the
the unit
unit was
was turned
turned off
off
lhat
last time.
time.
last
Notes:
Notes:
[SAT] buffon
button selects
selects the
the Sirius
Sirius mode
mode direcfly.
directly.
0" The [S&T]
Some source
source unit
unit does
does not
not have
have a ~~~~1
[SAT] buffon.
button. IfIf
Some
the ~~~~~
[FNC] (FUNC)
(FUNC) button.
button.
not, press the
(FUNC) buffon
button selects
selects the
the external
external dede8• The [FNC] (FUNG)
vices connected to the source unit in ordel; for example: Radio
Radio mode
mode -9p
<4 DAB
DAB mode
mode <4 Sirius mode
ample:
<4 CD mode <4 CD changer mode <4 .,.
Selecting a band
Press the [BND] button
button lo
to select
select a band.
band.
e button
Each press of the
button changes
changes the
the display
display as
as
shown below.
SRi <4 SR2 <4 SR3 <4 SR1
SRi .‘.
...
*,. The currently
currently received band is displayed
displayed in the
Lhefunction mode
mode indication.
indication.
.,. Models
without a function
function mode indication
indication display
display
x:
Models without
name and channel
channel number
number in the OperaOperathe band narne
tion status
status indication.
indication.
Notes:
Operation status
status indication
indication of
of the source
source unii
unit
*• The Operation
secdisplays the
the abbreviated
abbreviated channel
channet name
name for
for 22 secdisplays
onds when a station
station is selected
selected before
before refurning
returning
onds
to the previous
previous display
display mode.
fo
e• Scrofling
or other
other
Scrolling starts
starts when the
the channel
channel name
name or
seconds. When
text has
has been
been displayed
displayed for
for 2 seconds.
fext
scrolling finkhes,
finishes, the first
first text
text display
display appears.
appears.
scrolling
To sfarf
start scrolling
scrolling again,
again, press
press the 1~~J~
[ADJ] button.
button.
button is
Is described
described in the source
source unit
unit
• The [ADJ] button
insfrucfion
instruction manual
manual either
either as the [T]
[7] (TITLE)
(TITLE) button
button
or
or (A-M]
[A-M] button.
button. This refers
refers to the function
function of
of the
button labeled "AfJJ"uon the source
source unit
unit panel.
panel.
ADJ
or
or
Channel selection
Channels
butChannels are
are selected
selected with
with the
the following
following buttons.
tons.
Information displayed during reception
• The [<:<.iI] or [~>] button
• A [DIRECT] button
The [SCN] (SC) button
when the
the receiver
receiver is turned
turned on
•*uUPDATING : when
the first
first time
time or
or after
after a reset
reset
the
when a channel
channel is being
being tuned
tuned
o ACQUIRING:: when
in (no signal is yet received)
shown on an 8("LINKING"” is shown
digit display)
display)
digit
W : a channel
channel without
without a broadcast
broadcast
• INVALID Cli
lected
has been selected
shown on an 8CIi"’ is shown
("INVLD
z
d
digit
display)
-UP : a channel
channel not covered
covered by your
• NO SIGN·UP
contract
contract
@
ANTENNA
antenna is connected
connected or the
:: no antenna
antenna is defective)
defective)
antenna
Switching the display
to select
select the
the dede1. Press the [DISP] (D) buttonn to
sired display.
display.
sired
The main
main display
display or
or the
the clock
clock display
di
The
apwpears each
each time
time you
you press
press the
the [DlSP]
[
pears
(D)
103
button.
button.
etc.
etc.
mAD,.J
The following
following information
information is displayed in the OpThe
eration status
status indication
indication when
when Sirius
Sirius Radio
Radio cancaneration
ed normally.
normally.
not be received
not
@
I
2.
2. In
In the
the main
main display,
display, press
press and
and hold
hold the
the
(D) button
button for
for 11 second
second or
or longer
longer to
to
[[DISP]] (13)
cycle between
between the
the following
following display
display modes:
modes:
cycle
Channel name'" title ... artist name'" category name'" text <4 channel name'" ...
@
• The [CAT] (RDM) button
descriptions.
"-:;For details, see the following operation descriptions.
Notes:
Notes:
T/Je audio output
output is muted
muted and
and other
other button
button op"-: The
eralions are not accepted
accepted during channel
channel selecerations
tion.
tion.
Tuning mode (T-MODE)
channel selection
selection modes:
modes: seek
seek
There are two channel
mode and manual
manual mode.
mode.
mode
@) Seek tuning
hat can be received
received are selected
selected
Only channels that
while channels
channels without
without broadcasts
broadcasts and channels
channels
while
not covered
covered by the contract
contract are automatically
automatically
skipped.
skipped.
1. Press the [<:<.iI] or [~>] button.
next available
available chanchanThe receiver seeks thee next
nel below
below or
or above
above the
t current channel.
channel.
nel
button.
2. Press and hold the [<:<.iI] or [~>]] button.
OSH920S
OSH920S
7
Sirius operation
@I
The receiver
receiver moves
moves to
to seek
seek channels
channels below
below
The
or above
above the
the current
current channel.
channel. IfIf the
the channel
channel
or
found when
when either
either button
button isis released
released isis availavailfound
able that
that channel
channel isis received.
received. Otherwise,
Otherwise,
able
seeking continues
continues until
until an
an available
available channel
channel
seeking
is found.
found.
is
Manual tuning
Any channel including
channels without
without broadbroadding channels
casts and
and channels
channels not
not covered
covered by
by the
the contract
contract
casts
can be
be selected
selected during
during manual
manual tuning.
tuning.
can
Press and
and hold
hold the
the [[BAND]] (END)
(BND) button
button for
for
I.i. Press
second or
or longer.
longer.
1i second
to manual
manual mode
mode
This changes
changes the
the seek
seek mode
mode to
r This
the display
display lights.
lights.
and the
the ‘~~A~~”
"MANU" indicator
indicator on the
and
When this
this operation
operation is performed
performed in manual
manual
When
engaged and
and the
the
mode, the
the seek
seek mode
mode is engaged
mode.
"MANU" indicator
indicator on
on the
the display
display goes
goes off.
‘I~~~~
Notes:
bones:
rts to the seek
" The receiver automatically reverts
seek
tton is not
mode when the [<44J or [$»1 button
not used
used for
7 seconds in the manual mode.
ton. The
2. Press the [~] or [1»] button.
The receiver
receiver
moves to channels above or
or below
below the
the curcurrent channel one by one.
3. Press and hold the [<<ilJ or [1»]] for
for ‘Ii second
second
or longer.
longer.
or
The receiver
receiver moves
moves to seek
seek channels
channels below
bolow
The
or above
above the
the current
current channel
channel and
and the
the chanchannel found
found when
when either
either button
button is released
released is
received.
received.
Recalling a preset station
A total of 18 SIRIUS stations can be stored (6SRI, 6-SR2
6-SR2 and 6-SR2).
6-SRZ). This
This allows
allows you to seseSRi,
lect your
your favorite
favorite SIRIUS
SIRIUS stations
stations and store
store
lect
them in memory
memory for later
later recall.
recall.
them
] button
button and select
select the deI. Press
Press the [BND]
[
i.
sired SIRIUS
SIRIUS band
band (SRi,
(SR1, SR2
SR2 or SR3).
SR3).
sired
red SIRIUS
SIRIUS station,
station, press
press the
2. To
To recall
recall a stored
2.
CT] button
button to select
select that stadesired [DIRECT]
[
desired
tion.
Press and
and hold
hold one
one of
of the
the [DiRECTJ
[
'":/:Press
buttons
for 22 seconds
seconds or
or longer
longer to
to store
store the
the current
current
for
station into
into preset
preset memory.
memory.
station
Manual memory
Select the
the desired
desired station
station with
with seek
seek tuning,
tuning,
i. Select
manual tuning
tuning or
or preset
preset tuning.
tuning.
manual
Tj buttons
buttons for
for
Press and
and hold
hold one
one of
of [DIRECT]
[
2. Press
seconds or
or longer
longer to
to store
store the
the current
current stasta22 seconds
tion into
into preset
preset memory.
memory.
tion
8
USH920S
DSH920S
Notes:
a• When
When the
the name
name of
ofaa channel
channel stored
stored in
in memory
memory is
is
changed
changed by
byaa broadcasting
broadcasting sfaation,
station, the
the display
display
may
may show
show aa channel
channel name
name that
that differs
differs from
from fhe
the
stored name.
name.
stored
0• AA channel
channel stored
stored in
in memory
memory may
may be
be discontinued
discontinued
at
at the
the option
option of
of the
the broadcasting
broadcasting station.
station.
Category selection function
SIRIUS
SIRIUS Radio
Radio allows
allows you
you to
to select
select broadcast
broadcast
channel
channel category
category (contents).
(contents).
Receiving stations seiected by
category
1. Press the [RDMJ (RD) button
button to
to enter
enter the
the
category selection mode.
ob clockwise
2. Turn the [ROTARYJ knob
clockwise or
or counCOUllterclockwise to select a category.
Or, press a [D!RECTJ button
button if the
the category
category
is preset.
3. Press [<<ill or [1»] button to tune in a station.
This
This starts
starts seek
seek tuning
tuning and
and broadcast
broadcast chanchannels
tile specified
specified category
category are
are sese·
nels that
that meet
meet the
the
lected. The "CA"” indicator
indicator is displayed
displayed in the
function
function mode
mode indication
indication during
during seek
seek tuning.
tuning.
The CAT indicator
indicator lights
lights on models
models without
The
without a
function mode
m
Idication.
function
indication.
(RD) button
button again
again to cancel.
cancel.
Press the
the [ROM]] (RD)
4. Press
notes:
Notes:
When the
the category
category selection
selection mode
mode is
is entered,
entered, the
the
•e When
category of
of the
the last
lasf received
received channel
channel is
is displayed
displayed
category
first.
The category
category selection
selection mode
mode is
is canceled
canceled when
when
•s The
channel with
with the
the setected
selected category
category can
can be
be
no channel
found.
wit/?bJ 77 seconds
seconds afnf• Press the [<441 or [$» J button? within
continue seeking
seeking
ter a channel has been set to0 continue
channels up
up or
or down.
down. The
The category
category selection
selection
channels
mode is
is canceled
canceled and
and normal
normal reception
reception is
is reremode
sumed ifif no operation
operation is
is performed
performed for
for 77 seconds.
seconds.
sumed
Presetting a category
registering specific
specific
A category can be preset by registering
ns 11 to
to 6.
6. Then
Then the
the
categories in [DIRECT] buttons
recalled by
by pressing
pressing
desired category can be recalled
the corresponding [DIRECT] button.
(RD) button
button to
to enter
enter the
the
i. Press the [ROM]] (RD)
category mode.
“91knob
knob clockwise
clockwise or
or councoun2. Turn the [ROTARY]
terclockwise to
to select
select aa category.
category.
terclockwise
T] button
button for
for 22’
Press and
and hold
hold one
one [DIRECT]
[
3. Press
seconds or
or longer
longer to
lo store
store the
the current
current catcatseconds
egory in
in the
the preset
preset memory.
memory.
egory
Sirius operation
Notes:
name of
of a channel
channel stored
stored in memory
memory is
8• When the name
changed by
by a broadcasting
broadcasting station.
station, the display
display
changed
may show
show a channel
channel name
name that
that differs
differs from the
may
stored name.
stored
memory may
may be
be discontinued
discontinued
channel stored
stored in memory
a• A channel
at the option
option of
of the
the broadcasting
broadcasting station.
station.
at
Scan function
lhcre
There are
are two
two scan
scan modes:
modes: a category
category scan
scan
mode
mode and
and a preset
preset scan
scan mode.
mode.
During scanning
scanning channels
channels are
are displayed
displayed in abDuring
abbreviated
breviated form
form and
and the
the display
display mode
mode cannot
cannot be
switched.
switched.
€} Category scanning
In a category
category scan,
scan, broadcast
broadcast channels
channels in the
the
same
same category
category as the
the currenl
current channel
channel are
are seselected about every 10 seconds.
1. Press the [SCN] (8e) button to start a category scan.
2. Press the [SCN] (8C) button, a [DiRECT]
button, the [<<11] or [~>] button to cancel a
category scan.
scan.
category
MSfX
Note:
Cate.gory scanning
scauriing is not
IJO~ available
available when no cat•* Category
defined for the
If7e current
current channel.
egory is defined
scan
€} Presett scan
scan scans
scans the channels
channels (up to 18
A preset scan
channels) stored
stored in the
the preset
preset memory
memory about
about
channels)
every 10 seconds.
seconds.
every
S.
'j.
Press and
and hold
hold the
the [SCN]
[SC (8C) button for 1
Press
second or longer
longer to start
start a preset
preset searL
stain.
second
2. Press the [SCN] (8C) button, a [DIRECT]
button, the
or [~>] button to cancel a
preset scan.
scan.
preset
DSH920S
DSH920S
9
I
1. Before starting,
starting, be sure
sure to disconnect
disconnect the
the
battery’s'15 negative
negative "-"
“-‘I terminal
terminal to prevent
prevent acaccidents
cidents due
due to short-circuits.
short-circuits.
2. Location
Location
Gonsi'der
Consider safety
safety and
and operability
operability when
when selectselecting a place
place for installation.
installation. Avoid
Avoid the
the followfollowing.
-Locations
0 Locations where the unit will hamper
hamper driving.
passen•e Locations where the unit could injure passengers if the
the car stops suddenly.
gersif
sunlight or hot air
•e Locations exposed to direct sunlight
from the heater, etc.
e Locations where the unit may be exposed
exposed to
<Locations
rain or water.
rain
3. Be sure
sure to use
use the
the included
included screws
screws and
and
brackets.
Screws other
other than
than those
those supplied
supplied
brackets. Screws
could damage
damage the
the unit.
unit.
could
Case
Case
,,
l---~--"'-
1'1
~iJ~~~=
-,---
!/ I/_ 8rnrn
8mm max.
max .
~I~
When drilling
drilling holes
holes in the
the dashboard,
dashboard, etc.,
etc., be
be
4. When
sure to
to check
check beforehand
beforehand thal
thai there
there are
are no
no
sure
harnesses
other wires
wires inside.
inside.
harnesses or other
@Mounting
bracket _..._........_....._.......... 2 pieces
pieces
1
mting bracket
@ Canoa clip
@Canoe
clip .. .... . ..__...._...,.........,....,,... 4 pieces
pieces
@ Mounting screw
screw .. .... ... .. . ... .... .... . . . 4 pieces
pieces
@lMounting
@ CeNET cable
@CeNET
cable . ... .. .... ... ... .. . .. . . .. .. I1 piece
piece
@
\
DSH92ClS
DSH920S
Installation Example (Instamng the unit l.mder the driver's seat)
1. Attach
Attach the
the mounting
mounting brackets
brackets @
CD toto the
the sides
sides
4.
D8H9208 using
using the
the screws
screws@
® propro,ofthe
the DSM920S
,of
vided.
vided.
2.
the location
location on
on the
the floor
floor mat.
mat. Drill
Drill
Select
2. Selectthe
holes inin the
the floor
floor mat
mat to
to match
match the
the positions
positions
holes
in the
the mounting
mounting brackets
brackets 0.
CD.
of the
the holes
holes in
of
3. Insert
Insert the
the canoe
canoe clips
clips @
® from
from the
the rear
rear of
of the
the
3.
D8H9208.
floor mat
mat and
and install
install the
the DSM920S.
floor
There are
are three
three mounting
mounting holes
holes on
on each
each side
side
.,. There
y:
of the
the DSt-WOS.
D8H9208. Select
8elect the
the appropriate
appropriate holes
holes
of
to match
match to
to the
the installation
installation location.
location.
to
Connection Example and Identification of Parts
OJ CeNET input/output terminal
Connect to
to the
the main
main unit
unit or
or CD/MD
CD/MD changer
changer
Connect
@.
using the
the CeNET
CeNET cable
cable 0.
using
'" Equipment
terminal is not specified.
specified.
ipment to this terminal
pin ~e~~f~a~
terminal
q~ RCA pin
Tllis terminal
terminal is not
this unit.
This
not used
used for this
unit. Use
llse it
when the
the DSC920S
(sold separately)
separately) is conconwhen
DSC920S (sold
nected.
nected.
@]
~~~~~ antenna
a~te~~~~ terminal
te~~~~~~
@I SATELliTE
Connect
onncct to the
the SIRIUS
SIRIUS antenna
antenna (SATEL(SATELLITE)
LITE) cable,
cable, (sold
(sold separately).
separately).
[1]
L antenna
a~t~~~~~terminal
~~~~i~~~
ISI TERRESTRIAL
2-E
Connect
Connect to the SIRIUS
SIRIUS antenna
antenna (TERRES(TERRESTRIAL) cable, (sold separately).
[]] CONTROLLER terminal
CeNETcable
clarion
""_,,,,,,,,,,,,,:",,.t>:'''_~''''V"",'
This
This terminal
terminal is not used tor
for this unit. Use it
when
when the DSC920S
DSC920S (sold separately)
separately) is conconnected.
nected.
jYJ POWER SUPPLY
PLY terminal
~e~~~~~~~
(§]
This terminal is
is not
not used
used for
for this
this unit.
unit. Use
Use itit
when
whan the
the DSC920S
DSC92OS (sold
(sold separately)
separately) is
is conconnected.
nected.
II]
switch
swltc~
-us
I.77CeNETfSTANDAlONE
This switch
switch is
is Llsed
used to
to select
select the
the setting
setting posiposiThis
tion when
when the
the CeNET
C&NET connection
connection isis made
made or
or
tion
the DSC920S
DSC92OS (sold
(sold separately)
separately) isis connected
connected
the
to this
this unit
unit (STAND
(SIAND ALONE).
ALONE).
to
DSH9Z0S
,
"
""
,." ,.
I
\
=<l"'''.<£!>~'''''''K~
Boltom view of the unit
~
MC';"W ~1l-:;;,
;::::lLZJ
~\L~SIRIUS
antennacable
cable
antenna
DSH920S
DSH920S
11
(f;eNET (f;able
Orient the
the CeNET
CeNET cable
cable in
in the
the direction
direction
Orient
~tKllJ\ln ininthefig~r0
and insert
insert itit until
until itit isis
chmnrn
the finiwe
and
locked in
in position.
position. Tc
To1 remove
remove the
the CeNET
CeNET
locked
cabl('),pull
lightlY
grasping the
the slide
slide (cap
v nrnsning
:Etp
cable,
pull ititpy
by lightl,
J..^-r
@inyour
fingers.
69
in mru finnwrs.
Y,,....“*I
a1.
.%)”
~‘YY.V.
Connect
antenna (sold
(sold separately)
separately)
Connect a SIRIUS
SIRIUS antenna
tome
antenna terminal.
terminal.
to the SIRIUS
SIRIUS antenna
When
When removing,
removing; extract
extract while
while keep
keep pressing
pressing
the portion
portion @.
@.
the
Erie:
Note:
•e.B?sure
i/712maJn
main unit
unit power
power otf
oif when
when the
the
Be sure to
to turn
turn the
SIRIUS antenna
antenna cable
cab/e is
is connected.
connected.
SIRIUS
•e Do
Do not
not give
give aa strong
strong shock
shock to
to the
the antenna
anfenna concon/7ector,
nector.
clSH920S
OSH920S
3. (f;eNET/STAND ALONE switch
Be sure
suretotocheck
checktoto see
see ififthe
the select
select switch
Be
located on
on the
the back
backside
side ofofthe
the main
main unit
unitisis
located
set to
to the
the “CeNET”
"CeNET" position.
position.
set
to the
the “SP.4ND
"STAND ALONE”
AL.ONE" position
position
Also, set
set ilit to
Also,
when the
the SIRIUS
SIRIUS controller
controller (DSC920S),
(DSC920S), sold
sold
when
separately, isis used.
used.
separately,
®
m
m
r---,,·w"'··'·--!
o.,·~,
\'-~,-_._-~-~-~-~
·.=A_
. .___.
__
,
,
_
~
.
~
~
.
@ Main
iViain unit
unit compatible
compatible with
CeNET connection
connection
CD
with CeNET
@
CD
changer
compatible
with
CeNET
connec®
changer compatible with CeNET connection
tion
@ CeNET
CeNET cable
cable (provided
(provided with
DSM920S)
@
with the DSH920S)
Using this
this cable,
cable, connect
connect the
the DSH920S
DSl-l920S to
to
Using
n-Ml unit
unit.
the main
@ CeNET
CeNE’T cable
cable (provided
(provided with
the CD
CD
@
with the
changer)
changer)
Using this
this cable,
cable, connect
connect the
the DSH920S
DSH920S to
Using
the CD changer,
changer.
the
@ SIRIUS
SIRIUS antenna
antenna (sold
(sold separately)
separately)
®
@ Front
Front speakers
speakers
®
@ Rear
Rear speakers
speakers
(j)
~0~e:
Note:
The longest wiring length of the GeNET cable Is less than 20m. When you connect
careful not to execeed the wiring length of 20m.
Q
DSHS20S
DSH92DS
®
®
@ SIRIUS
Sl;;S
controller (DSC920S,
(DSC92OS, sold
sold sepasepaG)
controller
)
@ Connection
cable (provided
(provided with
with the
the
onnection cable
DSH920S)
DSH920S)
@ Audio systems
systems other
other than
than those
those compatible
compatible
@Audio
with the
the CeNET
CeNET connection
connection
with
Connect the SIRIUS
SIRIUS satellite
satellite radio
radio output
output to
Connect
external input
input terminal.
terminal.
the external
14
DSH920S
DSH920S
@
@
@
®
@
®
RCA pin (audio)
RCA
(audio) cable
cable (sold
(sold separately)
separately)
SIRIUS antenna
SIRIUS
antenna (sold
(sold separately)
separately)
Front speakers
Front
speakers
f;
Digital radio section
General
Receiving
Receiving frequencies:
frequencies:
Satellite
: 2322.293/2330.207
MHz
2322.293i2330.207
IVll-lz
Satellite
Power
voltage:
Power supply
supply voltage:
14.4
(10.8 to
to 15.6
15.6 V allowable),
allowable),
14.4 V DC (10.8
negative
ground
negative ground
Terrestrial
Terrestrial : 2326.250
2326.250 MHz
h/Ha
A.udio
Signal
Signal to noise
noise ratio:
ratio : 95 dB
dC3
Distortion:
Distortion : 0.01
0.0 1 % (1
(1kHz)
k&)
Power
Power consumption:
consumption:
Less
than 1 A (with
(with antenna)
antenna)
Less than
Antenna current
current limit
limit;; 0.2
0.2 A
Antenna
Weight:
Weight : 0.55
0.55 kg
Dimensions:
30 (l-l)
(H) x 130
130 (II)
(D) mm
mm
Dimensions : 178
178 (W) x 30
Note:
•* Specifications
further improvement,
improvement.
Specifications and
and design
design are
are subject
so~bject to change
change without
without notice
notice for
for further
DSH92OS
DSH92DS
15
Product
for USA and
IMPORTA
keepit with
with your
yourrecords.
retards.
1. Detach
eta~t~this
this section
sectionof
of the
the card
cardand
an keep
2.
2. Retain
retail your
yoursales
salesreceipt
receiptto
to validate
validatewarranty
warrantyservice.
service.
3.
a Clarion
3. If you
you purchased
~~~~~ased
~iarionADX
ADXSeries,
series,Pro
ProVideo
Videoor
or Pro
ProAudio
Audio
product,
product,be
be sure
sureto
to complete
completethe
the box
boxon
on the
the last
last page
pageof
of this
this form.
form.
rionauthorized
authorizedWarranty
~arra~tyCenters
~e~ters
Information on Clarion
maybe
be obtained
~~ta~~ied
by writing
writingClarion
~lariol~Corporation
~or~~rationat the
the address
addressbelow
below
may
by
or by calling
1-800-GO-ClARION.
I" USA:
SalesCorporation
Corporation
Clarion Sales
~arra~tyService
ServiceCenter
Center
Warranty
66’1West
WestRedondo
RedondoBeach
BeachBlvd.
Blvd.
661
Gardena,
CA90247
90247
Gardena,
CA
(310)327-9100
327-9100
(310)
In Canada
ada,Inc.
Inc.
Clarion. Canada,
~arrant~Servic~
ServiceC~rlter
Center
Warranty
2239Winston
WinstonPark
ParkDrive
Drive
2239
Oakville,Ontario
OntarioL6H
L6H5R1
5Rl
Oakville,
(905)829-4600
(905)829-4600
www.clarionmultimedia.com
PAGE OFf AND KEEP IT WITH YOUR RECEIPT!
ed against
againstall
all defects
defectsin
in material
materialwork~~~sh~p
warranted
workmanship for a ~er~~~
period of
originalpurchase.
~~r~~a$e.The
The conditions
~~~l~itio~~
of this warranty
one year from the date of original
warranty and
and the
My of Clarion
elation Corporation
~arpo~~ti~nunder
umberthis warranty
?xtl~ntof thi:l responsibility
warranty are
are as
as fol~~~~:
follows:
1.
DATE Of PURCHASE Will. BE REQtiiRE[I FOR WARRANTY SERVICE OF THiS
TiON ABOUT CLARiON AUTHORIZED WARRANTY SERVICE CENTERS MAY
BVCOI\iTACTlI\iG OR WRITING CLARION CORPORATION AT TiiE ADORESS
THE FRONT OF nils CARll
2. Thiswarranty
will become
becomevoid
voidif service
serviceperformed
pe~ormedby
by anyone
anty will
anyone other
other than
than an
an approved
approved Clarion
Clarion
WarrantyService
ServiceCenter
Centerresults
resultsin
in damage
damageto
to product
product.
3. Thiswarranty
doesnot
notapply
applyto
to any
anyproduct
productwhich
whichhas
hasbeen
beensubject
antydoes
SUbject to misuse,
misuse, neglect
neglect or
accident,or
or which
whichhas
hashad
hadthe
the serial
serialnumber
numberaltered,
altered,defaced
accident,
defaced or removed,
removed, or which
which has
has been
been
connected,
installed,acljusted
adjustedor
or repaired,
repaired,other
otherthan
than in
in accordance
d, installed,
accordance with
with the
the instructions
instructions
furnishedby
by Clarion
ClarionCorporation.
Corporation,
4.
This
warranty
does
not
covercar
carstatic
staticor
or other
otherelectrical
electricalinterferences,
interferences,
tapehead
4. This warranty does not cover
lape
head cleaning
cleaning or
adjustments,
or.Iabor
laborcosts
costsfor
for the
the removal
removalor
or reinstallation
reinstallationof
of the
the unit
unit for repair.
repair.
or
5. Thesoleresponsibility
of Clarion
ClarionCorporation
Corporation
underthis
esponsibility of
under
this Warranty
Warranty shall
shall be
be limited
limited to
to the
the repair
repair or
or
replacement
thereof,at
at the
the sole
solediscretion
discretioriof
of Clarion
ClarionCorporation.
Corporation.
replaceme'nt
thereof,
6. If it becom(~s
becomesnecessary
necessaryto
to send
sendthe
the product
productor
or any
anydefective
defectivepart
part to
to Clarion
Clarion Corporation
Corporation or an
an
authorizedwarranty
warrantyservice
servicestation,
station,the
the product
productmust
mustbe
be shipped
authorized
shipped in
in its
its original
original carton
carton or
or
equivalentcarton,
carton,fully
fully insured,
insured,with
with shipping
shippingcharges
chargesprepaid.
prepaid.Clarion
equivalent
Clarion Corpora~iotl
Corporation will
will not
not
assumeany responsibility
for any
anyloss
lossor
or damage
damageincurred
incurredin
onsibllity for
in shipping.
shipping.
7. ALLIMPLIED
WARRANTIES
EXCEPT
TOTHE
THEEXTENT
EXTENT
PROHIBITED
BY
IES EXCEPT
TO
PROHIBITED
BY APPLICABLY
APPLICABLE LAW
LAW SHALL
SHALL
HAVENO
NOGREATER
GREATER
DURATION
THANTHE
THEWARRANTY
WARRANTPERIOD
PERIOD
SET
HAVE
DURATION
THAN
SET FORTH
FORTH ABOVE.
ABOVE. UNDER
UNDER NO
NO
CIRCUMSTANCES
SHALLCLARION
CLAKION
~ORPORATIDN
BELIABLE
LIABLEFOR
C1~CWfVI§!ANCES
SHALL
CORPORATION
BE
FOR ANY
ANY LOSS
LOSS OR
OR DAMAGE,
DAMAGE, DIRECT
DIRECT
ORCONSEOUENTIAL,
CONSEQUENTIAL,
ARISING
OUTOF
OFTHE
THEUSE
USEOR
ORINABILITY
INABILITY
TO
OR
ARISING
OUT
TO USE
USE THE
THE P~D~U~~
PRODUCT. BECAUSE
BECAUSE
SOMESTATES
STATES
DONOT
NOTALLOW
ALLOWLIMITATIONS
LIMITATIONS
ONHOW
HOWLONG
LONGAN
IMPLIED
WARRANTY
SOME
DO
ON
AN IMPLIED
WARRANTY LASTS
LASTS OR
OR
EXCLUSIONS
ORLIMITATIONS
LIMITATIONS
OFINCIDENTAL
INCIDENTAL
ORCONSEOUENTIAL
~ONS~~U~NTIAL
DAMAGES,
NS OR
OF
OR
DAMAGES, THE
THE ABOVE
ABOVE
LIMITATIONS
OREXCLUSIONS
EXCLUSIONS
MAYNOT
NOTAPPLY
APPLY
TOYOU.
NSOR
MAY
TO
YOU.
8.
THIS
WARRANTY
GIVES
YOU
SPECIFIC
LEGAL
RIGHTS,
8. THIS WARRANTY GIVES YOU SPECIFIC lEGAL RIGHTS, AND
AND YOU
YOU MAY
MAY ALSO
ALSO HAVE
HAVE OTHER
OTHER RIGHTS
RIGHTS
WHICH
VARY
FROMSTATE
STATE
TOSTATE.
STATE.
VARY
FROM
TO
9. Shouldyou
youhave
haveany
anydifficulties
difficultieswith
with the
the performance
performance
of
of this
this product
product during
dUring warranty,
warranty, or
or with
with any
any
Clarionauthorized
authorizedservice
servicecenters,
centers,you
youmay
maycontact
contactthe
Clarion
the Clarion
Clarion National
National Service
Service tanagers
Managers at
at the
the
addresslisted
listedon
onthe
the front
frontof
of this
this card
cardor
or call
call 1-800-GO-CLARION
1-8~O”GO-~~~lON
for
for a
a listing
listing of
of Authorized
Authorized
Warranty
Service
Centers
in
your
area,
281-0607-00
rranty Service Centers in your area.
28 i -0607-00