1
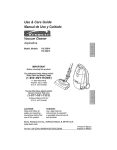
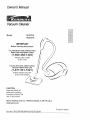
Owner's Manual
®
Vacuum Cleaner
Model
I16.27514
116.27515
IMPORTANT
Before returning this product-
Sears Parts and Repair Center
(1-800-488-1222)
Anytime, day or night
(UoS,A, only)
For a_p_y_oiber
issue
co_Qtact.:
Vacuum Cleaner Help Line
(1=877-531-7321)
8:00am-5:00pm EST, M-F
(US.A_ and Canada)
--.-.
CAUTION:
Read and follow all
safety and operating
instructions before first
use of this product.
Sears, Roebuck
wwwosears.com
and Co., Hoffman
Estates,
IL 60179 U.S.A.
Printed in Mexico
Part No. CO1ZDDY20UO0-KCO1ZDDYZOUO
Before Using Your New
Vacuum Cleaner
................
KenmoreVacuum
CteanerWarranty
.. 3
Important
Safety Instructions
.........
4
Parts and Features ................
5_6
Canister Care
Bag Changing
Cleaning Exterior and Attachments
Motor Safety Filter Changing
Exhaust Fi_lerChanging
14
14
15
t5
!6
Assembly
PowerMate e Care
17
Instructions
2
........
7-8
Pet PowerMate _ Storage
............
8
Operating Instructions
.............
9
How to Start .......................
9
Vacuuming Tips .................
10
Suggested Pile Height Settings .........
tt
Attachments ....................
1t
Attachment Use Table ................
12
Performance Features ...........
12-13
How Your Vacuum Cleaner Works .....
14
Please read this guide, It will help you assemble
cleaner in the safest and most effective way
Belt Changing and Agitator Cleaning
Light Bulb Changing
Agitator Servicing
Troubleshooting
Master Protection
Notes
Requesting
Or Service
17-18
t8
t9
20
21
22
Agreements
Assistance
Back Cover
and operate your new Kenmore vacuum
For more information about vacuum cleaner care and operation, call your nearest Sears store
You will need the complete model and serial numbers when requesting information, "four vacuum cleaner's model and serial numbers are located on the Model and Serial Number Plate
Use the space below to record the model number and serial number of your new Kenmore
vacuum cleaner
Model No
Serial No_
Date of Purchase
Keep this book and your sales check (receipt) in a safe place for future reference,
OneYear Limited Warranty
Whenassembled,operatedand maintainedaccordingto all instructionssuppliedwith
the product,if this vacuumcleanerfails dueto a defectin materialor workmanshipwithin
one year fromthe dateof purchase,returnit to any Searsstore,SearsParts& Repair
Centeror other Kenmoreoutletfor free repair.
if this vacuumcleaneris usedfor otherthan privatefamilypurposes,this warranty
appliesfor only 90 daysfromthe date of purchase
This warranty
covers only defects
in material
and workmanship.
pay for:
1o Expendable items that can wear out from normal
filters, belts, light bulbs, and bags,
2.
A service technician
maintenance_
3. A service
4.
5.
6.
use, including
to instruct the user in correct product
technician
to clean or maintain
Sears will
NOT
but not limited to
assembly,
operation
or
this producL
Damage to or failure of this product if it is not assembled, operated or maintained
according to all instructions supplied with the product.
Damage to or failure of this product resulting from accident, abuse, misuse or use for
other than its intended purpose_
Damage to or failure of this product caused by the use of detergents, cleaners,
chemicals or utensils other than those recommended
in all instructions supplied
the product.
7. Damage to or failure of parts or systems
made to this product°
Disclaimer
of implied
warranties;
resulting
limitation
from unauthorized
with
modifications
of remedies
Customer's
sole and exclusive remedy under this limited warranty shalt be product repair
as provided herein, implied warranties,
including warranties of merchantability
or fitness
for a particular purpose, are limited to one year or the shortest period allowed by law.
Sears shall not be liable for incidental or consequential
damages. Some states and
provinces do not allow the exclusion or limitation of incidental or consequential
damages,
or limitations on the duration of implied warranties of merchantability
or fitness, so these
exclusions
or limitations
may not apply to you.
This warranty
Canada_
applies
only while this vacuum
This warranty
gives you specific
legal rights,
cleaner
is used in the United States and
and you may also have other rights which
vary from state to state.
Sears, Roebuck and Co., Hoffman Estates, IL 60179
Sears Canada Inc., Toronto, Ontario, Canada M5B 2B8
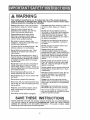
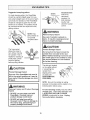
WARNn G
Your safety is important
to us, To reduce the risk of fire, electrical shock,
inj_ury to persons
or damage when usin,g your vacuum cleaner, follow basic
safety precautions
nncludmg the following:
Read all Instructionsin this manual before
assembling or using your vacuum cieaner.
Use your vacuum cleaner only as
described in this manual Use only wtth
Sears recommended attachments.
Disconnect electrical supply before
servicing or cleaning out brush area.
Failure to do so could result in electrical
shock or brush suddenly starting
Do not leave vacuum cleaner when
plugged in, Unplug from outlet when not in
use and before servicing.
To reduce the risk of electrical shock - Do
not use outdoors or on wet surfaces
Do not allow to be used as a toy,. Close
attention is necessary when used by or
near children.
Do not use with damaged cord or plug. if
vacuum c_eaner is not working as it should,
has been dropped, damaged, Feftoutdoors,
or dropped into water, return it to a Sears
Service Center.
Do not putl or carry by cord, use cord as a
handle, close door on cord, or pull cord
around sharp edges or corners. Do not run
vacuum cleaner over cord. Keep cord away
from heated surfaces.
Do not unplug by pulling on cord. To
unplug, grasp the plug, not the cOrdr
Do not handle plug or vacuum cleaner with
wet hands.
Do not put any objects into openings.
Do not use with any opening blocked; keep
free of dust, lint, hair and anything that may
reduce airflow.
Keep hair, loose clothing, fingers, and all
parts of body away from openings and
moving pads.
Turn off all controls before unplugging
SAVE THESE
Use extra care when cleaning on stairs, Do
not put on chairs, tables, etc. Keep on
floor.
Do not use vacuum cleaner to pick up
flammable or combustible liquids (gasoline,
cleaning fluids, perfumes, etc.), or use in
areas where they may be present. The
fumes from these substances can create a
fire hazard or explosion.
Do not pick up anything that is burning or
smoking, such as cigarettes, matches, or
hot ashes.
Do not use vacuum cleaner without dust
bag and/or filters in place
Always change the dust bag after
vacuuming carpet cleaners or freshener,
powders and fine dusL These products clog
the bag, reduce airflow and can cause the
bag to bursL Failure to change bag could
cause permanent damage to the vacuum
cleaner.
Do not use the vacuum cleaner to pick up
sharp hard objects, small toys pins paper
dips, etc, They may damage the vacuum
cleaner or dust bag_
Do not operate vacuum cleaner without the
exhaust filter or exhaust filter door in place
(if appFicable).
The hose contains electrical wires. Do not
use when damaged, cut, or punctured.
Replace if cut or worn. Do not pick up
sharp objects.
Always turn off and unplug the vacuum
cleaner before connecting or disconnecting
either hose, Handi-Mate Jr.® (if applicable),
or noz-zle_
Hold plug when rewinding onto cord reel.
Do not allow plug to whip when rewinding.
You are responsible for making sure that
your vacuum cleaner Is not used by anyone
unable to operate it properly.
iNSTRUCTiONS
Proper assembly and safe use of your vacuum cleaner are your responsibilities.
Your vacuum cleaner is intended for Household
use° Read this Owner s Manual
carefully for important use and safety information° This guide contains safety
statements under warning and caution symbols.
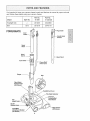
It is important to know your vacuum cleaner's parts and features to ensure its proper and safe
use. Review these before using your vacuum cleaner°
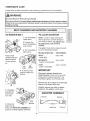
Object
Part No,
Part No.
Style Noo
in USA
in Canada
.....
20-5240
20-40600
CB-3
20-52t8
20-4.0I 18
Readiight Bulb
Belt
POWERMATE
_- Plug Holder
Hotder._..._
--
Upper
Wand
Handle Quick
Release
L
Wand
Swivel ,.
-- Upper Wand
Cord Holder
Flange
Belt
Wand Quick
Release Pedal
(Not Shown)
]d Lens
Pile Height Indicator
Pile
Height Pedal
Protector/Belt
Reset Button
Handle
Release Pedal
PowerMate
Model/Serial Number
(On Bottom)
Edge Cleaner
(Not Shown)
HOSE
ATTACHMENTS
3-Way On/Off Switch
Off/Floor/Carpet
Crevice
Tool _
Brush
(L_._..__J
_-
Flo or
Pet PowerMa
te
Dusting
Brush
Combination
Brush
Hose Swivel
CANISTER
Style No.
Part No.
in USA
Part No.
in Canada
Q
20-50557
20-50410
Exhaust Filter
EF-I
20-86889
2040324
Motor Safety Filter
CF-I
......20-86883
Object
Dust Bag
'20-40'32i
Pet PowerMate
Storage
cover
ExlTaust Filter
(Not Shown)
Tool Storage Cover
(Attachment Storage inside)
Canister
Hood
Release
Bag Holder
Dust Bag
Motor Safety Filter
(Behind Dust Bag)
Cover
Please pay special attention
to these hazard alert boxes, and fotiow any instruc-
tions given
WARNING
alert you
to such alert
dangers
assuch
fire, dangers
electric
shock,
burns and
personal statements
injury. CAUTION
statements
you to
as personal injury and!or property damage.
_,,,.411.d.
Shock
i.i.ii.
I
.. iiilff
Handle _
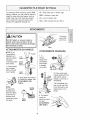
WARNING
=lectrical
,.
Hazard
NOT plug into electrical supply until
assembly
is complete, Failure to do so
could result in electrical shock or
injury.
Lock
Button
Before assembling vacuum cleaner, check
the PACKING LIST on the cover of the
separate REPAIR PARTS LIST_ Use this list
to verify that you have received all the
components of your new Kenmore vacuum
cleaner.
WANDS
Slide wands together
until wand button
Button
Upper
Wand
snaps into place Turn
wand button to the
slotted area of the
wand swivel.
The swivel allows you
to turn the handle to
the left side to reach
farther under few furniture.
I
Wand
Button
Swivel
-m
Cord
Holder
j
POWERIVIATE
Area
Wand
Swivel
Lower
Wand
1. Insert wands into
PowerMate until the
wand button snaps
into place
m
2. Connect
PewerMate plug and
cord as shown. DO
NOT force. Raised
area of plug must be
toward hand
3. Secure cord into the cord holder on the
wand swivel.
To remove: Step on wand quick release
pedal, then pull up on wands,
Quick
Release Pedal
i
CANISTER
1, Open the canister
HOSE
hood,
2. Check to see that the dust bag is properly installed, See BAG CHANGING for
instructions,,
3, Check to see that the motor safety filter is
properly installed See MOTOR SAFETY
FILTER CHANGING for instructions.
HOOD AND TOOL
STORAGE COVER
tt is normal for the canister
1, Line up the hose
latch tab and notch
in canister hood
and insert hose
into canister until it
snaps in place
Hose
Latch
Tab
To remove: Lift
hose latch tab
Notch
upward and pull up
on hose,
2. Insert handle into wand
until lock button snaps in
place, Be
sure hose is
not twisted.
hood and tool
storage cover to come off when opened further than needed. Line up the hinge slots,
insert the hinges into the slots, and close
the hood and toot storage cover to reinstall,
Lock
Button
storage
prevent
canister
cover open. This will help to
damage from occurring
to the
hood and/or tool storage cover.
Handle
Quick
To store: Disconnect
M
To remove:
Press handle
quick release
button and
pull up on
handle,
hose from wands and
canister to prevent stress on hose during
storage, Store hose in a loosely coiled
position so the hose covering is not
stressed.
This canister is equipped with an on-board
storage area for a Pet PowerMate attachment
"To Install:
Open the Pet PowerMate storage cover.
Insert the Pet PowerMate, press down into
place, and close the lid securely
To Remove:
Open the storage cover Remove Pet
PowerMate from the storage area and use
as needed (see ATTACHMENTS
and
ATTACHMENT
USE TABLE),
Pet PowerMate
Storage Cover
/
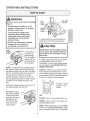
OPERATING
iNSTRUCTiONS
WARNING
_
J
p
--
Personal
Hazard
Injury
and
Product
oda,
DO NOT plug in if switch
position. Personal injury
damage could result.
is in ON
or property
The cord moves rapidly when
rewinding°
Keep children away
and provide a clear path when
rewinding the cord to prevent
personal injury°
DO NOT use outlets above counters.
Handle'_X,_Uf_
I,Pull cord out
desired length
The cord win not
of canister
rewind
unfii tothe
cord rewind button is pushed
NOTE: To reduce the risk of electric shock,
this vacuum cleaner has a polarized plug;
one blade is wider than tile other. This plug
wilt fit in a polarized outlet only one way If
the plug does not fit fully in the outlet,
reverse the plug If it still does not fit, contact a qualified electrician to install the proper outlet. Do not change the plug in any
way
, i"
/---/"
tl\
\
3. Lower wand from upright position by
pressing on the handle release pedal
Damage from cord to items in
surrounding
area could occur,
Cord
Rewind
ile Height
Damage
CAUTION
DO NOT leave the PowerMate running
in one spot in the upright position for
any length of time° Damage to carpet
may occur.
4. Select a pile height setting by pressing
the small pedal on the rear of the
PowerMate The pile height setting shows
on the indicator See SUGGESTED PILE
HEIGHT SETTINGS,
Attention:
Refer to your carpet manufacturers cleaning recommendations
Some
more delicate carpets may require that they
be vacuumed with the PowerMate agitator
turned off to prevent carpet damage.
b
OFF
FLOOR
2, Plug the polarized power cord into a 120
Volt outlet located near the floor°
5. Select a switch
position on the
handle.
To rewind: Unplug
the vacuum cleaner
Hold the plug while
rewinding to prevent
damage or }niury
from the moving
cord.. Push cord
rewind button
t'_;i_;!t
t'_/_%_!!
i!
OFF
FLOOR - turns on the canister motor only..
CARPET - turns on both the canister and
the PowerMate motors
NOTE -When this switch is in the FLOOR
position, the headlight DOES NOT function
since no electricity flows to the PowerMate.
Suggested
sweeping
pattern,
Carpeted stairs
need to be
vacuumed
regularly. For
best cleaning
results, fully
close the suction
control,
Suction
Control
For best cleaning action, the PowerMate
should be pushed straight away from you
and pulled straight back. At the end of each
pull stroke, the direction of the PowerMate
should be changed to point into the next
section to be cleaned. This pattern should
be continued across the carpet with stow,
gliding motions
WARNING
NOTE: Fast,
jerky strokes do
not provide
complete cleaning
Personal
Injury
Hazard
Use care if canister is placed on
stairs. It may fall, causing personal
injury or property damage,
CAUTION
The hose swivel
allows the hose to
turn without moving
the canister. This is
Product
J
When finished cleaning in one area use
the handle grip on the canister to move
the vacuum cleaner to a new location
hose for twisting
before pulling canister,
for further
in preventing the
canister from
slipping when used
on stairs (see
PERFORMANCE
Damage Hazard
Use care if the PowerMate
and wand is
left in the upright position as it may tip
over easily. Property damage can occur
if tipped,
FEATURES),
NOTE: Be sure the canister is resting
securely on the stairs and the caster is in a
locked position before using.
WARNING
Injury
and Product
Damage
For best cleaning results, keep the airflow
passage open, Check each assembly area
in HOWYOUR VACUUM CLEANER
DO NOT run over power cord with
PowerMate.
Personal injury or
product damage could result,
WORKS occasionally for clogs
from outlet before checking
DO NOT pull plug from wall by
the power cord. If there is damage to
the cord or plug, personal injury or
property damage could result,
,
cleaning.
The stair grip located
on the caster will aid
CAUTION
Personal
Hazard
Hazard
Do not pull on the hose to move the
canister from one stair to the next°
helpful for cleaning in
small areas Check
Product
Damage
,
,
,,,,,
,
,,,
,
10
Unplug
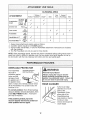
Forbest deepdowncleaning,usetheXLO
setting,However,youmayneedto raisethe
heightto makesomejobseaster,suchas
scatterrugsandsomedeeppilecarpets,
andto preventthe vacuumcleanerfrom
shuttingoff Suggestedsettingsare:
H1-
Shag, deep pile, or scatter rugs
MED - Medium to deep pile.
LO - Low to medium pile.
XLO - Most carpets and bare floors.
CAUTION
To remove
press latch
and lift out
DO NOT attach or remove handle or
wands while vacuum cleaner is ON.
This could cause sparking
the electrical contacts.
,
i,i
i
,, i
ATTACHMENTS
and damage
i
ON HANDLE
ATTACHMENTS
NOTE: If the
PowerMate is
attached, turn
vacuum cleaner
off before
removing handle
from wands,
l_To
remove
wands from
PowerMate,
lock wands
Handle
Quick
Release._
in straightup position,
Io Press handle
quick release
button and pull
up on handle
Upper
Wand--
2. Slide attachments firmly
on handle as needed. See
ATTACHMENT USE
TABLE.
NOTE:
To assemble
l
Wand
Quick
Release
Pedal
/
2. Press wand quick
release pedal with foot
and pull the wands
straight up and out of
PowerMate.
The PowerMate plug
and cord do not have
to be removed to use
attachments on the
wands.
Dusting
Brush
dusting brush
insert the fabric
brush into the
dusting brush
nozzle and press
into place.
ON WANDS
3. Put attachments on
wands as needed. See
ATTACHMENT
USE TABLE,
Fabric
Brush
11
CLEANING
AREA
Bare
BetweEn
ATTACHMENT
Combination
brush
Ft,r.lt.,_ 1 c..,io.......
I Drape.I
Dusting
brush
_
Fabric _rt_
brush I_
Crevice tool
7"
7"
"/
Stairs
CarpEted
FlaorslRugs
t
V"
I ......_ .........
7
¢
¢
y2
PowerMate
Handi-Mate Jr. _ 2
¢
7
_
_
Walls
,/
7"
Floor brush
Pet PowerMate 3,4
Floors
,/
_/
I,, Always clean attachments before using on fabrics_
2. 3-position switch should be in FLOOR position.
3. Some models; HandbMate Jroe and Pet PowerMate attachment
with the products,
4, The Pet PowerMate can only be used on hose handle
I
instructions
are included
NOTE: When separating wands, depress lock button completely before pulling wands apart
wand lock button is difficult to depress, push the two wands more tightly together to line up
the lock button with the hole Depress lock button and then pull wands apart,
The PowerMate
has built-in
Overload
If
,WARNING
Protector/
Personal
protection against
motor and belt
Injury
Hazard
Always unplug the vacuum cleaner
before cleaning the agitator area as
agitator may suddenly restart. Failure
do so can result in personal injury.
damage should
the agitator jam If
the agitator slows
down or stops, the overload protector shuts
off the PowerMate The canister motor will
continue to run.
to
ii i i i i,,, i 1 i, i i1,=,_=_,,_.
EDGE CLEANER
Active brush edge
cleaners are on both
sides of the
PowerMate, Guide
either side of the
To correct problem: Turn off and unplug
vacuum cleaner, remove obstruction, then
press BELT RESET button. A bali point
pen may be required..
PowerMate along
base-boards or next to
If the problem persists, have the
vacuum cleaner serviced by a Sears or
other qualified service agent.
furniture to help
remove dirt trapped at
carpet edge&
12
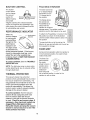
SUCTION
PowerMate
CONTROL
The suction
control allows
you to change
the vacuum
suction for
different fabrics
The lower wand has
a "U" shaped flange
that slides into the
"U" shaped slot in
the canister
crease
Suction
Suction
The flange
the wands
PowerMate
stored with
canister to
and carpet
weights. Opening the control decreases
suction for draperies and lightweight rugs,
while closing the control increases suction
for upholsteries and carpets.
PERFORMANCE
INDICATOR
To attach the PowerMate, it must be in the
fiat position as shown in the illustration
Use the handle release pedal to place it in
this position
Indicator
The wand will slip out of the slot as it is
lifted up for use and will slide into the slot as
it is lowered for storage.
"--.
The light comes
on whenever the
airflow becomes blocked, If that occurs,
check the disposable dust bag, motor
safety filter and other possible clog
locations shown in HOW YOUR VACUUM
CLE-_NER WORKS.
To correct problem:
SHOOTING
table.
ailows
and
to be
the
conserve
storage space. The canister must be
stored on end for this feature to be used
When the
vacuum cleaner
is running with
normal airflow,
the light on the
performance
indicator is off.
STORAGE
STAIR GRIP
During normal operation while the canister is
in the horizontal position, the caster wheel
rotates freely 360 °.
The Stair Grip
feature aNows
the caster
wheel to lock in
position when
the canister is
rotated 25 °
from horizontal
See the TROUBLE-
NOTE: The light may come on when using
certain attachments, due to reduced airflow
through attachment..
into a vertical position in order for the
canister to rest on stairs.
THERMAL PROTECTOR
This vacuum cleaner has a thermal
protector which automatically trips to protect
the vacuum cleaner from overheating. If a
clog prevents the normal flow of air to the
motor, the thermal protector turns the
motor off automatically. This allows the
motor to cool in order to prevent possible
damage to the vacuum cleaner_
To correct problem:
Turn the vacuum
cleaner off and unplug the power cord
from the outlet to allow the vacuum
cleaner to cool and the thermal protector
to reset. Check for and remove clogs, if
necessary.
Also check and replace any
clogged filters.Wait
approximately
thirty (30) minutes and plug the vacuum
cleaner in and turn back on to see if the
motor protector
has reset.
t3
Thevacuumcleanercreatessuctionthat
picksupdirt°Rapidlymovingair carriesthe
dirt to the dust bag through the airflow passages. The dust bag lets the air pass
_-,_
[[ u.-_
////"-'q
through, while it traps the dirt
///'
./_'/_/
For best cleaning results, keep the air- /_.,_"
flow passage open Check the starred ..,_.*J
1
1,
Motor
areas occasionally
U
Safety
for clogs Unplug/_
from outlet before che
_
\
Filter
Exhaust
7. The red bag mount will flip forward after
removing bag. This win prevent the hood
from closing until a new bag is installed.
For best cleaning results, the dL_st bag
should be changed often. The electronic
performance indicator wiEI come on when
the bag needs to be changed or the airflow
is blocked.
NOTE: See PARTS AND FEATURES
Filter
Note: DO NOT bend or crease the middle
of the cardboard when installing
the bag
into the bag mount slots.
for
& Rotate red bag
mount down and
Bag Number
1, Unplug cord from
wall outlet.
install bag into slots
per illustration,
pushing down until
the cardboard tab
locks into position
and the holes align.
Tuck the bag
securely into the bag cavity so that none of it
is able to be pinched by the hood,
3, Pull hood release
out and up, then lift
canister hood.
4. Disengage
cardboard tab from
9. Close and latch canister hood,
red bag mount by
pulling away and
lifting up
10. Reinstall hose.
11, Plug cord into wall outlet
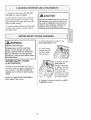
5. Pull bag out of the
red bag mount.
CAUTION
NEVER REUSE A DUST BAG. Very fine
materials, such as carpet freshener,
face powder, fine dust, plaster, soot,
new carpet lint, etc. can clog the bag
and cause it to burst before it is full and
6. Check the
Red Bag
Mount
motor safety
filter and
replace, if
necessary.
may cause damage to vacuum cleaner
motor. Change bag more often when
vacuuming
these materials.
t4
1, Unplugcordfromwalloutlet,DONOT
drip water on vacuum cleaner.
CAUTION
2, Cleanexteriorusinga clean,soft cloth
that hasbeendippedin a solutionof mild
liquiddetergentandwater,thenwrungdry
Wipedry aftercleaning.
3oToreducestaticefectricityanddustbuildup,wipeoutersurfaceof vacuumcleaner
Do not use attachments
if they are wet,
Attachments
used in dirty areas, such
as under a refrigerator,
should not be
used on other surfaces until they are
washed. They could leave marks,
and attachments
_'_ _<_"'_
'Ii'_)
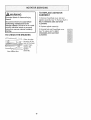
Ak WARN IN G
Electrical
Shock
BAG1"
RemoVecHANGiNGthe
bagsection.aS
outlined in the
Hazard
Unplug power cord from electrical
outlet. Do not operate the vacuum
cleaner without the motor safety filter.
Be sure the filter is dry and properly
installed to prevent motor failure and/or
electrical shock.
i ii
_i::
i ,,11,,1111
MOTOR SAFETY
i,;,,,
i
2, Lift the rubber
retainer and pull
out motor safety
filter as shown.
Rubber
Retainer
//////
......................
FILTER
3. Replace the filter,
white side out,
facing the dust bag,
by stiding ft back into
place under the ribs
in the bag cavily
Tuck filter in so that it
fits completely under
the rubber retainer,
ELECTROSTATIC
This filter must be replaced when dirty. It
should be replaced regularly depending on
use conditions.. The filter CANNOT be
washed as it will lose its dust trapping
ability.
NOTE'. See PARTS AND FEATURES
for
Motor Safety Filter number
4_ Replace the bag as outlined in the BAG
CHANGING section
15
_ }tli
WARNING
Fire andlor
Electrical
2o Pull the exhaust
__
Exhaust
Shock Hazard
Do not operate with a clogged exhaust
filter or without the exhaust filter or
exhaust filter cover installed.
i
filter up and out
from the rear of
the canister.
ii
EXHAUST
HEPA
3. Replace the
exhaust filter
FILTER
cartridge
Place the new
filter into the
canister with
the foam seal
The exhaust filter cartridge must be
replaced when dirty Replace the filter when
the entire surface area is covered evenly,
The filter CANNOT be washed as it will
lose its dust trapping ability,
NOTE: See PARTS AND FEATURES
Exhaust Filter number
"----
Filter
facing
towards the
canister,
for
4. Replace the
exhaust filter cover
1, Pull out and
up on the
exhaust filter
cover to remove
from the
by placing the two
tabs on the filter
cover into the slots
on the canister
and rotate into
canister and lay
aside.
Tabs
16
place until it snaps
closed
POWERMATE
CARE
Always follow all safety precautions
when ped'orming maintenance
to the PowerMate.
WARNING
Electrical
Shock Or Personal
Disconnect
electrical supply
Failure to do so could result
suddenly starting,
Injury
Hazard
before performing
maintenance
to the vacuum cieanero
in electrical shock or personal injury from vacuum cleaner
TO REMOVE BELT
TO CLEAN AGITATOR:
1. Turn PowerMate
NOTE: In order to keep cleaning efficiency high and to prevent damage to
your vacuum cleaner, the ggjtator mu
be.._!eaned eyer_ time the belt is
upside down
2. Unscrew the
two (2) PowerMate
cover screws
The agitator must also be cleaned according to the following schedule:
3. Turn PowerMate
right side up
Vacuum
Press handle
release pedal and
lower the swivel
Lift rear latches
up
Side
Latch
ear
Latches
Cleaner
Use
Clean Aqitator
HEAVY (used daily)
every week
MODERATE (used 2-3 timestweek)
every month
LIGHT -
every 2 months
(used 1 timelweek)
IMPORTANT
4. To remove cover,
grasp the sides and
pull ouL
Disconnect
vacuum cleaner from
electrical outlet° Check and remove hair,
string and lint build-up frequently in the
PowerMate agitator and end cap areas.
Remove any dirt or debris in the belt path
area or in the brush roller area.
Carefully remove any string or debris
located on the agitator or end caps.
5o Lift agitator
assembly out
and remove
worn belt.
AGITATOR ASSEMBLY
End Cap
_'--End
6o Check and
clean end cap
areas. See AGITATOR
picture of complete
ASSEMBLY
Belt Path
Cap
Brush
for
agitator assembly.
17
Unit
End Cap.I
TO REPLACE
BELT
3, Line up
front of
cover and
1, Instaft new
belt over
motor drive,
then over
belt path,
"/_/'///'_
base, Rest
cover on
front edge
of base as
shown
tor
Drive
\ A;XY "- .o1,
NOTE: See
\
PARTS AND
Agitator
FEATURES
for Belt number.
--\
_
_',
Cover
Base
Path
End Cap
l I:"
i
2. Place agitator
assembly back into
PowerMate
Side
Latch
Rear
Latches
x_
4. Rotate cover
back Press
cover firmly until
side and rear
latches snap
into place.
Make sure there
is no gap between the cover and base
5. Turn PowerMate upside down and
replace two (2) cover screws
Push In
1. Remove PowerMate cover as shown in
BELT CHANGING AND AGITATOR
CLEANING section,
2. Push in and turn
bulb counterclockwise, then pull out
to remove,
3. Push in and turn
bulb clockwise, to
replace
Bulb must
not be higher than
15 Watts (130 'Colts)
4. Reinstall PowerMate cover as shown in
BELT CHANGING AND AGITATOR
CLEANING section
NOTE: See PARTS AND FEATURES
Bulb number,,
18
for
TO REPLACE AGITATOR
ASSEMB_
_WARNING
Electrical
Hazard
Shock Or Personal
Injury
I. Remove PowerMate cover, belt and
agitator assembly. See "To Remove Belt" in
BELT CHANGING AND AGITATOR
CLEANING
Disconnect
electrical supply before
performing
maintenance
to the
vacuum cleaner. Failure to do so could
2. Replace agitator assembly.
result in electrical shock or personal
injury from vacuum cleaner suddenly
starting°
TO CHECKTHE
BRUSHES
-_:_z'_'--'_--'---(C'_
When brushes
__
level of the base
are worn to the
replace the
support bars,
agitator
ur__
Base Support
3. Reinstall belt and PowerMate
See "]b replace belt" in BELT
CHANGING AND AGITATOR
CLEANING,
Bars
assembly,
19
cover
ii_ii!ii
¸:!i!:i<!i:ili
: :_ ,_:
,:
;,:L_i?
i!il,;_
!_!_ _::<_ ii_;!:;i¸¸;_
__ili__i !_:J:,i_i:,_:_:L:
#_ii_!i!!_Lii_i!i_]ii_i!:'!!!:!i:i_:!i_]i_iii!_
__:_L:!_'#:!_!ili_
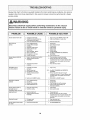
Review this chart to find do-it-yourself solutions for minor performance problems
needed, other than those described in this owner's manual, should be pedormed
service center°
Any service
at a Sears
]I WARNING
Disconnect
electrical
supply
before performing
maintenance
to the vacuum
cleaner. Failure to do so could result in electrical
shock or personal
injury,
Vacuum cteanerwon't star!:
Poorjobof dire
pick.up,
Vacuum cleaner start_ bat
cula off
1
2
Unplugged at wali oulleL
Tripped ci[suil breakedbiown iuse
at household service panet
3, Loose hose electrical connections,
I
2
3
4
5
6
7
B
9
10.
Fult or clogged dust bag
Clogged airflow passages
Dirty rigors
Wrong pile height setting
Suction conlrol Isopen
Hole in hose,
Were PewerMata agllalor
Worn or broken bell
3,
Reconnect hose ends,
1
2
3
4
S
g
7
B&g
Change bag
Clear airflow passages
Change fWars
Adjust seging
Adjustcorrtrol
Replace hose
Change agtlalor,
See BELT CHANGING AND AGITATOR
CLEANING
10, Close andre[oh hood,
Didy adulator or and caps
Canister hood open,
I Hose Or hood electrical
connections
2 Tripped overload protector in
PowerMate
PowerMatewill not
run when attached
1 Plug in firmly, push ONIDFF swilch to ON
2 Reset circuit breaker or replace fuse
1 Check corc_-c_ns, reconnect hose ends,
2 Remove any Items that may be eaugh_
or jammed, Ihen resel If vacuum cleaner starts
and Mops again, clean agitator and end cops,
than reset,
3
Tripped thermal protector
in canister
3
1
PowerMata connections
1 Piug in firmly
2
3
4
unplugged
Worn or broken bell
2&3
Dirly agitator or end caps
Tripped overload pro_ector in
PowerMate
Reset thermal protector
Sea BELT CHANGING AND AGITATOR
CLEANING
Remove any items thai may be caught
or jammed, then resel If vacuum cieaoe r starls
and stops again, clean agitator and end caps,
than reset
Move swiloh to CARPET position
5
Switch not in CARPET
Performance Indicator
activates
1
2
3
4
Futt or clogged dust bag
Dirty fi!ters
Blocked aldlow passage
Certain attachmen_ fuels
1
2
3
4
Change bag
Change fi_bre
Clear blockage from a_rflow passage
This is normal Light should go off
when tool is removed.
Vacuum c{eanerpicks up
moveable rugs -orPowerMate pushestoo hard
1
2
Wrong pileheight setting
Suction ton slrong
t
2
AdJusl salting
Open suction control
Light won't work
1
2
Burnedout light
bulb
Trippedovedoad proteclor in
PewerMate
I
2
Change light
bulb
Remove any i!ems that may be caught
or jammed, then reset t[ vacuum cleaner starts
and slops again, clean agitator and end caps,
then reset
Cord won't rewind
I Bird/power cord
2. Cord jammed,
1 Clean lhe power cord
2, Pull ou[cord and rewind.
Vacuum cleaner leaves marks
I
1
position
Wrong vacuuming pattern
on carpet
2O
5
See VACUUMING
TIPS
Master
Protection
Agreements
Congratulations on making a smart purchase Your new Kenmore® product is designed and manufactured for years of dependable operation- But like all products, it may require preventive maintenance or repair from time to time That's when having a Master Protection Agreement can save you
money and aggravation,
The Master Protection Agreement also helps extend the life of your new product, Here's what the
Agreement* includes:
E_] Parts and labor needed to help keep products operating properly under normal use, not just
defects. Our coverage goes well beyond the product warranty. No deductibles, no functional
failure excluded from coverage-- real protection
Expert service by a force of more than 10,000 authorized Sears service technicians,
means someone you can trust will be working on your product.
[]
Unlimited
want us.
service calls and nationwide
which
service, as often as you want us, whenever you
"No-lemon" guarantee - replacement of your covered product if four or more product failures
occur within twelve months.
t21
Product replacement
[_
Annual Preventive
if your covered product can't be fixed,
Maintenance Check at your request-
no extra charge,.
Fast help by phone - we cal! it Rapid Resolution - phone support from a Sears representative on all product& Think of us as a "talking owner's manual."
[]
Power surge protection
against electrical damage due to power fluctuations,
$250 Food Loss Protection annually for any food spoilage that is the result of mechanical failure of any covered refrigerator or freezer.
[]
Rental reimbursement
[]
10% discount
parts.
if repair of your covered product takes longer than promised,
off the regular price of any non-covered repair service and related installed
Once you purchase the Agreement, a simple phone call is all that it takes for you to schedule service You can call anytime day or night, or schedule a service appointment online,
The Master Protection Agreement is a risk free purchase. If you cancel for any reason during the
product warranty period, we will provide a full refund. Or, a prorated refund anytime after the product
warranty period expires, Purchase your Master Protection Agreement todayl
Some limitations and exclusions apply, For prices and additional
call 1-800-827-6655o
information
in the U,S.A.
* Coverage in Canada varies on some items, For full details call Sears Canada at 1-800-3616665,
Sears Installation Service
For Sears professional installation of home appliances, garage door openers, water heaters, and
other major home items, in the U&A, or Canada call 1.800.4-MY.HOME®.
21
22
Your Home
For repair - in your home - of all major brand appliances,
lawn and garden equipment, or heating and cooling systems,
no matter who made it, no matter who sold itl
For the replacement parts, accessories and
owner's manuals that you need to do-it-yourself,
For Sears professional installation of home appliances
and items like garage door openers and water heaters,
1-800-4-MY-HOME
®
(1-800-469-4663)
Call anyUma, day or night (USIA and Canada)
www, sears,com
www.sears.ca
For expert home solutions advice_ www.managemyhome,com
Our Home
For repair of carry-in items like vacuums, lawn equipment,
and electronics, call or go on-line for the nearest
Sears Parts and Repair Service Center.
1-800-488-1222
(U.S,A_)
1-800-469-4663
(Canada)
Call anytime, day or night (US,A, and Canada)
www, sears.com
www.sears.ca
To purchase a protection
1-800-827-6655
agreement
(U,S.A.)
Pare pedir servicio de reparaci6n
a domicifio, y para ordenar piezas:
1-888-SU.HOGAR ®
(1-888-784-6427)
on a product serviced by Sears:
1-800-361-6665
(Canada)
Au Canada pour service en franc;ais:
1-800.LE-FOYER Mc
(1-800-533-6937)
wwwsears,ca
® Reglelered Trademark 1TMTrademark I s_,_
Service Mark of Seers Brands, LLC
® Marca Reglstrada I TM Marca de F_brtca t sMMarca de Serv]cle de Sears Brands, LLC
McMarque de c_mmarce / MaMarque d_posee de Sears Brands, LLC
@ Seam, Roebuck and Co.