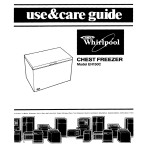
1
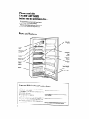
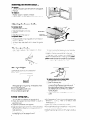
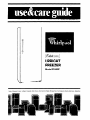
( &&!lU!P
SERIES 1
UPRIGHT
FREEZER
Model EVISOE
\
Freezers
Refrigerator-Freezers
-
i
Ice Makers.
Dishwashers.
Bull!-In
Ovens
and Surface
Units.
Ranges,
MIcrowave
Ovens,
Trash Compaclors,
Room Air Condltloners,
Oehumldlfler!
Please read this
Use and Care Guide
before you do anything else...
This booklet tells you how to start your freezer,
defrost it, clean it and adjust controls.
Treat your new freezer with care. Use it only to
do what home freezers are designed to do.
Parts and features
Adjustable
Slide-Out
Shelf
/
’
Power Savmg /
Contfol
Staiionarv
Do&
Shelves
-Juice
Can
Basket Shelf /
----+-L
Stationary
Freezer
Shelves
Y&r;:;:::
lock
L
Model and
Serial Number
Copy your Model and Serial Numbers here...
ti%;‘rVCiil~twtl!
service
‘-Jr Cali ;Yilh a questiw
hake
this rmfc .I’t&>n
readb
1. Complete
Model and Serial
plate locatec I as shown)
2. Purhase (!ate irony sales $11~
Copy this lformatlon
In these
book, your wOrrOnty Ond SQleS
handy p/ace There IS no warranty
turn Proof-of purchase
IS oil that
warranty sen ce
L
2
Numbers
(from
Model
Serial
spaces Keep this
Slip together ITI a
reglstratlon to reIS required
Number
‘he
Number
purchase Date
for rn%viCe
Company
and Telephone
Number
Contents
SAFETY FIRST.
BEFOREYOU PLUG IT IN
Install Properly
Level Freezer
Remove Sales Labels
Clean It
:
Plugltln
::
USING YOUR FREEZER. : : :
Setting the Temperature Control
Adjusting the Temperature Control
Cooling Freezer First
The Power Saving Control
Changingthe
Light Bulb
Adjusting the Basket Shelf
Removing the Bottom Basket
Adjusting the Freezer Shelf
:
The Key Eject Lock
The Signal Light.
Energy Saving Tips
CLEANING YOUR FREEZER.
Cleaning Chart
FREEZING FOOD IN YOUR FREEZER,
Packaging and Sealing Food
To Wrap Foods
Loading
Storing Frozen Food
VACATION AND MOVING CARE.
Vacations
Shutting Off and Moving
IF YOU NEED SERVICE OR ASSISTANCE
I, Before Calling for Assistance
2 If You Need Assistance
3 IfYouNeedService
,, ,, ,,,,
,,.
4 IfYouHaveaProblem
,, ,, ,,,,,.
(~81985 Whirlpool
Page
6
6
7
7
8
8
8
9
9
10
10
10
11
11
11
11
11
Corporation
Before you plug it in
IMPORTANT
Before usrng your freezer. you are personally re
sponsrble for making sure that tt
l IS rnstalled
and levelled on a floorthat WIII hold the
werght, and In an area suitable for Its size and use
l ISconnected
only to the right kind of outlet, with the
rrght electrical
supply and grounding
[Refer to
your “Electrical
Requirements
and Grounding
Instructtons”)
l IS used only for jobs expected
of home freezers
l IS not near an ,oven, radiator
or other heat source
l
l
l
l
l
l
IS properly maintained
IS out of the weather
IS used in an area where the room temperature
will not exceed
110’ F (43 3 C).
IS not run where there are explosrve fumes
IS not used by those who may not understand
how it should be used
IS not loaded
with food before It has time to get
properly cold
Install properly...
Remove sales labels...
Remove the Consumer Buy Guide label and any
inside labels before ustng the freezer
To remove any remaining
glue:
1 Rub briskly with thumb to make a ball, then
remove
OR
2 Soak area with drshwashing detergent solution [I
teaspoon detergent
in 1 quart warm water] before removing glue as described
In step 1
DO NOT USE rubbing
alcohol
or flammable
or
toxic solvents, such as acetone,
gasoline,
carbon tetrachloride,
etc. These can damage
the
material.
NOTE: DO NOT REMOVE the Tech Sheet fastened under the freezer at the front.
Clean it ...
1 Check the strength of the floor It should hold the
werght of a fully loaded freezer
2 Pick a safe place,
indoors,
away from inflammables
such as gasoline.
3 Allow 3 Inches (7 5 cm] air space on top of freezer
for proper ventilation
4 Allow at least an Inch (2 5 cm] betweer
the
freezer conaenser, on the back of the unit. and
the wall
5 Allow ‘: inch (1 25 cm) on each side of the freezer
for ease of ir stallation
6 If the freezer IS to be against a wall you might
want to leave extra space on the hinge side so the
door can be opened wider
Level freezer...
Clean your freezer before
using It See cleaning
InstructIons on page 7
Plug it in...
3-prong groundin
type wall recepta
RetainiFg
Clip
so the door will stay open at any position
Freezer
’
Power Plug
grounding
Raise
Lower
This freezer has 2 threaded leveling legs that are
shipped in a separate package.
4. Screw these legs all the way into bolt holes in the
bottom front corners of the freezer
2. Slide the freezer into place.
3. Adjust front legs to level the freezer.
-To raise front, turn legs clockwise.
~ To lower front, turn legs counterclockwise.
4. Check with level.
5. After freezer is fully loaded, recheck wtth level.
Recommended
Grounding
plug
Method
A 115 Volt, 60 Hz., AC only 15 or 20 ampere fused
and properly grounded electrical supply is required.
It is recommended
that a separate circuit serving only
this appliance
be provided.
Use a receptacle
which cannot be turned off with a switch or pull
chain. Do not use an extenslon
cord.
Attach retaining
literature package
clip over power cord plug from
inside the freezer.
Using your freezer
Setting the temperature
control...
To start, turn control to the middle of the doI Thus
setting IS designed to marntain the temperature
at
operating
0’ near 0 F[ ‘7 8 C) under normal
; ondrtrons
Adjusting
the temperature
control..,
1 Turn control to hrgher number for colder temperatures
2 Turn to lower number for less cold temperatures
Cooling freezer first...
1 Allow freezerto cool 6 to 8 hours before hlling with
frozen food.
2 Let It cool overnight before adding large amount
of unfrozen food.
Note: When freezer IS first started, the compressor
vii111run constantly until the cabinet
IS cooled
It may
take up to 6 to 8 hours or longer, depending
on room
temperature
and the number of times the freezer
door 1sopened
After the cabinet IS cooled, the compressor will
turr ON and OFF as needed to keep the freezer at
the proper temperature
The Power Saving Control...
Joerates electric heaters These heaters help pre.~~r~*moisture frc’m formrng on the outside of the
fr:,ezer when hurjldrty IS high
’ Jse the 3FF setting when humidity E iow
L .>se the C)N setting only If morsture forms on the
>Jslde of the freezer
Changing the light bulb...
Adjusting the basket shelf...
To remove basket shelf:
1 Remove food from basket
2 Slide basket straight out to stop
3 Lift front
4 Slide the rest of the way out
To replace
basket shelf:
1 Fit back of basket shelf on top of guide stops on
bottom of gurdes.
2 Lrft front, then slide the basket until it clears the
guide stops.
WARNING:
To avold posslble shocks, first unplug
freezer or turn off electrlclty
leadlng
to freezer at the maln power supply.
1 Remove the light shield from the side of the control
panel Depress the back of the shreld to release the
tabs, then pull away
2 Replace bulb wrth a 40-w&t applrance
bulb
3 Replace the lrght shield Insert the shield tabs in the
slots, then press the shield to snap into place
Removing the bottom basket . . .
To remove:
1. Lift front of basket up to remove from wall supports.
2. Pull out
To replace:
1 Positlon basket in bottom of freezer.
^.
,,I
,,
.I
/ /
2 Insert Dasket Inlo wall suppons one siae aT a Time
Adjusting
the freezer shelf...
To remove shelf:
1 Remove food from shelf
2 Slide shelf straight out to stop
Guide Stop
3 Lift front
4 Slide the rest of the wav out
Shelf Stop
To replace
shelf:
1 Fit back of shelf on top of gulaes with wire stops on
bottom of guides.
2 Loft front, then slide shelf until It clears the guide
stops
The key eject lock...
can
help
entraorrent
reduce
the
hazard
of
child
To lock or unlock the freezer you must hold the
Key ~rl the lock while turning The lock IS spring
loaded so the key cannot be left or the lock
your WHIRLPOOL
If the key IS lost. contact
dealer for a replacement
Always give the complete model and serial number of your freezer
when requesting
a replacement
key
The signal light...
automatically
power failure
warns of any unexpected
SIgnal Llghl
l
l
l
If the signal light is not glowing, immediately
for power Interruption,
for an unplugged
power cord,
for a burned out signal light.
To replace
burned out signal light:
1 Unplug power cord from outlet
2 Open the freezer door
3 Push out signal light from behind, then unplug
burned out light. Replace light with one of
the same wattage and size Signal light can
be ordered from your WHIRLPOOL dealer,
Part No. 1103639
4. Close freezer door and plug power cord into
outlet.
check,
Energy saving tips...
l
l
l
l
6
You can help your freezer use less electricity
Check door gasket and level freezer to assure a
good door seal
Clean the condenser coils regularly
Keep door openings to a mlnlmum. Remove several
Items at one time Keep contents organized to ellmlnote searching
Fill to capacib
Follow recommended
pror 2dures
for freezing foods See pages 8 and 9
l
l
l
l
Set Temperature Control to provide temperatures
around 0 F [ 17 8 C) There IS no need to store
foods below 0 F
Keep door locked to ensure door closure
Do not let frost build up to more than !‘3 inch (6 mm)
thick Efftclency IS reduced
Keep Power Saving Control on OFF when humldlty is
low
Cleaning your freezer
This freezer should-be cleaned when frost has built up to about Yd Inch (6 mm] thickness
Complete defrosting and cleaning should be done at least once a year
In high humrdrty areas, a freezer may need more frequent defrosting
Note: Wrap frozen foods and packages
in several
To defrost and clean:
layers of newspaper and cover with blanket Food WIII
1 Turn Temperature Control to OFF
stay frozen for several hours
2 Unplug power cord
5 Place pan of hot water lnstde freezer to speed
3 Place a shallow pan (sides no higher than1 Inch) on
melting of frost Keep door open Ice can be refloor under drain hole in bottom of freezer
moved In large pieces as It melts Direct air from
electric
fan into freezer to speed defrosting
CAUTION: Do not place pan under the
6 Clean
freezer
according
to the followrng
right hand side of the freezer. Coils under
drrectrons
the freezer could be damaged
and sharp
edges of the freezer could cause perAfter defrosting:
I,.
1 Remove shallow pan from underneath freezer
2 Plug In power cord
-4
’ Take out all fold ona removable parts
ZBSee dIrections for “Setting the Temperature Con
trol’ page 5
Cleaning chart...
Part
What to use
How to clean
Removable
parts
(baskets,
shelf)
Sponge or cloth, mild
detergent and warm
water
l
Outside
Sponge cloth or paper
towel, mrld detergent
appliance
wax (or good
auto paste wax1
l
l
l
l
Waxing
Inside
palnted
metal
Wasii with warm water and a mild detergent
IZlN,seand dry
Wash with warm water and a mild
detergent Do not use abrasive
or
harsh cleansers.
Rinse and dry
Wax patnted metal surfaces at least twice a
year with appliance
wax or a goad auto
paste wax Apply wax with a clean, soft cloth
Do not use wax on plastic parts.
surfaces
provides
rust protectfon.
“last c scraper pans ‘of
tic&r elec+rlc far
:pcr ye or towel boklng
blTaa al-0 Aor
dater
walls
PC,’
scraper to remove frost
l Use plastic
0 P’ace pans of hot water in freezer with door open
+o speed meltrng Directing air from an electric
fan Into freezer WIII also help
. Wash with solutNon of 2 tablespoons (26 g] baking
soda to 1 quart ( 95 L) warm water
. I?,nse and dry
DO NOT USE an ice pick, knife of other sharp-pointed
tool or any
tvpe of electric defroster to defrost freezer. They can cause damage
to the liner and interior parts.
Door liner and gasket
Sponge soft cloth or
l Wash with mild detergent
and warm water
paper towel, mild aeter
9 Rrnse and dry
gent and warm water
DO NOT USE cleaning
waxes, concentmted
detergents,
bleaches
or cleansers
containing
petroleum
on plastic parts.
Condenser
Use vacuum cleaner
wtth brush attachment
WARNING: Watch out
for sharp wire ends at
top of condenser
tolls. They can cause
Injury or damage
brush.
coils
l
l
Slide freezer out away from the wall
Clean dust and lint from condenser coils behind
the freezer, every two or 3 months
Freezing food in your freezer
2. 3ring front and back of wrapping
together
ond fold in toward food makIng oi east +wc
or’e~,rch# ~2 5 cm 1 f~~las url+ fclod ‘*s ‘iyhtlb
Wherl freezer has cooled +c u safe storayr?
temperature
it may be loaded ws+hfrozen food.
When you plan to freeze unfrozen food, SFJ~
the followrng chart for the arrour‘: to freeze ,a+
one time.
19.1 cu. ft.
(545.5 L)
38.2 Ibs.
(17.2 kg.)
57.3 Ibs.
(25.8 kg.)
‘These amounts are based on USDA recommerdotions If too mony packages of Iurfrozen foot?
are packed at one ttme Into the freezer +he rate
of freezing 1stoo slow Poor qualit\, products result
Packaging and sealing food...
AIrtIght packaging
IS Important
in freezlrng
foods Containers
and wrapprngs
should be
moisture and vapor-prool and packages should
be sealed carefully to keep mclrsture in and air
out
Freezer burn can result If food IS not properly
wrapped
When this happens, fooa dehvdrotes
and IS of poor qualrty
To wrap foods...
1. Cut sheet of wrapping
matertcl about onethtrd longer than distance around food to be
wrapped
Place wrapplng sheet OP flat surface with food In center of sheet
w
3. Crease
erds
Close +C foi:d
4. 3ress a1101rfro-r package
twce
‘vloke sure fola
ogarst era cf oockage
‘0 e18mro+e 011
Fold each er;d over
orld fosrer~
w thl freezer tape
IS t,gPi
NOTE: ‘Wher packaging
meats that have r’ot
beers borled pad sharp eages \w1’17extro Arap
or JSe stockinette to protect against tearing or
pui’cturing
Jse head\-dub
olumnum freezer foil kroft pa
per with cellophane bonded to It, specicl freezer
bags jars carters and freezer searing tape for
packaging
your food Items You II find them at the
supermarket or freezer dealer
See booklet,
“How to Preserve Foods the
Modern Way with Your WHIRLPOOL Freezer,”
for complete
information
and tips on home
freezing.
Loading...
Storing frozen food...
After food ISfrozen. stack packages anywhere
In the freezer Packages should not edend beyond the shelf edge or they may keep the door
from closrng and sealing properly.
1. Before freezing large quantities of food, turn Temperature Control to highest setting and let freezer
operate for several hours. Atter loading all food
Control to the usual
items. return Temperature
I,
Baskets ~ Store heavy and bulky packages
here Baskets should be in place at all times
for proper air circulation
2. To speed freezing, lay packages
in a single
layer so each rests on the freezrng surface of a
shelf Leave space between packages
3. Add mere unfrozen food after first load 1s
frozen (aoproximately
18 to 24 hours)
/
Door storage
Store packages
shelves behind the retarnrng bar
Juice can shelves
shown
on the door
~ Storeturce cans on door as
Vacation and moving care
Vacations...
Shutting
Arrange for someone to make regular checks of
your freezer to make sure It ISoperating and electrlclty
has not been interrupted
If freezer is shut off for more than 24 hours:
1. Remove and store all food
2. Unplug freezer
See “Cleaning
your freezer,”
3. Clean thoroughly
page 7
4. Block door open for air circulation
Turn lock to
locked positIon with door open Place blocks between door and cabinet and tape In place with
self-adhesive filament tape
off and moving...
If you move the freezer:
1. Remove the baskets
2. Do not place
3. Level properly
objects inside cabinet.
to ensure goocl door seal
WARNING:
Do not allow children near the freezer when the
door Is blocked
open. They may become
Injured or trapped.
To restart freezer, see Lslng your freezer,” page 5
10
If you need service or assistance, we suggest
you follow these four steps:
1. Before calling for assistance...
2. If you need assistance*...
Performance problems often result from llttle things
JOU can find and fix yourself without tools of any kind
Call Whirlpool COOL-LINE@service
assistance
telephone
number. Dial free from:
Continental
U.S. . . . . . . . . . . . (800) 253-1301
Michigan
. . . . . . . . . . . . . . . . . . (800) 632-2243
Alaska & Hawaii
. . . . . . . . . . (800) 253-1121
apd talk with one of our trained Consultants
The
Consultant can Instruct you In how to obtain satlsfactory operation from your appliance
or, if service IS
necessary. recommend a quaIlfled service company
lr: your area
If electricity
goes off:
Learn how lor’g power ~111be off bb colllng the
I )cwer compan:
l
If service s to i e interrupted 24 hours \lr less, keep
free:er closed ‘vlost food ~111stay frnzep
l
If ser\;lce ‘s to ; e #rterriJoteU longer ‘bar 24 hours
30 ihIS
1. lie-nave al; Irrf:a;rer8 focd arld store r’ o frorer
food locker OR...
2. Place 2 lbs (0.9 kg) of dry ice In freezer for every
cu. f? of freezer space. This will keep frozen foods
for 2 to 4 days Wear gloves to protect your hands
from dry ice burns
3. I‘ neither foe ? ‘,cker storage or dry ce is ai@
able use or arm oerlshable food a+ 3nce
l
1% engrh of tlrsle f:)od WIII stav frozer’ depends x
several factors t 3 irxstar)ce a full freezer WII remair’
:olC orger th’lr a freezer ~,oir~ally fIlled And a
freezer ~,JII of ,<leot \~‘III stab cold larger ?t?ar a
free;t;‘r fitied w ‘7 DaKea goods Alsc f the food stIrI
coptalns Ice crjstals it may be safely refrozer ai+b(Jgb
the
quc ‘iv orrd flavor may be CIffeCted Lse
this food us so( I> 05 corlver Ien+ If the cordlttor
of
I+ 8s
the food #spot’ ::r s II orly wok questIonable
wise tr! dispose: of ‘i
If freezer stops running:
l
Check +c see ’ power cord s pluggecl irlto the
outlet
l
Check fclse bo- :I :,rcu~: breaker
l
Check electric .~ompony for a power failure
l
Be sbre Temper&Jre Control ISturnea ON
If compressor
seems to run too long:
Check to see tb’at condenser located on back cf
freezer, IS free ct dust and l:n+
l
On hot summer ‘jays or if room IShot, compressor WIII
rurl longer to provide the correct amount of cooling
l
If large amounts of unfrozen food hove been put
Into the freezer, compressor WIII run longer
l
Check to see that there IS enough air clrculatlon
space above arId in back of the freezer
l
FSP is a registered
trademark
of Whirlpool
Corporation
for
quality parts. Look for this
FSP
symbol of quality whenever
you need a replacement
part
R for your Whirlpool
appliance.
FSP replacement
parts
wtll tit right and work right, because
they are
made to the same exacting
specifications
used to build every new Whirlpool
appliance
0
3. If you need service*...
WhIrlpool has a natlonwlde
netivork
of
franchised TECH-CARE@
Service
Companies
TECH-CARE
service
technicians are trained
to fulfill the product
warranty and provide
after-warranty
service,
I JRANCHISED
SERVICE
anywhere In the United
States
To
locate
:kCH-CARE serv:ce In your area, call our COOL-LINE
jtirv’ce assIstonce telephone number (see Step 2) or
Look in your telephone directory Yellow Pages under
-Tkkl
2
01
7&f-CAM
APPLIANCES-HOUSEHOLDMAJOR-SERVICE
6 REPAIR
WHIRL.POOL APPLIANCES
FRANCHISED TECH.CARE SERVICE
SERVICE
XYZ SERVICE CO
173 Maple
ELECTRICAL
MAJOR-
OR
APPLIANCESREPAIRING
6 PARTS
WHIRLPOOL APPLIANCES
FRANCHISED TECH-CARE SERVICE
COMPANIES
SERVICE
XYZ SERVICE CO
123 Maple
999.9999
COMPANIES
999.9999
OR
WASHING
MACHINES,
DRYERS
h IRONERS-SERVICING
WHIRLPOOL APPLIANCES
FRANCHISED TECH-CARE SERVICE
SERVICE
XYZ SERVICE CO
123 Maple
COMPANlES
-. 999.9999
4. If you have a problem*...
Call our COOL-LINE service assistance telephone
number (see Step 2) and talk with one of our
Consultants, or if you prefer, write to.
Mr Stephen E Upton
Senior Vice President
Whirlpool Corporation
Administrative Center
2000 US-33 North
Benton Harbor, MI 49022
.If you must call or write, please provide: model
number, serial number, date of purchase,
and a
complete description of the problem This information IS needed in order to better respond to your
request for assistance.
whi~rlpool
Home
Maklng
Part No.1104075
01985 Whirlpool
! Makers,
Dlshwashets.
Built-In
your world
&Aiances
a little easier
Printed in U.S.A.
Corporation
Ovens
and Surface
Units,
Ranges,
Microwave
Ovens,
Trash Compactors,
Room Air Condltloners.
Oehumldlflers.
Automatic
Washers,
Clothes
Dryers.