1
.
S
FACSIMILE
O
M
INSTALLATION .a..-..e-.--.-*-.--.-..e-..-* 1
INITIAL SETTINGS ---.--.--..-----..---e-. 2-1
FAX OPERATIONS ----.----*-------.m----- 3“1
. USINGTHE ANSWERINGMACHINE-- 4-1
MAKINGCOPIES --.-..-.---... -.--.---..-. s 5-1
MAKINGTELEPHONECALLS ------------ 6-1
SPECIAL FUNCTIONS -------------------- 7-1
OPTIONAL SETTINGS .----.-.------------ 8-1
PRINTINGOUT REPORTSAND LISTS 9-1
.a-.---e-..-e----.s. 10-1
MAINTENANCE -q------m
. TROUBLESHOOTING --------------------- 11-1
SPECIFICATIONS
QUICK REFERENCEGUIDE
INDEX
W
—A
R
m
s
t
N
E
C
T
i
c
a
t
i
t
m
e
l
w
I
a
e
A
3
d
r
w
g
o a
o
o
— R
— I
— C
— C
m
t
t
t
s
t
t
e
r
i
c
d
t
u
H
ap
r
t e
t i
o
t
c
n
m
a
t e
o
Y
n
i
a
a
d
a
ac
e
F
u
i
c
c
e
f
a
g
i
n
c
d
w
u
p
w
r
b
t
E
r
i
e
r
w
i
t
t
m
r
e
a
e
t
t
c
o
(
p
T
f
r
u
l
i
r
t
p
a
r
d
t
t
r
f
t
f
h
R
Please r
t m
n
a s
n
b
f e
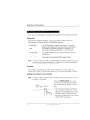
r
case of loss or theft. These numbers are located on the rear side of the unit.
Space is also provided for other relevant information.
Model Number
S
Number
Date of Purchase
Place of Purchase
The FO-455 facsimile transceiver is G3 compatible, which means It ISable to
communicate with almost every facsimile machine in use today. In addition to the
basic operations of sending and receiving documents, it provides a variety of
special features designed to increase the ease and effectiveness of your
communications.
This manual gives you easy-to-follow instructions for Installing and using the
FO-455. The Table of Contents will show you where instructions for using each
feature are located. Whilst you may not need to read every section In detail at first,
we recommend you at least review them briefly.
If you have any questions or problems which cannot be solved by reading this
manual, please contact your Sharp dealer.
I
●
Th/s facsimile machine is not designed for use on a line which has call waiting,
call forwarding, and some other special services offered by your !elepnone
com,pany./f you attempt to use the fax machine In conjunction with any of these
services, you may experience errors during transmission and reception of
facsimlie messages.
●
This fax machine is not compatible with digital telephone systems. No other fax
machines may be connected to the same line.
For your safety, if any of your equipment is not operating properly or should any
physical damage occur to the equipment where Internal parts may become
exposed, the equipment should be immediately disconnected from the phone line
and then the power line and returned to a SHARP authorised Service Centre for
Inspection, repair, or disposal.
INTRODUCTION
I
N
I
s
i
Never install telephone wiring during a Ilghtning storm.
Never install telephone jacks in wet locations unless the jack is specifically designed
for wet locations.
Never touch uninsulated telephone wires or terminals unless the telephone line has
been disconnected at the network interface.
Installing or modifying telephone lines should only be under taken by a Iiscenced
techician.
Avoid using a telephone (otherthan a cordless type) during an electrical storm. There
may be a remote risk of electric shock from lightning.
Do not use a telephone in the vicinity of a gas leak.
Do not install or use the machine near water, or when you are wet. Take care not to
spill any liquids on the machine.
Y
f
m
a
t
t
s
The Austel Registration Number and Ringer Equivalence Number (REN) for this
equipment are shown on the label on the back of the machine, The telephone
company may require these numbers.
The sum of all Ringer Equivalence Numbers on your telephone line should be three
or less in order to assure proper service from the telephone company.
ii
INTRODUCTION
1
I
N
Unpacking Check List . . . . .
Connections . . . . . . . . .
Attachments . . . . . . . .
Loading the Fax Paper . . . .
2
I
.
.
.
.
.
.
.
.
.
.
.
.
. . . . . . .
. . . . . . . .
. . . . . . . .
. . . . . . .
.
.
.
.
.
.
.
.
.
.
.
.
.
1-1
. . , 1-2
. . . 1-4
. . . I-5
S
Set-up Guide . . . . .
AL
t O
P
E
Y
N
a F
Entering Letters for Names
Setting the Date and Time
S
t R
M
A
M
S
Distinctive Ringing . . . . .
S
N
f A
Volume Adjustment . . . .
F
.
.
.
.
. .
2-1
2-2
2-4
2-5
2-7
Z-8
. . .
. . . .
N
. . . .
. . .
. .
. , . .
. . . .
D
. . . .
.
.
.
,
. .
, .
2
2
2
2
3
O
—
Sending Documents . . . . . . . . . . . . . . . . . . . . . 3-I
Receiving Documents . . . . . . . . . . . . . . . . . . . . . . 3-10
4
U
T
A
M
Operating the Answering Machine . , . . . . . . . . . . . .
4-I
Remote Operations . . . . . , . . . . . . . . . . . . . , . . . . 4-5
Other Functions . . . . . . . . . . . . . . . . . . , . . . . 4-13
5
M
C
6
M
T
7
S
C
F
Anti Junk Fax . . . . . . . . . . . . . . . . . . . . , . . . . . 7-1
Polling . . , . . . . . . . . , . . . . . . . . . . . . . . . . . . 7-2
Timer Operations . . . . . . . . . . . . . . . . . . . . . . .
. 7-5
Memory . . . . . . . . . . . .
. . . . . . . . . . . .
. . .
7-7
8
O
S
...
Ill
C
TABLE
9
P
10
M
O
R
A
L
T
R
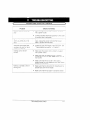
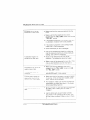
Problems and Solutions .
. . . . . . .
. . . . . .
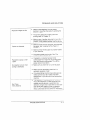
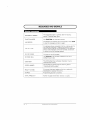
Messages and Signals
. . . ,
. .
.
.
Clearing Paper Jams . . . . . . . . . . . . . . . . .
S
Q
I
iv
. .
. .
. .
11-1
11-4
11-6
P
R
G
C
L
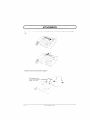
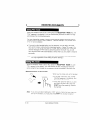
After unpacking your fax, make sure you have all the items shown below. If any are
missing, contact your dealer or retailer.
Warranty card
Received document
support
labels
/
carrier
+ In addition to the above items, you should have an F080TP adaptor (fax Ilne
cord). This is supplied separately by your dealer.
P
k
m
w
s
Keep the fax away from air conditioners, heaters, direct sunlight, and dust.
Provide easy access to the front, back, and sides of the fax. In particular, keep
the area in front of the fax clear, or the original document may jam as It comes
out after scanning.
If the fax is moved from a cold to a warm place, it is possible that condensation
may form on the reading glass, preventing proper scann[ng of documents for
transmission. To remove the condensation, turn on the power and wait
approximately 2 hours before using the fax.
If your area experiences a high incidence of lightning or power surges, we
recommend that you install surge protectors for the power and telephone lines
Surge protectors can be purchased at most telephone specialty stores.
INSTALLATION
1-1
)
C
/
~>
*J
>
/
‘;/&b
,f\ <l
./
[
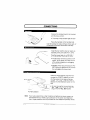
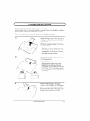
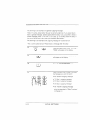
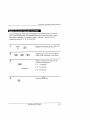
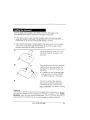
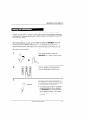
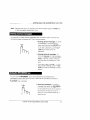
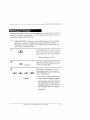
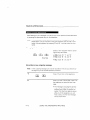
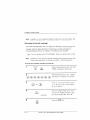
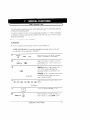
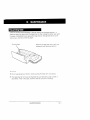
Connect the handset lead to the handset
and the fax as shown.
. The ends of the handset lead are identtcal. so they will go into either socket.
j,
,/’
Place the handset on the handset rest.
Use the handset to make ordinary phone calls, or
to transmit and receive documents manually.
E
~
,
“
6*
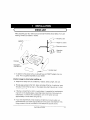
Install the fax machine near an easily accessible power point 230-240 V, 50Hz,
Plug the power lead into a 230-240 V.
50 Hz, grounded (3-prong) AC outlet.
. The fax does not have a power on/off
switch, so the power is turned on and
off by simply plugging or unplugging
thepower,ead
●
Caution: When disconnecting the FO455, unplug the telephone line cord before unplugging the power lead.
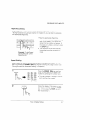
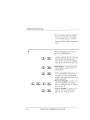
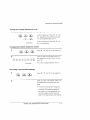
Insert the small modular plug which terminates the F080TP adaptor line cord
into the socket on the back of the fax
marked “TEL. LINE”, Plug the F080TP
adaptor into the telephone socket on the
wall,
For
c Be sure to plug the line cord into the
TEL. LINE socket on the fax. Do not
plug it into the TEL, SET socket.
For New Zealand
Note: If your area experiences a high incidence oflightnlng orpowersurges, we
recommend that you install surge protectors for the power and telephone
lines. Surge protectors can be purchased at most telephone specialty stores.
1-2
INSTALLATION
C
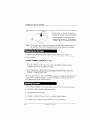
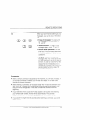
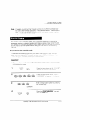
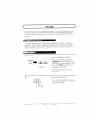
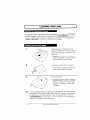
If desired. you can connect an extension phone to your fax.
+ You can connect an extension phone to the fax to make and receive calls like
any other extension phone on your line. For details on receiving faxes from an
extension phone, see “Receiving Documents” in Chapter 3.
Insert one end of the extension phone
line either into the socket on the back
side of the F080TP adaptor, or into the
socket marked “TEL. SET” on the fax
(first remove [he seal from the socket).
or
I
●
M
In New Zealand, not all standard telephones and answering machines WIII
respond to incoming ringing when connected to the extension socket of the
equipment.
y
f
a
r
Should it be necessary to move your fax to a new location. first disconnect the telephone line cord before disconnecting the power lead. When reconnecting, it is necessary to connect the power lead before connecting the telephone line cord.
I
1
A
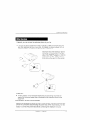
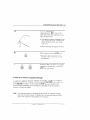
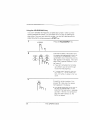
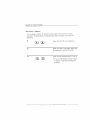
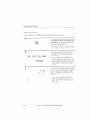
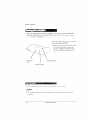
Flip up the original document support. Rotate the extender so that it points straight
up.
Attach the received document support
,.,/
The bend In the
support must point ~
awa> from you.
---/ /-+
.,
.
,’
..-’.,
>
. .::
-. ~‘“ .. . >‘~ - -
@’!
K
,,-
‘
.
k
INSTALLATION
-
1 [
.
----..
‘:;$”’
,,+. \ . . %,
-c’“<
“’’---:-.::.<::-
/
1-4
,
*
,~
-—---- ..
.
L
T
F
P
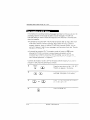
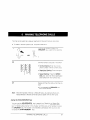
Your fax prints by a process called thermal printing. The print head applies heat to
special paper which ISchemically treated to change colour when heated to a cefialn
level. and this creates the printed text or Image.
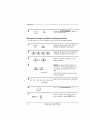
Follow the steps below to load the sample roll of fax paper provided.
1
n
,-.‘~>.,~
-<-.
‘-: ?----~~’y’ > ,/
/–. ./
“*
-, - =. ‘..
.. =.- . ‘==—. ‘B.
t[t - { ‘
J3
‘J:
-..
““--, -,- ..
.
\
2
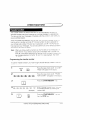
Grasp the finger hold on the right side of
the paper compartment cover, and pull
up to open it.
Remove the packing paper from the paper compartment.
. Caution! If you are replaclng the paper, do not touch the metal strip in the
compartment. It may be hot If a document has just been printed.
Unwrap the roll of fax paper and insert it
In the compartment.
The roll must be placed so
. I
that the leading edge of the paper
feeds from over the top of the roll.
(The paper is only coated on one side
for printing. If the roll is placed upside
down, the paper will come out blank after printing.)
3
Pass the leading edge of the paper
through the slit between the metal paper
guide and the protruding ribs, and pull It
out from the other side of the paper compartment cover. Remove any SiaCK.
-.,
‘/
INSTALLATION
1-5
L
T
F
P
4
Close the cover, and at the same time
pull the paper out through the outlet so
that there is no slack in the compartment,
●
N
A short length of the fax paper will
feed out and be cut off. (If this doesn’t
happen, repeat the Ioadlng procedure.)
The fax has a built-in anti-curl mechanism that will help to reduce paper curling problems, The anti-curl mechanism will be more effect!ve at the beginning of the paper roll and less effective towards the end.
To assure a long life for your fax and obtain the best reproduction quality, we
recommend that you use the following Sharp fax (thermal) paper which ISavailable
from your dealer:
FO-40PR THERMAL PAPER (50 m r
+ The use of any other paper may result in poor copy quality and excessive
build-up of residue on the head, This is due to the different thermal reactive
characteristics of each manufacturer’s paper.
+ Other manufacturers paper may not have paper out sensor Ilne at end of roll
which could cause messages to be lost and may cause the cutter to Jam.(see
Chapter 11 “Clearlng paper jams”)
When the paper runs out, OUT OF PAPER will appear in the displa}. Reception and
copying wili no longer be possible. To replace the paper, first take out the old roll,
then load the new roll as described above.
Do not unpack the paper until you are ready to use it. It may become dlscoloured if:
+ It is stored at high humidity or high temperature.
+ It ts exposed to direct sunllght.
+ It comes in contact with glue, thinner, or a freshly copied blueprlnt
+ A rubber eraser or adhesive tape is used on It. or it ISscratched
1-6
INSTALLATION
(
S
G
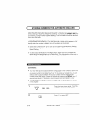
Before you can begin using your fax, there are some settings which must be made
with the keys on the operation panel. Some of the settings are required for basic
use of your fax, others may or may not be necessary depending on how you want to
use the fax. The procedures for making the settings are described In this chapter [n
the order shown below.
R
s
Entering your name and fax/telephone number In the fax
Setting the fax to the current date and time
Selecting the reception mode
Answering machine set-up
S
w
m
n
+ Distinctive ringing: If you subscribe to a distinctive rlnglng service from your
telephone company (this is a service which allows you to use several different
devices, each with its own phone number and ringing pattern, on one line), you
may want to select ringing patterns for the fax and/or the built-in answering
machine.
O
s
Storing numbers for automatic dialling: Automatic dialling allows you to dial a full
fax or phone number by simply pressing a Rapid Key, or by pressing the S
D
s
k a
t d
e
f
a
a2
p
n
n
u
a
d
y
m
in the fax.
Volume adjustment: Adjustment of the volume of the speaker. handset, and
ringer.
I
S
2-1
AL
(
A T
O
P
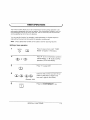
Before you make the settings, take a moment to familiarise yourself with the operation panel.
R
P
t
k
k
automatically redlal
the last number
dlalled.
I
P
k
D
Press this key to play
r
m
k
this key e
recorded messages.
p
During playback, press it
to skip forward to the next
message.
\
R
S
D
k
p
a 2-digit Speed Dial
number.
\
\.
.
k
Press this key to
\“ a
repeat playback of
message.
REC/fiEMO
RE&AT
PLAY{SKIP
DEL:TE
R
k
—
\/
Press this key to record
a phone conversation
or a message.
S
P
P
k
t
key to ~
reduce the speed of
message playback.
I
Number keys
Use these keys to dial
numbers, and enter
numbers and letters
during numberlname
stor]n-gprocedures
F
P
k
/
Press this key to
Increase the speed of
message playback.
2-2
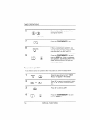
S
k
/
Press this key to dial a
number without plcklng
up the handset
INITIAL SETTINGS
Press this kev to search
f
a
d
number, or. during a
phone conversation.
press Ii to put the other
party on hold.
A LOOK AT THE OPERATION PANEL
Display
This displays various
messages during operation
and programming.
RECEPTION MODE key
Press this key to select the
mode of reception.
FUNCTION key
Press this key to select
various special functions,
i
/
\
I
I
I
1
I
b
J
DOWN
~
07
.
08
s
09
I
12
13
14
16
~
17
18
19
I
I
10
1
1
1
‘1
RECEPTION
MODE
FUNCTION
Resolution
I
~
06
/
/
VOLUME keys
Press these keys to adjust the
volume of the spea~er ‘,vhen
the SPEAKER key has been
pressed, or the volume of the
ringer at all other t~mes.
-ST(JP
m
C
)
15
n
1
I
(n
START/!J
EMOR
1
\
v
Rapid Dial Keys
Press one of these keys to
diai a fax or voice number
automatically. (Note that you
must attach the Rapid Key
labels.)
RESOLUTION key
Press this key to aajust the
resolution and contras~
before sending or copvlng
a document.
v
STOP key
Press this key to sto~
operations before
they are completed.
9
vur f kev
Press this-key to
make a copy of a
document.
START/MEMORY key
Press this key to send
or receive a document,
or to scan a document
Into memory before
sending It.
INITIAL SETTINGS
2-3
E
Y
N
A
F
N
To have your name and faxltelephone number (called the “Senders name” and
“Sendefs number”) printed at the top of every page you transmit. program them by
pressing the panel keys as shown below.
+ If you enter an Incorrect number or letter, press the HOLD key to move the
cursor back to the mistake, then enter the correct number or letter. (To move the
cursor forward, press the SPEAKER key.)
m
1
Press the keys shown at left. “ENTRY
MODE” will appear in the display.
2
Press the “#” key 2 times. “OWN NUMBER SET” will appear in the display.
~-;:r
},,
Et:
r
m
3
Press the START key.
4
@@@
Enter your fax number (max. of 20 digits) by pressing the number keys. (To insertaspacebetween digits. pressthe
“#” key. To insert a “+”. press the “*”
key.)
~@@@
(Example)
-:c.,,a;
,,l
.L
5
o
6
Press the S
key.
o
m
m
Enter your name by pressing the appropnate number keys as shown on the following page. Press each key repeatedly
until the desired letter appears In the dlsplay. (Max. of 24 characters.)
ama
~~
mSPEAKER
@
(Example: “SHARP”)
mm
Press the START key and then the
STOP key.
2-4
I
S
)
E
L
F
N
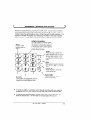
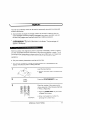
Names are programmed by pressing the numeric keys. You WIIInotice that letters
are indicated above each of the number keys “2” through “9”. To enter a letter (or
number), press the appropriate key one or more times until the letter appears In the
display (the number will appear first, followed by the letters In the order indicated
above the key). The keys used for entering letters and editing are shown below.
Letters and numbers
To enter a letter or number, press
the appropriate key repeatedly until
the desired number/letter appears
in the display (the number appears
first. then the letters in the order
shown above the key).
Space
Press this key
twice to enter a
rn~nn
I
Delete
/
Press this key to move the
cursor to the left.
Cursor right
Press this key to move the
cursor to the right.
Symbols
Press either key repeatedly until the
desired symbol appears (see the
symbol list on the following page).
●
To enter two letters in succession which require using the same key, press the
SPEAKER key once afier entering the first letter, then enter the second letter.
.
To change one Individual letter to another. move the cursor to that letter ~nd
enter the desired letter. The new letter will simply replace the old one.
I
S
2
ENTERING LETTERS FOR NAMES
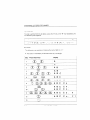
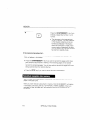
S
l
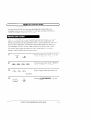
To enter a symbol from the list below, press the “#” key or the “*” key repeatedly until
the desired symbol appears.
. /
! “ # s 90 & ‘ ( ) * + , - : ; c = > ‘? @ [ ~ ] A - ‘ { I } --
E
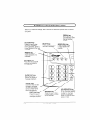
The followlng ISan example of entenng the name “ABC Co. #l”
+ The cursor in the display is Indicated below by a rectangle:
I Step
Press these keys:
Display
ABC
I
i 9
a
10 ,
1‘2
m
~ 13
J
2-6
A
CO.
ABC
CO.
ABC
co.
# 1 ~
I
,1
!I
INITIAL SETTINGS
S
b
T
D
A
T
The date and time appear In the display and reports, and are printed at the top of
evety page you transmit. Set the date and time by pressing the keys on the
operation panel as shown below.
o T. correct a mistake. press the SPEED DIAL key to move the cursor back to
the mistake, and then enter the correct number.
Press the keys shown at left. “ENTRY
MODE” will appear in the display,
1
‘“~””
@
2a
m
Press the keys shown at left. “DATE 3
TIME SET”
appear !n the display
Press the START key.
4 m
Enter a 2-dlglt number ‘or the day f ’01”
to “31“).
(Example: the 5th)
5
Enter a 2-digit number for the month
(“01” for January, “02” for February. ’12”
(Example: January) for December etc.)
G
@
7
@
@
(Eyample: 1996)
,
(Example: 9:25)
~m6
Enter the last 2 digits of the year,
Enter a 2-digit number for the hour (“00”
to “23”) and a 2-digit number for the mlnute “00” to “59”).
Press the START key and then the
STOP key.
INITIAL SETTINGS
2-7
S
T
R
M
Your fax has three modes for receiving incoming calls and faxes:
ANS mode: Select this mode when you are out and want the built-in answenng machine to answer all calls. Voice messages will be recorded. and fax messages will
be received automatically.
TEL mode: Select this mode when you are In and want to receive both voice calls
and fax messages on the same line. You must answer all calls, including fax messages, using the fax’s handset or an extension phone connected to the same line.
FAX mode: Select this mode when you only want to receive fax messages on your
line. The fax will answer all calls and receive incoming fax messages automat}cally.(see also Fax/Phone Changeover in Chapter 8.)
S
t
r
m
RECEPTION
MODEFUNCTION
RESOLUTION
‘
o
o 0
Set the mode of reception with the RECEPTION MODE key on the panel
●
To select ANS, press the key until
“GENERALOGM PLAY”appears in
the display (“ANS” will appear after
the general outgoing message plays).
N
h
A
mode cannot be selected
unless a general outgoing message has been recorded as described In ‘)AnsweringMachine
Set-up’i In this chapter.
. To select TEL. press the key until
“TEL” appears in the display.
. To select FAX, press the key until
“FAX” appears In the display,
2-8
INITIAL SETTINGS
A
M
S
The FO-455’Sbuilt-in answenng machine allows you to receive both voice
messages and fax transmissions while you are out. Up to 11 minutes of voice
messages can be recorded when no documents are stored in memory (this may
vary depending on the content of the messages).
When the reception mode ISset to ANS, the answering machine WIIIautomatically
answer incoming calls and play your outgoing message (this is your recorded
greeting which informs callers that they can leave a message or send a fax). l~olce
callers can leave a message just as with any regular answering machine. If the call
is a fax transmission, the FO-455 will automatically receive it.
The built-in answering machine has four different “boxes” in which voice messages
from callers can be recorded. This allows individuals in your office or members ot
your family to each receive their own private messages. A passcode can be
programmed for each box to prevent other people from Iistenlng to or erasing
messages.
The General Box is for general use, and Boxes 1, 2, and 3 are each for’personal
use. An outgoing message for the General Box must be recorded, and an outgoing
message must also be recorded for each personal box used.
When the answering machine answers a call, the caller will hear the general
outgoing message. If they want to leave a message in the General Box, they need
only wait for the beep and then speak.
If they want to leave a message in a personal box, they must enter the number of
the box (“1” for Box 1. “2” for Box 2, or “3” for Box 3) by pressing the appropriate
key on their telephone before the beep. The outgoing message for the selected box
WIIIplay, and they can then leave a message.
N
To leave a message in a personal box. the caller must be on a touch-tone
phone.
To use the built-in answering machine, you must first record a general outgoing
message. This must be done even if you only intend to use personal boxes. An
outgoing message for each personal box used must also be recorded. A personal
box cannot be accessed if it does not have an outgoing message.
INITIAL SETTINGS
2-9
ANSWERING MACHINE SET-UP
The following ISan example of a general outgoing message:
“Hello, this ISthe Jones family. We are not at home right now, If you would like to
leave a general message, please speak after the beep. If you would like to leave a
private message, press “1” for John, “2” for Jane, or “3” for Billy before the beep. If
you would like to send a fax. press your facsimile Start button.”
The followlng is an example of an outgoing message for a personal box.
“This ISJane’s personal box. Please leave a message after the beep,’
1
2
3
FUNCTION
o
2-10
Press the keys shown at left “A.M SETTINGS” will appear in the display,
m
Press the “#” key OGM RECORDING
will appear in the display.
7,-,.,,7-
Press the START/MEMORY key.
0
4
m
@
Press a numenc kc\/ to select the outgoing message you want to record:
●
“O’. General outgoing message
●
“
●
“2’ Box 2 outgoing message
●
“3’: Box 3 outgoing message
●
“4”: Transfer outgoing message
(This !s used for the Transfer function,
which is described In “Other Functions”
In Chapter 4.)
Box 1 outgoing message
INITIAL SETTINGS
/4NSWERlNG MACHINE SET-UP
Press the REC/MEMO key, and then
speak facing the “MIC”mark on the
lower left co-rnerof the machine at a distance of about 30 cm.
The general outgoing messagecan be
up to 60 seconas long. ,A~ersonal outgoing message can be up [o 30 seconds long,
While recording, the display wlil snow
the time rema[nlngto record.
6
When finished, press the STOP <ev
STOP
m
s If the time Ilmit is exceeaea or the
handset ISlifted, recoralng I(VIIIstop
automatically
v
Go back 10Step 4 to record an outgoing
message for another box, or Dressthe
STOP tey twice to exit.
‘GG
l
e
o
m
To Ilsten to or erase an outgoing message. follow Steps 1 through 4 of the above
procedure to select the message, and then press the PLAY/SKIP keyto ilsten to :t,
or the DELETE !Oerase It. To exit, press the STOP key twice. Note that the
general outgoing message can be changed by repeating the above procedure,
however, !t cannot be erased.
N
If an extension phone ISconnected to the FO-455, an outgoing message
cannot be recorded, played. or deleted while the extension phone ISbeing
used (wh//e LINE IS IN USE appears In the dls~lav)
INITIAL SETTINGS
2-11
ANSWERING MACHINE SET-UP
A 3-digit passcode can be programmed for each of the boxes. If this is done, the
passcode must be entered before messages in the box can be listened to or
erased. Program a new passcode or clear a previously programmed passcode by
pressing the panel keys as shown below.
+ The numbers “1”, “2”, and “3” cannot be selected for the first digit of the
passcode.
1
FUNCTION
0
2
Press the keys shown at Iefi. “A.M. SETTINGS” will appear in the display.
m
0*
Press the keys shown at left. “BOX
PASSCODE” will appear in the display.
or
Press “ to enter a passcode, or “2” to
clear a previously programmed
passcode.
3
@
m
4
@
(Example)
5
6
N
2-12
Enter the number of the box for which
you want to program or clear a
passcode by pressing the appropriate
numeric key.
If you are clearing a passcode. go to
Step 6.
Enter a 3-digit passcode by pressing the
number keys.
(Example)
Press the S
then the STOP key.
key and
ensure confidentiali~, passcodes cannot be checked. If you have forgotten a passcode, clear it and program a new one.
INITIAL SETTINGS
ANSWERING
MACHINE SET-UP
Incoming messages (ICMS) are the messages which callers leave for you on the
built-in answering machine. The answering machine is set at the factory to allow
each caller a maximum of 4 minutes to leave a message. If desired, you can
change this setting to 15, 30, or 60 seconds.
1
FUNCTION
o
Press the keys shown at left. “A.M. SETTINGS” will appear in the display.
m
2
Press the keys shown at left. “ICM RECORD TIME” will appear in the display
3
Press a numeric key to select the desired ICM recording time:
m
●
“
1 seconds
l
. “2”: 30 seconds
(Example)
●
“3”: 60 seconds
. “4”: 4 minutes
4
Press the STOP key.
o
@
I
S
2-13
ANSWERING MACHINE SET-UP
If the memory for recording Incoming messages becomes full while you are out, the
answering machine will no longer be able to record messages, The ON A.M.
FAILURE setting is used to choose the response of the machine to [ncomlng calls
when this happens:
Automatic fax reception OFF: The FO-455 will answer after 20 rings. after which
it will wait to receive a remote command, Most caliers will hang up before i~
answers: however. when you call the FO-455 from a remote Iocatlon, you can
wait until it answers, listen to your messages, and tnen erase them (see “Remote
operations” in Chapter 4).
Automatic fax reception ON: The reception mode will switch to FAX mode,
allowing the FO-455 to continue to receive faxes automatically without
broadcasting an OGM on answenng. With this setting, you can still use the
remote commands to Ilsten to your messages and erase the message memorjf
(see “Remote operations” In Chapter 4).
Au~omatlcfax reception is set to OFF at the factory before shlpplng. If you mrantto
change it to ON, press the panel keys as follows:
1
F
o
m
2
Press the keys shown at left, “AM; SET
TINGS” will appear In the display.
Press the keys shown at Iefi. ‘“ONA.M
FAILURE’ WIIIa~~ear Ir the dlspla~,
mm
Press “1” 10turn automatic fax receptlor
“2’ to turn II off
4
~..l 4
@
o
Press the STOP ke)
INITIAL SETTINGS
D
)
RINGING
I
If you subscribe to a distinctive rlnglng services from your telephone com~any, you
WIIIneed to reset OptIon Setting 12 to turn on Dlstlnctlve Rlng[ng function. When
this ISdone, your fax machine WIIIsignal voice calls by the normal rlnglng pattern.
and fax transmissions by a special ringing pattern. In the case of a fax transmlsslon,
your fax machine will automatically answer the call after 2 rings and receive [he fax
To reset Option Setting 12 see Chapter 8.
Factory set to ‘NO” If set to “{ES” both Austral!a (Distinctive Ring ‘) and New
Zealand (Fax ,~bilt; ~ :i!p~oflea
I
●
The ~
,
f
S
‘
T’uncrlon
y
f
O
c
U
s
:
1
d d
O
s
;2
(
on a normal line. as !he fax machine ItiI1/not zperate ,pro~erly.
,4utomat/c!C3XPbone
:he
fax
,~ach;fle !vIII::ot aperzte
Cl+angeover(Option Ser?ing81.~f;V’ctico,
pro,perlay
a ,/ :
1
/
D
F
o
,
t
Press the Keysshown at left. ‘OPTION
SETTING” will ap~ear In the dispiav,
m
3
o
(Example)
4
Press “1” (ON) to have i~ourfax signal
voice calls and fax transmissions by different ringing patterns. Press “2” ?0turn
the function off.
Press [he STOP key
INITIAL SETTINGS
2-15
S
N
F
A
D
Automatic dialling ISa quick and convenient way of dialling which ISperformed by
DIAL key
either pressing a Rapid Key (Rapid Key Dialling). or pressing the S
and entering a 2-digit number (Speed Dialling). It can be used for both fax transmissions and voice calls.
To use automatic dialling. you must first store the full number in your fax and assign
a 2-digit Speed Dial number to it. You can also enter a name which appears in the
display when the number is dialled. Up to 50 numbers can be stored.
Speed Dial numbers from “01” to “20” can be used for both Rapid Key Dlalllng
and Speed Dialling; Speed Dial numbers from “21” to “50” can only be used for
Speed Dialling.
To allow easy identification of the Rapid Keys, attach each strip of Rapid Key
labels above the appropriate row of Rapid Keys. The arrangement of the keys IS
shown in “Operation Panel” at the beginning of this chapter.
C
You may need to add a pause between cetiain digits in the number to allow time
telephone system that requires
for connection. For example, if you are on a P
an access number to be dialled (such as “9”) to access an outside line. you will
need to enter a pause between the access number and the telephone/fax
number of the other party. Pauses are entered by pressing the REDIAL key (2
seconds per pause). If necessary, several pauses can be entered in a row.
To enter letters for names or correct a mistake. see “Entenng letters for names”
in this chapter.
1
‘“’o”’
2
2-16
m
m
m
Press the keys shown at left. “FAXTEL.
# MODE” will appear In the display.
Press “ to select SET.
INITIAL SETTINGS
STORING NUMBERS FOR AUTOMATIC DIALING
3
Enter a 2-digit number (from “01” to
“50”) by pressing the number keys. This
will be the Speed Dial number.
(Example)
4
~
@
~
~
@
@
‘~
Enter the fax or voice number by pressing the number keys (max. of 32 digits :neluding pauses).
(Example)
5
Press the START key,
6
Enter the name of the location or party
by pressing number keys as described
in “Entering Letters for Names” in this
chapter (max. of 10 characters). If you
don’t want to enter a name, skip this
step.
@
b b
... @
(Example)
7
Press the S
8
STOP
Step 3 or
o
G
key.
Return to Step 3 to store another number, or press STOP to exit. If the number will be used for Rapid Key Dialling,
you can write the name on the label
above the appropriate Rapid Key.
INITIAL SETTINGS
2-17
STORING NUMBERS FOR AUTOMATIC DIALING
1
FUNCTION
Q
2
3
Press the keys shown at left “~AX’TEL.
# MODE’ WIIIappear In the d[sp[ay.
ma
Press “2” to select CLEAR,
m
a
Enler the Speed Dial number tnai you
want to clear by press[ng the numDer
keys
a
(~xample)
Press the STMT
5
Return to Step 3 to clear another numpress S
e
STOP
o@
Step 3 or
key
T:, maKe~hange~17a number previously stored repeat the storing procecitire SeIec: t~e ~o~e num~eYfo’ whIch you want to rr,ake changes In ste~ 3, and ther
:Oangs !!1snum~eFando t name when the)’ appea; In the u!splay (Steps 4 a~c 6
res~e~tlL/ely~
~ Al
b
k
a
d
n
m
Your fax uses a Iithlum batte~f to keep automatic dlallln~ numbers anc othe~rogrammed data In memory when the power ISturned off
BatteD1power ISconsumed primarily when the power ISturnea OR Viltb the power
kept contlnuousli off, the Ilfe of the batte~’ ISabout S Vears
!t the batle~l fails have your dealer o: service centre replace
replace )/ourself
2-18
INITIAL SETTINGS
DGno: to’ to
V
A
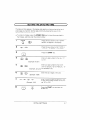
You can adjust the volume of the speaker and ringer tislng the UP and DOWN
keys on the operation panel.
S
The speaker has 5 volume settings: To ddjust the volume of the speaker, first press
the SPEAKER key, and then press the UP or DOWN key ?Ochange :he volume ;O
the aeslred setting. Press the SPEAKER key again to turn the speaker off
R
The ringer has ~ volume settings: HIG~, !VlDDL~, LOW. and OFF, To adjust the
volume of the ringer, press the UP or DOWN key to change Thevolume [o the
desired setting (make sure !he SPEAKER nas not been pressed and the hanaset
ISno~Ilfted), The fax wIIl ring at the new volume level each time you change the
setting. if you select OFF, press the START :(eyto confirm the setting,
S
r
f
r
s
You can also set your fax macnine to receive faxes slien[lv, but ring :0 aier~:Jou:C
vo!ce call. To do so. set the ringer volume to OFF, and turn Option Se[tlng 8 on
(this procedure ISdescribed In Chapter 8). When a voice call comes in. a special
ringer on the fax machine WII1ring. Note that extension telephones will no[ ring,
INITIAL SETTINGS
2-19
VOLUME ADJUSTMENT
Notes
2-20
INITIAL SETTINGS
(
S
)
D
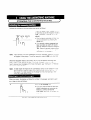
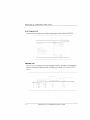
Your fax can transmit most standard office documents. Specific guidelines are as
follows:
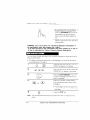
S
a
w
The size and weight of documents which you can load in the document feeder
depend on whether you load one sheet at a time or several sheets at once.
O
sheet at a time:
52 glm2 ~
157 g
m
128mm
210 mm
216
S
s
52 glm2 ~
o
80 g/m2
128
297
210
N
O
216
The area of the document which ISscanned bv the fax IS.sIiqhtlvsmaller
than the actual document size. The scanning width is 210 ;m. ‘and the scanning length is the length of the document minus 8 mm.
r
e
Documents written in yellow, greenish yellow, or light blue Ink cannot be
transmitted, as the scanner does not recognise these colours.
Ink, glue, and correcting fluld on documents must be dry before they are
transmitted.
All clips, staples. and pins must be removed from documents before
transmission. If these are not removed, they may damage the fax.
Documents which are patched, taped, torn, smaller than the minimum size,
carbon backed, or easily smudged should be photocopied, and the copy used for
transmission.
FAX OPERATIONS
3-1
S
D
W
u
t
d
c
‘Thedocument carrlel- gives you a means of sending ceflain documents v~hlch
cannot otherwise be loaded Into the feeder. Use it for the followlng types of
documents
Documents wnlc~ are torn
Documents smaller than the mlnlmum size
Carbon-backed documents (Insert a sheet of white paper between the carbon
back of the document and the document carrier).
Documents which are easily smudged.
Note: /f
document carrjer ISdl~, c/can If LvItha soft cloth mo/s[ef7ec~kltb
~~ater,Make sure I?has a’nedcompietel,vbefore ustng It for tra,~sm!ssloc
3-2
FAX OPERATIONS
S
D
Up to 20 pages can be placed in the feeder at one time. The pages WIIIbe
automatically fed into the fax starting from the page on the bottom.
+ If you need to send or copy more than 20 pages, place the additional pages
gently and carefully In the feeder just before the last page is scanned. Do not try
to force them In, as this may cause double-feeding or jamming.
+ If your document consists of several large or thick pages which must be loaded
one at a time, insert each page into the feeder as the previous page ISbeing
scanned. Insert gently to prevent double-feeding.
1
Adjust the document guide on the right
side of the feeder to the width ot your
document.
2
Place the document face down and push
it gently into the document feeder, The
top edge of the document should enter
the fax first.
. The feeder will draw the leading edge
of the document into the fax. RE,4DY
TO SEND WIIIappear in the display,
3
You can now either make resolution
and/or contrast settings as described in
the following section, or dial the other
party as described in the section, “DialIing
and transmission”.
I
If you need to remove the document from the feeder before transmission or copying,
first open the operation panel by pulling the front edge up (grasp It at the “PANEL
RELEASE”ma~). and thenremove the document. If you fry to pull the document out
without opening the operation panel, you may damage the feeder ,rnechan/sm,
FAX OPERATIONS
3-3
S
D
If you want, you can adjust the resolution and contrast before sending a document.
R
Your fax has 4 resolution settings. If you do not make a setting. the fax will
automatically send the document in STANDARD resolution.
STANDARD:
Use STANDARD for ordinary documents. This setting
gives you the fastest and most economical transmission.
FINE:
Use FINE for improved reproduction. especially with
documents containing small letters or fine drawings
SUPER FINE:
U SUPER FINE when you need the highest quallty of
reproduction.
HALF TONE:
Use HALF TONE for photographs and illustrations The
onglnal will be reproduced in 64 shades of grey.
N
In order to t
In FINE or SUPER FINE resolution, the recelvlng fax machine must also have that resoiutjon. If It doesn“t,your fax will automatically
step down to the next best availabie setting.
C
The contrast ISnormally set to AUTO, which means that the fax automatrcaliy
controls the contrast. but for faint documents you can change the setting to DARK
S
t
N
r
a
c
In order to makes resolutio,vand~orcontras?setting, the documen: must firs:
be Ioadea’In the feeder.
Press the RESOLUTION key one or
more times until the desired resolution
and contrast settings appear In the dls~la~[.
RECEPTION
F
00”
3-4
R
r The first time you move through the
J
o
h
●
Ilst of resolution settings. the contrast
setting AUTO will appear next to each
resolution setting, The second time
you move through the list. the contrast
setting DARK will appear.
FAX OPERATIONS
S
D
Once you have loaded the document and made any desired contras~resolution
settings, you are ready to dial the number of the receiving fax machine and transmit
the document. There are several ways of dialllng, and you can select the one which
~est suits your needs.
N
D
with Normal Dialling,
pick up the handset (or press the S
k a
dial as you would to make a telephone call. If the receiving machine is set to
receive faxes manually (this means that the recelvlng party first answers your call
vocalIy, and then presses their Start key to begin fax reception), you can talk with
them before sending the fax.
Pick up the handset or press the
SPEAKER key. Listen for the dial tone.
1
$
2
?
or
sp~
Dial the number of the receiving machine by pressing the numenc keys.
m-..,
@am
~mm
@(
)@
h
3
o -J
-.
.---
P
-—.Beep
Wait for the connection. Depending on
the setting of the receiving machine, you
will either hear a facsimile reception tone
or the other person will answer.
●
If the other party answers, ask them to
press thetr Start key (if you pressed
the SPEAKER key, pick up the handset to speak with them). This causes
the recelvlng machine to Issue a reception tone.
FAX OPERATIONS
3-5
SENDING DOCUMENTS
4
When you hear the reception tone, press
the START key. Replace the handset if
you used it.
. When transmission IScompleted, the
fax will beep.
D
K
D
If you do not need to talk with the other party before sending the fax, you can Just
dial: it isn’t necessary to pick up the handset or press the SPEAKER key.
Direct Keypad Dialling ISa form of automatic dialllng, so if you need to insert a
pause between any digits of the number, press the REDIAL key. (For more
Information on pauses, see “Storing Numbers for Automatic Dlalllng” In Chapter
2.)
1
2
Enter the number of the receiving machine by pressing the numeric keys,
~-~si
,,,~,,!:c
r
\
o
o
h
3-6
Check the display. If the number of the
recelvlng machine shown IScorrect,
press the START key.
●
If it is not correct. press the STOP key’
to backspace and clear one digit at a
time, and then re-enter the correct
digit(s).
FAX OPERATIONS
S
R
K
D
D
If the number you want to dial has been stored as a Rapid Key number (see
“storing Numbers for Automatic Diailing” In Chapter 2), you can dial it by pressing
the appropriate Rapid Key.
Press the appropriate Rapid Key.
,01
~~
06
.o~
‘
=
I
02
o
03
,04
,05
08
,09
10
“n’
i
●
~
I m’ ‘
Example: To dial Speed
Dial number “02”, press
Rapid Key 02.
S
The name of the recelvlng party WIIIappear in the display. If no name was
stored. the fax number Willappear (If
the name or number ISIncorrect, press
the STOP key.)
The document will be automatically
transmitted once the connection IS
made.
D
If the number you want to dial has been stored as a Speed Dial number, you can
dial it by pressing the SPEED DIAL key and then entering the 2-digit number (see
“Storing Numbers for Automatic Dialling” in Chapter 2).
1
CDCCn 111Af
n@@
) ,5
~
) @ @
-,. ~
2
-32$,~i!~c,
6
mo
Press the SPEED DIAL key and then
enter the two digits of the Speed Dlat
number by pressing the number keys.
. To enter numbers 1 through 9, fIrst enter Oand then the number.
Check the display, If the name or number shown IScorrect, press the START
key. (If not, press the STOP key and
then repeat Step 1.)
k
FAX OPERATIONS
3-7
SENDING DOCUMENTS
U
t
H
k
If you don’t remember the Rapid Key or Speed Dial number In which you have
stored a particular fax number, you can search for the number by followlng the
steps below. Once you have found the number, you can dial it and transmit the
loaded document by simply pressing the START key.
1
HOLD/SEARCH
/-’
)
o
Press the HOLD/SEARCH key.
h
2
Enter the first letter of the stored name
by pressing the appropriate number Kc\’
(the key which corresponds to the required letter) one or more times until the
letter appears In the display. If the name
begins with a special character or number, press “
If you don”t remember the flrst letter.
go to Step 3 (you will scroll through
the Ilst from the beglnnlng),
●
●
P
3
17
\
J
o
n
t “ k
or the ‘*“ key to scroll
through the names ~numbers )
pressed “O”), Stop when the ueslred
name appears in the display.
●
3
If a name wasn’t stored for the number, press “O’ This will cause numbers, not names, to appear when you
scroll.
If no names have been stored that begin with the entered letter, you will
scroll from the next name, [n alphabetical order, In the list. If no names,/numbers have been stored at all, NO
DATA will appear,
FAX OPERATIONS
S
4
,.,
i o
7
G
D
Press the S
key. The document
will be automatically transmitted once
the connection ts made.
k
A
r
If you use automatic dialling (including Direct Keypad Dialllng) and the line ISbusy.
your fax will automatically redial the number. Up to 2 redialling attemp~swill be
made at intewals of 5 minutes.
+ To stop automatic reciialling, press the STOP key.
U
t
R
k
You can press the REDIAL key to reaial the last number dialled. To send a
document. proceed from Step 3 of Normal Dialling. Note that the speaker !vII1be
automatlcallv activated, so you do not need to pick up the handset Immedlatel\/.
FAX OPERATIONS
3.9
R
)
D
When the reception mode is set to FAX (press the F?ECEPTION MODE key until
“FAX” appears in the display). your fax automatically answers all calls on 2 rings
and receives the incoming documents.
You can change the number of rings on which the fax answers Incoming calls by
changing OptIon Setting 2 (see Chapter 8. “Optional Settings”). Any number from
“2” to “4” can be selected.
+ If you pick up the handset before your fax answers, you can talk to the other
party and/or receive a document as described below In “Using TEL mode”, For
example, with the fax set to answer on 4 rings, you can receive both voice calls
and fax messages in FAX mode by answering before the fourth ring. but still
have the fax answer calls automatically at times when you are unable to respond
personally.
N
If you are using dtstlnctive ringing, your fax will answer incoming calls after
two rings regardless of the setting of Option Setting 2.
When the reception mode is set to TEL (press the RECEPTION MODE key until
“TEL” appears In the display). you must answer all calls (Including fax transmlsslons) using the fax’s handset or an extension phone connected to the same Ilne,
R
f
t
F
n
When your fax rings, pick up the handset,
{;
. If vou hear a fax tone, wait until RECEIVING appears in the d!splay, and
then replace the handset.
‘Q
L~
●
*
k
N
3-10
If the other party first talks to you and
then wants to send a fax, press the
START key after speaking Replace
the handset.
If you have set Opt/on Sett/ng 8 to “OFF’ and you hear a fax tone Whenyou
kc}’ to begin reception
pick up the handset, you must press the S
FAX OPERATIONS
R
R
f
e
D
p
If the other party first talks to
and then wants to send a document, press “5”
“x” and “x” if you are on a tone dial phone. If you are on a pulse dial phone. set
the handset down (do not hang up), walk over to the fax, pick up the handset, and
press the START key.
N
Your fax WIIInot accept the signal to begin reception (’5
document ISloaded In Its feeder.
“+”. and ‘*”) If a
C
/f you have set Option Sett/ng 8 to “ON” and heara fax tone when you answer
the extension phone, you must press “5” “*”. and “* !fyou are on a tone dlai
key If
phone, or walk over to the fax, pick up the handset. and press the S
you are on a pulse dial only phone.
The code used to activate fax reception from a tone dial extension phone (“5”.
“*”, and “* can be changed if desired. See Option Setting 4 (J’Tel/’F~xRemote
Number”) in Chapter8, “Optional Settings”.
If you do not Intend to use the code for activating fax reception, you can turn
detection of the code off by resetting Opt/on Setting 5. This WIIIensure that the
fax never m/staken/y attempts to begin reception If It detecfs a s/gna/ wnich It
perceives to be similar to “5”. “+”. and “*” while you are /a/k/rigon an extension
phone.
In New Zealand, not all standard telephones and answering lmachlneswill respond
to incoming ringing when connected to the socket of the equipment.
FAX OPERATIONS
3-11
R~cElvlNG
D
This ISa special function In FAX recept[on mode which allows you to use one Ilne
for both fax and voice communications without having to personally answer every
call. When [t ISturned on. your fax will detect whether an Incomtng call ISa voice
call or a fax message. If It ISa voice call (or a manually dialled fax message). your
fax WIIIalert you to answer. If It is an auto-dialled fax message, your fax will automatically start reception.
T
A
F
C
Automatic Fax/Phone Changeover ISturned on by setting OptIon Setting 8 to
for doing this r described In Chapter 8.o“OPtlon Settln9s”
IyESI The p
+ Make sure the reception mode is set to FAX.
H
t
f
o
When a call comes In, your fax will answer II after the number of rings set with Optlon Setting 2, After answering. the fax monitors the Ilne for about 5 seconds to see
it a fax tone ts be]ng sent.
If your fax detects a fax tone. lt will begin reception automatically
l; your fax doesn’1aetect a fax lone, will make a special rlnglng sound [called
pseudo ringing\ for approxlmatelv 15 seconds. alening you to pick up the
handse:
?neiatter case I: vou 00 not K)Ic~:
UFthe nandsei wlthln 15 seconds your fax wilI
Issde a fax tone tc tne otner fax machine. Th)s allows the other Dart}’t~ send a
aocumen~manualIVif tne~’aeslre when you are out The aocument wIi, be receivec
au[omatlcally.
After receiving a document, your fax automatically cuts the fax paper to a Iengtn
sllghtly longer than the onglnal,
3-12
FAX OPERATIONS
c
e
C)PEMWG
mE A
M
Activate the answenng machine before you go out as follows:
R
MODECUNCTION
RESOLUTION
“00
J—
——.—
-
Press the RECEPTION MODE key one
or two times to set the reception mode to
A . “GENERAL OGM PLAY” is d\sRlaved.
.
, Each outgoing message WIIIolay (you
can stop playback by pressing the
STOP key).
If no general outgoing message has
been recorded, an alarm WIIIsounc
and the reception mode will change to
TEL. Record a general outgoing message as described in ‘Answering Machine Set-up” [n Chapter 2.
N
If the memory ISfull from messages ,~revtouslyrecoroed. ~klEMQ,~Y1S,CULL
will appear [n the dlsplav. To set ihe receptlcn mode [o ANS. vou must tirs:
erase the m
When the reception mode ISset to AfdS, the FO-455 WIIIanswer incoming calls
after 2 rings If it has received at least 1 incoming message. or after -1,-ingsif it
hasn’t received any messages. (For more information. see ‘Toll Saver” in ~emote
Operations” In this chapter.)
Note: In ANS mode, the machine IWIIIautomatically switch /o fax receotlon f It detects a period of silence longer than 6 seconds after answering a cail ,~or
this reason, if a caller pauses for this length of time while Ieavlng z message, he or she will be cut off.
When you return, the display WIIIshow the number of messages recorded In each
box. Listen to them as follows:
1
P
P
A
●
o
h
U
the P
k
If you only want to listen to new messages (messages not previously listened to), continue to hold the
PLAY/SKIP key down for at least two
seconds.
THE ANSWERING
MACHINE
4-1
—
O
T
A
M
2
If you want tOlisten to the messages in a
personal box. enter the number of that
box by pressing the appropriate number
key.
m
(Example)
3
If the box (general or personal) has a
passcode, enter the passcode by pressing the appropriate number keys.
(Example)
4
The messages will play
●
As each message plays, the date and
time of recording will appear briefly in
the display. If no messages were received. NO MESSAGES will appear.
To listen to a message a second time.
press the REPEAT key before playback of that message ends,
RE&AT
o
To move back to the previous message. press the REPEAT key wlthln 3
seconds of the beginning of the current message.
To “rewind” gradually. hold the REPEAT key down at least one second
The longer you hold down the kc}’, the
further back you will go,
>
To sk[p forward to the next message
press the PLAY/SKIP key.
PLAJISKIP
o
To move forward gradually, hold the
PLAY/SKiP key down at least one
second The longer you nold down the
key, the further forward you WIIIgo,
●
~B PLAY
SLOW
4-2
To Increase playback speed, press
the FAST PLAY key. To decrease
playback speed, press the SLOW
PLAY key
USING THE ANSWERING
M
OPERATING THE ANSWERING
N
MACHINE
Playback wlil s
r
a call, lift the handset, press the STOP kev.
or open the paper compartment cover,
It is important to erase received messages after you listen to them to ensure that
the memory does not become full. This is done as follows:
●
Erasing general messages: To erase
all messages In the General Box,
press and hold down the DELETE key
for at least 2 seconds, If the General
Box has a passcode. press the DELETE key and then enter the
passcode.
●
Erasing personal messages: To
erase all messages in a personal box,
press the DELETE key (do not hold it
down), enter the number of the box,
and then enter Its passcode (if It has
one).
●
Erasing a single message: To erase
only a single message, press the DELETE key while the message ISbeing
played.
key to record telephone conversations and
You can use the R
messages for other users of the FO-455. These WIIIbe recorded in the General
Box, and played back together with any Incoming messages in that box wnen the
PLAY/SKIP key ISpressed.
●
Recording messages: To record a
message, hold down the l?EC/MEMO
key and speak facing the “MIC”mark
on the lower left corner of the machine
at a distance of about 20 to 30 cm.
When you have finished speaking. :eIease the key.
USING THE ANSWERING
MACHINE
4-3
OPERATING THE ANSWERING
MACHINE
●
Recording phone conversations To
record a phone conversation hoic
down the REC/MEMO key during tne
conversation you want to record
When you are flnlshed. release the
key
A beep WIIIsound at every 15 seconds
interval to signify that 2 way recording
IStaking place.
WARNING: Use of this device for monitoring telephone conversation is
not permissible under New Zealand law, unless.
a) At least one party of the conversation has given consent for its use. or
b) Use is authorised for Police or Security Service Applications.
You can check the date and time of your received messages by pressing the panei
keys as shown below.
+ The dates and times are also shown In tne Message List, which can be prlntea
out as described In Chapter 9,
F
1
2
Press the keys shown a?left “A.~ S=TTINGS” will appear In the display
m
o
press
B
m
B
~lRMATION” wili appear In the dls~la}
--...,,:
3
o
4
Press the START/MEMORY key, The
number of messages recorded WIIIap~ear In the display.
@
Press “#’ or”* one or more times to
show the date and time of each of the
messages.
o*
a
at Ief? “lcM ~~N-
s
. The message number will appear first,
and then the aate and time severa! sec-
0@
5
N
r
d
Press the STOP key
?
c
e
t
J
sages
4-4
USING THE ANSWERING
MACHINE
e
the mes-
R
O
You can call the FO-455 from any tone dial telephone and play back your
messages using the remote commands. You can also use these commands to
change the reception mode and other settings.
When you call the FO-455. you must enter the passcode for the box you want to
Ilsten to, or a remote code number if the box does not have a passcoue. One
remote code number can be programmed. and It is used to access anv box I.vmch
does not have a passcocie.~hls prevents unauthorized people from Iistenlng :0
your messages. You can use any 3-digit number as the remote code numoer.
The remote code number has ~een set to ’001” at the factoy. If you wanl IO
change ~t.press [he panel keys as shown below.
1
~UNCTION
0
Press Ihe keys shown at lefi. ~.~fl 3=-TINGS” will appear In the display.
m
2
3
Press the keys shown at left. “REivlOTE
CODE” WIIIappear In the d!splav
@
m
Enter a 3-digit number by pressing the
number keys.
@
(Example)
Press the START/MEMORY key and
then the STOP key.
USING THE ANSWERING
MACHINE
4-5
R
O
When you call the FO-455 to listen to your messages, it will answer after two rings
if it has received at least one message in any of the boxes, or after four rings if it
hasn’t received any messages.
This allows you to save money on telephone charges, particularly if you are calling
long distance. If the machine does not answer after the second ring, you can simply
b
a
s
y
t c
t
c
hang
If you do not want to use the Toll Saver function, you can turn it off by following the
steps below. In this case, the FO-455 will answer after the number of rings set with
O
S
2(
C
8 t r s
f FAX reception mode.
1
FUNCTION
0
Press the keys shown at left. “A.M. SETTINGS” will appear in the display.
a
Press the keys shown at left. “TOLL
SAVER” will appear in the display.
3
Press “ to turn Toll Saver on. or “2” to
turn it off.
(Example)
4
4-6
Press the S
@
o
STOP
U
T
A
M
key.
R
O
Follow the steps below to listen to your messages from a remote Iocatlon. Note that
you can only access one box per call: If you want to access more than one box. you
must make a separate call for each box.
N
1
You can also access the FO-455 for remote operation when the reception
mode is set to FAX. /n this case. call the FO-455. press the “#” key /mediately afier It answers. or during pseudo ring!ng If Automatic Fax/Phone
Changeover IS turned on (before you hear the fax tone in either case). and
then continue from Step 2 below.
m
Call the FO-455 from a touch-tone telephone. When your outgoing message begins, press the “#” key on the telephone.
●
2
m
(Example)
3
You will hear a short beep, and the
outgoing message will stop.
Enter the number of the box you want to
listen to. If you want to listen to the General Box, skip this step.
Enter the box’s passcode, or your remote code number If the box does not
have a passcode. When finished. press
“#” on the telephone.
●
(Example)
You will hear a series of beeps equal
to the number of messages recorded
in the box, or one long beep if four or
more messages have been received.
The machine will then play back the
messages, beeping once at the end of
each message. When all messages
have been played back, you will hear
a long beep.
USING THE ANSWERING
MACHINE
4-7
R
O
. If no messages have been received In
the box, you wil! hear a snort beep
You can either hang up, or perform
any of the operations described in the
followlng section “Other remote operations”.
4
While the messages are playing. you
can do any of the followlng:
Repeat: To Ilsten to a message a second time. press “ and “#’ on the telephone before that message ends To
move back to the previous message,
press “2’ and “#” wlthln the first 3 seconds of the current message.
Skip forward: To skip fomfard to the
next message. press “5” and “#” on
the teiephone.
Stop: To stop playback, press “0’ and
“#’ on the telephone. After this, you
can enter any of the commands described [n the following section, “Other
remote operations”
Play new messages: Tc Ilsten to onl}
your new messages. first stop playback by pressing “O’ and “#”, and then
press “6’ and “#’.
Erase a message: To erase the message you are currently Ilstenlng to,
press “3’ and “#” before It ends.
4-8
USING THE ANSWERING
MACHINE
REMOTE OPERATIONS
5
When you have finished listening to your
messages, you can do any of the following:
~
. Erase all messages: To erase all of
the messages in the box, press “3”.
“3”, and “#”.
. Repeat playback: To listen to your
messages aga]n, press ‘7” ana ‘ #“.
●
●
Perform other operations: You can
enter any of the commands descrlbea
in the followlng secllon. ‘other remote
operations”.
Hang up: If you do not erase !/our
messages first. they will be savea anc
any new messages will be recorded aiter them. In order to make the FO-~55
release the Iine immediatelv prior to
hanging up (necessary pafl]cularly aurlng the transfer function), press “+”
twice before hang[ng up.
C
.
●
When a remote command ISaccepted by the machine, you WIIIhear one beep. If
an incorrect command ISentered, you will hear four beeps. In the !atter case.
re-enter the correct command.
When entering a command, do not pause longer than 10 seconds between each
digjt. If you do. a 4-beep error signal will be issued and the dlglts entered up !O
that point will be disregarded. In this case. re-enter the command from the
beginning.
. If you make two errors (cause two 4-beep signals to be issued) ‘whileenferlng
your remote code number, the line will be disconnected. This prevents
unauthorized people from attempting to guess your remote code number.
* If you pause
longer than 60 seconds before entenng a command. you WIIIbe
disconnected.
USING THE ANSWERING
MACHINE
4-9
REMOTE OPERATIONS
After Iistenlng to your messages. you can do any of the operations described below
by press!ng the appropriate keys on the telephone.
N
The following commands cannot be entered wh//e messages are being
played back. If you do not want to wait until playback ends to entera command, first stop playback by pressing “O”and “#, and then enter the command.
C
t
f
r
m
Select a new reception mode b)’ pressing the keys as follows:
c ANS mode: “8’, “
●
(Example)
and “#”.
FAX mode: “8’. “2”, and “#’.
. TEL mode: “8”. “3”, and “#”
R
an
N
A
o
b
o
m
m
o
r
o
r
p
s
1
press “4’ and “*’ on the telephone,
2
When you hear a short beep. SpeakInto
the telephone to record the new message.
. The message (Includlng the general
outgoing messagej can be up to 15
seconds long. Afier 15 seconds (or
earner if the machine detects silence
after you flnlsh speaking), you will
hea: a beep. and the new message
will be played back
4-10
USING THE ANSWERING
MACHINE
REMOTE OPERATIONS
T
t
T
o
f
(The Transfer function ISdescr[bed In the following section, “Other functions”.)
To turn Transfer on: Press “9”. “ and
“f#”, followed by the number of the box
(“O” for the General Box) and “~”.
@@@
mm
To turn Transfer off: Press “9”, “2”, and
“#” on the telephone.
(Exampie~
C
t
t
t
n
Press “9”. ‘f)” and “#” on the telephone
1
~
2
After you hear a short beep. enter the
●
(Example)
R
an
t
To Insert a pause between any two
digits of the number, press ‘*”.
m
‘
Press ‘9”, “3”, and “#” on the telephone
2
near a short beep. speak Into
\
the ~elephoneto record the new message.
. The time for the transfer message
fixed at 15 seconds. After 15 seconds
(or earlier [f the machine detects silence after you finish speaking), you
will hear a beep, and the new message will be played back automatically
U
T
A
M
1
REMOTE OPERATIONS
R
a “
You can leave a “memo” for yoursell or other users of the machine. It will be
recorded in the General Box, ana played back wnen messages In that box are
Ilstened to.
1
Press “w” and “#” on the telephone.
2
When you hear a short beep. speak Into
the telephone to record the memo.
3
When you are finished, press “0” and “#’
. If the FO-455 detects a certain period
of silence. lt will stop recording automatically.
4
USING THE ANSWERING
M
-
(
O
F
The Transfer function is used to make the FO-455 automatlcal[v call you at a
specified number every time it receives an Incoming message in a selected box.
This lets you hear your messages Immediately after they come In. even when you
are at a remote location.
a
your recorded message telllng VOU
t
that the call is a transfer call. Enter “#”. the box number, the box’s passcode (or
your remote code number if the box has no passccde). and “#” The CG-J53 JVIII
then play back your messages. You can also perform any of the remcte o~erations
described in the previous section.
N
When you hang up after a :rat?stercall. /he FO-455 !vIIInot immediale’~~‘e/ease the //ne. /fyou need to accept calls immediate/v after a transfer caI/.
enfer “*” ~lce before hanging up to free the Ilne (If you want to hang IJpduling message playback. first enter”0” and ‘%”to stop p/ayback. then enter
“*” twice).
P
t
t
n
r
To use the Transfer function. you must first give the FO-455 the number IOcall (the
transfer number). This is done by pressing the panel keys as follows:
1
F
Press the keys shown at left. ‘A.hl. SETTINGS” WIIIappear In the ais~[a!~.
a
0
2
mmm
m
0@
3
4,=
Press the keys shown at left. ‘?~ANSFE~ # ENTRY” WIIIappear in the dispia!~
mm
press
theS
-,,~!,2
la
,=
@
@
a
@
(Example)
~
~
Enter a transfer number ~max.~f 22 ~IgIts ;ncluding pauses) by presslng the
number keys.
Press the START/MEMORY <eyan~
‘her?the STOP ke:j.
USING THE ANSWERING
MACHINE
4-13
O
F
N
If needed. you can change the transfer number from a remote location. See
“Other remote operations” In the previous section “Remote operations”
R
t
t
m
The transfer message plays when you answer the telephone. and Informs you tnat
the call is a transfer call. It can be up to 15 seconas long. To record a transfer
message, follow the steps described In “Recording an outgoing message” In
“Answenng Machine Set-up” in Chapter 2. The followlng ISan example:
“i-lello. This ISa transfer call for (YOUR NAME). Enter your remote code number
n~w ‘i
N
T
needed. you can record the transfer message from a remote /ocatlon. See
“Other remote operations” In the prevjous section. “Remote operations”.
t
1
T
f
a
keys shown at Ieh. “A.V, SETTINGS’ will appear [n the dlspla~’.
F
2
@
Press the Keyssnown at Iefi. “
@
@
@
@
~
~
F
FUNC’ WIIIappear In tne dlspla)
to tu
m
tne Transfe~funcllo~
on, or “2” to Iurn it off. (If vou pressea
“2” go tc Step 5.)
4
m
(Example]
5
4-14
o@
USING THE A
Enter tne number of the box for which
you want the Transfer function to operate (for the General Box, enter “0”).
Press the STOP kev
M
OTHER FUNCTIONS
if n
. can turn the Transfer tuncf[on on or off from a remote /Oca[ion, See ‘Other remote operations” ~nthe ,orevloussection. ‘Remote operations” (To turn the transfer funcr[on on or off. the transfer ~umber must be
programmed In the machine first).
N
This funct]on allows selected callers using a tone dial telephone to overrlae the
answering ,ma.chinesoutgoing message and make a special ringer on the FO-455
~lng, alefl[ng you :~at they are calling. Th]s ISuseful when you are near the macnIne
but only want to {alk with certain callers. taking all other calls on [he answering
machine.
P
t
o
c
r
To overr]ae the answering machine. your callers must enter a 3-21cjIT
“over~lde
code” from their teiephone. This code has been se{ :0 009 at the ~ac!or~ ‘f \/ou
want to change !t, press the panel keys as shown ~elow.
I
m
●
/
sure the override code ISdifferent from the remote coae 11-~n,v,~asscoces
programmed for boxes.
F
1
Press the keys shown at ~eti. A.hl SE–TINGS’i will appear [n the dis~iay.
m
o
2
~
3
~
@
~
@
Press the keys shown at left, ‘OVE~,1.,~o.~wlllappearlnthedspa)
~nler
a3-dlglt code number
the number keys.
~~~
~ress:ng
(Example)
4
@
o
Press the START/MEMORY key and
then the STOP key.
USING THE ANSWERING
MACHINE
4-15
OTHER FUNCTIONS
U
t
f
The proceaure for overrldtng the answering machine ISas follows:
1
Your caller calls the ~0-455 from a tone
dial telephone. When the outgoing message begins. he or she should press the
“#” key on the telephone.
a
. The caller WIIIhear a short beep. and
the outgoing message will stop.
2
The caller should enter the override
code and “#” by pressing the keys on
the telephone.
~
●
(
3
The FO-455 WIIImake a speclai rlnglng
sound PICKup the handset to answer
the cal; (Note that an extension 1ele~hone connected to the same Ilne will
nol ring ,
,-
- --- .
.
,,4..
\
●
/“52
,!
: “’ ,
L
If an Incorrect code is entered, the
caller will hear four beeps. He or she
must re-enter the correct code wlthln
60 seconds or the Ilne will be disconnected.
.-
..
If L1OU
do not answer wlthln 30 secends tne outgoing message wlti plai
aga[n and the caller can then ieav~ a
m~~s~g~
“.
U
T
A
I
Your fax can also be used to make coDles. In pafllcular. ~hlsrunctlon Canbe usea
to make sample copies of documents to De transmitted to see :f the resolution or
contrast needs adjustment.
+ The defauit resolution for ccpvlng ISFINE
Load the aocument(s~face ~c~vn
1
contrast ‘,vlth{he ~ESOLUTION <e!j
2
~
Press the COPY <e!/
COPY
c
d
c
The ‘ax goes nto manual :ecep~lonmode ~unng ccp!jlrg. so f a cal! ;Ci~eS(n a~
this :Ime. pick JO[he nandset 10ans~er
To receive a document. press the START/MEMORY <ey after co~vlng IStinlshec.
C
If \/ou ,Nant~c~egln rece~tlon Immediatelv, ~ress ih~ STOP Kev
and :hen press [he ~TART/MEMOl?Y key as socn as ‘he :ocL]ment ~as fed OL;
I
ana the fax has ~e?urnedto standby moae.
MAKING COPIES
~. -
M
C
Notes
5-2
MAKING COPIES
‘{our fax can be used Ilke a regular Ielepnone to ma~e and receive voice cails,
+ To make or receive a phone call. the power must be on.
1
Pick up the handset or press the
SPEAKER key, Listen for the dial tone
0
S
f
:*
.
{ /7
\’
c
‘r
)
h
2
Dial the number using one of the followfng methods:
3
●
INormaI Dialling: ~nter ~hefull felephone number ‘,fi/iththe numeric keys,
●
Rapid Key Diailing: Press :he appropriate Rapid Kev.
●
Speed Diailing: Press the SPEED
DIAL key, and enter the 2-digit Speed
Dial number with the numeric keys.
Speak with the other party when they answer,
. If you pressed the SPEAKER key.
pick up the handset.
l~hlle [he handset of the
N
n
U
t
d
H
l
c
(
u
h
e
s
w
p
o
c
p
k
‘(OUcan use the HOLD/SEARCH key to search for a Rapid Key or Speed Dial
number. First search for the number as described In “Using ~heHOLD/SEARCH
key” in “Sending Documents” in this chapter, and then pick up [he handset or press
the SPEAKER key. The number WII1be dialled automatically after you do so {do
not press the START/MEMORY key),
MAKING TELEPHONE CALLS
6-1
M
T
C
R
The last number called can Deredialled by pressing tne REDIAL key (tl ISnot
necessa~ to pick up the handset or press the SPEAKER Keyi Whenthe other
Party answers.
up the nandsel.
H
You can put the other part) on nold during a conversation ~~rpressing the
.
HOLD/SEARCil key When this ISdone, the) cannot hear you. You can put the
handset back In the cradle without breaking the connection. When you are readi to
s~eak with them agalc. pick up the handsei If vou dld no~put the handset back In
the cradle. press the HOLD/SEARCti kev one more time
6-2
MAKING TELEPHONE
CALLS
A
(
J
F
The Anti Junk Fax function lets you avoid wasting fax paper ~y preventing reception
of faxes from specified parties.
To use this function, first turn It on by setting Option Setting 1310 ‘YESas described
!n Chapter 8. and then enter the fax numbers from wh!ch you do not want to receive
faxes as shown below.
S
a
c
j
n
C
a
entered in the Anti Junk Number L/s/
s n
To clear a number from the Anti ti’unk Number List. you 1
<now :~fie?-dIgIr
number which identifies It. /f you have forgotien this number. print out ;he Anrl
Junk Number List as described in Chapter 9.
●
1
sno,vn at left ‘STORE
JUNK 4“ will appear in the display.
press
‘“0°’
m
m
2
Press ‘ to store a number n the Ant[
Junk Number List, or ‘2” to clear a ni~,mber from the Ilst.
m
a
3
Storing: Enter a 1-dlglt number from I ‘
to “5”. This number identifies the
fax/voice number you WIIIstore in the
next ste~.
Clearing: Enter‘he number ~,vhichldefltlfies the fax/voice number you ,vant to
clear, and go to Step 5.
m
~Example)
(Example)
5
o
‘-’““‘“
o
6
Step 3 or
the Keys
Pt
START/MEMORY
Key.
Return to Step 3 to enter (or clear) another num~er. or press STOP !Oexit.
0
~
S
F
7 1
POLLING
Polling
allows
you ICI request another fax machine to send a document
to your faX
machine. In other words the recelvlng fax machine. not the transmitting fax machine. activates the transmission. You can use your fax to both poll and be polled
by others.
TOuse the polling function. YOUmust first reset Rapid Key 20~POLLfor use as a
polllng key. This is done by resetting OptIon Setting 14, as described [n Chapter 8.
“Optional Settings”. (Note that when Rapid Key 20jpOLL ISset as a ?ollln9 key. I?
cannot be used for Rapid Key Dialllng.)
Dial the fax machine you want to poll using one of the following methods:
1
SPEED
DIAL
●
Pick up the handset (or press the
SPEAKER key) and dial the full number. Wait for the fax answerback tone
s
Press the SPEED key and enter a 2-
(Example)
dlglt Speed Dial number
●
2
Press Rapid Ke}J20/POLL.
:20/ POLL~
7-2
Enter the full number USlngtne numerlc ke}/s
.
the handset. replace II
when POLLING appears In the dlsplal
Reception WIIIbegin.
SPECIAL FUNCTIONS
P
After polling a fax machine. you can send a document to it on the same connection.
Simply place the document to be sent in the feeder and follow the steps described
above in “Polling others”. When polling is finished, the document will be automatically transmitted.
+ The other fax machine must also have Turnaround Polling capability.
+ Turnaround Polling cannot be performed when a timer transmission operation IS
set.
To let another fax machine poll your fax, simply set the reception mode to FAX. and
load the document(s) to be sent.
Transmission will take place when the other fax machine calls your fax and activates polling. Automatic reception is possible whilst your fax ISon polling standby.
Polling Security allows you to prevent unauthorized polling of your fax. When this
function is turned on, polling will only take place when the fax number of the polling
fax machine has been entered in your fax’s list of permitted fax numbers (called
“passcode numbers”). The number of the polling fax must also be correctly programmed into itself.
T
P
S
a
o
Press the keys shown at left. “ENTRY
MODE” will appear in the display.
1
F
o
m
Press the “#” key 3 times. “SECURITY
SELECT” WIIIappear in the display.
Press “1” to turn polling security on. or
“2” to turn it off.
S
F
7
P
,
Press the START/MEMORY key and
then the STOP key.
S
a
c
f
n
f
p
p
You can store up to 10 fax numbers In your fax”s I[st of permitted numbers.
1
F
Press the keys shown at left. “ENTRY
MODE” will appear In the display,
m
o
key 4 times. “PASSCODE
appear In the display.
3
m
Press “ to store a number. or “2” to
clear a number.
‘r m
4
S
Enter a 2-digit number from
“01” to “1O“.This number identifies the
fax number you will store in the next
step.
Clearing: Enter the number which identifies the fax number you want to clear,
and go to Step 6.
mm
(Examplej
5
~
~
Enter the fax number (max. of 20 dlglts)
@ @ @ @ ~
(Example)
6
-
o
7
Step 4 or
7-4
:
Press the START/MEMORY key.
Return to Step 4 to enter (or clear) another number. or press STOP to exit
o
~
S
F
T
O
The Timer function allows you to set a transmission and/or polling operation to be
performed automatically at a time you specify. One transmission operation and one
polling operation can be set at any one time, and the times they will be performed
can be specified up to 24 hours in advance.
You can use this function, for example, to take advantage of off-peak telephone
rates without having to be there when the operation ISperformed.
N
S
Only a Speed Dial number can be used to dial the receiving machine.
at
1
o
F
Press the keys shown at left. “TIMER
MODE” WIIIappear In the display,
a
o
2
m
0’
Press “#” to set a transmission operation
(SEND MODE), or “w” to set a polling
operation (POLLING MODE).
m
3
Press “1” to select SET,
4
Enter the time at which you want the operation to take place (2 digits for the
hour and 2 digits for the minute).
~
@
~~
(Exampie: 9:25)
5
Press the START/MEMORY key.
S
F
7
T
O
6
Enter the Speed Dial number of the receiving fax machine.
~~
(Example)
: ,: \
7
o
8
Press the S
o
If this is a transmission operation, you
can adjust the resolution and/or contrast
(skip this step if you don’t want to).
RESOLUTION
o
9
l
~-~~’
c
key.
Press the S
key and
then the S
key. If this is a transmission operation, load the document in the
feeder sometime before the specified
time of transmission.
t
o
If you need to cancel an operation after it has been set. follow the steps below.
1
F
o
Press the keys shown at left. “TIMER
MODE” will appear In the display.
a
Press “#” to cancel a transmission operation, or “*” to cancel a polling operation.
3
Press “2” to select CLEAR.
m
Press the START/MEMORY key and
then the STOP key.
7-6
S
F
..
M
-
Your fax has a memory which can be used to temporarily store both incoming and
outgoing documents.
●
Approximately 20 pages of average content can be held in memory when no
voice messages (including outgoing messages) have been recorded. Less can
w
s
u
f
h
r
be held if a p
+ To see t
S
p
m
w
k
t
c
d
o
p
t
T
in the feeder. The percentage WIII
appear in the display.
With this function, the original document is scanned immediately, stored in memory.
and then transmitted once the connection to the receiving machine is made. This is
convenient when transmitting to places where the line is often busy. as it saves you
from waiting to collect the original document and frees the feeder for other
operations.
+ Only one memory transmission can be set at a time.
+ The amount of memory currently occupied appears as a percentage in the
display while the document is being scanned.
Load the document(s).
1
~, #
,~~
2
~
/..
●
.- .-”
~
-,
/ e
Set the resolution and/or contrast if desired.
Press the START/MEMORY key.
>-ART ,,4EbAo4
f
o
.
o
3
Enter the number of the receiving machine using one of the following methods:
. Press a Rapid Key.
. Press the SPEED DIAL key and enter
a Speed Dial number.
. Enter a full telephone number by
pressing the number keys.
(Example)
S
F
7
M
4
Press the START/MEMORY key if you
entered a Speed Dial number or a full
number.
. The document ISfirst scanned and
stored In memory. The other machine
is then dlalled (redlalllng will be performed automatically if necessary).
When the connection is made, transmission begins. Afterwards, the document is cleared from memory and your
fax returns to standby mode.
t
m
b
f
If the memory becomes full while the document ISbeing scanned, MEMORY IS
FULL will appear in the display.
key if you want to transmit the pages which have
Press the S
been stored up to that point in memo~, The remaining pages will be ejected
from the feeder. After transmission. the memory will be cleared and you can
transmit the remaining pages. You will also need to transmit the page which was
being scanned when the memory filled up.
Press the STOP key if you want to cancel the entire transmission.
This is a back-up function which ISautomatically activated if your fax runs out of
paper or the pape”rjams.
When you have received a document [n memory, FAX RX IN MEMORY will appear
in the display, alternating with OUT OF PAPER or PAPER JAMMED. When you
add paper or clear the paper jam. the stored documents will automatically be
printed out.
7-8
SPECIAL FUNCTIONS
A variety of optional settings are available which you can use to fine-tune your fax
to better suit your needs. The settings are made by pressing the panel keys, and
each setting is described in the list below.
Press the keys shown at left. “OPTION
SETTING” will appear In the alsplay.
1
FUNCTION
o
a
2
~
‘r
Move through the list of settings by
pressing “#” to move forward, or ‘w” to
move backward. The settings will appear in the order listed below.
@
3
When the desired setting appears in the
display, change It appropriately as described below.
m
(Example)
4
Press the STOP key.
o
0
Setting 1: FINE RESOLUTION PRIORITY
This sets the default resolution (the resolution used If a setting ISnot made with the
RESOLUTION key) for transmitting documents. Press “ (YES) to set it to FINE. or
“2” (NO) to set it to STANDARD.
●
Factory s
“
Setiing 2: NUMBER OF RINGS TO ANSWER
This sets the number of rings the fax machine waits before answering an incoming
call In FAX reception mode. Enter any number from “2” to “4”
●
Factory setting: “2”
O
S
8
O
S
Setting 3: 4 RINGS MANUAL ANSWER
Press “1” (YES) to have the machine answer a call after 4 rings when it ISin
MANUAL reception mode. Press “2” (NO) to turn the function off.
●
Factory setting: “2”
Setting 4: TEL/FAX REMOTE NUMBER (TRANSFER CODE)
This sets the 1-digit number for activating fax reception from an extension phone.
Enter any number from “O”to “9”.
●
Factory setting: “5”
Setting 5: REMOTE RECEPTION SELECT
This turns detection of the code for activating fax reception from an extension
phone on or off. Press “ to turn detection on. or “2” to turn detection off.
. Factory setting: “1”
Setting 6: TRANSACTION REPORT PRINT SELECT
This sets the condition for printing out Transaction Reports. Enter a number from
“l” to “4” as follows:
“1” (ALWAYS PRINT):
Print out after each transmission. reception, or error.
“2” (ERR,~MR/MEM PRINT): Print out after an error, timer operation, or memory
operation.
“3” (SEND ONLY):
Print out only after a transmission.
“4” (NEVER PRINT):
Never print out.
. Facto~/ setting: “2”
Setting 7: DIAL MODE
This sets the mode of dlalling. Press “ if you are on a tone dial line, or “2” if you
are on a pulse d l
. Factory setting: “
Note: For all units installed in New Zealand, select “1” for tone dlalling. The pulse
setting “2” will not operate correctly and must not be used.
8
O
S
O
S
Setting 8: AUTO FAX/PHONE CHANGEOVER
Press “1” (YES) to have your fax detect whether incoming calls are voice calls or
fax transmissions In automatic reception mode. Press “2” (NO) to turn the function
off.
. Factory setting: “2”
Setting 9: PSEUDO RINGING DURATION
, This sets the duration of pseudo ringing when Automatic Fax/Phone Changeover is
turned on. Enter a number from “ to “2”as follows:
“ (15 SEC.):
15 seconds
“2” (30 SEC.):
30 seconds
●
1
Factory setting: “1”
Setting 10: PAPER SAVE
This reduces the vertical length of documents received, allowing you to save paper.
Enter a number from “1” to “3” as follows (“S” will appear highlighted in the displav
while Paper Save is turned on):
“l” (MODE 1):
Reduce only the white spaces between lines.
“2” (MODE 2):
Reduce the entire document by 50°0 (only when
standard resolution is used).
“3” (NO):
No Paper Save.
. Factory setting: “3”
Setting 11: TIME SAVE
This reduces the vertical length of documents transmitted by 20°0, saving line time
and thereby allowing you to reduce telephone costs. Press “1”to turn the function
on, or “2” to turn it off.(”T” will appear highlighted in the display while Time Save is
turned on):
. Factory setting: “2”
Setting 12: DISTINCTIVE RINGING
This sets the ring pattern to which your fax will answer if you subscribe to a
distinctive ringing service. Enter a number from “l” to 2“ to select a pattern. See
“Distinctive Ringing” in Chapter 2 for more details.
●
Factory setting: “2”
O
1
SE~lNGS
8-3
O
S
JUNK
N
C
Press “1” to prevent reception from fax numbers entered In the Anti Junk Fax List.
Press “2” to allow recepllon from all numbers.
S
●
Factory setting: “2”
POLLING
Press “1” if you want to use Rapid Key 20 as a polllng key. Press “2” if you want to
use it as a regular Rapid Key.
S
. Factory setting: “2”
8-4
OPTIONAL SE~lNGS
You can print out a variety of lists showing settings and Information entered In the
fax. You can also have the fax automatically print out a repoti on transactions after
they are made. Each list and the report ISdescribed below.
1
F
2
a
3
T
o
or
m
Press the keys shown at left. ‘LISTING
MODE”
appear In the display.
o
Press the “#” key or the ‘+” key until the
desired list appears In :he display.
*
Press the START/MEivlORY key.
/
This list shows the timer operations which are currently set.
PRINTING OUT REPORTS AND LISTS
9-1
P
O
T
N
R
A
L
L
This list shows the fax and voice numbers which have been stored for automatic
dialling.
P
L
This list shows settings made for polllng security. your name and faxftelephone
number as entered In the machine. and a sample of the header printed at the top of
every page you transmit (HEADER PRINT).
..
!.
F.
9-2
:
.. -
..
!.
.- -
.
...
,
PRINTING OUT REPORTS A
L
<,
P
O
S
O
R
A
L
L
This list shows the current status of the optional settings. The bottom part of the list
shows the status of the settings made for answering machine connection.
A
J
N
L
This list shows the fax numbers from which
is not allowed.
PRINTING OUT REPORTS AND L
P
A
O
P
R
A
L
L
This list shows the settings and codes programmed for the answenng machine.
M
L
This Ilst shows information about the messages currently recorded In the answenng
machine. Includlng the date and time of recording, the length. and the type (ICM or
memo)
9-4
PRINTING O
R
A
L
PRINTING OUT REPORTS AND L
This report is printed out automatically after an operation IScompleted to allow you
to print out the report only when an
to check the result. Your fax is set at the f
error occurs, or after a timer or memory operation. If desired, you can change the
setting to have It printed out under a variety of other conditions. This ISdone by
changing Option Setting 6 as described In Chapter 8.
+ The report cannot be prlnteci out manually.
E
h
x
SENDER/
RECEIVER
The fax number of the other machine Involved in the transaction. In the
case of a transmission. the number dialled appears. In the case of a
reception, the programmed ID of the sending machine appears. If this
machine does not have an ID function. the communication mode WIII
appear (for example. “G3”).
PAGES
Number of pages transmitted or received
NOTE
- Transmission/reception was normal.
P.FAIL - A power failure occurred.
JAM - A problem with the fax paper or document occurred.
NO PAPER - You ran out of fax paper during reception
COM.E-Oto COM.E-7 - A telephone line error preventedthe transaction.
Explanations of the error numbers are given In the following tables.
however, these are primarily for use by sewice engineers. In general.
you will want to simply try the transaction again. If necessary,check with
the other party to make sure their machine is functioning properly.
CANCEL - Transmission was cancelled because the STOP key was
pressed, no document was in the feeder, or the other machine
requested transmission using a function which your fax does not have,
PRINTING OUT REPORTS AND LISTS
9-5
P
O
R
T
A
L
e
1
E-O I Ableto recognise
handshakesignal.but It haserrors
, E-1 ~ Cannotrecognisethe handshakesignalfromthe receiverside
I
d
transmission
E-2 ‘ L d
, E-3 ! L
d
a
L
d
d
E-4
E-6 ; C
I E-7
E-1
f
m
t
h
s
s
n
‘d
p
r
s
s
r
t
s
e
1
~A
L
r
h
d
s
d
r
h
~ E-3 , C
r
l
I
I C
i E-4
I c
r
m
; E-5
~
\ E-7
r
No r
e
r
, E-2 ,~ C
9
s
~ No response from r
R
E
r
m
s
f
h
s
t
f
s
t
s
h
s
n
p
f
t
h
s
n
~
f
n
s
c
f
P
t
“
O
ISreceivedal recelve~side
s
R
rs
A
L
I
Clean the printing head frequently to ensure optimum printing performance. To
clean the head, first disconnect the telephone line then unplug the power lead. open
the paper compartment cover (grasp the finger hold on the right side of the cover
and pull up), and remove the fax paper.
Prlntlng head
‘wipe the pr!ntlng heaa with a soft cloth
dampened with dena[ured alcohol.
C
benzene or [hInner. Avo\d touching the head with ;Iara objects
●
h
●
d
t
y
c
m
a
j
h
MAINTENANCE
r
c
p
al
c
n
10-1
MAINTENANCE
Clean the reading glass and rollers frequently to ensure the quality of transmitted
Images and copies Open the operation panel by pulling the front edge up (gras~ It
at the “PANEL REMASE” mark), and clean them as shown below
W
r
9~ass while t)ackp[ate
and rollers with a soft cloth.
M
sure tnat all dirt and stains (such
as those of correcting fluid} are removed as these will cause vertical
lines on transmitted Images and copies.
Document
W
r
b
I
R
W
e
a
p
s
m
w
a dr~ cloth
Caution!
*
not
u
b
o: fhlnne’ These so/\/enfs maif d
m
10-2
MAINTENANCE
or discolour ff?e
PROBLEMS AND SOLUTIONS
(
1
Problem
~othlng aopears In the dlsplay
C
●
r
Make sure the power cord is properly ~luggea
Into a power outlet.
I
I
The fax does not respond
when you press any of Its
keys,
Automatic document feedIng does not work for transmlsslon or copying,
ISlalling cannot be performed.
.
Connect another electrical appllance to the outlet ~
to confirm that It has power,
‘ .
If a beep sound ISnot made when you press the ~
~
keys. unplug the power cord and then plug
back in several seconds later,
—-Check the size and we[ght of the documen~Isee ~
“Transmltta~\e documents In ;hapter ~~
●
.
●
Nothing ISprinted at the recelvlng end.
Make sure the oower cord !s proper!v oluggec
Into a power ou~let.
;
Make sure ~hatthe telephone Ilne !s pro~er!>
ana :he I
connected to both ~heTEL. LINE
wall socket.
.
Make sure that the fax is set to the correc:
dialling mode for your telephone Ilne, See Option ~
Setting 7 C
.
Make sure that the document for transmission IS ~
1
placed face down In the feeder.
I
●
Make sure that the fax paper is properly loaded
at the recelvlng machine.
TROUBLESHOOTING
11-1
~
I
PROBLEMS AND SOLUTIONS
Thepowerlson. butno
transmission takes place.
;
●
Make sure that the recelvlng machine has fax
paper.
.
Make sure that the telephone line cord is
plugged Into the “TEL. LINE’ socket. ana not the
“TEL.SET” socket
.
If the receiving machine ts In manual mode with
no attendant. reception will not be possible.
.
If the receiving machine ISnot a Sharp model.
make sure it ISG3 compatible.
●
Check the display for error messages.
.
Pick up the handset and check for a dial tone.
Call the recelvlng machine by nomal (manual)
dlalling. and confirm Its response.
.
Noise on the telephone I!ne may cause
distortion. Try send[ng the document again.
.
Make a copy of the document on your fax If the
copy ISalso distorted. your fax may have a
problem. If the problem persists. call for service
.
Make sure that the telephone I[ne cord IS
plugged Into the “TEL. LINE”
and
the “TEL.SET” socket.
The fax pa~er
does no?
,!
come out.
.
The fax paper ma~;be lammed See “~learlng
jammed fax paper’ In this chapler
The fax paper comes out
~lank wnen \/oti Inl to re-
.
Make sure that the fax paper ISproperl~’loaded
in your fax (If the roll has been loaded upside
down. nothing will be printed.~
A dlstorteu Image ISreceived at tne other end.
The power ISon but no reCeptlontakes Place.
ceive or co?)’a document
Q For reception. make sure tna?the document for
transmission ISloaded face down in the feeder
of the transmitting machine
The received document IS
faint.
●
.
Make sure that you are using the recommended
fax paper. See “Loading tne Fax Paper” In
Chapter 1.
Ask tne other party to send h!gher contrast
documents If the contrast ISstill loo low your
fax may have a problem. Make a cop} to check
—
11-2
TROUBLESHOOTING
P
A
S
I
Received Images are distorted.
.
I
Noise on the telephone line may cause
distortion. Have the other party try sending the
document again.
The printing head may be dirty. See “Fax
printing head” in Chapter 10.
10
I
I
.
Make a copy of another document on your fax. If
the copy is also distorted, your fax may have a
problem. If the problem persists. call for service.
~.
Make sure that you are using the recommended
fax paper. See “Loading the Fax Paper’ In
Chapter 1.
Copies are distorted.
.
Make sure that the fax paper ISproperly loaded
in your machine.
I . The printing head may be dirty. See “Fax
printing head” in Chapter 10.
1
I
●
Reception~copylngISInterrupted.
No reception occurs when
polling is attempted.
;
I
~
I
Bell Tinkle
(New Zealand)
I
●
reception or copying has been done
continuously for a long time, the printing head
may have become overheated. Turn off the
power and let it cool down.
Make sure you have not run out of fax paper.
.
Make sure the transmitting machine is [n
automatic reception mode.
.
If the transmitting machine has polling security,
make sure that your fax number has been
entered both In your fax and in the ~ransmlttlng
machine.
●
The operation of this equipment on the same
line as the telephone or other equipment with
audible warning devices or automatic ring
detectors will give rise to bell tinkle or noise and
may cause false tripping of the ring detector
Should such a problem occur,contact your
Sharp authorised Setvlce Centre for information.
TROUBLESHOOTING
11-3
(
I
AND S
I
D
J
F
M
L
d
“
~
1
FUNCTION
O
H
P
J
R
I
I
i
I w
p
h
t
w I
V
m
w
t
P
transmissionat this
u
the extenslo~
c
c
m
r
p
a
SPEAKER
b
p
d
h
o
o
p
O
c
j
f
j
s
p
Ad
~t
P
1
~N
a
p
b
c
I
S
s
a
ISb
h
p
I
I
~“
pressSTOP
t
c
f
c
S
p
r
I
D
f
b
m
e
~
I
I t
I
~p
~ d
H
j
J
P
c
P
1
o
I T
E
L
T
~
~s
l
b
p
w
I
t
TROUBLESHOOTING
c
r
c
1
b
M
A
S
I
C
t
I
t
I
3s
I
I
5s
s
1s
b
! I
1t
~c
o
s
R
i
t
(
s
0.3 s
T
on.
o
I
r
I I
t
; c
I
I I
i
h
t
n
r
n
n
1
R
C
P
J
If a document doesn’t feed properly during transmission or copying, or DOCUMENT
key. If the
JAMMED appears in the display, first try pressing the S
document doesn’t feed out, open the operation panei (grasp the front edge at the
“
R
mark and pull up) and pull it out gently.
1
Open the paper compartment cover
(grasp the finger hold on the right side of
the cover and pull up). and remove the
paper roll.
●
2
Cut off the wrinkled pafl of the paper.
●
3
Caution! Do not touch the metal strip
In the compartment. It may be hot if a
document has just been printed.
If any pieces of paper are stuck In the
cutter. remove them with caution.
Reload the paper.
. Jammed fax paper ISoften caused by
Improper loading. Be sure to carefully
follow the Instructions for paper loading given In “Loading the Fax Paper”
In Chapter 1.
N
11-6
are finding it difficult to reload the recording paper, the cutter may still
be engaged In the cutting position Make sure that no pieces of recording paper are stuck In the cutter assemb/y. ciose the operation panel, press the
START~EMORY
and re-open /1,This wi// reset the cutter assembly, a/Iow\ngyou to reload the recording paper.
TROUBLESHOOTING
Applicable telephone line:
Public switched telephone network i PBX
Compatibility:
ITU-T (CCITT) G3 mode
Configuration:
Half-duplex, desktop transceiver
Compression scheme:
Modified Huffman and Sharp special mode
Scanning method:
Flat-bed, solid-state CCD
Resolution:
Horizontal:
8 lines/mm
Vertical:
Standard — 3.85 lines/mm
Fine /Halftone 7.7 lines/mm
Super fine — 15.4 lines/mm
Recording system:
Thermal recording
Display:
7 x 5 dots, 1 line by 16-digit display
Automatic cutter:
Standard
Reception modes:
ANS/TEUFAX
Modem speed:
9600 bps with automatic fallback to 7200, 4800, or 2400
bps
Transmission time*:
Approx. 15 seconds (Sharp special mode)
Effective recording width:
210 mm max.
Input document size:
Automatic feeding:
Width —21 Gmm
Length — 128 to 297 mm
Manual feeding:
Width —21 Gmm
Length — 128 to 1000 mm
Effective scanning width:
210 mm max.
A
d
H
(
C
c
f
sheets max.
s
64 levels
Automatic/Dark selectable
Copy f
T
f
*B
I
T
S
(
S
(
C
s
r
u
r
p
S
f
s
mode.
excluding time for protocol signals (i.e., ITU-T phase C time only).
S
S
P
O
S
Power requirements:
230-240 V AC, 50
Operating temperature:
5 to 35’C
Power consumption:
Stand-by: 9.0 W
Maximum: 120 W
Dimensions:
Width: 352 mm
Depth: 294 mm
Height: 130 mm
Weight:
Approx. 3.55 kg
Message recording time:
Approximately 11 minutes (with no documents in memory).
Document capacity in memory:
Approximately 20 pages (with no voice messages In
memory).
-
Hz
As a part of our policy of continuous improvement, SHARP reserves the ngh?
to make design and specification changes for product improvement without
prior notice. The performance specification figures Indicated are nominal
values of production units. There may be some deviations from these values
in individual units,
Spec-2
S
]
. -— -- - -.
N
Steps which are optional are enclosed in a dotted frame.
T
d
Normal Dialling
r
~~Oa~
,document +
~-~~~,j~-~~
; O
L -
1 +
-
press SPEAKER
–d
.-.,,~,-
+
receQtiontone
. . - —. - - .=
~L
~Uocumenl
II
8ESOLUT,0N
o
+
:
. . . . . . . .4
. . - . - _. .7
.
‘Load
-
-
-
-
-
-
-
.
.
-
Hangup
,. ,
Dial (press
numenc keys)
+
“0’”1’0” ~
L – -
Dialling
-
Dial ipress
numenc ke~s)
+
f
Rapid Key Dialling ~~~~~m~n~
~
S
-
Waltfor
1
Direct Keypad
Dialling
– -
Lifthan~,set
o@
+
[;SS Rapid
. .
.<,4.
Enter Speed Dial
-.
2ESOLUTION
+ ‘~ i
L___—
—
--J o + ;;::::{F:;:;2
document +
~
+
o;
..-
RESOLUTION
Load
,document
L!.,,
;
R
M
I
v
+-0
O
--- -j +
+
:~s~j~~ntOne +
0:
0
c
] F
Recording
an outgoing
m
j
+
Erasing received
message
;
~
2
3
T
P
R
s
Box 1
I
Listeningto
“O:G
~ a
i @
r
m
Press a numeric key
to select a box,
o
the
f
‘MIC”mark on
l
l
~
~~~~~~~~ea
c
m
o
m
>/m
+
~ “
b
n
ap
e
+
E
fn
D
~General messages
~(no passcode),
General messages
(passcode needed)
~HolddownDELETE
; key for 2 seconds
PressDELETEand
boxnumberanoenter
enter passcode
passcode If necessary
Q
R
G
Personal messages
Press DELETEenter
Q
~
Q
R
G
k
F
m
The following chart shows the layout of the functions and settings accessed by
pressing the FUNCTION key. First press the FUNCTION key, the appropriate
numeric key as shown. and then “#” or “M” until the desired setting appears.
Instructions for making each setting appear in the display. If you have any difficulty
refer to the detailed instructions on the page shown below the setting.
F
?
A
M
Timer Mode
M
S
R
m
4
t
o*
T
(
T
M
(7-5)
(
P
(
S
R
T
L
M
L
T
)
(
L
O
(
(
N
P
S
(
L
(9-3)
R
(
C
Num-
J
berLIS!(9-3)
O
(
C
T
(
N
A
P
(
M
L
MessageLlst(9-4)
TransferOn~Off
(4-14)
C
(
F
(
Passcode
(2-12)
Q
Listing Mode
Q
R
G
Q
Entry Mode
Optional Settings
F
F
o
R
(
N
A
M
R
(
M
a
N
D
A
(
N
N
(
P
S
P
b
P
T
(
J
(
(7-
R
(
(
D
(
J
R
c
P
(
R
S
D
M
Q
(
S
(
T
P
P
D
)
S
G
(
R
S
A
c
P
T
R
N
N
D
S
N
4
(
S
(
P
R
R
(
(
P
(
R
(
R
G
Q
A
F
A.M. Program List. 9-4
AMS reception mode, 2-8. 4-1
Anti Junk Fax (Anti Junk Number). 7-I,
8-4
Anti Junk Number List, g-3
Audible signals. 11-5
Automatic dlallng, 2-16
Fast Play key. 2-2, 4-2
Fax paper, 1-5 -1-6
Fax reception mode, 2-8.3-10
Fax reception on TAD failure, 2-14
Fine Resolution Prlorlty. 8-1
Function key. 2-3, Quick-i! - Quick-iii
.
c
Cleaning. 10-1 -10-2
Connections. 1-2 -1-3
Contrast. 3-4
Copies, 5-1
Copy key, 2-3. 5-1
H
Halftone, 3-4
Handset, 1-2
Hold. 6-2
Hold/Search key, 2-2.3-8, 6-1
Housing. cleanlng. 10-2
I
D
Incoming message time, 2-13
Date, setting. 2-7
Delete key, 2-2, 4-3
Dialing
Direct Keypad. 3-6
Normal. 3-5
Rapid Key. 3-7
Search, 3-8
Speed, 3-7
Dialing mode. 8-2
Direct Keypad Dialing, 3-6
Display messages, 11-4
D
r
2
Document feeder, 3-3
Document guide, 3-3
Document restrictions, 3-1
Document rollers. 10-2
Document sizes, 3-1
Document, maximum scanning size, 3-1
J
Jams, clearing 11-6
L
Letters, entenncj,2-5 -2-6
Llqulcicrystal display, 2-3
Loading the document. 3-3
M
Memo key. 2-2. 4-3-4-4
Memory, 7-7 -7-8
Message List, 9-4
Messages
Playback,
E
D
E
Electrical outlet, 1-2
Extension telephone, connecting, 1-3
Extension telephone, using, 3-11
I
and time.
N
Normal Diallng. 3-5
Number of Rings In Fax Mode, 8-1
Number keys. 2-2
o
s
OGM key, 2-10
OptIon Setting List, 9-3
Outgoing message. 2-9-2-11
Override ringing, 4-15-4-16
Senders name and number. anterlng,
2-4
Slow Play key, 2-2, 4-2
Speaker key, 2-2.3-5, 6-1
Speaker volume. 2-19
Speed Dial key, 2-2.3-7, 5-;
Speed Dialing, 3-7, 6-1
Start/Memory key, 2-3
Stop key, 2-3
Storing numbers for automatic a[ailng,
2-16-2-18
P
P
P
P
P
P
2
P
P
P
P
P
f
-
j
c
1
L
b
a
2
4
n
d
k
4
T
2
T
k
c
h
s
7
T
c
L
j
r
1
R
Rapid Key Dialing, 3-7, 6-1
Rapid Keys, 2-3
Reading glass, cleaning, 10-2
Reception mode. 2-8
Setting, 2-8
FAX mode, 3-10
ANS mode, 4-1
TEL mode, 3-10, 3-12
Reception mode key, 2-3, 2-8
Redial key, 2-2, 3-9. 6-2
Redialing, 3-9, 6-2
Remote code number, 4-5
Remote operation, 4-5-4-12
Resolution, 3-4
Resolution key, 2-3, 3-4
Ringing volume, 2-19
Rollers. cleaning, 10-2
m
2
3
-
j
Telephone, using as, 6-1 -6-2
Telephone/Fax Remote Number. 8-2
Telephone line cord,
Telephone Number List, 9-2
Time, setting, 2-7
Timer operations. 7-5 -7-6
Timer List, 9-1
Toll Saver, 4-6
TransactIon Report, 9-5
Transaction Report Print Select. 3-2
Transfer function, 4-13
v
V
K
2
I
SHARP CORPORATION OF AUSTRALIA PTY.LTD.
1H
D
A
H
0
B
W 2
SHARP CORPORATION OF NEW ZEALAND LIMITED.
C
M
D
&H
N
S
A
Z
M
B
A
C
P
T
S