1
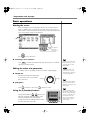
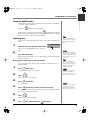
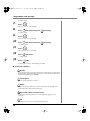
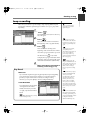
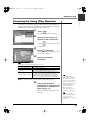
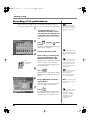
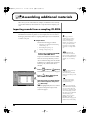
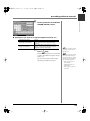
QuickStart_e.book 1 ページ 2003年11月28日 金曜日 午前5時45分
Quick Start
Welcome to the MV-8000 Production Studio!
This manual is written for people who ...
• Are using the MV-8000 for the first time
• Want to learn what the MV-8000 is
• Want to get started making sounds
● About the Symbols and icons in this manual
Text in square brackets [ ] refers to buttons on the panel of the MV-8000.
Buttons indicated as [F1 (Sample)] refer to the F1 (function 1) button when the F1
function shown in the LCD is "Sample."
Indicates information that you should be aware of when using the MV-8000.
Indicates a convenient operation or useful music production technique.
Indicates supplementary information about an operation.
Indicates a reference page.
Indicates an explanation of a term.
Before using this unit, carefully read the sections entitled: “IMPORTANT SAFETY
INSTRUCTIONS” (Owner’s Manual p. 2), “USING THE UNIT SAFELY” (Owner’s
Manual p. 3, p. 4), and “IMPORTANT NOTES” (Owner’s Manual p. 5–7). These
sections provide important information concerning the proper operation of the
unit. Additionally, in order to feel assured that you have gained a good grasp of
every feature provided by your new unit, Quick Start and Owner’s Manual should
be read in its entirety. The manual should be saved and kept on hand as a
convenient reference.
©2003 Roland Corporation
All rights reserved. No part of this publication may be reproduced in any form
without the written permission of ROLAND CORPORATION.
Roland Web Site http://www.roland.co.jp/
QuickStart_e.book 2 ページ 2003年11月28日 金曜日 午前5時45分
Let's get started (Contents)
1
Preparations and concepts .................... 3
Explains how to connect the MV-8000 with peripheral equipment, and how to
turn the power on/off.
Checking the included items...................................................... 3
Preparing your equipment and making connections............. 4
Connecting the power ................................................................. 5
Turning on the power ................................................................. 6
Turning off the power ................................................................. 7
Basic operations ........................................................................... 8
2
Listening to the demo song ................. 11
When shipped from the factory, the internal hard disk contains demo songs.
To get an idea of the MV-8000's potential, start by listening to these demo
songs.
Moving the time location and operating the sequencer....... 12
3
Using the velocity pads ........................ 13
Try using the pads to play the sounds you heard in the demo songs. The sound
will change according to the force with which you strike the pads. You can
also switch sounds by changing the part that is played by the pads.
Playing other materials ............................................................. 14
4
If you are using the MV-8000
for the first time, wi suggest
that you read the sections in
order, starting with
“Preparations and concepts”
(p. 3).
With the factory settings,
demo song data will be loaded
automatically when you turn
on the power. If data other
than the demo song is loaded,
you will need to load the demo
project before continuing.
If the project contains no data,
or if no sounds have been
assigned to the pads, striking
the pads will not produce
sound. You will need to
Import (p. 24, p. 26) or Sample
(p. 27) data into the pads.
Creating a song ..................................... 17
Let's create a song by recording your pad performance and by putting sounds
together. We'll use the Loop function to input a drum part, and the Quantize
function to adjust the sense of groove.
Creating a new song .................................................................. 18
Loop recording........................................................................... 19
Creating a track for sequence recording................................. 20
Correcting the timing (Play Quantize) ................................... 21
Recording a live performance .................................................. 22
Saving your completed composition ...................................... 23
5
Assembling additional materials ......... 24
Here's how to load data from a commercially-available sampling CD-ROM or
audio CD, or record your own samples from a mic.
Importing sounds from a sampling CD-ROM ...................... 24
Importing sounds from an audio CD ..................................... 26
Sampling ..................................................................................... 27
6
2
Index ..................................................................... 29
You must create a “Song”
before you can sample. For
details on creating a song, refer
to “Creating a new song” (p.
18).
QuickStart_e.book 3 ページ 2003年11月28日 金曜日 午前5時45分
Preparations and concepts
Preparations and concepts
Checking the included
items
• Q&A
• File system Structure Overview/surface
• How you use the MV-8000 depends on what
you want to do!/reverse side
The MV-8000 package contains the following
items.
Q&A
Q1.
Ans
How
1-1.
The pro
1.
cedure
do I
outp
ut
the
met
rono
for
Press
output
[MENU
ting
the met
].
Select
ronome
“10 Me
sound
tronom
Press
is:
e.”
[ENTER
4.
].
Select
Mode.
5.
Select
Outpu
t.
1-2
2.
me
soun
d?
3.
Ans
If any of the included items are missing, please
contact a “Roland Service Center” or an
“authorized Roland distributor” (p. 31).
• MV-8000
1.
.
The pro
cedure
for out
In the
putting
SEQU
the met
ENCE
At this
ronome
screen
time
sound
, pre
you can
ss [RE
is:
also
C] to
How
make
access
the sam
do I
RECO
use
e set
RDING
tings
the
by pre
PAR
VALU
AMETE
ssing
Holdin
E dial
[F3(Me
R.
g dow
You
tronom
to m
cannot n [JUMP
] and
e)].
2.
Q2.
Ans.
Q3.
How
Ans.
1.
mov
e the
time
ct a sou
the cur
ove
turning
the
location the VAL
by usin UE dial
to mov
g the
e
VAL
t a so
UE dial in steps of
one tick
alone.
und
.
do I
selec
To sele
Make
nd for
a MID
time
loca
tion?
for a
MID
I
track
rent
k:
track
?
[F1 (Tra
the MID
ck Par
I trac
Outpu
am)].
k for
which
t Ass
ign to
you wan
select
If at
t to sele
this poi
the par
nt in
ct a sou
If you
t you
the
want
nd.
want
4.
to assi procedure
to
Press
use
gn a
.
differen you find
[INS
5.
the
TRUM
t sou
Make
ENTS]
nd (pa sound you
the cur
tch)
.
wan
6.
to the
t to use
rent
Press
par t
part:
, you
[F4 (Lib
the par
're don
7.
rary)].
t who
e.
Select
se ass
the sou
8.
ignme
nd (pa
Press
nt you
tch)
[F5 (Us
want
that
9.
e Thi
to cha
you wan
Return
s)].
nge.
to ste
t to ass
If at
p 1 and
ign.
this
select
original point in
the pro
a
patch
cedure par t.
by
2.
3.
Press
I trac
Use
samplin
g or
you
still
importi have not
fou
ng.
nd the
sound
you
want
to use
, you
'll nee
d to
create
your
own
1
• Shortcut labels
• Quick Start (the document you are reading)
• Owner's Manual
• Short pin
Quic
Welc
ome
This
to th
e
manu
Own
k Sta
r
t
t the
al is
000
• Ar
writte
Prod
e using
n for
peop
the MV
uctio
• W
le wh
ant to
-8000
o ...
n Stu
for the
learn
• W
what
dio!
first
ant to
the MV
time
get sta
-8000
Abou
rted
is
makin
t the
g soun
Sym
ds
bols
Text
and
in sq
uare
ic
ons
brack
Butto
in th
ets [
ns
is m
] refers
functi indicated
an
ual
to bu
as [F1
on sh
ttons
own
(Samp
on the
in the
le)] ref
LCD
pane
er to
l of the
is "Sa
the F1
mple.
Indica
MV-80
(func
"
tes inf
tion
00.
ormati
1) bu
on tha
tton
when
t you
should
the F1
Indica
be
tes a
aware
conven
ient op
n or
tes sup
pleme
ntary
tes a
ng the
useful
music
ation
refere
nce pa
about
ge.
tes an
Rolan
explan
ation
3 Ro
land
an op
d Web
of a ter
m.
Corp
Site htt
oratio
p://w
n
ww.ro
land.c
o.jp/
MV-80
00.
produ
ction
inform
Indica
©200
of wh
en usi
eratio
Indica
Indica
er’s
Abou
Text
MV-8
eratio
n.
techn
ique.
Sym
in sq
uare
bols
and
Man
ual
ic
ons
brack
Butto
in th
ets [
ns
is m
] refers
functi indicated
anua
to bu
as [F1
on sh
l
ttons
own
(Samp
on the
in the
le)] ref
LCD
pane
er to
l of the
is "Sa
the F1
mple.
Indica
MV-80
(func
"
tes inf
tion
00.
ormati
using
1) bu
the MV
on tha
tton
when
t you
-8000.
sho
the
uld be
aware
of wh
Indica
en
tes a
conven
produ
ient op
ction
techn
eratio
ique.
n or
useful
music
Indica
tes sup
opera
pleme
tion.
ntary
inform
ation
about
Indica
an
tes a
refere
nce pa
ge.
Indica
tes an
explan
Befor
ation
e using
of a ter
INST
m.
this
F1
unit,
RU
car
Manu CTIONS
” (Own efully rea
al p.
d the
3), an
er’s Ma
prov
sectio
d “IM
ide
nual
ns en
PORT
p. 2),
Addit important
“USIN titled: “IM
ionall
inform ANT NO
G TH
PORT
y, in
TES”
featur
ation
E UN
order
ANT
(Own
e prov
conc
IT SA
to fee
SAFE
erning
er’s Ma
ided
read
FELY
l assur
TY
by yo
in its
nual
” (Own
ed tha the prop
ur ne
entir
p. 5).
refere
er op
er’s
ety. Th
t you
w un
These
nce.
eratio
it, Qu
have
e ma
sectio
n of
ick Sta
gaine
nual
ns
the un
shou
d a go
rt
an
it.
ld be
d Ow
od gra
saved
©200
ner’s
sp of
3 Ro
and ke
Manu
every
land
al sh
pt on
Corp
All rig
ould
hand
oratio
hts res
be
as a co
n
witho
erved
nven
ut the
. No
ient
part
writte
Rolan
of thi
n perm
s publi
d Web
ission
cation
Site htt
of RO
m
p/
When the MV-8000 is shipped from the factory, a
shorting pin is installed in the PHONO jacks.
• Backup CD-ROM
• Sample data CD-ROM
• Block diagram sheet/surface
• MV-8000 Structure Overview/reverse side
3
QuickStart_e.book 4 ページ 2003年11月28日 金曜日 午前5時45分
Preparations and concepts
Preparing your equipment and making
connections
Speakers
You cannot use the PHONO and MIC/LINE analog inputs
at the same time.
If you make connections to MIC/LINE,
the PHONO input will be disabled.
Power amp
Headphones
Turntable
MD Recorder, etc.
Ground Connector
Foot Switch
VGA OUT/MOUSE (OPTION)
MV8-OP1 (sold separatery)
Power cable
Microphone
Edirol
UM-1, etc.
Sound module
device
e.g., DV-7PR
Computer
Device with R-BUS connector
e.g., VS-2400CD
In order to prevent malfunctions and speaker damage, you must turn down the
volume of all your equipment and turn off the power before making connections.
• Connect the rear panel ground connector if you are using a turntable. This can
prevent hum noise.
• When connection cables with resistors are used, the volume level of equipment
connected to the inputs (ANALOG INPUT) may be low. If this happens, use
connection cables that do not contain resistors, such as those from the Roland PCS
series.
• If you're not using the PHONO jacks, insert the included short plug. This will
prevent noise from being introduced via the PHONO jacks.
4
In addition to the equipment
shown above, the following
items can also be convenient.
• Audio CD or CD-ROM
discs containing materials
for sampling
• CD-R or floppy discs for
backup or data exchange
QuickStart_e.book 5 ページ 2003年11月28日 金曜日 午前5時45分
«
Preparations and concepts
Preparations and concepts
Howling could be produced depending on the location of microphones
relative to speakers. This can be remedied by:
• Changing the orientation of the microphone(s).
• Relocating microphone(s) at a greater distance from speakers.
• Lowering volume levels.
Connecting the power
Use the included power cable to connect the MV-8000 to an AC outlet.
To prevent electrical shock, use the included power cable and connect the
ground correctly.
The included power cable has a three-pin plug with a ground pin that can
prevent electrical shock and damage to your equipment.
* Unsuitable places for connection
• Water pipes (may result in shock or electrocution)
• Gas pipes (may result in fire or explosion)
• Telephone-line ground or lightning rod (may be dangerous in the event of
lightning)
Depending on the
circumstances of a
particular setup, you may
experience a discomforting
sensation, or perceive that
the surface feels gritty to
the touch when you touch
this device, microphones
connected to it, or the metal
portions of other objects,
such as guitars. This is due
to an infinitesimal electrical
charge, which is absolutely
harmless. However, if you
are concerned about this,
connect the ground
terminal (see figure) with
an external ground. When
the unit is grounded, a
slight hum may occur,
depending on the
particulars of your
installation. If you are
unsure of the connection
method, contact the nearest
Roland Service Center, or
an authorized Roland
distributor, as listed on the
“Information” page.
5
QuickStart_e.book 6 ページ 2003年11月28日 金曜日 午前5時45分
Preparations and concepts
Turning on the power
1
2
Make sure that the audio devices connected to the MV8000 are powered-off.
Set the rear panel POWER switch to the ON position.
The LCD backlight (illumination) will light, and the opening screen and the
MV-8000's system software version will be displayed.
After making connections
correctly as described in
Preparing your equipment
and making connections (p.
4), turn on the power using
the procedure given here. If
you fail to observe this
procedure, you risk
malfunctions or speaker
damage.
This unit is equipped with a
protection circuit. A brief
interval (a few seconds) after
power up is required before
the unit will operate normally.
• When you turn on the power, you may hear a sound even though the MASTER
knob is turned down; this is not a malfunction.
• While the opening screen is displayed, the MV-8000 is checking its system and
loading data required for startup. Please wait until it is ready to operate.
• To cancel loading and to create a new project, press [F5 (Create New)].
• To adjust the contrast of the display, turn the CONTRAST knob located at the right
of the LCD.
3
4
5
6
When start-up is complete, the SEQUENCE screen will
appear.
Turn on the power of your audio equipment.
Use the MV-8000's MASTER knob and the volume controls
of your audio equipment to adjust the volume appropriately.
The first time you start up the
MV-8000, demo playback data
will be loaded automatically.
The next time you start up, the
project and song that were
being used when you last shutdown the system will be
loaded automatically.
QuickStart_e.book 7 ページ 2003年11月28日 金曜日 午前5時45分
«
Preparations and concepts
Preparations and concepts
Turning off the power
You must perform the Shutdown operation before turning the power off. The
Shutdown operation saves the stored parameters before powering-off, and
safely stops the hard disk.
1
Press
.
A message of “SHUTDOWN Are you sure?” will appear.
2
Press
(Yes).
A message of “Save Current Project before SHUTDOWN?” will appear.
3
Press
(Yes).
The current project will save. When save process is completed, the
“SHUTDOWN Completed. You May Turn Off.” message will appear.
4
5
Turn down the volume of all connected equipment
If you press [EXIT] in step 3,
shutdown will be cancelled. If
you want to shutdown without
saving the current project,
press [F1 (No)].
Turn off the rear panel POWER switch.
Make sure that the “You May Turn Off.” message is displayed before you turn
off the power.
If you turn off the power without performing Shutdown, or if you turn
off the power before “You May Turn Off.” is displayed, the data and
the MV-8000 itself will be damaged. Roland will accept no
responsibility for any damage that results from your failure to
perform the Shutdown operation.
• When you turn off the power, you may hear a sound even though the MASTER
knob is turned down; this is not a malfunction.
• While the Shutdown process is occurring, system parameters and project/song
data is being saved. This will require a certain amount of time before the MV-8000
is ready for you to turn off the power.
7
QuickStart_e.book 8 ページ 2003年11月28日 金曜日 午前5時45分
Preparations and concepts
Basic operations
Moving the cursor
Each screen displays various parameters (items to set) or menus (items to
select). To edit the value of a parameter, move the cursor to the value you
want to edit. To select a menu item, move the cursor to the desired item. The
cursor is enclosed in a frame as shown below.
Cursor
Cursor (highlighted)
Black characters
on white background
(value display)
Use
to move the cursor.
● Finalizing a menu selection
Press
to finalize the selected menu item. The selection or command
(operation) will be executed.
If functions are shown at the
bottom of the LCD, you can
use the F buttons to select
them directly.
Editing the value of a parameter
To edit the value of a parameter, use the VALUE dial or [DEC]/[INC].
● VALUE dial
on a white background.
Turn the VALUE dial toward the right
to increase the value, or toward the
left to decrease it.
decrease
to increase a value. Press
to decrease a value.
Using the F (function) buttons
The top panel F buttons (
–
) have various
functions assigned to them depending on the
screen shown in the LCD. These buttons
correspond one-to-one with the function names
shown at the bottom of the LCD.
8
increase
You can hold down [SHIFT]
and use the VALUE dial or
[INC][DEC] to change a value
in larger steps.
● [DEC]/[INC]
Press
To edit a parameter value,
move the cursor to an area
displayed in black characters
You can continue holding
down [DEC] or [INC] to make
the value continue changing
(“repeat”). At this time, you
can hold down the other
button as well to make the
value change even faster
(“turbo repeat”).
QuickStart_e.book 9 ページ 2003年11月28日 金曜日 午前5時45分
«
Preparations and concepts
Preparations and concepts
Using the SHIFT button
Some buttons have more than one function assigned to them; use [SHIFT] to
access these additional functions.
Hold down
and press the desired button.
In this manual, operations accessed using the
are indicated as [SHIFT] +
[(button name)]. Use [SHIFT] to access the functions whose names are printed
inside a white frame on the panel of the MV-8000.
Inputting text
Here's how to input alphanumeric characters, such as when specifying a file
name.
1
Move the cursor to the desired location.
The cursor is the highlighted character, as shown
below.
2
Cursor (highlighted)
Turn the VALUE dial.
Input the desired character. To move to the next place (toward the right) the
right cursor button.
● Using the numeric keys to input characters
You can use the numeric keys to input alphanumeric characters. Let's try
inputting “Hello!”
1
Press
Press
If you use the VALUE dial to
input characters, turning the
dial toward the right will select
characters in the order of “a...z,
A...Z, 0...9,!,#...”
When you are inputting
lowercase characters, you can
temporarily input uppercase
characters by holding down
[SHIFT] as you input.
three times.
When you are in uppercase
input mode, repeatedly
pressing [3] will cycle in the
order of 3→G→H→I→3→G.
“H” will be input at the cursor location.
2
You can use the SHIFT LOCK
parameter (p.302) to change
the operation of the SHIFT
button.
.
The cursor will move to the right.
3
Press
three times.
“E” will be input.
4
Press
(A➜a/a➜A) to switch to lowercase input.
This will switch the type of character that is input. Press [F4 (A➜a/a➜A)] so
that lowercase character is changed.
5
Press
When in lowercase character
input mode, pressing [2]
repeatedly will cycle in the
order of 2→D→E→F→2→D.
.
The cursor will move to the right.
6
Press
four times and press
(A➜a/a➜A).
9
QuickStart_e.book 10 ページ 2003年11月28日 金曜日 午前5時45分
Preparations and concepts
“l” will be input.
7
Press
.
The cursor will move to the right.
8
Press
four times and press
(A➜a/a➜A).
“l” will be input.
9
Press
.
The cursor will move to the right.
10
Press
four times and press
(A➜a/a➜A).
“o” will be input.
11
Press
.
The cursor will move to the right.
12
Press
four times.
“!” will be input.
13
Press
(OK).
You have input “Hello!” This ends the procedure.
● Part of the F buttons
History
You can recall (and re-input) up to the ten most recent names you input in the
EDIT NAME popup since turning on the power. Selects the name at the cursor
in the history list then press [ENTER].
Insert Space
Inserts a space at the cursor location.
Delete
Deletes the character at the cursor location. Characters at the right of the
cursor will be moved forward to fill the gap.
A➜a/a➜A (switch character case)
Switches the character at the cursor location between uppercase and
lowercase.
OK
Finalizes the name and closes the EDIT NAME popup.
10
QuickStart_e.book 11 ページ 2003年11月28日 金曜日 午前5時59分
Listening to the demo song
Perform the following steps.
• “Preparing your equipment and making connections” (p.4)
• “Connecting the power” (p.5)
When the MV-8000 is shipped
from the factory, the internal
hard disk contains a demo
song.
• “Turning on the power” (p.5)
The project and song will be loaded
automatically. Please wait until the
SEQUENCE screen appears.
A project is a collection of data
that manages songs
(performance data) and
samples (audio materials).
Do not strike the pads or otherwise subject
the MV-8000 to physical shock while the
DISK indicator (red) is lit. Doing so will
cause malfunctions.
Start playback the demo song
The demo song included with the MV-8000 may not be used for any purpose
other than your own personal enjoyment without permission from the
copyright holder. You may not create copies or derivative works of this data
without permission from the copyright holder.
About the demo song
A song is a collection of data
that includes sequence data
(playback “events” located on
a time axis), patches
(instrument settings), and
various libraries (effect
settings). Playback data
specifies “the time” at which
“what sound” will be played
for “what duration” and “how
strongly.” By pressing [PLAY],
you can reproduce this data in
h
● “TRIBE of THREE”
Written & Composed by HUSTON SINGLETARY
Copyright 2003 Huston Music, BMI
Guitar: Peter Vogle
Vocals: Tara Amedure
Using the demo song and
samples for any purpose
other than personal
enjoyment without
permission of the copyright
owner is prohibited by law.
● “REALITY CHECK”
Written & Composed by Hans-Joerg Scheffler
Copyright 2003 Roland Corporation
1
Start playback
Press
. The sequencer will start
playing a demo song.
2
Adjust the volume
Turn
toward the right to increase
the volume to an appropriate level.
A sequencer is somewhat like
a tape recorder that reads
sequence data (“song” =
performance data) at a
specified tempo. The sequence
data that is read can be used to
play the MV-8000's sound
generator (sampler section) or
transmitted as MIDI messages
to an external device.
If you are monitoring through
headphones connected to the
PHONES jack, use the
PHONES knob to adjust the
volume.
11
Listening to the demo song
● Preparations
QuickStart_e.book 12 ページ 2003年11月28日 金曜日 午前5時59分
Listening to the demo song
Moving the time location and operating
the sequencer
You can use the following functions.
● Stop
● Return to the beginning
● Return/advance by measures
/
● Return to the previous event /
Advance to the next event
+
/
+
● Record
● Return/advance by steps
/
● Return to the previous marker /
Advance to the next marker
+
/
+
● Return/advance by one tick
+VALUE dial
If a message of “Project is too Large!” appears ...
The project you are attempting to load is too large, and cannot be loaded. This can
happen when the amount of currently-installed memory is less than the amount of
memory that was installed when this project was created.
If this occurs, install the same amount of memory as when the project was created (or
more memory). For details on installing memory, refer to Owner’s Manual
“Exchanging the memory (removing and installing)” (p. 184). To check the amount of
currently-installed memory, refer to “Testing the installed memory (Memory
Diagnosis)” (p. 182).
12
During recording, you can
press [REC] once again to enter
record-ready mode.
A “step” is the interval
specified by the Step Time (p.
231).
In the SEQUENCE screen you
can change the step time by
pressing [SHIFT] + numeric
key [1]~[9] (the note values are
printed on the top panel).
QuickStart_e.book 13 ページ 2003年11月28日 金曜日 午前5時45分
Using the velocity pads
Using the velocity pads
Let's try using the velocity pads (we'll simply call them “pads” from here on)
to play the sounds used in the demo song.
● Preparations
Perform the following procedures.
• Preparing your equipment and making
connections (p. 4)
• Connecting the power (p. 5)
• Turning on the power (p. 6)
1
Play!
Go ahead and strike the
pads.
The loudness (volume) will vary
depending on the strength (velocity) with
which you strike the pads.
Playing techniques
Roll
If you hold down
and strike (press) a pad, the sound of that pad
will played repeatedly. The Roll function is active only while you are holding
down [ROLL]. The spacing (the interval between notes) of the roll is the Roll
Interval (p. 301).
Hold
If you hold down
and strike a pad, the sound of that pad will be
“Step” is the interval specified
by the Step Time setting
(p.231).
In the SEQUENCE screen you
can change the step time by
pressing [SHIFT] + numeric
key [1]–[9] (note value symbols
are printed on the top panel).
held just as if you were continuing to hold down the pad, and the HOLD
indicator (red) will light. To cancel the Hold function, press [HOLD] once
again (the indicator will go dark).
Multilevel
After striking the pad of a certain note number, you can press
to
assign varying velocity levels (from soft to strong) of that note to pads 1–16.
Pad 1 will play the minimum velocity and pad 16 will play the maximum
velocity.
Fixed Velocity
If you press
, the pads of the current track will always sound at the
To defeat Multilevel or Fixed
Velocity, press the same button
once again.
To adjust the strength
produced by Fixed Velocity,
edit the PAD/CONTROLLER
setting in the SYSTEM screen.
same velocity, regardless of how strongly you strike the pad.
Aftertouch
After you strike a pad, try varying the pressure you apply to it. Changes in the
pressure you apply will create changes in the sound.
In order to hear the effect of
Aftertouch, use it with a
sustained or slowly-decaying
sound.
13
QuickStart_e.book 14 ページ 2003年11月28日 金曜日 午前5時45分
Using the velocity pads
Playing other materials
The demo song uses other materials as well. Here's how to select and play
these materials.
Switching tracks
Each of the sixteen sound
sources is called a “part.” A
patch is assigned to each part,
and determines how that part
will sound.
The pads will play the materials used in the current track (the currently
selected track number). By switching the current track to a track used by a
different part, you can play a different set of sounds.
1
Press
.
The SEQUENCE screen will appear.
2
Even if you switch MIDI
tracks, you may not hear any
difference if the tracks use the
same part.
Use the cursor buttons to select
a different MIDI track.
This changes the current track. The pads
play the part used by the current track.
Current
track
MIDI
track
Audio
track
Sound source
Part, or MIDI output from MIDI
OUT
Audio phrase
The track number that is the current track
will be highlighted. The type of each track
is indicated by an icon as shown below.
The sound source that is used by pads play
Current track
(highlighted)
Audio track
MIDI track
3
Strike the
sounds.
to play the
You will hear the sounds of a different
track.
14
An “audio phrase” is sampled
data of an appreciable length,
containing a performed phrase
and used as a pattern.
QuickStart_e.book 15 ページ 2003年11月28日 金曜日 午前5時45分
Using the velocity pads
Using the velocity pads
Switching the pad bank
By switching the “pad bank” you can use the sixteen pads on the top panel to
play a larger number of materials.
1
Press
.
The PAD BANKS pop-up will appear.
2
The number of pad banks
depends on the type of the
current track.
• MIDI tracks = 6 pad banks
(96 notes=6 pad banks x 16
pads)
• Audio tracks = 32 pad
banks
(512 phrases = 32 pad banks
x 16 pads)
Use the VALUE dial to select a
pad bank and press
(SELECT).
The pad bank will be switched.
3
Strike the
sounds.
to play
You will hear the sounds that are assigned
to the newly-selected pad bank.
Switching the patch of a part
Here's how to switch the patch (instrument) used by the part for a MIDI track,
so that you can play a different sound from that part.
1
Press
.
The SEQUENCE screen will appear.
2
Use the cursor buttons to
choose a MIDI track as the
current track.
In the SEQUENCE screen, the pads will
play the sounds of the current track. The
track number that is the current track will
be highlighted.
“Patches” are used by MIDI
tracks. If you select an audio
track, you will not be able to
switch the patch.
Current track
(highlighted)
MIDI track
15
QuickStart_e.book 16 ページ 2003年11月28日 金曜日 午前5時45分
Using the velocity pads
3
Press
(Track Param).
The area indicated in the illustration
shows information about the current
track. Check this area to see the part
number used by the current track. In the
example shown here, part 1.
4
Press
The Output parameter
specifies the part (sound
source) played by each track.
.
The INSTRUMENTS screen will appear.
Move the cursor to the part number you
noted in step 3.
In the example shown here, part 1.
5
Press
(Library).
The patch library will appear.
6
Use the VALUE dial to select a
patch, and press
(Use This).
Your selection is limited to the
patches that are saved in the
current project; however, you
can use Import (Owner’s
Manual p.152) or Sampling
(Owner’s Manual p.38) to
bring in more of your favorite
sounds.
The part will switch to the selected patch.
7
Strike the
to play.
You will hear the sound of the selected
patch.
16
If you come up with a cool
phrase while hitting the pads,
go ahead and make a song out
of it! For details, refer to
Owner’s Manual “Creating a
song (Song Recording)” (p. 76).
QuickStart_e.book 17 ページ 2003年11月28日 金曜日 午前5時45分
Creating a song
Creating a song
Let's record a song using the sounds provided.
● Preparations
Perform the following procedure.
• Preparing your equipment and making
connections (p. 4)
• Connecting the power (p. 5)
• Turning on the power (p. 6)
• If you want to create a blank song for
recording your new composition, perform
Creating a new song (p. 18)
1
Select a track
In the SEQUENCE screen, use
(up/down) to select the track on which
you will record sequence data
(performance data) as the current track. If
you want to record MIDI events, select a
MIDI track; if you want to record audio,
select an audio track.
2
Standby for sequence recording
Press
. The REC indicator (red)
will blink.
3
. The REC indicator (red)
and PLAY indicator (green) will light.
Perform
Strike the
to begin performing.
The performance data will be recorded.
5
At this time the RECORDING
PARAMETER screen will
appear. For details on the
recording parameters, refer to
Owner’s Manual p. 209, 212.
Start recording
Press
4
If you want to add more tracks
for recording, add a track as
described in Creating a track
for sequence recording (p. 20).
When you are finished
recording, press
.
Recording will stop.
“Loop Recording” provides a
convenient way to record
drum patterns. For details,
refer to Loop recording (p. 19).
If you want to erase data that
you input, hold down [EVENT
ERASE] (while you are still in
recording mode) and hold
down the pad of the note
number you want to erase.
Events of the note number
whose pad you are holding
down will be erased from the
current track when the current
time location passes over the
event.
17
QuickStart_e.book 18 ページ 2003年11月28日 金曜日 午前5時45分
Creating a song
Creating a new song
Here's how to create a new song that contains no data.
1
Press SONG
.
The SONG SETUP MENU screen will
appear.
2
Choose CREATE NEW SONG
and press
.
The CREATE NEW SONG screen will
appear.
3
Select a Track Layout.
For this example, select Track Layout =
“01 Very Simple,” and check the
Instrument parameter.
Parameter
Instrument
Effect
Explanation
If you check this, the source material data of the current song
will be used in the new song.
If you check this, the effect settings of the current song will be
used in the new song.
If you create a song without
checking the Instrument box in
Copy Current, instrument
settings will not be copied to
the new song. This means that
immediately after creating the
song, striking the pads will not
produce sound.
For details on other song settings, refer to Owner’s Manual p. 258.
4
Press
(Execute).
The newly created song will become the
current song, and the Sequence screen
will appear.
18
The “current song” is the song
data that is currently loaded.
QuickStart_e.book 19 ページ 2003年11月28日 金曜日 午前5時45分
Creating a song
Here's how you can use Loop Recording to keep layering additional pad
performances while the specified region continues to loop (i.e., plays back
repeatedly).
1
Press
Creating a song
Loop recording
“Loop” is a function that
repeatedly plays back the
specified region.
.
The SEQUENCE screen (Owner’s Manual p.
203) will appear.
2
Press
.
The current time location will return to
the beginning of the song (0001-01-000).
3
Press
.
The four measures starting at the
beginning of the current measure will be
set as the loop region, and the Loop screen
will be turned on (
is lit). In this
example, the loop region extends from the
beginning of the song (0001-01-000) to the
end of the fourth measure (0004-04-479).
4
Begin recording as described in
Creating a new song (p. 18).
Try these!
Rehearsal
If you start the sequencer by pressing [PLAY] instead of pressing [REC],
your performance will not be recorded. You can use this feature to
practice your performance before actually recording it. During
rehearsal, you can press [REC] to start recording immediately.
Track Mute/Solo
If you make the track parameter
“M” light, that track will be
muted (silenced). If you make
“S” light, only that track will be
heard.
If both Mute (M) and Solo (S) are lit,
mute will take priority.
To change the loop region,
move the time to the measure
from which you want to loop,
and press [QUICK SET] once
again.
To change the loop length,
press [MENU] in the
SEQUENCE screen and choose
Loop, or press [SHIFT] +
[LOOP ON]. Set the Loop
Quick Set Length parameter in
the LOOP pop-up.
To add a MIDI track to the
song, use Add MIDI Tracks. To
add an audio track to the song,
use Add Audio Tracks. For
details, refer to Creating a
track for sequence recording
(p. 20).
To delete data that you input,
hold down [EVENT ERASE]
(while you are still in
recording mode), and hold
down the pad of the note
number you want to erase.
Events of the note number
whose pad you are holding
down will be erased from the
current track when the current
time location passes over the
event.
If you're not satisfied with
the results of the realtimerecording performed, you
can press [UNDO] to return
to the previous state
(Owner’s Manual p. 80).
19
QuickStart_e.book 20 ページ 2003年11月28日 金曜日 午前5時45分
Creating a song
Creating a track for sequence recording
Here's how to add a track to the song so that you can record additional
performance data.
1
Press
and then
.
A menu will pop up.
2
A “MIDI track” is an area
where MIDI messages are
stored. An “audio track” is an
area where the timing of audio
phrases (audio events) is
stored.
Choose Add MIDI Tracks or Add
Audio Tracks, and press
(Select).
The ADD MIDI TRACKS pop-up or the
ADD AUDIO TRACKS pop-up will
appear.
3
Parameter
Track Output
Assign
Track MIDI
Output Assign
Number of Tracks
Make settings for the track(s)
you want to add.
Explanation
Specify the part used by the track.
Specify the output connector and output channel used
to transmit MIDI messages from MIDI OUT.
Specify the number of tracks you want to add.
4
Press
(Execute).
The track(s) will be added below the
current track.
20
To add a track for recording
MIDI messages, choose Add
MIDI Tracks. To add a track
for recording audio events,
choose Add Audio Tracks.
To delete the track, choose
“Delete Track” in step 2. The
DELETE TRACKS popup
(Owner’s Manual p. 246) will
appear.
To delete a track, use the
DELETE TRACKS popup
(owner’s manual p. 246) in
step 2. The track you specify
here will be deleted. For detail,
refer to Deleting tracks
(owner’s manual p. 103).
QuickStart_e.book 21 ページ 2003年11月28日 金曜日 午前5時45分
Creating a song
Creating a song
Correcting the timing (Play Quantize)
Performances you input by striking the pads manually will inevitably have
slight timing inaccuracies. Play Quantize is a function that lets you align the
timing of the notes precisely to the beat during playback.
1
Press
.
The SEQUENCE screen will appear.
2
Select the track you want to
quantize as the current track.
Use the
(up/down) to choose the
current track.
3
Press
(Track Prm).
The TRACK PARAMETER pop-up for the
current track will appear.
4
Set the Play Quantize
parameters.
(Example) To align your performance to 16th notes ...
Parameter and setting
Quantize Type= Grid
Grid Resolution=
(1/16)
Grid Strength= 1~100%
Result
Apply grid quantization.
Specifies 16th notes as the smallest unit of time into
which the quantized measure will be divided.
Specifies the degree to which quantization will correct
the timing. With a setting of 100, the notes will be
aligned precisely to the timing intervals specified by
Grid Resolution. With a setting of 0, the note timing
will not be corrected at all. Try out various settings.
For details on other quantize parameters, refer to Owner’s Manual p. 206.
5
Listen to the quantized
performance as described in the
procedure for Listening to the
demo song (p. 11).
The note timing will be aligned to 16th
note steps.
In addition to the Play
Quantize function described
here, there is also an “Edit
Quantize” (Owner’s Manual p.
227) function that directly
affects the sequence data itself,
and a “Input Quantize”
(Owner’s Manual p. 209)
function that applies
quantization while you are
recording the sequence data.
You can use “Quantize
Templates” (Owner’s Manual
p. 228) to quantize a
performance to various types
of “groove.”
21
QuickStart_e.book 22 ページ 2003年11月28日 金曜日 午前5時45分
Creating a song
Recording a live performance
Here's how to use an audio track to record audio (Direct Recording). For
example you might use this to record a vocal along with your sequence data.
1
Create an audio track as
described in Creating a track
for sequence recording (p. 20),
and make it the current track.
The actual audio data itself is
not recorded on the audio
track; rather, the audio track
records the timing of the
sound.
Recording will take place on the current
track.
2
Press
Phrs/In).
, and then
(AUX/
The AUX/FX/AUDIO PHRASE/INPUT
MIXER screen will appear.
3
4
Clip
Set the IN (A) slider to 100.
While singing or speaking into
your mic, gradually turn the
SENS knob toward the right.
Adjust the knob so that the IN (A) (analog
input) level meter shown in the LCD
moves approximately in the upper half
(the -12–0 dB region).
Recommended
input level
5
Press
.
The REC indicator (red) will blink, and the
RECORDING PARAMETER screen will
appear.
6
For the REC Mode parameter,
specify Direct.
With this setting, your live performance
can be recorded on the audio track.
7
Press
.
Recording will begin. The REC indicator
(red) and PLAY indicator (green) will
light. Record your vocal performance.
22
You can use the sliders of the
MV-8000's front panel to adjust
the sliders displayed in the
screen.
If the IN (A) level meter moves
all the way to the top (clip)
position when using analog
input, the input level is too
high. Turn the SENS knob
toward the left.
You can't use Direct Recording
when LOOP [ON] is lit.
Pressing [REC] will
temporarily disable looping
(LOOP [ON] will blink).
For details on other recording
parameters, refer to Owner’s
Manual p. 212.
During recording, you can
press [REC] to stop recording
but continue playback
(“punch-out”). When you
press [REC] once again,
recording will resume
(“punch-in”).
QuickStart_e.book 23 ページ 2003年11月28日 金曜日 午前5時45分
Creating a song
Creating a song
Saving your completed composition
So that an unexpected accident does not cause you to loose the data you have
edited up to this point, let's save it to the MV-8000's internal hard disk.
1
Press
.
The PROJECT screen will appear.
2
Choose SAVE PROJECT, and
press
.
A message will ask “Save Current
Project?”
3
To save, press
(YES).
The project will be saved. If you decide
not to save, press
(No).
You can also use [SHIFT] +
[SHUTDOWN] to save your
project. This method can be
used from any screen.
If you now want to turn off the
MV-8000's power, perform the
Shutdown operation. For
details, refer to Turning off the
power (p. 7).
23
QuickStart_e.book 24 ページ 2003年11月28日 金曜日 午前5時45分
Assembling additional materials
Here's how you can collect materials (samples) in addition to those already
saved on the hard disk, and use them in a composition that's uniquely your
own.
Importing sounds from a sampling CD-ROM
You can import files (sample data) from commercially-available sampling
CD-ROMs and use them as patches. As an example, here's how to create a
drum-type patch that is ideal for assigning different percussion instrument
sounds to each pad.
● Preparations
Perform the following procedures.
• Preparing your equipment and making
connections (p. 4)
• Connecting the power (p. 5)
Drum-type patches are
suitable when you want to
assign a different type of
sound to each pad (note
number). For example you can
create a patch that contains
kick, snare, tom, and cymbal
sounds etc. as a single “drum
set.”
• Turning on the power (p. 6)
1
Insert your sampling CD-ROM
into the CD-R/RW drive.
Prepare to load data from the CD-ROM.
There are several points that you must
observe when inserting a disc into the CDR/RW drive. For details, refer to Owner’s
Manual p. 129, and insert the disc as
directed.
2
Press
and then
(Patch).
The IMPORT (PATCH) screen will appear.
3
4
Press
(Drive Select) and
then select “CD-ROM.”
Use the cursor to select the file
you want to import, and press
(Execute).
The file highlighted by the cursor will be
imported. The Quick Assign (Patch)
screen will appear.
24
The included CD-ROM
contains the same materials
that are already loaded into the
MV-8000's hard disk when it is
shipped. (I.e., it is a backup
disc.)
To import a file from the CDR/RW drive, press
[F1 (Select Drive)] and select
the drive from which you want
to import.
To audition (preview) the
sound before importing it,
press [F4 (Preview)].
If you want to automatically
detect and divide the sample at
regions of silence and assign
each slice to a pad, turn on the
Auto Divide setting. To make
this setting, go to the IMPORT
(PATCH) screen, press
[MENU] - Import Options [ENTER] to access the
IMPORT OPTION popup, and
check the Auto Divide setting.
QuickStart_e.book 25 ページ 2003年11月28日 金曜日 午前5時45分
Assembling additional materials
Assembling additional materials
5
Set the parameters in the QUICK
ASSIGN (PATCH) screen.
● (Example) If you want to assign the imported sound to C4 ...
Parameter and setting
Make Keyboard setting
unchecked (Drum mode)
Assign To= 3-08 (C 4)
Result
With this method of assignment, the playback
pitch will be the same as the pitch during
sampling.
The sound will be assigned to C4. You may
specify a range in which the same sound is
assigned to all notes in the range.
6
Press
(Set).
The file will be imported. You can play the
sound as described in Using the velocity
pads (p. 13).
If you want to import another sample,
repeat the procedure from step 4.
For details on settings for other
parameters, refer to Owner’s
Manual p. 359.
In the following cases, pressing
[F4 (Assign All)] will assign
sounds consecutively, starting
with the Assign To setting (in
the example, C4, C#4, D4, ...).
• When importing two or
more samples
• If Make Keyboard= off
(drum mode)
• If the Assign To region is a
single note
25
QuickStart_e.book 26 ページ 2003年11月28日 金曜日 午前5時45分
Assembling additional materials
Importing sounds from an audio CD
You can import audio from a conventional audio CD. As an example, here's
how to create audio phrases (longer samples that might contain several notes
or more) that you can assign to each pad.
● Preparations
Perform the following procedures.
• Preparing your equipment and making
connections (p. 4)
• Connecting the power (p. 5)
• Turning on the power (p. 6)
1
Insert your audio CD into the
CD-R/RW drive.
Prepare to load data from the audio CD.
2
Press
and then
(A.Phrase).
The audio phrase import screen will
appear. In this example we will use the
imported audio as an “audio phrase” (a
longer sample that might contain several
notes or more).
3
4
Press
(Drive Select) and
then select “Audio CD.”
Use the cursor to select the CD
track that you want to import,
and press
(Execute).
The track highlighted by the cursor will be
imported. The quick assign (audio phrase)
screen will appear.
5
Specify the pad number.
Specify the number of the pad to which
you want to assign the imported audio.
6
Press
(Set One).
The data will be imported. You can play
the sound as described in Using the
velocity pads (p. 13).
An “audio phrase” is a sample
containing a performance
(phrase) of an appreciable
length. For example, you
might assign a four-measure
phrase containing a guitar riff
to a pad, so that the fourmeasure guitar performance
would play each time you
struck that pad.
There are several points that
you must observe when
inserting a disc into the CD-R/
RW drive. For details, refer to
Owner’s Manual p.129, and
insert the disc as directed.
To import a file from the CDR/RW drive, press
[F1 (Select Drive)] and select
the drive from which you want
to import.
When you strike a pad, the
Assign To field will be set to
the number of the pad you
struck.
The black areas of the pads
displayed in the screen
indicate pads to which a sound
has already been assigned.
When you strike a pad for
these note numbers, you will
hear the assigned sound.
In the following cases, pressing
[F4 (Assign All)] will assign
sounds consecutively, starting
with the Assign To setting (in
the example, C4, C#4, D4, ...).
• When importing two or
more samples
• If the Assign To region is a
single note
26
QuickStart_e.book 27 ページ 2003年11月28日 金曜日 午前5時45分
Assembling additional materials
Here's how you can use a mic etc. to sample (record) a sound, and assign the
sample to a pad. As an example, we will create a keyboard-type patch that will
assign each sampled sound to a separate pad at different pitches.
● Preparations
Perform the following procedures.
• Preparing your equipment and making
connections (p. 4)
• Connecting the power (p. 5)
• Turning on the power (p. 6)
1
Press
and then
You use a keyboard-type patch
by assigning it to a range of
pads (note numbers) and using
it to play a sampled sound at
different pitches. For example
you might sample just one
note of a piano, and assign this
sample to two or more pads so
that you can use the pads to
play different piano pitches.
.
The SAMPLING (PATCH) screen
(Owner’s Manual p. 352) will appear. In this
example we will use the sampled sound
as a keyboard-type (pitched) patch.
2
You can use Start Trigger (p.
Press
(Start).
Sampling will begin. Record the desired
audio material.
3
Press
(Stop).
Sampling will end. The SAMPLING
RESULT screen (Owner’s Manual p. 354)
will appear.
4
336) to make sampling start
automatically when an audio
signal is input.
You can use various
operations to edit your sample,
such as deleting unwanted
portions at the beginning and
end of the sample (Truncate, p.
338) or maximizing the level
(Normalize, p. 338). For
Press
(OK).
Check the recorded result.
details, refer to the
SAMPLING RESULT screen
(p. 338).
The QUICK ASSIGN (PATCH) screen
(Owner’s Manual p. 358) will appear.
27
Assembling additional materials
Sampling
QuickStart_e.book 28 ページ 2003年11月28日 金曜日 午前5時45分
Assembling additional materials
5
Set parameters in the QUICK
ASSIGN screen.
(Example) To assign the sample to separate pitches F3 through E4
Parameter and setting
Make Keyboard
checked (keyboard
mode)
Original Key= C4 etc.
Assign To= F3–E4
Result
This assigns the sample in a scale of semitone steps
around the Original Key.
With a setting of C4, note number C4 will sound the
sample at the same pitch as when it was recorded.
This assigns the sample over the range F3 through E4.
6
Press
(Set).
The sampled sound will be assigned to the
pads. Assign the patch to the current
track, and play it as described in Using the
velocity pads (p. 13).
You can import sample data that was created for the Roland S-700 series or the Akai
MPC-2000(XL).
28
You can use [F1 (Name)] to
write or edit the name. For
details on inputting a name,
refer to Inputting text (p. 9).
For details on other
parameters, refer to Owner’s
Manual p. 359.
QuickStart_e.book 29 ページ 2003年11月28日 金曜日 午前5時45分
Index
Add Audio Tracks .........................................................
Add MIDI Tracks ..........................................................
Aftertouch ......................................................................
audio CD ........................................................................
audio phrases .................................................................
Roll ................................................................................... 13
20
20
13
26
26
C
CD-R/RW ....................................................................... 24
CD-ROM ......................................................................... 24
D
DEC ................................................................................... 8
demo song ...................................................................... 11
Direct Recording ............................................................ 22
F
F button ............................................................................. 8
Fixed Velocity ................................................................ 13
S
Sampling ......................................................................... 27
sampling CD-ROM ....................................................... 24
SAVE PROJECT ............................................................. 23
SHIFT button .................................................................... 9
Short pin ........................................................................... 3
song ................................................................................. 17
T
Track Layout .................................................................. 18
Track Mute ..................................................................... 19
Track Solo ....................................................................... 19
V
VALUE dial ...................................................................... 8
velocity pads .................................................................. 13
H
Hold ................................................................................. 13
I
IMPORT .......................................................................... 24
INC .................................................................................... 8
Inputting text ................................................................... 9
L
Loop recording .............................................................. 19
M
Moving the time location ............................................. 12
Multilevel ....................................................................... 13
N
new song ......................................................................... 18
O
operating the sequencer ............................................... 12
P
Play Quantize ................................................................. 21
power ............................................................................ 5–7
Project is too Large! ....................................................... 12
Q
QUICK ASSIGN (PATCH) .......................................... 27
R
record .............................................................................. 17
Rehearsal ........................................................................ 19
29
Index
A
QuickStart_e.book 30 ページ 2003年11月28日 金曜日 午前5時45分
Index
30
QuickStart_e.book 31 ページ 2003年11月28日 金曜日 午前5時45分
information
Information
When you need repair service, call your nearest Roland Service Center or authorized Roland distributor in your country as
shown below.
AFRICA
EGYPT
Al Fanny Trading Office
9, EBN Hagar A1 Askalany Street,
ARD E1 Golf, Heliopolis,
Cairo 11341, EGYPT
TEL: 20-2-417-1828
REUNION
Maison FO - YAM Marcel
25 Rue Jules Hermann,
Chaudron - BP79 97 491
Ste Clotilde Cedex,
REUNION ISLAND
TEL: (0262) 218-429
SOUTH AFRICA
That Other Music Shop
(PTY) Ltd.
11 Melle St., Braamfontein,
Johannesbourg, SOUTH AFRICA
P.O.Box 32918, Braamfontein 2017
Johannesbourg, SOUTH AFRICA
TEL: (011) 403 4105
Paul Bothner (PTY) Ltd.
17 Werdmuller Centre,
Main Road, Claremont 7708
SOUTH AFRICA
PHILIPPINES
G.A. Yupangco & Co. Inc.
SUPRO MUNDIAL, S.A.
150 Sims Drive,
SINGAPORE 387381
TEL: 6846-3676
Boulevard Andrews, Albrook,
Panama City, REP. DE PANAMA
TEL: 315-0101
CRISTOFORI MUSIC PTE
LTD
PARAGUAY
Blk 3014, Bedok Industrial Park E,
#02-2148, SINGAPORE 489980
TEL: 6243-9555
10F. No.18 Anhuaxili
Chaoyang District, Beijing 100011
CHINA
TEL: (010) 6426-5050
Roland Shanghai Electronics
Co.,Ltd.
(GUANGZHOU OFFICE)
2/F., No.30 Si You Nan Er Jie Yi
Xiang, Wu Yang Xin Cheng,
Guangzhou 510600, CHINA
Tel: (020) 8736-0428
TAIWAN
ROLAND TAIWAN
ENTERPRISE CO., LTD.
URUGUAY
Rivera Digitec (India) Pvt. Ltd.
409, Nirman Kendra Mahalaxmi
Flats Compound Off. Dr. Edwin
Moses Road, Mumbai-400011,
INDIA
TEL: (022) 2493 9051
INDONESIA
PT Citra IntiRama
J1. Cideng Timur No. 15J-150
Jakarta Pusat
INDONESIA
TEL: (021) 6324170
KOREA
Cosmos Corporation
1461-9, Seocho-Dong,
Seocho Ku, Seoul, KOREA
TEL: (02) 3486-8855
MALAYSIA
BENTLEY MUSIC SDN BHD
140 & 142, Jalan Bukit Bintang
55100 Kuala Lumpur,MALAYSIA
TEL: (03) 2144-3333
NORWAY
Roland Scandinavia Avd.
Kontor Norge
ISRAEL
Halilit P. Greenspoon &
Sons Ltd.
8 Retzif Ha'aliya Hashnya St.
Tel-Aviv-Yafo ISRAEL
TEL: (03) 6823666
JORDAN
AMMAN Trading Agency
POLAND
Easa Husain Al Yousifi Est.
Francisco Acuna de Figueroa 1771
C.P.: 11.800
Montevideo, URUGUAY
TEL: (02) 924-2335
MX MUSIC SP.Z.O.O.
UL. Gibraltarska 4.
PL-03664 Warszawa POLAND
TEL: (022) 679 44 19
Theera Music Co. , Ltd.
VENEZUELA
PORTUGAL
330 Verng NakornKasem, Soi 2,
Bangkok 10100, THAILAND
TEL: (02) 2248821
Musicland Digital C.A.
THAILAND
Saigon Music
AUSTRALIA/
NEW ZEALAND
AUSTRALIA
Roland Corporation
Australia Pty., Ltd.
38 Campbell Avenue
Dee Why West. NSW 2099
AUSTRALIA
TEL: (02) 9982 8266
NEW ZEALAND
Roland Corporation Ltd.
32 Shaddock Street, Mount Eden,
Auckland, NEW ZEALAND
TEL: (09) 3098 715
ARGENTINA
INDIA
Viale delle Industrie 8,
20020 Arese, Milano, ITALY
TEL: (02) 937-78300
No.41 Nike St., Dr.Shariyati Ave.,
Roberoye Cerahe Mirdamad
Tehran, IRAN
TEL: (021) 285-4169
Todo Musica S.A.
Room 5, 9fl. No. 112 Chung Shan
N.Road Sec.2, Taipei, TAIWAN,
R.O.C.
TEL: (02) 2561 3339
Tom Lee Music Co., Ltd.
Service Division
8th Floor, Railway Plaza, 39
Chatham Road South, T.S.T,
Kowloon, HONG KONG
TEL: 2333 1863
Roland Italy S. p. A.
MOCO, INC.
245 Prince Mohammad St.,
Amman 1118, JORDAN
TEL: (06) 464-1200
HONG KONG
Parsons Music Ltd.
ITALY
IRAN
Lilleakerveien 2 Postboks 95
Lilleaker N-0216 Oslo
NORWAY
TEL: 2273 0074
CENTRAL/LATIN
AMERICA
22-32 Pun Shan Street, Tsuen
Wan, New Territories,
HONG KONG
TEL: 2415 0911
Distribuidora De
Instrumentos Musicales
J.E. Olear y ESQ. Manduvira
Asuncion PARAGUAY
TEL: (021) 492-124
ASIA
Roland Shanghai Electronics
Co.,Ltd.
(BEIJING OFFICE)
G2 Calmount Park, Calmount
Avenue, Dublin 12
Republic of IRELAND
TEL: (01) 4294444
PANAMA
Suite DP-8
40 Ba Huyen Thanh Quan Street
Hochiminh City, VIETNAM
Tel: (08) 930-1969
5F. No.1500 Pingliang Road
Shanghai 200090, CHINA
TEL: (021) 5580-0800
Roland Ireland
Av. Toluca No. 323, Col. Olivar
de los Padres 01780 Mexico D.F.
MEXICO
TEL: (55) 5668-6699
Swee Lee Company
VIETNAM
Roland Shanghai Electronics
Co.,Ltd.
IRELAND
Casa Veerkamp, s.a. de c.v.
SINGAPORE
P.O.BOX 23032, Claremont 7735,
SOUTH AFRICA
TEL: (021) 674 4030
CHINA
MEXICO
339 Gil J. Puyat Avenue
Makati, Metro Manila 1200,
PHILIPPINES
TEL: (02) 899 9801
Instrumentos Musicales S.A.
Av.Santa Fe 2055
(1123) Buenos Aires
ARGENTINA
TEL: (011) 4508-2700
BRAZIL
Roland Brasil Ltda
Rua San Jose, 780 Sala B
Parque Industrial San Jose
Cotia - Sao Paulo - SP, BRAZIL
TEL: (011) 4615 5666
COSTA RICA
JUAN Bansbach
Instrumentos Musicales
Ave.1. Calle 11, Apartado 10237,
San Jose, COSTA RICA
TEL: 258-0211
CHILE
Comercial Fancy S.A.
Rut.: 96.919.420-1
Nataniel Cox #739, 4th Floor
Santiago - Centro, CHILE
TEL: (02) 688-9540
EL SALVADOR
OMNI MUSIC
75 Avenida Norte y Final
Alameda Juan Pablo ,
Edificio No.4010 San Salvador,
EL SALVADOR
TEL: 262-0788
Av. Francisco de Miranda,
Centro Parque de Cristal, Nivel
C2 Local 20 Caracas
VENEZUELA
TEL: (212) 285-8586
Tecnologias Musica e Audio,
Roland Portugal, S.A.
Cais Das Pedras, 8/9-1 Dto
4050-465 PORTO
PORTUGAL
TEL: (022) 608 00 60
ROMANIA
EUROPE
AUSTRIA
Roland Austria GES.M.B.H.
Siemensstrasse 4, P.O. Box 74,
A-6063 RUM, AUSTRIA
TEL: (0512) 26 44 260
BELGIUM/HOLLAND/
LUXEMBOURG
Roland Benelux N. V.
Houtstraat 3, B-2260, Oevel
(Westerlo) BELGIUM
TEL: (014) 575811
CZECH REP.
K-AUDIO
Kardasovska 626.
CZ-198 00 Praha 9,
CZECH REP.
TEL: (2) 666 10529
DENMARK
FBS LINES
QATAR
Al Emadi Co. (Badie Studio
& Stores)
P.O. Box 62, Doha, QATAR
TEL: 4423-554
aDawliah Universal
Electronics APL
MuTek
3-Bogatyrskaya Str. 1.k.l
107 564 Moscow, RUSSIA
TEL: (095) 169 5043
SPAIN
Roland Electronics
de España, S. A.
Calle Bolivia 239, 08020
Barcelona, SPAIN
TEL: (93) 308 1000
SWEDEN
Roland Scandinavia A/S
SWEDISH SALES OFFICE
Danvik Center 28, 2 tr.
S-131 30 Nacka SWEDEN
TEL: (0)8 702 00 20
Roland (Switzerland) AG
FINLAND
Chahine S.A.L.
Gerge Zeidan St., Chahine Bldg.,
Achrafieh, P.O.Box: 16-5857
Beirut, LEBANON
TEL: (01) 20-1441
RUSSIA
SWITZERLAND
4, Rue Paul Henri SPAAK,
Parc de l'Esplanade, F 77 462 St.
Thibault, Lagny Cedex FRANCE
TEL: 01 600 73 500
LEBANON
SAUDI ARABIA
Nordhavnsvej 7, Postbox 880,
DK-2100 Copenhagen
DENMARK
TEL: 3916 6200
Roland France SA
Abdullah Salem Street,
Safat, KUWAIT
TEL: 243-6399
Piata Libertatii 1,
535500 Gheorgheni, ROMANIA
TEL: (266) 364 609
Roland Scandinavia A/S
FRANCE
KUWAIT
Corniche Road, Aldossary Bldg.,
1st Floor, Alkhobar,
SAUDI ARABIA
P.O.Box 2154, Alkhobar 31952
SAUDI ARABIA
TEL: (03) 898 2081
SYRIA
Technical Light & Sound
Center
Khaled Ebn Al Walid St.
Bldg. No. 47, P.O.BOX 13520,
Damascus, SYRIA
TEL: (011) 223-5384
TURKEY
Ant Muzik Aletleri Ithalat
Ve Ihracat Ltd Sti
Siraselviler Caddesi Siraselviler
Pasaji No:74/20
Taksim - Istanbul, TURKEY
TEL: (0212) 2499324
Landstrasse 5, Postfach,
CH-4452 Itingen,
SWITZERLAND
TEL: (061) 927-8383
U.A.E.
UKRAINE
Zak Electronics & Musical
Instruments Co. L.L.C.
TIC-TAC
Mira Str. 19/108
P.O. Box 180
295400 Munkachevo, UKRAINE
TEL: (03131) 414-40
Zabeel Road, Al Sherooq Bldg.,
No. 14, Grand Floor, Dubai, U.A.E.
TEL: (04) 3360715
NORTH AMERICA
Roland Scandinavia As,
Filial Finland
UNITED KINGDOM
Elannontie 5
FIN-01510 Vantaa, FINLAND
TEL: (0)9 68 24 020
Atlantic Close, Swansea
Enterprise Park, SWANSEA
SA7 9FJ,
UNITED KINGDOM
TEL: (01792) 702701
CANADA
MIDDLE EAST
Roland Canada Music Ltd.
(Toronto Office)
BAHRAIN
170 Admiral Boulevard
Mississauga On L5T 2N6
CANADA
TEL: (905) 362 9707
GERMANY
Roland (U.K.) Ltd.
Roland Elektronische
Musikinstrumente HmbH.
Oststrasse 96, 22844 Norderstedt,
GERMANY
TEL: (040) 52 60090
GREECE
STOLLAS S.A.
Music Sound Light
155, New National Road
Patras 26442, GREECE
TEL: 2610 435400
HUNGARY
Roland East Europe Ltd.
Warehouse Area ‘DEPO’ Pf.83
H-2046 Torokbalint, HUNGARY
TEL: (23) 511011
Moon Stores
No.16, Bab Al Bahrain Avenue,
P.O.Box 247, Manama 304,
State of BAHRAIN
TEL: 211 005
CYPRUS
Radex Sound Equipment Ltd.
17, Diagorou Street, Nicosia,
CYPRUS
TEL: (022) 66-9426
Roland Canada Music Ltd.
(Head Office)
5480 Parkwood Way Richmond
B. C., V6V 2M4 CANADA
TEL: (604) 270 6626
U. S. A.
Roland Corporation U.S.
5100 S. Eastern Avenue
Los Angeles, CA 90040-2938,
U. S. A.
TEL: (323) 890 3700
As of November 1, 2003 (Roland)
QuickStart_e.book 32 ページ 2003年11月28日 金曜日 午前5時45分
03341167
’03-12-2KS