1
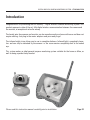
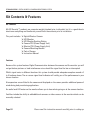
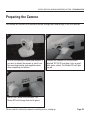
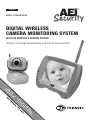
130510-3
MODEL: CTVM300LCDDM
DIGITAL WIRELESS
CAMERA MONITORING SYSTEM
WITH LCD MONITOR & DOCKING STATION
PERFECT FOR BABY MONITORING & SECURITY APPLICATIONS
CTVM300LCDDM - DIGITAL WIRELESS CAMERA MONITORING SYSTEM
Contents
Introduction
03
Kit Contents & Features
04
Preparing the Camera
05
Preparing the LCD Monitor
06
Syncing the Camera and LCD Monitor
07
Using the Digital Wireless Camera Monitoring System
Menu Settings
Adjusting the Menu Settings
Using the LCD Monitor Docking Station
08
08
08
09
Adding extra Cameras
10
Troubleshooting
Frequently Asked Questions
Technical Support
11
11
11
IMPORTANT NOTICES
This system is NOT SUITABLE FOR EXTERNAL USE. Exposure to moisture may damage this device, render it unsafe for use and invalidate the warranty.
ALWAYS SWITCH OFF this device prior to connecting to mains power and when not in use.
Page 02
Please read this instruction manual carefully prior to installation
DIGITAL WIRELESS CAMERA MONITORING SYSTEM - CTVM300LCDDM
Introduction
Congratulations on purchasing the AEI Security™ Digital Wireless Camera Monitoring System. This
product represents state of the art, fully digital wireless communication between the camera and
the monitor, at exceptional value for money.
The handy wire free camera and monitor can be moved around your home with ease and does not
require cabling. Just plug in the mains adapters and your ready to go!
The infrared night vision allows you to see in complete darkness. Infrared light is completely harmless and can only be detected by the camera i.e. the room remains completely dark to the naked
eye.
This system makes an ideal general purpose monitoring system suitable for the home or office, as
well as being a perfect baby monitor.
Please read this instruction manual carefully prior to installation
Page 03
CTVM300LCDDM - DIGITAL WIRELESS CAMERA MONITORING SYSTEM
Kit Contents & Features
Kit Contents
All AEI Security™ products are computer weight checked prior to dispatch, but it is a good idea to
check over everything and familiarise yourself with the contents prior to installation.
This pack includes:1x Digital Wireless Camera
1x LCD Monitor
1x LCD Monitor Docking Station
1x Camera PSU (Power Supply Unit)
1x Monitor PSU (Power Supply Unit)
1x Camera Mounting Bracket
1x Pack of Screws
1x Instruction Manual
Features
Because this system features Digital Communication between the camera and the monitor you will
not get broken pictures or loud interference noise should the signal level be low or interrupted.
Whilst signal varies in different locations this system should provide adequate reception around a 3
to 4 bedroom home. The on screen signal level indicator will satisfy you of the performance in your
chosen location.
A temperature sensor fitted to the camera and displayed on the screen provides additional peace of
mind during baby monitoring applications.
An audio level LED meter on the monitor allows you to hear whats going on at the camera location.
Facilities include the ability to add additional cameras or video sources to the monitor which can be
manually selected.
Page 04
Please read this instruction manual carefully prior to setting up
DIGITAL WIRELESS CAMERA MONITORING SYSTEM - CTVM300LCDDM
Preparing the Camera
The Camera will transmit the sound and picture through walls and ceilings to the LCD Monitor.
1.
2.
Position the camera in the desired location. If
you wish to attach the camera to a wall, use
the mounting bracket and supplied screws
after completing installation.
Connect the Camera PSU to the socket
labelled ‘DC 5V IN’ and plug it into an available mains socket. The Power LED will light
up red.
3.
Switch the Camera on at the back. The
Power LED will change from red to green.
Please read this instruction manual carefully prior to setting up
Page 05
CTVM300LCDDM - DIGITAL WIRELESS CAMERA MONITORING SYSTEM
Preparing the LCD Monitor
1.
2.
Connect the Monitor PSU to the socket labelled ‘DC 12V’ and plug it into an available
mains socket.
Ensure that the Mode Switch on the back is
set to Camera.
3.
4.
Press the power button on the front of the
monitor. The ‘Power LED’ will change from
red to green and the AEI logo will appear on
screen.
You can connect the LCD monitor to a TV,
VCR or Hi-Fi by connecting a 3.mm Jack to
Phono cable (not supplied) into the ‘AV OUT’
socket on the back.
Page 06
Please read this instruction manual carefully prior to setting up
DIGITAL WIRELESS CAMERA MONITORING SYSTEM - CTVM300LCDDM
Syncing the Camera and the LCD Monitor
1.
2.
Select Channel 1 using the button labelled
CH1-4 on the front of the Monitor.
Simultaneously press and hold the sync
buttons on both the Camera and the Monitor
for 3 seconds. This will sync the Camera to
Channel 1 on the Monitor.
3.
Congratulations!
You have now successfully installed your AEI
Security™ Digital Wireless Camera Monitoring System.
Once the Camera and the Monitor have been
correctly synced, the ‘Sync LED’ will be lit
up solid green.
Please read this instruction manual carefully prior to setting up
Page 07
CTVM300LCDDM - DIGITAL WIRELESS CAMERA MONITORING SYSTEM
Using the Digital Wireless Camera Monitoring
System
Menu Settings
Picture
Brightness
Contrast
Colour
Audio
Volume
Function - This will allow you to display the screen normally or upside down.
Normal
Down
S-ROLOC - This allows you to change the Video Colour mode. For best results, leave it set to AUTO.
AUTO
SECAM
PAL
NTSC
Preset
Sleep - Allows you specify a period of time after which the monitor will switch off.
Time - Sets the current time.
Off-Time - Specifies a time when the monitor will turn off.
On-Time - Specifies a time when the monitor will turn on.
Page 08
Please read this instruction manual carefully prior to setting up
DIGITAL WIRELESS CAMERA MONITORING SYSTEM - CTVM300LCDDM
continued...
Adjusting the Menu Settings
1 - Press the Menu button to toggle through the various menu selections.
2 - Press the Select button to toggle through and select a setting.
3 - Use the - or + button to adjust the settings.
Using the LCD Monitor Docking Station
If you wish to use the LCD Monitor without having to plug it into a mains socket, this can be
achieved by using the supplied Docking Station.
1 - Remove the base cover to access the battery compartment.
2 - Install 10x AA rechargeable batteries (not supplied.)
3 - Place the LCD Monitor onto the Docking Station.
To recharge the batteries, simply connect the Monitor PSU to the Docking Station and switch the
Mode Switch to Fast Charge. Charge time should be limited to 24 hours maximum.
Please read this instruction manual carefully prior to setting up
Page 09
CTVM300LCDDM - DIGITAL WIRELESS CAMERA MONITORING SYSTEM
Adding extra Cameras
This system can be expanded to include up to 4 Digital Wireless Cameras.
Follow the steps below for each additional camera you wish to add to your system.
1.
2.
Select Channel 2 using the button labelled
CH1-4 on the front of the Monitor.
Simultaneously press and hold the sync
buttons on both the new Camera and the
Monitor for 3 seconds. This will sync the
Camera to Channel 2 on the Monitor.
3.
4.
Press the button labelled CH1-4 to cycle
through the cameras assigned to each channel.
If you wish to connect a wired camera to the
LCD monitor this can be achieved by using
the ‘AV IN’ socket and switching the monitor
to ’AV IN’ mode.
Page 10
Please read this instruction manual carefully prior to setting up
DIGITAL WIRELESS CAMERA MONITORING SYSTEM - CTVM300LCDDM
Troubleshooting
Frequently Asked Questions
There is no power on the Camera or Monitor
• Make sure that the correct power supply is connected, they are clearly labelled.
• Ensure that the Camera and the Monitor are turned on. Check the ‘Power LED’.
There is no sound or picture
• Take a look at the ‘Sync LED’. If it is flashing, this shows that the Camera and the Monitor have not been correctly synced or they are out of range. Repeat steps 1 and 2 on Page 07.
The sound or picture is poor quality
• Make sure that your microwave is turned off. Microwaves typically have little to no shielding and will cause interference on your Wireless Camera Monitoring System.
• Other wireless devices operating on 2.4GHz may be interfering with your Wireless Camera Monitoring System.
- Try syncing the Camera to a different Channel on the monitor.
- Identify the source of the interference and turn it off.
- Change the position of the Camera and/or Monitor.
• Your Camera and Monitor might be out of range. Move them closer together and try again.
• Try changing the position of the antenna on the Monitor.
Technical Support
AEI Security & Communications Ltd is dedicated to providing our customers with first class customer care and technical support.
Free technical advice is available online at our web site:
Chat to one of our technical advisers by clicking the
www.aei.eu
Live Chat button on our website.
We have a dedicated helpline, open Monday to Friday, 10AM - 3PM:
01797 226 123
Please note that calls are charged at the local rate and your call may be recorded for training purposes.
Please read this instruction manual carefully prior to setting up
Page 11
SPECIFICATIONS
Camera:
Frequency
Channels
Antenna
Max. Range
Sensitivity
Optical Size
Effective Resolution
White Balance
Night Vision Range
Mic. Range
Power
2.4GHz Digital
4
Directional
300ft (clear line of sight)
10dBm CE
1/4”
640 x 480
Auto
1 - 2 Metres
2 - 3 Metres
DC 5V
LCD Monitor :
Frequency
Channels
Antenna
Max. Range
LCD Size
Effective Resolution
Max. Sound Output
Power
2.4GHz Digital
4
Directional
300ft (clear line of sight)
5” TFT
640 x 480
600mW
DC 12V
©2010 AEI Security & Communications Ltd. All rights reserved.
Registered in England: 02831823
AEI Security & Communications Ltd
Weslake Industrial Park
Rye Harbour Road, Rye
East Sussex
TN31 7TE
United Kingdom
AEI Security and its logo are trademarks of AEI Security & Communications Ltd.