1
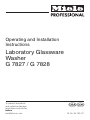
Operating and Installation
Instructions
Laboratory Glassware
Washer
G 7827 / G 7828
To prevent accidents
and machine damage
read these instructions
before
installation or use.
UV
M.-Nr. 06 190 411
2
Contents
IMPORTANT SAFETY INSTRUCTIONS . . . . . . . . . . . . . . . . . . . . . . . . . . . . . . . . . 5
Description of the machine . . . . . . . . . . . . . . . . . . . . . . . . . . . . . . . . . . . . . . . . . . 9
Opening and closing the lift door. . . . . . . . . . . . . . . . . . . . . . . . . . . . . . . . . . . . 15
Automatic mobile unit recognition (AWK) . . . . . . . . . . . . . . . . . . . . . . . . . . . . . 16
Mobile unit coding . . . . . . . . . . . . . . . . . . . . . . . . . . . . . . . . . . . . . . . . . . . . . . . . . 16
Setting mobile unit coding . . . . . . . . . . . . . . . . . . . . . . . . . . . . . . . . . . . . . . . . 17
Application . . . . . . . . . . . . . . . . . . . . . . . . . . . . . . . . . . . . . . . . . . . . . . . . . . . . . . 19
Laboratory glassware (LG) . . . . . . . . . . . . . . . . . . . . . . . . . . . . . . . . . . . . . . . . . . 21
Adding liquid detergents and neutralizers . . . . . . . . . . . . . . . . . . . . . . . . . . . . 22
Preparing the DOS dispensers . . . . . . . . . . . . . . . . . . . . . . . . . . . . . . . . . . . . . . . 22
Filling the containers with liquid agents . . . . . . . . . . . . . . . . . . . . . . . . . . . . . . 23
Priming the liquid dispensing systems . . . . . . . . . . . . . . . . . . . . . . . . . . . . . . . . . 24
Dispensing system maintenance. . . . . . . . . . . . . . . . . . . . . . . . . . . . . . . . . . . . . . 24
External Dispensing systems. . . . . . . . . . . . . . . . . . . . . . . . . . . . . . . . . . . . . . . . . 24
Operation . . . . . . . . . . . . . . . . . . . . . . . . . . . . . . . . . . . . . . . . . . . . . . . . . . . . . . . 25
Turning on . . . . . . . . . . . . . . . . . . . . . . . . . . . . . . . . . . . . . . . . . . . . . . . . . . . . . . . 25
Changing the operating level . . . . . . . . . . . . . . . . . . . . . . . . . . . . . . . . . . . . . . . . 25
Starting a program . . . . . . . . . . . . . . . . . . . . . . . . . . . . . . . . . . . . . . . . . . . . . . . . . 26
Program sequence . . . . . . . . . . . . . . . . . . . . . . . . . . . . . . . . . . . . . . . . . . . . . . . . 27
Turning off . . . . . . . . . . . . . . . . . . . . . . . . . . . . . . . . . . . . . . . . . . . . . . . . . . . . . . . 27
Cancelling a program . . . . . . . . . . . . . . . . . . . . . . . . . . . . . . . . . . . . . . . . . . . . . . 28
Interrupting a program. . . . . . . . . . . . . . . . . . . . . . . . . . . . . . . . . . . . . . . . . . . . . . 29
Serial interface . . . . . . . . . . . . . . . . . . . . . . . . . . . . . . . . . . . . . . . . . . . . . . . . . . . 30
3
Contents
Maintenance . . . . . . . . . . . . . . . . . . . . . . . . . . . . . . . . . . . . . . . . . . . . . . . . . . . . . 31
Maintenance and care . . . . . . . . . . . . . . . . . . . . . . . . . . . . . . . . . . . . . . . . . . . . . . 31
Process validation . . . . . . . . . . . . . . . . . . . . . . . . . . . . . . . . . . . . . . . . . . . . . . . . . 32
Routine checks . . . . . . . . . . . . . . . . . . . . . . . . . . . . . . . . . . . . . . . . . . . . . . . . . . . 32
Cleaning the filters in the wash cabinet . . . . . . . . . . . . . . . . . . . . . . . . . . . . . . . . . 33
Cleaning the fine filter . . . . . . . . . . . . . . . . . . . . . . . . . . . . . . . . . . . . . . . . . . . . 33
Cleaning the flat filter . . . . . . . . . . . . . . . . . . . . . . . . . . . . . . . . . . . . . . . . . . . . 33
Cleaning the filter system of the circulation pump . . . . . . . . . . . . . . . . . . . . . . 33
Cleaning the spray arms . . . . . . . . . . . . . . . . . . . . . . . . . . . . . . . . . . . . . . . . . . . . 34
Cleaning the control panel. . . . . . . . . . . . . . . . . . . . . . . . . . . . . . . . . . . . . . . . . . . 35
Cleaning the exterior . . . . . . . . . . . . . . . . . . . . . . . . . . . . . . . . . . . . . . . . . . . . . . . 35
Cleaning the wash cabinet . . . . . . . . . . . . . . . . . . . . . . . . . . . . . . . . . . . . . . . . . . 35
Cleaning the door seal. . . . . . . . . . . . . . . . . . . . . . . . . . . . . . . . . . . . . . . . . . . . . . 35
Mobile units, baskets and inserts . . . . . . . . . . . . . . . . . . . . . . . . . . . . . . . . . . . . . 36
Report printer (Option). . . . . . . . . . . . . . . . . . . . . . . . . . . . . . . . . . . . . . . . . . . . . . 37
Replacing the print paper . . . . . . . . . . . . . . . . . . . . . . . . . . . . . . . . . . . . . . . . . . . 37
Replacing the ribbon cartridge . . . . . . . . . . . . . . . . . . . . . . . . . . . . . . . . . . . . . . . 37
After sales service . . . . . . . . . . . . . . . . . . . . . . . . . . . . . . . . . . . . . . . . . . . . . . . . 38
INSTALLATION INSTRUCTIONS . . . . . . . . . . . . . . . . . . . . . . . . . . . . . . . . . . . . . 39
Installation . . . . . . . . . . . . . . . . . . . . . . . . . . . . . . . . . . . . . . . . . . . . . . . . . . . . . . 40
Steam/Electro or Electro/Steam conversion. . . . . . . . . . . . . . . . . . . . . . . . . . . . . . 40
Electrical connection . . . . . . . . . . . . . . . . . . . . . . . . . . . . . . . . . . . . . . . . . . . . . . 41
Plumbing. . . . . . . . . . . . . . . . . . . . . . . . . . . . . . . . . . . . . . . . . . . . . . . . . . . . . . . . 42
Water connection . . . . . . . . . . . . . . . . . . . . . . . . . . . . . . . . . . . . . . . . . . . . . . . . . . 42
Technical Data . . . . . . . . . . . . . . . . . . . . . . . . . . . . . . . . . . . . . . . . . . . . . . . . . . . 44
Caring for the environment . . . . . . . . . . . . . . . . . . . . . . . . . . . . . . . . . . . . . . . . . 45
4
IMPORTANT SAFETY INSTRUCTIONS
This machine conforms to current
safety requirements. However,
inappropriate use can lead to
personal injury and property
damage. Read the operating
instructions carefully before using
this machine.
The manufacturer cannot be held
responsible for damage caused by
non-observance of these Important
Safety Instructions.
Use
This machine is designed for
commercial use and for
specialized applications only, as
described in these Operating
Instructions. Do not use for purposes
other than those for which it was
designed, as this could be dangerous.
Miele is not responsible for damages
caused by improper use.
The installation of this unit in non
stationary locations (e.g. ships)
must be performed by a qualified
installer or service agency in strict
accordance with national and local
safety regulations and standards.
Please pay attention to the following
notes to maintain safe procedures.
The machine should be
commissioned and maintained only
by a Miele Service Technician. Repairs
by unqualified persons could be
dangerous.
Do not install the machine in an
area where a danger of explosion
or freezing may be present.
Be certain this appliance is
properly installed and grounded by
an authorized technician. To guarantee
the electrical safety of this appliance,
continuity must exist between the
appliance and an effective grounding
system. It is imperative that this basic
safety requirement be met. If there is
any doubt, have the electrical system
checked by a qualified technician. The
manufacturer cannot be held
responsible for damage or injury
caused by the lack, or inadequacy, of
an effective grounding system
(e.g. electric shock).
A damaged machine is dangerous.
Turn off the machine immediately at
the power switch and call the Miele
Service Department.
Personnel operating the machine
should be trained regularly.
Children and untrained personnel must
not be allowed access to the machine
or its controls.
5
IMPORTANT SAFETY INSTRUCTIONS
Take care when handling liquids
such as detergents, neutralizing
agents, wetting agents and rinse aids.
These may contain irritant or corrosive
ingredients, acids or alkalis. Never use
any organic solvents, as the danger of
explosion exists. Wear protective
gloves and goggles. The
manufacturer’s safety conditions must
be observed at all times.
The water in the machine must not
be used as drinking water.
Be careful when sorting items with
sharp pointed ends. Position them
in the machine so that you do not hurt
yourself or create a danger for others.
When using this machine regard
the high temperatures and be
especially careful not to scald or burn
yourself. When opening the door
bypassing the electrical lock, a danger
of burning, scalding and corrosion
exist. Let mobile units, inserts and
cleaned items cool before touching
them. Any water which may remain in
containers will be very hot and must be
emptied into the wash cabinet.
After drying with the TA drying unit
open the door to allow the items
and inserts to cool.
6
Do not touch the heating elements
(under the wide area filter) during
or directly after the end of a program,
you could burn yourself. They remain
hot for some time after the program
end.
If the boiler has been programmed
to "BOILER READY", be particularly
careful of hot water and steam when
opening the door. Danger of burning or
scalding. The water inlet pipe to the
wash cabinet is located, as viewed
from the unclean side, underneath the
basket runner on the left hand side.
Steam heating is permissible up to
a pressure of 145 psi. This
corresponds to a water steam
temperature of 354°F (179 °C).
Never clean the machine near or
with a water or high pressure hose.
Before servicing, disconnect the
power supply by either removing
the fuse, unplugging the unit or
manually "tripping" the circuit breaker.
,Mount on non-combustible floors
only!
IMPORTANT SAFETY INSTRUCTIONS
The following points should be
observed to assist in maintaining
quality standards, for critical lab
glassware, to protect patients, and to
avoid damage to the loads being
cleaned.
Use only Miele approved cleaning
agents with this machine. Use of
unsuitable cleaning agents could
adversely affect the components of the
machine. Damages resulting from using
unsuitable cleaning agents are not
covered by the warranty.
Pre-treating (e.g. with cleaning
agents), certain soiling and
cleaning agents with a chemical
interaction, can cause foam. For
pre-treatment and/or cleaning only use
low-sudsing detergents which have
been approved by Miele. Suds can
have an adverse effect on the operation
of the machine.
After START has been pressed the
program must not be interrupted
by pressing the I-0 button. A program
should not be interrupted since the
result may be effected. Otherwise the
program must be repeated.
When a chemical additive is
recommended, the manufacturer of
the machine takes no responsibility for
the effect of the chemical on the items
being cleaned.
The machine must only be
operated with water and the
recommended cleaning agents.
Organic solvents must not be used in
the machine as there is the danger,
under certain circumstances, of
explosion and damage to rubber and
synthetic materials. Follow the dosage
recommendations of the cleaning
agent’s manufacturer.
In critical applications where very
high requirements have to be met,
it is strongly recommended that all the
relevant factors for the process, such
as cleaning agent, quality of water, etc.
are discussed with the Miele
Applications Specialists.
If the cleaning result is subject to
particularly stringent requirements
(e.g. chemical analysis, specialized
processes), a regular quality control
test should be carried out by the user to
ensure that the required standards of
cleanliness are being achieved.
The cleaning standard in the
routine use must be verified by the
user. The process should be checked
regularly using thermoelectric and
documented results.
7
IMPORTANT SAFETY INSTRUCTIONS
The mobile units and special
inserts should only be used for
their specific application.
Empty any containers or utensils
before arranging them in the
machine.
Do not allow any remains of acids,
solvents or corroding ferrous
material, and in particular hydrochloric
acid or chloride solutions to get into the
wash cabinet. Similarly avoid any
materials with a corrosive effect. The
presence in compounds of any solvents
should be minimal, (especially those in
hazard class A1).
To avoid any corrosion damage
ensure that solutions or steam
containing hydrochloric acid do not
come in contact with the stainless steel
casing of the machine.
Please follow the installation advice
in these instructions and the
separate Installation Instructions.
Using accessories
Only specific additional equipment
made by Miele should be
connected to this machine. Consult a
Miele Application Specialist on the type
and application of such equipment.
Only Miele mobile units, modules
and inserts should be used. If
equipment from another manufacturer
is used, Miele cannot ensure the
cleaning and disinfection results.
Damage or injury caused by this are
excluded from the warranty.
8
Disposal of an old appliance
When discarding a lab washer,
disconnect it from the power
supply and cut off the power cord.
The old appliance may be
contaminated by blood or other body
fluids and must be disinfected before
disposal.
For environmental and safety reasons
ensure the machine is completely
drained of any residual water and
cleaning agent. (Observe safety
regulations and wear safety goggles
and gloves). Make the door lock
inoperative or remove the door
completely, so that children cannot
accidentally shut themselves in. Make
appropriate arrangements for the safe
disposal of the machine.
Machines with a tank system: remove
the water from the tank before
disposing the machine.
SAVE THESE
INSTRUCTIONS
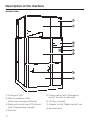
Description of the machine
The Miele G 7827/G 7828 Large
Capacity Glassware Washer is
designed for high-throughput,
centralized wash areas. This unit is
ideal for cleaning both large volumes of
small items, and difficult to clean large
items.
Optional peripheric machines
– Drying unit (TA)
– Steam condensor (DK)
– Report printer (PRT)
9
Description of the machine
Electronic controls
10
Description of the machine
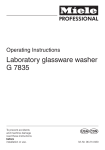
a Display
with screen saver
The background light turns off
automatically after 15 minutes.
^ Press any key to turn the background
light on again.
b On/Off button (I-0)
c Cursor left 1
moves the cursor to the left:
– to the previous menu
– to the previous parameter
– to the previous input position
d Cursor right 2
moves the cursor to the right:
– to the next menu
– to the next parameter
– to the next input position
g Door button 5
h Start button 6
– Starting a program
– Activating insert mode
– Confirming settings
– Confirming menu points,
to get to the respective submenu
i Stop button 7
– Canceling a program
– Leaving the input screen
without saving
– Leaving a menu
j Optical interface 8
(for service technician)
k Program selector
Selecting programs 1-23
e Minus button 3
– program selection for programs
over 24
– scrolling back pagewise in menus
– entering numbers and letters
– changing default settings,
e.g. service parameter
f Plus button 4
– program selection for programs
over 24
– scrolling forward pagewise in
menus
– entering numbers and letters
– changing default settings,
e.g. service parameter
11
Description of the machine
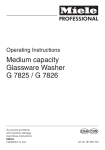
Unclean side
a Drying unit (TA)
b Steam condensor (DK)
behind top housing (Optional)
c Electronic circuit board "Profitronic"
(see "Programming manual")
d Controls
12
e Power switch (with "Emergency
cut-off" function for Service)
f Lift door (closed)
g Adapter for the "Miele transfer" cart
h Service panel
Description of the machine
Unclean side
a Lift door (open)
b Filter combination
c Containers for dosage system DOS 1 - DOS 4
13
Description of the machine
Clean side (G 7828 only )
a "Door" button
b Lift door (closed)
c Printer (optional)
G 7827 on the unclean side
d Service panel
with adapter for "Miele transfer" cart
14
Opening and closing the lift door
The lift door can only be opened when:
To open the lift door
– the lab glassware washer is
connected to the electrical supply,
^ Press the 5 door button. The lift door
rises.
– the red ("emergency cut off") switch
is in the I-ON position,
– the I-0 On-Off button is pressed in,
and
– no program is running.
The lift door on the clean side (G 7828)
can only be opened when:
– DESIN (disinfection) programs have
been correctly completed,
or
– the Door interlock has been
activated, i.e. DOOR MECH. has
been set to one of the following
parameters:
- INTERLOCK,
- DOOR CLEAN+INTERLOCK,
- DOOR UNCL.+INT.LOCK.
(see "Machine function - Door
mechanism..." in the Programming
manual).
,Do not touch the heating
elements (under the wide area filter)
during or directly after the end of a
program, you could burn yourself.
If the boiler has been programmed
to "BOILER READY", be particularly
careful of hot water and steam when
opening the door. Danger of burning
or scalding. The water inlet pipe to
the wash cabinet is located, as
viewed from the unclean side,
underneath the basket runner on the
left hand side.
To close the lift door
^ Press the 5 door button. The lift door
lowers.
15
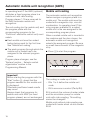
Automatic mobile unit recognition (AWK)
In operating level C the AWK (optional)
attributes a fixed program place to a
mobile unit with valid coding.
Program places 1-15 are reserved for
the AWK automatic mobile unit
recognition.
The unit coding (on the mobile unit) and
the program place with the
corresponding program (in the
"Profitronic" electronic control unit) must
match.
^ Each mobile unit must be coded
before being used for the first time.
See "Mobile unit coding".
^ The wash program through which the
mobile unit is coded has to be
assigned to the relevant program
place.
Mobile unit coding
The automatic mobile unit recognition
feature assigns a program place to a
mobile unit. The mobile units must be
coded with a magnetic strip, via a bit
combination. In operating level C the
only program available for a coded
mobile unit is the one assigned to the
corresponding program place.
When a coded mobile unit is inserted in
the machine and the door closes, the
automatic mobile unit recognition
selects the assigned program. Be sure
no small items connect to the magnetic
strip.
^ Press 6 to start the program.
Program place changes, see the
"System function - Selector switch
organization" section in the
Programming Manual.
Important!
Before starting the program with the
"Start" button 6, check that the
program needed for this mobile unit
is displayed.
Otherwise insufficient wash results
may occur!
Always check that programs for
mobile units with AWK (on fixed
program places) are not exchanged.
16
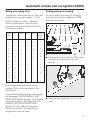
The coding is made up of 5 bits:
– Bits 1 to 4 define the mobile unit
code,
– Bit 5 serves as a control (Parity-Bit).
Bit 6 controls the volume of water intake
and the circulation pump for mobile
units with side coupling. This setting
cannot be changed!
Mobile units without side coupling are
coded with tracks which do not contain
Bit 6!
Automatic mobile unit recognition (AWK)
Mobile unit coding strip
Setting mobile unit coding
15 different codes can be set. They are
assigned to program places 1 to 15.
To set or alter the coding of a mobile
unit with automatic recognition (AWK)
proceed as follows:
Under "System function - Selector
switch organization" the matching
programs have to be put into the first
15 program places.
Prog.place
Bit 1
Bit 2
Bit 3
Bit 4
Bit 5
ParityBit
-
0
0
0
0
0
1
l
0
0
0
l
2
0
l
0
0
l
3
l
l
0
0
0
4
0
0
l
0
l
5
l
0
l
0
0
6
0
l
l
0
0
7
l
l
l
0
l
8
0
0
0
l
l
9
l
0
0
l
0
10
0
l
0
l
0
11
l
l
0
l
l
12
0
0
l
l
0
13
l
0
l
l
l
14
0
l
l
l
l
15
l
l
l
l
0
^ Unscrew the track with an AWK (allen
wrench) and remove it from the
retainer.
The coded total must be an even
number. Bit 6 is not included in this
calculation.
If the coded total equals an odd number
the message CHECK MOBILE UNIT
RECOGNITION will appear. If the mobile
unit code equals 0, the message NO
MOBILE UNIT RECOGNITION will
appear. In both cases the program
cannot be started. The mobile unit
recognition must be reset.
^ Remove the magnetic strip from the
track.
17
Automatic mobile unit recognition (AWK)
^ Set the program place coding.
^ Place the track in the holder of the
mobile unit and screw firmly in place.
Bit 6 is not an integral part of the
modifiable magnetic strip.
Make sure that you code mobile
units with side coupling to a track
where Bit 6 is set to I.
Mobile units without side coupling
must be coded with a track that
does not have Bit 6.
^ Put the magnetic strip back in the
track.
Important:
The magnetic strip must be placed
in the track so that the Bit coding,
set according to the chart, is visible
through the round windows of the
track.
18
The magnetic strips on the G 7825 /
G 7826 must have gray magnets.
The magnetic strips on the G 7827 /
G 7828 must have black magnets.
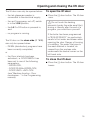
Application
The machine can be fitted with a variety
of mobile units, baskets and inserts,
depending on the cleaning application
desired.
Check before cleaning
– Are the items to clean correctly
sorted, loaded and connected?
– Are the spray arms clean and can
they rotate freely?
– Is the filter combination free of
coarse soiling? Clean if necessary.
– Is the adapter to the water inlet in
place? The spray arms correctly
connected?
– Are the detergent and neutralizer
containers full?
Check after cleaning
– Check the cleaning results visually.
– Perform protein analytical checks,
e.g. with the Miele test kit.
– Are the jets and connections
securely connected with the mobile
unit / inserts?
19
Application
Loading tips
Select mobile units, baskets and
inserts appropriate for the
application.
^ Load the items to be washed so that
water can access all surfaces. This
ensures that they will be properly
cleaned.
^ Do not place items to be cleaned
inside other pieces where they may
be concealed.
^ Hollow vessels such as beakers,
measuring cylinders, flasks, etc.
should be inverted and placed in the
correct inserts so that water can flow
in and out unrestricted. A cover net
can be used to reduce the risk of
movement during the wash process.
^ Use a cover net (e.g. an A 2) or
mesh tray to secure small and/or
lightweight items to prevent them
from blocking the spray arms or
being caught in the magnetic strip on
the automatic mobile unit recognition
system.
^ Deep based items should be placed
at an angle to allow water to run off
easily.
20
^ Tall, narrow pieces should be placed
in the center of the baskets. This
ensures good water coverage.
^ Mobile units with an adapter must
engage correctly.
^ Engage inserts correctly into the
module carts.
^ The spray arms must not be blocked
by tall items or items which hang
down in their path. If necessary,
manually rotate the arms to test.
^ Petri dishes and the similar should be
placed in the correct insert with the
soiled side facing the center.
^ Insert pipettes with the pointed end
downwards.
^ Quarter inserts should be placed as
close to the middle of the unit as
possible.
^ Glassware should not stick out of the
door area.
Application
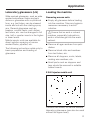
Laboratory glassware (LG)
Wide-necked glassware, such as wide
necked erlenmeyer flasks and petri
dishes or glassware with a cylindrical
form, e.g. test tubes, can be cleaned
inside and out with the rotating spray
arm. General glassware such as
beakers, conical flasks, petri dishes,
test tubes, etc. can be arranged in full
size, half or quarter inserts in the higher
or lower levels.
Mobile injector units are available for
direct injection spraying of narrow
necked flasks, pipettes, etc.
The following instructions relate only to
basic preparation and loading of
glassware.
Loading the machine
Removing excess soils
^ Empty all glassware before loading
into the machine. Take any hygienic
measures necessary to avoid
infection.
,Ensure that no acid or solvent
residues, especially hydrochloric
acid or chlorides get into the wash
cabinet.
^ Remove all agar residues from petri
dishes.
^ Remove blood clots and residues
from test tubes, etc.
^ Remove all stoppers, corks, labels,
sealing wax residues, etc.
^ Small parts such as stoppers and
taps should be secured in suitable
basket inserts.
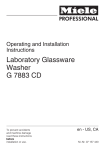
E 940 Injector mobile unit
Contains two levels, for narrow necked
laboratory glassware (can also be used
without the upper level).
21
Adding liquid detergents and neutralizers
,Use only cleaning detergents
and neutralizers specially designed
for lab washers and regard the
application recommendations of the
manufacturer.
This automatic cleaning machine is
fitted with 4 dispensers:
– Dispensing system DOS 1 (blue) to
dispense liquid detergent. The
dosing rate is 200 ml/min.
– Dispensing system DOS 2 (white).
The dosing rate is 105 ml/min.
– Dispensing system DOS 3 (red).
The dosing rate is 105 ml/min.
– Dispensing system DOS 4 (green).
The dosing rate is 465 ml/min.
The amounts of cleaning agent
required, depending on the application
chosen for this machine, are dispensed
through these dispensing systems.
Preparing the DOS dispensers
The liquids can be filled into 10 l plastic
containers, which are color coded for
the corresponding dispensing system.
When first commissioning, or when the
message "FILL DOS 1 CONTAINER"
and/or DOS 2, 3, 4 flashes in the
display after switching on or at the end
of a program, fill the storage container
with the correct detergent or neutralizer.
If the message "CHECK DISPENSING
SYSTEM 1" and/or "DISPENSING
SYSTEM 4" flashes in the display, (the
program has been automatically put on
hold), check the storage container and
dispensing hoses, refill if necessary.
When first commissioning or when
the message "CHECK DISPENSING
SYSTEM... ", appears, start the
DOS-FILL program to prime the
dispensing system (see "Priming the
liquid dispensing systems").
,Use caution when handling
detergents!
Follow the instructions and relevant
safety procedures carefully.
Wear protective gloves and goggles.
22
Adding liquid detergents and neutralizers
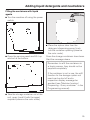
Filling the containers with liquid
agents
^ Turn the machine off using the power
switch.
^ Place the siphon tube from the
detergent dispensing pump firmly
into the container opening (observe
the color code).
^ Open the service panel and lift it up
and out at the bottom.
Once the storage containers have been
filled the message clears.
Remember to refill the containers in
a timely manner, they should not be
emptied completely.
If the container is not in use, the refill
function for the dosage system not
used can be shut off and a
respective display message be
avoided (see "Machine function/
Dispensing - Query container" in the
Programming manual).
^ Take the storage container out of the
unit, open it and fill with the agent
required (observe the color code).
23
Adding liquid detergents and neutralizers
Priming the liquid dispensing
systems
Dispensing system
maintenance
Before the machine is first used, and
later if one or more containers have
been allowed to empty, the dispensing
system(s) for liquid agents must be
primed.
To ensure safe function, the following
maintenance should be carried out by a
Miele Service Technician at specified
intervals.
^ Press the ON/OFF I-0 button.
Every 12-18 months:
^ Select operating level "B".
Inspect the hoses of the dispensing
system(s). Replace if necessary.
^ Select from the following as required:
Program DOS1-FILL
Program DOS2-FILL
Program DOS3-FILL
Program DOS4-FILL.
^ Press the "Start" 6 button.
The DOS-FILL Service Programs
were allocated by default to program
places 58-61, but they can also be
allocated to other program places.
24
External Dispensing systems
If external pumps are to be used for
dispensing liquid detergent, please
inform the Miele Technical Service
Department. The notes in the
Programming Manual under "Machine
functions" must be observed.
Operation
Turning on
Changing the operating level
^ Open the water supply (if turned off).
^ Press 1 and 2 at the same time.
Operating levels A B C D will appear
in the display.
^ Turn the power switch to I-On.
^ Press the ON/OFF I-0 button in.
In operating levels A, B and D the most
recently selected PROGRAM NAME
appears and in operating level C
"AUTOMATIC MOBILE UNIT
RECOGNITION" is displayed.
^ Select the operating level you want
using the 1 or 2 keys.
^ Press 6 to confirm selection.
^ Enter code when requested in the
display.
The four operating levels are:
The code is set by default to >0000<.
A = Fixed program / Programs with free
access
^ Press the "Start" button 6.
B = Free program selection
C = AWK – Automatic Mobile Unit
recognition (program selection via
mobile unit coding)
D = Programming / free program
selection / change code (see the
Programming manual)
[0000] appears.
^ Enter numbers using the 4 and 3
keys.
^ Select number positions with the 1
or 2 keys.
^ To confirm code press 6.
If it was entered incorrectly: FALSE
CODE, ENTER AGAIN will appear in the
display.
^ Close the door.
Selecting or changing your own
code
The factory set code can be
changed (see "System function" in
the Programming Manual).
Code 1 for levels ABC
Code 2 for levels ABCD
25
Operation
Starting a program
You can find detailed and important
information regarding the Miele
default programs in the program
chart of the supplied Programming
Manual.
A. Fixed program
To utilize access level "A", fixed
programs must be assigned for access.
See the Programming Manual section
on "System Functions" for details on
assigning programs. Once programs
are assigned to access level "A" they
can be operated in the following
manner.
^ Select operating level "A".
^ Check in the display that the program
shown is the one required. If several
fixed programs have been made
freely accessible, select the one
required using the program selector.
^ Press the "Start" 6 button.
B. Free program selection
^ Select operating level "B".
With operating level "B" there are three
possibilities for program selection.
1. Program places 1 - 23 can be
selected using the Program selector.
^ Turn the program selector to the
required program.
The program name appears in the
display.
2. Programs above place 24 can be
selected using the 4 and 3 keys.
^ Turn the program selector to 24.
^ Press 4 (scrolls upwards) or 3
(scrolls down), until the required
program is shown.
3. The PROGRAM SURVEY menu lists
all stored programs. A program can be
selected from this menu.
^ Select Program Survey with 1 and
confirm with 6.
^ Select a program using 1 or 2.
^ Press 6 to confirm the selection.
This exits the Program Survey, and the
selected program is shown in the
display.
After selecting one of the three options
above:
^ Press the "Start" 6 button, the
program proceeds.
For further information on program
selection see "Operating Level B" in the
Programming Manual.
26
Operation
C. Automatic mobile unit recognition
(AWK)
^ Select operating level "C".
^ Push the coded mobile unit into
place.
Make sure that no small metallic
items (e.g. keys) stick to the
magnetic strip or its underside. The
coding might be not readable.
^ Close the door.
Important:
It is absolutely essential to check
that the program required for this
mobile unit is the one shown in the
display, before starting the program
by pressing the "Start" button.
Otherwise inadequate cleaning
could result.
Please make sure, that the places
assigned for programs using the
AWK (Automatic mobile unit
recognition) are not changed at
random.
Program sequence
After being started the program will
proceed automatically. It is finished
when PROGRAM END appears in the
display and the background lighting
flashes (press any button to switch off
the flashing lights).
The flashing lights can be permanently
switched off. See "System Functions" in
the Programming Manual.
Detailed information on program
sequences is given in the appendix
of the Programming Manual.
The display background lighting
goes out automatically after
approximately 15 mins. To bring it
back on again press one of the
buttons.
Do not change the printer paper roll
and cartridge during a running
program.
^ Press the "Start" 6 button.
Document any program and dosage
changes. Cleaning performance
must be validated again if
necessary.
Turning off
^ Press in and release the ON-OFF, I-0,
button.
^ Turn off the water supply.
27
Operation
Cancelling a program
A program can only be interrupted
or cancelled in the operating levels
B or D.
In operating levels B or D
^ Press the "Stop" 7 button.
The program is interrupted.
>CANCEL< OR >CONTINUE< appears
in the display.
^ Select >CANCEL< with the 1 button.
The cursor > < flashes.
^ Press the "Start" 6 button.
The program is cancelled and the water
is drained. DRAIN WATER appears in
the display.
^ After the water has been drained the
required program can be selected
and restarted.
28
Operation
Interrupting a program
A program can only be interrupted
or cancelled in operating levels B
or D.
If the door needs to be opened in
extreme cases, e.g. if items are moving:
In operating levels B or D
^ Press the "Stop" 7 button.
The program is interrupted.
>CANCEL< OR >CONTINUE< appears
in the display.
^ Open the door.
Important G 7828:
Which door can be opened will depend
on what setting has been programmed
under MACHINE FUNCTION / DOOR
MECH. (see the Programming manual).
The door on the unclean side can
always be opened, no matter which
parameter has been set.
The door on the clean side can only be
opened if one of the following
parameters are set:
– INTERLOCK,
– DOOR CLEAN+INTERLOCK,
– DOOR UNCLN.+INT.LOCK.
,Caution! Water and items in the
machine may be hot. There is a
danger of burning or scalding.
^ Arrange the parts securely, observe
any protective measures.
^ Close the door.
^ Press the "Start" 6 button.
The program continues.
29
Serial interface
Each machine is supplied with a 16’ 5"
(5 m) long interface cable for data
transfer between the Profitronic system
and an external report printer or PC.
The interface cable is rolled up
inside the machine and must only be
connected by a Miele Service
Technician.
The printer settings are described in
the chapter PC/Printer function in the
Programming manual.
The report printer offers the following
print options:
– Program print
– Additional functions print
– Rinse protocol print
The serial interface is RS 232
compatible.
Various printers can be used as
external printers:
– Epson-compatible sign-set
– HP Laserjet
For the interface configurations see
"PC/Printer Function" in the
Programming Manual.
The address of the 9-pole pin sub-D
plug of the serial interface cable:
5GND (ground)
3TXD (transmit)
2RXD (receive)
1-4-6 (linked)
7-8
(linked)
A standard null-modem or laplink cable
can be connected.
The extension cable to the printer/PC
must not exceed 32’ 9" (10 m).
Please note the following when
connecting a printer or PC:
– Only use an industry-standard PC or
printer.
– When installing the machine take the
dimensions of the printer/PC into
account.
30
– Fault protocol print
Maintenance
Maintenance and care
It is recommended that periodical
maintenance for this washer be carried
out by Miele’s Technical Service
Department after 1000 operating hours
or every 6 months.
Maintenance covers the following:
– Electric safety
A function check is done with the
following:
– a program is run as a test
– ensure proper wash temperatures
– ensure a water tight door seal
– all safety relevant measure systems
(Display of faults).
– Door mechanism and door seal
– Screws and connections in the wash
cabinet
– Water inlet and drain
– Internal and external dispensing
systems
– Spray arms
– Triple Filter System
– Drain pump and non-return valve
– Steam condenser
– All mobile units, baskets and inserts
If available:
– Drying unit
– Connected printer
31
Maintenance
Process validation
Routine checks
The standard of cleaning processes
must be ensured by the user as a
routine matter.
The routine checks must be done daily
by the user before using the machine.
A checklist is supplied with the washer.
Check the following points:
– the filters in the base of the wash
cabinet,
– the spray arms in the machine and at
the mobile units and inserts,
– the wash cabinet and the door seal,
and
– the mobile units, baskets and inserts.
32
Maintenance
Cleaning the filters in the wash
cabinet
Cleaning the flat filter
The filter combination in the base of the
wash cabinet should be inspected
regularly and cleaned if necessary.
,The machine must not be used
without all the filters in place.
,Be aware of glass splinters,
danger of injury.
Cleaning the fine filter
^ Remove the flat filter and clean if
necessary.
Cleaning the filter system of the
circulation pump
Two filters are situated under the flat
filter (on the right, next to the heater
block) to protect the circulation pump.
^ Remove the fine filter and clean if
necessary.
^ Pull the filters up and out of the holder
to remove. Clean if necessary.
^ Replace the filter combination in the
reverse order.
33
Maintenance
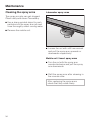
Cleaning the spray arms
Labwasher spray arms
The spray arm jets can get clogged.
Check daily and clean if necessary.
^ Use a sharp pointed object to push
particles into the spray arm jets and
rinse thoroughly under running water.
^ Remove the mobile unit.
^ Loosen the nut with a 60 mm wrench
and pull the spray arm upwards or
downwards respectively.
Mobile unit / insert spray arms
^ Turn the nut with the spray arm
counterclockwise and pull the spray
arm downwards.
^ Refit the spray arms after cleaning in
the reverse order.
After replacing the spray arms
check that they rotate freely.
34
Maintenance
Cleaning the control panel
Cleaning the wash cabinet
^ Clean the control panel with a damp
cloth or with a glass/plastic cleaner.
To disinfect use an approved
cleaning agent.
The wash cabinet is mostly self
cleaning.
,Do not use abrasive or all
purpose cleaners! They will damage
the surface.
Cleaning the exterior
^ Stainless steel surfaces can be
cleaned using a non-abrasive
stainless steel cleaner or with
dishsoap and warm water.
If deposits have built, call Miele for info.
Cleaning the door seal
^ To remove soiling clean the door seal
regularly with a damp cloth.
^ Damaged or leaking door seals
should be replaced by Miele’s
Technical Service Dept.
^ To help prevent resoiling, a
conditioner for stainless steel can
also be used. Apply sparingly and
with even pressure.
,Do not use thinner or ammonium
cleaner. They will damage the
surface.
35
Maintenance
Mobile units, baskets and
inserts
To ensure the proper function of mobile
units, baskets and inserts, they must be
checked daily. A checklist is supplied
with the machine.
Check the following points:
– Are the rollers in the proper condition
and are they securely fixed in the
mobile unit/insert?
– Is the mobile unit connection
correctly set and tightly screwed on?
– Are all spray jets, spray sleeves and
hose adapters tightly connected with
the mobile unit/insert?
– Are all spray jets, spray sleeves and
hose adapters unclogged so that the
wash water can flow through?
– Are covers and fasteners tightly
screwed on the spray sleeves?
If available:
– Do the spray arms rotate freely?
– Are the spray jets clogged? See
"Cleaning and Care / Cleaning the
spray arms".
– Are the screws in the rail of the
Automatic mobile unit recognition
tightly screwed on?
36
Maintenance
Report printer (Option)
Replacing the ribbon cartridge
Replacing the print paper
^ Open and pull down the printers front
panel.
Replace the print paper, 2 ¼" (58 mm)
wide, when the red indicator lights in
the report printer.
^ Open and pull down the front panel
of the printer.
^ Take the empty roll together with its
spindle from the roll holder, fit the
new roll on the spindle and put it
back in place.
^ Cut the paper at an angle and guide
it up and over the paper transport
roller (slit behind the ribbon
cartridge). Press the green paper
transport button until the paper
reemerges above the ribbon
cartridge (see the illustration on the
inside of the front panel).
^ Pull the ribbon cartridge (above the
paper roll) forward and out of its
holder and replace it with a new one.
The paper must be guided between
the ribbon and the cartridge housing.
^ Turn the small wheel for manual
ribbon transport on the right
clockwise until the ribbon is tight.
^ Cut the paper at an angle and guide
it through the slit of the front panel.
Shut the front panel.
,Please refer to the installation
diagram supplied with the machine.
Replacement ribbon cartridges can be
obtained from Miele.
^ Guide the paper through the slit of
the front panel. Shut the front panel.
Replacement paper rolls, 2 ¼" (58 mm)
wide, outer diameter approx. 2"
(50 mm) can be obtained from Miele.
37
After sales service
Should you have any difficulties please
contact the Miele Technical Service
Department.
See back cover for contact information.
^ Please quote the model and serial
number of your machine.
This information can be found on the
data plate (see also "Electrical
connection").
38
INSTALLATION INSTRUCTIONS
Installation
Steam/Electro or Electro/Steam
conversion
If the machine is convertible, the
heating type can be changed in the
service program from
STEAM>>ELECTRO to/from
ELECTRO>>STEAM.
^ Select program STEAM>>ELECTRO
or ELECTRO>>STEAM
(see "Operation - B. Free program
selection").
^ Press the "Start" 6 button.
When the service program has
ended, a message appears in the
display.
^ Confirm the instruction >CONTINUE<
with 6.
40
,Mount on a non-combustible
floor only!
Electrical connection
All electrical work must be carried
out by a qualified electrician in
accordance with local and national
safety regulations.
– Installation, repairs and other work
by unqualified persons could be
dangerous. The manufacturer can
not be held responsible for
unauthorized work.
^ For technical data see the data plate
or wiring diagram supplied.
The machine must only be operated
with the voltage, frequency and fusing
shown on the data plate.
This unit is convertible for use with
steam or electric heating.
Hook up requirements are as follows:
1. Electric heat only:
208 V 3 phase 60 HZ 60 amp
2. Steam heat only:
without drying option
208 V 3 phase 60 HZ 20 amp
with drying option
208 V 3 phase 60 HZ 30 amp
WARNING:
THIS APPLIANCE MUST BE
GROUNDED
The data plate is on the cover plate
behind the service panel of the unclean
side.
The wiring diagram is secured to the
inner side of the service panel.
41
Plumbing
Water connection
This machine must be connected to
the water supply in accordance with
all national and local plumbing
codes.
,Water in the machine is not
suitable for drinking.
The washer is constructed so that it
may be connected to a water supply
without an extra non-return valve,
unless required by code.
Faucets and drain connections should
be situated as close to the machine as
possible, and be easily accessible.
Water supply pressure
Hot + Cold water connection =
min. 22 psi - max.145 psi
DI water connection =
min. 9 psi - max. 145 psi
Recommended water pressure
Hot + Cold water connection =
over 37 psi - max.145 psi
DI water connection =
over 22 psi - max. 145 psi
to avoid long intake times
42
The machine cannot be operated with
an inflow pressure of less than 10 psi.
The machine is supplied with
3 connection hoses 5 ft. (1.5 m) long
with 3/4" (19 mm) female hose thread
ends.
Large area filters, supplied with the
machine, are to be installed in the hose
attached to the water supply. See
"Cleaning and Care - Cleaning the
water inlet filters".
,Do not shorten or damage the
hoses!
Do not remove the filters in the
hoses.
Plumbing
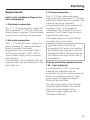
Requirements
(refer to the Installation Diagram for
more information)
1. Cold water connection
One 1/2" (13 mm) cold water supply line
with a standard 3/4" (19 mm) male hose
thread faucet is needed. The cold water
supply hose is marked with blue tape.
2. Hot water connection
One 1/2" (13 mm) hot water supply line
with a standard 3/4" male hose thread
faucet is needed. The water
temperature must not exceed 158°F /
70°C (recommended: 140°F / 60°C).
The hot water supply hose is marked
with red tape.
If no hot water line is available, the red
marked hose must be connected to the
cold water line.
3. DI water connection
One 1/2" (13 mm) deionized water
supply line with a standard 3/4" (19 mm)
male hose thread faucet is needed. The
machine cannot be operated
conventionally with a flow pressure of
less than 10 psi. In this case the
installation of an optional DI pump is
required. The DI water supply hose is
marked with green tape.
If the water pressure is below 29 psi,
the intake time will increase.
,If the machine will not be
connected to DI water, the cleaning
and disinfection programs must be
changed by Miele Technical Service.
The intake hose stays at the rear of
the machine.
DI water connection (pressureless)
1.25 - 9 psi (optional)
For connection to 1.25 - 9 psi water
pressure the machine must be
converted if it was not ordered from the
factory as a special model. A feed
pump must be installed by Miele's
Technical Service Dept.
The discharge nipple of the DI water
container (pressureless) must be at
least at the same height as the
machine's upper edge (see the
"Installation Manual").
43
Technical Data
Height:
98 7/16" (250 cm) (minimum room height)
Width:
45 ¼" (115 cm)
Depth:
34 ¼" (87 cm)
Weight (net):
approx. 1,210 lbs (550 kg)
Operating weight
approx. 1,760 lbs (800 kg)
Voltage:
Electric Heat
Steam Heat
(without drying option)
(with drying option)
208 V 3 phase 60 HZ 60 amp
208 V 3 phase 60 HZ 20 amp
208 V 3 phase 60 HZ 30 amp
Rated loading:
21 KW
Air pressure requirements:
85 psi (required for steam operation)
Steam connection
(with Electric TA):
(with Steam TA):
36 - 145 psi / 284 - 356 °F (140 - 185 °C)
36 - 87 psi / 284 - 327 °F (140 - 164 °C)
Water pressure
(flow rate):
30 - 145 psi
Cold, hot and
de-ionized water (DI):
up to max. 158 °F (70 °C)
Room temperature:
41 - 104 °F (5 - 40 °C)
Height above sea level:
up to 4921 feet (1500 m)2)
Noise level in dB (A):
for the cleaning cycle under 70
for the drying cycle under 70
!-mark:
MPG-Guidelines 93/42/EWG, Class IIa
1)
A steam pressure of 36 - 43 psi a drying temperature of maximum 194 - 212 °F
(90 - 100 °C) can be reached.
2)
When the machine is installed at a location over 4921 feet (1500 m) the boiling
point of the wash water is decreased.
44
Caring for the environment
Disposal of the packing
materials
The cardboard box and packing
materials protect the appliance during
shipping. They have been designed to
be biodegradable and recyclable.
Ensure that any plastic wrappings,
bags, etc. are disposed of safely and
kept out of the reach of children.
Danger of suffocation! Please recycle.
Disposal of an old appliance
Old appliances may contain materials
that can be recycled. Please contact
your local authorities about recycling in
your area.
Ensure that the appliance presents no
danger to children while being stored
for disposal. See "Important Safety
Instructions".
45
46
47
All rights reserved / 3706
M.-Nr. 06 190 411 / 01
en - US/CDN